Zapier and Make
This page is for business owners and office managers who want NaliSuite to work with the other apps they use, without a developer. Zapier and Make are automation services that connect thousands of apps. With the NaliSuite app in Zapier or Make you can, for example, add every issued invoice to a Google Sheet, send a Slack or WhatsApp message when a big payment comes in, open a support ticket from a web form, or add new customers from your online shop to NaliSuite. This page covers creating the API token they need, connecting NaliSuite in Zapier and in Make, the triggers and actions available, and where the connections show up in NaliSuite.
Nothing needs switching on in the marketplace: it uses NaliSuite's API, which every workspace has. You only need an API token, under Settings → API tokens.
Note: The token must belong to someone with the core.integrations.manage permission, because turning an automation on adds a webhook to your workspace. Owners and admins have it. The token can then only do what its user may do: creating invoices needs invoicing.manage, contacts contacts.manage and tickets helpdesk.manage. Set permissions under Settings → Roles.
How it works
- A trigger starts an automation when something happens in NaliSuite, such as Invoice issued. When you turn the automation on in Zapier or Make, they ask NaliSuite to send that event to them; NaliSuite adds a webhook for it, and from then on sends each event to Zapier or Make the moment it happens.
- An action does something in NaliSuite, such as Create Invoice, when something happens in another app.
- A search finds a customer or supplier in NaliSuite, for example to put the right customer on an invoice.
Zapier calls automations Zaps; Make calls them scenarios. Both work the same way with NaliSuite.
Create an API token
Create one token for each service (one for Zapier, one for Make), so you can cut one off without stopping the other.
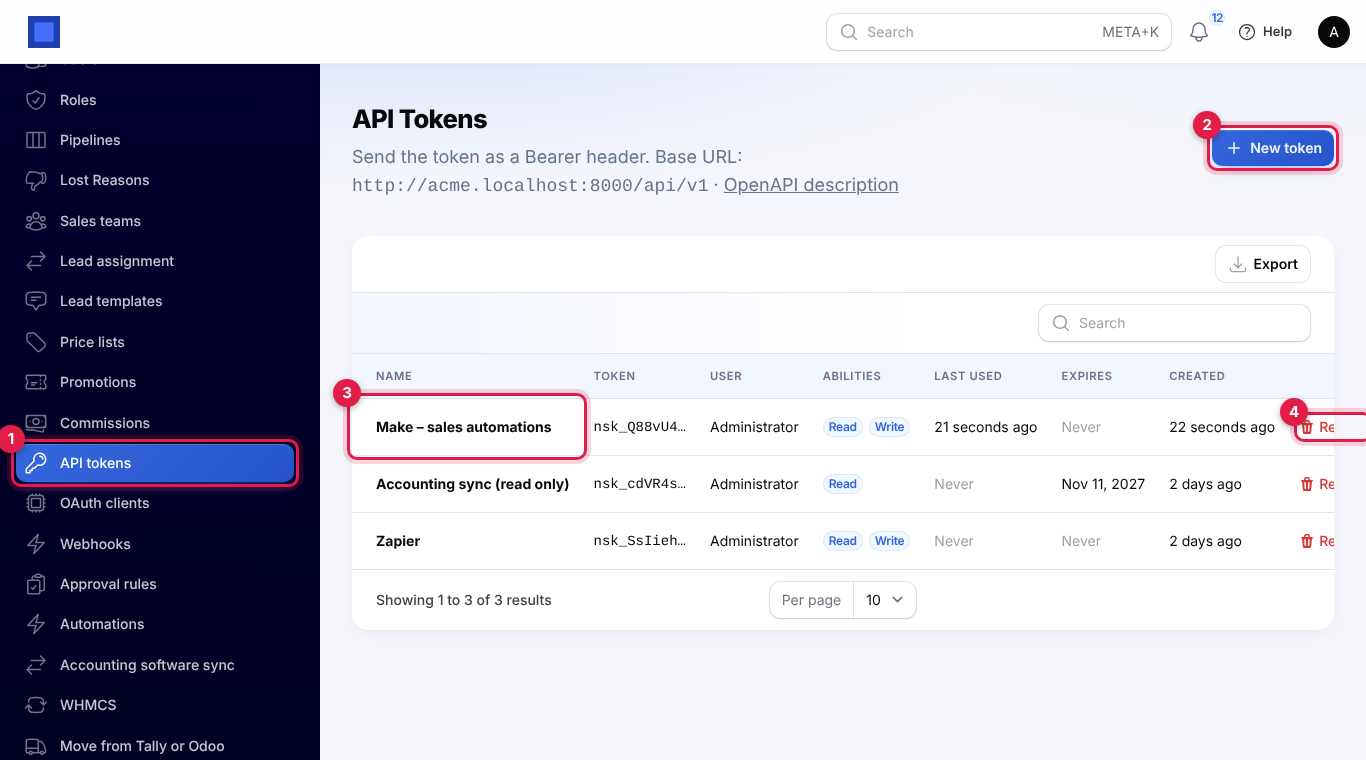
- In the menu, open Settings → API tokens (marker 1). The line under the title shows your workspace's API address.
- Click New token (marker 2).
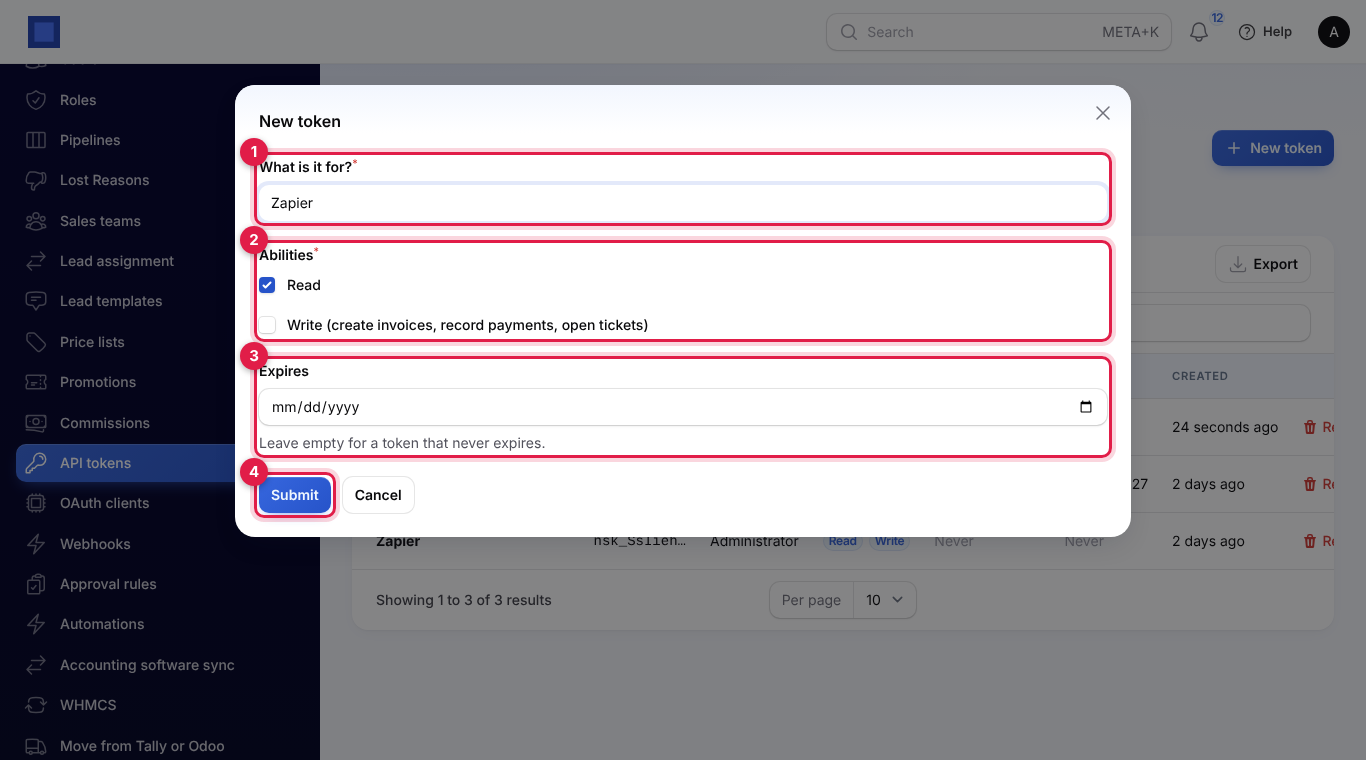
- In What is it for? (marker 1), type the service, for example Zapier.
- Under Abilities (marker 2), tick both Read and Write (create invoices, record payments, open tickets). Triggers only need Read, but turning a trigger on and the actions need Write.
- Leave Expires (marker 3) empty, unless you want the automations to stop on a given date.
- Click Submit (marker 4). A message shows the token once: "Token created. Copy it now: it will not be shown again." It starts with
nsk_. Copy it straight into Zapier or Make (below), or somewhere safe.
NaliSuite keeps only a fingerprint of the token, so a lost token cannot be shown again: create a new one and connect again. Revoke (marker 4 in the list) cuts a token off at once; every automation using it stops.
Tip: Create the token while signed in as a user whose role allows only what your automations need, for example a separate "automations" user. Every invoice or contact an automation creates is recorded as that user's work. See Integrations for more on tokens.
Connect NaliSuite in Zapier
- Sign in at zapier.com and create a Zap.
- For the trigger or an action step, search for NaliSuite and choose it. If NaliSuite does not appear in the search, ask NaliSuite support for the invitation link to the NaliSuite app, open it and accept, then search again.
- When Zapier asks you to connect an account, fill in:
- Workspace address: the address you open NaliSuite at, for example
yourbusiness.nalisuite.com.https://and a slash at the end are ignored. - API token: the token you copied.
- Workspace address: the address you open NaliSuite at, for example
- Click the button to continue. Zapier checks the token with NaliSuite and names the connection after your name and workspace address, for example Amina Hassan (yourbusiness.nalisuite.com).
- Choose the trigger or action and fill it in (see below). For a trigger, click Test trigger: Zapier shows the most recent real event of that kind from your workspace, or an example if there has not been one yet, so you can map its fields in the next steps.
- Publish the Zap. NaliSuite adds a webhook named "Automation: Zapier – …" (see Where the connections show up).
If Zapier says "NaliSuite did not accept the API token. Create a new one under Settings → API tokens.", the token is wrong or revoked. If it says "The token's user is not allowed to do this…", give the token's user the permission, or use a token with Write.
Connect NaliSuite in Make
- Sign in at make.com and create a scenario.
- Click the +, search for NaliSuite and choose it. If it does not appear, ask NaliSuite support for the invitation link to the NaliSuite app, open it and install it in your Make organisation, then search again.
- Choose a module, then click Create a connection and fill in:
- Workspace address: for example
yourbusiness.nalisuite.com, withouthttps://. - API token: the token you copied.
- Workspace address: for example
- Click Save. Make checks the token and shows your name.
- For Watch events, click Create a webhook, give it a name and choose the Event from the list (it is read from your workspace). Click Save. NaliSuite adds a webhook named "Automation: Make – …".
- Add the next modules, map the fields and switch the scenario on.
If Make says "NaliSuite did not accept the API token. Create a new one under Settings → API tokens.", the token is wrong or revoked.
Triggers
Each trigger starts the automation when the event happens in NaliSuite:
| Trigger in Zapier | Event in Make | When it fires |
|---|---|---|
| Invoice Issued | Invoice issued | An invoice is issued (not when a draft is saved). |
| Invoice Cancelled | Invoice cancelled | An invoice is cancelled. |
| Payment Received | Payment recorded | A customer payment is recorded, by hand or online. |
| Sales Order Confirmed | Sales order confirmed | A sales order is confirmed. |
| Vendor Bill Posted | Vendor bill posted | A supplier bill is posted. |
| Vendor Bill Paid | Vendor bill paid | A payment to a supplier is recorded. |
| Purchase Order Received | Purchase order received | Goods on a purchase order are received. |
| Support Ticket Opened | Support ticket opened | A helpdesk ticket is opened. |
| Support Ticket Resolved | Support ticket resolved | A ticket is resolved. |
| Lead Won | Lead won | A CRM lead is marked won. |
| Lead Lost | Lead lost | A CRM lead is marked lost. |
| Document Signed | Document signed | A document is signed. |
| Subscription Started | Subscription started | A subscription starts. |
| Subscription Ended | Subscription ended | A subscription ends. |
| Subscription Suspended | Subscription suspended or past due | A subscription is suspended or falls behind. |
| Subscription Resumed | Subscription resumed | A suspended subscription is resumed. |
| Subscription Plan Changed | Subscription plan changed | A subscription moves to another plan. |
An event only happens in an app your workspace uses: Support Ticket Opened needs Helpdesk, Lead Won needs CRM, and so on.
What a trigger brings: the record the event is about, with its fields, for example for an invoice its number, status, dates, currency, subtotal, tax, total, amount paid and due, your customer's reference and the link the customer pays on. In Zapier these fields appear directly, with Record ID (the record's number in NaliSuite), Event and Occurred At. In Make, Watch events gives Delivery ID, Event, Occurred at and Record, which holds the record's fields.
Actions and searches
| In Zapier | In Make | What it does |
|---|---|---|
| Create Contact | Create a contact | Adds a customer or supplier: Name (required), Type (organisation or individual), email, phone, mobile, tax number, whether it is a customer and/or a supplier, and notes. |
| Create Invoice | Create an invoice | Creates an invoice for a Customer ID, with lines (description, quantity and unit price, and optionally a product ID and tax ID), dates, your customer's reference and notes. Leave Issue it now off to get a draft to check in NaliSuite; switch it on to number and issue it at once. |
| Create Support Ticket | Create a support ticket | Opens a ticket with a subject, message, the customer's name and email, a priority (low, normal, high, urgent) and a channel (web, email, phone, WhatsApp, walk-in). |
| Find Contact | Search contacts | Finds customers and suppliers by part of their name, email or phone. |
To put the right customer on an invoice, add Find Contact (or Search contacts) before Create Invoice and map its ID into Customer ID.
If an action is refused, Zapier and Make show NaliSuite's reason, for example a required field that is missing.
Where the connections show up
Every trigger you turn on in Zapier or Make appears in NaliSuite under Settings → Webhooks (marker 1), named "Automation:", the service and the event, for example Automation: Zapier – Invoice issued (marker 2) or Automation: Make – Lead won (marker 3), with the address Zapier or Make gave.
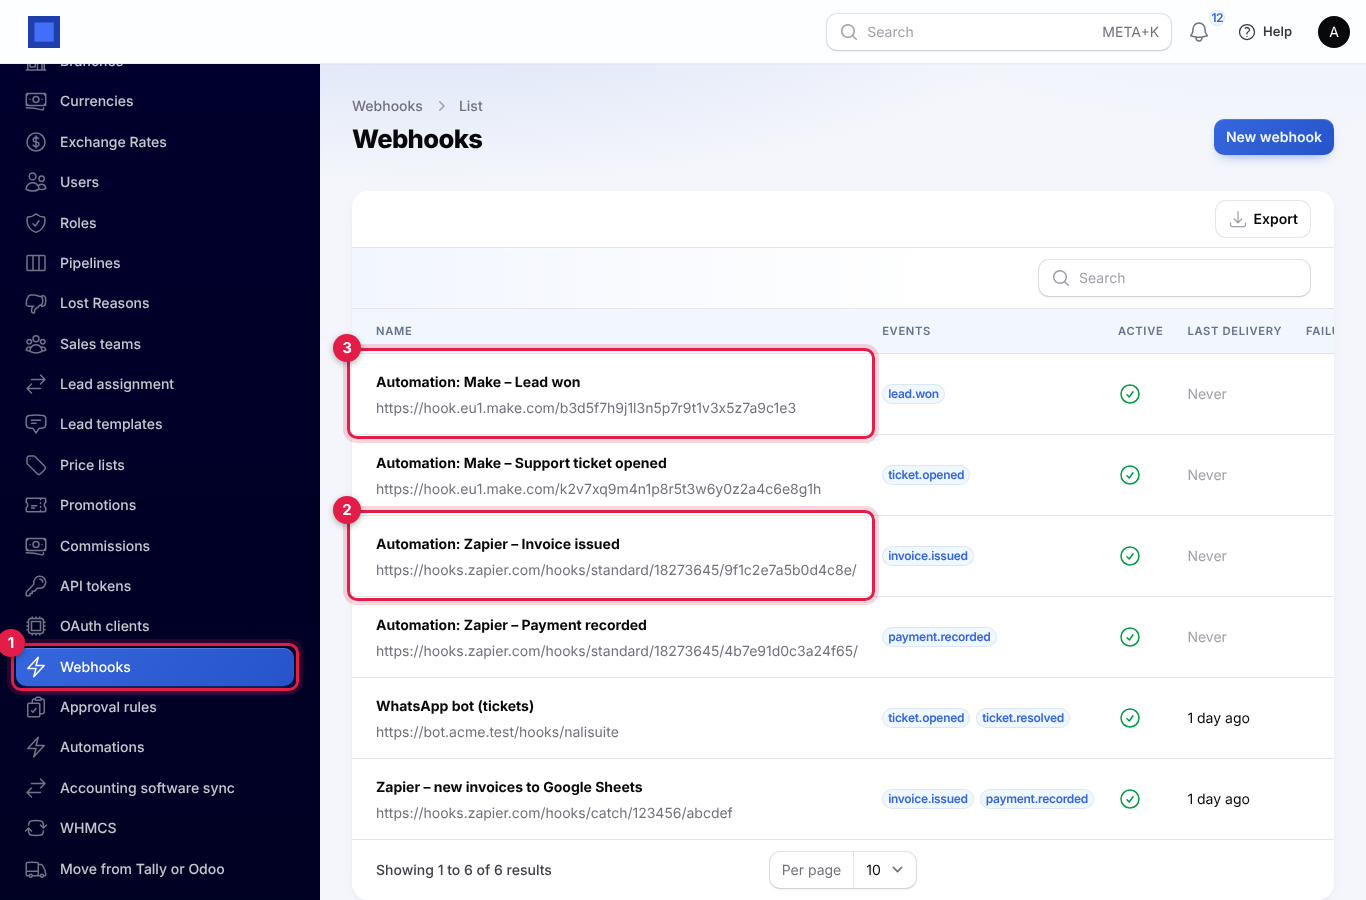
They are ordinary webhooks, so everything in Webhooks applies: each message is signed, a failed delivery is tried again after 1, 5, 15 and 60 minutes, and you can open one to see its Deliveries, redeliver a message or see exactly what was sent. Each one is subscribed to its single event (marker 3 below).
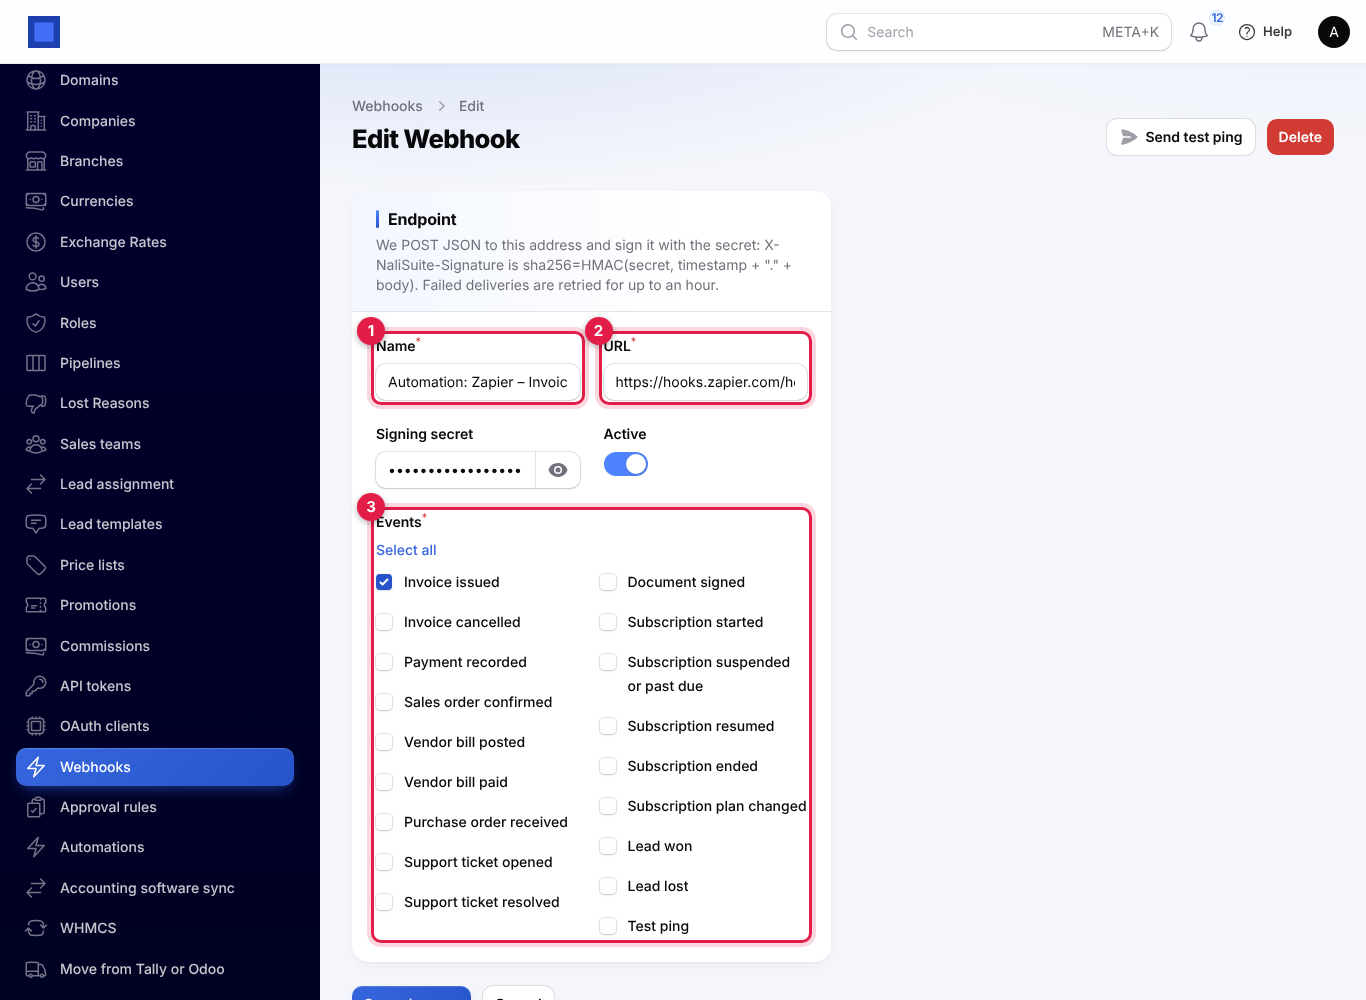
When you turn the Zap or scenario off, or delete its trigger, Zapier or Make tells NaliSuite and the webhook is removed by itself. Webhooks you set up by hand are never removed this way.
Important: Turn automations off in Zapier or Make, not here. Do not rename an "Automation:" webhook: Zapier and Make can then no longer remove it. If you delete one here, the Zap or scenario stays on but receives nothing; turn it off and on again in Zapier or Make to add it back.
Good to know
What does it cost? Nothing extra in NaliSuite. Zapier and Make charge for their own plans by the number of tasks or operations your automations run.
How fast are triggers? Instant: NaliSuite sends the event the moment it happens. Zapier and Make do not need to check for new records.
An automation stopped working. Check under Settings → API tokens that its token was not revoked or has not expired, and under Settings → Webhooks that its "Automation:" webhook is still there, active and delivering (the Failures column). The deliveries list shows Zapier's or Make's answer to each message.
Can I use other automation tools? Yes. Any tool that can receive a webhook can use Settings → Webhooks directly, and any tool that can call a web API can use the token with the REST API.