Exams
Exams is for schools, colleges, training centres and exam bodies that set and mark their own exams. You keep a question bank per subject, plan each exam's papers on a timetable that is checked so no candidate sits two papers at once, put candidates in rooms with seating plans and invigilators, print papers with a marking scheme or give them online in the portal with a time limit, and let each teacher enter the marks for their own paper. Once marks are moderated, Exams works out grades, points, means, positions and class positions, prints result slips, shows the analysis and releases the results to candidates and guardians in the portal. With School Management switched on, it uses School's students, classes and subjects and puts the results on School report cards.
It is in the Examinations group of the left menu: Exams, Marks entry, Question bank, Online answers, Results and analysis, Candidates, Subjects, Rooms and Grading scales.
Note: You need the exams.view permission to see the Examinations pages and printouts. With it, a teacher can enter marks for the papers they are named on, add questions to the bank and mark online answers for their papers. exams.manage is needed to create exams and papers, set rooms and seating, enter marks for any paper, moderate, release and withdraw results, and manage candidates, subjects, rooms and grading scales. Owners and admins have both. Give teachers a role with exams.view only. Set permissions under Settings → Roles.
Switch on Exams
Exams is an add-on sold separately from your plan. It needs the Contacts app; it works on its own, and also with School Management.
- Open Settings → Marketplace and type Exams in the search box (marker 1).
- On the Exams card (marker 2), click Start free trial (or Add to subscription) and confirm. The Examinations group appears in the menu, and candidates and guardians get Exam results in the portal.
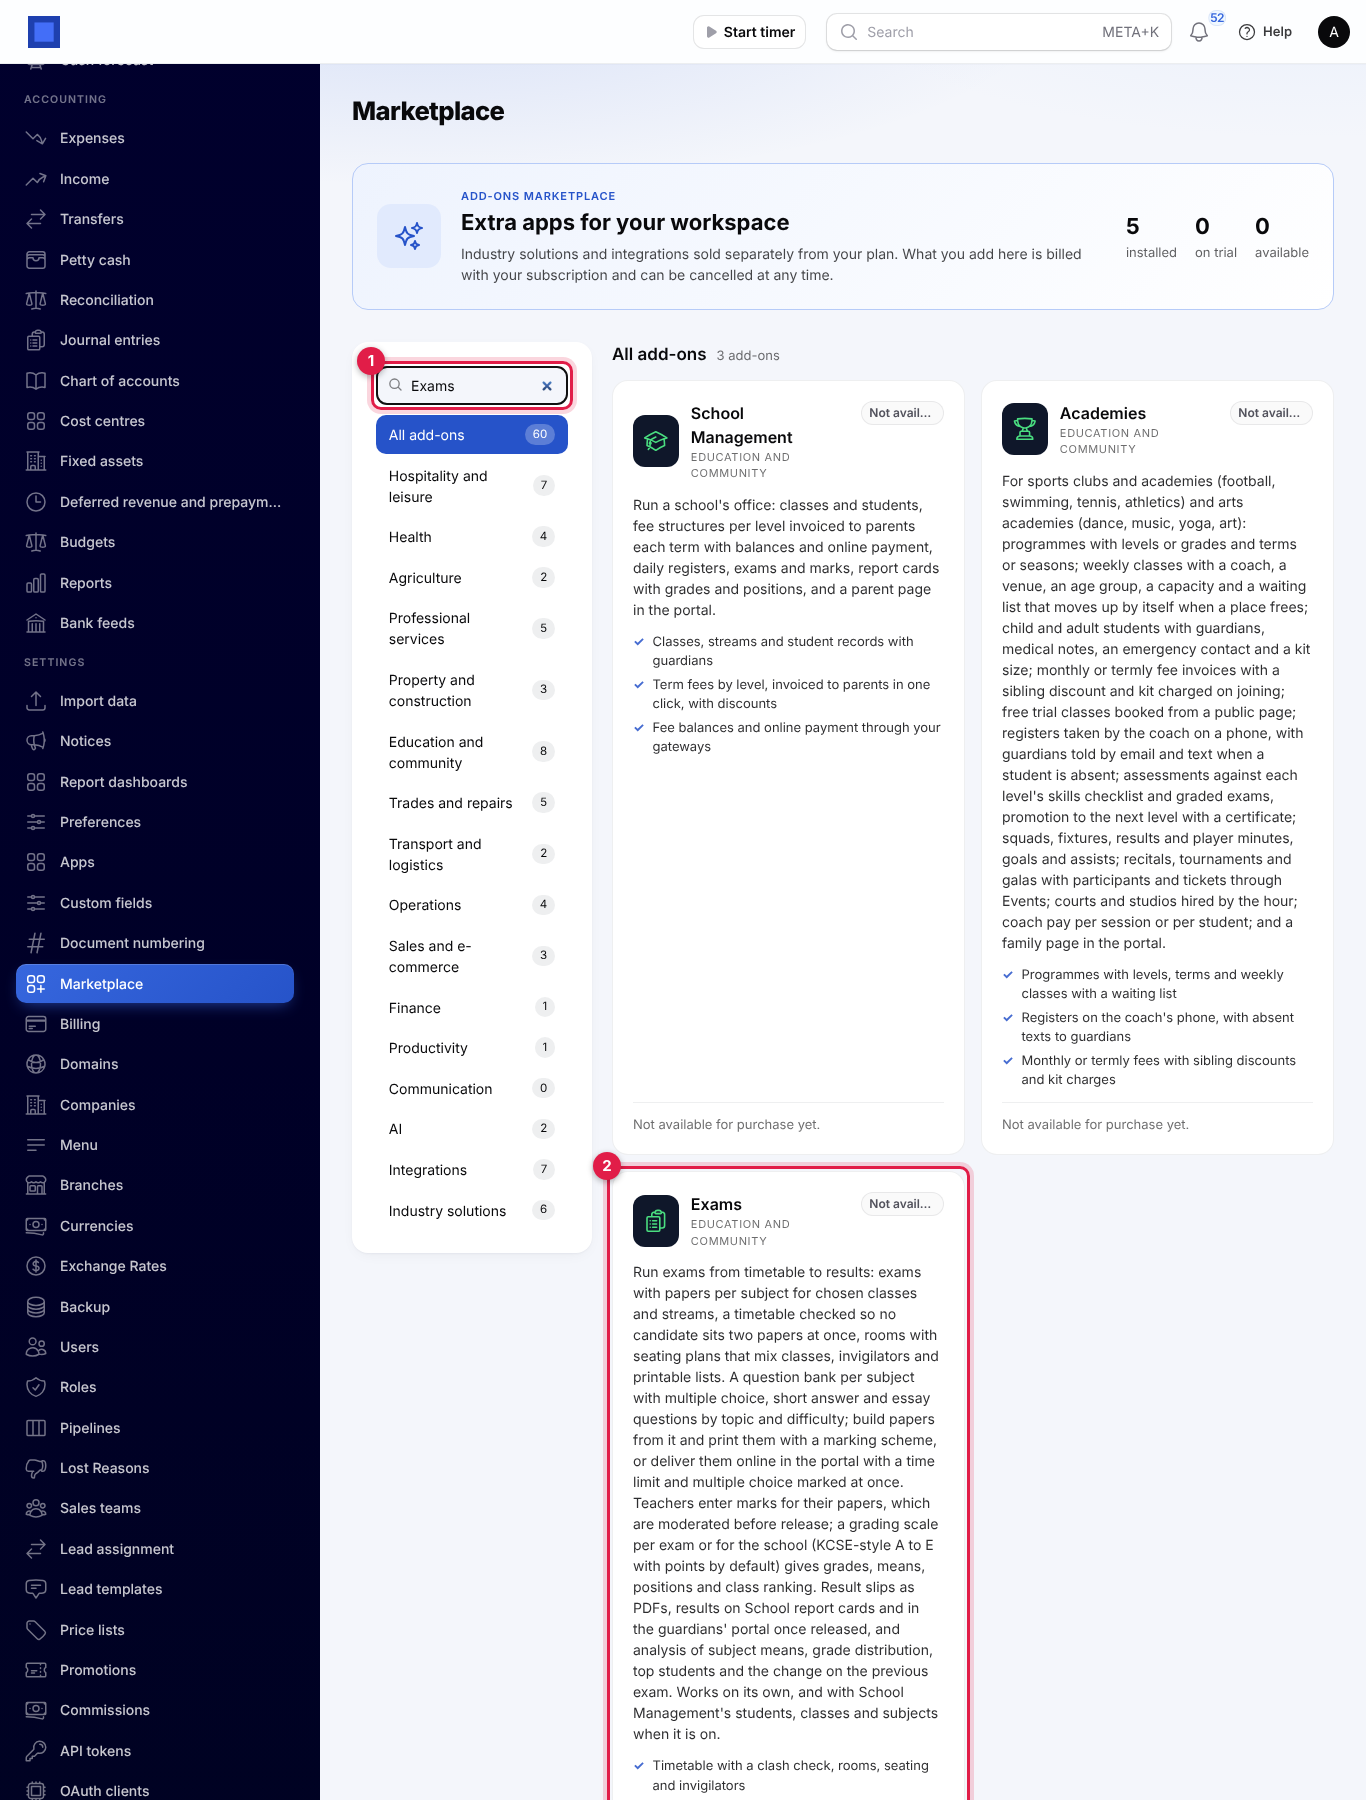
If the card says Not available for purchase yet, ask NaliSuite support to switch it on. See Billing and marketplace.
Exams settings
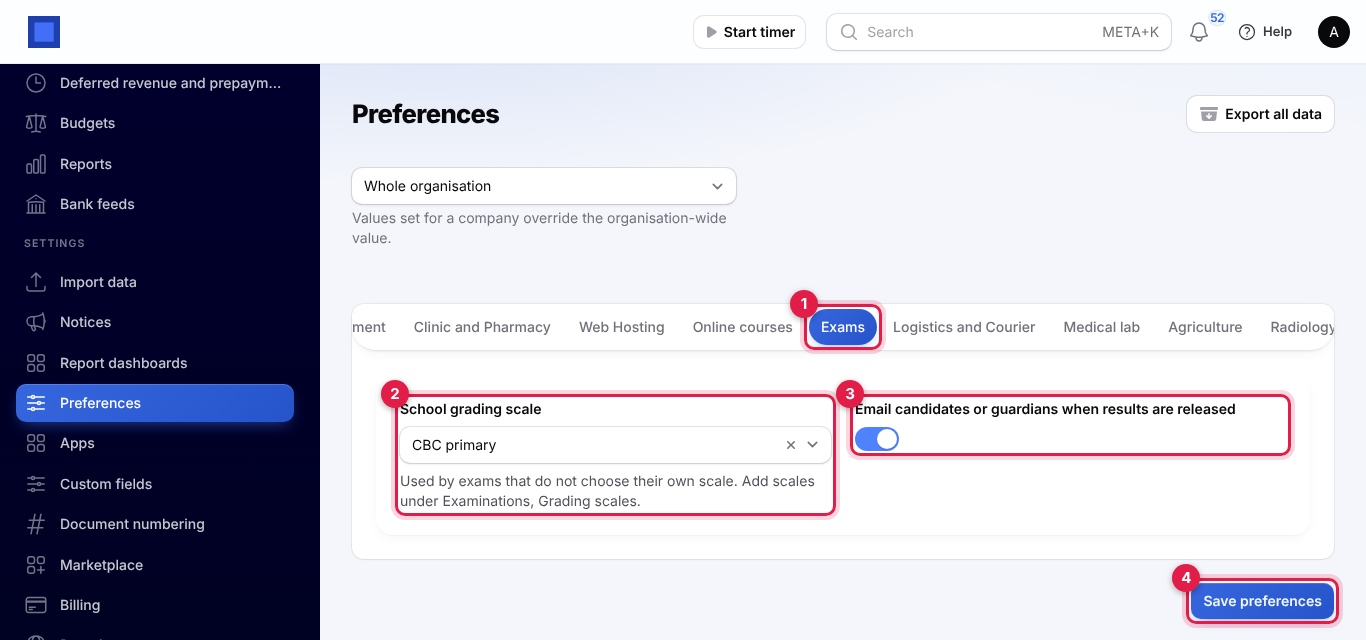
- Open Settings → Preferences and click the Exams tab (marker 1).
- Change the settings and click Save preferences (marker 4).
| Setting | Default | What it does |
|---|---|---|
| School grading scale (marker 2) | KCSE-style A to E with points | The scale used by every exam that does not choose its own. Add scales under Examinations → Grading scales first. |
| Email candidates or guardians when results are released (marker 3) | On | When you release results, each candidate's portal contact is emailed their mean, grade and position, with a See the results button. |
Set up subjects, candidates, rooms and grading scales
Do this once, before your first exam.
Subjects
Open Examinations → Subjects.
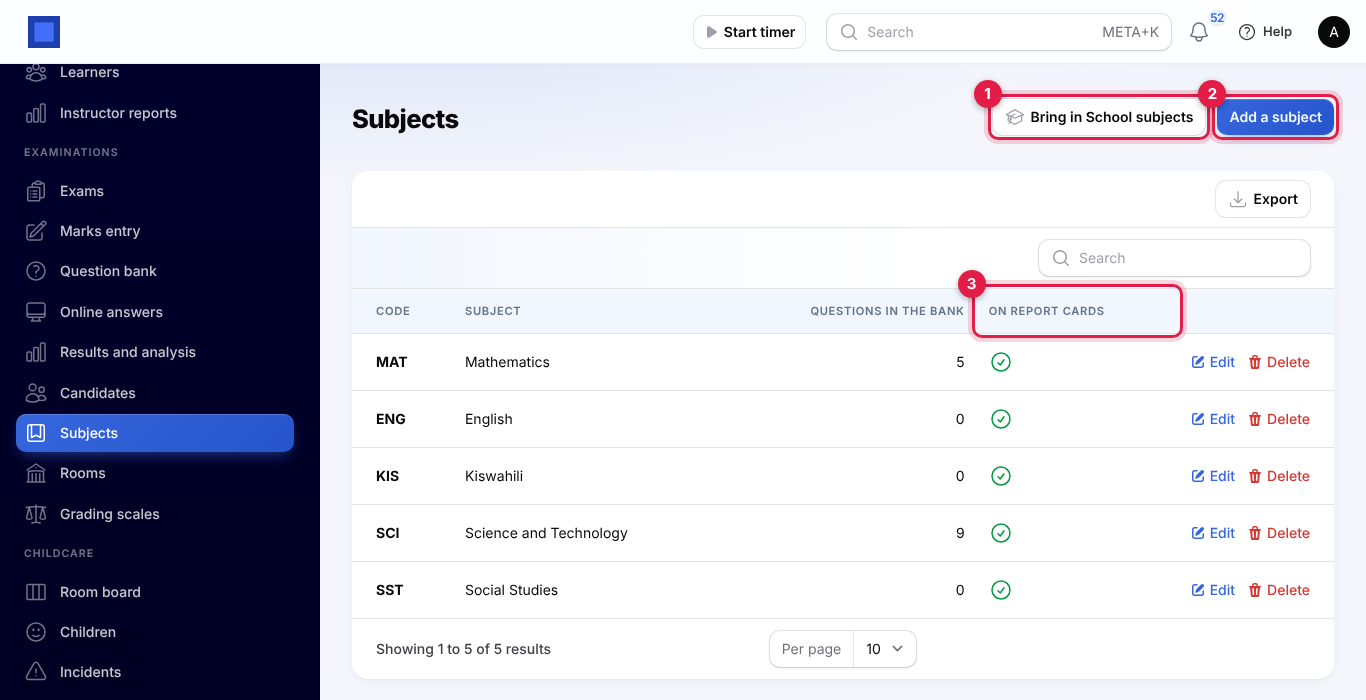
- Bring in School subjects (marker 1, only with School Management on): adds School's subjects and links them, so released results reach the report cards. Run it again after adding subjects in School.
- Add a subject (marker 2): type a short Code (MAT, shown on the broadsheet and slips), the School subject name and the Order on slips.
- On report cards (marker 3) shows which subjects are linked to School.
Candidates
Open Examinations → Candidates.
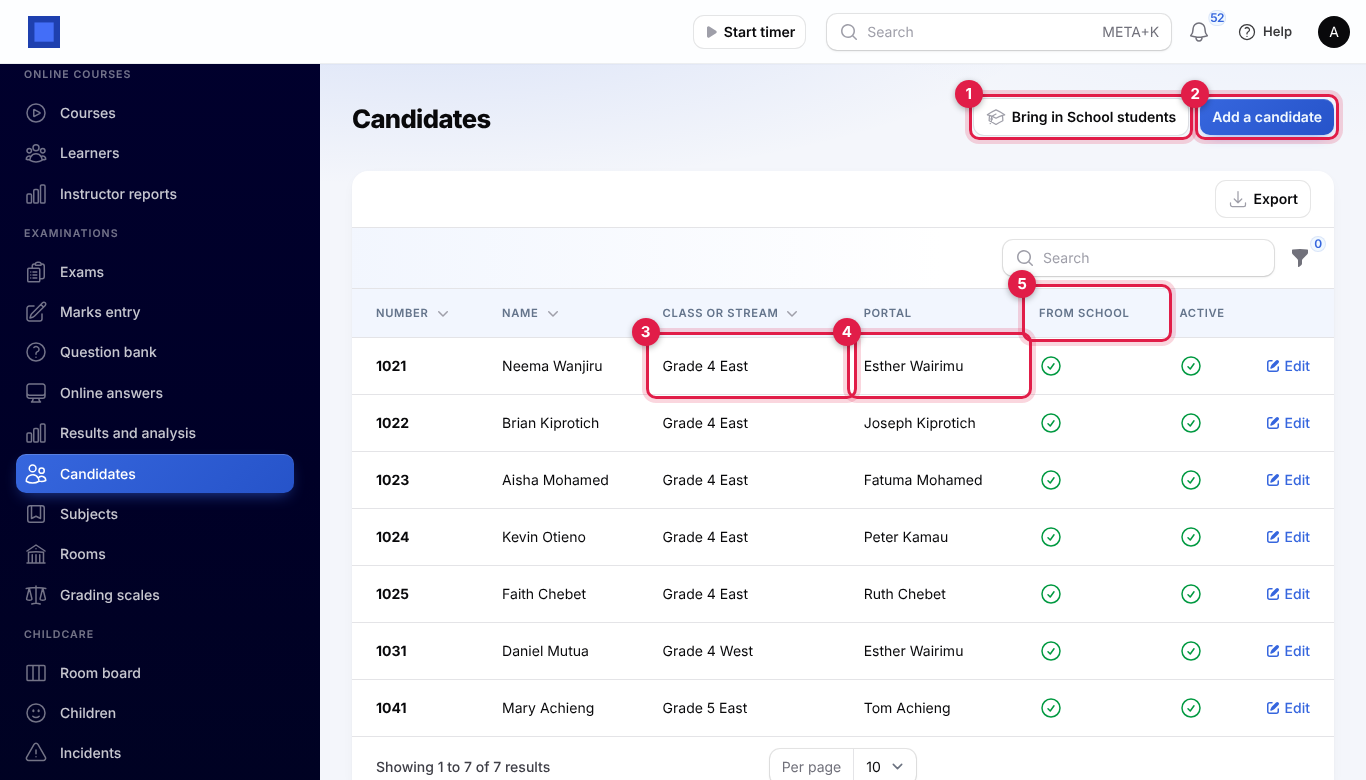
- Bring in School students (marker 1, only with School Management on): every School student becomes a candidate with their admission number, their class as the Class or stream and their guardian as the portal contact. Students who are no longer active are kept but do not sit exams. Run it again after students move class. From School (marker 5) shows who came from School.
- Add a candidate (marker 2), for candidates who are not School students: the Index or admission number (unique), Name, Class or stream (marker 3, type it or pick one already used, such as Form 3 North), Sees results in the portal (marker 4: the candidate or their guardian, from your contacts) and Sits exams (off to leave someone out of new exams).
Rooms
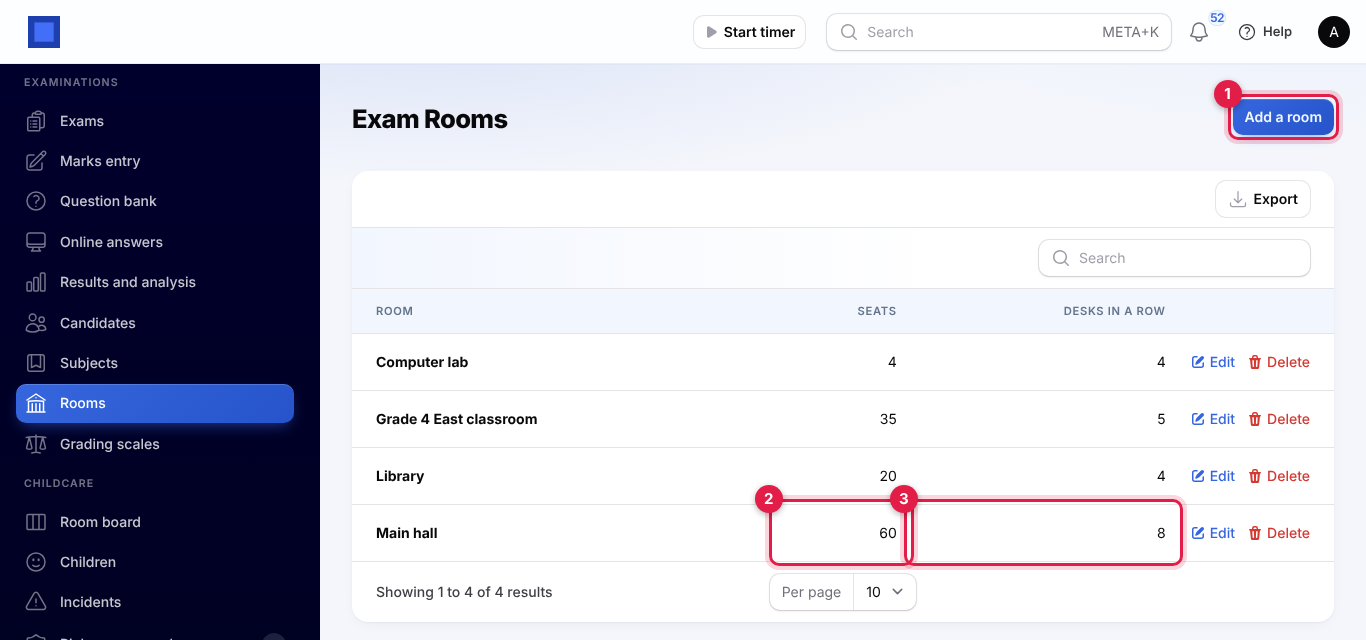
Open Examinations → Rooms, click Add a room (marker 1) and type the Room name, its Seats (marker 2) and Desks in a row (marker 3). Seats are labelled A1, A2… row by row on the seating plan.
Grading scales
Exams grades on a KCSE-style scale unless you add your own: A from 80 (12 points), A- from 75 (11), B+ 70 (10), B 65 (9), B- 60 (8), C+ 55 (7), C 50 (6), C- 45 (5), D+ 40 (4), D 35 (3), D- 30 (2) and E below (1).
- Open Examinations → Grading scales and click Add a grading scale, or Edit on one.
- Type the Name (marker 1), then each grade (marker 2): the lowest mark From mark that earns it, the Grade, its Points and a Remark such as Meeting expectations. Add a grade (marker 3) adds a row. A new scale starts filled with the KCSE grades for you to change.
- Click Save changes. Choose it as the School grading scale in Settings, or on an exam.
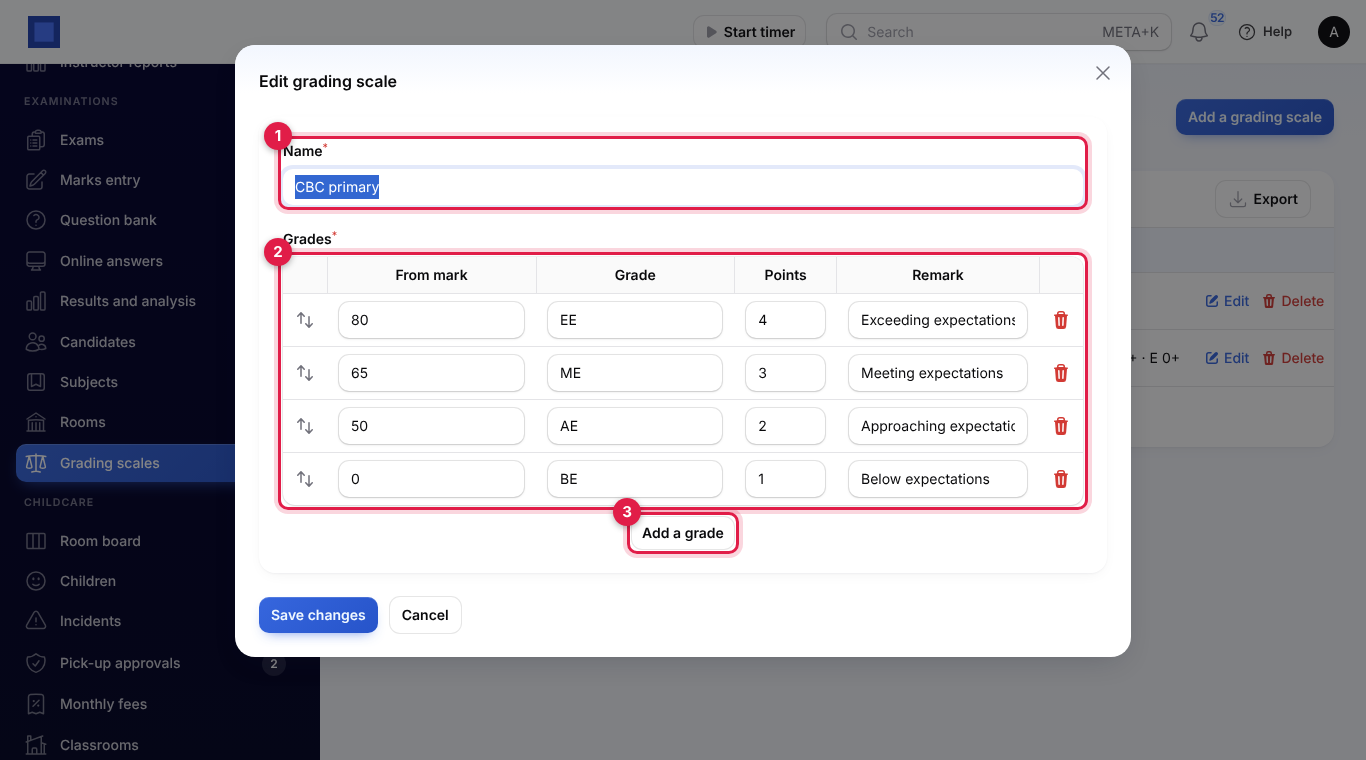
When every grade on the scale has points, candidates get mean points and the overall grade comes from the mean points, KCSE style. Leave Points empty to grade on the mean mark instead.
The question bank
Open Examinations → Question bank. Each question shows its subject, Kind (marker 3: Multiple choice, Short answer or Essay), Topic (marker 4), difficulty, marks and whether it is In use. Use the filter (marker 2) to show one subject, kind, topic or difficulty.
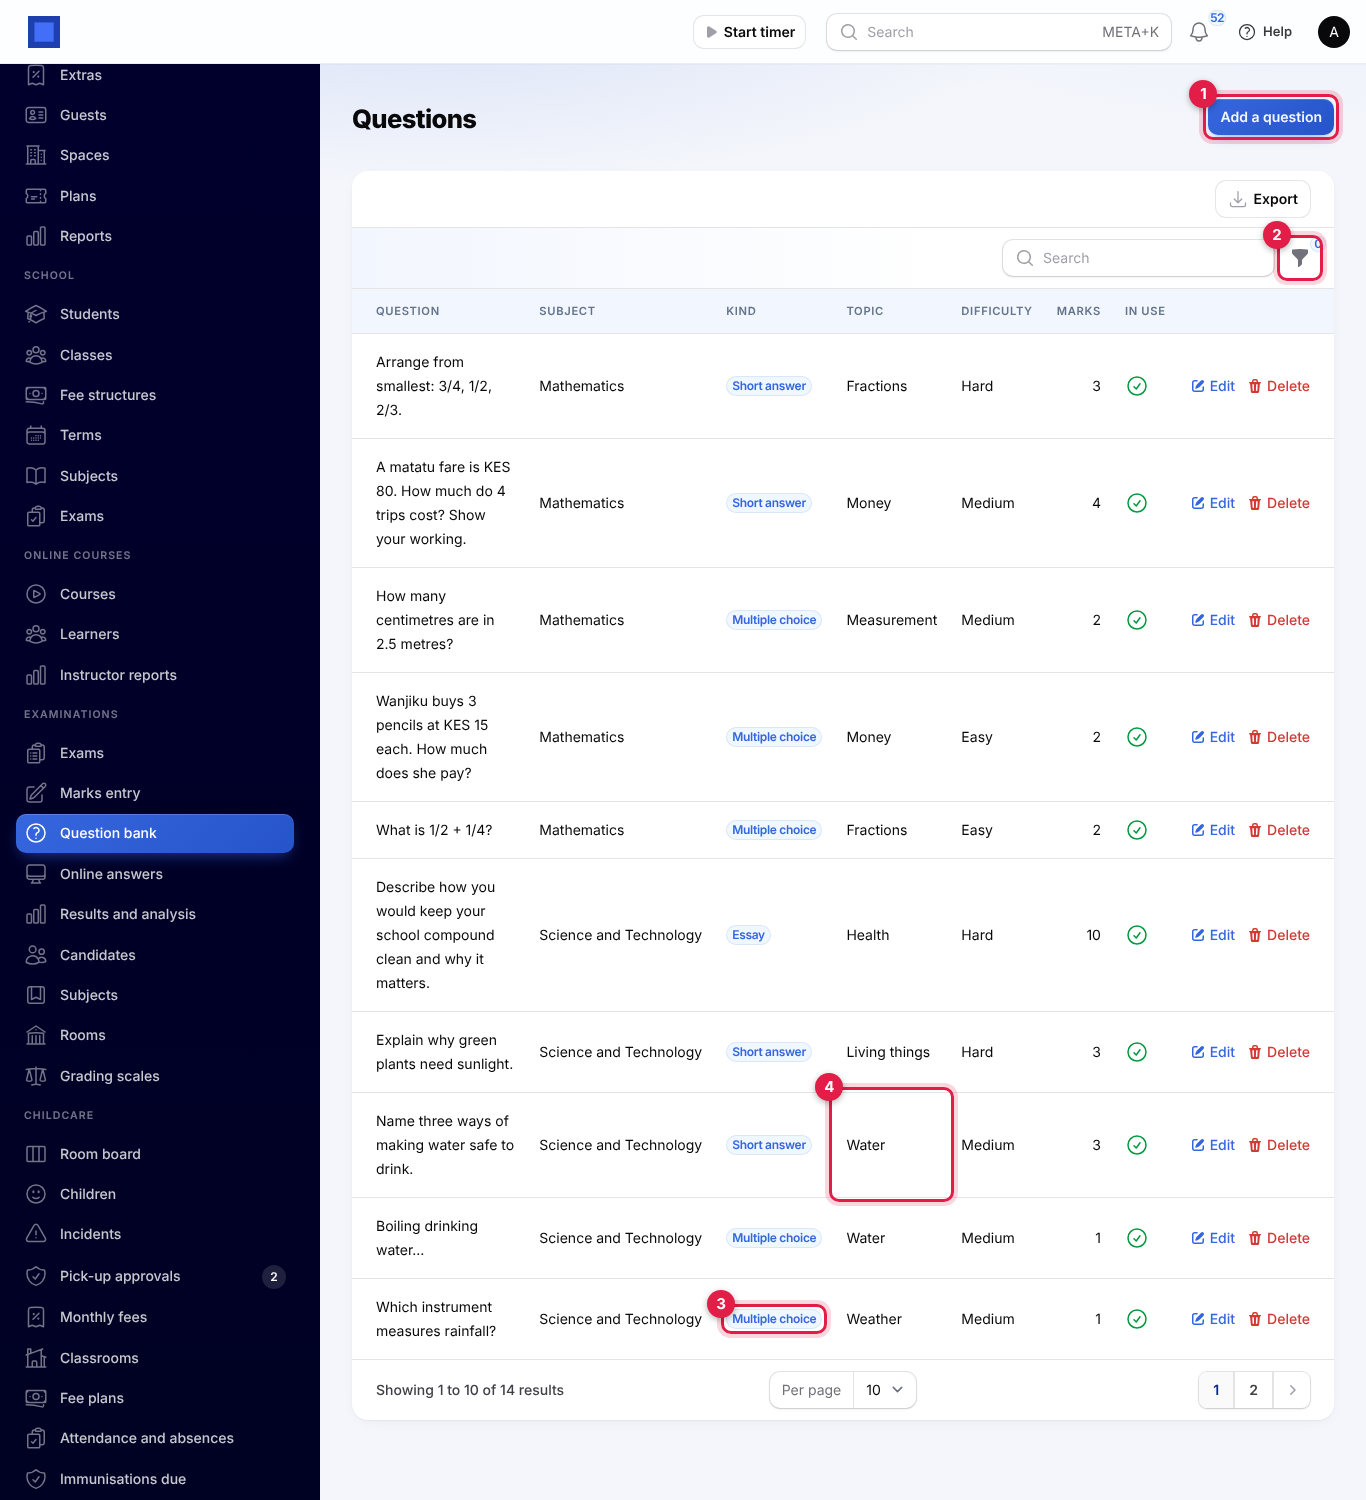
Click Add a question (marker 1), or Edit on one:
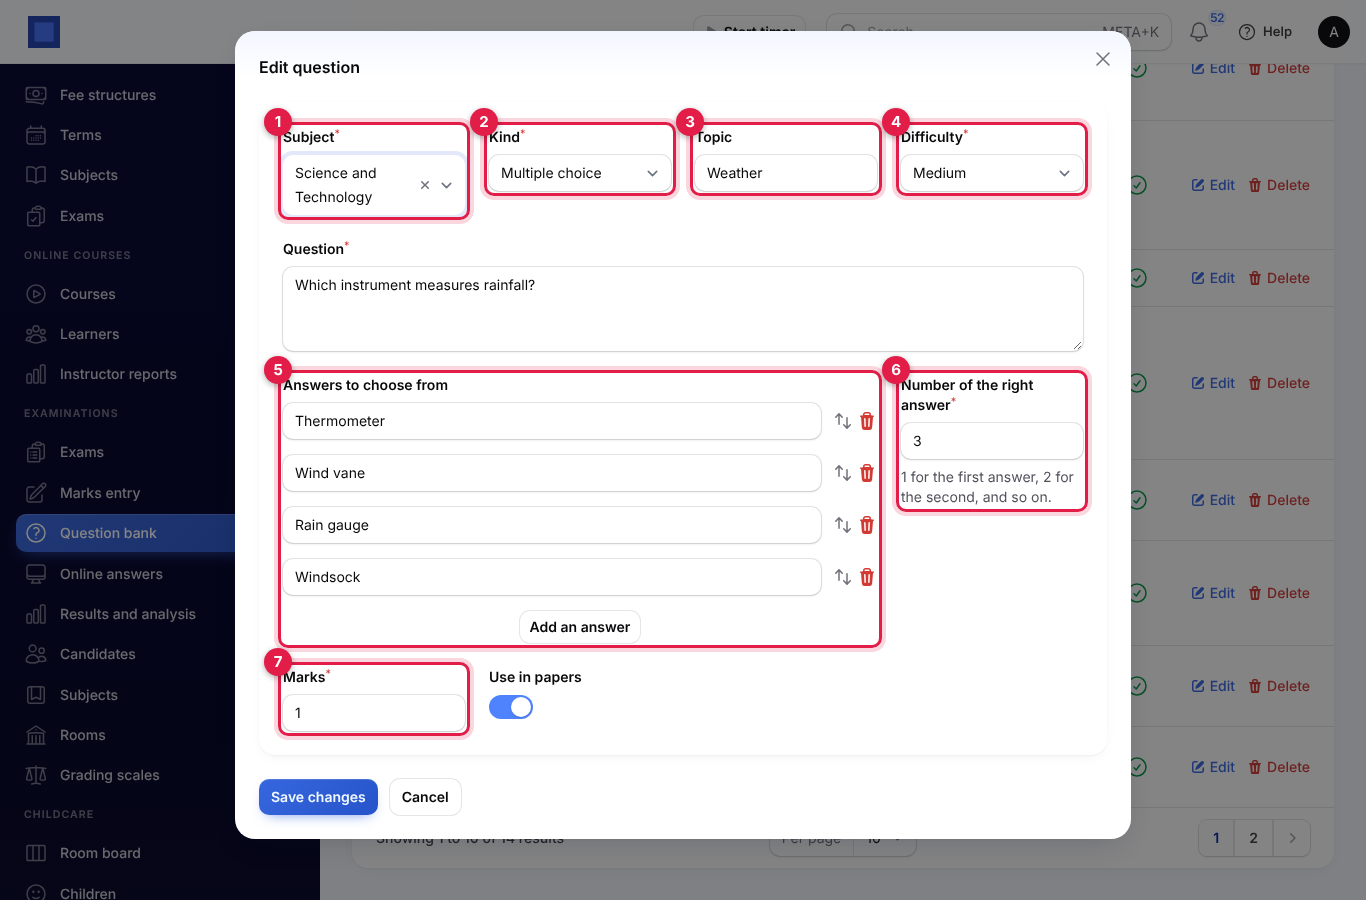
| Field | What to enter |
|---|---|
| School subject (required, marker 1) | The subject's bank it goes in. |
| Kind (required, marker 2) | Multiple choice, Short answer or Essay. |
| Topic (marker 3) | Type a topic or pick one already used, such as Water. Used to pick questions at random. |
| Difficulty (required, marker 4) | Easy, Medium or Hard. |
| Question (required) | The question as candidates see it. |
| Answers to choose from (marker 5, multiple choice) | Two to eight answers. |
| Number of the right answer (marker 6, multiple choice) | 1 for the first answer, 2 for the second, and so on. |
| Marking guide (short answer and essay) | What earns the marks. Printed on the marking scheme. |
| Marks (required, marker 7) | What the question is worth. |
| Use in papers | Off to keep the question but stop it being added to papers. |
Create an exam and its timetable
- Open Examinations → Exams. Each exam shows when it starts, the Classes sitting (marker 2), its number of papers and whether its Results are Released (marker 3).
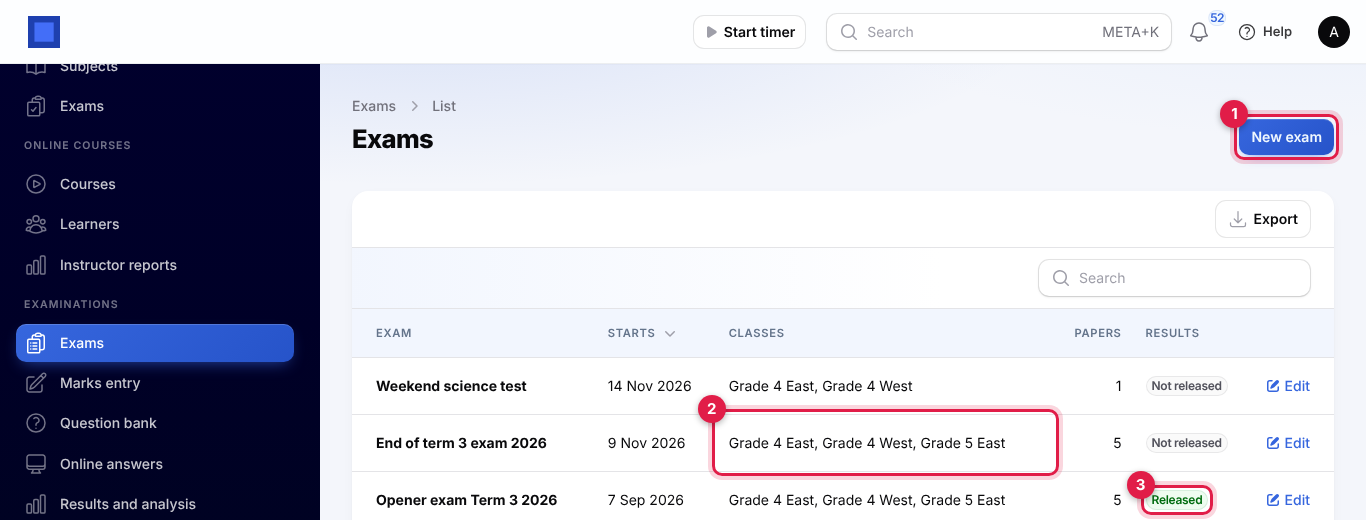
- Click New exam (marker 1), fill in the form and click Create.
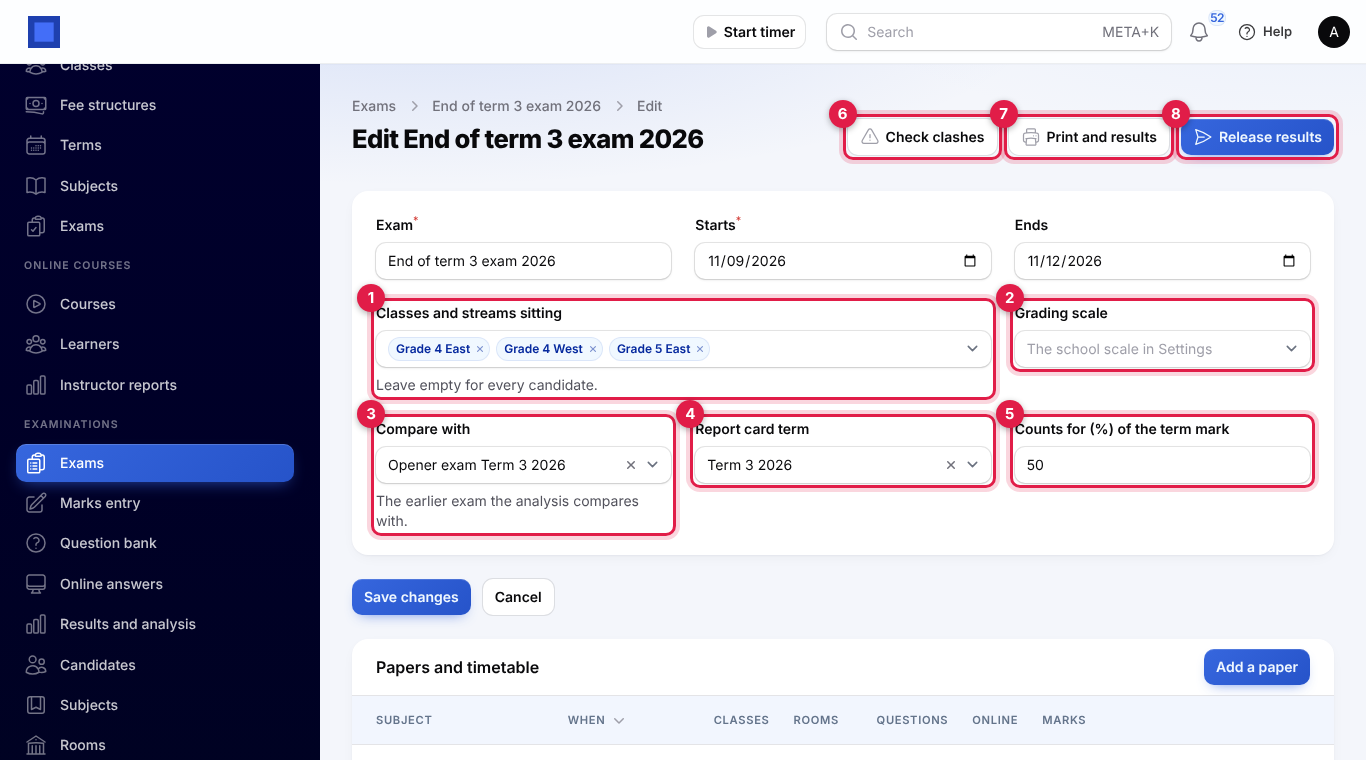
| Field | What to enter |
|---|---|
| Exam (required) | End of term 3 exam 2026. |
| Starts (required) and Ends | The exam's dates. |
| Classes and streams sitting (marker 1) | The classes or streams that sit the exam. Leave empty for every active candidate. |
| Grading scale (marker 2) | Leave empty for the school scale in Settings. |
| Compare with (marker 3) | An earlier exam, such as the opener exam. The analysis and result slips show the change on it. |
| Report card term (marker 4, School on) | The School term whose report cards get the results. Empty: the current term. |
| Counts for (%) of the term mark (marker 5, School on) | The weight of this exam on the report card, like a School exam's weight. Default 100. |
The exam's page has Check clashes (marker 6), Print and results (marker 7: Timetable PDF, Result slips PDF and Results and analysis) and Release results (marker 8).
Add papers
Under the form, Papers and timetable lists each paper with when it is sat and for how long (marker 2), the classes, its Rooms with how many are seated (marker 3), the number of questions from the bank, whether it is Online, and its Marks status (marker 4: Being marked, Waiting for moderation or Moderated) with how many marks are entered. Marks (marker 5) opens the paper's marks entry, and ⋮ (marker 6) holds its other actions (see below).
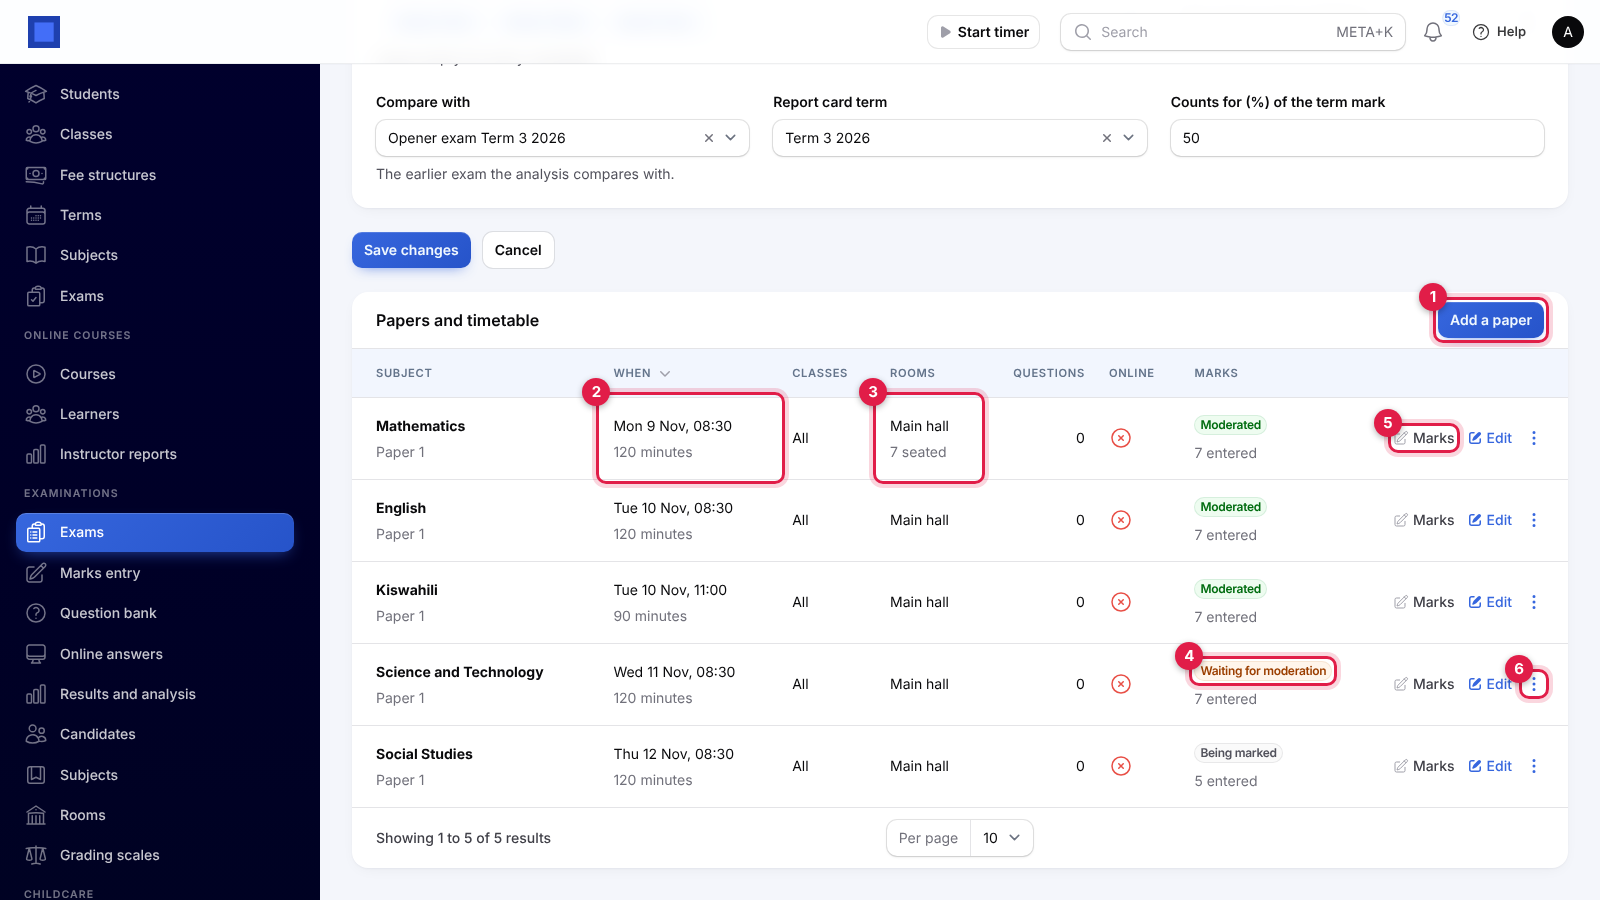
Click Add a paper (marker 1) and fill in the window:
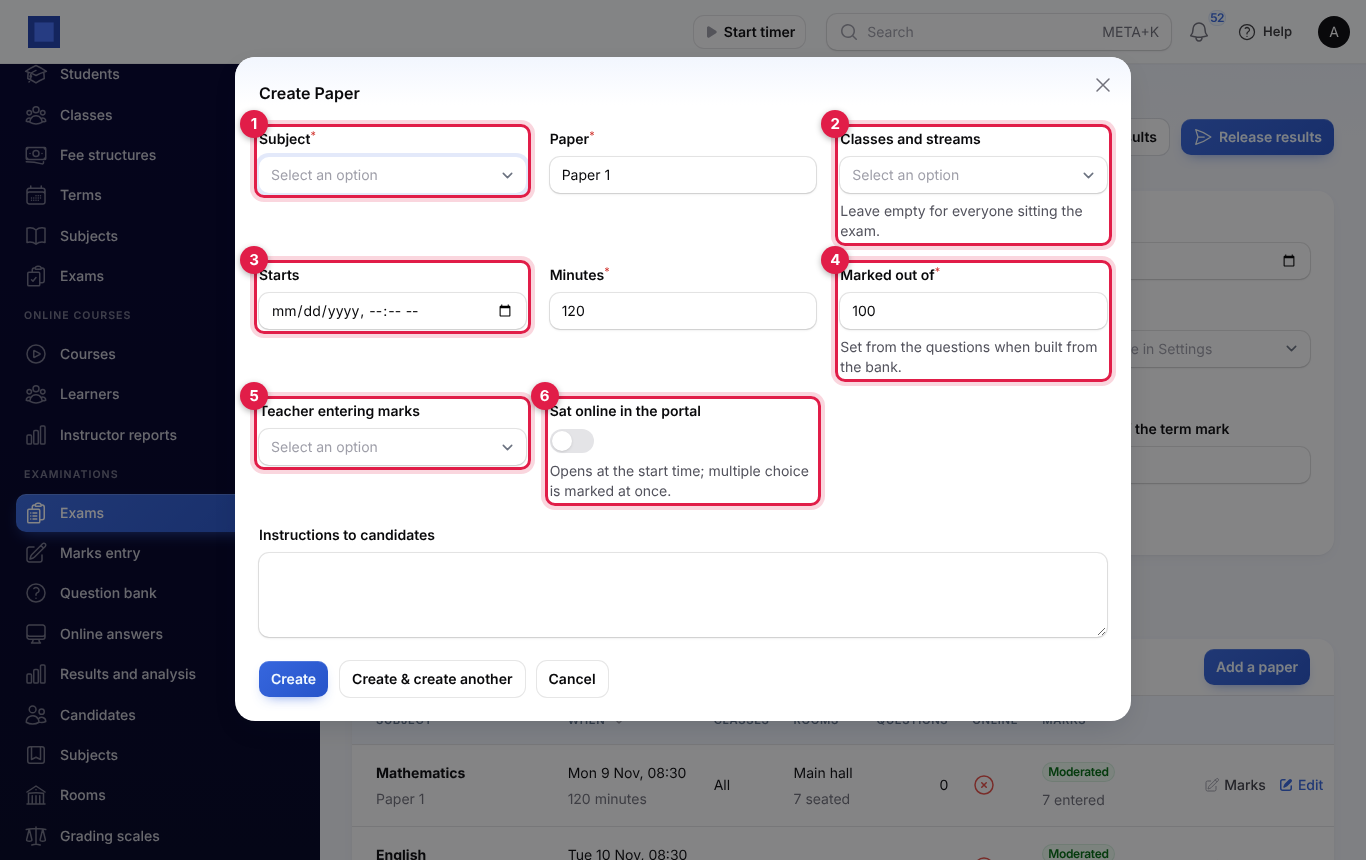
| Field | What to enter |
|---|---|
| School subject (required, marker 1) and Paper (required) | Mathematics, Paper 1. |
| Classes and streams (marker 2) | Only some of the exam's classes sit this paper. Empty: everyone sitting the exam. |
| Starts (marker 3) and Minutes (required) | The date and time on the timetable, and how long the paper is. |
| Marked out of (required, marker 4) | Default 100. Set for you from the questions when you build the paper from the bank. |
| Teacher entering marks (marker 5) | The teacher who marks this paper. They can enter its marks and see its marking scheme. |
| Sat online in the portal (marker 6) | On to give the paper online (see Online papers in the portal). |
| Instructions to candidates | Printed on the paper and shown online. |
Click Create. If the time would make any candidate sit two papers at once, the paper is not saved and you see Timetable clash: This clashes with English · Paper 1: 3 candidates would sit both at once (…). Change the time or the classes.
Check for clashes
Click Check clashes at the top of the exam. The window lists every pair of papers that overlap where a candidate sits both, or where both use the same room at the same time, or says No clashes. No candidate sits two papers at once and no room is double booked. Room double booking is only reported here; it does not stop a paper being saved.
Rooms, seating, questions and printing
Click ⋮ on a paper:
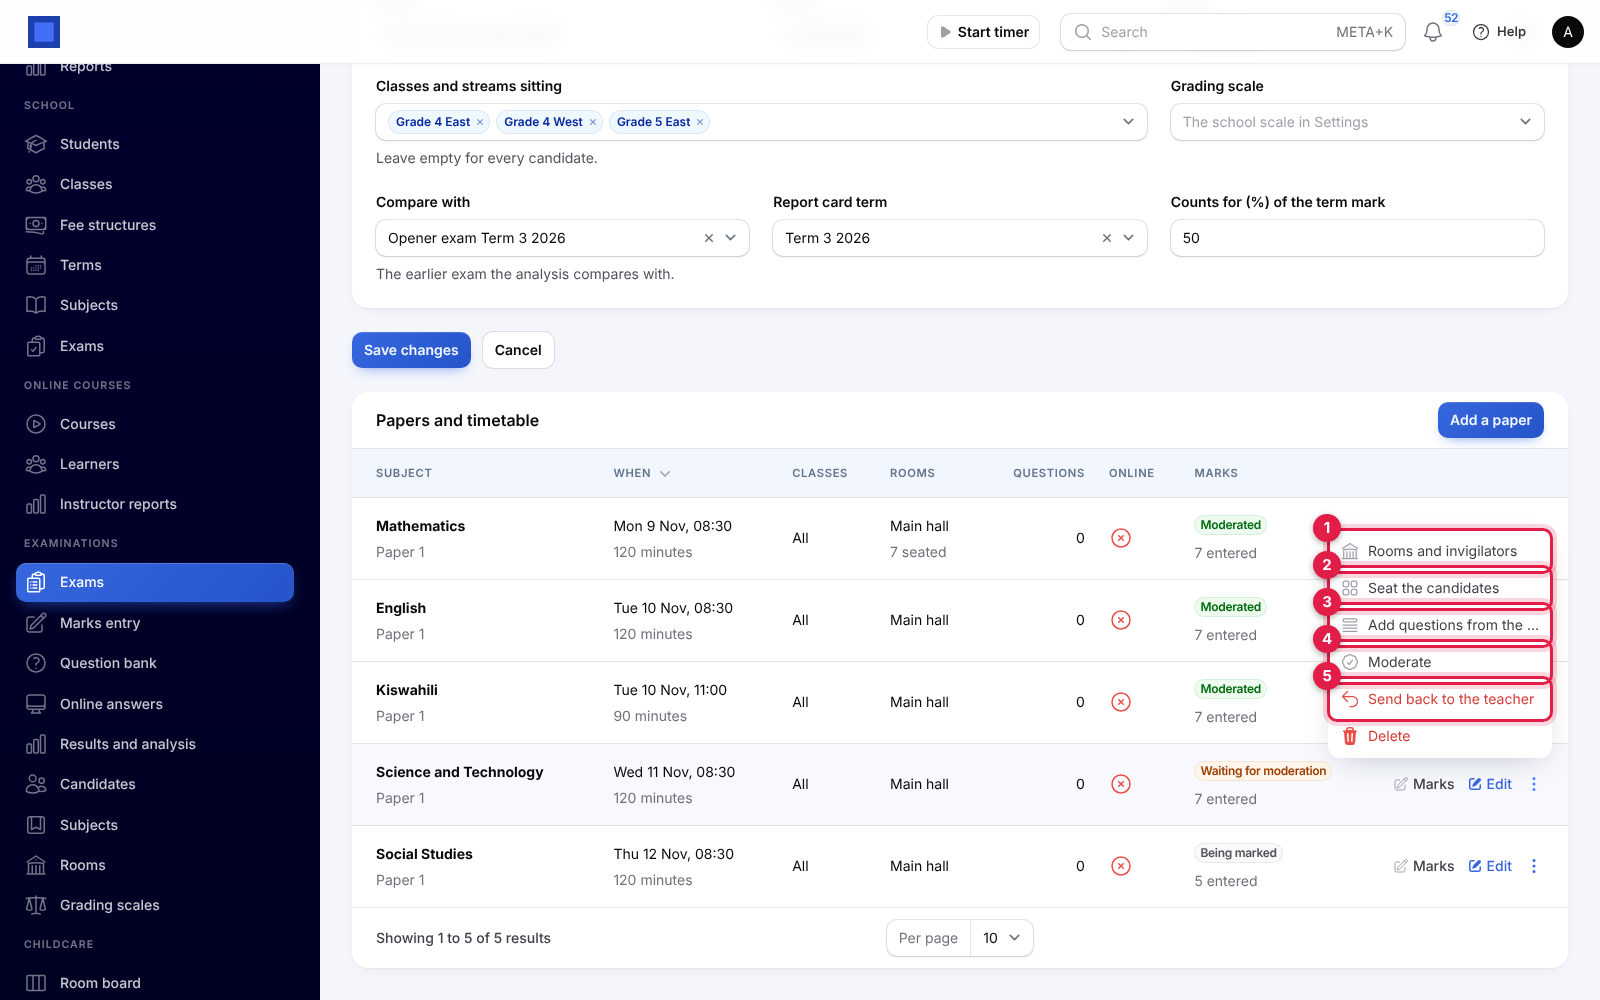
- Rooms and invigilators (marker 1): add each Room used for the paper (its seats are shown) and its Invigilators (your users).
- Seat the candidates (marker 2): spreads the candidates over the rooms, class by class in turn, so neighbours come from different classes. Any earlier plan for the paper is replaced. If the rooms seat fewer than sit the paper, you are told to add another room.
- Seating plan PDF (once seated): the plan room by room with seat, number, name and class, the invigilators, and columns for signatures and scripts collected.
- Add questions from the bank (marker 3): pick Questions from the subject's bank, and/or Or pick at random: how many, Of kind, On topic and Difficulty. Marked out of becomes the total of the questions' marks.
- Print the paper and Marking scheme (once it has questions): the paper as a PDF with the instructions, time allowed and total marks; and the same with the right answers and marking guides. Only exam managers and the paper's teacher can open the marking scheme.
- Moderate (marker 4) and Send back to the teacher (marker 5): see below.
- Delete removes the paper.
Enter marks and moderate
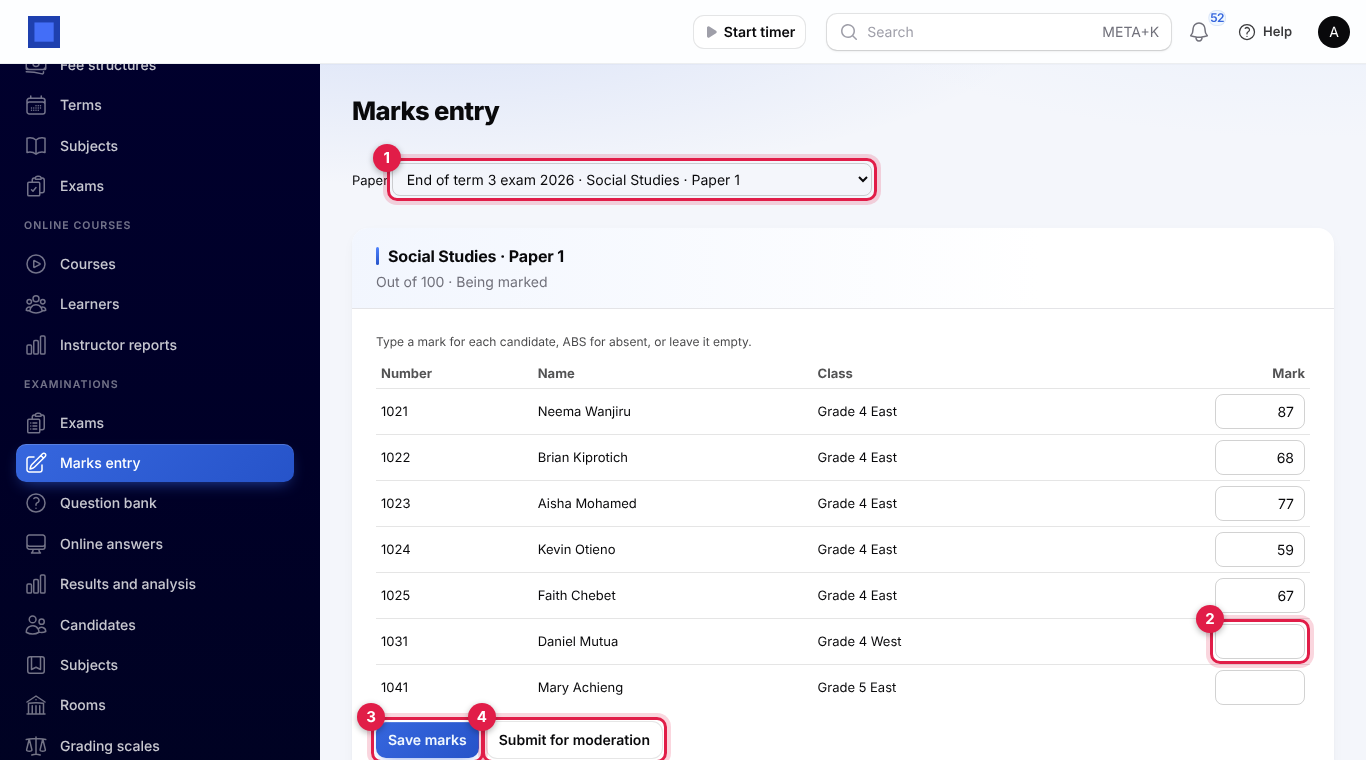
- Teachers open Examinations → Marks entry, or click Marks on a paper.
- Choose the Paper (marker 1). Teachers see only the papers they mark; exam managers see every paper of exams not yet released.
- Type each candidate's mark (marker 2), ABS for absent, or leave it empty. Marks run from 0 to the paper's Marked out of.
- Click Save marks (marker 3) as often as you like. When finished, click Submit for moderation (marker 4) and confirm. The marks are then locked for the teacher.
To moderate, someone with exams.manage clicks ⋮ → Moderate on a paper Waiting for moderation, types Marks to add to everyone (negative to take off), for example 2 or -3 (0 to approve as entered), and clicks Submit. The paper becomes Moderated. No candidate's mark goes above the paper's total or below 0. Send back to the teacher reopens a paper's marks for changes, until results are released.
Online papers in the portal
A paper with Sat online in the portal opens in the portal at its Starts time and closes when its Minutes have passed. Build it from the question bank first.
- Candidates (or the guardian, on their behalf) open Exam results in the portal. The paper shows Open once it starts, Not open yet before, and Closed after.
- Open, then Start the paper. From that moment they have the paper's minutes, but never past the paper's closing time, so starting late gives less time. Each candidate can start once.
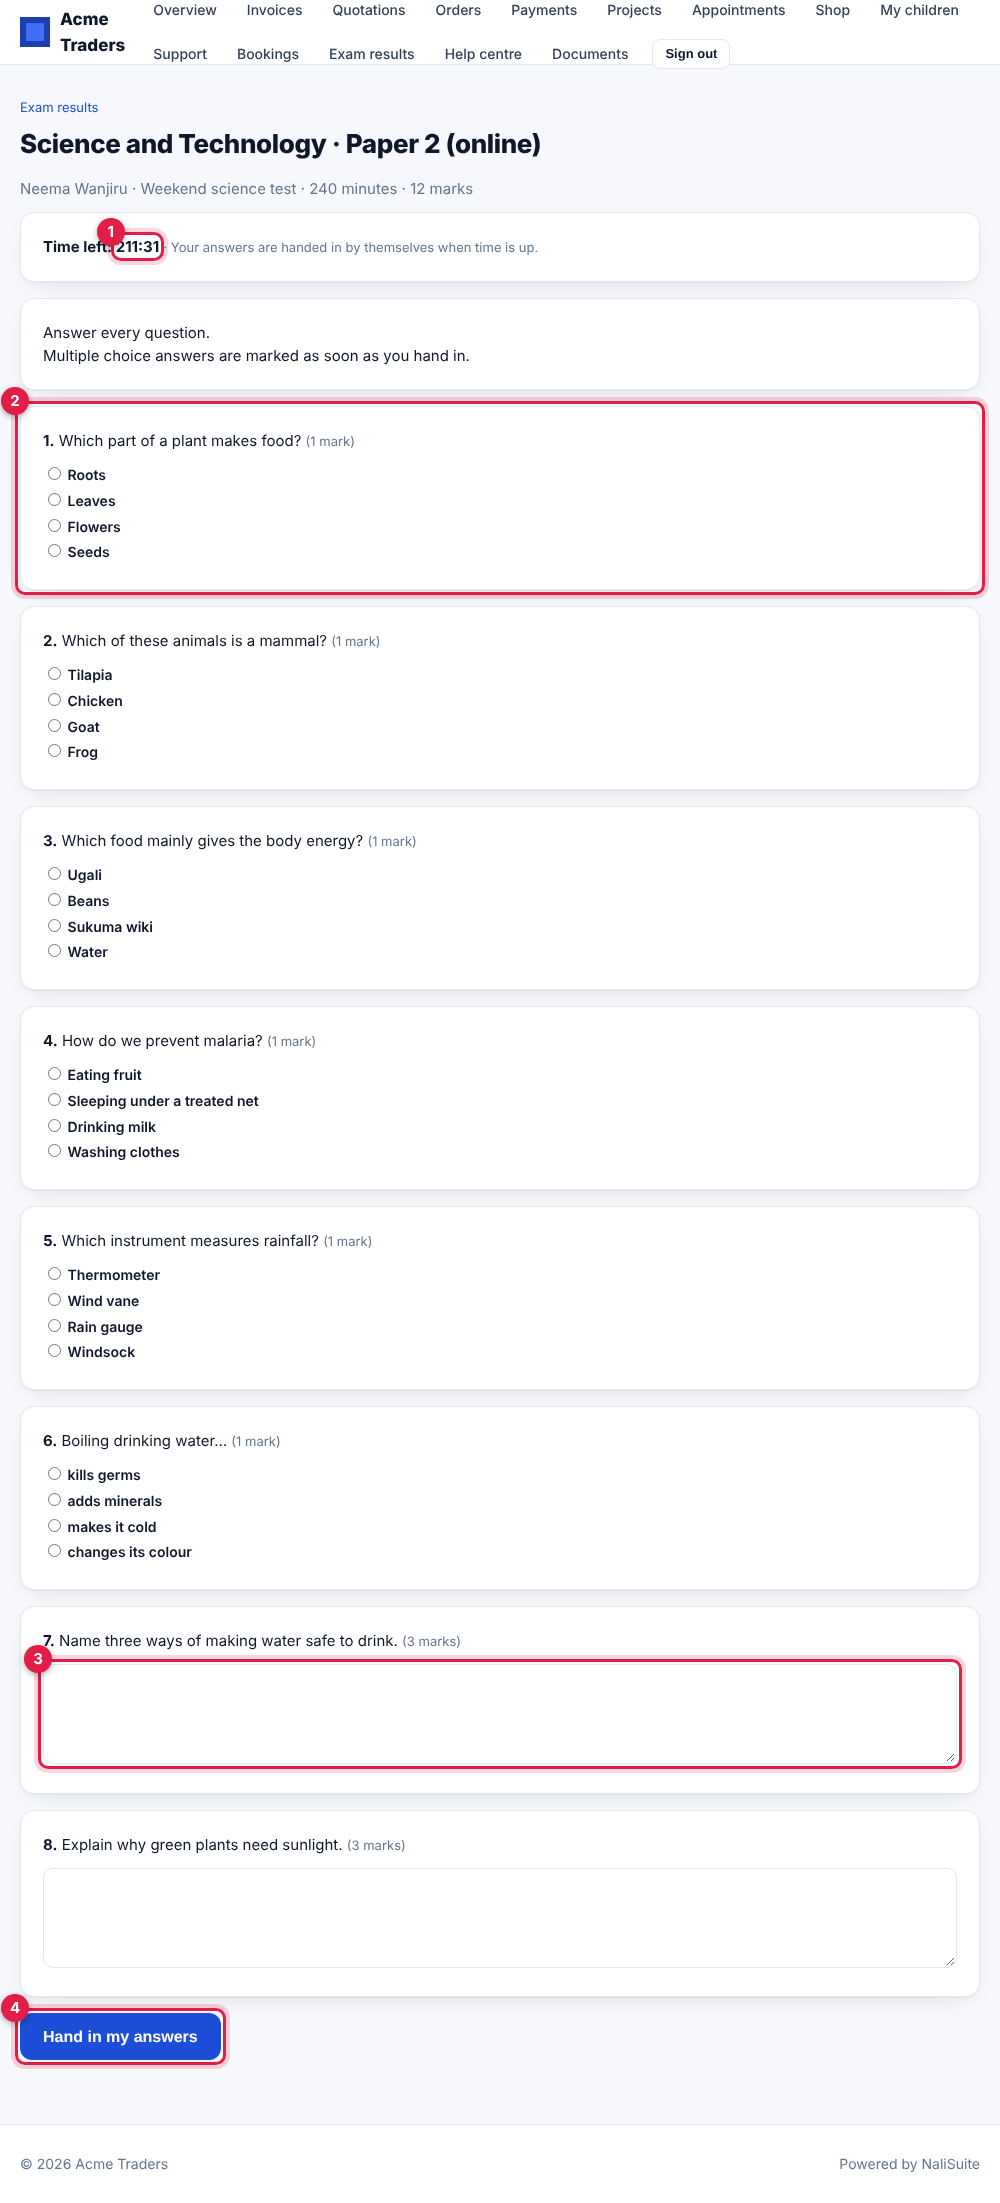
- The page shows Time left (marker 1), the instructions, each question (marker 2) with radio buttons for multiple choice and a box (marker 3) for written answers. Carry on in the portal returns to a paper already started.
- They click Hand in my answers (marker 4). When time runs out the page hands the answers in by itself; answers arriving more than two minutes after the deadline are not accepted, and the candidate sees Time ran out before the answers arrived, so none were recorded.
Multiple choice is marked as soon as the answers are handed in, and the total becomes the candidate's mark for the paper (while its marks are still being marked).
Mark written answers
Open Examinations → Online answers. Each sitting shows when it was started and handed in (marker 1: Still writing until then), the Multiple choice marks (marker 2) and Written (marker 3: To mark, or the written marks given).
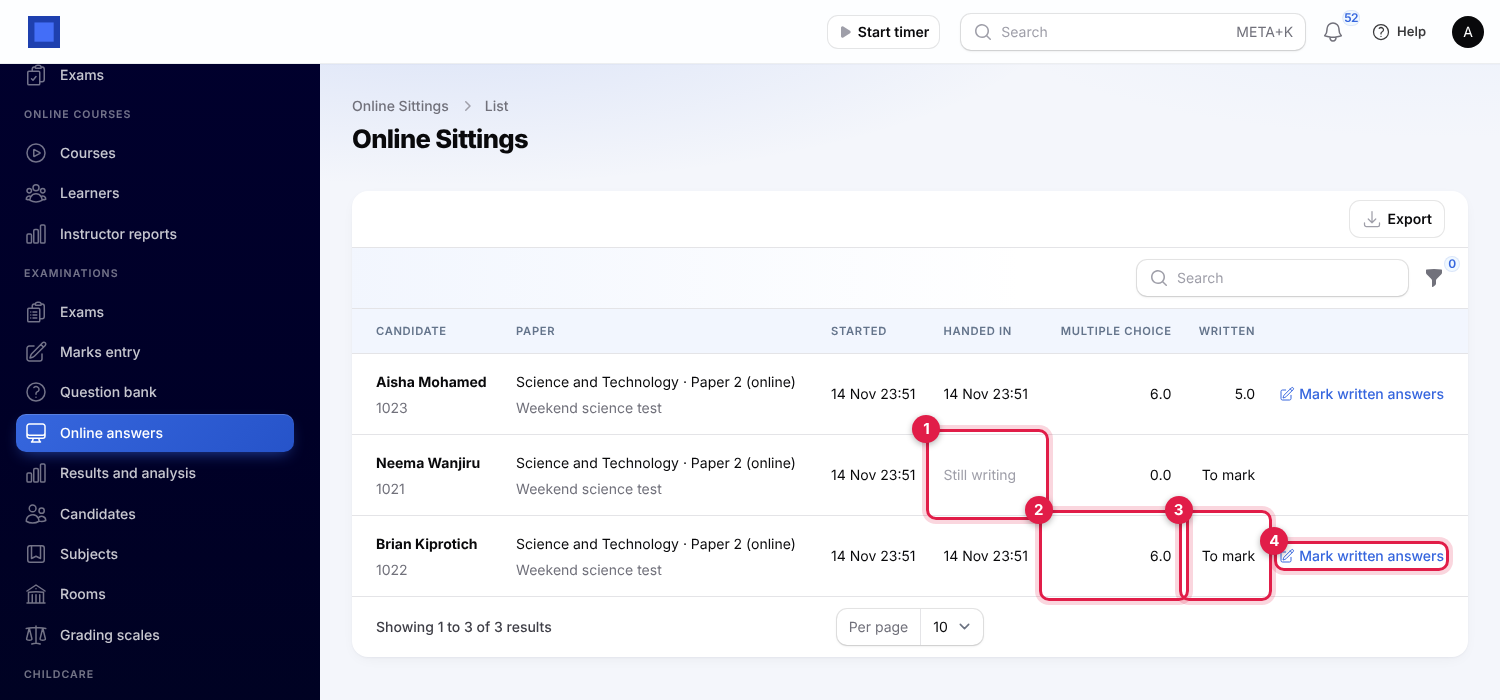
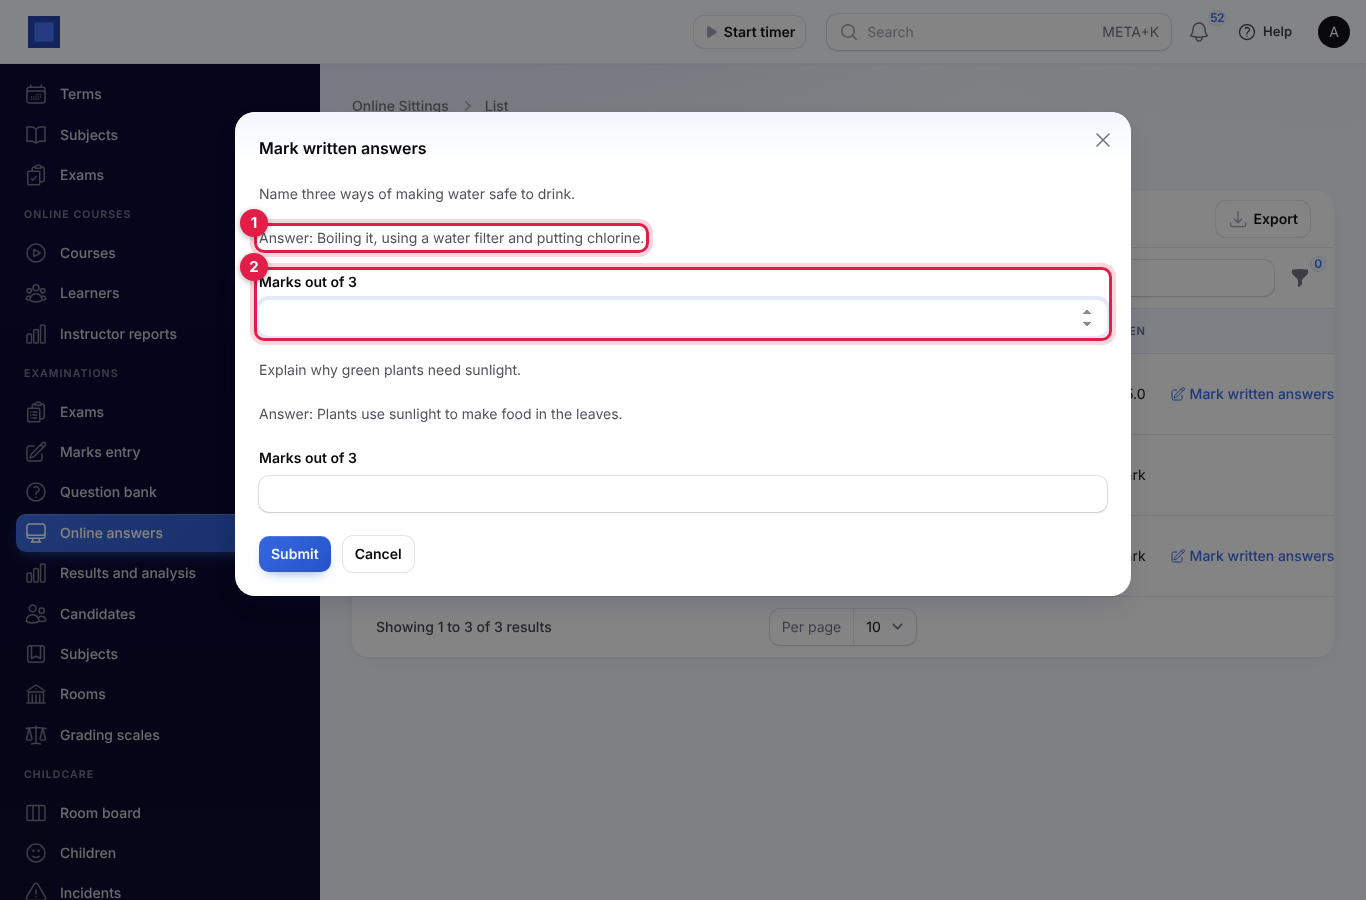
Click Mark written answers (marker 4). For each short answer or essay question you see the question and the candidate's Answer (marker 1); type the Marks out of the question's marks (marker 2) and click Submit. The paper mark becomes the multiple choice marks plus the written marks. The paper's teacher or an exam manager can do this while the paper is being marked.
Results and analysis
Open Examinations → Results and analysis (or Print and results → Results and analysis on an exam). Choose the Exam and, if you like, one Class (marker 1). It works as soon as marks are entered, before release.
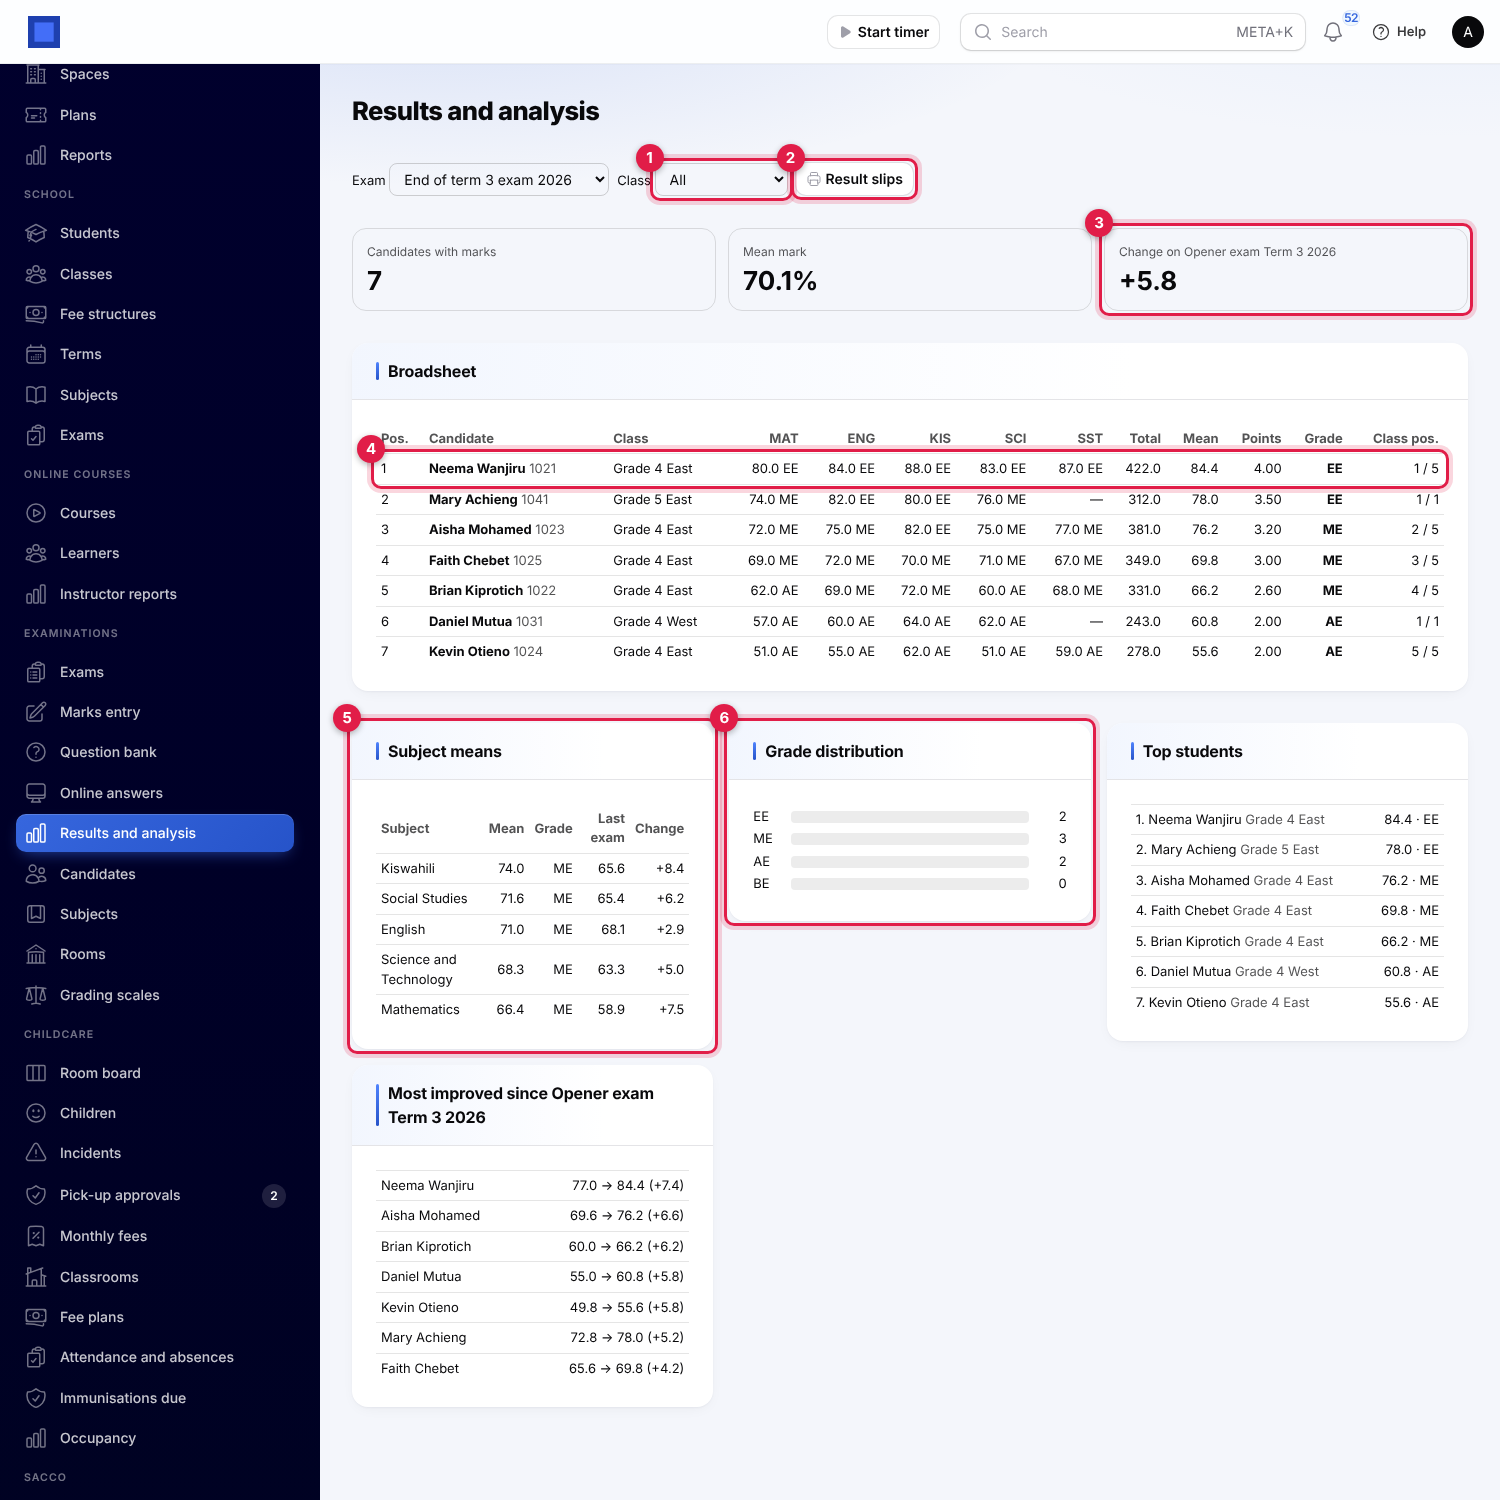
- The tiles: Candidates with marks, the Mean mark and the Change on the exam in Compare with (marker 3).
- Broadsheet (marker 4): each candidate by position with each subject's mark and grade, Total, Mean, Points, overall Grade and Class pos. (position in their class, for example 2 / 5).
- Subject means (marker 5): each subject's mean and grade, last exam's mean and the change.
- Grade distribution (marker 6): how many candidates got each overall grade.
- Top students and Most improved since the earlier exam.
- Result slips (marker 2): a PDF with one page per candidate: each subject's mark, grade, points and remark, the overall result, the position overall and in class, the mean in the earlier exam, and lines for the class teacher and the parent or guardian.
How results are worked out:
- A subject's mark is the candidate's marks on all its papers, after moderation, as a percentage of the papers' totals. Absent (ABS) and empty marks are left out.
- The Mean is the average of the candidate's subject marks; the Total is their sum.
- With a scale that has points, Points is the average of the subject points and the grade comes from the rounded mean points; otherwise the grade comes from the mean.
- Positions go by mean points, then mean mark. Candidates level on both share a position.
Release results
When every paper is Moderated, click Release results on the exam and confirm. If a paper is not moderated you see Moderate every paper first. Still waiting: Science and Technology · Paper 1. On release:
- the results appear in the portal for candidates and guardians, with the result slip to download;
- with School Management on, the marks go onto School report cards (see Working with School Management);
- with the email setting on, each candidate's portal contact is emailed End of term 3 exam 2026 results for Neema Wanjiru: their mean, grade and position, and a See the results button.
You see Results released for 7 candidates and how many marks were added to report cards. Marks can no longer be changed. To correct something, click Withdraw results and confirm: the results leave the portal and the report cards until you release them again, and you can send papers back to their teachers.
What candidates and guardians see in the portal
A contact set as Sees results in the portal on a candidate (with School, the student's guardian) gets Exam results in your customer portal once there are released results or an online paper. A guardian with two children sees a card for each.
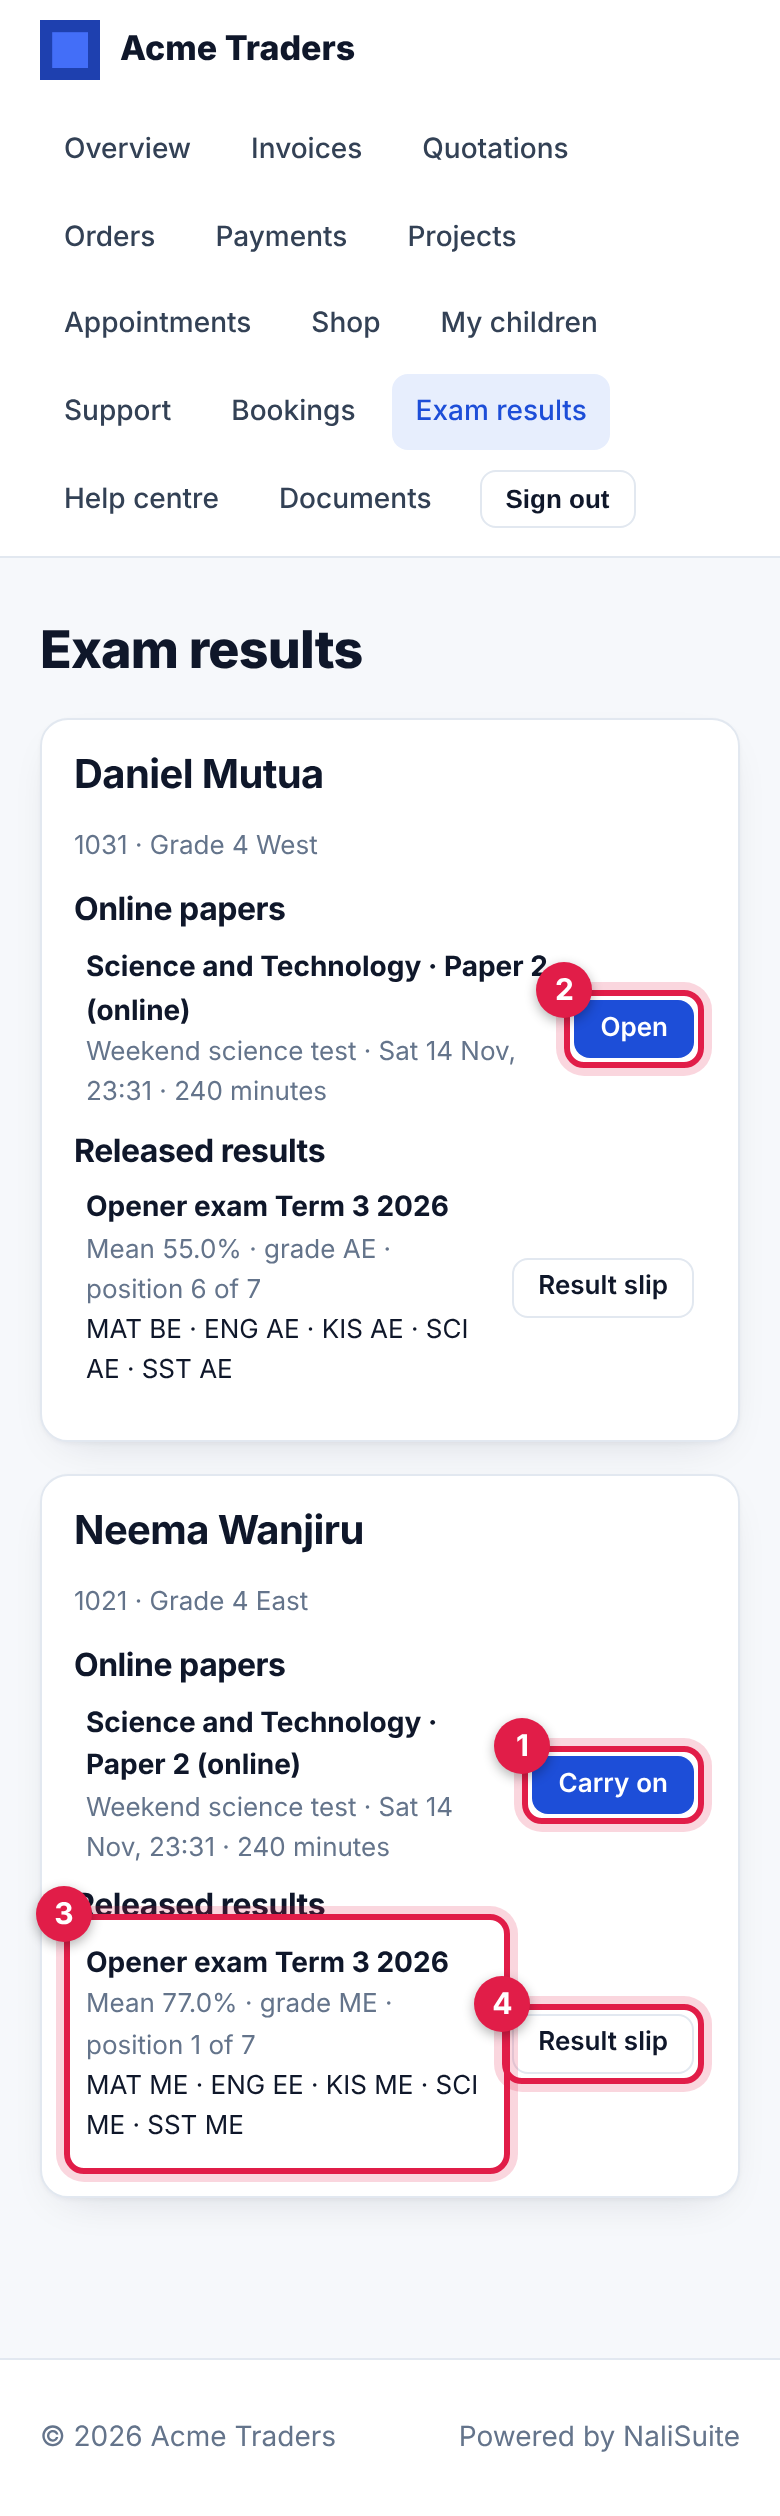
- Online papers: each online paper for the candidate in the last two days and ahead, with Open (marker 2), Carry on (marker 1) for a paper already started, or Handed in.
- Released results (marker 3): each released exam with the mean, grade and position and every subject's grade. Result slip (marker 4) downloads the candidate's slip.
To give a guardian access, invite their contact to the portal (see Customer and vendor portal).
Working with School Management
Exams works on its own with candidates and subjects you add. When School Management is on as well:
- Bring in School students and Bring in School subjects fill your candidates and subjects from School, keep candidates in their School class, and make each student's guardian the portal contact. Run them again after changes in School.
- Each exam gets Report card term and Counts for (%) of the term mark.
- On release, Exams adds an exam with the same name to School's exams in that term (marked out of 100, held on the exam's start date, with your weight) and writes each subject's mark and remark for every candidate who is a School student, in every subject linked to School. The report cards then include it, weighted like any School exam (see School Management). Make sure a term's exam weights still add up to 100.
- Withdrawing the results removes those marks from the report cards.
- If there is no School term yet, release stops with Add a School term first, so the results have a report card to go on.
Good to know
- One teacher per paper. Only the paper's Teacher entering marks and exam managers can enter its marks. Leave it empty if only managers enter marks.
- Marks are locked once submitted; managers can send them back until results are released, then only after withdrawing.
- Online papers need questions from the bank and a start time. Multiple choice is marked at once; short answers and essays wait for the teacher. A candidate who never starts the paper gets no mark for it.
- The clash check only looks at papers in the same exam.
- Candidates without a portal contact get no email and cannot see results in the portal; print their result slips instead.
- Means are worked out over the subjects a candidate has marks in, so a candidate missing a subject is ranked on the rest. Check the broadsheet for gaps before release.
- Online courses is a separate app for self-paced lessons and multiple-choice quizzes with certificates; see Online courses.