HR: people, leave, attendance, recruitment and performance
The HR app keeps one record per employee and everything around it: departments and positions, the organisation chart, contracts and pay details, emergency contacts and dependants, documents, leave and public holidays, attendance (including phone check-in inside a geofence and imports from biometric clocks), recruitment from job opening to hire, onboarding and leaver checklists, appraisals with 360° feedback, and training and skills. HR managers and business owners use it every day; every screen is under HRM in the left menu. Payroll, staff loans and the year-end summary are in the same menu group and have their own page: see Payroll. What each employee sees about themselves (payslips, leave, attendance, appraisals) is covered in Employee self-service.
Who can do what. HR uses four permissions, set per role under Settings → Roles: hr.view (see all HR screens), hr.manage (create, edit, import, run checklists, recruit, launch reviews), hr.leave.approve (the Approve and Reject buttons on leave) and hr.expenses.approve (approve and pay expense claims). Owners and admins have all four. A person without hr.view does not see the HRM menu at all, but still sees their own pages under Me if their login is linked to an employee record.
Add an employee
- In the menu, open HRM → Employees. The list shows every employee with their number, name, job title, department, basic salary from the current contract, start date, onboarding progress (for example 4 / 10 while a new-hire checklist is open) and status.
- Click New employee (marker 1). To bring in many people at once, click Import employees (marker 2) instead: see Import employees from a spreadsheet.
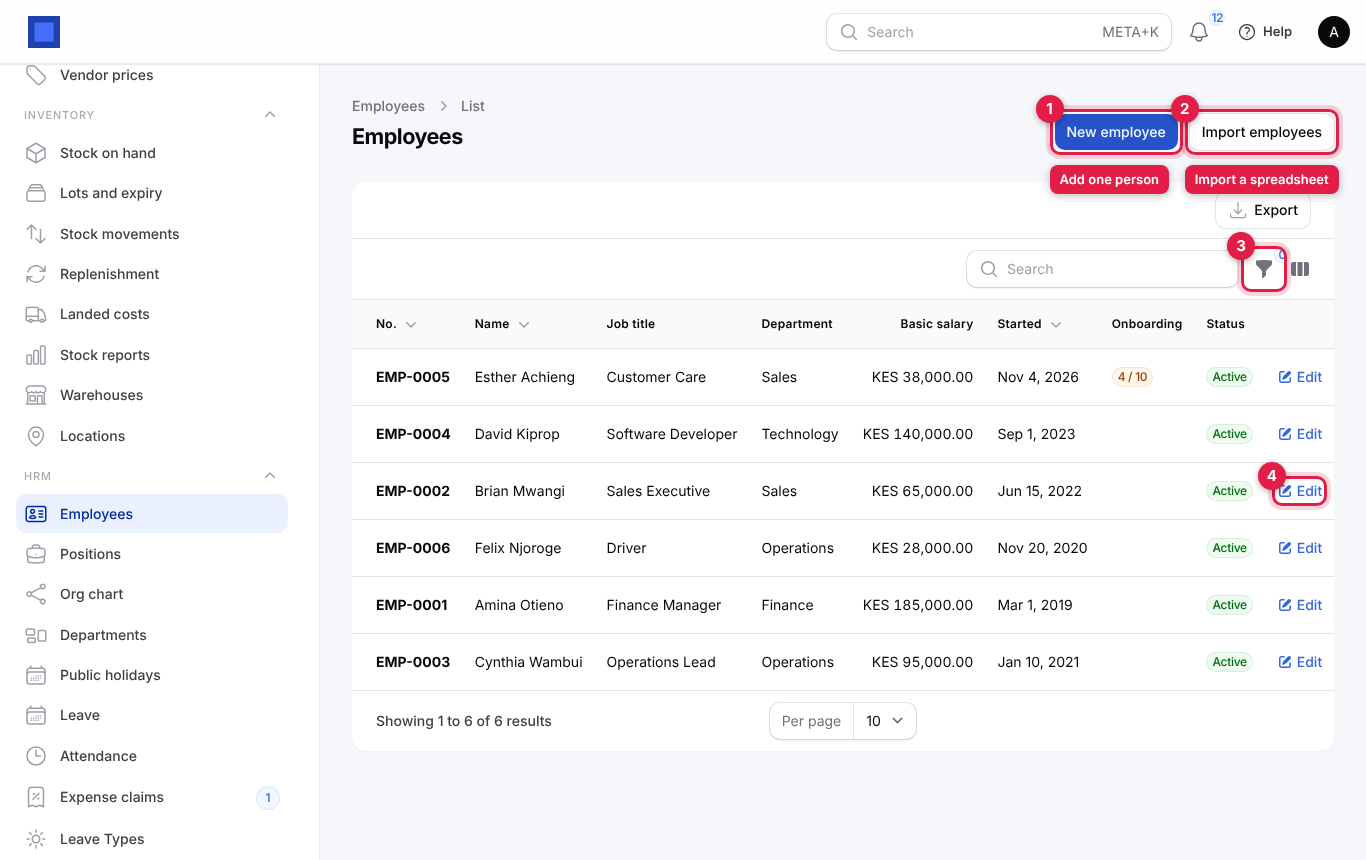
Use the funnel button (marker 3) to filter the list by Department or Status (Active, On leave, Left), the search box to find someone by name or email, and Edit on a row (marker 4) to open a record. Former employees stay in the list with the status Left so their payslips and history are kept; filter them out with Status.
- The form has three tabs. Fill in the Person tab (marker 1).
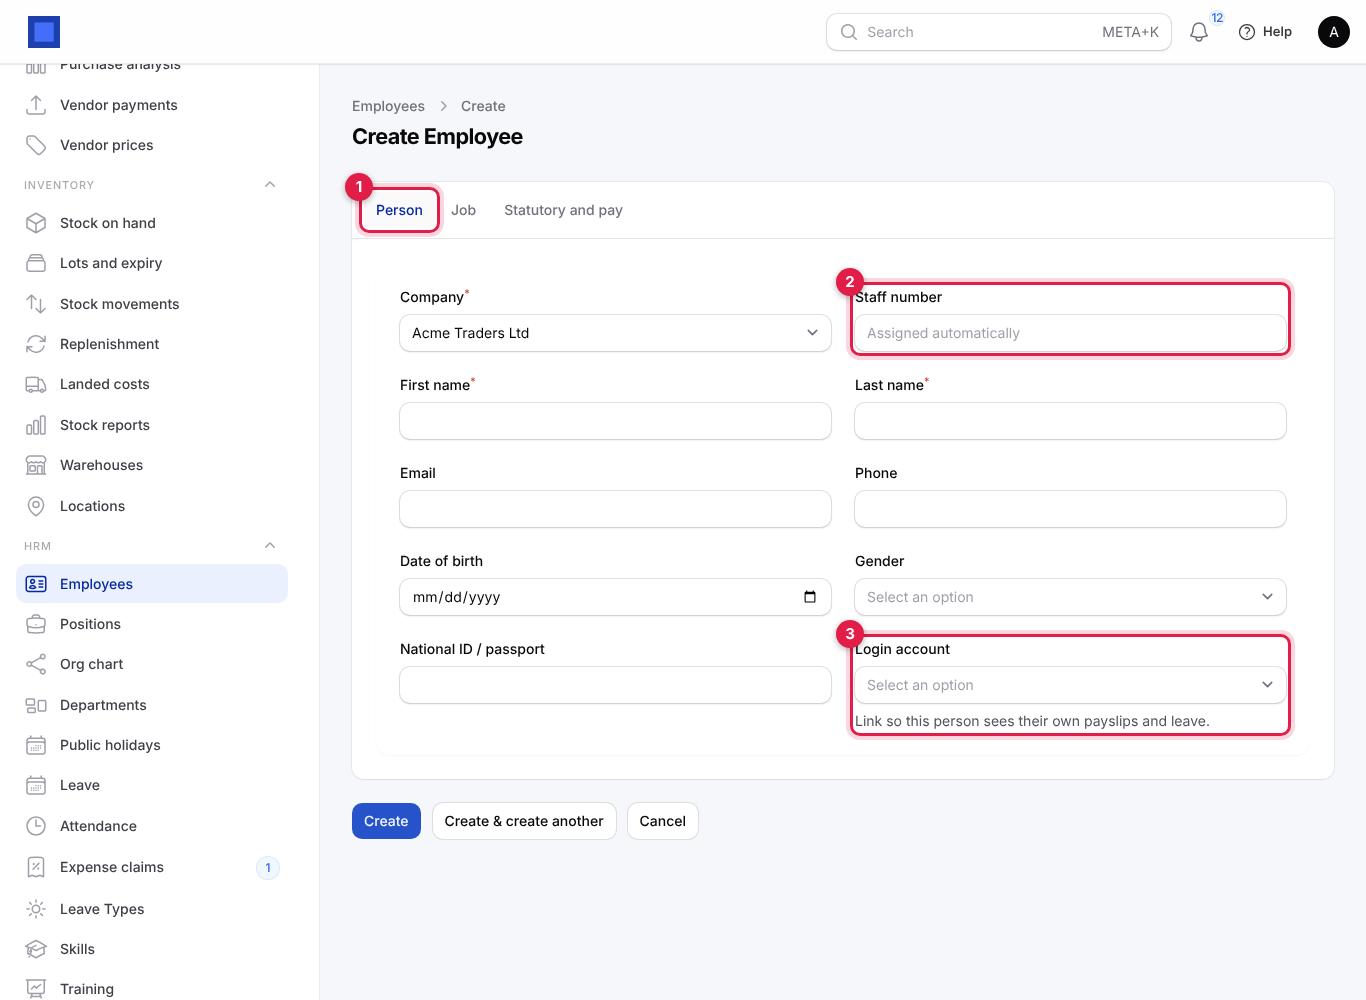
| Field | What to enter |
|---|---|
| Company (required) | Which of your companies employs this person. It decides the currency of the salary, the country payroll rules and which pay run includes them. Defaults to your main company. |
| Branch | Only shown when you have branches (Settings → Branches). Used for filtering and reports. |
| Staff number (marker 2) | Leave it empty and the next number is given on save (EMP-0001, EMP-0002…). Type your own if you already number staff; it must be unique and is what biometric clocks and attendance imports match on. |
| First name, Last name (required) | As on the national ID. They appear on payslips, the P9 card and statutory returns. |
| Work or personal email. Payslips are emailed here and recruitment emails go here. | |
| Phone | With the country code (+254…). Used for WhatsApp payslips. |
| Date of birth, Gender | Optional; used in reports and statutory files that ask for them. |
| National ID / passport | Printed on statutory returns. |
| Login account (marker 3) | Pick the person's user account if they sign in to NaliSuite. This is what gives them the Me pages (My payslips, My leave, My attendance and so on). Invite the user first under Settings → Users. |
- Open the Job tab (marker 1 below).
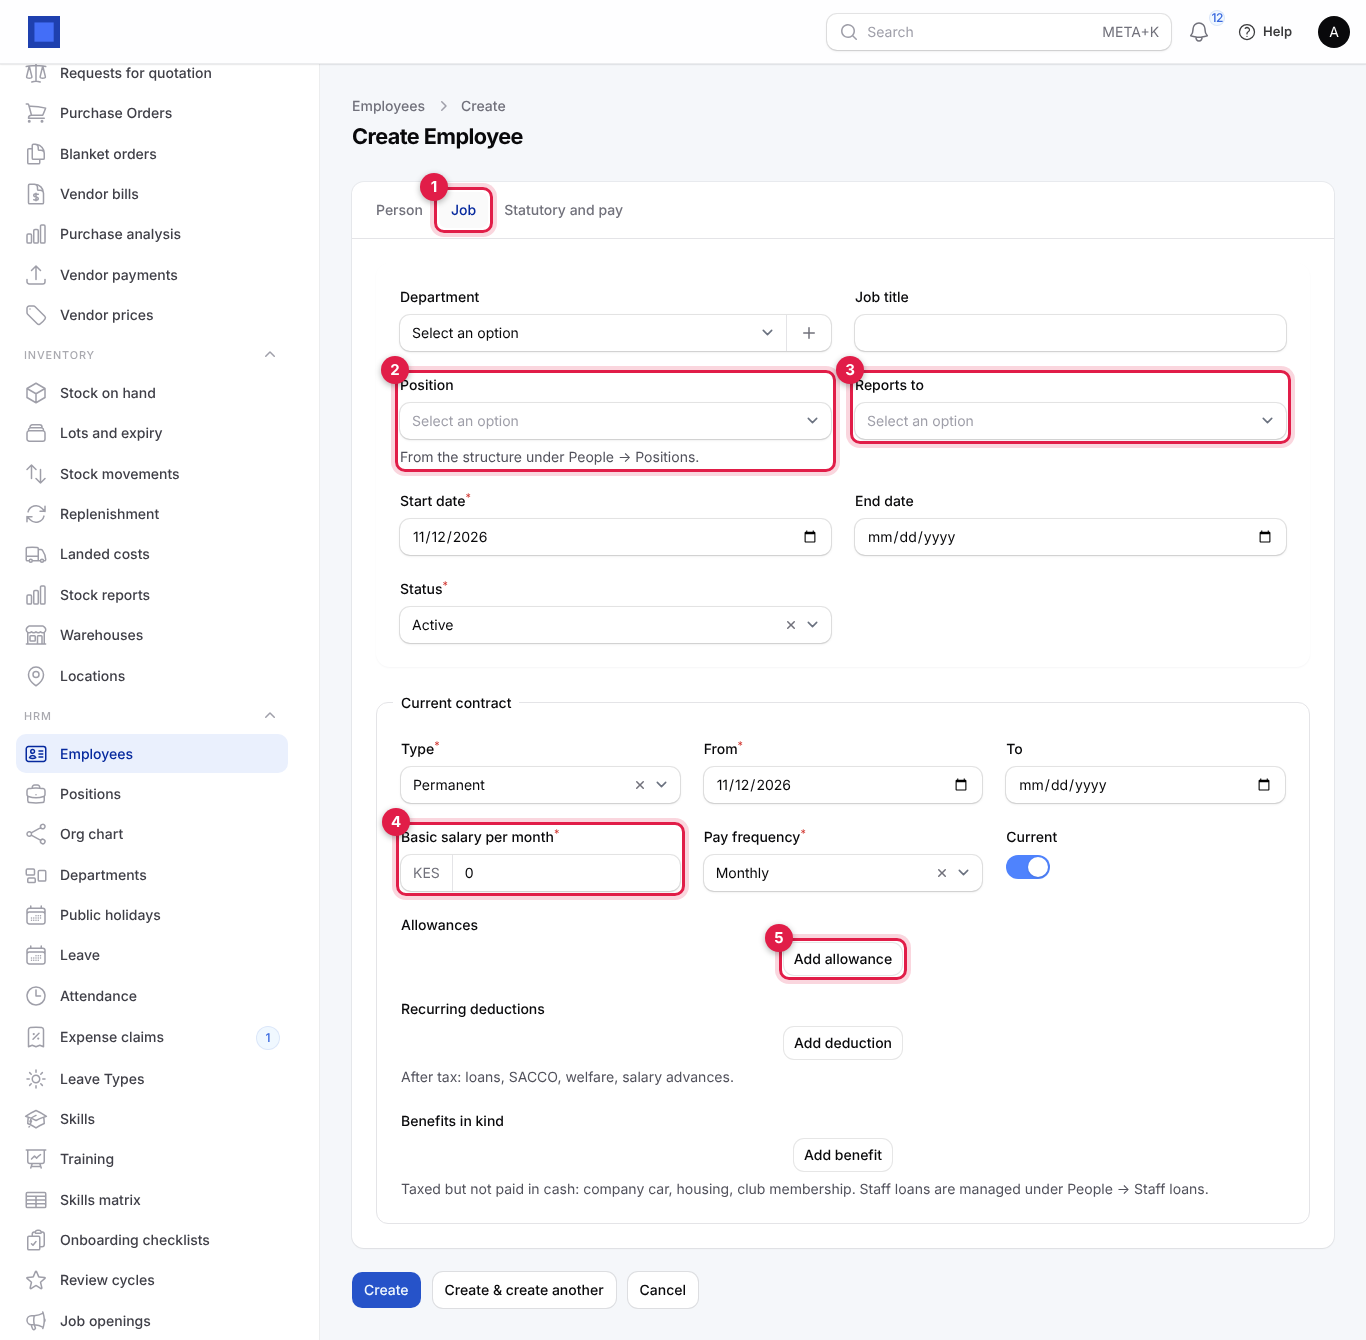
| Field | What to enter |
|---|---|
| Department | The department they work in. Click + to create a department without leaving the form. The department's manager becomes the default reviewer in appraisals. |
| Job title | Free text shown on payslips and the org chart, for example Sales Executive. |
| Position (marker 2) | The approved post they fill, from HRM → Positions. Optional, but it lets you see filled and vacant posts against headcount. (The hint under the field says People → Positions; the menu item is HRM → Positions.) |
| Reports to (marker 3) | Their line manager. This builds the Org chart. Only current staff are listed. |
| Start date (required) | First working day. Leave entitlement for the first year is pro-rated from this month, and it decides which pay runs include them. |
| End date | Leave empty while they work for you. It is filled for you when you start offboarding. |
| Status (required) | Active (normal), On leave (long absence, still paid unless the contract changes) or Left (not included in new pay runs). |
The Current contract box below holds the pay terms. Payroll calculates every payslip from it.
| Field | What to enter |
|---|---|
| Type (required) | Permanent, Fixed term, Casual or Intern. |
| From (required), To | The contract dates. Leave To empty for a permanent contract. |
| Basic salary per month (required, marker 4) | The monthly basic pay in the company's currency. Statutory deductions are calculated from it (and from allowances). An employee with a basic salary of 0 gets an empty payslip. |
| Pay frequency (required) | Monthly, weekly or daily. |
| Current | Leave on. Only the current contract is used by payroll. |
| Allowances | Click Add allowance (marker 5) for each recurring allowance: a Name (house, transport, airtime), the monthly Amount and whether it is Taxable. Taxable allowances are added to taxable pay; non-taxable ones are paid but not taxed. |
| Recurring deductions | Click Add deduction for after-tax deductions taken every month: SACCO, welfare, union dues. (Staff loans and salary advances with a repayment schedule go under HRM → Staff loans instead; see Payroll.) |
| Benefits in kind | Click Add benefit for non-cash benefits that are taxed but not paid: company car, housing, club membership. Enter the taxable Monthly value. It raises PAYE but does not change net cash pay. |
- Open the Statutory and pay tab (marker 1).
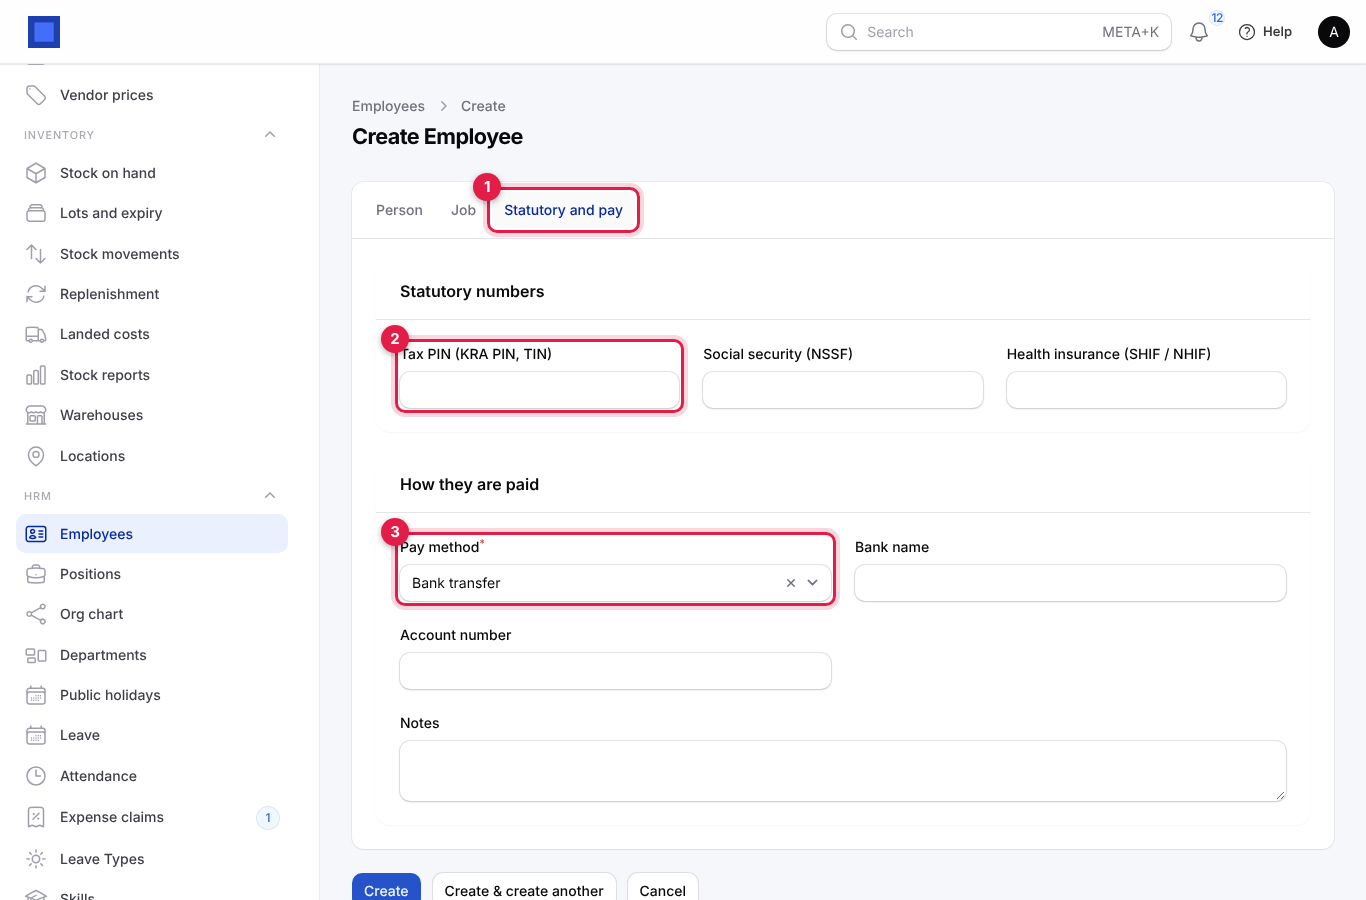
| Field | What to enter |
|---|---|
| Tax PIN (KRA PIN, TIN) (marker 2) | The employee's tax number. It is printed on the PAYE return (P10 in Kenya) and on the tax deduction card. |
| Social security (NSSF) | NSSF, SSNIT, RSSB, CNSS… number, for the pension return. |
| Health insurance (SHIF / NHIF) | Health scheme number, for the health return. |
| Pay method (required, marker 3) | Bank transfer, Mobile money or Cash. It decides which payout file the person appears in after a pay run. |
| Bank name, Account number | Shown for bank transfer. Go into the bank payment file. |
| Mobile money number | Shown for mobile money. Go into the M-Pesa / mobile money bulk file and is used to send salaries straight to the wallet. |
| Notes | Anything HR should know. |
- Click Create. The record opens. Click Create & create another to stay on a blank form.
Tip: Add the employee with a contract before the month's pay run is drafted. If you forget, open the draft pay run and click Recalculate.
Common mistake: Leaving Login account empty. The person then has no My payslips or My leave pages. Edit the employee and pick their user.
Import employees from a spreadsheet
- Open HRM → Employees and click Import employees.
- Upload a CSV or Excel file with a header row. The columns the importer understands are: employee number, first name and last name (both required), email, phone, job title, department (created if it does not exist), start date, date of birth, gender, national ID, tax PIN, social security number, health insurance number, paid by (
bank_transfer,mobile_moneyorcash), bank, bank account, mobile money number and basic salary. Common headings such as KRA PIN, NSSF, Surname or M-Pesa number are matched automatically. - Check the column mapping on the next screen and start the import. You are notified when it finishes; rows that fail are listed in a downloadable file with the reason.
A basic salary in the file creates a current contract for the person, so they are ready for payroll.
Work with an employee record
Open an employee from HRM → Employees. The top of the record has three buttons and the bottom has tabs for related information.
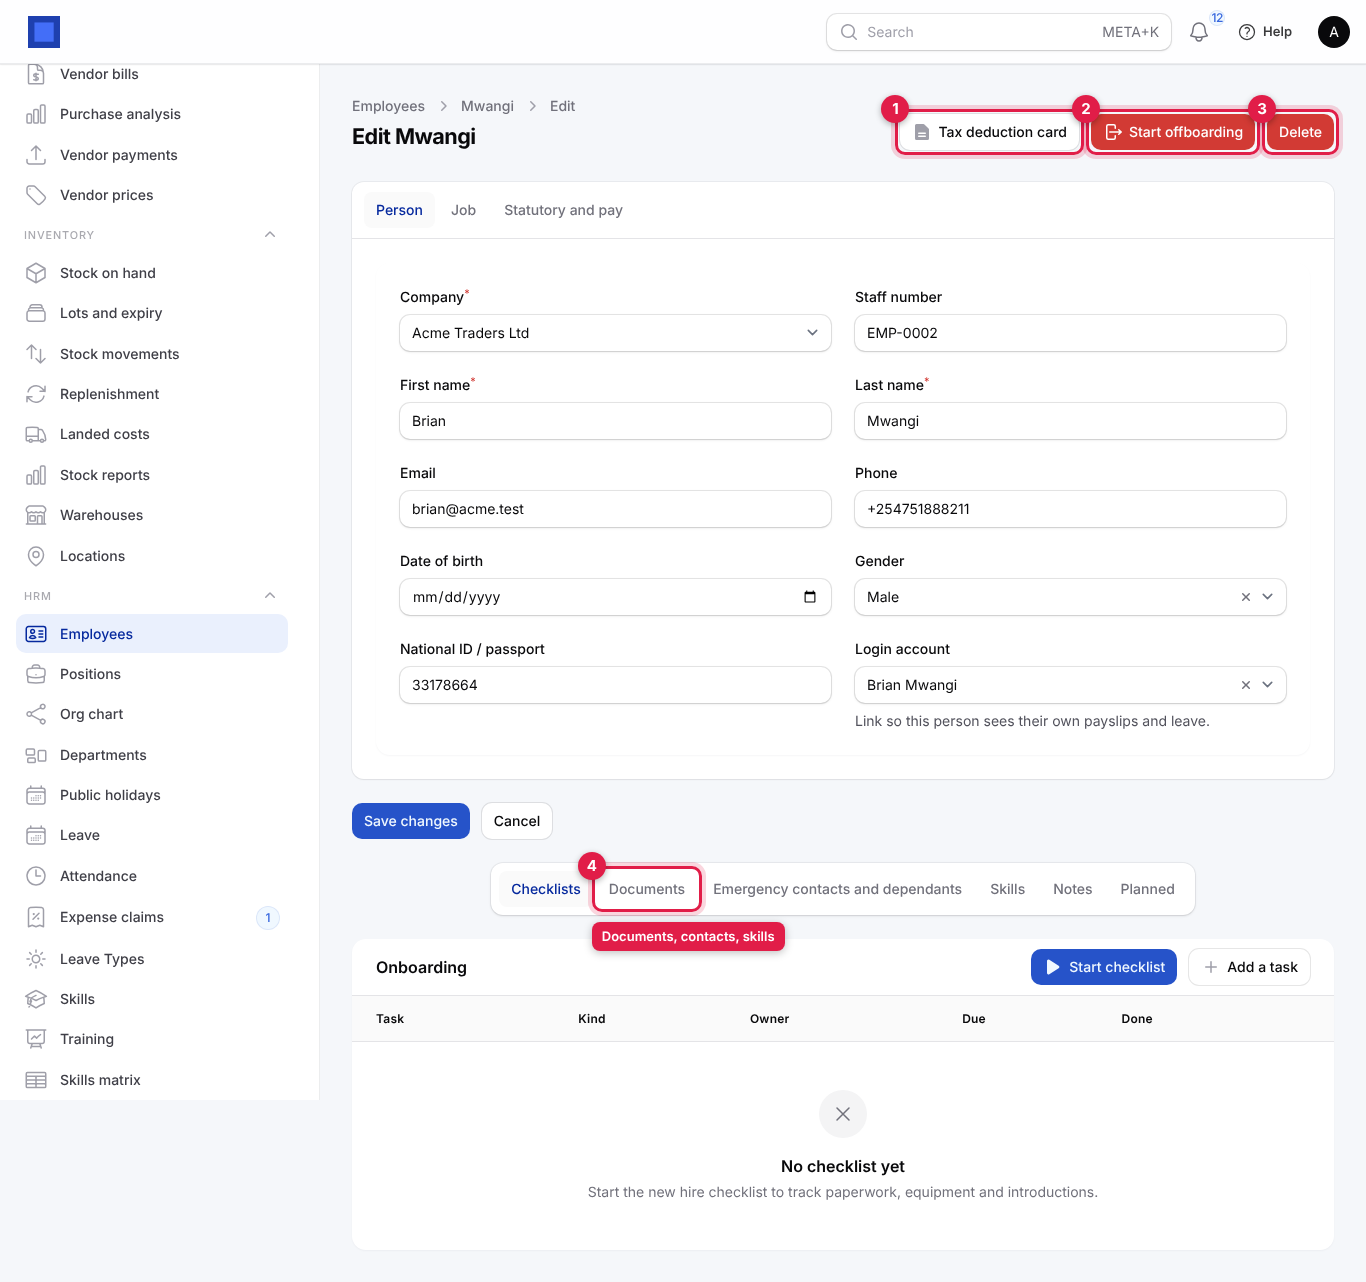
- Tax deduction card (marker 1): pick a Year and download the employee's tax deduction card (P9 in Kenya) as a PDF. Shown when Payroll is on and you have payroll.view. See Payroll.
- Start offboarding (marker 2): when the person is leaving. See Offboard a leaver.
- Delete (marker 3): removes the record completely. Use it only for a record created by mistake. For someone who has left, start offboarding instead, so payslips and history stay.
- Erase personal data: appears instead once the status is Left. See Erase a former employee's personal data.
The tabs under the form (marker 4) are Checklists (onboarding and leaving tasks), Documents, Emergency contacts and dependants, Skills, Notes (internal chatter and file comments) and Planned (activities and reminders scheduled on the record).
Add emergency contacts and dependants
- On the employee record, open the Emergency contacts and dependants tab and click New employee contact.
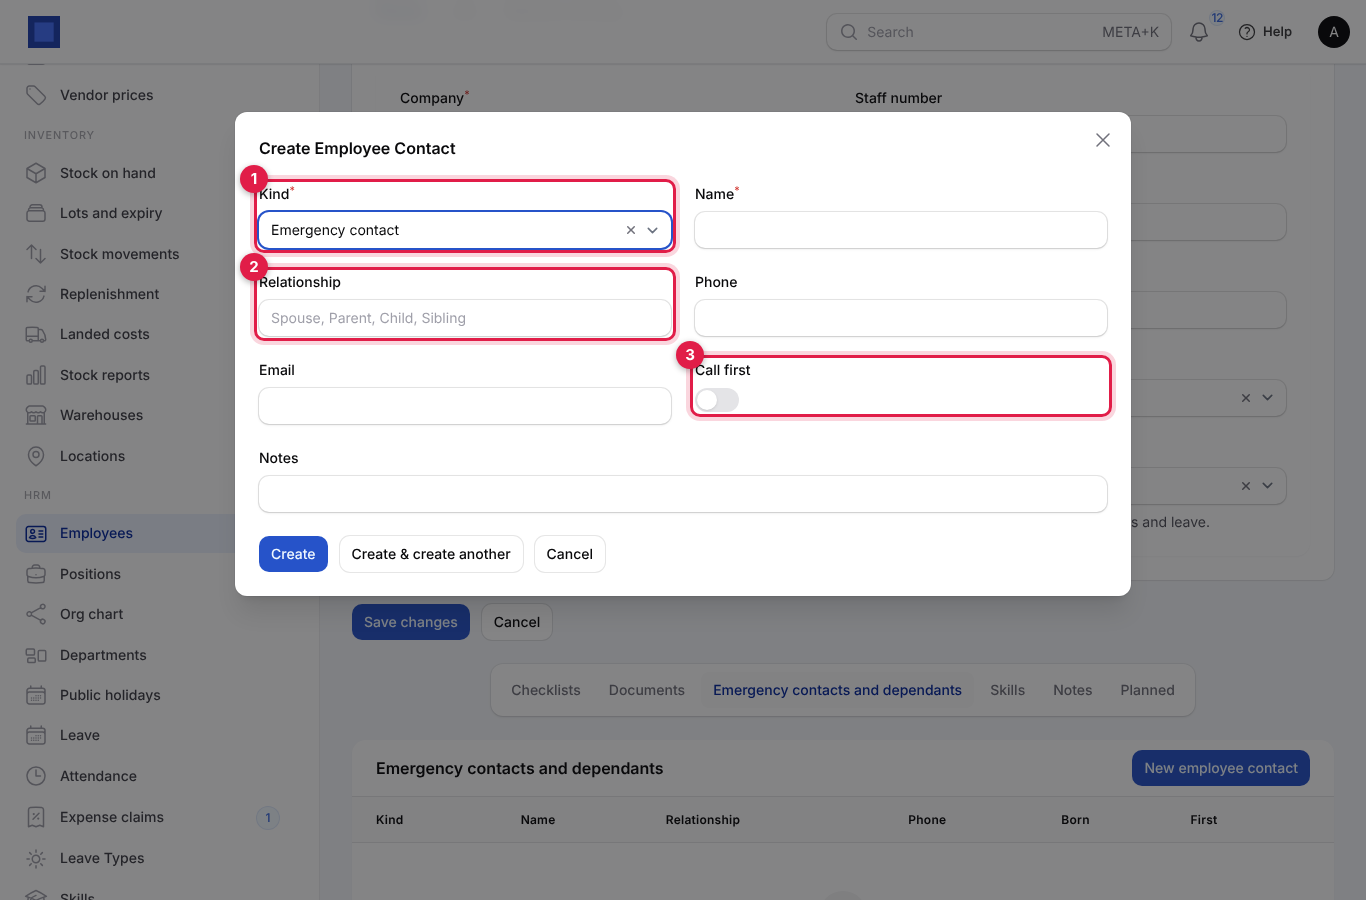
| Field | What to enter |
|---|---|
| Kind (required, marker 1) | Emergency contact (someone to call) or Dependant (spouse or child, for medical cover and records). The form changes with the choice. |
| Name (required) | Full name. |
| Relationship (marker 2) | Spouse, Parent, Child, Sibling… |
| Phone, Email | How to reach them. |
| Date of birth | Dependants only. |
| Call first (marker 3) | Emergency contacts only: switch on for the person to call first. |
| Notes | Anything else, for example speaks Kiswahili only. |
- Click Create. The table shows emergency contacts with a red badge and dependants with a grey one; use Edit or Delete on a row to change it.
Keep employee documents
- On the employee record, open the Documents tab and click New employee document.
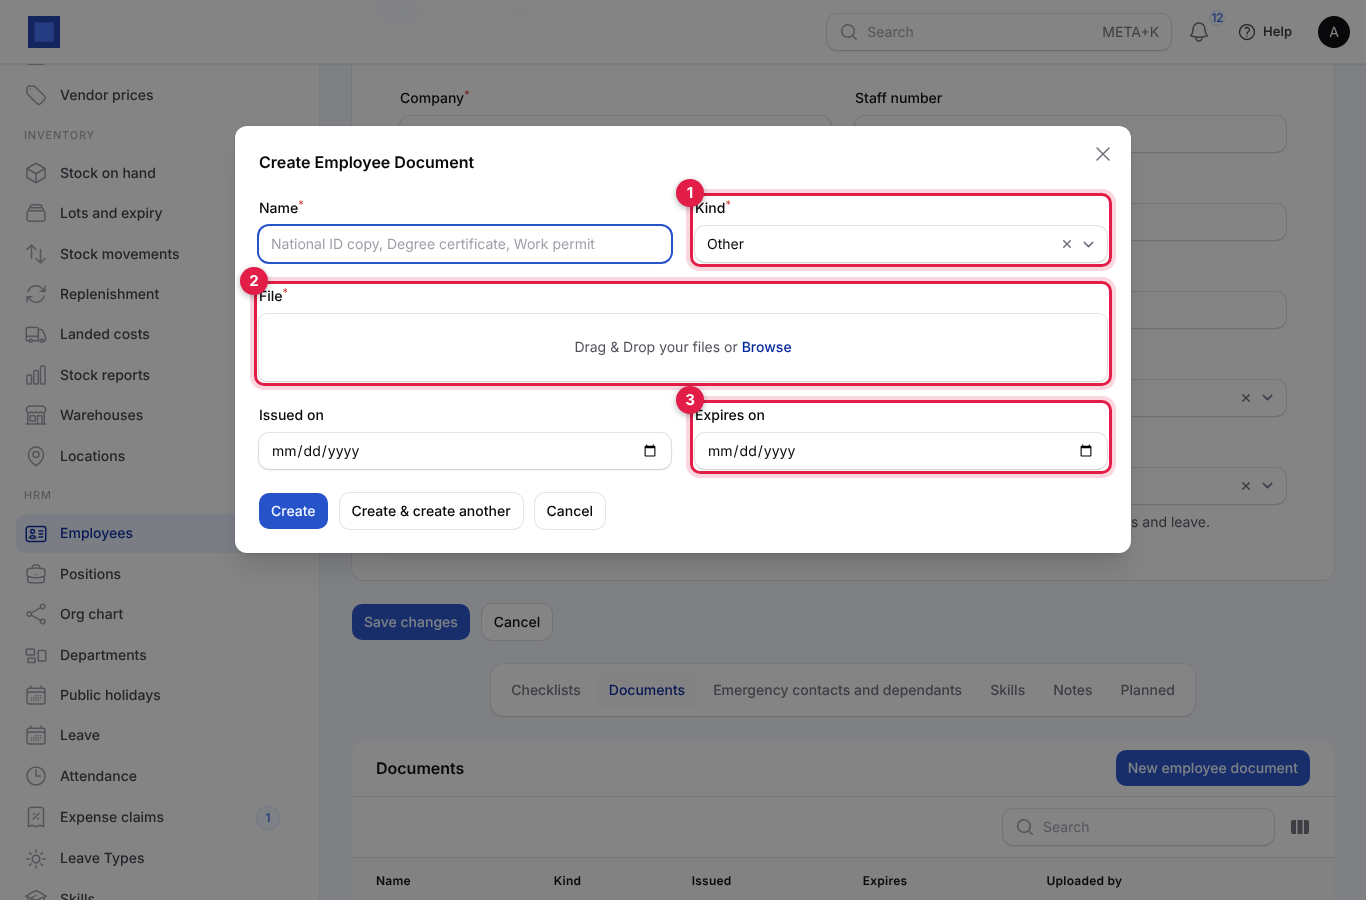
| Field | What to enter |
|---|---|
| Name (required) | What it is, for example National ID copy, Degree certificate, Work permit. |
| Kind (required, marker 1) | Identity document, Contract, Certificate, Work permit or licence, Medical, or Other. |
| File (required, marker 2) | A PDF, image or Word document up to 10 MB. Files are stored privately and only open for people with HR access. |
| Issued on | Optional. |
| Expires on (marker 3) | For permits, licences and medical certificates. As the date approaches the document shows Expiring soon in amber, and Expired in red after it. How early the warning starts is set in Settings → Preferences → HRM → Document expiry warning (days) (30 by default). |
- Click Create. Use Download on a row to open the file, Edit to replace details and Delete to remove it.
Record skills
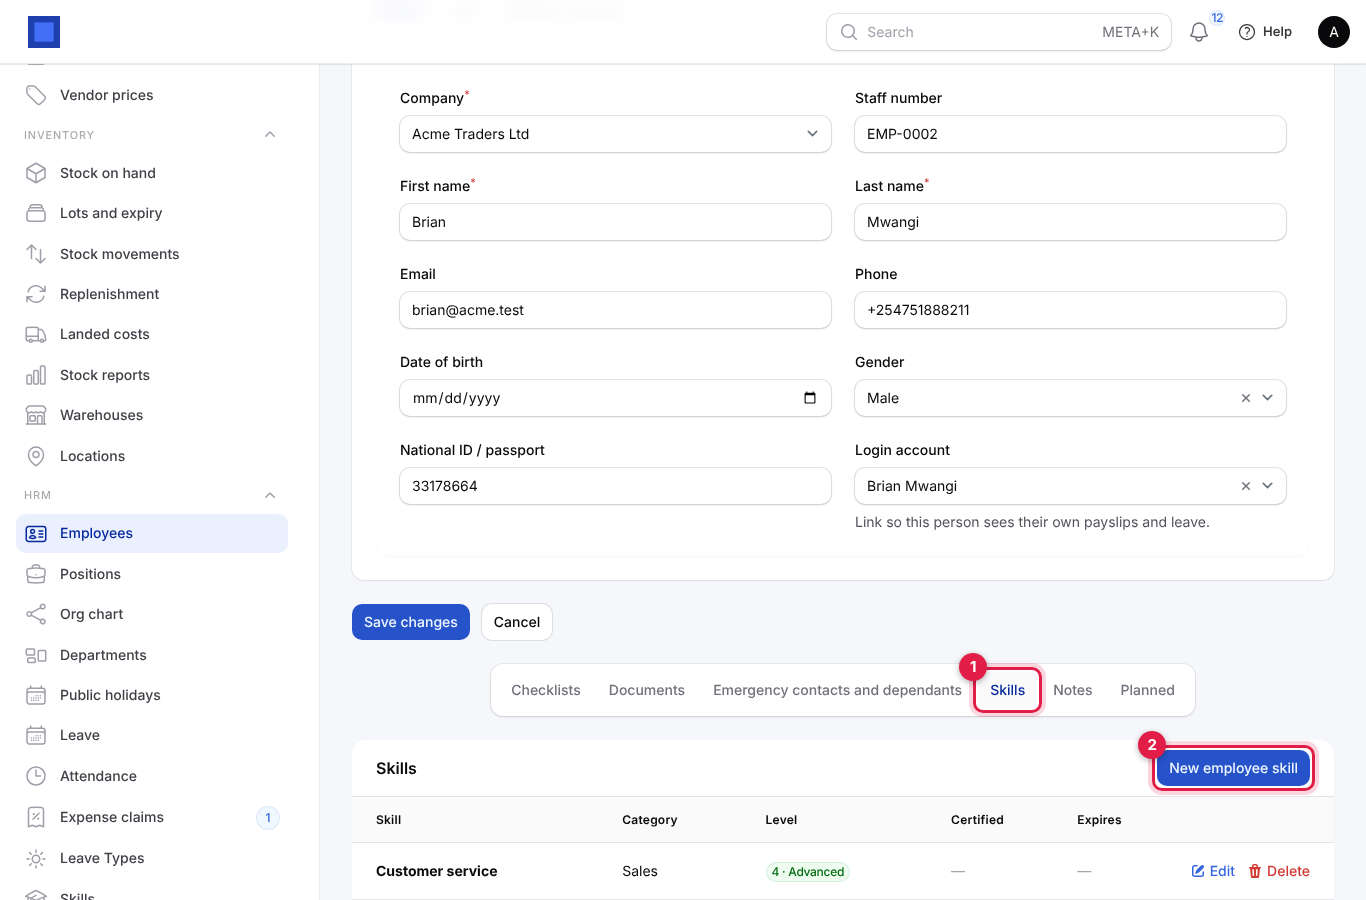
Open the Skills tab (marker 1) and click New employee skill (marker 2). Pick the Skill (or type a new one and create it on the spot with a category), the Level (1 Beginner, 2 Basic, 3 Competent, 4 Advanced, 5 Expert), and when it was Certified on and Expires on if it is a certification. Expired skills show in red. Completing a training course adds skills here for you; see Run training and track skills.
Erase a former employee's personal data
When someone has left and you no longer need their personal data (for example after a data-protection request), open their record and click Erase personal data, type ERASE and click Erase for good. Names, ID numbers, contact and bank details, emergency contacts, dependants, HR documents, check-in locations and their job application are removed permanently. Payslips, pay runs and ledger postings keep their amounts under the employee number, as payroll and tax law require. The button only appears once the status is Left, and you need hr.manage. This cannot be undone.
Set up departments and positions
Departments
- Open HRM → Departments and click New department (marker 1).
- Choose the Company, type the Name (Finance, Sales, Operations…) and pick the Manager from current employees.
- Click Create.
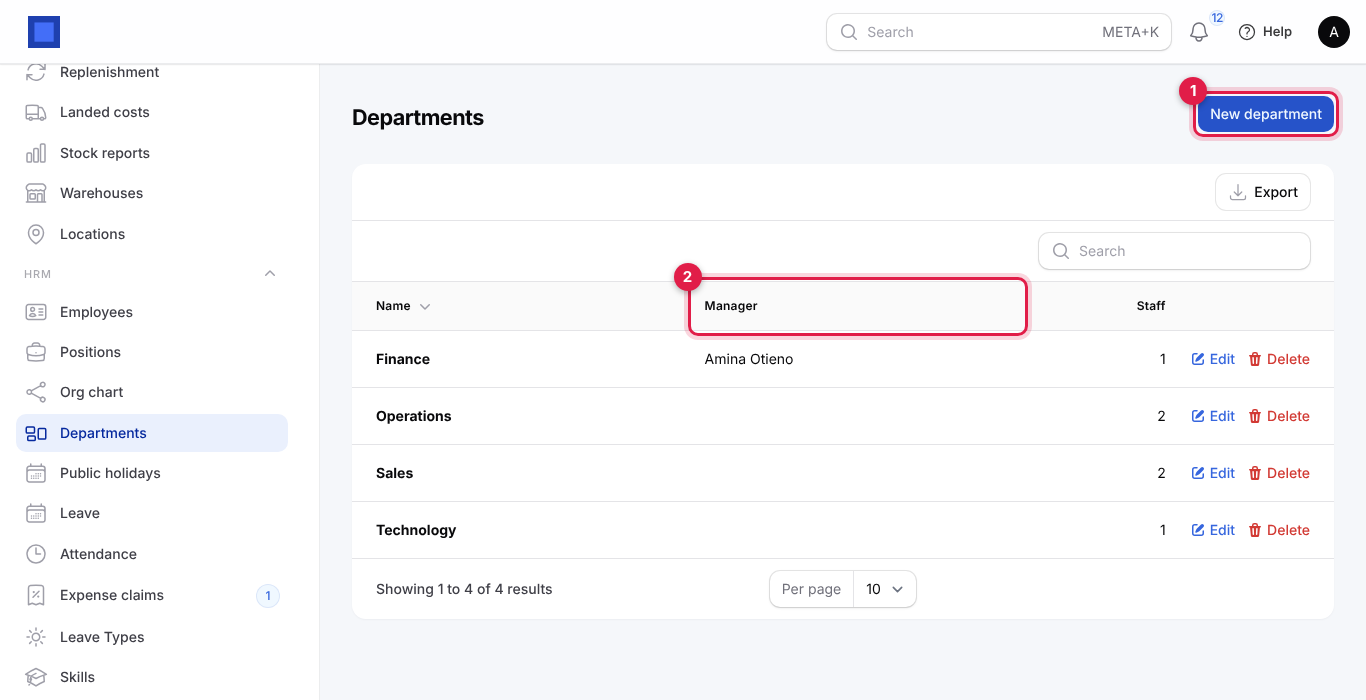
The Manager (marker 2) matters: when a review cycle is launched, each employee's appraisal is assigned to their department manager's login. The Staff column counts the employees in each department. Delete a department only when nobody is in it.
Positions
Positions describe the approved structure: which posts exist, who each reports to and how many people each should hold. They are optional; small businesses often only use departments and Reports to.
- Open HRM → Positions. The list shows each position's department, the position it reports to, grade, and Filled (marker 2): people in the post against the headcount, in amber while there is a vacancy.
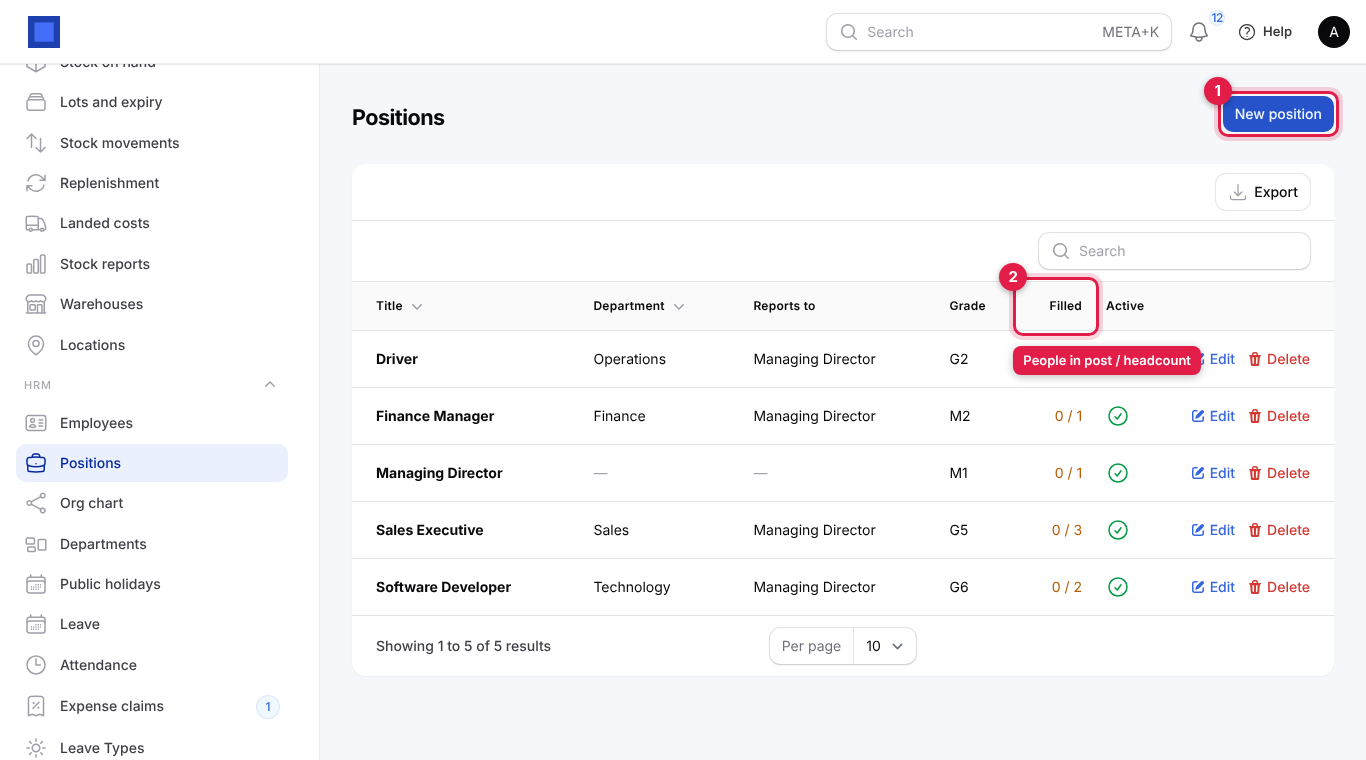
- Click New position (marker 1).
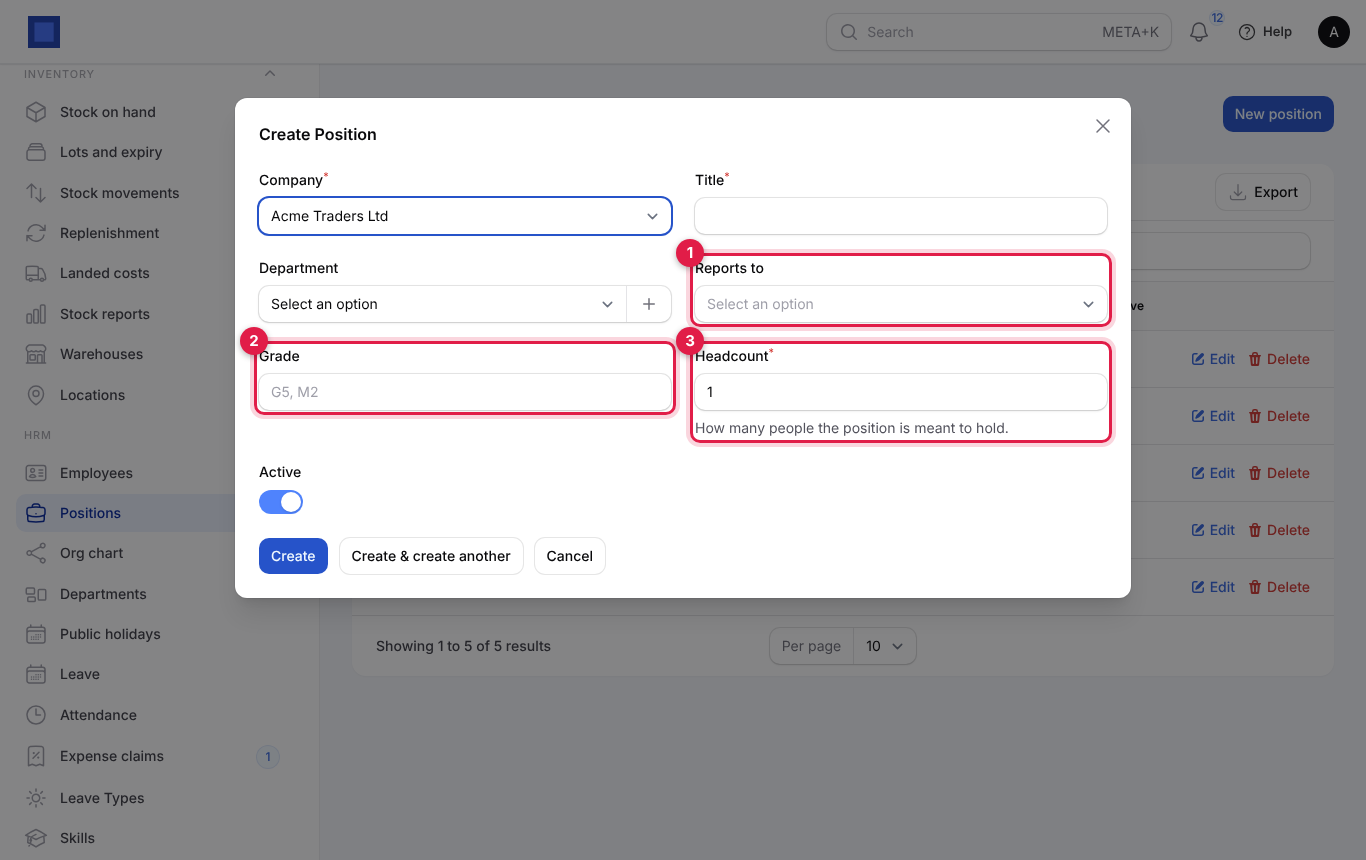
| Field | What to enter |
|---|---|
| Company (required) | The company the post belongs to. |
| Title (required) | For example Sales Executive. |
| Department | Where the post sits. |
| Reports to (marker 1) | The position above it, for example Managing Director. |
| Grade (marker 2) | Your pay grade code, for example G5 or M2. |
| Headcount (required, marker 3) | How many people the position should hold. 1 for a single post. |
| Active | Switch off for a post you no longer recruit for; it then disappears from the employee form. |
- Click Create, then set Position on each employee's Job tab. A position cannot be deleted while someone holds it.
View the organisation chart
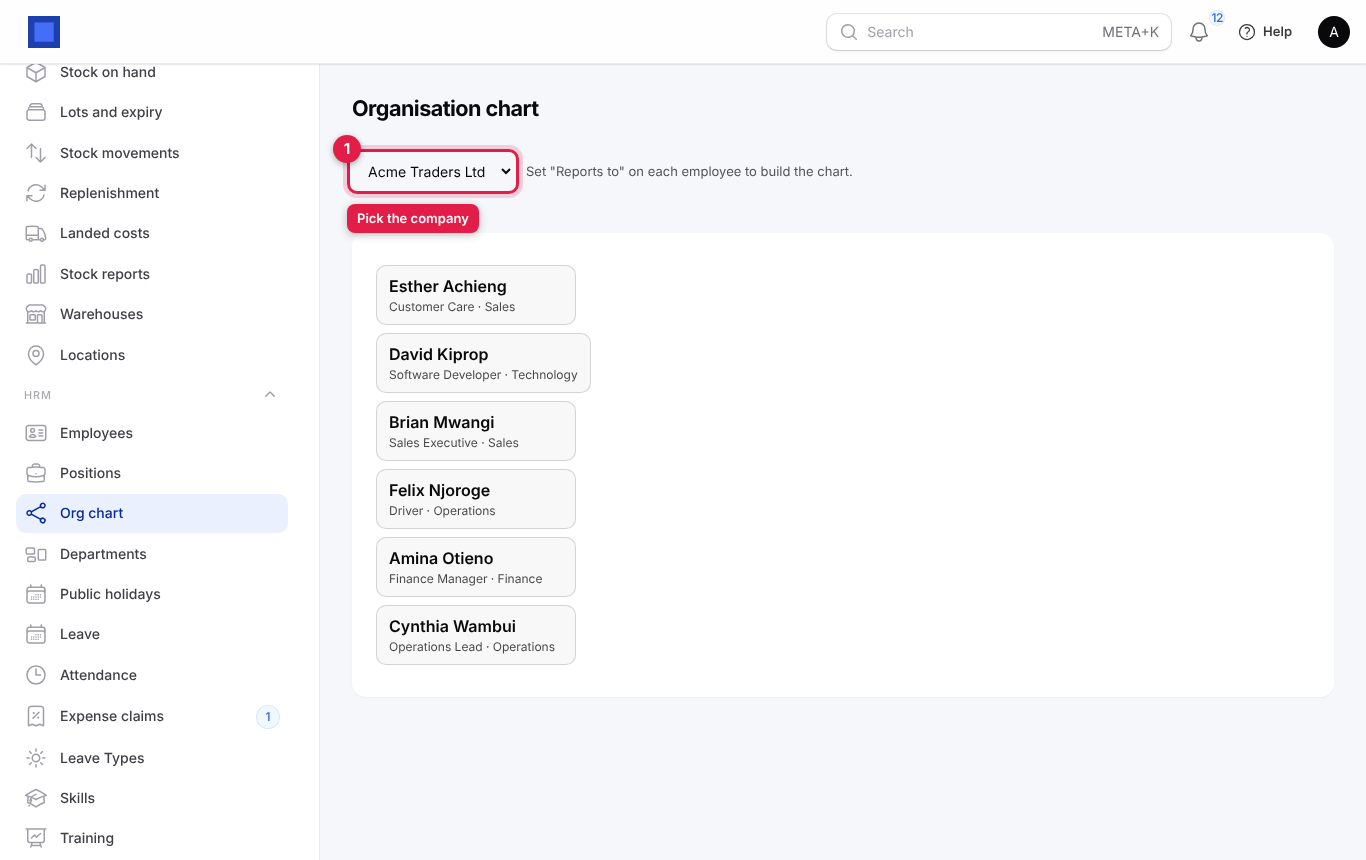
Open HRM → Org chart to see who reports to whom, drawn as a tree from each employee's Reports to field. If you have several companies, pick one from the list at the top (marker 1). People with no manager appear at the top level, so a flat list like the one below means Reports to has not been filled in yet.
Set up leave types
Leave types say how much leave people get and how it builds up. When you open HRM → Leave Types for the first time, a starter set is created for each company: Annual leave (21 days), Sick leave (14), Maternity leave (90), Paternity leave (14), Compassionate leave (5) and Unpaid leave (0, unpaid). Edit them to match your policy, contracts and local law.
- Open HRM → Leave Types and click New leave type, or Edit on an existing one.
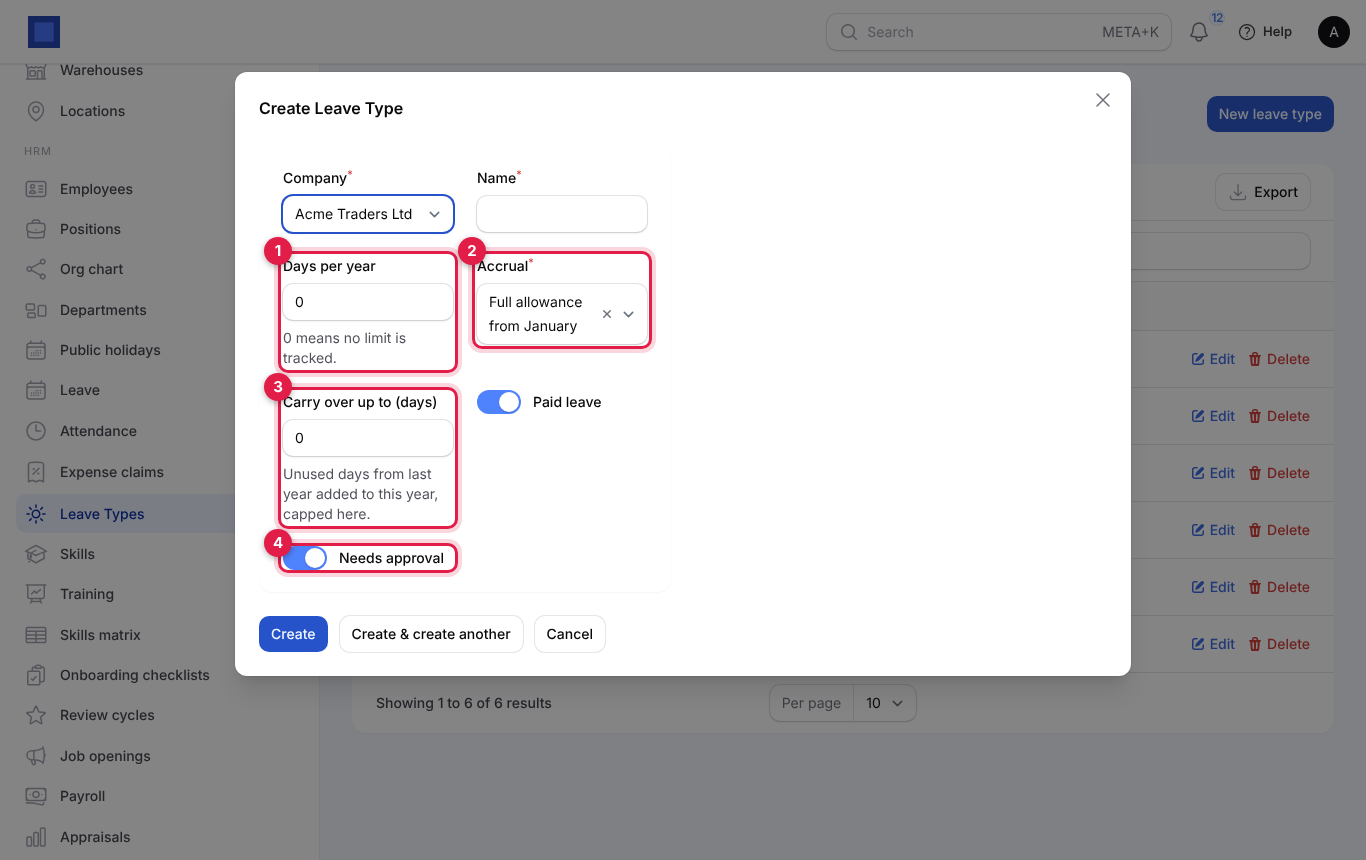
| Field | What to enter |
|---|---|
| Company (required) | Leave types are per company. |
| Name (required) | Annual leave, Sick leave, Maternity leave, Compassionate leave… |
| Days per year (marker 1) | The yearly entitlement in working days, halves allowed (21, 30, 7.5). 0 means no limit is tracked: requests are never refused for lack of balance (useful for unpaid or compassionate leave). |
| Accrual (required, marker 2) | Full allowance from January: the whole year's days are available from 1 January. Earned month by month: one twelfth is earned each month worked, so in April an employee on 21 days has 7. Someone who joins mid-year gets a pro-rated share either way. |
| Carry over up to (days) (marker 3) | Unused days from last year added to this year, capped at this number. 0 means unused days are lost on 31 December. |
| Paid leave | On for paid leave. Off marks it as unpaid leave in reports. |
| Needs approval (marker 4) | On: requests wait for a manager. Off: requests are approved the moment they are made (handy for public duty or company-wide closures). |
- Click Create (or Save changes).
How balances work: balance = entitlement this year − approved days taken this year, where entitlement includes accrual and carry-over. A request or approval that would take someone below zero is refused with a message such as Brian Mwangi has 3.0 days of annual leave left this year. Weekends and public holidays are not counted.
Load public holidays
Public holidays are left out when leave days are counted. Load them once a year.
- Open HRM → Public holidays.
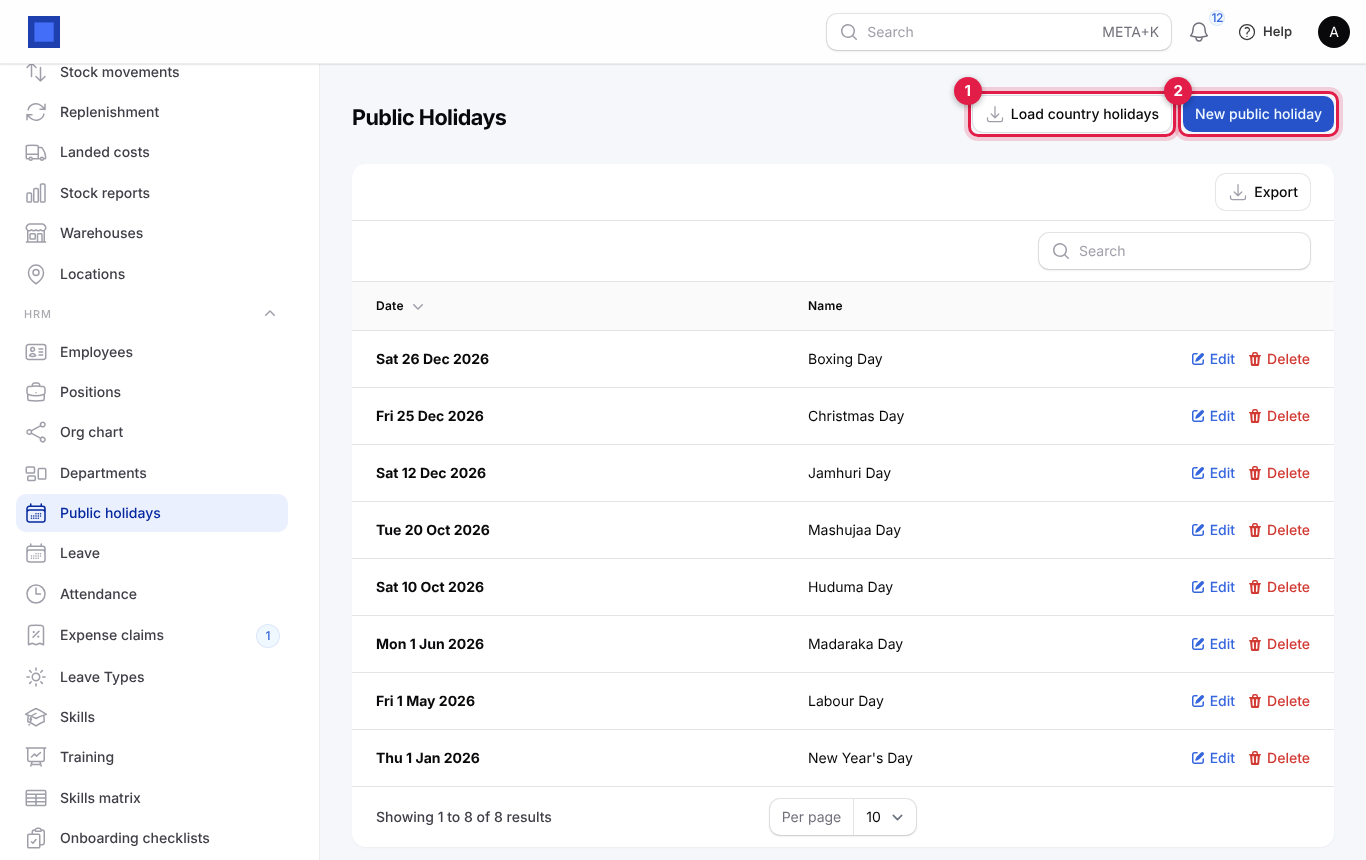
- Click Load country holidays (marker 1).
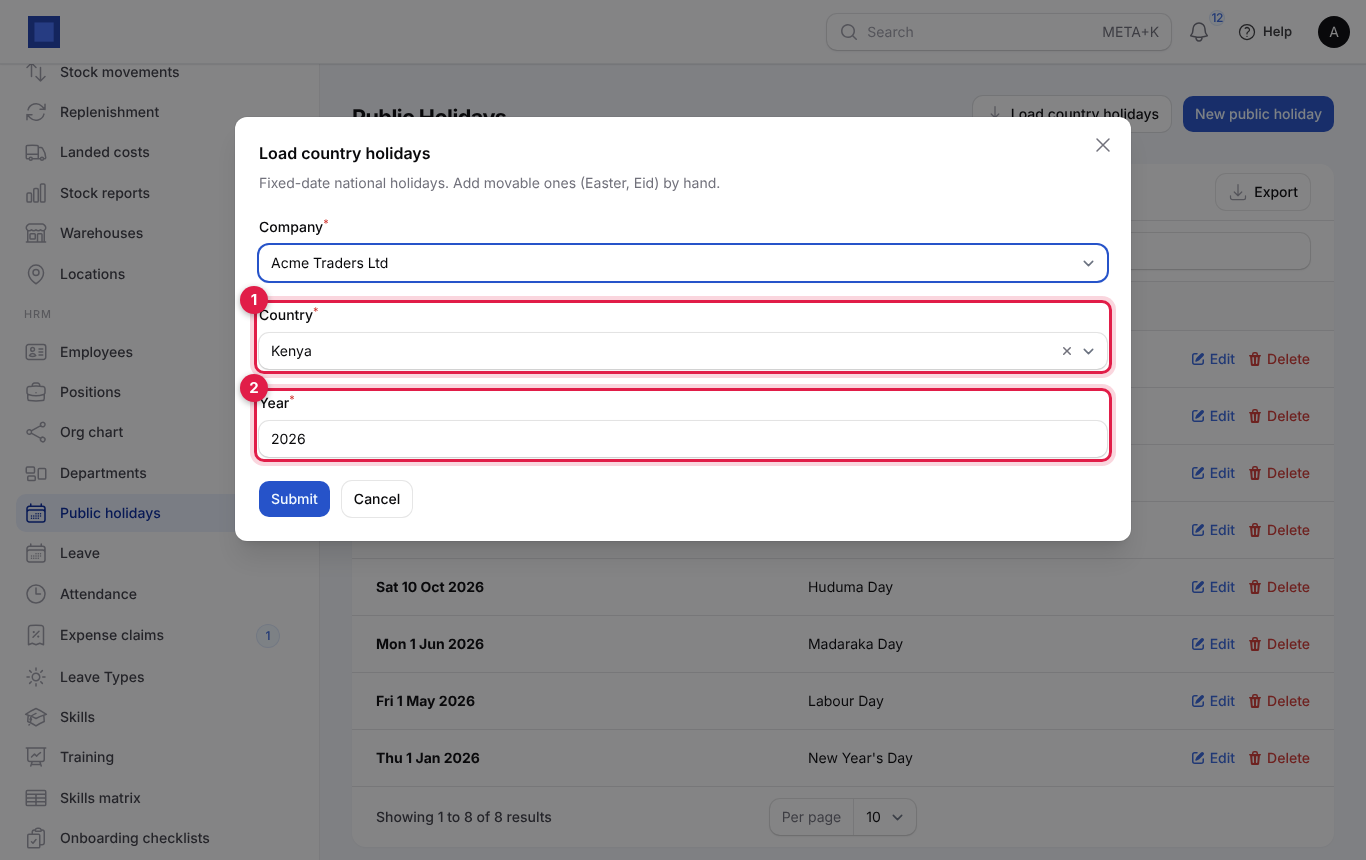
- Choose the Company, the Country (marker 1: Kenya, Uganda, Tanzania, Rwanda, Nigeria, Ghana or South Africa) and the Year (marker 2), then click Submit. The fixed-date national holidays are added; holidays already in the list are not duplicated.
- Add movable holidays (Good Friday, Easter Monday, Eid al-Fitr, Eid al-Adha, Diwali) and any one-off holiday the government gazettes with New public holiday (marker 2 on the list): pick the Company, the Date and type the Name.
Note: Leave already approved is not recounted when you add a holiday later. Edit the request's days by hand if it matters.
Approve and record leave
Employees request their own leave from Me → My leave (see Employee self-service). HR and managers see every request here.
- Open HRM → Leave. The list opens filtered to Pending requests; use the filter (marker 2) to see approved or rejected ones.
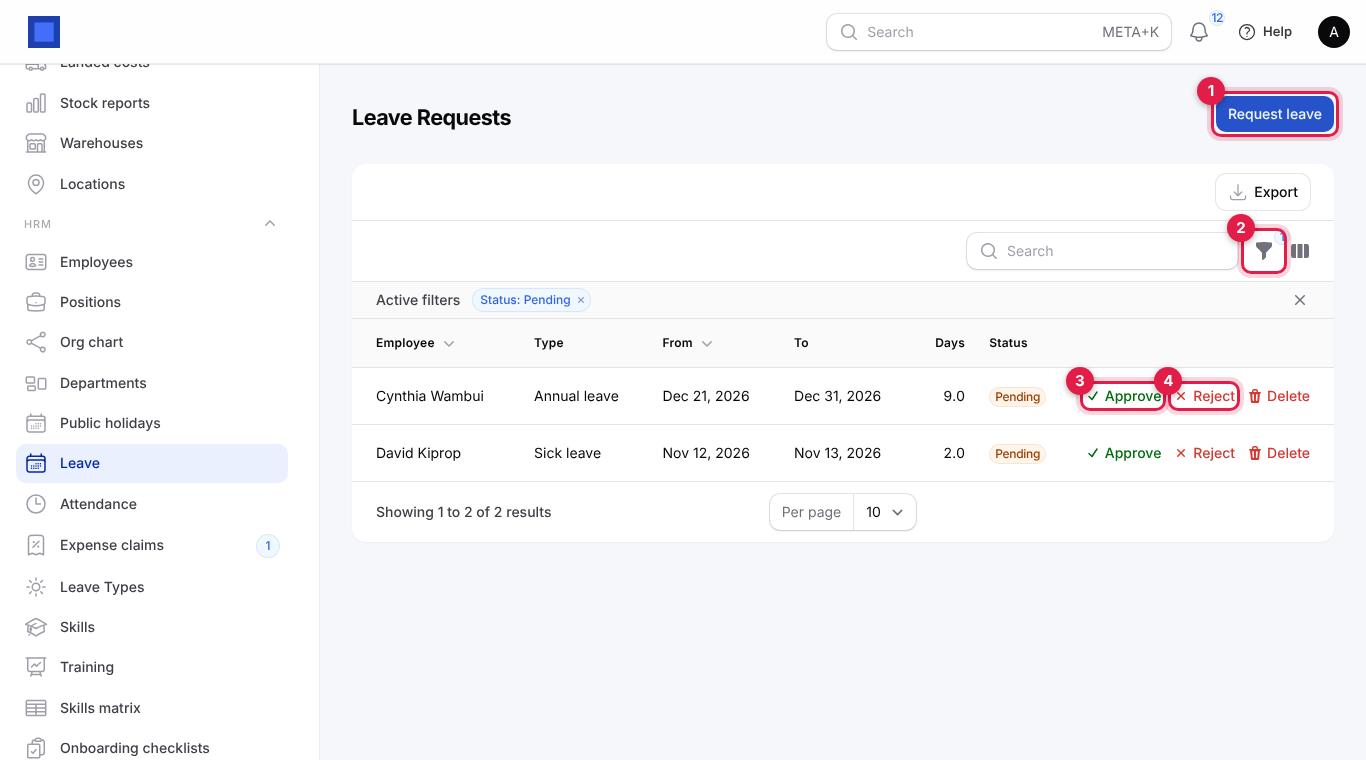
- For a pending request, click Approve (marker 3) and confirm, or Reject (marker 4), type a Reason and click Submit. Approving checks the balance again; if days ran out meanwhile, you see a red message and nothing changes.
- The employee sees the new status and your note on My leave. Their balance updates straight away.
To book leave on someone's behalf (for a staff member without a login, or after a phone call), click Request leave (marker 1).
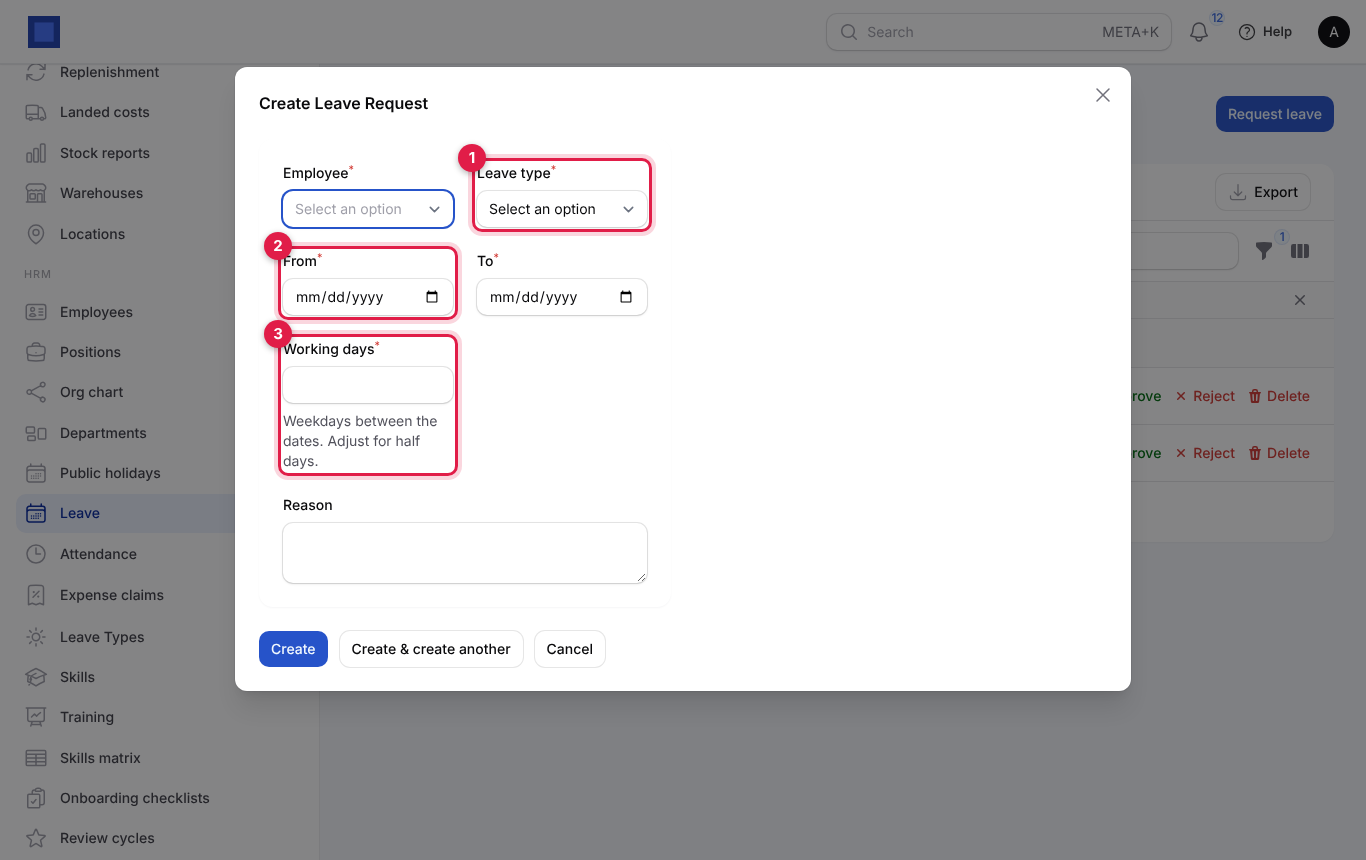
| Field | What to enter |
|---|---|
| Employee (required) | Who is going on leave. |
| Leave type (required, marker 1) | From your leave types. |
| From, To (required, marker 2) | First and last day of leave, inclusive. |
| Working days (required, marker 3) | Filled in for you (weekdays between the dates). Change it for half days, for example 0.5. |
| Reason | Optional note. |
Click Create. If the leave type needs approval, the request is Pending; otherwise it is Approved at once.
Statuses: Pending (waiting for a decision), Approved (counts against the balance), Rejected (does not count), Cancelled. Only pending requests can be approved, rejected or deleted. To change approved leave, add a correcting request or ask an administrator.
Permissions: the Approve and Reject buttons need hr.leave.approve.
Track attendance
Attendance records one row per employee per day: time in, time out, hours worked, status and minutes late. Rows come from three places: employees checking in on their phone or computer (Me → My attendance), imports from biometric clocks, and entries typed by HR.
Set working hours and the geofence
- Open Settings → Preferences and click the HRM tab.
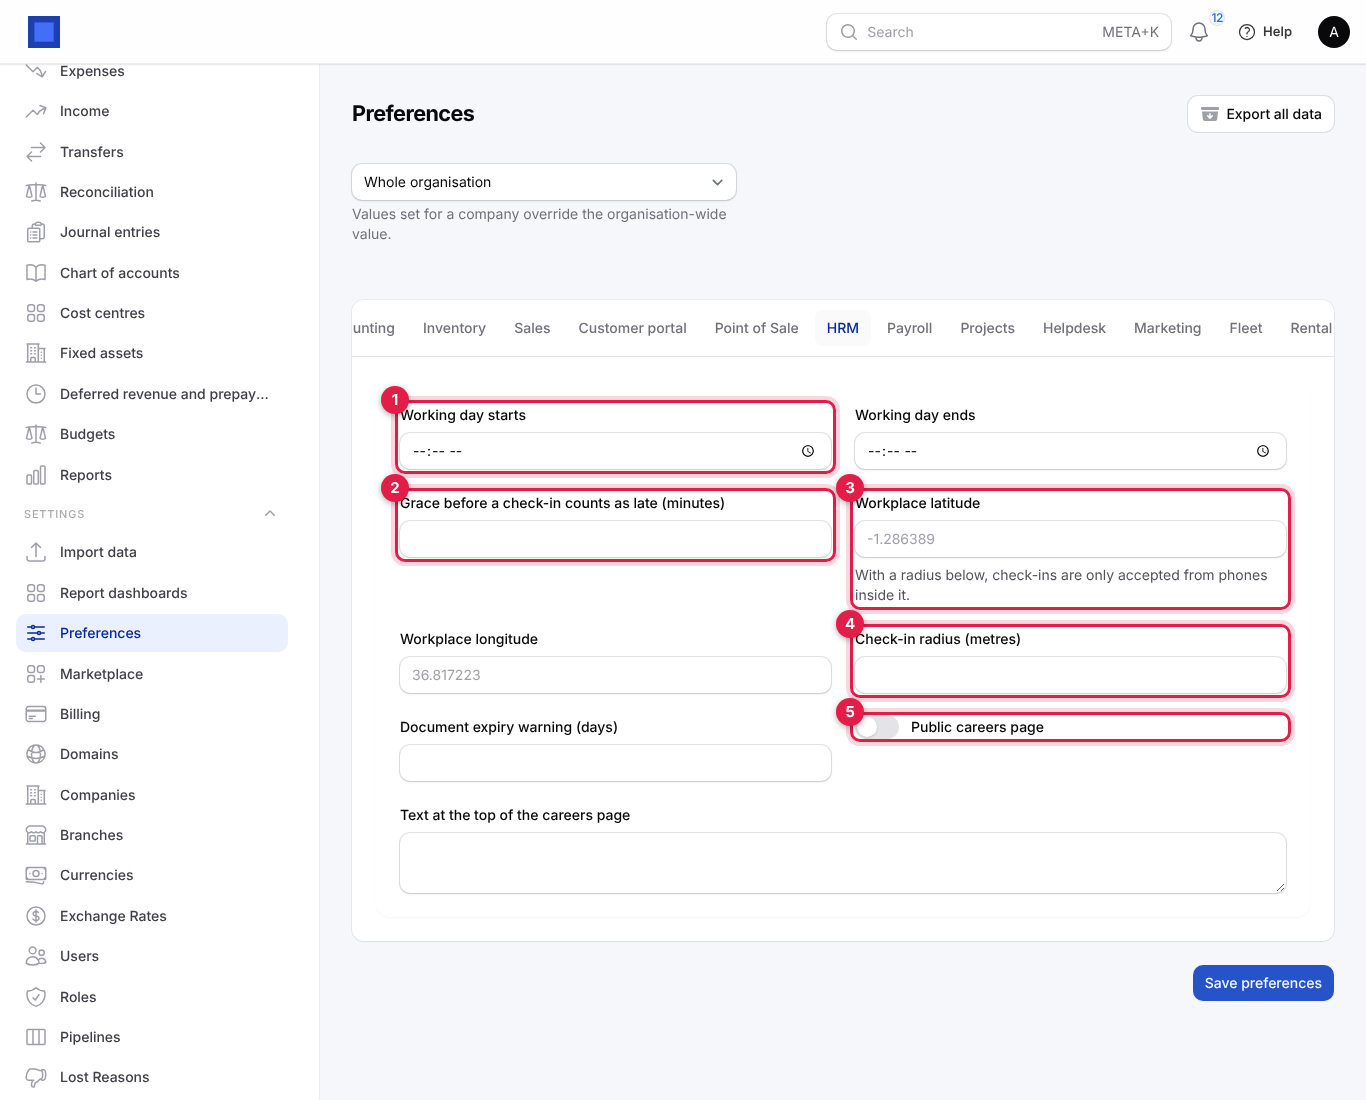
| Setting | What it does |
|---|---|
| Working day starts / Working day ends (marker 1) | The normal day, for example 08:00 to 17:00. A check-in after the start (plus the grace below) is recorded as Late with the minutes. |
| Grace before a check-in counts as late (minutes) (marker 2) | Default 15. A check-in at 08:14 with a 15-minute grace is on time; 08:16 is 16 minutes late. |
| Workplace latitude / Workplace longitude (marker 3) | The centre of your workplace, in decimal degrees (Nairobi CBD is about -1.286389, 36.817223). Find them by right-clicking the spot in Google Maps. |
| Check-in radius (metres) (marker 4) | With a latitude, longitude and a radius above 0, phone check-ins are only accepted inside this circle. An employee outside sees You are 1,240 m from the workplace; check-ins are accepted within 200 m. 0 switches the geofence off. 100–300 m suits most offices; GPS on phones is accurate to about 20–50 m. |
| Document expiry warning (days) | How early employee documents show Expiring soon. |
| Public careers page (marker 5) | Switches the public jobs page on or off. See Recruit. |
| Text at the top of the careers page | An introduction shown above your job openings. |
- Click Save preferences. The selector at the top of Preferences lets you set different values for each company; values set for a company override the organisation-wide ones.
Note: With a geofence, the employee's browser must be allowed to share location. If they refuse, the check-in has no location and is refused.
Review attendance and download the register
- Open HRM → Attendance. The list opens filtered to This month, newest day first, with each person's in and out times, hours, status (Present, Late, Absent, Half day) and minutes late. Hidden columns (the table's column button) show the Source (web, manual or the device name), the check-in Location (opens Google Maps) and the Note.
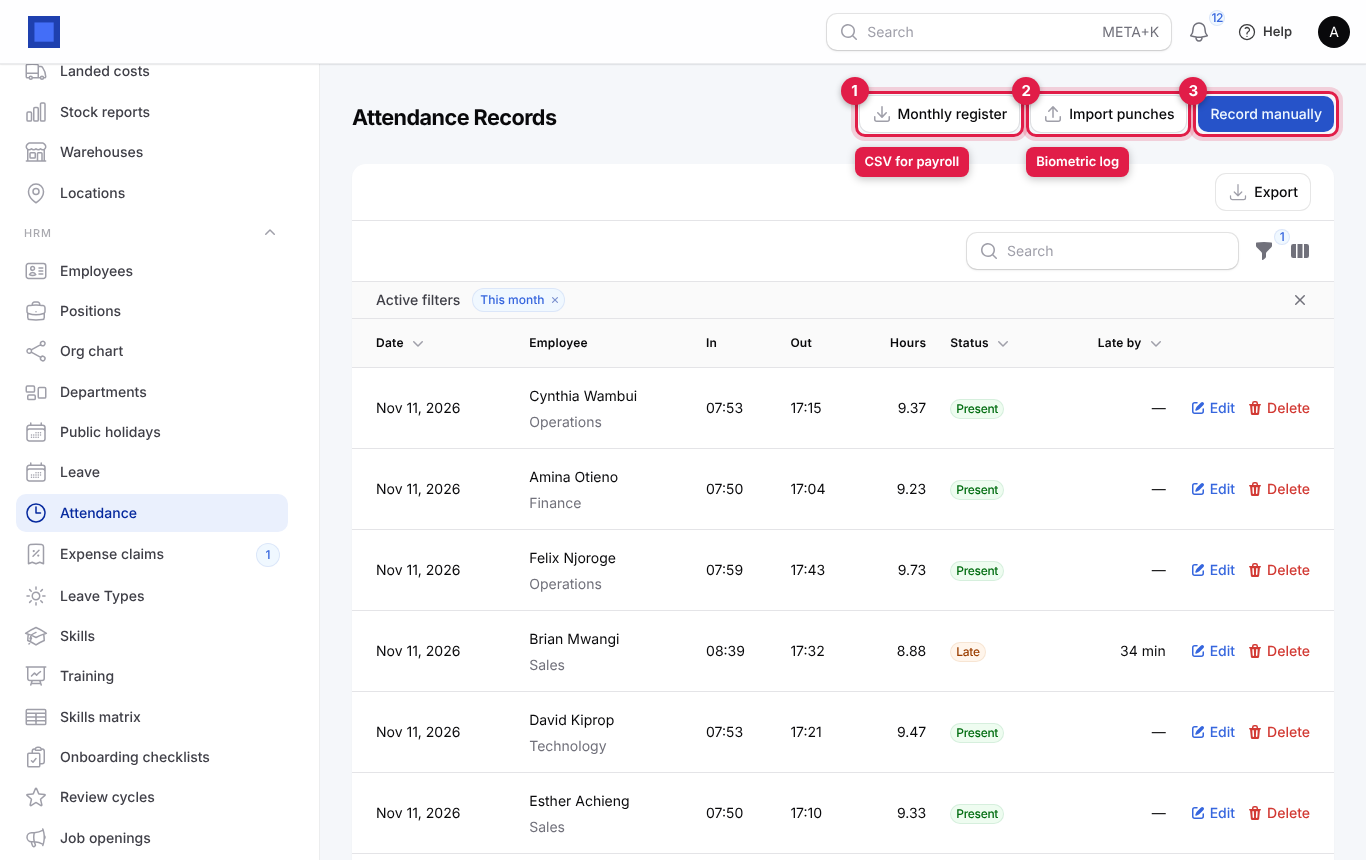
- Click Monthly register (marker 1), pick the Company and Month and click Submit to download a CSV with, for each employee: days present, days late, late minutes, days absent and hours worked. Payroll and line managers use it to check overtime and deductions for absence.
Import punches from a biometric clock
- Export the attendance log from the device or its software (ZKTeco, Anviz, Hikvision or any reader) as CSV or TXT with a header row.
- Click Import punches (marker 2 above).
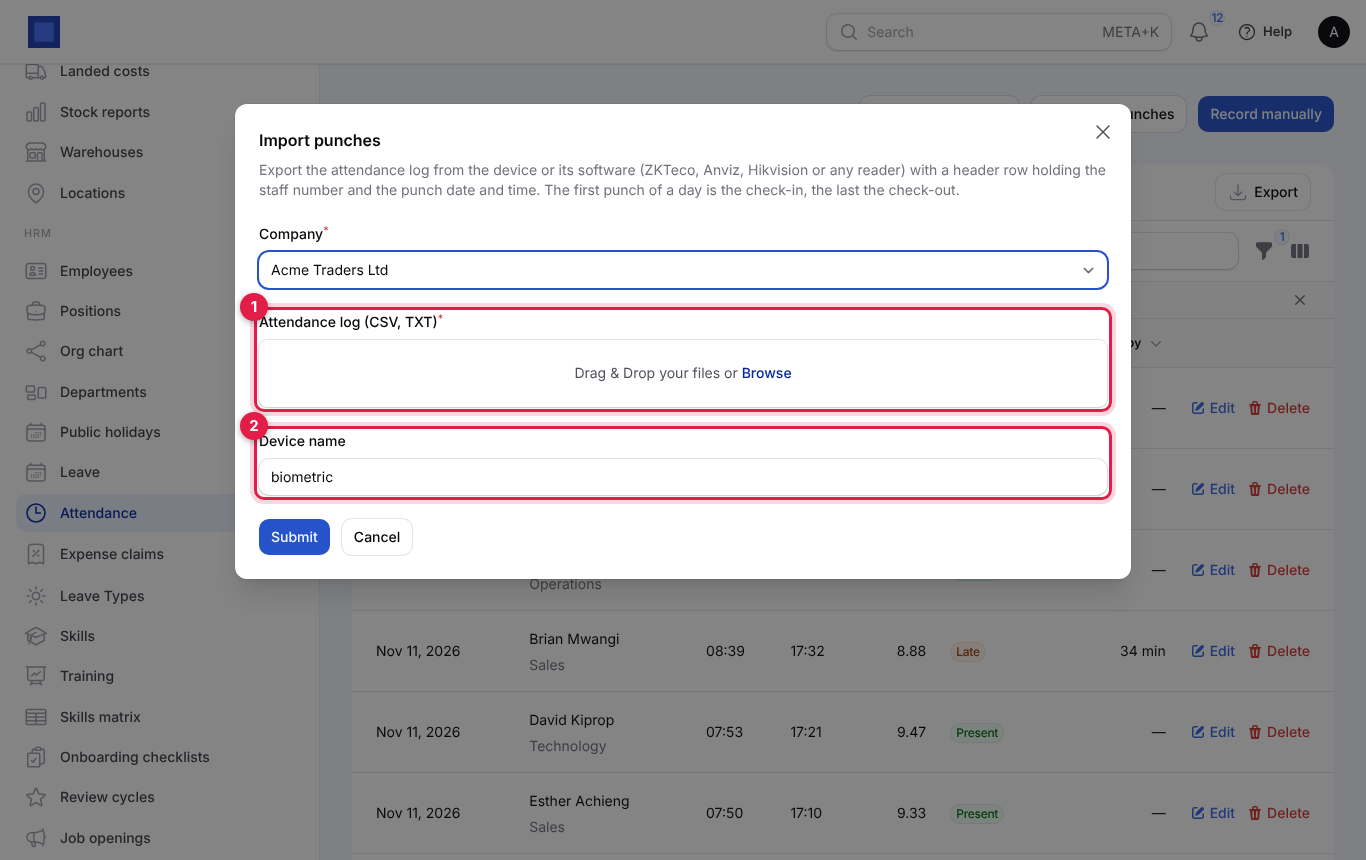
- Choose the Company, drop the file into Attendance log (CSV, TXT) (marker 1) and type the Device name (marker 2; it is shown as the source of each row). Click Submit.
The importer recognises the staff number column whatever it is called (No, User ID, Badge, Enroll No, PIN, Staff No, AC-No) and either one date-and-time column or separate Date and Time columns; tab, comma and semicolon separators all work. Punches are grouped per person per day: the first punch is the check-in and the last is the check-out, and lateness is worked out from your working day. Existing rows for the same day are updated, so you can import the same file twice safely. A message tells you how many days and employees were imported and lists the first rows that were skipped, for example Row 14: no employee with number "27". Make sure the numbers enrolled on the device match Staff number on the employee (leading zeros are ignored).
Record attendance by hand
Click Record manually (marker 3 on the list) for a forgotten check-in, a site visit or an absence.
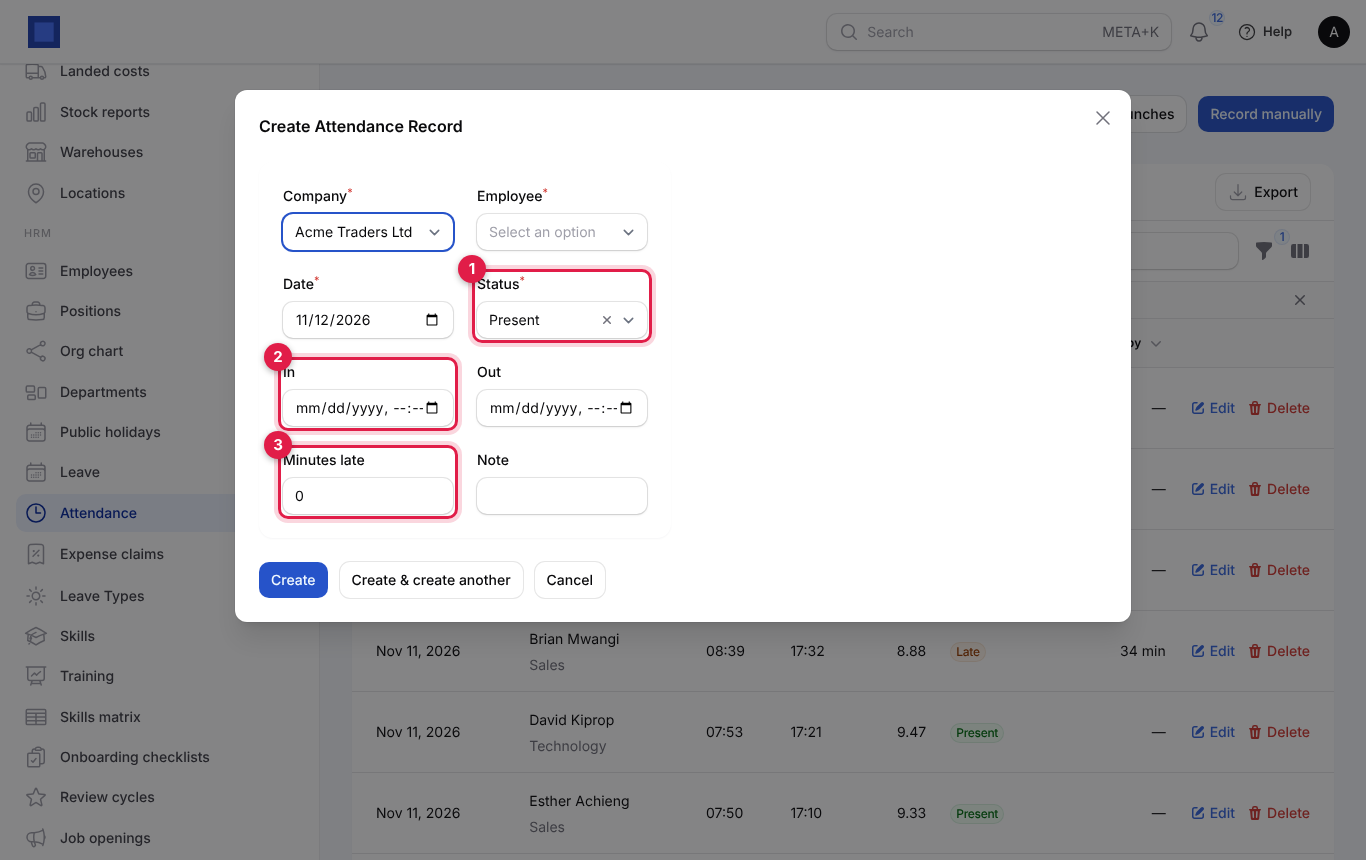
| Field | What to enter |
|---|---|
| Company, Employee, Date (required) | Who and which day. |
| Status (required, marker 1) | Present, Late, Absent or Half day. |
| In, Out (marker 2) | Date and time of arrival and departure. Hours worked are calculated from them. |
| Minutes late (marker 3) | Type it if the status is Late. |
| Note | Why the entry was typed, for example Client visit in Thika. |
Use Edit or Delete on a row to correct a record.
Recruit: from job opening to hire
Recruitment runs in four screens: Job openings (the vacancies), the public careers page where people apply, Applicants (the pipeline) and Interviews.
Post a job opening
- Open HRM → Job openings. Each opening shows its status, the number of applicants (and how many are still in progress), the closing date and when it was posted.
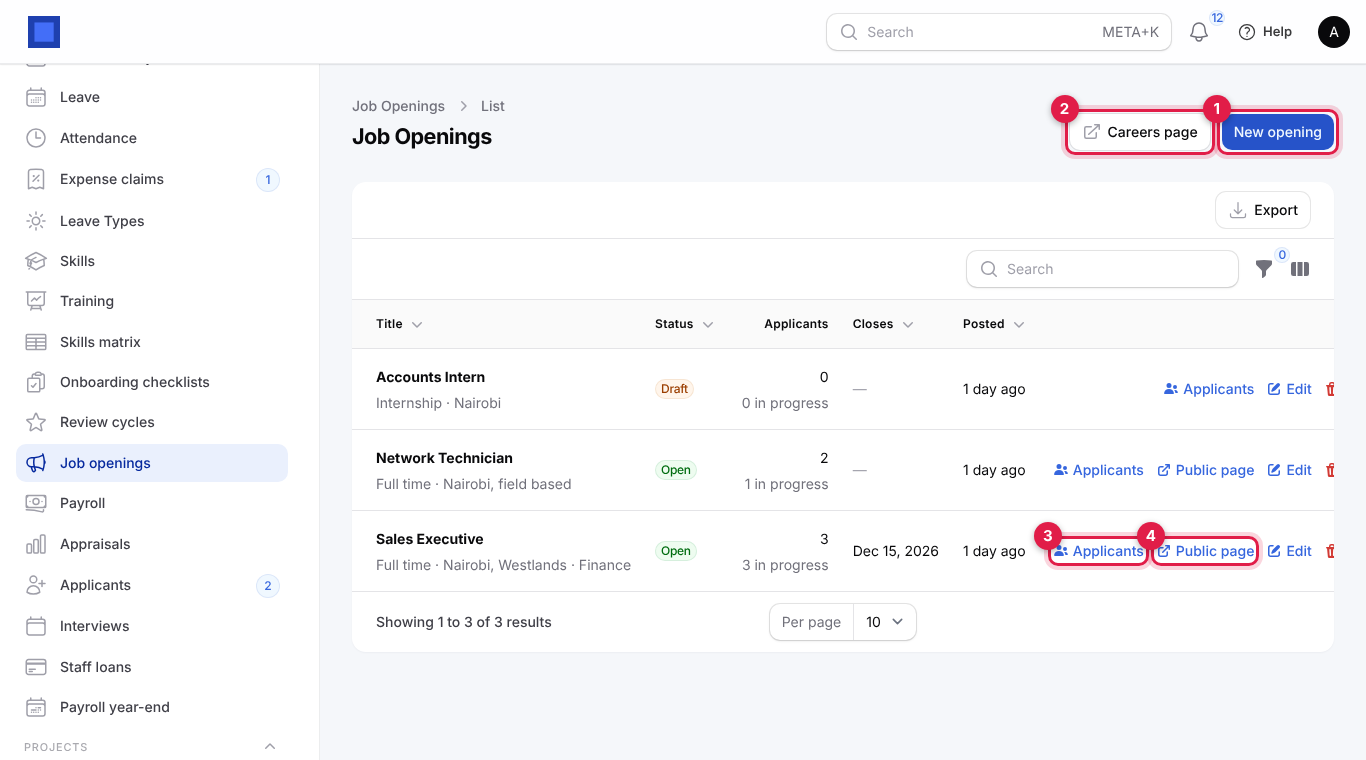
- Click New opening (marker 1).
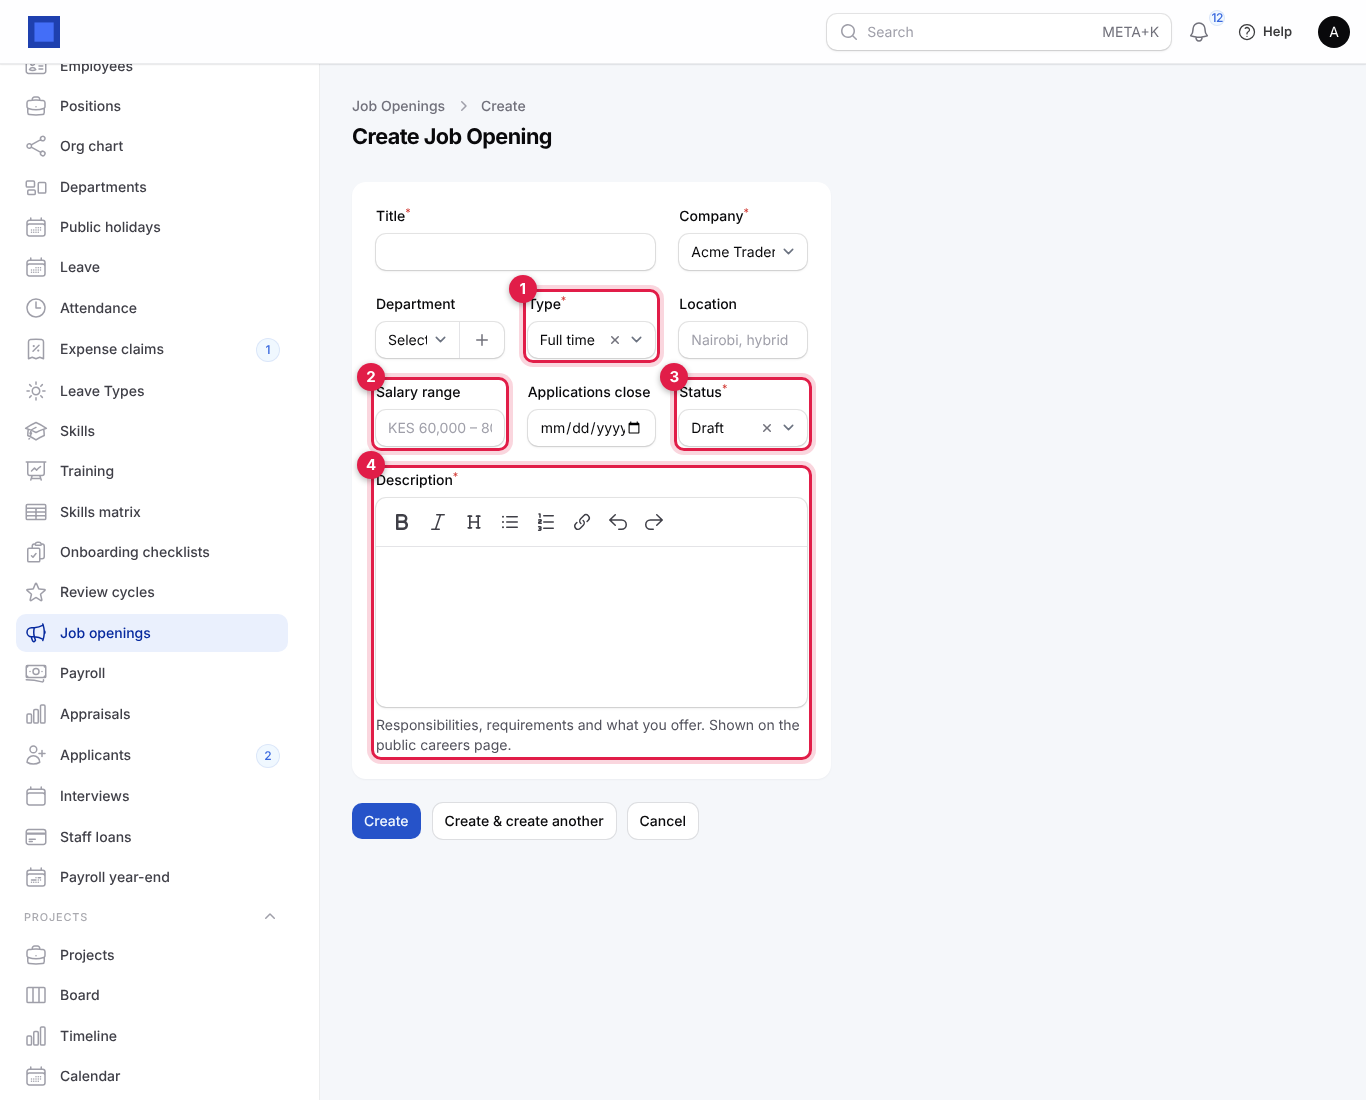
| Field | What to enter |
|---|---|
| Title (required) | The job title candidates search for, for example Network Technician. |
| Company (required), Department | Who is hiring. |
| Type (required, marker 1) | Full time, Part time, Contract, Internship or Casual. |
| Location | Town and arrangement, for example Nairobi, hybrid. |
| Salary range (marker 2) | Optional, free text such as KES 60,000 – 80,000. Shown publicly if filled in. |
| Applications close | After this date the opening disappears from the careers page and no longer accepts applications. |
| Status (required, marker 3) | Draft (only you see it), Open (on the careers page, accepting applications) or Closed. |
| Description (required, marker 4) | Responsibilities, requirements and what you offer. Use the toolbar for headings and bullet lists. It is shown on the careers page. |
- Click Create. Set the status to Open when you are ready to publish.
On the list, Careers page (marker 2) opens your public jobs page in a new tab, Applicants on a row (marker 3) jumps to that opening's applicants, Public page (marker 4, only while the opening accepts applications) opens the opening's own page to share on social media or job boards, and Edit / Delete change or remove it.
The careers page
Your careers page lives at https://<your workspace address>/careers and lists every open opening of your main company; each opening has its own page with an application form (name, email, phone, cover letter and a CV as PDF or Word, up to 8 MB). Applicants receive an email confirming their application. It can be switched off with Public careers page in Settings → Preferences → HRM, where you can also add an introduction at the top. When it is switched off, the address shows Not Found.
Note: The careers page was switched off in the demo workspace used for these screenshots, so it is not pictured.
Manage applicants
- Open HRM → Applicants. The menu shows a badge with the number of new applications. The list opens filtered to applicants still in progress (New, Screening, Interview and Offer; marker 3); clear the filter to also see hired and rejected people, or use the funnel (marker 2) to filter by Position.
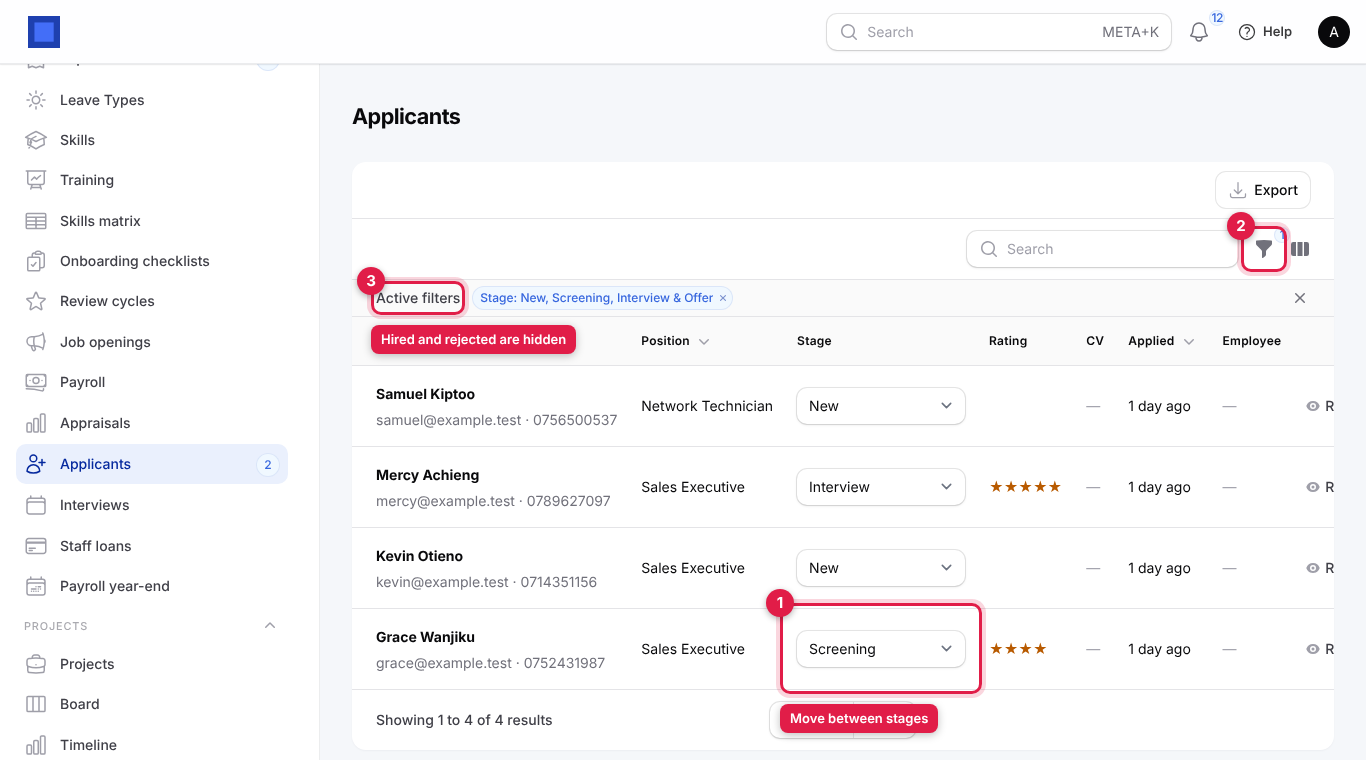
- Change an applicant's Stage straight from the list (marker 1). The stages are New → Screening → Interview → Offer → Hired or Rejected. The CV column opens the uploaded CV; the Rating shows stars from 1 to 5.
Each row has these actions (scroll the table to the right to see them):
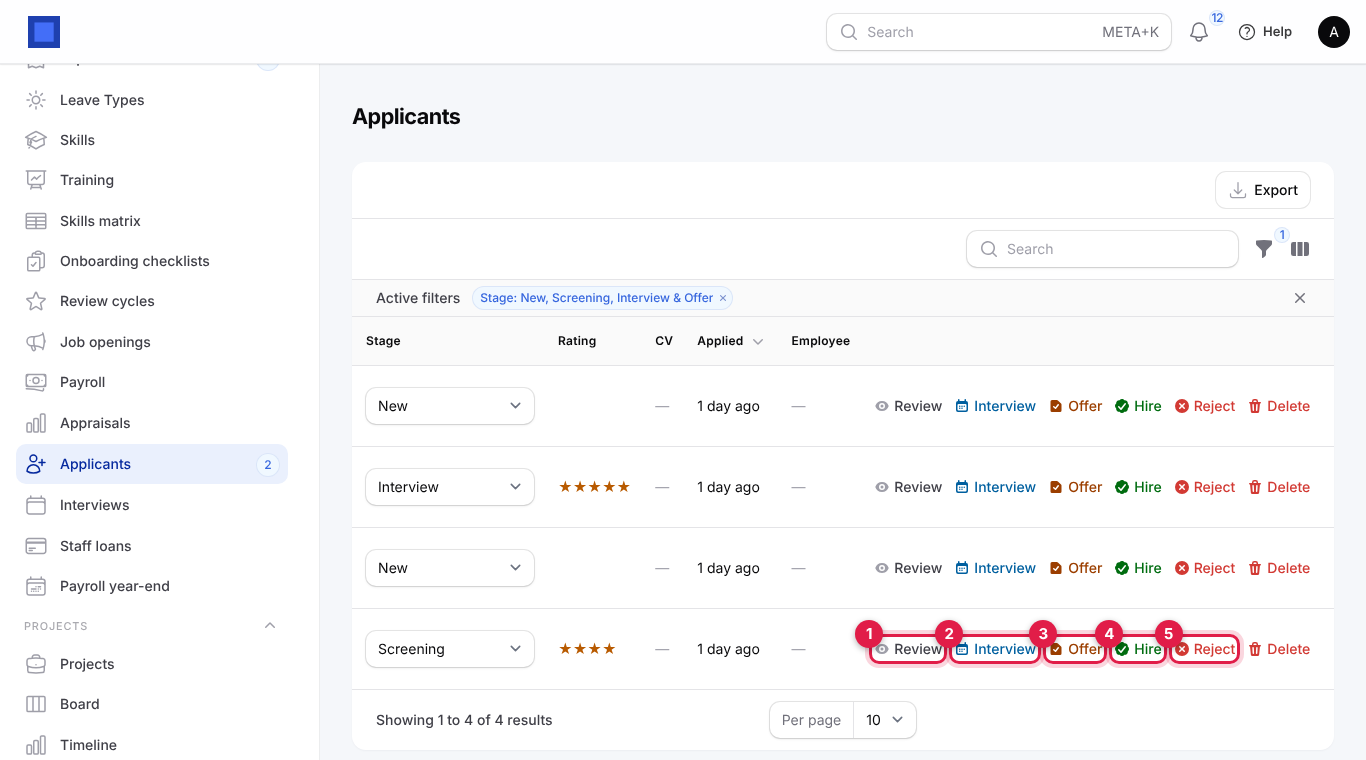
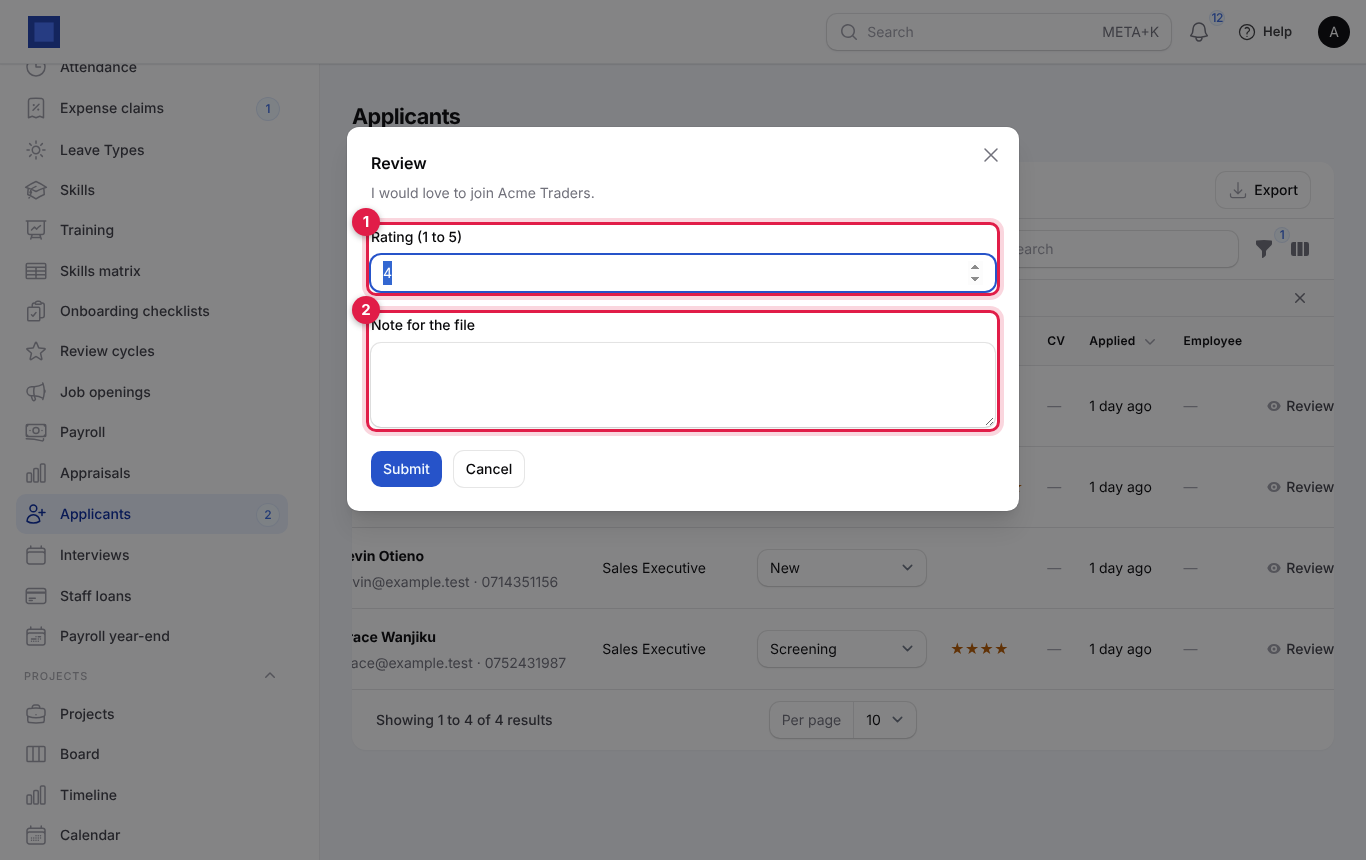
- Review (marker 1): read the cover letter, give a Rating (1 to 5) and add a Note for the file. Notes are kept with the date in the applicant's history.
- Interview (marker 2): book an interview. See below.
- Offer (marker 3): send a written offer the candidate accepts or declines online.
- Hire (marker 4): turn the applicant into an employee directly, without an offer.
- Reject (marker 5): type a Reason for the file and leave Email the applicant on to send a polite regret email. The stage becomes Rejected.
- Delete: removes the application and its CV.
Interview, Offer, Hire and Reject are only shown while the application is open (not yet hired or rejected) and need hr.manage. A Hire on offer button appears when the candidate has accepted an offer.
Book an interview
- Click Interview on the applicant's row.
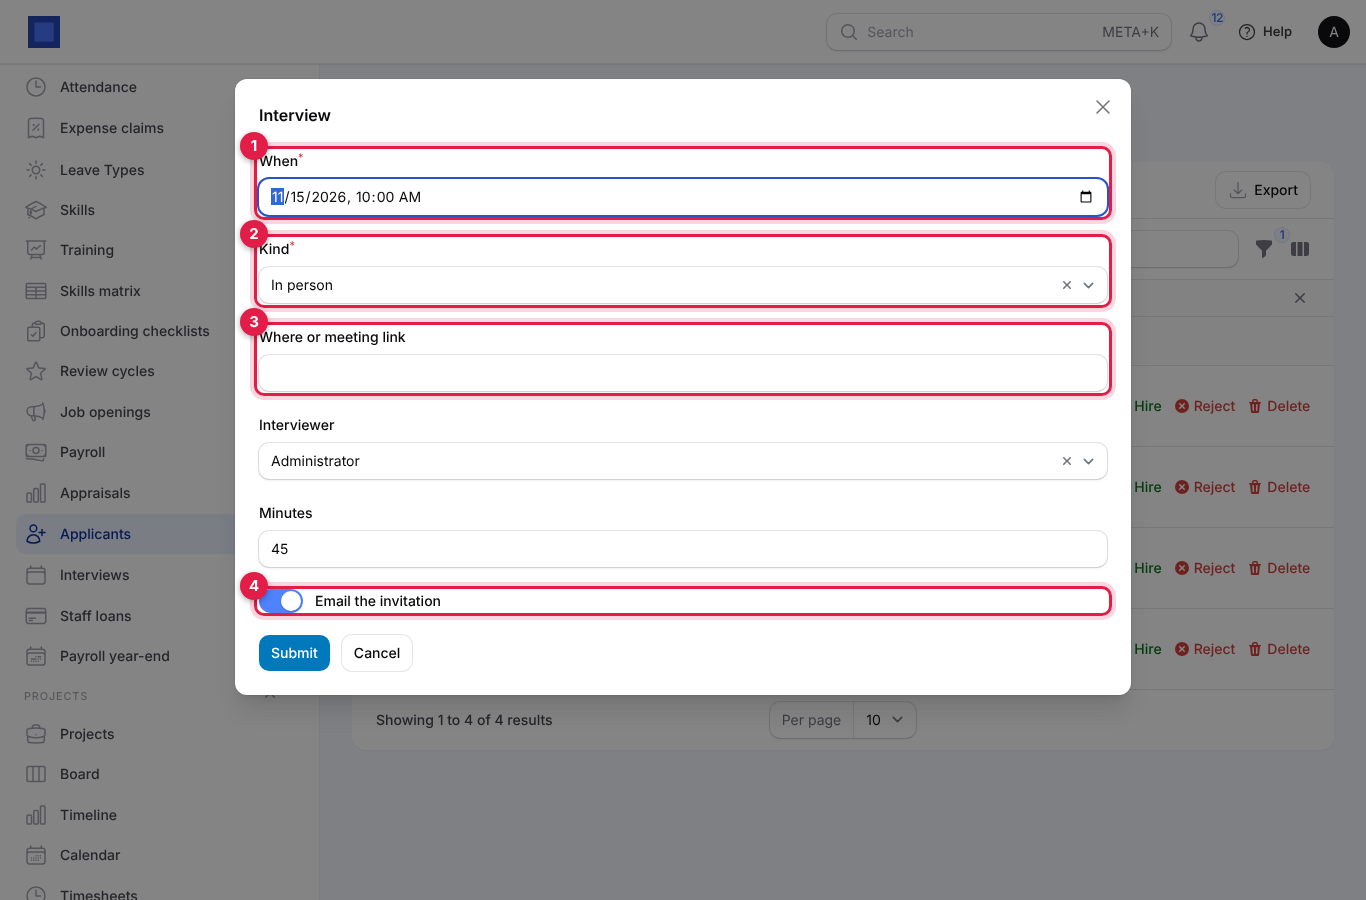
| Field | What to enter |
|---|---|
| When (required, marker 1) | Date and time. Defaults to three days from now at 10:00. |
| Kind (required, marker 2) | In person, Phone or Video call. |
| Where or meeting link (marker 3) | The address or the Google Meet / Teams / Zoom link. |
| Interviewer | The colleague who interviews. Defaults to you. |
| Minutes | Length, 45 by default. |
| Email the invitation (marker 4) | On: the candidate gets an email with the date, kind and place, asking them to reply if the time does not suit. |
- Click Submit. An applicant at New or Screening moves to Interview.
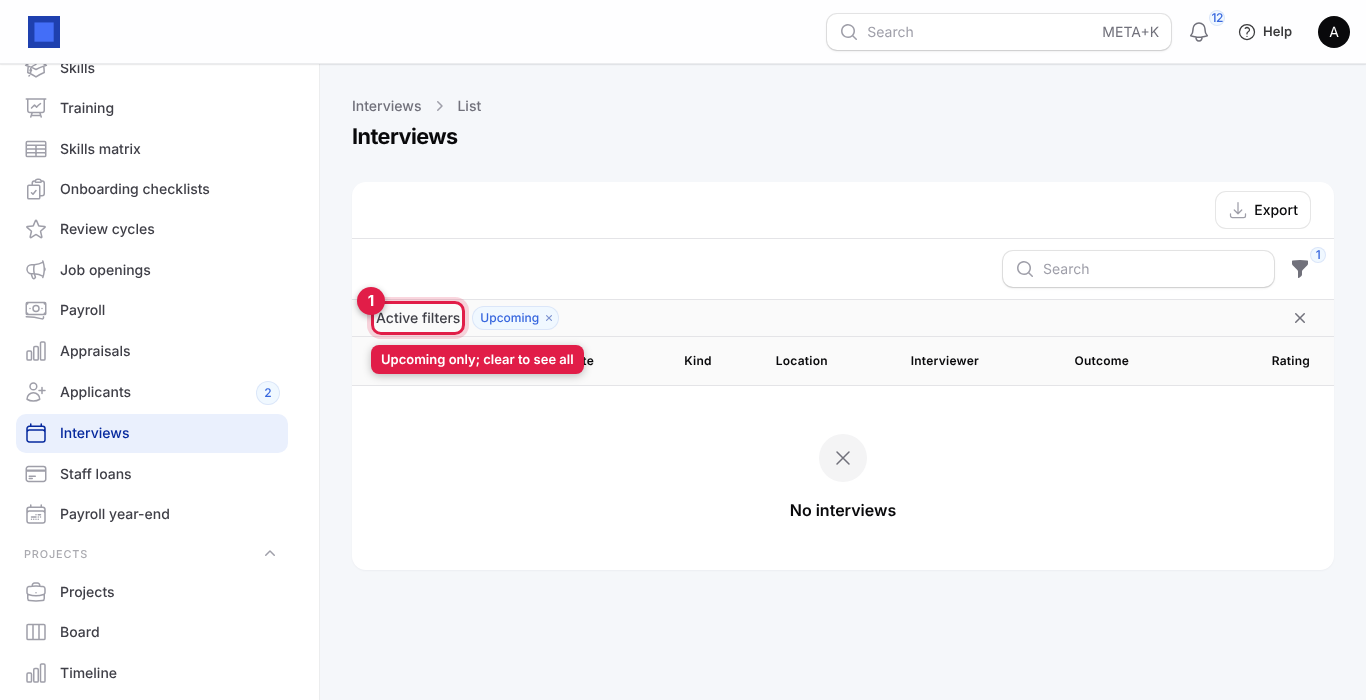
After the interview, open HRM → Interviews. The list shows Upcoming interviews by default (marker 1); clear the filter to see past ones. Click Record outcome on a row and choose Advance, On hold or Do not proceed, give a Rating (1 to 5) and type Feedback. The rating is copied to the applicant and the outcome is added to their history. The stage does not change by itself: move the applicant on, make an offer or reject them.
Send an offer
- Click Offer on the applicant's row. The dialog says The candidate gets an email with a link to accept or decline.
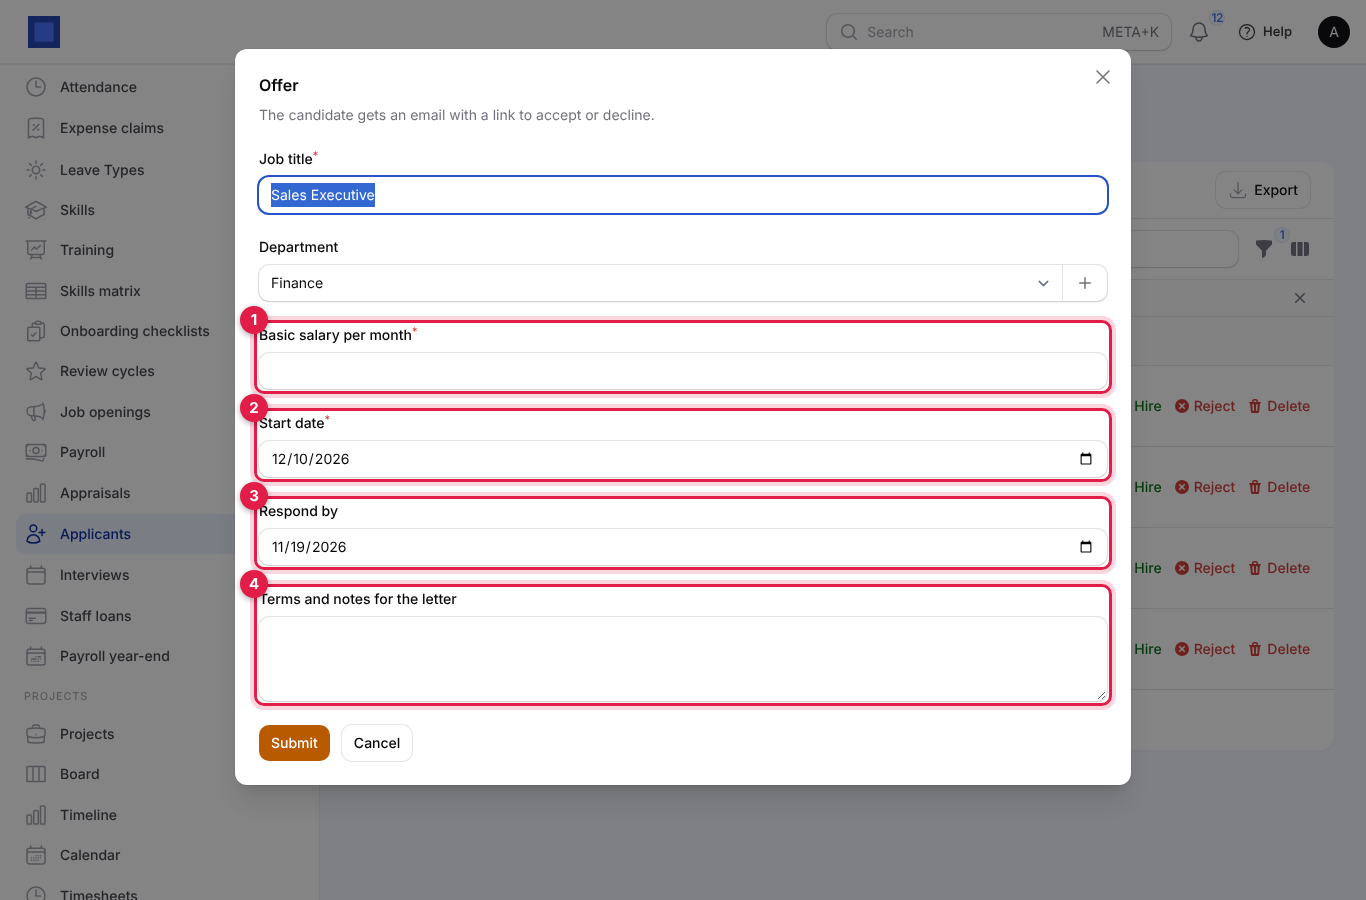
| Field | What to enter |
|---|---|
| Job title (required) | Defaults to the opening's title. |
| Department | Defaults to the opening's department. |
| Basic salary per month (required, marker 1) | In the company's currency. |
| Start date (required, marker 2) | Proposed first day. |
| Respond by (marker 3) | Deadline for the answer, a week ahead by default. |
| Terms and notes for the letter (marker 4) | Probation, benefits, documents to bring. Printed in the email and on the offer page. |
- Click Submit. The applicant moves to Offer and receives an email with a View and respond to the offer button. On that page they click accept or decline (with an optional note). Sending a new offer withdraws the previous one.
- When the candidate accepts, the note Offer accepted by the candidate is added to their history and a Hire on offer button appears on their row. Click it and confirm to hire them on exactly the offer's title, department, salary and start date.
Offer statuses: Sent (waiting for the candidate), Accepted, Declined, Withdrawn (replaced by a newer offer).
Hire an applicant
Click Hire (or Hire on offer). In the dialog set the Start date, Job title, Department and Basic salary per month, then click Submit.
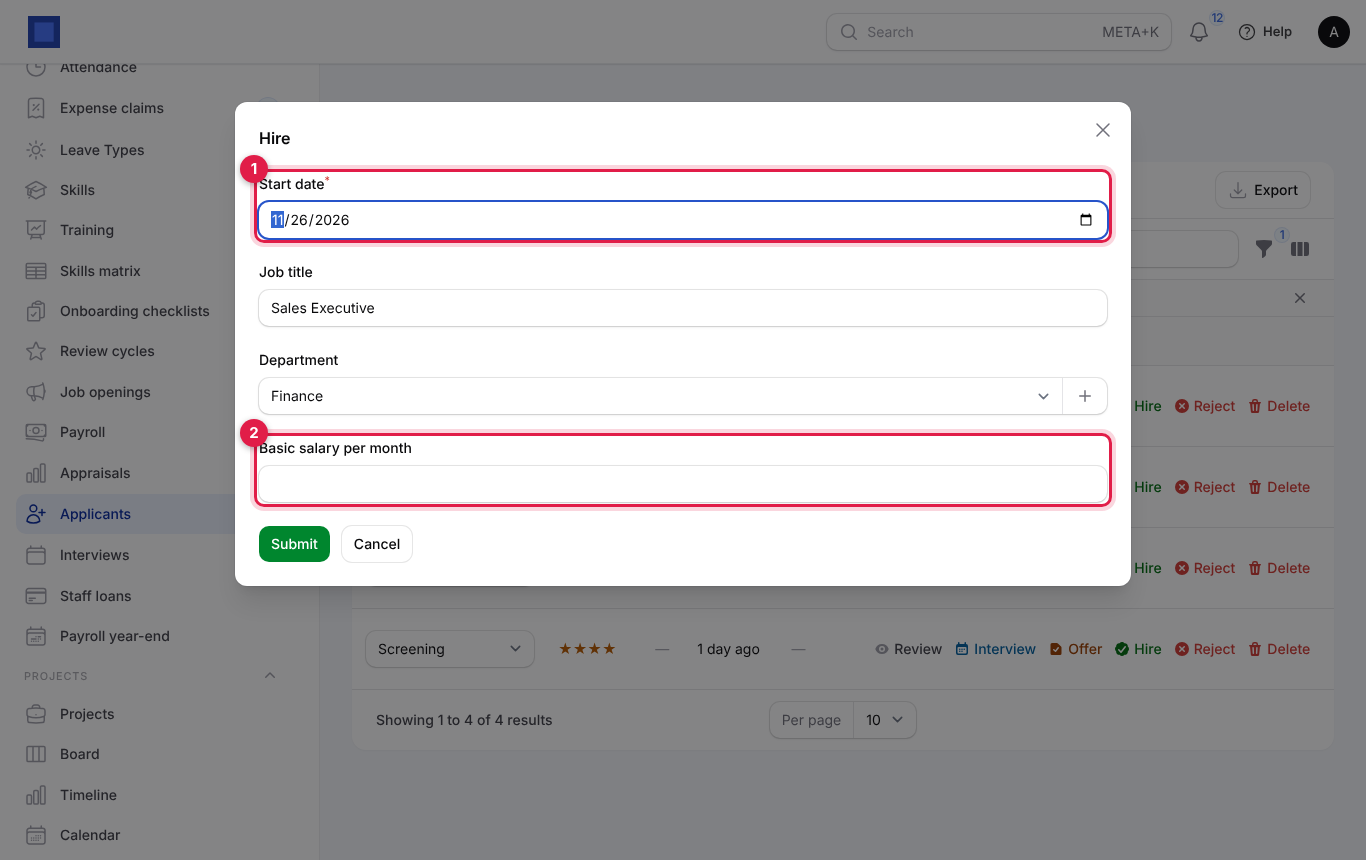
What happens: a new employee is created with the next staff number and the applicant's name, email and phone; a current contract is created with the salary (if you gave one); the applicant's stage becomes Hired and the Employee column links to the new record; and the default new-hire checklist is started. Open the employee to complete the statutory numbers, pay method and login account.
Run onboarding and leaver checklists
Set up the checklists
- Open HRM → Onboarding checklists. A New hire checklist with typical tasks is created for you; the Default column (marker 2) shows which checklist starts automatically on every hire.
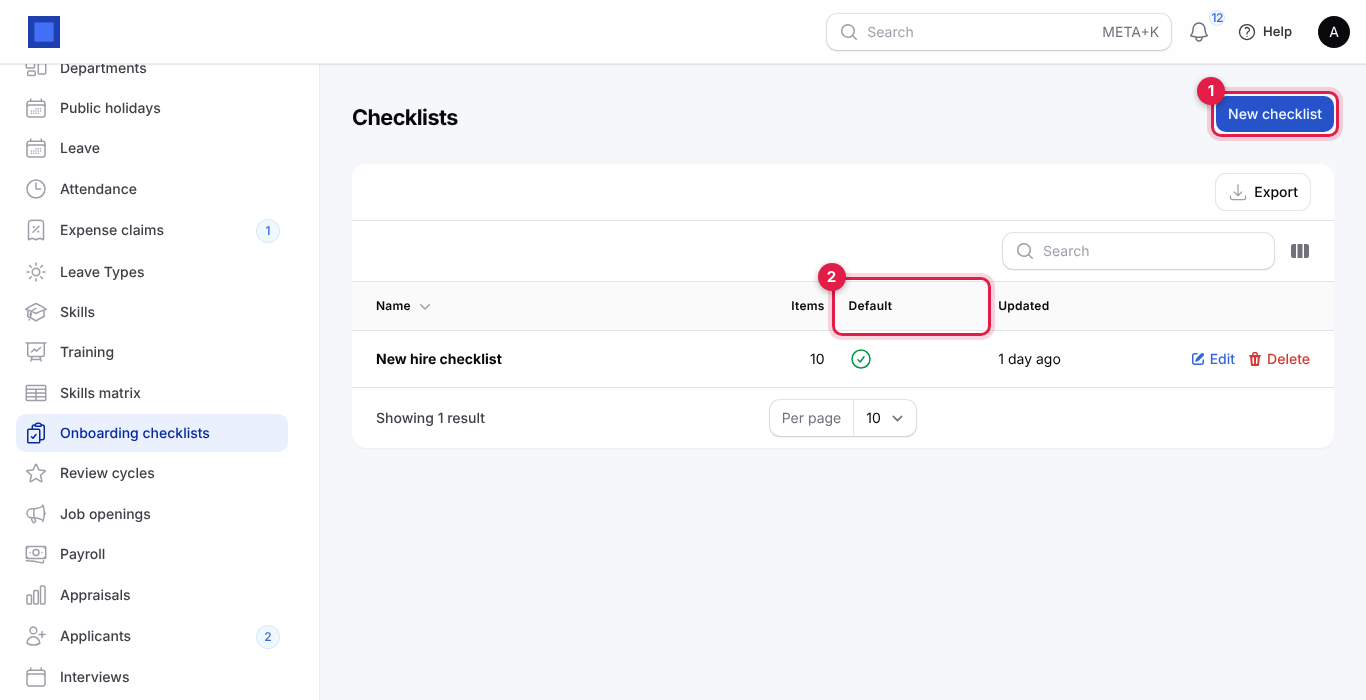
- Click Edit on a checklist (or New checklist, marker 1).
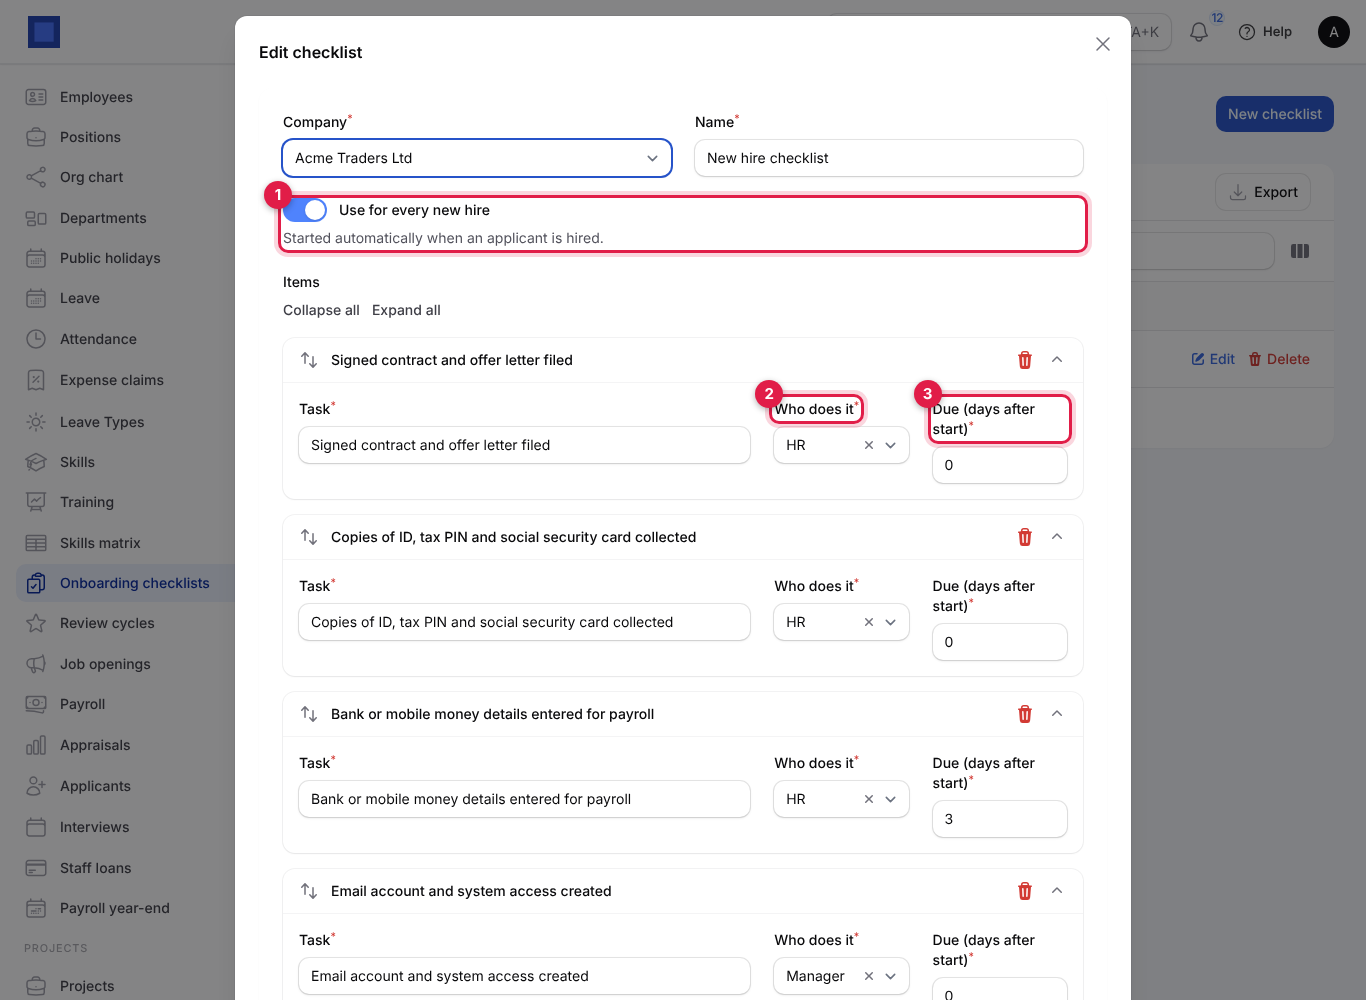
| Field | What to enter |
|---|---|
| Company (required), Name (required) | For example New hire checklist or Driver onboarding. |
| Use for every new hire (marker 1) | On for the checklist started automatically when an applicant is hired. |
| Items | One block per task. Drag the arrows to reorder, use the bin to remove, and Add an item at the bottom of the list to add one. |
| Task (required) | What has to be done, for example Copies of ID, tax PIN and social security card collected. |
| Who does it (required, marker 2) | HR, Manager or Employee. Tasks for the employee appear on their My onboarding page with a Done button. |
| Due (days after start) (required, marker 3) | 0 for the first day, 3 for the third day after the start date, and so on. |
- Click Save changes.
A separate Leaver checklist (resignation letter filed, handover notes, laptop and keys returned, system access removed, exit interview, final pay and leave balance computed, certificate of service, statutory bodies notified) is created the first time you offboard someone; its due days count from the last working day (negative numbers mean before it).
Follow a new hire's checklist
Open the employee and stay on the Checklists tab. The heading shows progress (marker 1, for example Onboarding · 4 of 10 done) and how many tasks are overdue.
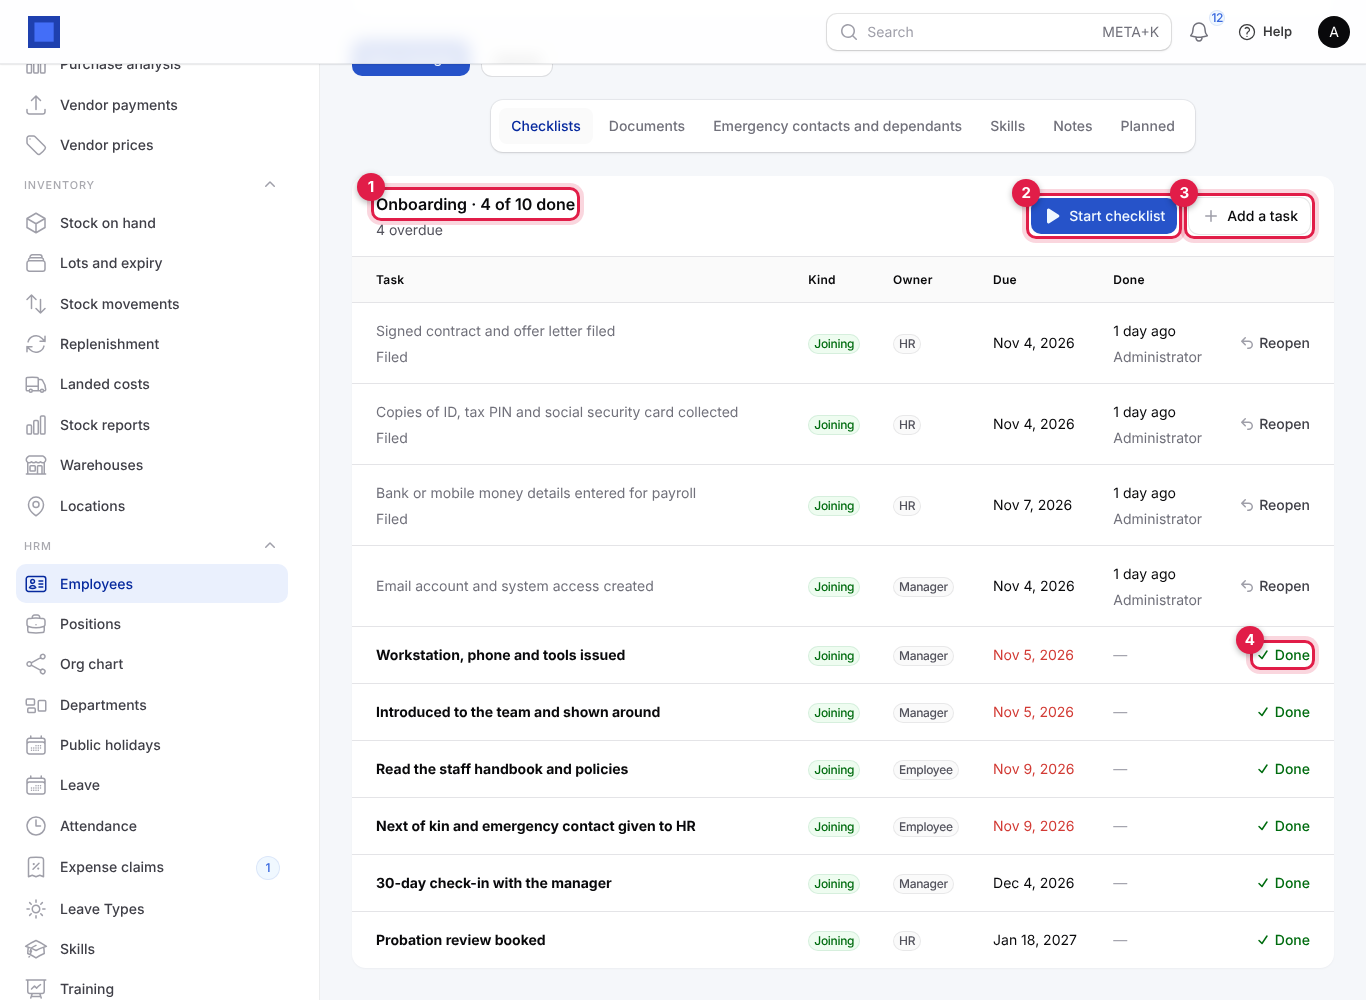
- Start checklist (marker 2): adds the tasks of a checklist you choose, with due dates counted from the start date. Use it for employees added by hand (hiring from Applicants starts the default checklist for you).
- Add a task (marker 3): a one-off task with Task, Who does it and a Due date.
- Done (marker 4): ticks a task off, with an optional Note; the table records who did it and when. Reopen undoes it.
Overdue tasks show their due date in red. Joining tasks have a green Joining badge and leaving tasks a red Leaving badge.
Offboard a leaver
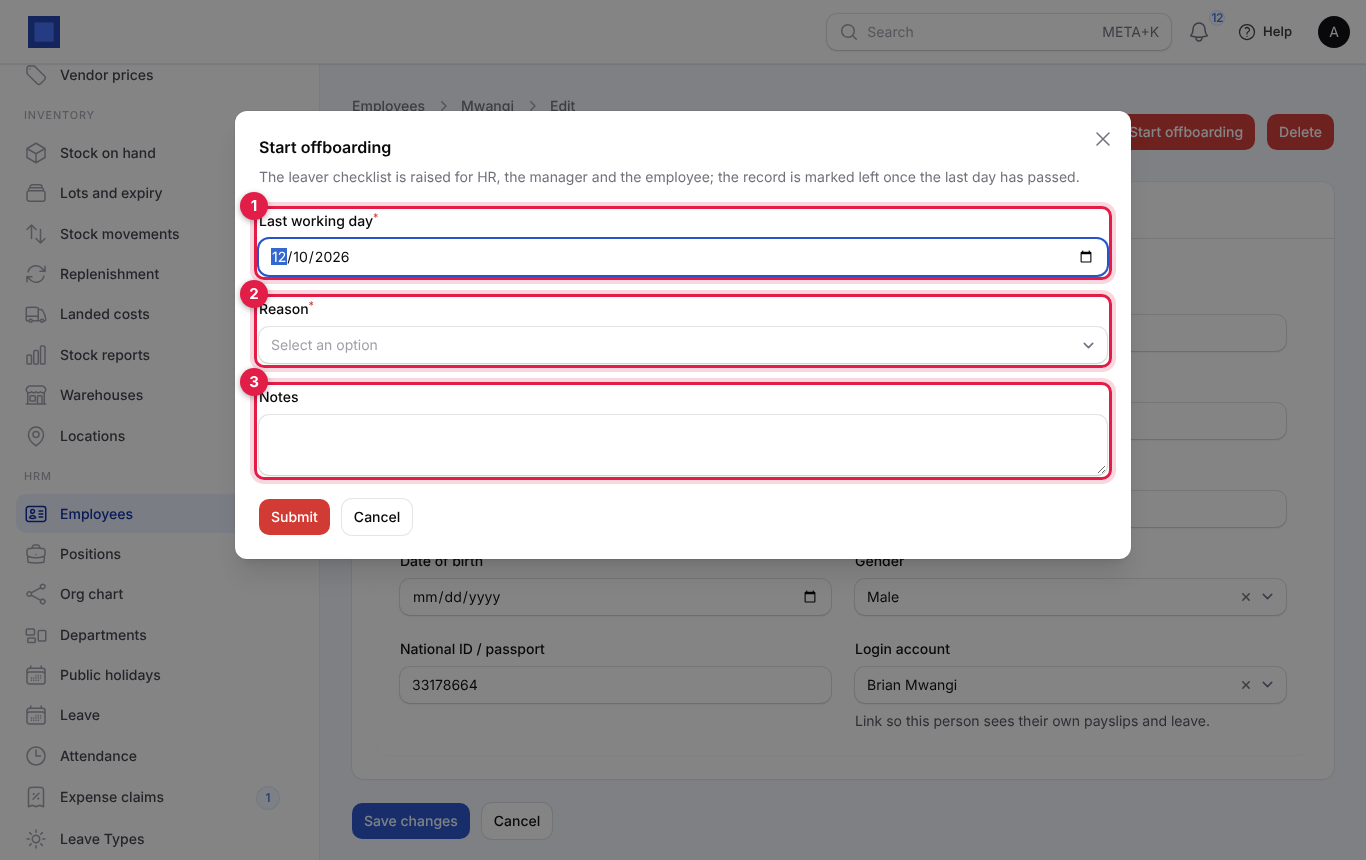
- Open the employee and click Start offboarding. The dialog explains: The leaver checklist is raised for HR, the manager and the employee; the record is marked left once the last day has passed.
| Field | What to enter |
|---|---|
| Last working day (required, marker 1) | Defaults to four weeks from today (a typical notice period). |
| Reason (required, marker 2) | Resignation, End of contract, Redundancy, Dismissal, Retirement, Death in service or Other. |
| Notes (marker 3) | For example the resignation date or terms agreed. |
- Click Submit. The employee's End date is set and the leaver tasks are added to the Checklists tab with due dates around the last day. If the last day is already past, the status changes to Left at once; otherwise a nightly job marks them Left the day after their last day.
- Work through the tasks. Remember to settle any staff loan balance and to include final dues in the last pay run. Once the status is Left, the person is no longer included in new pay runs.
Run appraisals and 360° feedback
Appraisals work in cycles: you set the goals and their weights once for everyone, launch the cycle, employees rate themselves, managers complete the review, and the overall rating is the weighted average.
Create and launch a review cycle
- Open HRM → Review cycles. Each cycle shows its period, due date, status, progress (3 of 6 completed) and average rating.
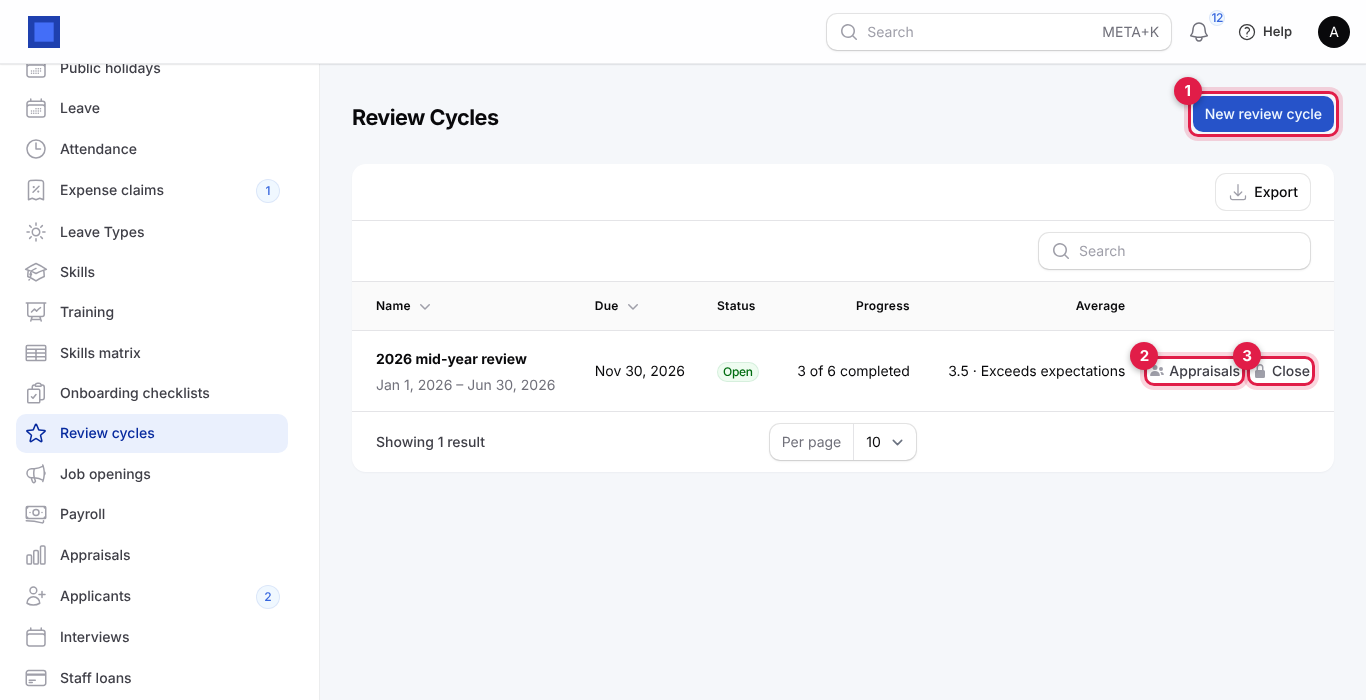
- Click New review cycle (marker 1).
| Field | What to enter |
|---|---|
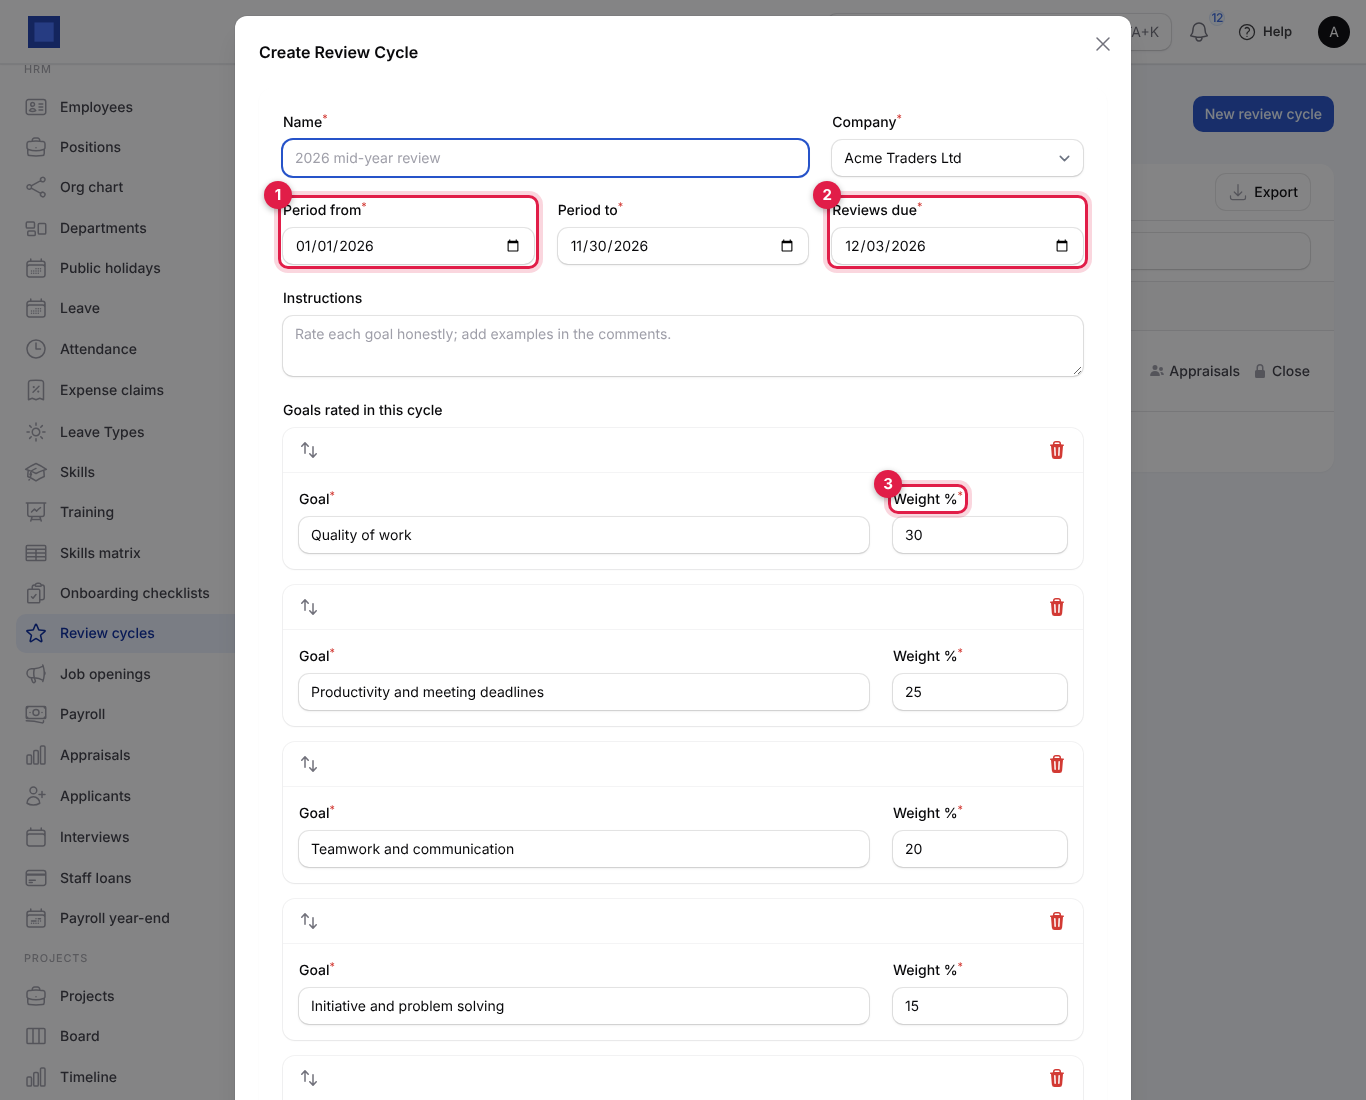
| Name (required) | For example 2026 mid-year review. |
| Company (required) | Whose staff are reviewed. |
| Period from / Period to (required, marker 1) | The period being reviewed. |
| Reviews due (required, marker 2) | Deadline shown to employees and reviewers. |
| Instructions | Shown at the top of the self-review, for example Rate each goal honestly; add examples in the comments. |
| Goals rated in this cycle | A starter set (quality of work, productivity, teamwork, initiative, attendance) is filled in. Each has a Goal and a Weight % (marker 3) saying how much it counts in the overall rating. Use Add a goal below the list for more. Weights do not have to add up to 100; they are used relative to each other. |
- Click Create. The cycle is a Draft: you can still edit or delete it.
- When ready, click Launch on the row and confirm. Every active employee gets an appraisal with the cycle's goals, assigned to their department manager as reviewer. Employees with a login get a notification that their self-review is open. The cycle becomes Open.
Cycle statuses: Draft (being prepared) → Open (launched; self-reviews and reviews can be done) → Closed (click Close, marker 3; no more changes). Appraisals (marker 2) opens the appraisals of that cycle.
Complete appraisals
- Open HRM → Appraisals. Each row shows the employee, cycle, reviewer, status, 360° summary, overall rating and completion date. Filter by Cycle, Status or Employee. Scroll the table to the right for the actions.
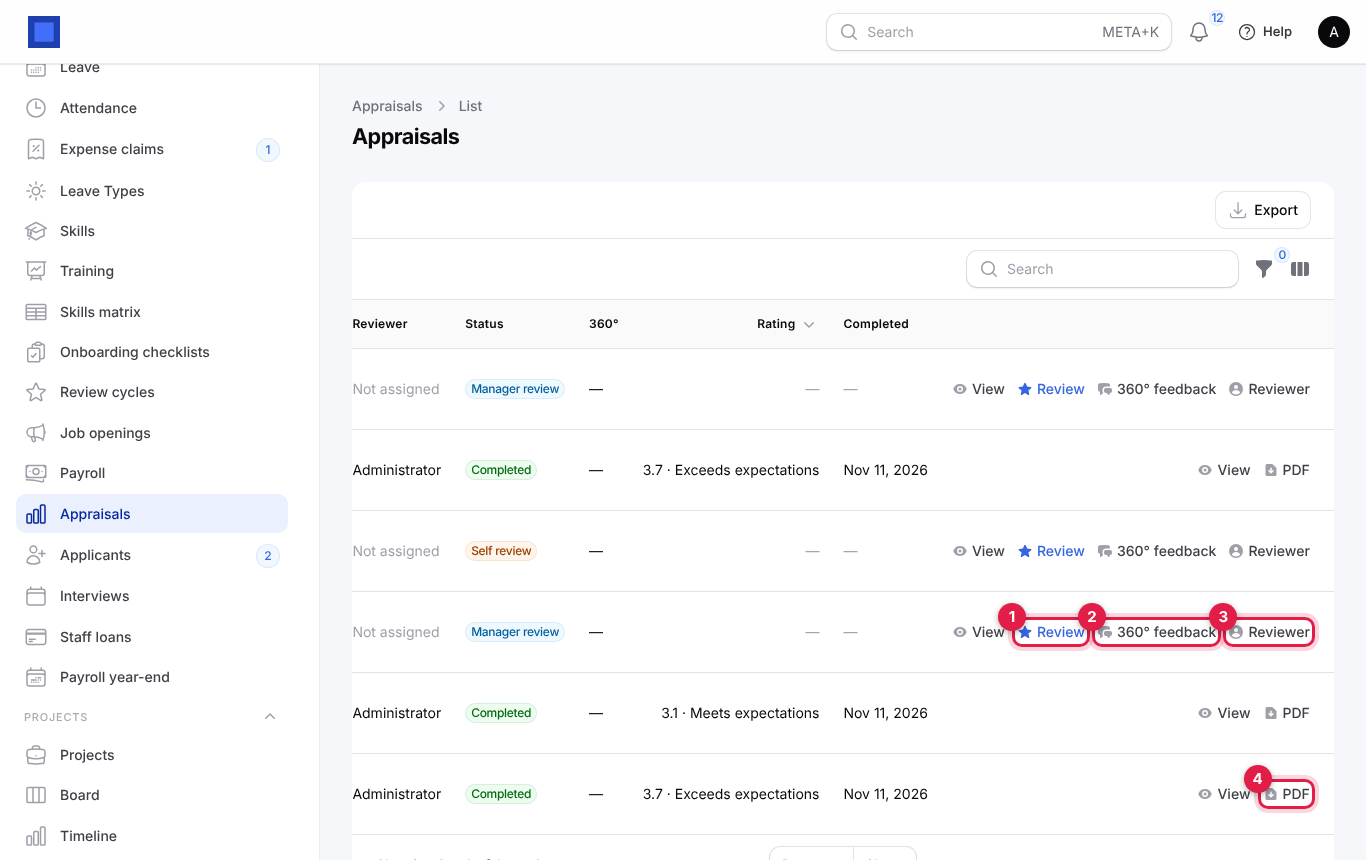
The actions are:
- View: the whole appraisal read-only, with self and manager ratings side by side.
- Review (marker 1): the manager's review (shown to HR and to the assigned reviewer).
- 360° feedback (marker 2): ask colleagues for feedback.
- Reviewer (marker 3): change who reviews this appraisal, for example when a department has no manager with a login (the column then says Not assigned).
- PDF (marker 4): download the completed appraisal as a PDF for the personnel file.
- Click Review. The dialog shows the employee's own comment at the top and, beside each goal, their self-rating.
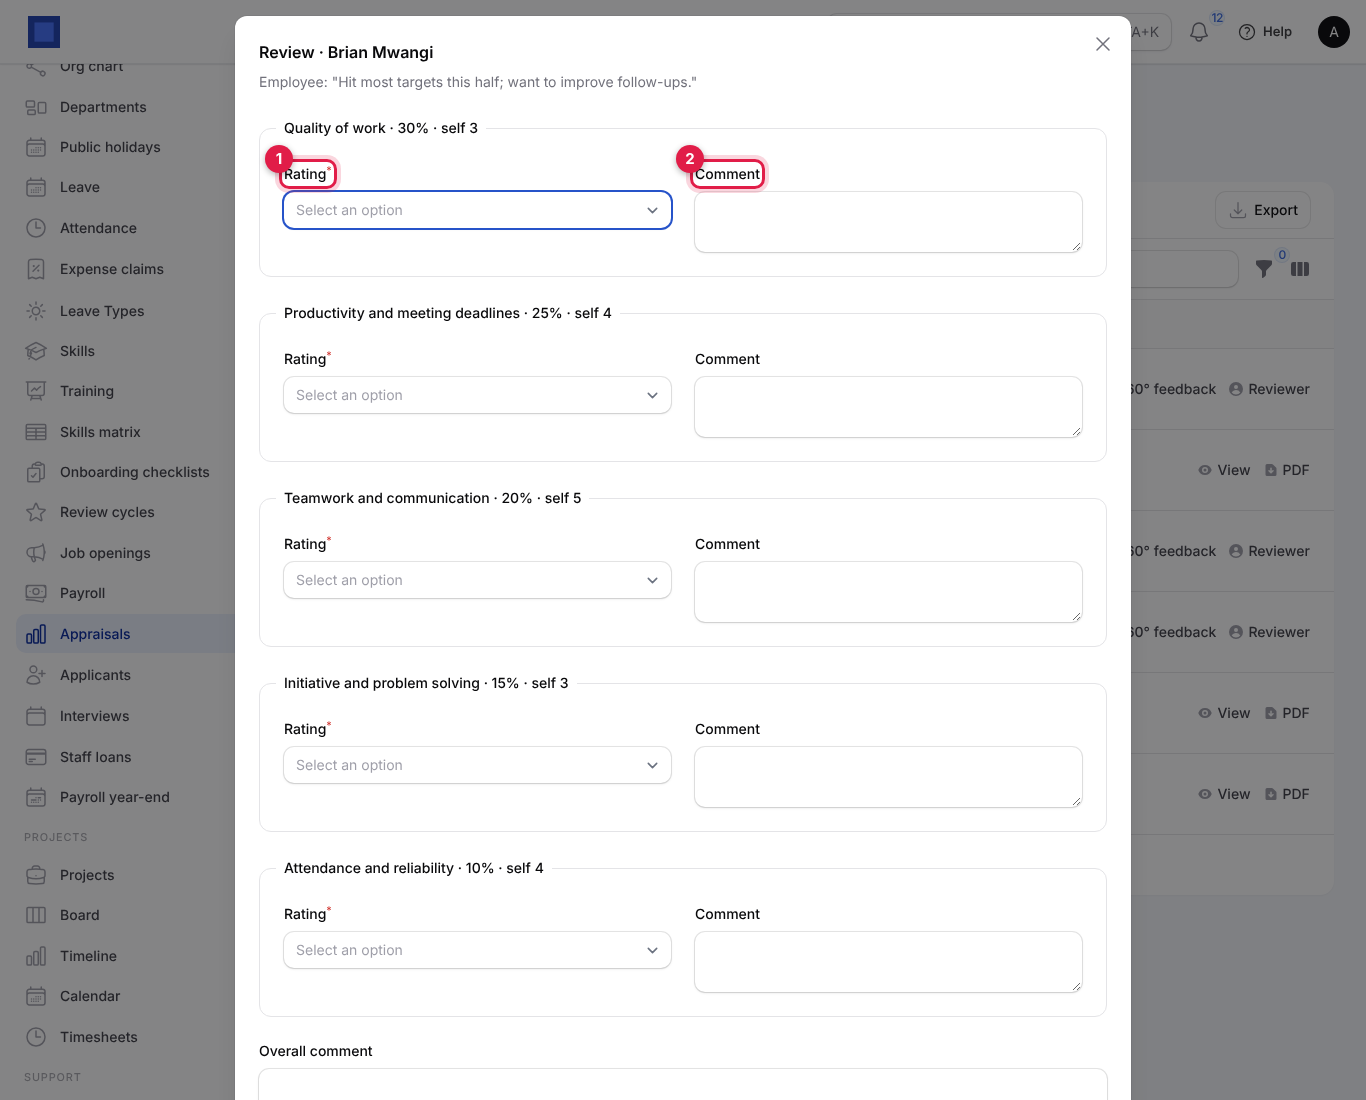
- For every goal choose a Rating (marker 1): 1 · Below expectations, 2 · Needs improvement, 3 · Meets expectations, 4 · Exceeds expectations, 5 · Outstanding, and add a Comment (marker 2). Scroll down to write the Overall comment, then click Submit. Every goal must be rated.
- The appraisal is Completed. The overall rating is the weighted average of your ratings, shown with its band (for example 3.7 · Exceeds expectations), and the employee is notified that their review is complete.
Appraisal statuses: Self review (waiting for the employee) → Manager review (employee submitted; the reviewer is notified) → Completed. A manager can complete the review even if the employee has not done a self-review.
Ask for 360° feedback
- Click 360° feedback on the appraisal. The dialog says how many colleagues have answered so far.
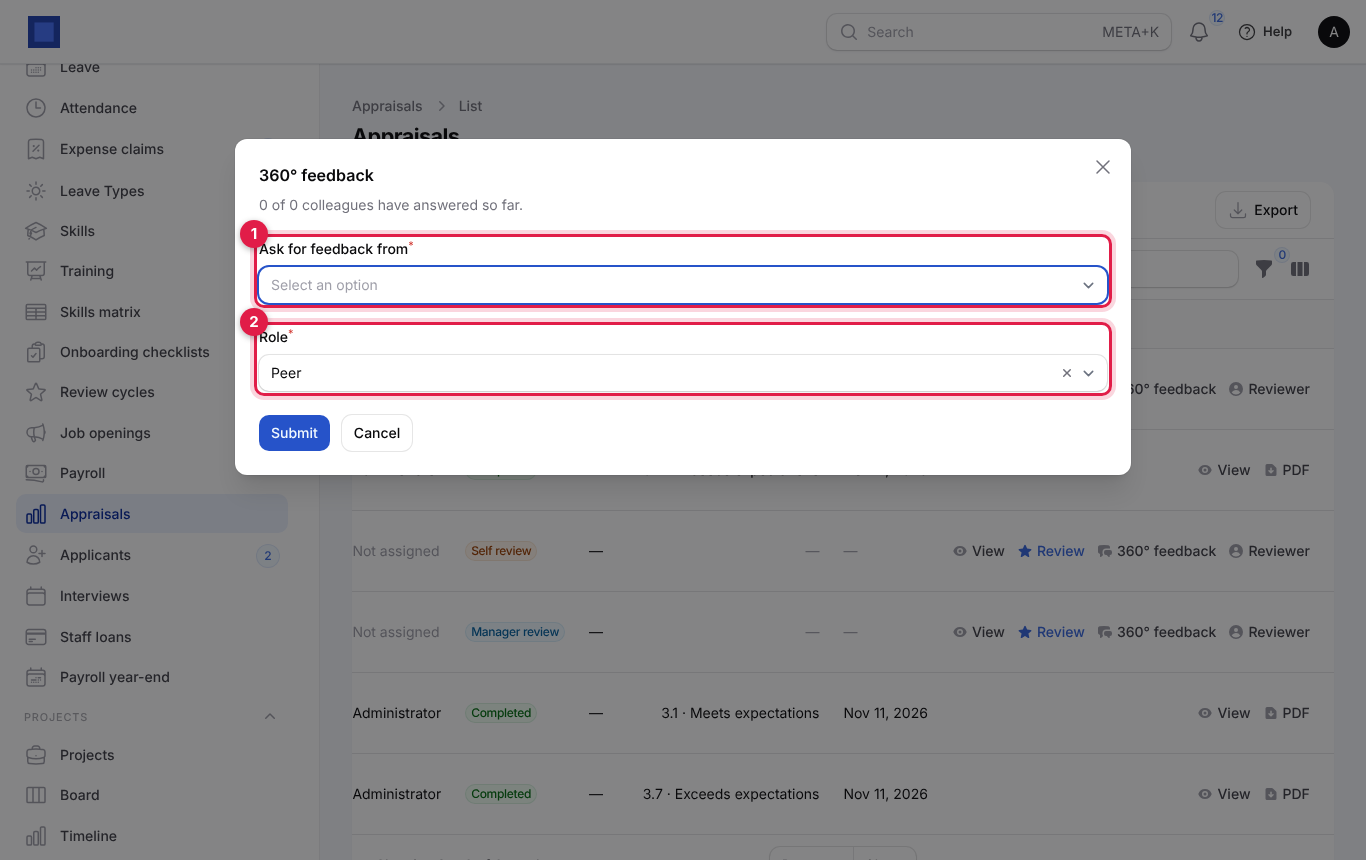
- In Ask for feedback from (marker 1) pick one or more colleagues (they need a login). Choose their Role (marker 2): Peer, Direct report, Other manager or Internal customer. Click Submit.
- Each colleague is notified and answers from Me → My appraisals with Give feedback, rating each goal from 1 to 5 and adding a comment. The 360° column shows the average and how many have answered, for example 3.8 · 2/3.
Run training and track skills
Skills
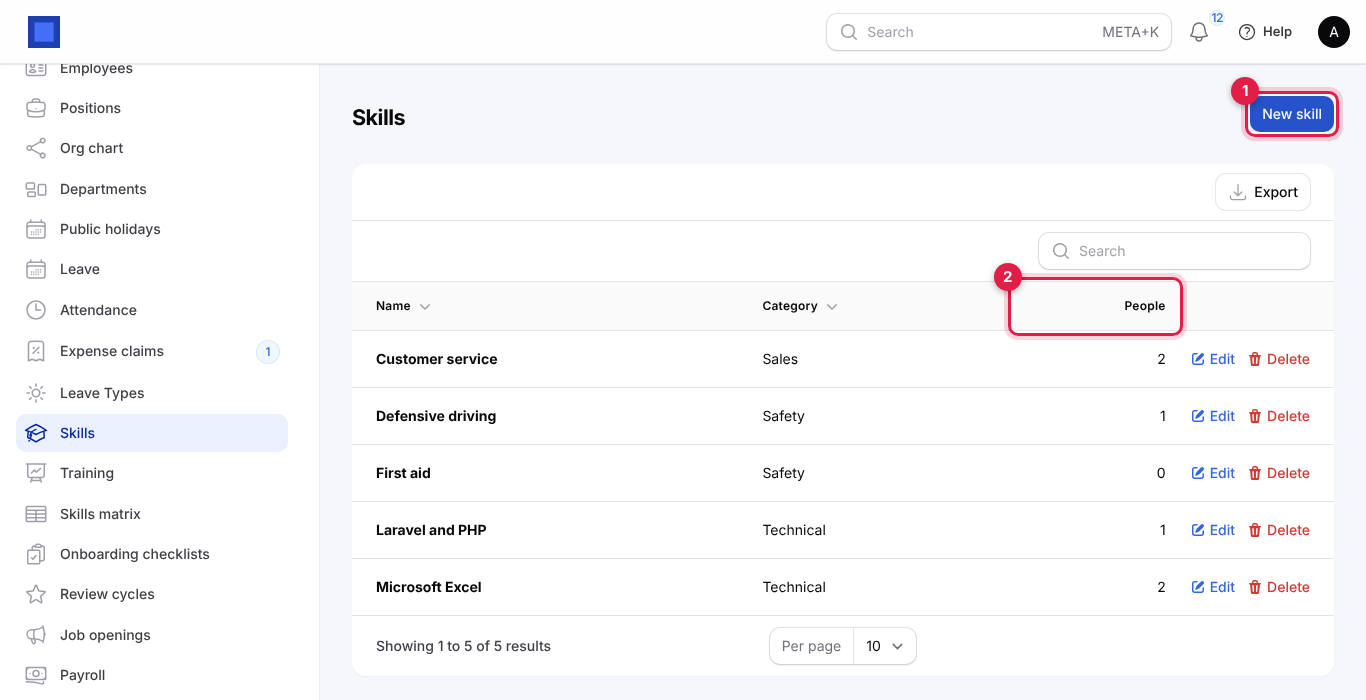
Open HRM → Skills to keep the list of skills you track. Click New skill (marker 1), choose the Company, type the Name and a Category (Technical, Sales, Safety, Languages). The People column (marker 2) counts who holds each skill. Skills can also be created from an employee's Skills tab.
Training courses
- Open HRM → Training.
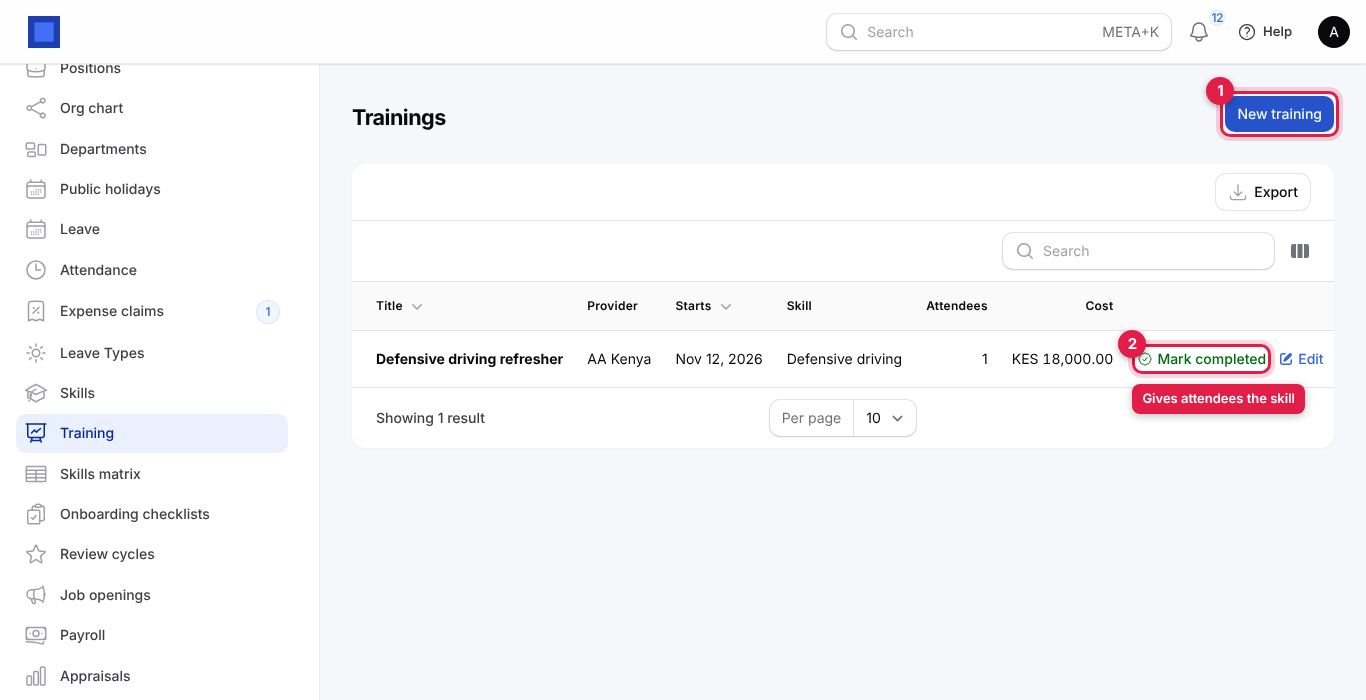
- Click New training (marker 1), or Edit on a course.
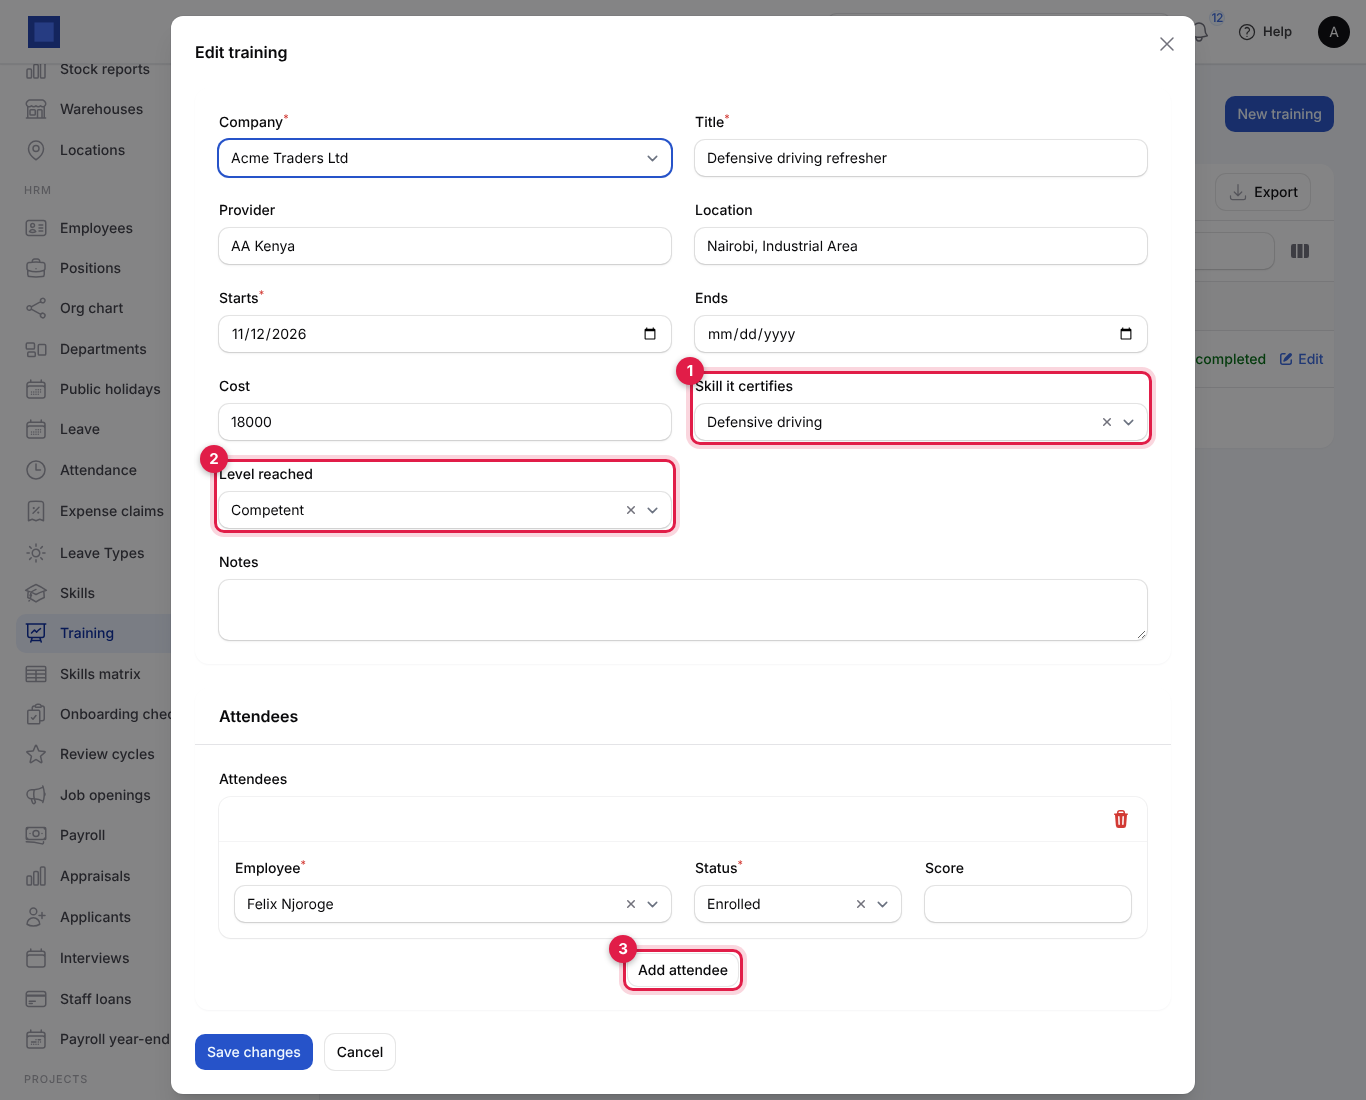
| Field | What to enter |
|---|---|
| Company (required), Title (required) | For example Defensive driving refresher. |
| Provider, Location | In-house, KIM, AA Kenya, Coursera… |
| Starts (required), Ends | Course dates. |
| Cost | What the course costs, for your training spend reports. |
| Skill it certifies (marker 1) | Optional. When the course is completed, attendees get this skill. |
| Level reached (marker 2) | The level they get, 1 to 5. |
| Notes | Anything else. |
| Attendees | Click Add attendee (marker 3) for each person: the Employee, their Status (Enrolled, Completed or Did not pass) and an optional Score out of 100. |
- Click Create (or Save changes).
- After the course, click Mark completed (marker 2 on the list), set Completed on and click Submit. Every enrolled attendee becomes Completed and, when the course certifies a skill, gets it at the level set (it appears on their Skills tab and in the skills matrix). Mark people who failed as Did not pass before you do this.
Skills matrix
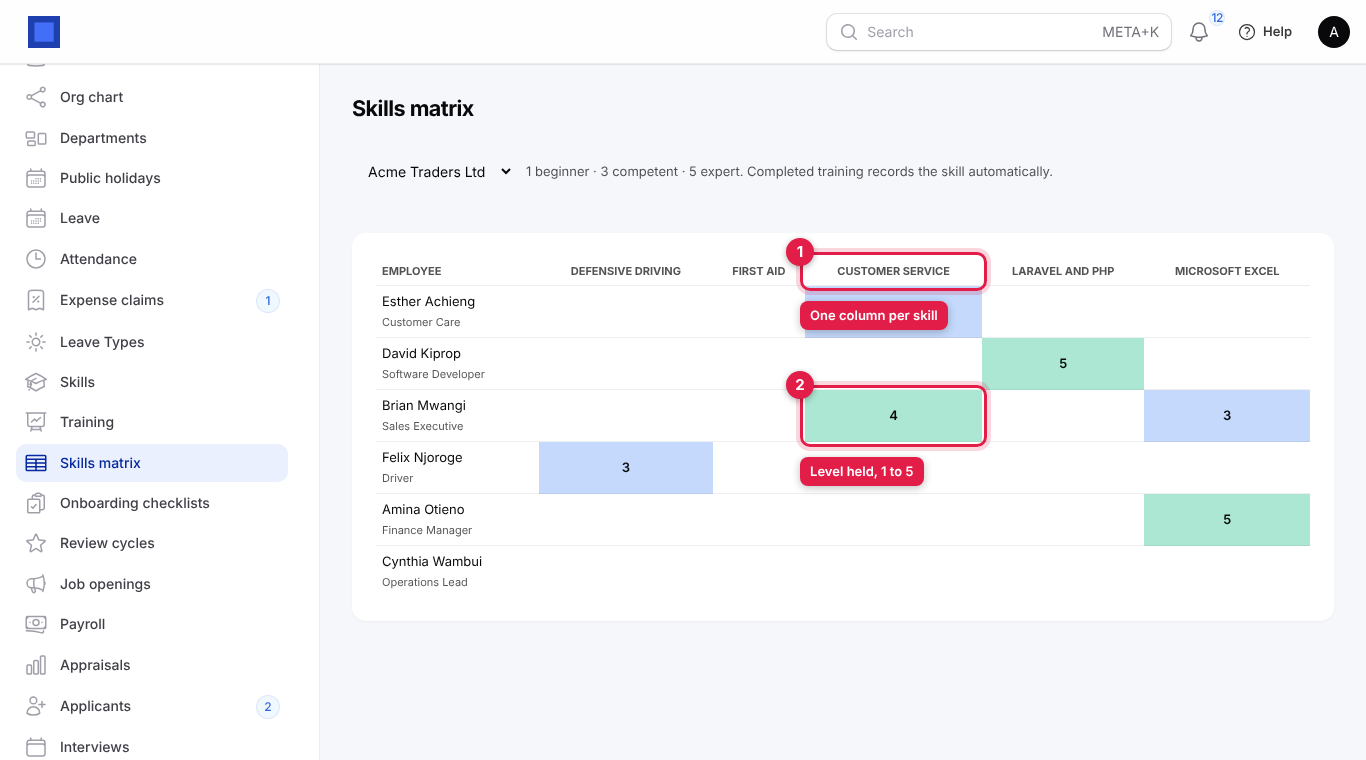
Open HRM → Skills matrix to see everyone against every skill (marker 1: one column per skill), with the level each person holds (marker 2) coloured from beginner to expert. Use it to spot gaps before assigning work or planning training. Pick another company from the list at the top if you have several.
Expense claims
Employees submit expense claims with a receipt photo from Me → My expenses (see Employee self-service). Everyone with hr.expenses.approve is notified of each new claim. In HRM → Expense claims, the menu badge counts claims waiting for a decision; each row has Approve (optional note), Reject (reason required) and, once approved, Mark paid, where you choose the Expense category (account) and the account it was Paid from. With Accounting on, marking paid records the expense in the books. The employee is notified of each decision. Statuses: Submitted → Approved or Rejected → Paid.
Common questions
An employee cannot see My payslips or My leave. Their user account is not linked. Open the employee, go to the Person tab and pick their user in Login account.
Why was a leave request refused? The type has a yearly limit and the request is larger than the balance. The message says how many days are left. Check the leave type's Accrual (monthly accrual gives fewer days early in the year) and Carry over settings.
Do weekends and holidays count as leave? No. Working days are counted Monday to Friday, without the public holidays in HRM → Public holidays. Adjust Working days by hand for half days or Saturday workers.
Our careers page shows Not Found. Switch on Public careers page in Settings → Preferences → HRM and save. Also check the opening is Open and its closing date has not passed.
Can someone check in from home? Only if no geofence is set, or home is inside the radius. Without a geofence, anyone can check in from anywhere and the location is recorded for you to review.
The biometric import skipped rows. The staff numbers on the device must match Staff number on the employee. Edit the employee numbers or re-enrol people on the device, then import again; existing days are updated, not duplicated.
Who reviews an appraisal when a department has no manager? Nobody is assigned. Use Reviewer on the appraisal to pick someone.
How do I stop paying someone who left? Start offboarding with their last day. A pay run includes active employees whose end date is on or after the start of the pay period, so they get a payslip for their final month and none after it. If a draft run was created before you recorded the leaving date, click Recalculate on it.