Integrations: API, webhooks, single sign-on, e-invoicing and payment gateways
This page is for the owner, the administrator or the developer who connects NaliSuite to other systems: the REST API with API tokens or OAuth clients, webhooks that tell other systems when something happens, sign-in with Google or Microsoft, electronic invoicing with the tax authority (KRA eTIMS in Kenya, FIRS in Nigeria, ETA in Egypt), and the payment gateways your customers pay through. The API and webhook screens are under Settings (API tokens, OAuth clients, Webhooks); the rest are tabs of Settings → Preferences.
Who can do what. The API tokens, OAuth clients and Webhooks screens need the core.integrations.view permission; creating OAuth clients and webhooks needs core.integrations.manage; changing Preferences needs core.settings.manage. Owners and admins have all three. A user with core.integrations.view can create personal API tokens, and a token can only do what its user is allowed to do. Users with core.integrations.manage see everyone's tokens and clients and can revoke them.
The REST API
NaliSuite has a JSON REST API at https://<your workspace address>/api/v1 (for example https://acme.nalisuite.com/api/v1). It covers:
| Resource | Endpoints |
|---|---|
| Who am I | GET /me |
| Contacts | GET /contacts, POST /contacts, GET /contacts/{id}, PATCH /contacts/{id} |
| Products | GET /products, POST /products, GET /products/{id} |
| Invoices | GET /invoices, POST /invoices (creates a draft), GET /invoices/{id}, POST /invoices/{id}/issue |
| Payments | GET /payments, POST /payments |
| Support tickets | GET /tickets, POST /tickets, GET /tickets/{id} |
The full machine-readable description (OpenAPI 3.1) is at https://<your workspace address>/api/v1/openapi.json, with every field, filter and response. Import it into Postman, Insomnia or a code generator, or give it to your developer. It is also linked as OpenAPI description at the top of Settings → API tokens.
Rules that apply to every call:
- Send
Authorization: Bearer <token>andAccept: application/json. - Lists are paginated:
?page=2&per_page=50(50 by default, at most 200 per page). - Each token can make 120 requests a minute; above that you get HTTP 429 and should wait.
- Amounts are decimal strings; dates are
YYYY-MM-DD. - A read-only token gets HTTP 403 on
POSTandPATCH.
Create an API token
Use a personal API token for your own scripts, Zapier, Make, a WhatsApp bot or a spreadsheet sync.
- Open Settings → API tokens. The subheading (marker 2) shows the base URL and the OpenAPI description link. Each token shows its name, the first characters of the token, its user, abilities, when it was Last used (marker 3), when it expires and when it was created.
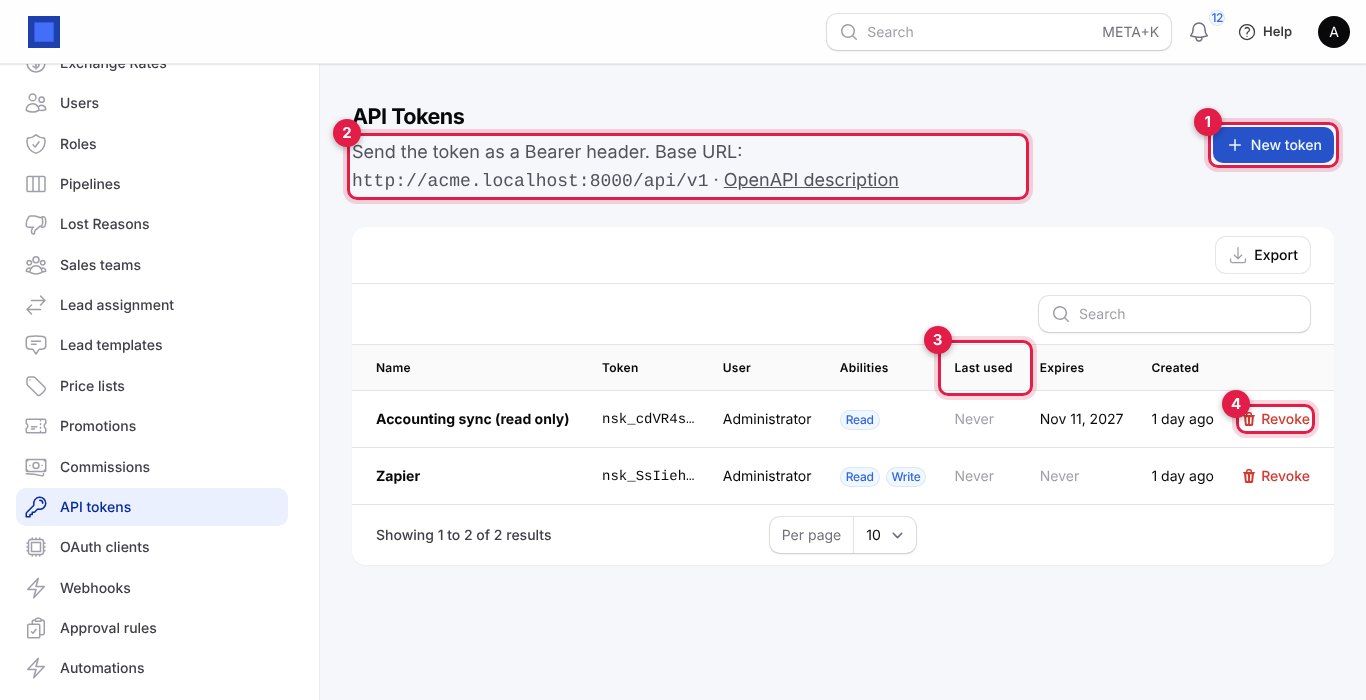
- Click New token (marker 1).
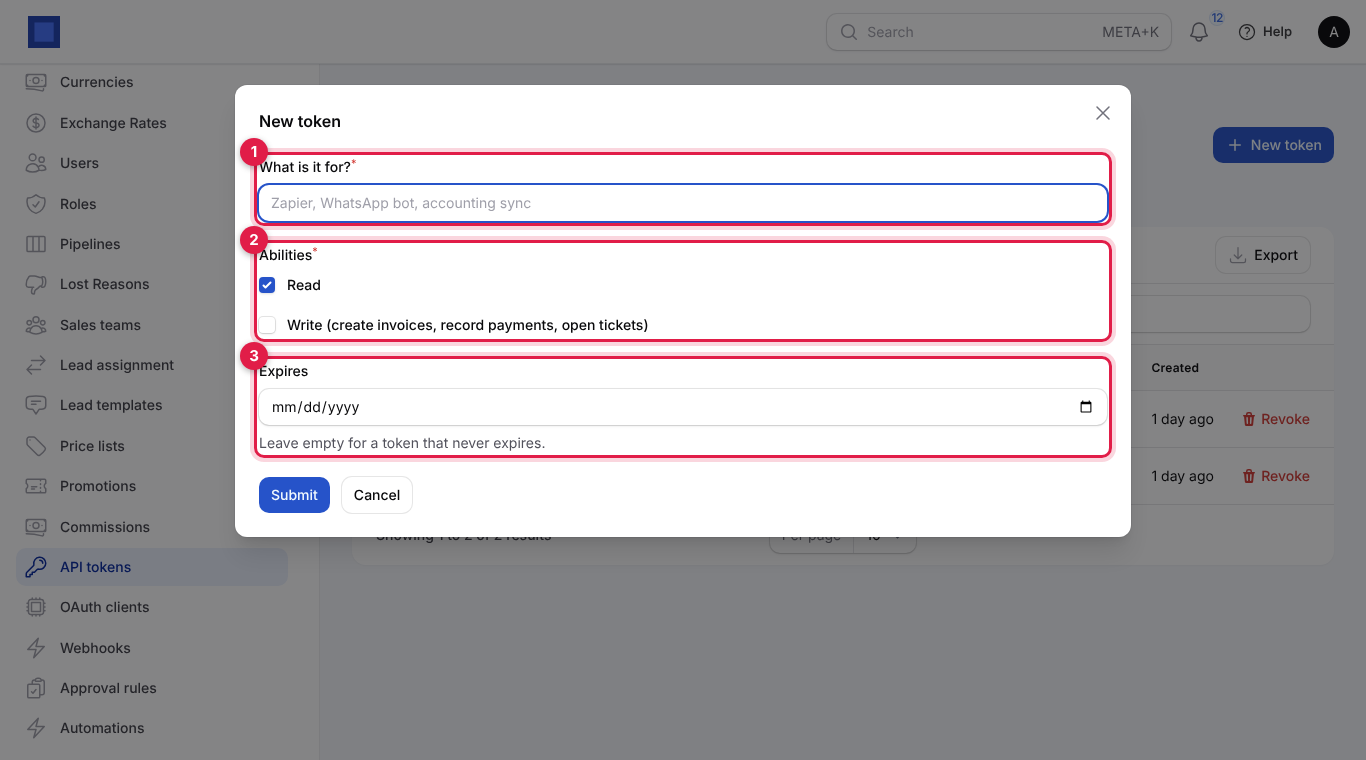
| Field | What to enter |
|---|---|
| What is it for? (required, marker 1) | For example Zapier or Accounting sync, so you know what breaks if you revoke it. |
| Abilities (required, marker 2) | Read (list and view) and/or Write (create invoices, record payments, open tickets). Give only what the integration needs. |
| Expires (marker 3) | A date after which the token stops working. Leave empty for a token that never expires. |
- Click Submit. A message shows the token once: Token created. Copy it now: it will not be shown again. Copy it into the other system straight away. NaliSuite only keeps a fingerprint, so a lost token cannot be shown again; create a new one.
- To cut off an integration, click Revoke (marker 4) on its token. It stops working at once.
Tip: create the token while signed in as a user with a limited role (for example a "sync" user) rather than as the owner, so the token cannot do more than the integration needs.
Create an OAuth client
Use an OAuth client for software that runs on its own server (a website checkout, Power BI, a warehouse scanner app): it exchanges a client ID and secret for a bearer token that lasts one hour, so no long-lived token is stored.
- Open Settings → OAuth clients. The subheading (marker 2) shows the token endpoint:
POST https://<your workspace address>/api/v1/oauth/tokenwithgrant_type=client_credentials.
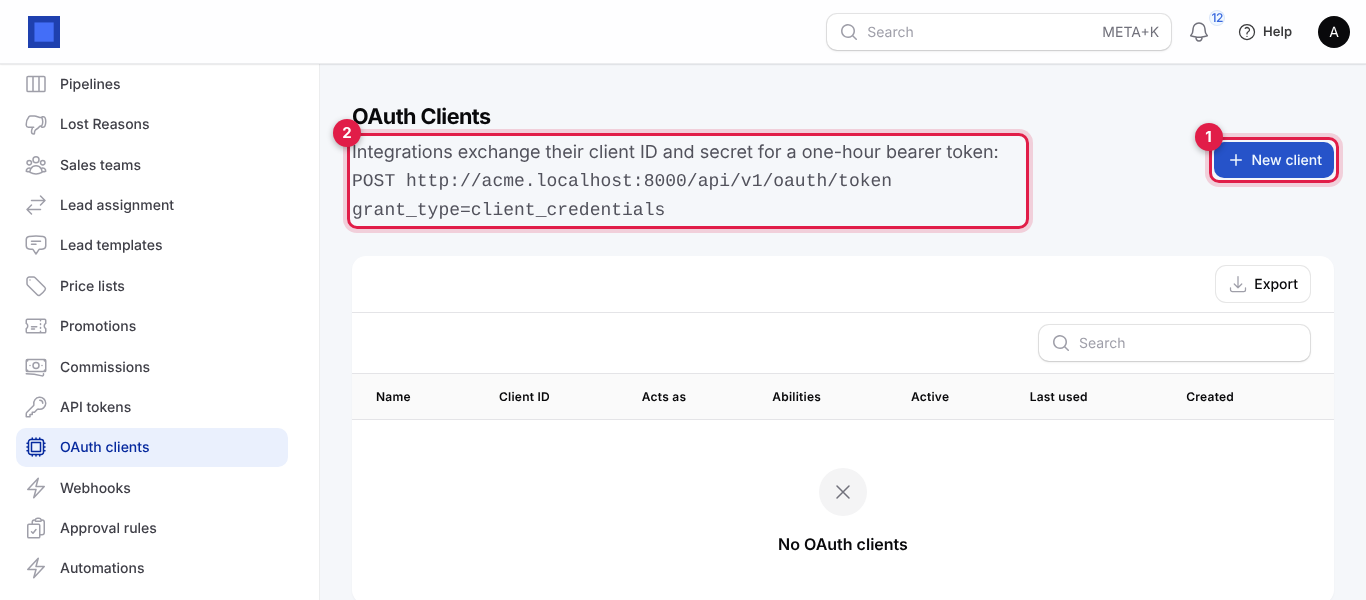
- Click New client (marker 1).
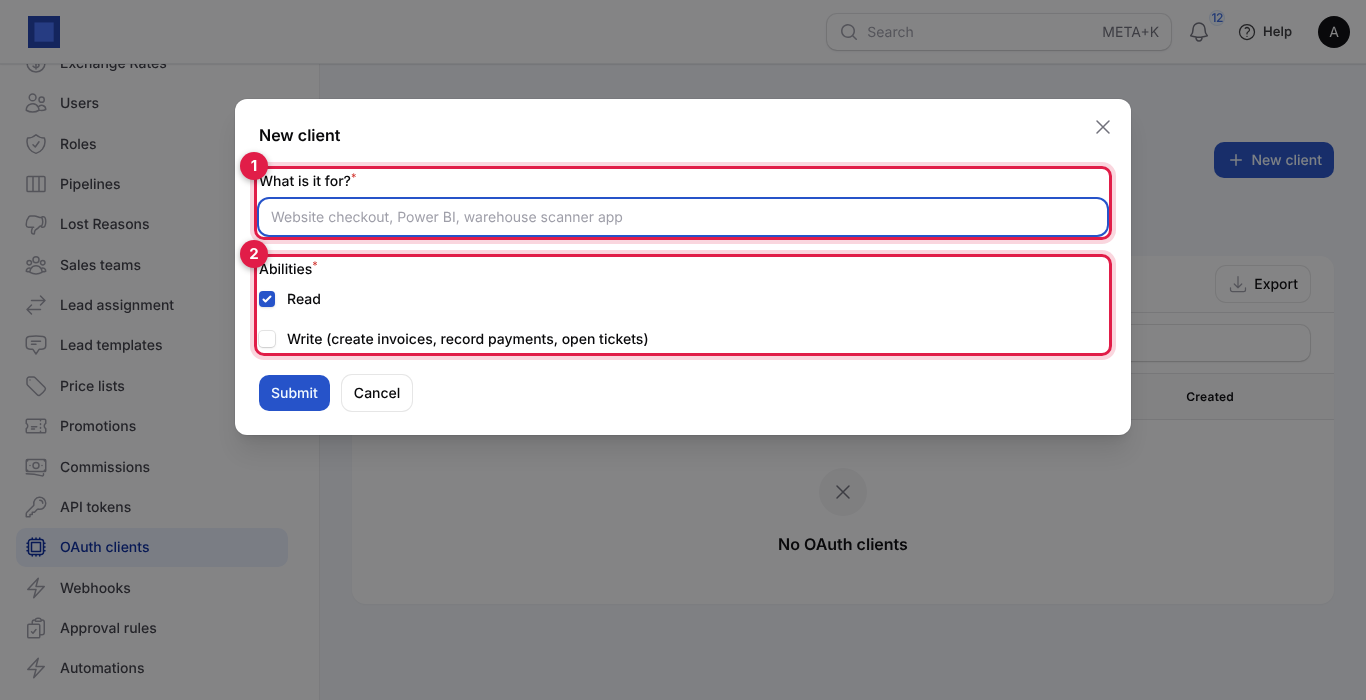
- Type What is it for? (marker 1), tick the Abilities (marker 2) and click Submit. The message shows the Client ID and the Secret once: copy both.
- The integration calls the token endpoint with
grant_type=client_credentials,client_idandclient_secret(as form fields or HTTP Basic). The answer containsaccess_token,token_type(Bearer),expires_in(3600 seconds) andscope. It then calls the API with that token and asks for a new one when it expires.
On each client row: Client ID (copy button), Acts as (the user who created it; the client has that user's permissions), abilities, Active, last used. Rotate secret issues a new secret (the old one stops working immediately; tokens already issued stay valid until they expire). Disable / Enable switches the client off and on. Delete removes it.
Webhooks
A webhook sends a message to another system the moment something happens in NaliSuite, for example invoice issued to Zapier or ticket opened to your WhatsApp bot.
- Open Settings → Webhooks. Each endpoint shows its name and URL, the events it receives, whether it is Active, the Last delivery (marker 2) and the number of consecutive Failures (marker 3).
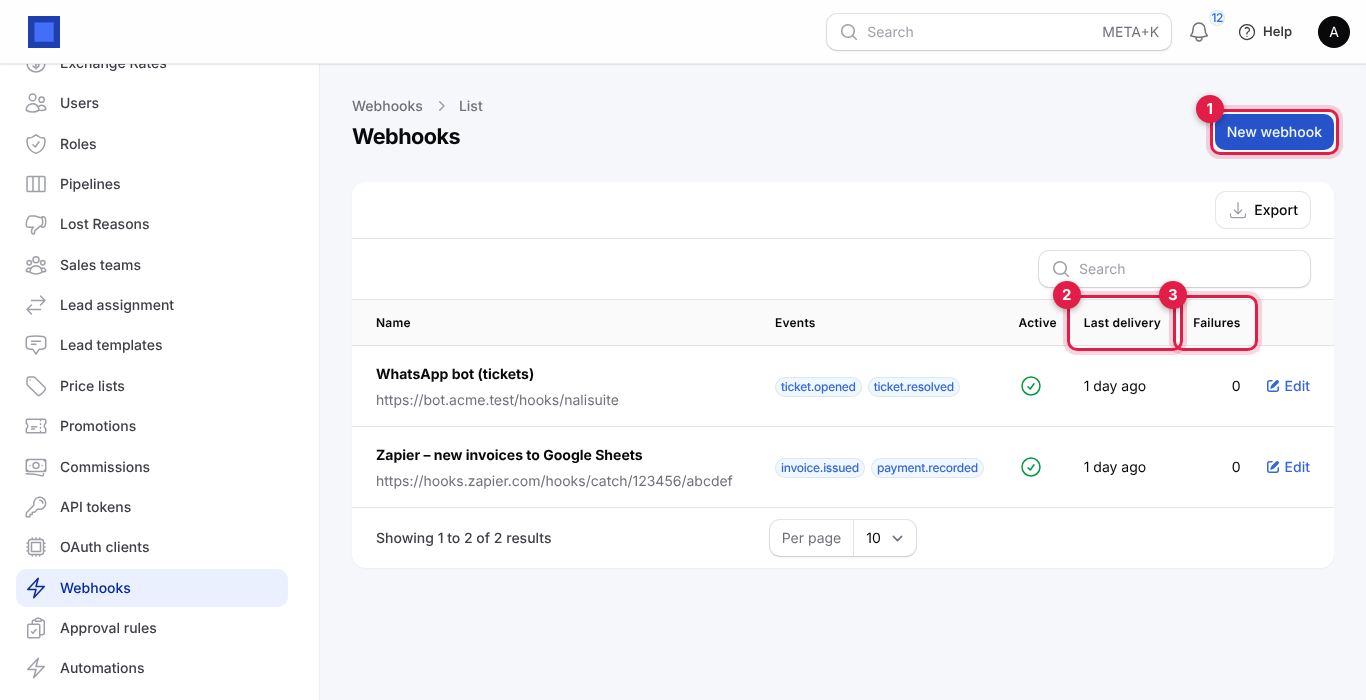
- Click New webhook (marker 1).
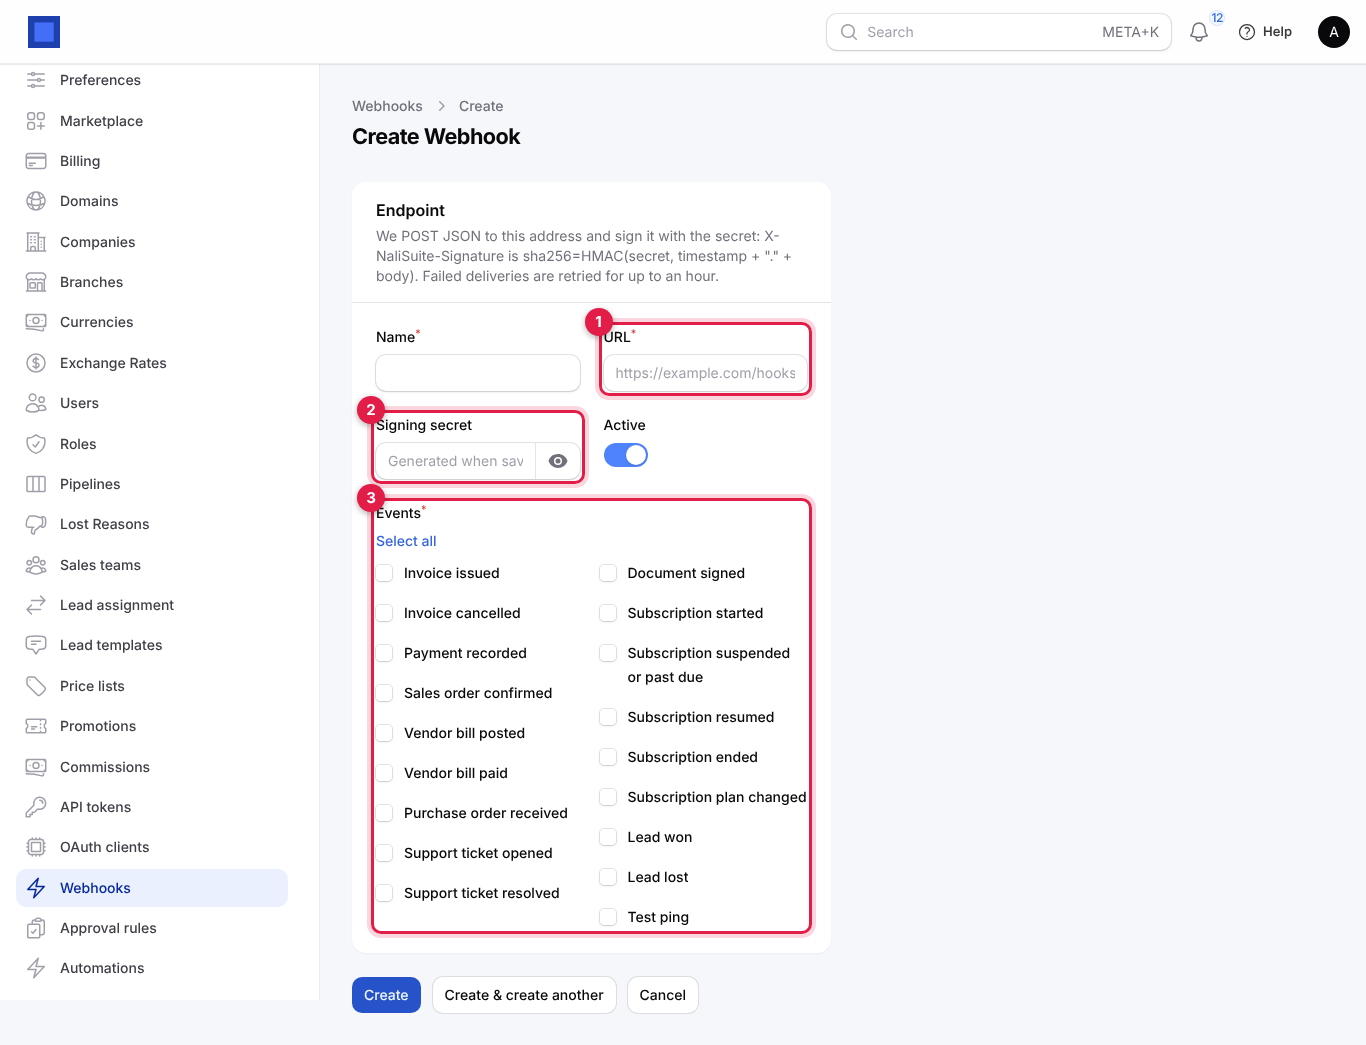
| Field | What to enter |
|---|---|
| Name (required) | For example Zapier – new invoices to Google Sheets. |
| URL (required, marker 1) | The https:// address that receives the messages, for example a Zapier Catch Hook URL. |
| Signing secret (marker 2) | Leave empty and one is generated when you save; or paste the secret the receiver expects. Click the eye to reveal it. |
| Active | Off pauses deliveries. |
| Events (required, marker 3) | Tick what to send: Invoice issued, Invoice cancelled, Payment recorded, Sales order confirmed, Vendor bill posted, Vendor bill paid, Purchase order received, Support ticket opened, Support ticket resolved, Document signed, Subscription started, Subscription suspended or past due, Subscription resumed, Subscription ended, Subscription plan changed, Lead won, Lead lost, Test ping. Select all ticks every event. |
- Click Create.
How messages are sent: NaliSuite POSTs JSON to the URL with these headers: X-NaliSuite-Event (the event name), X-NaliSuite-Timestamp, and X-NaliSuite-Signature: sha256=<HMAC>, where the HMAC is SHA-256 of timestamp + "." + raw body with your signing secret. The receiver should recompute it and reject messages that do not match. Any answer other than 2xx counts as a failure; failed messages are retried after 1, 5, 15 and 60 minutes, then marked Failed. A success resets the failure count.
Test and troubleshoot a webhook
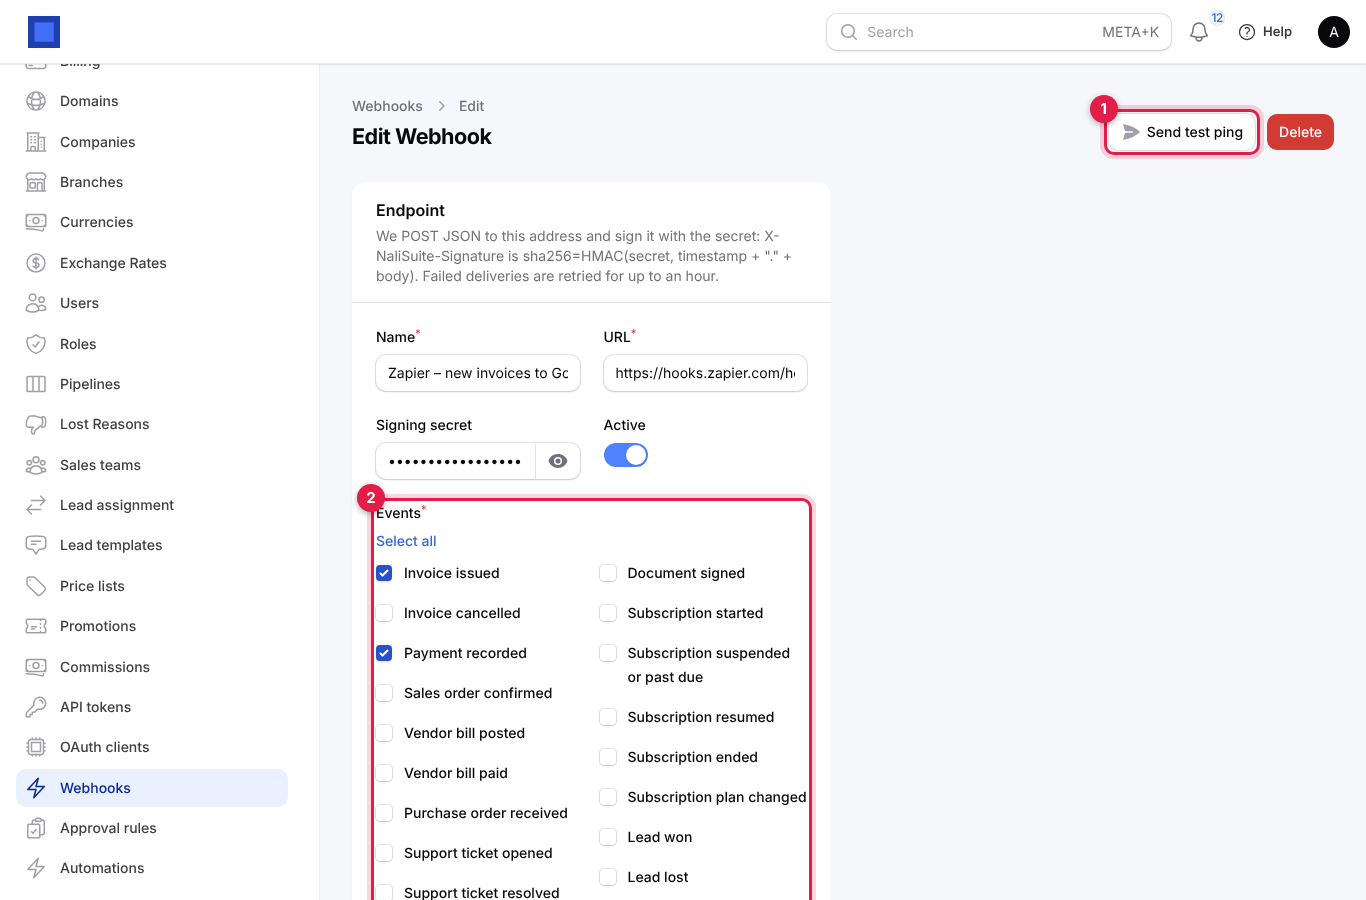
Open the webhook. Send test ping (marker 1) sends a ping event at once so you can check the receiver; the Events list (marker 2) shows what is subscribed.
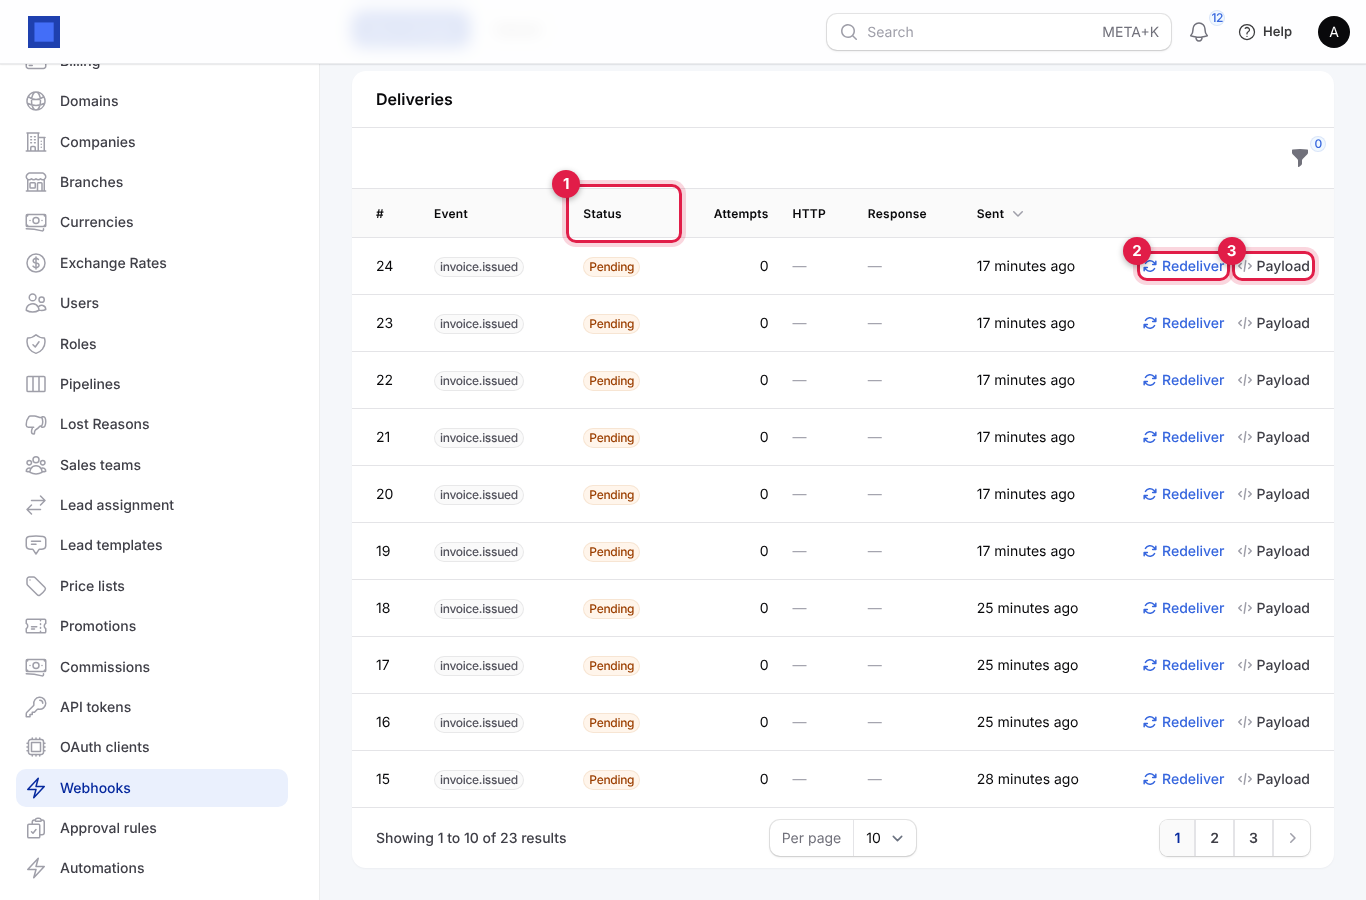
The Deliveries table at the bottom lists every message with its event, Status (marker 1: Pending, Delivered, Failed), number of attempts, the HTTP code and response from the receiver, and when it was sent. Filter by status. Redeliver (marker 2) sends a message again (for example after fixing the receiver); Payload (marker 3) shows the exact JSON that was sent.
Sign in with Google or Microsoft
Staff can sign in with their Google Workspace or Microsoft 365 account instead of a password. This is set up in two places.
1. The provider app (platform administrator)
The administrator of your NaliSuite installation registers one OAuth app per provider and enters it in the staff panel under Settings → Security → Single sign-on (marker 1): Google client ID (marker 2) and Google client secret, Microsoft application (client) ID and Microsoft client secret, and Microsoft directory (tenant) (marker 3: common accepts any work or personal account; a tenant ID limits sign-in to one organisation). The redirect URI to register with Google and Microsoft is https://<workspace domain>/app/sso/<provider>/callback, for example https://acme.nalisuite.com/app/sso/google/callback.
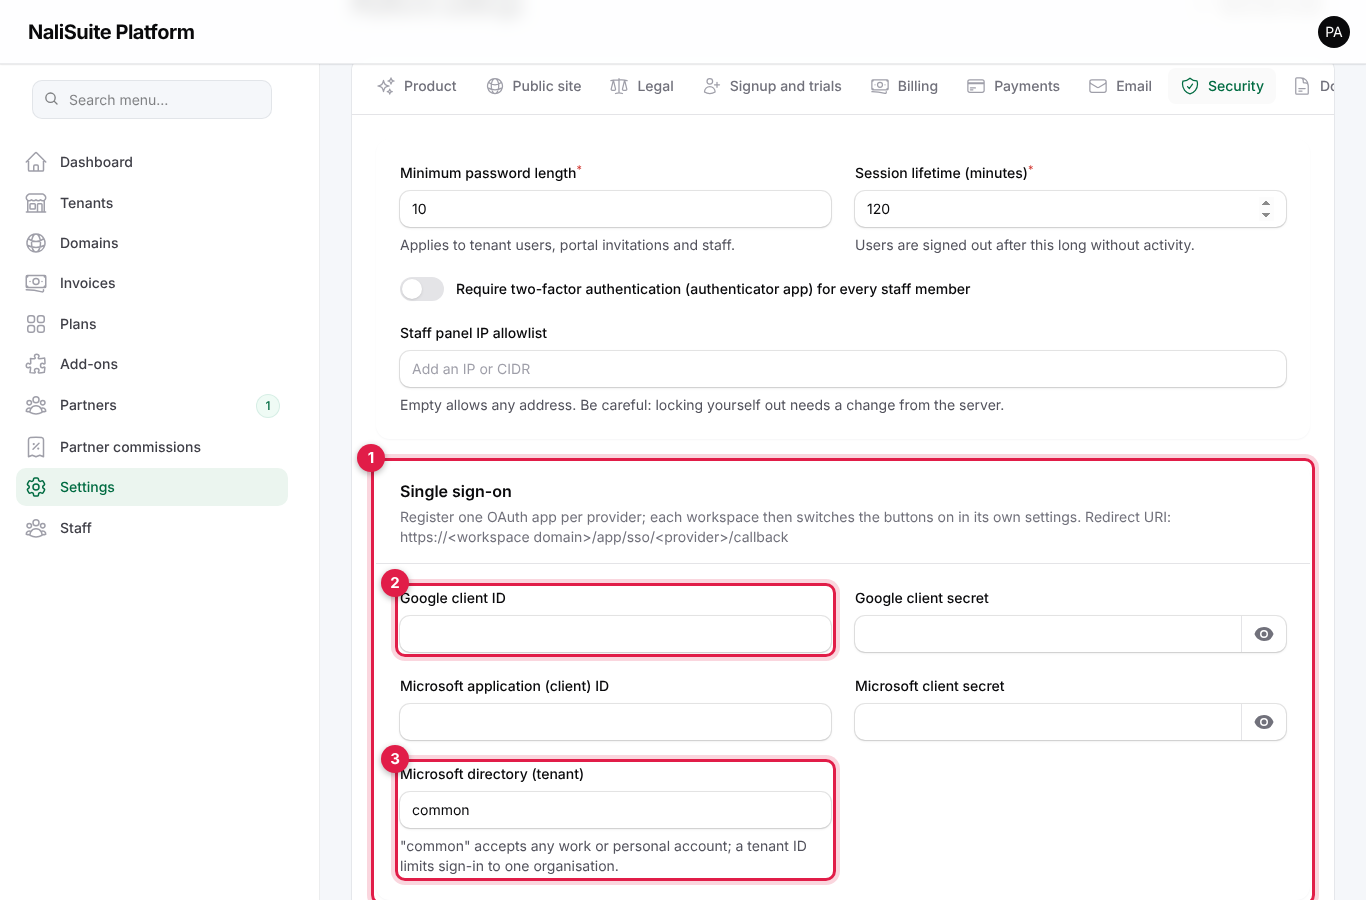
If you use the hosted service, this is already done for you, or ask support to enable it.
2. Switch it on for your workspace
- Open Settings → Preferences → General. When the provider app exists, three switches appear under the security options: Allow sign-in with Google, Allow sign-in with Microsoft and Create a member account for anyone who signs in with SSO using a new email address.
- Switch on the providers you want and click Save preferences. The login page shows Sign in with Google / Sign in with Microsoft buttons.
How sign-in works: the person is matched by their Google or Microsoft identity, or by email address. A Google address must be one Google has verified; for Microsoft the user principal name (the address the person signs in to Microsoft with) is used, never the editable contact email, so nobody can claim an account by putting someone else's address on their Microsoft profile. If nobody in the workspace has that email, sign-in is refused with No account here uses … Ask an administrator to invite you, unless Create a member account… is on, in which case a new user with the Member role is created. SSO users count as having a confirmed email.
The same General tab holds the other sign-in rules: Require every user to set up a second sign-in step (authenticator app, emailed or texted code) (marker 1) and Offer "Email me a sign-in link" on the login page (marker 2: a single-use link that works for 15 minutes, not offered to people who use a second sign-in step).
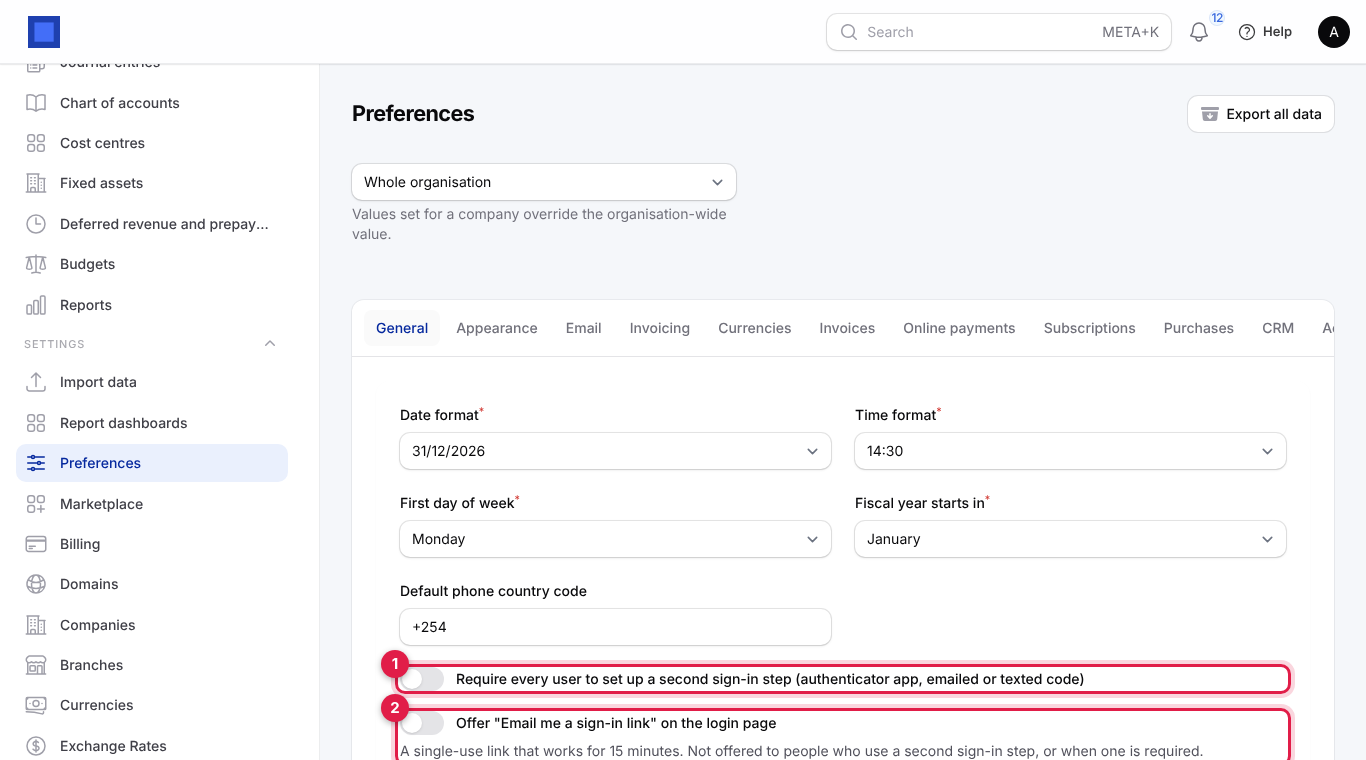
Note: the Google and Microsoft switches only appear once the provider app is configured, so they are not visible in the demo workspace pictured.
Electronic invoicing with the tax authority
NaliSuite can register every issued invoice with the tax authority and print its reference and QR code on the invoice: KRA eTIMS (Kenya, through an OSCU integration), FIRS e-Invoice (Nigeria) and ETA e-Invoice (Egypt).
- Get your credentials from the authority (for eTIMS: register for OSCU on the KRA eTIMS portal and receive the device communication key for your branch; for FIRS and ETA: register an ERP system and receive the API credentials).
- Open Settings → Preferences → Invoices and find E-invoicing (tax authority).
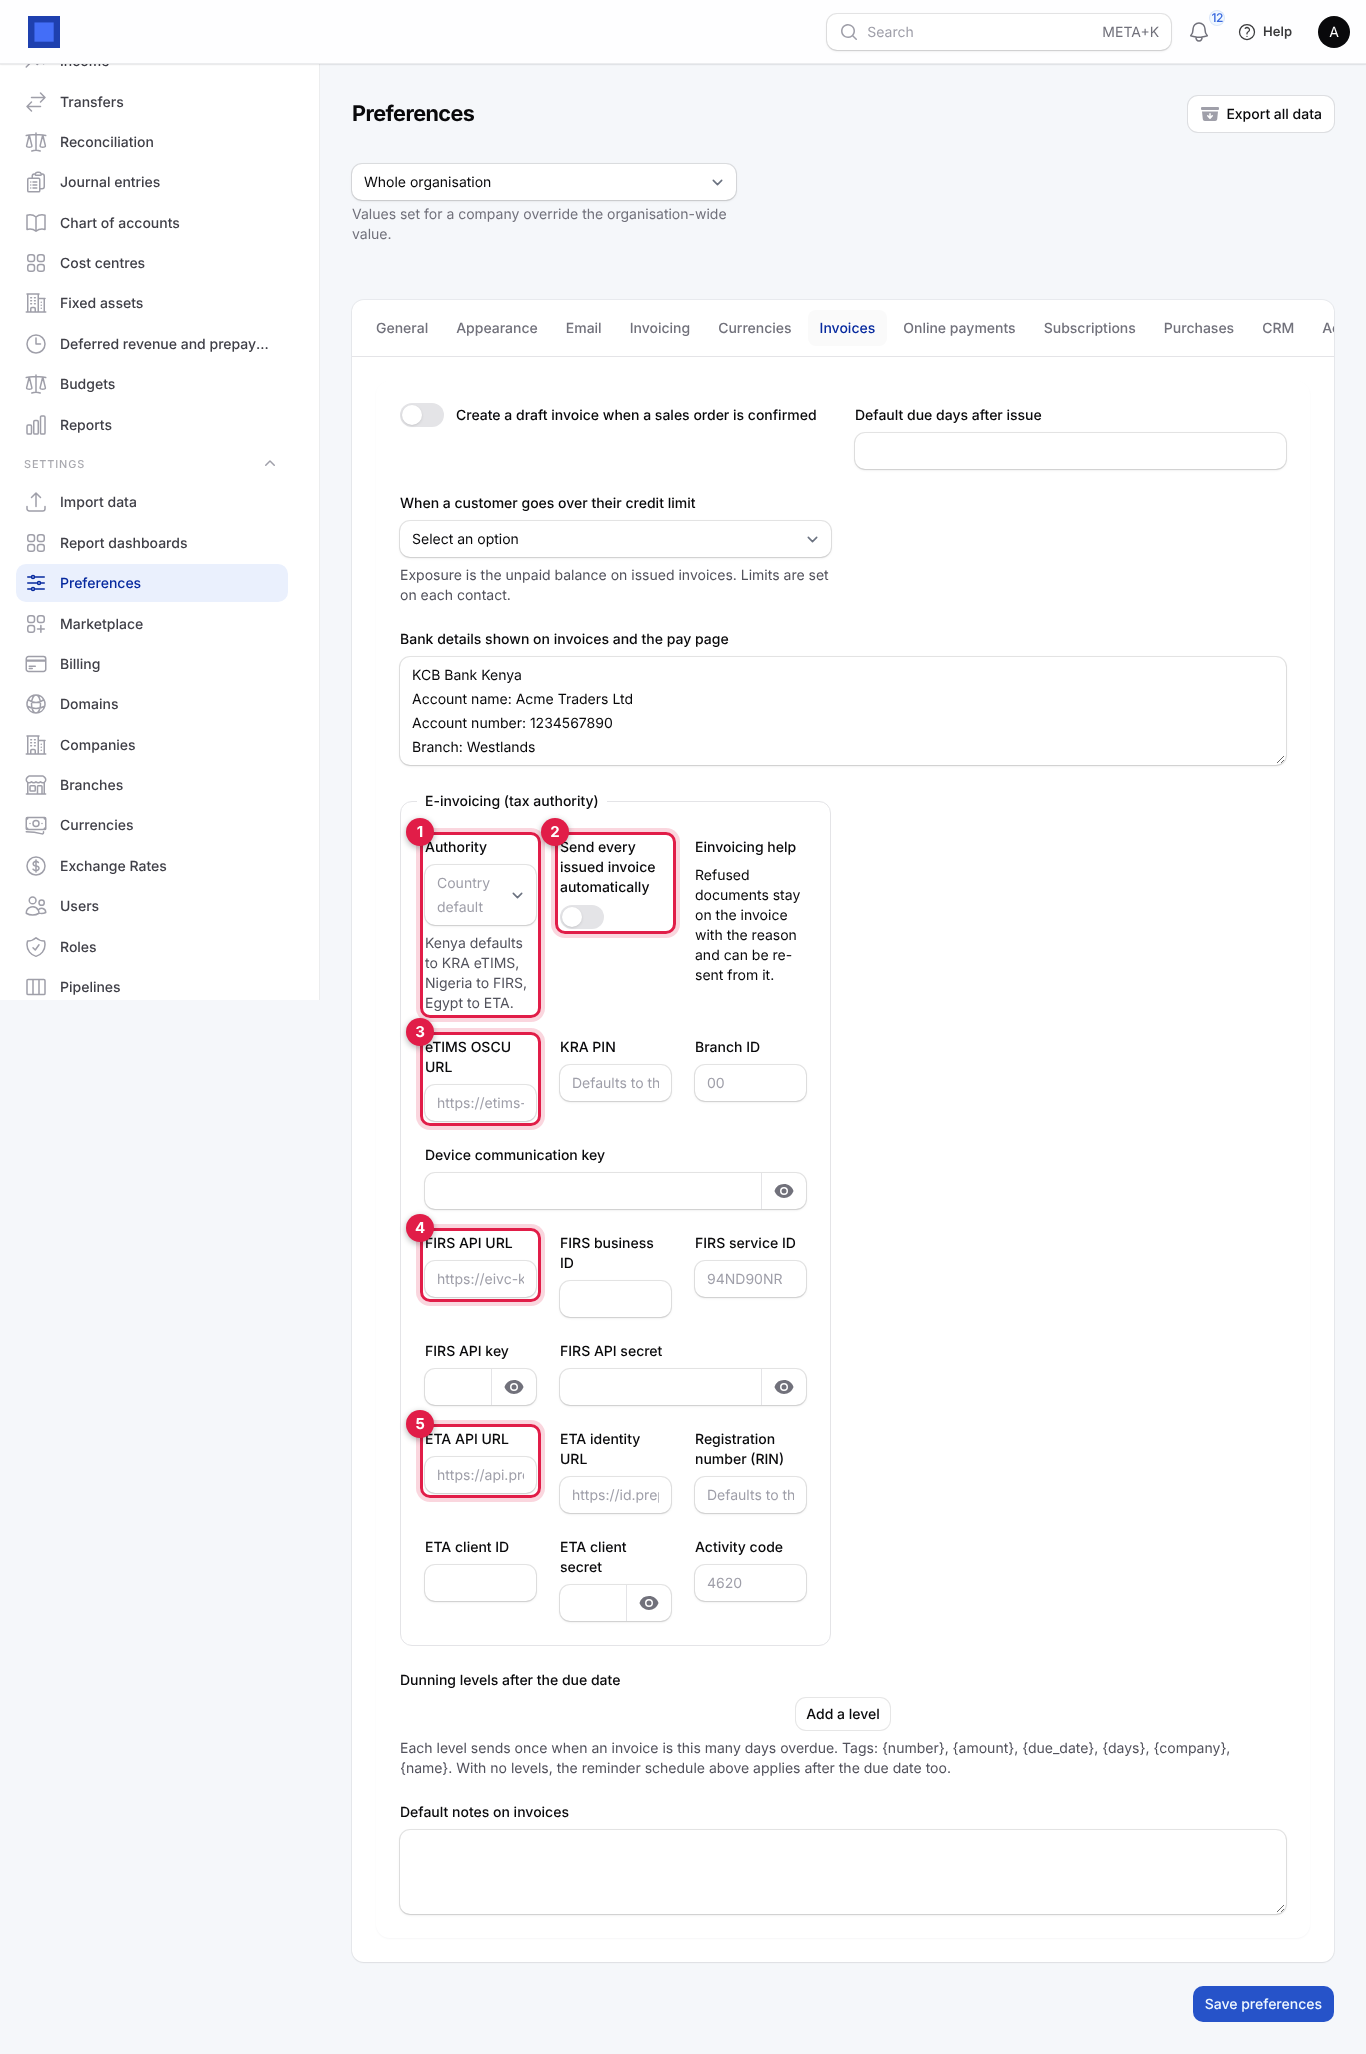
| Field | What to enter |
|---|---|
| Authority (marker 1) | KRA eTIMS (Kenya), FIRS e-Invoice (Nigeria), ETA e-Invoice (Egypt) or None. Empty uses the country default: Kenya eTIMS, Nigeria FIRS, Egypt ETA. |
| Send every issued invoice automatically (marker 2) | On: each invoice is submitted the moment it is issued. Off: submit invoices one by one. |
| eTIMS OSCU URL (marker 3), KRA PIN, Branch ID, Device communication key | Kenya. The URL defaults to the KRA sandbox: use it to test, then the production URL KRA gives you. KRA PIN defaults to the company tax ID; Branch ID is usually 00. |
| FIRS API URL (marker 4), FIRS business ID, FIRS service ID, FIRS API key, FIRS API secret | Nigeria. |
| ETA API URL (marker 5), ETA identity URL, Registration number (RIN), ETA client ID, ETA client secret, Activity code | Egypt. RIN defaults to the company tax ID. |
- Click Save preferences. Use the selector at the top of Preferences to enter different credentials for each company.
On an issued invoice (not drafts or pro-formas), a Send to tax authority button appears for users who can issue invoices. Click it and confirm to submit. When accepted, the button turns into Tax authority: registered and the reference and QR code are printed on the invoice PDF. A refused submission stays on the invoice with the reason (the dialog shows Last attempt: …); fix the cause (usually a missing customer PIN or a wrong tax rate) and send it again.
Note: e-invoicing was not configured in the demo workspace, so the button on the invoice is not pictured.
Set up payment gateways
Payment gateways let customers pay invoices online from the pay link in the invoice email, the customer portal and the online shop, and some can also send money out (salaries to mobile money wallets, see Payroll). Open Settings → Preferences → Online payments.
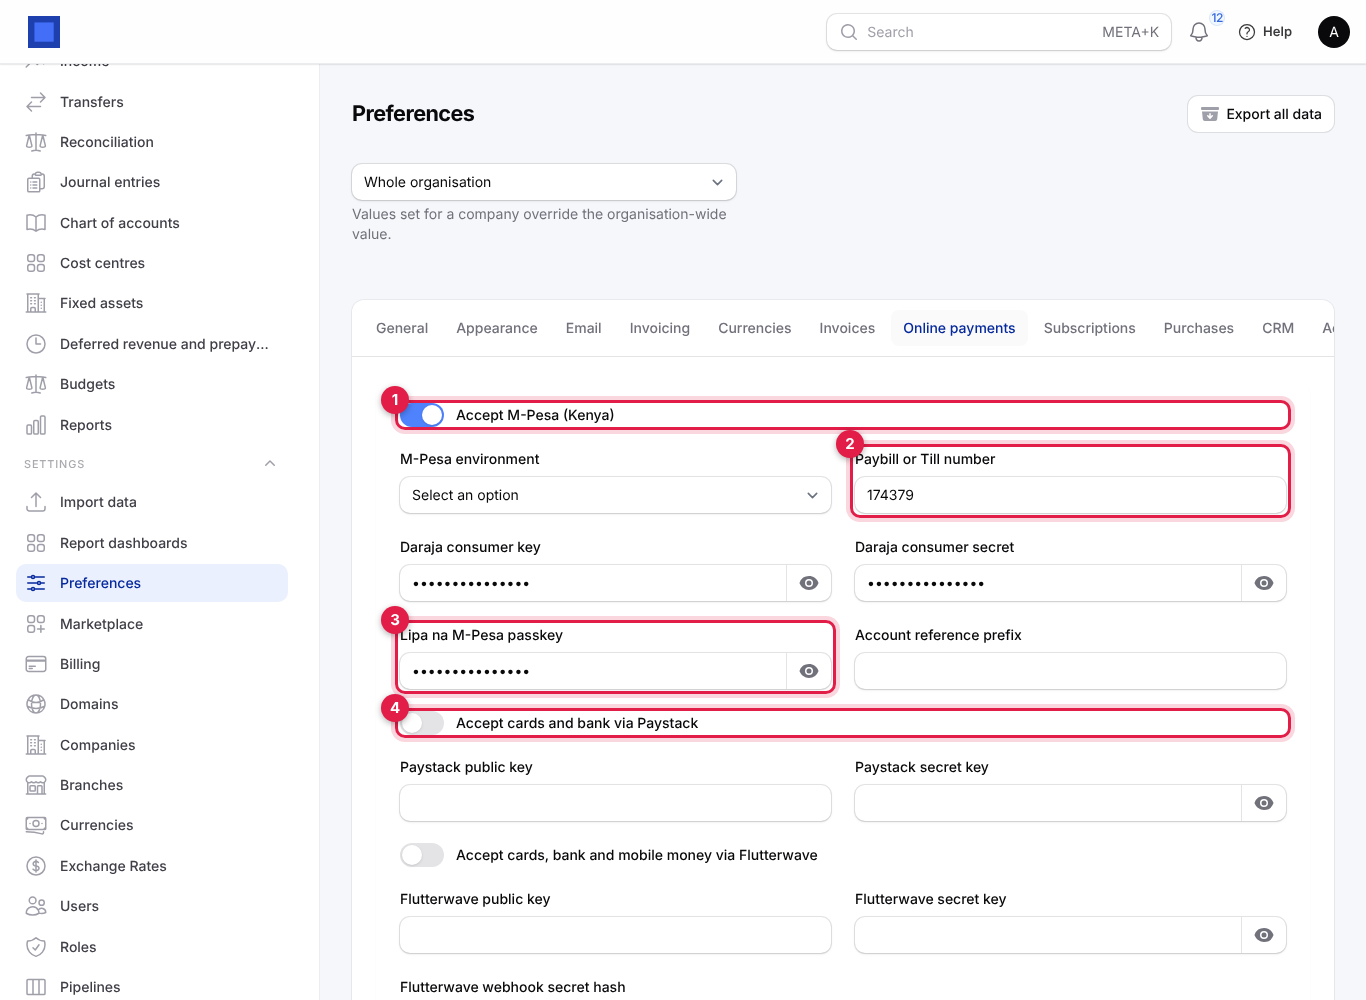
M-Pesa (Kenya)
| Field | What to enter |
|---|---|
| Accept M-Pesa (Kenya) (marker 1) | Switch on to offer Lipa na M-Pesa (an STK push to the customer's phone) on the pay page. |
| M-Pesa environment | Sandbox to test with Safaricom's test credentials, Production for real money. |
| Paybill or Till number (marker 2) | Your shortcode. |
| Daraja consumer key, Daraja consumer secret | From your app on the Safaricom Daraja portal. |
| Lipa na M-Pesa passkey (marker 3) | From Safaricom when your shortcode goes live on Lipa na M-Pesa Online. |
| Account reference prefix | Up to 6 characters shown before the invoice number on the customer's M-Pesa message. |
Cards and other gateways
- Accept cards and bank via Paystack (marker 4): Paystack public key and Paystack secret key from the Paystack dashboard (Settings → API Keys & Webhooks).
- Accept cards, bank and mobile money via Flutterwave: Flutterwave public key, Flutterwave secret key and Flutterwave webhook secret hash (set the same value under Settings → Webhooks in the Flutterwave dashboard).
- Accept cards via Stripe: Stripe secret key and Stripe webhook signing secret (from the webhook endpoint you create in the Stripe dashboard for
checkout.sessionevents).
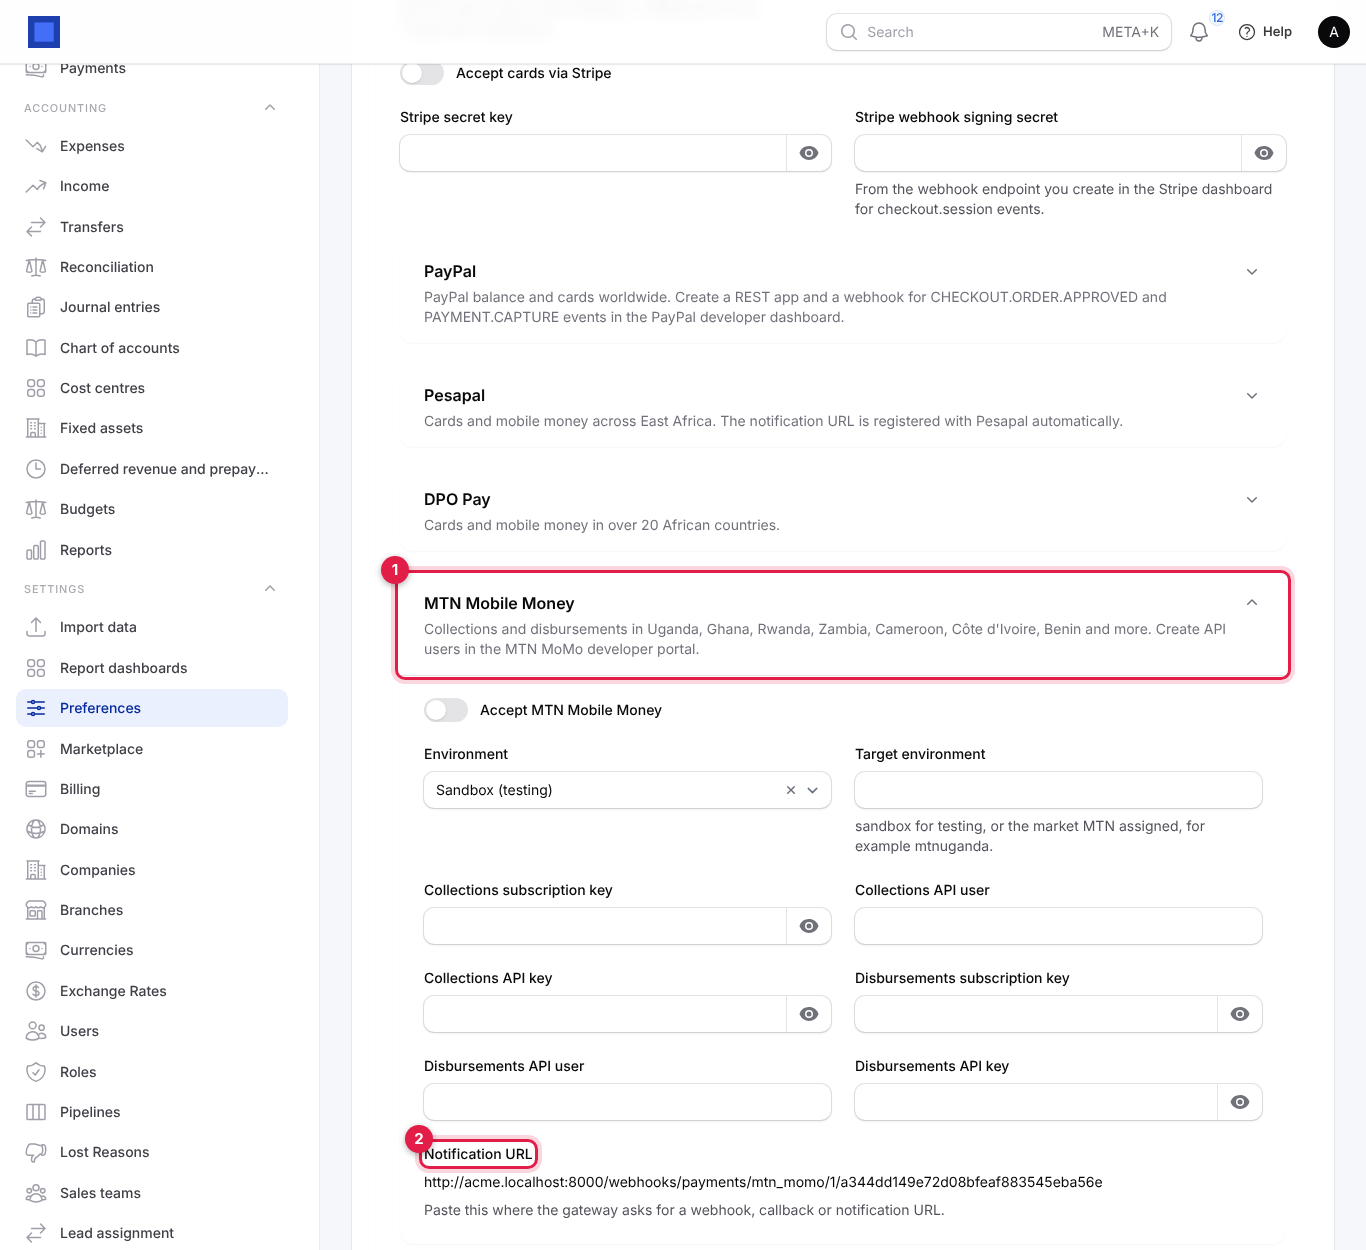
Further down, each other gateway has its own section, closed until you click its header (marker 1): PayPal, Pesapal, DPO Pay, MTN Mobile Money, Airtel Money, Orange Money, Wave, CinetPay, PayFast, Ozow, Peach Payments, Fawry and Cellulant (Tingg) (see Cellulant Tingg below). Each starts with an Accept … switch, an Environment (sandbox or live) and the keys the provider gives you; the short description under the header says where to get them. At the bottom of each section, Notification URL (marker 2) is the address to paste where the gateway asks for a webhook, callback or notification URL, so payments are confirmed automatically.
Cellulant Tingg
Cellulant's Tingg checkout lets customers pay on one page by M-Pesa, Airtel Money, MTN MoMo, cards or bank, in over 30 African countries. Get a Tingg merchant account from Cellulant first; they give you the API credentials and assign your business a service code.
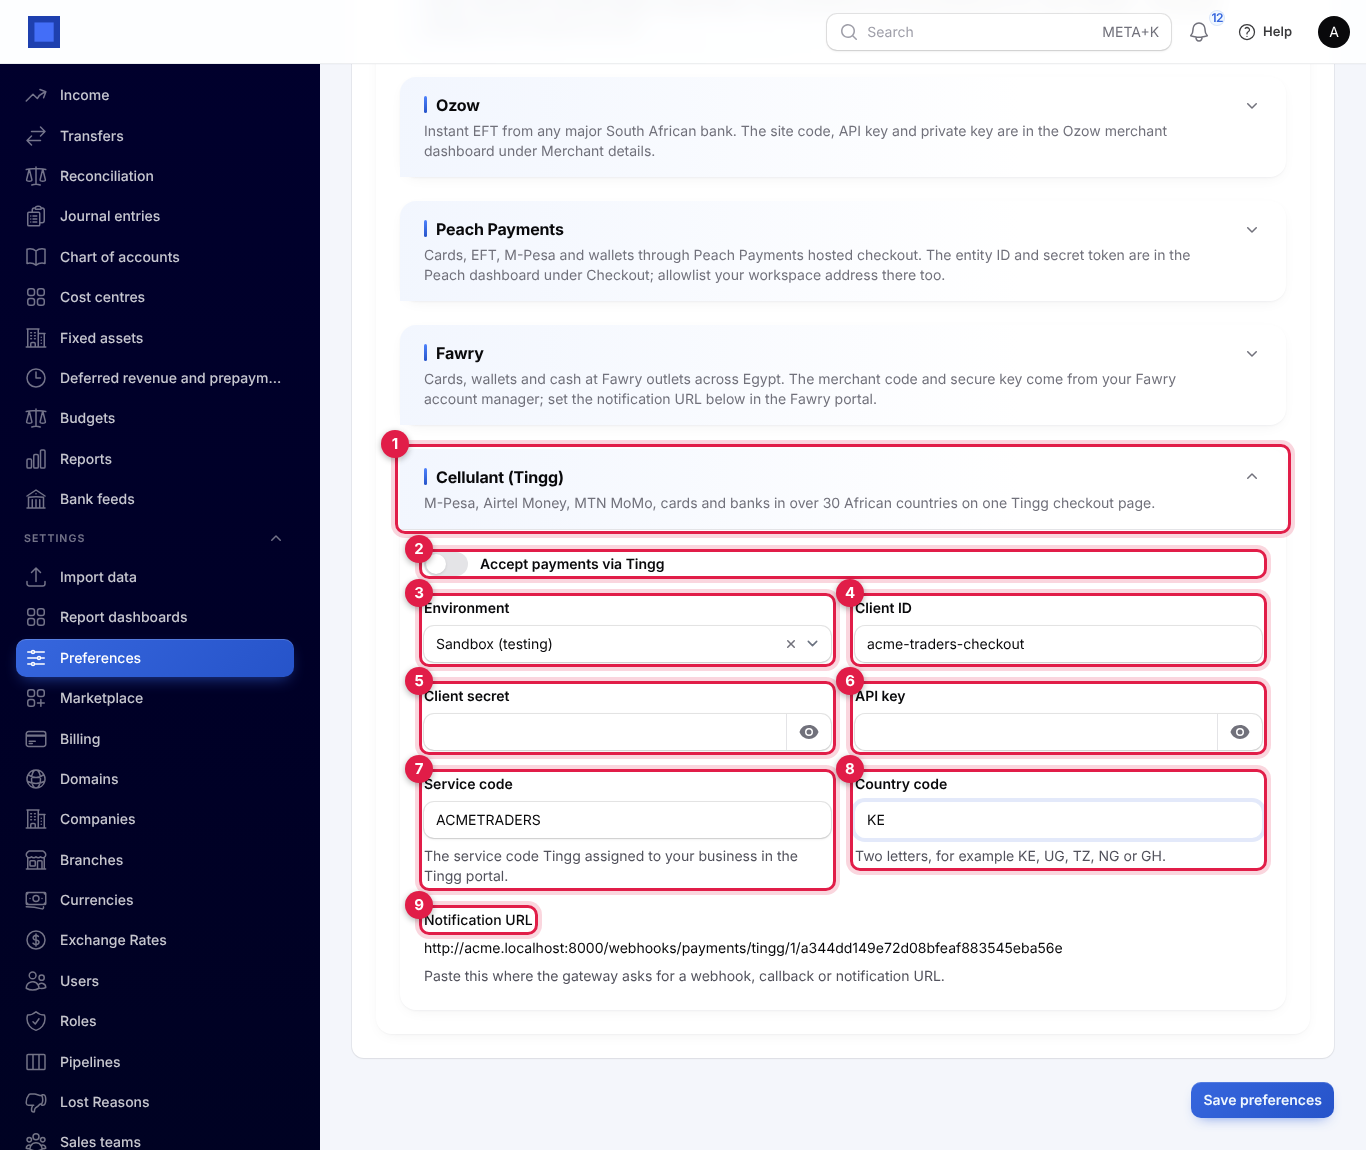
- On the Online payments tab, click the Cellulant (Tingg) header (marker 1) to open its section.
- Fill in the fields, then click Save preferences.
| Field | What to enter |
|---|---|
| Accept payments via Tingg (marker 2) | Switch on to offer Mobile money, card or bank (Tingg) on the pay page. |
| Environment (marker 3) | Sandbox (testing) for Tingg's test platform with test credentials, Live for real money. |
| Client ID (marker 4) and Client secret (marker 5) | Your Tingg API client credentials, from Cellulant or the Tingg portal. NaliSuite uses them to sign in to Tingg for each payment and each confirmation. |
| API key (marker 6) | Your Tingg API key. |
| Service code (marker 7) | The service code Tingg assigned to your business in the Tingg portal. |
| Country code (marker 8) | Two letters for the country your Tingg service is in, for example KE, UG, TZ, NG or GH. |
All five (client ID, client secret, API key, service code and country code) are needed; until they are filled in, Tingg is not offered to customers. The Notification URL (marker 9) is sent to Tingg with every payment, so there is nothing to paste; if Tingg asks you for a callback address for your service, give it this one.
How a Tingg payment is confirmed:
- The customer chooses Mobile money, card or bank (Tingg) on the pay page and is taken to Tingg's checkout page, with the amount and their name, email and phone filled in.
- They pay there with the method they choose, then come back to the pay page.
- Tingg tells NaliSuite at the Notification URL. Tingg does not sign these messages, so NaliSuite never takes them at their word: it asks Tingg for the payment's status first.
- If Tingg says the payment is paid in full (or paid and accepted), the payment is recorded and allocated to the invoice, and NaliSuite tells Tingg it is accepted. If Tingg says it expired, failed, was rejected or was reversed, nothing is recorded and the payment shows as failed. Anything else waits: NaliSuite tells Tingg it will be confirmed later.
The amount recorded is what Tingg says was paid, and the reference is the mobile money or card transaction number Tingg gives. Test with Sandbox (testing) and a small payment before you switch to Live.
To send salaries by mobile money, fill in the payout (disbursement) keys as well: MTN Disbursements subscription key, Disbursements API user and Disbursements API key; Airtel Disbursement PIN and Airtel encryption public key; Wave and Flutterwave use the same API key.
Click Save preferences when done. Then open an issued invoice, copy its pay link and make a small test payment in sandbox mode before switching to production. Bank transfer details for the pay page and invoices are typed in Settings → Preferences → Invoices → Bank details shown on invoices and the pay page.
Common questions
My API calls return 401. The token is wrong, expired or revoked, or the Authorization: Bearer header is missing. Create a new token.
My API calls return 403. The token has only Read, or its user's role lacks permission for that action.
Webhook deliveries stay Pending. The background queue processes deliveries; on a self-hosted server make sure the queue worker is running. On the hosted service, contact support.
The receiver says the signature is invalid. Compute HMAC-SHA256 over the timestamp header, a dot and the raw request body (before JSON parsing) with the signing secret, and compare it with the part after sha256=.
Sign in with Google does not appear on the login page. The provider app is not configured for the installation, or the switch is off in Preferences → General.
eTIMS refuses invoices. Check the device communication key and branch for the right environment (sandbox keys do not work on production), and that each customer with a KRA PIN has it on their contact.
Customers pay but invoices stay unpaid. The gateway's notification URL is not registered in the gateway dashboard, or the webhook secret differs. Copy the Notification URL again and check the secret.