Billing, marketplace and domains
This page is for the workspace owner: the person who pays for NaliSuite. It explains your subscription on Settings → Billing (plan, status, invoices, add-ons, paying), the Settings → Marketplace where you add extra apps and integrations, and Settings → Domains where you connect your own web address. Only users with the billing permissions (the owner role by default) see Billing and Marketplace.
How your subscription works
- Your workspace starts on a free trial. The trial end date is on the Billing page and in a notice at the top of every screen ("Your free trial ends …", with a Subscribe link).
- You pay per user (or a flat price, on some plans) for a plan, monthly or yearly. The plan decides which apps are included.
- Add-ons extend your limits (for example Extra users or an SMS bundle). Marketplace apps add whole industry solutions or integrations. Both are billed with your plan.
- Users are counted on the day each invoice is issued.
- Invoices are paid online (M-Pesa, mobile money, cards, depending on your provider) or by bank transfer.
Subscription statuses
| Status | What it means | What moves it on |
|---|---|---|
| Free trial | Everything in your plan works. Reminder emails are sent before the trial ends. | Paying a subscription invoice makes it Active. If nobody subscribes, the workspace is suspended a few days (7 by default) after the trial ends. |
| Active | Paid up. Shows Current period ends and Subscribed since. | About a week before the period ends, the next invoice is issued and emailed. If it is not paid by its due date, the status becomes Past due. |
| Past due | An invoice is overdue. Everything still works, and an email asks you to pay. | Paying the invoice makes it Active again. After 14 days past due (by default) the workspace is Suspended. |
| Suspended | Nobody can use the workspace, its portal, pay pages, website or forms, and scheduled work (customer invoices and reminders, campaigns, automations, syncs) is paused. Payments your customers make on invoices you already sent are still recorded. Your data is safe. Opening the workspace address shows why it was suspended and a Pay invoice button for the unpaid subscription invoice; your customers see only that the workspace is unavailable. | Paying the invoice reopens the workspace at once, as does your provider reopening it. After a long suspension (60 days by default) the workspace is closed. |
| Cancelled | Closed by you or your provider. Data is kept for a retention period (90 days by default), then deleted for good. Reminder sent 7 days before deletion. | Your provider can reopen it before deletion. |
The exact number of days is set by your provider.
Read the Billing page
Open Settings → Billing.
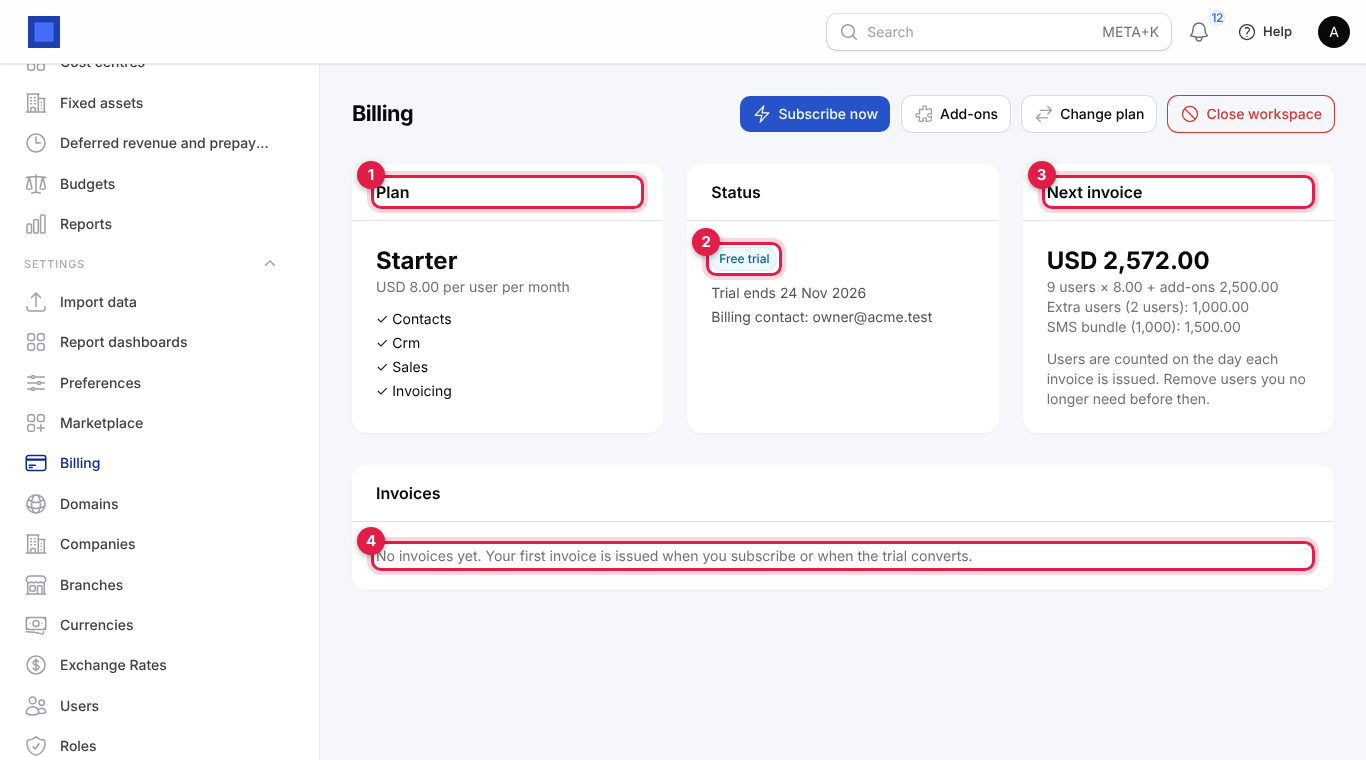
| Section | What it shows |
|---|---|
| Plan (marker 1) | Your plan's name, its price ("USD 8.00 per user per month", or yearly), and the apps it includes, each with a tick. |
| Status (marker 2) | The status badge (Free trial, Active, Past due, Suspended, Cancelled), then Trial ends, Current period ends, Subscribed since where they apply, and the Billing contact email. Billing emails go to this address. |
| Next invoice (marker 3) | What your next invoice will come to: users × price per user, plus each add-on line and tax. "Users are counted on the day each invoice is issued. Remove users you no longer need before then." |
| Invoices (marker 4) | Every invoice from your provider: Number, Period, Issued, Total and Status (Unpaid, Overdue, Paid or Void), with Pay (unpaid) or View (paid) to open it. Before the first invoice it says "No invoices yet. Your first invoice is issued when you subscribe or when the trial converts." |
When an invoice is waiting, a yellow box at the top reads "Invoice … is waiting for payment", with the amount, due date ("overdue" if late) and a Pay now button.
The buttons at the top right:
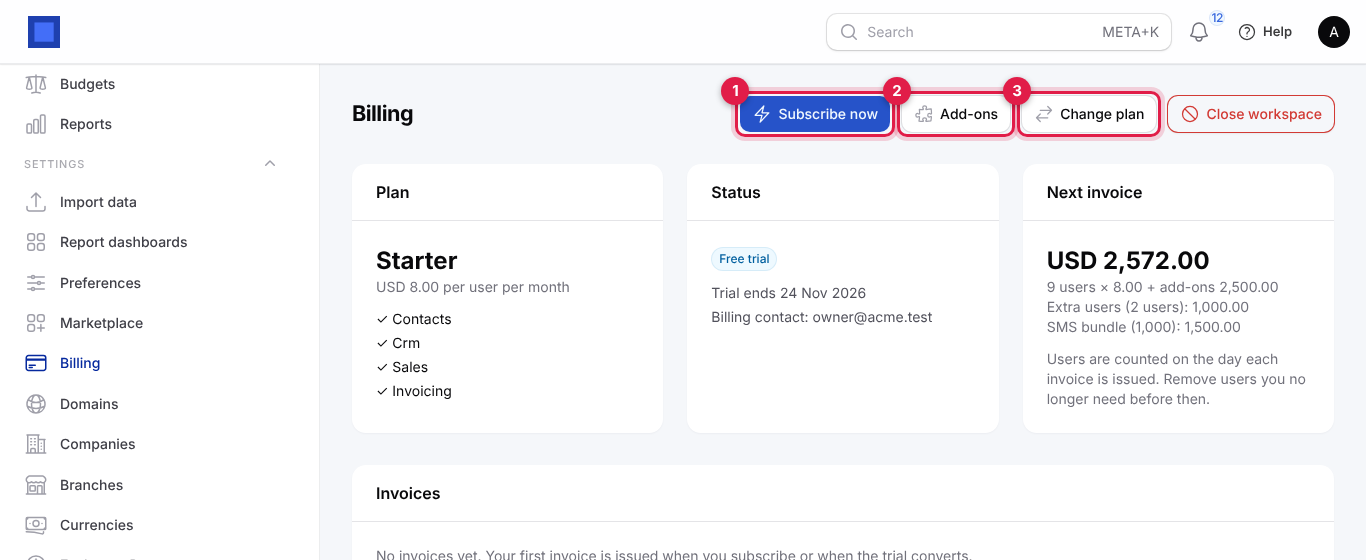
| Button | What it does | Shown when |
|---|---|---|
| Subscribe now (marker 1) | Issues your subscription invoice and takes you to the payment page. On an active workspace it reads Pay next period now. | You can manage billing and no invoice is waiting. |
| Add-ons (marker 2) | Choose add-ons such as extra users or SMS bundles. | Your provider offers add-ons. |
| Change plan (marker 3) | Move to another plan or billing cycle. | You can manage billing. |
| Close workspace | Closes the workspace for good. See Import, export and your data. | You have the owner role. |
Subscribe and pay
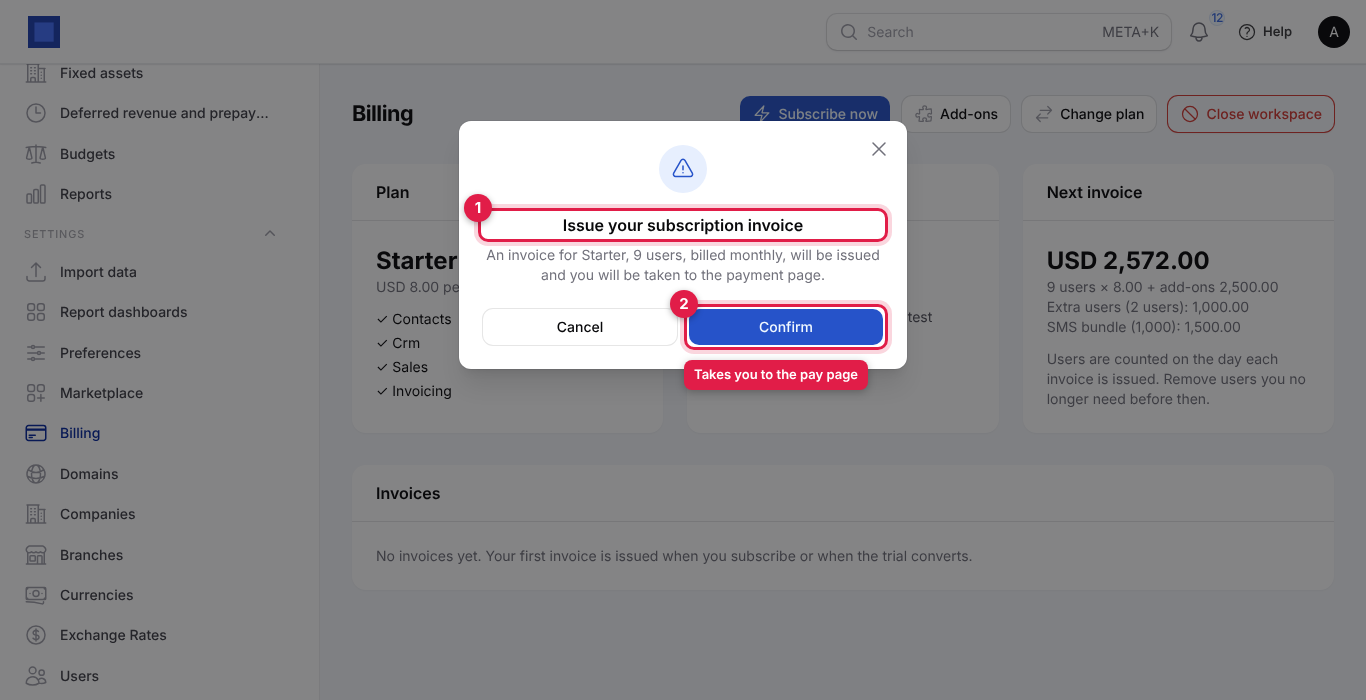
- Open Settings → Billing and click Subscribe now (or Subscribe in the trial notice at the top of the screen).
- Read the window Issue your subscription invoice (marker 1): "An invoice for Starter, 9 users, billed monthly, will be issued and you will be taken to the payment page."
- Click Confirm (marker 2). The invoice is created and the payment page opens.
- The invoice opens. It shows who it is From and Billed to, the Issued and Due dates, the lines (Description, Qty, Unit price, Amount) with "Includes: …" under the plan line listing the apps your plan includes, then Subtotal, Tax, Total and Amount due. Under Pay with, click a method to open it; the fields for that method appear under its name:
- M-Pesa: type the M-Pesa phone number and click Pay now. "You will receive a prompt on your phone to enter your PIN." Enter it on your phone and keep the page open: it changes to Paid by itself once M-Pesa confirms.
- Prompt not arriving? Click Switch to M-Pesa Paybill. The page shows the Paybill number, the Account number (your invoice number) and the Amount, each with a Copy button. "On your phone open M-Pesa, then Lipa na M-Pesa, then Pay Bill." Enter the business number, account number and amount, then your PIN. "The invoice is marked paid once the payment is matched to the account number." Switch back to the phone prompt returns to the PIN prompt.
- Mobile money or other mobile wallets: type the Mobile money number and confirm on your phone.
- Card (Paystack, Flutterwave, Stripe and others): click Pay now. You are taken to the provider's secure page, then brought back. The receipt goes to your workspace's billing email, so you are not asked for one (some other providers still ask for an Email for the receipt).
- Bank transfer: click Show bank details. "Pay by bank transfer and quote the invoice number. Your workspace is activated once the money arrives."
- Each method may charge in its own currency (for example M-Pesa in KES and cards in USD); the amount shown under the method is what you pay.
- When the payment is confirmed the invoice reads Paid in full, your status becomes Active, and Current period ends moves to the end of the period paid for.
- Click Back to your workspace billing at the bottom of the invoice to return to Settings → Billing. Print or save as PDF keeps a copy.
If the page says "No online payment method is set up yet", contact the email shown or pay by bank transfer.
Tip: Remove users who have left (Settings → Users) before you subscribe or before a renewal; you are billed for every user on the day the invoice is issued.
Pay an existing invoice
Click Pay now in the yellow box, or Pay next to the invoice in the Invoices list. Renewal invoices are also emailed to the billing contact with a pay link. To see a paid invoice, click View.
Change plan or billing cycle
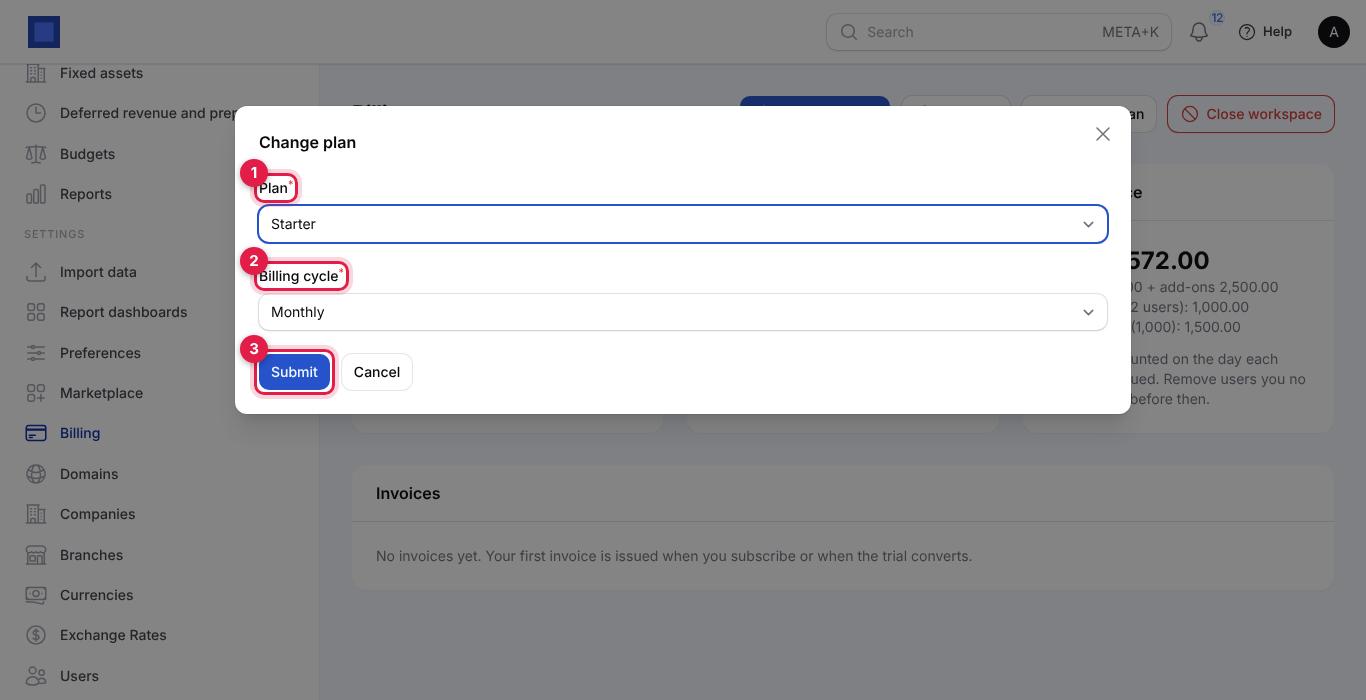
- Click Change plan.
- Pick the Plan (marker 1) and the Billing cycle (marker 2): Monthly or Yearly.
- Click Submit (marker 3).
What happens next depends on whether you are in a paid period:
| Situation | What happens |
|---|---|
| On a trial, or your invoice is unpaid | The plan changes straight away and the new price applies from your next invoice. |
| Paid period, bigger plan (the usual rule; your provider may instead switch you at once or at the renewal) | You are taken to an invoice for the difference for the days left in your period, for example "Upgrade from Starter to Business (12 of 30 days)". The new plan, with its apps, switches on as soon as that invoice is paid. Your period end date does not change. If you pick again before paying, the unpaid upgrade invoice is cancelled and a new one issued. |
| Paid period, smaller plan or another billing cycle | You keep your current plan until the paid period ends. The Plan card says "Changes to … on …", Next invoice shows the new price, and the change happens on that date. Picking your current plan again cancels it. |
When the new plan starts, apps it includes are switched on and their menus appear; roles get the new permissions.
Note: Moving to a plan that does not include an app switches that app off, unless you bought it separately in the Marketplace. Your data is kept and comes back if the app is switched on again. If an app you keep needs it (Point of Sale needs Sales, for example), it keeps running in the background without its own menu. Talk to your provider before moving to a smaller plan if you rely on apps it does not include.
Reminders by text message
When NaliSuite sends texts, the signup page asks for an optional Mobile number. With a number, you also get a short text when your trial is about to end, before an invoice is due, when it is overdue, when a payment is received and if your workspace is suspended. To add, change or remove the number later, click Text reminders at the top of the Billing page; leave it empty for no texts.
Use a discount code
If your provider gave you a discount code:
- Open Settings → Billing and click Discount code.
- Type the code, for example
LAUNCH50, and click Submit.
You see "Discount code applied" with what it gives, for example "50% off the first 3 invoices, starting with your next subscription invoice." The Status card shows the code, and each invoice it reduces has a Discount line. A new code replaces the old one. You can also type a code when you sign up, in Discount code (optional).
Messages you may see: "That discount code is not valid.", "That discount code has expired.", "That discount code has been used up.", "That discount code is not for your plan.", "Your workspace has already used that discount code." or "That discount code is for new workspaces only."
Limits: users, companies and storage
Your plan, plus any add-ons, sets three limits:
| Limit | What counts | When you reach it |
|---|---|---|
| Users | Your staff who sign in to the workspace (Settings → Users). Customers, vendors, contacts, employees without a login and portal users are not counted. | New user is greyed out until you remove a user or add Extra users. |
| Companies | Companies set up under Settings → Companies. | You cannot add another company until you add one. |
| Storage | Your workspace's database plus every file uploaded: product pictures, attachments, receipts, documents, signatures, CVs, screenshots. Shown on the Status card as "Storage: 4.4 GB of 5.0 GB". | From 80% an amber notice at the top of every screen says "Your workspace storage is 84% full." At 100% it turns red ("Your workspace storage is full. New files cannot be uploaded until you free up space or add storage.") and every upload is refused with the reason. Records without files carry on as normal. |
Click Add storage → in the notice (or Add-ons on the Billing page) and add a storage add-on, or delete files you no longer need. The usage figure is refreshed every 15 minutes.
Add or change add-ons
Add-ons raise limits without changing plan, for example Extra users, Extra storage or an SMS bundle.
- Click Add-ons. The window lists Your add-ons.
- For each add-on, choose the Add-on (marker 1); the list shows its price per unit and cycle, such as "Extra users · KES 500/users". Type the Quantity (marker 2), from 1 to 1,000.
- Click Add an add-on (marker 3) to add another line. Click the bin on a line to remove that add-on; drag the arrows to reorder.
- Click Submit.
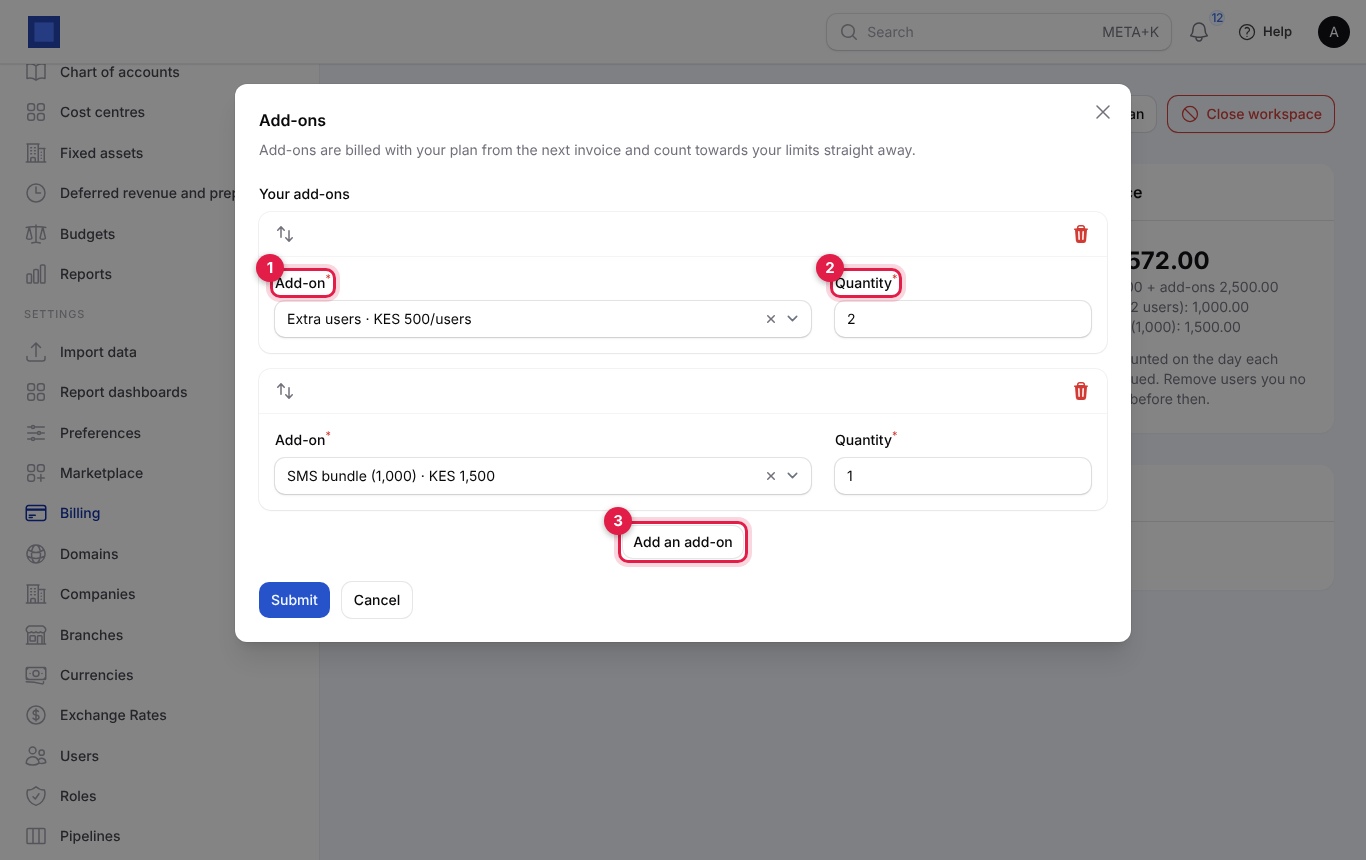
What happens next: "Add-ons updated. They appear on your next invoice." They count towards your limits straight away (for example, extra users can be created at once) and are billed from the next invoice. Each add-on can be chosen only once; change its Quantity instead.
The Marketplace
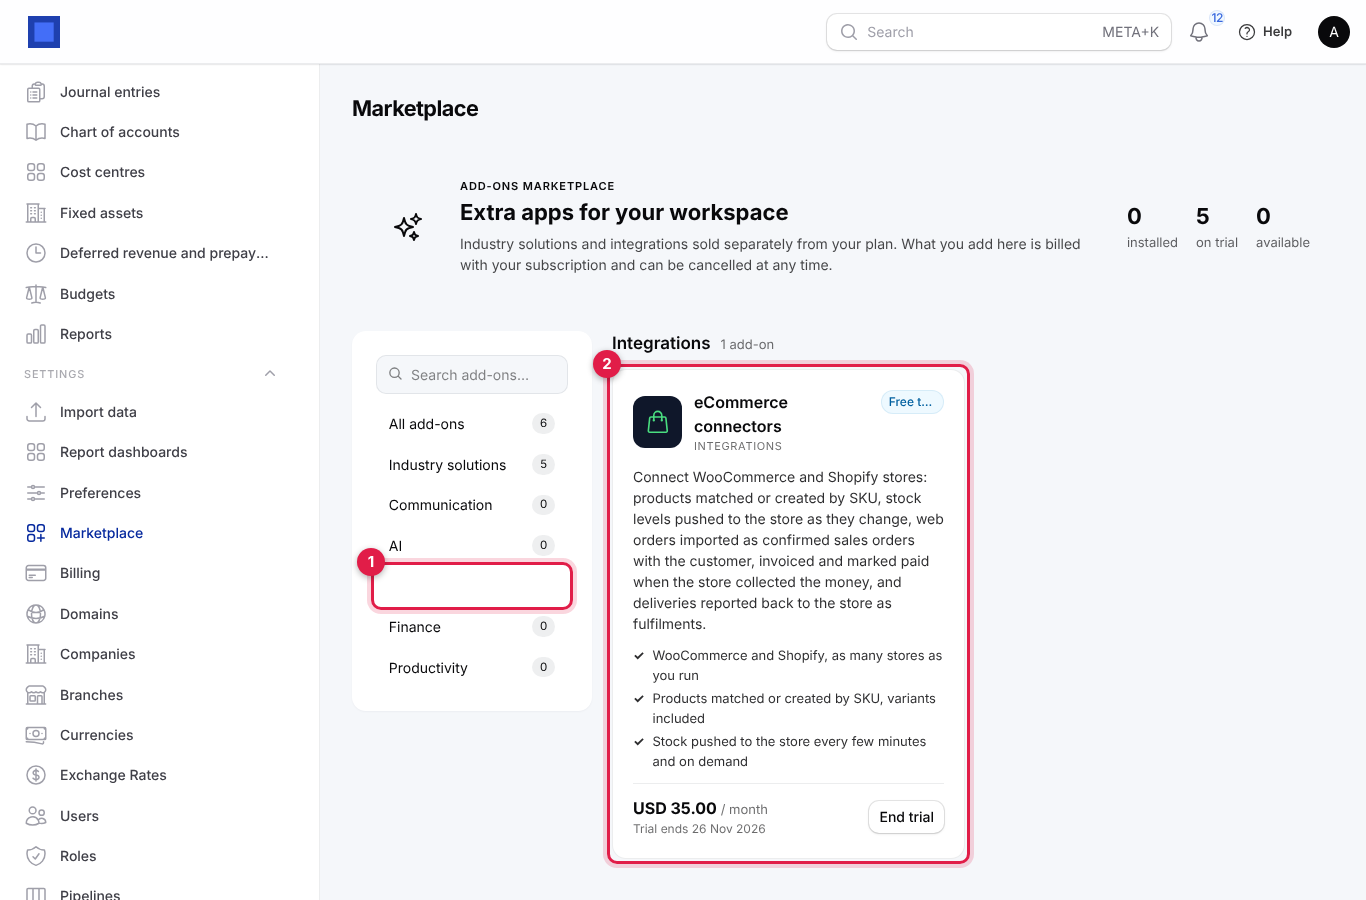
Settings → Marketplace sells apps that are not part of your plan: industry solutions (for example Fleet, Rental, Manufacturing, Field Service) and integrations (for example eCommerce connectors for WooCommerce and Shopify). The green number next to Marketplace in the menu counts apps you could add now.
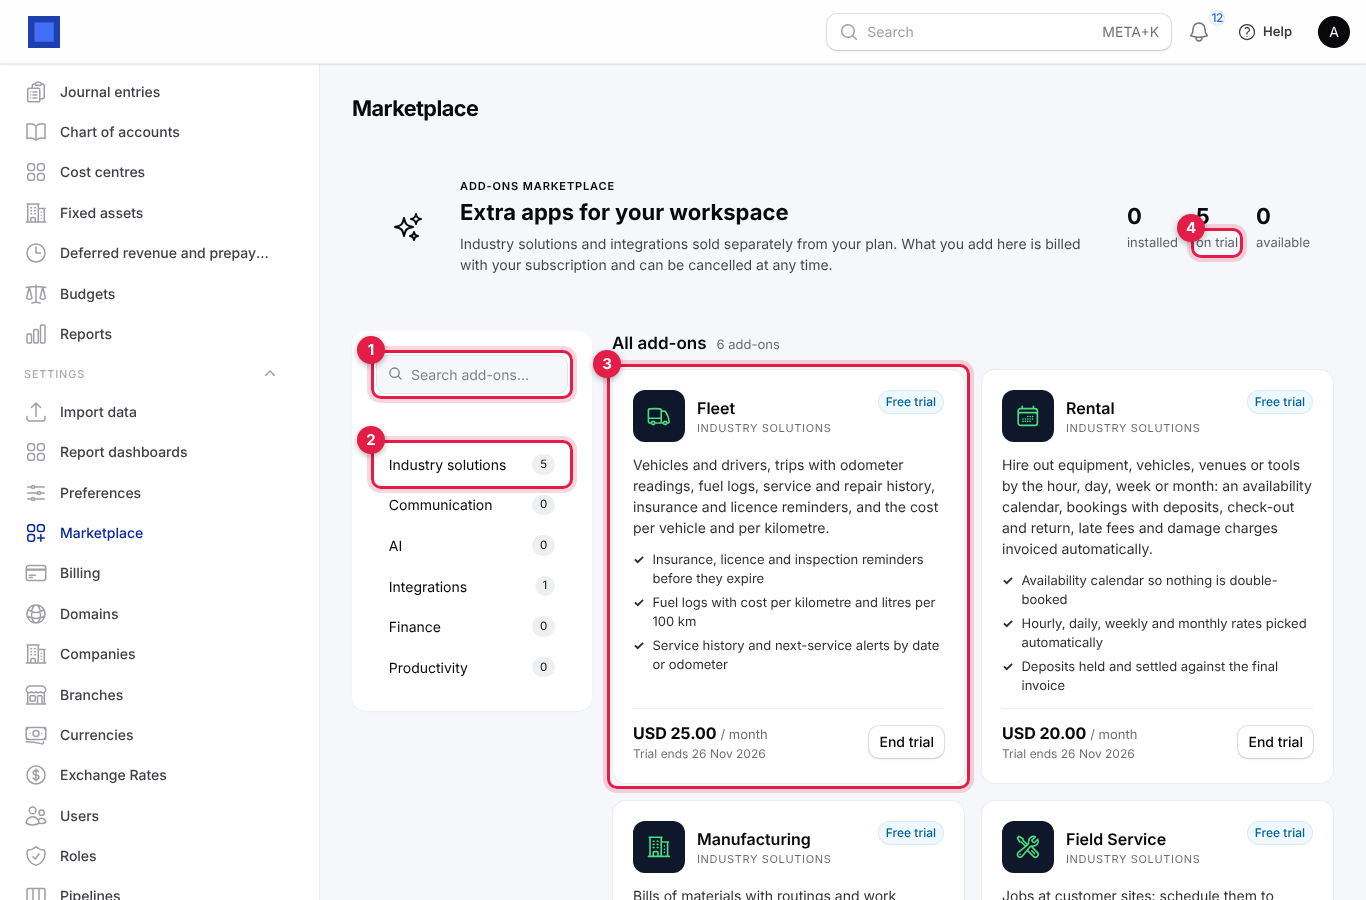
| Part | What it is |
|---|---|
| Search add-ons… (marker 1) | Finds apps by name, description or highlights. |
| Aisles (marker 2) | All add-ons, Industry solutions, Communication, AI, Integrations, Finance and Productivity, each with a count. Empty aisles fill as new apps are released. |
| App cards (marker 3) | Each app: icon, name, aisle, a badge, a description, up to three highlights, the price per month or year, and the action button. |
| Counters (marker 4) | How many apps are installed, on trial and available. |
What the badge on a card means
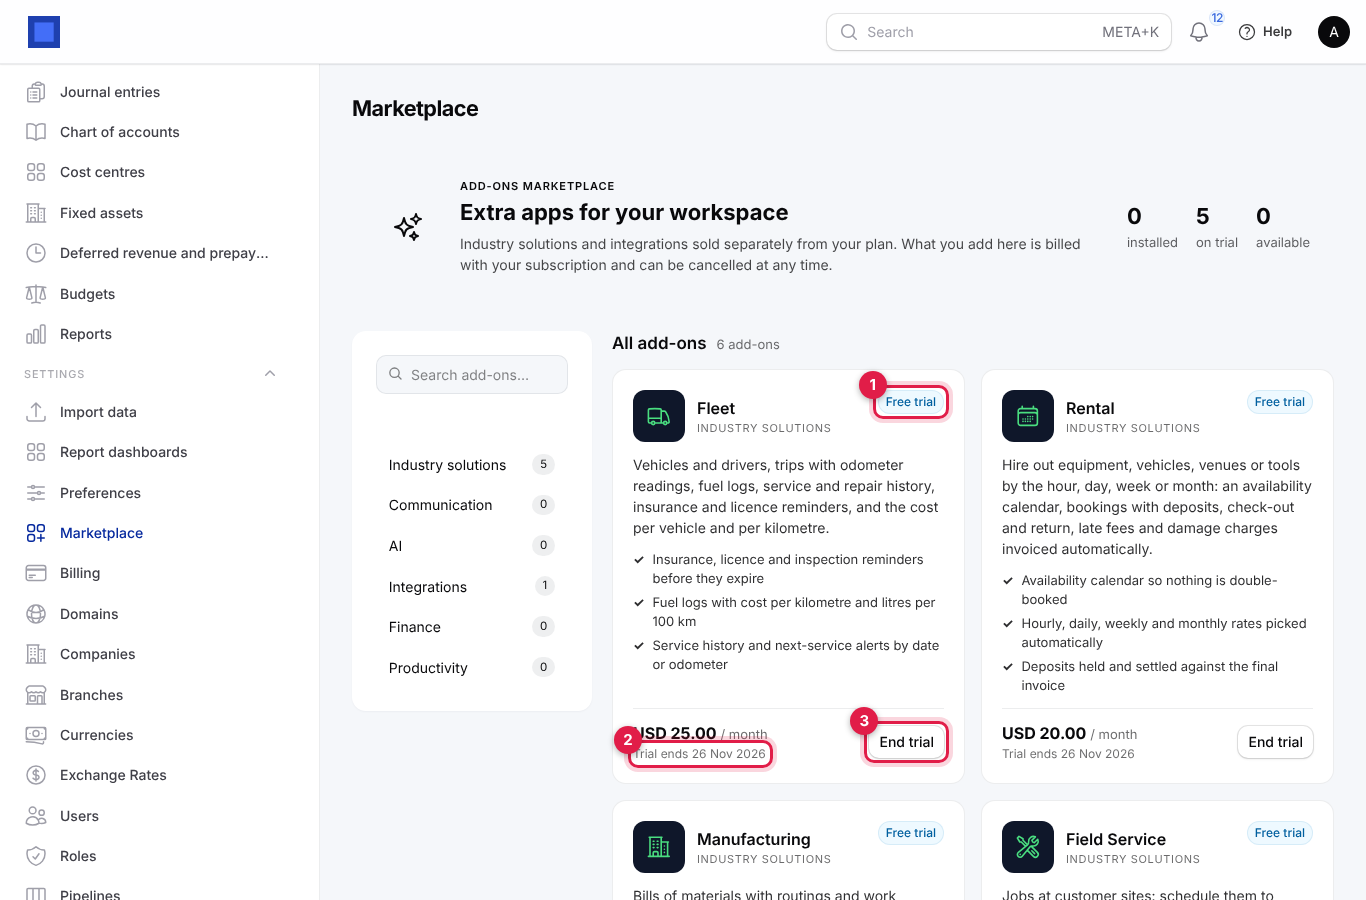
| Badge (marker 1) | Meaning | Button |
|---|---|---|
| Available | You can add it. The price shows "/ month" or "/ year"; if it has a trial, "…-day free trial" below. | Start free trial or Add to subscription |
| Free trial | You are trying it. "Trial ends …" shows when it becomes paid (marker 2). | End trial (marker 3) |
| Installed | Part of your subscription. | Cancel |
| Ending | Cancelled; it stays on until "Switches off on …". | Keep it |
| Included in your plan | Your plan already pays for it ("No extra charge"). | Switch on if it is not on yet |
| Not available | It cannot be bought yet, or it is priced in a different currency from your plan. The reason is shown. | none |
If an app needs another app your plan lacks, the card says "Needs …, not in your plan." in orange and cannot be added; change plan first.
Find an app
- Type in Search add-ons… (marker 1); the list narrows as you type. If nothing matches you see "Nothing matches …".
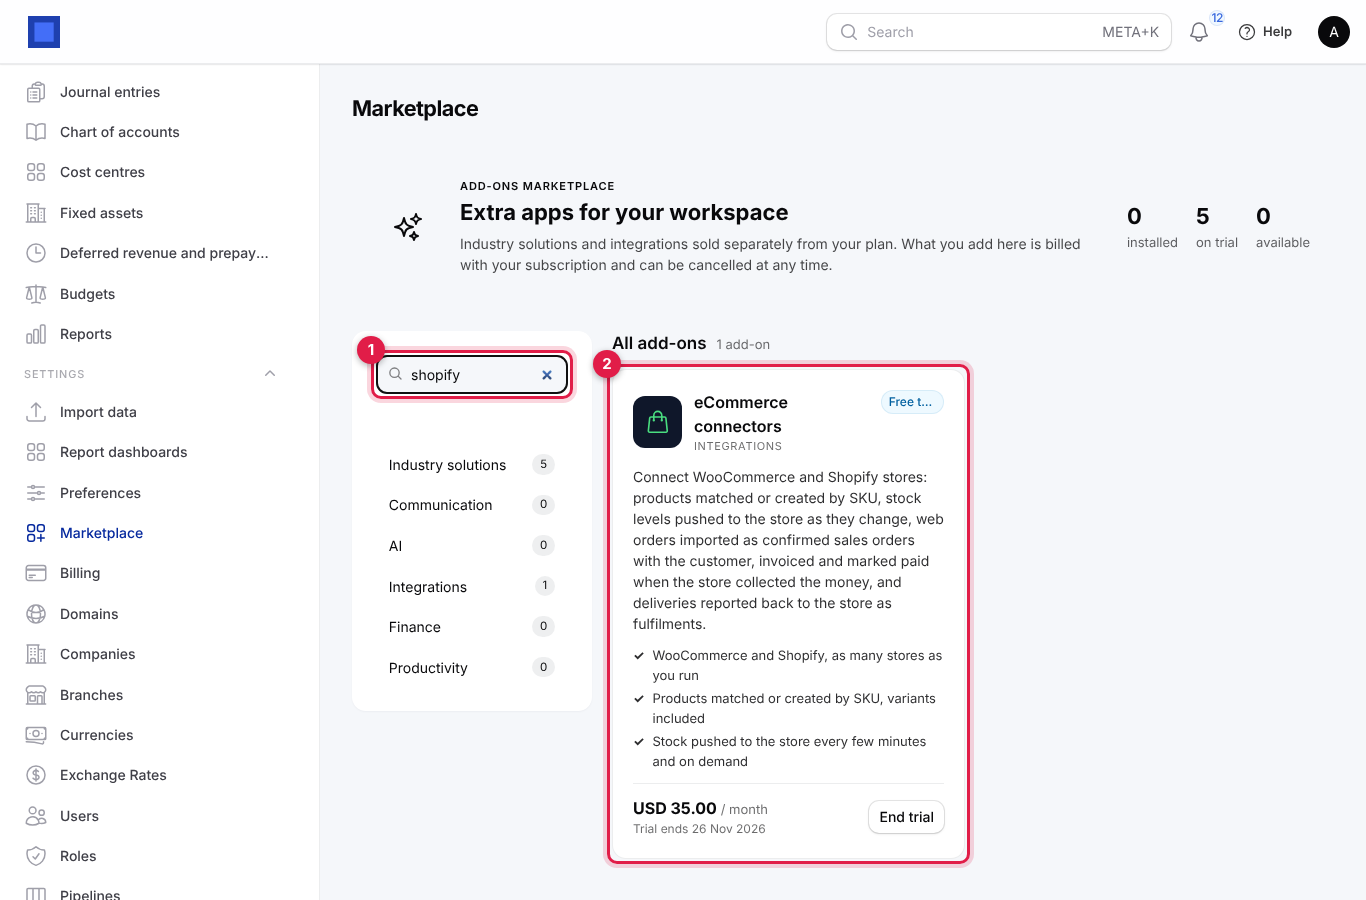
- Or click an aisle (marker 1) to see only its apps.
Start a free trial or buy an app
- Find the app and click Start free trial (when it offers a trial and you have never had it before) or Add to subscription.
- Confirm the message:
- Trial: "Start a free trial of …? It becomes part of your subscription after … days unless you cancel."
- Purchase: "Add … for … per month? The rest of this period is invoiced now."
- What happens next:
- Trial: "Module switched on. Its menu is now available. Reload the page if you do not see it." An email confirms the trial and its end date. Three days before the end you get a reminder with the price. On the end date it becomes part of your subscription; if you are mid-period, an invoice for the rest of the period is issued and emailed with a pay link.
- Purchase: "Module added. Invoice … covers the rest of this period." You are taken to the payment page for a share of the price for the days left in your current period. From the next invoice it is billed in full with your plan.
The new app's menu group appears in the sidebar and its permissions are added to the built-in roles (owner and admin get everything, member and accountant the view permissions). Give your own roles access under Settings → Roles.
Cancel an app or end a trial
- On the app's card, click End trial (on trial) or Cancel (installed).
- Confirm:
- End trial: "End the trial now? The module switches off immediately; your data is kept."
- Cancel: "Cancel …? It stays on until the end of the period you have paid for."
- A cancelled app shows Ending with "Switches off on …". Until then, click Keep it to undo the cancellation ("Kept. The module stays on your subscription.").
Your data in the app is kept when it switches off. A free trial is only offered once per app; if you add it again later, it is billed straight away.
Connect your own domain
Your workspace always works at its own address (for example yourbusiness.nalisuite.com). You can also open it at an address under a domain you already own, such as erp.yourcompany.co.ke. NaliSuite does not buy or register domains; buy one from a registrar (for example a .co.ke registrar) first. Settings → Domains only appears when your provider allows custom domains.
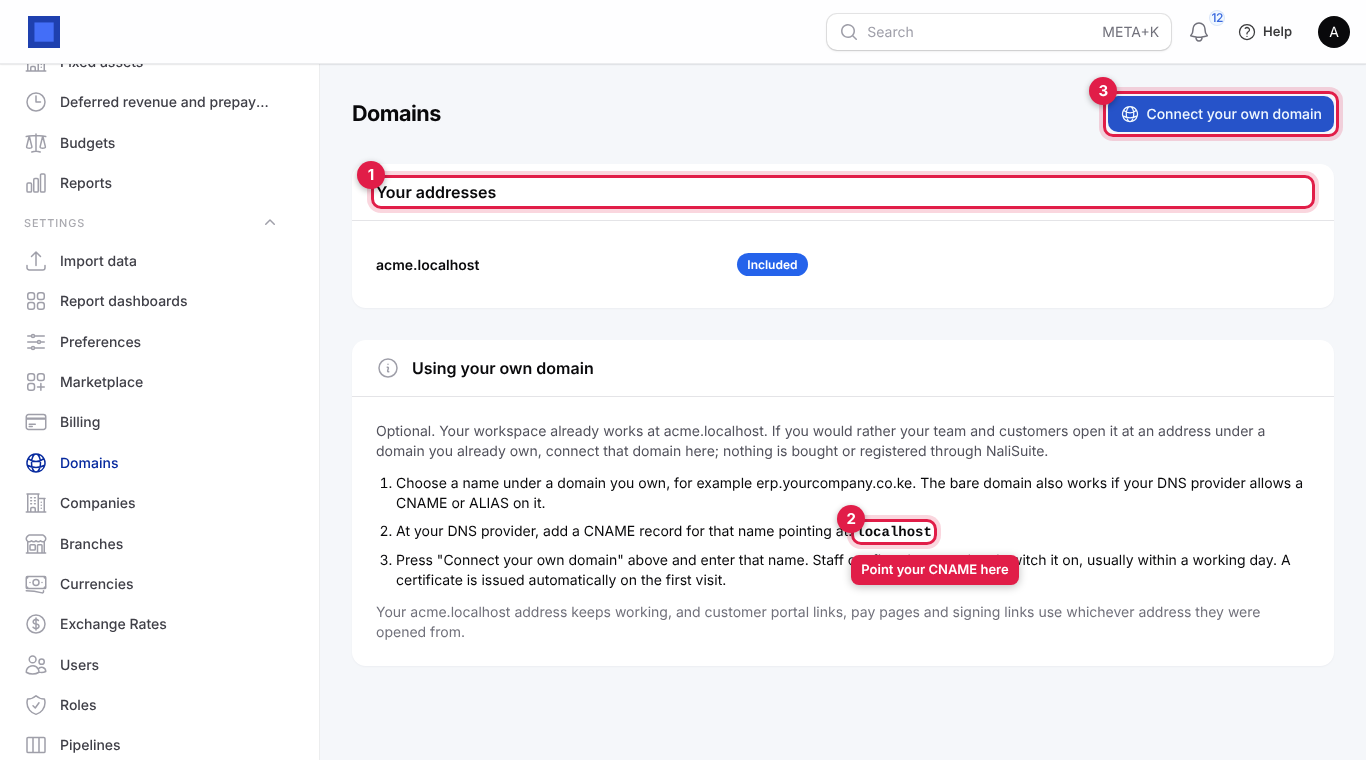
Your addresses (marker 1) lists your included address and every domain you asked for, with its status:
| Status | Meaning |
|---|---|
| Included | Your built-in address. Always works. |
| Waiting for approval | You sent a request; your provider is checking the DNS record. |
| Live | The domain works. You received an email "Your domain … is live". |
| Rejected | The provider could not activate it; the reason is shown next to the badge and was emailed. Fix the DNS record and request again. |
Remove next to a domain disconnects it (after you confirm).
Step 1: check your plan allows it
Whether you can connect a domain depends on your plan. On NaliSuite's own plans: Starter does not include custom domains (the Domains page says "Your plan does not include custom domains" and you move to another plan under Billing → Change plan), Growth offers them as a paid add-on (below), and Business and Enterprise include them, so you go straight to Step 2.
If your plan offers custom domains as a paid add-on
When custom domains are a paid add-on, a yellow note says "Custom domains are a paid add-on: … a month." and the button at the top reads Add custom domains · … a month.
- Click Add custom domains · … a month.
- Read the price (monthly, and yearly on yearly billing) and click Confirm.
- You see "Custom domains added. Connect your domain now." It is billed from your next invoice and Connect your own domain appears.
Step 2: add the CNAME record
- Choose a name under your domain, for example
erp.yourcompany.co.ke. The bare domain (yourcompany.co.ke) only works if your DNS provider allows a CNAME or ALIAS on it. - Sign in to wherever your domain's DNS is managed (your registrar, cPanel, Cloudflare and so on).
- Add a CNAME record: Name/Host =
erp(the part before your domain), Target/Points to = the address shown on the Domains page after "pointing at:" (marker 2). Save it. DNS changes can take from a few minutes to a few hours.
Step 3: send the request
- Click Connect your own domain (marker 3).
- In Your domain name (marker 1), type the exact name you created the CNAME for, for example
erp.yourcompany.co.ke. - Click Send request (marker 2).
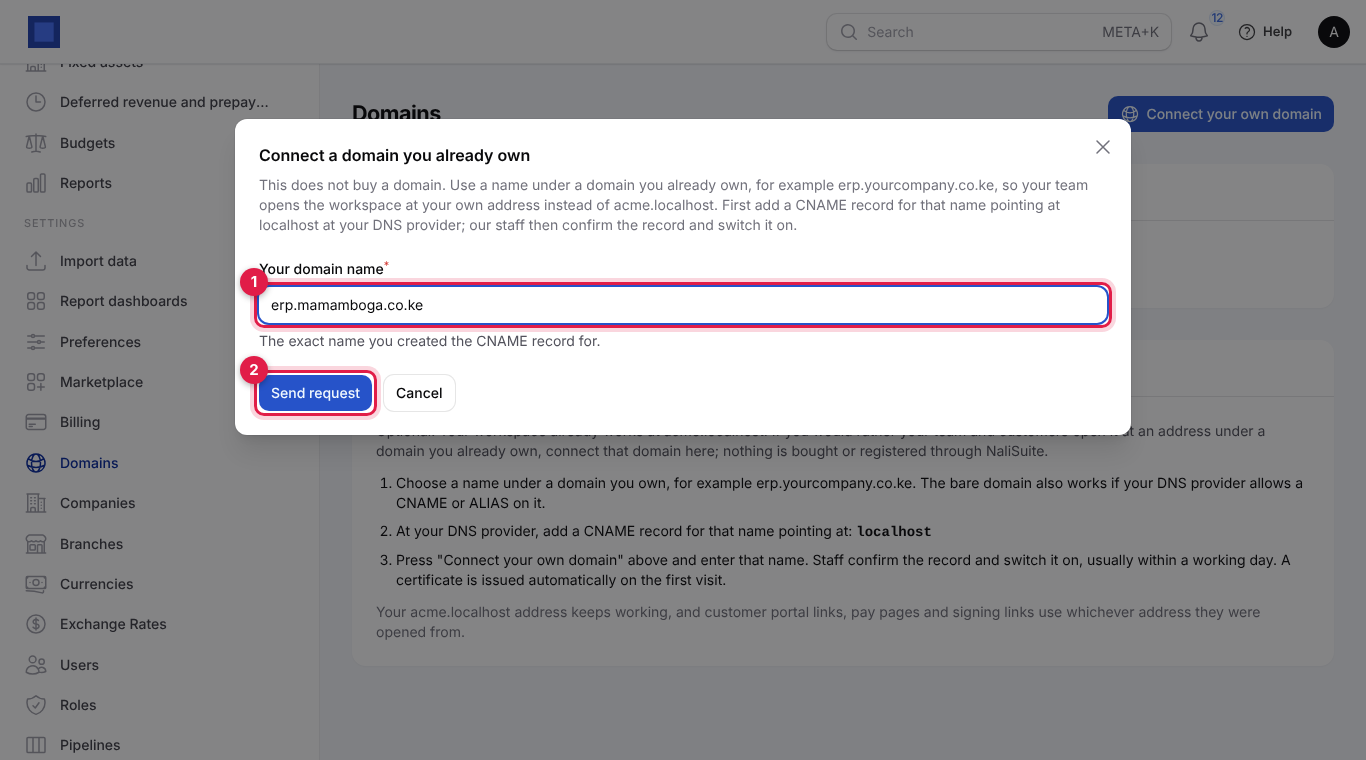
What happens next: "Request sent. We will email … once the domain is live." The domain shows Waiting for approval. Your provider confirms the record and switches it on, usually within a working day. The security certificate (https) is issued automatically on the first visit.
Error messages you may see: "Enter a full domain name such as erp.example.com.", "Use a domain you own, not a … address.", "… is already in use." or "Add custom domains to your subscription first."
Once live, your original address keeps working. Customer portal links, pay pages and signing links use whichever address they were opened from. Users need to sign in again on the new address the first time.
Common questions
Who receives the billing emails? The Billing contact shown in the Status card (the email used at signup). Ask your provider to change it.
Why is my next invoice higher than plan × users? It includes add-ons and tax. Each line is listed under Next invoice.
I got an "Apps removed from your plan" message. What happened? Your provider took those apps out of your plan, so they were switched off in your workspace. Your data in them is kept. Apps you bought separately in the Marketplace are not affected. To keep using a removed app, buy it from Settings → Marketplace or ask your provider about a plan that includes it.
Can I pay for a year at once? Yes. Click Change plan, choose Yearly and save; the next invoice is for a year.
I paid by bank transfer. When will my workspace be active? When your provider records the payment. Quote the invoice number in the transfer reference to make it quick.
What happens to my data if I cancel a marketplace app? It is kept. If you add the app again later, your records are still there.
The Domains page is missing from my menu.
Your provider does not offer custom domains, or your role lacks core.settings.view.
My domain was rejected.
Check the CNAME record points exactly at the target shown on the page (no extra dot or http://), wait for DNS to update, then remove the rejected entry and request again.
I paid through M-Pesa Paybill. When will the invoice show as paid? As soon as the payment is matched to the account number, which is your invoice number. Use it exactly as shown on the invoice.
Do customers or employees count as users? No. Only staff who sign in to the workspace count. Customers, vendors, contacts, portal users and employees without a login are free.
What uses up storage? Your records and every uploaded file. Pictures and scanned documents take the most room. Delete old attachments you no longer need, or add storage under Add-ons.