Sign in with Facebook, LinkedIn or X, and alerts in Slack and Telegram
This page is for owners and administrators. It covers three things: letting your team sign in with their Facebook, LinkedIn or X account, posting chosen alerts to Slack channels, and sending alerts to Telegram, both to groups and to each person's own Telegram.
You will find them under Settings → Preferences → Social sign-in, Settings → Slack and Settings → Telegram. Each person links their own Telegram from their initial at the top right → Notification settings. All of this comes with every plan; no app needs to be switched on.
Note: Social sign-in needs the Manage settings permission (
core.settings.manage). Adding, testing and changing Slack channels, connecting the Telegram bot and adding Telegram chats needcore.integrations.manage. Both belong to the owner and admin roles by default. Other users can see the Slack and Telegram lists but not change them. Anyone can link their own Telegram.
Social sign-in: Facebook, LinkedIn and X
People sign in with Facebook, LinkedIn or X only when they already have an account in your workspace with the same confirmed email address. No new accounts are created this way; add people under Settings → Users first.
- Open Settings → Preferences and click the Social sign-in tab (marker 1).
- Switch on Allow sign-in with Facebook, Allow sign-in with LinkedIn or Allow sign-in with X (marker 2).
- Copy the Redirect address for your … app (marker 3), for example
https://yourname.nalisuite.com/app/sso/facebook/callback, and add it to your app in Facebook for Developers, the LinkedIn developer portal or the X developer portal. - Paste the app's ID into … app ID (marker 4) and its secret into … app secret (marker 5). If your provider has set up a shared app for the platform, the ID says "Leave empty to use the app the platform provides" and both fields can stay empty.
- Click Save preferences. The sign-in page now shows "or continue with" and a Sign in with … button for each one.
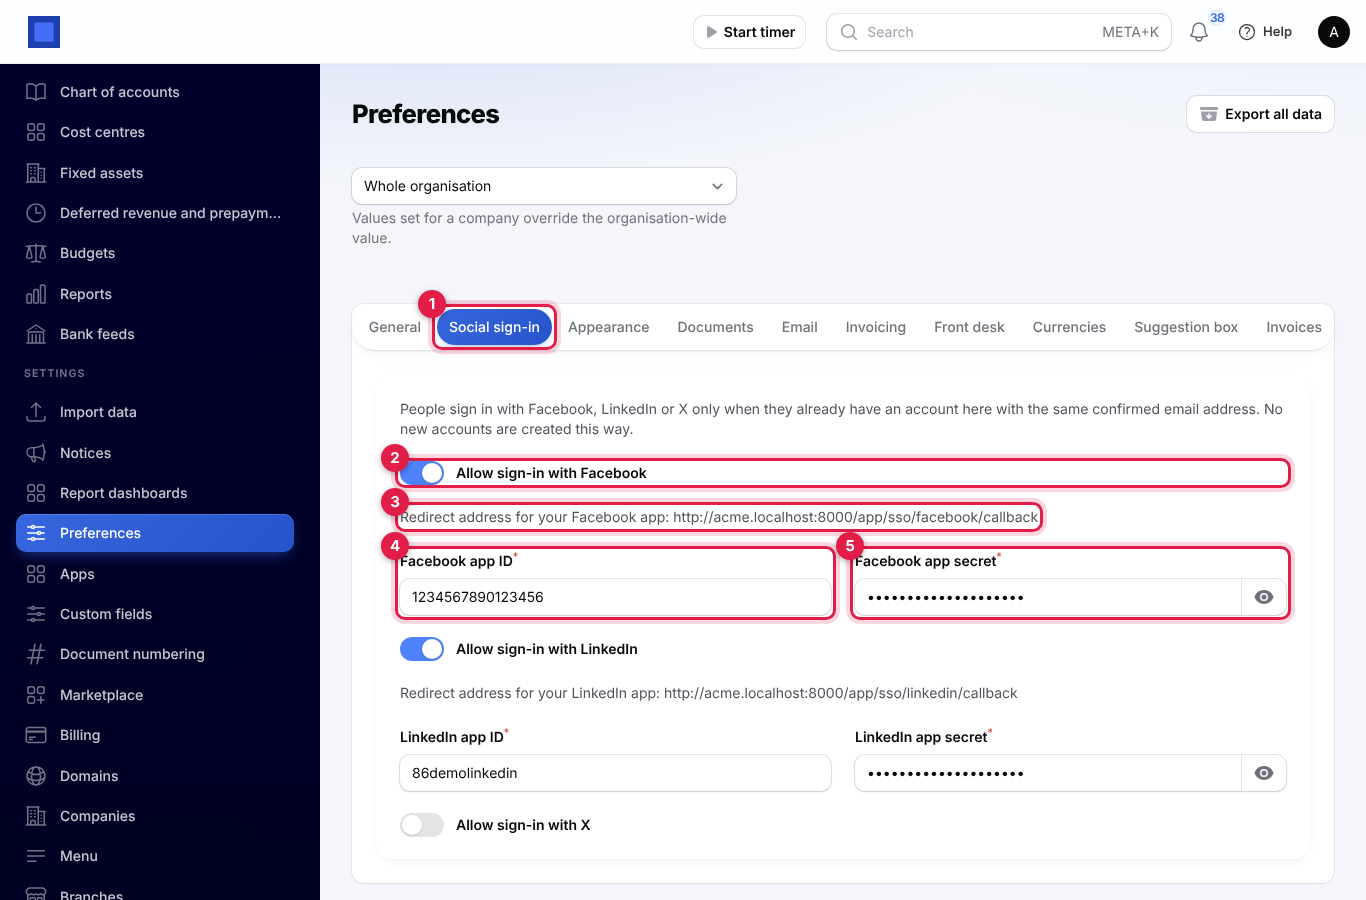
The app secret is stored encrypted. Your LinkedIn app needs the "Sign In with LinkedIn using OpenID Connect" product, and your X app needs "Request email from users" turned on.
How accounts are matched
When someone presses Sign in with …:
- If their Facebook, LinkedIn or X profile was linked to an account here before, they are signed in to that account.
- Otherwise NaliSuite takes the email address the provider shares and signs them in to the account with that email, but only if the provider has confirmed the address. LinkedIn must say the email is verified, and Facebook must not flag the account as unverified. The profile is then linked to the account for next time.
- If no account uses that email, they see "No account here uses … Ask an administrator to invite you."
X without an email. X only shares an email the person has confirmed with X, and only when your X app asks for it. If X shares no email and the profile is not linked yet, the person sees "X did not share an email address, and no account here is linked to that profile yet." Once they have signed in with X one time while X shares their confirmed email, the profile is linked, and later sign-ins with X work even without the email.
Google and Microsoft sign-in work differently and are on the General tab; see Workspace settings.
Post alerts to Slack
Each Slack channel gets the alerts you choose for it, for example new shop orders in #sales and new tickets in #support.
Add a Slack channel
- In Slack, create an app for your workspace, turn on Incoming Webhooks and add a webhook for the channel. Copy its address; it starts with
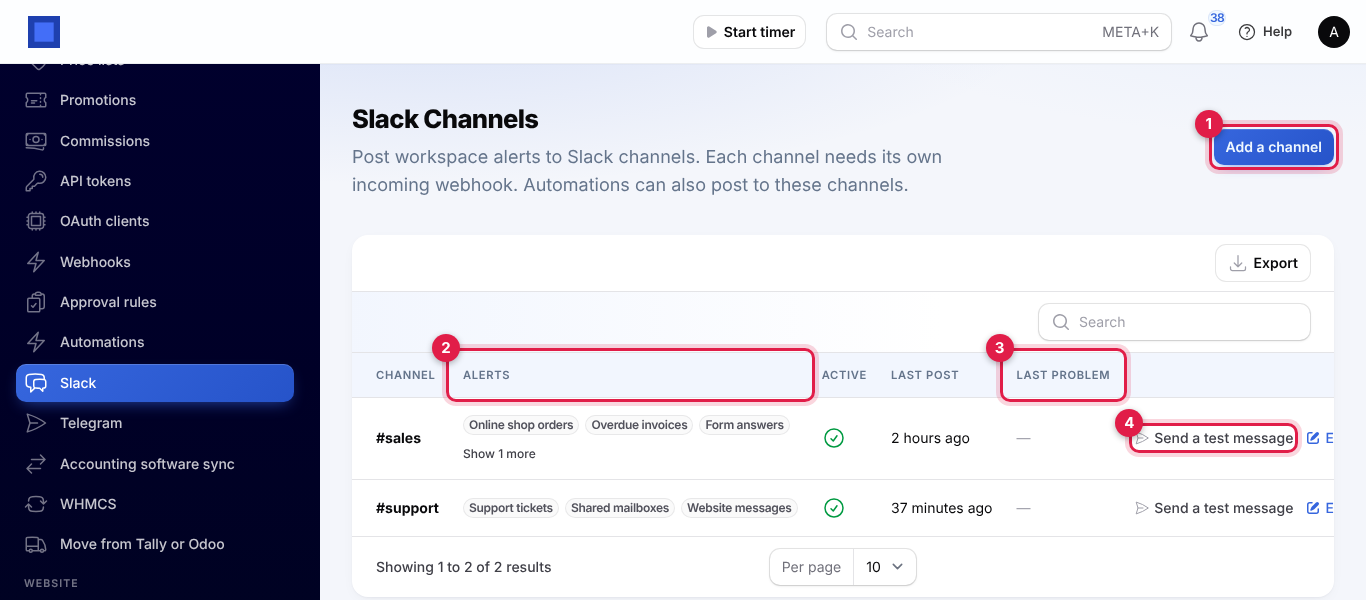
https://hooks.slack.com/. - In NaliSuite, open Settings → Slack and click Add a channel (marker 1).
- Type the Channel name (marker 1), such as
#managers, so you know which one it is. Leave Active on. - Paste the address into Incoming webhook URL (marker 2). It is stored encrypted. When you edit a channel later, leave it empty to keep the saved address.
- Tick the alerts under Post these alerts (marker 3), or Select all, and click Create.
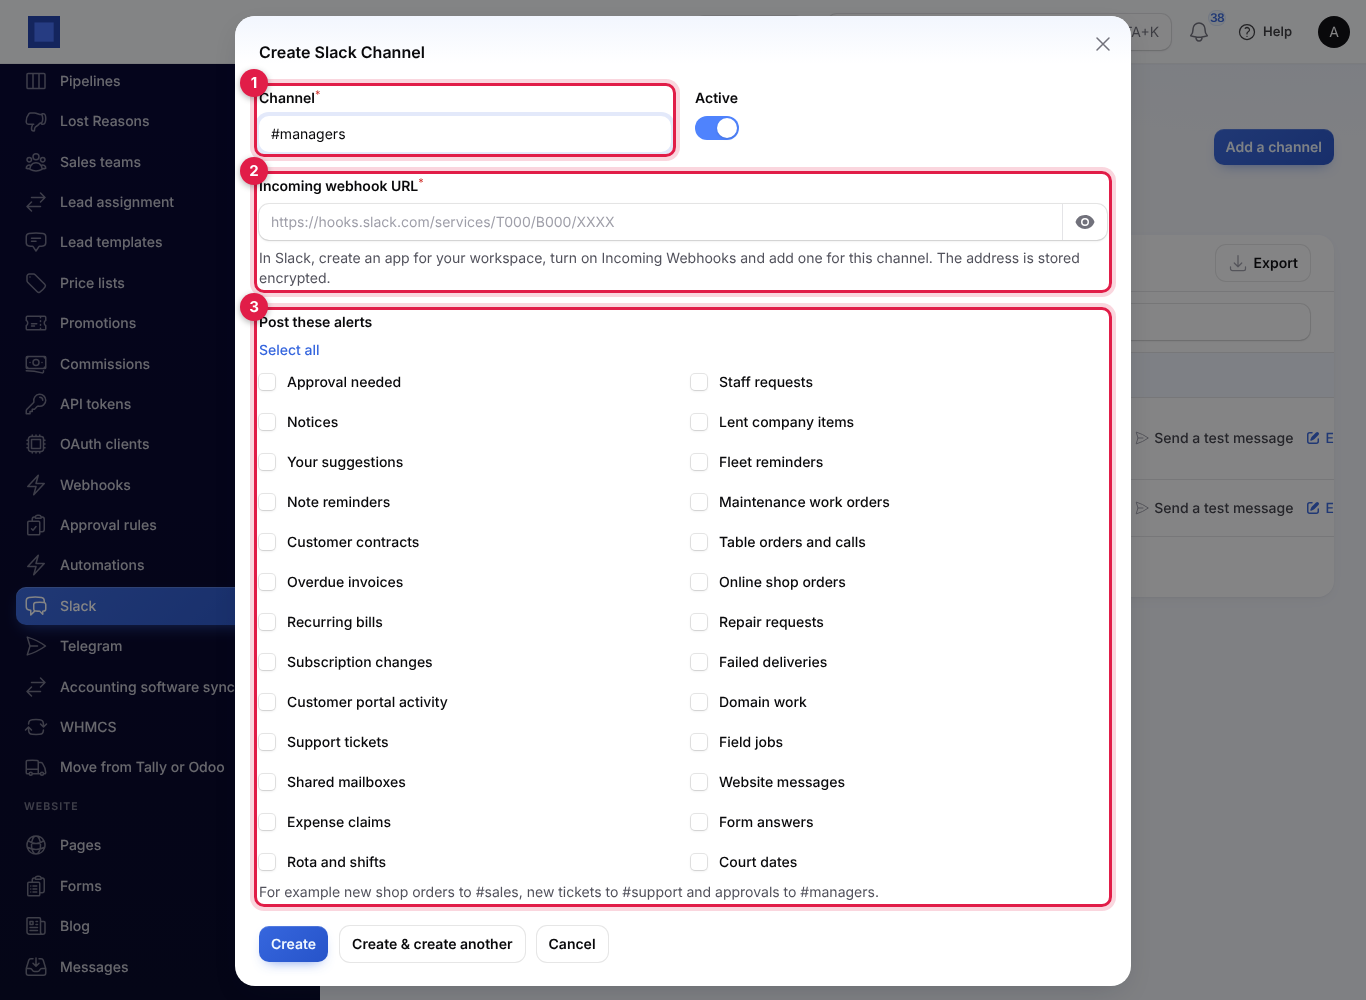
Personal alerts, such as approvals you asked for, mentions, records you follow and appraisals, are never posted to a shared channel, so they are not in the list.
Test it and check it keeps working
- Send a test message (marker 4 on the list) posts "Test message from …" to the channel. "Test message sent to …" means Slack took it; otherwise you see Slack's answer.
- Alerts (marker 2) shows what each channel receives, Last post when it last worked and Last problem (marker 3) Slack's last error, for example after someone removed the webhook in Slack.
- Switch Active off to pause a channel without deleting it.
What a Slack message looks like
Each alert arrives as one message with:
- the alert's title in bold as a heading;
- a line of text with the details;
- Alert: the kind of alert, for example "Online shop orders";
- an Open button that goes to the record in NaliSuite;
- your workspace name underneath.
The same alert is posted once to each channel that chose it, however many people in your team also receive it.
Send alerts to Telegram
Telegram works through your own Telegram bot. Once it is connected, you can post alerts to Telegram groups and channels, and each person can get their own alerts on Telegram.
Connect your bot
- In Telegram, open @BotFather, send
/newbotand follow the steps (marker 1). BotFather gives you a token. - In NaliSuite, open Settings → Telegram and click Connect bot.
- Paste the token into Bot token (marker 2) and click Submit. NaliSuite checks the token with Telegram and stores it encrypted.
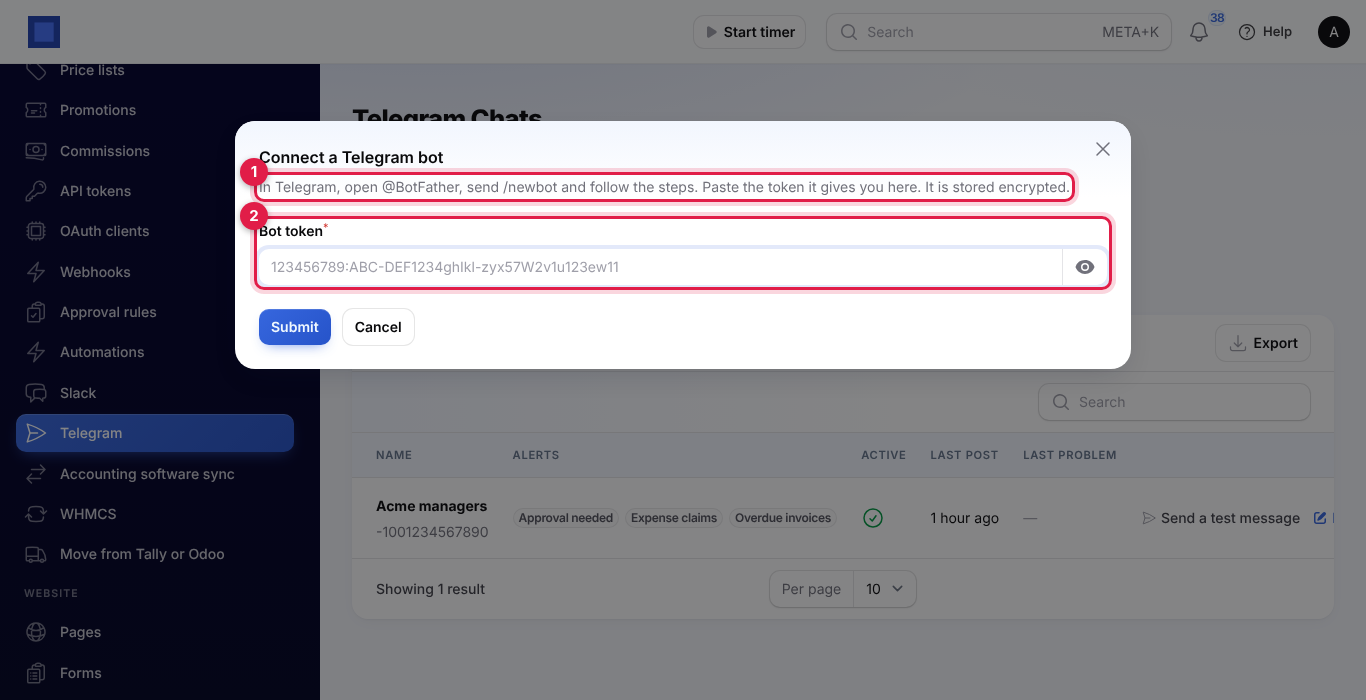
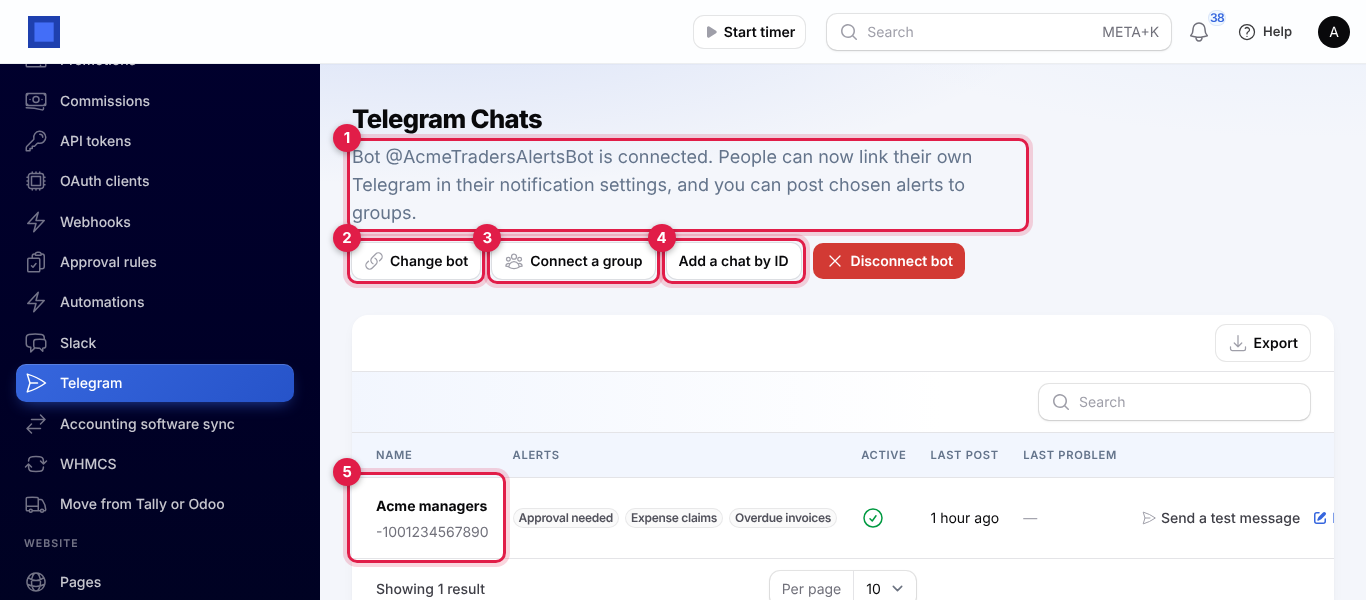
The page then says "Bot @… is connected" (marker 1 below). Connect bot becomes Change bot (marker 2).
Connect a group
- Click Connect a group (marker 3). A message gives you a link and an Open Telegram button.
- Within 30 minutes, open the link and pick the group. The bot joins and says the group is connected.
- The group appears in the list (marker 5) with its chat ID. Click Edit, tick the alerts it should receive under Post these alerts, and save.
Add a chat by ID
For a Telegram channel, or a group whose ID you already know:
- Add your bot to the channel as an administrator.
- Click Add a chat by ID (marker 4) and give it a Name.
- Enter the Chat ID (marker 1): the number, for example
-1001234567890, or a public channel's name such as@acme_alerts. - Tick the alerts under Post these alerts (marker 2) and click Create.
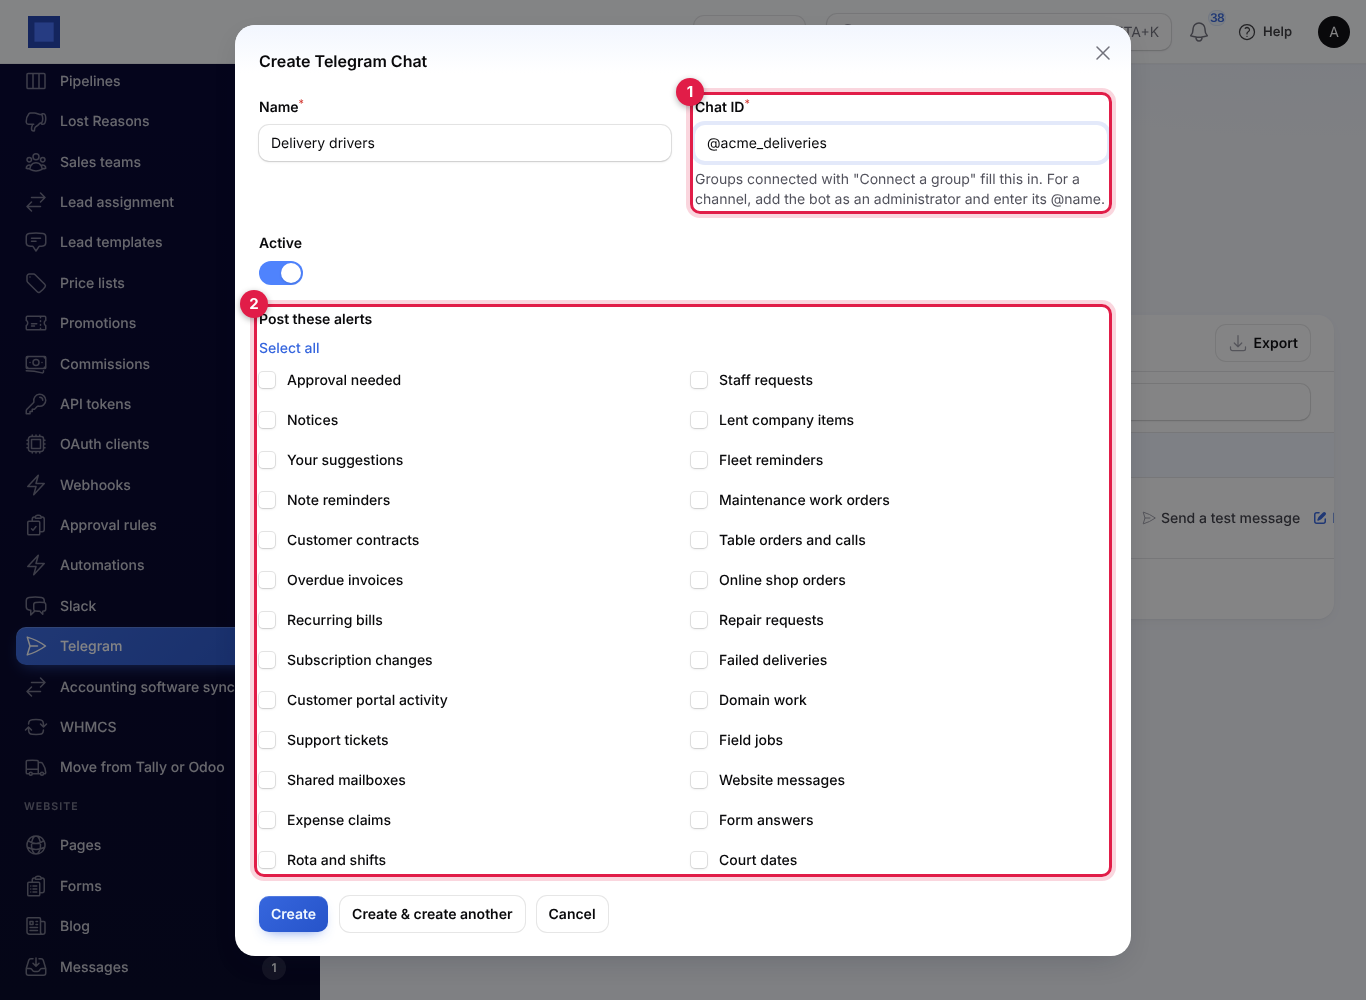
Send a test message on a chat's row posts a test to it. Last post and Last problem work as for Slack. A Telegram message shows the title in bold, the details, the kind of alert, your workspace name and an Open button.
Disconnect bot stops all Telegram alerts until a bot is connected again. Linked people and groups are kept, but if you then connect a different bot, they need to link again.
Get your own alerts on Telegram
Once a bot is connected, anyone can get their own alerts on Telegram.
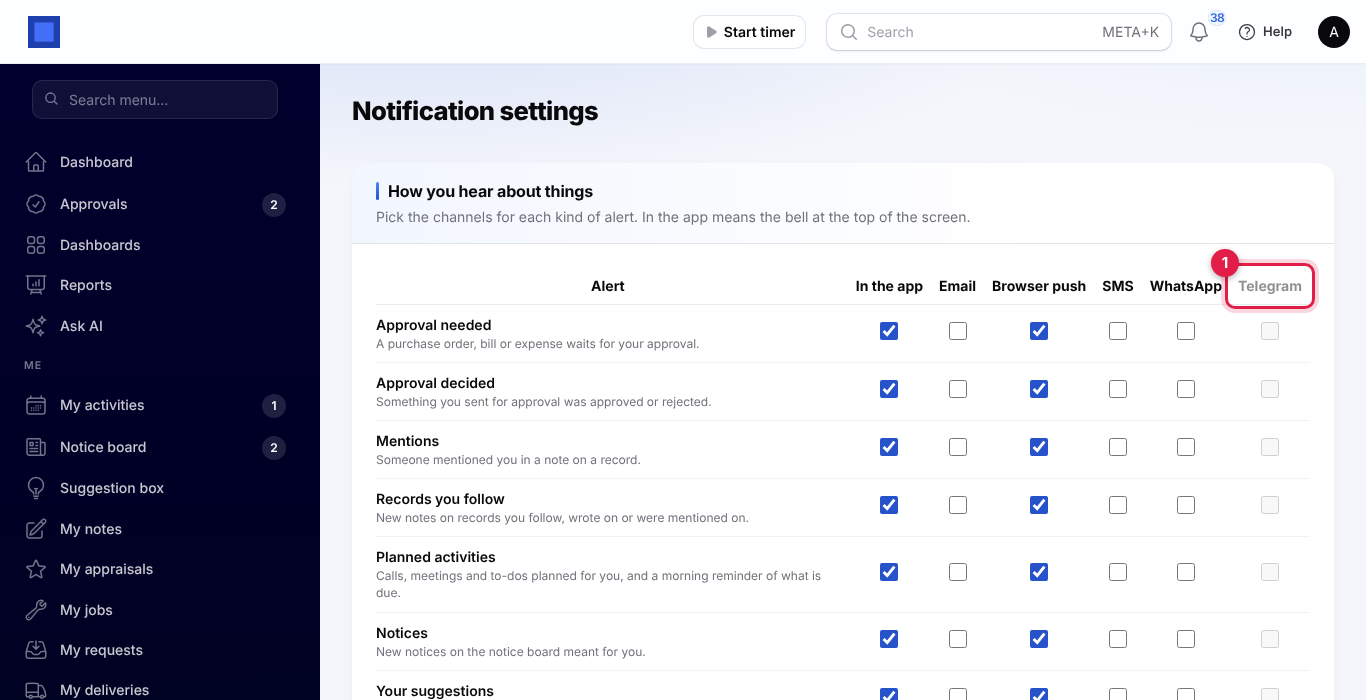
- Click your initial at the top right and choose Notification settings. The Telegram column (marker 1) is greyed out until you link your account.
- In the Telegram section (marker 2), click Link Telegram (marker 3).
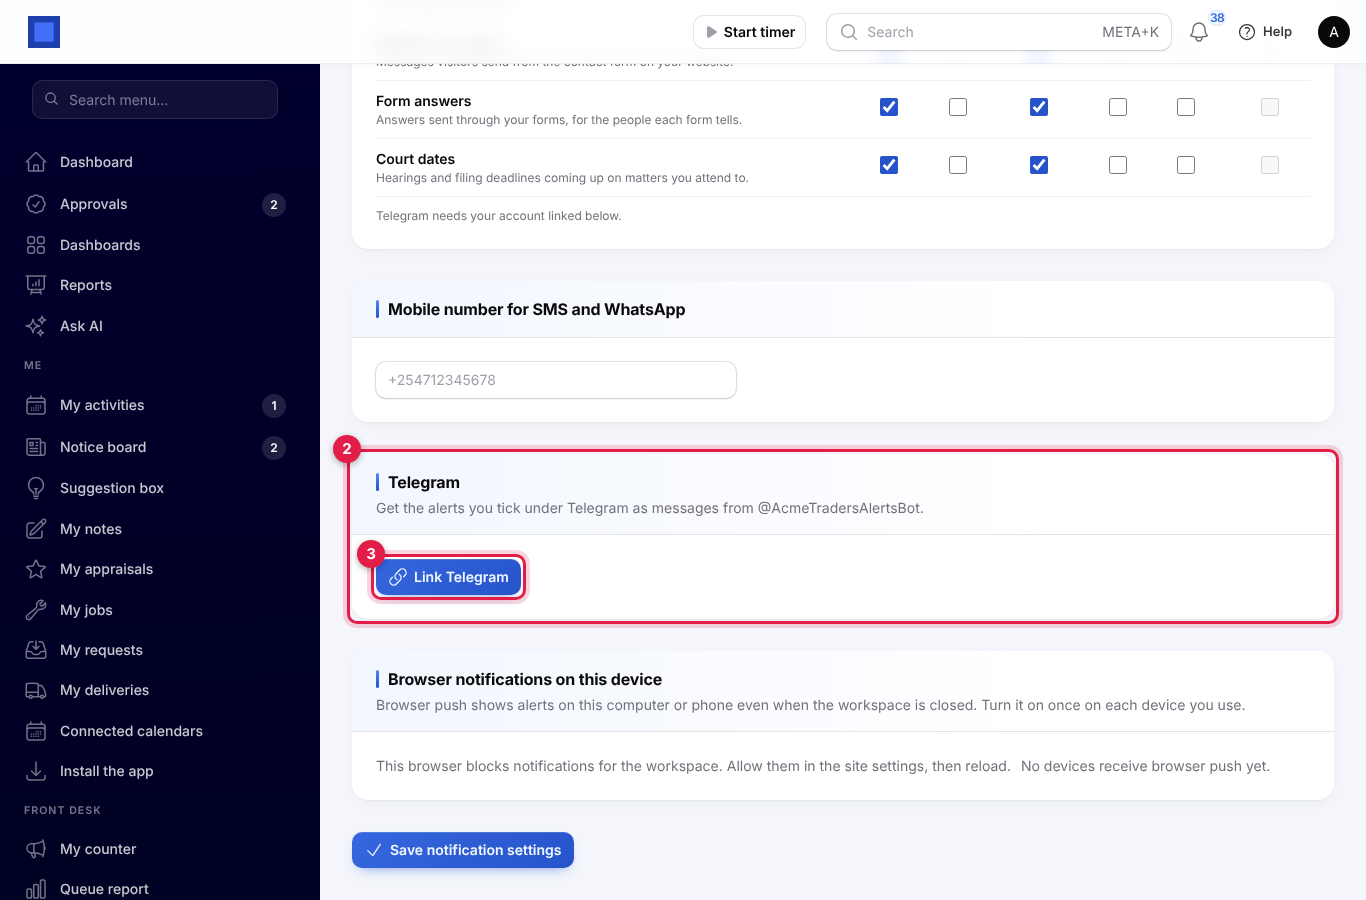
- Click Open Telegram and press Start. The link works once, for 30 minutes. In Telegram, press Start; the bot answers "Linked to …".
- Back in NaliSuite, click I have pressed Start. The section shows "Linked to @yourname", with Send a test and Unlink.
- Tick the alerts you want under Telegram and click Save notification settings.
To stop, click Unlink, or send /stop to the bot in Telegram.
Post to Slack or Telegram from an automation
Automations can post their own messages, for example "Invoice overdue by 30 days" to #finance.
- Open Settings → Automations and create or open a rule.
- Under Then, choose Post to Slack or Send to Telegram as the action's Type (marker 1).
- Pick the Slack channel or Telegram chat (marker 2). Only channels and chats added under Settings → Slack and Settings → Telegram are offered.
- Write the Message title (marker 3) and Body. Both take merge tags such as
{{invoice.number}}.
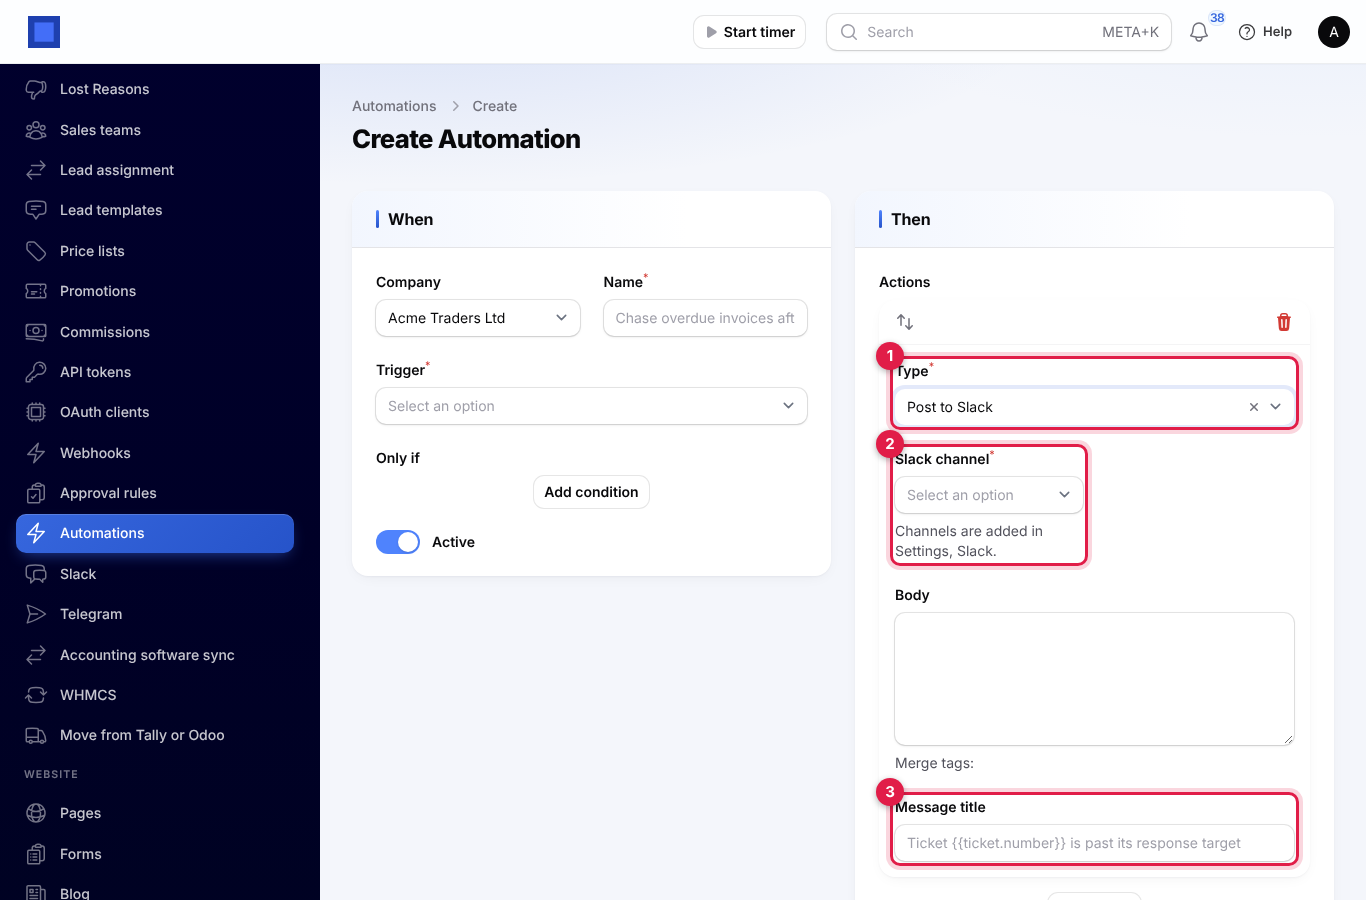
The message also lists the key facts of the record that set the rule off, with an Open button to it. Building automations needs core.automations.manage; see Approvals and automations.
Good to know
- No new accounts. Facebook, LinkedIn and X never create users. Invite people first, with the email address they use on that site.
- Turning sign-in off. Switching a provider off removes its button at once. People keep their password and any other way they sign in.
- One alert, one post. An alert is posted once to each Slack channel or Telegram chat that chose it, even when it goes to many people.
- Problems show on the list. When Slack or Telegram refuses a message, Last problem says why. Fix it, then use Send a test message.
- Group upgrades. When a Telegram group becomes a supergroup and gets a new ID, NaliSuite follows the change by itself.