Contacts and CRM
Contacts are the people and organisations you sell to and buy from: customers, vendors (suppliers) or both. The CRM (leads) tracks every sales opportunity from the first enquiry until it is won or lost. Owners, sales managers, salespeople and clerks use these screens every day. You find them in the Sales group of the menu: Leads, Sales calendar, Sales performance and Contacts. The CRM set-up screens (Pipelines, Lost Reasons, Sales teams, Lead assignment and Lead templates) are in the Settings group.
What you need before you start
| You want to | Permission needed (Settings → Roles) |
|---|---|
| See contacts | contacts.view |
| Add, edit, merge, archive contacts, record consent, erase personal data | contacts.manage |
| Import contacts from a spreadsheet | contacts.import |
| Export contacts | contacts.export |
| See leads, the sales calendar and sales performance | crm.view |
| Add and edit leads, mark them won or lost, log activities, send templates | crm.manage |
| Choose or change the salesperson on a lead | crm.assign |
| Export leads | crm.export |
| Change pipelines, lost reasons, sales teams and assignment rules | crm.pipelines.manage |
The role's Can see setting also applies to leads: a salesperson whose role says "Only records assigned to them" sees only their own leads, and "Records owned by their team" shows the leads of their sales team. See Workspace settings for roles.
Find your way around the contact list
- In the menu, open Sales → Contacts.
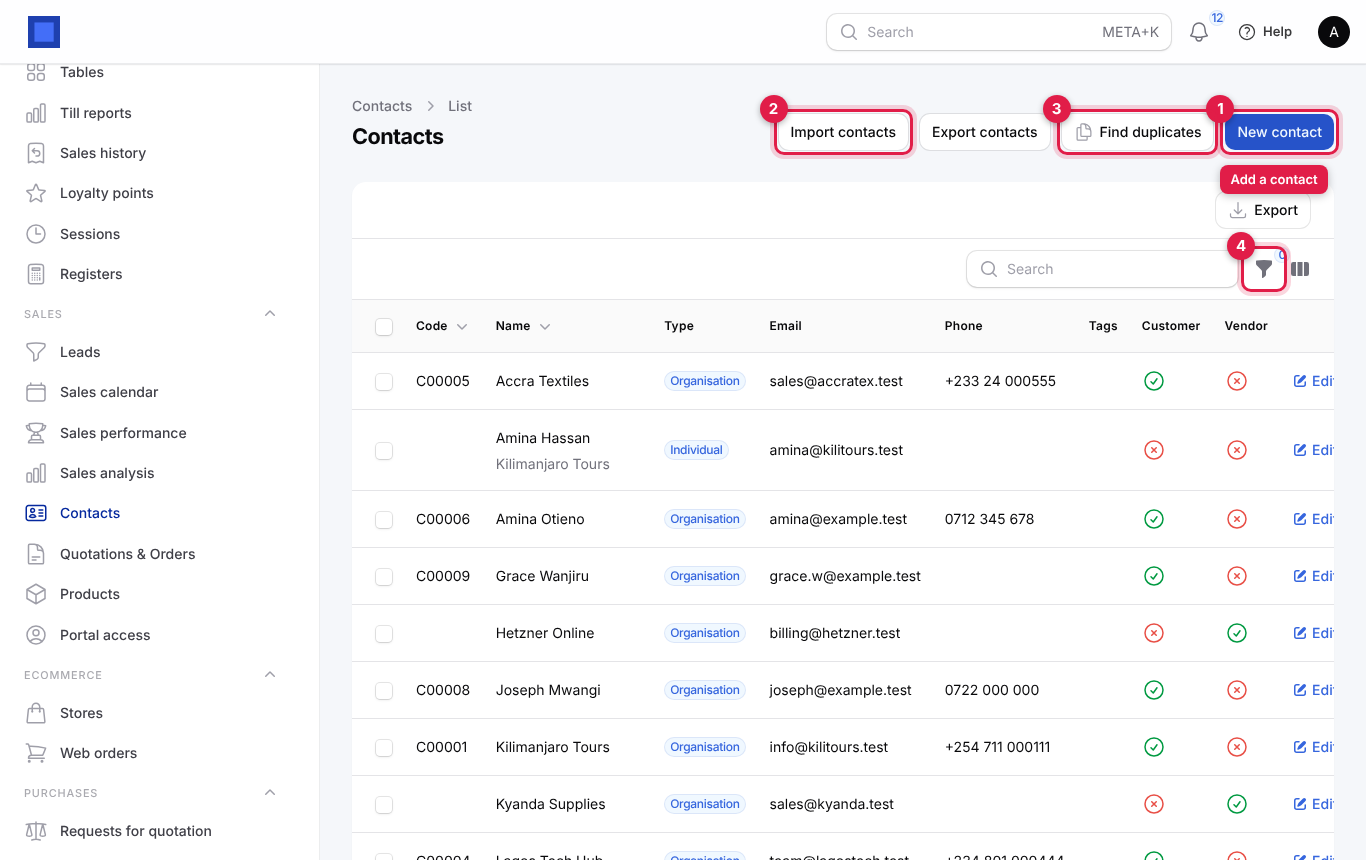
| Button | What it does |
|---|---|
| New contact (marker 1) | Opens an empty contact form. |
| Import contacts (marker 2) | Upload a spreadsheet (CSV or Excel) to create many contacts at once. Columns are matched by their heading: name, type, code, email, phone, mobile, website, tax_id, is_customer, is_vendor, payment_terms_days and notes. You choose the company to import into. See Import, export and your data. |
| Export contacts | Downloads the whole list as a spreadsheet. Needs contacts.export. |
| Find duplicates (marker 3) | Opens the duplicate finder. See Find and merge duplicate contacts. |
| Filter (marker 4) | Narrow the list by Type (organisation or individual), Customers, Vendors, Tags, Company and archived records (Trashed). |
| Search box | Searches code, name, email and phone. |
| Column manager (the bars icon next to the filter) | Show or hide columns such as Company and Updated at. |
The list shows the code, name (with the organisation underneath for people), type, email, phone, tags and a tick or cross for Customer and Vendor. Click a row or Edit to open the contact.
Tick the boxes on the left of several rows to get the Bulk actions menu: export the selected contacts, delete them (they are archived, not destroyed) or restore archived ones.
Tip: Contacts are also found from anywhere with the global search at the top (Ctrl+K or Cmd+K). It searches name, email, phone, mobile, code and tax number.
Add a customer or vendor
- Open Sales → Contacts and click New contact.
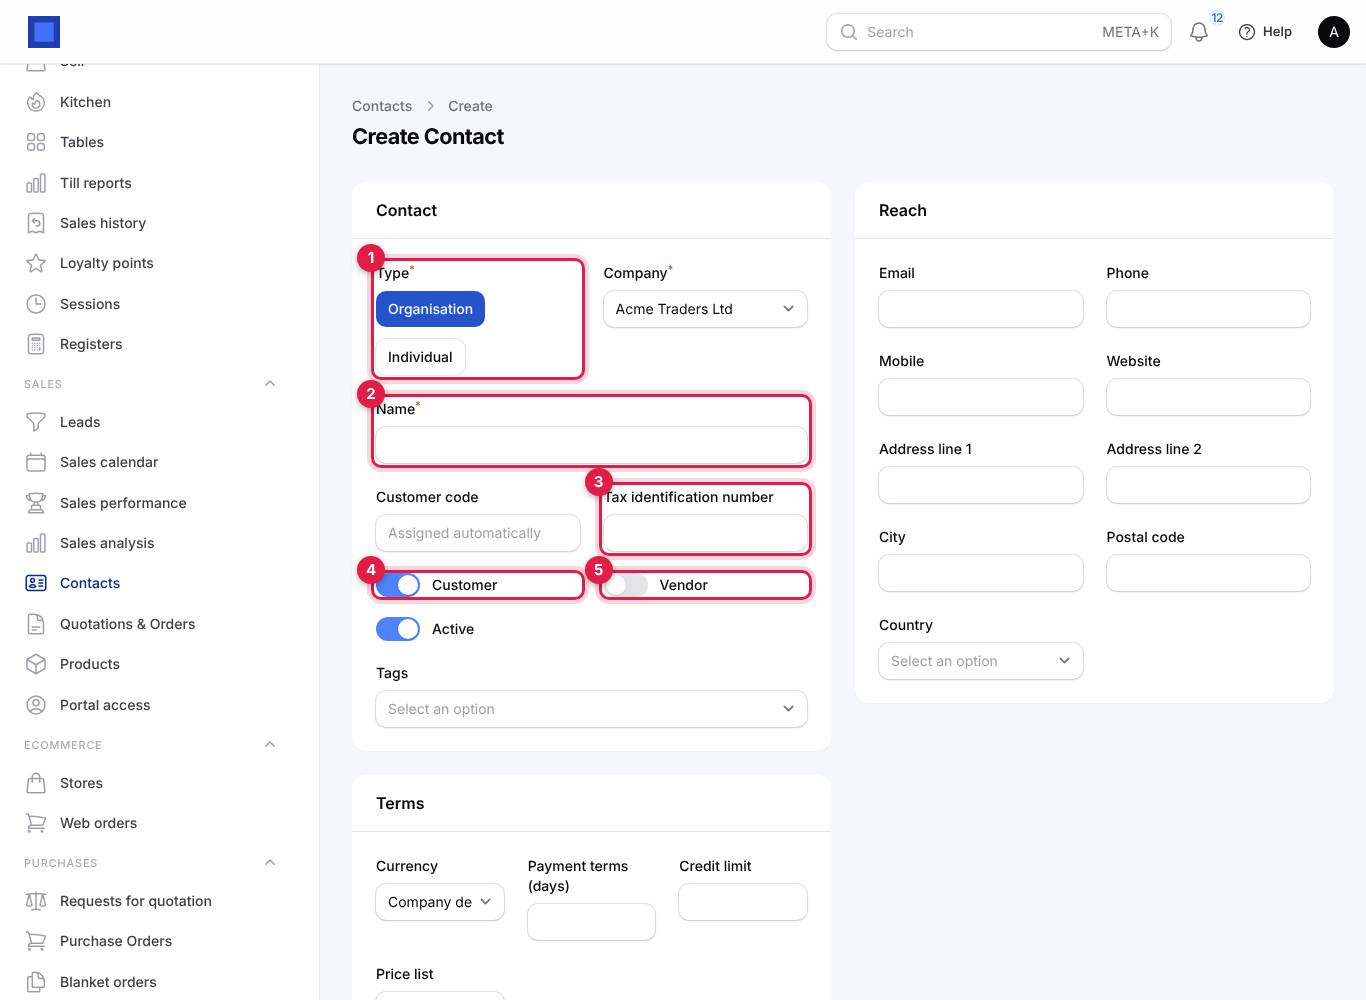
- Choose the Type (marker 1): Organisation for a business, school, NGO or government office; Individual for a person.
- Type the Name (marker 2).
- Fill in the Tax identification number (marker 3) if the contact is registered, for example their KRA PIN.
- Switch on Customer (marker 4), Vendor (marker 5), or both.
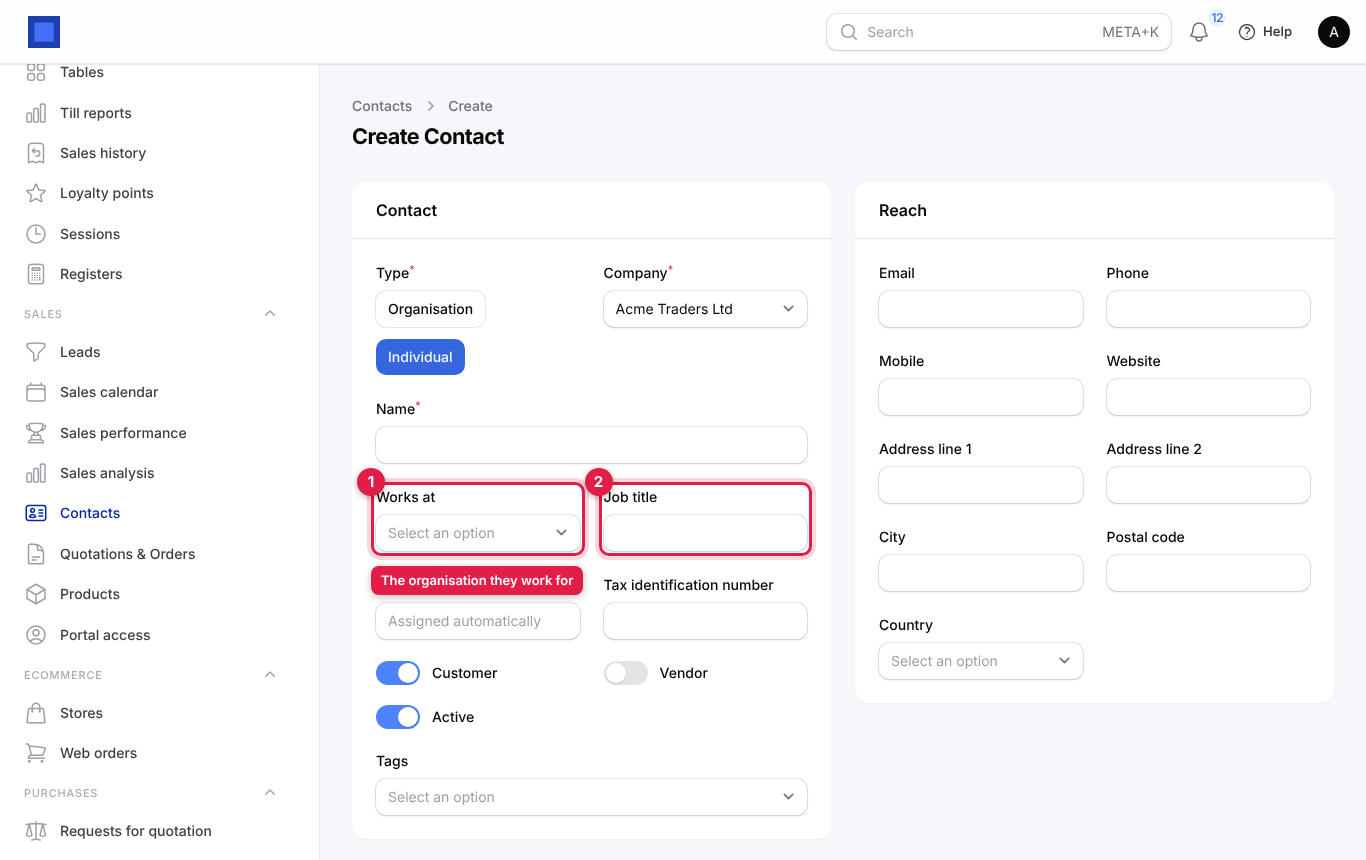
When you choose Individual, two more fields appear so you can link the person to the organisation they work for:
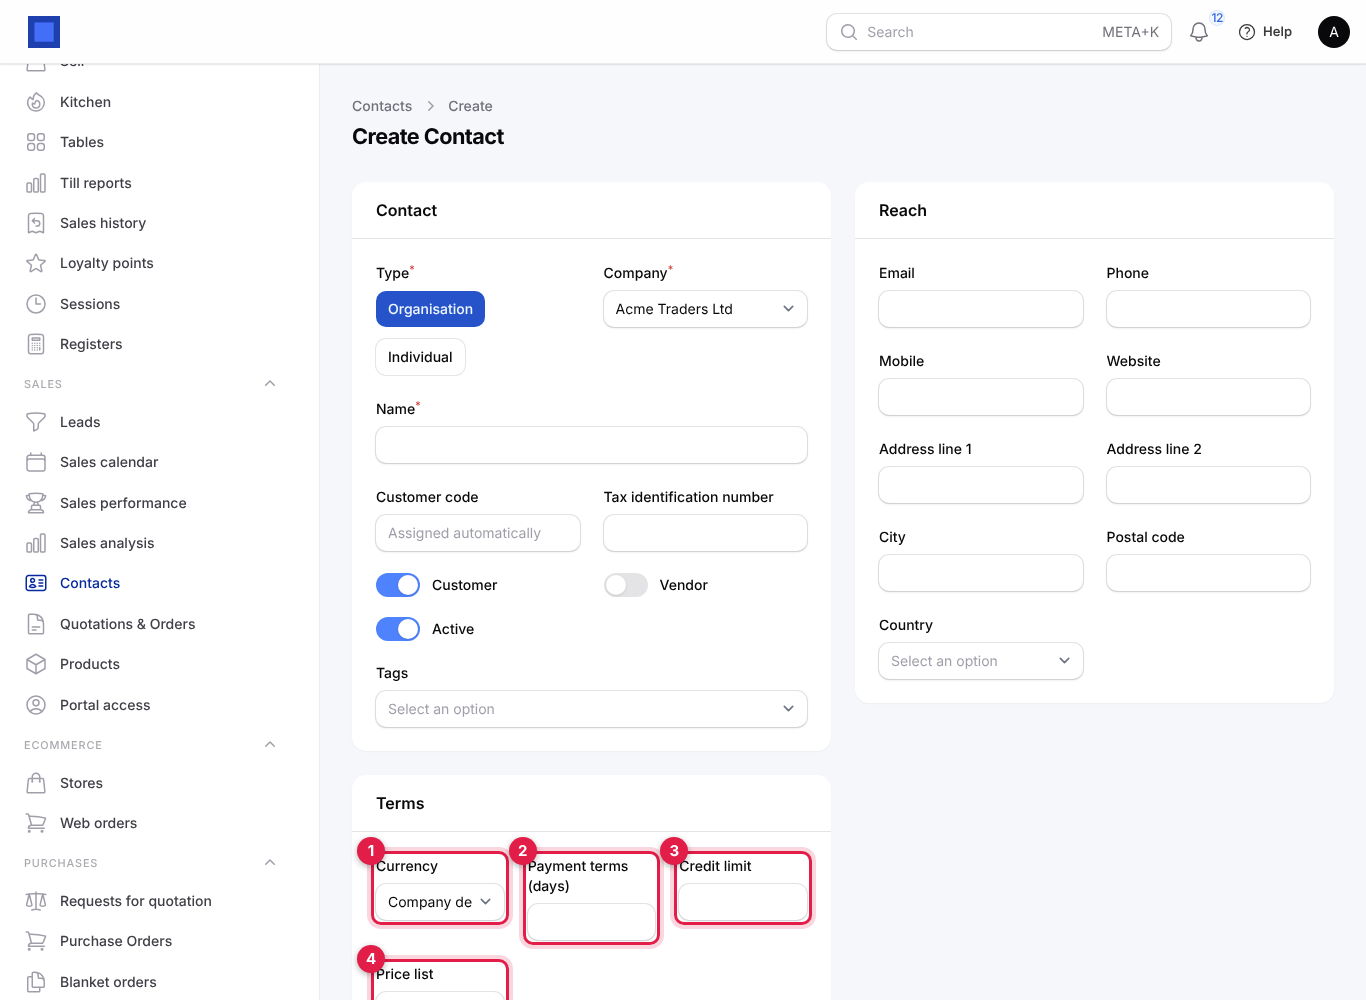
- Scroll down to Terms and set the currency, payment terms, credit limit and price list.
- Click Create. Use Create & create another when you are entering several contacts in a row.
Every field on the contact form
Contact section
| Field | What to enter |
|---|---|
| Type (required) | Organisation or Individual. Defaults to Organisation. Changing it shows or hides Works at and Job title. |
| Company (required) | Which of your own companies this contact belongs to. Only matters when you run more than one company in the workspace; it is filled with your default company. Documents for a contact must be in the same company. |
| Name (required) | The legal or trading name as it should print on invoices, for example "Kilimanjaro Tours Ltd" or "Amina Hassan". Up to 255 characters. |
| Works at (individuals only) | The organisation the person belongs to. Pick an existing organisation contact. A portal user who is a person sees the documents of their organisation too. |
| Job title (individuals only) | For example "Finance manager". |
| Customer code | Leave empty: a code such as C00012 is assigned automatically. Type your own if you already number customers. |
| Tax identification number | KRA PIN, TIN, VAT number. Printed on invoices and used by e-invoicing, and the duplicate finder compares it. |
| Customer | On: the contact appears in the Customer dropdown on quotations, invoices and subscriptions. On by default. |
| Vendor | On: the contact appears as a supplier on purchase orders and bills, and can be chosen as a product's preferred vendor. A vendor with portal access sees the vendor portal. |
| Active | Switch off for contacts you no longer deal with. On by default. |
| Tags | Free labels such as "Wholesale" or "Nairobi CBD". Pick existing tags or type a new one and click the + to create it. Used for filtering and marketing lists. |
Reach section
| Field | What to enter |
|---|---|
| Where invoices, quotations, statements, reminders and portal invitations are sent. Without an email, nothing can be emailed and the contact cannot be invited to the portal. | |
| Phone, Mobile | Include the country code, for example +254 722 000 000. The mobile is used for M-Pesa prompts on the pay page when the customer does not type another number. |
| Website | Must start with http:// or https://. |
| Address line 1, Address line 2, City, Postal code, Country | Printed on documents. |
Terms section
| Field | What to enter |
|---|---|
| Currency | The currency you normally bill this contact in. Leave as Company default for local customers. New quotations and orders for the contact switch to this currency. |
| Payment terms (days) | How many days the customer has to pay, from 0 (cash) to 365. Used to work out the due date on quotations and invoices. Empty means the workspace default (Preferences → Invoicing → Default payment terms (days)). |
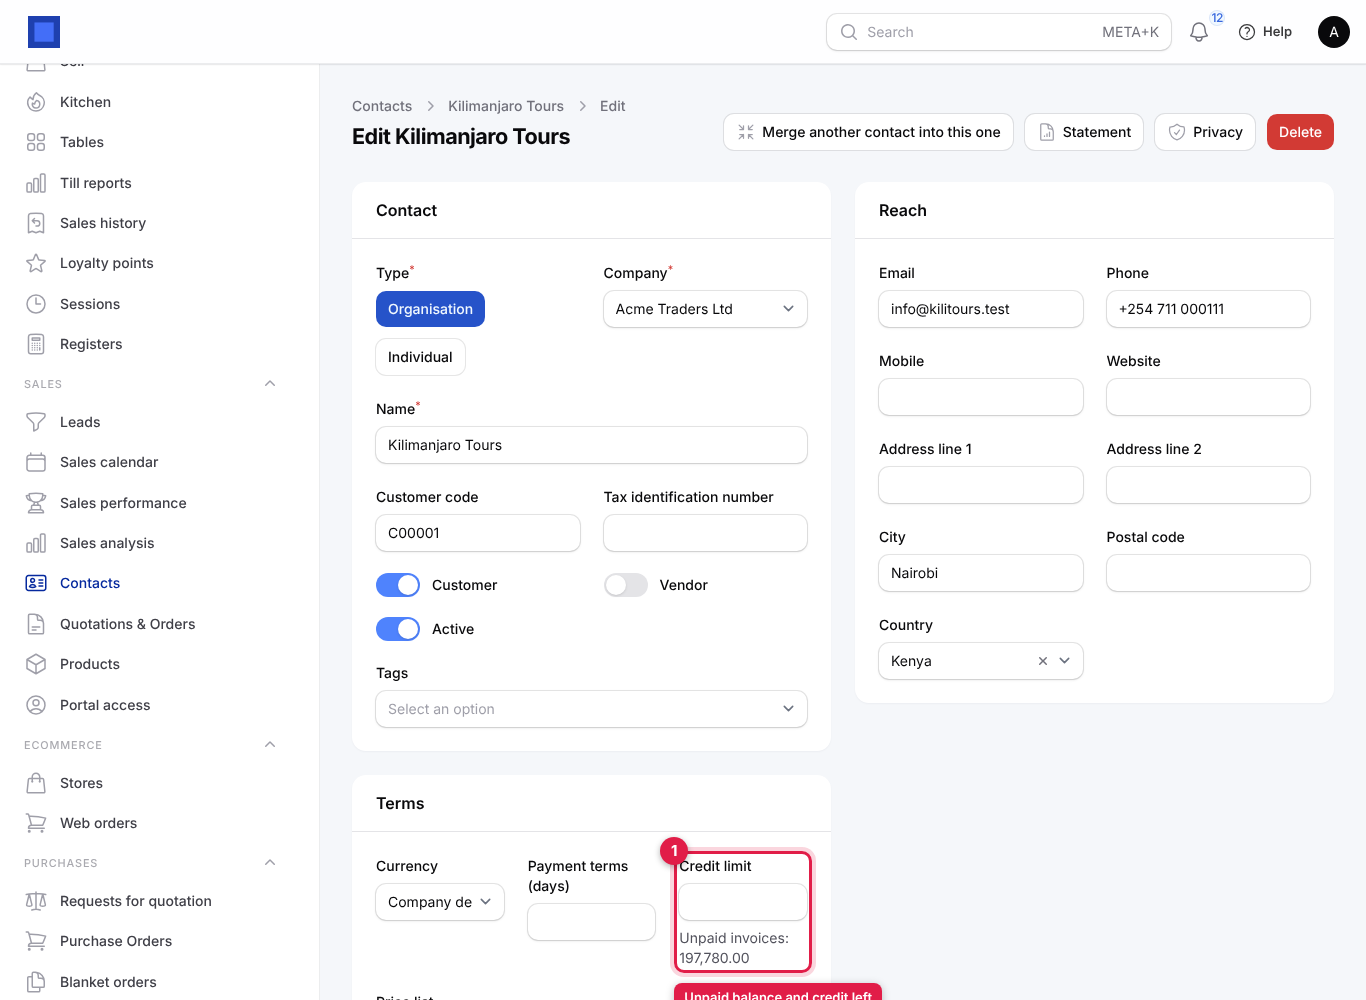
| Credit limit | The most this customer may owe you on unpaid invoices. Empty means no limit. On an existing customer the box shows Unpaid invoices and the credit still available underneath. What happens when they go over is set in Preferences → Invoices. See Set a credit limit. |
| Price list | A price list with special prices for this customer, for example "Wholesale". Empty means the company's default list (if any), otherwise the product list prices. Shown when Sales is on. See Products and pricing. |
| Notes | Anything your team should know. Internal only, never printed. |
Common mistake: creating a contact twice because the first one was spelled differently. Search first, and run Find duplicates now and then.
Tip: You do not have to leave a quotation, invoice or purchase order to add a missing customer or vendor: click the + next to the Customer field. See Add a record from inside a dropdown.
Work on an existing contact
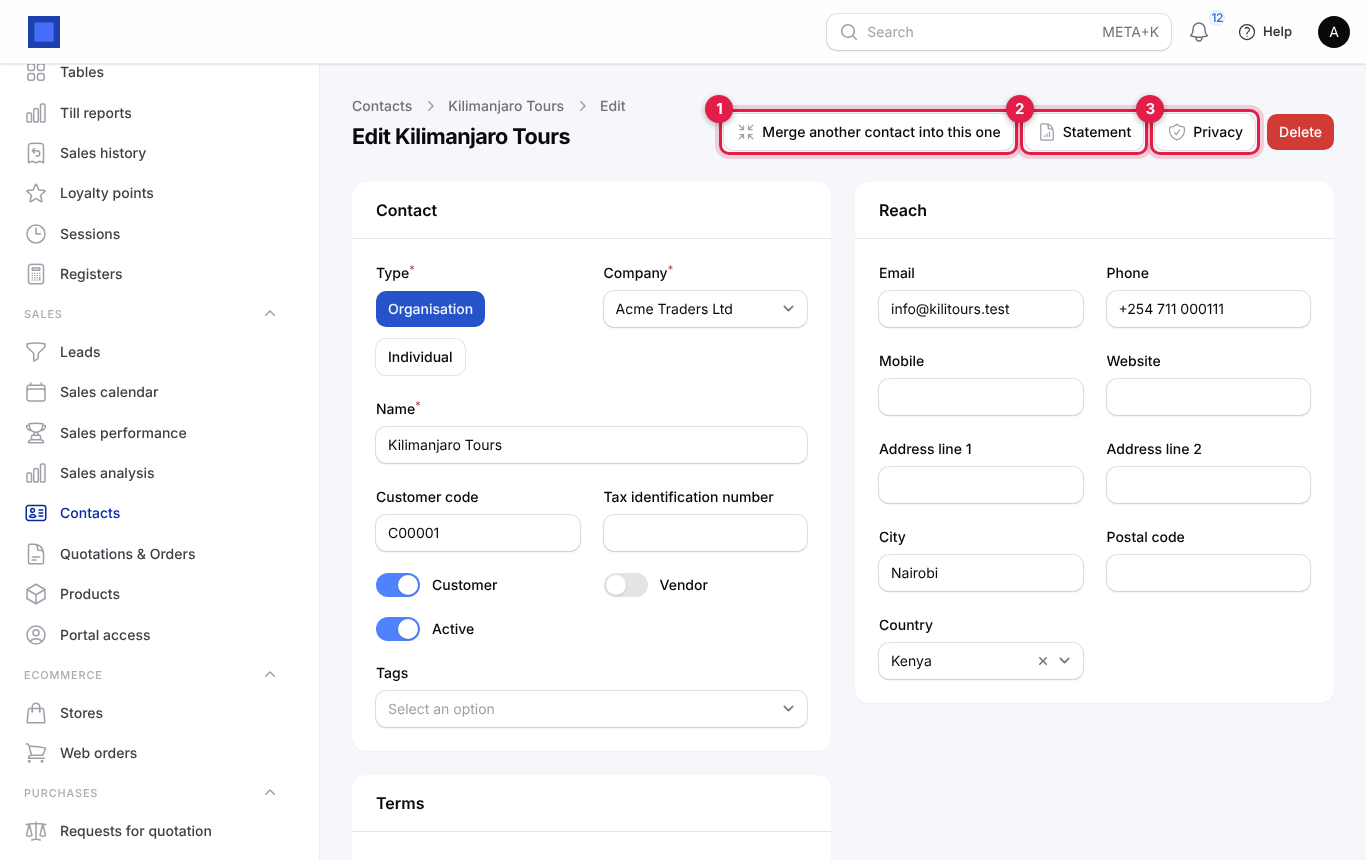
Open the contact from the list. The header has these actions:
| Action | What it does |
|---|---|
| Merge another contact into this one (marker 1) | Absorbs a duplicate into this record. See Find and merge duplicate contacts. Needs contacts.manage. |
| Statement (marker 2) | Downloads or emails a statement of account. See Send a customer statement. Shown when Invoicing is on and you have invoicing.view. |
| Privacy (marker 3) | Download personal data and Erase personal data. See Handle a data protection request. |
| Delete | Archives the contact. Its invoices and history are kept. An archived contact can be brought back with Restore from the same place or from the list filter Trashed. |
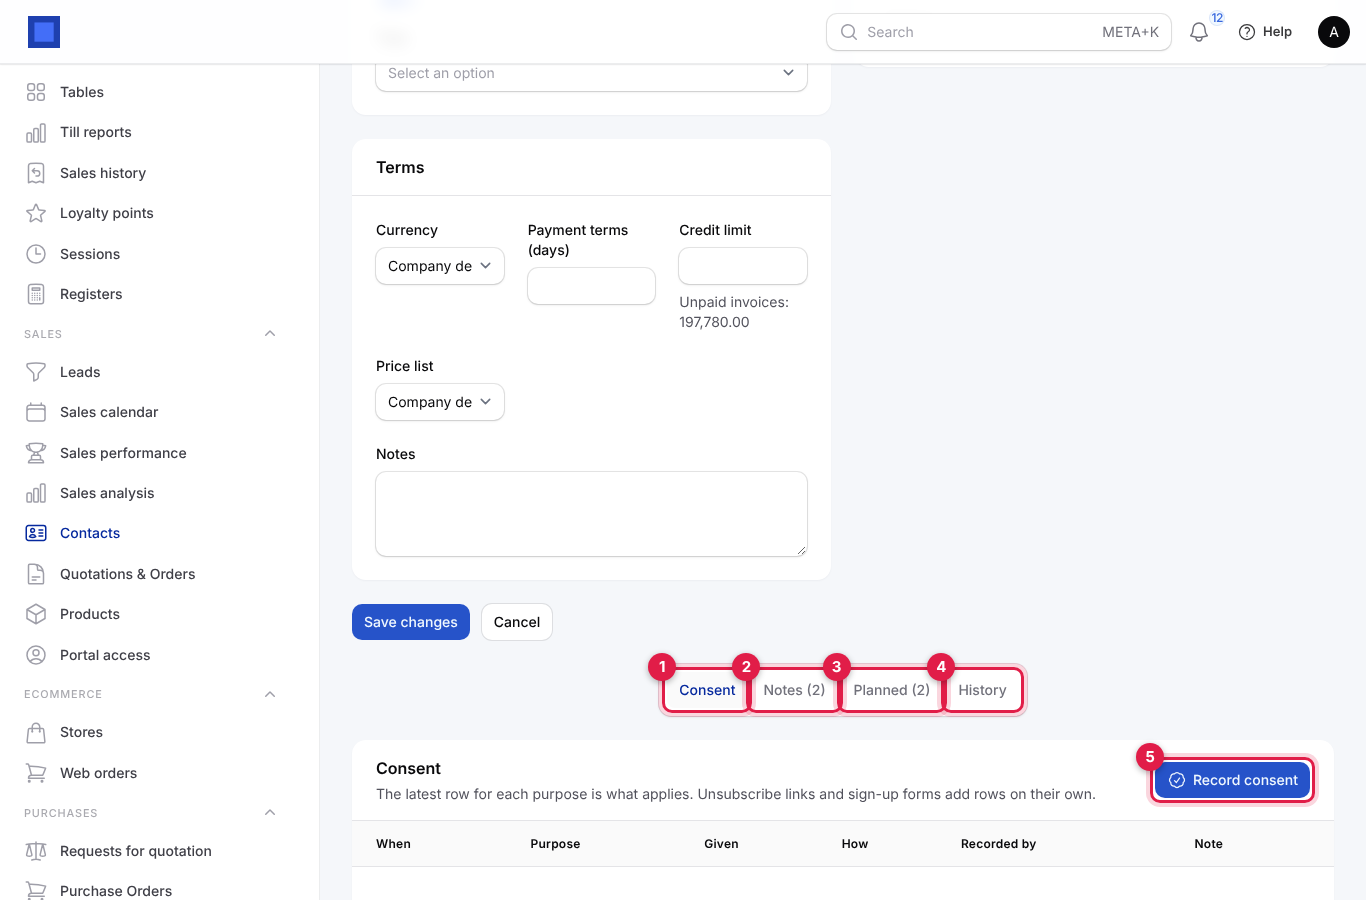
Below the form are tabs:
| Tab | What it holds |
|---|---|
| Consent (marker 1) | The consent history for marketing and data processing. Record consent (marker 5) adds a row. See below. |
| Notes (marker 2) | Internal notes and messages on the contact, with @mentions. See Getting started. |
| Planned (marker 3) | Calls, meetings and to-dos planned for this contact. |
| History (marker 4) | Who changed what and when. |
Record consent
Data protection laws (Kenya's Data Protection Act, Nigeria's NDPA and others) expect you to prove a person agreed to marketing. Rows cannot be edited or deleted because they are evidence; the latest row for each purpose is the one that applies.
- Open the contact, go to the Consent tab and click Record consent.
- Choose the Purpose: Marketing by email, Marketing by SMS, Marketing on WhatsApp or Processing of personal data.
- Choose the Answer: Given or Withdrawn.
- Choose How it was given: Recorded by staff, Sign-up form, Landing page, Unsubscribe link, Customer portal, Import or Signed paper form.
- Add a Note (for example "Ticked the box on the order form, 3 March") and click Submit.
Unsubscribe links in campaigns and sign-up forms add rows by themselves.
Set a credit limit
- Open the customer and scroll to Terms.
- Type the Credit limit (marker 1), for example 200000. The line underneath shows what is unpaid now and how much credit is left.
- Click Save changes.
What happens when the customer would go over the limit is set once in Settings → Preferences → Invoices → When a customer goes over their credit limit:
| Option | Effect |
|---|---|
| Do nothing | No check. |
| Warn, but allow the order or invoice (default) | Confirming an order or issuing an invoice still works, and a yellow "Over the credit limit" message tells you by how much. |
| Block confirming orders and issuing invoices | Confirming the order or issuing the invoice is refused with "Over the credit limit" until the customer pays or you raise the limit. |
"Exposure" is the unpaid balance on issued invoices; drafts and quotations do not count. Credit notes are never blocked.
Send a customer statement
A statement lists the balance brought forward, every invoice, debit note, credit note and payment in a period, and the running balance.
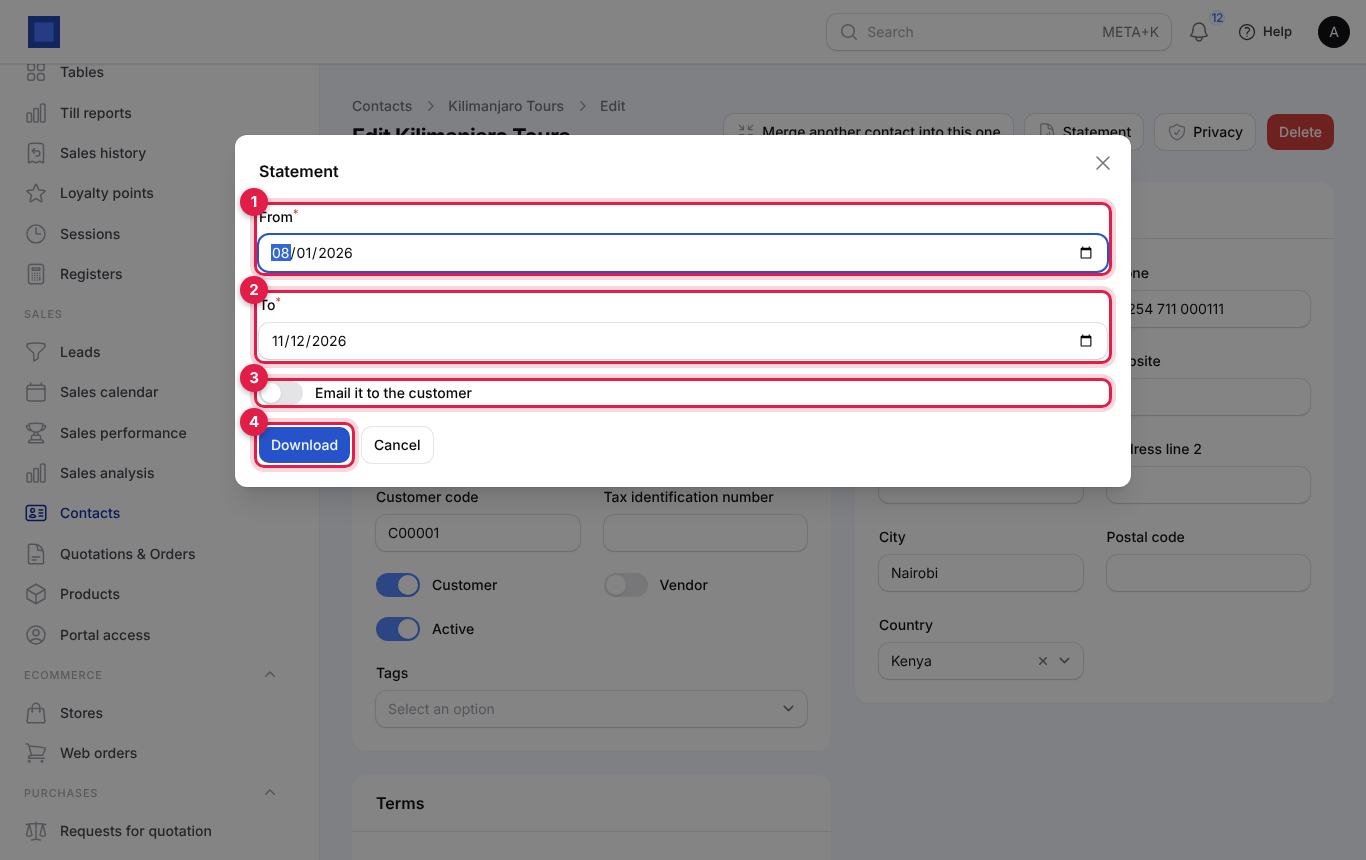
- Open the customer and click Statement.
- Set From (marker 1) and To (marker 2). The default is the start of the month three months ago until today.
- To send it, switch on Email it to the customer (marker 3). Leave it off to download the PDF.
- Click Download (marker 4). With the email switch on, the PDF is emailed to the contact's email address and a green message confirms it; nothing downloads.
Note: "Name has no email address" means the contact needs an email before a statement can be sent.
Find and merge duplicate contacts
The duplicate finder groups contacts in the same company that share an email address, a phone number (only the digits are compared), a tax number, or a name once capitals, punctuation and words such as "Ltd" are ignored.
- Open Sales → Contacts and click Find duplicates.
- Each group shows why the contacts match. Pick the record to keep and click Merge into the selected contact, then confirm.
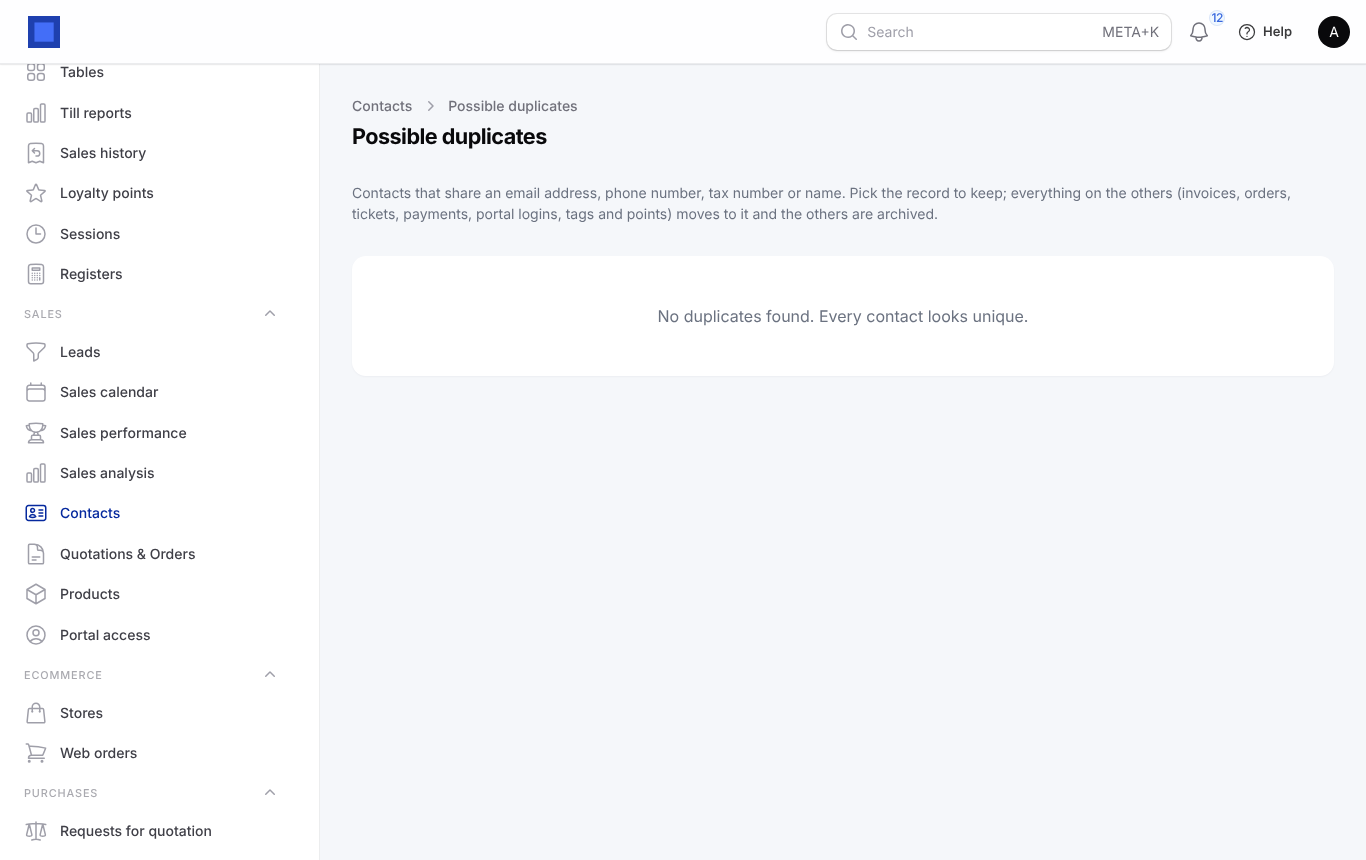
When nothing matches, the page says "No duplicates found. Every contact looks unique."
You can also merge from a contact you already have open:
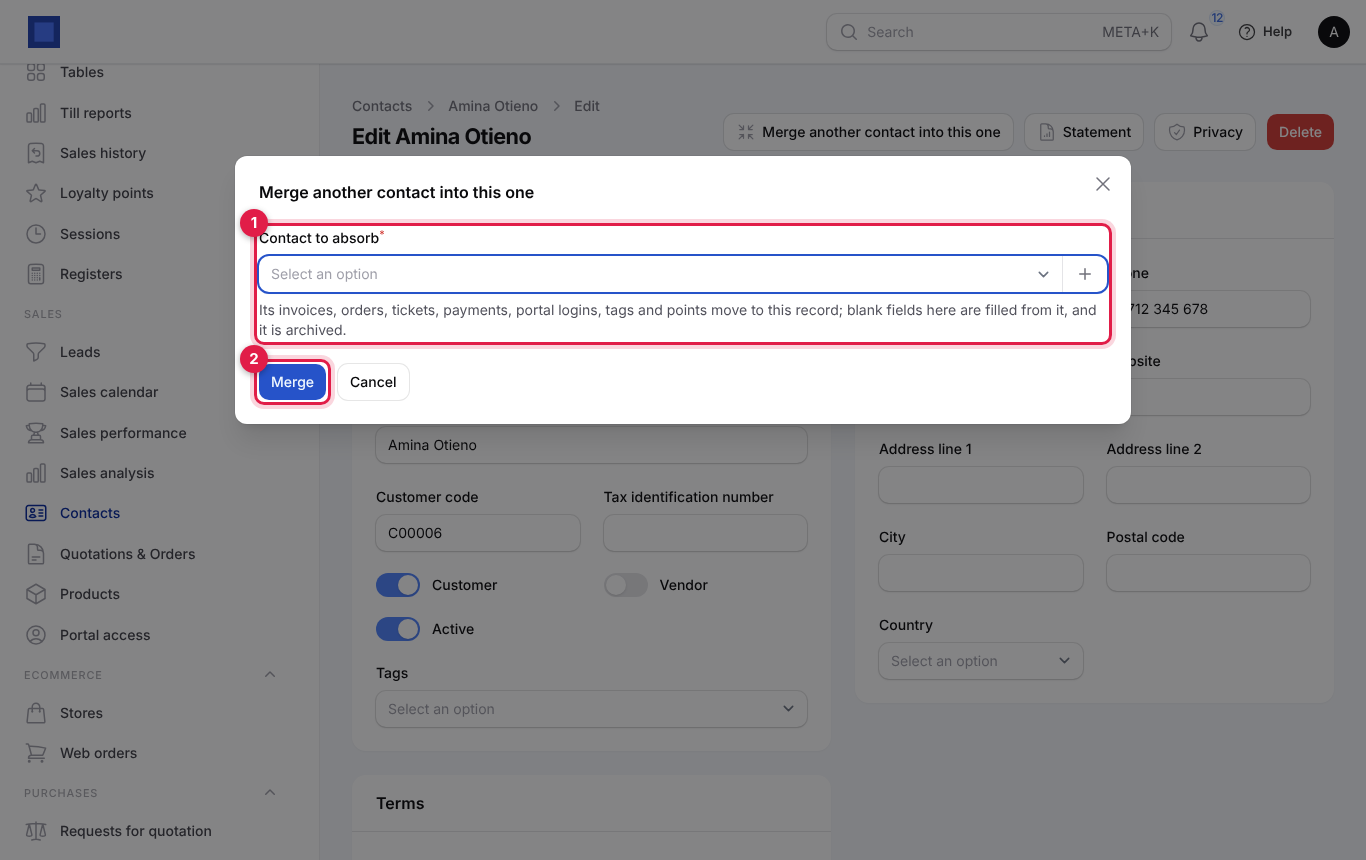
- Open the contact you want to keep and click Merge another contact into this one.
- In Contact to absorb (marker 1), pick the duplicate. The most similar contact is suggested.
- Click Merge (marker 2).
What a merge does:
- Every invoice, order, quotation, payment, ticket, lead, subscription, portal login and other record pointing at the duplicate now points at the kept contact.
- Blank fields on the kept contact (email, phone, tax number, notes, terms) are filled from the duplicate. Fields you already filled are not overwritten.
- Tags and loyalty points are combined.
- The duplicate is archived, so the merge shows in its history.
A merge cannot be undone, and only contacts of the same company can be merged.
Handle a data protection request
When a person asks for a copy of their data or to be forgotten:
- Open the contact and click Privacy.
- Click Download personal data (marker 1) to get a JSON file with everything held about them. Do this first if they also asked for a copy.
- Click Erase personal data (marker 2) to anonymise them. Type ERASE in capitals to confirm and click Erase for good.
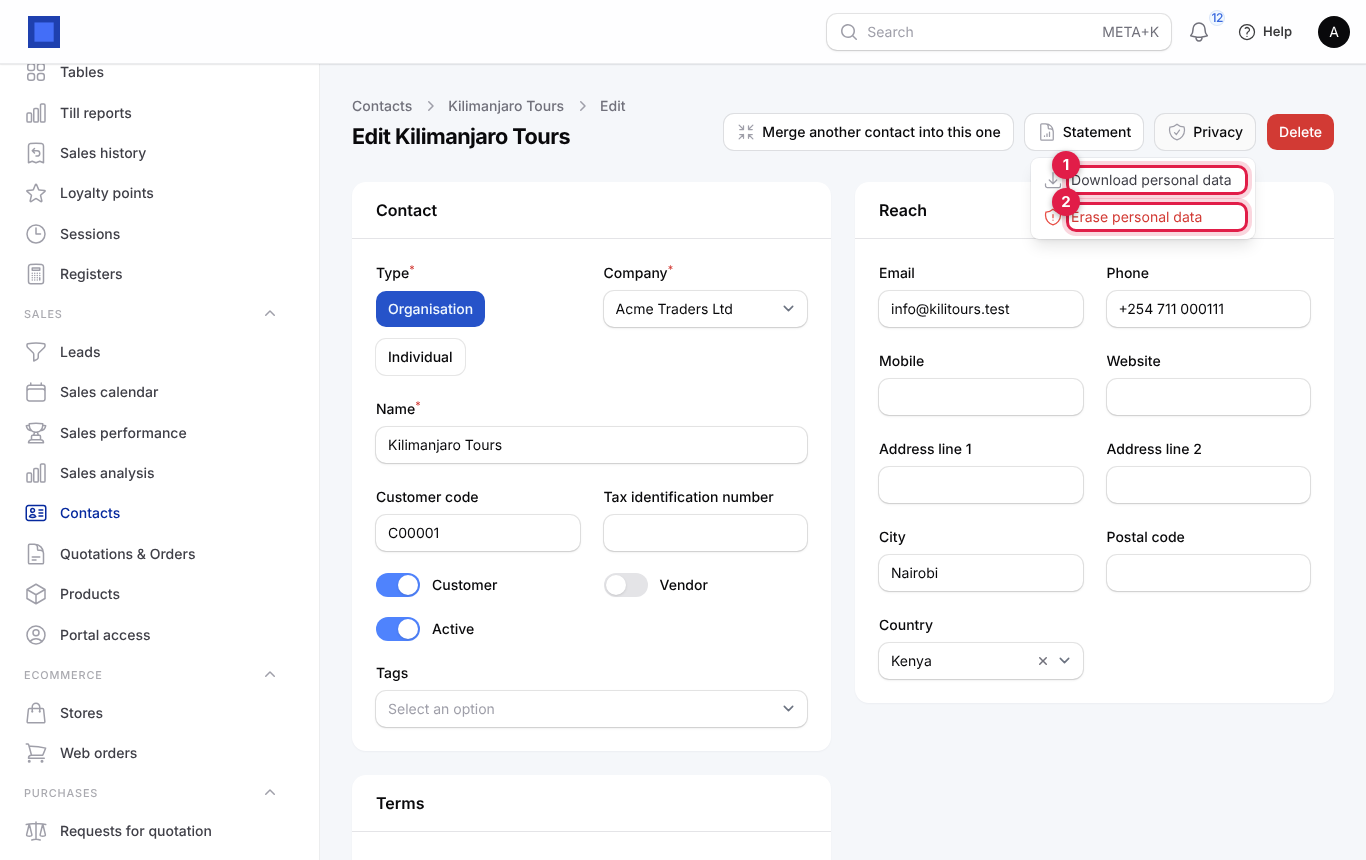
Erasing removes the name, email, phones, address, tax number, notes, tags, consents, portal logins and mailing-list memberships for good. Invoices, payments and orders stay with their numbers and amounts under an anonymous name, because tax law requires you to keep them. The history keeps only who erased the record and when. Erasing needs contacts.manage and cannot be undone.
Invite a customer to the portal
Customers with an email address can sign in to your customer portal to see and pay invoices, accept quotations and more. Invite them from Sales → Portal access → Invite a customer. The full steps, and what customers see, are in Customer and vendor portal.
Understand leads and the pipeline
A lead is a sales opportunity: someone who might buy. Each lead sits in a stage of a pipeline, for example New → Qualified → Proposal → Negotiation → Won or Lost. Each stage carries a probability (the chance of winning at that point), which is copied to the lead when it moves there.
| Lead status | Meaning | How it gets there |
|---|---|---|
| open | Still being worked on. | Every new lead; Reopen on a won or lost lead. |
| won | The customer said yes. | Won in the list's ⋮ menu, or moving the lead to a stage marked Won stage. Probability becomes 100%. |
| lost | The deal is gone. | Lost in the ⋮ menu (with a reason), or moving it to a stage marked Lost stage. Probability becomes 0%. |
Every lead also has a score from 0 to 100 that says how worth chasing it is. It is recalculated each time the lead is saved:
| Points | For |
|---|---|
| 10 each | An email, a phone number, an organisation name or linked contact. |
| 5, 15 or 25 | Expected revenue above 0, at or above the "medium deal" amount (default 100,000) or at or above the "large deal" amount (default 500,000). |
| 0 to 20 | The source: the points you set per source in Preferences → CRM, otherwise 5 for any source and 0 with no source. |
| Up to 20 | Probability divided by 5. |
| Up to 10 | 5 for each activity logged in the last 14 days. |
Scores of 70 and above show as Hot (red), 40 to 69 as Warm (amber), below 40 as Cold (grey).
Work with the lead list
- In the menu, open Sales → Leads.
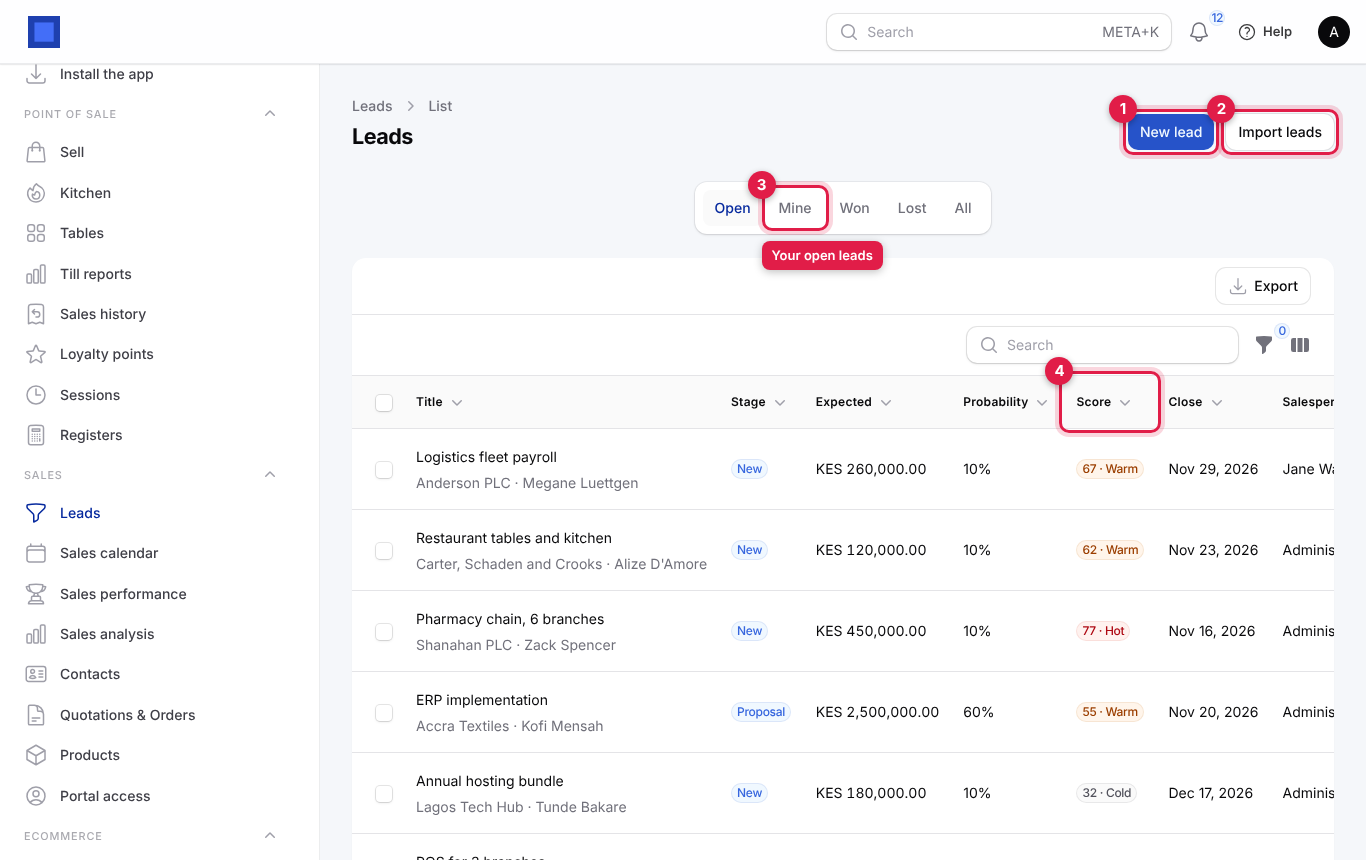
| Item | What it does |
|---|---|
| New lead (marker 1) | Opens the lead form. |
| Import leads (marker 2) | Upload a spreadsheet of leads. Recognised columns: title, contact_name, organisation_name, email, phone, expected_revenue, expected_close_date, source, stage, owner and description. Needs crm.manage. |
| Tabs Open, Mine (marker 3), Won, Lost, All | Open (the default) shows every open lead you may see; Mine shows open leads assigned to you. |
| Score column (marker 4) | The 0 to 100 score with Hot, Warm or Cold. Click the heading to sort the hottest first. |
| Export | Downloads the leads as a spreadsheet. |
| Filter | Stage, Salesperson, Status, Team and Score (Hot 70+, Warm 40–69, Cold). |
The other columns are Title (with organisation and contact person underneath), Stage, Expected revenue, Probability, Close (expected close date), Salesperson and Status. Hidden columns you can switch on: Priority and Updated at.
Mark a lead as won or lost
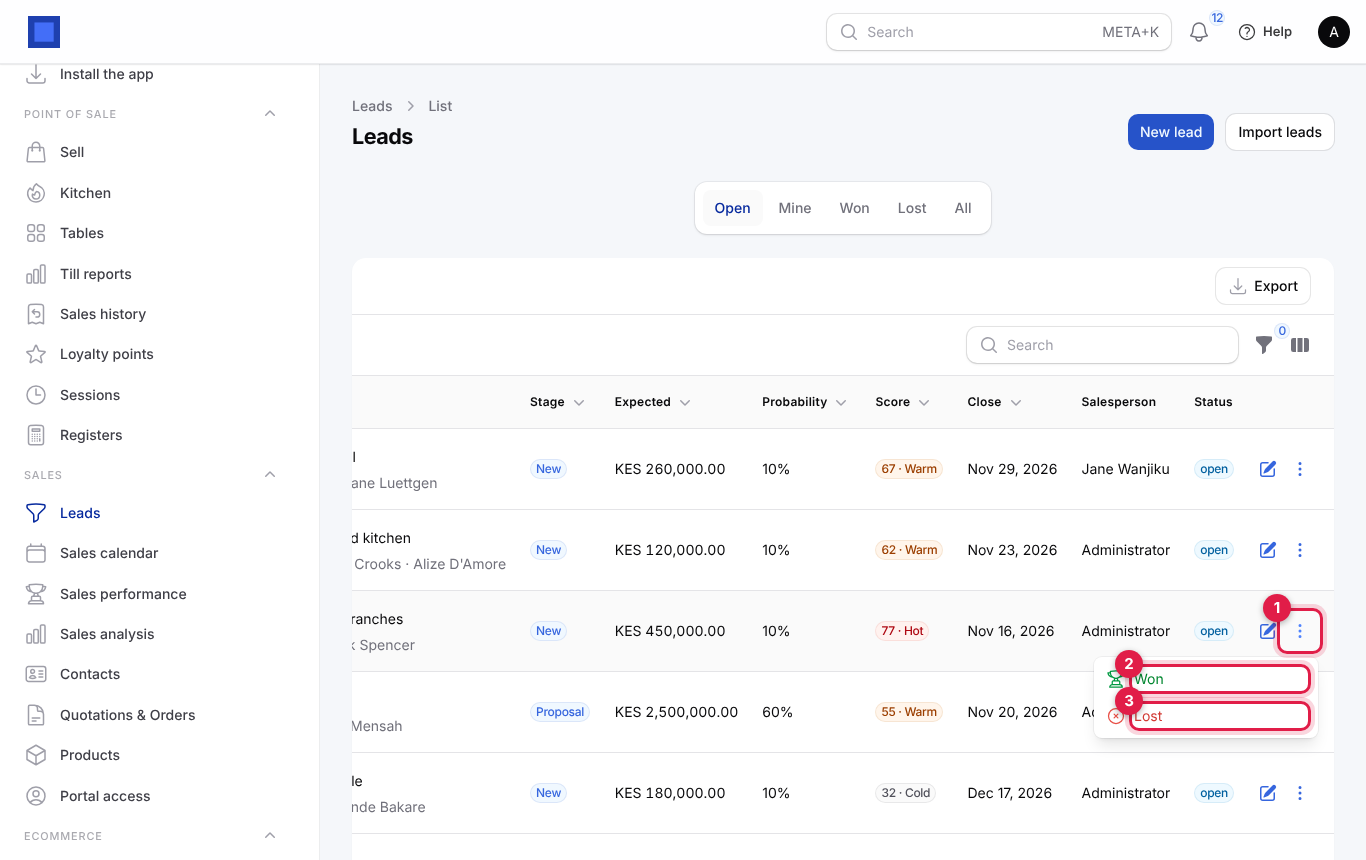
- In the lead list, click ⋮ at the end of the row (marker 1).
- Click Won (marker 2) and confirm, or Lost (marker 3).
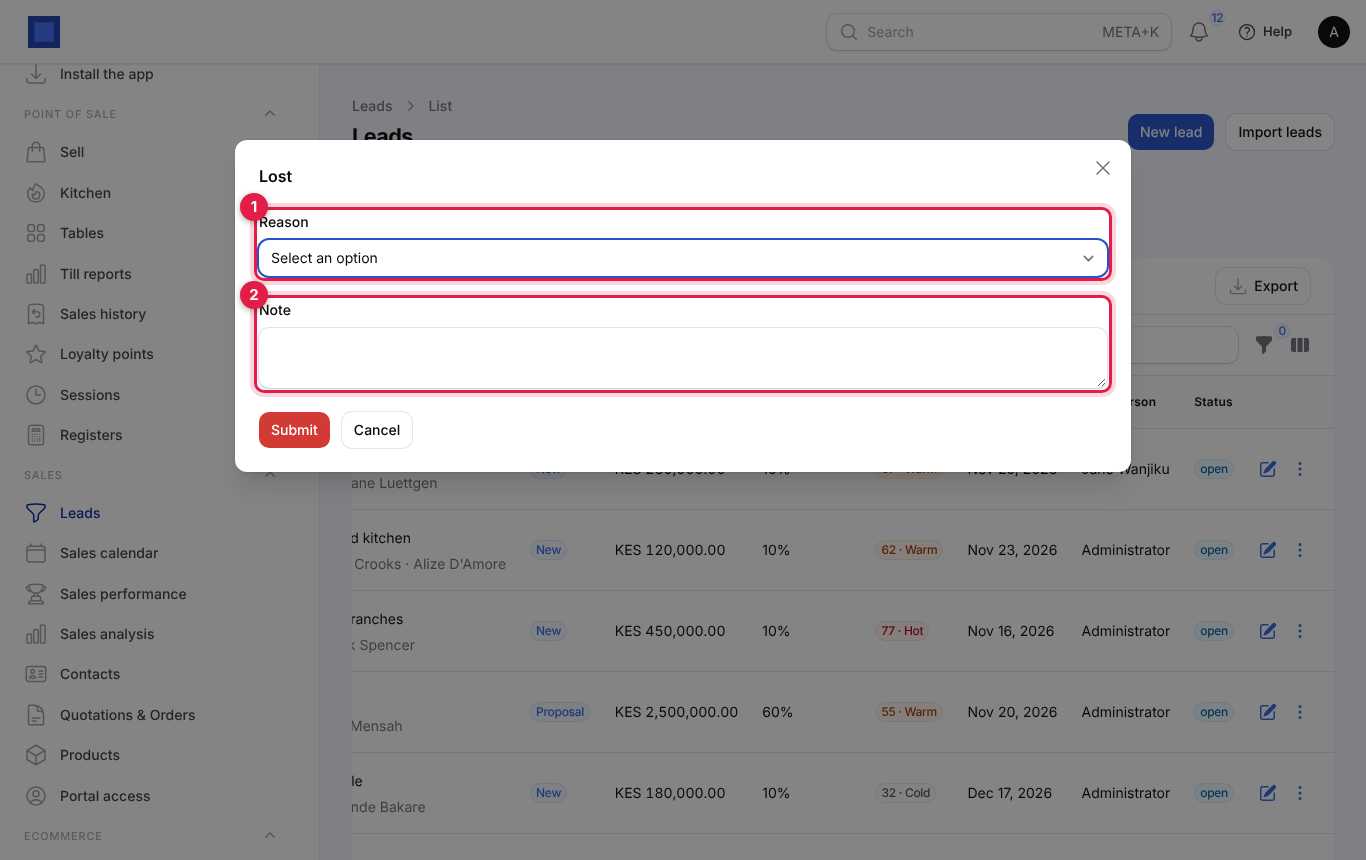
- For Lost, choose the Reason (marker 1), add a Note (marker 2) if useful, and click Submit.
What happens next:
- The lead moves to the pipeline's won or lost stage and its probability becomes 100% or 0%.
- When Create a contact automatically when a lead is won is on (Preferences → CRM), a won lead without a contact gets one.
- Lost reasons feed the Why deals were lost box in Sales performance. Always choose a reason; "no reason" teaches you nothing.
- To undo, open the lead and click Reopen. It goes back to open at its stage.
Add a lead
- Open Sales → Leads and click New lead.
- Type a Title that describes the deal, for example "POS for 3 branches".
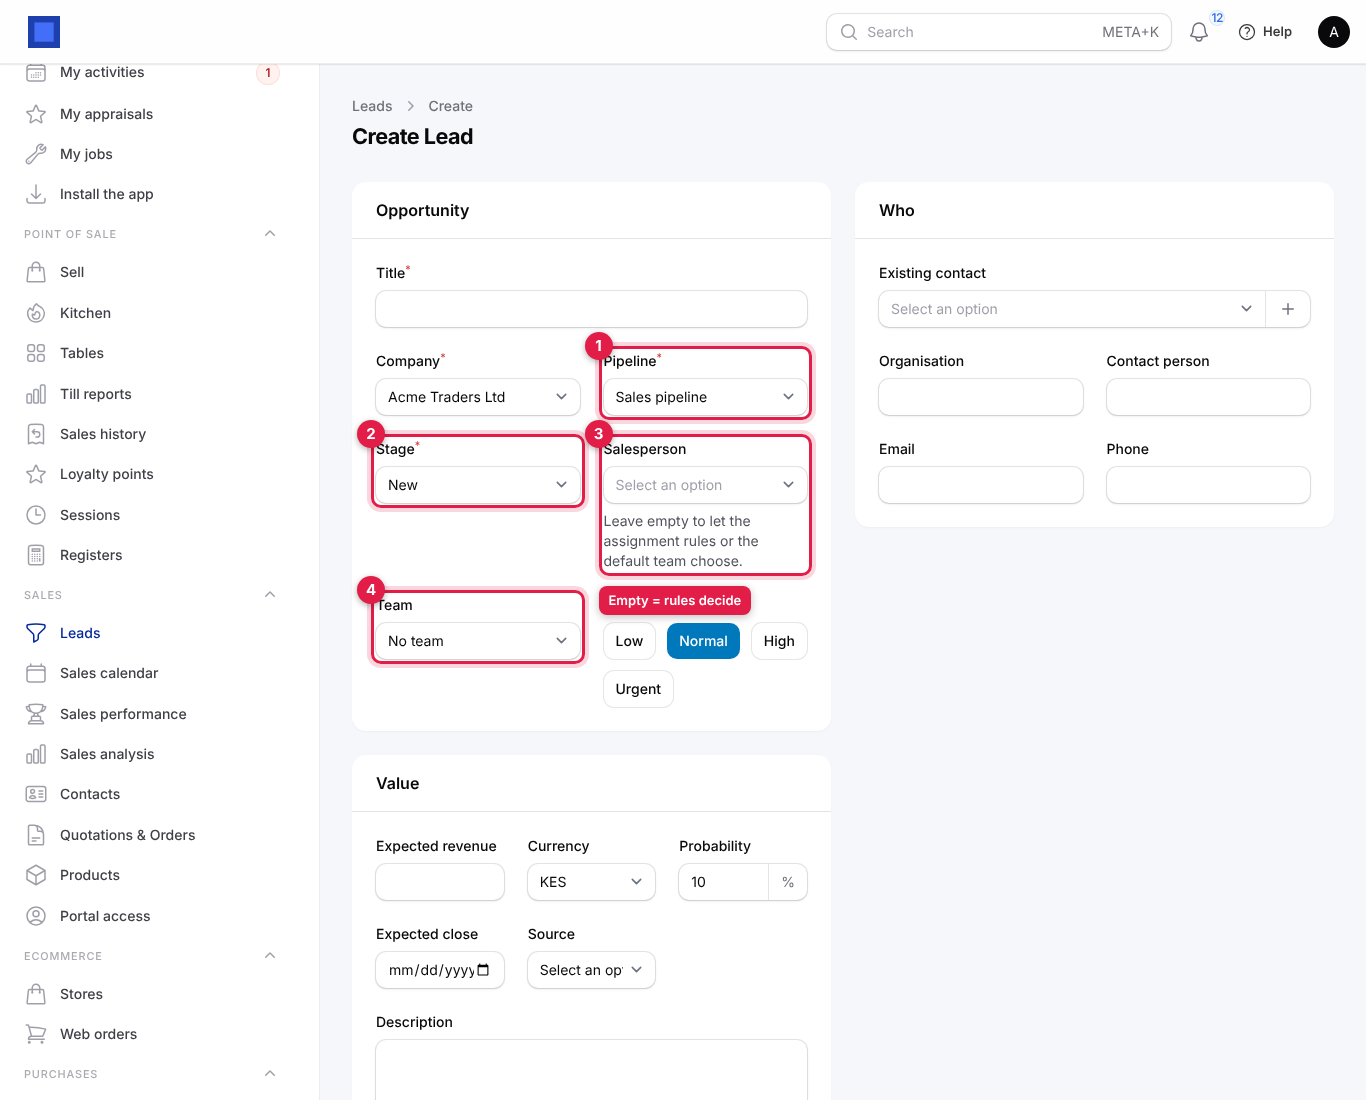
- Check the Pipeline (marker 1) and Stage (marker 2). New leads start at the first stage of the default pipeline.
- Leave Salesperson (marker 3) empty to let the assignment rules and round robin choose, or pick a person. Only people with
crm.assigncan change it. - Pick a Team (marker 4) if it belongs to one.
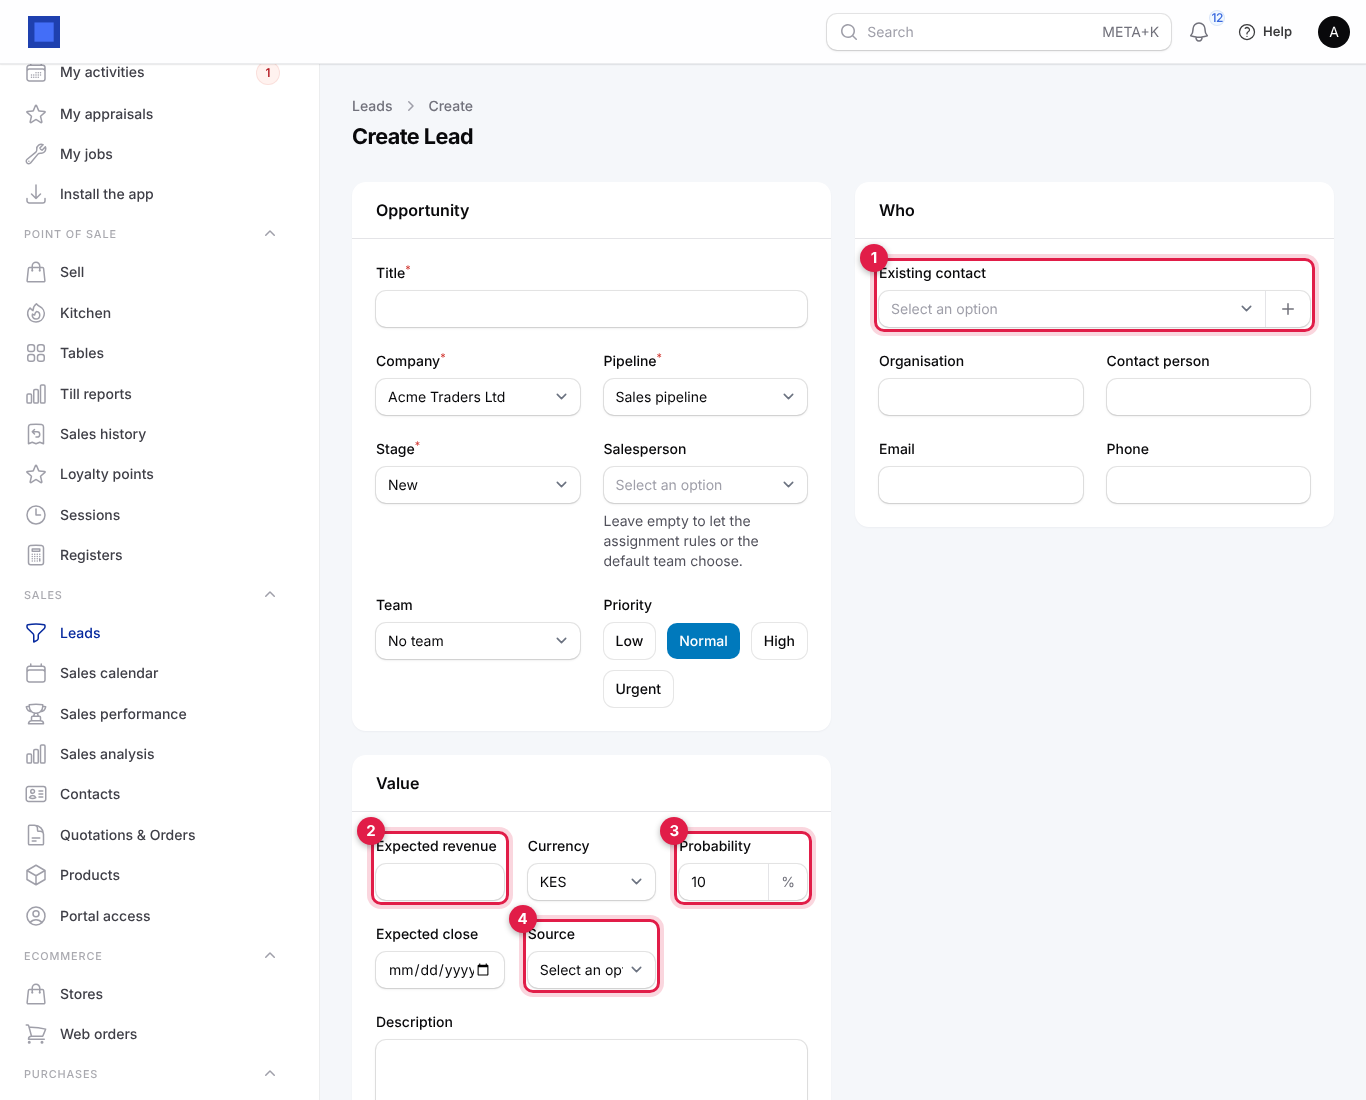
- Under Who, pick an Existing contact (marker 1) if you already know them. The organisation, contact person, email and phone fill in. Otherwise type them, or click + to create the contact now.
- Under Value, type the Expected revenue (marker 2), check the Probability (marker 3), choose the Expected close date and the Source (marker 4).
- Click Create.
Every field on the lead form
| Field | What to enter |
|---|---|
| Title (required) | Short name of the opportunity. Searchable. |
| Company (required) | Your company the deal is for. Changing it resets the pipeline and stage to that company's default. |
| Pipeline (required) | Which pipeline the lead follows. Changing it moves the lead to that pipeline's first stage. |
| Stage (required) | Where the deal stands. Choosing a stage copies its probability into Probability. |
| Salesperson | Who owns the deal. Empty: the first matching assignment rule, or the default team's round robin, picks someone when you save. Greyed out for people without crm.assign. |
| Team | The sales team. Used for team targets and for "Records owned by their team" visibility. |
| Priority | Low, Normal (default), High or Urgent. Shown as a column you can switch on in the list. |
| Existing contact | Link the lead to a contact. Needed before you can create a quotation from the lead. |
| Organisation, Contact person, Email, Phone | The prospect's details when there is no contact yet. An email is needed for Send email, a phone for WhatsApp. Each adds 10 to the score. |
| Expected revenue | What the deal is worth. Used in the score, the leaderboard's open pipeline and the sales calendar. |
| Currency | Defaults to your company currency. |
| Probability | 0 to 100 %. Defaults to the stage's probability, or the default in Preferences → CRM (10% if not set). |
| Expected close | When you expect a decision. Shows on the sales calendar. |
| Source | Where the lead came from. The list comes from Preferences → CRM → Lead sources (default Website, Referral, Phone, Walk-in, Social media, Event). Used by assignment rules, scoring and win rate by source. |
| Description | Background, needs, budget. Assignment rules can look for keywords here. |
Follow up on a lead
Open the lead. The header has these actions:
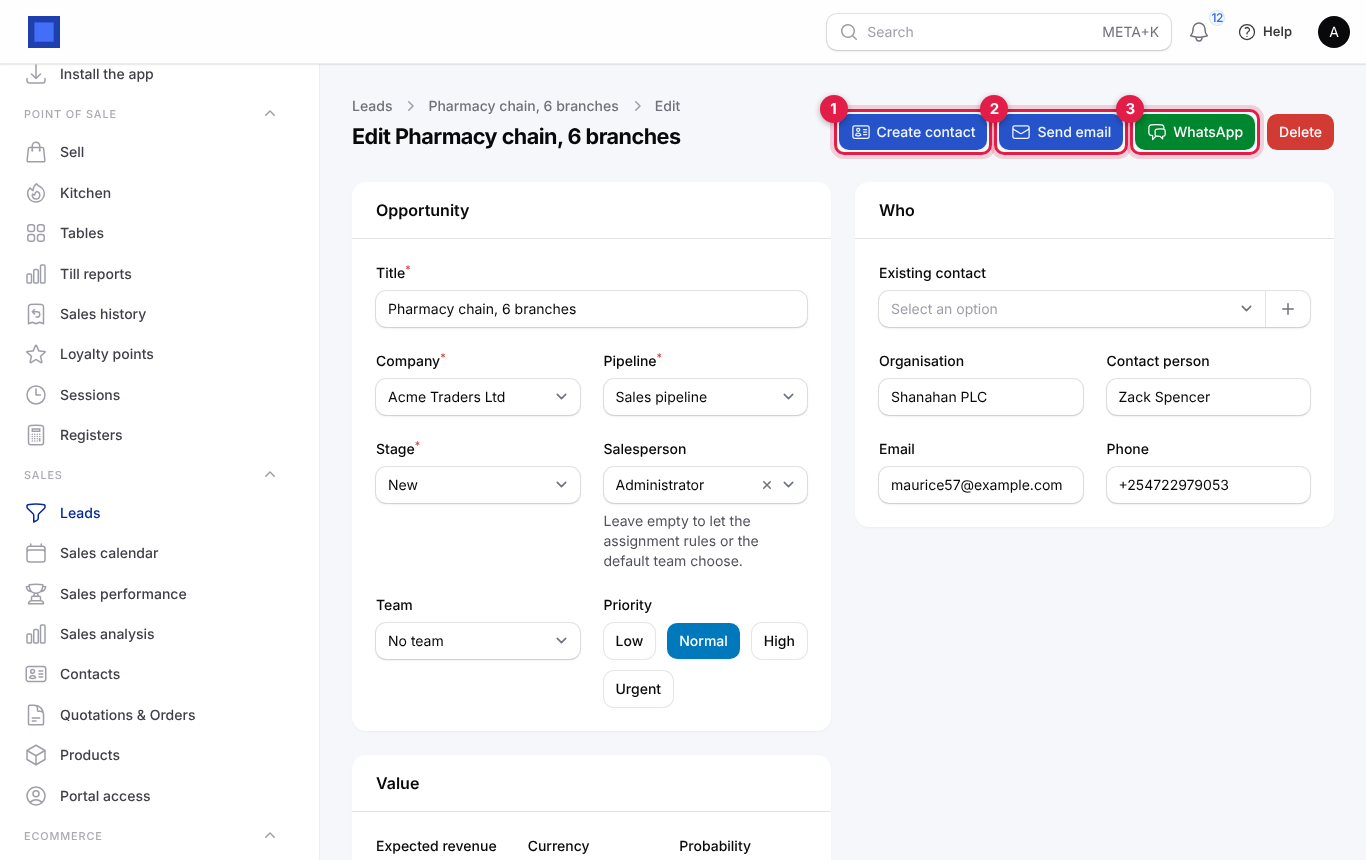
| Action | When it shows | What it does |
|---|---|---|
| Create contact (marker 1) | The lead has no contact and you have contacts.manage. |
Creates a contact from the lead. The organisation becomes an organisation contact, and the person becomes an individual under it when both are given. The lead is linked to it. |
| Send email (marker 2) | The lead has an email and at least one active email template exists. | Sends a templated email. |
| WhatsApp (marker 3) | The lead has a phone and at least one active WhatsApp template exists. | Sends a templated WhatsApp message. When the workspace has no WhatsApp connection, the message is logged and a button Open WhatsApp opens the chat on your phone or computer with the text filled in. |
| Create quotation | The lead has a contact, Sales is on and you have sales.manage. |
Opens a new quotation with the customer, currency and salesperson filled in, linked to the lead. See Quotations and orders. |
| Reopen | The lead is won or lost. | Puts it back to open. |
| Delete | Always (with crm.manage). |
Deletes the lead. |
To send a templated email:
- Click Send email.
- Choose the Template (marker 1). The Subject (marker 2) and Body (marker 3) fill in with the lead's details.
- Edit the text if needed and click Send (marker 4).
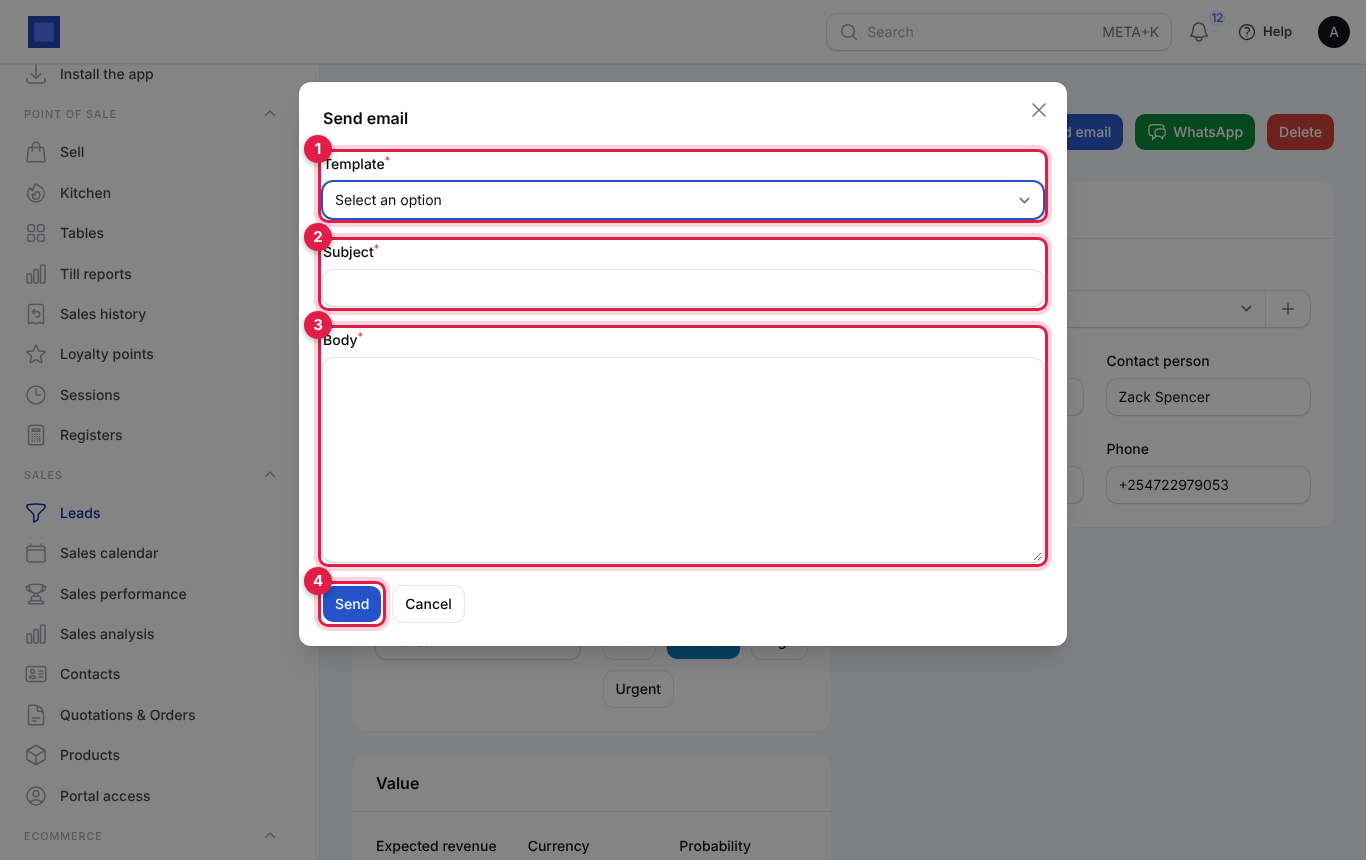
The email is sent from your workspace and logged on the lead.
Log calls, meetings and tasks
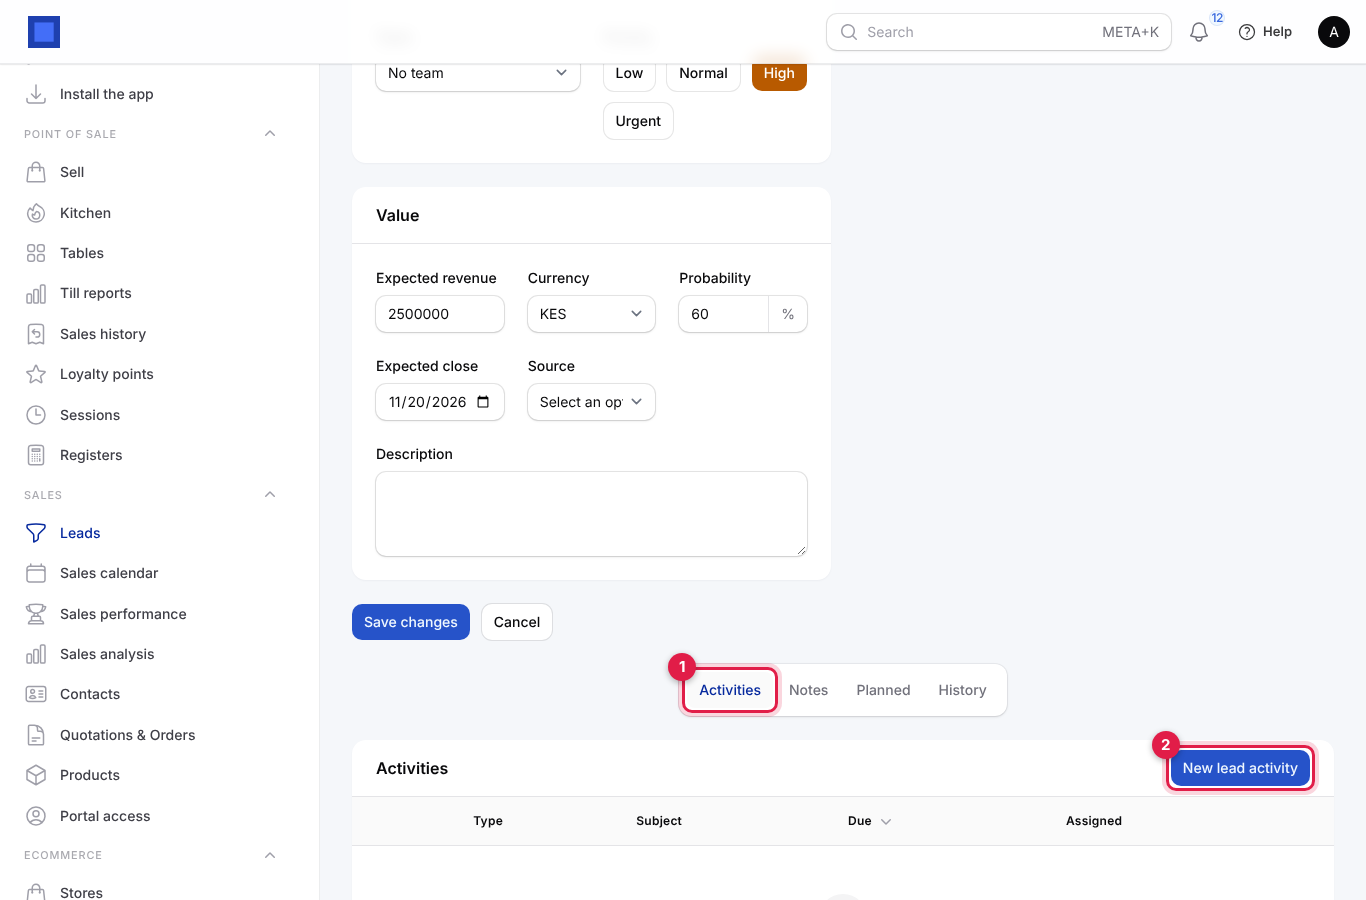
Below the lead form are the tabs Activities, Notes, Planned and History. Use Activities for sales work on the lead.
- Scroll down to the Activities tab (marker 1) and click New lead activity (marker 2).
- Choose the Type (marker 1): Call, Meeting, Email, Task or Note, and type a Subject.
- Set when it is Due (marker 2) and who it is Assigned to (marker 3). It defaults to you.
- Add Notes and click Create.
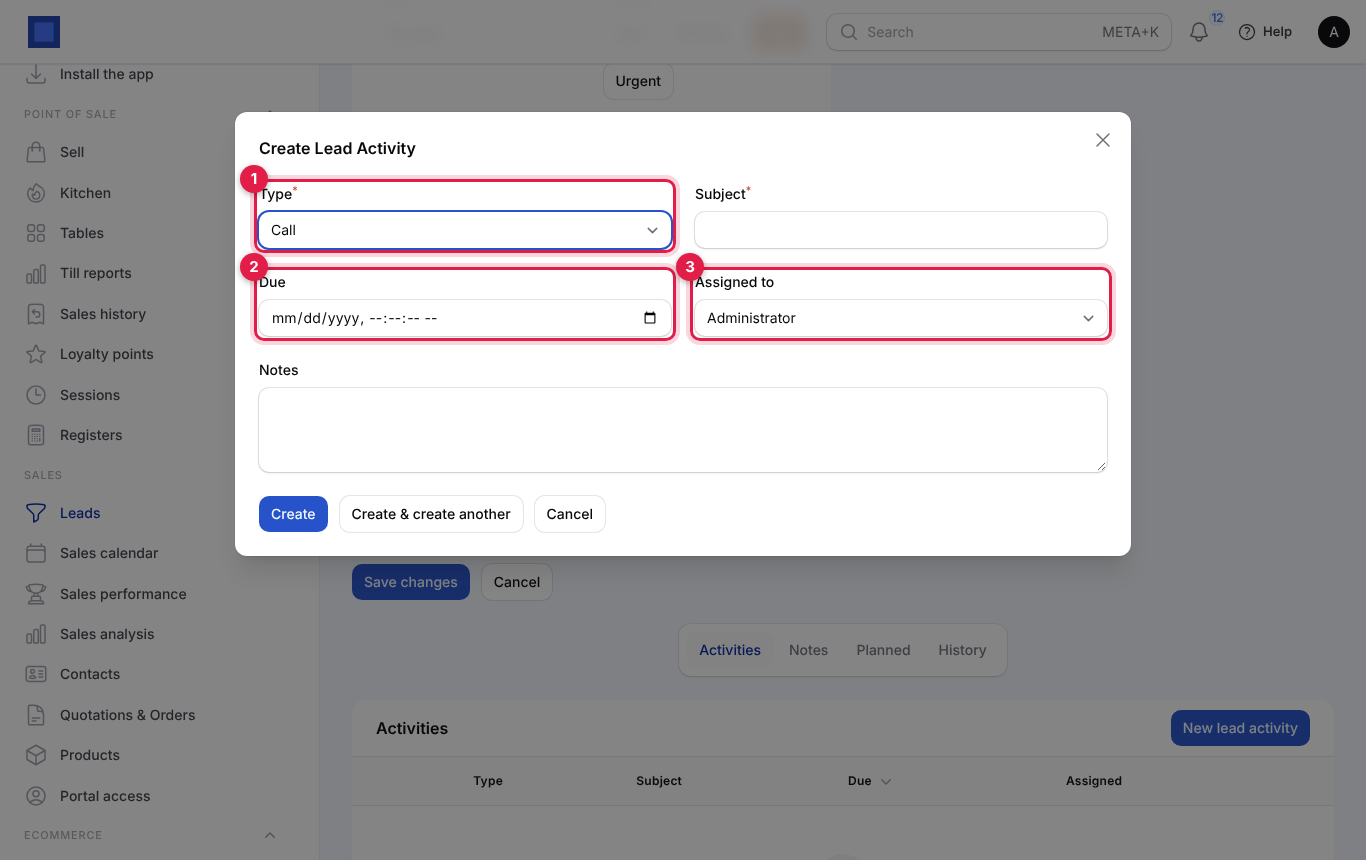
In the activities table, a clock means not done yet (red when overdue) and a green tick means done. Click Done on a row when it is finished, or Edit / Delete. Activities logged in the last 14 days raise the lead's score, and due activities appear on the sales calendar.
Use the sales calendar
Sales → Sales calendar shows a month with each open lead's expected close date and every lead activity that is due.
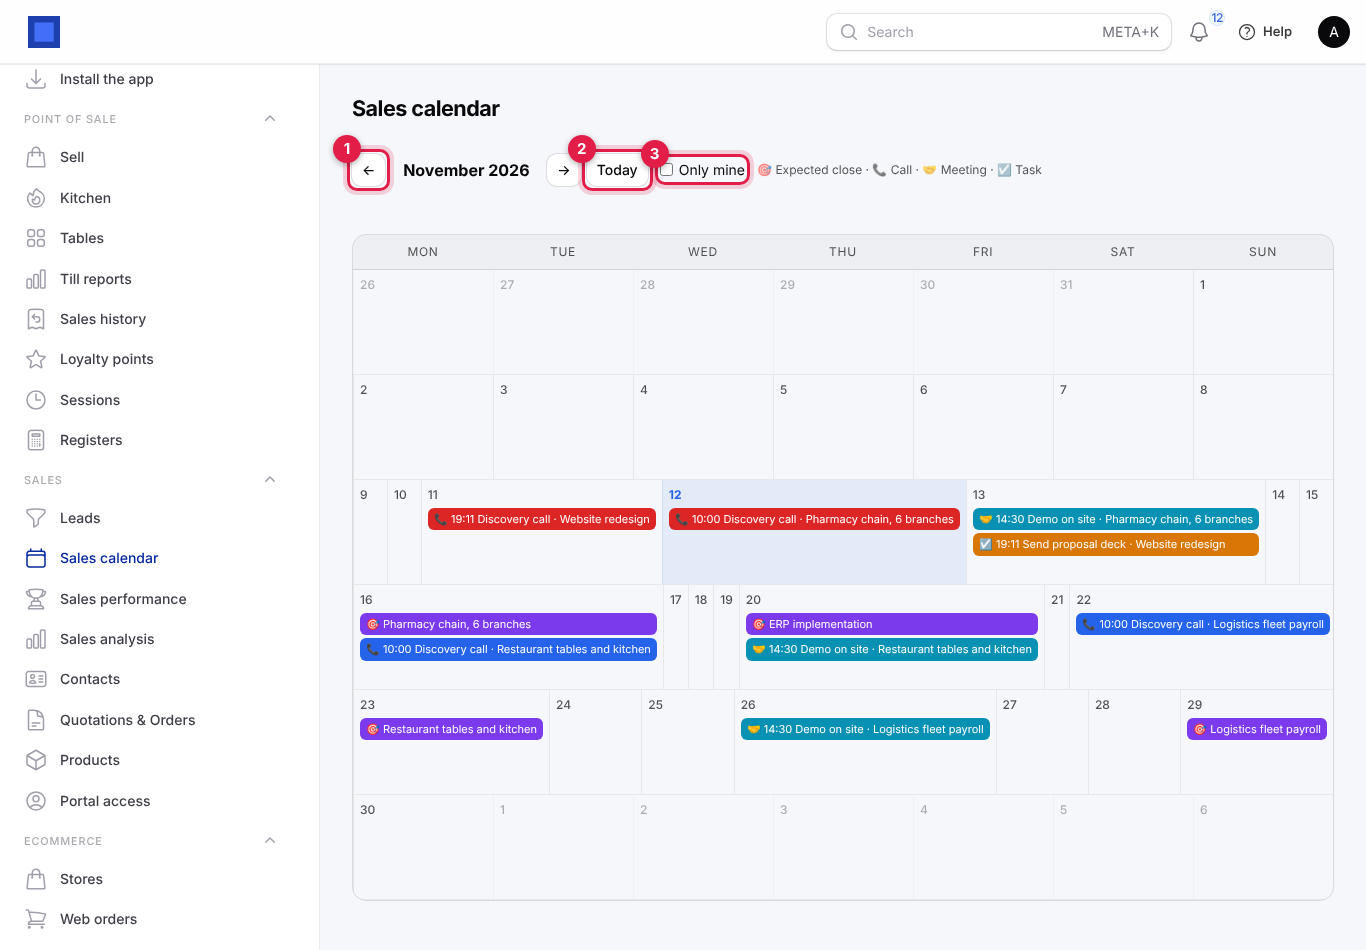
- Use ← (marker 1) and → to move between months and Today (marker 2) to come back.
- Tick Only mine (marker 3) to see only your leads and activities.
- The colour key at the top: Expected close, Call, Meeting, Task. Overdue activities are highlighted and done ones are faded.
- Click any item to open its lead.
See the leaderboard and win/loss analysis
Sales → Sales performance answers "who is on target?" and "why are we losing?".
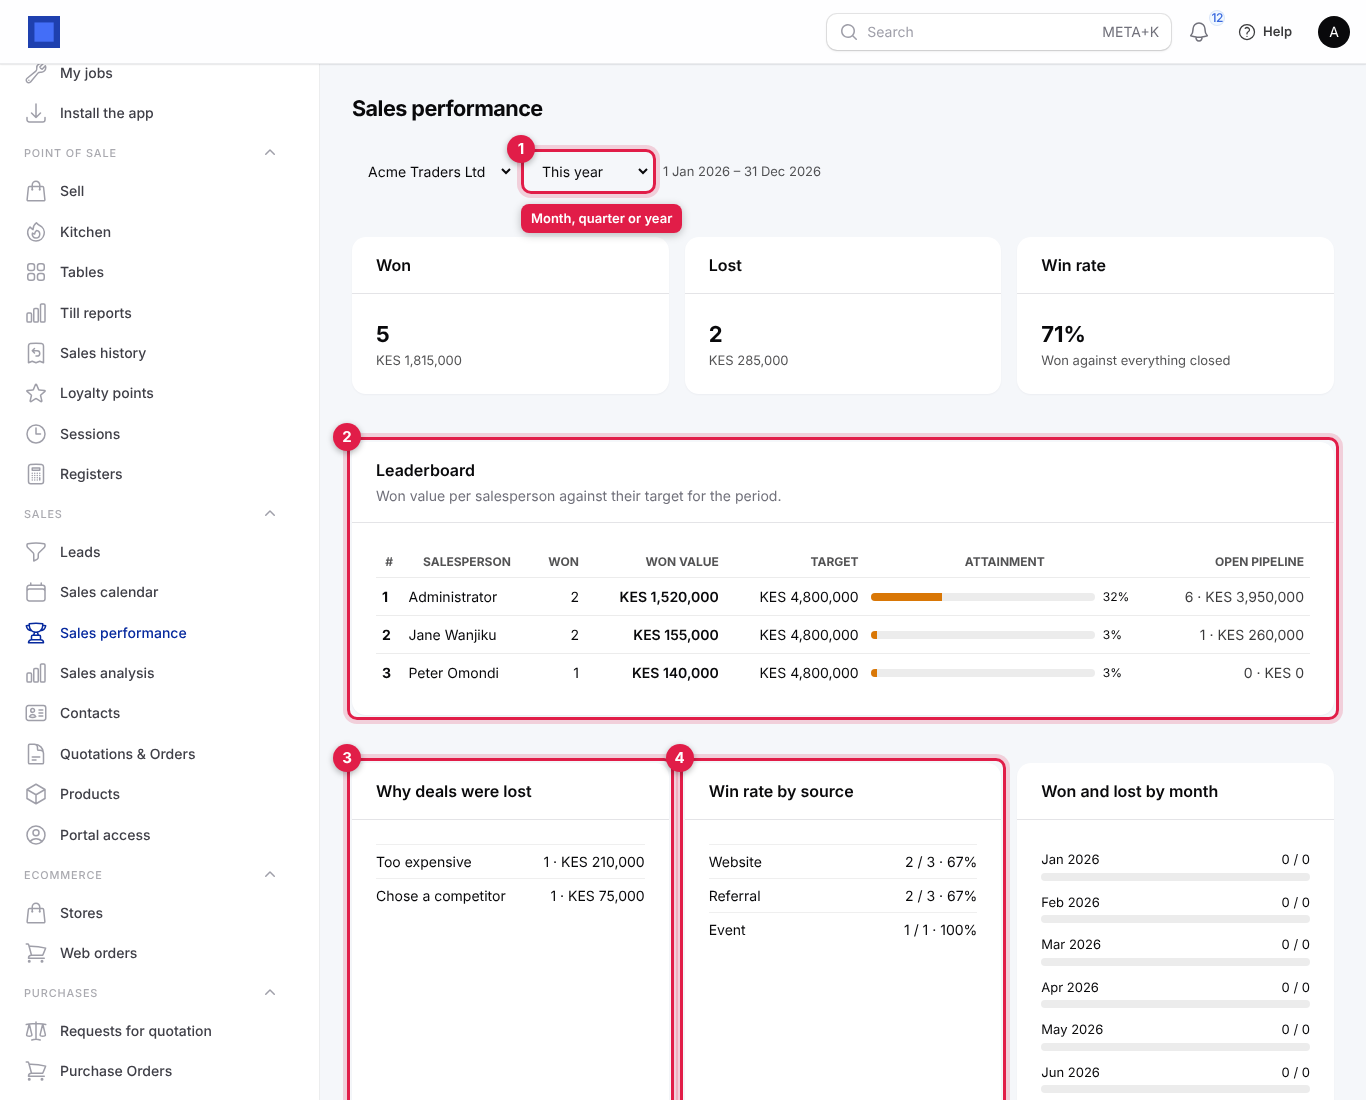
- Choose the company (when you have more than one) and the period (marker 1): This month, This quarter or This year.
- Read the boxes:
| Box | What it shows |
|---|---|
| Won, Lost, Win rate | Count and value of deals won and lost in the period; win rate is won against everything closed. |
| Leaderboard (marker 2) | Each salesperson's won deals and value, their Target (the team's monthly target per member multiplied by the months in the period), Attainment as a bar, and their Open pipeline. Green at 100% or more, blue from 60%, amber below. |
| Why deals were lost (marker 3) | Lost deals grouped by lost reason, with count and value. |
| Win rate by source (marker 4) | Won / closed and the percentage for each lead source. |
| Won and lost by month | A month-by-month count. |
Set up pipelines and stages
Most businesses use the one Sales pipeline created automatically. Add another when you sell in very different ways (for example "Projects" and "Retail accounts").
- Open Settings → Pipelines and click a pipeline, or New pipeline.
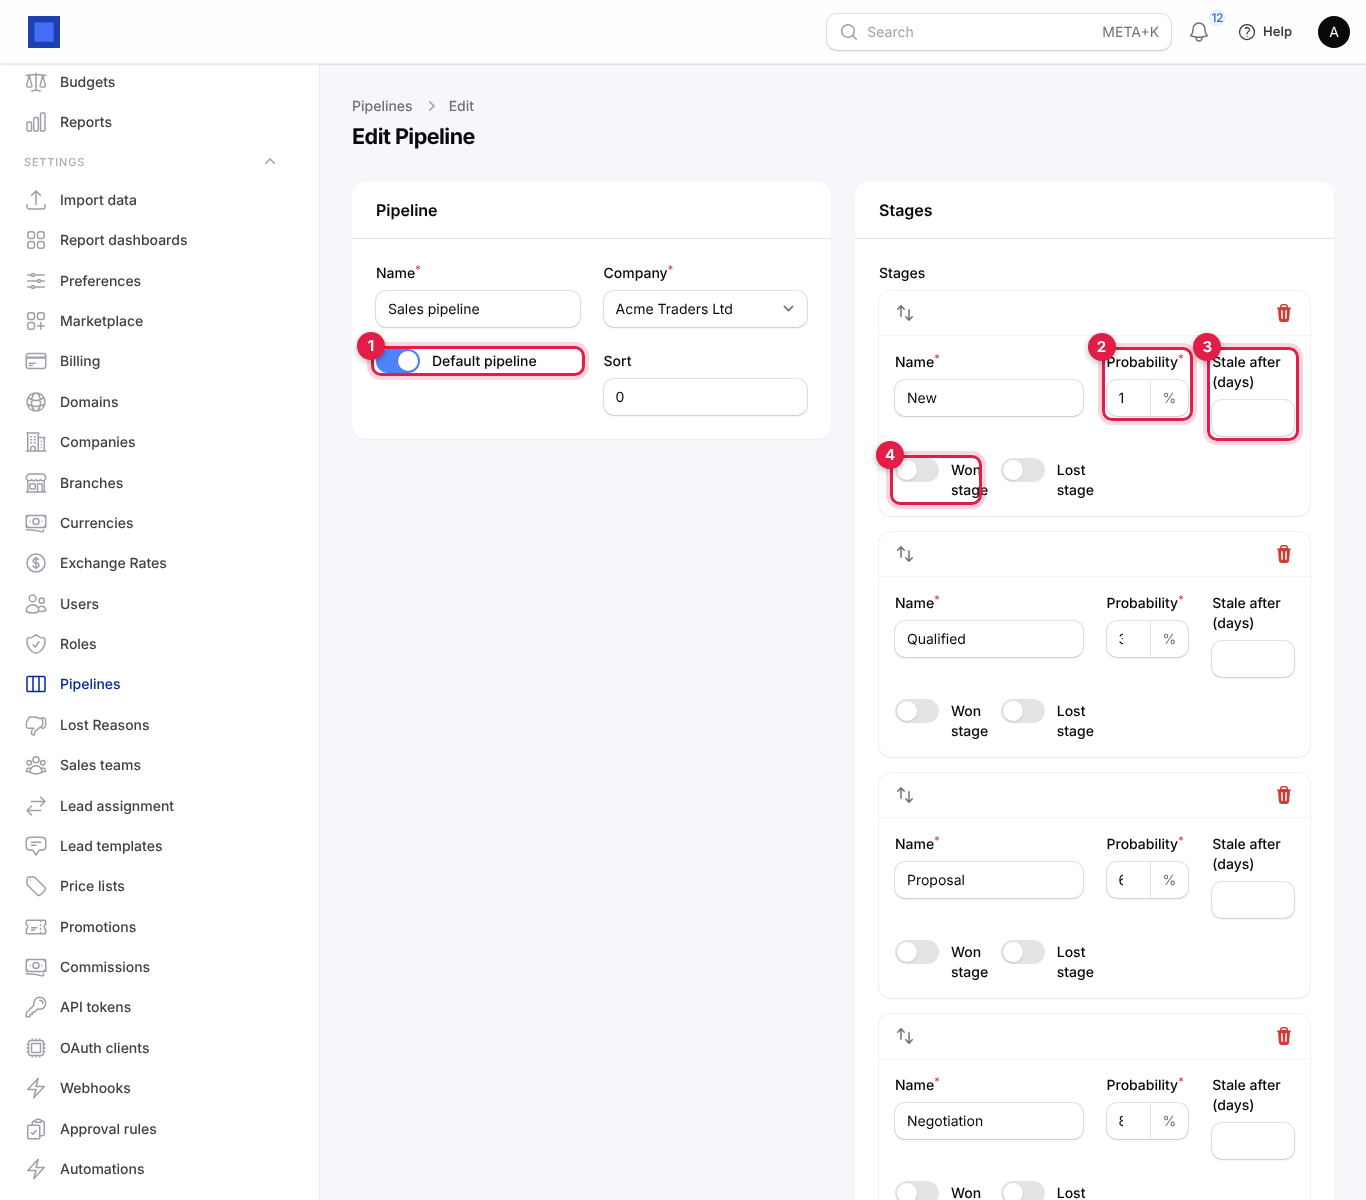
- Fill in the Name, Company and switch on Default pipeline (marker 1) for the one new leads and web enquiries should use. Sort sets the order in dropdowns.
- Under Stages, each stage has a Name, Probability (marker 2), Stale after (days) (marker 3), Won stage (marker 4) and Lost stage. Drag the arrows to reorder stages; the top stage is where new leads start. Use the bin to remove one and Add to stages to add one. A pipeline needs at least two stages.
- Click Save changes.
| Stage field | Meaning |
|---|---|
| Name | What salespeople see, for example "Proposal sent". |
| Probability | 0 to 100%. Copied to a lead when it enters the stage. |
| Stale after (days) | How long a lead may sit in this stage without activity before it counts as stale. Stored for reporting; leads are not yet flagged on screen. |
| Won stage / Lost stage | Mark exactly one stage of each. Marking a lead won or lost moves it there. |
The pipeline list shows how many stages and leads each pipeline has.
Record reasons for lost deals
Settings → Lost Reasons holds the list offered when a lead is marked lost, for example "Too expensive", "Chose a competitor", "No budget", "No response".
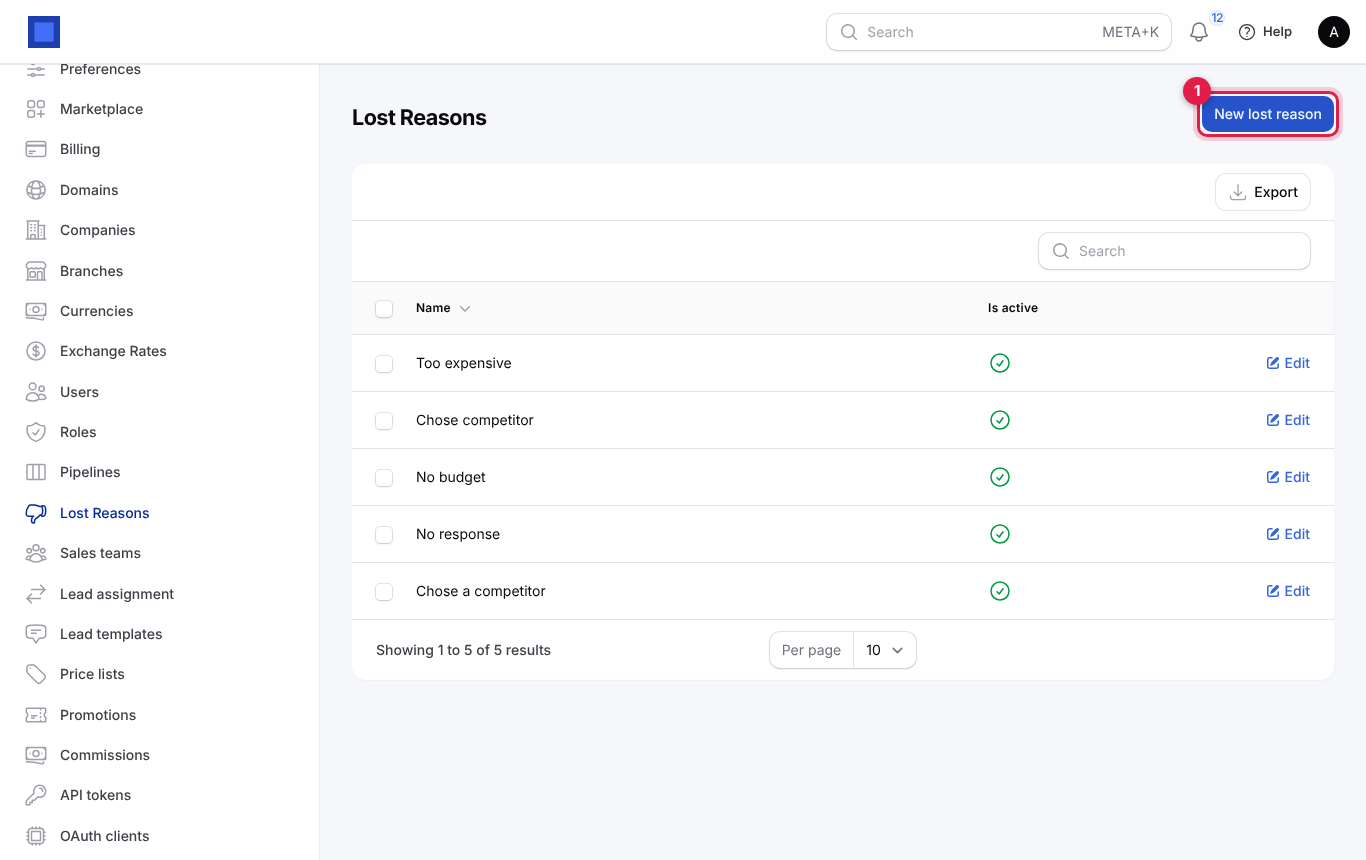
Click New lost reason (marker 1), type the Name and keep Is active on. Switch a reason off instead of deleting it when it is no longer used, so old analysis stays readable.
Set up sales teams, targets and round robin
- Open Settings → Sales teams and click New sales team, or Edit on a team.
- Fill in the form and click Save changes.
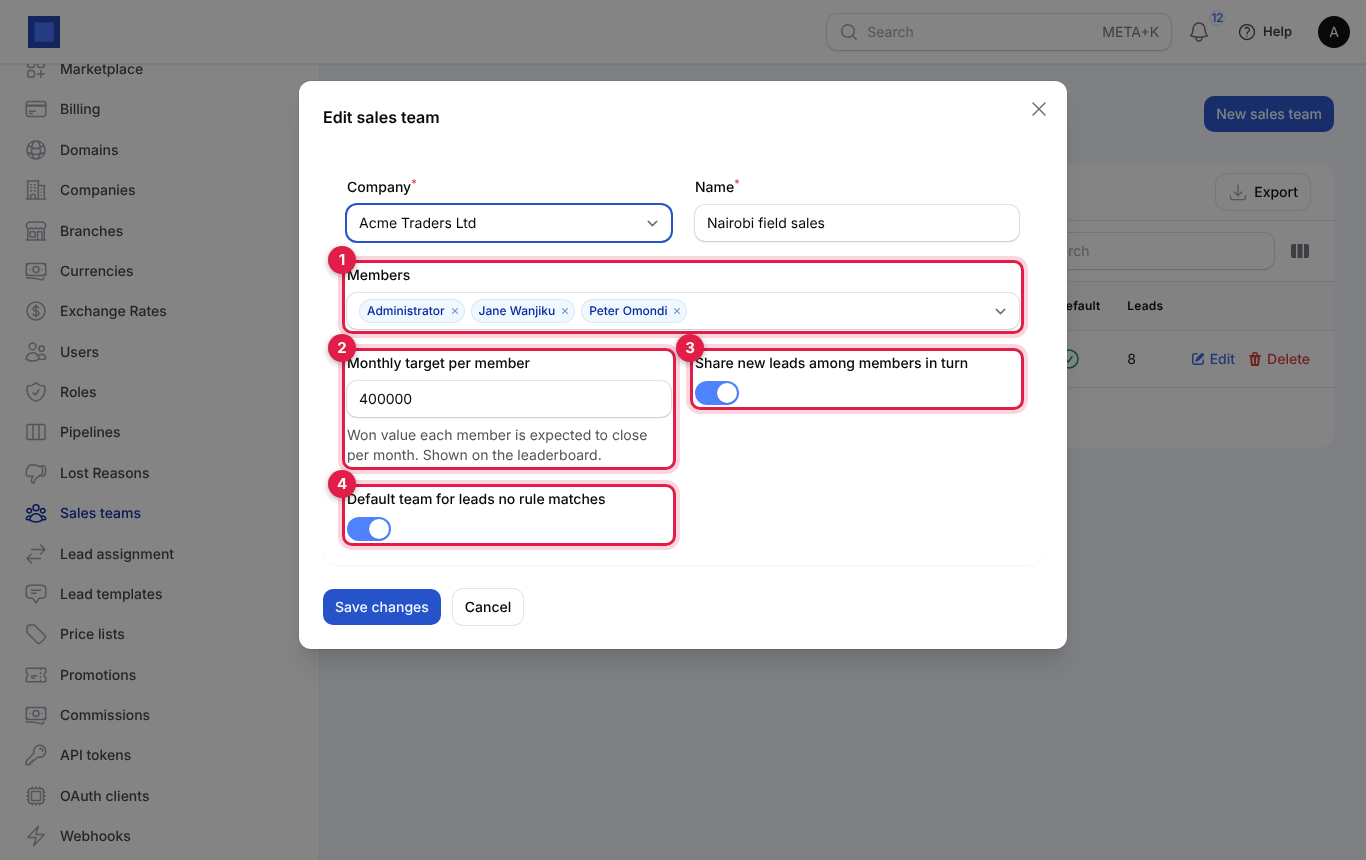
| Field | What to enter |
|---|---|
| Company, Name (required) | For example "Nairobi field sales". |
| Members (marker 1) | The users in the team. |
| Monthly target per member (marker 2) | Won value each member should close per month, for example 400000. Shown on the leaderboard. |
| Share new leads among members in turn (marker 3) | Round robin: each new lead that reaches this team goes to the next member in turn. On by default. |
| Default team for leads no rule matches (marker 4) | New leads with no salesperson and no matching assignment rule go to this team. Mark only one team. |
Assign leads automatically
Assignment rules decide who gets a new lead that has no salesperson: leads from the web form, landing pages, imports, or ones created with Salesperson left empty.
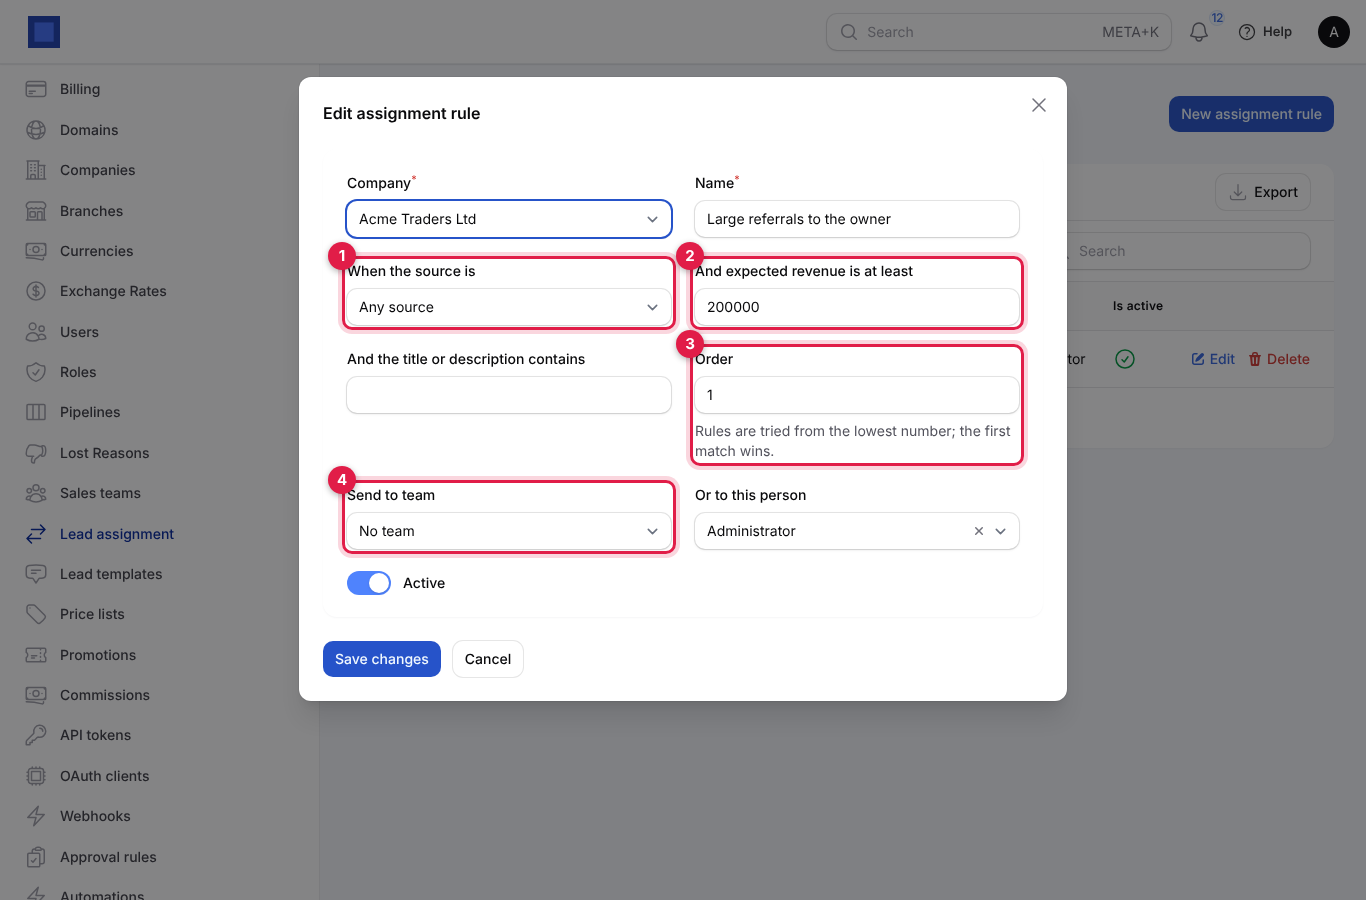
- Open Settings → Lead assignment and click New assignment rule, or Edit on a rule.
- Set the conditions. A lead must meet all the conditions you fill in:
- When the source is (marker 1): a source, or Any source.
- And expected revenue is at least (marker 2): a minimum amount.
- And the title or description contains: a keyword such as "hospital".
- Set the Order (marker 3). Rules are tried from the lowest number; the first match wins.
- Choose where the lead goes: Send to team (marker 4), where it goes to the next member in turn, or Or to this person for a named salesperson.
- Keep Active on and click Save changes.
If no rule matches, the default sales team shares the lead. If there is no default team either, the lead stays unassigned and appears for everyone with access. A lead that already has a salesperson is never reassigned.
Write email and WhatsApp templates
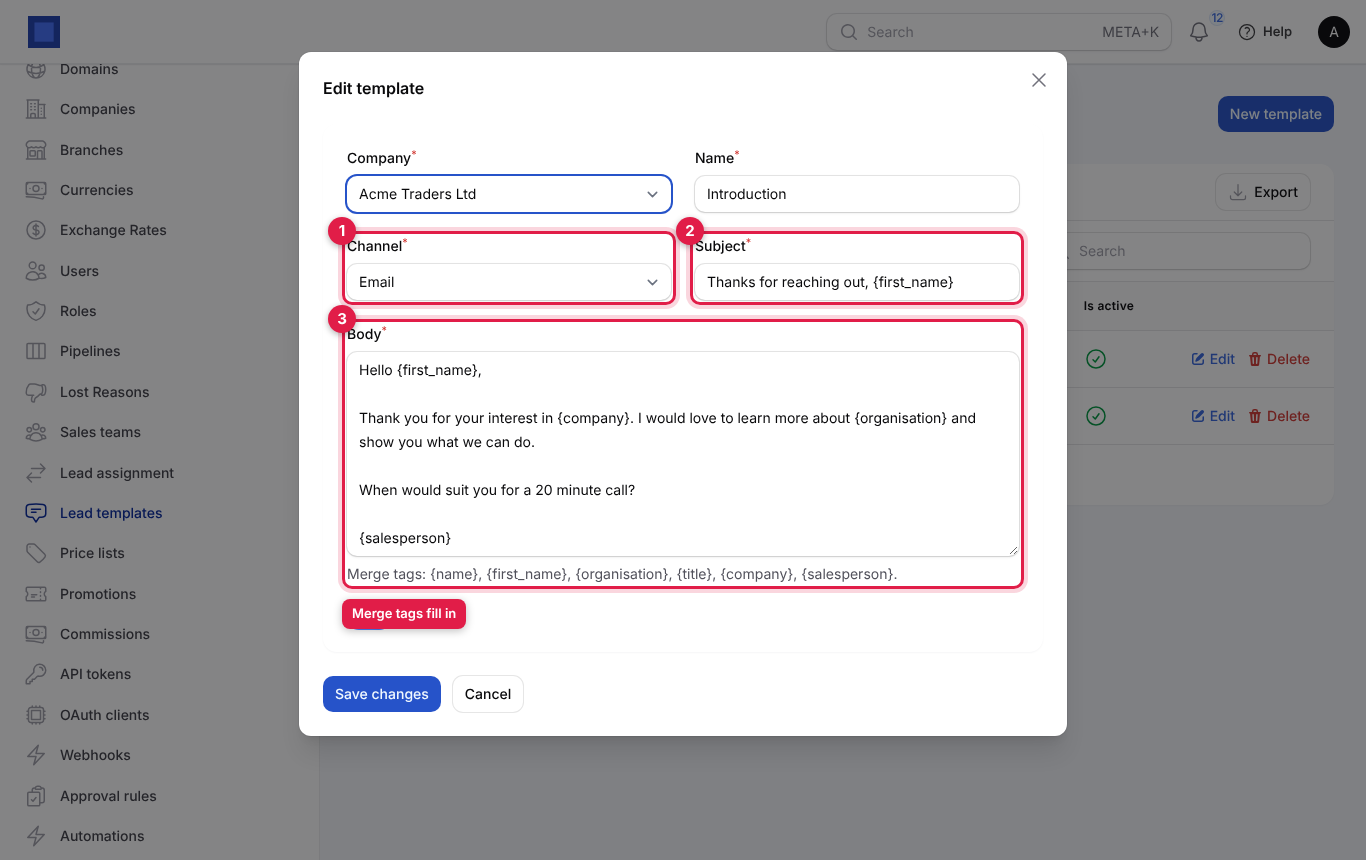
- Open Settings → Lead templates and click New template, or Edit.
- Choose the Channel (marker 1): Email or WhatsApp.
- For email, type the Subject (marker 2).
- Write the Body (marker 3). Merge tags are replaced with the lead's details when sending:
{name},{first_name},{organisation},{title},{company}and{salesperson}. - Keep Active on and save.
The Send email and WhatsApp buttons on a lead only appear once at least one active template of that channel exists.
Capture enquiries from your website
The web enquiry form is a public page where anyone can send you an enquiry; each one becomes a lead.
- Open Settings → Preferences and click the CRM tab.
- Under Web enquiry form, switch on Accept enquiries from a public form.
- The Form token is filled with a random code. The Form address under it is the link to share or put behind a "Contact us" button. You can also POST the same fields as JSON to that address from your own website.
- Set Source given to enquiries (default "Website") and the Text above the form.
- Click Save preferences.
The visitor sees a form with Your name, Organisation (optional), Email, Phone, What are you interested in? and Message, and clicks Send enquiry (marker 1). They must give an email or a phone number.
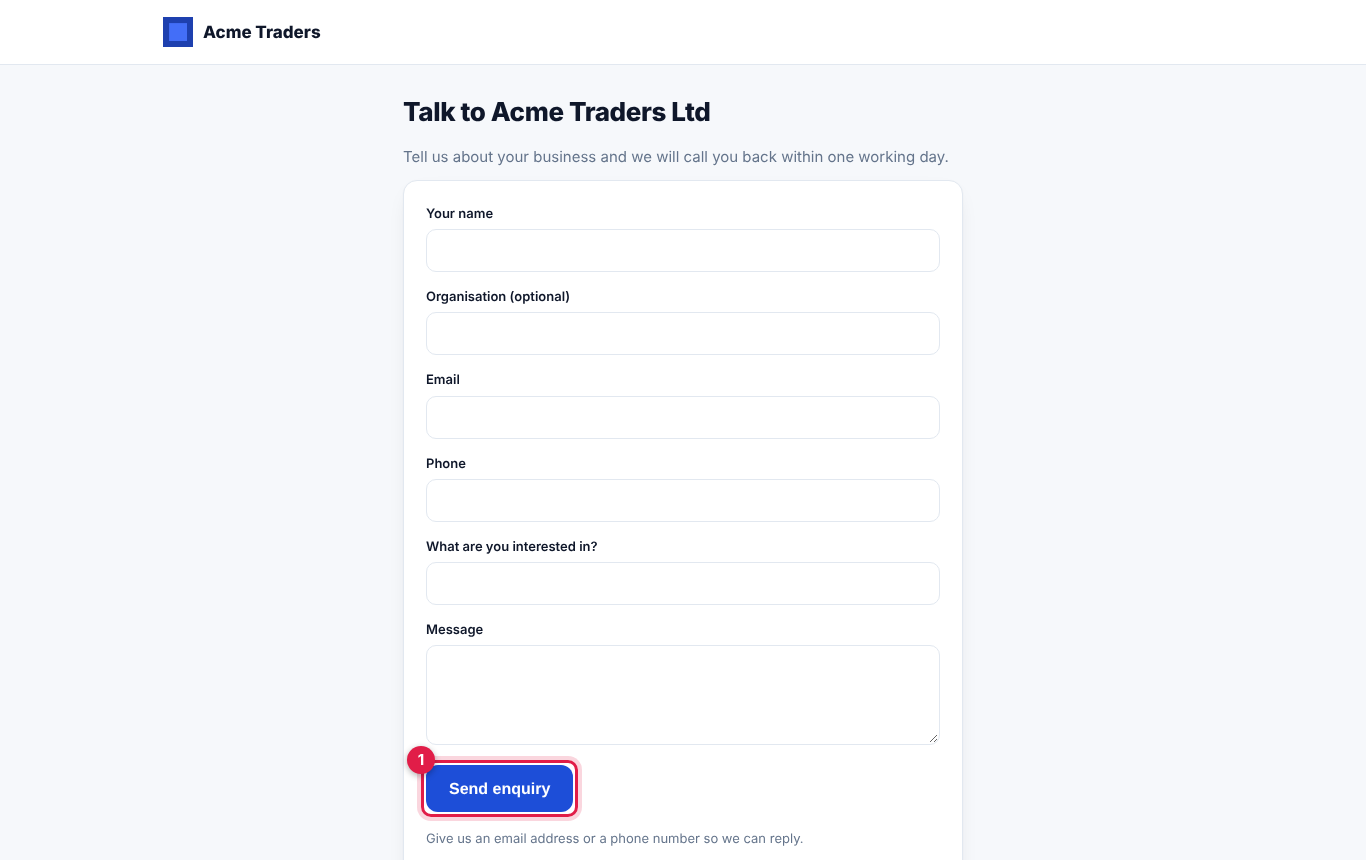
Each enquiry becomes a lead at the first stage of the default pipeline, with the source you set, a score, and a salesperson chosen by your assignment rules. Landing pages built under Marketing create leads the same way.
Tip: To change the form address (for example if it is being spammed), type a new Form token and save. The old link stops working.
CRM preferences
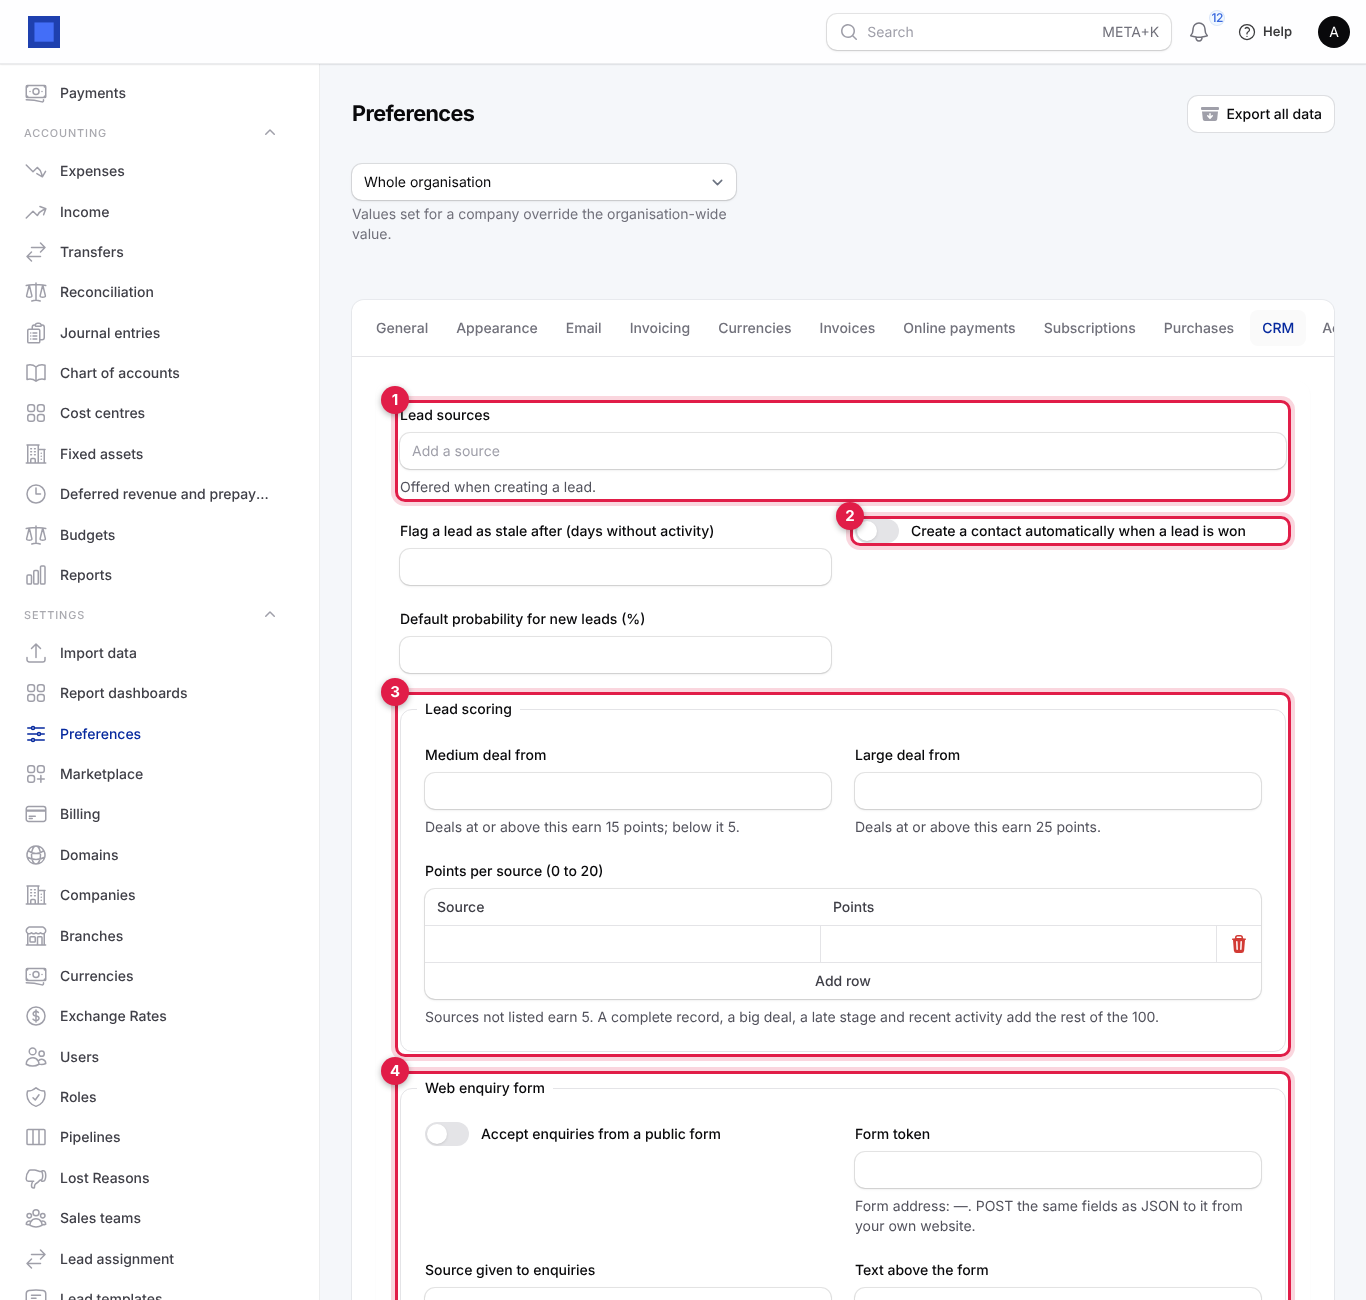
Settings → Preferences → CRM (choose a company at the top of Preferences to set different values per company):
| Setting | What it does |
|---|---|
| Lead sources (marker 1) | The list offered in the lead's Source field. Type a source and press Enter to add it. |
| Flag a lead as stale after (days without activity) | The workspace default for stale leads. |
| Create a contact automatically when a lead is won (marker 2) | Saves a contact for won leads that do not have one yet. |
| Default probability for new leads (%) | Used when a stage gives none. |
| Lead scoring (marker 3): Medium deal from, Large deal from, Points per source (0 to 20) | Tune the score. Add a row per source, for example Referral 20, Website 10. Sources not listed earn 5. |
| Web enquiry form (marker 4) | See Capture enquiries from your website. |
Common questions
Is there a drag-and-drop board (kanban) for leads? Not in this version. Change a lead's stage on the lead form, use the Open list sorted by stage, and the dashboard's leads-by-stage chart for the overview.
A salesperson cannot change the Salesperson field.
Their role is missing crm.assign. Add it under Settings → Roles.
Why can a salesperson not see some leads? Their role's Can see is set to their own or their team's records. Leads assigned to others are hidden from them.
The Send email button is missing on a lead. The lead has no email, or there is no active email template under Settings → Lead templates.
Can I delete a contact who has invoices? Deleting archives the contact; invoices and payments are kept. Use the Trashed filter and Restore to bring them back.
What is the difference between Merge and Erase? Merge combines two records for the same customer. Erase anonymises a person who asked to be forgotten. Neither can be undone.
The duplicate finder misses two contacts I know are the same. It only compares email, phone digits, tax number and the cleaned-up name. Open the one to keep and use Merge another contact into this one to pick the other by hand.