Security services (guarding)
Security services is for guarding companies. You keep each client's sites with their GPS location, the posts at each site and the guards every post needs by day and night; agree contracts billed per guard per month, per shift covered or at a fixed monthly amount, and invoice them every month with deductions for shifts nobody covered; keep your guards' PSRA or PSIRA licences and firearm licences up to date; build the weekly roster; let guards check in and out on their phones inside the site; send relief guards when someone does not come; check night patrols with QR checkpoints; and keep the occurrence book, with incidents emailed and texted to the client. Clients see their sites in the customer portal.
Everything is in the Security group of the left menu: Today, Roster, Sites, Contracts, Guards, Patrol report, Occurrence book and Expiring licences. Guards use Me → My guard shifts on their phones.
Note: Four permissions control the module (under Settings → Roles): security.view to see sites, contracts, guards, the occurrence book, the patrol report and expiring licences; security.supervise for the roster, the Today board and recording occurrences; security.manage to set up sites, contracts and guards and invoice contracts; and security.guard for a guard's own shifts on the phone. Owners and admins have all four; the member role has security.view. See Permissions and what a guard sees.
Switch it on
Security services is a marketplace add-on. It needs the Contacts and HR apps, since every guard is an HR employee. Invoicing is needed to invoice contracts, Marketing (with SMS set up) to text clients about incidents, and the Customer portal for My sites.
- Open Settings → Marketplace and type Security services in the Search add-ons… box (marker 1).
- On the Security services (guarding) card (marker 2), click Start free trial (or Add to subscription) and confirm. The Security group appears in the left menu.
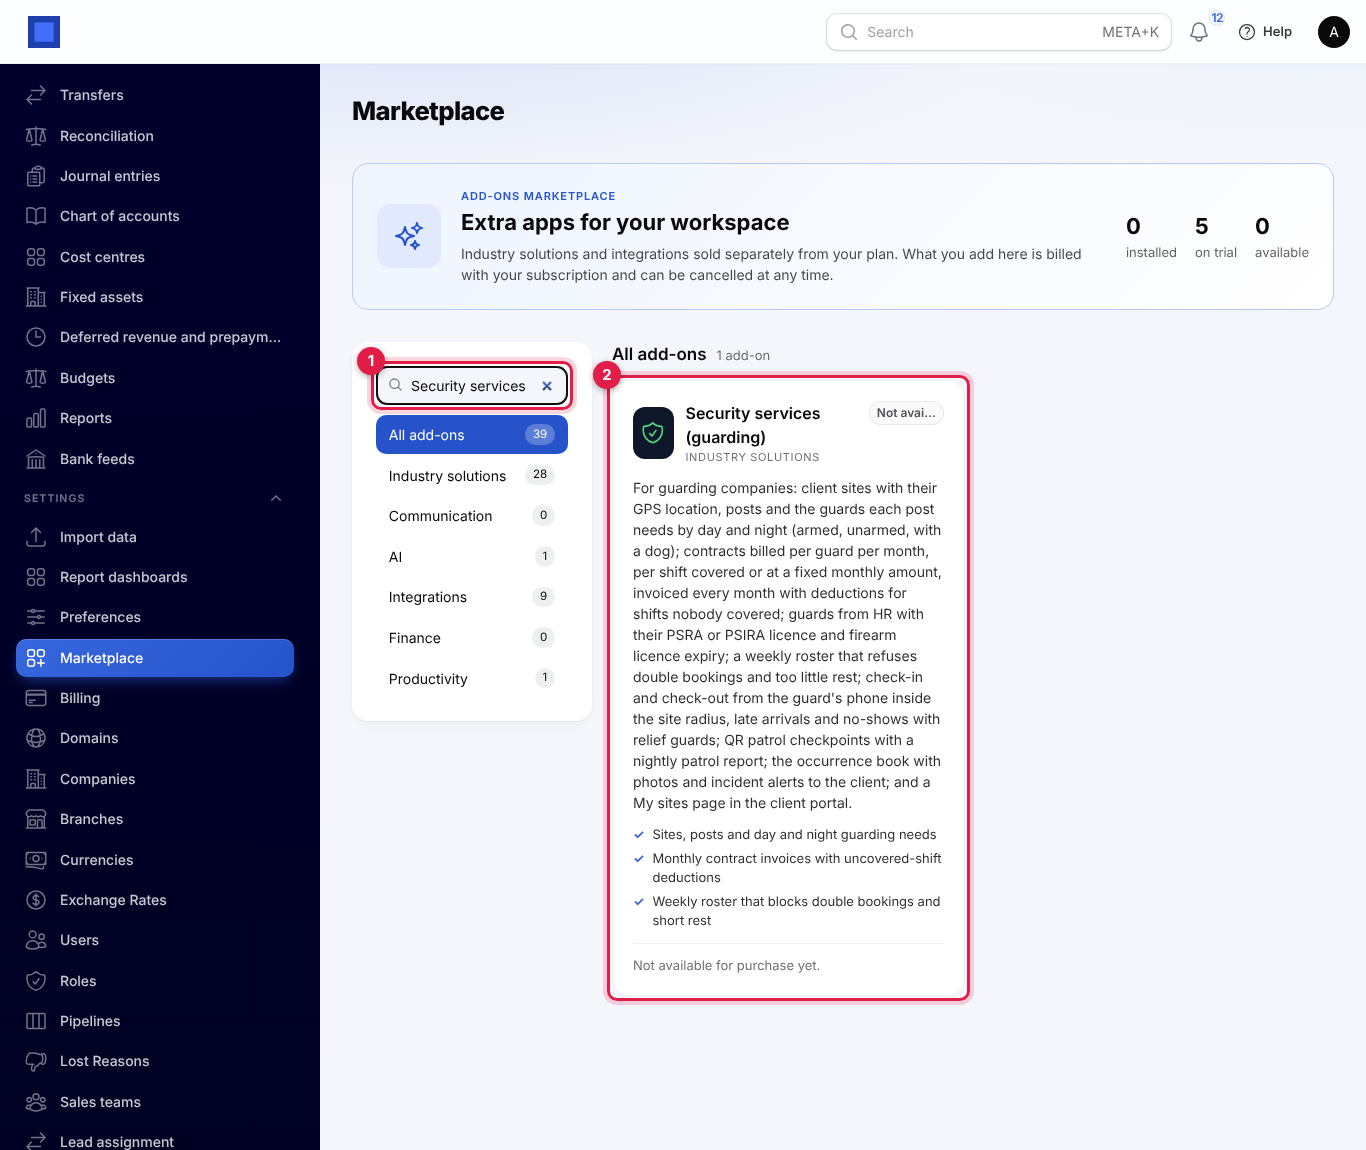
If the card says Not available for purchase yet (as in the screenshot), the add-on has not been priced for your plan: ask NaliSuite support to switch it on. See Billing and marketplace.
Settings
Open Settings → Preferences and click the Security tab. Change what you need and click Save preferences (marker 8).
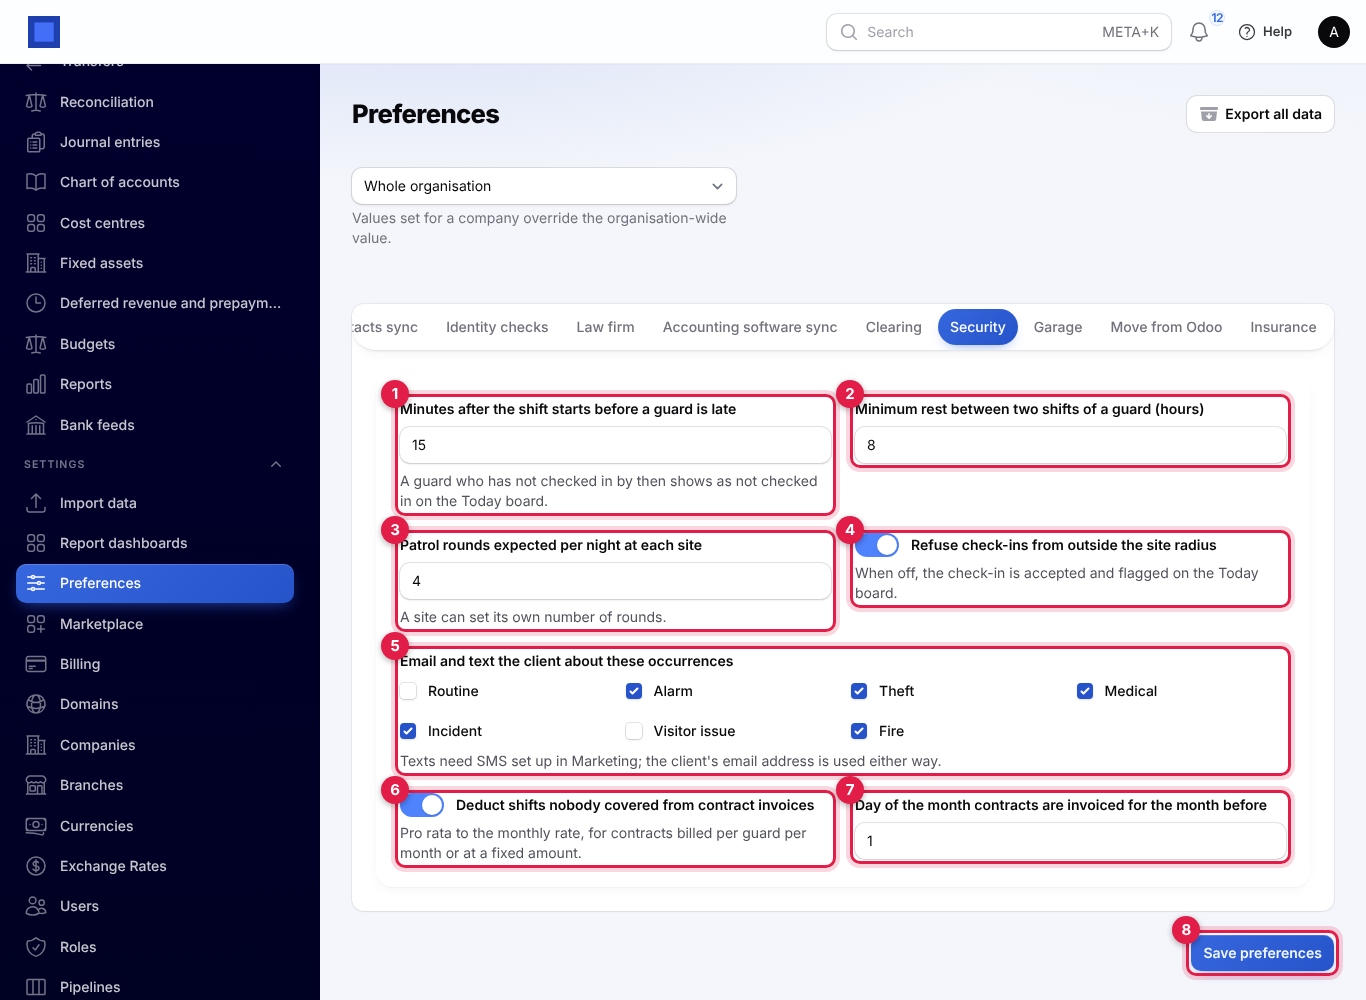
| Setting | Default | What it does |
|---|---|---|
| Minutes after the shift starts before a guard is late (marker 1) | 15 | A guard checking in later is marked late. A guard who has not checked in by then shows as Not checked in on the Today board. |
| Minimum rest between two shifts of a guard (hours) (marker 2) | 8 | The roster refuses a shift that leaves a guard less rest than this before or after another shift. |
| Patrol rounds expected per night at each site (marker 3) | 4 | Used by the patrol report. A site can set its own number. |
| Refuse check-ins from outside the site radius (marker 4) | On | On: a guard outside the site's radius cannot check in. Off: the check-in is accepted and flagged on the Today board. |
| Email and text the client about these occurrences (marker 5) | Incident, Alarm, Theft, Fire, Medical | Occurrence book entries of the ticked types are sent to the client at once. Routine and Visitor issue are off by default. Texts need SMS set up in Marketing (see Marketing). |
| Deduct shifts nobody covered from contract invoices (marker 6) | On | For contracts billed per guard per month or at a fixed amount. See Contracts and billing. |
| Day of the month contracts are invoiced for the month before (marker 7) | 1 | From this day (1 to 28) the daily run invoices last month. |
The dropdown at the top of Preferences lets one company use different settings from the rest of the organisation.
Sites, posts and guarding needs
Add a site
Open Security → Sites. Each site shows its client, the Contact person at the site (marker 2), the number of Posts (marker 3) and Checkpoints (marker 4), and whether it has a GPS point (marker 5). The Active only filter is on by default.
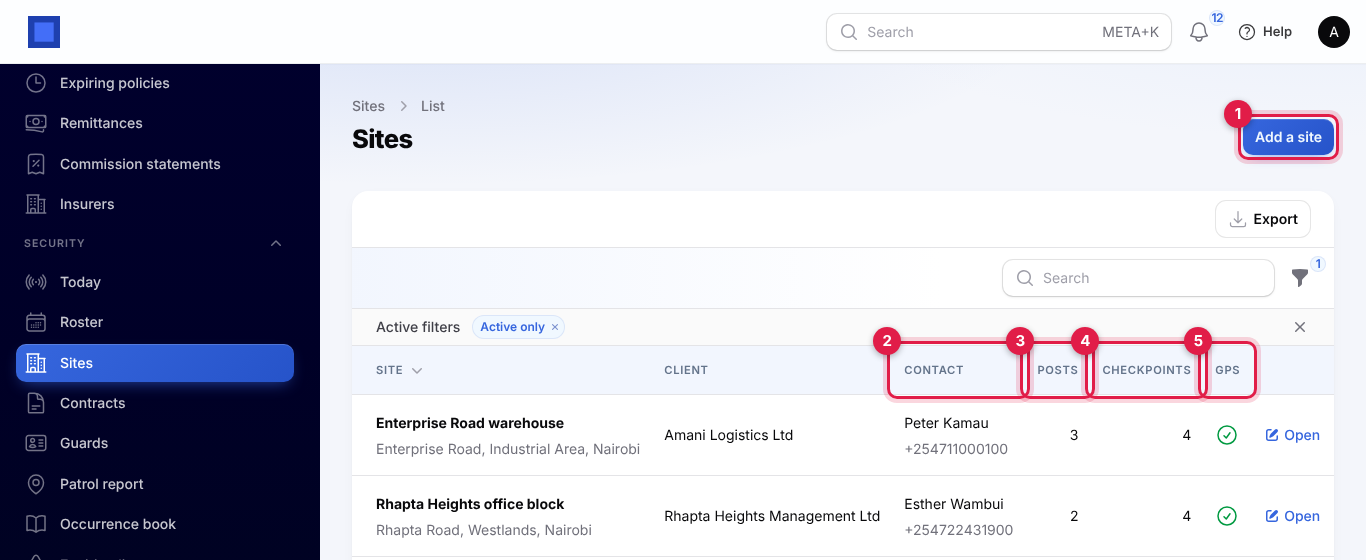
- Click Add a site (marker 1 above).
- Choose the Client (marker 1 below), or click + to add one with a name, email and mobile.
- Type the Site name (marker 2), the Address, the Contact person at the site (marker 3) and Their phone. Guards can call that number from their phone screen.
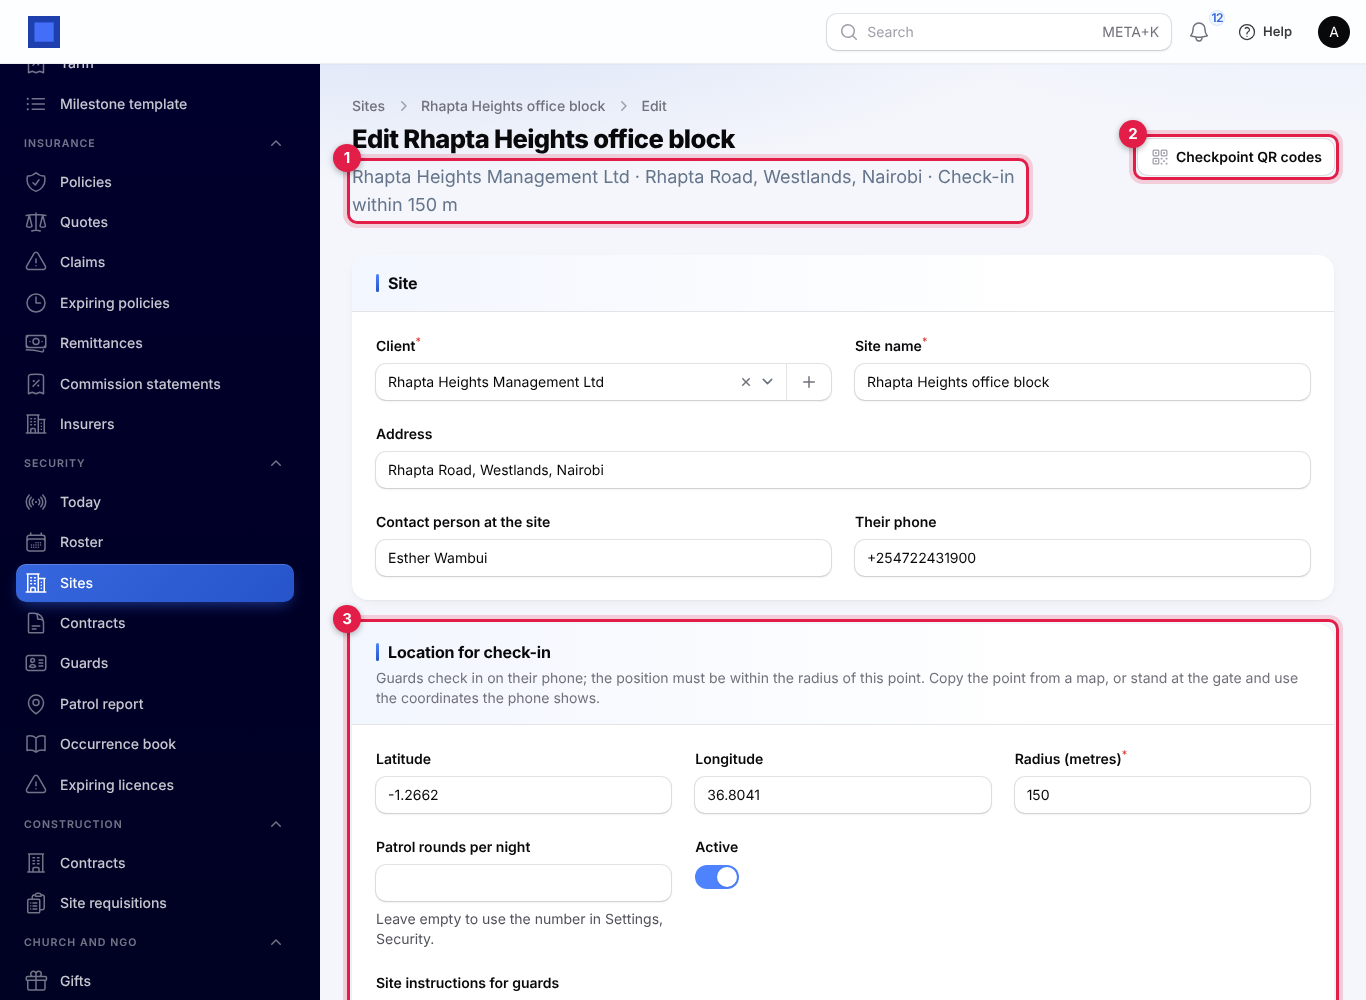
- Under Location for check-in, enter the Latitude and Longitude (marker 4) of the site. Copy the point from a map, or stand at the gate and use the coordinates your phone shows.
- Set the Radius (metres) (marker 5), 150 by default (20 to 5,000). Guards must be within this distance of the point to check in.
- Leave Patrol rounds per night (marker 6) empty to use the number in Settings, or type this site's own number.
- Write the Site instructions for guards (marker 7). Guards see them with every shift.
- Click Create.
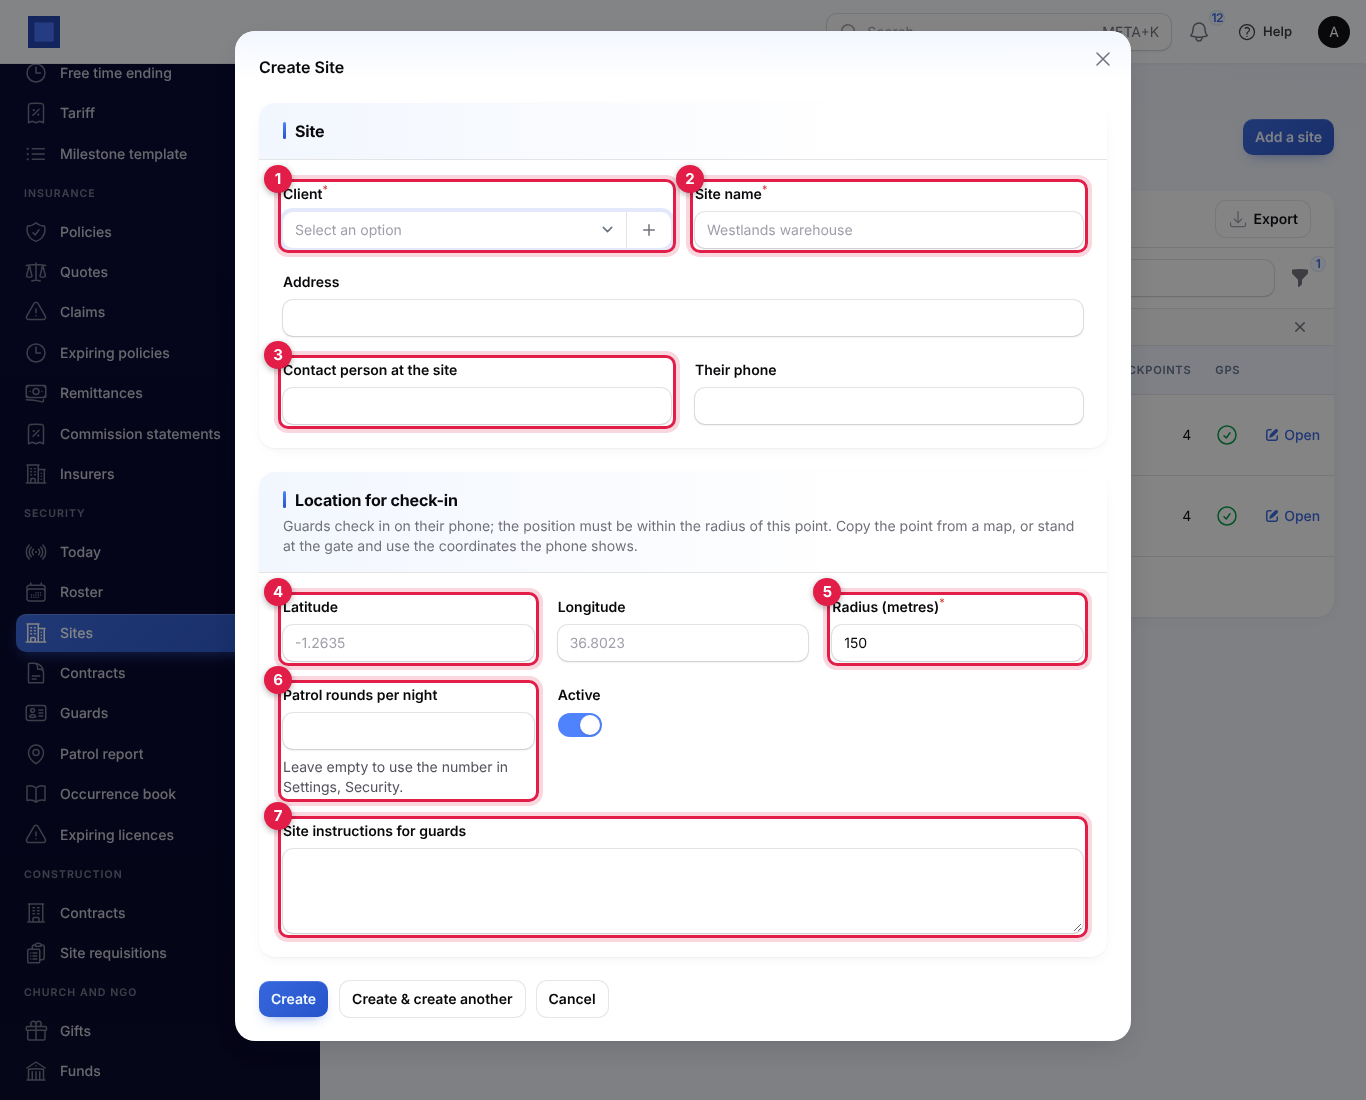
A site without a GPS point accepts check-ins from anywhere. Turn Active off for a site you no longer guard; it leaves the roster and the patrol report.
The site page
Click Open on a site. Under the name (marker 1) are the client, the address and the check-in radius (or "No GPS point yet"). Checkpoint QR codes (marker 2) opens the printable QR sheet. You can change the details and the Location for check-in (marker 3) and click Save changes. Below are four tabs: Posts, Guarding required, Patrol checkpoints and Contracts.
Posts
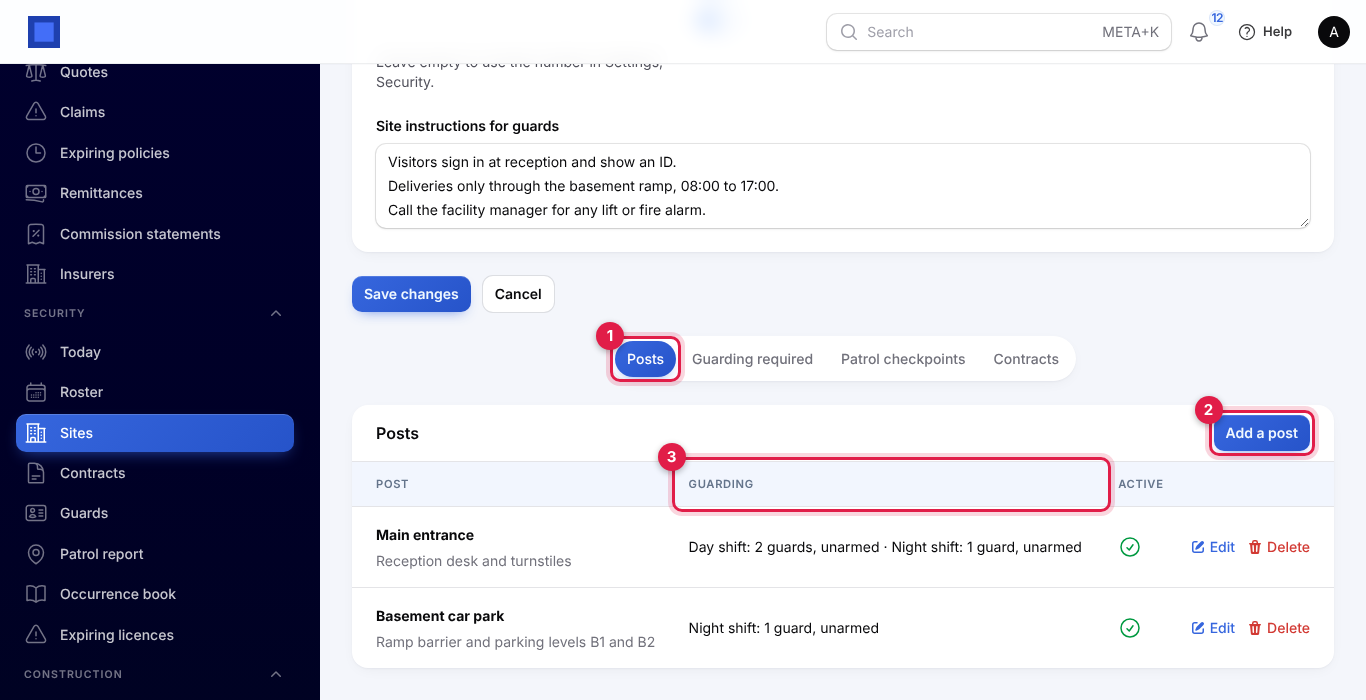
A post is a guarded position, such as the main gate, the reception or the car park. On the Posts tab (marker 1), click Add a post (marker 2), type the Post name, the Order it is listed in and any Post instructions, and click Create. The Guarding column (marker 3) sums up the guards each post needs.
Guarding required
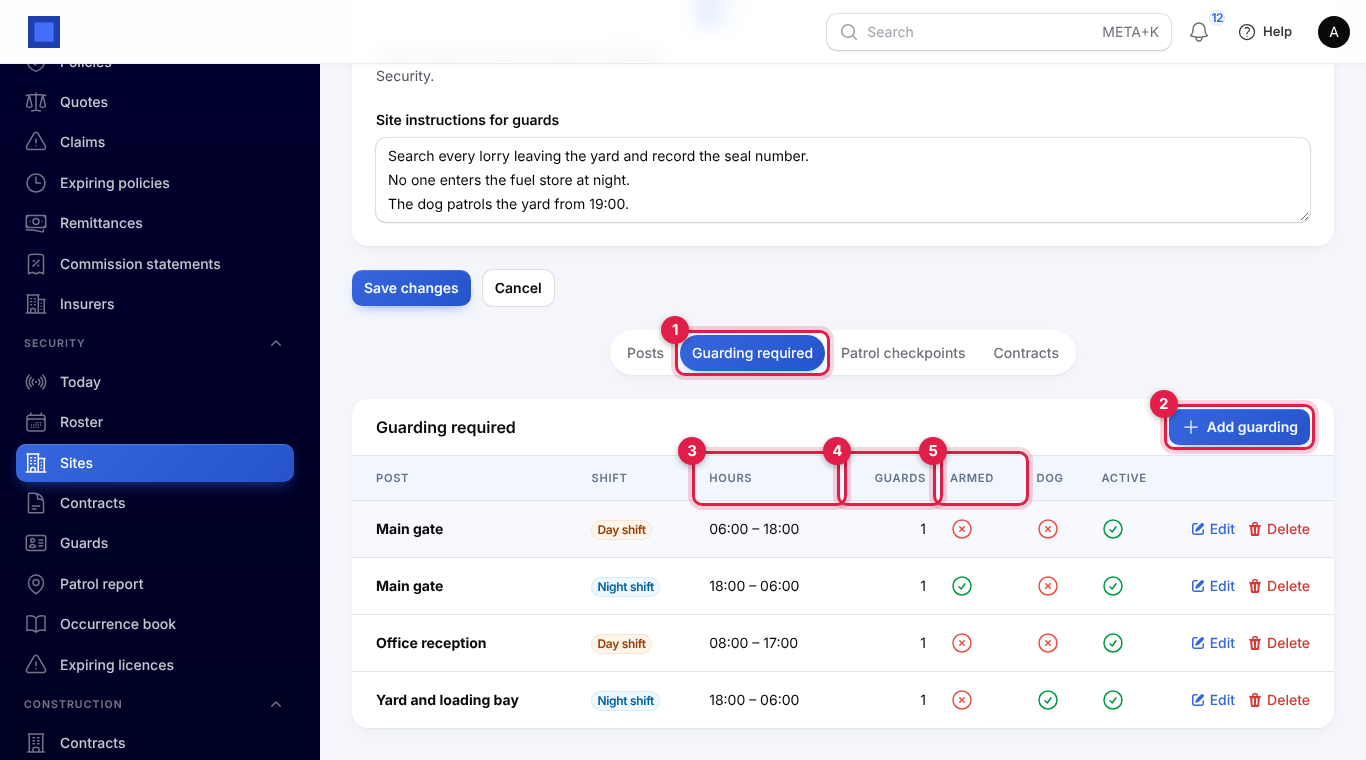
On the Guarding required tab (marker 1) you say how many guards each post needs on each shift. The list shows the Hours (marker 3), the Guards per shift (marker 4) and whether they are Armed (marker 5) or with a dog.
- Click Add guarding (marker 2 above).
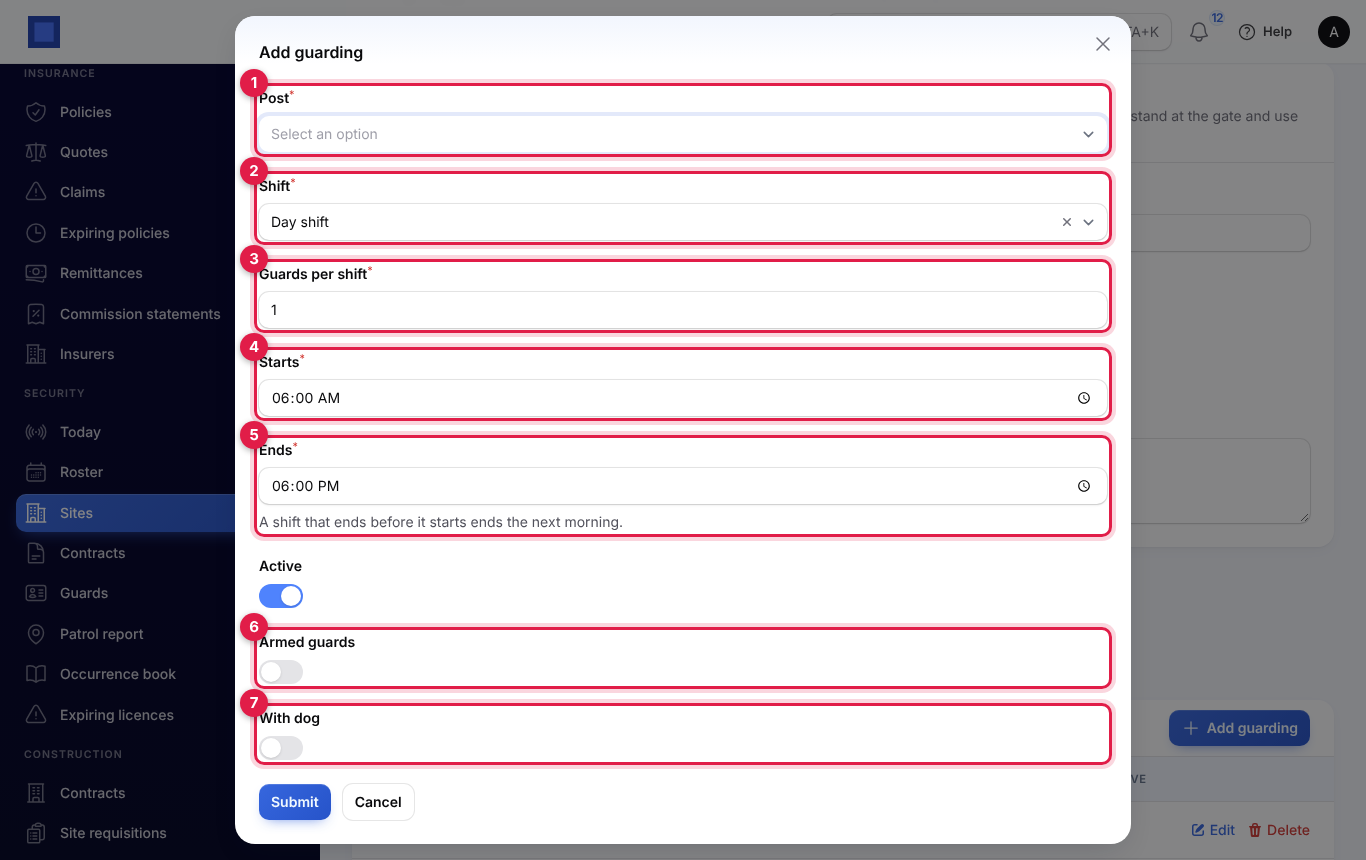
- Choose the Post (marker 1).
- Choose the Shift (marker 2): Day shift fills in 06:00 to 18:00, Night shift 18:00 to 06:00. Each post has at most one day and one night shift.
- Set the Guards per shift (marker 3), and change Starts (marker 4) and Ends (marker 5) if needed. A shift that ends before it starts ends the next morning.
- Turn on Armed guards (marker 6) if the post needs guards with a firearm licence, and With dog (marker 7) for a dog patrol.
- Click Submit.
Each line becomes a row on the roster and a line on the contract invoice.
Checkpoints and the QR sheet
Checkpoints are points on the night patrol route, such as the back fence, the generator room or the fuel store.
- On the site's Patrol checkpoints tab (marker 1), click Add a checkpoint (marker 2).
- Type the Checkpoint name, its Order on the route, and, if you like, its own Latitude and Longitude (the site's point is used otherwise). Click Create.
- Click Print QR codes (marker 3), or Checkpoint QR codes at the top of the site page. A PDF opens with one card per checkpoint, two to a row, each with your company and site name, the checkpoint's name and number and its QR code.
- Cut out the cards and fix each one at its checkpoint where guards can reach it.
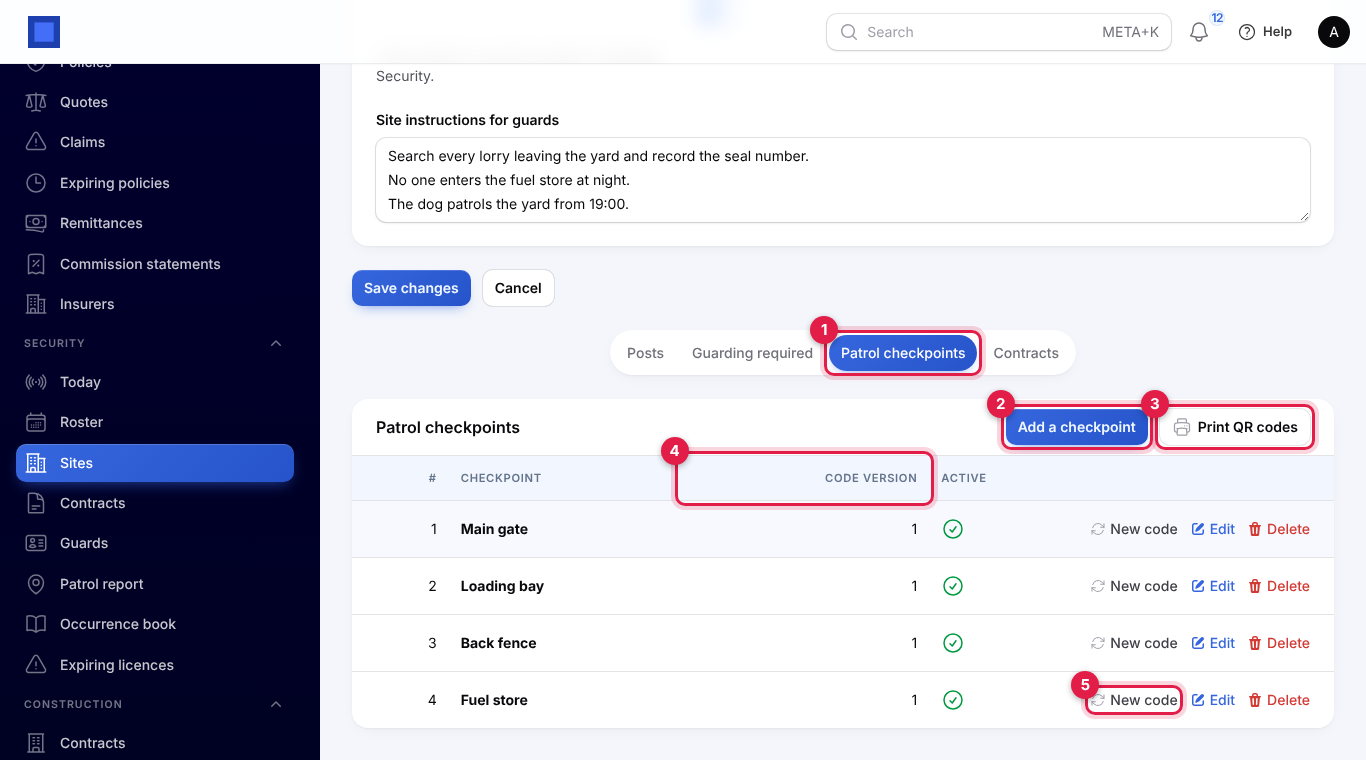
Each QR code holds a signed code for its checkpoint, so a copied or altered code is refused. If a card is lost or copied, click New code (marker 5) on that checkpoint and confirm: the printed card stops working and the Code version (marker 4) goes up. Print the sheet again and put up the new card. Only staff with security.manage can print the sheet.
Contracts and billing
Add a contract
Open Security → Contracts. Each contract shows its site and client, how it is Billed (marker 2), its dates and the month it was Last invoiced (marker 3). The Status filter starts on Active.
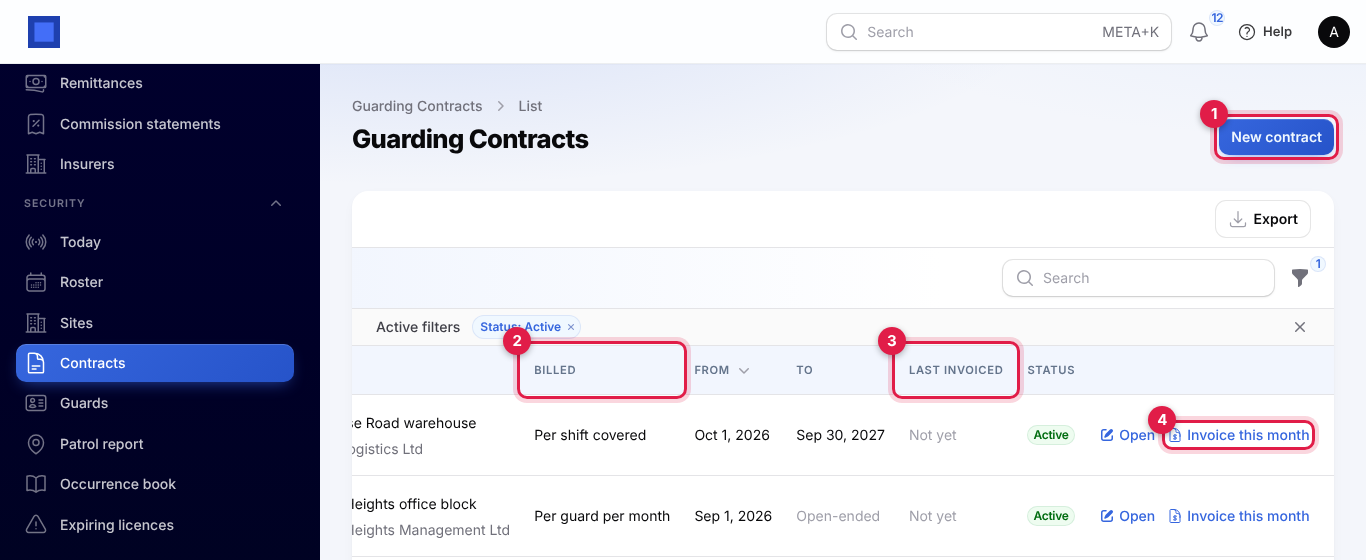
- Click New contract (marker 1 above), or New contract on the site's Contracts tab (the site is then filled in).
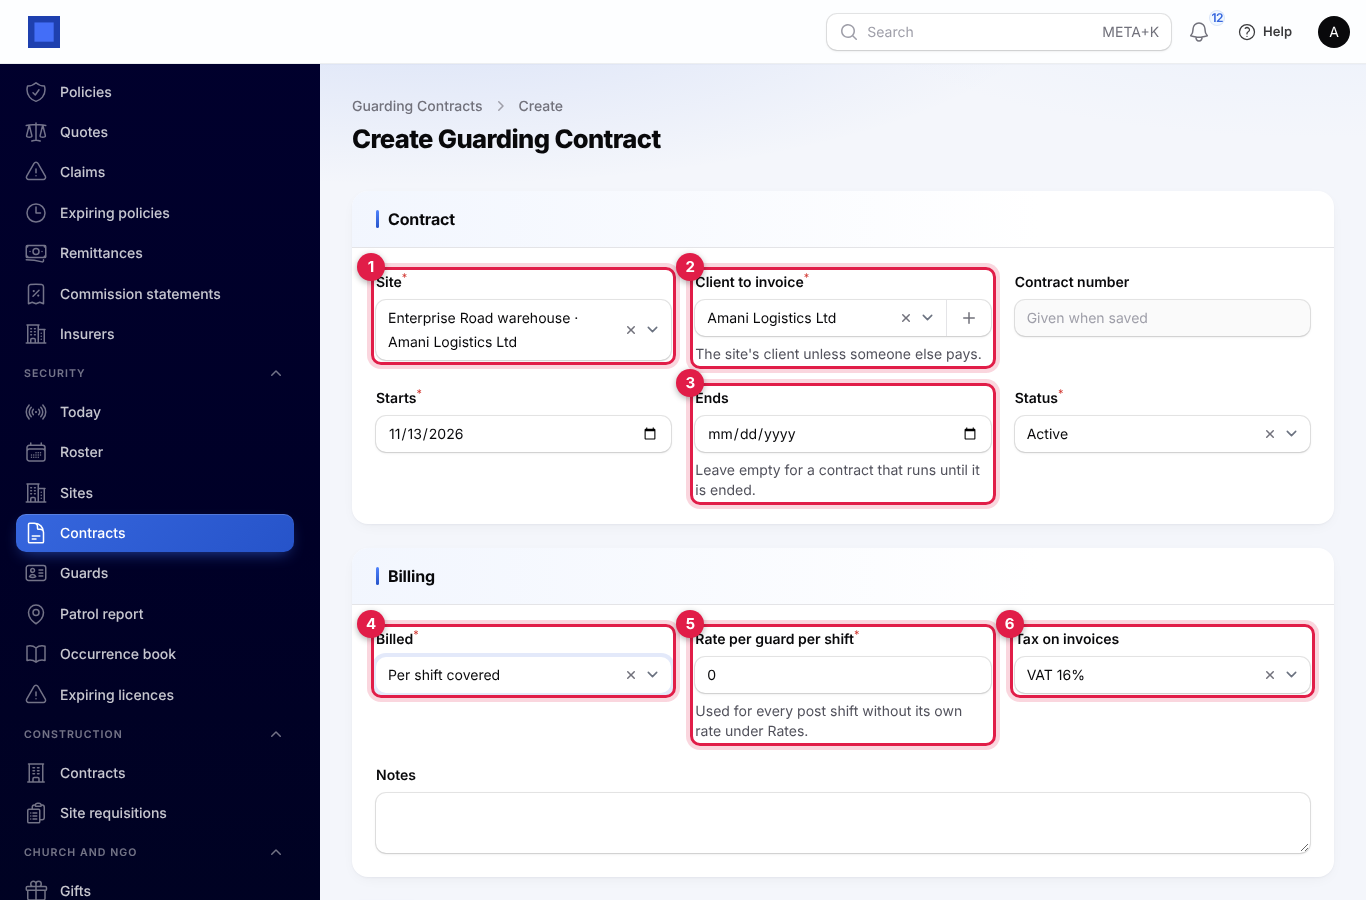
- Choose the Site (marker 1). The Client to invoice (marker 2) is filled in with the site's client; change it if someone else pays.
- Set Starts, and Ends (marker 3) for a fixed term; leave it empty for a contract that runs until it is ended.
- Choose how it is Billed (marker 4):
- Per guard per month: each guard on each post shift at a monthly rate.
- Per shift covered: each shift a guard actually checked in for, at a rate per guard per shift.
- Fixed monthly amount: one amount every month, whatever the guarding.
- Enter the Rate per guard per month or Rate per guard per shift (marker 5), or the Fixed amount per month.
- Choose the Tax on invoices (marker 6), your default tax to start with.
- Add any Notes and click Create. The contract gets a number such as GSC-2026-0002 and opens.
Rates per post shift
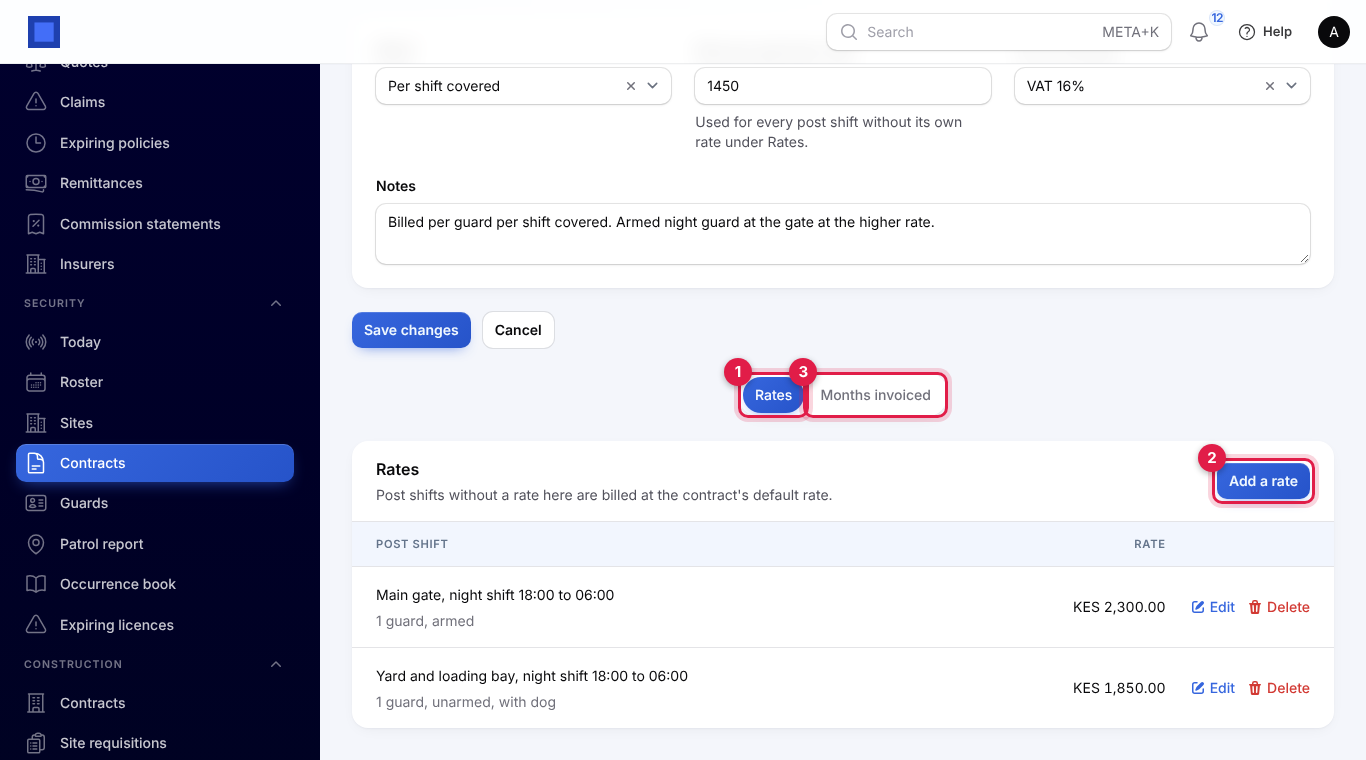
The contract's default rate applies to every post shift. For a different rate on one of them, for example armed night guards, open the Rates tab (marker 1), click Add a rate (marker 2), choose the Post shift and type its Rate. The Months invoiced tab (marker 3) lists every month billed.
Invoice a month
Contracts are invoiced automatically (see below), but you can invoice one now:
- Click Invoice this month on the contract, or on its row in the list.
- Choose the Month (marker 1). The last six months are offered; last month is chosen when it has not been invoiced yet, otherwise this month.
- Click Submit. You see "Invoice INV-… raised for …".
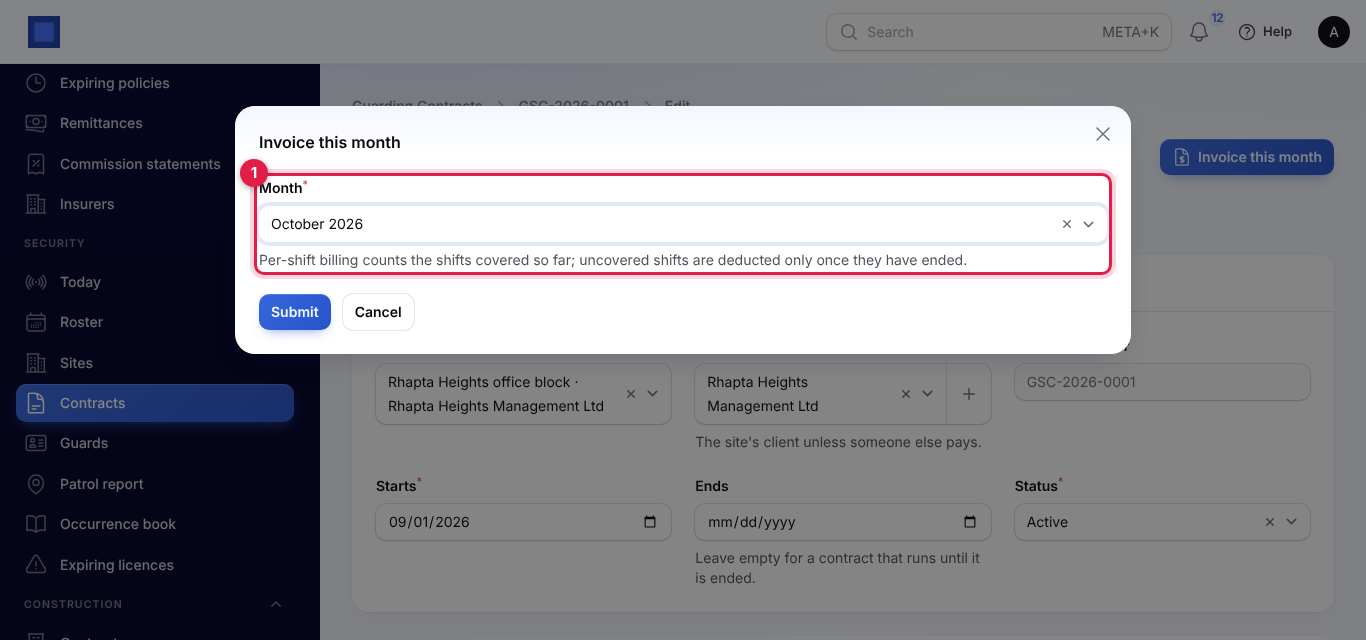
A contract is invoiced once per month: a second try says "Contract … is already invoiced for …". With Invoicing on and something to charge, an invoice is issued to the client, dated today, due after the client's payment terms (30 days when none are set), covering the days billed, with the contract number and site as its reference and the contract's tax on every line. Without Invoicing, or with nothing to charge, the month is still recorded under Months invoiced. A contract whose end date falls in the month billed becomes Ended.
Months invoiced shows each month with the Shifts covered out of those expected, the amount Deducted, the total Before tax, the invoice and when it was billed. Lines shows every line of that month's bill; Invoice opens the invoice.
How a month is billed
| Billed | Lines on the invoice |
|---|---|
| Per guard per month | One line per post shift: the number of guards × the monthly rate. Then, with deductions on, "Less 2 uncovered shifts at Main gate, night shift": each shift nobody checked in for, at the monthly rate ÷ the days in the month. |
| Per shift covered | One line per post shift: the shifts a guard checked in for × the rate per shift. Never any deduction. |
| Fixed monthly amount | One line, "Guarding services at … , November 2026". With deductions on, uncovered shifts are taken off at the fixed amount ÷ (guards needed × days in the month) each. |
A month the contract only partly runs is charged for its days, shown as "(5 of 31 days)". A shift counts as covered when a guard checked in, and as uncovered only once it has ended, so invoicing the current month early deducts only the shifts already missed.
The daily run
Every morning the security:invoice command runs for every workspace. From the Day of the month contracts are invoiced in Settings, each active contract that ran last month and has not been invoiced for it is invoiced for last month. Running again the same month bills nothing more, and a month you already invoiced by hand is skipped.
Guards and their licences
Guards are HR employees with their guarding details kept here; their phone, next of kin and pay stay on the employee record (see HR).
Open Security → Guards. Each guard shows the employee number, the licence, when the Licence expires (marker 2: amber within 60 days, red once expired), whether armed, when the Firearm licence expires (marker 3) and whether a Dog handler (marker 4). The filters are Active only (on by default) and Armed only.
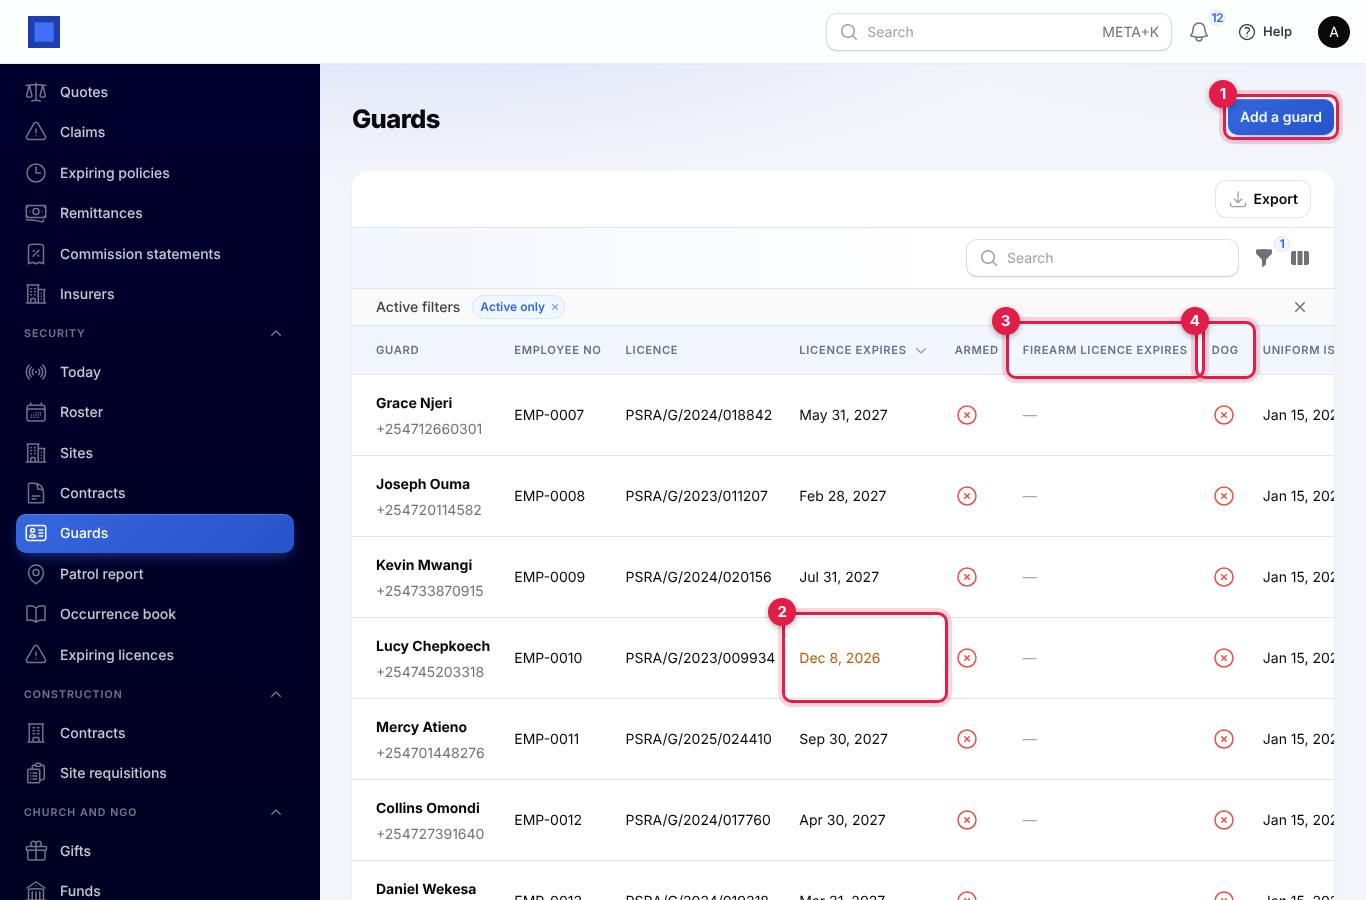
- Click Add a guard (marker 1 above).
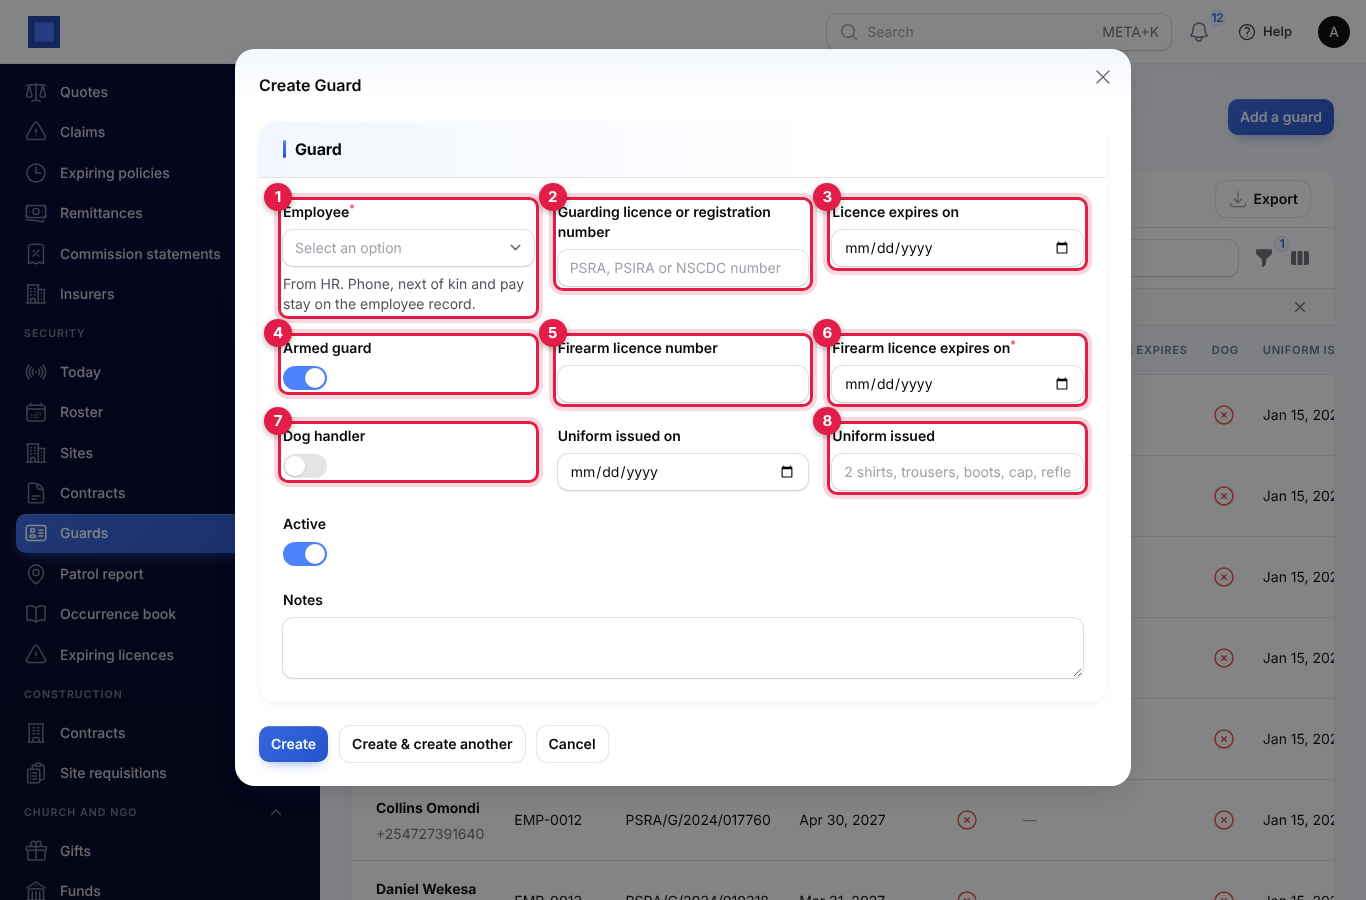
- Choose the Employee (marker 1 below). Only active HR employees who are not guards yet are listed.
- Type the Guarding licence or registration number (marker 2), for example the PSRA, PSIRA or NSCDC number, and when the Licence expires (marker 3).
- For an armed guard, turn on Armed guard (marker 4) and enter the Firearm licence number (marker 5) and when the Firearm licence expires (marker 6, required).
- Turn on Dog handler (marker 7) if it applies.
- Record when the uniform was issued and what was issued (Uniform issued, marker 8), and any notes.
- Click Create.
To let a guard check in on the phone, the guard's HR employee record must be linked to their NaliSuite user, and that user needs the security.guard permission (see Permissions and what a guard sees).
Expiring licences
Security → Expiring licences lists active guards whose guarding licence, or firearm licence for armed guards, has expired (marker 1, red, "Expired 13 days ago") or expires within 60 days (marker 2, amber, "In 25 days"). Marker 3 is a firearm licence about to expire. The Already expired filter shows only lapsed licences.
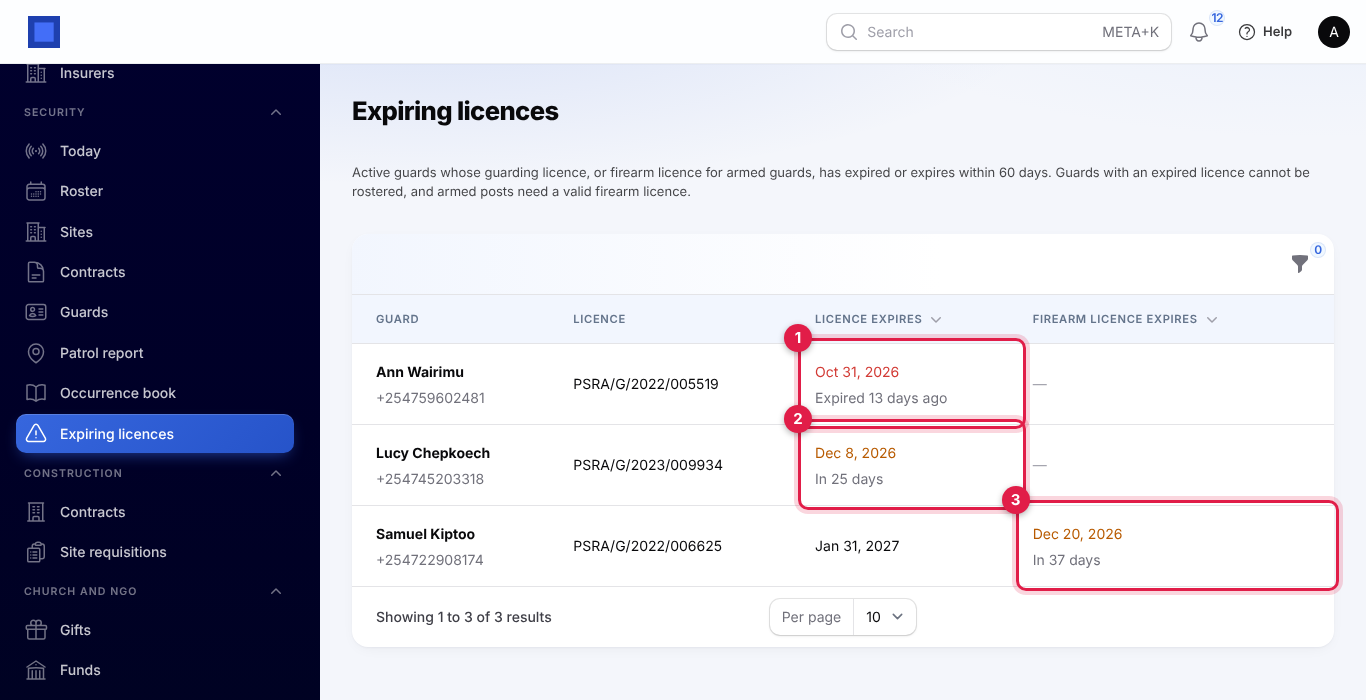
A guard with an expired licence cannot be rostered, and an armed post needs a valid firearm licence on the day.
The weekly roster
Open Security → Roster. Every active post shift is a row and the days of the week, Monday to Sunday, are the columns; today is in blue. Each cell lists the guards rostered and how many of the guards needed are there, for example 1/1. A cell that is short is red and has an Add button (marker 4). A guard who did not come is struck through, and a relief guard is marked relief (marker 5).
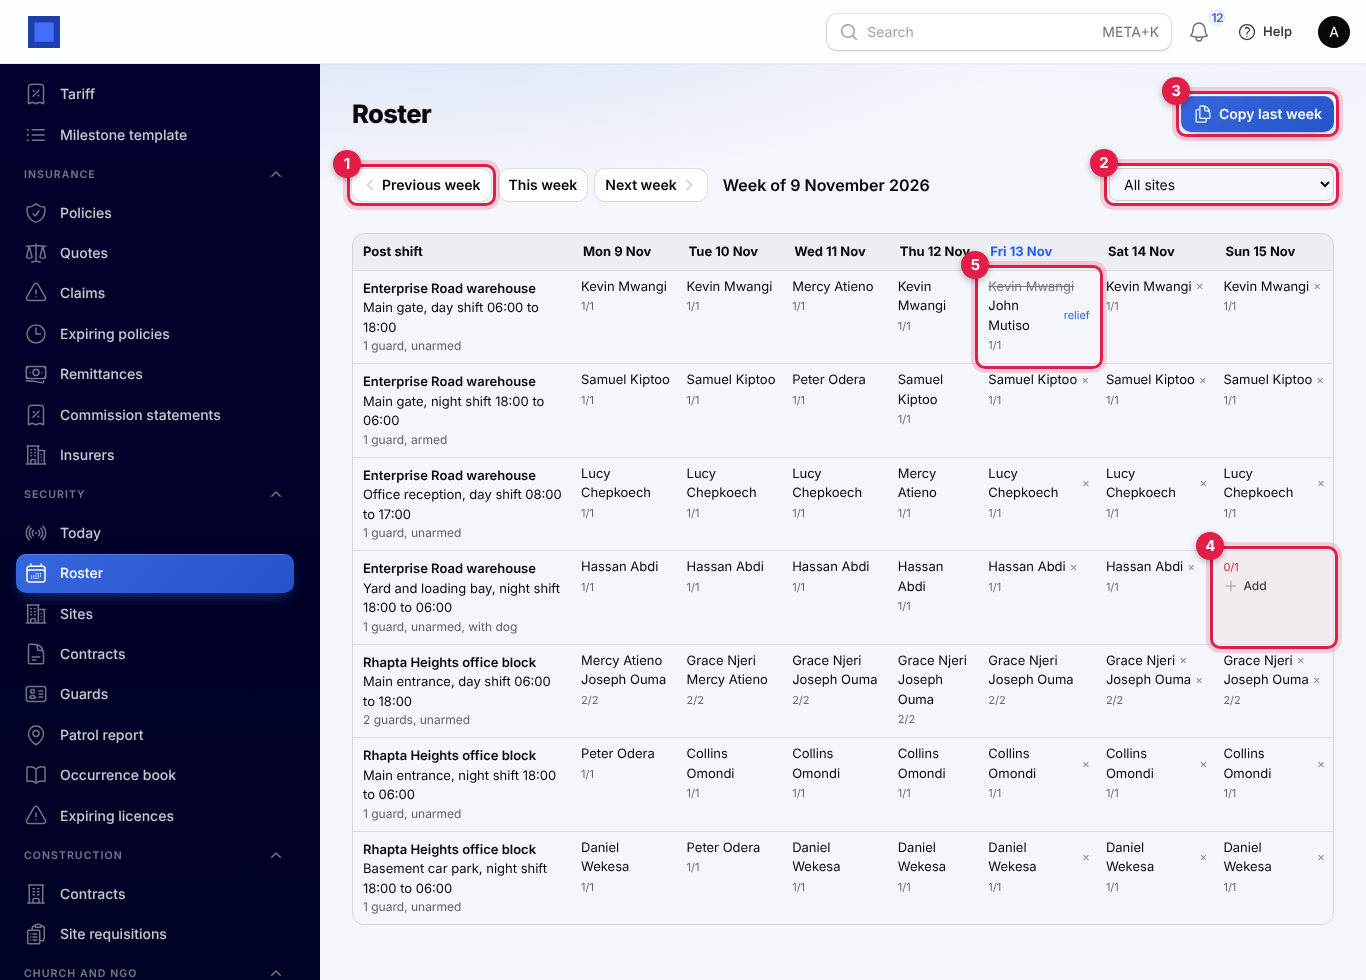
- Move between weeks with Previous week (marker 1), This week and Next week.
- Show one site with the site list (marker 2).
- Click × next to a guard to take them off a shift they have not checked in for.
Roster a guard
- Click Add in a short cell.
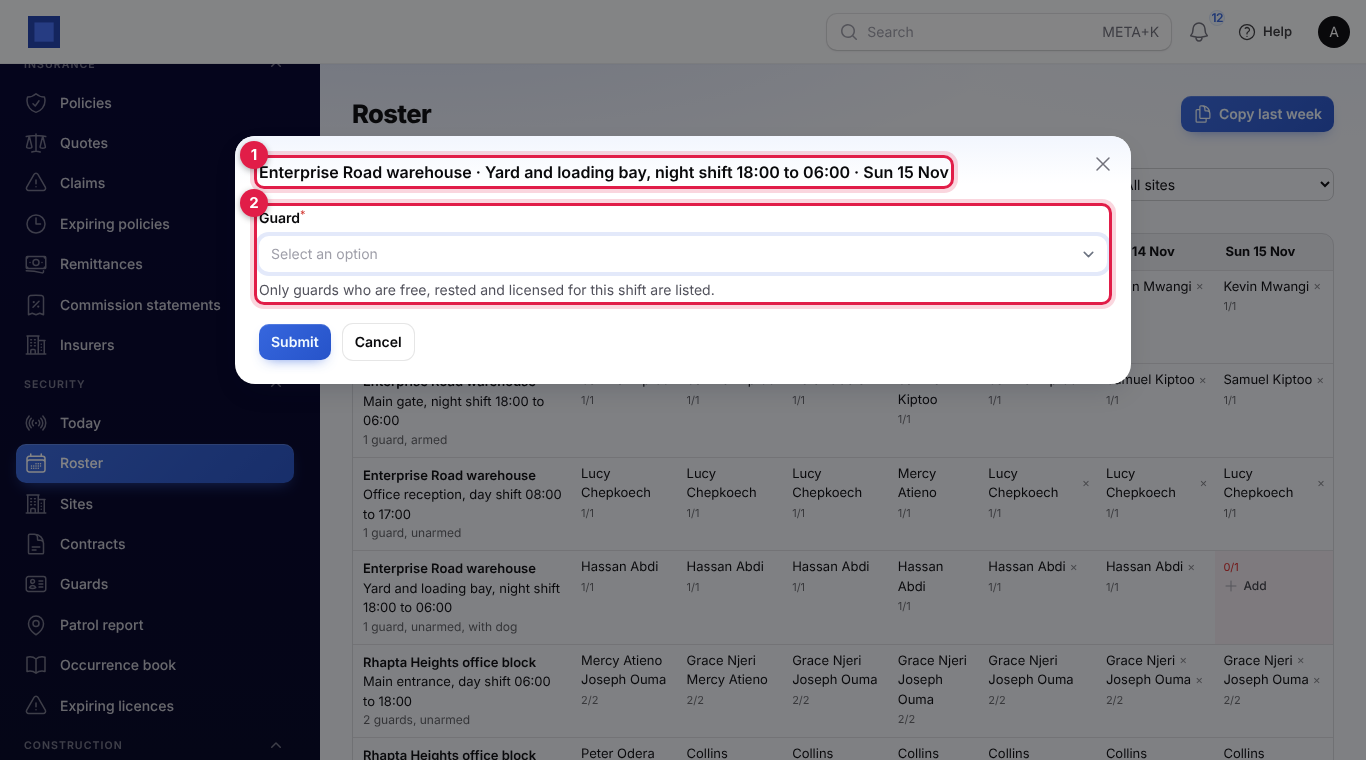
- The window says which post shift and day (marker 1). Choose the Guard (marker 2). Only guards who are free, rested and licensed for that shift are listed.
- Click Submit. You see "Grace Njeri rostered".
The roster refuses, with the reason, a guard who:
- is not an active guard, or whose guarding licence has expired by that day;
- has no valid firearm licence for an armed post;
- is already on another shift at the same time;
- would get less than the minimum rest from Settings before or after another shift, for example "Grace Njeri would have only 4 hours of rest next to … ; the minimum is 8 hours".
A post shift also takes no more guards than it needs: "Main gate, day shift 06:00 to 18:00 already has 1 of 1 guards on Mon 16 Nov".
Copy last week
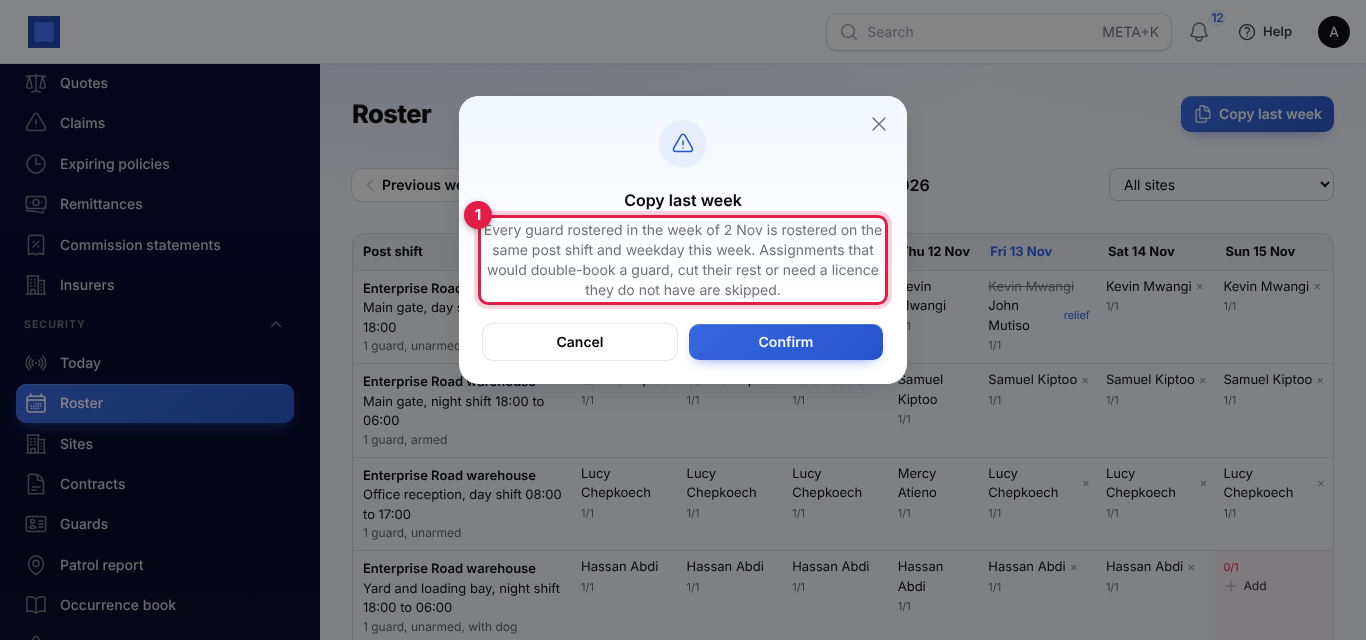
Click Copy last week (marker 3 on the roster) and confirm. Every guard rostered in the week before is rostered on the same post shift and weekday in the week shown (marker 1). Relief guards and cancelled shifts are not copied; guards already there are left alone. An assignment that would double-book a guard, cut their rest or need a licence they no longer have is skipped. You see, for example, "56 copied, 0 skipped", with the first reasons for anything skipped.
The Today board
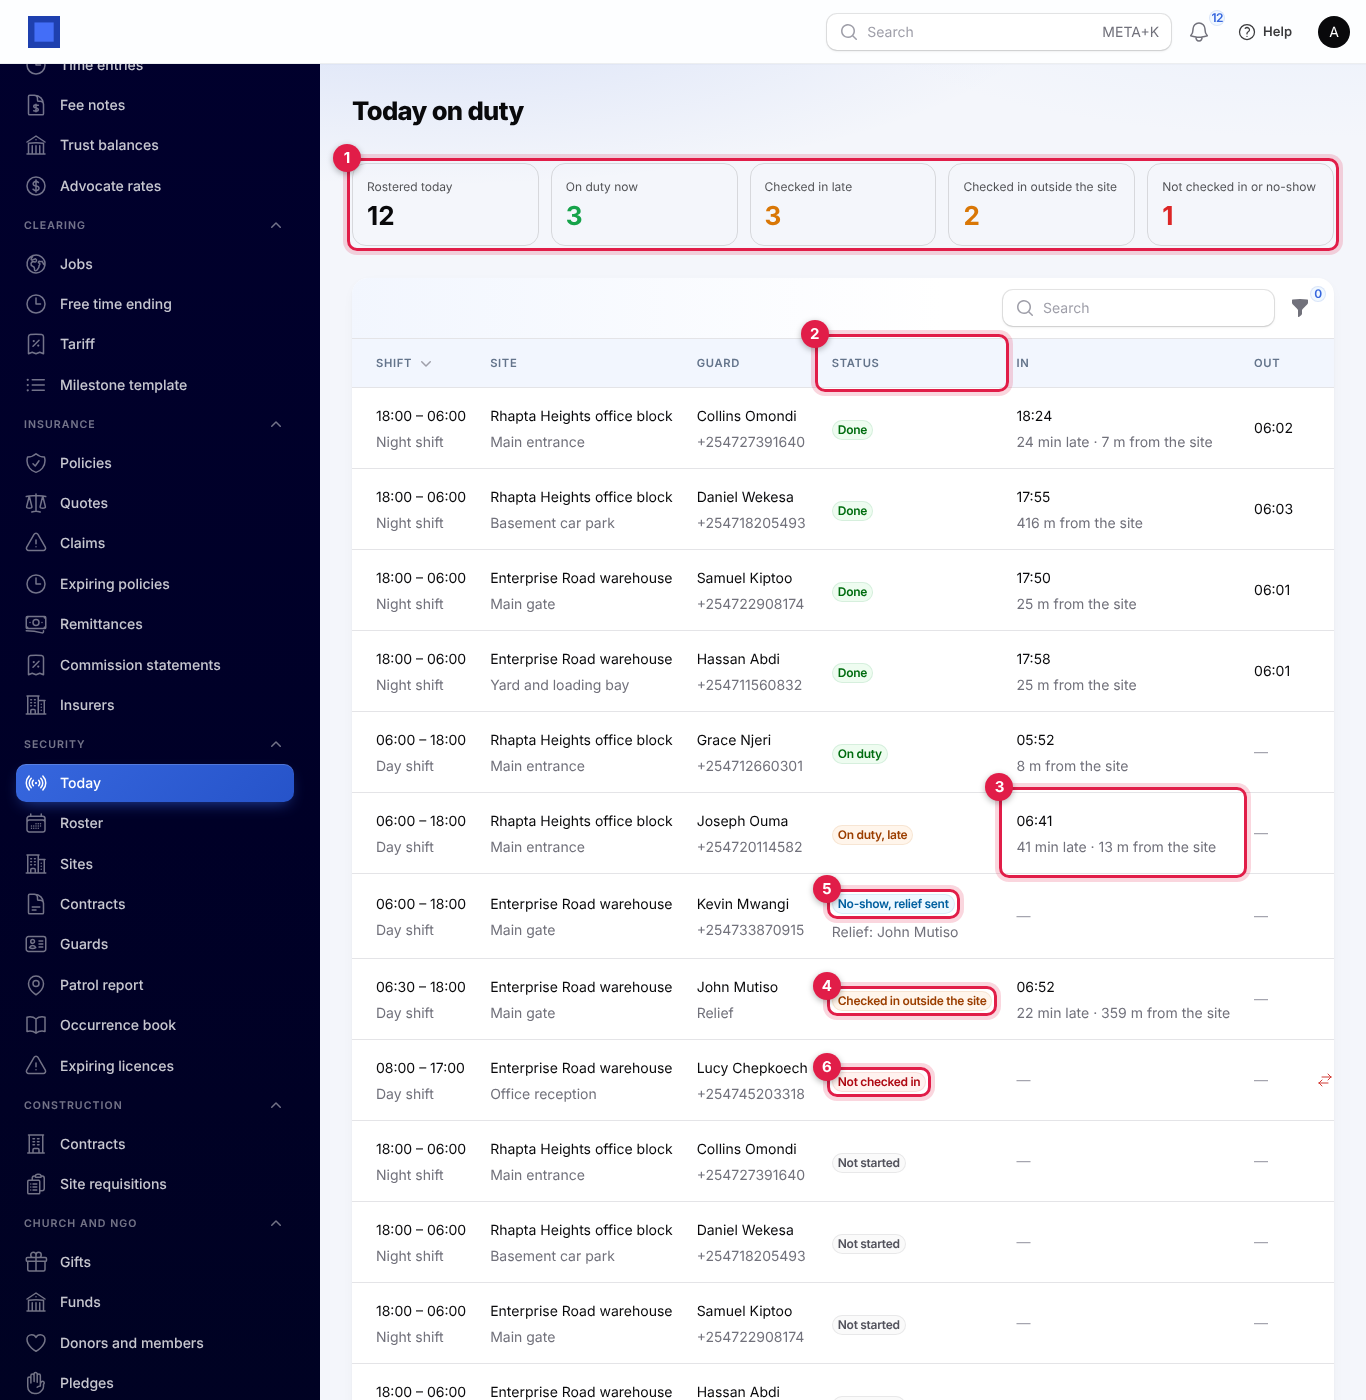
Open Security → Today at the start of each shift. The tiles at the top (marker 1) count the guards Rostered today, On duty now, Checked in late, Checked in outside the site and Not checked in or no-show. Below is every shift starting today, and last night's shifts still running at midnight, with its site and post, the guard and phone, the Status (marker 2), the check-in time (with minutes late and the distance from the site, marker 3) and the check-out time. The board refreshes every minute.
| Status | Meaning |
|---|---|
| Not started | The shift has not started yet. |
| On duty | Checked in on time. |
| On duty, late | Checked in after the late minutes in Settings. |
| Checked in outside the site (marker 4) | Checked in farther than the site's radius; only possible when Refuse check-ins from outside the site radius is off. |
| Not checked in (marker 6) | The shift started more than the late minutes ago and the guard has not checked in. |
| No-show | Marked as a no-show. |
| No-show, relief sent (marker 5) | A relief guard took the shift; their name is under the status. |
| Done | Checked out. |
The filters are Not checked in or no-show, Late or outside the site and Site.
Relief guards and no-shows
Scroll the row of a guard who has not come to the right for the buttons.
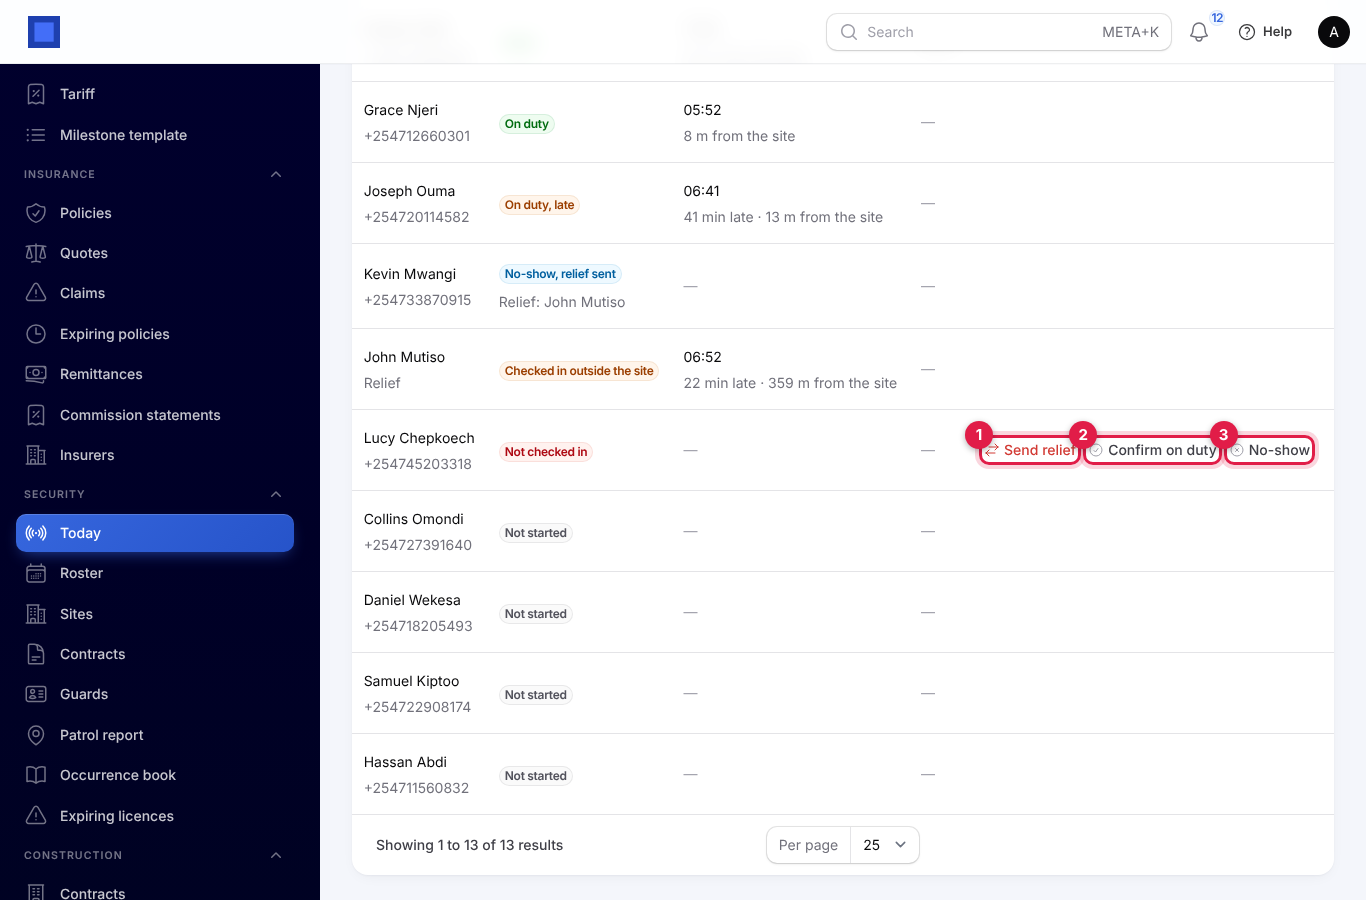
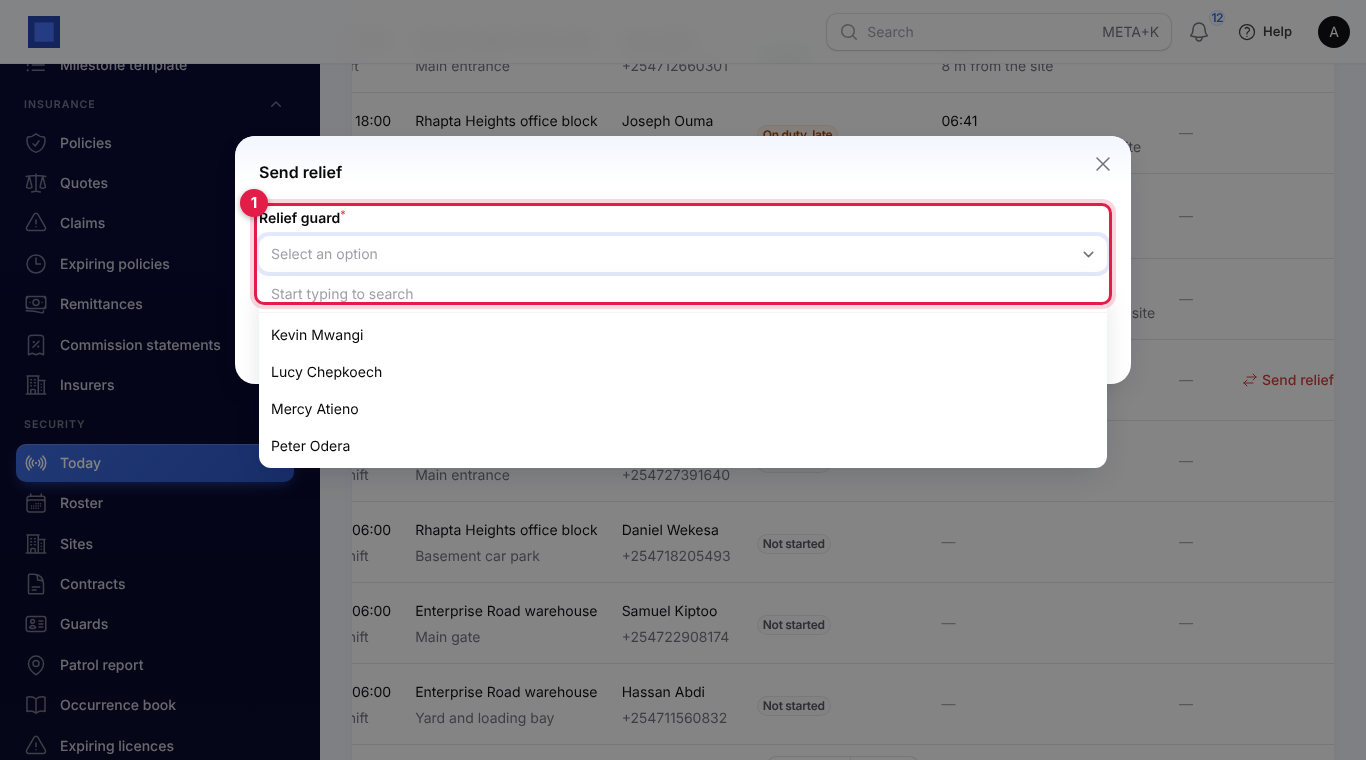
- Send relief (marker 1): choose the Relief guard (marker 1 below) and click Submit. The missing guard is marked a no-show and the relief guard is rostered for the rest of the shift, from now, or from the start if it has not begun. Only guards who are free, rested and licensed for the post are listed.
- Confirm on duty (marker 2): for a guard without a phone. After a call or a visit, it records the guard as on duty now, without a location; lateness is still recorded. It shows from an hour before the shift starts until it ends.
- No-show (marker 3): marks the guard as a no-show without sending anyone. The shift then counts as uncovered on the contract invoice.
My guard shifts on the phone
Guards sign in to NaliSuite on their phone (in the browser or the installed app) and open Me → My guard shifts. Allow the page to use the phone's location.
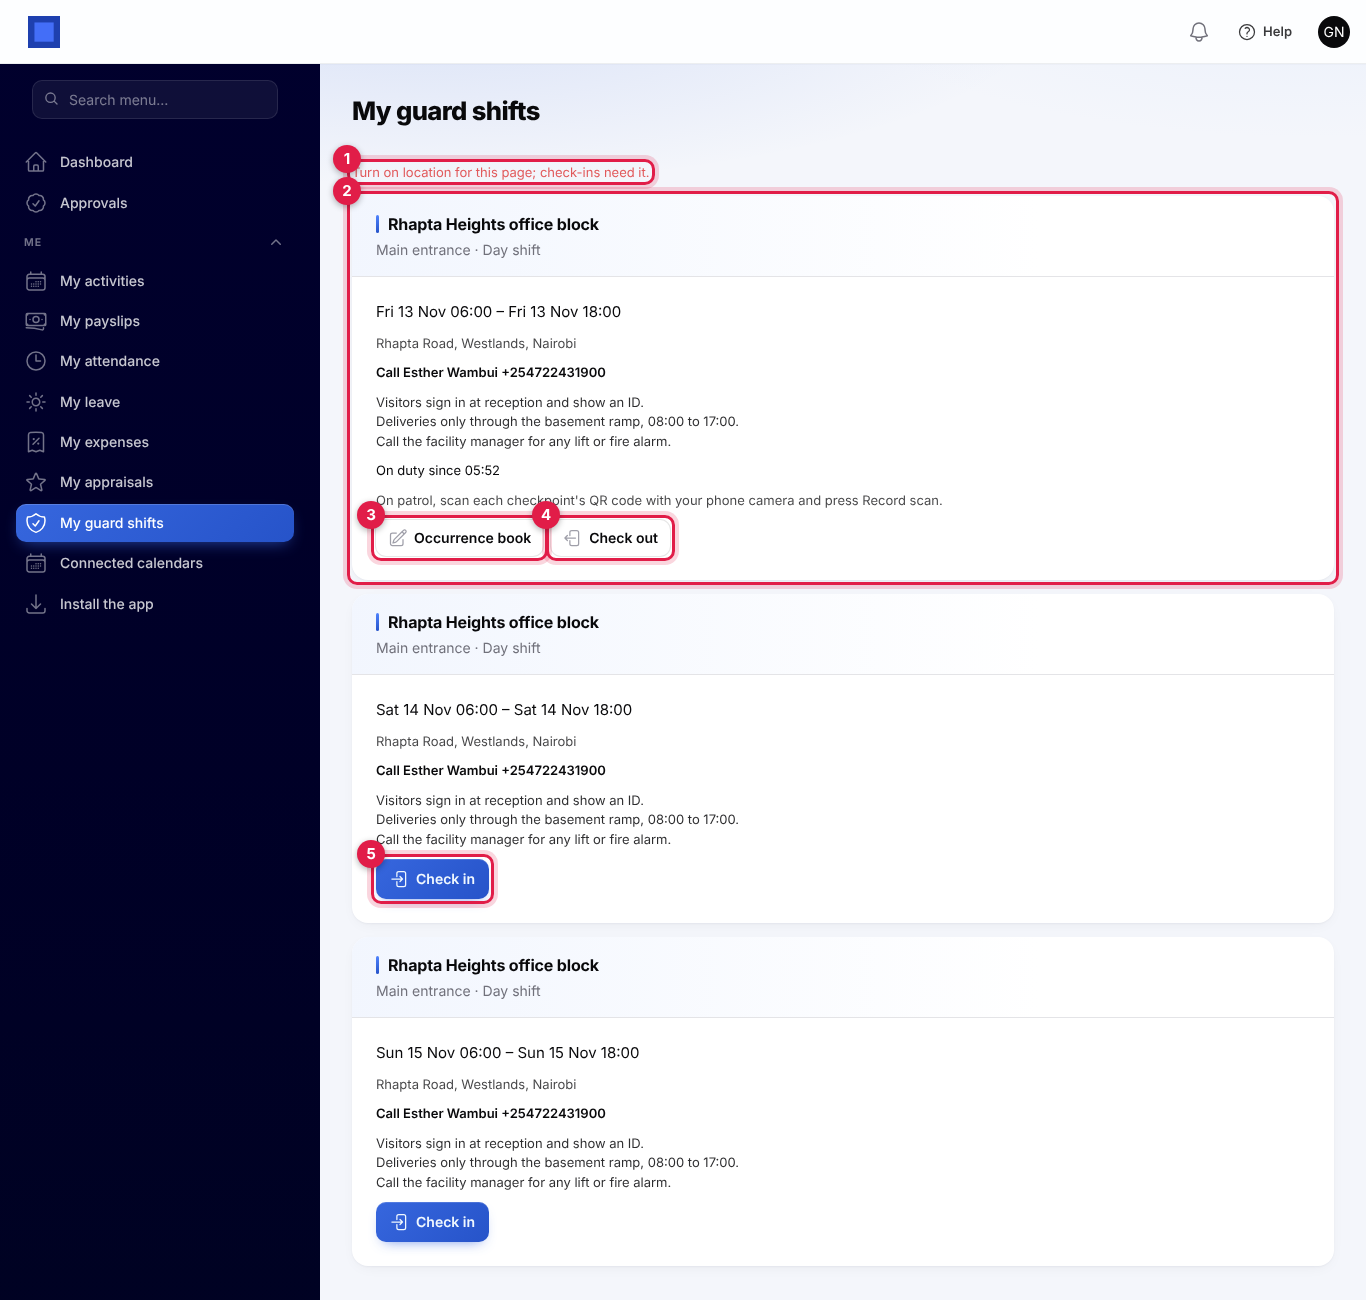
- The line at the top (marker 1) says whether the location was found. "Turn on location for this page; check-ins need it." means the phone is not sharing it.
- Each shift (marker 2) shows the site, post and shift, the times, the address, a button to call the site contact, and the site instructions. The guard sees their own shifts from the last 12 hours to a week ahead.
- Check in (marker 5) records the time and the phone's position. Check-in opens an hour before the shift starts. You then see "Checked in. Have a safe shift.", or "Checked in, 41 minutes late".
- While on duty, the shift shows since when, and whether the guard was late or outside the site. Occurrence book (marker 3) records an entry for that site (see The occurrence book).
- Check out (marker 4) at the end of the shift records the time and position.
What a guard may see when checking in:
| Message | Why |
|---|---|
| You are 420 m from Rhapta Heights office block; check-ins are accepted within 150 m. | Outside the radius, with Refuse check-ins from outside the site radius on. Move closer to the site's point. |
| Share your location to check in; this site only accepts check-ins on site. | The phone did not share its location. |
| Check-in opens 60 minutes before the shift starts, at 05:00. | Too early. |
| This shift has already ended. | Too late to check in. |
With the refuse setting off, a check-in outside the radius is accepted with "You are outside the site; your supervisor can see this." and flagged on the Today board.
Patrols and the patrol report
Scan a checkpoint
On patrol, the guard on duty scans each checkpoint's QR code with the phone camera. The code opens the Patrol checkpoint page in NaliSuite with the checkpoint and site (marker 1). The guard presses Record scan (marker 2); the time and the phone's position are saved and the page says, for example, "Fuel store scanned at 02:05."
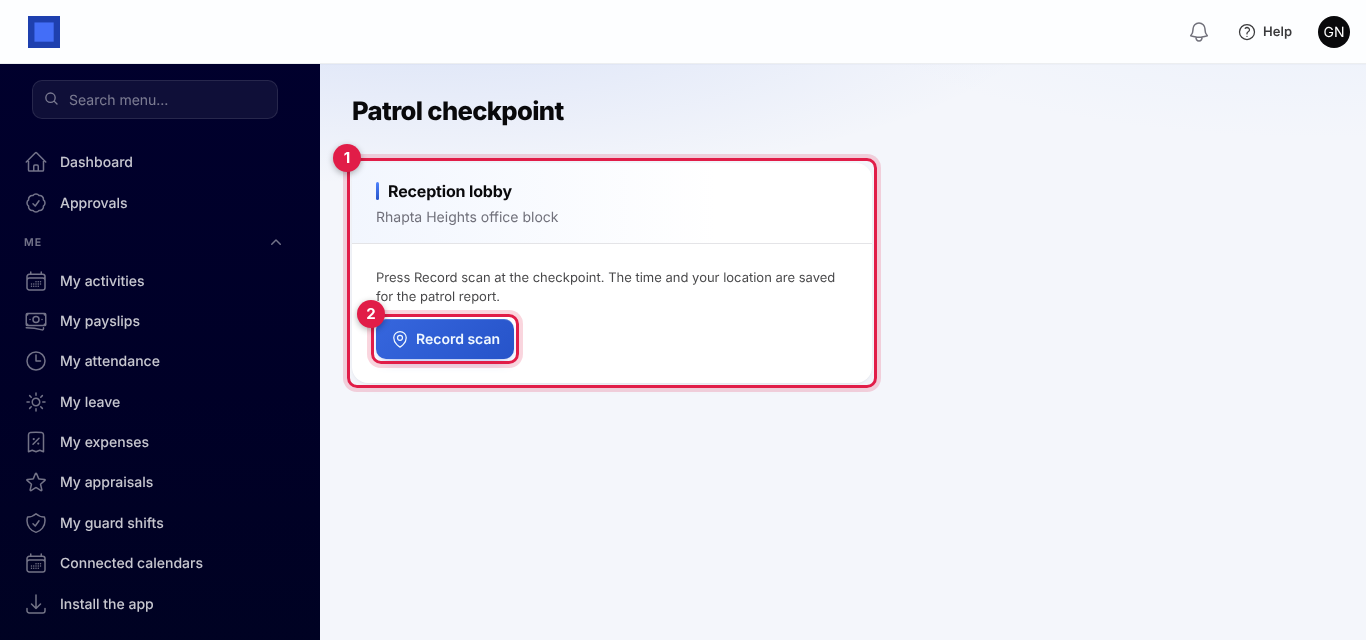
A guard must be checked in at that site to record a scan; otherwise the page says "You are not on duty at … , so this scan cannot be recorded." Supervisors (security.supervise) can scan without a shift, for example to check the route. Two scans of the same checkpoint within five minutes count as one. A replaced or altered code shows "This checkpoint code is not valid".
The patrol report
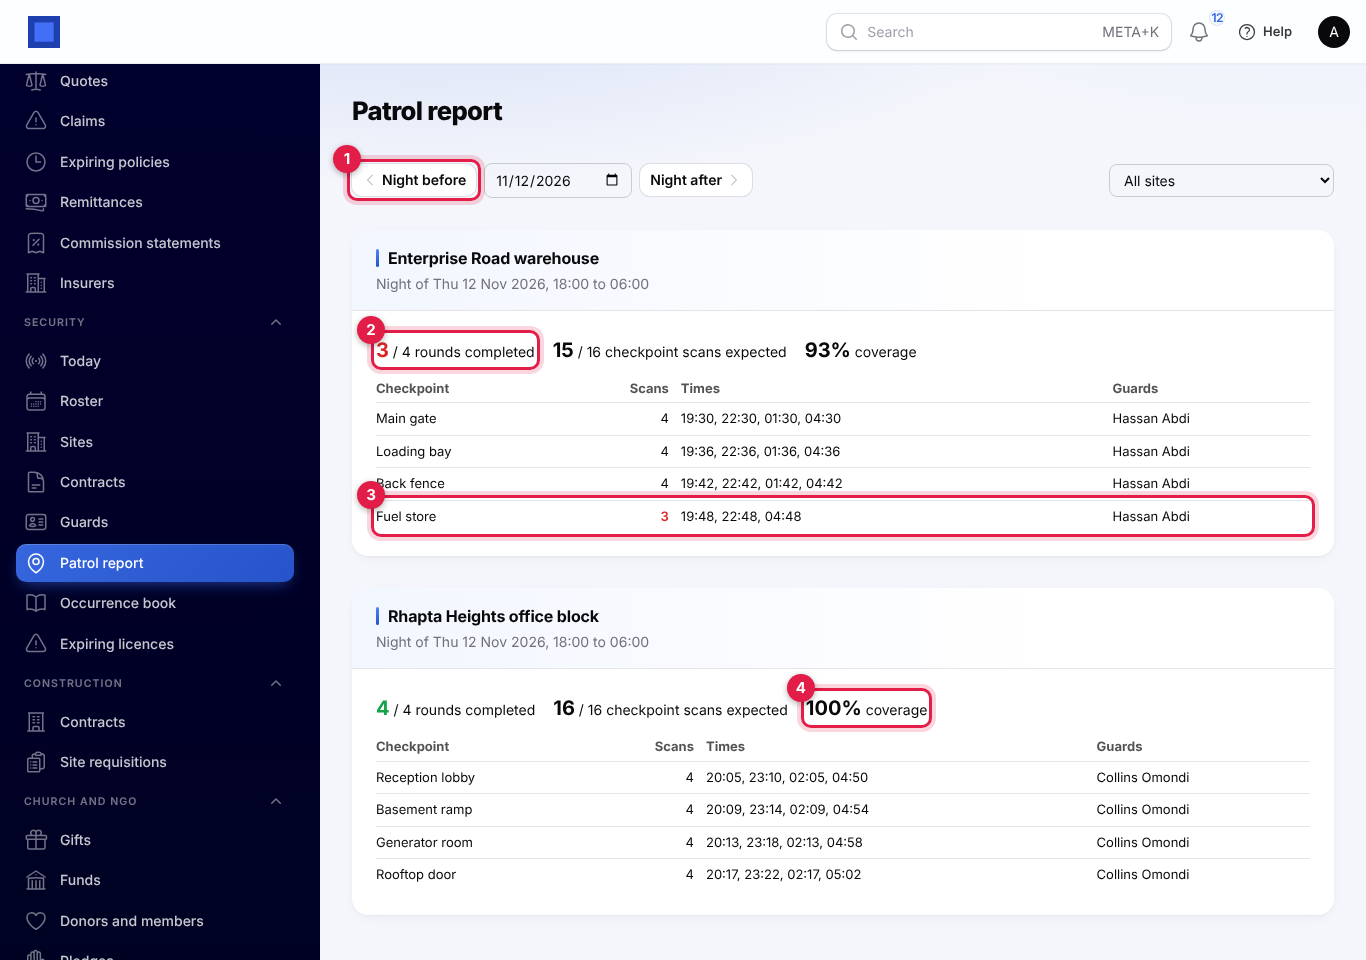
Open Security → Patrol report. It shows last night by default; use Night before (marker 1), the date or Night after to move, and the site list for one site. For each site with checkpoints you see the night (from the start of the site's night shift to its end the next morning, or 18:00 to 06:00 without one) and:
- the rounds completed out of the rounds expected (marker 2), green when all were done and red when not. A round is every checkpoint scanned once, so the rounds completed are the fewest scans of any checkpoint;
- the checkpoint scans made out of those expected (checkpoints × rounds), and the coverage in per cent (marker 4);
- every checkpoint with its number of scans, the times and the guards. A checkpoint scanned fewer times than the rounds expected is in red (marker 3).
The occurrence book
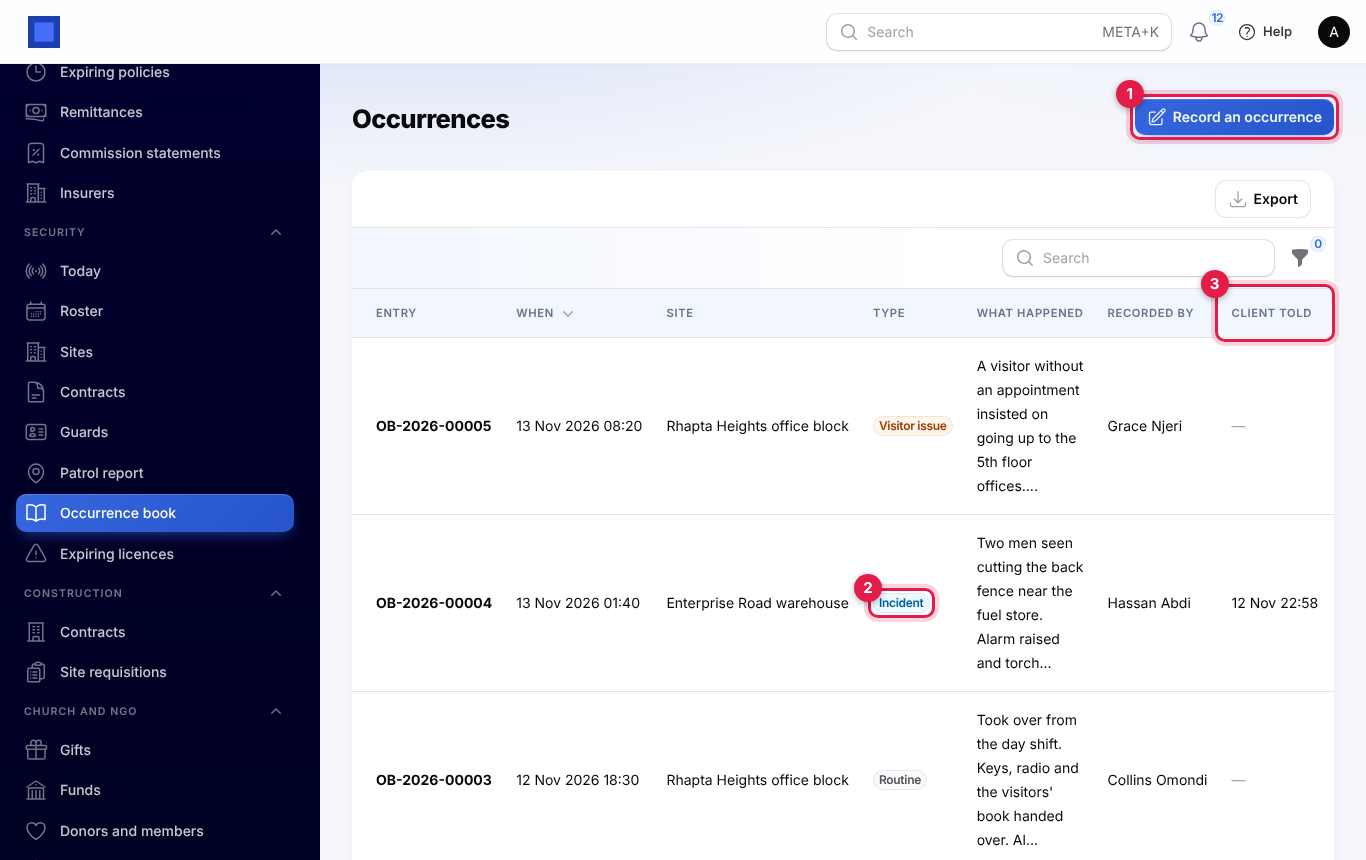
Open Security → Occurrence book. Each entry has a number such as OB-2026-00004, when it happened, the site, the Type (marker 2), what happened, who recorded it and when the Client was told (marker 3). Filter by Type or Site, or search the text.
To record an entry from the office:
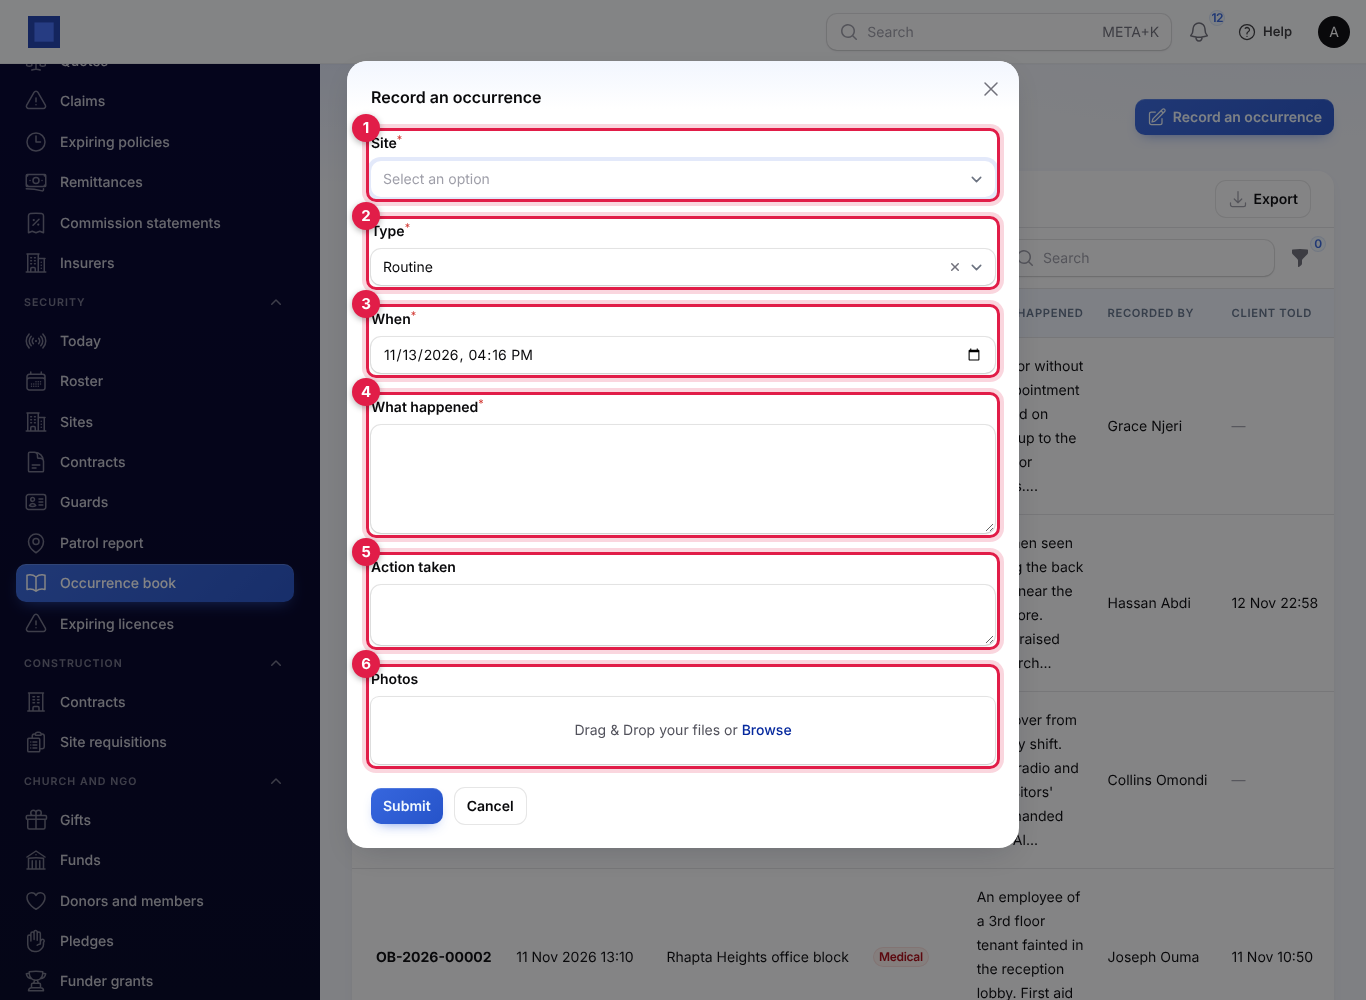
- Click Record an occurrence (marker 1 above).
- Choose the Site (marker 1) and the Type (marker 2): Routine, Incident, Alarm, Visitor issue, Theft, Fire or Medical.
- Check When (marker 3), now by default.
- Describe What happened (marker 4) and the Action taken (marker 5).
- Add up to six Photos (marker 6), 8 MB each at most.
- Click Submit. You see "Entry OB-2026-00006 recorded", and "The client has been told." when it was sent.
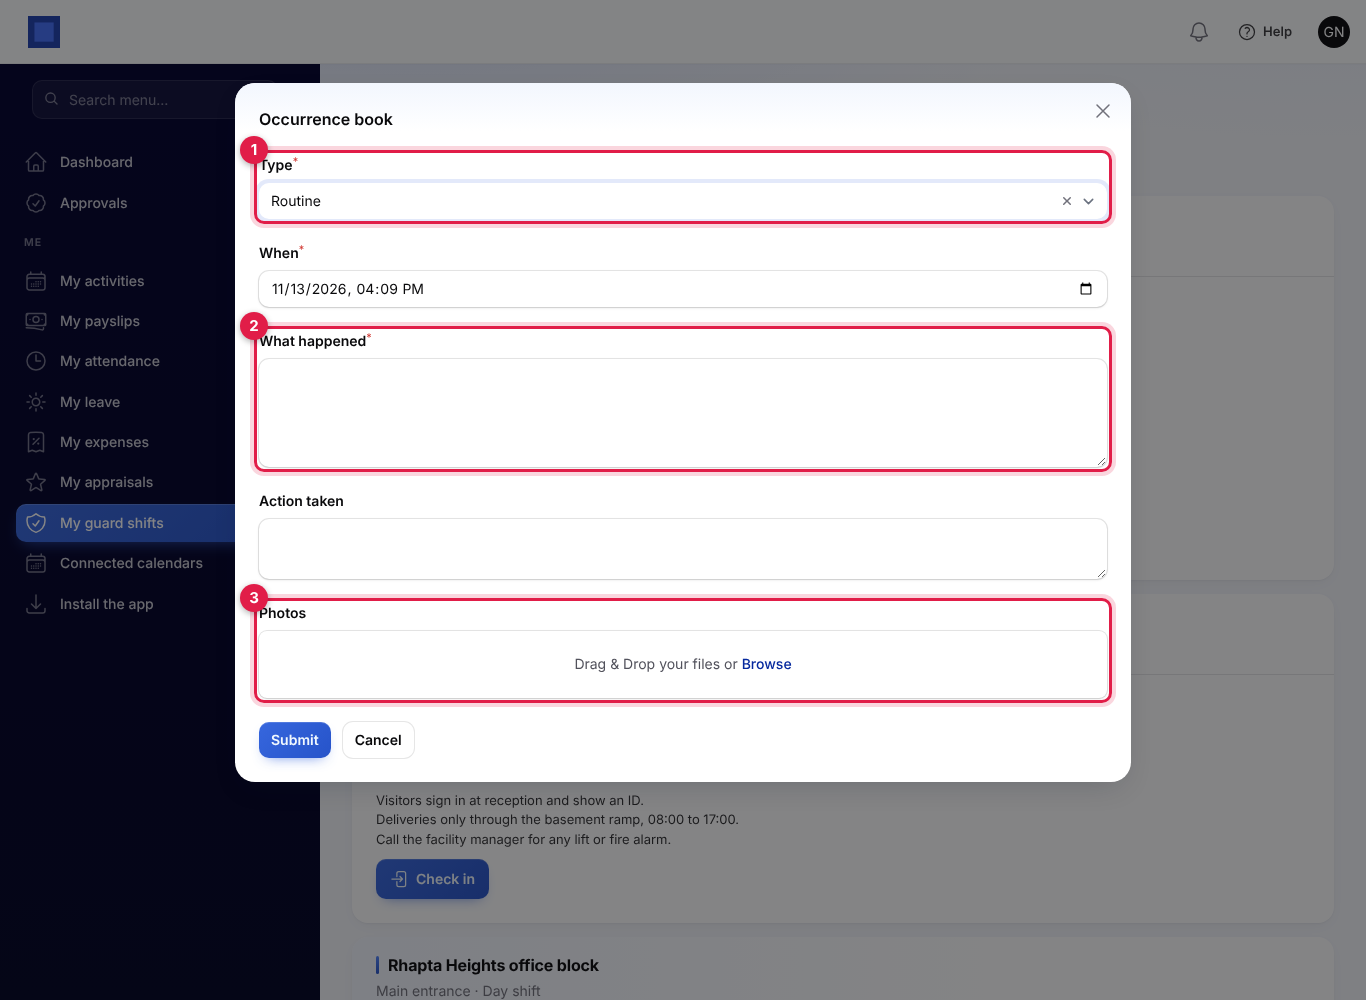
Guards record entries from My guard shifts while checked in: the site and the shift are taken from the shift they are on, so they only choose the Type (marker 1), describe What happened (marker 2), add the action taken and any Photos (marker 3).
Client notifications
Entries of the types ticked in Settings (Incident, Alarm, Theft, Fire and Medical by default) are sent to the client straight away:
- by email to the client's email address, with the site, the time, the entry number, what happened and the action taken;
- by text to the client's mobile (or phone) and to the site contact's phone, when SMS is set up in Marketing.
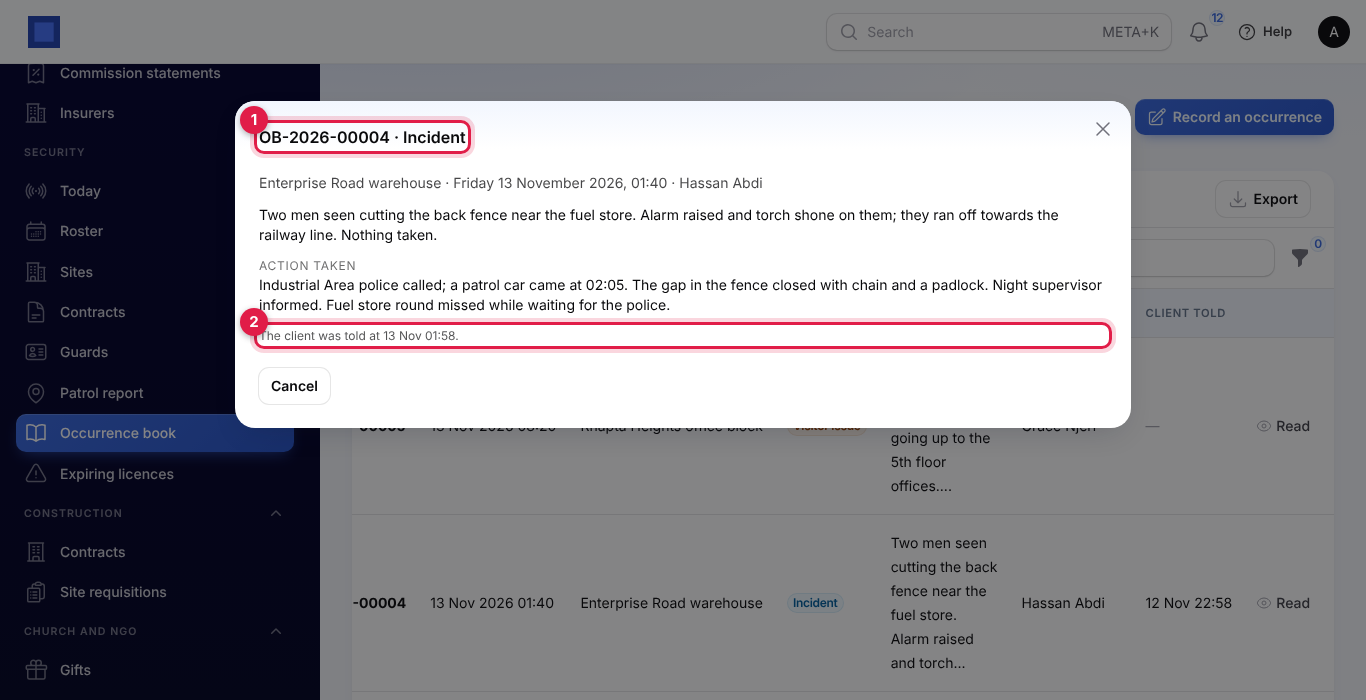
Click Read on an entry to see it in full, with its photos. The heading gives the number and type (marker 1); the last line (marker 2) says when the client was told, or that the entry was not sent.
Photos are stored privately and open only for staff with security.view and for the guard who recorded them.
What clients see in the portal
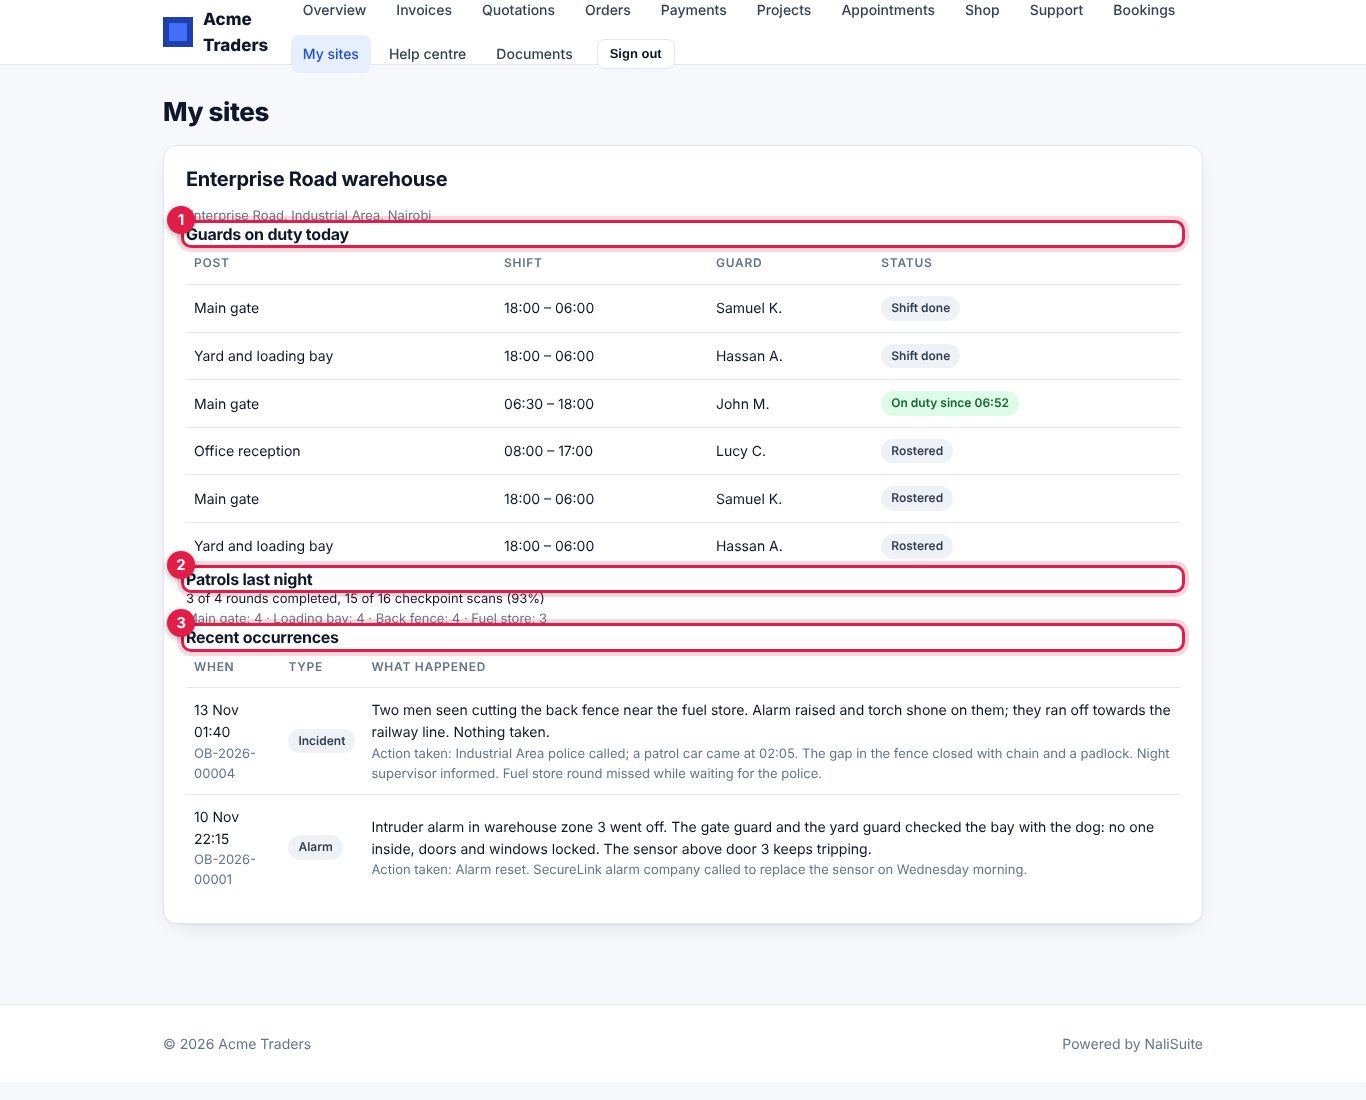
Clients with portal access (see Customer and vendor portal) get a My sites page once they have a site. For each active site they see:
- Guards on duty today (marker 1): each post and shift with the guard's first name and initial and the status: On duty since 06:52, Shift done or Rostered. No-shows are not shown;
- Patrols last night (marker 2): the rounds completed, the checkpoint scans and the coverage, and the scans per checkpoint;
- Recent occurrences (marker 3): up to ten entries from the last 30 days, with the action taken.
Permissions and what a guard sees
| Permission | What it allows |
|---|---|
| security.view | See Sites, Contracts, Guards, the Occurrence book, the Patrol report and Expiring licences, read entries and their photos. |
| security.supervise | Open Roster and Today: roster guards, copy last week, send relief, confirm on duty, mark no-shows; record occurrences from the office; scan checkpoints without a shift. |
| security.manage | Add and change sites, posts, guarding needs, checkpoints and their codes, contracts and rates, and guards; print the QR sheet; Invoice this month. |
| security.guard | Me → My guard shifts: check in and out, record occurrences on their own shift, and scan checkpoints while on duty. |
Owners and admins have all four; the member role has security.view.
Set up a guard's login. Under Settings → Roles, create a role such as Guard with only security.guard (see Workspace settings). Add the guard as a user with that role, then on their HR employee record choose that user as the Login account. My guard shifts appears only for a user who has the permission and is linked to a guard.
What a guard can see: only their own shifts, from the last 12 hours to a week ahead, with the site's address, contact and instructions; the occurrence book for the shift they are on; the patrol checkpoint page when they scan a code; and their own HR self-service pages (see Employee self-service). What a guard cannot see: the roster, the Today board, sites, contracts, other guards, the occurrence book of other shifts, the patrol report or any invoice. Opening those pages is refused, and a guard cannot check in for anyone else's shift.
Good to know
What time zone is used? Your company's time zone (Settings → Companies). Shift hours, roster days, the Today board, the patrol night and invoice months all follow it.
Can a guard work a day and the following night? Only if the rest between the shifts is at least the minimum in Settings. With the default of 8 hours, a 06:00–18:00 day shift cannot be followed by an 18:00 night shift the same day.
Why is a shift deducted when a guard was there? A shift counts as covered only when the guard checked in (on the phone or with Confirm on duty). Confirm guards without phones on the Today board so their shifts are billed.
A printed QR card was copied. Click New code on the checkpoint and print the sheet again; the old card stops working.
The client did not get an incident alert. Check that the type is ticked in Settings, that the client has an email address, and for texts that SMS is set up in Marketing and the client or site contact has a phone number. The Client told column stays empty when nothing was sent.
Can I bill a contract for the current month? Yes, choose this month in Invoice this month. Per-shift contracts count the shifts covered so far, and uncovered shifts are deducted only once they have ended. The month cannot be invoiced again afterwards.