Employee self-service: the Me menu and the My work app
Every employee who signs in to NaliSuite has a Me group at the top of the left menu with pages about themselves: My payslips, My attendance, My leave, My expenses, My appraisals and, for new starters, My onboarding. Staff use them to download payslips and the tax deduction card, request leave and see their balance, check in and out, claim expenses with a receipt photo, tick off their onboarding tasks and complete their appraisals. The same pages install on a phone as a separate app called My work. This page is written for employees and for the HR officer or owner who sets them up.
What HR needs to set up first
The Me pages show only for a person whose user account is linked to an employee record:
- Invite the person under Settings → Users (they receive an email to set a password and confirm their email address). A member role is enough; they do not need any HR or payroll permission to see their own pages.
- Open HRM → Employees, edit the person and, on the Person tab, choose their user in Login account. Click Save changes. See HR.
- Share the My work link with them (see Install the My work app).
Which pages appear also depends on the apps you use: My payslips needs Payroll; the other pages need HR; My onboarding appears only while the person has onboarding or leaving tasks; My appraisals also shows for any manager who has appraisals to review. My activities (your follow-ups across the system) and My jobs (for field technicians, see Field service) live in the same group.
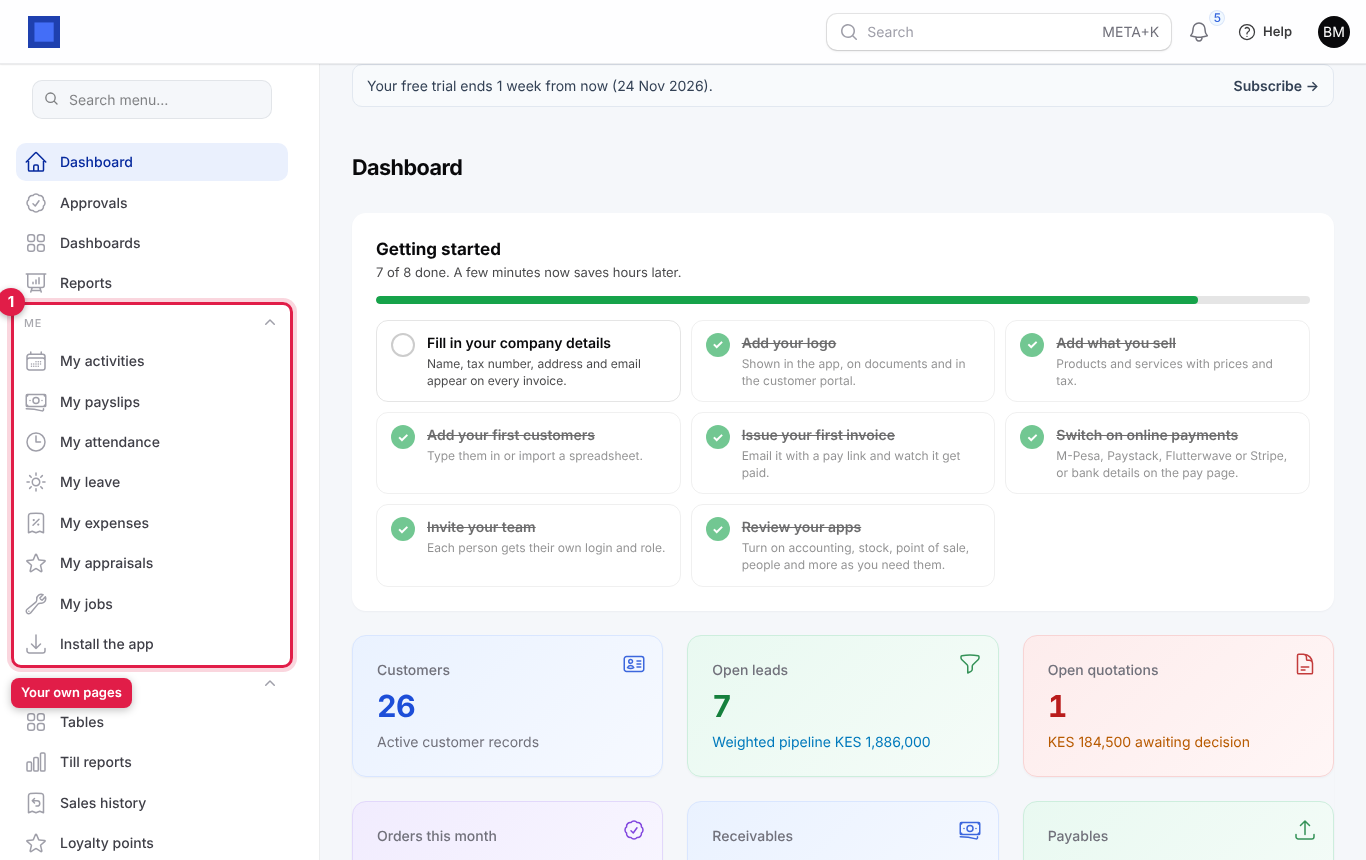
Privacy: each employee only ever sees their own payslips, leave, attendance, claims and appraisals. Nothing on these pages shows other people's pay.
My payslips
Open Me → My payslips. Every payslip from an approved or paid pay run is listed with the period, pay date, payslip number, gross pay, deductions, Net pay (marker 3) and whether the run is Approved or Paid. Draft pay runs are not shown.
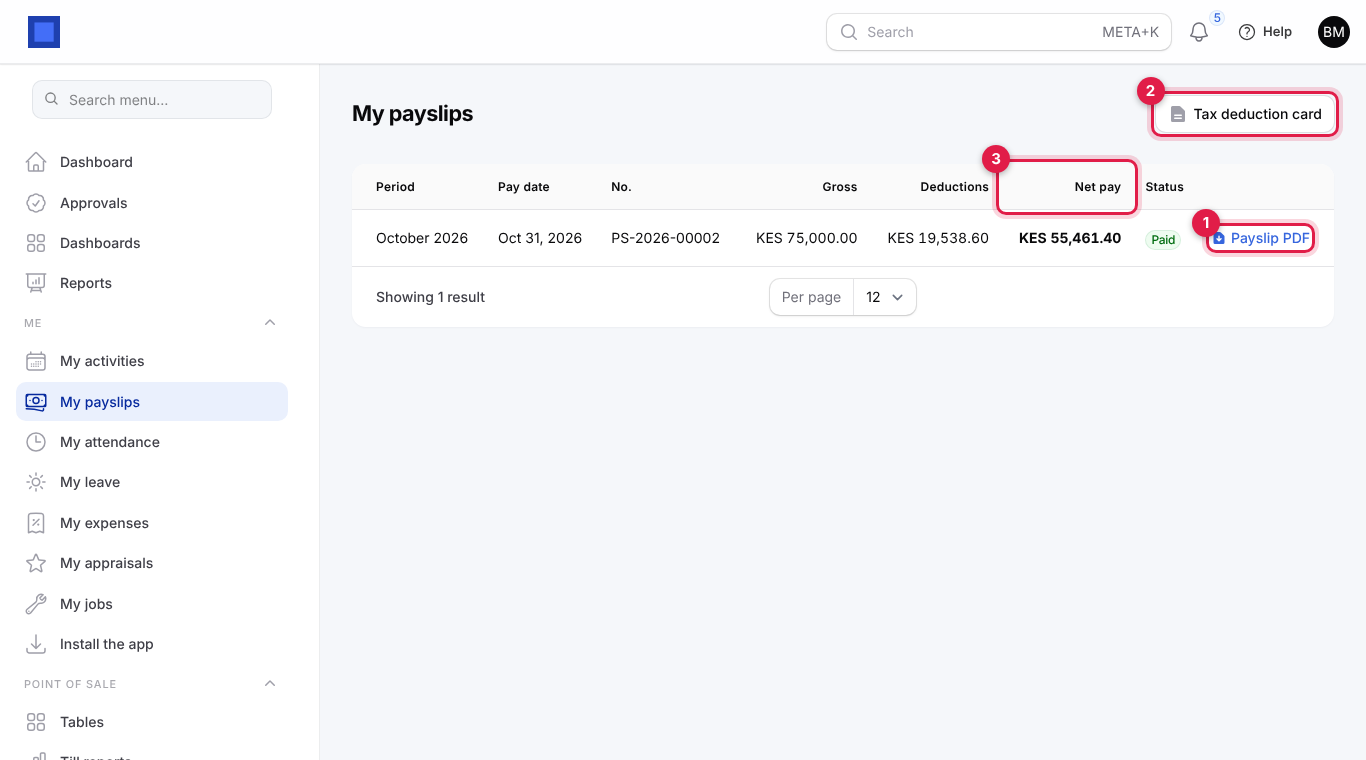
- Click Payslip PDF (marker 1) on a row to open or save the payslip. It shows your earnings, allowances, benefits in kind, each deduction (tax, pension, health, levy, loan instalments, SACCO and so on) and net pay.
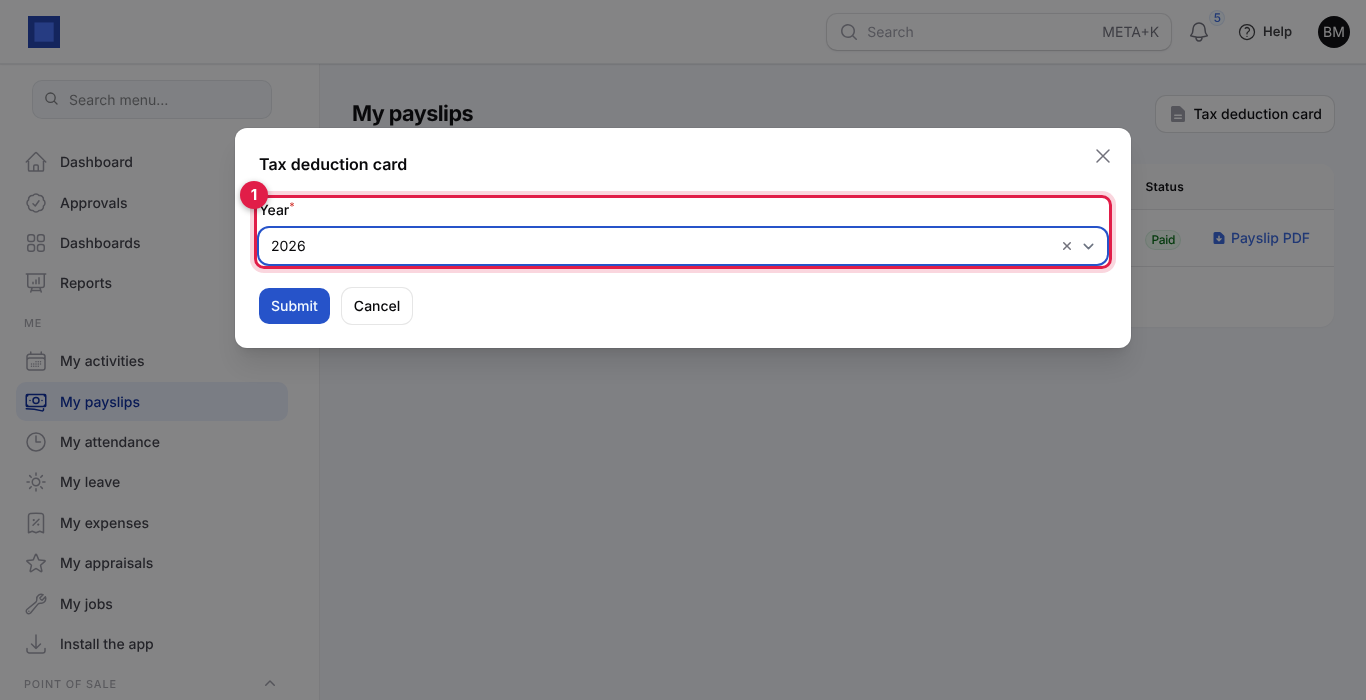
- Click Tax deduction card (marker 2), choose the Year and click Submit to download your annual tax deduction card (the P9 in Kenya), which you need for your yearly tax return.
Your employer may also email your payslip as a PDF or send a summary on WhatsApp when the pay run is approved.
My leave
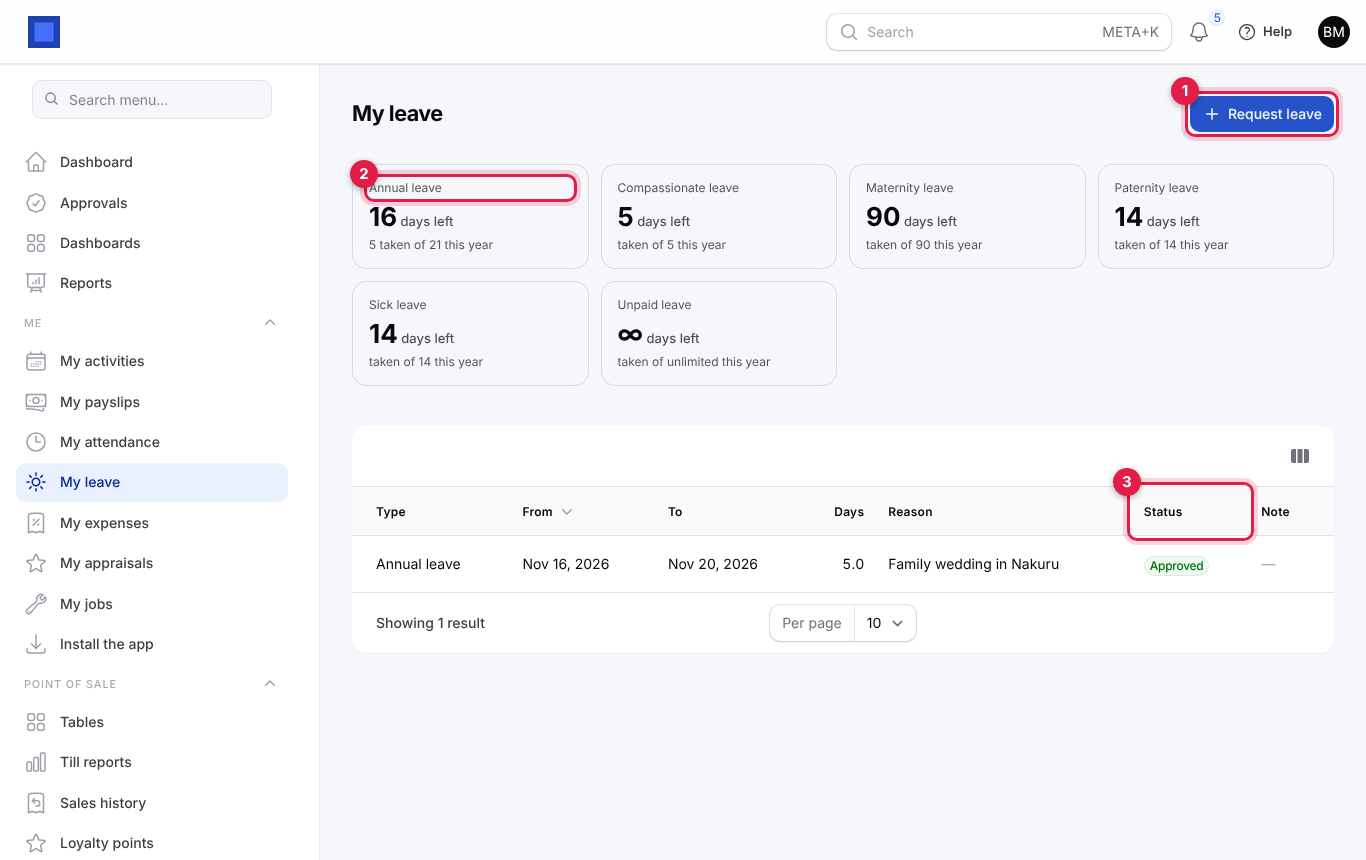
Open Me → My leave. At the top there is a card for each leave type (marker 2) with the days left this year in large figures and taken of … this year under it. Leave types with no yearly limit show ∞ days left (unlimited). Your past and upcoming requests are listed below with their dates, days, reason and Status (marker 3), plus the approver's Note if they left one.
Request leave
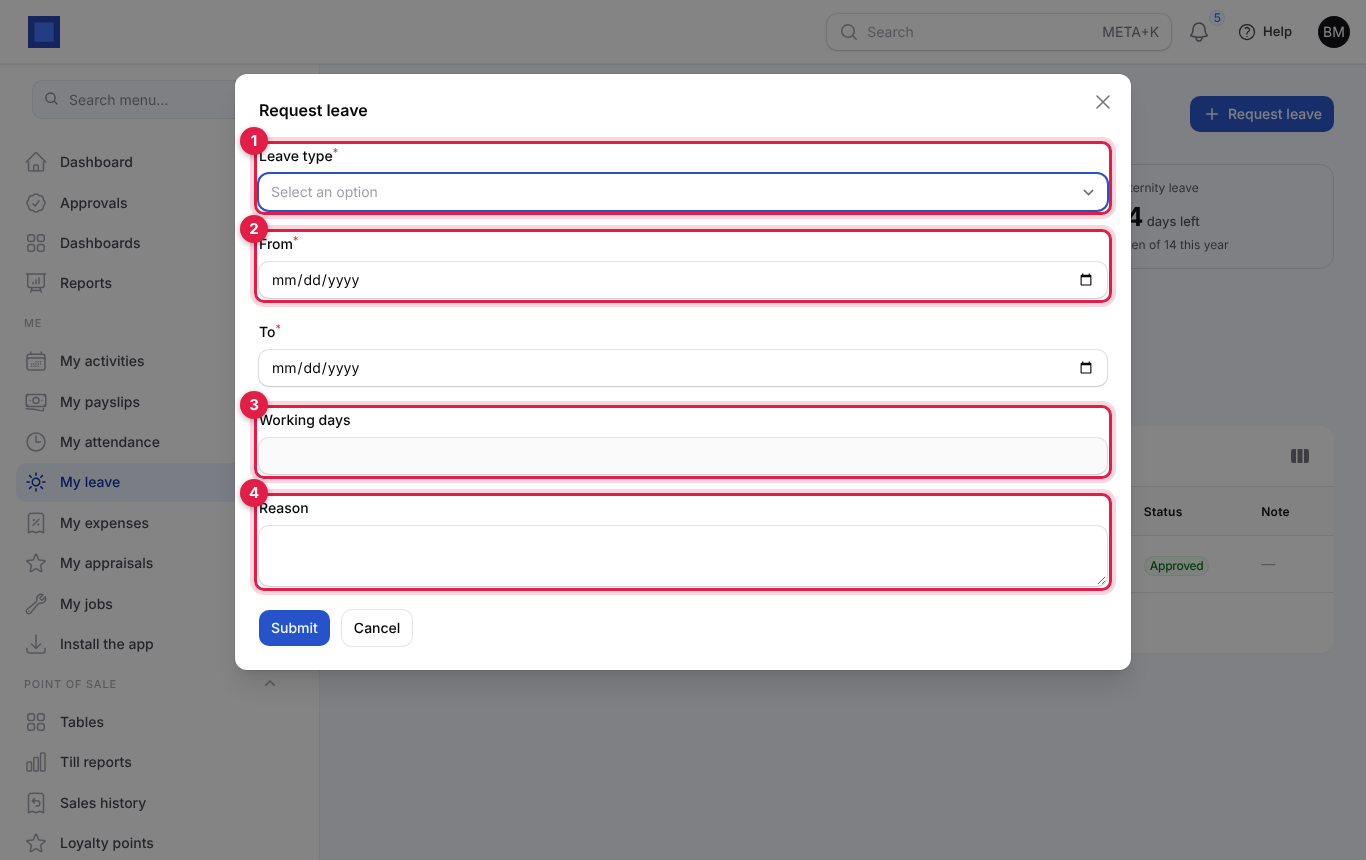
- Click Request leave (marker 1).
| Field | What to enter |
|---|---|
| Leave type (required, marker 1) | Annual, sick, compassionate… |
| From, To (required, marker 2) | Your first and last day away, inclusive. |
| Working days (marker 3) | Worked out for you: weekdays between the dates, without public holidays. If you need a half day, ask HR to adjust it. |
| Reason (marker 4) | Optional, for example Family wedding in Nakuru. |
- Click Submit. You see Request sent for approval (or Leave recorded for a leave type that does not need approval).
What happens next: HR or your manager approves or rejects it under HRM → Leave. The status changes from Pending to Approved or Rejected, with any note they add. Approved days come off your balance at once. If you ask for more days than you have left, the request is refused with a message saying how many days remain.
Statuses: Pending (waiting), Approved, Rejected, Cancelled.
My expenses
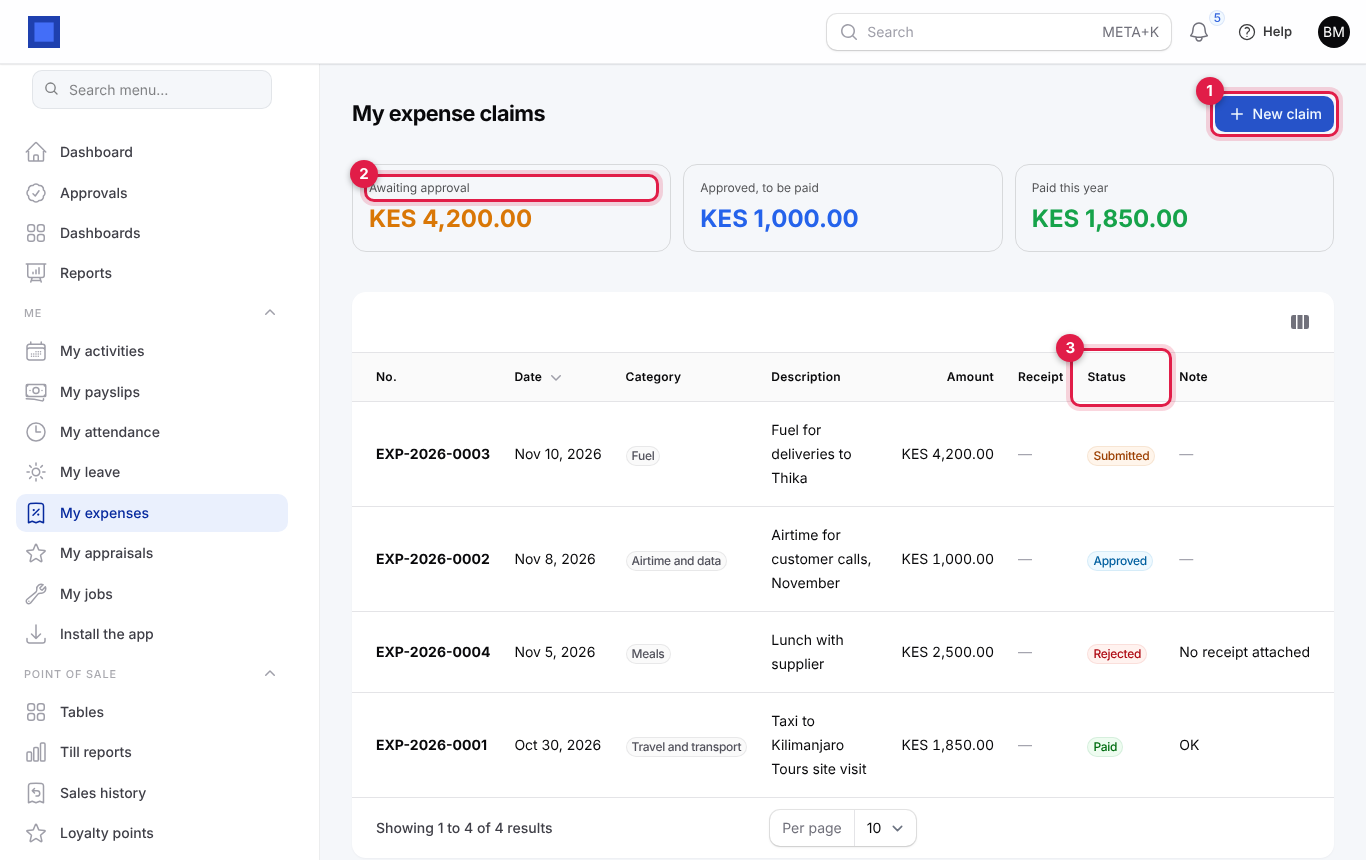
Open Me → My expenses (the page is titled My expense claims). Three totals sit at the top: Awaiting approval (marker 2), Approved, to be paid and Paid this year. Each claim is listed with its number (EXP-2026-0001…), date, category, description, amount, a link to the receipt, Status (marker 3) and the approver's Note.
Claim an expense
- Click New claim (marker 1).
| Field | What to enter |
|---|---|
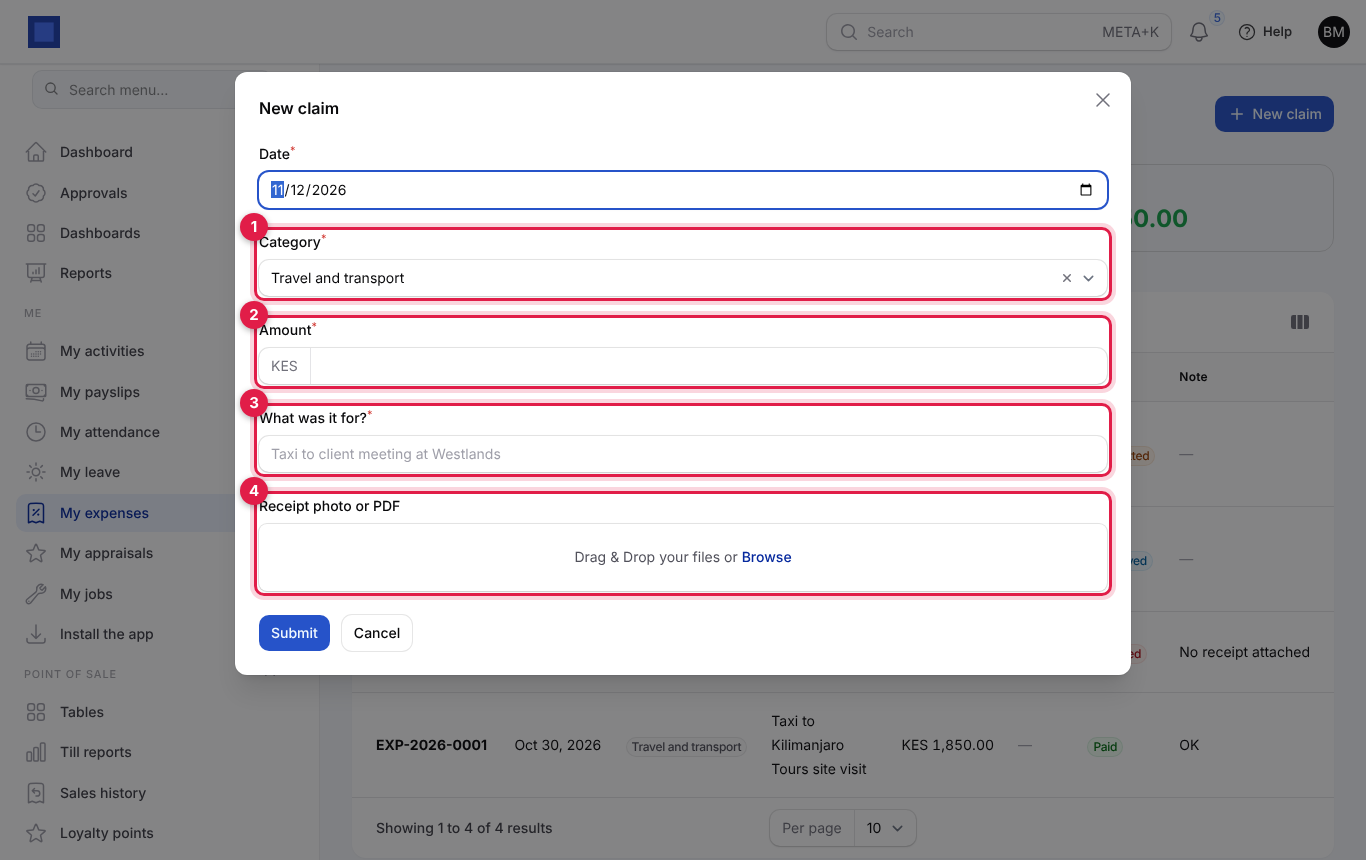
| Date (required) | When you spent the money. It cannot be in the future. |
| Category (required, marker 1) | Travel and transport, Meals, Accommodation, Airtime and data, Supplies, Fuel or Other. |
| Amount (required, marker 2) | What you paid, in your company's currency. |
| What was it for? (required, marker 3) | For example Taxi to client meeting at Westlands. |
| Receipt photo or PDF (marker 4) | Take a photo of the receipt with your phone or upload a PDF (up to 8 MB). Claims with a receipt are approved faster. |
- Click Submit. You see Claim EXP-2026-0005 submitted, and everyone who approves expense claims is notified.
Statuses: Submitted (waiting for approval) → Approved (to be paid; you are notified) or Rejected (you are notified with the reason) → Paid (reimbursed). Payment is usually made with salaries or by M-Pesa; the finance team marks the claim paid.
My attendance
Open Me → My attendance to check in when you arrive and check out when you leave. The left card shows today's date and your status; the right card (marker 2) shows This month: days present, how many were late and hours worked. Your daily records (in, out, hours, status and how late) are listed below.
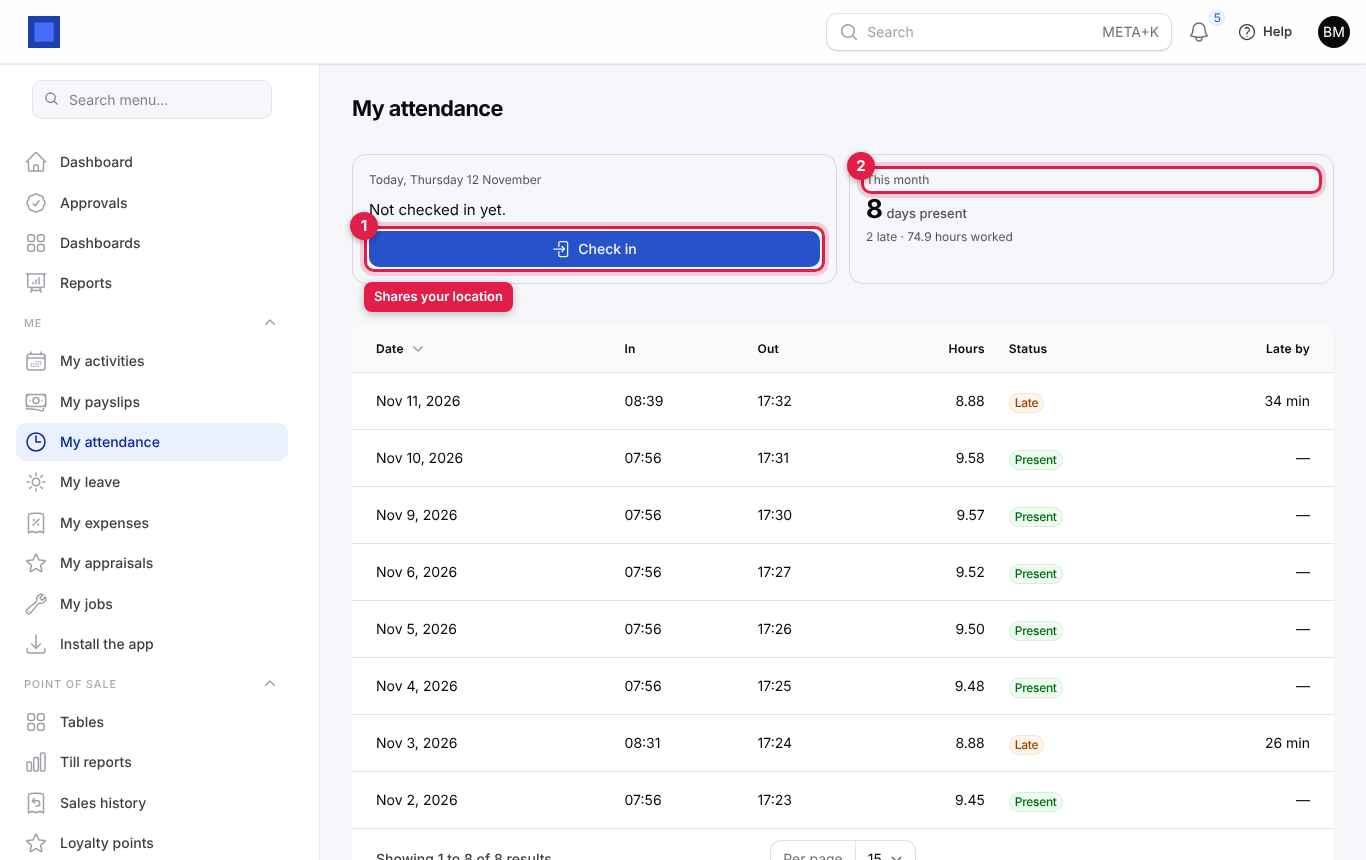
- When you arrive, click Check in (marker 1). Allow the browser to share your location when asked. You see Checked in. Have a good day. or Checked in, 12 minutes late.
- When you leave, click Check out (it replaces Check in). You see Checked out after 8.5 hours.
- After checking out, the card shows your times and hours for the day.
Note: If your employer has set a workplace geofence, you can only check in from inside it. Outside, you see a message such as You are 1,240 m from the workplace; check-ins are accepted within 200 m. Turn on your phone's location (GPS) and try again at work. If you clock in on a fingerprint reader instead, your records appear here after HR imports them.
Lateness counts from the working day start set by your employer plus a grace period (for example 08:00 + 15 minutes).
My onboarding
New starters see Me → My onboarding while their joining checklist is open (and leavers while their leaving checklist is open). It lists every task with who does it (You, HR or Manager), the due date (red when overdue) and when it was done. At the top, a progress bar shows how many tasks are done, with the hint Tick off the items marked "You"; HR and your manager handle the rest.
Click Done on a task marked You (for example Bank or mobile money details entered for payroll or Handover notes written and shared) when you have finished it. HR sees your progress on your employee record.
Note: The demo employee used for these screenshots had no open checklist, so this page is not pictured. HR's side of the checklist is shown in HR.
My appraisals
Open Me → My appraisals to see your reviews and, if you are a manager, the reviews you have to give. Each row shows the cycle and its due date, Who (Me for your own, or the employee's name), the Status (marker 1) and the overall Rating once complete. The text at the top reminds you: Rate each goal from 1 (below expectations) to 5 (outstanding). Your reviewer rates the same goals after you; the weighted average is the overall rating.
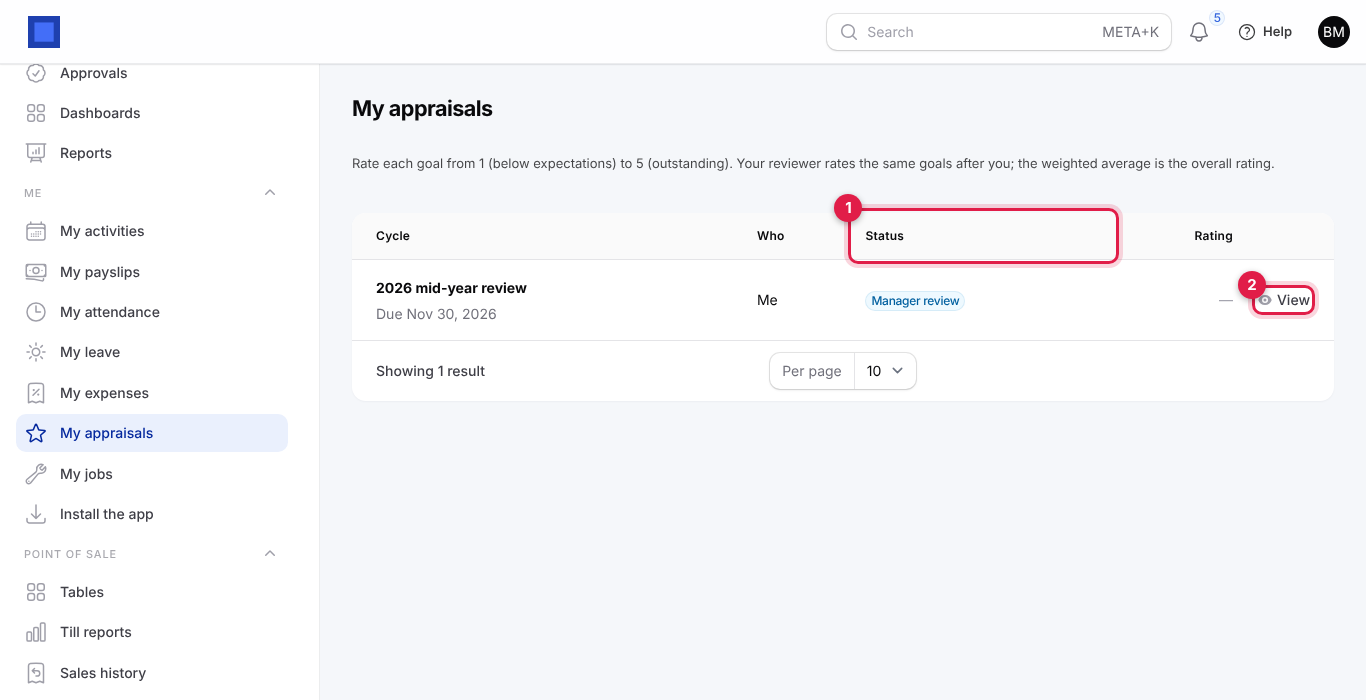
The buttons on a row depend on its status:
- Self-review (on your own appraisal while it is in Self review and the cycle is open): for every goal choose Your rating from 1 · Below expectations to 5 · Outstanding, write What went well, what you want to improve, and click Submit. The appraisal moves to Manager review and your reviewer is notified.
- Review (managers, on a team member's appraisal): rate each goal, add a comment per goal and an overall comment, and click Submit. The appraisal is Completed and the employee is notified.
- View (marker 2): read the whole appraisal, with self and manager ratings.
- PDF: download a completed appraisal.
If colleagues have asked for your 360° feedback, a Give feedback (n) button appears at the top. Click it, pick the Colleague, rate each goal from 1 to 5, add a comment and click Submit. You see Thank you, feedback recorded.
Statuses: Self review → Manager review → Completed.
Install the My work app
The Me pages install on a phone as an app called My work, with its own icon, opening straight on the employee's pages (on My payslips, or My leave when Payroll is off).
- The owner or HR opens Me → Install the app. The My work (staff self-service) box (marker 1) shows the link to share, for example
https://acme.nalisuite.com/me.
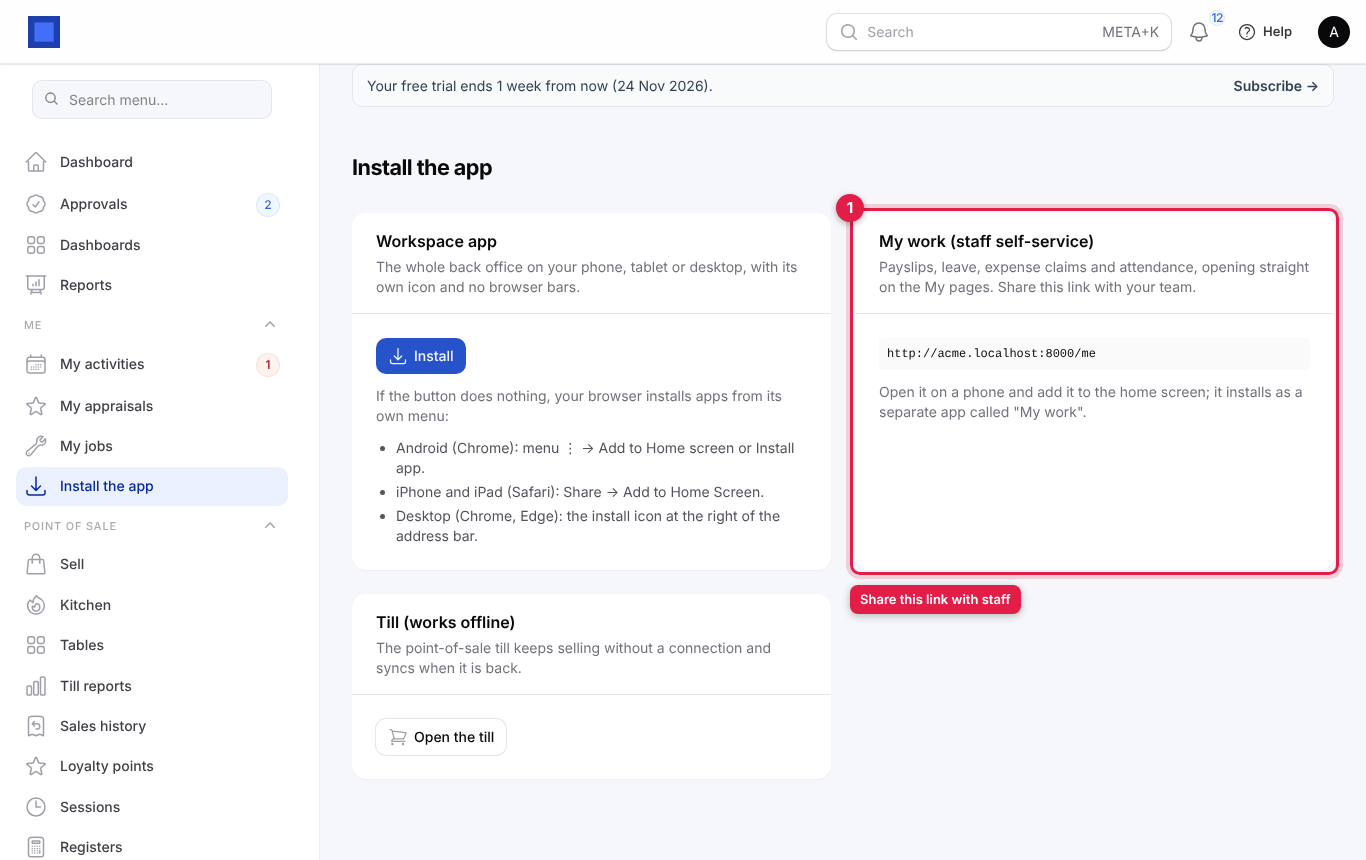
- Send the link to staff by WhatsApp, SMS or email.
- Each employee opens the link on their phone and signs in, then adds it to the home screen:
- Android (Chrome): menu ⋮ → Add to Home screen or Install app.
- iPhone and iPad (Safari): Share → Add to Home Screen.
- Desktop (Chrome, Edge): the install icon at the right of the address bar.
The same page has the Workspace app (the whole back office) and, for cashiers, the offline Till. See Installing the apps.
Common questions
I cannot see the Me pages. Your login is not linked to your employee record yet. Ask HR to set Login account on your record.
My payslip for this month is not there. Payslips appear when the pay run is approved. Draft runs are not shown.
My leave balance looks wrong. Monthly-accrual leave builds up through the year, so early in the year you have fewer days. Carry-over from last year is capped. HR can explain the rules for each leave type.
Check in says I am too far from the workplace. Your phone's location is outside the geofence, or location sharing is blocked in the browser. Allow location for the site and try again from work.
Can I edit or cancel an expense claim? Not once it is submitted. Ask the approver to reject it and submit a corrected one.
I forgot to check in. Ask HR to add the record under HRM → Attendance → Record manually.