Dairy Cooperative Milk Collection
Dairy Cooperative Milk Collection is for dairy cooperatives and milk processors that buy milk from smallholder farmers. You register your member farmers on their collection routes, set the price you pay per litre (with extra pay for butterfat if you like), and record every can of milk at the collection centre, morning and evening. Milk that fails the lactometer test is rejected and never paid. Each farmer can get a text receipt, feeds and other items can be given on store credit, and once a month you prepare a payout that takes off the cooperative levy, share contributions and store credit before paying each farmer by M-Pesa. Farmers can follow their own milk in the customer portal.
It is in the Dairy group of the left menu: Farmers, Milk prices, Collections, Store credit and Payouts.
Note: There are three permissions. dairy.view lets someone see every Dairy page. dairy.collect is for clerks at the collection centre: together with dairy.view it lets them record milk, but not change farmers, prices, store credit or payouts. dairy.manage registers farmers, sets prices, gives store credit, prepares and approves payouts and downloads the payment file. Owners and admins have all three; the member role has dairy.view. Set permissions under Settings → Roles.
Switch it on
Dairy is a marketplace add-on. It needs the Contacts app. It works on its own, and does more when these apps are on:
- Purchases: approved payouts become supplier bills, ready to pay.
- Inventory: accepted milk goes into stock.
- Marketing with an SMS provider: farmers get a text receipt for every delivery.
- Customer portal: farmers see their milk online.
- Open Settings → Marketplace and type Dairy in the Search add-ons… box (marker 1).
- On the Dairy Cooperative Milk Collection card (marker 2), click Start free trial (or Add to subscription) and confirm. The Dairy group appears in the menu.
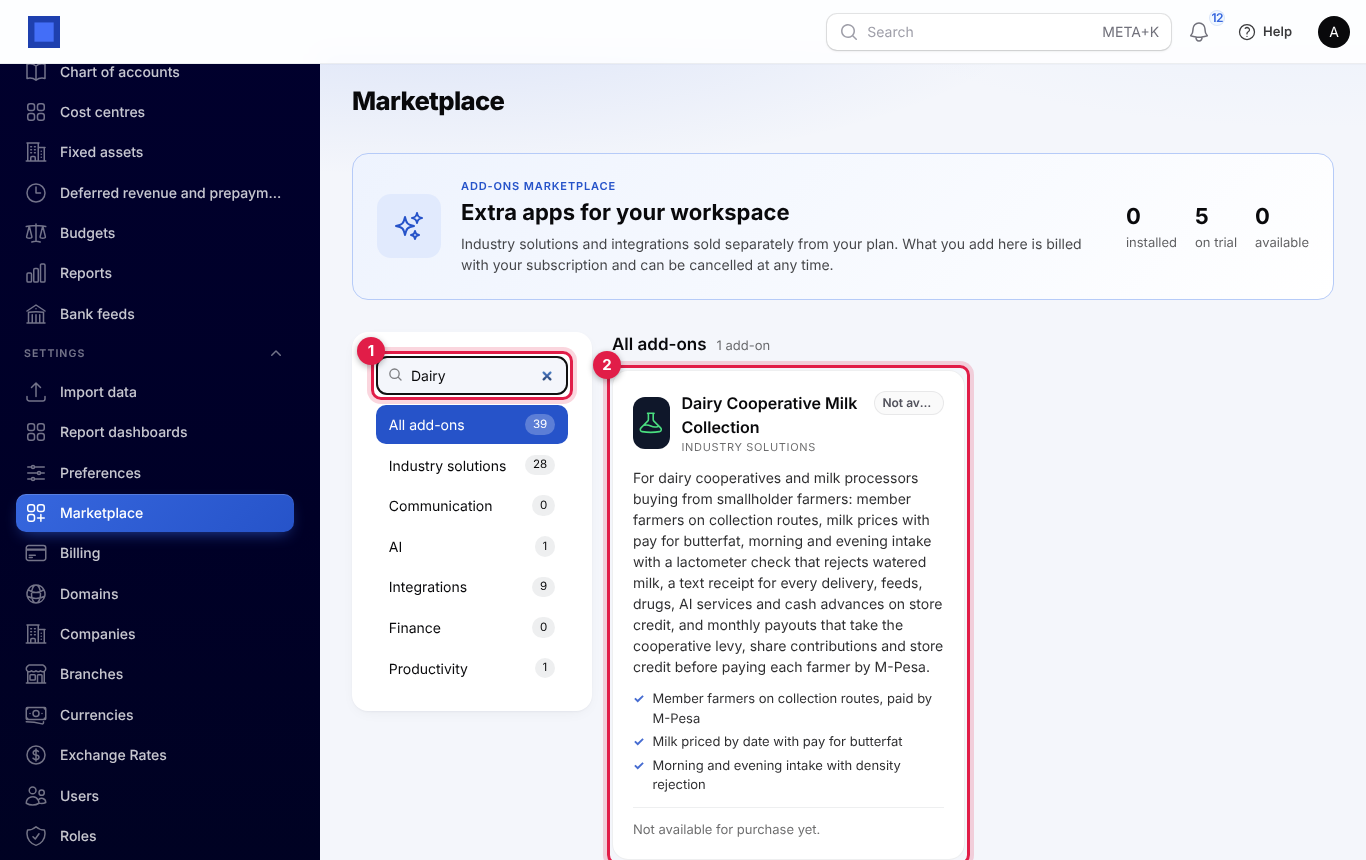
If the card says Not available for purchase yet (as in the screenshot), the add-on has not been priced for your plan: ask NaliSuite support to switch it on. See Billing and marketplace.
Dairy settings
Set these before you record any milk, because the levy, shares and density test use them.
- Open Settings → Preferences and click the Dairy tab (marker 1).
- Fill in the fields below and click Save preferences (marker 8).
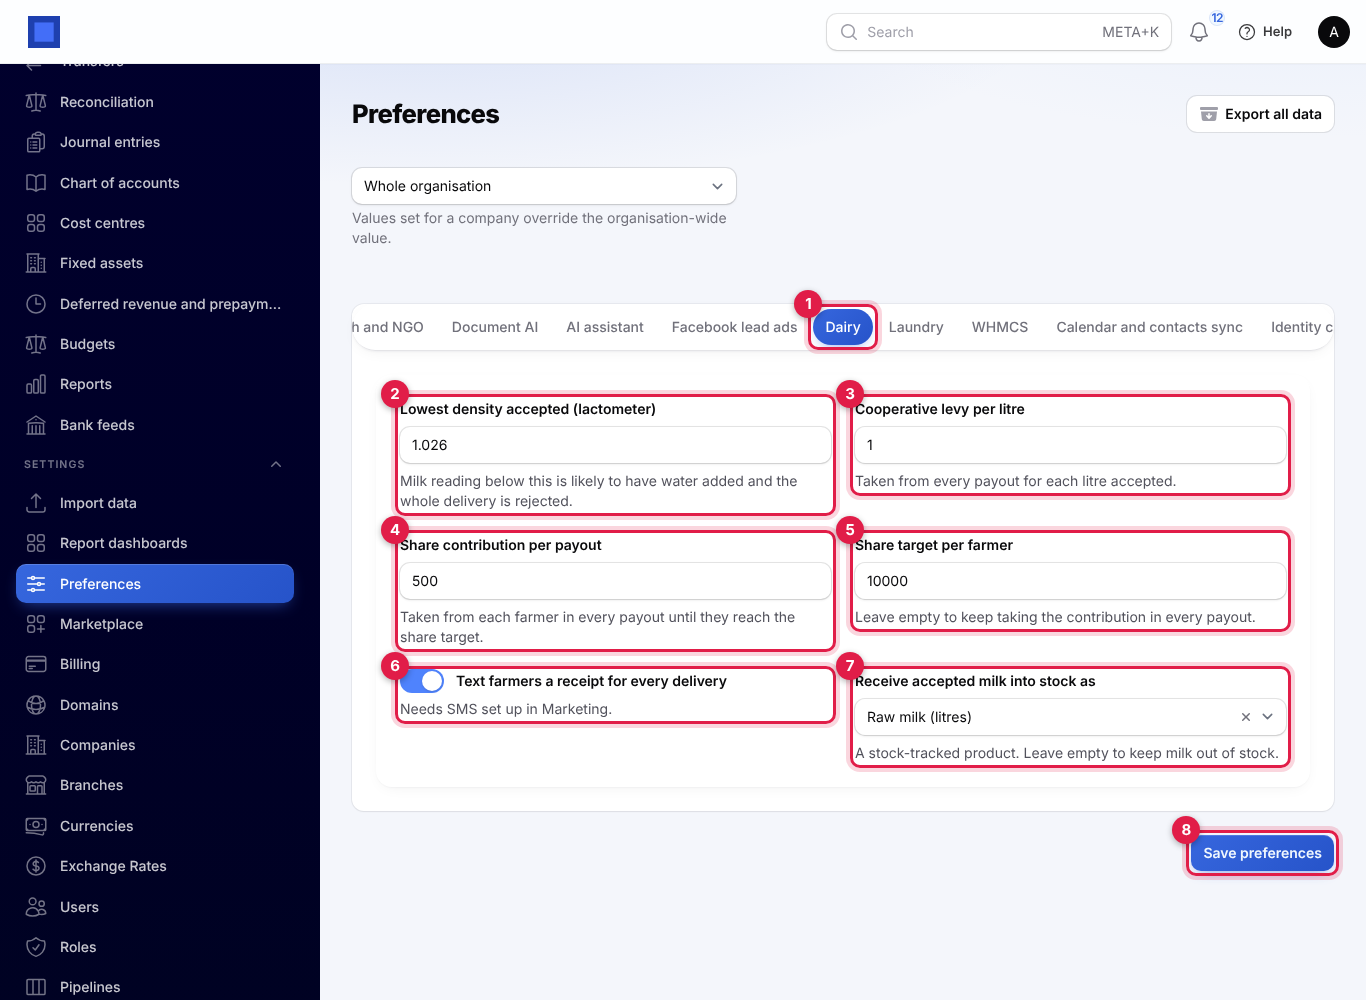
| Setting | Default | What it does |
|---|---|---|
| Lowest density accepted (lactometer) (marker 2) | 1.026 | Milk that reads below this probably has water added, and the whole delivery is rejected. Enter it as a density between 1 and 1.1, for example 1.026. |
| Cooperative levy per litre (marker 3) | 0 | Taken from every payout for each litre accepted. For example 1 takes KES 1 a litre. |
| Share contribution per payout (marker 4) | 0 | Taken from each farmer in every payout towards their shares in the cooperative. |
| Share target per farmer (marker 5) | empty | Once a farmer's shares paid reach this, the contribution stops. Leave it empty to keep taking the contribution in every payout. |
| Text farmers a receipt for every delivery (marker 6) | On | Sends the receipt text described in Text receipts. Needs SMS set up in Marketing. |
| Receive accepted milk into stock as (marker 7) | empty | A stock-tracked product, for example "Raw milk (litres)". Shown only when Inventory is on. Leave it empty to keep milk out of stock. |
The dropdown at the top of Preferences lets one company use different values from the rest of the organisation.
Register farmers and routes
Every farmer is a contact in NaliSuite with a member number such as DF-00001. Registering a farmer also marks the contact as a vendor, so the cooperative can pay them.
- In the menu, open Dairy → Farmers.
- Click Register a farmer (marker 1).
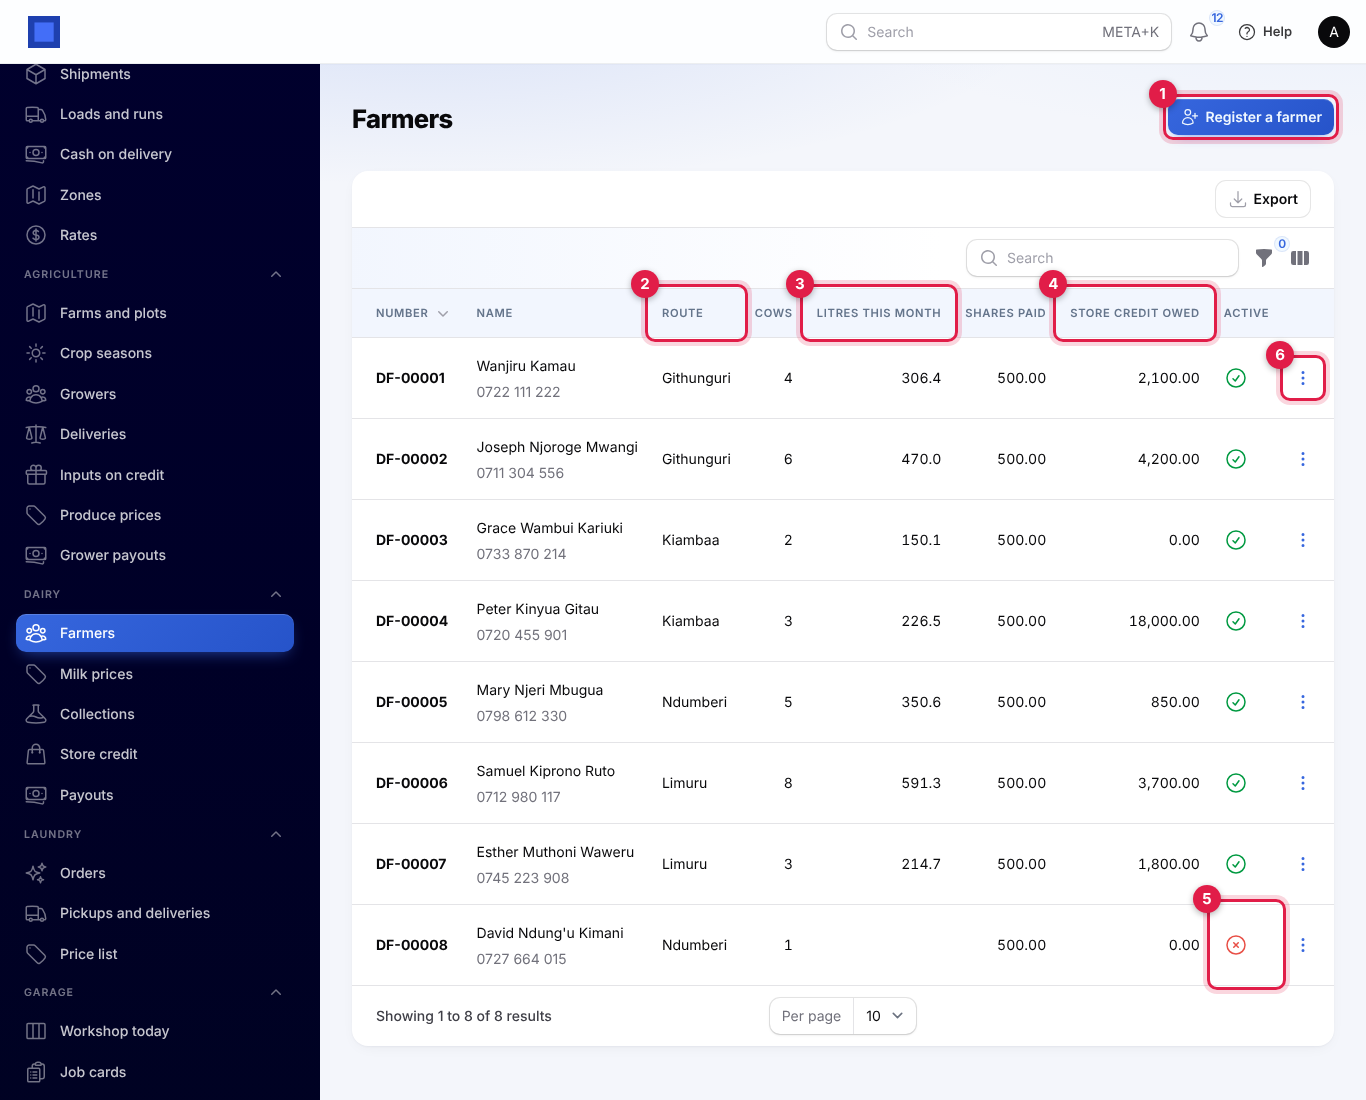
- Fill in the window:
- Existing contact (marker 1): pick the farmer if they are already in your contacts. Or leave it empty and fill in the next fields for someone new.
- Name (marker 2): needed when you did not pick a contact.
- Payout phone (M-Pesa) (marker 3): the number their payouts and receipts go to. If you leave it empty for an existing contact, their mobile (or phone) is used.
- National ID (marker 4): saved on the new contact.
- Collection route or centre (marker 5): for example Githunguri or Kiambaa. Type the same name for every farmer on a route, so you can filter by it.
- Number of cows (marker 6): optional.
- Click Submit. You see, for example, "Wanjiru Kamau registered as DF-00001". A contact can be registered only once.
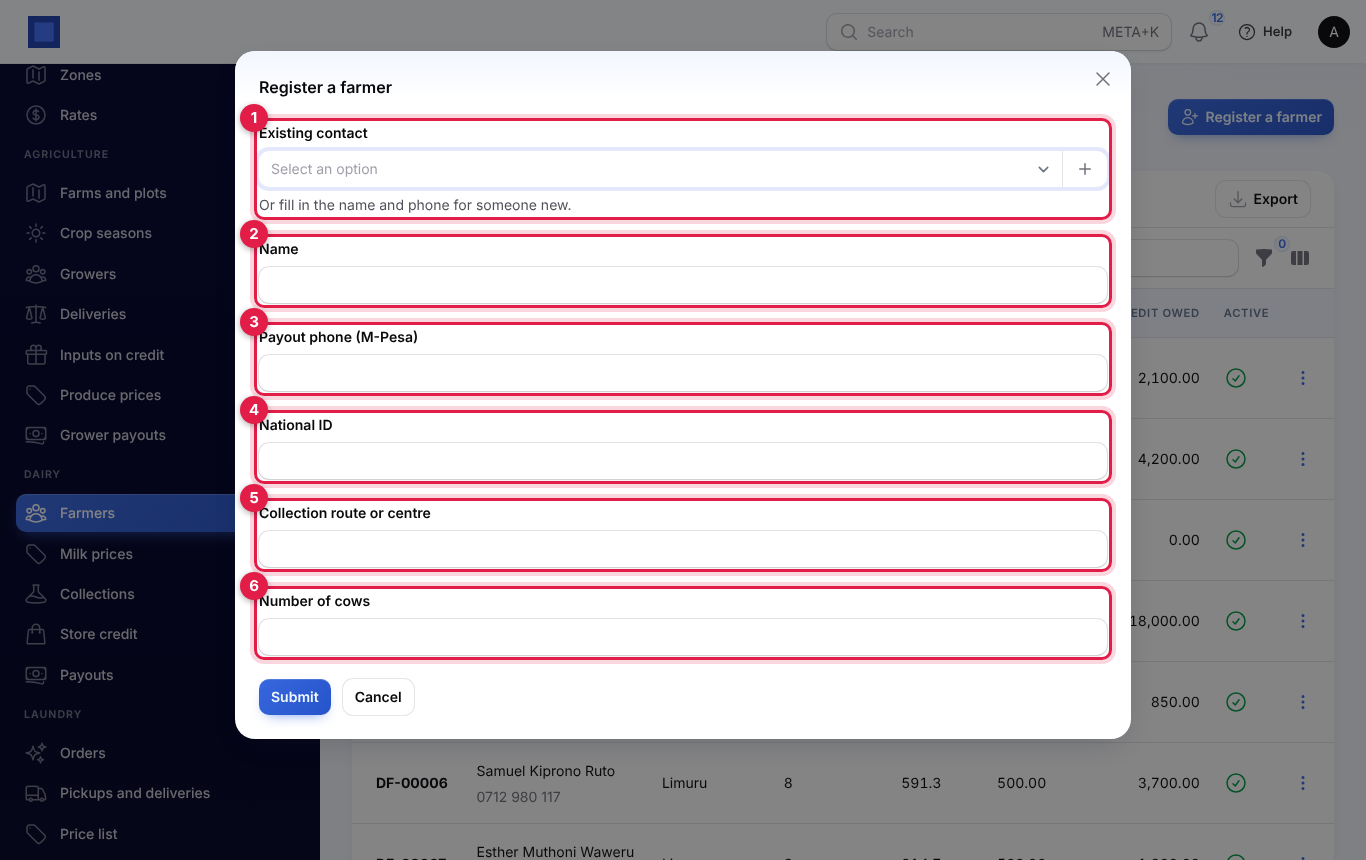
The list shows each farmer's Route (marker 2), the Litres this month accepted so far (marker 3), the Shares paid to date and the Store credit owed (marker 4). Use the filter icon to show one Route, or only active farmers.
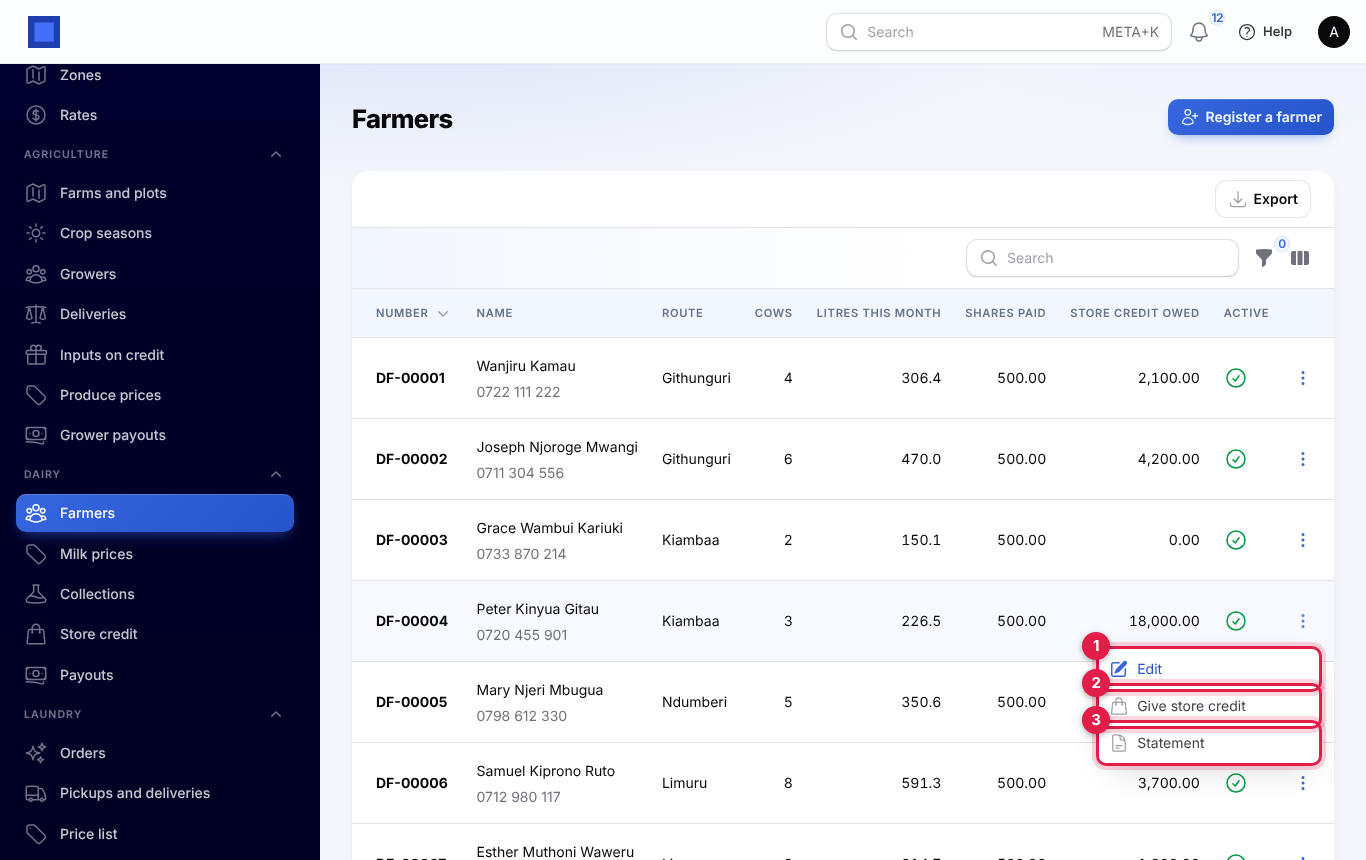
To change a farmer, click ⋮ at the end of their row (marker 6) and then Edit (marker 1 in the next picture). You can change the route, payout phone and number of cows, and switch Active off when a farmer stops delivering. An inactive farmer (marker 5 in the list) cannot be chosen when recording milk, but their history and payouts stay.
Set milk prices with butterfat pay
A delivery is paid at the latest price that had started by its date. You never overwrite a price: add a new one from the day it changes, and older deliveries keep the price they were recorded at.
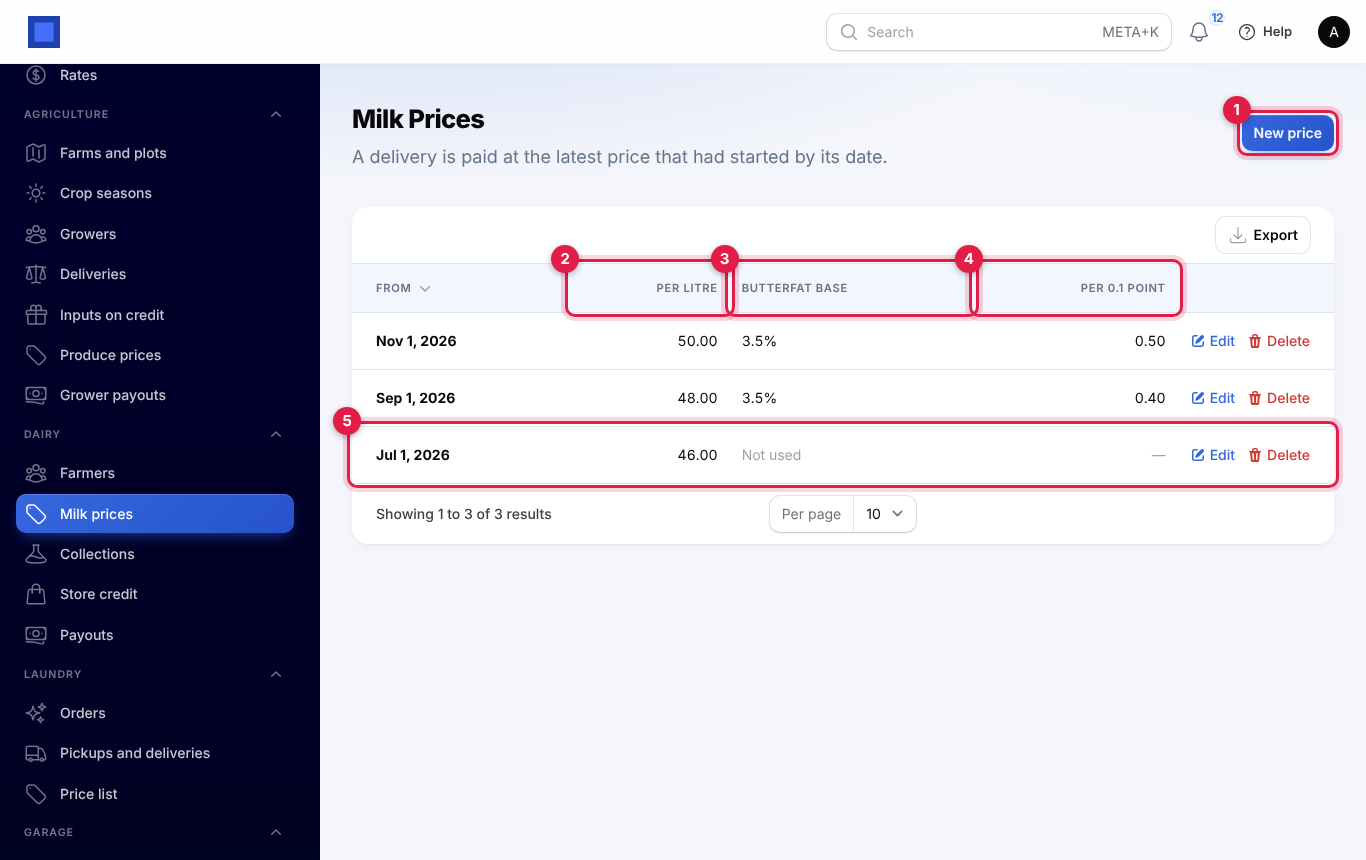
- Open Dairy → Milk prices and click New price (marker 1). The list shows each price's base Per litre (marker 2), the Butterfat base (marker 3) and the change Per 0.1 point (marker 4). A price without butterfat pay shows Not used (marker 5).
- Fill in the form:
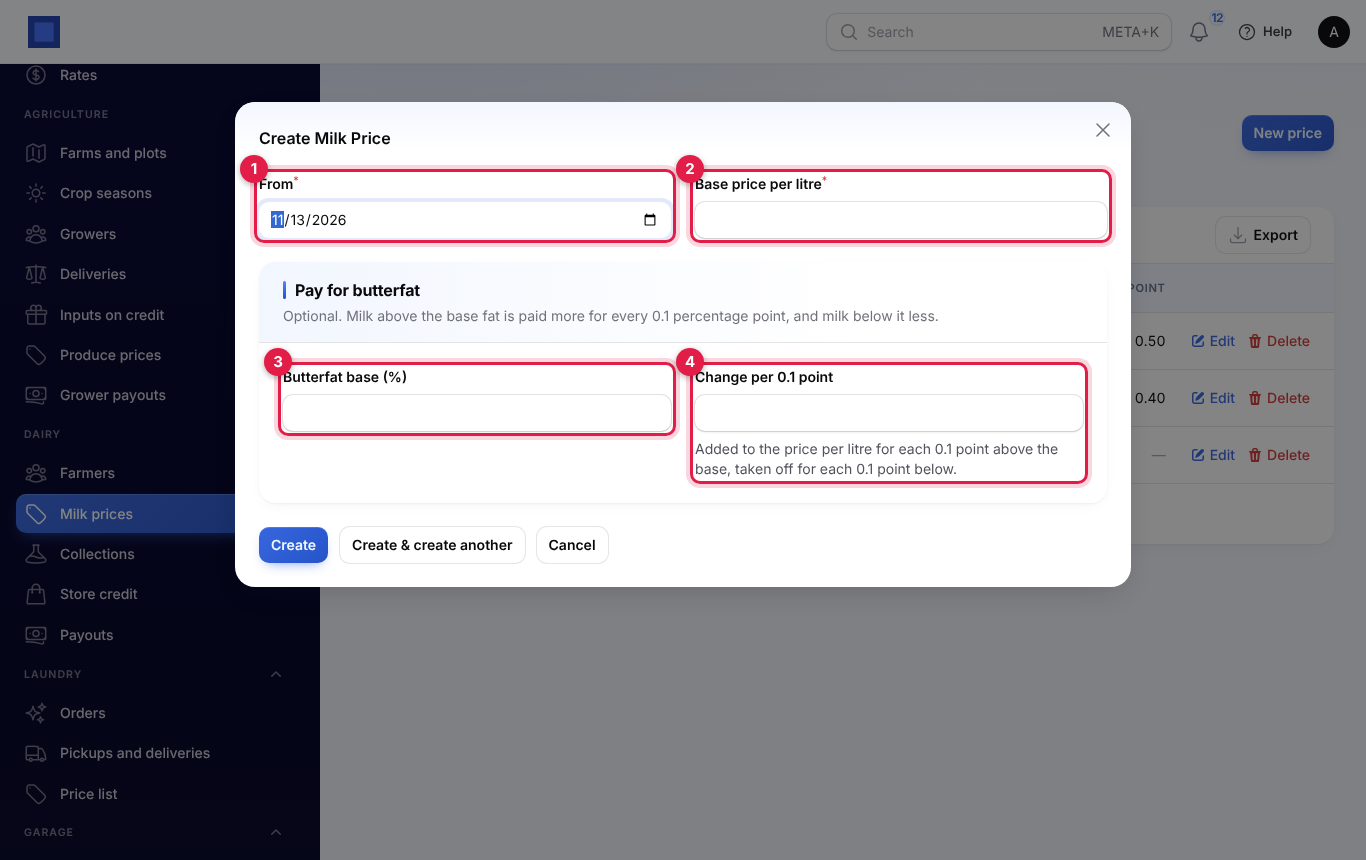
- From (marker 1): the first day of the price.
- Base price per litre (marker 2).
- Under Pay for butterfat (optional): Butterfat base (%) (marker 3), for example 3.5, and Change per 0.1 point (marker 4), for example 0.50. Fill in both or neither.
- Click Create.
How butterfat pay works: for every whole 0.1 percentage point the milk's butterfat is above the base, the change is added to the price per litre; for every whole 0.1 point below, it is taken off. The price never goes below zero.
| Price from 1 Nov: base 50.00, butterfat base 3.5%, 0.50 per 0.1 point | Price per litre |
|---|---|
| Butterfat 3.8% (3 points above) | 51.50 |
| Butterfat 3.5%, or no butterfat reading | 50.00 |
| Butterfat 3.4% (1 point below) | 49.50 |
| Butterfat 3.55% (part of a point is ignored) | 50.00 |
A price without a butterfat base pays the base price whatever the reading. Use Edit or Delete on a row to correct a price; deliveries already recorded keep the price they were paid at.
Record milk at the collection centre
- Open Dairy → Collections and click Record milk (marker 1 in the list screenshot below).
- Fill in the window:
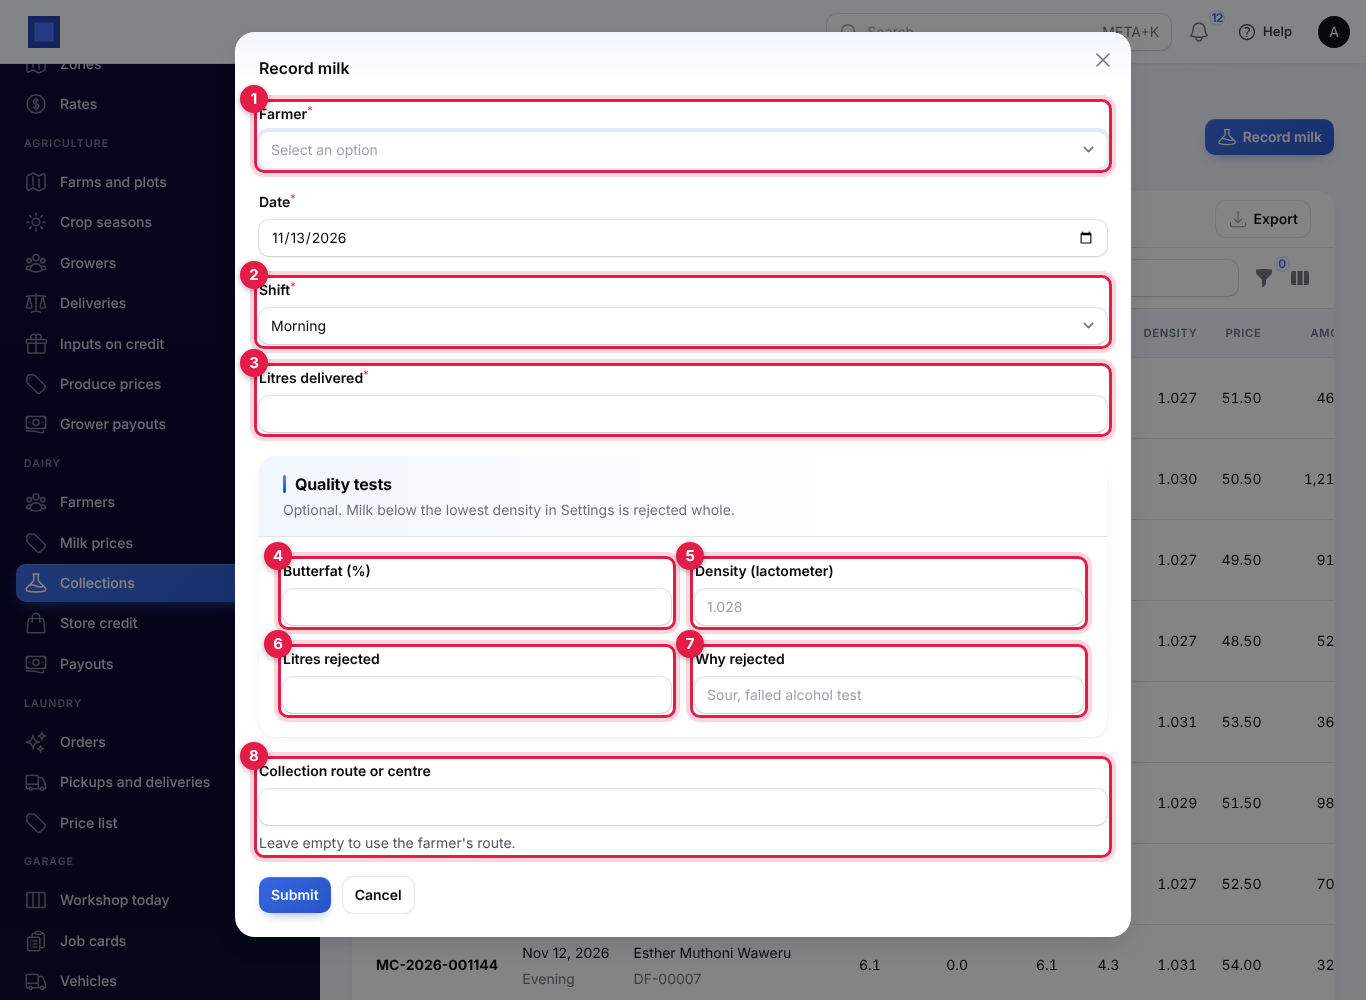
- Farmer (marker 1): type part of their name or number. Only active farmers are found.
- Date: today unless you change it.
- Shift (marker 2): Morning or Evening. It starts on Morning before 1 pm and Evening after.
- Litres delivered (marker 3): everything the farmer brought.
- Under Quality tests (all optional):
- Butterfat (%) (marker 4): from 0.1 to 15. It sets the price as described above.
- Density (lactometer) (marker 5): type the reading as a density, such as 1.028, or the short form farmers and clerks use, 28. Any number of 2 or more is read as the short form, so 28 means 1.028 and 31 means 1.031.
- Litres rejected (marker 6) and Why rejected (marker 7): for milk you turn away for another reason, for example one can was sour or failed the alcohol test. A reason is required when you reject litres.
- Collection route or centre (marker 8): leave it empty to use the farmer's own route.
- Click Submit. You see the receipt number with the litres accepted and the amount, for example "MC-2026-001151: 9.1 L, 468.65".
Every delivery gets a receipt number such as MC-2026-001151 (numbering restarts each year). The amount is the litres accepted times the price for that date and butterfat.
When milk is rejected
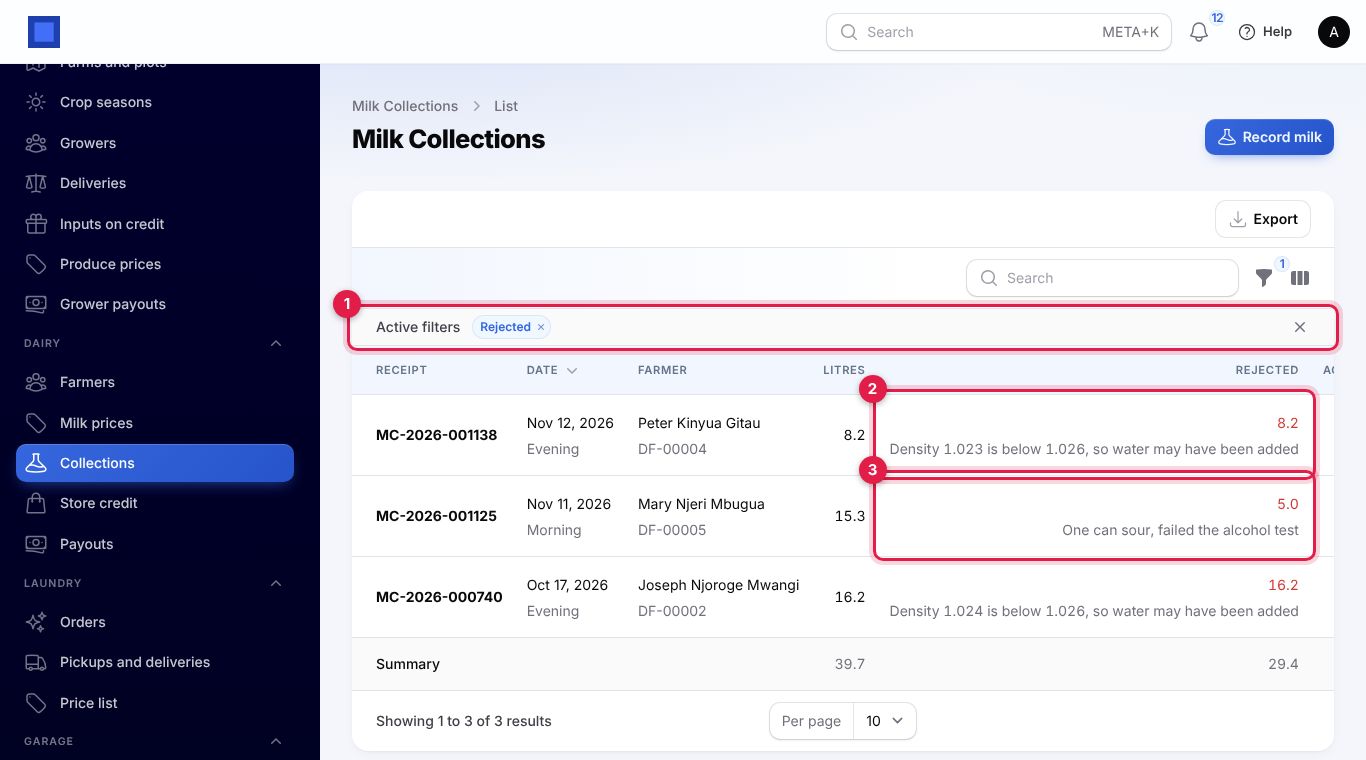
- Density below the lowest density in Settings: the whole delivery is rejected, because water has probably been added. The reason is filled in for you, for example "Density 1.023 is below 1.026, so water may have been added". You see "milk rejected" instead of an amount.
- Litres rejected for another reason: only those litres are taken off. The rest is accepted and paid.
Rejected litres are never paid. To list them, click the filter icon (marker 5 below), tick Rejected and click Apply filters. The active filter shows above the table (marker 1 in the second picture), and each rejected delivery shows the litres in red with the reason underneath: a density rejection (marker 2) and a partly rejected delivery (marker 3).
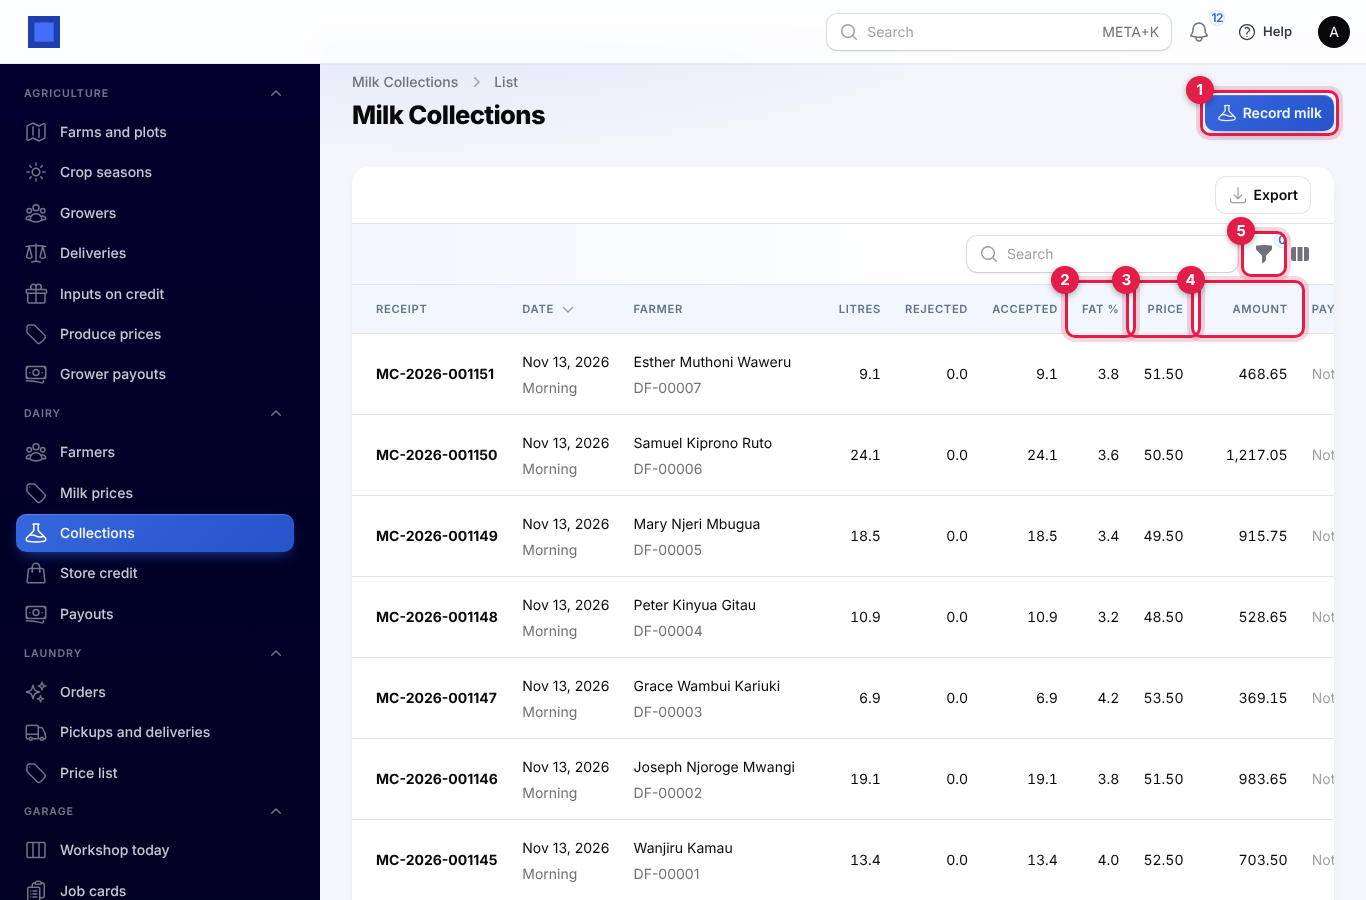
The Collections list shows each receipt with the date and shift, the farmer, Litres, Rejected, Accepted, Fat % (marker 2), Price (marker 3) and Amount (marker 4), and the Payout it was paid in ("Not yet" until then). The bottom row sums litres, rejected, accepted and amount for what is shown. Filters: Today, Shift, Not yet paid, Rejected and Route. Density and Route columns can be shown or hidden with the columns icon.
Important: A delivery cannot be edited or deleted once recorded, because the farmer has a receipt for it. If litres were too low, record the missing litres as another delivery. If they were too high, give the difference as store credit so it comes off the next payout.
If there is no milk price on the delivery's date, you see "There is no milk price on … Add one under Dairy → Milk prices." Add a price that starts on or before that day and record the milk again.
Text receipts
When Text farmers a receipt for every delivery is on in Settings, Marketing is on and an SMS provider is set up (see Marketing), every delivery sends a text to the farmer's payout phone (or their contact's mobile or phone). It includes the month's accepted litres so far, so farmers can check their total:
- Accepted: "Acme Dairy: received 13.4 L of milk from you on 13 Nov morning (MC-2026-001145), KES 703.50. This month: 306.4 L."
- Partly rejected: the same, plus "5.0 L rejected: One can sour, failed the alcohol test."
- Rejected: "Acme Dairy: your 8.2 L of milk on 12 Nov evening (MC-2026-001138) was rejected: Density 1.023 is below 1.026, so water may have been added. This month: …"
If SMS is not set up, milk is still recorded and nothing is sent. A text that fails to send never stops the delivery being recorded.
Accepted milk into stock
When Inventory is on and Receive accepted milk into stock as names a product in Settings, every accepted delivery is received into your main warehouse straight away: the accepted litres, at the price paid per litre, with the receipt number as its reference and a note such as "Milk from farmer DF-00001 · Wanjiru Kamau". Rejected litres never go into stock. Stock levels and movements are under Inventory; see Inventory.
Store credit
Feeds, veterinary drugs, artificial insemination (AI) services, cash advances or anything else the cooperative gives a farmer on credit is recorded as store credit, then taken back from their next payouts.
To give store credit:
- Open Dairy → Store credit and click Give store credit (marker 1), or click ⋮ on a farmer's row in Farmers and choose Give store credit.
- Pick the Farmer (from the Store credit page), then fill in:
- Date: today unless you change it.
- What was given: Feeds, Veterinary drugs, Artificial insemination, Cash advance or Other.
- Details: for example "2 bags dairy meal 70 kg".
- Amount: more than zero.
- Click Submit. You see "Recorded; it will be recovered from the next payouts".
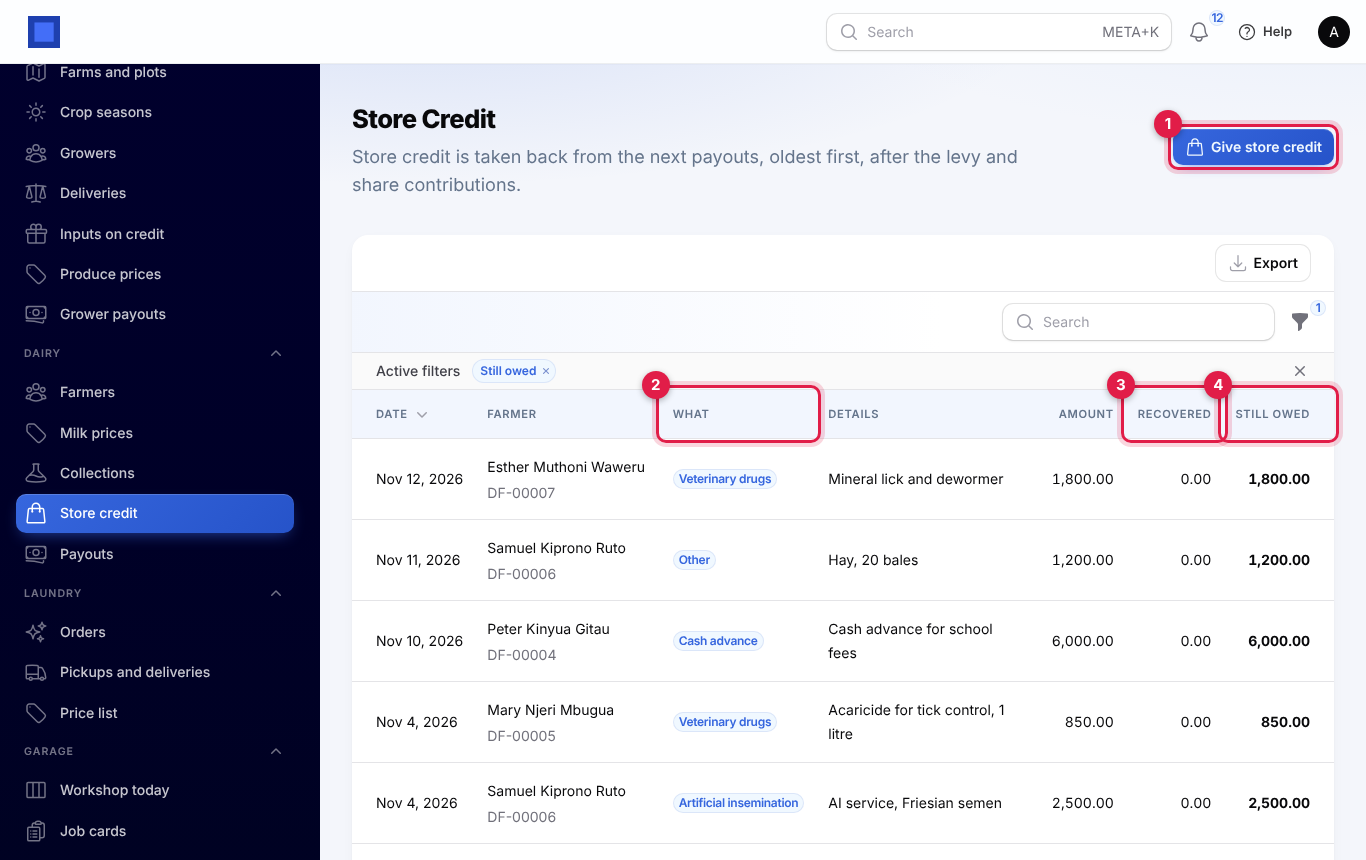
The list opens filtered to what is Still owed. It shows the date, farmer, What (marker 2), the details, the amount, how much has been Recovered (marker 3) and what is Still owed (marker 4). Clear the filter to see credit already paid back, or filter by What. Store credit cannot be edited or deleted once recorded, so check the farmer and amount before you click Submit.
Pay farmers
How deductions work
A payout gathers the accepted milk not yet paid in a period and works out, for each farmer, the value of their milk and three deductions, always in this order:
- Levy: the cooperative levy per litre × the farmer's accepted litres.
- Shares: the share contribution per payout, but only while the farmer's shares paid are below the share target, and never more than what is left to reach it.
- Store credit: everything the farmer still owes.
Each deduction is capped at what is left after the ones before it, so a farmer is never paid less than zero. If a farmer earned less than their store credit, the rest is taken from later payouts.
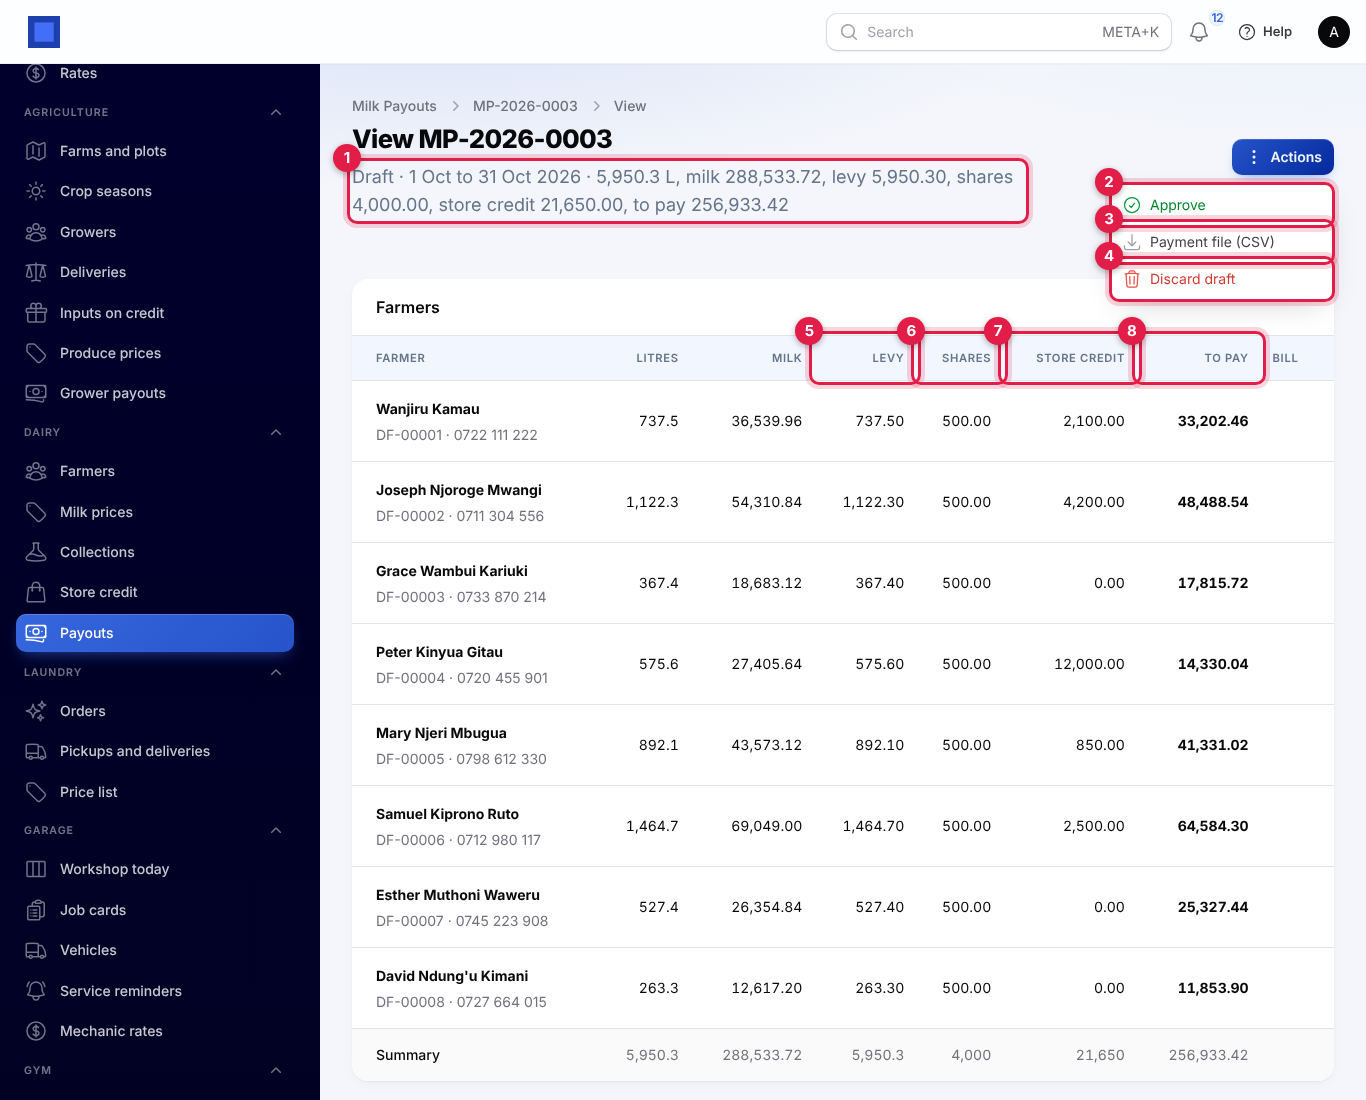
For example, Wanjiru delivered 737.5 L in October worth KES 36,539.96. The levy is 737.50, the share contribution 500.00 and her store credit 2,100.00, so she is paid 33,202.46.
Prepare a payout
- Open Dairy → Payouts and click Prepare a payout (marker 1).
- Choose From and To. They start on last month. You can pay for any period, for example the 1st to the 15th.
- Click Submit. NaliSuite creates a draft payout (numbered
MP-2026-0003) and opens it.
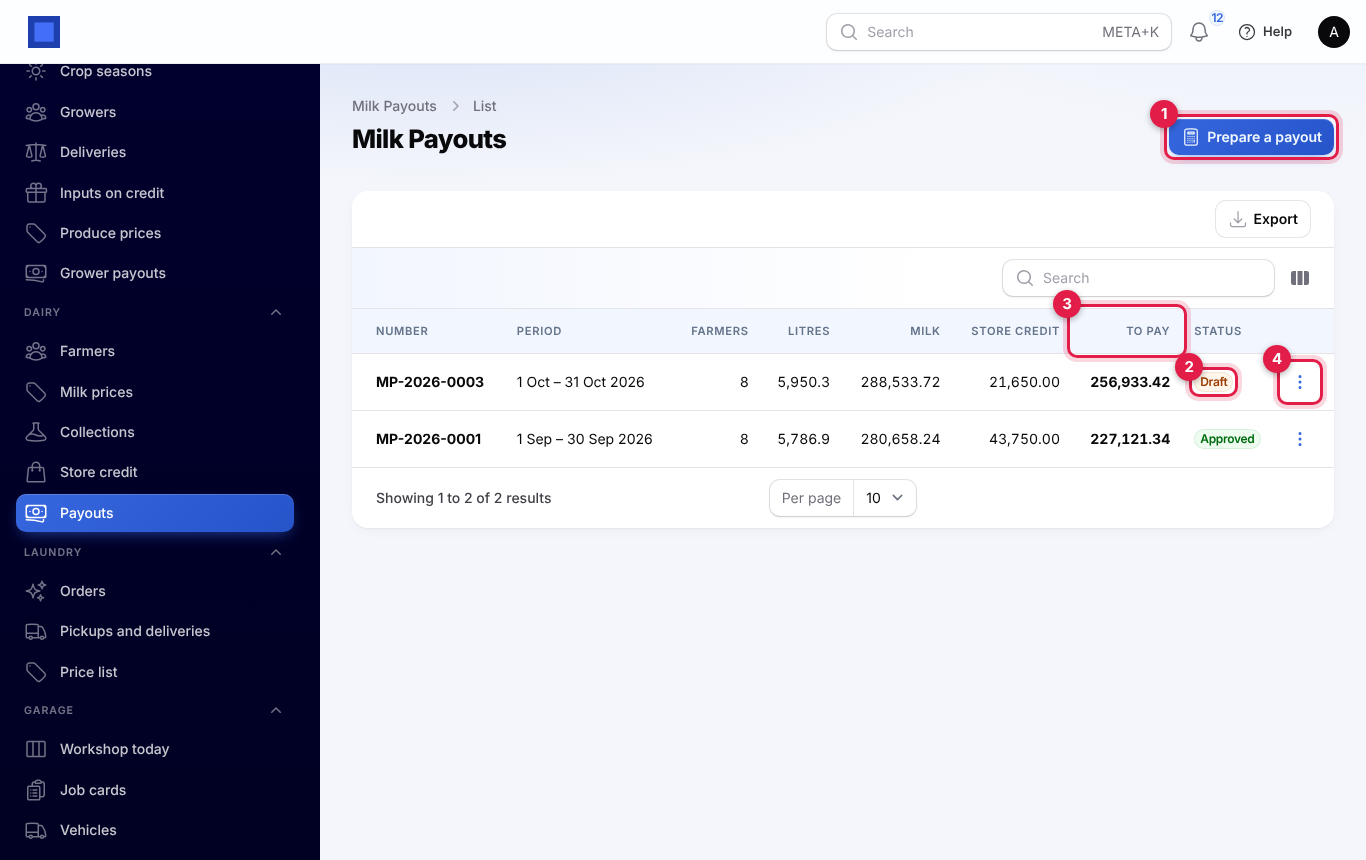
If there is no unpaid milk in the period, you see "No unpaid milk between … and …". Each delivery can only ever be in one payout. Shares and store credit already held back in another draft are not taken twice.
The payout page shows a summary line (marker 1): the status, period, litres, milk value, levy, shares, store credit and the total to pay. Below it, Farmers lists one line per farmer with their litres, Milk, Levy (marker 5), Shares (marker 6), Store credit (marker 7), To pay (marker 8) and, after approval, the Bill number.
Approve or discard
Check the draft, then click Actions at the top right, or ⋮ on the payout's row in the list (marker 4 in the list screenshot):
-
Approve (marker 2): asks you to confirm, then:
- store credit is marked as recovered, oldest first;
- each farmer's share contribution is added to their Shares paid;
- when Purchases is on, each farmer with something to pay gets a posted supplier bill for what they are owed, dated the last day of the period, with their payout and farmer numbers as the vendor's invoice number (for example
MP-2026-0003-DF-00001) and a line such as "737.5 L of milk delivered (MP-2026-0003): 36,539.96 less levy 737.50, shares 500.00 and store credit 2,100.00". With Accounting on, it is booked to cost of sales.
You see "Payout approved; supplier bills raised". An approved payout cannot be changed or discarded.
-
Discard draft (marker 4): after you confirm, the draft is thrown away and its milk goes back to Not yet paid, ready for another payout. Use it if you prepared the wrong period or recorded more milk afterwards.
Pay by M-Pesa with the payment file
Payment file (CSV) (marker 3) downloads a spreadsheet file for a bulk M-Pesa or bank payment upload. It has one row for each farmer with something to pay, with the columns phone (the payout phone), amount (to pay), name and reference (the payout and farmer numbers, for example "MP-2026-0003 DF-00001").
- Approve the payout first, so the bills exist and the amounts are final.
- Download the payment file and upload it to your M-Pesa bulk payment (B2C) or bank portal.
- Once the money has gone, record the payment of the farmers' bills under Purchases → Vendor bills. See Purchases and bills.
The file can also be downloaded from a draft, for checking, but pay only from an approved payout.
Farmer statements
A statement is a PDF for one farmer and any period, to print or send.
- Open Dairy → Farmers and click ⋮ on the farmer's row.
- Click Statement (marker 3 in the farmer actions picture).
- Choose From and To (this month so far by default) and click Submit. The PDF opens in your browser.
It shows the farmer's name and payout phone, their route, the litres accepted and their value in the period, the litres rejected, the store credit still owed and shares paid. Then come the deliveries (date and shift, receipt, litres, fat %, rejected litres with the reason, price and amount), the store credit given in the period with what has been recovered, and the approved payouts in the period with the levy, shares, store credit and the amount paid.
What farmers see in the portal
Farmers who can sign in to your customer portal see My milk deliveries when the Customer portal app is on and their contact is a registered farmer. To give a farmer access, invite their contact to the portal; see Customer and vendor portal.
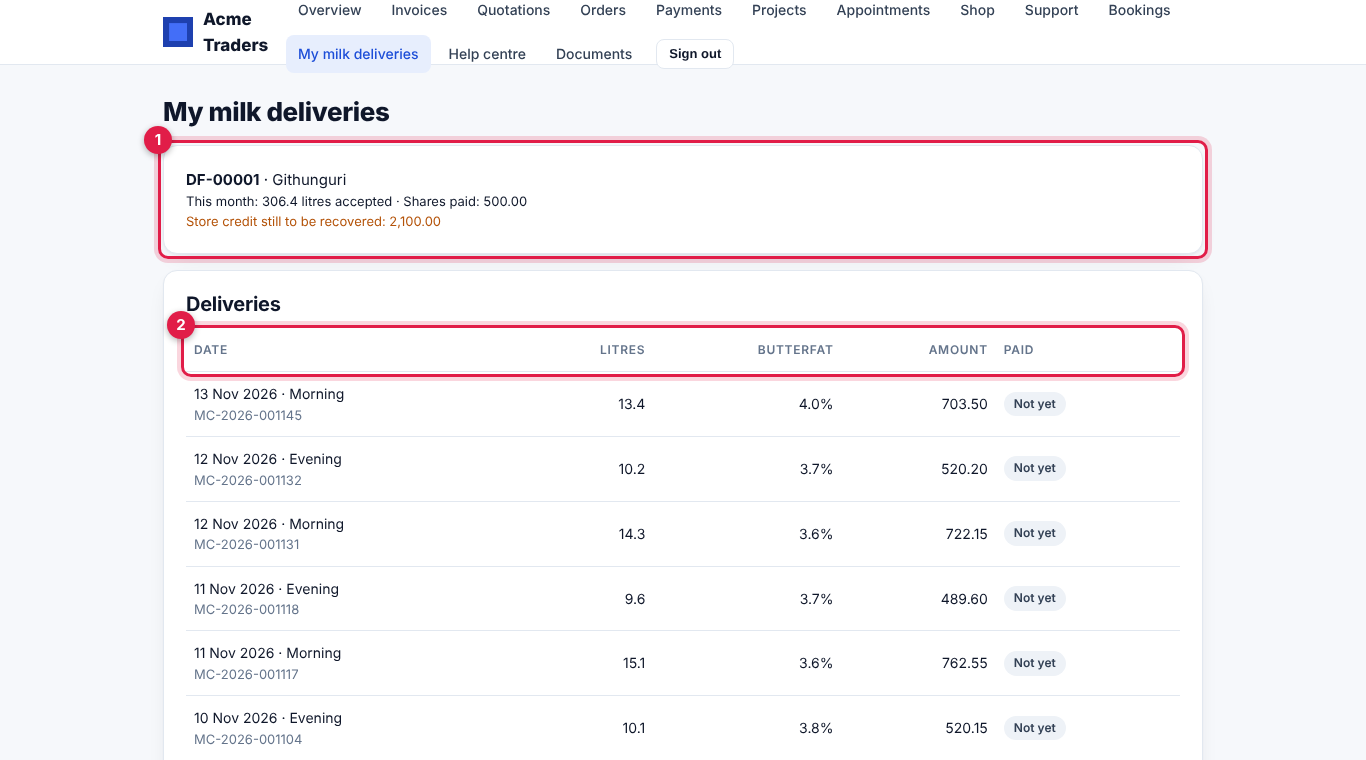
- The top box (marker 1) shows the farmer number and route, the litres accepted this month, shares paid and any store credit still to be recovered.
- Deliveries (marker 2) lists their last 60 deliveries with the date, shift and receipt, litres accepted (and any rejected), butterfat, amount, and In payout or Not yet.
- Payouts, further down, lists their approved payouts with the period, the milk value, what was deducted and what was Paid to you.
Good to know
Who can record milk? Give collection clerks dairy.view and dairy.collect. They can record milk and see the lists, but cannot change prices, farmers, store credit or payouts.
Which store credit comes off a payout? All store credit the farmer still owes when you prepare the payout, whatever its date, oldest first. Credit given after the payout was prepared waits for the next one.
What if a farmer's milk is worth less than their deductions? They are paid zero for that payout and no bill is raised for them. The store credit not covered stays owed for the next payout.
Can I change a price after milk was recorded? Deliveries keep the price they were recorded at. To pay a different price for past milk, give the difference as store credit (to take money back) or pay it outside the payout.
Does the payout pay farmers? No. Approving raises the supplier bills; the money goes out through your M-Pesa or bank bulk payment, and you then record the bill payments in Purchases.
Do I need Purchases, Inventory or Marketing? No. Without Purchases, approving still recovers store credit and adds shares, and you can still download the payment file; no bills are raised. Without Inventory, milk is not put into stock. Without SMS, no receipts are texted.
Do readings like 1.5 work for density? No. A density must be between 1 and 1.1 (for example 1.028), or the short form 2 and above (28). Anything else shows "Enter the lactometer reading as a density such as 1.028."