Inventory
Inventory tells you what you have, where it is, what it cost and when it expires. Stock comes in from purchase orders and manual receipts, goes out on invoices, the till and manufacturing, and moves between warehouses and shelves. Every movement is recorded and, when Accounting is on, the cost of goods is posted to the ledger for you. Storekeepers, buyers and owners use it. Everything is in the Inventory group of the sidebar: Stock on hand, Lots and expiry, Stock movements, Replenishment, Landed costs, Stock reports, Warehouses and Locations.
Note: You need the inventory.view permission to see these pages, inventory.manage to receive, transfer, add warehouses, rules and landed costs, and inventory.adjust to record stock counts and import opening stock. Owners and admins have all three. Set permissions under Settings → Roles.
How stock works in NaliSuite
- A product is stocked only when Track stock is on. Services and goods without tracking never appear in Inventory.
- Each warehouse keeps its own quantity and average cost per product. One warehouse per company is the default: purchase orders are received into it and invoices deliver out of it.
- Every change is a stock move (receipt, delivery, adjustment, transfer, return). Moves cannot be edited or deleted; to correct a mistake you record another move, such as a count or a return.
- Cost of goods goes to Accounting automatically when the Accounting module is on (see What is posted to the ledger).
Set up your products for stock
Before you can count, receive or sell stock, the product itself must be set up as tracked goods.
- In the menu, open Sales → Products and open the product (or click New product).
- Set Type to Goods. The Inventory section appears only for goods.
- In the Inventory section, turn on Track stock (marker 1) and fill in the rest of the section (markers 2 to 4).
- Click Save changes.
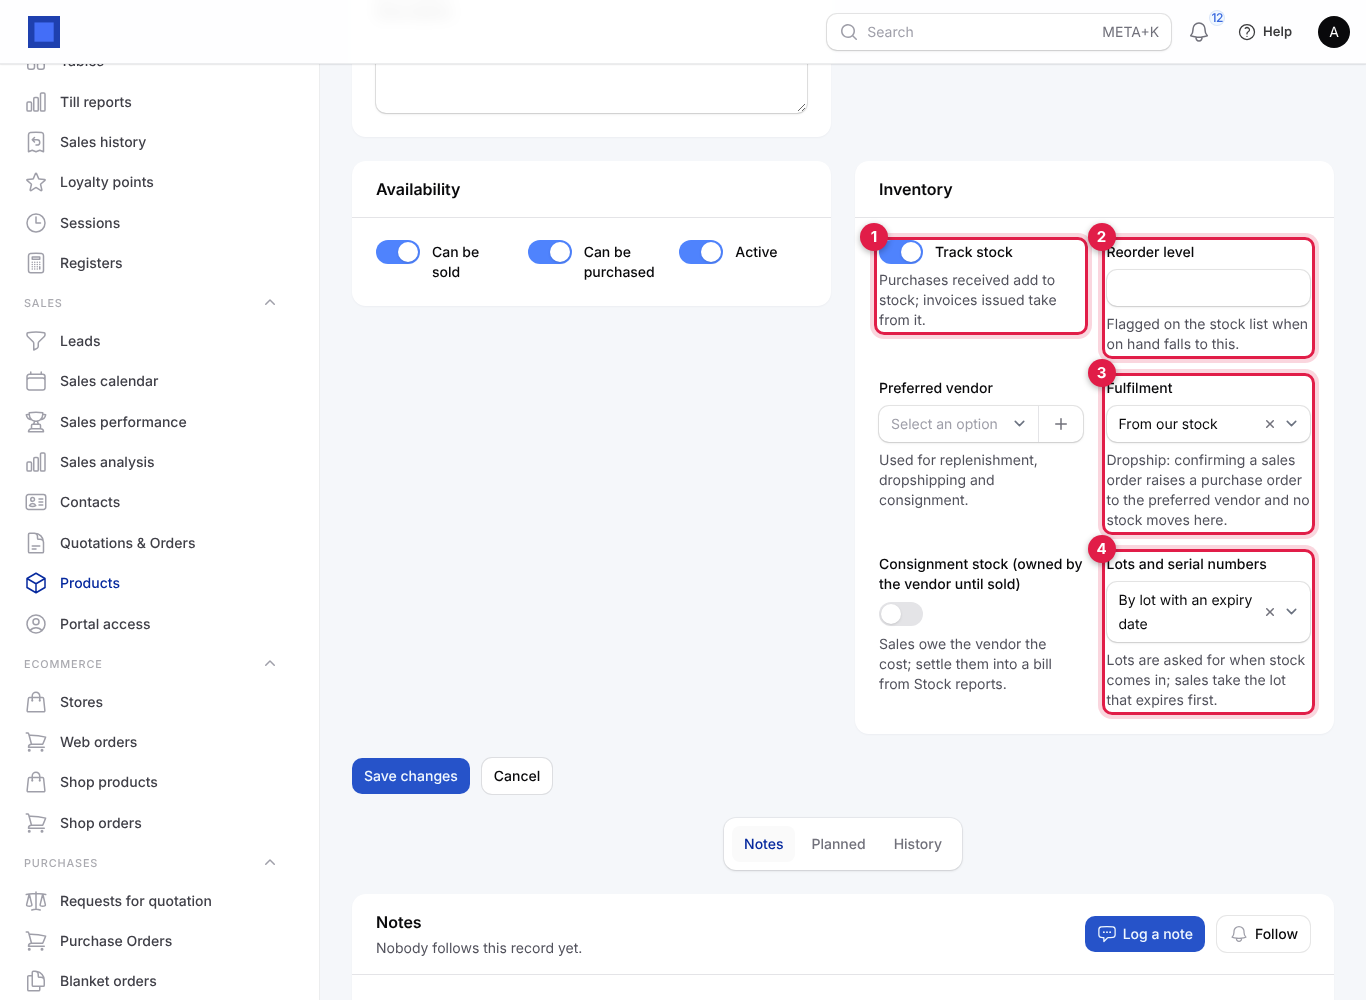
| Field | What to enter |
|---|---|
| Track stock | On for anything you keep on a shelf. When on, purchases received add to stock and invoices issued take from it. Leave off for services, fees and non-stock items. |
| Reorder level | Optional. The quantity at which the product is flagged in red as Below reorder level on Stock on hand. For example 5 for a router you sell two of a week. It only flags; to have NaliSuite suggest a purchase, add a reorder rule (see Reorder automatically). |
| Preferred vendor | The supplier you normally buy from. Used by reorder suggestions, dropshipping and consignment. Required for dropship and consignment products. |
| Fulfilment | From our stock (normal) or Dropship: the vendor ships to the customer. Dropship means confirming a sales order raises a purchase order to the preferred vendor and no stock moves in your warehouse. |
| Consignment stock (owned by the vendor until sold) | Turn on for goods a supplier leaves with you and you pay for only when sold. Their value is kept out of your stock value, and each sale creates an amount owed to the vendor. |
| Lots and serial numbers | Not tracked, By lot with an expiry date (food, medicine, cosmetics, anything with batches) or By serial number (phones, laptops, appliances: one number per unit). Appears only when Track stock is on. Lots are asked for when stock comes in, and sales take the lot that expires first. |
Tip: Set lot or serial tracking before the first stock comes in. Stock received before you switch it on has no lot.
Note: The Barcode field is at the top of the product form. Click Generate next to it to make an in-store EAN-13 code you can print on labels (see Print barcode labels).
Set up warehouses
A warehouse is any place you keep stock: a main store, a shop, a branch, a van. Every company gets one warehouse automatically the first time you open Inventory.
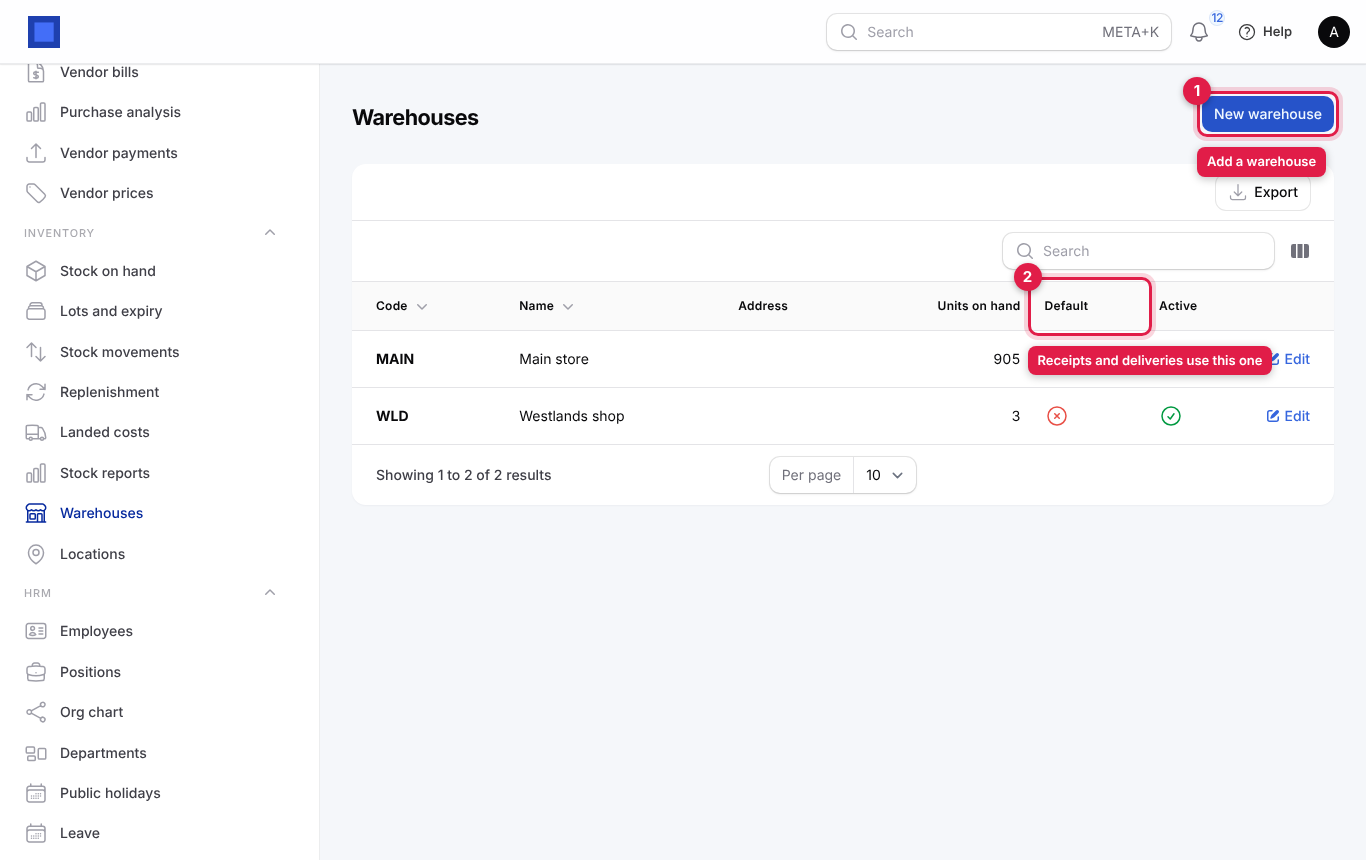
- In the menu, open Inventory → Warehouses.
- Click New warehouse (marker 1). The Default column (marker 2) shows which warehouse receives purchases and delivers invoices.
- Fill in the form and click Create (marker 4). Create & create another saves and opens a blank form straight away.
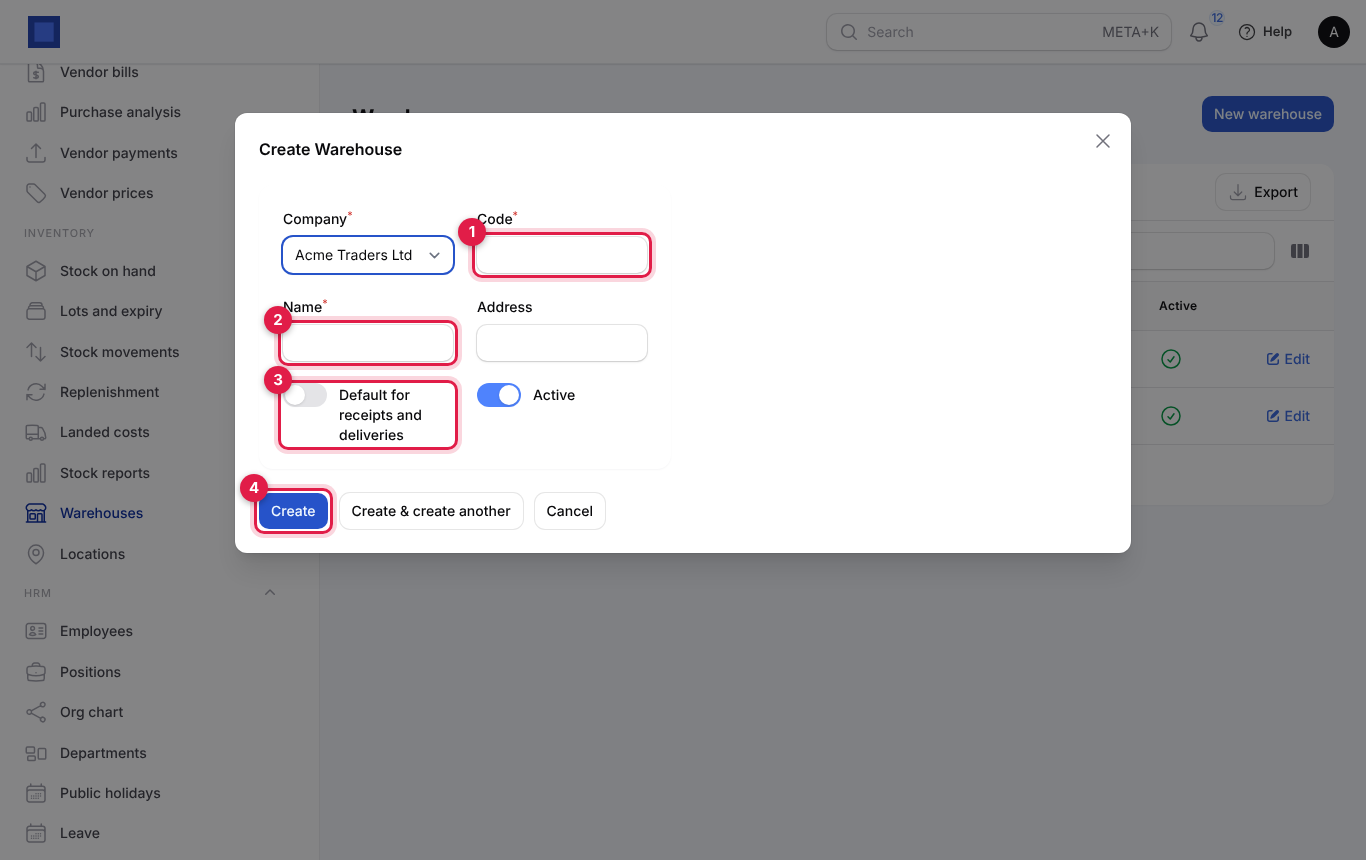
| Field | What to enter |
|---|---|
| Company | Required. The company that owns the stock. Only shown choices are your companies. |
| Branch | Optional, shown only when you have branches. Links the warehouse to a branch for branch reporting. |
| Code | Required, up to 20 characters. A short code used on reports and notes, for example MAIN, WLD or VAN1 (marker 1). |
| Name | Required. The name staff see everywhere, for example "Westlands shop" (marker 2). |
| Address | Optional. Printed on delivery and goods received notes. |
| Default for receipts and deliveries | Turn on for the one warehouse that purchase orders receive into and invoices deliver from (marker 3). Keep it on for only one warehouse per company. |
| Active | On by default. Turn off to hide a warehouse you no longer use from receive, transfer and till choices without losing its history. |
The list shows Units on hand per warehouse. Use Edit on a row to change it. Delete appears only for a warehouse that is not the default and has no stock.
Set up locations (shelves, aisles and bins)
Locations are optional places inside a warehouse, such as an aisle, a shelf or a cold room. Use them if staff need to know where to pick from.
- In the menu, open Inventory → Locations.
- Click New location (marker 1) and fill in the form, then click Create.
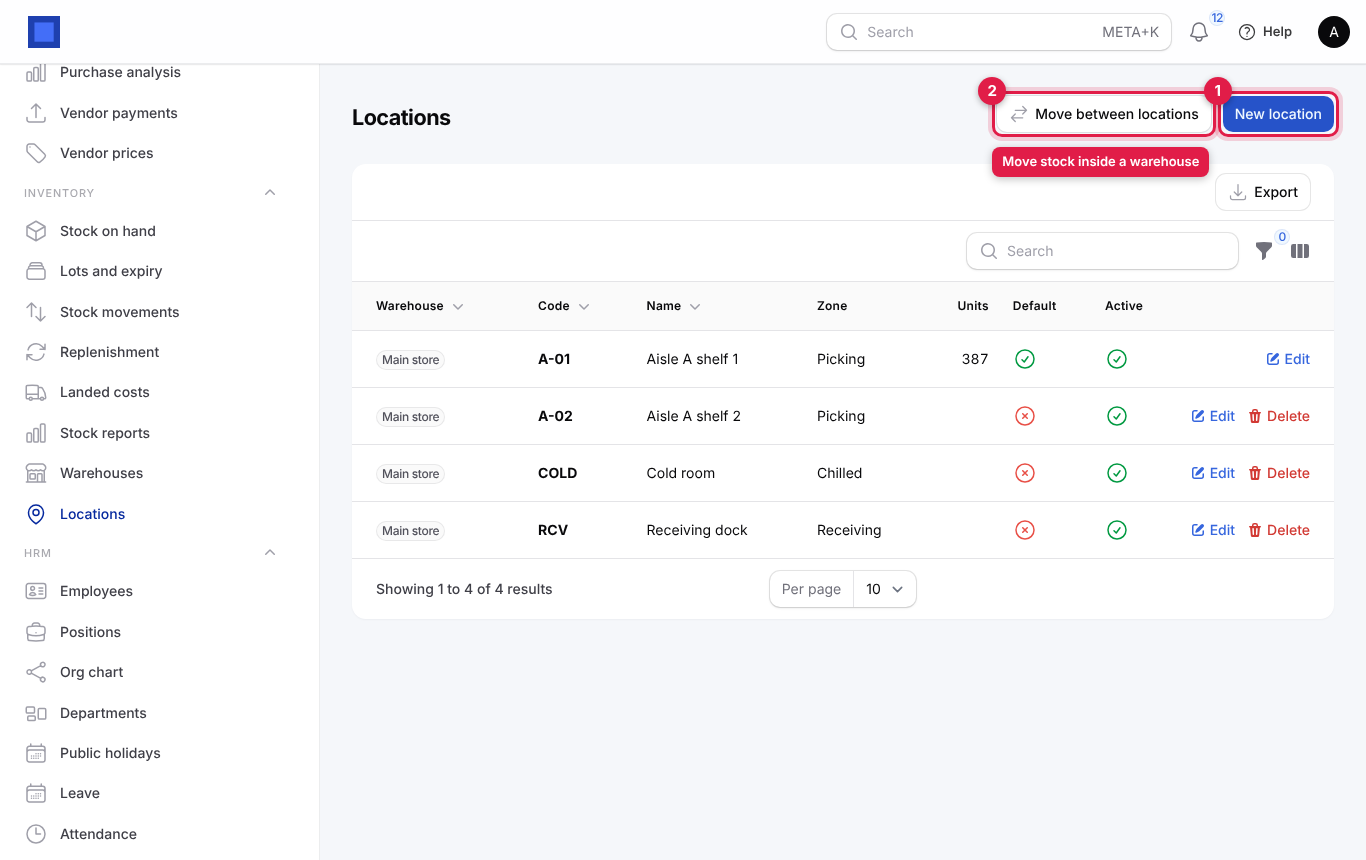
| Field | What to enter |
|---|---|
| Company | Required. Choose it first; the warehouse list follows it. |
| Warehouse | Required. The warehouse the location is in. |
| Code | Required, short, for example A-01-3 or COLD. |
| Name | Required, for example "Aisle A shelf 1". |
| Zone | Optional grouping such as Receiving, Picking or Cold room. |
| Default location for the warehouse | Stock that arrives without a location is counted here. |
| Active | Turn off to retire a location. |
To move stock from one shelf to another in the same warehouse, click Move between locations (marker 2), pick the Product, the From location, the To location (only locations in the same warehouse are offered) and the Quantity, then click Submit. Moving between locations does not change the warehouse total or the cost, and is not posted to the ledger.
The Units column shows what is on each location. A location with stock cannot be deleted; move the stock out first.
See what is in stock
- In the menu, open Inventory → Stock on hand. The page is headed Stock Levels.
- Each row is one product in one warehouse, with On hand, Avg cost (average cost per unit) and Value (on hand × average cost).
- A product at or below its reorder level shows the quantity in red with Below reorder level under it (marker 2).
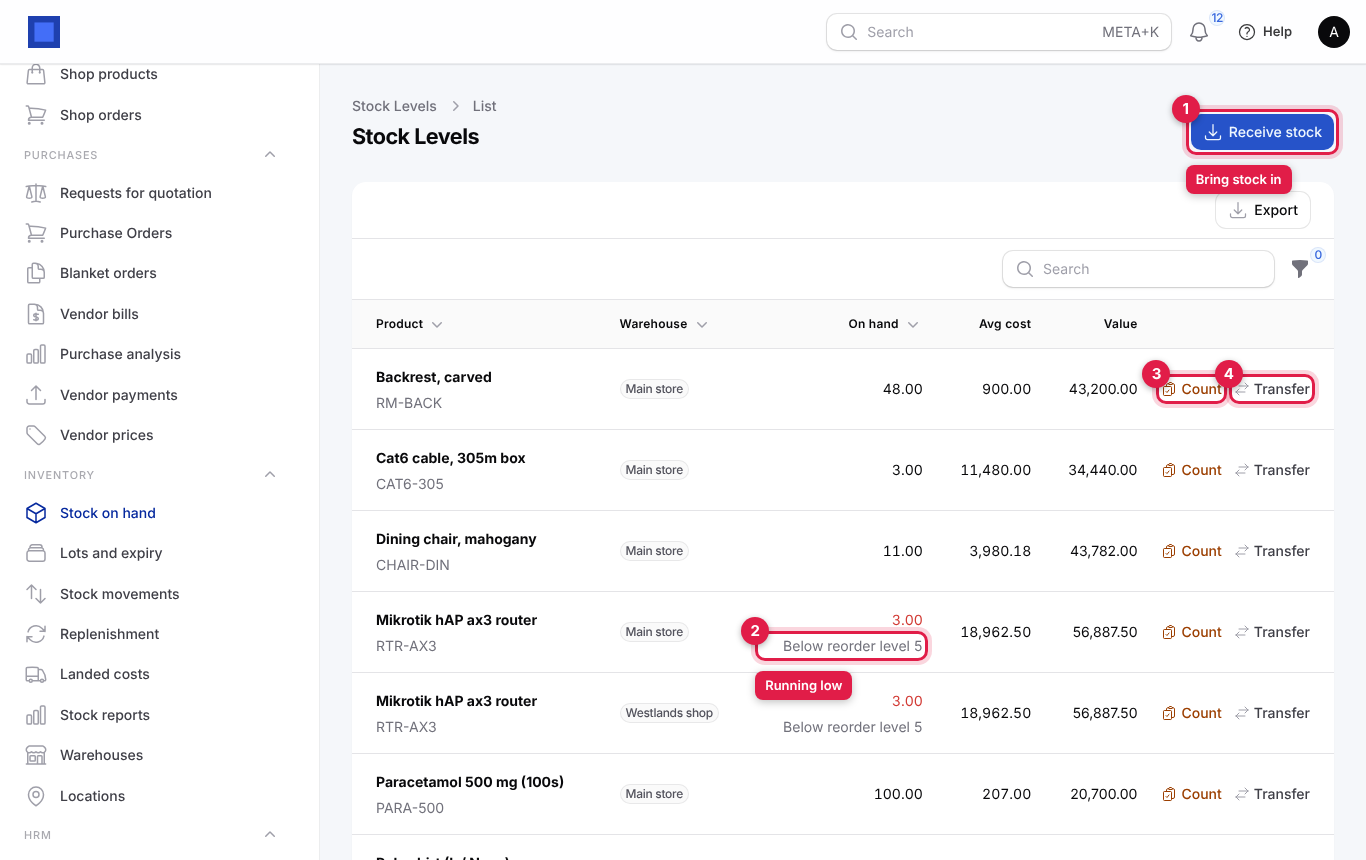
The buttons on this page:
| Button | What it does |
|---|---|
| Receive stock (marker 1) | Brings stock in without a purchase order, for example opening stock or a cash purchase. |
| Count (marker 3) | Records a stock count and adjusts on hand to what you counted. Needs the inventory.adjust permission. |
| Transfer (marker 4) | Moves stock from this warehouse to another warehouse of the same company. Shown only when there is stock to move. |
| Export | Downloads the list as a spreadsheet. |
| Filter icon | Filter by Warehouse, Below reorder level or In stock only. |
Tip: Click the column headers to sort, and use Search to find a product by name.
Receive stock without a purchase order
Use this for opening stock, a cash purchase from a market, or goods given to you. Stock bought on a purchase order is received from the order instead (next section).
- On Inventory → Stock on hand, click Receive stock.
- Fill in the form and click Submit.
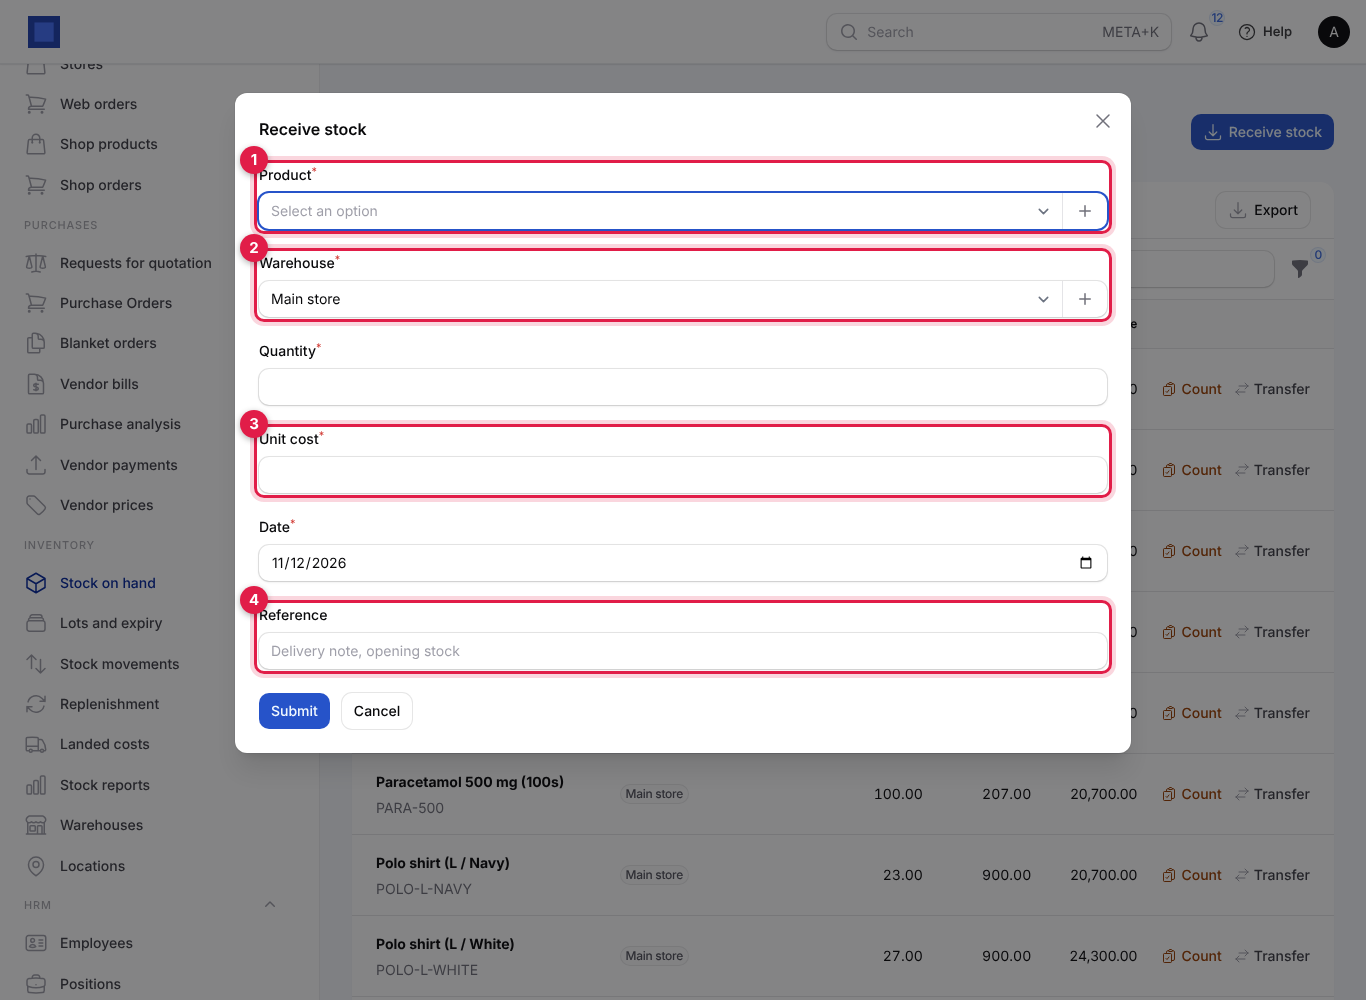
| Field | What to enter |
|---|---|
| Product | Required (marker 1). Only active products with Track stock on are listed. Type to search. |
| Warehouse | Required (marker 2). Starts on the default warehouse. |
| Quantity | Required for normal and lot products. Hidden for serial-numbered products, where the number of serials is the quantity. |
| Unit cost | Required (marker 3). What one unit cost you, in the company currency. It is blended into the average cost (or becomes a new FIFO layer). Enter 0 only for free goods. |
| Date | Required. Defaults to today. Back-date for opening stock. |
| Reference | Optional (marker 4), for example the supplier's delivery note number or "Opening stock". It is printed on the goods received note and moves received with the same reference on the same day share one note. |
| Lot number | Appears for lot-tracked products; required. The batch number printed on the goods. |
| Expiry date | Appears for lot-tracked products. The best-before or expiry date of the batch. |
| Serial numbers | Appears for serial-tracked products; required. One per line (commas and spaces also work). Each serial becomes one unit. |
You see Stock received (or "n serial numbers received"). The stock appears on Stock on hand and a Receipt line appears on Stock movements.
Note: A manual receipt is not posted to the ledger, because nothing is owed to anyone. If you bought the goods, record the purchase as a vendor bill or expense so the money side is right. For many products at once, use the opening stock import (see Import opening stock).
Receive goods from a purchase order
When the supplier's delivery arrives, receive it from the order. NaliSuite adds the goods to the default warehouse at the order price (converted to your currency at the order's exchange rate).
- In the menu, open Purchases → Purchase Orders and open the confirmed order.
- Click Mark received (marker 1). On an order that is already part-received the button reads Receive more.
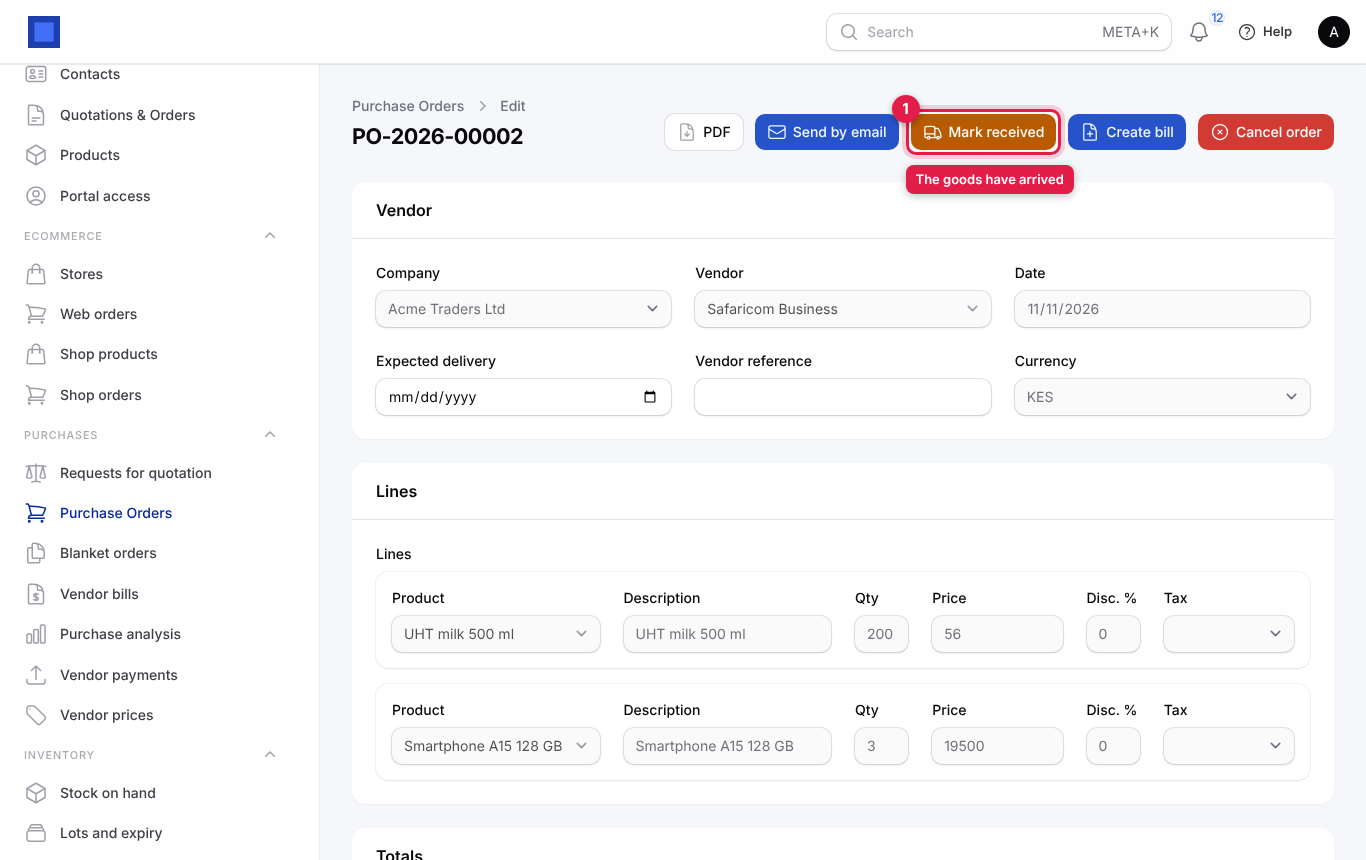
- The Goods received window opens. For each line, enter the quantity that actually arrived (marker 1); below it you see how much has been received so far. Enter less than ordered for a part delivery.
- For lot-tracked goods, check the Lot number (it starts as the order number) and enter the Expiry date (marker 2).
- For serial-numbered goods, enter the Serial numbers, one per line (marker 3). The hint tells you how many are expected.
- Click Submit (marker 4).
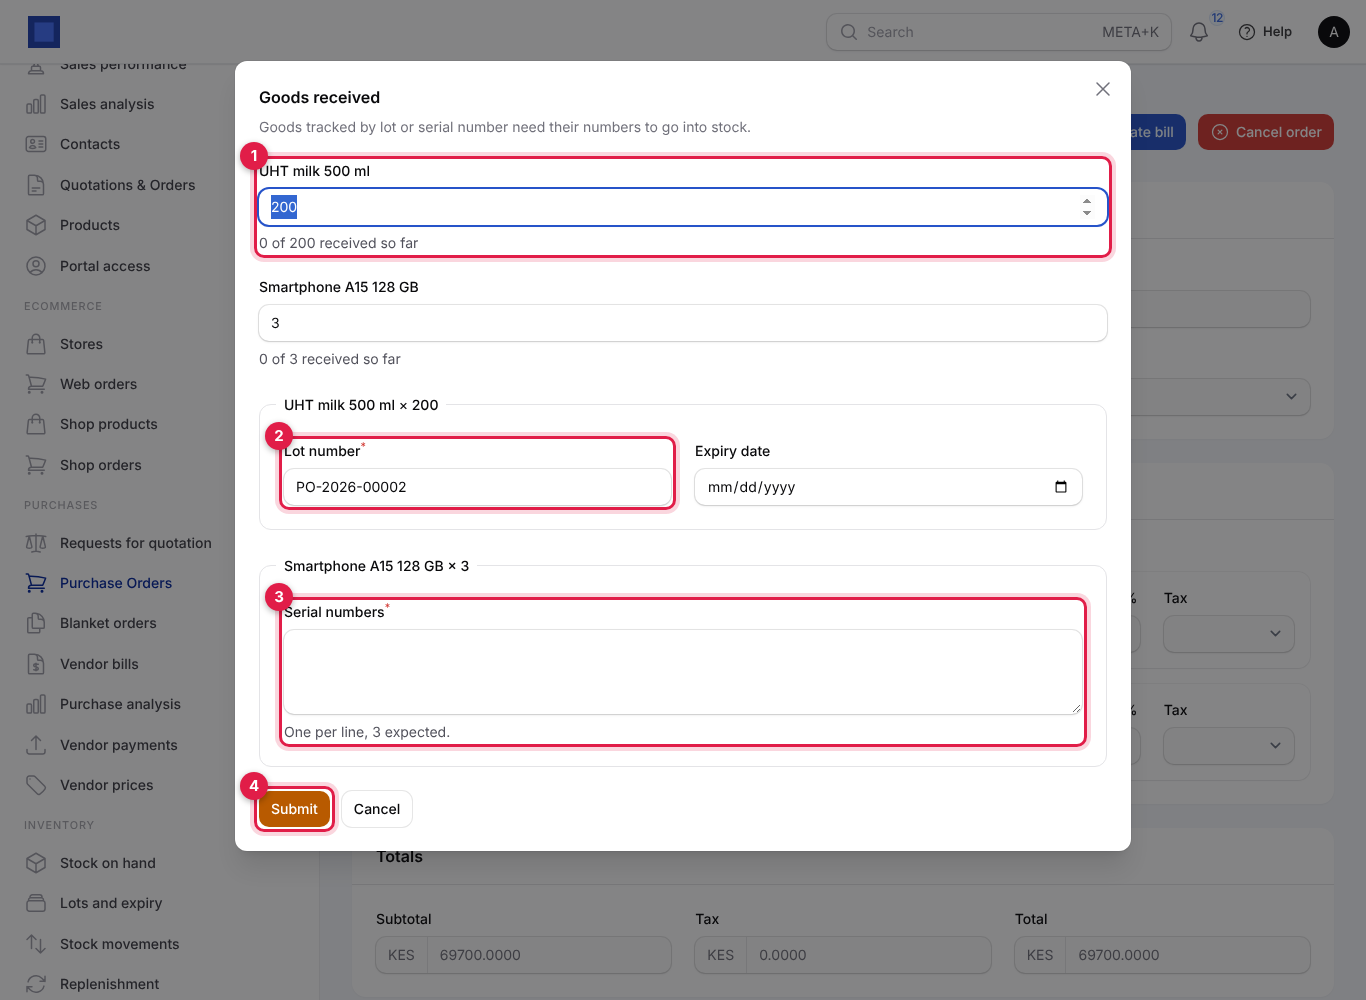
What happens next:
- The order moves to Partially received (some lines still to come) or Received. Its status then becomes Billed once you click Create bill.
- Stock goes up in the default warehouse and Receipt moves are written with the order number as the reference.
- A Goods received note button appears on the order to print the GRN.
- Dropship orders never add stock: the vendor delivers straight to the customer.
Deliver goods (invoices, the till and sales orders)
You do not usually record deliveries by hand.
- Invoices: when an invoice is issued, the tracked goods on it are delivered from the default warehouse (a Delivery move with the invoice number). A credit note brings them back at the current average cost. Pro-forma invoices and dropship products never move stock. Turn this off under Settings → Preferences → Inventory → Deliver tracked goods when an invoice is issued if you deliver separately.
- Point of sale: each sale takes stock from the register's warehouse ("Stock comes from" on the register); refunds put it back. See Point of sale.
- Lots: sales and deliveries take the lot that expires first. Expired lots are skipped unless Allow expired lots to be sold is on. If only expired stock is left, the sale is refused with a message such as "Only 3 unit of UHT milk 500 ml in date in Main store (34 expired)".
- Not enough stock: with Allow stock to go negative off (the default), an invoice for more than is on hand is refused. Receive or count the stock first.
Count stock and correct differences
Use Count after a stock take, or whenever the shelf does not match the system.
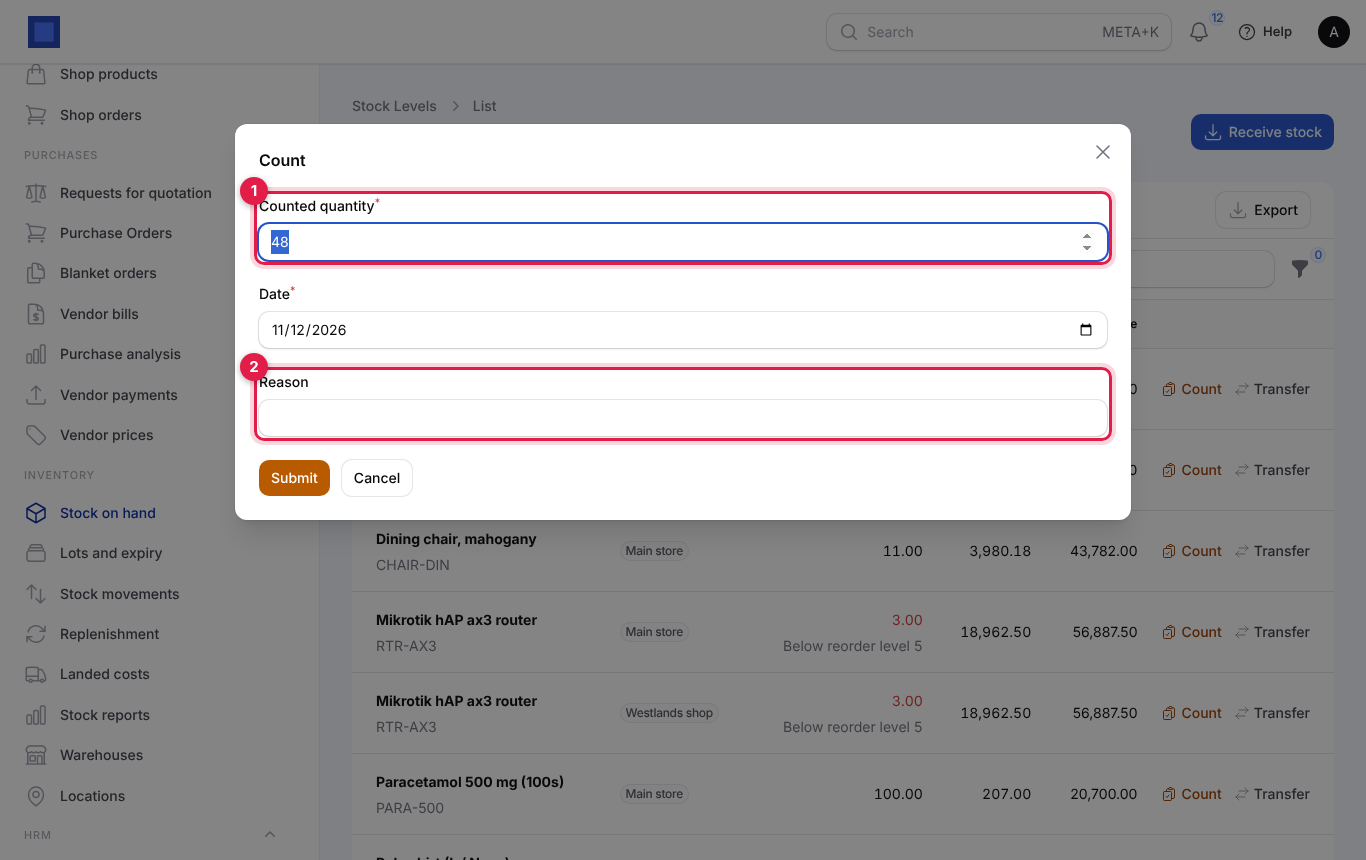
- On Inventory → Stock on hand, find the product and warehouse and click Count on its row.
- Enter what you physically counted and click Submit.
| Field | What to enter |
|---|---|
| Counted quantity | Required (marker 1). What is really on the shelf. It starts with the current on-hand figure, so change only what differs. |
| Date | Required. The date of the count. |
| Reason | Optional but recommended (marker 2), for example "Monthly stock take", "Damaged in transit" or "Theft". It shows on the movement and the adjustment note. |
| Lot number for stock found | Lot-tracked products only. Stock counted above what is on hand goes into this lot. Stock missing is taken from expired lots first. |
You see Adjusted by and the difference (for example "Adjusted by -2"), or No change if the count matched. An Adjustment move is written at the current cost and, with Accounting on, the difference is posted to the inventory adjustment account.
Tip: For a full stock take, filter Stock on hand by warehouse, print or export it, count, then use Count only on rows that differ.
Transfer stock between warehouses
- On Inventory → Stock on hand, click Transfer on the row of the product in the warehouse it is leaving.
- Choose the To warehouse (marker 1). Only other active warehouses of the same company are listed.
- Enter the Quantity (marker 2). It starts with everything on hand.
- Optionally add Notes (for example the driver or the van) and click Submit.
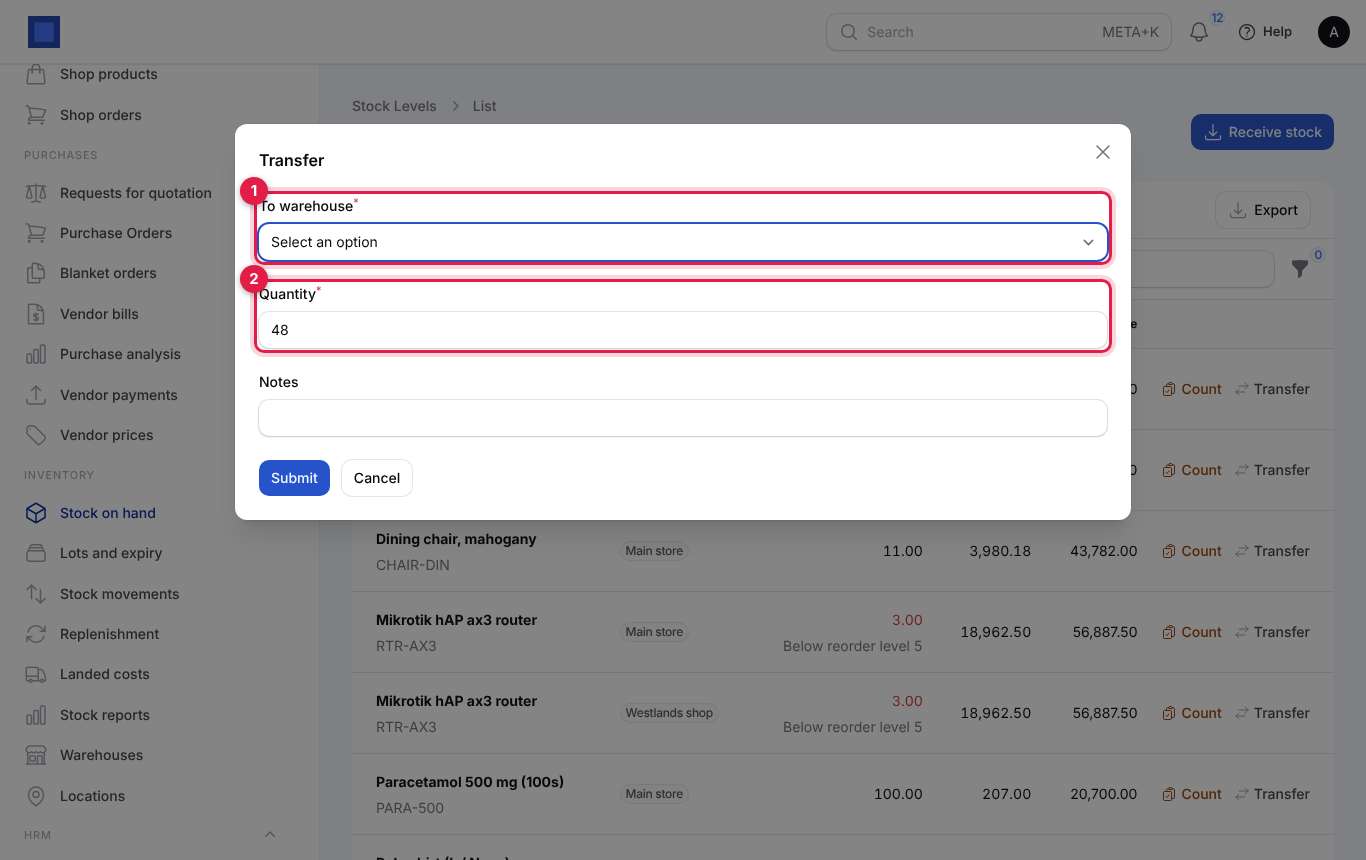
Two moves are written: Transfer out from the source and Transfer in to the destination, at the same unit cost. Lots travel with the goods. Transfers do not post to the ledger because the stock still belongs to you. Print a Stock transfer note from Stock movements for the driver.
Review stock movements and print notes
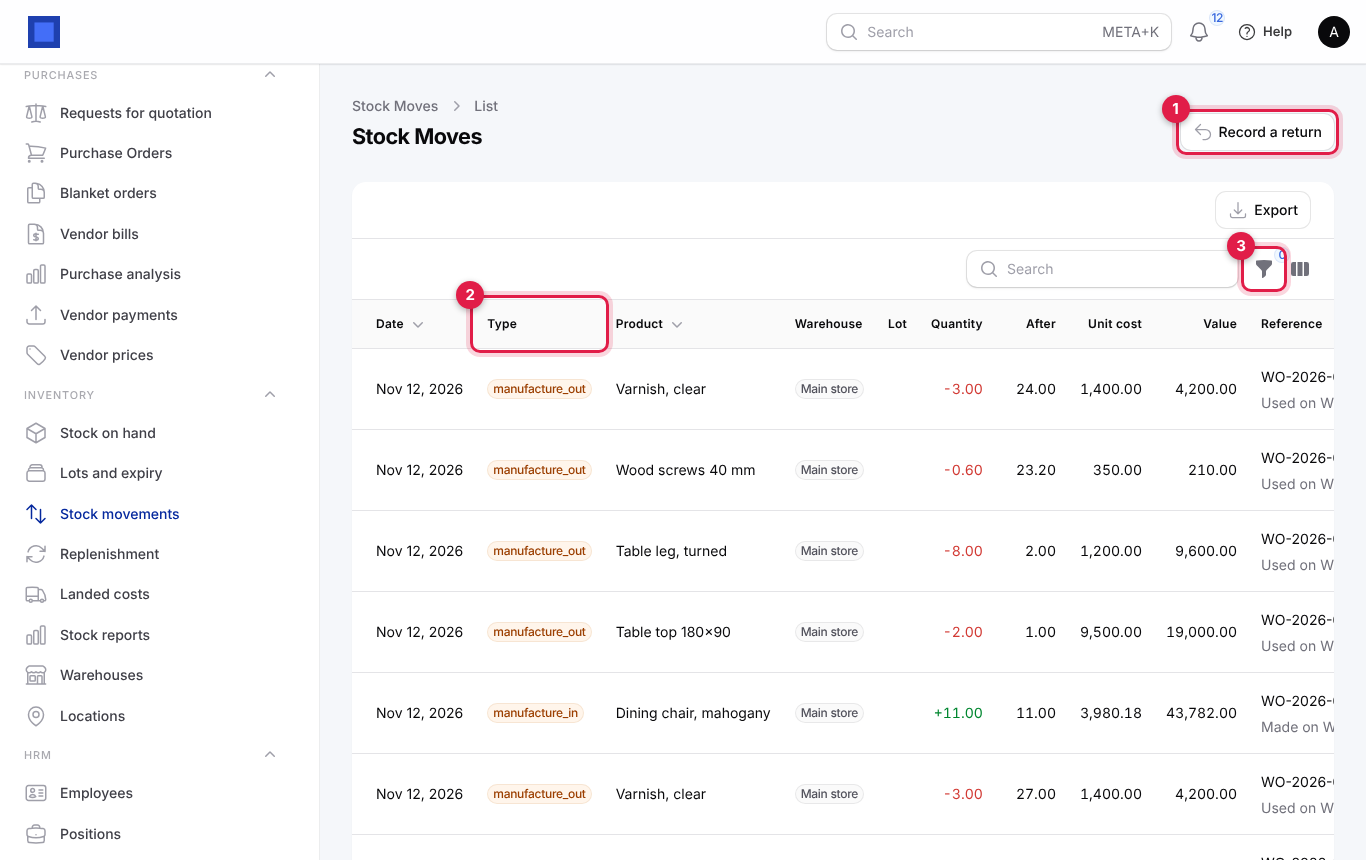
Inventory → Stock movements (headed Stock Moves) is the full history of every move, newest first.
| Column | Meaning |
|---|---|
| Date | The date of the move. |
| Type (marker 2) | Receipt, Delivery, Adjustment, Transfer in, Transfer out, Customer return, Return to vendor. Manufacturing adds moves for materials used and goods made. Incoming types are green, outgoing blue, others amber. |
| Product, Warehouse, Lot | What moved and where. The lot column shows the expiry date under the lot number. |
| Quantity | Plus for in, minus for out. |
| After | The quantity in that warehouse after the move. |
| Unit cost, Value | The cost the move carried. |
| Reference | The invoice, order or reference you typed, with notes under it. |
| By | Who recorded it (hidden by default; switch it on from the column manager). |
Use the filter button (marker 3) to show one Type or one Warehouse.
Print a delivery note, GRN, transfer or adjustment note
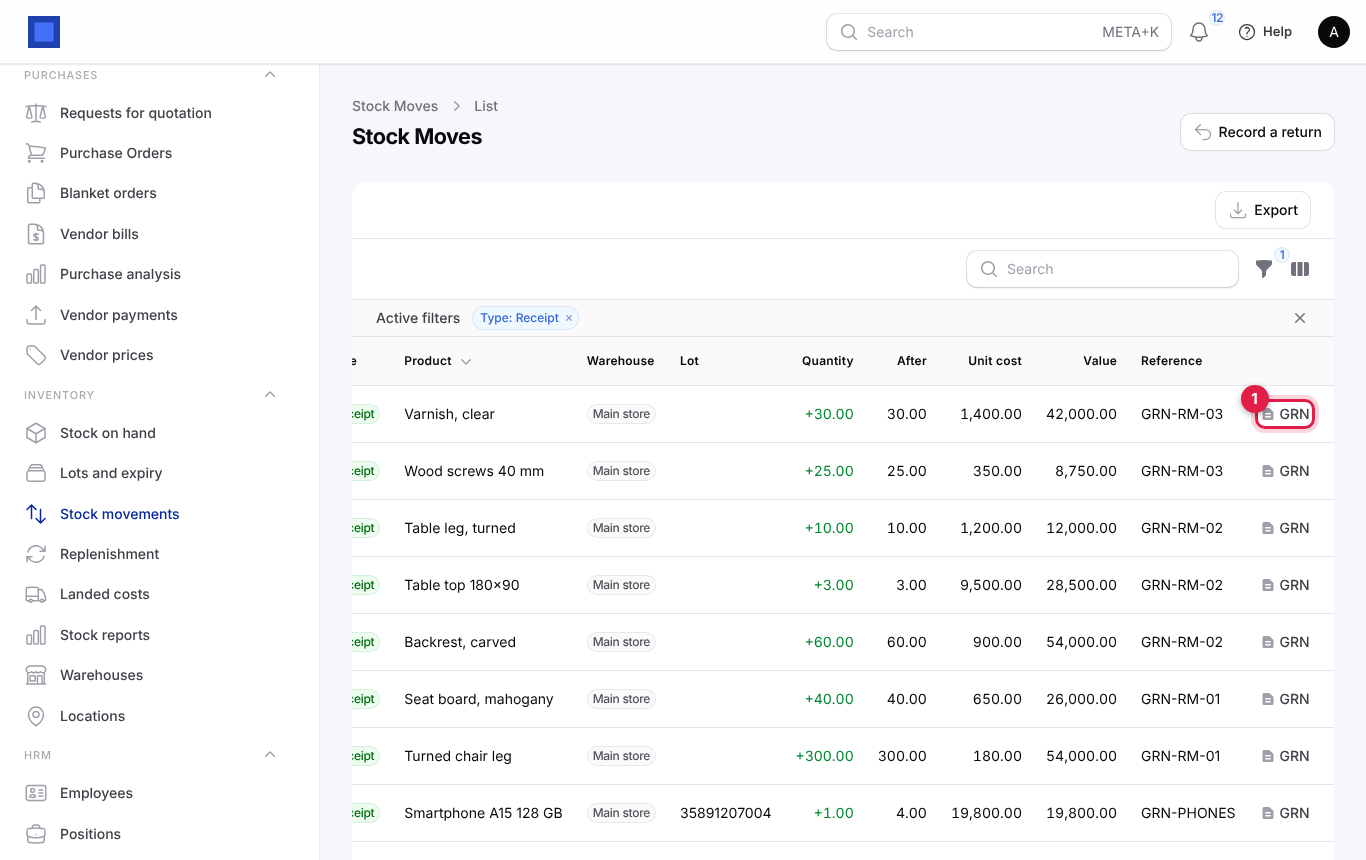
Each row has a button to open its paper document as a PDF in a new tab. It is labelled Delivery note on deliveries, GRN on receipts and Note on everything else.
| Move type | Document | Number |
|---|---|---|
| Delivery | Delivery note (with "Deliver to" the customer) | DN-000123 |
| Receipt | Goods received note (with "Received from" the vendor) | GRN-000123 |
| Transfer in or out | Stock transfer note | TRF-000123 |
| Adjustment and others | Stock adjustment note | ADJ-000123 |
One note covers every line moved together: all lines of the same invoice or order, or all lines with the same reference on the same day in the same warehouse. The note carries your company letterhead, the source document number and the lots. Print it, or save it and send it with the goods.
Record returns
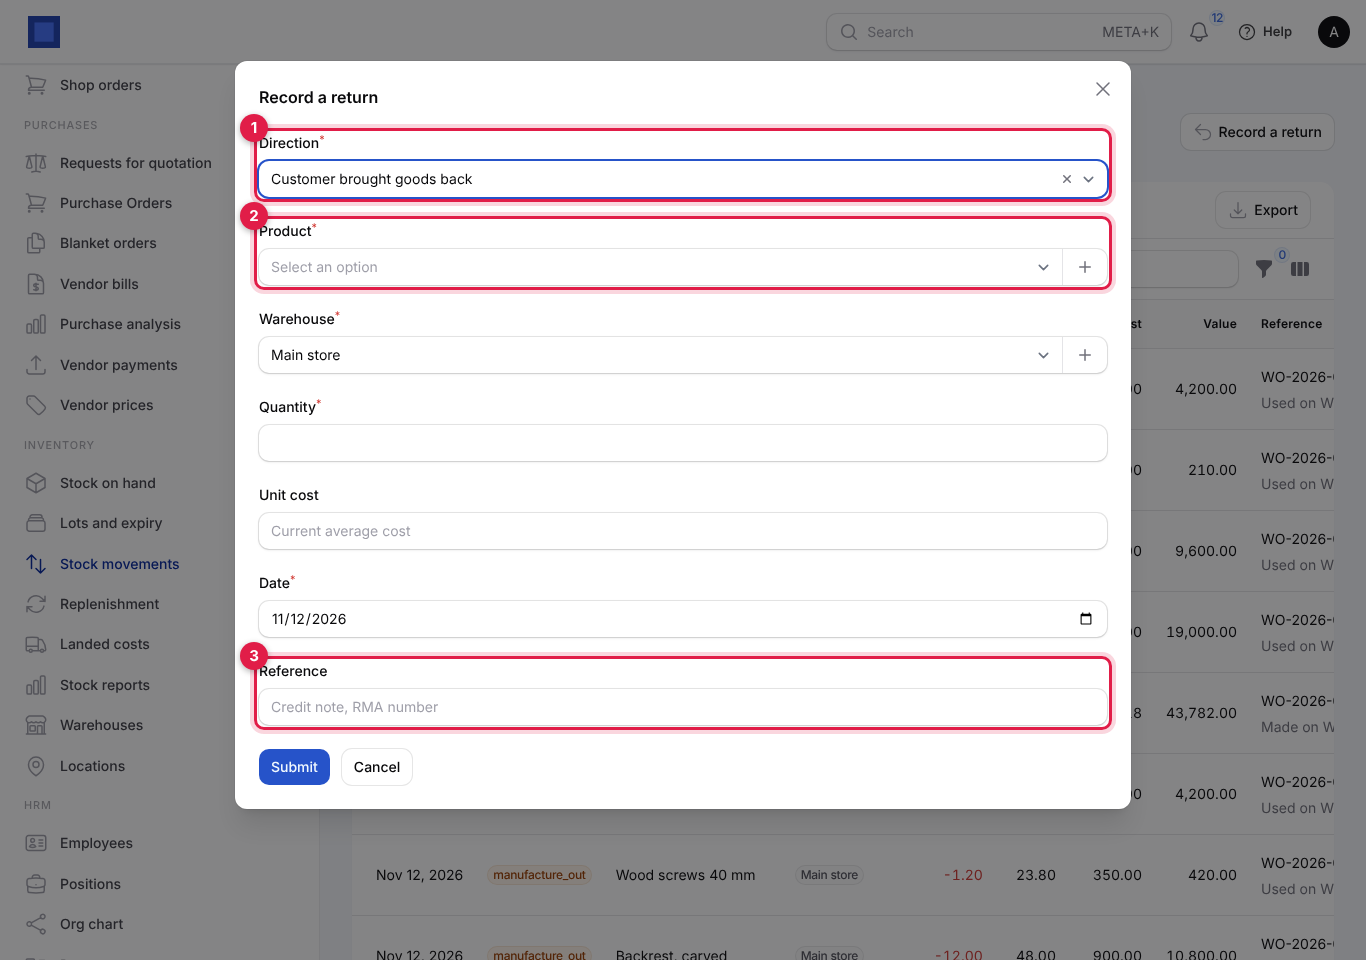
Use Record a return for goods a customer brings back without a credit note, or goods you send back to a supplier.
- On Inventory → Stock movements, click Record a return.
- Choose the Direction (marker 1) and fill in the rest, then click Submit.
| Field | What to enter |
|---|---|
| Direction | Customer brought goods back (stock in) or Goods sent back to the vendor (stock out). |
| Product | Required (marker 2). |
| Warehouse | Required. The warehouse the goods come into or leave from. |
| Vendor | Required when sending back to a vendor. |
| Quantity | Required. |
| Unit cost | Customer returns only. Leave blank to use the current average cost. |
| Date | Required. |
| Reference | Optional (marker 3), for example the credit note or the supplier's RMA number. |
A customer return writes a Customer return move and reverses the cost of goods sold. A return to a vendor writes a Return to vendor move and reduces what you owe that vendor in Accounting. Remember to issue the customer a credit note (Finance → Invoices) or ask the vendor for theirs so the money side matches.
Tip: If you issue a credit note for goods on an invoice, the goods come back automatically. Do not also record a return, or you will count them twice.
Track lots, serial numbers and expiry
Inventory → Lots and expiry lists every lot and serial number with stock, ordered by the soonest expiry. The In stock only filter is on by default.
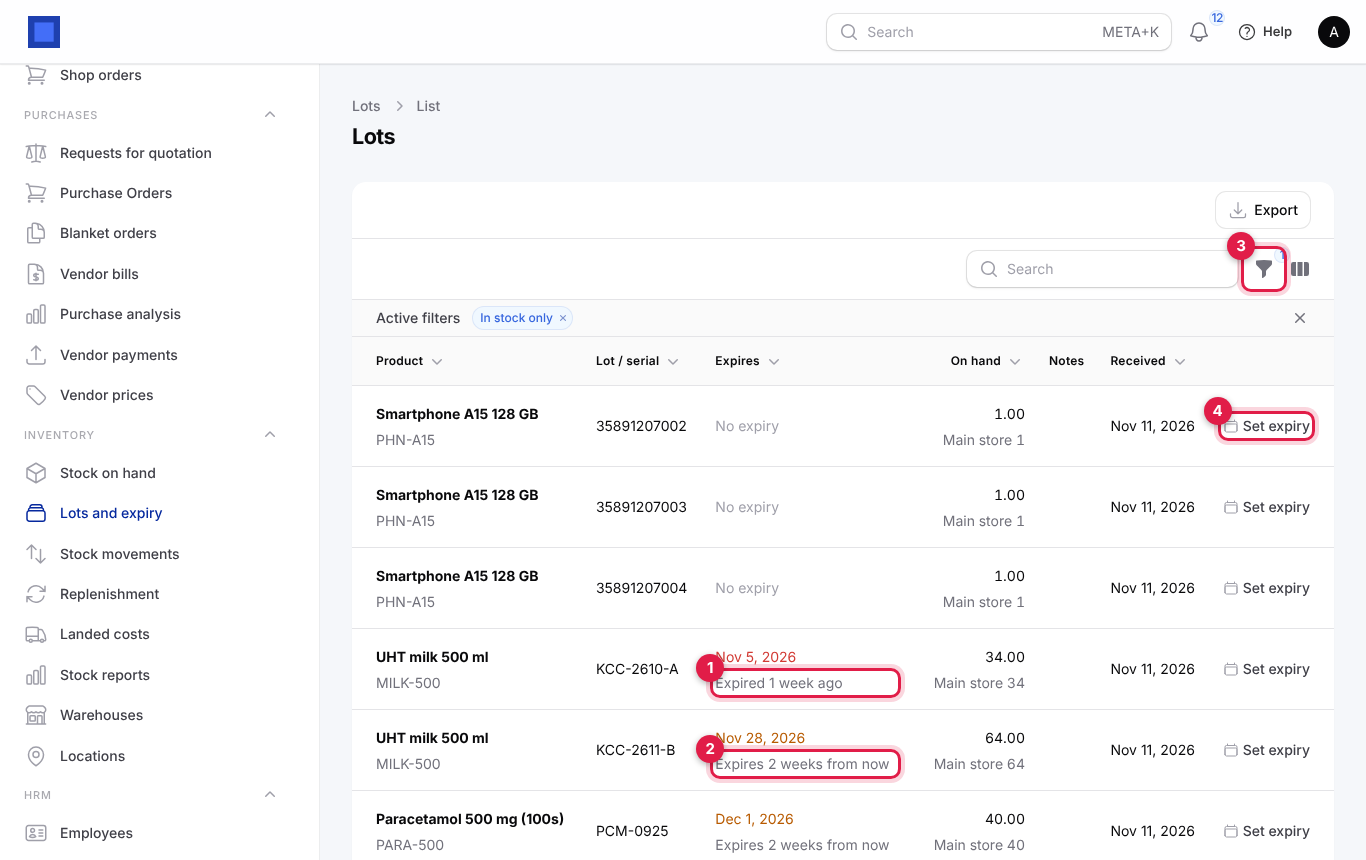
- A lot past its date shows in red with "Expired … ago" (marker 1).
- A lot expiring within the warning period shows in amber with "Expires … from now" (marker 2). The warning period is Expiry warning (days) in Preferences (30 days unless you change it).
- On hand shows the total and, under it, how much is in each warehouse.
- Use the filter button (marker 3) to show one Product, or Expiry: Expired, Expiring soon or In date. Remove In stock only to see used-up lots too.
- Click Set expiry (marker 4) to add or correct a lot's Expiry date and Notes.
Lots and serials can also be found from the global search (Ctrl/Cmd+K) by number.
Tip: Check Expiring soon weekly and run a promotion or move those lots to the till first. To write off expired stock, use Count on Stock on hand: missing stock is taken from expired lots first.
Reorder automatically with Replenishment
A reorder rule says "when this product falls to X, buy enough to get back to Y". NaliSuite counts what is on hand plus what is already on order on confirmed purchase orders, so you do not order twice.
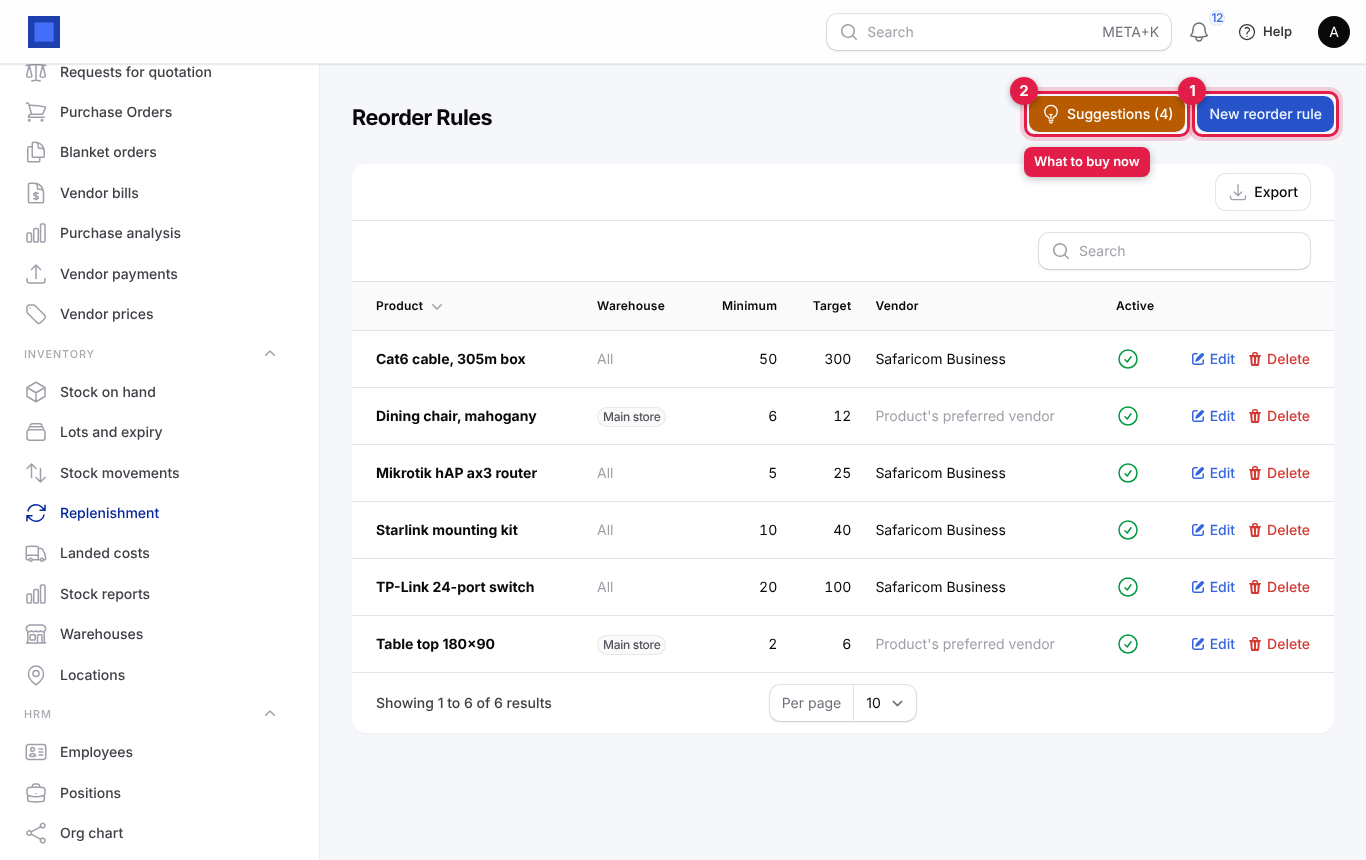
- In the menu, open Inventory → Replenishment (headed Reorder Rules).
- Click New reorder rule (marker 1).
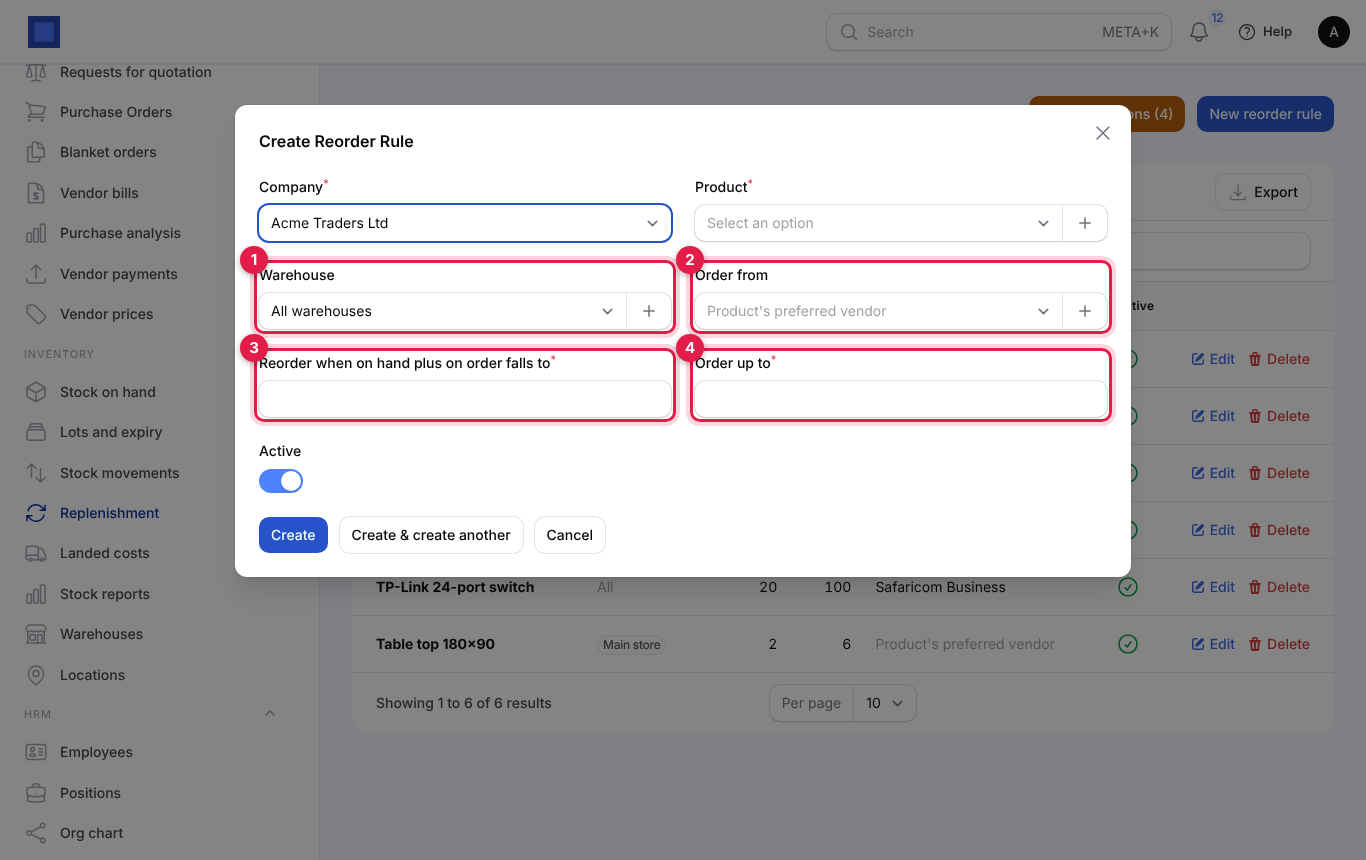
- Fill in the rule and click Create.
| Field | What to enter |
|---|---|
| Company | Required. |
| Product | Required. Only active, stock-tracked products. |
| Warehouse | Optional (marker 1). Leave as All warehouses to count stock everywhere, or pick one to keep a shop topped up on its own. |
| Order from | Optional (marker 2). The vendor to buy from. Leave blank to use the product's preferred vendor. |
| Reorder when on hand plus on order falls to | Required (marker 3). The minimum, for example 5. |
| Order up to | Required (marker 4). The target after ordering, for example 25. NaliSuite suggests target minus on hand minus on order. |
| Active | Turn off to pause a rule without deleting it. |
Turn suggestions into purchase orders
- On Replenishment, click Suggestions (marker 2 above). The number in brackets is how many products need buying now.
- Check the list: On hand, On order, Minimum, the quantity to Order (marker 1) and the Vendor.
- Click Create purchase orders (marker 2).
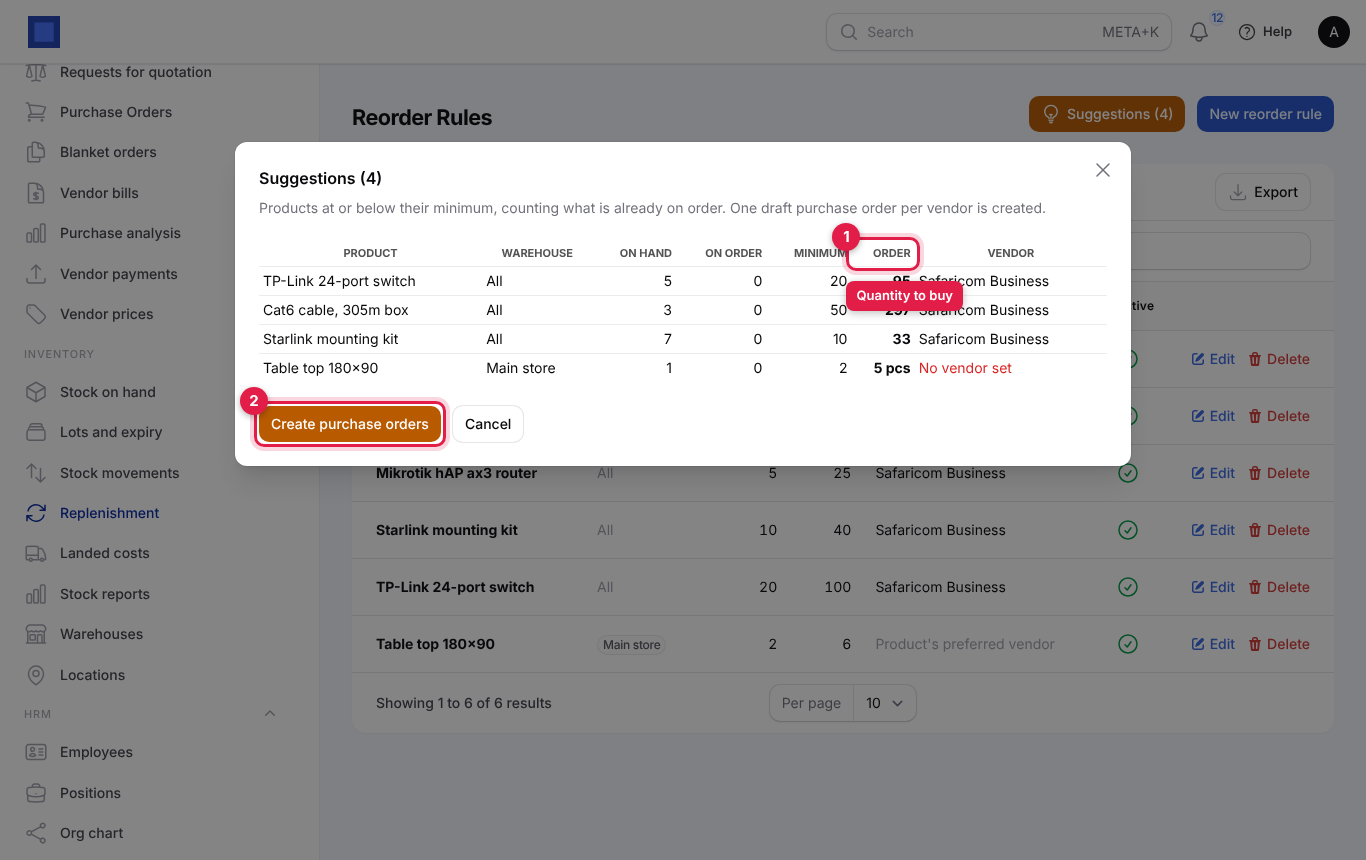
One draft purchase order is created per vendor, using the vendor's price list (Purchases → Vendor prices) or the product's cost price. Open it from the notification, check it, then Confirm and send it. Lines showing No vendor set in red are skipped: set a preferred vendor on the product or an Order from vendor on the rule.
Note: The Purchases module must be on to create purchase orders. Nothing is ordered until you confirm the draft.
Add landed costs (freight, duty, clearing)
Landed costs add the extra costs of getting goods to your store, such as sea freight, customs duty, KEBS fees and the clearing agent, to the cost of the goods themselves, so your margins are true.
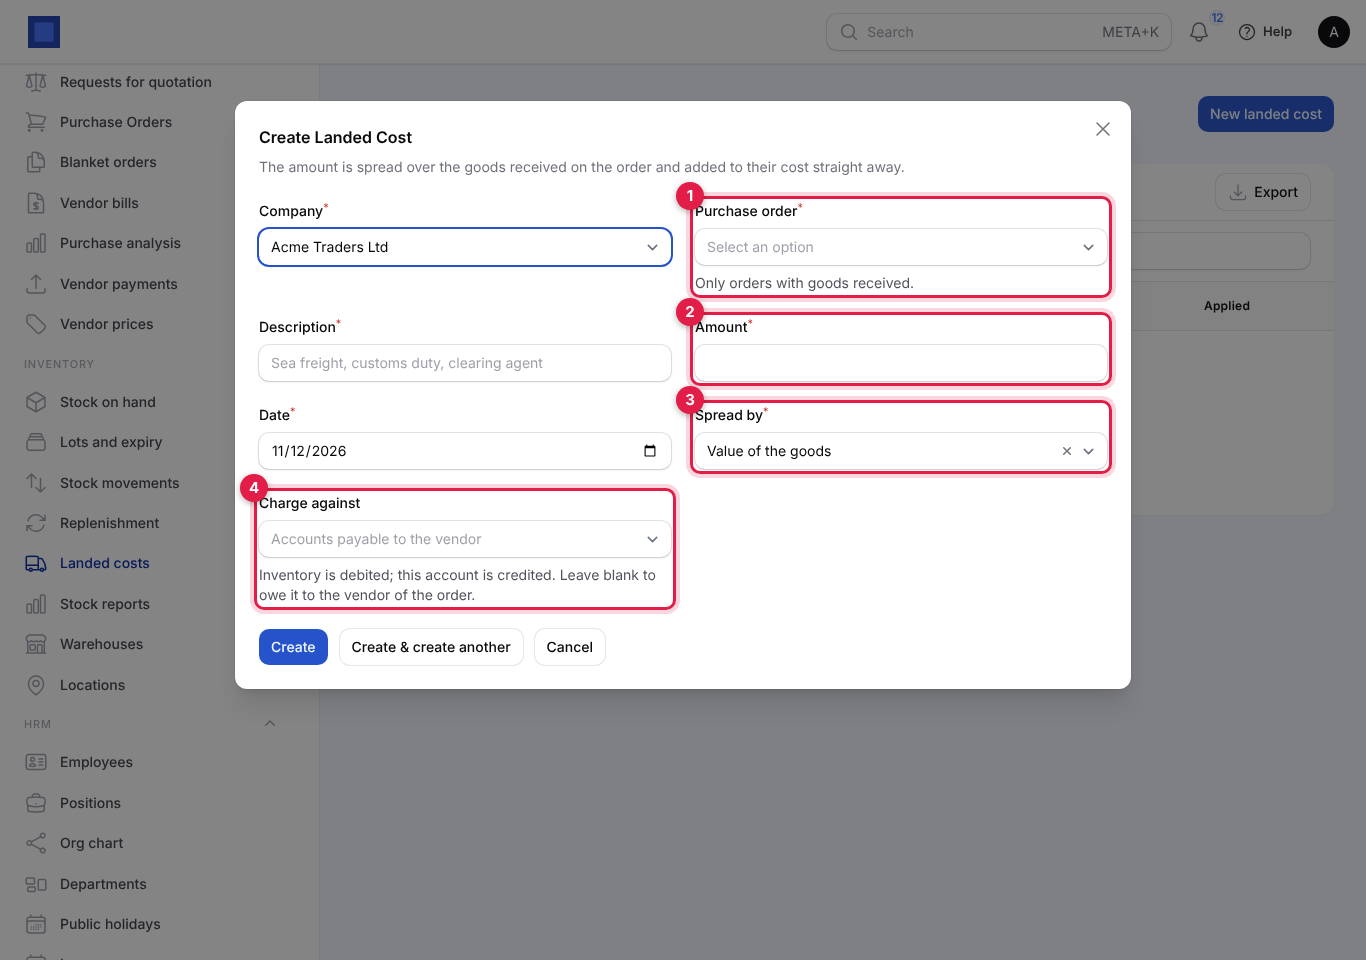
- In the menu, open Inventory → Landed costs and click New landed cost.
- Fill in the form and click Create. The amount is applied to the stock straight away.
| Field | What to enter |
|---|---|
| Company | Required. |
| Purchase order | Required (marker 1). Only orders with goods received are listed. |
| Description | Required, for example "Sea freight Mombasa", "Import duty". |
| Amount | Required (marker 2), in the company currency. |
| Date | Required. |
| Spread by | Required (marker 3). Value of the goods (a KES 100,000 item takes ten times the share of a KES 10,000 item) or Quantity received (each unit takes the same share). Use value for duty and insurance, quantity for freight of similar items. |
| Charge against | Shown when Accounting is on (marker 4). Inventory is debited; this account is credited. Leave blank to owe it to the vendor of the order (accounts payable). Pick the clearing agent's payable or a bank account if you paid someone else. |
You see Landed cost applied to the stock, and the average cost on Stock on hand goes up. The Applied column shows when it was applied. A landed cost can be applied only once and cannot be edited afterwards; if the amount was wrong, add another (negative amounts are not allowed, so correct the difference with a journal entry). If nothing has been received on the order yet, you see "Nothing has been received on that purchase order yet." and nothing is saved.
Choose a costing method (FIFO, average or standard)
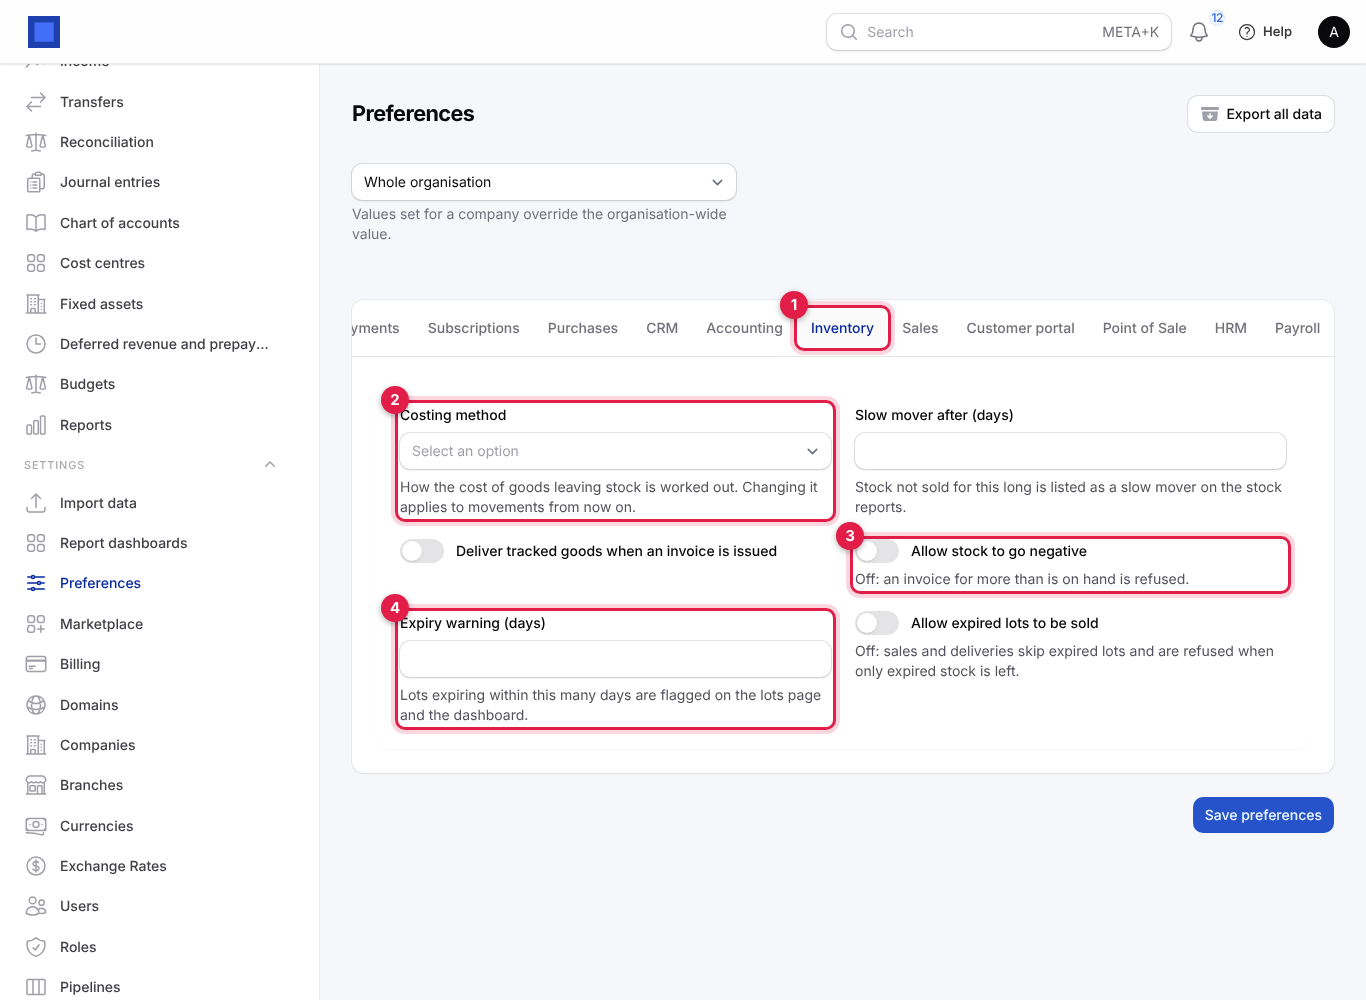
- In the menu, open Settings → Preferences and click the Inventory tab (marker 1).
- Set the options and click Save preferences.
| Setting | What it does |
|---|---|
| Costing method (marker 2) | How the cost of goods leaving stock is worked out. Weighted average (default): every unit costs the running average. First in, first out (FIFO): goods leave at the cost of the oldest receipts still on hand. Standard cost from the product: goods leave at the product's Cost price. Changing it applies to movements from now on, not to the past. |
| Slow mover after (days) | Stock not sold for this many days (90 by default) is listed under Slow movers in Stock reports. |
| Deliver tracked goods when an invoice is issued | On by default. Turn off if you do not want invoices to move stock. |
| Allow stock to go negative (marker 3) | Off by default: an invoice or transfer for more than is on hand is refused. Turn on only if you sell before you receive and will correct later. |
| Expiry warning (days) (marker 4) | Lots expiring within this many days are flagged amber on Lots and expiry and the dashboard. |
| Allow expired lots to be sold | Off by default: sales and deliveries skip expired lots and are refused when only expired stock is left. |
The Whole organisation box at the top lets you set a different value for one company; values set for a company override the organisation-wide value.
Tip: Pick your costing method before you start trading and leave it. Most small shops use weighted average. FIFO suits goods whose buying price changes often, such as imported electronics.
Consignment stock
Consignment goods belong to the supplier until you sell them. Mark the product Consignment stock and set its Preferred vendor (see Set up your products). Then:
- Receive the goods as normal. Their value is kept out of your stock value.
- Each sale owes the vendor the cost: the delivery posts cost of sales against accounts payable for that vendor.
- To pay the vendor, settle what has sold into a bill:
- In the menu, open Inventory → Stock reports and choose Consignment stock in the report list.
- Click Settle consignment (marker 1).
- Choose the Vendor, and optionally Sales from and Sales until dates, then click Submit.
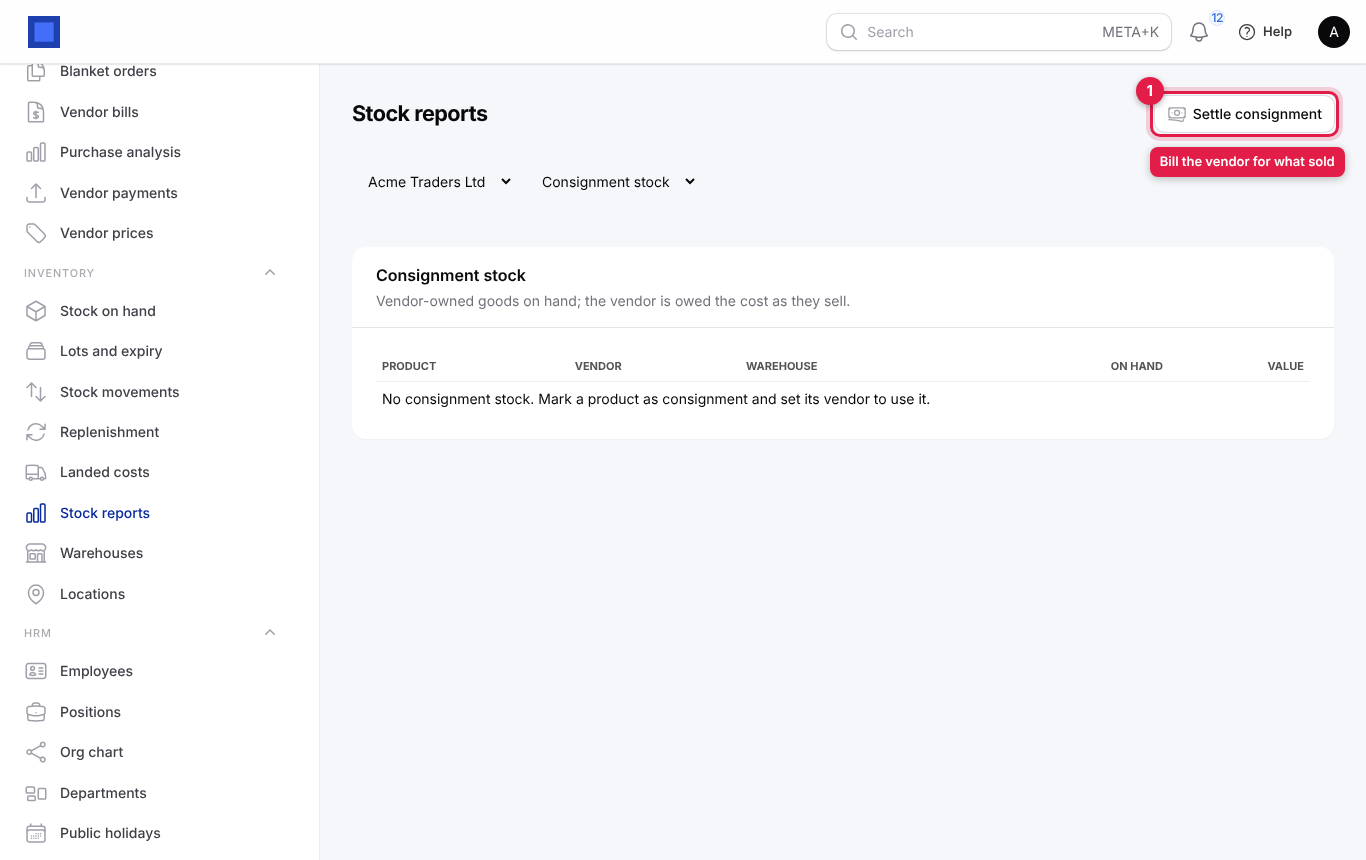
A draft bill to the vendor opens, listing everything of theirs sold and not yet settled. Check it and approve it in Purchases → Vendor bills. Each sale is settled only once. If nothing has sold you see "Nothing sold on consignment for this vendor in that period." The button needs the Purchases module and the bills.manage permission.
Dropshipping
For a product whose Fulfilment is Dropship: the vendor ships to the customer:
- Sell it on a quotation or sales order as normal (Sales → Quotations & Orders).
- When the order is confirmed, NaliSuite creates a purchase order to the product's preferred vendor, marked as a dropship, with a note saying who to deliver to and the customer's address.
- Confirm and send that purchase order to the vendor. No stock moves in your warehouses, and invoicing the customer does not take stock.
Note: A dropship product without a preferred vendor is not ordered automatically. Set the vendor on the product.
Print barcode labels
- In the menu, open Sales → Products.
- Tick the products you want labels for (marker 1).
- Click Bulk actions (marker 2), then Print labels (marker 3).
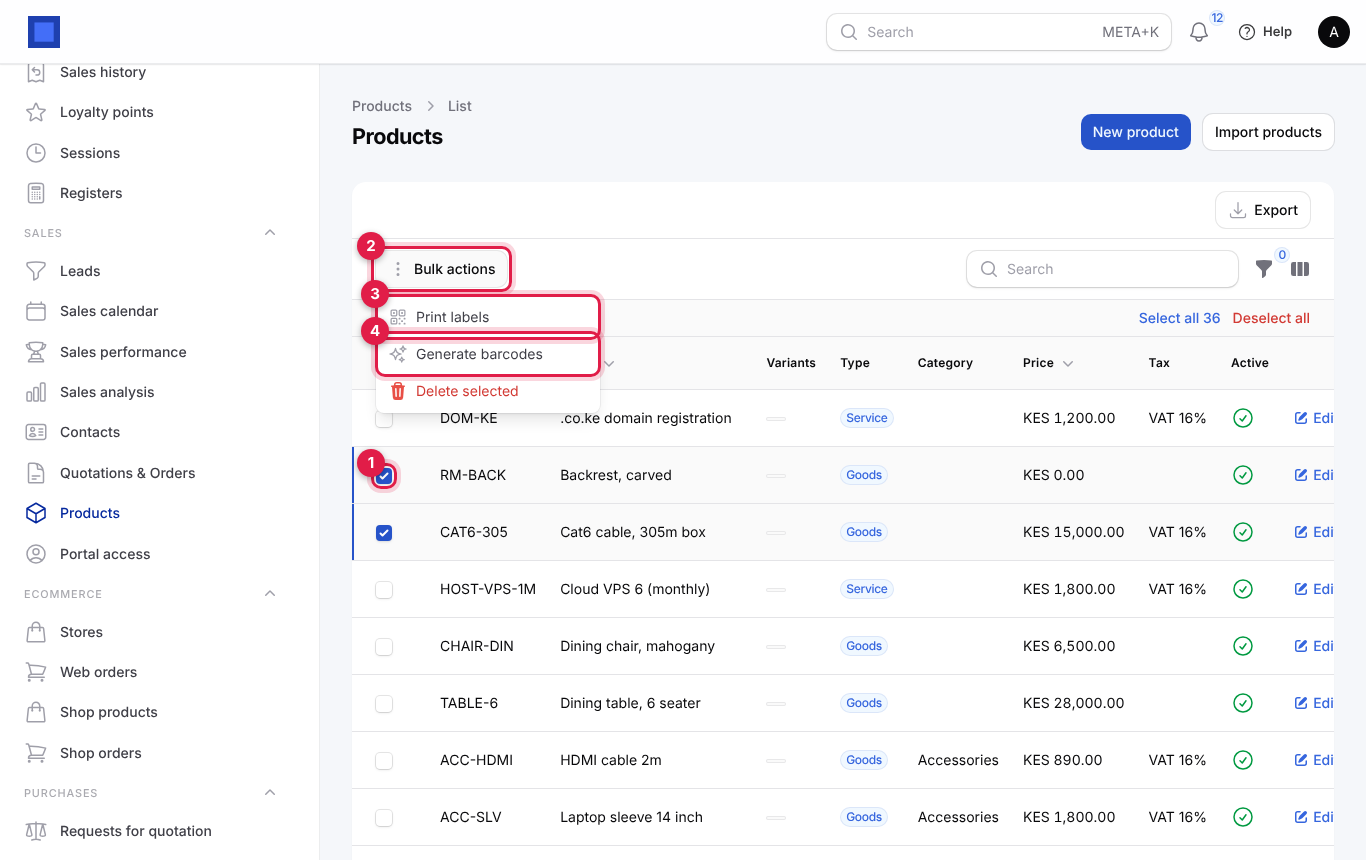
- Choose the layout and click Submit. A
labels.pdffile downloads; print it on A4 label sheets.
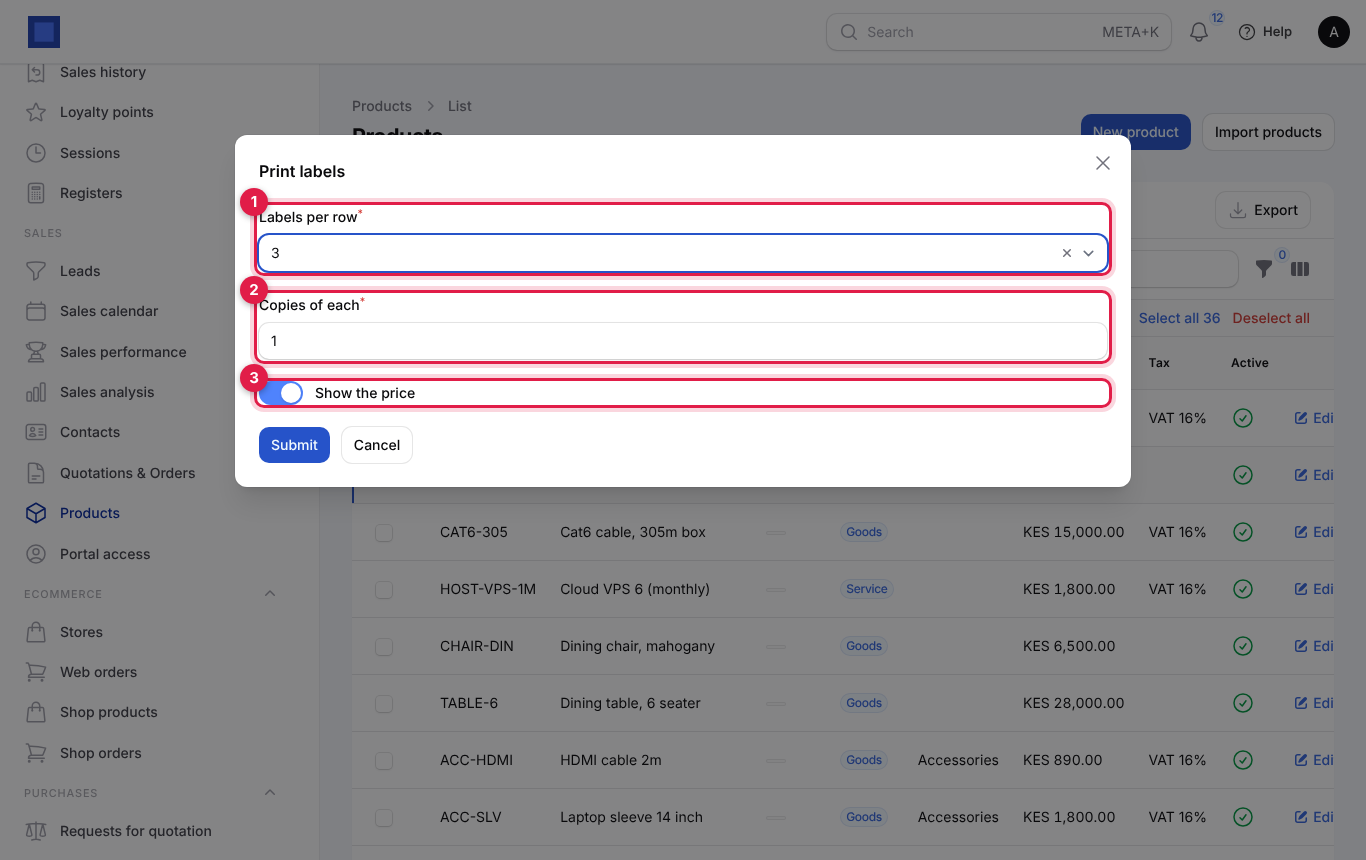
| Field | What to enter |
|---|---|
| Labels per row | 2, 3 or 4 (marker 1). Match your label sheet. |
| Copies of each | 1 to 50 (marker 2). For example the quantity on the shelf. |
| Show the price | On to print the sale price under the barcode (marker 3). |
Products without a barcode need one first: tick them and choose Bulk actions → Generate barcodes (marker 4 on the first picture). Products that already have a barcode are left alone; new codes are in-store EAN-13 numbers. Scan the labels at the till or with a phone camera.
Import opening stock from a spreadsheet
When you start using NaliSuite you can load all your stock at once.
- Import your products first (Sales → Products → Import products).
- In the menu, open Settings → Import data and choose Stock on hand.
- Upload a CSV or spreadsheet with these columns and match them on screen:
| Column | What to put |
|---|---|
| Product | Required. The SKU, barcode or exact product name, for example MF-2KG. |
| Warehouse | Optional. The warehouse code or name, for example MAIN. Blank means the default warehouse. |
| Quantity on hand | Required. What you counted, for example 120. |
| Unit cost | Optional. Cost per unit, for example 140. Blank uses the product's cost price. |
Each row is posted as a stock adjustment to the quantity given. You need the inventory.adjust permission.
Stock reports
- In the menu, open Inventory → Stock reports.
- Choose the company and the report (marker 1).
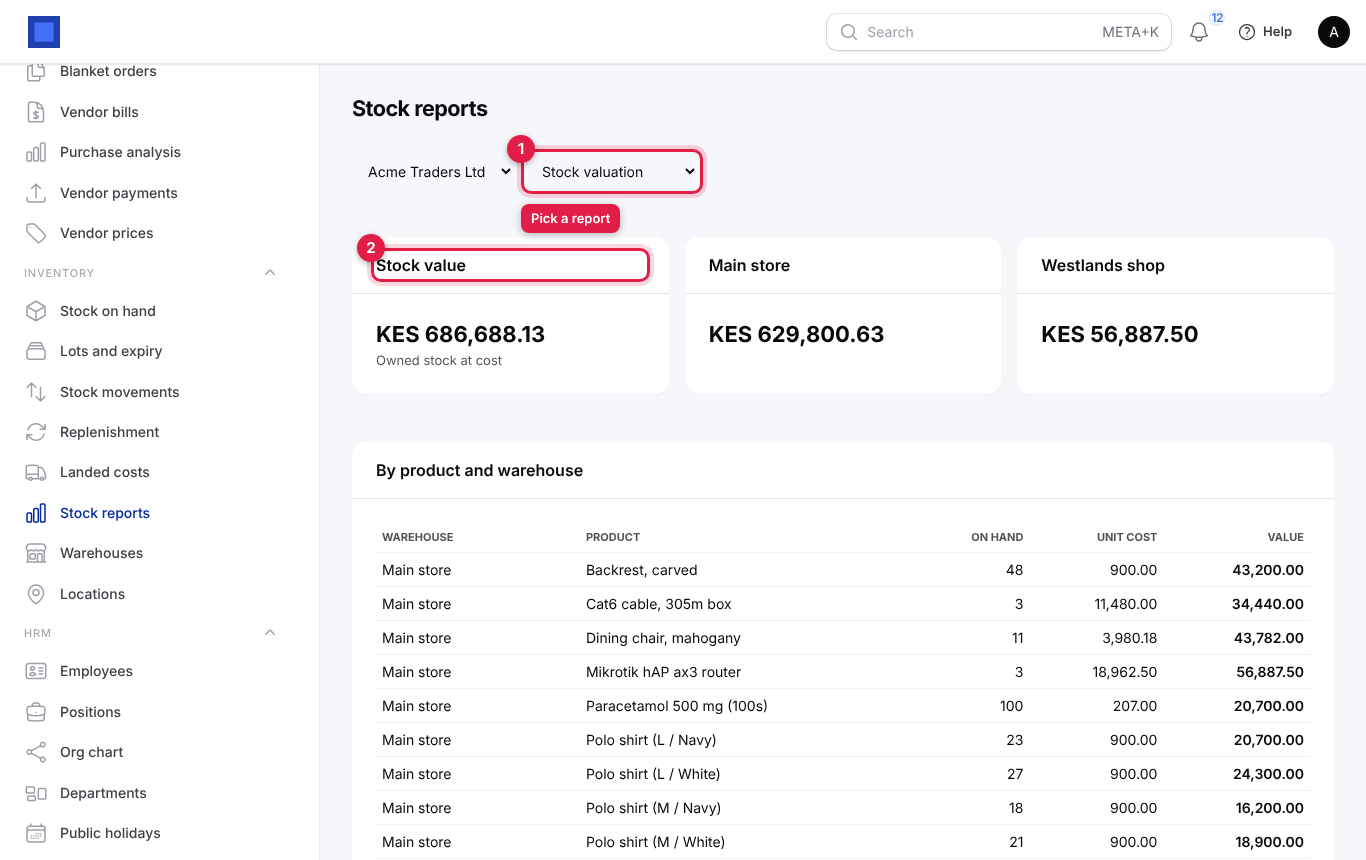
| Report | What it shows |
|---|---|
| Stock valuation | Total Stock value of owned stock at cost (marker 2), the value per warehouse, consignment stock (vendor-owned, not in the total), and a table by product and warehouse. Use it at month end to check the inventory balance in Accounting. |
| Movements | For This month, This quarter, This year or Last 12 months: moves, quantity and value by movement type, and quantity in and out per product. |
| Slow movers | Products in stock with no sale for longer than Slow mover after (days), with their value and the date last sold ("Never" if never sold). Good candidates for a promotion or return to the vendor. |
| Consignment stock | Vendor-owned goods on hand and their value, with Settle consignment. |
Stock on hand, Stock movements and Lots and expiry also have Export for spreadsheets.
What is posted to the ledger
When the Accounting module is on, stock moves post journal entries in the General journal (the move links to its entry):
| Event | Debit | Credit |
|---|---|---|
| Delivery (invoice, till sale) | Cost of sales | Inventory |
| Delivery of consignment goods | Cost of sales | Accounts payable (the vendor) |
| Customer return | Inventory | Cost of sales |
| Return to vendor | Accounts payable (the vendor) | Inventory |
| Count: stock found | Inventory | Inventory adjustment |
| Count: stock missing | Inventory adjustment | Inventory |
| Landed cost | Inventory | The Charge against account, or accounts payable |
Receipts from purchase orders are valued at the order price; the vendor bill you create from the order records what you owe. Manual receipts and transfers do not post. Moves with zero value do not post.
Common questions
Why does a product not appear on Stock on hand? It appears once it has had stock in a warehouse. Check that the product is Goods with Track stock on, then receive or count some stock.
Why was my invoice refused with "not enough stock"? The default warehouse holds less than the invoice quantity and Allow stock to go negative is off. Receive the stock, transfer it into the default warehouse, or correct the count, then issue the invoice again.
I received a purchase order into the wrong warehouse. How do I fix it? Purchase orders always receive into the default warehouse. Use Transfer on Stock on hand to move the goods to the right warehouse.
Can I delete a wrong stock move? No. Moves are permanent so the history and the ledger stay honest. Correct it with Count, Transfer or Record a return, and write the reason.
Why did the average cost change after a landed cost? That is the point: freight and duty are part of what the goods cost you. The new average is used for every sale from now on.
My stock value does not match the Inventory account in Accounting. Why? Common causes are manual receipts (not posted), opening balances entered directly in the ledger, or bills coded to an expense account instead of inventory. Compare Stock valuation with the account and post a journal entry for the difference.
How do I stop selling expired milk? Make sure the product is tracked By lot with an expiry date, enter expiry dates when receiving, and leave Allow expired lots to be sold off.
Can different shops have different reorder levels? Yes. Add one reorder rule per warehouse instead of one for All warehouses.