eCommerce connectors: WooCommerce and Shopify
The eCommerce connectors app links your online shop to NaliSuite, so you sell online and keep one set of stock and books. Products in the shop are matched to your NaliSuite products by SKU (or created), stock levels are pushed to the shop as they change, web orders come in as confirmed sales orders with the customer, are invoiced and marked paid when the shop collected the money, and deliveries you record are reported back to the shop as fulfilled. It works with WooCommerce (WordPress) and Shopify, as many shops as you run. Everything is under eCommerce in the left menu: Stores and Web orders. (The Shop products and Shop orders items in the same group belong to the separate Online Shop app, the shop hosted by NaliSuite itself.)
Switch the app on
The connectors are an add-on sold separately from your plan.
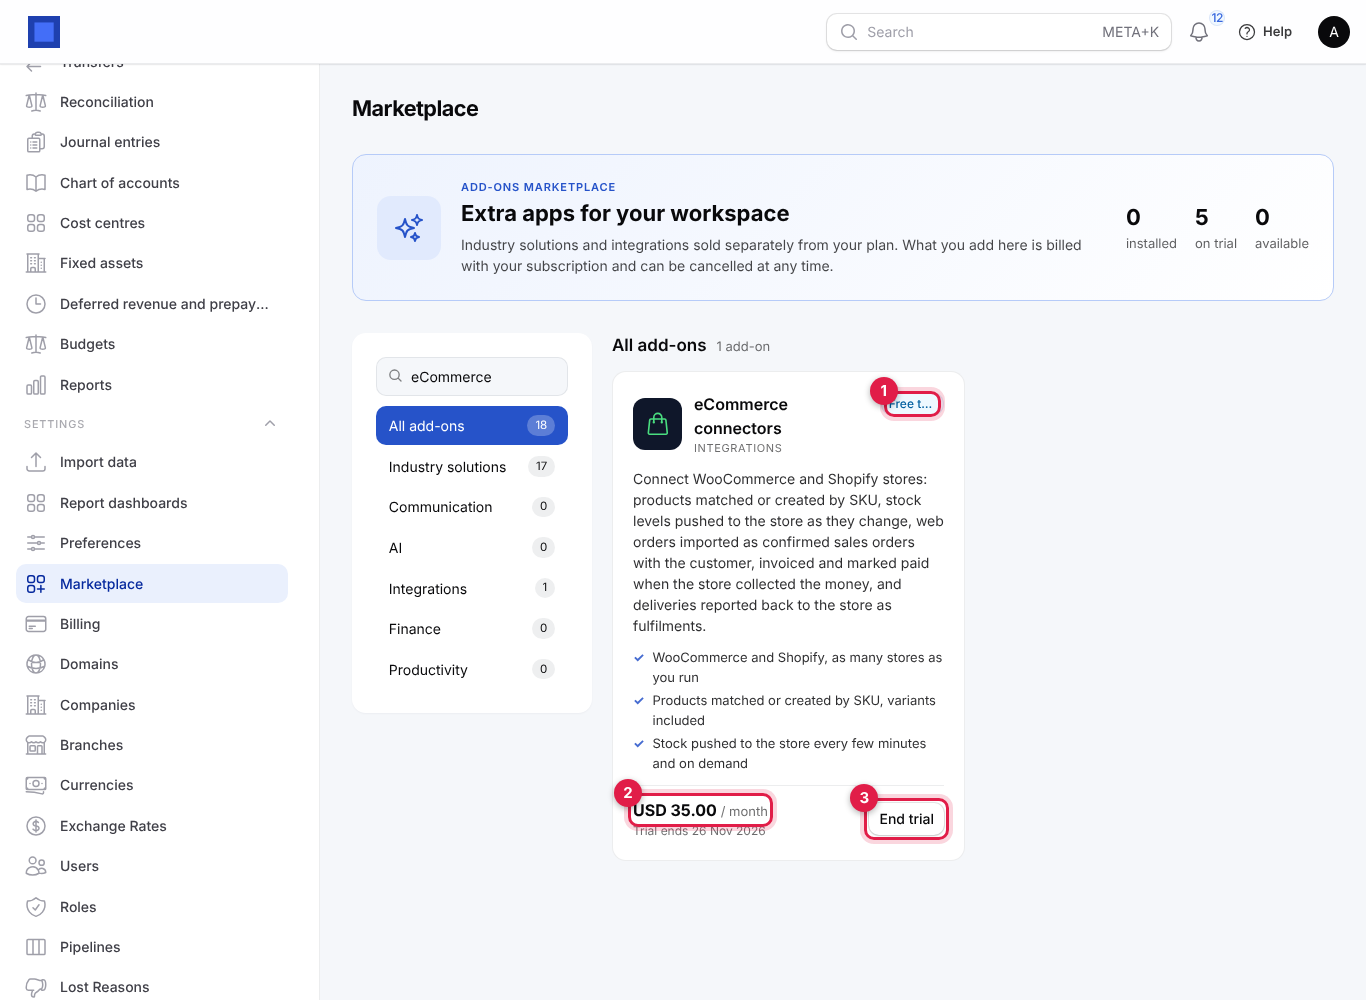
- Open Settings → Marketplace and find eCommerce connectors under Integrations (or search for it). The card shows the monthly price (marker 2).
- Click Start free trial (or Add to subscription) and confirm. During the trial the card shows Free trial (marker 1) and its end date. The eCommerce menu appears straight away.
- End trial (marker 3) or Cancel switches it off at the end of the paid period. Stores stop syncing; your sales orders and invoices stay.
Permissions (under Settings → Roles): ecommerce.view (see stores and web orders) and ecommerce.manage (connect stores, run syncs, mark orders fulfilled).
Before you connect
- SKUs. Matching is by SKU. Give every product the same SKU in the shop and in NaliSuite (Sales → Products). Variants (sizes, colours) each need their own SKU.
- Get API keys from the shop:
- WooCommerce: in WordPress go to WooCommerce → Settings → Advanced → REST API → Add key, give it Read/Write permission and copy the Consumer key (
ck_…) and Consumer secret (cs_…). - Shopify: in the Shopify admin go to Settings → Apps and sales channels → Develop apps, create an app, give it read and write access to products, inventory and orders, install it and copy the Admin API access token (
shpat_…) and the app's API secret key.
- WooCommerce: in WordPress go to WooCommerce → Settings → Advanced → REST API → Add key, give it Read/Write permission and copy the Consumer key (
Connect a store
- Open eCommerce → Stores. Each store shows its address, platform, the number of linked products and imported orders, when orders were last pulled (marker 2) and stock last pushed, and the Last error (marker 3) if a sync failed.
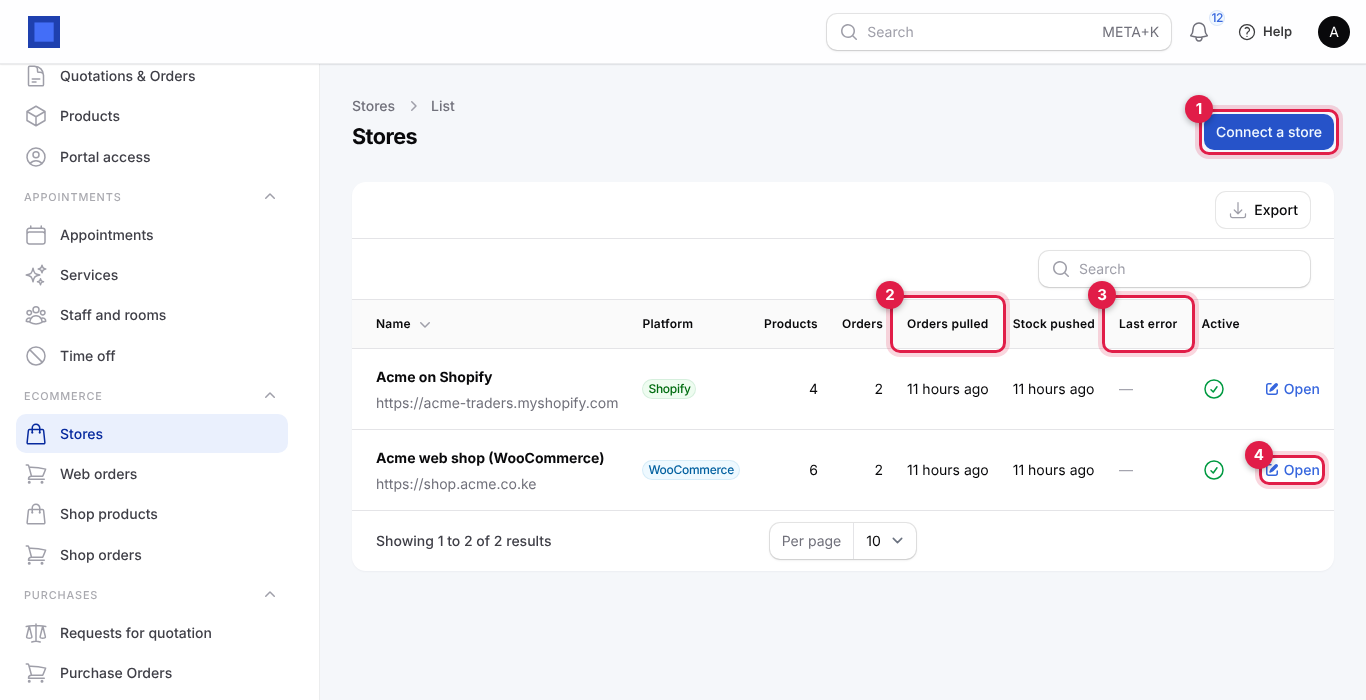
- Click Connect a store (marker 1).
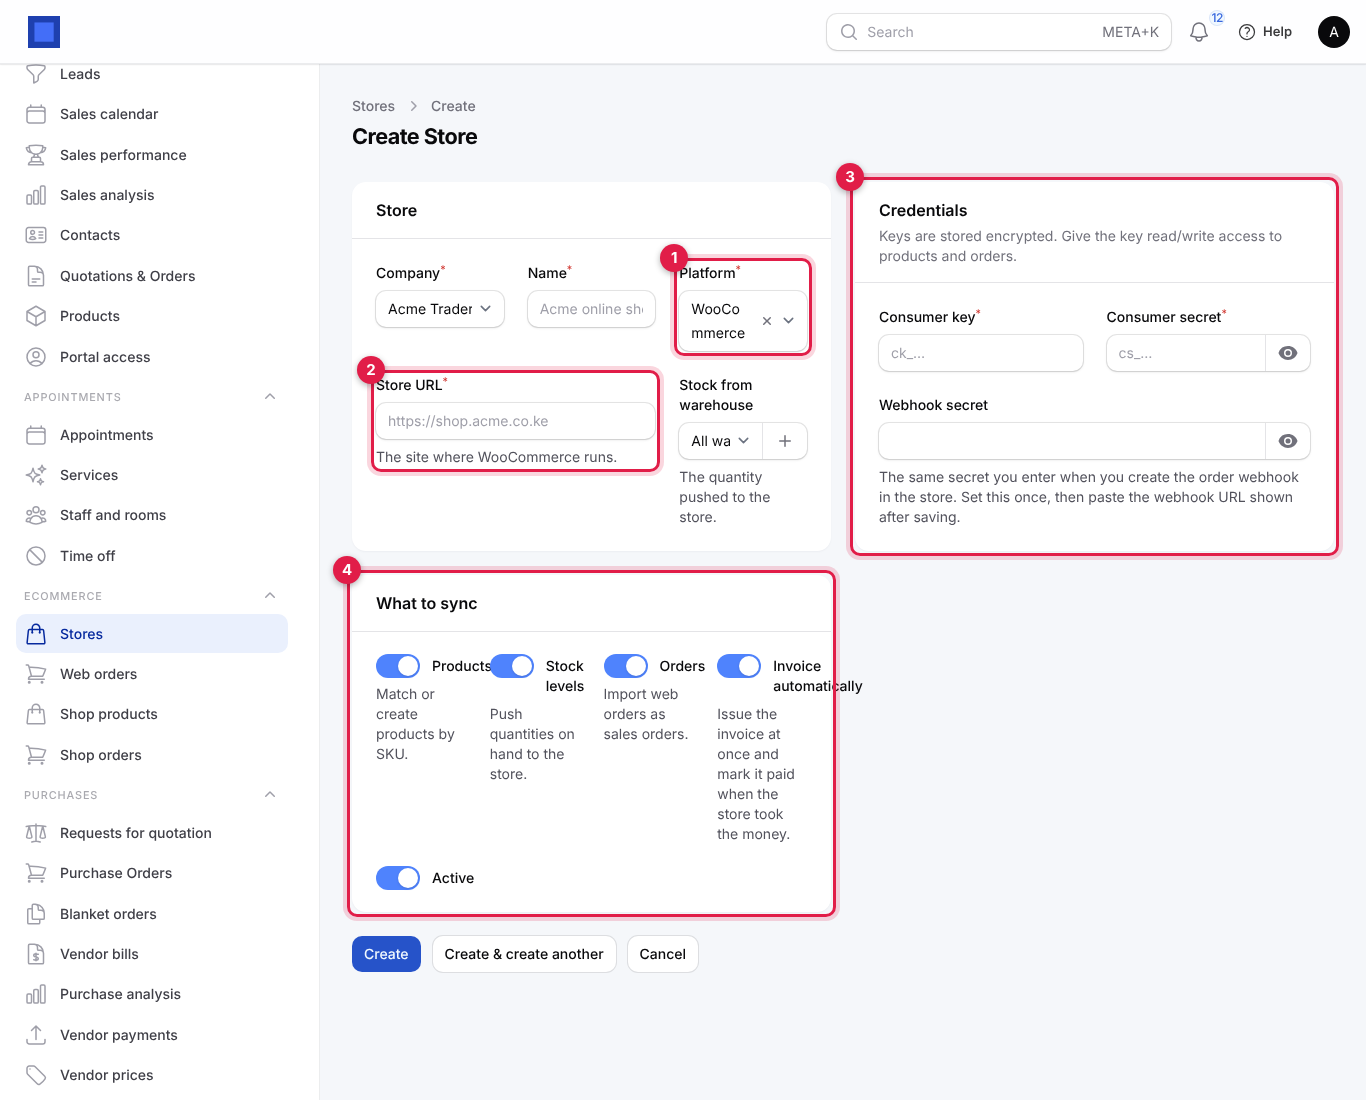
| Field | What to enter |
|---|---|
| Company (required) | Which company sells through the shop; it sets currency, stock and the books. |
| Name (required) | For example Acme online shop. |
| Platform (required, marker 1) | WooCommerce or Shopify. The credential fields change with it. |
| Store URL (required, marker 2) | WooCommerce: the site where WooCommerce runs, for example https://shop.acme.co.ke. Shopify: the myshopify.com address, for example https://acme-traders.myshopify.com. It must be a public web address; addresses on a private or internal network are refused. |
| Stock from warehouse | The warehouse whose quantity is pushed to the shop. All warehouses adds them together. |
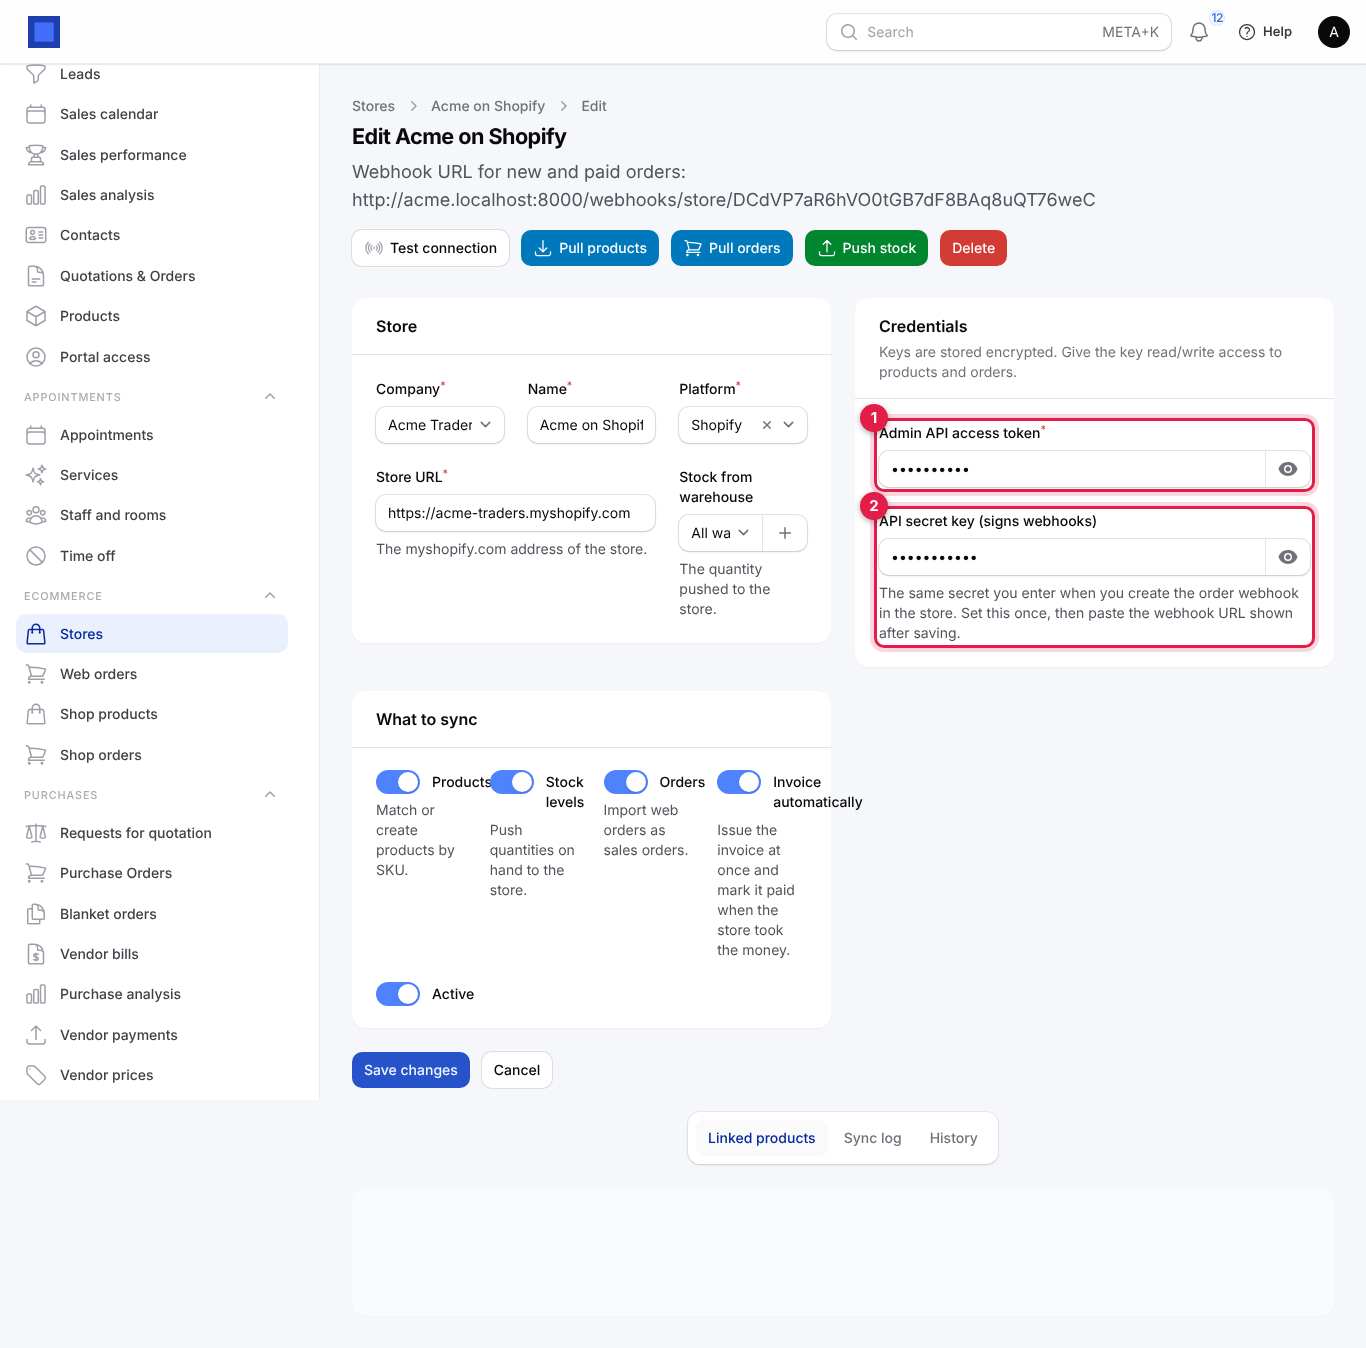
| Credentials (marker 3) | WooCommerce: Consumer key, Consumer secret and Webhook secret. Shopify: Admin API access token and API secret key (signs webhooks). Keys are stored encrypted. |
| What to sync (marker 4) | Products (match or create products by SKU), Stock levels (push quantities on hand to the shop), Orders (import web orders as sales orders), Invoice automatically (issue the invoice at once and mark it paid when the shop took the money). |
| Active | Off pauses all syncing for the store. |
For a Shopify store the credentials box looks like this: Admin API access token (marker 1) and API secret key (signs webhooks) (marker 2).
- Click Create. The store opens.
Run the first sync and set up the order webhook
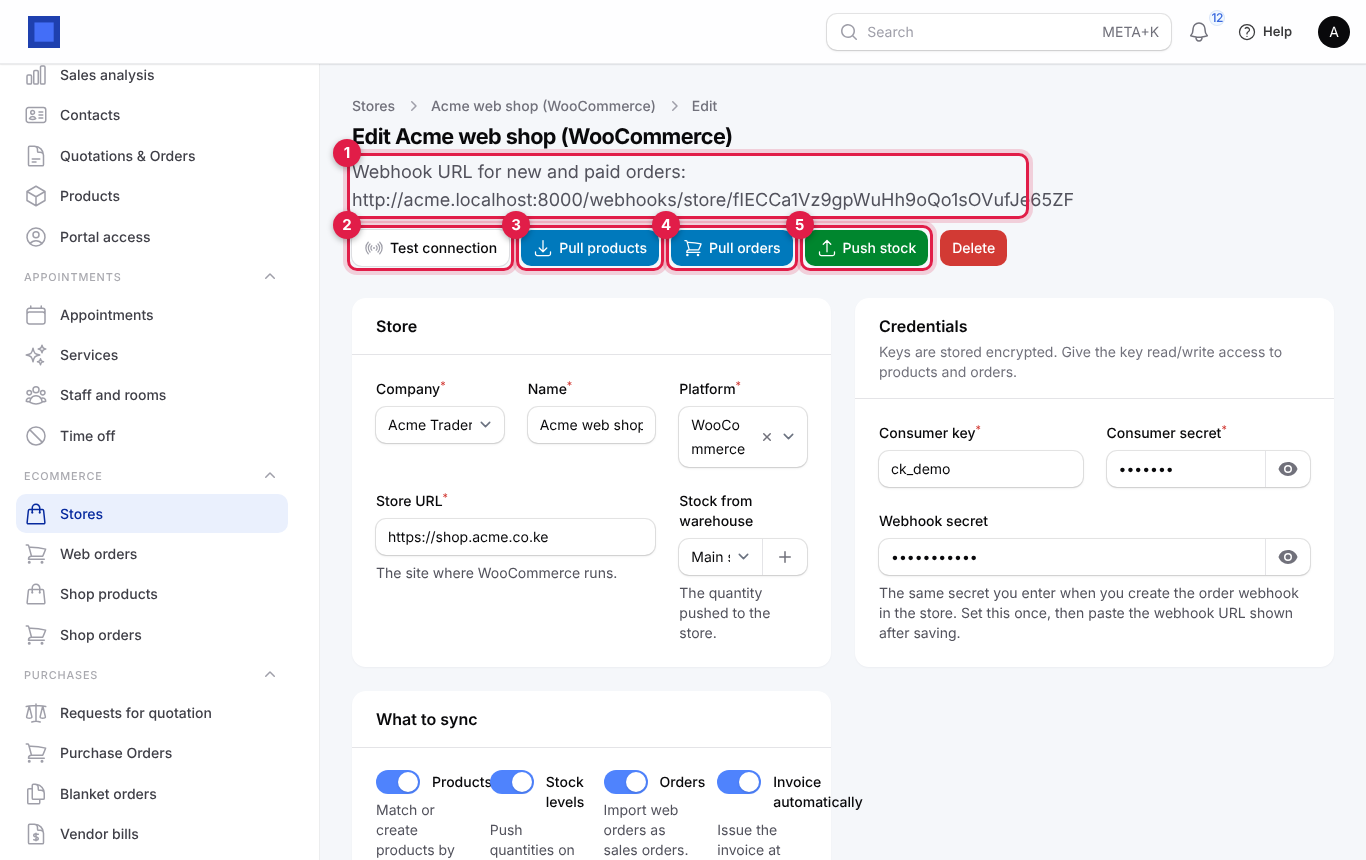
- Click Test connection (marker 2). A green message with the shop's own name means the keys work; a red one gives the shop's error (wrong key, wrong URL, missing permission).
- Click Pull products (marker 3). Every shop product is matched to a NaliSuite product by SKU; products with no match are created as stocked products. The message says how many were linked and how many are new.
- Click Push stock (marker 5) to send your quantities on hand to the shop now.
- Click Pull orders (marker 4) to import orders placed so far.
- Copy the Webhook URL for new and paid orders under the title (marker 1) and register it in the shop, so new and paid orders arrive within seconds instead of waiting for the next scheduled sync:
- WooCommerce: WooCommerce → Settings → Advanced → Webhooks → Add webhook, topic Order created (and a second one for Order updated), delivery URL = the webhook URL, secret = the Webhook secret you typed in NaliSuite.
- Shopify: Settings → Notifications → Webhooks → Create webhook, events Order creation and Order payment, format JSON, URL = the webhook URL. Shopify signs them with the app's API secret key.
After that, everything runs by itself: every 15 minutes NaliSuite pulls new and changed orders and pushes the stock of every linked product whose quantity changed since the last push (a sale at the till, a delivery, a purchase receipt), for every active store. Click Push stock or Pull orders whenever you want it now.
Linked products and the sync log
At the bottom of the store page:
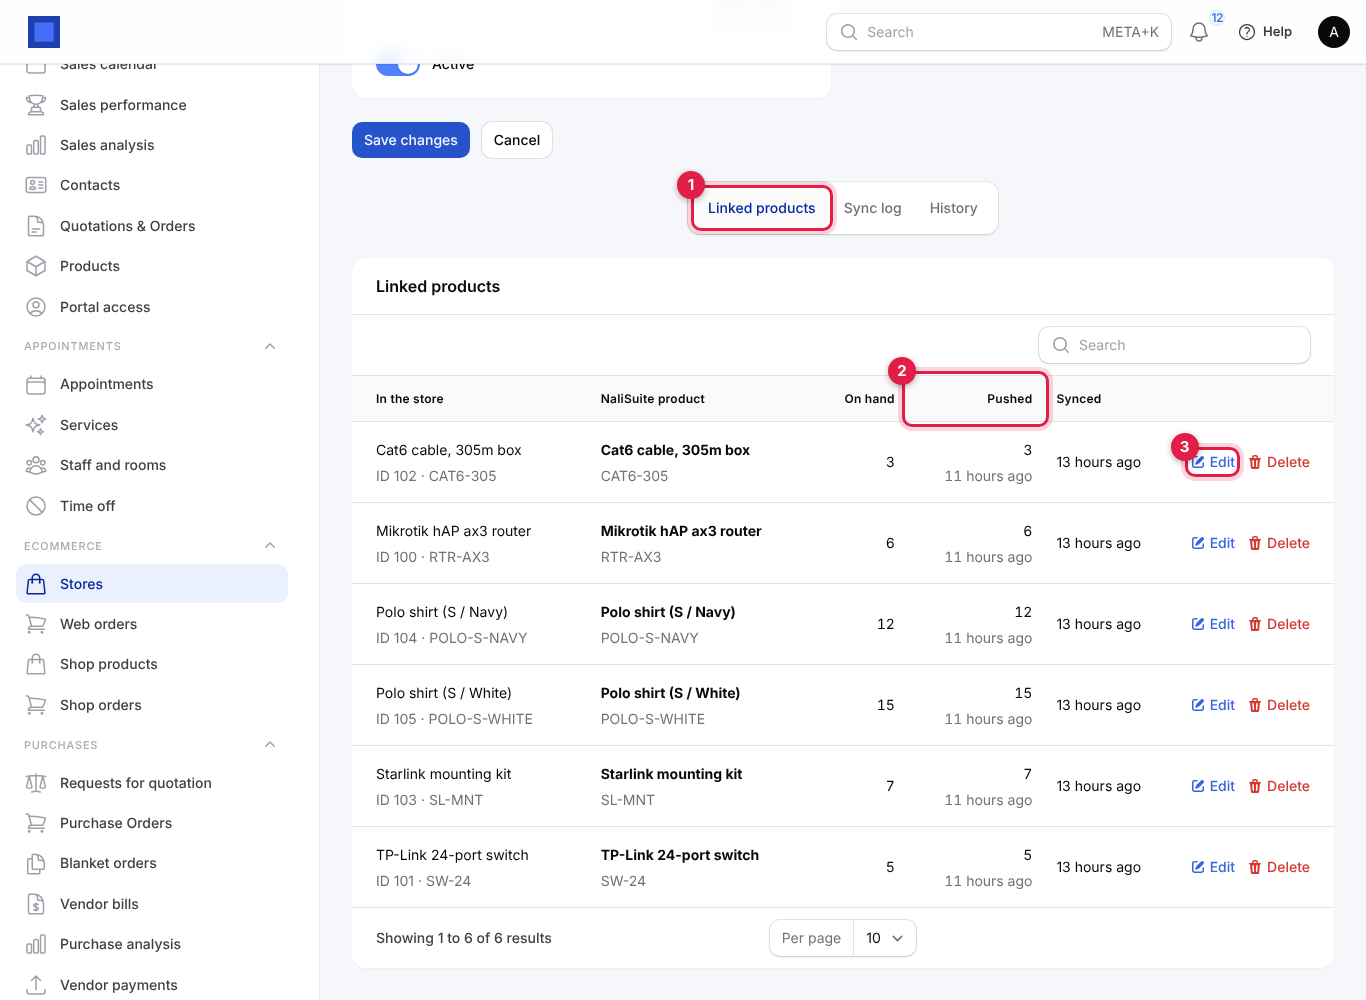
- Linked products (marker 1) lists each shop item (name, ID and SKU) with the NaliSuite product it maps to, the quantity On hand, the quantity last Pushed (marker 2) and when it was last synced. Click Edit (marker 3) to map a shop item to a different product (for example when SKUs differ), or Delete to unlink it.
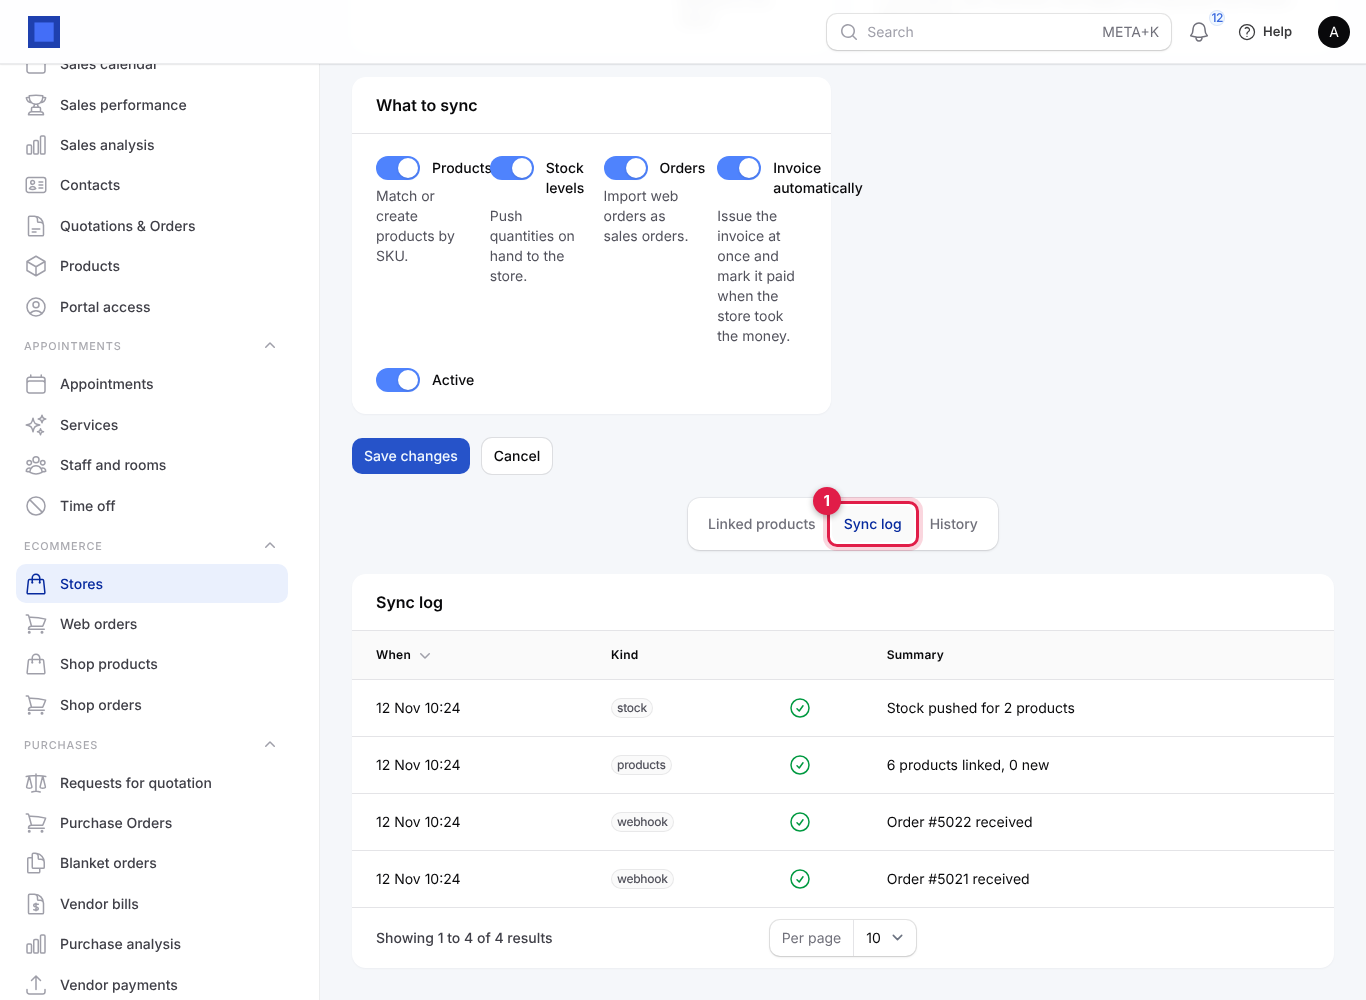
- Sync log (marker 1) records every product pull, stock push, order pull and webhook with a tick or a cross and a summary, for example Order #5022 received or Order 1043 not invoiced: …. Look here first when something is missing.
Handle web orders
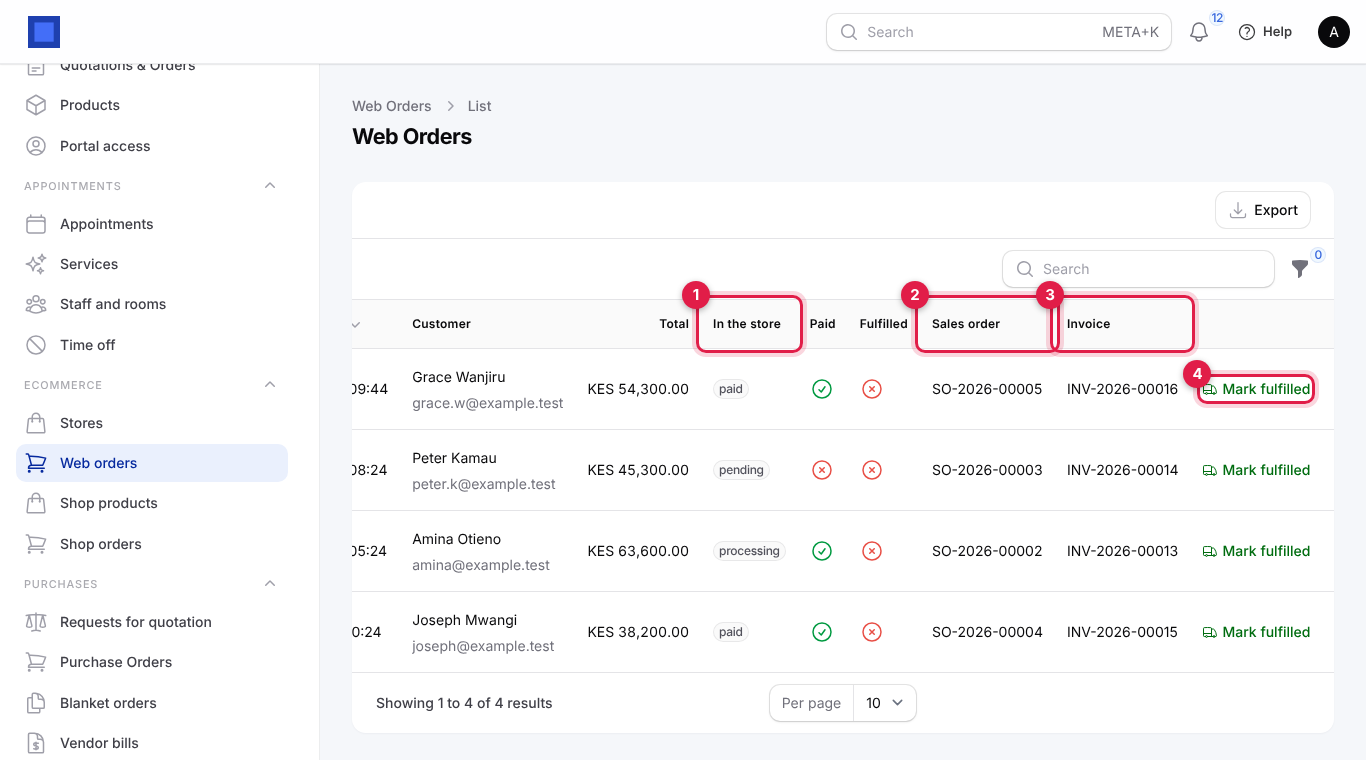
Open eCommerce → Web orders. Each imported order shows the shop's order number and store, when it was placed, the customer and email, the total, its status In the store (marker 1; processing, paid, pending…), whether it is Paid and Fulfilled, and links to the NaliSuite Sales order (marker 2) and Invoice (marker 3). Filter by Store or Paid.
What happens to each web order:
- The customer is found by email, or created as a contact.
- A sales order is created and confirmed with the shop's lines, shipping and prices.
- With Invoice automatically on, the invoice is issued straight away. When the shop has collected the money (paid status), a payment is recorded against it. If the invoice cannot be issued (for example over a credit limit), the sales order stays and the sync log says why; invoice it by hand.
- When the order changes in the shop (for example paid later), the next sync updates it and records the payment.
- When you deliver the sales order in NaliSuite, the order is reported to the shop as fulfilled and the customer gets the shop's own shipping notification. To do it without a delivery, click Mark fulfilled (marker 4) and confirm.
Common questions
A product was created twice. The SKU in the shop and in NaliSuite did not match. Correct the SKU, delete the duplicate product (if it has no history), and use Edit on the linked product to map it to the right one.
Stock in the shop is wrong. Check Stock from warehouse on the store and that Stock levels is on, then click Push stock. Only products that track inventory are pushed.
Orders are not arriving. Look at Last error on the stores list and the Sync log. Check that Orders is on, the store is Active, and the webhook URL and secret match in the shop. Orders still arrive every 15 minutes without the webhook.
Can I connect two shops? Yes, one store record per shop. A product linked to both has its stock pushed to both.
Who receives the money? The shop's own payment provider. NaliSuite records the payment against the invoice so your receivables and books match.