Clearing and Forwarding
Clearing and Forwarding is for clearing and forwarding agents at a sea port such as Mombasa or Dar es Salaam, an airport or a land border. Each consignment is a job with its bill of lading or air waybill, containers, cargo and customs value. You tick off a milestone checklist from documents received to delivered, and the client is told by text and email and can follow the shipment on a tracking page. NaliSuite watches free port storage and container demurrage days, records what you pay out on the client's behalf and the money they send ahead, estimates the duties, prices your agency fees from your tariff and raises the client's invoice. Clients see their shipments and shared documents in the customer portal.
It is in the Clearing group of the left menu: Jobs, Free time ending, Tariff and Milestone template.
Note: There are three permissions. clearing.view lets someone see jobs, free time, the tariff and the milestone template, and download documents. clearing.manage opens and changes jobs, completes milestones, records containers, disbursements and documents, makes duty estimates, edits the milestone template and cancels jobs. clearing.billing handles the money: agency fees and the tariff, advances, raising invoices and profitability. Owners and admins have all three; the member role has clearing.view. Set permissions under Settings → Roles.
Switch it on
Clearing and Forwarding is a marketplace add-on. It needs the Contacts app, and does more with these apps on:
- Invoicing: raise the client's invoice and record their advances as payments.
- Marketing with an SMS provider: text the client when key milestones are done.
- Purchases and Accounting: link disbursements to supplier bills and expenses.
- Customer portal: clients see My shipments.
- Open Settings → Marketplace and type Clearing in the Search add-ons… box (marker 1).
- On the Clearing and forwarding card (marker 2), click Start free trial (or Add to subscription) and confirm. The Clearing group appears in the menu.
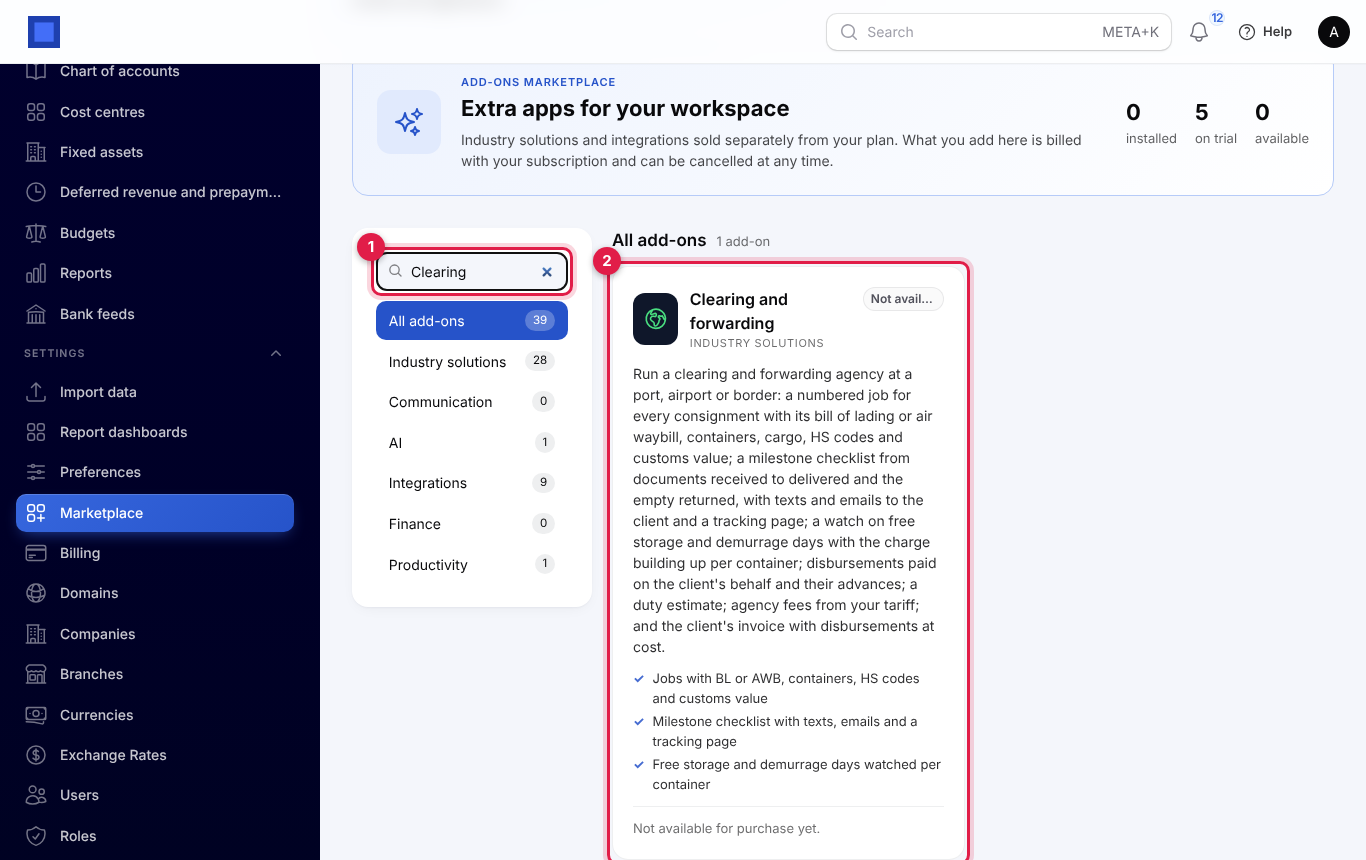
If the card says Not available for purchase yet, the add-on has not been priced for your plan: ask NaliSuite support to switch it on. See Billing and marketplace.
Clearing settings
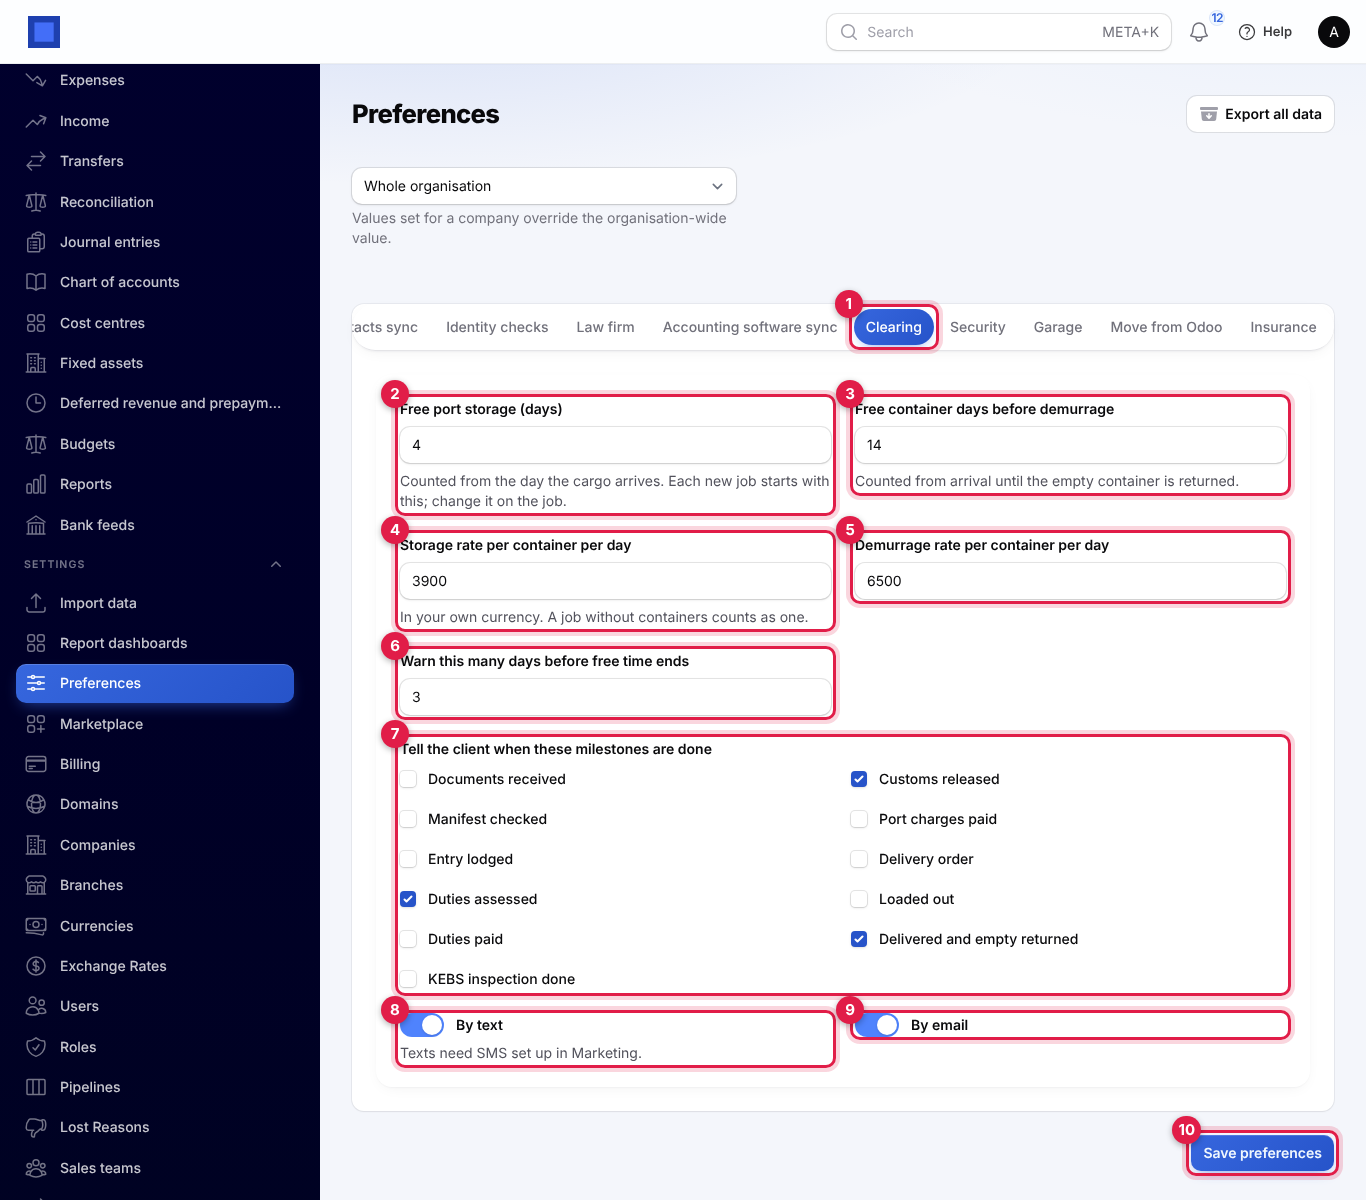
- Open Settings → Preferences and click the Clearing tab (marker 1).
- Fill in the fields and click Save preferences (marker 10).
| Setting | Default | What it does |
|---|---|---|
| Free port storage (days) (marker 2) | 4 | Days of free storage at the port, counted from the day the cargo arrives. Each new job starts with this; you can change it on the job. |
| Free container days before demurrage (marker 3) | 14 | Days the shipping line allows before charging demurrage, counted from arrival until the empty container is returned. |
| Storage rate per container per day (marker 4) | 0 | In your own currency, for the estimated storage charge. A job without containers counts as one. |
| Demurrage rate per container per day (marker 5) | 0 | For the estimated demurrage charge. |
| Warn this many days before free time ends (marker 6) | 3 | Jobs whose free time ends within this many days show in amber and on Free time ending. |
| Tell the client when these milestones are done (marker 7) | Duties assessed, Customs released, Delivered and empty returned | Tick the milestones that send the client a message. The list follows your milestone template. |
| By text (marker 8) | On | Send the message as a text. Needs SMS set up in Marketing. |
| By email (marker 9) | On | Send the message by email. |
Set up your tariff of agency fees
Your tariff lists the fees you charge on top of what you pay out: agency fees, documentation, handling. Fees marked automatic are added to every new job they apply to.
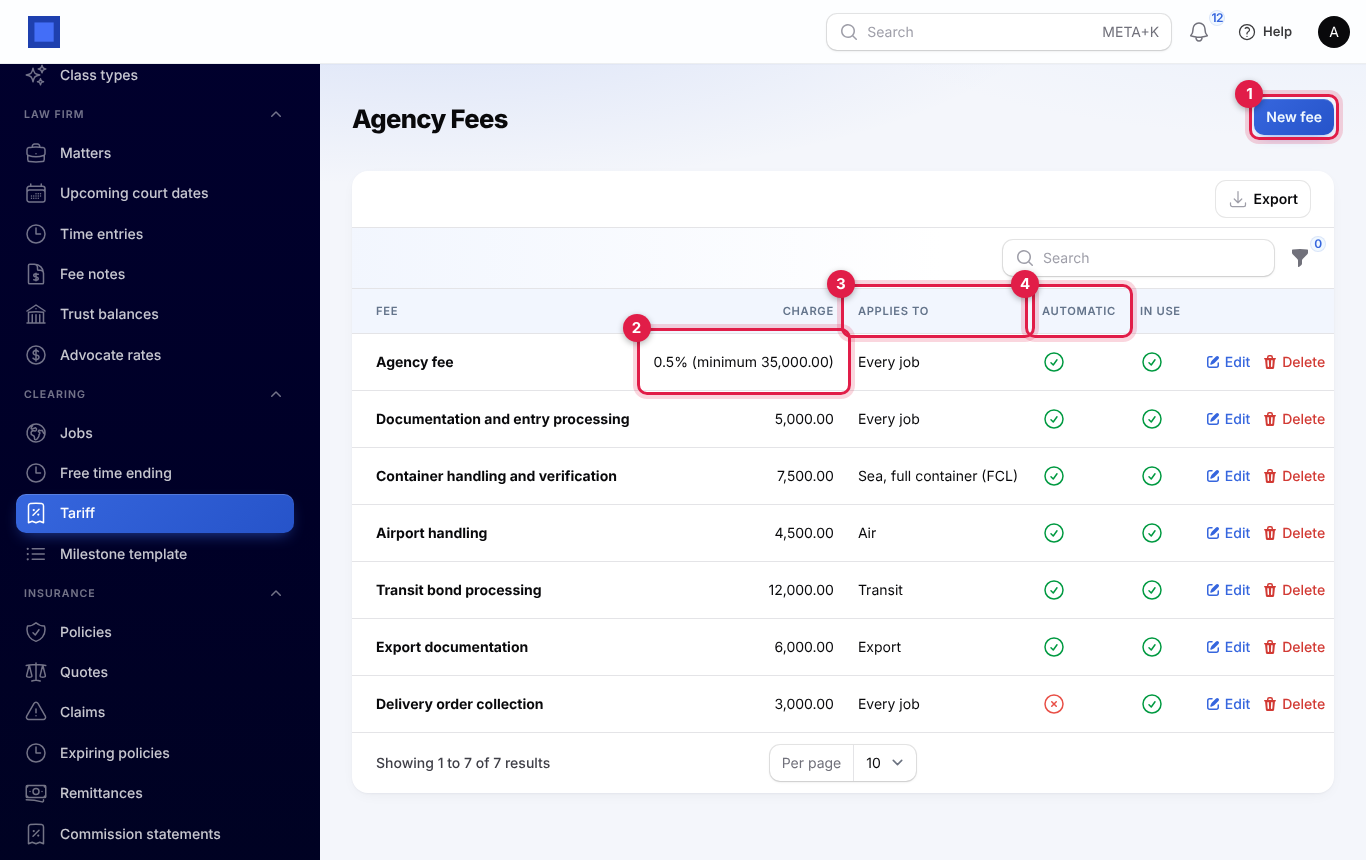
- Open Clearing → Tariff and click New fee (marker 1).
- Fill in the form and click Create.
| Field | What to enter |
|---|---|
| Fee (required) | The name on the invoice, for example "Agency fee" or "Documentation and entry processing". |
| Charged as | Fixed amount, or Percentage of the customs value. |
| Amount or Percent of the customs value | For example 5000, or 0.5 for 0.5%. |
| Minimum | For percentage fees: the fee is never less than this. |
| Only for | Leave empty for imports, exports and transit, or choose one. |
| Only by | Leave empty for every mode, or choose sea FCL, sea LCL, air or road. |
| Order | The order fees are added in. |
| Add to new jobs by itself | On to add the fee to every new job it applies to. Off for fees you add by hand when needed. |
| In use | Off to retire a fee. |
A percentage fee is the customs value × the exchange rate (so in your own currency) × the percentage. In the screenshot, the agency fee is 0.5% with a minimum of KES 35,000 (marker 2): on a job worth USD 21,800 at 129.20, 0.5% is KES 14,082.80, so the fee is 35,000.00. Applies to (marker 3) shows the direction and mode, or Every job; Automatic (marker 4) shows which are added by themselves.
Changing the tariff does not change fees already on jobs.
Set up the milestone template
Every new job gets a copy of the milestone template: the checklist your team ticks off. Open Clearing → Milestone template. The first time, it is filled with:
Documents received · Manifest checked · Entry lodged · Duties assessed · Duties paid · Customs released · Port charges paid · Delivery order · Loaded out · Delivered and empty returned.
The list shows each milestone's Order, its name with the wording the client sees under it, its Code, whether the Client is told (from Settings) and whether it is On new jobs. Click New milestone, or Edit on a row, to change it:
- Milestone (required): the name your staff see, for example "KEBS inspection done".
- Code: filled from the name when empty. It cannot be changed later.
- What the client sees: other wording for the client on the tracking page, portal and messages, for example "Goods inspected by KEBS". Empty means the same as the milestone.
- Order: for example 55 to sit between Duties paid (50) and Customs released (60).
- On new jobs: off to leave it off new jobs.
Two milestones do more than record a date: Loaded out stops port storage, and Delivered and empty returned stops demurrage. Changes to the template only affect jobs opened afterwards; jobs already open keep their own checklist.
Open a job
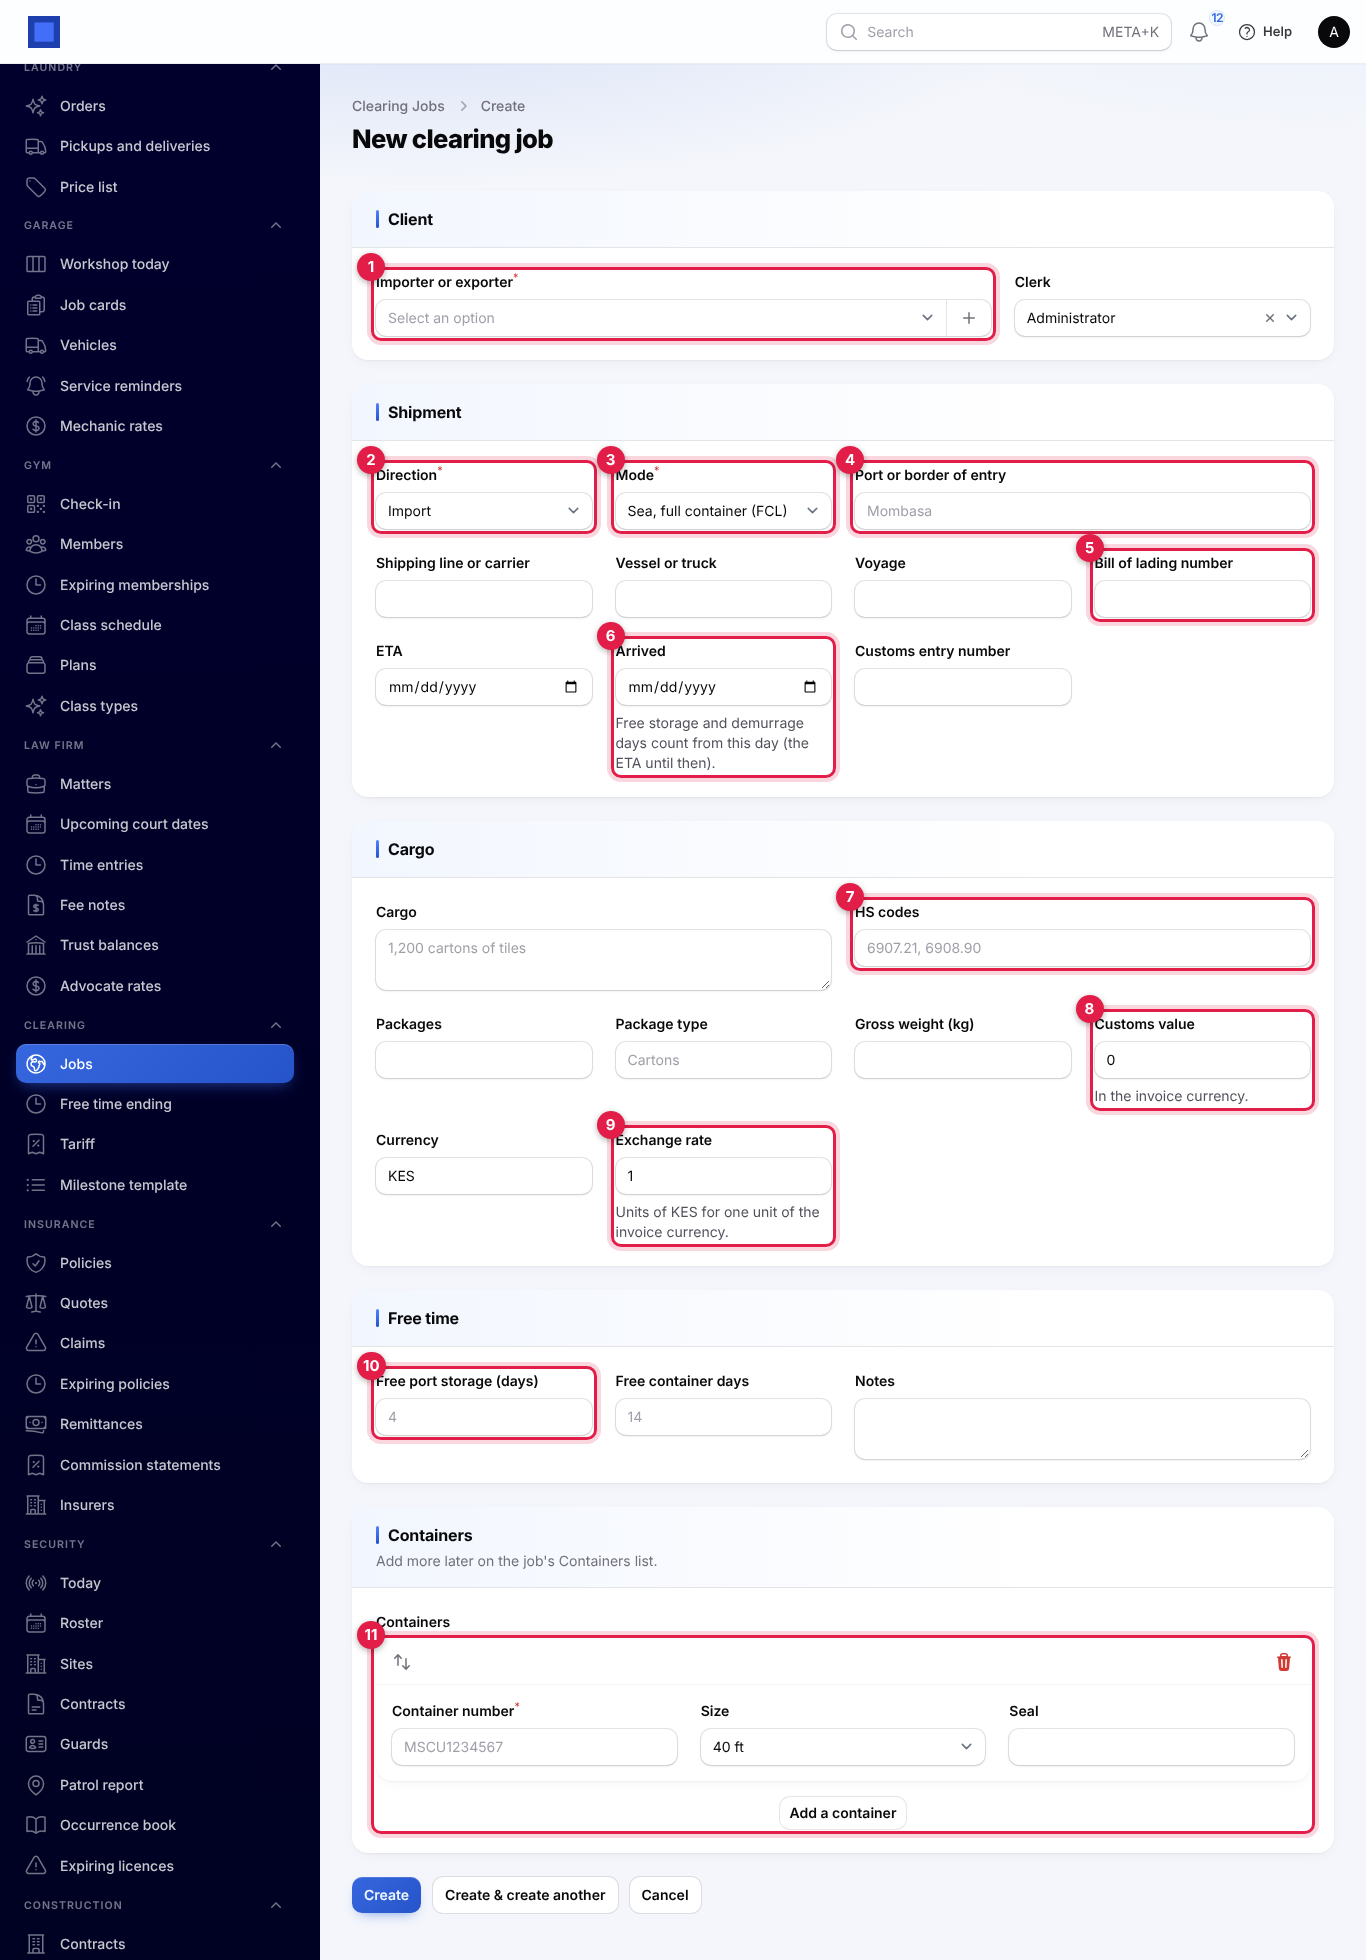
- Open Clearing → Jobs and click New job (marker 1 in the jobs list screenshot).
- Fill in the form:
Client
- Importer or exporter (required, marker 1): search your customers by name, email or mobile, or click + to add a company with its name, email and mobile. The client cannot be changed later.
- Clerk: who handles the job. You by default.
Shipment
- Direction (marker 2): Import, Export or Transit.
- Mode (marker 3): Sea, full container (FCL), Sea, groupage (LCL), Air or Road. For air, the labels change to Airline, Flight and Air waybill number.
- Port or border of entry (marker 4): type or pick, for example Mombasa, Jomo Kenyatta International Airport, Malaba or Namanga.
- Shipping line or carrier, Vessel or truck and Voyage.
- Bill of lading number (marker 5) or air waybill number.
- ETA and Arrived (marker 6, not in the future). Free storage and demurrage days count from the arrival day, or from the ETA until the cargo has arrived.
- Customs entry number.
Cargo
- Cargo: a description, for example "1,240 cartons of ceramic tiles".
- HS codes (marker 7): separated by commas, for example 6907.21, 6907.22.
- Packages, Package type and Gross weight (kg).
- Customs value (marker 8): in the invoice currency.
- Currency: of the customs value, for example USD.
- Exchange rate (marker 9): how many units of your currency for one unit of the invoice currency, for example 129.50.
Free time
- Free port storage (days) (marker 10) and Free container days: empty means the defaults from Settings.
- Notes.
Containers (marker 11): click Add a container for each box and fill in the Container number, Size (20 ft, 40 ft or 40 ft high cube) and Seal.
- Click Create. The job is numbered, for example
CF-2026-00002, and opens. It already has its checklist from the template, the automatic fees from your tariff, and its free-time dates.
The container number check
A container number must be four letters and seven digits, like MSCU4471230. Spaces and dashes are removed and letters made capitals for you, so medu-771234-5 is saved as MEDU7712345. Anything else is refused with "… is not a container number. It has four letters and seven digits, like MSCU1234567." The last digit (the check digit) is not verified, so still compare the number with the bill of lading.
Change a job
Open the job, change the fields and click Save changes. Percentage fees not yet invoiced follow a new customs value or exchange rate, and the free-time dates follow new arrival dates or free days. A cancelled job cannot be changed.
The jobs list
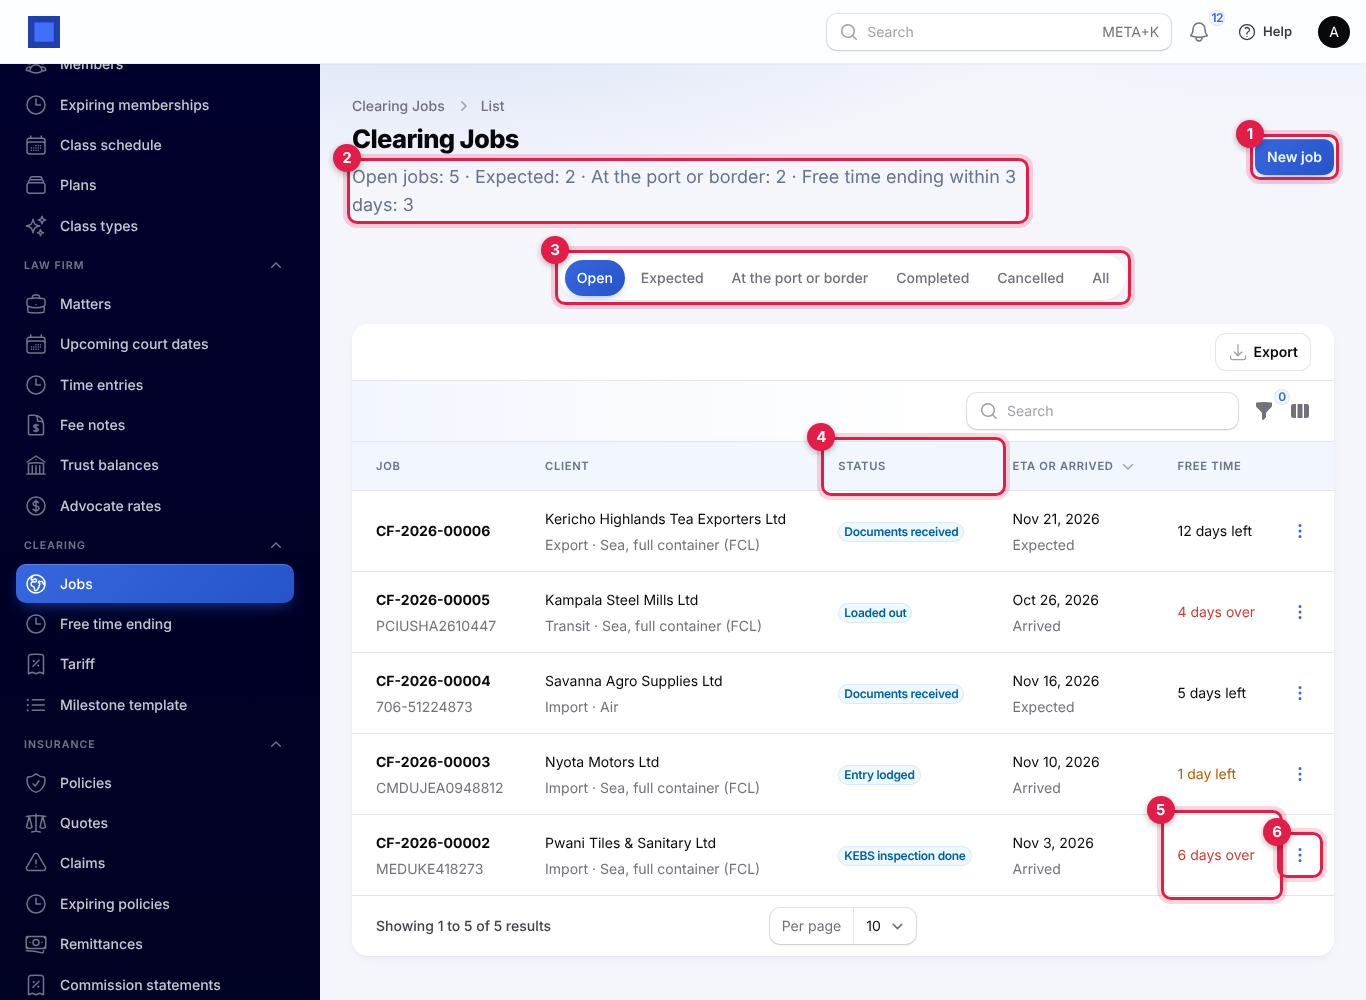
- The line under the title (marker 2) counts Open jobs, Expected (not yet arrived), At the port or border (arrived, not loaded out) and jobs whose Free time ends within the warning days.
- The tabs (marker 3): Open, Expected, At the port or border, Completed, Cancelled and All.
- Each job shows its number and bill of lading, the client with the direction and mode, the port and vessel, the Status (marker 4: the furthest milestone done), the ETA or arrival day, the Free time left or over (marker 5: amber when close, red when over) and the clerk.
- ⋮ (marker 6) opens the job's actions.
Search by job number, bill of lading or entry number. Filters: Direction, Mode, Clerk and Open. The Port and Clerk columns can be hidden with the columns icon.
The job page and its actions
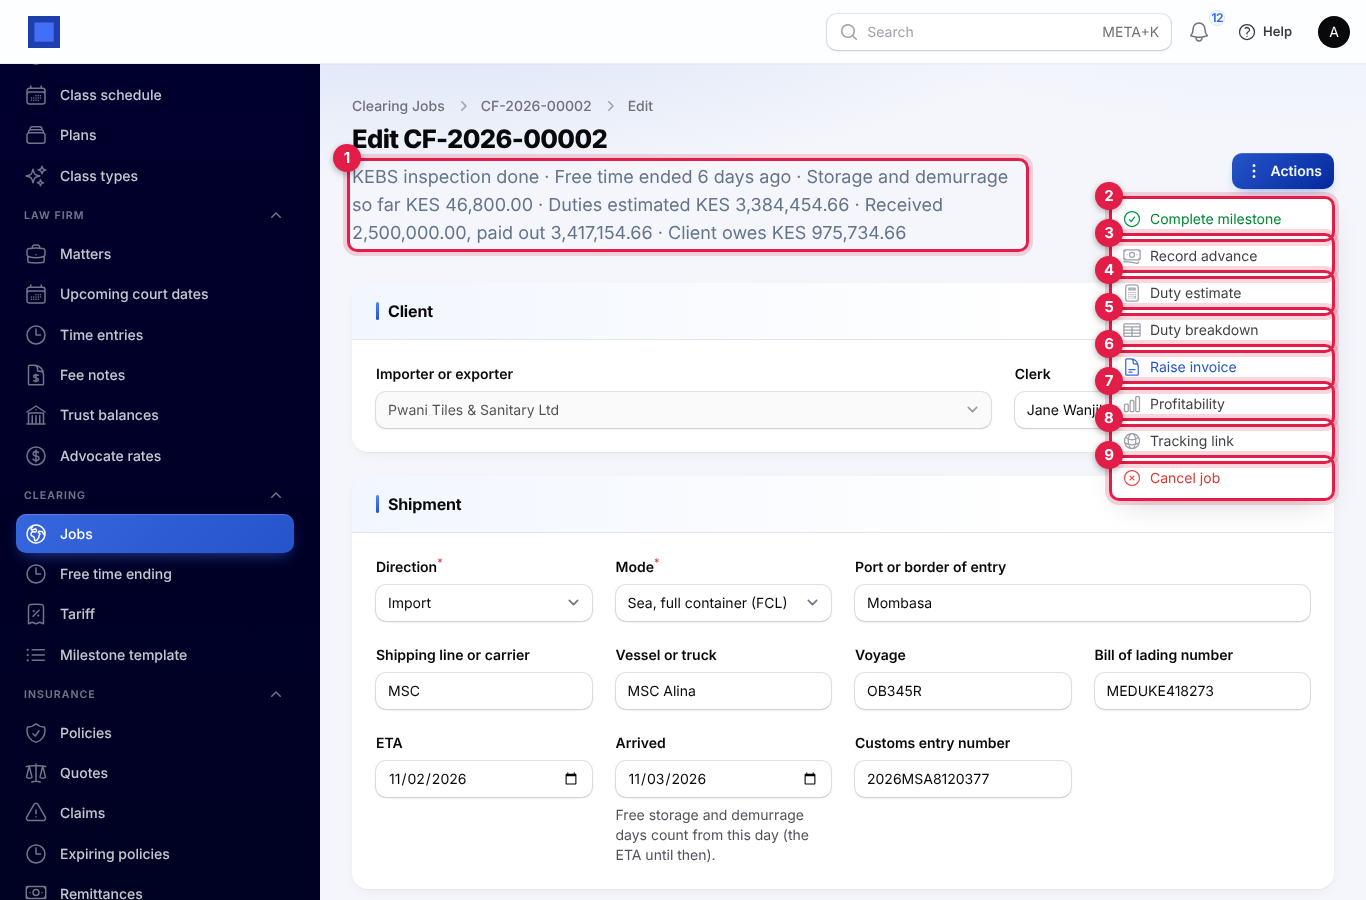
Click a job to open it. The line under its number (marker 1) sums it up: the status, when free time ends or how long ago it ended, the storage and demurrage so far, the estimated duties, money received and paid out, and what the client owes (or what is owed back to them).
Click Actions at the top right for everything you can do with the job:
Under the form are six lists, each on its own tab: Milestones, Containers, Disbursements, Agency fees, Advances and Documents.
Complete milestones
There are two ways to tick off a milestone:
- Actions → Complete milestone (marker 2): the Milestone list starts on the next one not done. Choose Done on (today by default, never in the future), add a Note if useful, and click Submit.
- On the Milestones tab, click Done on the milestone's row (marker 4) and fill in the same Done on and Note.
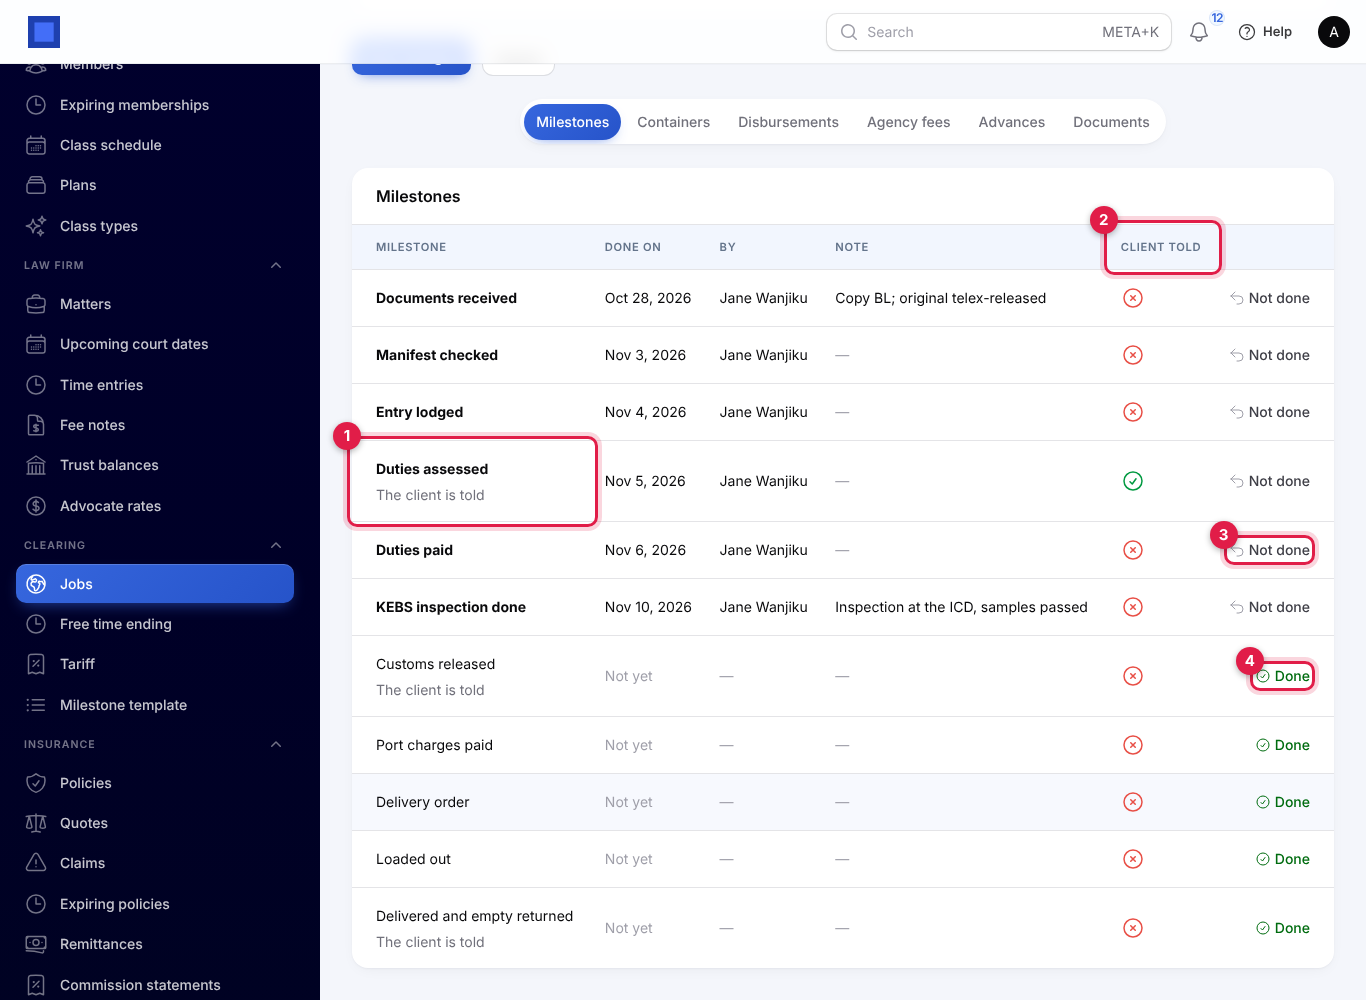
The tab lists every milestone in order with the day it was done, by whom and the note. Milestones that tell the client say The client is told under the name (marker 1).
- The job's status becomes the furthest milestone done in the checklist's order. Ticking an earlier one later does not move it back.
- Loaded out stops the port storage clock.
- Delivered and empty returned marks every container not yet returned as returned that day, which stops demurrage.
- When every milestone is done, the job is Completed. It moves to the Completed tab and no more milestones can be ticked.
To take back one ticked by mistake, click Not done (marker 3) and confirm. The status goes back to the furthest milestone still done. Taking back Delivered and empty returned does not clear the containers' return days; change them on the Containers tab if needed.
Tell the client and the tracking page
When a milestone ticked in Settings → Clearing is done, the client is told at once:
- by text, to the client contact's mobile (or phone), when By text is on and SMS is set up in Marketing (see Marketing);
- by email, to the client contact's email, when By email is on.
The message reads: "Hello Pwani, your shipment CF-2026-00002 (MEDUKE418273) is now at "Duties assessed" (5 Nov 2026). Follow it here: (link)". The milestone's client wording is used. Once a message has gone, the milestone shows a tick under Client told (marker 2 in the milestones picture).
The link opens the job's tracking page, which needs no sign-in. Open it yourself with Actions → Tracking link (marker 8) to copy it for the client.
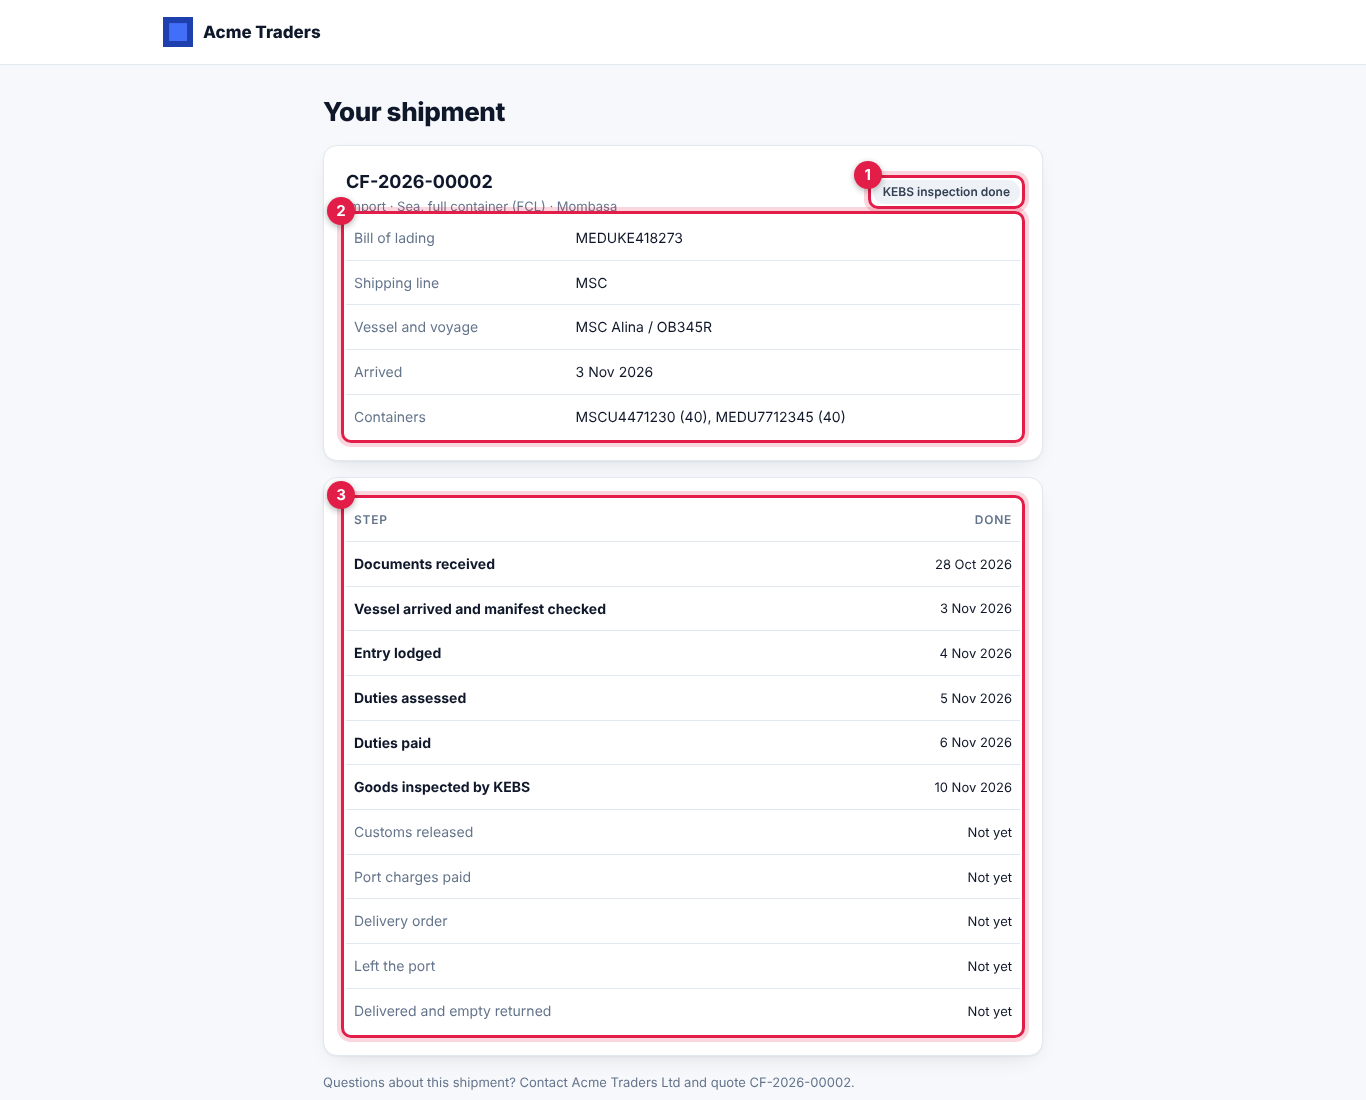
It shows the job number, direction, mode and port, the status (marker 1), the bill of lading or air waybill, carrier, vessel and voyage, the arrival or expected day and the container numbers (marker 2), and every milestone with the day it was done or Not yet (marker 3). It shows no money, phone numbers or emails. Each job has its own long code, so clients cannot see each other's shipments.
Free time: storage and demurrage
Free time counts from the day the cargo arrived, or from the ETA until it has arrived.
- Port storage is free until arrival + the free storage days. Every day after that, up to the day of the Loaded out milestone (or today while it is still at the port), is a day over. The estimated storage charge is days over × the storage rate × the number of containers (a job without containers counts as one).
- Demurrage applies to FCL jobs and any job with containers. Each container is free until arrival + the free container days. Every day after that, up to the day its empty was returned (or today), is a day over. The estimated demurrage is each container's days over × the demurrage rate.
For example, Pwani Tiles' two containers arrived on 3 November with 4 free storage days, so storage was free until 7 November. On 13 November that is 6 days over: 6 × 2 containers × KES 3,900 = KES 46,800 so far. Their container days are free until 17 November.
The Containers tab on a job lists each container with its seal, the Empty returned day, its Demurrage days and Estimated demurrage. Click Add a container to add one (the same number check applies) or Edit to set Empty returned when the shipping line confirms it; that stops demurrage on that container.
The Free time ending page
Clearing → Free time ending lists the open jobs whose free storage or container days end within the warning days, or have already ended.
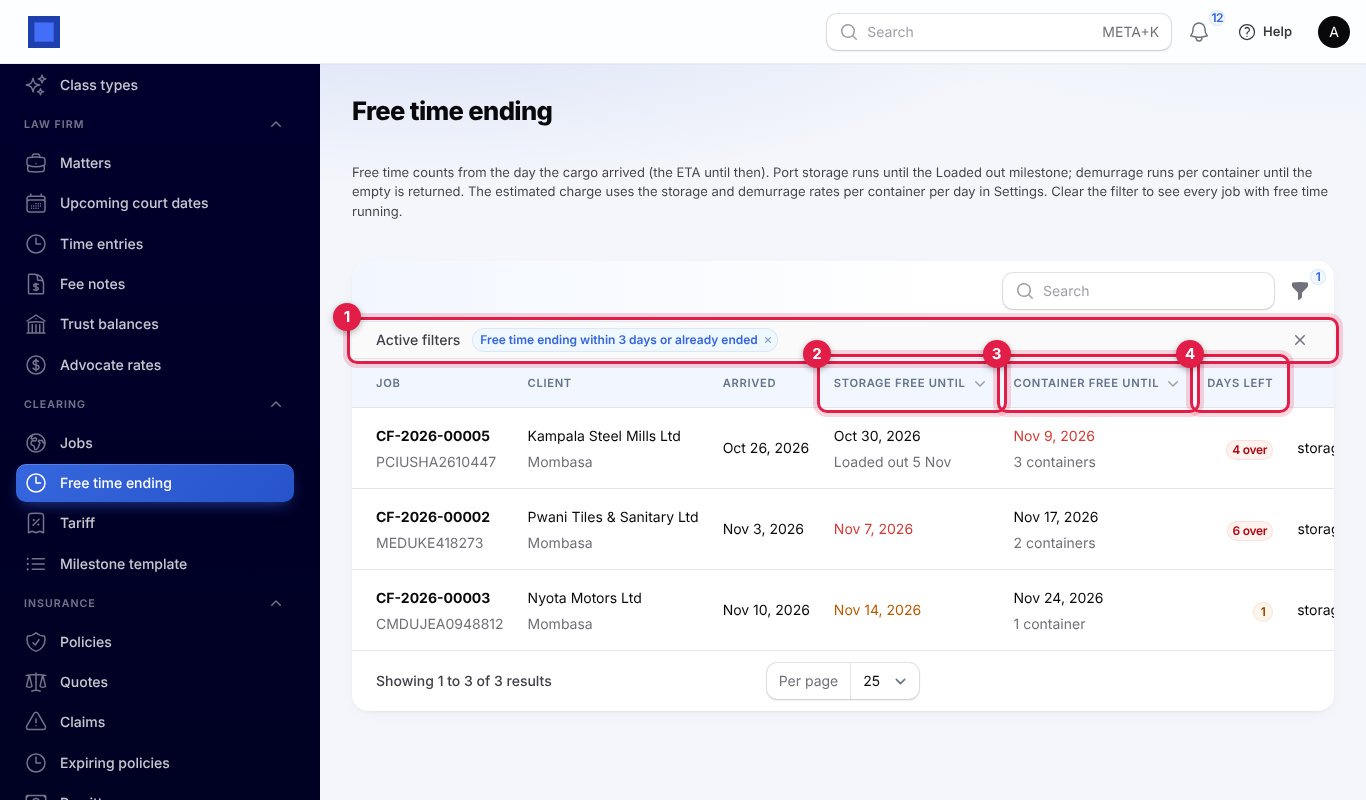
- The filter (marker 1) starts on your warning days. Click × to clear it and see every job with free time running, or change the number of days with the filter icon.
- Storage free until (marker 2) and Container free until (marker 3) are amber when close and red once passed. Under them you see Loaded out and the day, and the number of containers.
- Days left (marker 4): green, amber, or red with the days over.
- Further right: Days over for storage and demurrage, the Estimated charge and Open job.
Check this page every morning, so you can push for release before charges build up.
Disbursements
Disbursements are what you pay out for the client: customs duty, VAT, levies, port charges, shipping-line charges, inspections, storage and transport.
- On the job, open the Disbursements tab and click Record a disbursement (marker 1).
- Fill in:
- Paid for: Customs duty, Import VAT, IDF, RDL and other levies, Port charges, Shipping line or airline charges, KEBS, inspection and permits, Storage and demurrage, Transport or Other.
- Details, for example "KRA entry assessment".
- Paid on, Amount and Receipt or reference, for example the KRA payment number.
- Paid to: the supplier, for example Kenya Ports Authority.
- Supplier bill (when Purchases is on) or Expense (when Accounting is on): link the bill or expense the payment went through.
- Recharge to the client at cost: on for costs the client pays you back. Switch it off for costs your agency carries itself, such as your clerk's fuel; they count against the job's profit.
- Click Create.
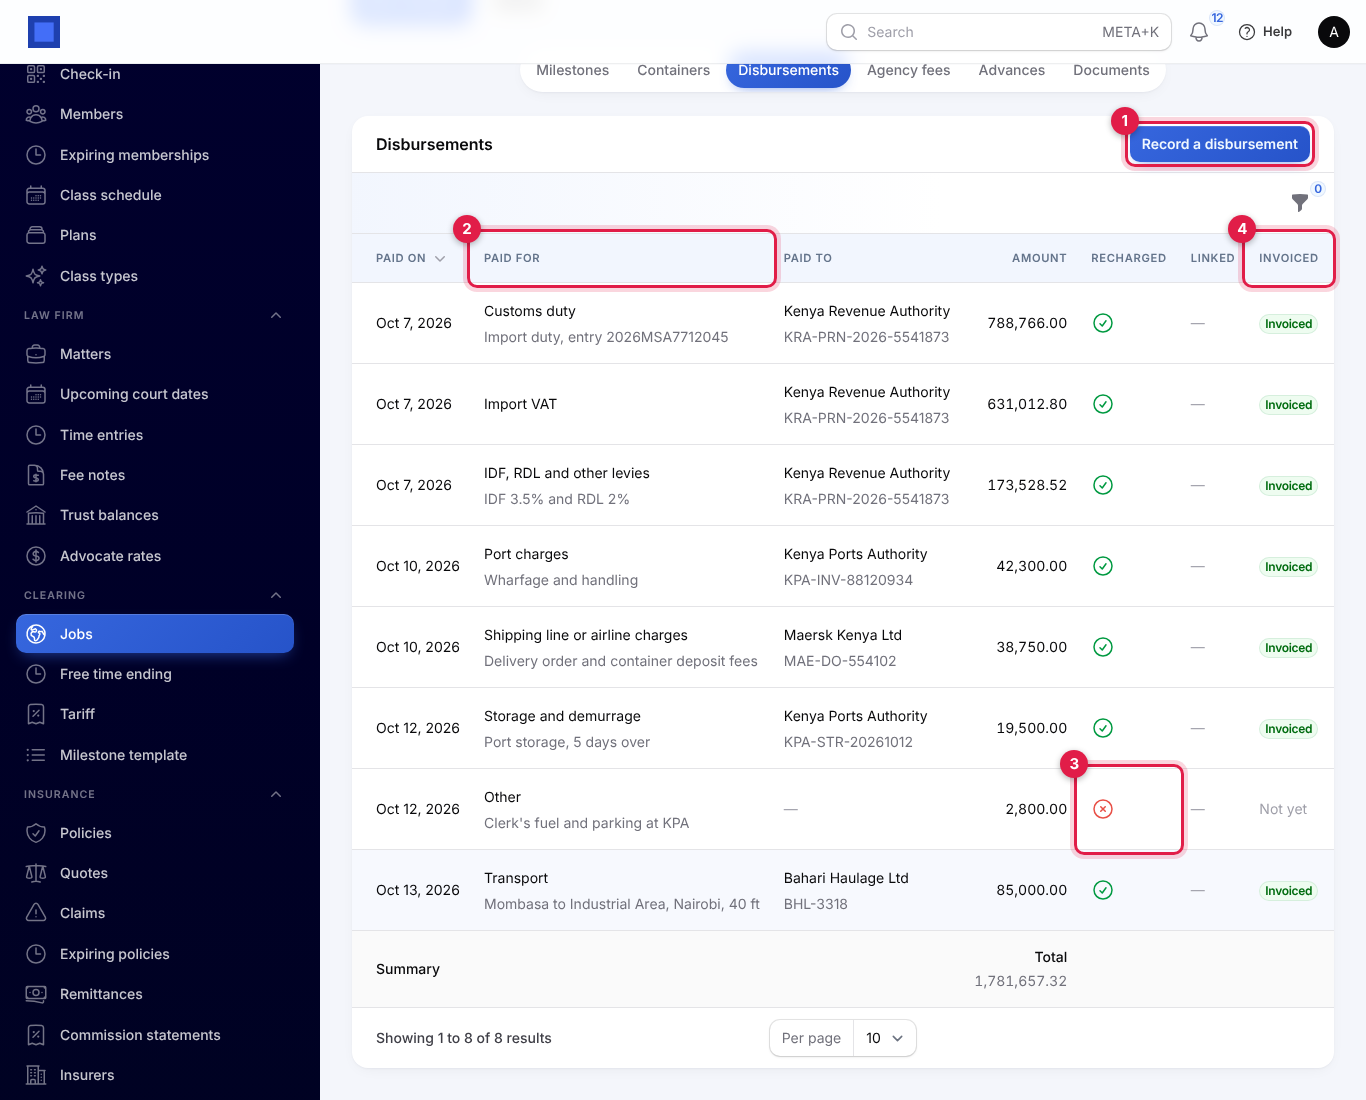
The list shows each disbursement with Paid for (marker 2) and its details, who it was paid to, the amount, whether it is Recharged (marker 3 shows one that is not), whether it is Linked to a bill or expense, and whether it has been Invoiced (marker 4). The bottom row totals the amounts.
Important: Recording a disbursement does not pay anyone or post anything to your books. Pay the supplier and record it in Purchases or Accounting as usual, then link it here.
A disbursement can be edited or deleted until it is invoiced.
Agency fees on a job
The Agency fees tab lists the fees on the job: those added from the tariff when the job was opened and any added since, with how each is Charged as (fixed, or a percentage of the customs value with its minimum), the Amount and whether it is Invoiced.
To add one, click Add a fee and either pick it From the tariff, or describe the Fee, choose Charged as, and type the Amount (or the percent and Minimum). Fees can be edited or deleted until they are invoiced. These actions need clearing.billing.
The duty estimate
Use the duty estimate to tell the client what duties to expect before the assessment comes out. There is no live tariff lookup: you enter the rates for each HS code.
- Click Actions → Duty estimate (marker 4 in the actions picture).
- Check the Currency and Exchange rate (marker 1), and type the Freight (marker 2) and Insurance in the invoice currency.
- Under HS lines, fill in one line per HS code (marker 3): the HS code, Value (FOB), Import duty %, Excise %, VAT %, Other levies % (for example 5.5 for IDF 3.5% and RDL 2%) and the Goods. Click Add an HS line for more.
- The line at the bottom (marker 4) shows the result as you type. Click Submit to save it on the job.
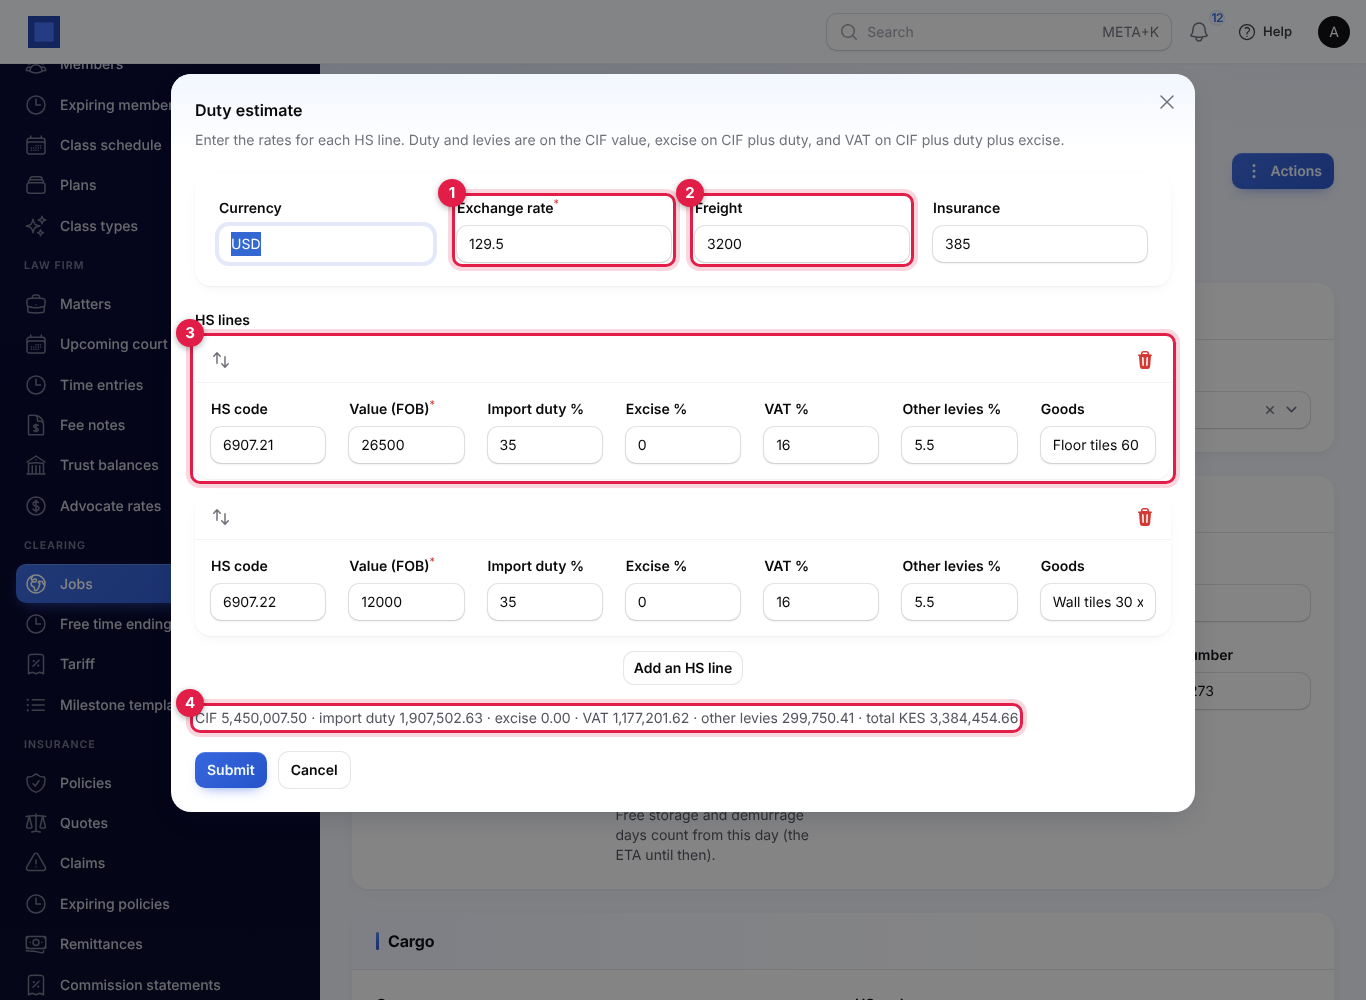
The first time, the form is filled from the job: its currency, exchange rate, customs value, first HS code and your default tax rate as VAT. After that, it opens with what you saved.
How it is worked out for each line:
- Freight and insurance are shared between the lines by value.
- CIF = (value + freight + insurance) × exchange rate.
- Import duty = CIF × duty %. Other levies = CIF × levies %.
- Excise = (CIF + duty) × excise %.
- VAT = (CIF + duty + excise) × VAT %.
In the example, tiles worth USD 38,500 with USD 3,200 freight and USD 385 insurance at 129.50 give a CIF of KES 5,450,007.50; with 35% duty, 16% VAT and 5.5% levies, the estimate is KES 3,384,454.66. The job's summary line shows the estimated duties, and Actions → Duty breakdown shows the saved estimate line by line with who made it and when.
Tip: The estimate does not record anything you paid. When the duties are paid, record them as disbursements.
Client advances
Clients often send money ahead for the duties.
- Click Actions → Record advance (marker 3 in the actions picture).
- Type the Amount received, choose Received by (Bank transfer, Mobile money, Cash, Cheque, Card or Other), the Received on day and a Reference, such as the bank's transfer number.
- Click Submit.
With Invoicing on, the advance is recorded as a customer payment at once. If the job already has an open invoice, it is applied to it; otherwise it waits on the client's account until you raise the invoice. The Advances tab lists them with Customer payment: Recorded.
Raise the invoice
When you are ready to bill, click Actions → Raise invoice (marker 6). It is shown when Invoicing is on, you have clearing.billing, and something on the job is not yet invoiced. The confirmation tells you how much will be billed.
The invoice is raised and issued to the client, dated today, with the reference "Clearing job CF-2026-00001, MAEU241188450" and:
- one line for each rechargeable disbursement at cost, without tax, for example "Disbursement at cost: Customs duty: Import duty, entry 2026MSA7712045 (KRA-PRN-2026-5541873)";
- one line for each agency fee, with your default tax (for example VAT 16%).
The client's advances are then applied to it, up to what it is owed; anything more stays on their account. Disbursements and fees added later go on a new invoice the next time you click Raise invoice. Actions → Open invoice opens the latest one (with invoicing.view). See Invoices and payments.
If nothing is left to bill, you see "There is nothing on … left to invoice."
Profitability
Actions → Profitability (marker 7) shows where the job stands:
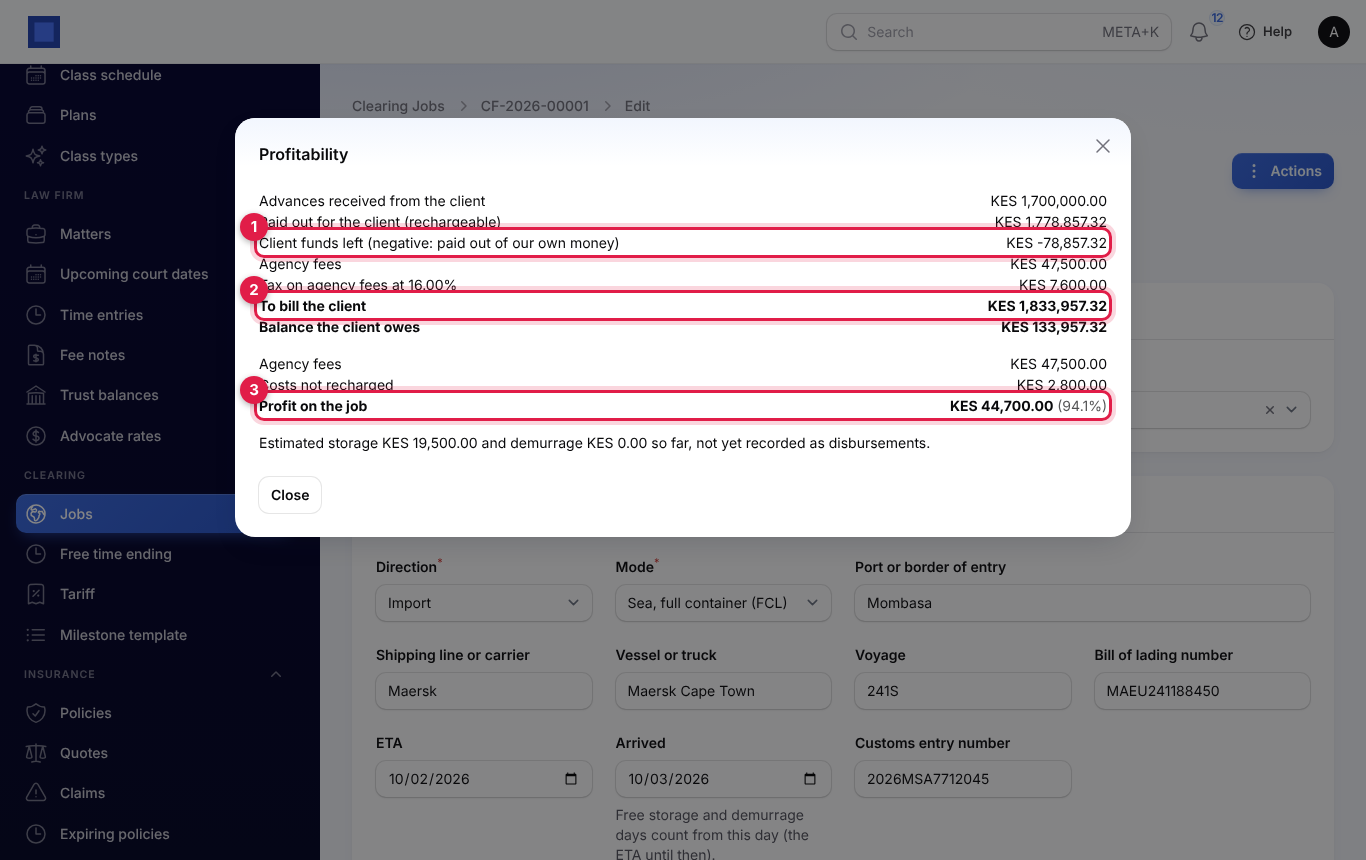
- Advances received from the client and what was Paid out for the client (rechargeable).
- Client funds left (marker 1): advances less what you paid out. Negative means you paid out of your own money.
- Agency fees, the Tax on agency fees at your default rate and the total To bill the client (marker 2): rechargeable disbursements + fees + tax.
- Balance the client owes, or Balance owed back to the client.
- Agency fees, Costs not recharged and the Profit on the job with its margin (marker 3).
- The estimated storage and demurrage so far that have not yet been recorded as disbursements.
Documents
Keep the shipping documents on the job and choose which ones the client sees.
- On the job, open the Documents tab and click Attach a document (marker 1).
- Choose the Document type (commercial invoice, packing list, bill of lading, air waybill, certificate of origin or conformity, customs entry, duty assessment, release order, delivery order or other), type a Name, and add the File (PDF, a photo, Word or Excel, up to 20 MB).
- Switch on Show to the client in the portal to share it.
- Click Create.
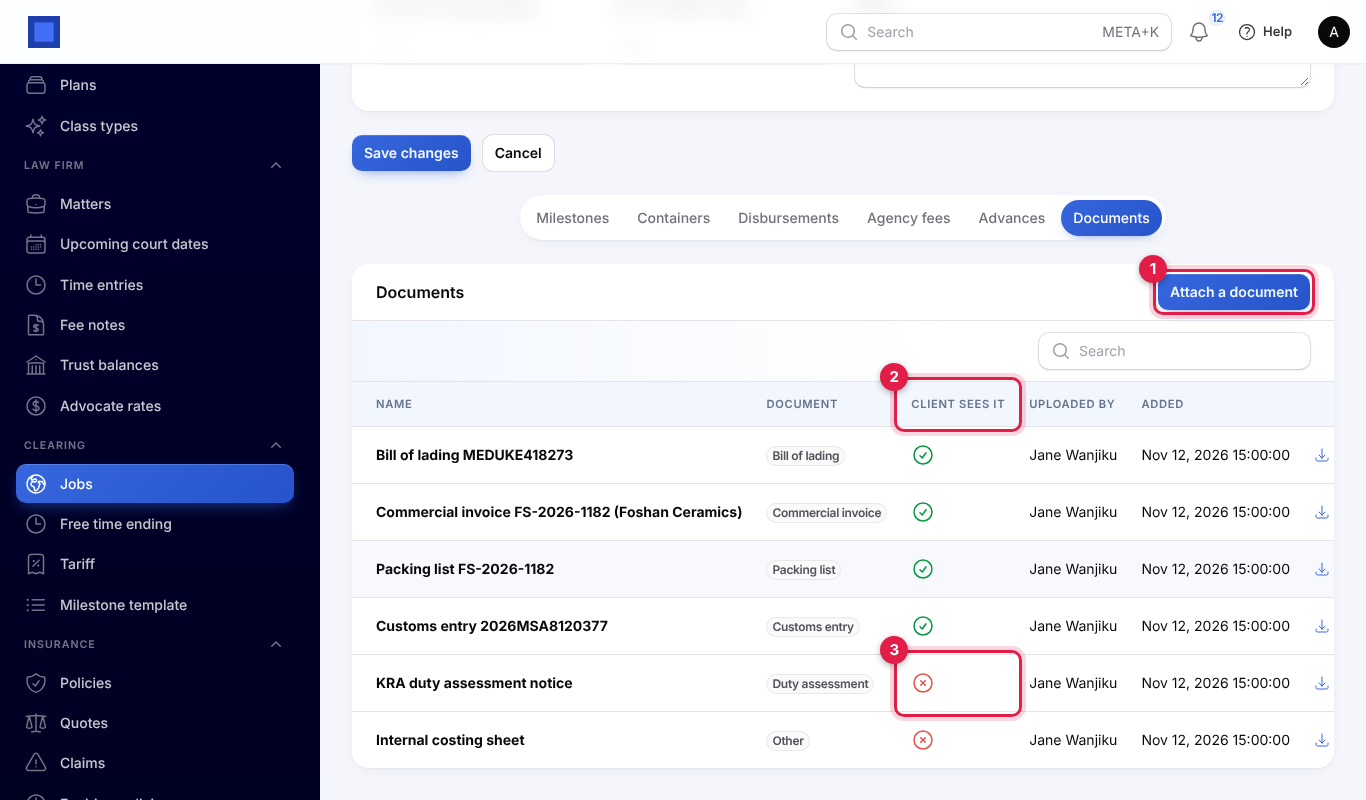
The list shows each document's name and type, whether the Client sees it (marker 2; marker 3 is an internal document the client does not see), who uploaded it and when. Download opens the file; it is stored privately and only signed-in staff with clearing.view can download it. Edit changes the name, type or sharing, and Delete removes the file.
What clients see in the portal
Clients who can sign in to your customer portal see My shipments when the Customer portal app is on and they have at least one job that is not cancelled. To give a client access, invite their contact; see Customer and vendor portal.
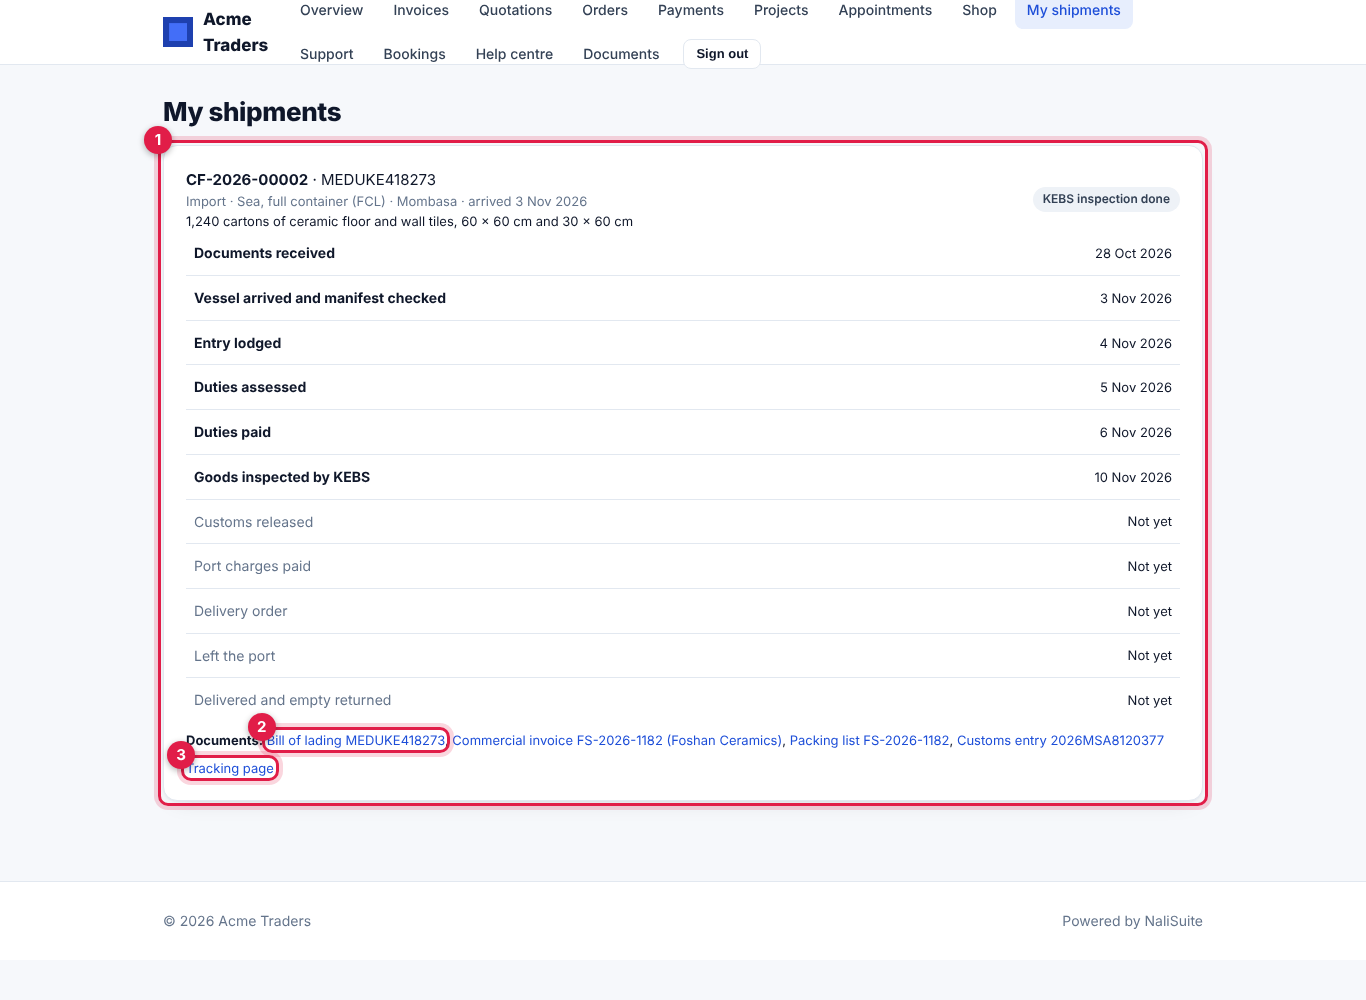
Each shipment (marker 1) shows the job number and bill of lading, the direction, mode, port and arrival or expected day, the cargo, the status, and every milestone with its day or Not yet. Under it are the Documents shared with the client (marker 2), which they can download, and a link to the Tracking page (marker 3). No money is shown.
Cancel a job
Actions → Cancel job (marker 9), after you confirm, stops the job counting free time and takes it off the open lists and the portal. Invoices and payments already recorded stay as they are. A cancelled job cannot be changed.
Good to know
Which day does free time start? The Arrived day. Until you fill it in, the ETA is used, so update the arrival day when the vessel actually berths.
Why does a job show no demurrage charge? Demurrage only applies to FCL jobs or jobs with containers, and the charge is only worked out when a demurrage rate is set in Settings.
Are the storage and demurrage charges billed automatically? No. They are estimates to warn you. When you pay the port or shipping line, record a Storage and demurrage disbursement.
Can I bill a job twice? Yes, in parts. Each Raise invoice bills only what was not invoiced before, so you can bill the duties first and the final charges later.
What if the client sent more than the job cost? The excess stays on their account in Invoicing. Profitability shows it as the Balance owed back to the client.
Does the client see my fees on the tracking page? No. The tracking page and the portal never show money.
Can I use it for air freight and border posts? Yes. Choose Air or Road as the mode and type the airport or border, for example Jomo Kenyatta International Airport or Malaba.