Web Hosting
Web Hosting is for web hosting companies, web designers and IT shops that sell domain names and hosting to their clients. You list the domain extensions you sell (.co.ke, .com…) with your prices; take orders from your team or from a public domain search page on your own site; invoice the client first and register or transfer the domain at your registrar once the invoice is paid; renew every domain on time with renewal invoices and reminder emails; and sell hosting plans that create the client's cPanel account automatically. Clients see their hosting and domains in the customer portal, open cPanel in one click, renew, and change their nameservers. It is in the Hosting group of the left menu: Domains, Domain prices and Hosting plans.
Each workspace connects its own registrar reseller account. NaliSuite does not sell domains itself: orders go to your ResellerClub, Namecheap, Enom or OpenSRS account, using your balance there, or are worked by hand at any other registrar (for example a KeNIC-accredited registrar for .co.ke).
Switch Web Hosting on
Web Hosting is an add-on sold separately from your plan. It needs the Contacts, Invoicing and Subscriptions apps; switching it on switches Subscriptions on too.
- Open Settings → Marketplace and search for Hosting, or click Industry solutions.
- On the Web Hosting card, click Start free trial (or Add to subscription) and confirm. The Hosting group appears in the menu, the public domain page goes live at
/domains, and Hosting and domains appears in the customer portal. - To stop, click End trial or Cancel on the card. Domains and invoices are kept, but renewals stop.
If the card says Not available for purchase yet, ask NaliSuite support to switch it on. See Billing and marketplace.
Permissions (under Settings → Roles):
| Permission | What it allows |
|---|---|
| hosting.view | See domains, domain prices and hosting plans. |
| hosting.manage | Order, renew, transfer and record domains, change nameservers, mark registrar work done, set prices and plans. Users with this permission also receive the "do this at the registrar" and "order failed" notifications. |
Owners and admins have both; the member role has hosting.view. Hosting subscriptions themselves need the Subscriptions permissions (see Subscriptions).
1. Web Hosting settings
- Open Settings → Preferences and click the Web Hosting tab.
- Fill in the general settings, then the section for your registrar, and click Save preferences at the bottom.
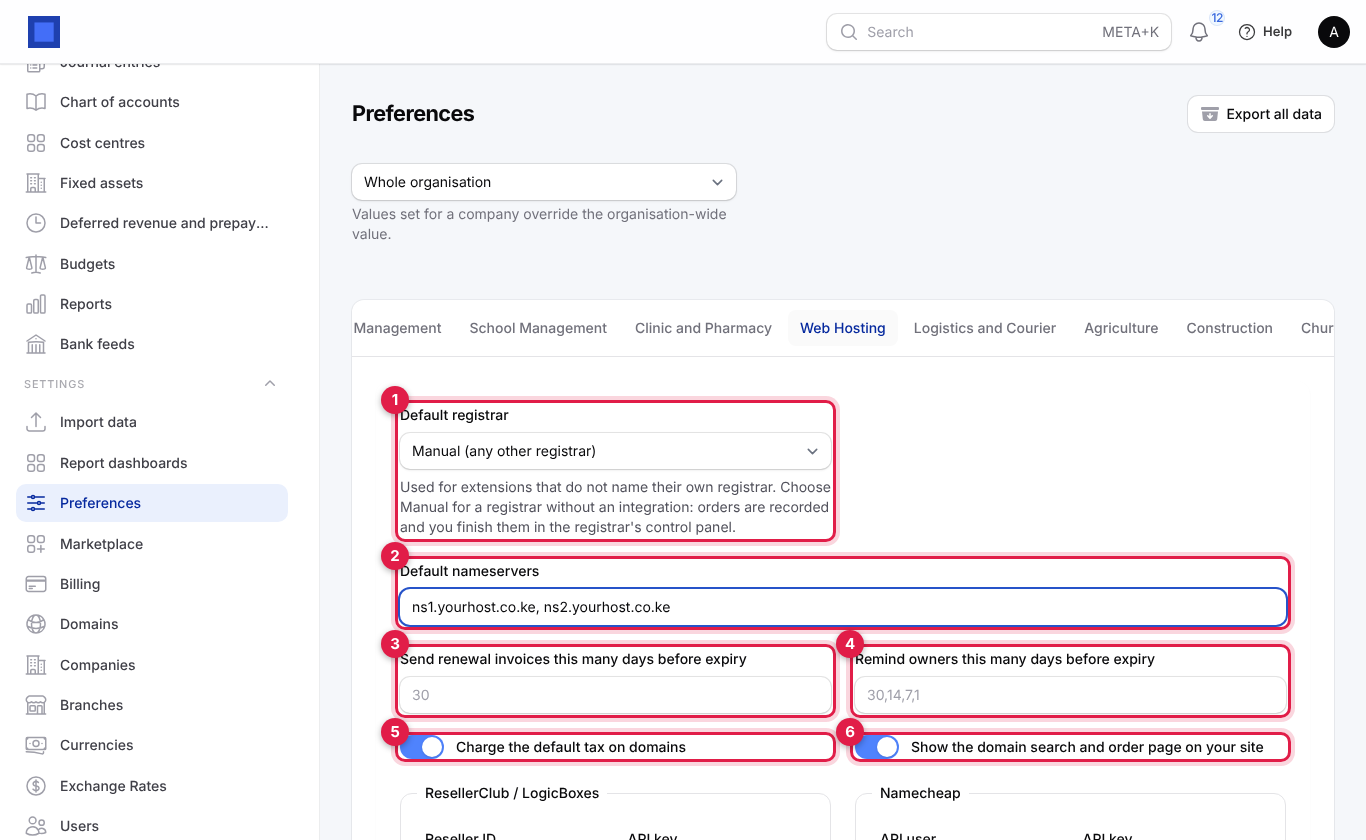
| Setting | Default | What it does |
|---|---|---|
| Default registrar (marker 1) | Manual | The registrar used for extensions that do not name their own on Domain prices. Manual (any other registrar) records orders for you to finish in the registrar's own control panel. |
| Default nameservers (marker 2) | — | Your nameservers, separated by commas, for example ns1.yourhost.co.ke, ns2.yourhost.co.ke. Used for new orders that do not give their own. |
| Send renewal invoices this many days before expiry (marker 3) | 30 | How early the renewal invoice is raised for domains on auto-renew (0 to 120). |
| Remind owners this many days before expiry (marker 4) | 30,14,7,1 | The days on which the owner is emailed before expiry, separated by commas. |
| Charge the default tax on domains (marker 5) | On | Domain invoices carry your default tax (for example VAT 16%). Turn it off to invoice domains without tax. |
| Show the domain search and order page on your site (marker 6) | On | Turns the public /domains page on or off. |
The dropdown at the top of Preferences lets one company use different settings from the rest of the organisation.
Connect your registrar
Fill in only the registrar you use. Each has a switch for its test environment: turn it on while you try things out with a test account, and off before you take real orders. Keys are kept with your workspace and are hidden on screen (click the eye to show them). If a registrar's keys are not filled in, orders for it are treated like Manual ones: you are told to do the work by hand.
Note: Every registrar below only answers requests from IP addresses you have allowed. Ask NaliSuite support for your workspace's outgoing IP address and add it to the allowed list in your registrar account.
ResellerClub / LogicBoxes (also for other LogicBoxes brands, such as NetEarthOne or ResellBiz):
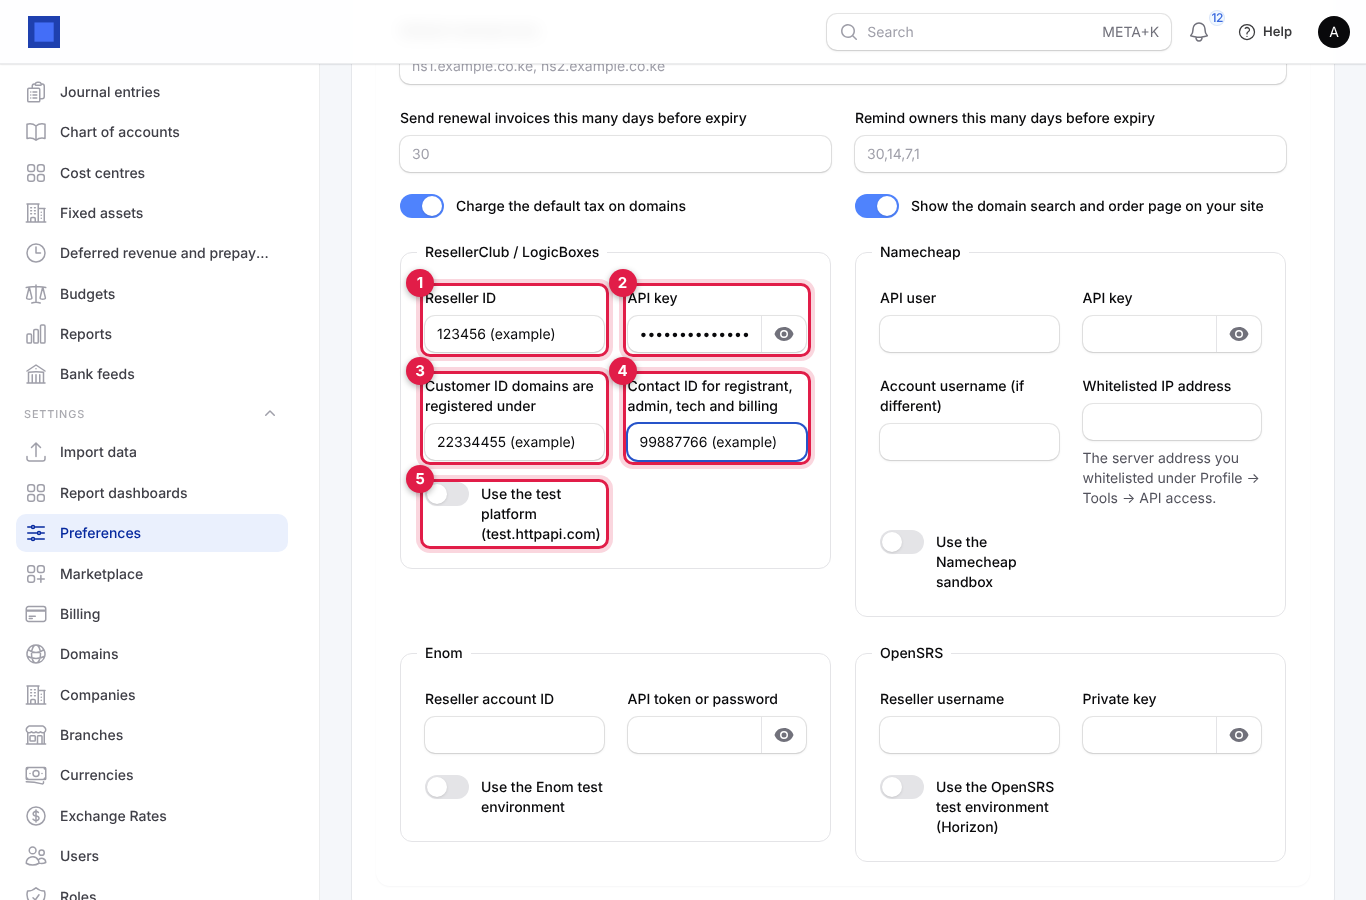
| Field | Where to find it |
|---|---|
| Reseller ID (marker 1) | In your ResellerClub control panel, under Settings → API. It is the number you sign in with (also shown at the top right). |
| API key (marker 2) | Same page, Settings → API: copy the API key (generate one if there is none). Add your server's IP address to the API whitelist on that page. |
| Customer ID domains are registered under (marker 3) | Domains are registered under one customer account in ResellerClub. Create a customer for your business (or use an existing one) under Customers and copy its customer ID. |
| Contact ID for registrant, admin, tech and billing (marker 4) | Under that customer, open Contacts, create the contact to appear on the domains and copy its contact ID. |
| Use the test platform (test.httpapi.com) (marker 5) | On to use a ResellerClub demo (test) account. |
With ResellerClub, every domain is registered with that one customer and contact, not with your client's own details.
Namecheap:
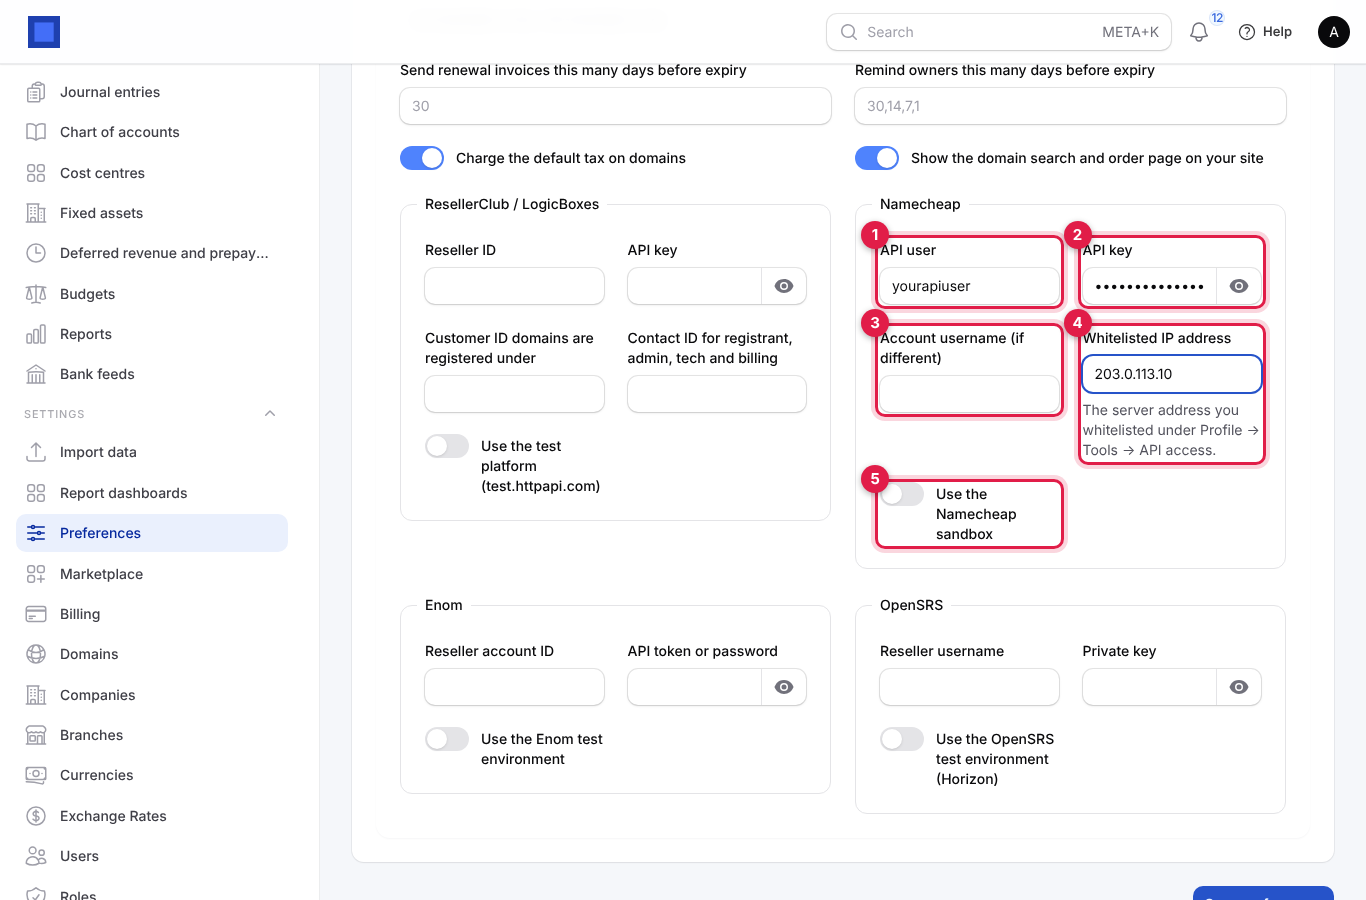
| Field | Where to find it |
|---|---|
| API user (marker 1) | Your Namecheap username. API access must be switched on: Profile → Tools → Business & Dev Tools → Namecheap API Access. Namecheap only switches it on for accounts that meet its conditions (balance or number of domains). |
| API key (marker 2) | Shown on the same API access page. |
| Account username (if different) (marker 3) | Leave empty unless you act for another Namecheap account. |
| Whitelisted IP address (marker 4, required) | The server IP address you added on the API access page. |
| Use the Namecheap sandbox (marker 5) | On for a sandbox account from sandbox.namecheap.com (a separate sign-up). |
Namecheap registrations use your client's name, email, phone and address from their contact (or your company's address where theirs is missing), so keep client contacts complete.
Enom and OpenSRS:
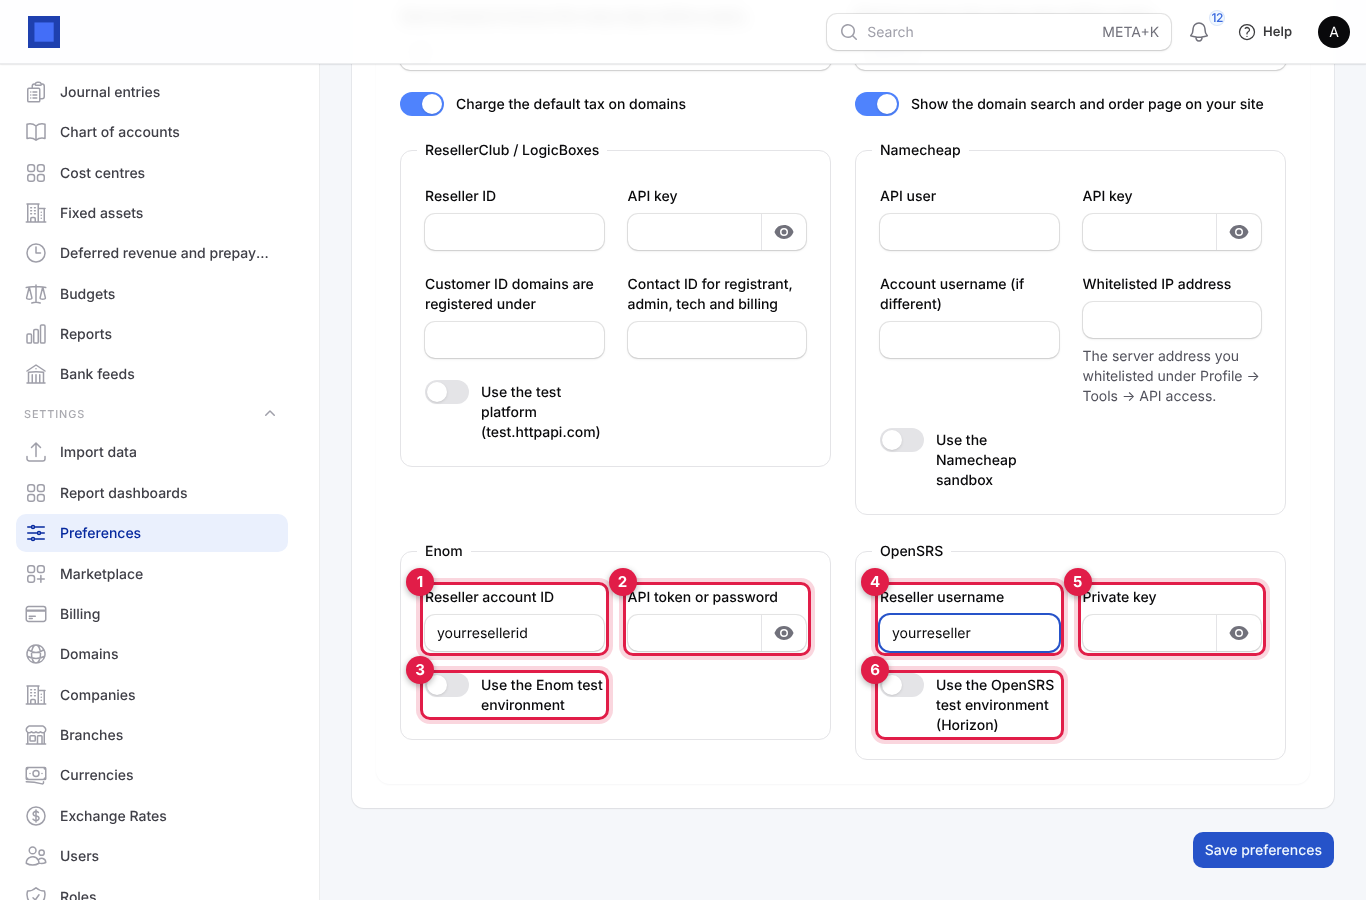
| Field | Where to find it |
|---|---|
| Enom: Reseller account ID (marker 1) | The login ID of your Enom reseller account. |
| Enom: API token or password (marker 2) | An API token created in the Enom reseller control panel (under the API or security settings; allow your server's IP there). |
| Enom: Use the Enom test environment (marker 3) | On for an account on resellertest.enom.com. |
| OpenSRS: Reseller username (marker 4) | Your OpenSRS (Tucows) reseller username. |
| OpenSRS: Private key (marker 5) | In the OpenSRS Reseller Control Panel, generate the API private key under the account or API settings, and add your server's IP to the list of addresses allowed to use the API. |
| OpenSRS: Use the OpenSRS test environment (Horizon) (marker 6) | On for an OpenSRS test (Horizon) account. |
Enom and OpenSRS registrations also use your client's contact details. If you cannot find a key, ask the registrar's reseller support for "API credentials"; menu names change from time to time.
Any other registrar (Manual): nothing to fill in. Choose Manual (any other registrar) for an extension, and NaliSuite records the order, invoices the client, and tells your staff when there is work to do at the registrar (see Finish an order at a manual registrar).
2. Set your domain prices
- Open Hosting → Domain prices. Each extension shows the Registrar it goes to (marker 2) and your price to Register (marker 3), Renew (marker 4) and Transfer in (marker 5), per year.
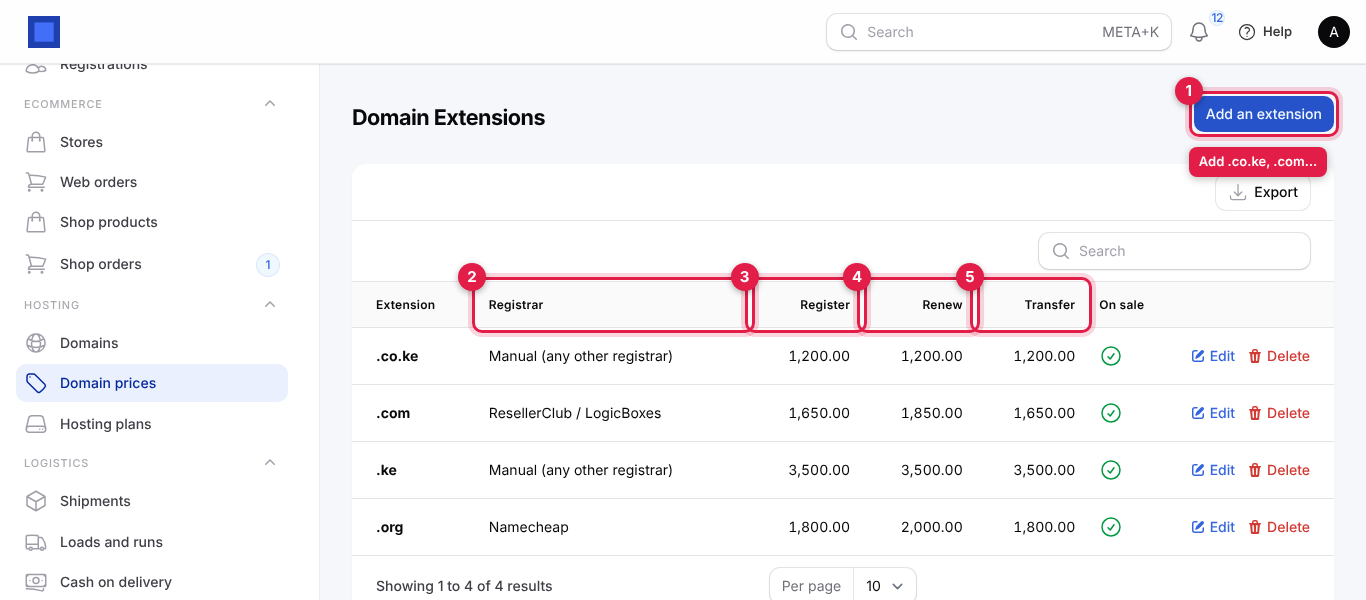
- Click Add an extension (marker 1), or Edit / Delete on a row.
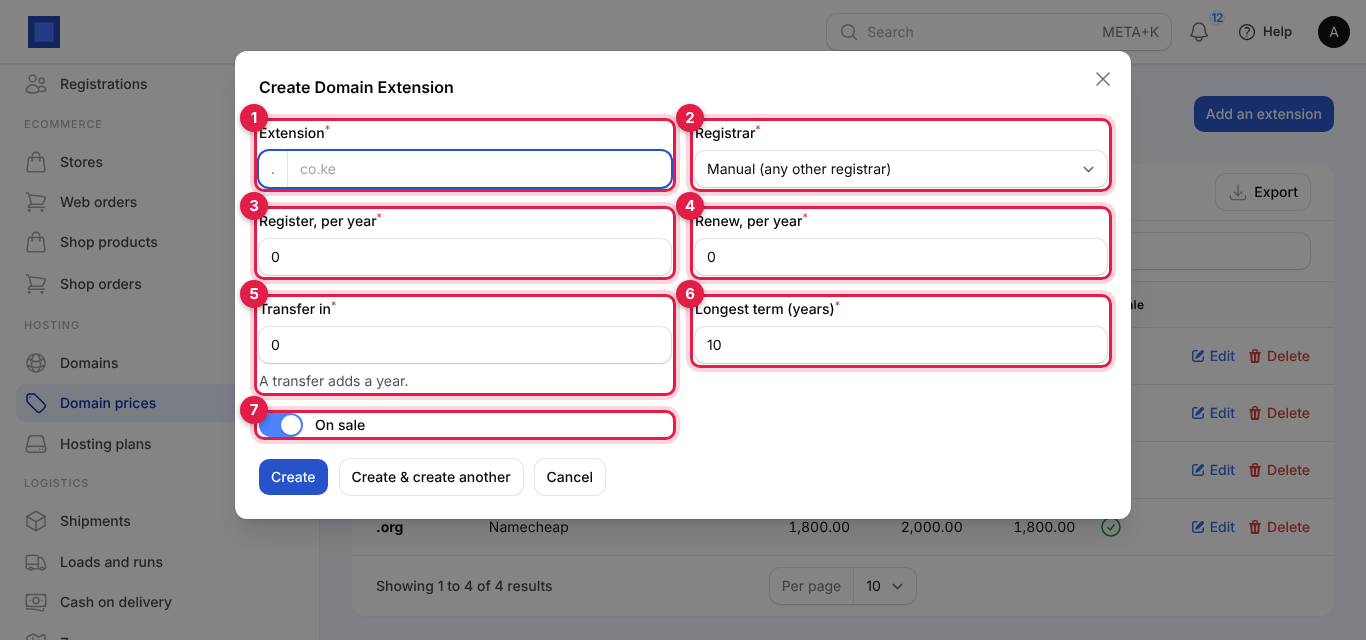
| Field | What to enter |
|---|---|
| Extension (required, marker 1) | Without the dot: co.ke, com, org, ke. Each extension once. |
| Registrar (required, marker 2) | Where orders for this extension go. Choose Manual for a registrar without an integration. |
| Register, per year (required, marker 3) | Your selling price for one year of a new registration. |
| Renew, per year (required, marker 4) | Your selling price per year of renewal. |
| Transfer in (required, marker 5) | Your price for a transfer, which adds one year. |
| Longest term (years) (required, marker 6) | 1 to 10. Longer orders are cut to this. |
| On sale (marker 7) | Off to stop selling the extension on the public page. |
These are the prices you charge clients; your cost at the registrar is not recorded here.
Important: Never leave a price at 0 for an extension that is On sale. An order with a zero price is not invoiced: it goes straight to the registrar, from your staff screen and from the public page.
3. Domains
Open Hosting → Domains. Every client domain is listed by expiry date: the Domain with what is waiting on it underneath (marker 3, for example Waiting: Register, or the registrar's last error), the Customer, the Registrar (marker 6; for manual domains, where it is registered), Expires (marker 4: amber within 30 days with the days left, red once past), Auto-renew and the Status (marker 5).
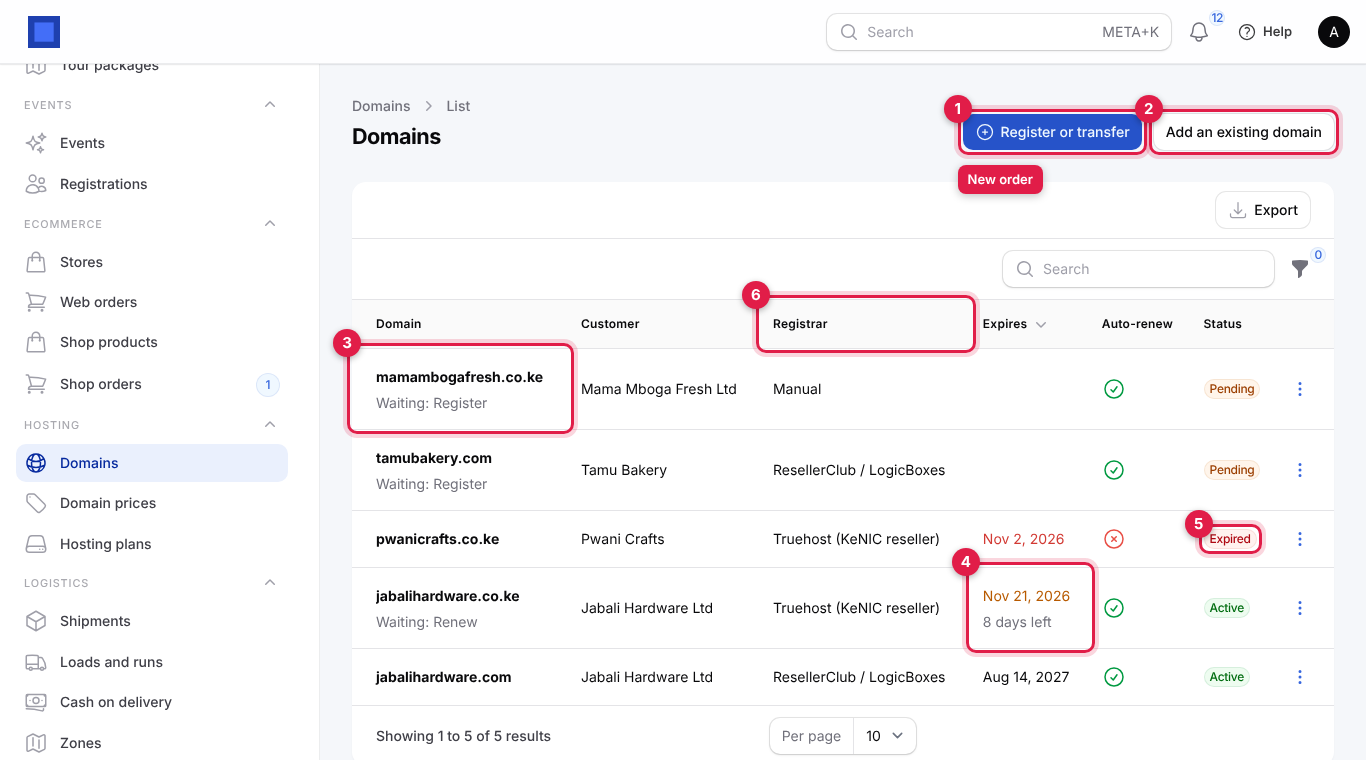
Filters (filter icon): Status, Registrar, Expiring in 60 days and Waiting on staff or a payment. Use the last one every morning.
Domain statuses
| Status | Meaning |
|---|---|
| Pending | Ordered; waiting for payment or for the registrar (or for you, at a manual registrar). |
| Active | Registered, with an expiry date. |
| Expired | Past its expiry date. It can still be renewed. |
| Transferred away / Cancelled | Set by hand when a client leaves; the name can then be ordered again. |
Order a new domain or a transfer
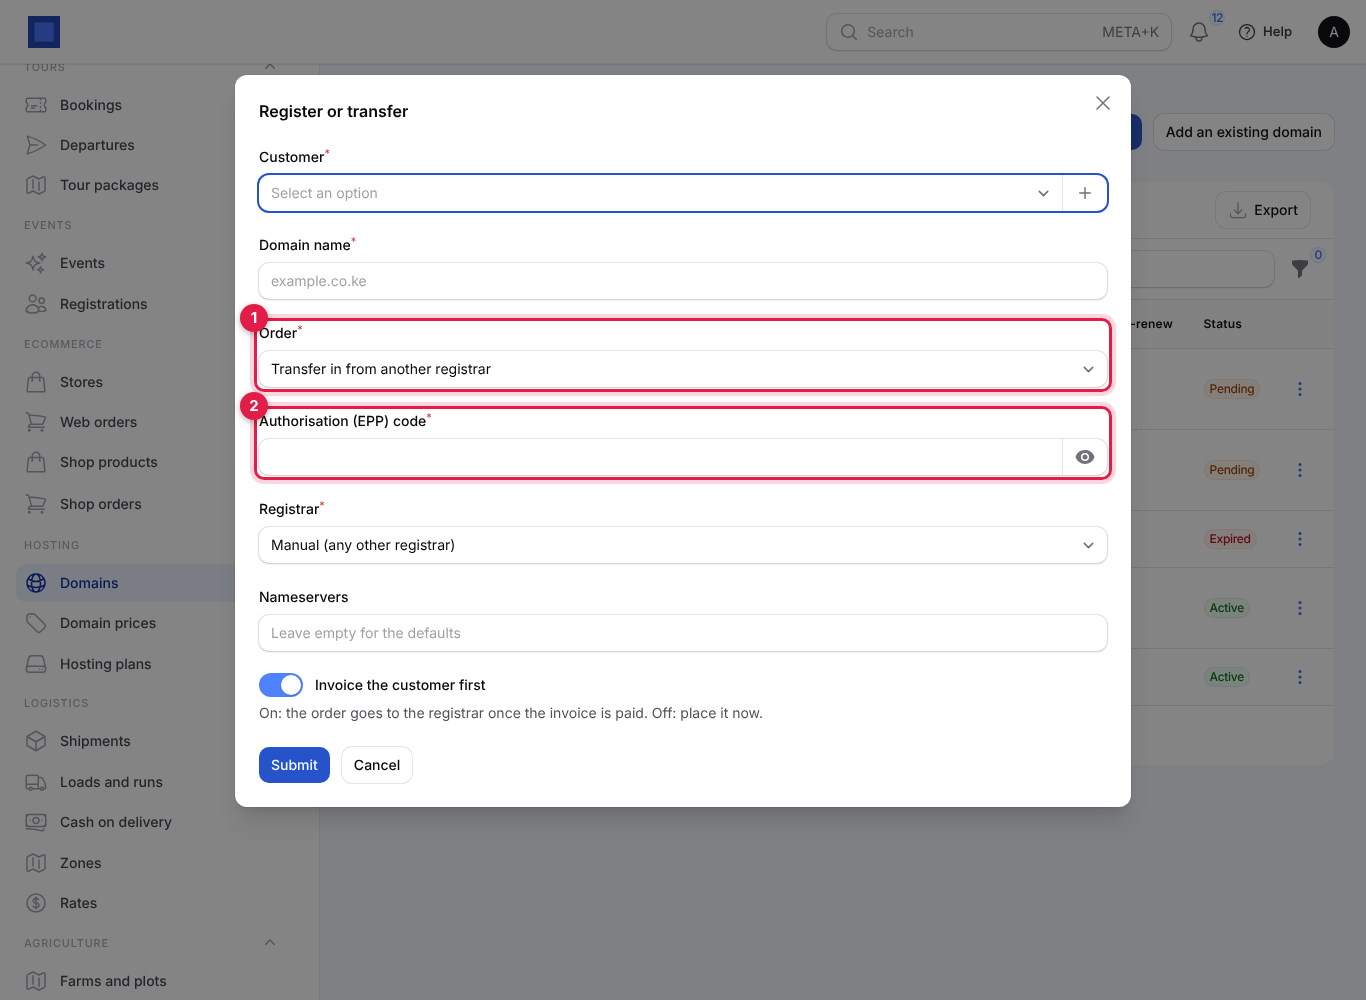
- Click Register or transfer (marker 1).
- Fill in the window. When you type the Domain name and leave the field, the line under it shows whether it is free and your price, for example Available · KES 1,200.00, Taken, or The registrar cannot check this name; it will be tried when ordered (manual registrars cannot check).
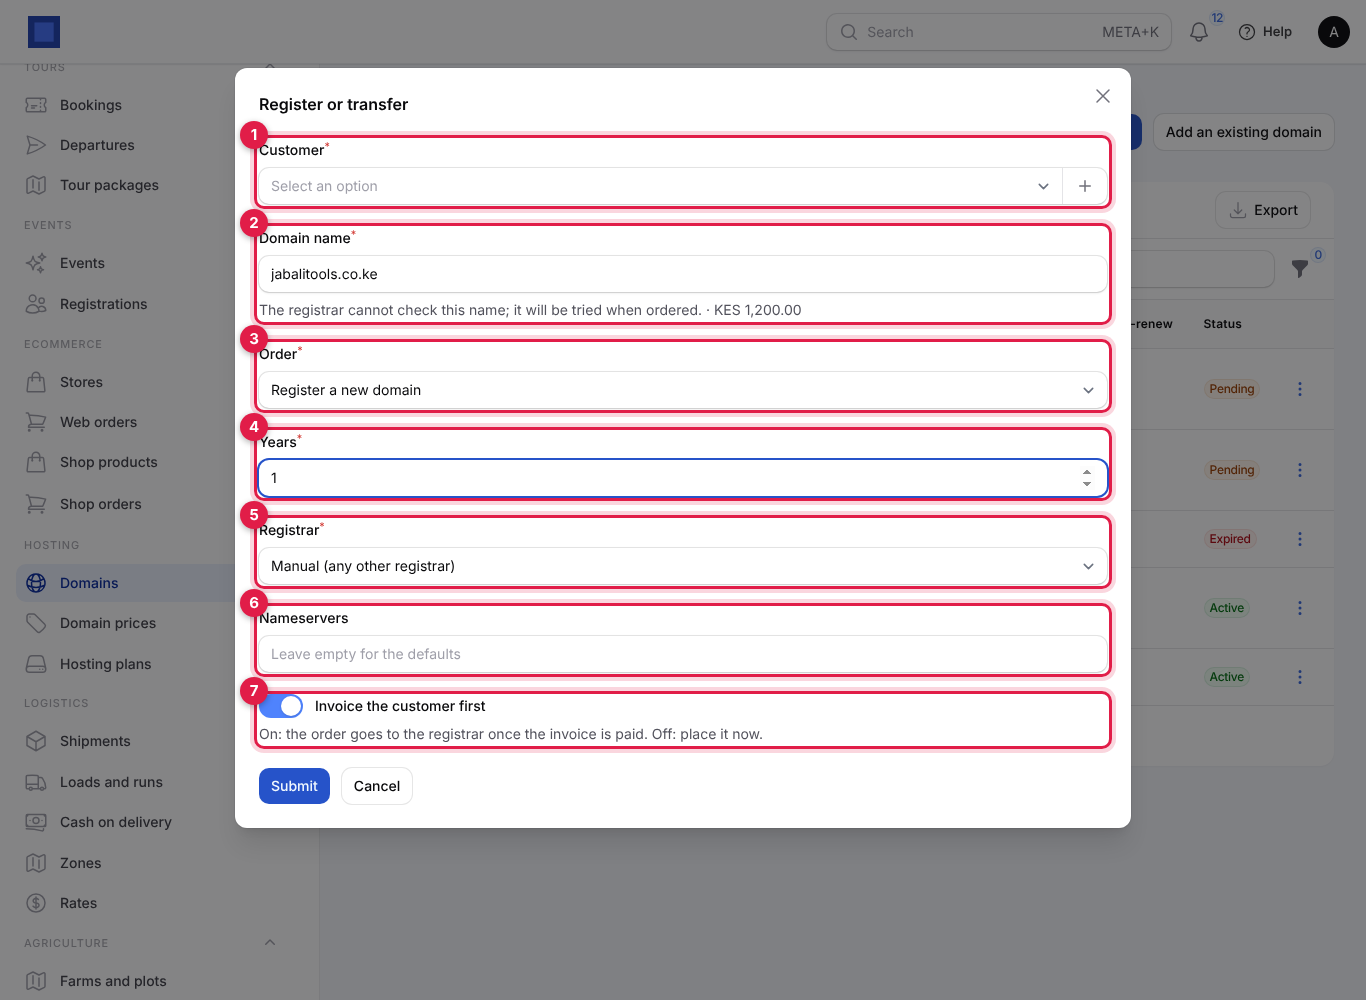
| Field | What to enter |
|---|---|
| Customer (required, marker 1) | The client who owns the domain. |
| Domain name (required, marker 2) | jabalitools.co.ke. "www." and "https://" are removed for you. The registrar is filled in from the extension. |
| Order (required, marker 3) | Register a new domain or Transfer in from another registrar. |
| Years (required, marker 4) | For registrations, 1 to 10 (cut to the extension's longest term). |
| Registrar (required, marker 5) | Filled from the extension; change it if needed. |
| Nameservers (marker 6) | Type each and press Enter. Leave empty for your default nameservers. |
| Invoice the customer first (marker 7) | On (recommended): the client is invoiced and the order waits for payment. Off: the order goes to the registrar now and is not invoiced. |
For a transfer, choose Transfer in from another registrar (marker 1) and paste the Authorisation (EPP) code (marker 2) the client got from their current registrar. A transfer is priced at the extension's Transfer in price and adds one year.
- Click Submit.
What happens with Invoice the customer first on: the domain is added as Pending (Waiting: Register), an invoice is issued to the client (Domain registration: jabalitools.co.ke (1 year), or Domain transfer: … (includes one year)), with the domain name as its reference, due today, and is emailed with your pay link. You see Order taken; the invoice is on its way to the customer. As soon as the invoice is paid in full (online, or when you record the payment), the order is sent to the registrar:
- ResellerClub, Namecheap, Enom, OpenSRS: the domain is registered (or the transfer started) in your reseller account. It becomes Active with its expiry date. If the registrar refuses (no balance, name taken, wrong keys), the domain stays Pending, the registrar's message shows under the name, and everyone with hosting.manage gets a notification Domain order failed: …. Fix the cause and use Send to registrar (below).
- Manual: staff are notified Register jabalitools.co.ke at …: do it in the registrar's control panel, then click Done at registrar.
With the switch off, the same happens immediately, without an invoice.
The ⋮ menu of a domain
The actions in ⋮ (and under Actions on the domain's own page) follow the domain's state. For an order waiting at a manual registrar:
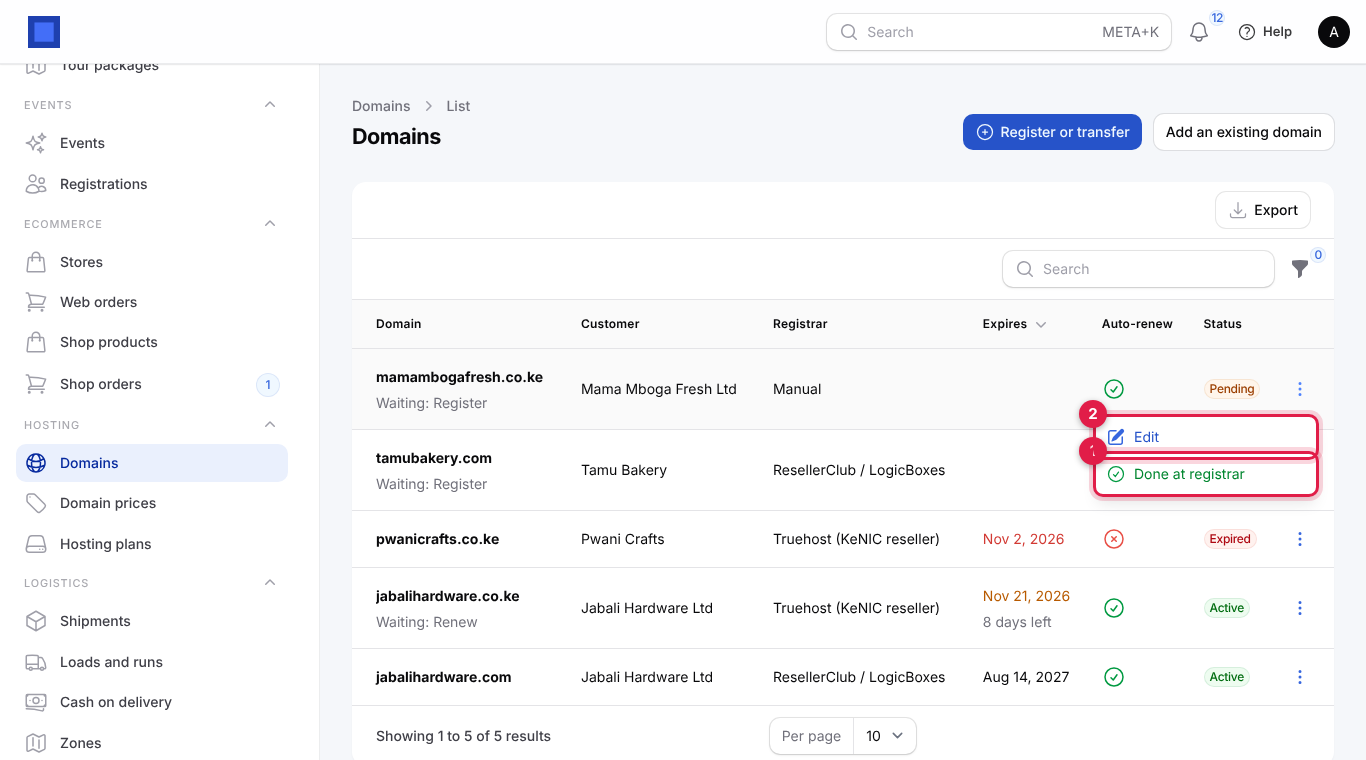
For an active domain:
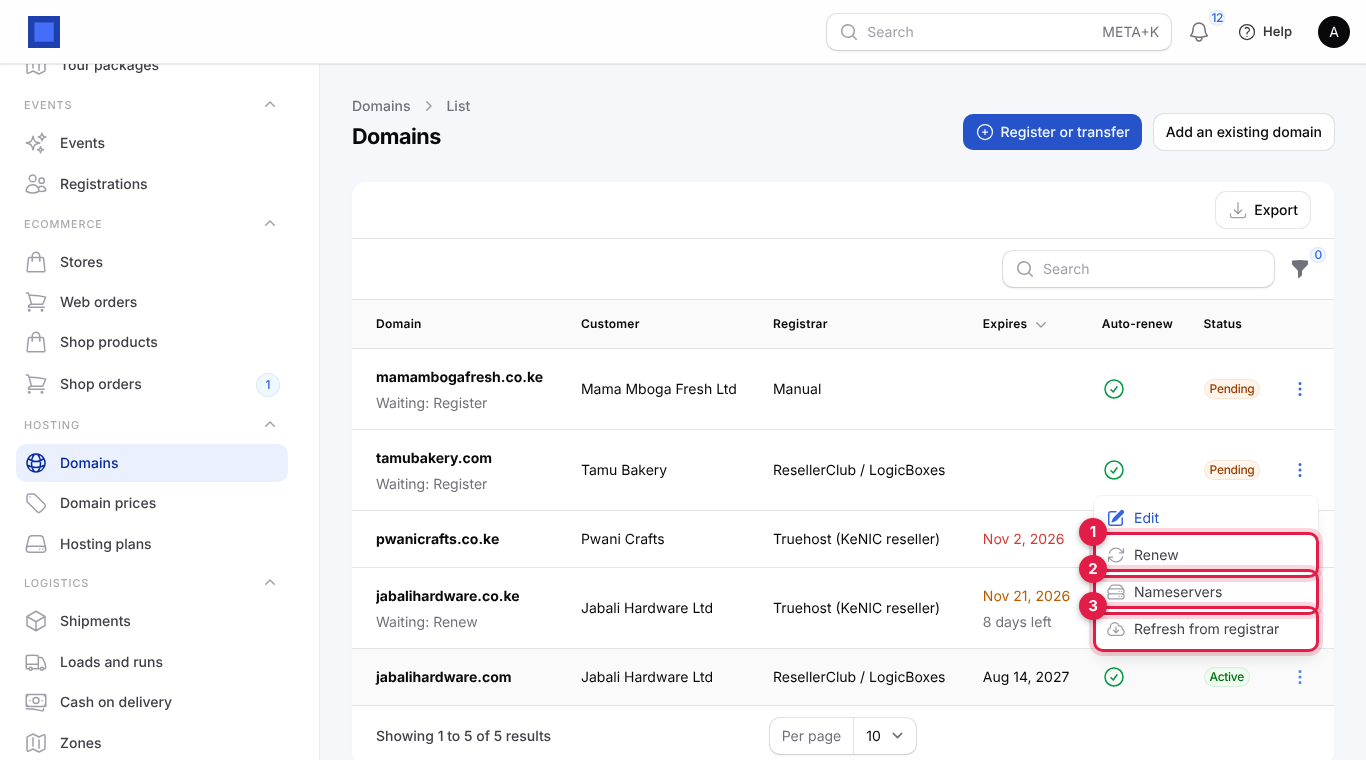
| Action | When | What it does |
|---|---|---|
| Edit | Always | Open the domain's page. |
| Send to registrar | Something is waiting, at a connected registrar | Places the waiting order now, without waiting for payment. The registrar's message is shown if it fails. |
| Done at registrar | Something is waiting | Records that you did it yourself (below). |
| Renew | Active or expired, nothing waiting | Renews the domain (below). |
| Nameservers | Active | Changes the nameservers (below). |
| Refresh from registrar | Connected registrar, not pending | Brings the expiry date, nameservers, order number and EPP code across from the registrar. |
Finish an order at a manual registrar
- Sign in to the registrar's control panel and register, transfer or renew the domain there.
- In NaliSuite, on the domain, click ⋮ → Done at registrar.
- Check the New expiry date (marker 2; worked out for you from the years ordered) and type the Registrar order number (marker 3) if there is one. Click Submit.
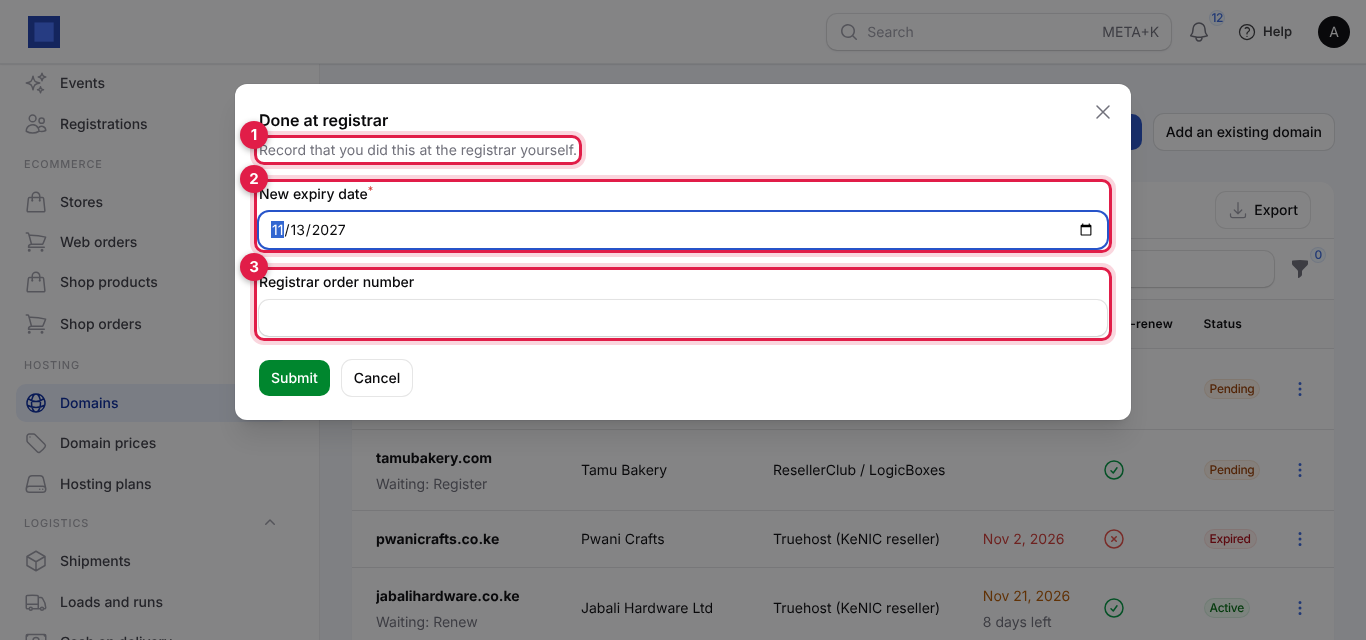
The domain becomes Active with that expiry date, and nothing is waiting any more. You see Domain updated.
Tip: Done at registrar works for connected registrars too: use it if you had to finish an order by hand in the registrar's panel.
Renew a domain
Click ⋮ → Renew, choose the Years (marker 1) and whether to Invoice the customer first (marker 2), then Submit.
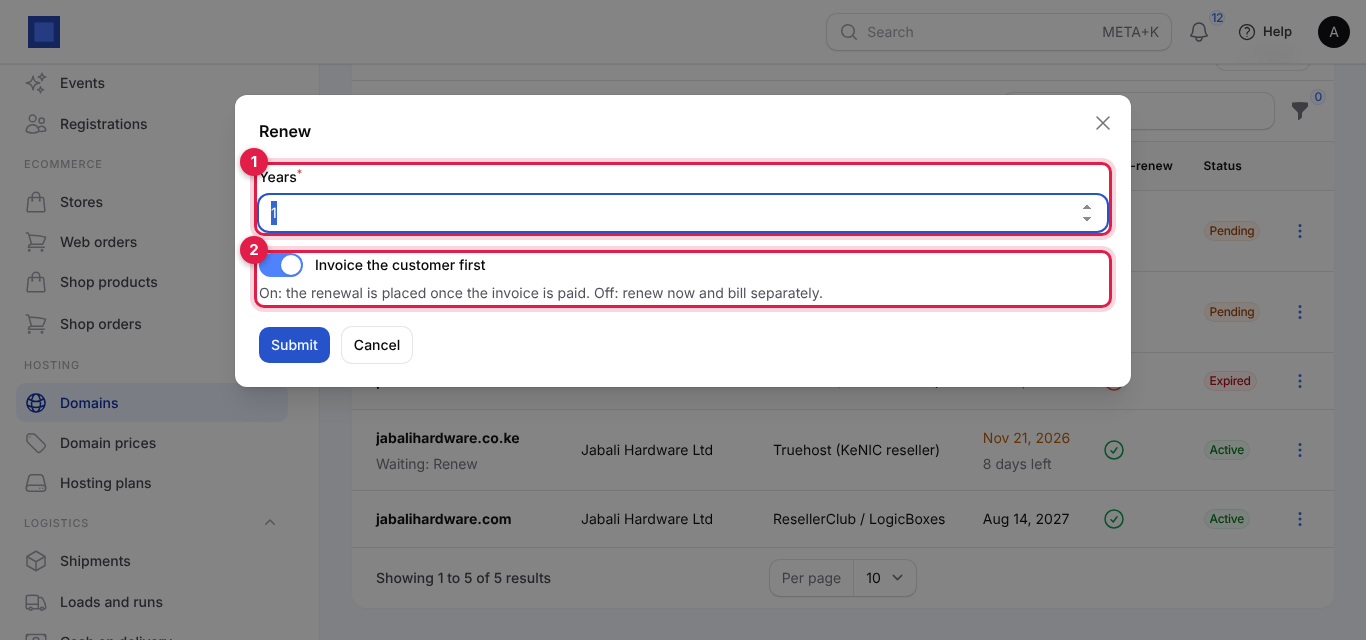
- Invoice first (on): a renewal invoice (Domain renewal: jabalihardware.com, 1 year from 14 Aug 2027) is issued, due on the expiry date (or today if it has passed), and emailed. The domain shows Waiting: Renew. When it is paid, the renewal goes to the registrar (or staff are told to do it, for manual registrars) and the expiry moves on by the years renewed.
- Off: the renewal is placed at the registrar now and not invoiced. Invoice the client separately if you need to.
Change nameservers
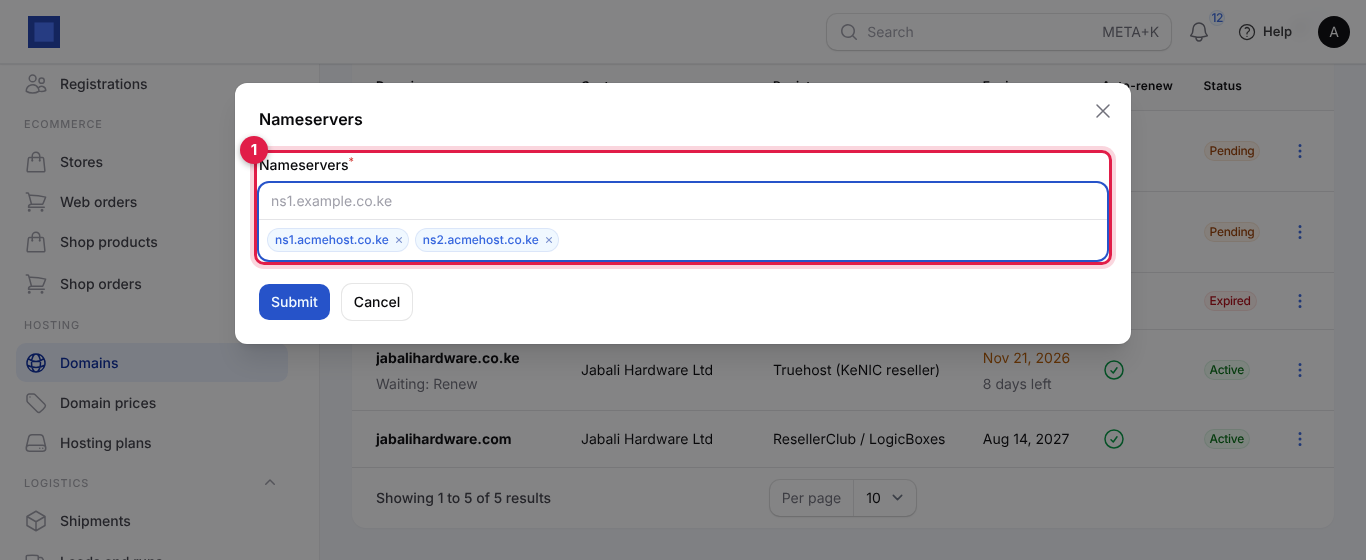
Click ⋮ → Nameservers, type at least two (press Enter after each, marker 1) and Submit. At a connected registrar the change is made there at once. For a manual registrar the new nameservers are saved and staff are notified to change them in the registrar's panel.
The domain page
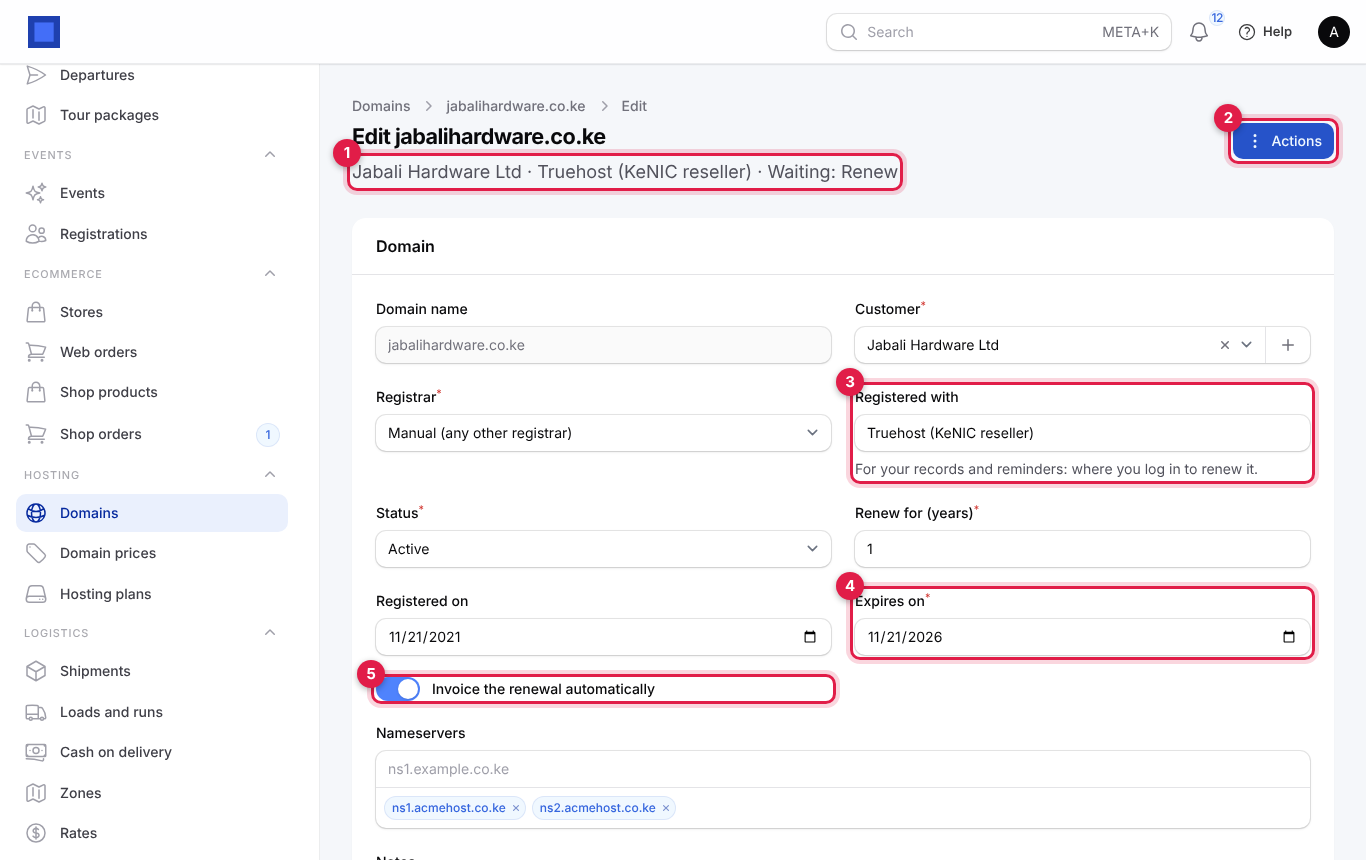
Click Edit (or the domain's name) to open it. Under the title (marker 1) are the customer, the registrar, what is waiting and the last error. Actions (marker 2) holds the same actions as the ⋮ menu. You can correct Registered with (marker 3) for manual domains, the Expires on date (marker 4), Invoice the renewal automatically (marker 5), the status, years, nameservers and notes, then click Save changes.
Add domains you already manage
So that existing clients' domains are renewed and reminded like new ones, record them once:
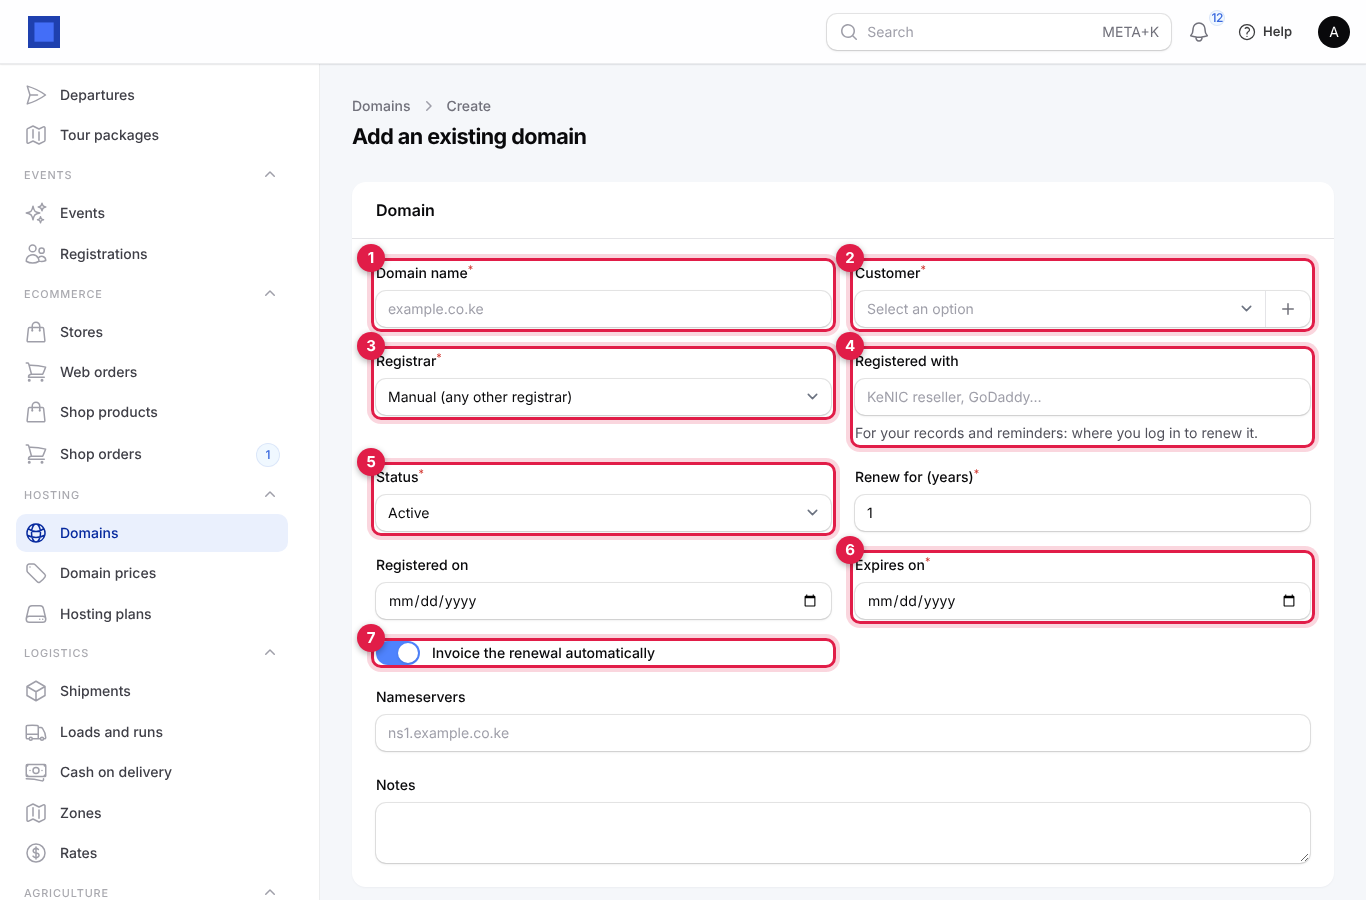
- On Hosting → Domains, click Add an existing domain (marker 2 on the domains list).
- Fill in the form and click Create.
| Field | What to enter |
|---|---|
| Domain name (required, marker 1) | pwanicrafts.co.ke. Cannot be changed later. |
| Customer (required, marker 2) | The owner. |
| Registrar (required, marker 3) | Where it is registered. |
| Registered with (marker 4, manual only) | The registrar's name for your records and the staff notifications: Truehost (KeNIC reseller), GoDaddy. |
| Status (required, marker 5) | Usually Active. |
| Renew for (years) (required) | The term of each renewal invoice. Default 1. |
| Registered on | Optional. |
| Expires on (marker 6, required when active) | The current expiry date. |
| Invoice the renewal automatically (marker 7) | On for renewals to be invoiced ahead of expiry. |
| Nameservers, Notes | Optional. |
Recording a domain does not contact the registrar. For connected registrars, use Refresh from registrar afterwards to bring the details across.
4. Renewals and reminders run by themselves
Every morning at 06:40, for each company, NaliSuite goes through domains that are active or expired:
- Expiry: an active domain past its expiry date becomes Expired, and staff are notified pwanicrafts.co.ke has expired.
- Renewal invoices: a domain with Invoice the renewal automatically on and nothing waiting gets its renewal invoice once the days left reach Send renewal invoices this many days before expiry (30 by default), up to 30 days after expiry. It is emailed to the owner. When paid, the domain is renewed at the registrar (or staff are told).
- Reminders: on each of the Remind owners days (30, 14, 7 and 1 by default) the owner is emailed jabalihardware.co.ke expires in 8 days. If a renewal invoice is open, the email names it and has a Pay and renew button to the pay page; otherwise it asks them to contact you and has a View my domains button to the portal. Each reminder day is sent once; the cycle starts again when the expiry date changes.
Emails go to the owner's contact email address. Owners without an email get no reminders; watch the Expiring in 60 days filter for them.
5. Hosting plans and cPanel accounts
A hosting plan is a recurring product tied to a cPanel package on your WHM server.
- Open Hosting → Hosting plans. Each plan shows what is included under its name (marker 3), its cPanel package (marker 2), the Price and how often it is billed (Every, marker 4).
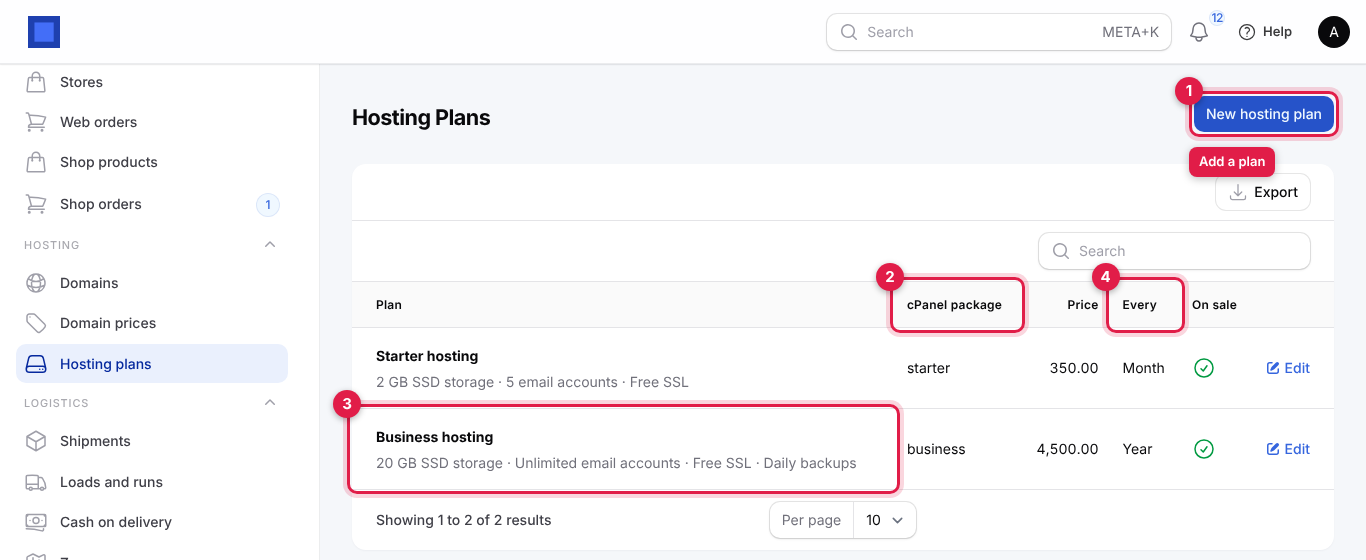
- Click New hosting plan (marker 1), or Edit.
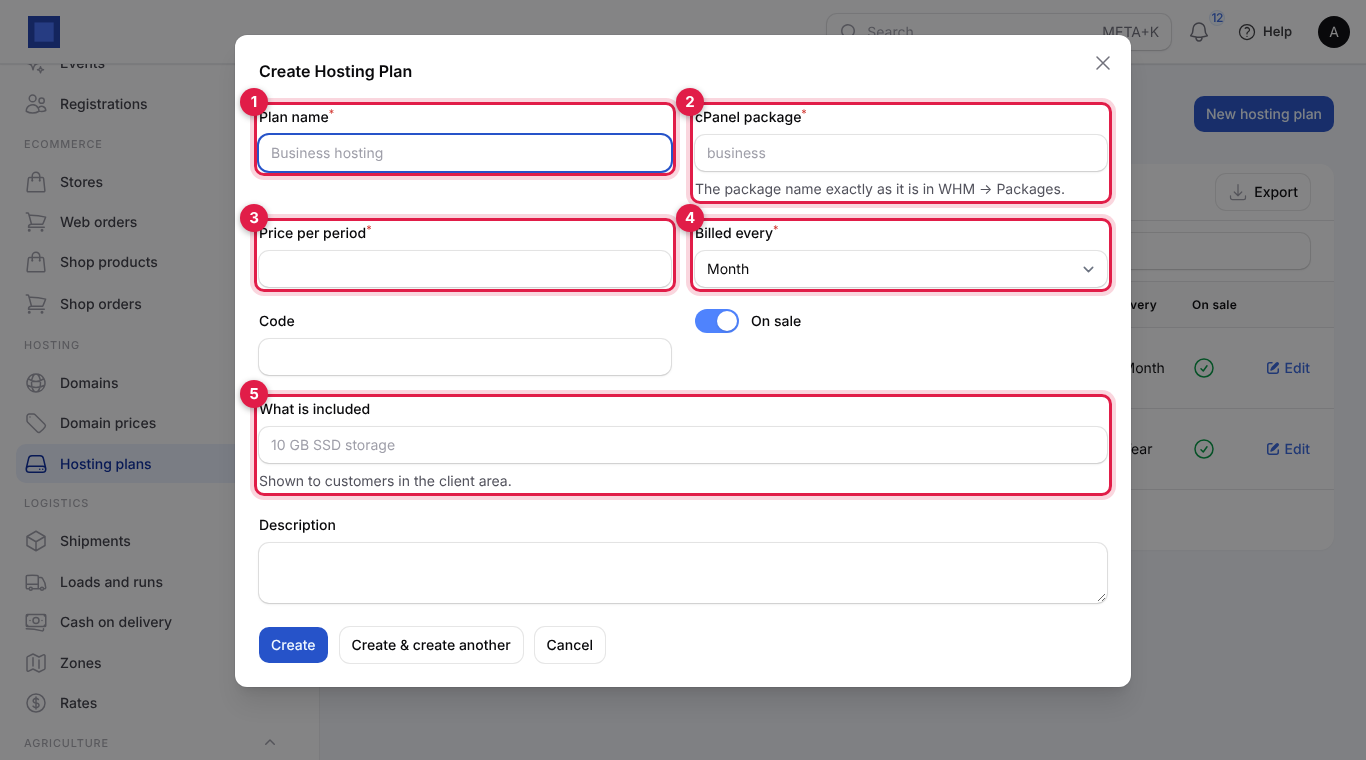
| Field | What to enter |
|---|---|
| Plan name (required, marker 1) | Business hosting. Shown on invoices and in the portal. |
| cPanel package (required, marker 2) | The package name exactly as it is in WHM → Packages, for example business. |
| Price per period (required, marker 3) | The price for each billing period. |
| Billed every (required, marker 4) | Month, Quarter or Year. |
| Code | Optional SKU. |
| On sale | Off to stop offering the plan. |
| What is included (marker 5) | Type each feature and press Enter: 20 GB SSD storage, Daily backups. Shown to clients in the portal. |
| Description | Optional. |
- Click Create. The plan is also a product under Sales → Products that you can use anywhere.
To sell hosting, create a subscription for the client under Finance → Subscriptions with the plan as its line and the client's Domain under Hosting account (cPanel). With your WHM server connected (Settings → Preferences → Subscriptions → cPanel / WHM: WHM URL, WHM user and an API token from WHM → Development → Manage API Tokens), the cPanel account is created with the plan's package when the subscription starts, suspended when it falls past due, unsuspended when paid, moved to the new package on a plan change, and suspended or removed when it ends. See Subscriptions.
6. The public domain page
Your domain search is at /domains on your workspace address, for example https://yourbusiness.nalisuite.com/domains. Link to it from your website.
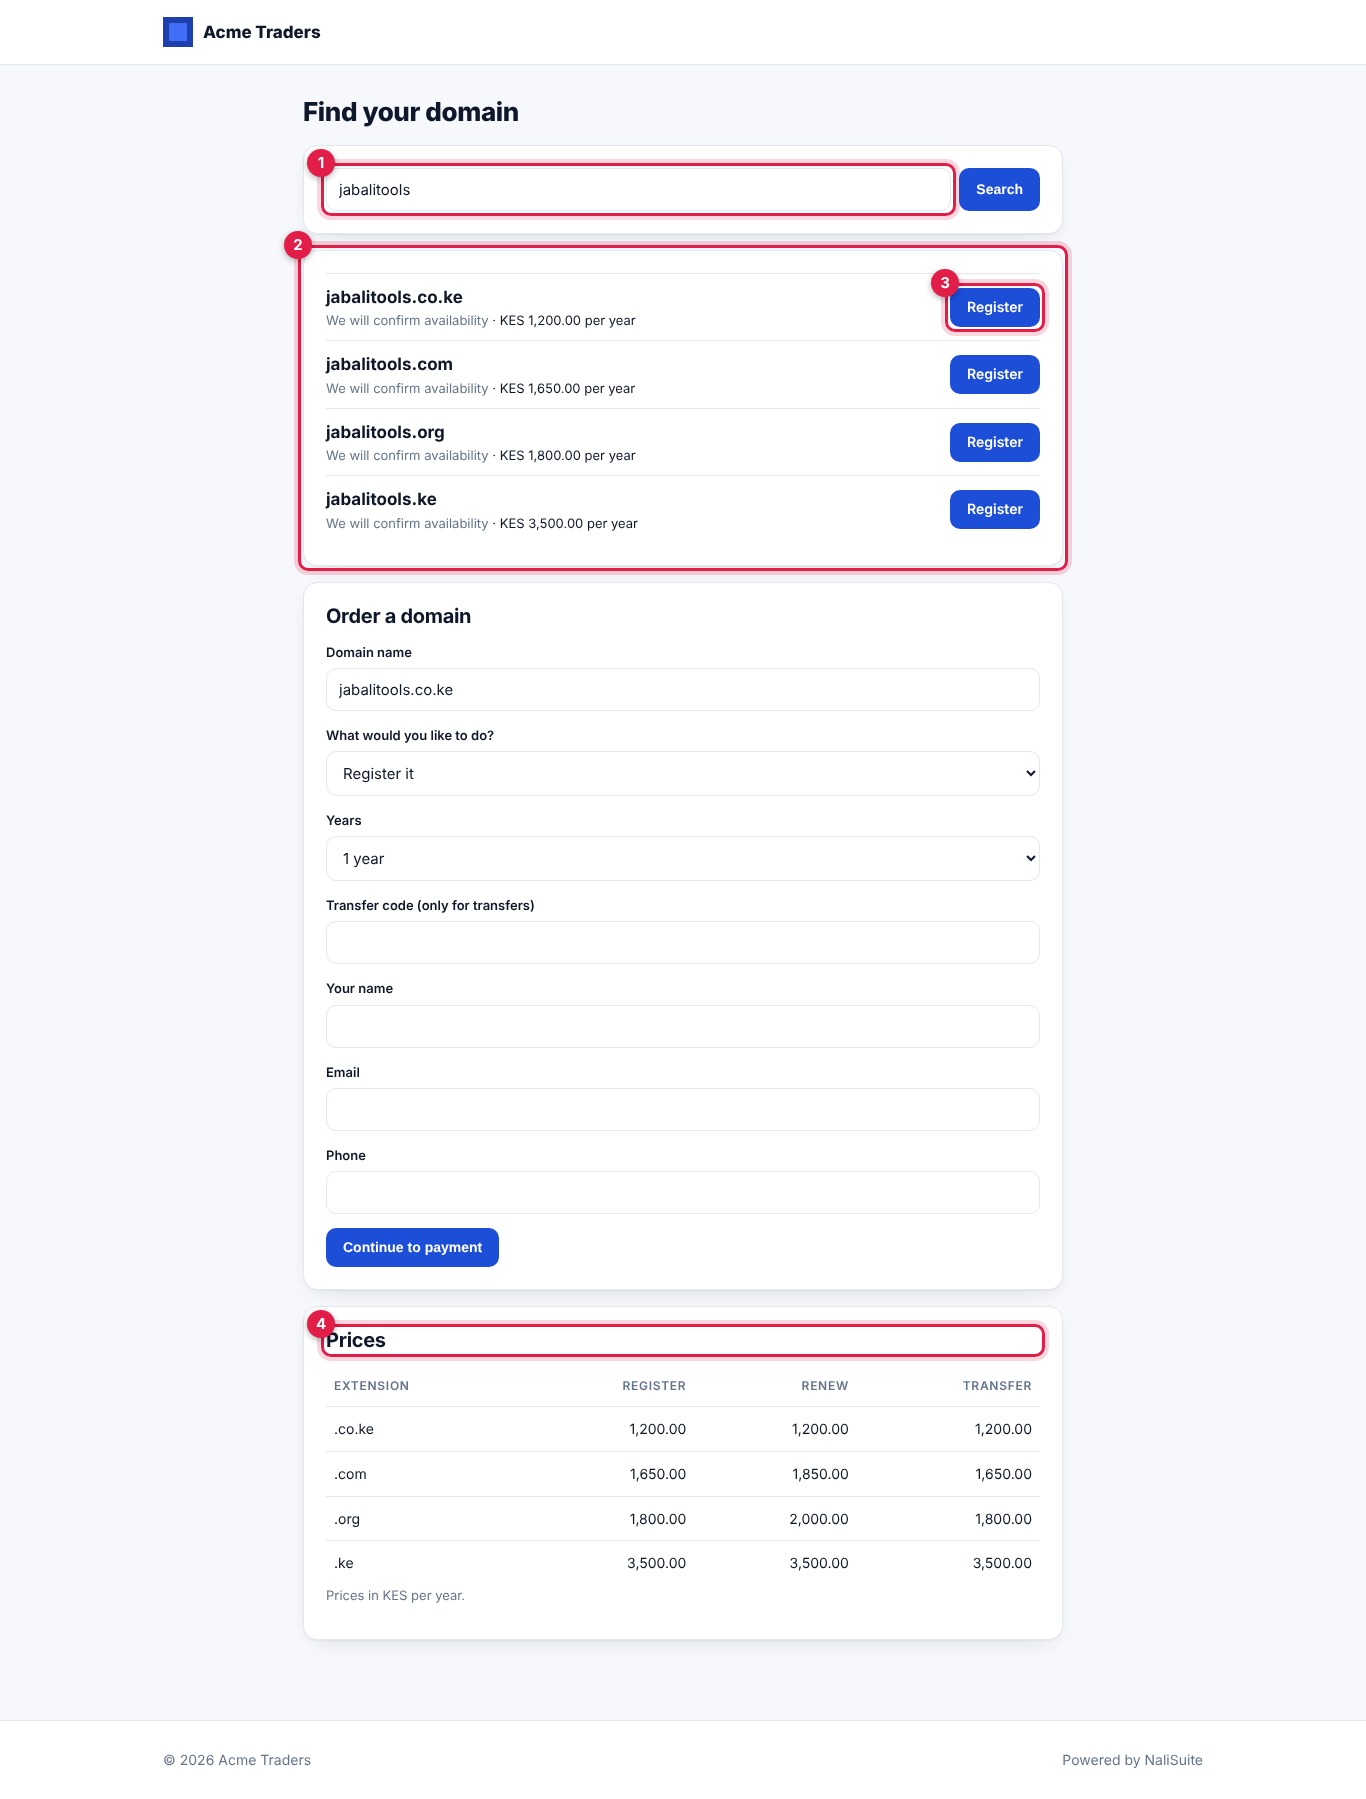
- Visitors type a name in the search box (marker 1) and click Search.
- The results (marker 2) show the name they typed and the same name on each extension you sell (cheapest first, up to six), each with Available, Taken or We will confirm availability (manual registrars and registrars without keys cannot check) and your price per year. Register (marker 3) fills the order form; for a taken name, Transfer it to us does the same for a transfer.
- Your Prices (marker 4) for every extension on sale are listed at the bottom.
The order form:
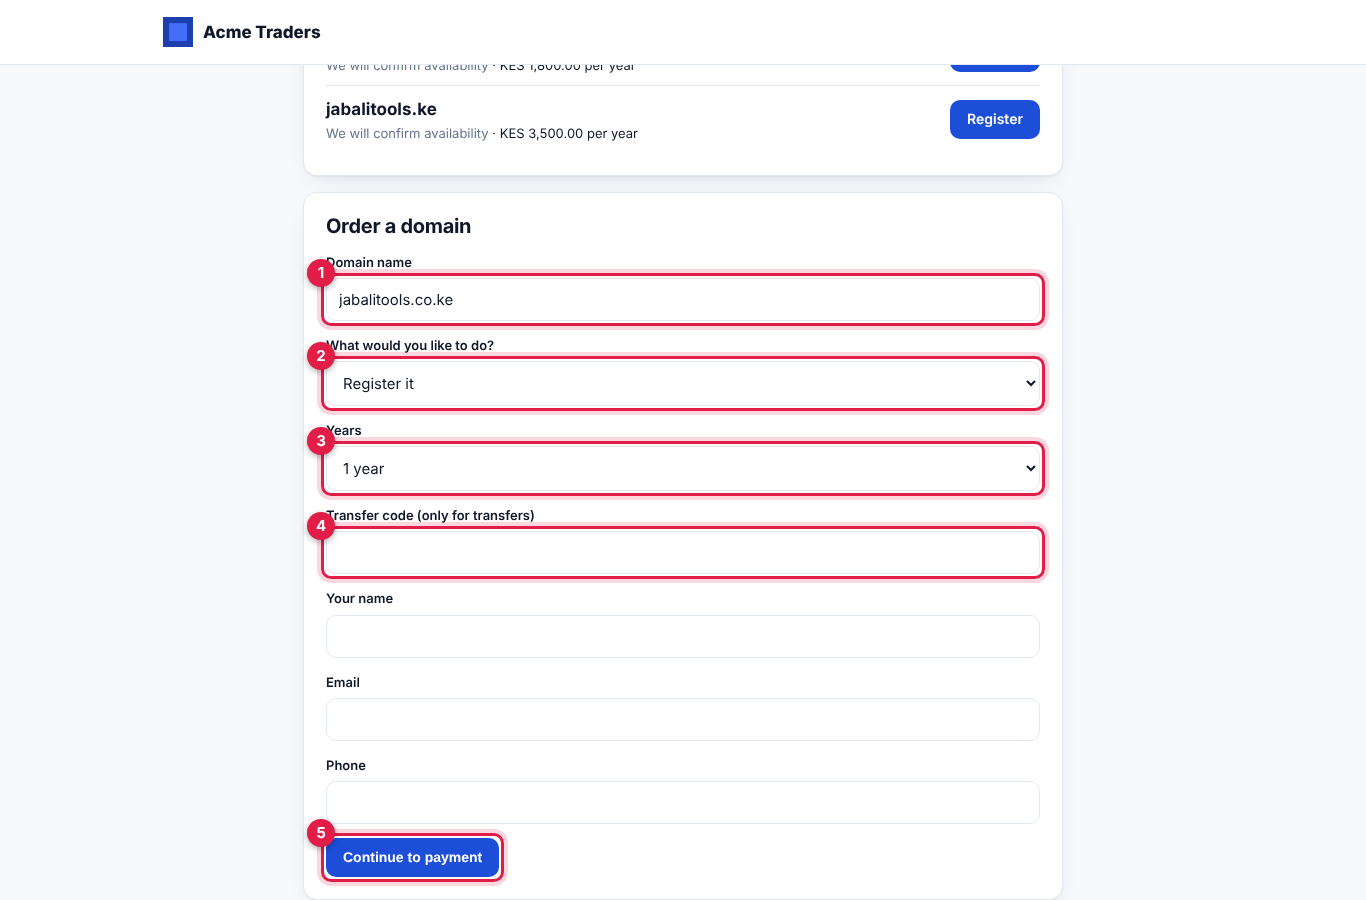
| Field | What the visitor enters |
|---|---|
| Domain name (marker 1) | Filled by Register, or typed. |
| What would you like to do? (marker 2) | Register it or Transfer it from my current registrar. |
| Years (marker 3) | 1, 2, 3, 5 or 10 years. |
| Transfer code (only for transfers) (marker 4) | The EPP code, required for transfers. |
| Your name, Email, Phone | Their details. They are matched to your contacts by email, or added as a new customer. |
Continue to payment (marker 5) creates the order exactly as Register or transfer does with the invoice switched on, and takes them to the invoice pay page to pay with M-Pesa, card or bank (see Invoices and payments). Once paid, the domain is registered and appears in their portal. Messages they may see: We do not sell example.xyz yet. Please contact us. (extension not on sale) and example.co.ke is already taken.
Turn the page off with Show the domain search and order page on your site if you do not want public orders.
7. What clients see in the customer portal
Clients with portal access (see Customer and vendor portal) have a Hosting and domains page.
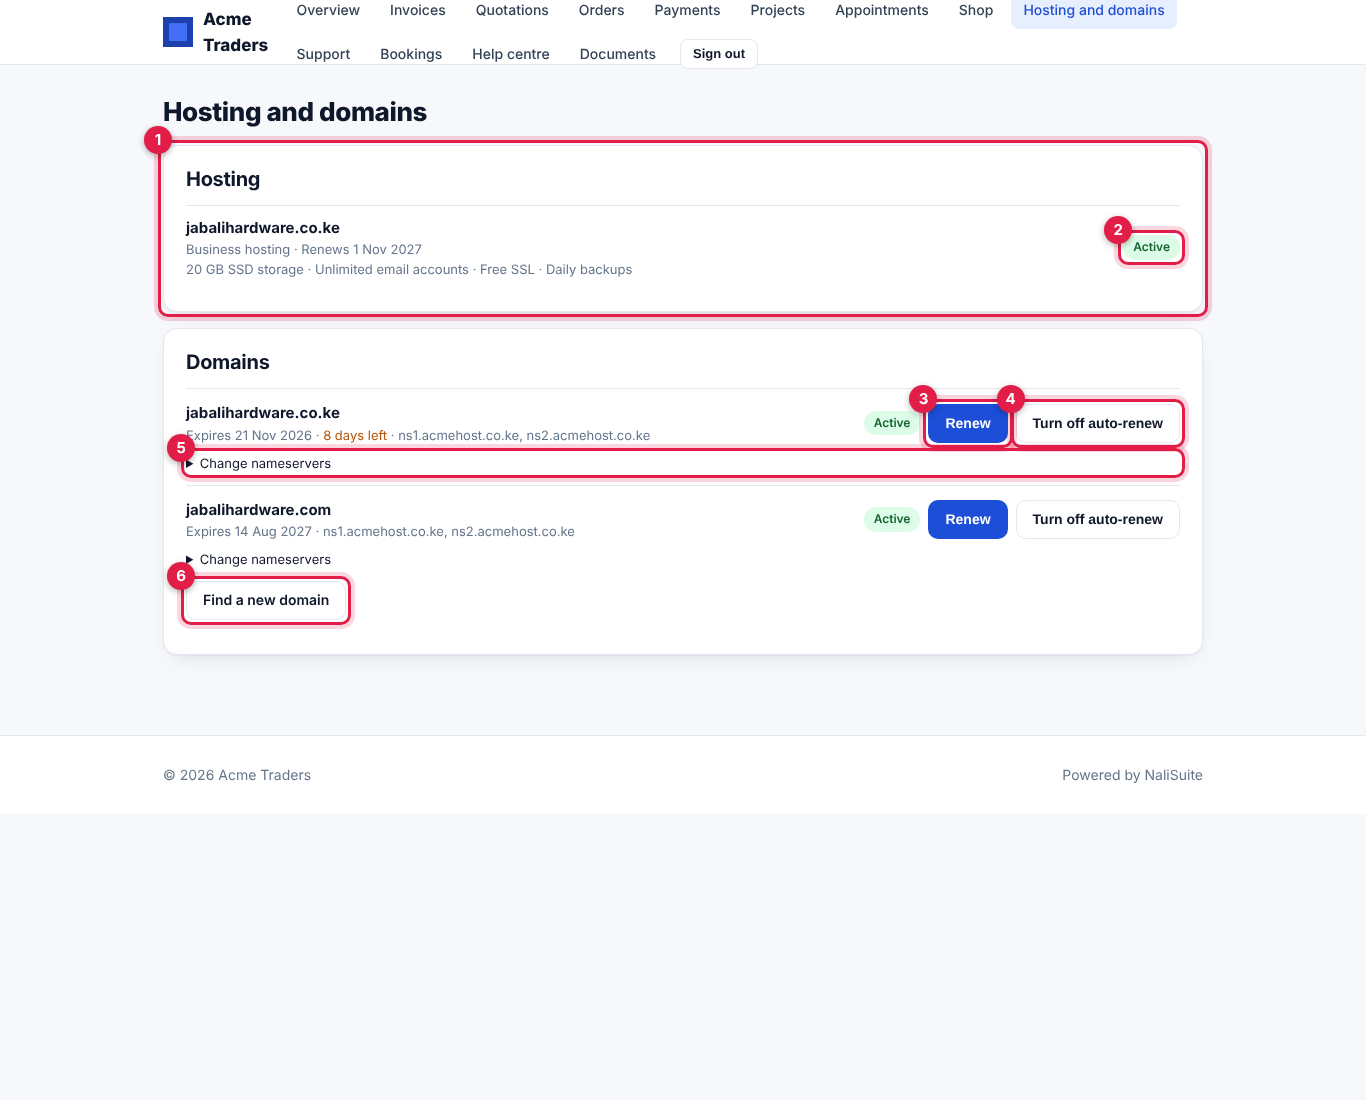
- Hosting (marker 1): each hosting subscription (trial, active, past due or paused) with its domain, plan, next renewal date and what is included, and its status (marker 2): Active, Suspended, Closed or Being set up. An active account on a connected WHM server has an Open cPanel button that signs the client straight in to cPanel in a new tab, with no password; the link works once.
- Domains: each domain with its expiry date, days left (within 60 days) and nameservers.
- Renew (marker 3): raises the renewal invoice (or reuses the open one) and takes them to its pay page.
- Turn off auto-renew / Turn on auto-renew (marker 4): whether renewal invoices are raised automatically.
- Change nameservers (marker 5, active domains): one per line, then Save nameservers. Changes can take up to 24 hours to spread.
- Pending orders show Waiting for payment or registration.
- Find a new domain (marker 6) opens your public domain page.
Common questions
A paid order is still Pending. Look under the domain name for the registrar's message. Common causes: not enough balance in your reseller account, keys or IP whitelisting not set, or the name was taken meanwhile. Fix it and click ⋮ → Send to registrar. For a manual registrar, do the work and click Done at registrar.
Can I sell .co.ke through ResellerClub? Yes if your ResellerClub account sells it; set the extension's registrar to ResellerClub. Otherwise use Manual and your KeNIC-accredited registrar's panel.
A client renewed directly with the registrar. Click Refresh from registrar (connected registrars), or correct Expires on on the domain page and save. Cancel any open renewal invoice.
A client moved their domain away. Edit the domain and set Status to Transferred away, and turn off automatic renewal. Cancel any open renewal invoice.
Do domain invoices include VAT? Yes, your default tax, unless you turn off Charge the default tax on domains.
Can I see what a domain costs me at the registrar? No. Domain prices are your selling prices; check your cost in the registrar's panel.