Construction and Contracting
Construction and Contracting is for building and civil works contractors. Each contract holds its bill of quantities (BoQ), the interim payment certificates you raise as the work goes on, the retention the client keeps back, and the subcontractors you have let parts of the work to. Site staff ask for materials with site requisitions, and the office approves them and buys or issues them. It is in the Construction group of the sidebar: Contracts and Site requisitions.
Construction and Contracting is a marketplace module. The owner switches it on under Settings → Marketplace (search for Construction). Certificates and retention are invoiced to the client through Invoicing; subcontractor payments become supplier bills in Purchases.
Note: construction.view shows the Construction pages. construction.manage creates contracts, certifies, releases retention, pays subcontractors and approves requisitions. construction.requisition is for site staff: together with construction.view it lets them request materials without being able to certify, pay or approve. Set permissions under Settings → Roles.
Words used on this page
- Contract sum: the agreed price of the works. If you leave it at 0, the bill of quantities total is used.
- Interim payment certificate (IPC): a valuation of the work done to date. Each certificate is numbered IPC 1, IPC 2… within the contract.
- Retention: a share of each certificate (10% by default) the client keeps back until the works are complete and defects are fixed. It stops growing once it reaches the retention limit (5% of the contract sum by default).
- Practical completion: the works are finished and handed over; the defects liability period (6 months by default) starts.
Create a contract
- In the menu, open Construction → Contracts.
- Click New contract (marker 1). The list shows each contract's number and works, the client, the Contract sum (marker 2), the share Certified so far (marker 3), the Retention held (marker 4) and the status.
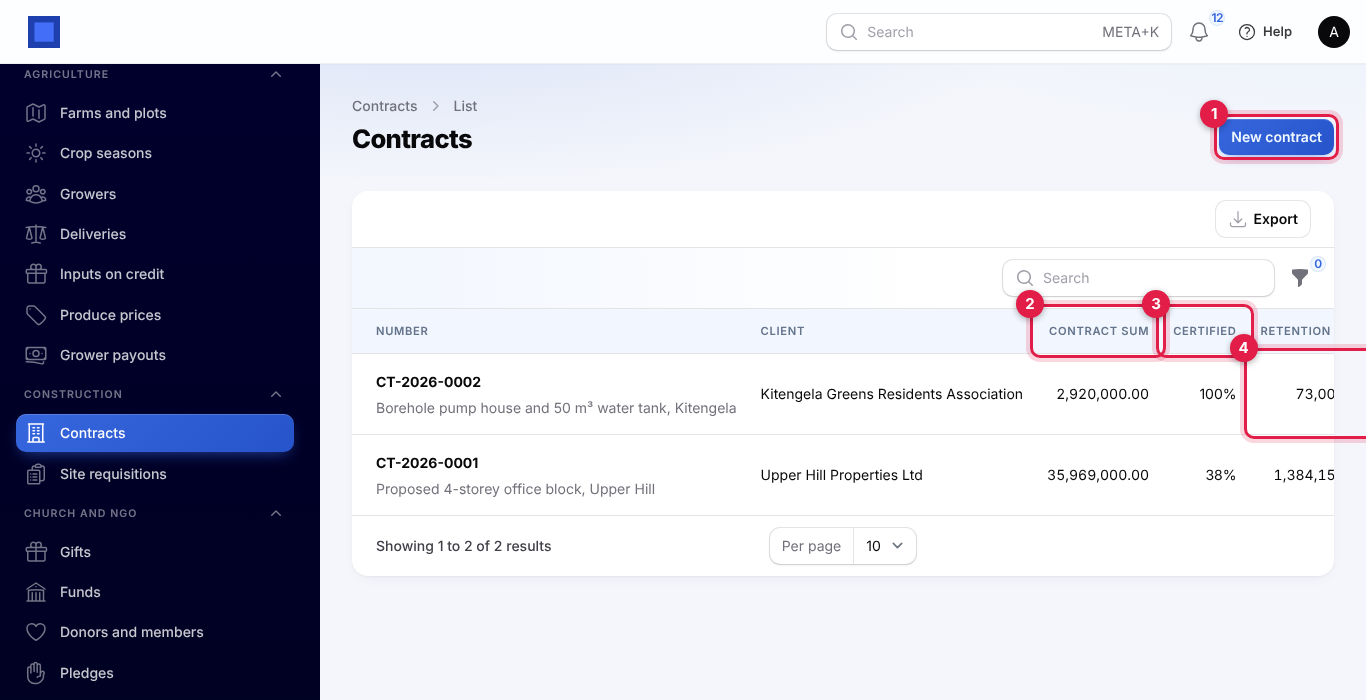
- Fill in the form and click Create. The contract gets a number such as
CT-2026-0001and opens.
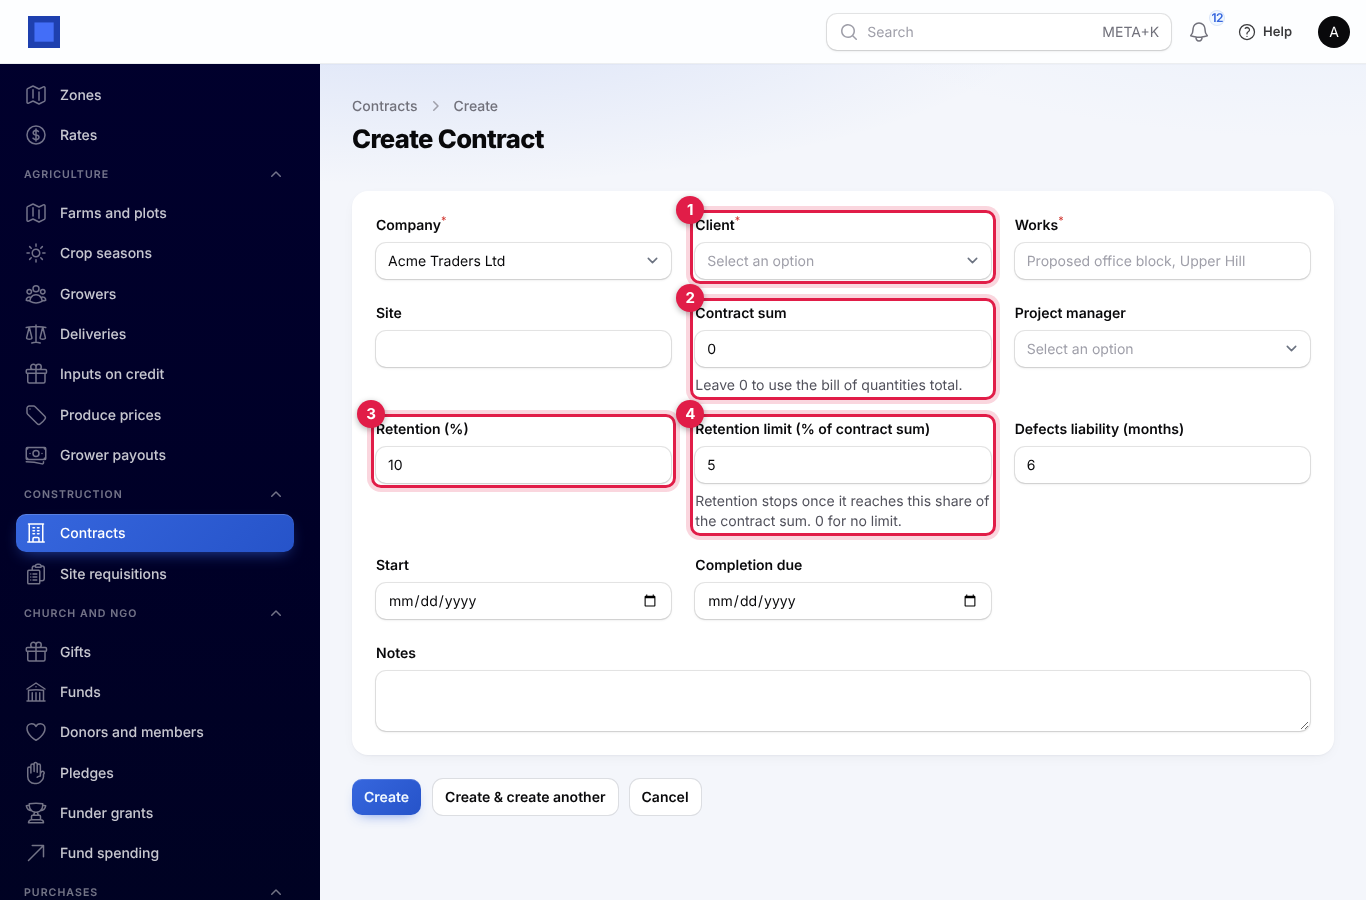
| Field | What to enter |
|---|---|
| Company | Required. The company that holds the contract. Cannot be changed later. |
| Client | Required (marker 1). The employer you invoice. Cannot be changed later. |
| Works | Required. A short name, for example "Proposed 4-storey office block, Upper Hill". |
| Site | Optional. The plot or address. |
| Contract sum | Optional (marker 2). Leave 0 to use the bill of quantities total. |
| Project manager | Optional. The workspace user in charge. |
| Retention (%) | Default 10 (marker 3). The share kept back from each certificate. |
| Retention limit (% of contract sum) | Default 5 (marker 4). Retention stops once it reaches this share of the contract sum. 0 for no limit. |
| Defects liability (months) | Default 6. |
| Start and Completion due | Optional dates. |
| Notes | For example the form of contract and the architect or quantity surveyor. |
Enter the bill of quantities
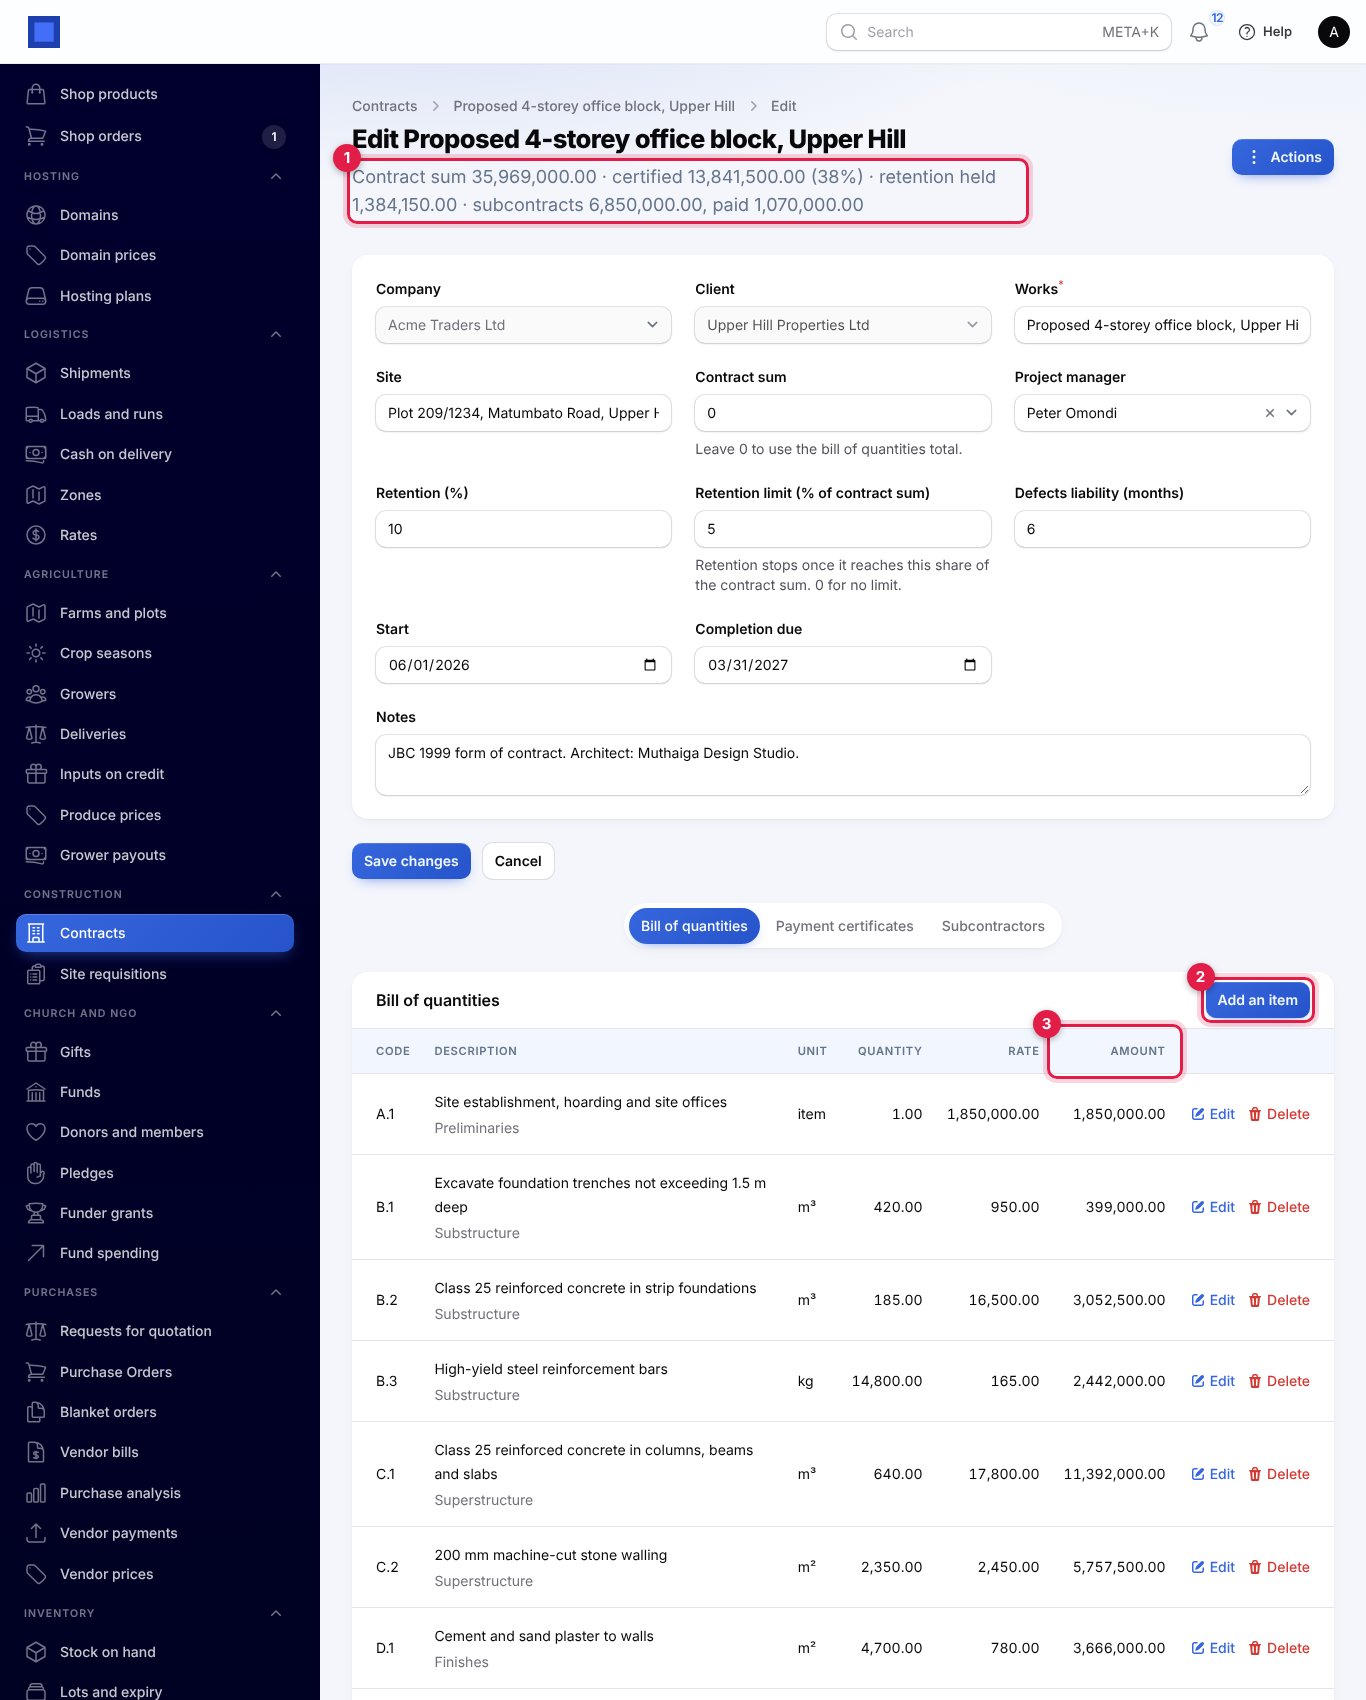
- Open the contract (click Edit on its row). The line under the title (marker 1) sums the contract up: contract sum, value certified and percentage, retention held, the total of subcontracts and how much of it has been paid for.
- Click the Bill of quantities tab, then Add an item (marker 2). Each item's Amount (marker 3) is its quantity times its rate, and the total is at the bottom.
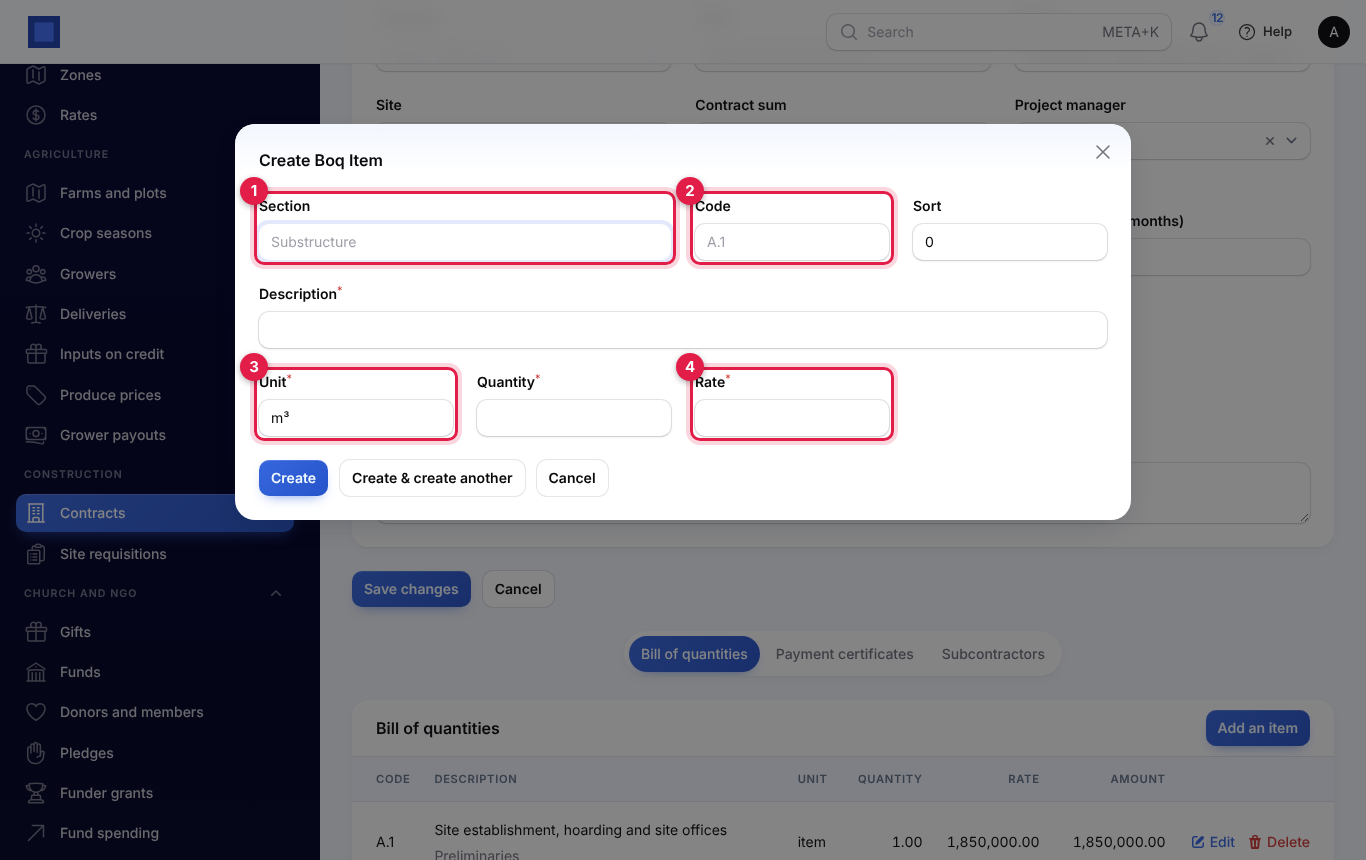
- Fill in the item and click Create:
- Section (marker 1), for example "Substructure". Items are grouped by section in the list.
- Code (marker 2), for example "B.2", and Sort for the order.
- Description, for example "Class 25 reinforced concrete in strip foundations".
- Unit (marker 3), for example m³, m², kg or item, the Quantity and the Rate (marker 4).
Use Edit and Delete on an item's row to change it. Change the BoQ before you raise the first certificate; later changes alter what remains to be certified.
Raise a payment certificate
Raise a certificate each month, or whenever the client's quantity surveyor measures the work.
- On the contract, click the Payment certificates tab.
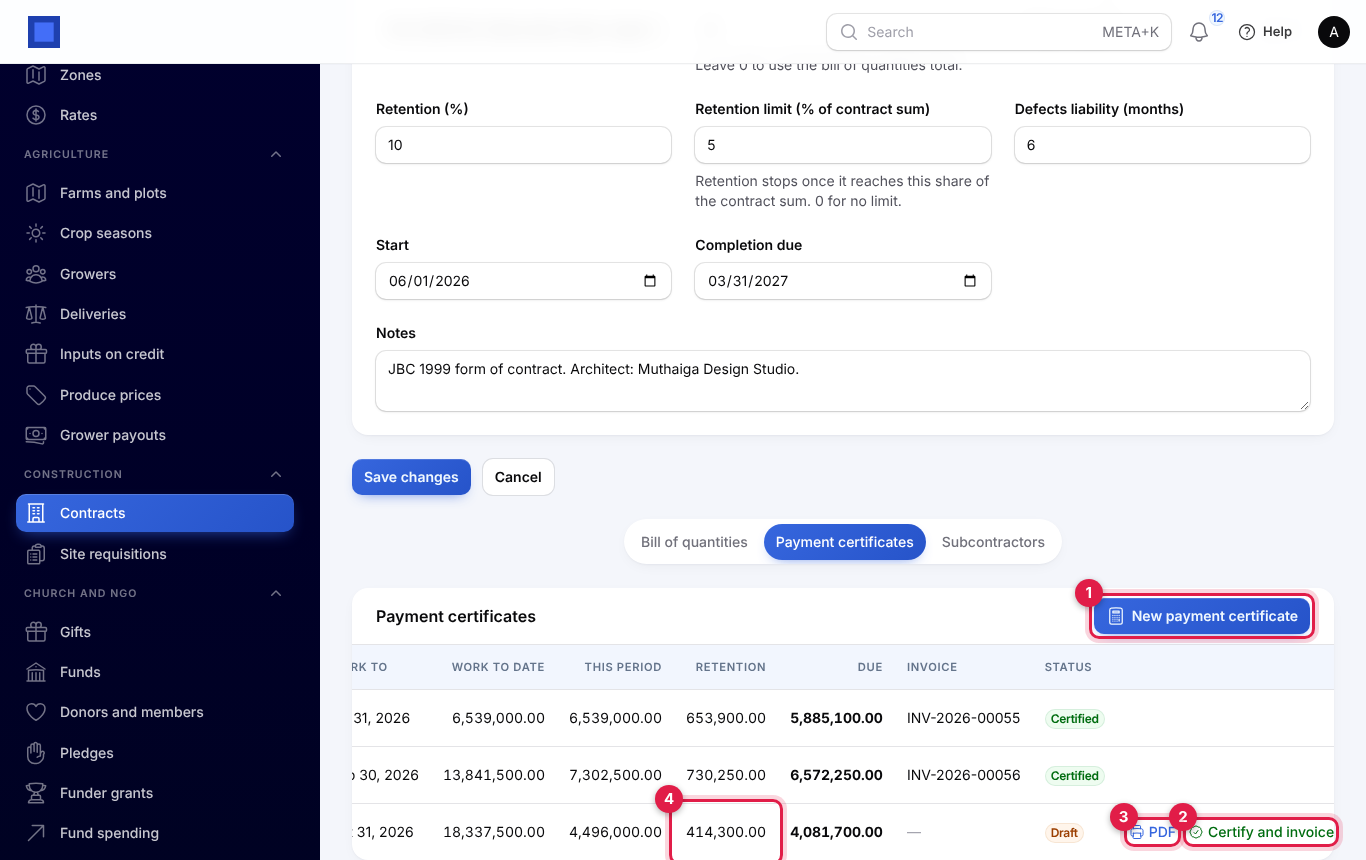
- Click New payment certificate (marker 1).
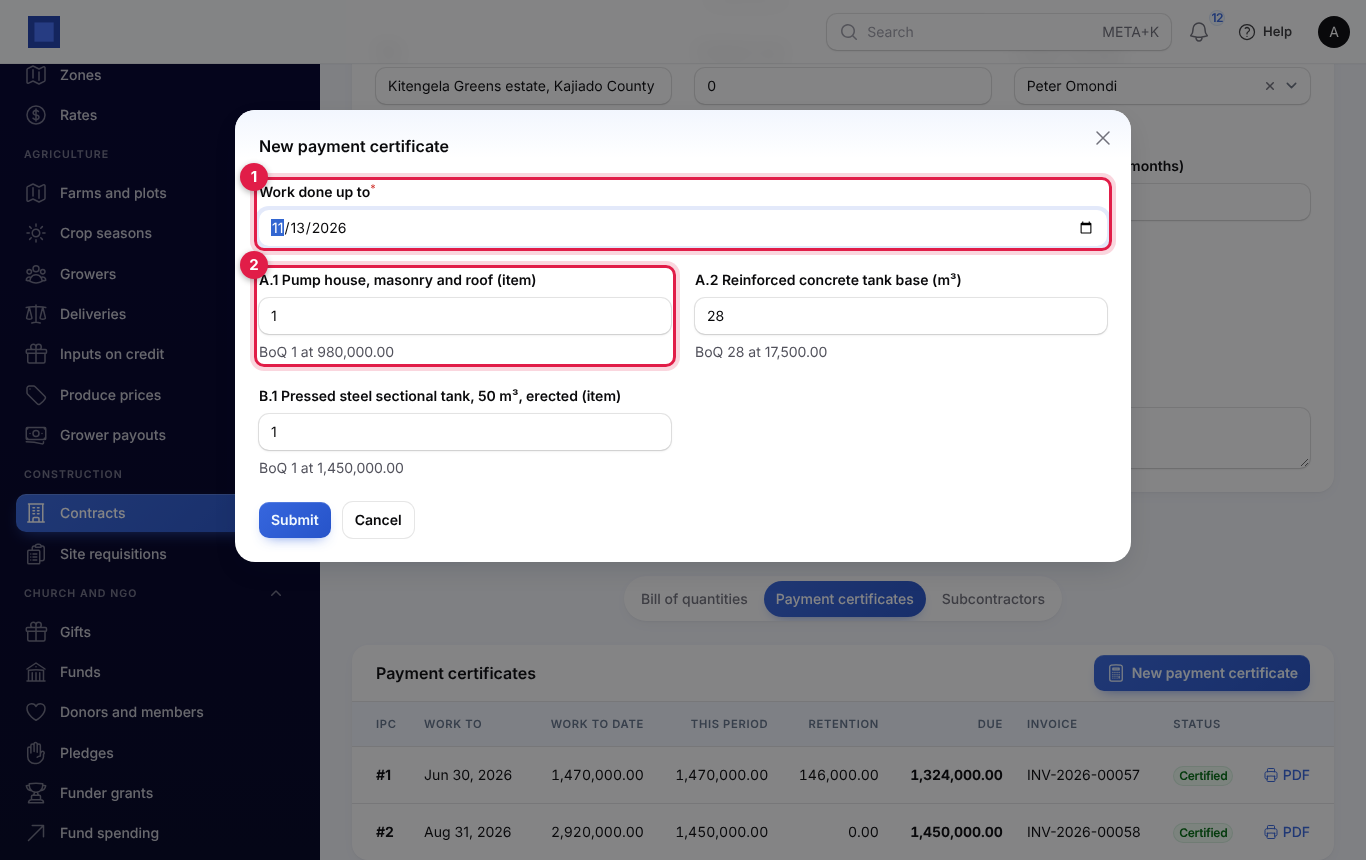
- Set Work done up to (marker 1), usually the last day of the month.
- For each BoQ item (marker 2), type the quantity done to date (not this month). The box starts on the quantity in the last certified certificate; under it you see the BoQ quantity and rate. Leave an item unchanged if no work was done on it this period.
- Click Submit. You see "Certificate drafted; check it and certify".
The draft certificate shows:
| Column | What it means |
|---|---|
| IPC | The certificate number within the contract. |
| Work to | The date the work is measured to. |
| Work to date | The value of all work done so far: each quantity to date times its rate. |
| This period | Work to date less the work to date on the last certificate. |
| Retention | 10% (or your rate) of this period, until retention reaches its limit. In the screenshot, IPC 3 keeps back only 414,300.00 because that is all the room left under the 5% limit (marker 4). |
| Due | This period less retention, before tax. |
| Invoice | The client invoice, once certified. |
| Status | Draft or Certified. |
Only one draft can exist at a time. If it is wrong, click Delete on its row and raise it again.
Certify and invoice
- Check the draft. Click PDF (marker 3 in the certificates screenshot) to print it for the client's quantity surveyor.
- Click Certify and invoice (marker 2) and confirm.
The certificate becomes Certified and an invoice is issued to the client with two lines: the work done this period ("…: interim payment certificate 3, work done to 31 Oct 2026") and Less retention at 10%. The customer reference is the contract number and IPC number. With Charge the default tax on certificates and retention on, your default tax is added. Send the invoice and record the payment from Finance → Invoices as usual.
The certificate PDF (Interim payment certificate 3) lists each BoQ item with the BoQ quantity, quantity to date, rate and value to date, then Value of work done to date, Less previously certified, Work done this period, Less retention, Amount due (before tax) and a Certified by (name, signature, date) box.
Practical completion and retention release
- On the contract, click Actions (top right).
- Click Practical completion (marker 1), set the date and click Submit. The status becomes Practical completion and the defects period starts.
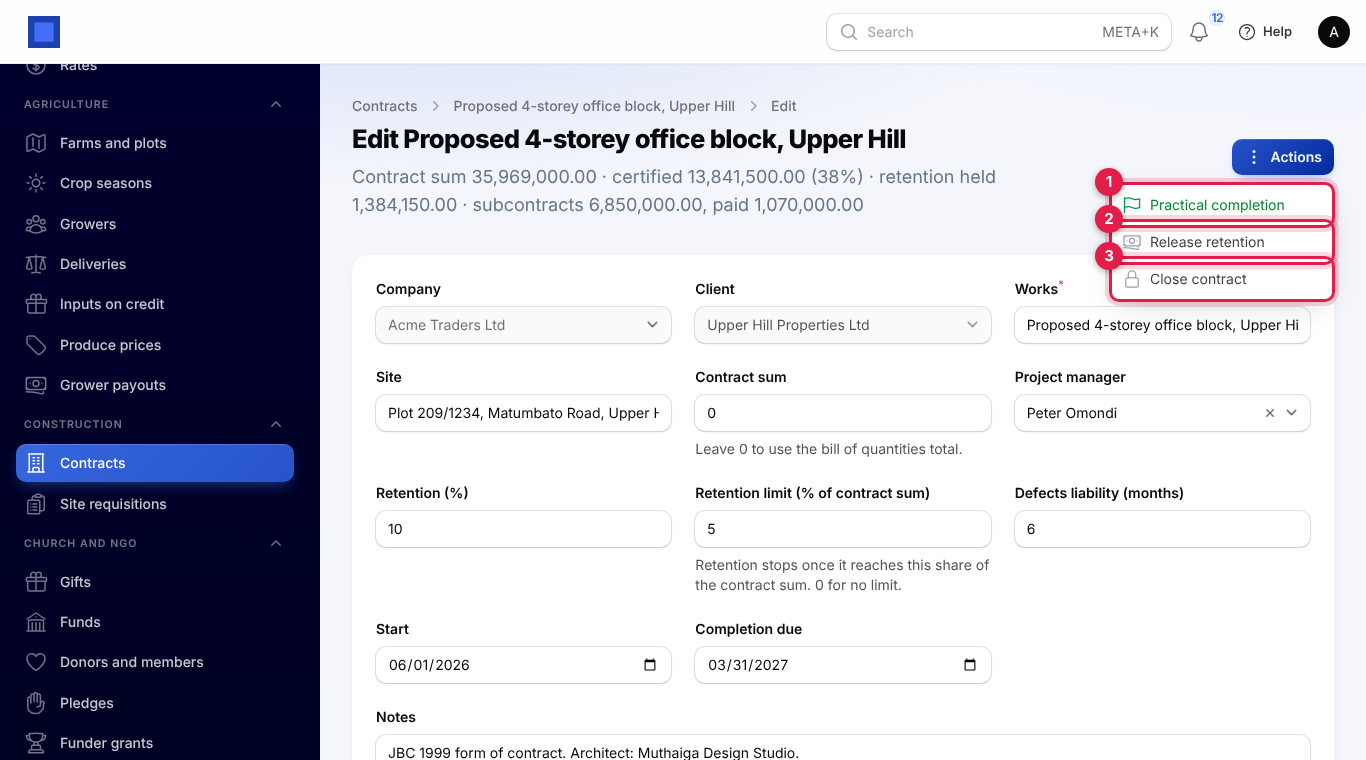
- To invoice retention back to the client, click Actions → Release retention (marker 2). The window shows the Retention held (marker 1 below). Type the Share of what is held to release (%) (marker 2), for example 50, and click Submit.
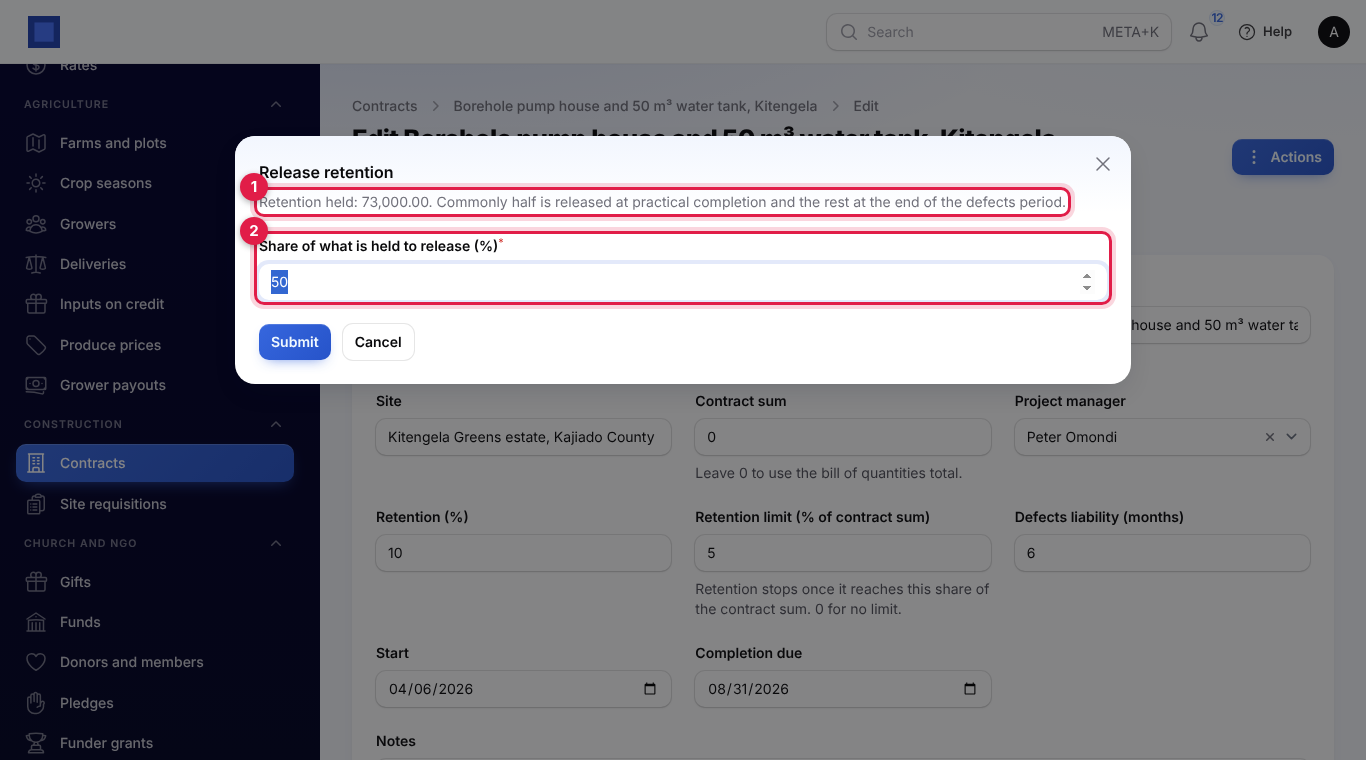
An invoice for that amount is issued to the client ("…: release of retention"), and the retention held goes down. The usual pattern is 50% at practical completion and the rest (100% of what is then held) at the end of the defects period.
- When everything is settled, click Actions → Close contract (marker 3) and confirm. A closed contract cannot take new certificates and drops out of the contract list on site requisitions.
Contract statuses
| Status | What it means |
|---|---|
| Under construction | The works are going on. Certificates can be raised. |
| Practical completion | Handed over; defects period running. Certificates and retention release are still possible. |
| Closed | Finished. No more certificates. |
Subcontractors
- On the contract, click the Subcontractors tab.
- Click Add a subcontractor (marker 1). Pick the Subcontractor (a supplier contact), type the Scope (for example "Electrical installation"), the Subcontract value and their Retention (%) (10 by default). Click Create.
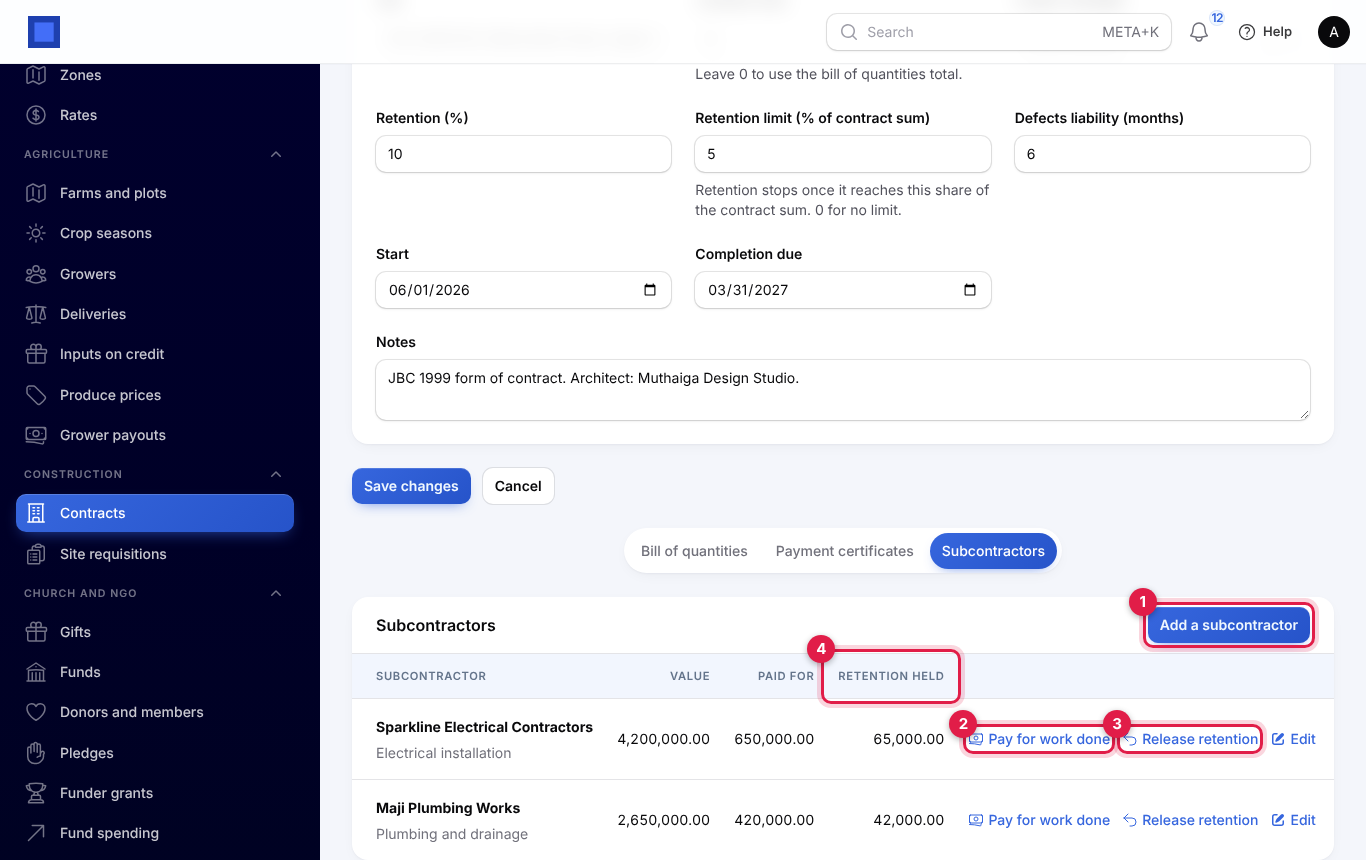
Each row shows the Value, how much has been Paid for and the Retention held (marker 4).
Pay a subcontractor for work done
- Click Pay for work done (marker 2) on their row.
- Set the Date, describe the work (marker 1 below), for example "First fix, ground floor", and type the Value of work (marker 2), before retention.
- Click Submit.
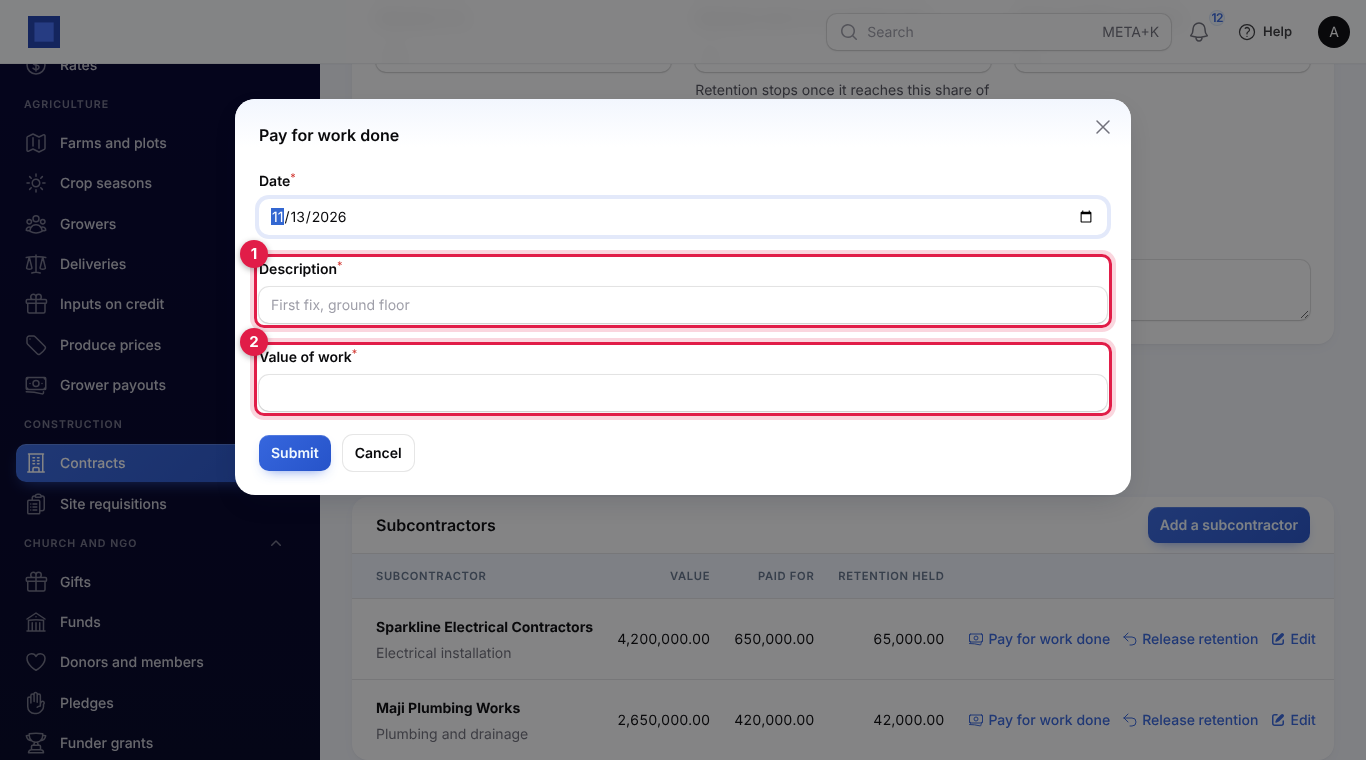
A posted supplier bill is raised for the value less their retention, for example KES 650,000 less 65,000 retention = KES 585,000. Pay it from Purchases → Vendor bills. You cannot pay more in total than the subcontract value; you see "That would pay … more than the subcontract value of …".
Release a subcontractor's retention
Click Release retention (marker 3) on their row and confirm. A supplier bill is raised for all the retention still held for them. The button only shows while some retention is held.
Site requisitions
Site staff ask for materials; the office approves and then buys or issues them.
Request materials
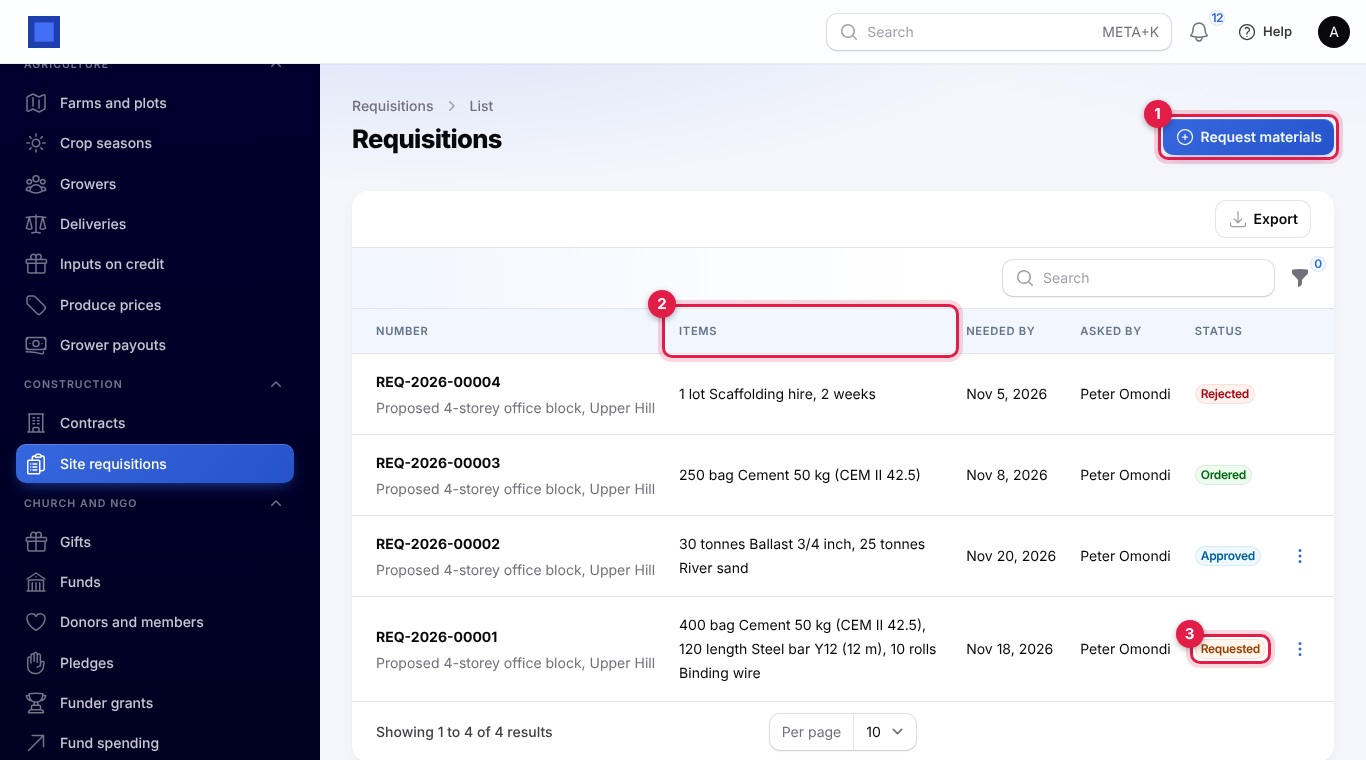
- In the menu, open Construction → Site requisitions.
- Click Request materials (marker 1). The list shows each requisition with its contract, the Items (marker 2), the date Needed by, who Asked by and the status (marker 3).
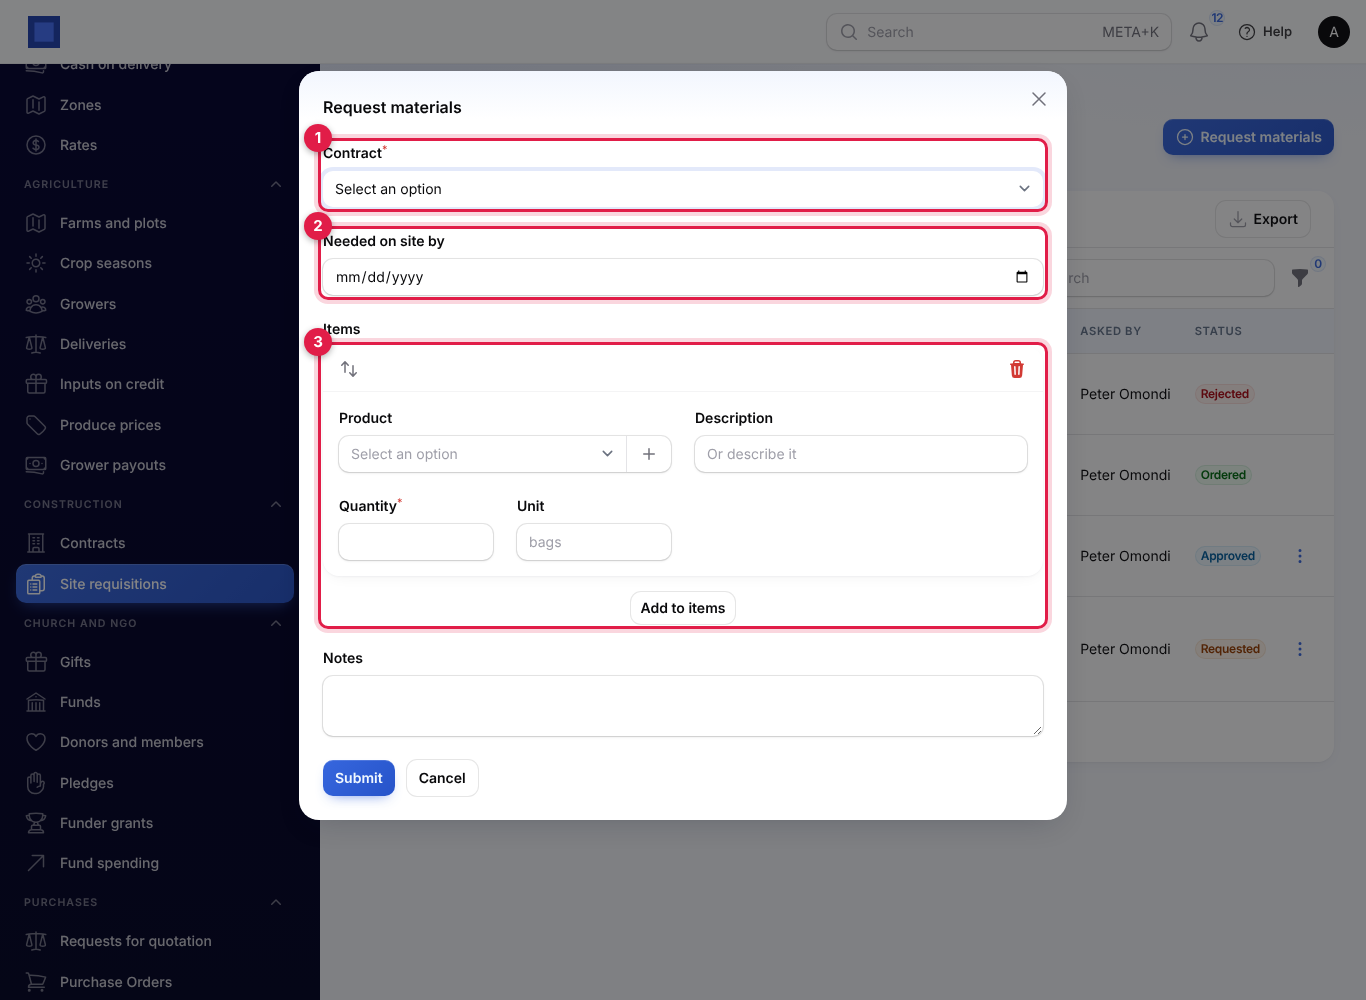
- Pick the Contract (marker 1) and the date Needed on site by (marker 2).
- Under Items (marker 3), pick a Product or type a Description if it is not in your products, then the Quantity and Unit (for example bags or tonnes). Click Add to items for each extra line.
- Add any Notes and click Submit. You see "REQ-2026-00005 sent for approval".
Approve, buy or issue
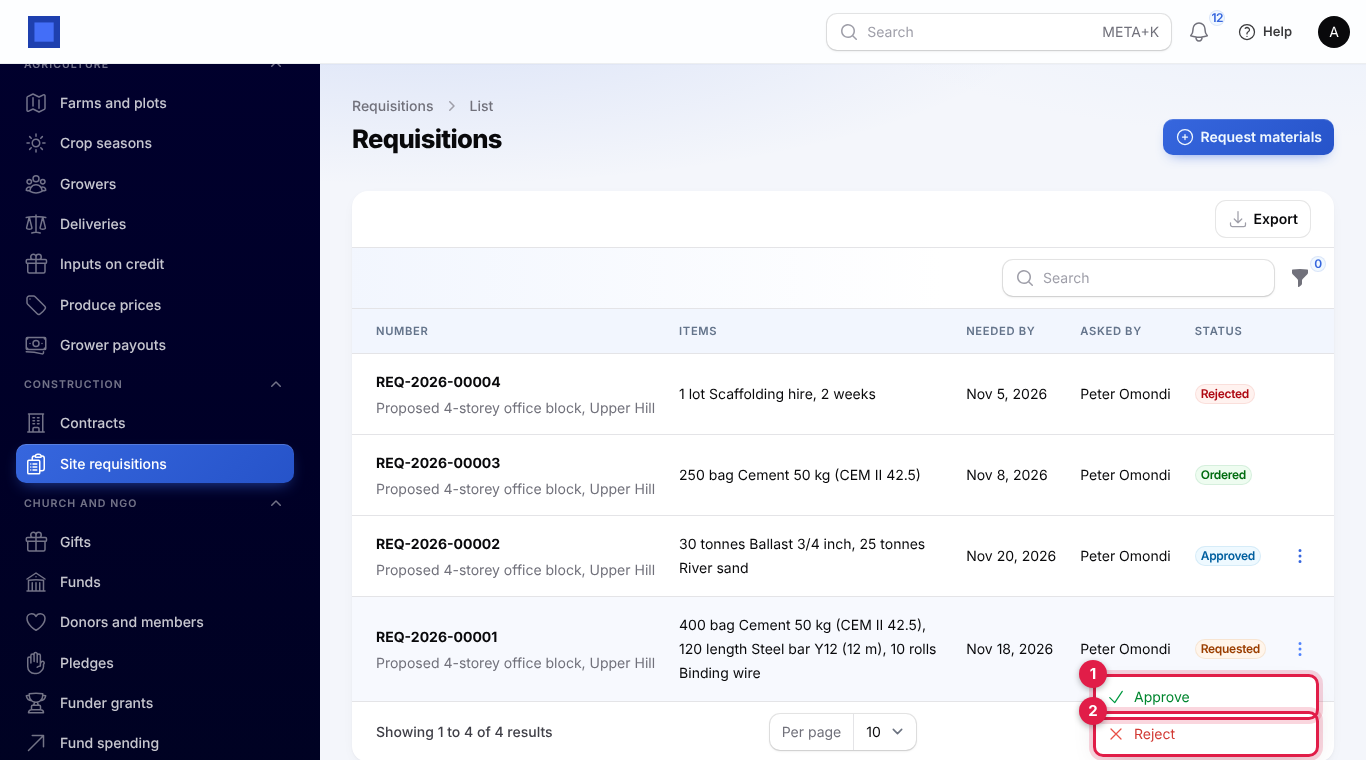
- Click ⋮ on a Requested requisition and choose Approve (marker 1) or Reject (marker 2).
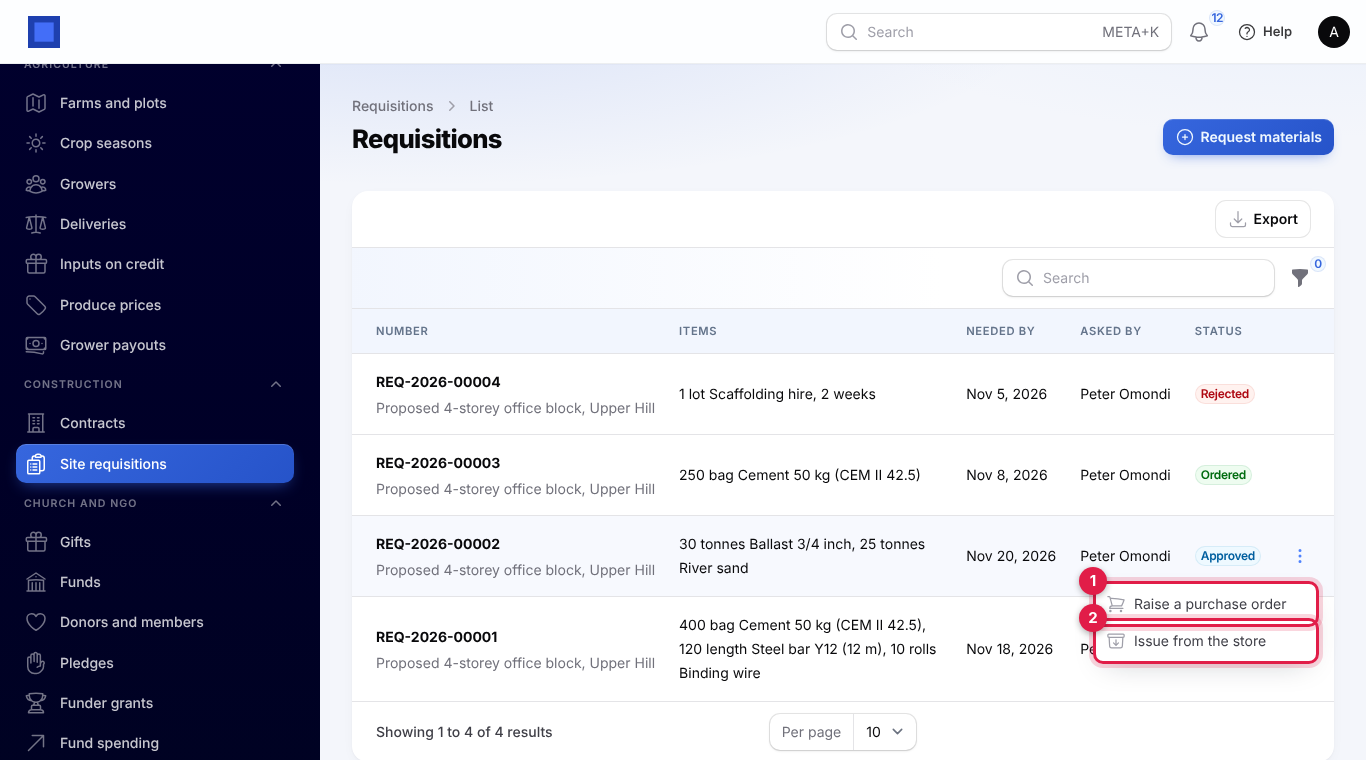
- On an Approved requisition, click ⋮ and choose:
- Raise a purchase order (marker 1): pick the Supplier and click Submit. A draft purchase order is created with each item priced at the product's cost (0 for described items), the requisition number as reference and the contract and site in the notes. Open it in Purchases → Purchase Orders to check the prices and send it. The requisition becomes Ordered.
- Issue from the store (marker 2): with Inventory on, stock-tracked products are taken out of the main store for the site. The requisition becomes Issued from store. Without Inventory you see "Turn on Inventory to issue from the store, or raise a purchase order."
| Status | What it means |
|---|---|
| Requested | Waiting for approval. |
| Approved | Approved; buy it or issue it. |
| Ordered | A draft purchase order was raised. |
| Issued from store | Taken out of stock for the site. |
| Rejected | Turned down. |
Construction settings
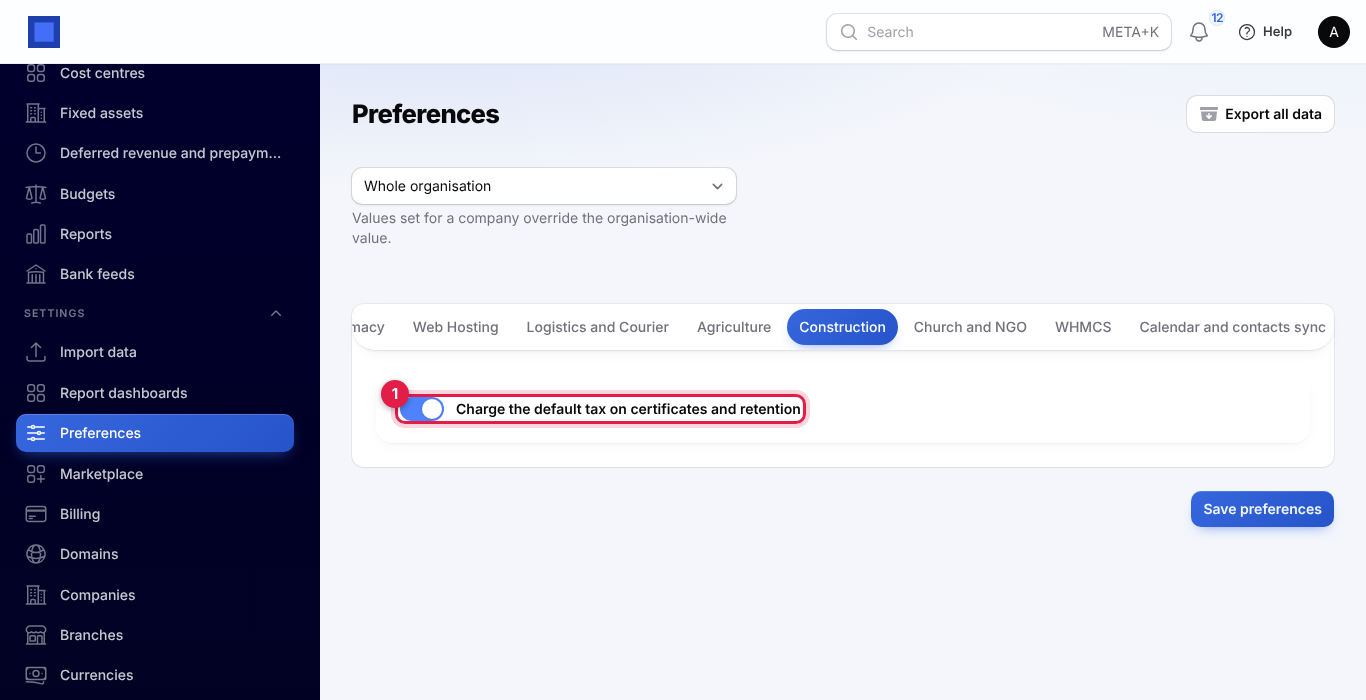
- In the menu, open Settings → Preferences.
- Click the Construction tab.
- Switch Charge the default tax on certificates and retention (marker 1) on or off and click Save preferences. It is on by default; switch it off if your works are zero-rated or exempt.
Common questions
Why did a certificate keep back less than 10%? Retention stopped at the Retention limit (% of contract sum). Once the retention held reaches the limit, later certificates keep back nothing more.
I made a mistake in a certified certificate. What now? A certified certificate cannot be changed. Correct the quantities to date on the next certificate; the difference is worked out automatically. To reverse money already invoiced, raise a credit note on the invoice.
Can I see a percentage complete? Yes. Certified on the contracts list and the line under the contract's title show the value certified as a share of the contract sum.
Can site staff see the contract values? Site staff need construction.view to open Site requisitions, which also lets them look at the contracts. With construction.requisition and without construction.manage they can request materials but cannot change a contract, certify, pay subcontractors or approve requisitions.
Does releasing retention to a subcontractor depend on the client releasing it to me? No. You decide when to click Release retention on their row.