Event Management
Event Management sells tickets to your events: conferences, workshops, trainings, concerts, church and school functions, fundraising dinners, a networking breakfast. Each event gets its own page on your workspace address with its ticket types and prices; buyers choose tickets, pay online through your payment gateways (M-Pesa, card or bank) or get free tickets at once, and receive an email with a link to their tickets, one QR code each. At the door your staff scan the QR codes with a phone and let each ticket in once. It is in the Events group of the left menu: Events and Registrations.
Switch the Events app on
Event Management is an add-on sold separately from your plan. It needs the Contacts and Invoicing apps, which every workspace has.
- Open Settings → Marketplace and search for Event, or click Industry solutions.
- On the Event Management card, click Start free trial (or Add to subscription) and confirm. The Events group appears in the menu, and your events page goes live at
/eventson your workspace address. - To stop, click End trial or Cancel on the card. Events and registrations are kept.
If the card says Not available for purchase yet, ask NaliSuite support to switch it on. See Billing and marketplace.
Permissions (under Settings → Roles):
| Permission | What it allows |
|---|---|
| events.view | See events, ticket sales and registrations. |
| events.manage | Create and change events and ticket types, cancel events, confirm or cancel registrations, and use the check-in screen at the door. |
Door staff need events.manage and a workspace sign-in to let people in. Owners and admins have both; the member role has events.view only.
Settings
Event Management has no tab of its own under Settings → Preferences. What buyers see depends on:
| Setting | Where | Effect |
|---|---|---|
| Online payment methods (M-Pesa, cards, bank details) | Settings → Preferences (online payments) | The ways buyers can pay on the pay page. See Invoices and payments. |
| Workspace name, logo and colour | Settings → Preferences (branding) | The header of the events pages, the ticket page and the emails. |
| Email signature and reply-to | Settings → Preferences (email) | Added to the ticket email. |
1. Create an event
- Open Events → Events. Each event shows its name and venue, When, Tickets sold against the capacity (marker 3, for example 7 / 300), how many have Checked in (marker 4), whether it is Public and its Status (Scheduled or Cancelled). Open page (marker 5) opens the public event page; Check-in screen (marker 1) opens the door screen in a new tab.
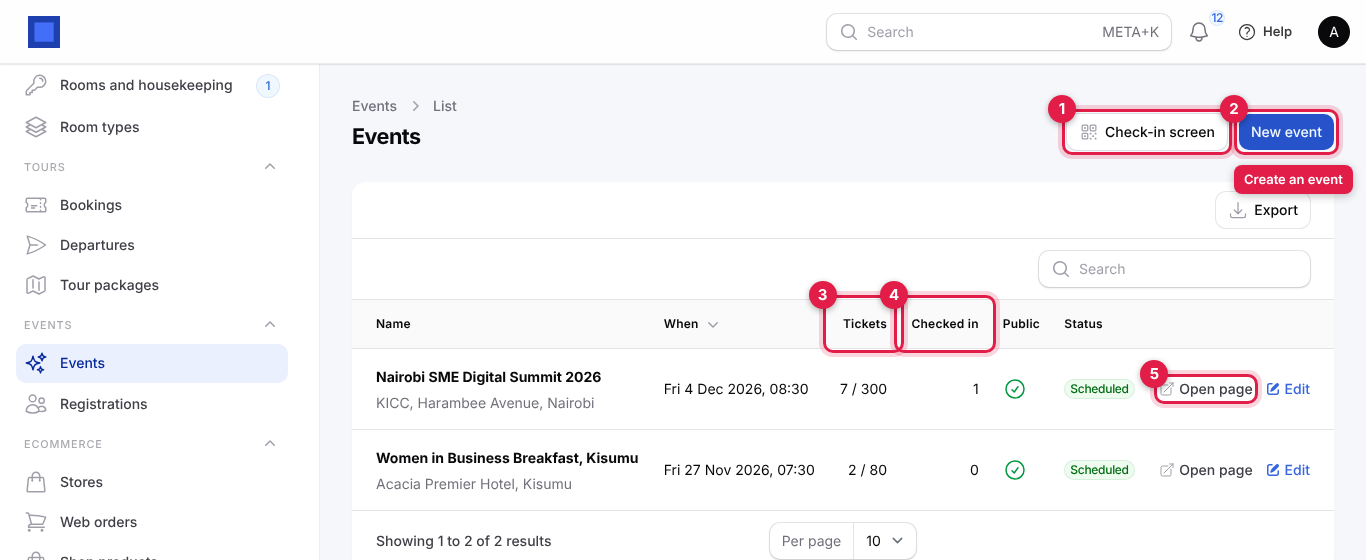
- Click New event (marker 2).
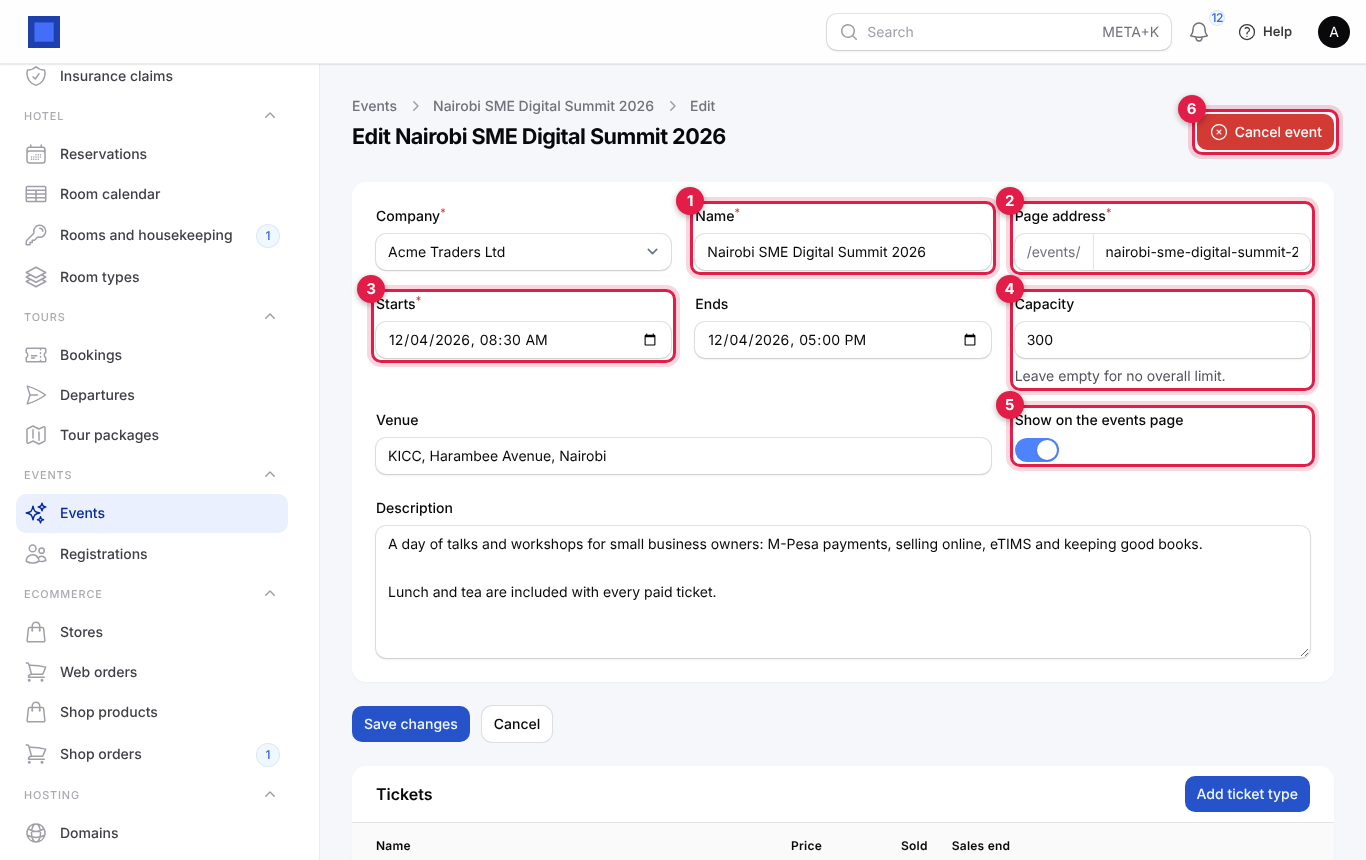
| Field | What to enter |
|---|---|
| Company (required) | Who sells the tickets. Ticket invoices are in this company's currency. |
| Name (required, marker 1) | Nairobi SME Digital Summit 2026. |
| Page address (required, marker 2) | Filled from the name when you create the event, for example /events/nairobi-sme-digital-summit-2026. Letters, numbers, dashes and underscores only; must be unique. Share this address. |
| Starts (required, marker 3) | Date and time. Registration closes when the event starts. |
| Ends | Must be after the start. Shown on the event page. |
| Capacity (marker 4) | The most tickets the event can take across all ticket types. Leave empty for no overall limit. |
| Venue | KICC, Harambee Avenue, Nairobi. |
| Show on the events page (marker 5) | Off while you prepare; turn it on to publish. Only published events can be opened and booked. |
| Description | The programme, what is included, dress code. Line breaks are kept. |
- Click Create. You land on the event, where you add the ticket types.
2. Add ticket types
Scroll down to Tickets on the event. Each ticket type shows its Price, how many are Sold against the number available (marker 2), and when Sales end (marker 3). A price of 0.00 (marker 4) is a free ticket.
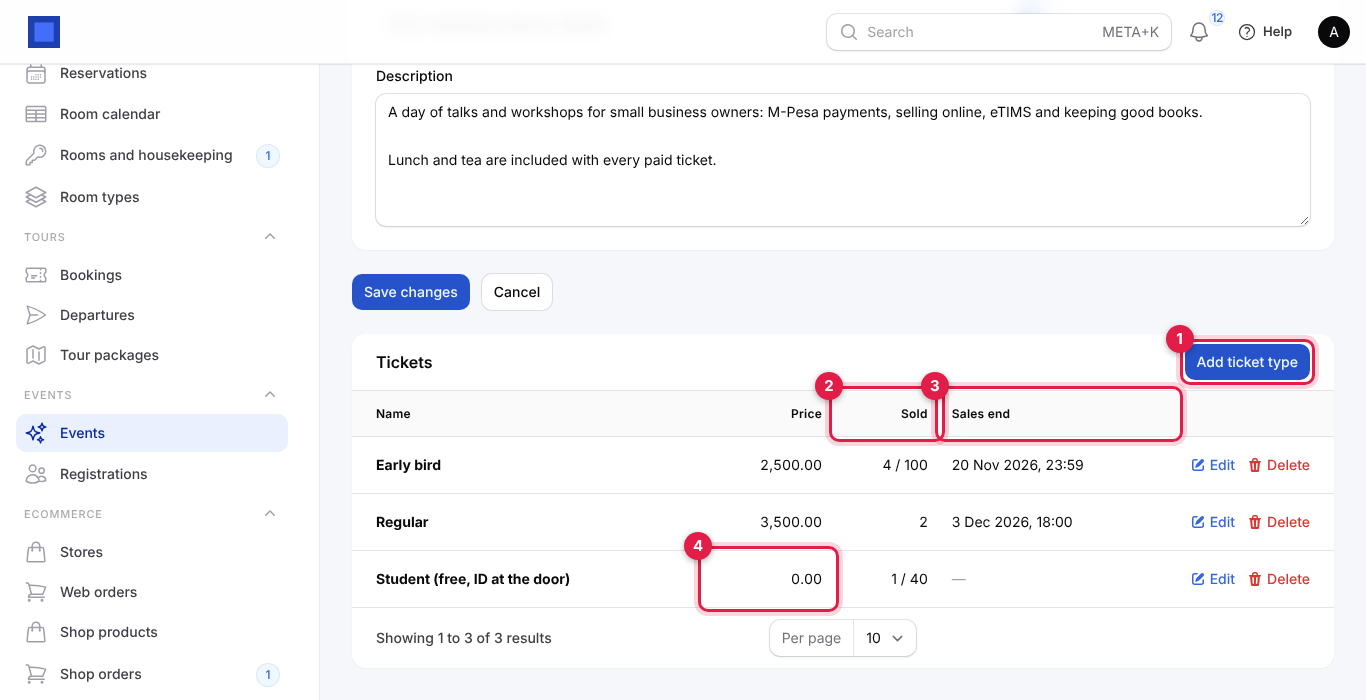
- Click Add ticket type (marker 1).
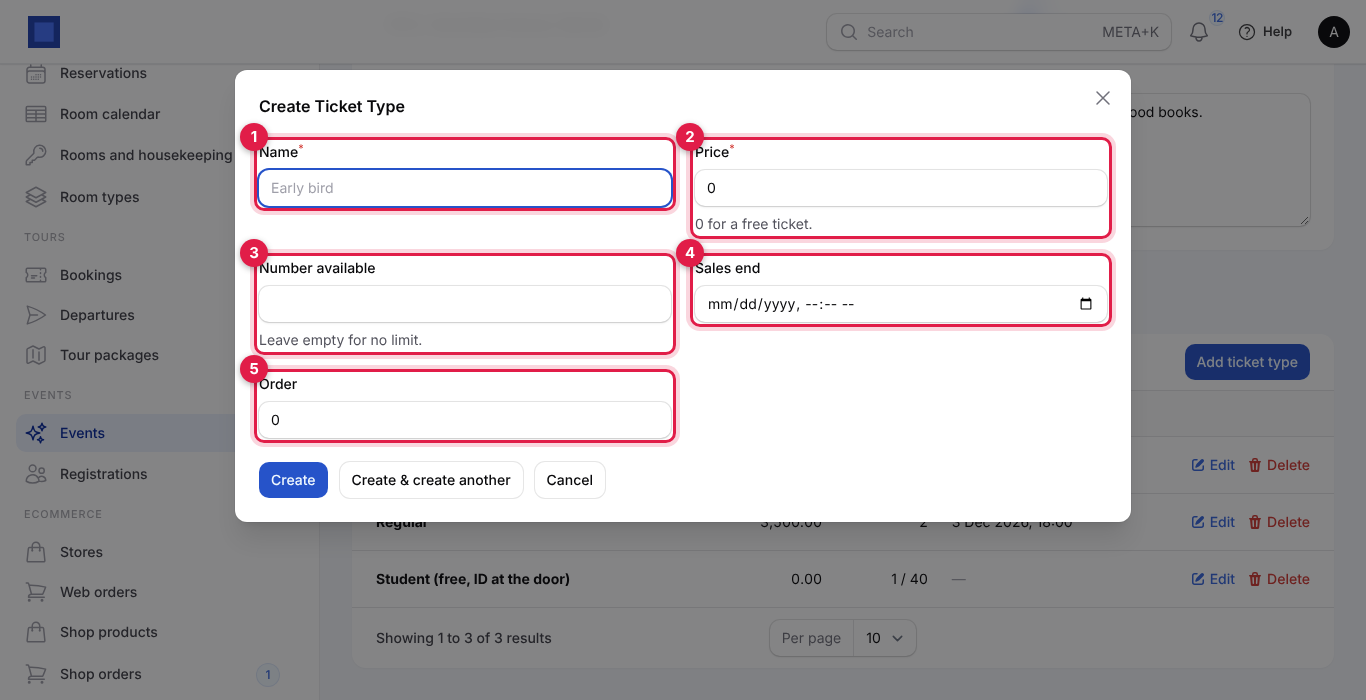
| Field | What to enter |
|---|---|
| Name (required, marker 1) | Early bird, Regular, VIP table of 10, Student (free, ID at the door). |
| Price (required, marker 2) | Per ticket. 0 for a free ticket. |
| Number available (marker 3) | How many of this type you sell. Leave empty for no limit (the event's capacity still applies). |
| Sales end (marker 4) | After this date and time the type can no longer be bought, for example the end of early-bird pricing. Leave empty to sell until the event starts. |
| Order (marker 5) | Lower numbers are listed first on the event page. |
- Click Create, or Create & create another. Use Edit and Delete on each row to change them.
Tickets count as sold as soon as they are registered, paid or not. Tickets of cancelled registrations are released.
3. What buyers see
The events page
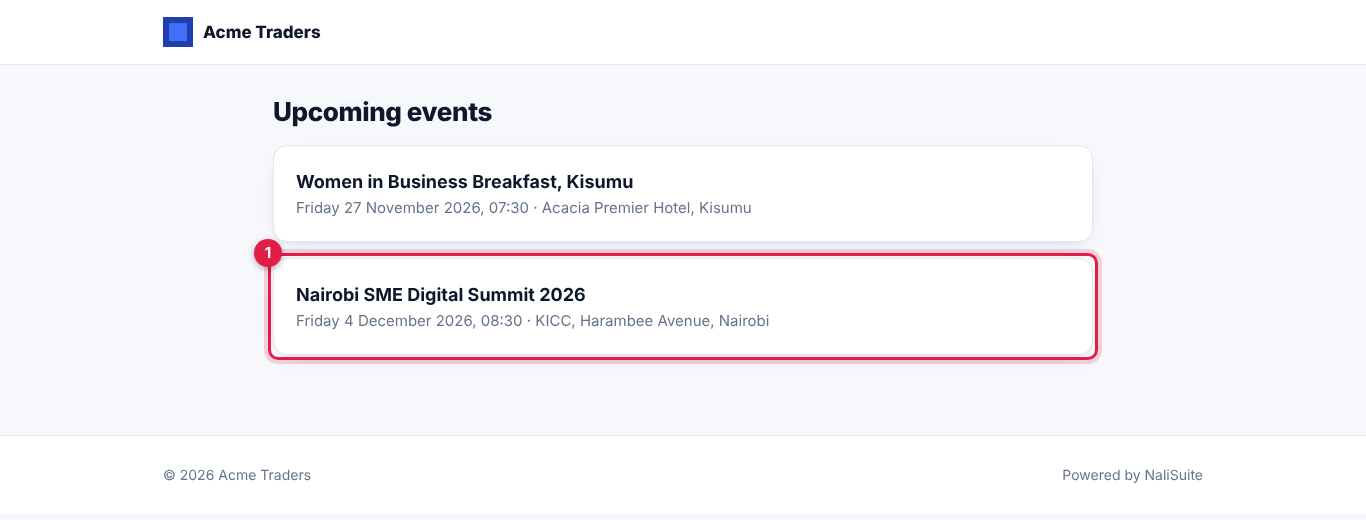
Your events page is at /events on your workspace address (for example https://yourbusiness.nalisuite.com/events). It lists every published, scheduled event that has not started yet, soonest first. Buyers click an event (marker 1) to open it.
Buying tickets
On the event page buyers see the date, time and venue, your description, and the Tickets (marker 1) with each type's price (or Free) and how many are left.
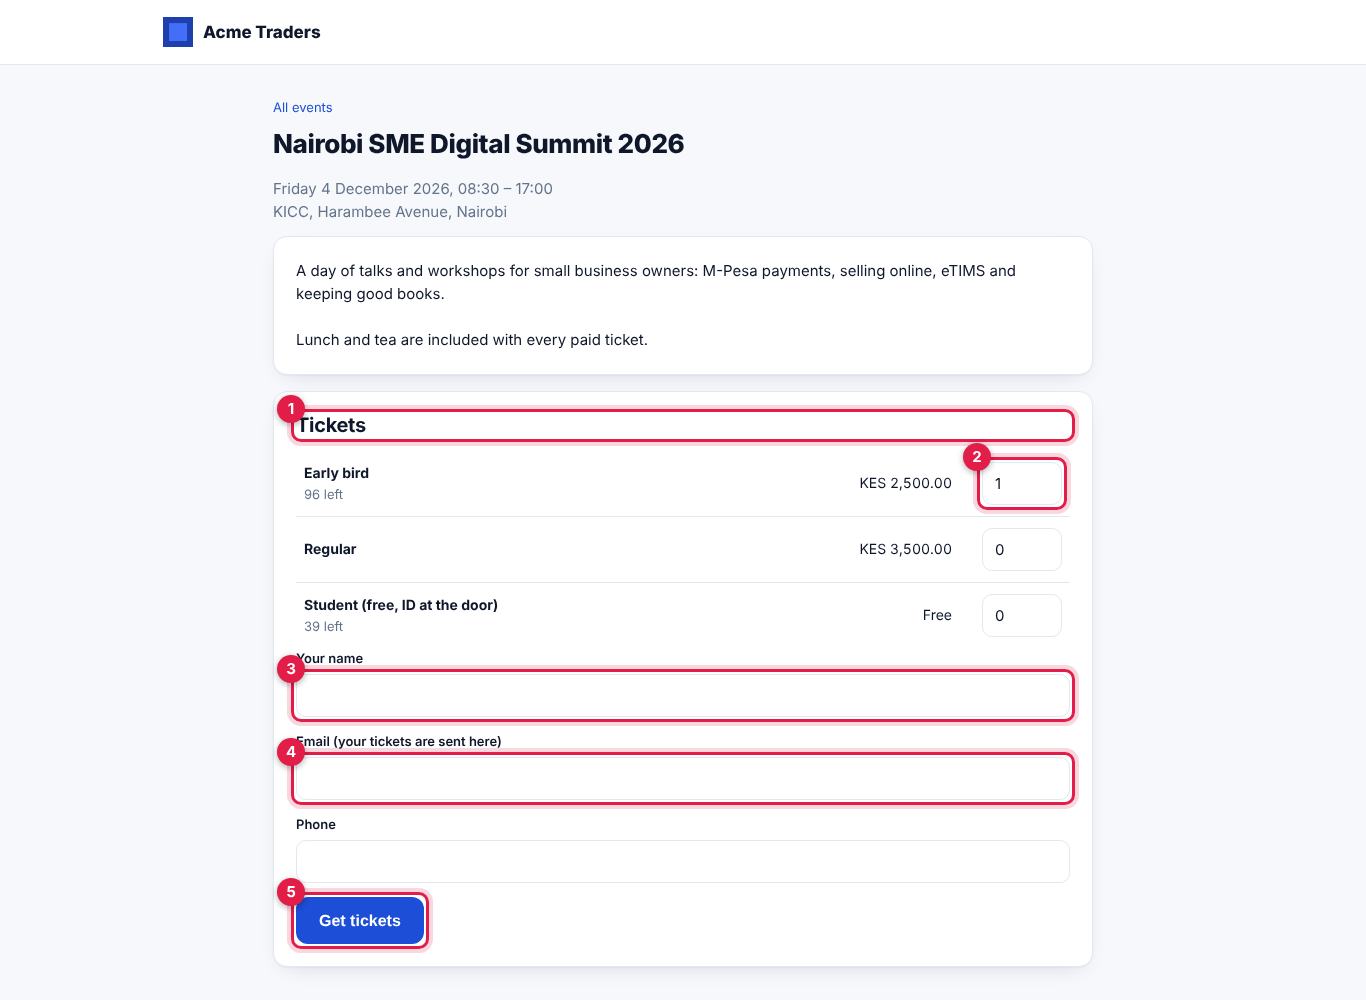
- They type how many of each ticket they want (marker 2; the first type starts at 1, up to 50 at a time).
- They fill in Your name (marker 3), Email (your tickets are sent here) (marker 4) and Phone.
- They click Get tickets (marker 5).
What happens next:
- Free tickets only: the registration is confirmed at once. The buyer lands on their ticket page with You are registered. We have emailed your tickets. and receives the ticket email.
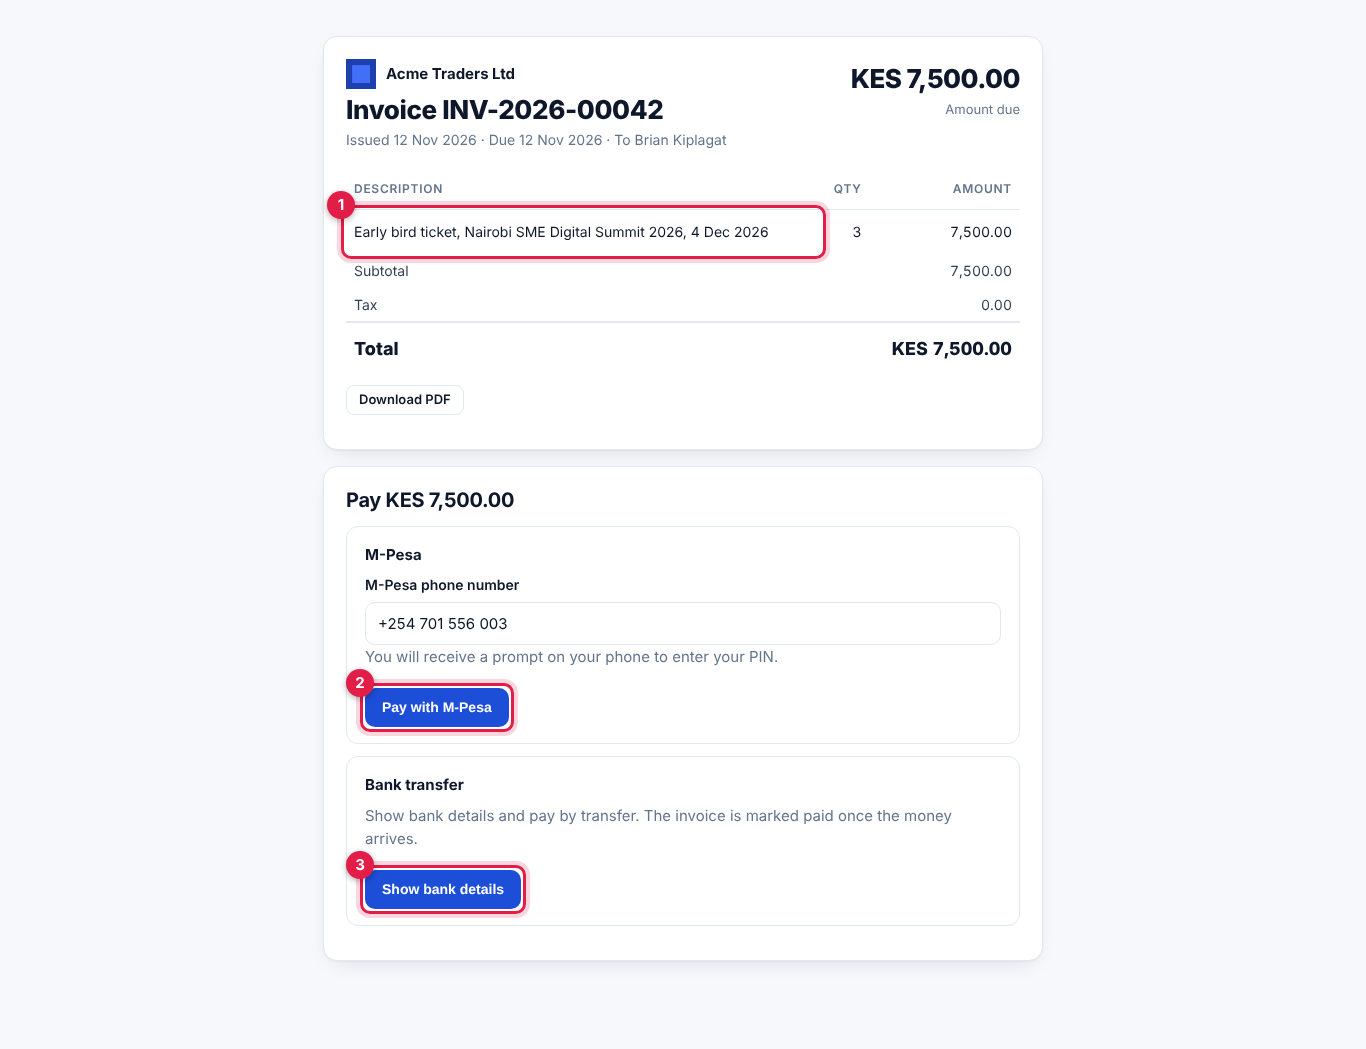
- Paid tickets: a registration is created as Awaiting payment with an invoice for the tickets (one line per ticket type, for example Early bird ticket, Nairobi SME Digital Summit 2026, 4 Dec 2026), and the buyer is taken straight to the invoice pay page (marker 1 is the line). They pay with Pay with M-Pesa (marker 2; an STK prompt comes to their phone), by card, or Show bank details (marker 3).
When the invoice is paid in full, by whatever means, the registration is Confirmed and the ticket email is sent.
The buyer is matched to your contacts by email, or added as a new customer. Their phone number is kept on the registration.
Messages buyers may see:
| Message | Why |
|---|---|
| Sold out (next to a ticket type) | That type has none left, or its sales have ended. |
| Registration is closed. | The event is full (capacity reached) or has started. |
| Only 2 Early bird tickets are left. | They asked for more than are left. |
| The event is full. | The tickets asked for would go over the capacity. |
| Choose at least one ticket. | All quantities were 0. |
The ticket email and the ticket page
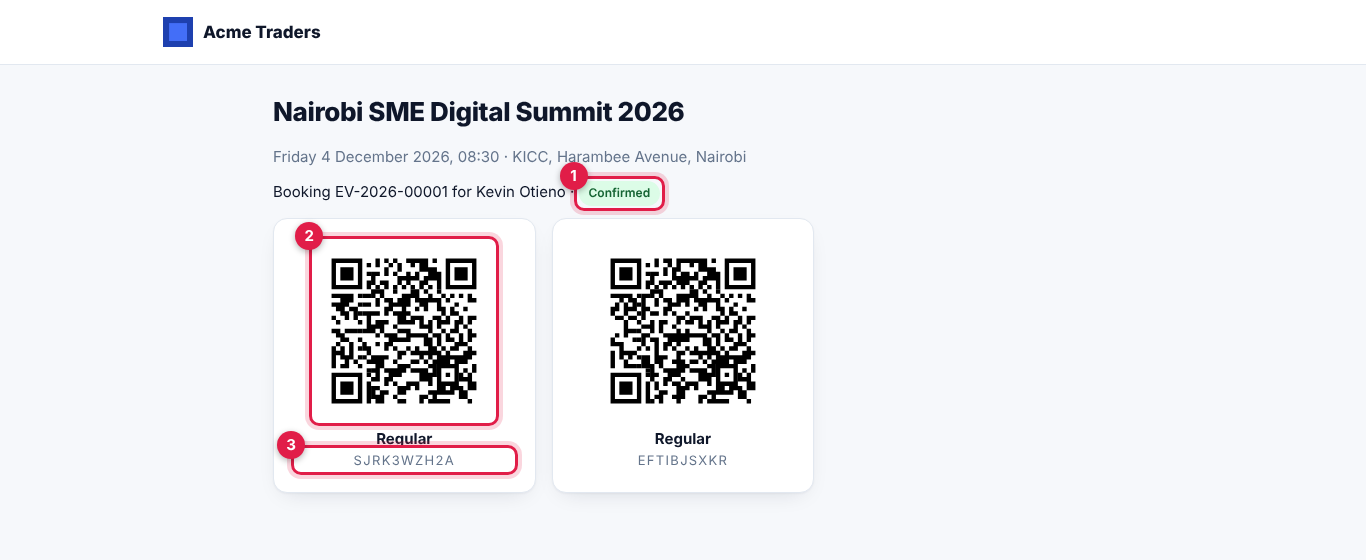
The confirmation email has the subject Your tickets for (event name), says when and where the event is, asks the buyer to show the QR code at the entrance, and has a View your tickets button. It opens the ticket page: the event, the booking number with its status (marker 1), and one card per ticket with its QR code (marker 2), ticket type and code (marker 3). Buyers show it on their phone or print it. A ticket that has been used shows Checked in.
While payment is outstanding, the same page says Your tickets are held until payment arrives. (marker 1) with a Pay button (marker 2) that opens the pay page again.
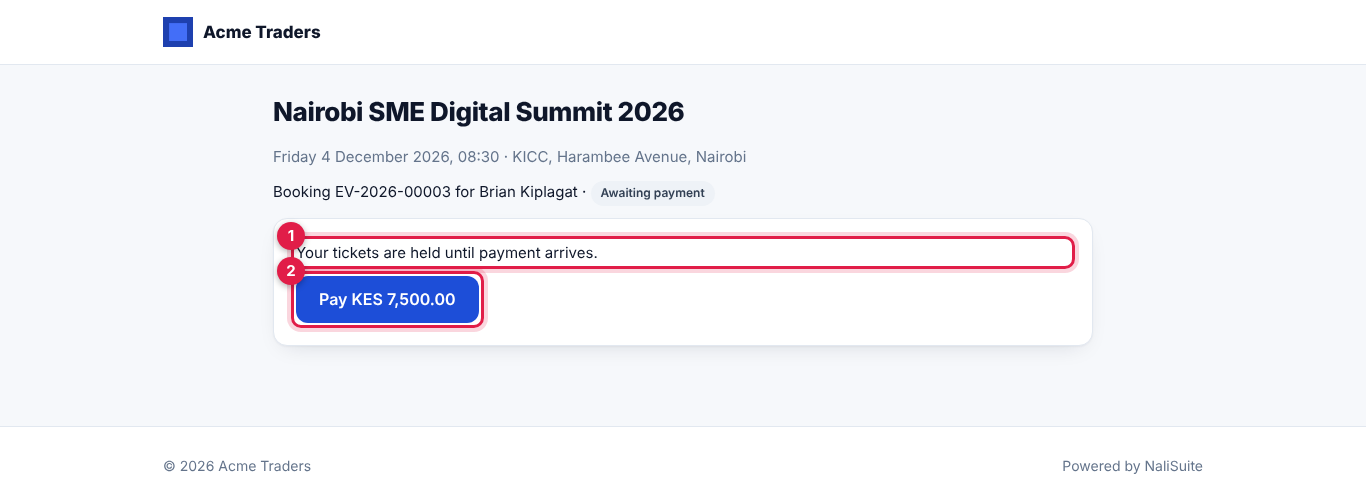
Note: No email is sent while a registration is awaiting payment. If a buyer leaves the pay page, send them their ticket page link (⋮ → Ticket page on the registration) so they can pay later.
4. Registrations
Open Events → Registrations to see everyone who has booked, newest first. Each registration shows its number (EV-2026-00003), the buyer's name and email, the event, how many Tickets (marker 2), how many have Arrived (marker 3), the Total and the Status (marker 1). Search by name, email or phone, and filter by Event or Status. Click Export to download the attendee list.
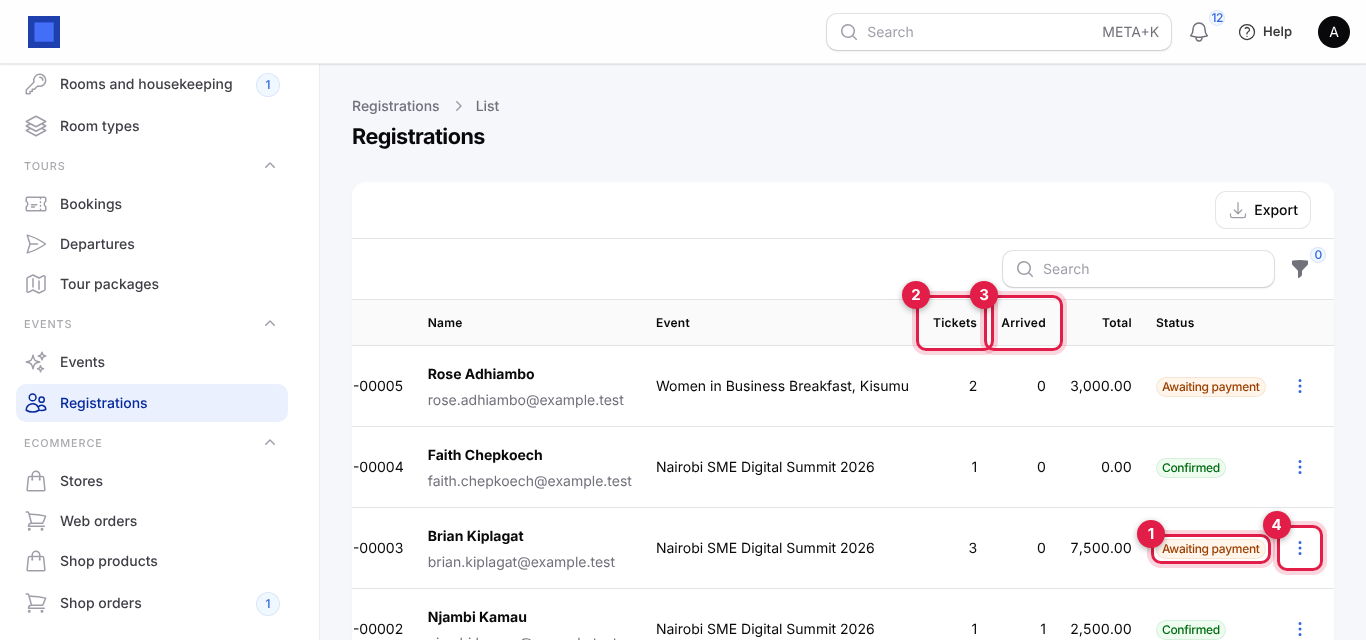
The ⋮ menu (marker 4):
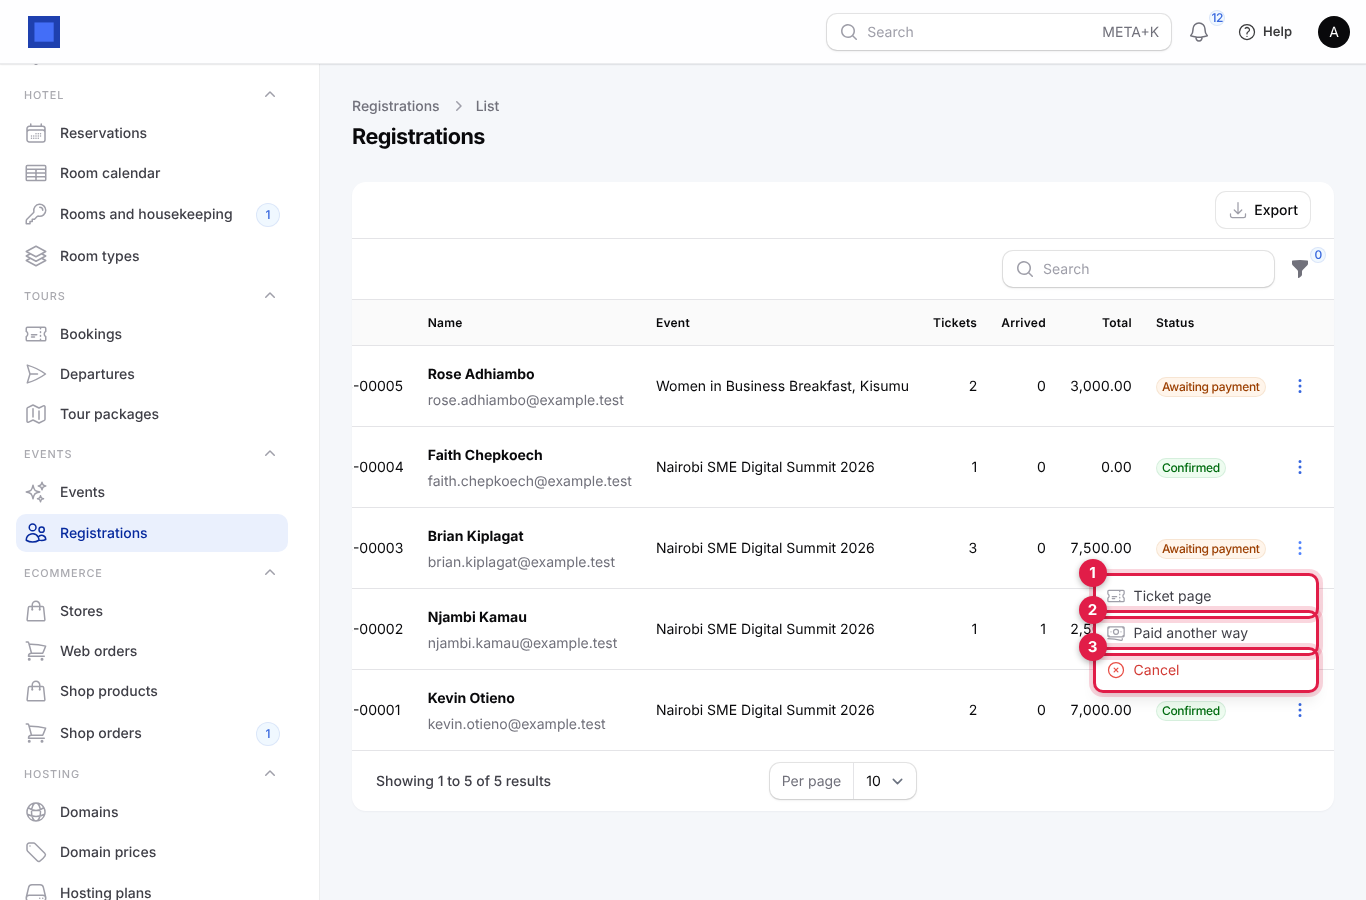
| Action | When | What it does |
|---|---|---|
| Ticket page (marker 1) | Always | Opens the buyer's ticket page in a new tab. Copy the address to send it on WhatsApp. |
| Paid another way (marker 2) | Awaiting payment | Confirms the registration and emails the tickets, for a buyer who paid cash or to your till. Then record the payment on its invoice as well (Finance → Invoices), so your books show the money. |
| Cancel (marker 3) | Not cancelled | Cancels the registration and releases its tickets. An invoice with nothing paid on it is cancelled too. Paid money is not refunded automatically; issue a credit note if you refund. |
| Registration status | Meaning |
|---|---|
| Awaiting payment | Tickets held; the invoice is not fully paid. Tickets cannot be checked in. |
| Confirmed | Paid (or free); tickets emailed and valid at the door. |
| Cancelled | Released; tickets are refused at the door. |
5. Check people in at the door
- On a phone, sign in to NaliSuite and open Events → Events → Check-in screen (or go to
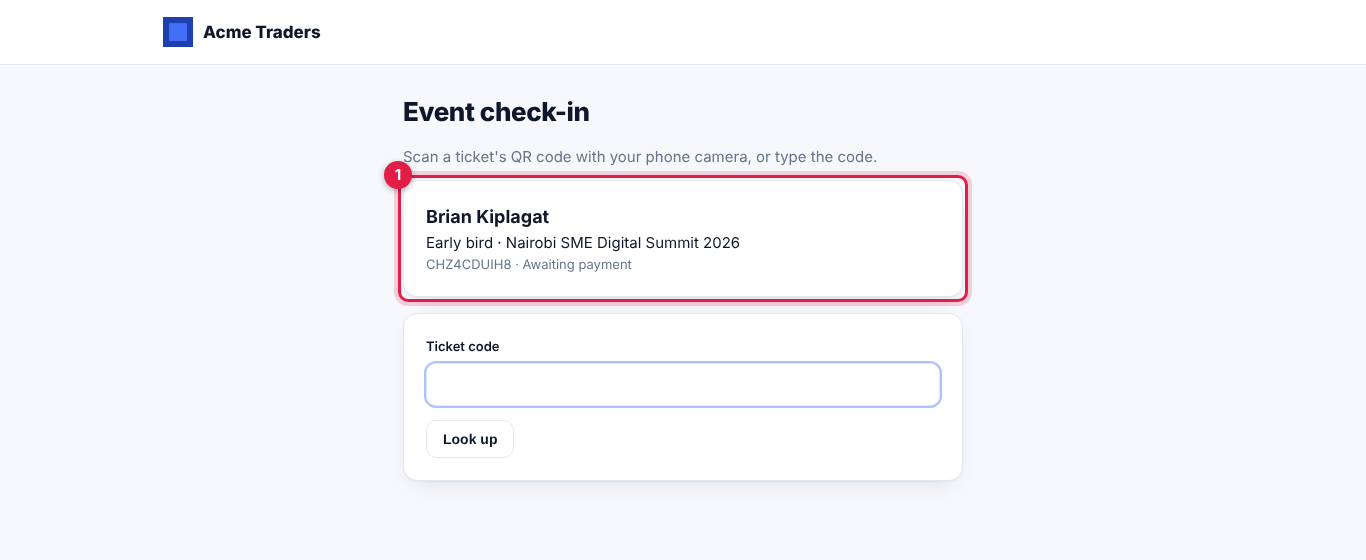
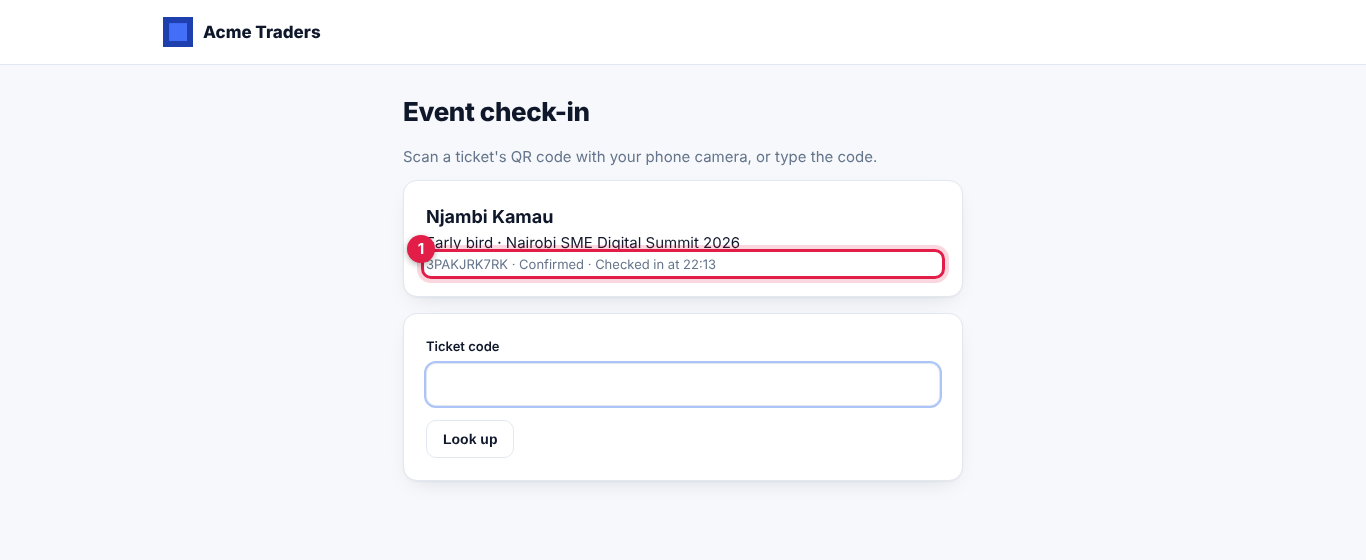
/app/event-check-inon your workspace address). Keep it open. - Scan the buyer's QR code with the phone camera. It opens the check-in screen with that ticket: the attendee, ticket type, event, code and status (marker 1).
- Tap Let in (marker 2). You see Kevin Otieno is in (Regular). and the screen is ready for the next ticket.
- If a QR code will not scan, type the code printed under it in Ticket code (marker 3) and tap Look up (marker 4).
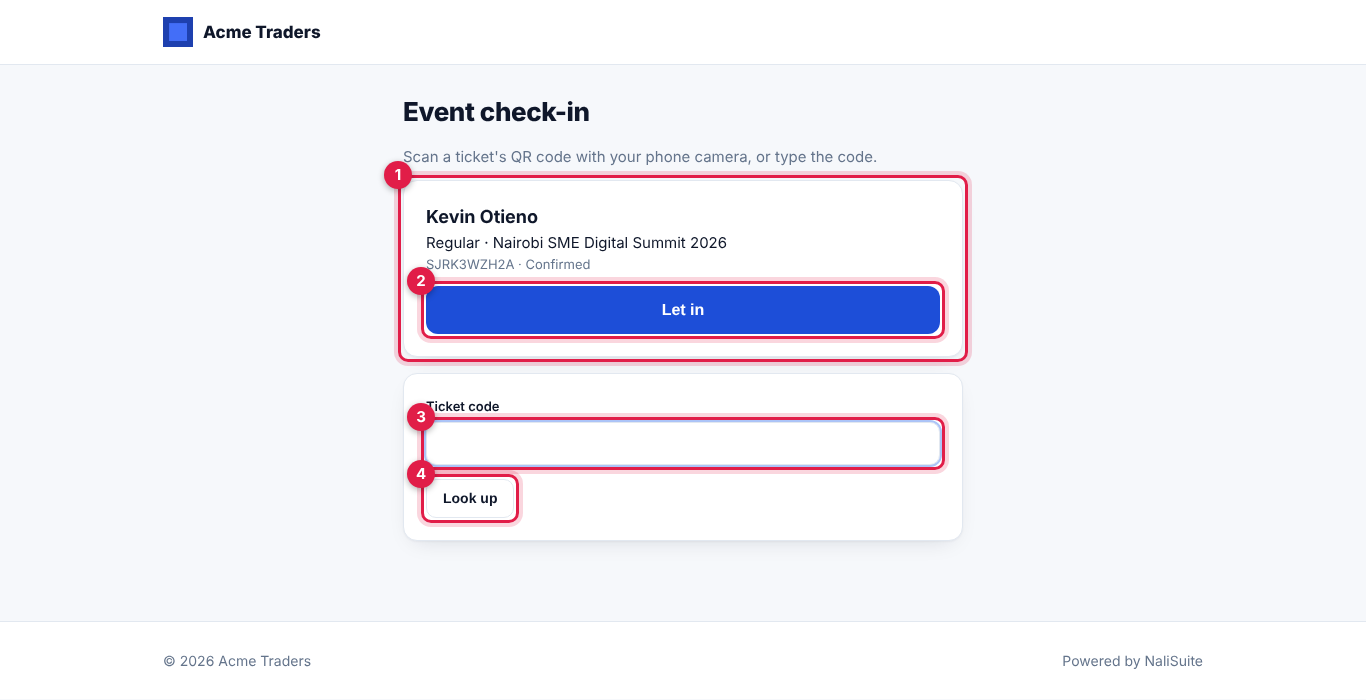
Each ticket works once. The screen refuses:
- a ticket not yet paid for: there is no Let in button and the status reads Awaiting payment (marker 1). Send the person to pay, or use Paid another way if they pay you at the door;
- a ticket already used: it shows Checked in at and the time (marker 1);
- a cancelled registration (This ticket was cancelled.) and an unknown code (No ticket has that code.).
Several phones can check people in at the same time. The Checked in count on the events list and Arrived on the registrations go up as people arrive.
6. Cancel an event
On the event, click Cancel event (marker 6 on the event form) and confirm. The event is taken off the events page, its status becomes Cancelled, and every registration still awaiting payment is cancelled with its invoice. Confirmed (paid) registrations are left as they are: contact those buyers and refund them with credit notes.
Common questions
Can staff sell tickets at the gate? There is no staff booking form. Open the public event page on the gate phone and register the buyer there, then use Paid another way if they pay cash.
How long are unpaid tickets held? Until the registration is paid or cancelled. Cancel unpaid registrations that go cold to release the tickets.
Can one buyer bring guests? Yes. They buy several tickets in one go; each has its own QR code, all under the buyer's name.
Is VAT charged on tickets? Ticket invoices are issued without tax. Set your ticket prices to include any tax you must collect.
Where does the ticket money go in the books? Each registration's invoice is a normal sales invoice, and payments through the pay page are recorded against it, so it shows in your sales and receivables like any invoice.