Import, export and your data
This page explains how to bring existing records into NaliSuite from spreadsheets, how to get any list out to Excel or CSV, how to download everything in the workspace, how to handle people's personal data (copies, erasure and consent), and how to close the workspace. Importing is done from Settings → Import data or the Import buttons on lists; exporting from the Export button on every list and from Settings → Preferences.
Who can do what:
| Task | Permission needed |
|---|---|
| Import customers and vendors | contacts.import |
| Import products | sales.products.manage |
| Import leads | crm.manage |
| Import employees | hr.manage |
| Import chart of accounts, expenses, income, transfers | accounting.manage |
| Import stock on hand | inventory.adjust |
| Export on lists | core.data.export |
| Export contacts (background export) | contacts.export |
| Export all data | core.settings.manage |
| Download a contact's personal data | contacts.view |
| Erase a contact / record consent | contacts.manage |
| Erase a former employee | hr.manage |
| Close the workspace | owner role |
Import data from a spreadsheet
Settings → Import data (marker 1) collects every import in one place. Each card says what it brings in and how it avoids duplicates. You only see cards for apps you use and imports you are allowed to run.
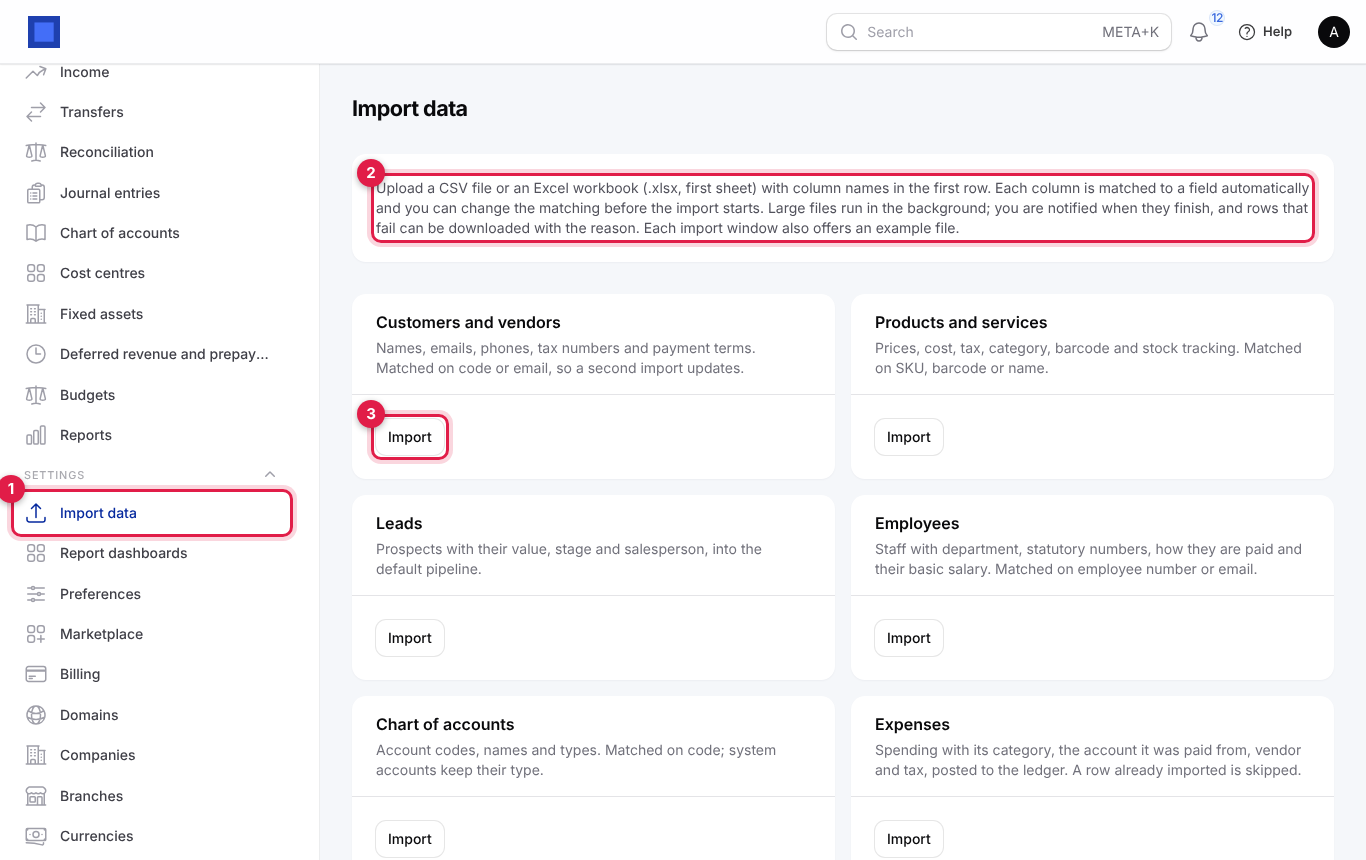
| Card | What it imports | How existing records are matched |
|---|---|---|
| Customers and vendors | Names, emails, phones, tax numbers and payment terms. | On code, else email, so a second import updates. |
| Products and services | Prices, cost, tax, category, barcode and stock tracking. | On SKU, barcode or name. |
| Leads | Prospects with value, stage and salesperson, into the default pipeline. | Always new leads. |
| Employees | Staff with department, statutory numbers, how they are paid and basic salary. | On employee number or email. |
| Chart of accounts | Account codes, names and types. | On code; system accounts keep their type. |
| Expenses | Spending with category, the account it was paid from, vendor and tax, posted to the ledger. | A row already imported is skipped. |
| Income | Money received with category, the account it went into, customer and tax, posted to the ledger. | A row already imported is skipped. |
| Transfers | Moves between bank, cash and mobile money accounts, posted to the ledger. | A row already imported is skipped. |
| Stock on hand | Quantities and unit costs per product and warehouse, posted as stock adjustments. Import products first. | Adds stock adjustments. |
Prepare your file
- Use a CSV file or an Excel workbook (.xlsx). For Excel, only the first sheet is read.
- Put the column names in the first row, one record per row after that. Names do not have to match exactly; NaliSuite recognises common names (for example "Customer", "Company name" or "Organisation" for the name; "PIN", "TIN" or "VAT number" for the tax number).
- Up to 20,000 rows per file. Split bigger files.
- Dates as
2026-03-15work everywhere. Yes/no columns acceptyes/no,1/0ortrue/false. - Click Download example CSV file in the import window for a ready-made template with the right columns.
Run an import
- Open Settings → Import data and click Import on the card you need (marker 3). Or click the import button on the list itself, for example Import contacts on Sales → Contacts.
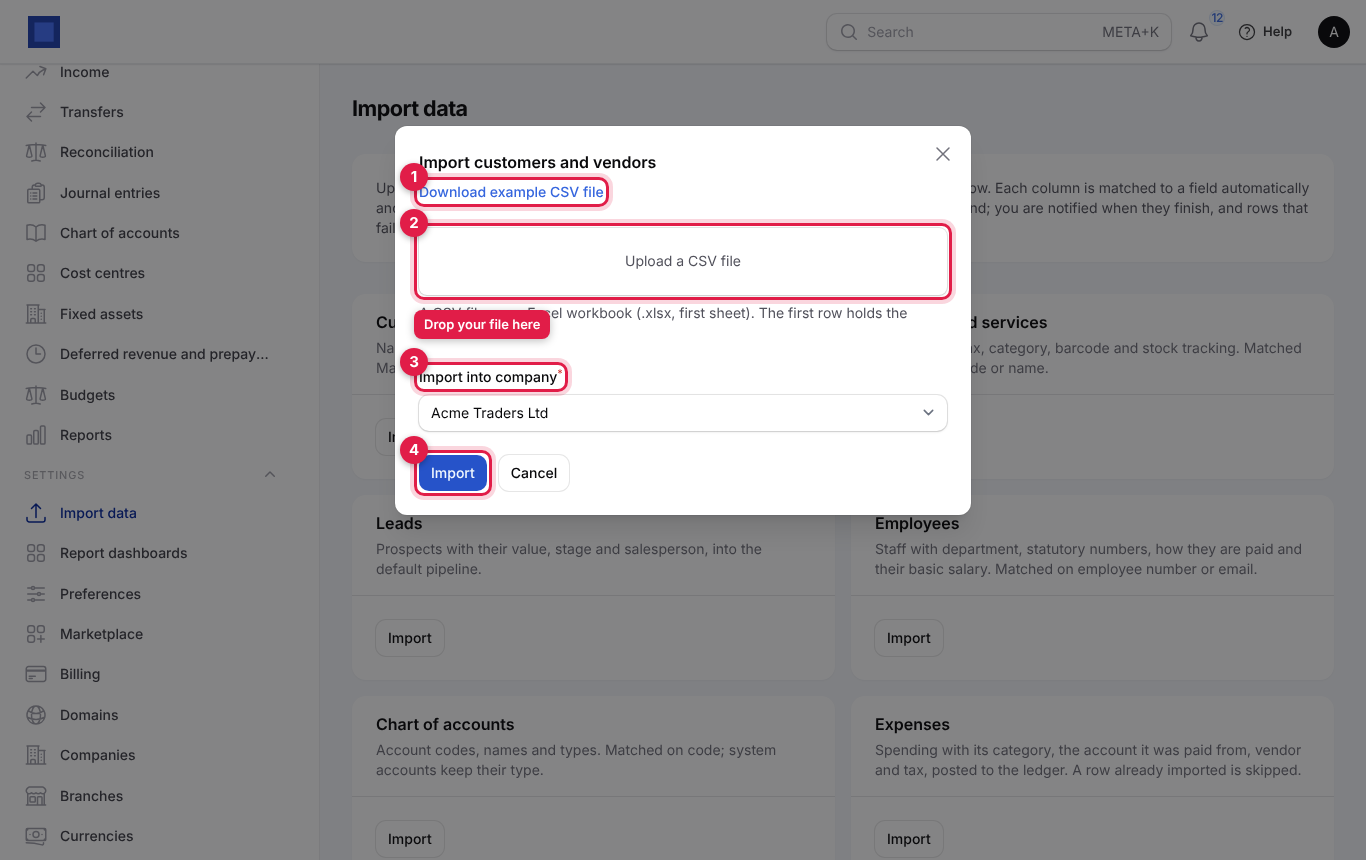
- In the window, click Download example CSV file (marker 1) if you need the template.
- Drop your file onto Upload a CSV file (marker 2), or click it to choose the file.
- Match the columns. Once the file is read, a list of NaliSuite fields appears, each with a drop-down of your file's columns. Columns are matched automatically; check each one, change it where it is wrong, and leave fields you do not have empty. Fields marked with an asterisk must be matched.
- Fill in any options, for example Import into company (marker 3) for contacts.
- Click Import (marker 4).
What happens next:
- The import runs in the background. You can keep working.
- When it finishes you get a notification in the bell, for example "Your contact import has completed and 245 rows imported." If some rows failed, it adds ":count rows failed and can be downloaded." Click the notification's download link to get a file of the failed rows with the reason for each, fix them, and import just that file again.
- Expenses, income and transfers are posted to the ledger as they are imported, like entering them by hand. Stock on hand creates stock adjustments.
Columns for each import
Fields marked * must be matched to a column.
Customers and vendors
| Column | What to put |
|---|---|
| name* | Company or person name. |
| type | organisation (default) or individual. |
| code | Your customer code, for example C00012. Used to update on re-import. |
| email, phone, mobile, website | Contact details. |
| tax_id | KRA PIN, TIN or VAT number. |
| is_customer / is_vendor | yes or no. A new contact is a customer and not a vendor unless you say otherwise. |
| payment_terms_days | 0 to 365. |
| notes | Free text. |
Option: Import into company (required) picks which company the contacts belong to.
Products and services: name*, sku, barcode, type, category, unit, sale_price, cost_price, tax, description, can_be_sold, can_be_purchased, track_inventory, reorder_level, is_active.
Leads: title*, contact_name, organisation_name, email, phone, expected_revenue, expected_close_date, source, stage, owner (the salesperson), description.
Employees: number, first_name*, last_name*, email, phone, job_title, department, start_date, date_of_birth, gender, national_id, tax_pin, social_security_no, health_insurance_no, pay_method, bank_name, bank_account, mobile_money_number, basic_salary.
Chart of accounts: code* (for example 6110), name* (for example "Motor vehicle expenses"), type* (for example expense), parent, description.
Expenses, Income and Transfers: date*, amount* (more than 0), category* (the expense or income category; for transfers, the To account), money_account (the bank, cash or M-Pesa account), description, reference, contact (vendor or customer), tax, is_settled.
Stock on hand: product* (SKU, barcode or name), warehouse, quantity*, unit_cost.
Tip: Import in this order on a new workspace: chart of accounts, customers and vendors, products, then stock on hand, then opening transactions.
Common mistake: Importing the same expense file twice "to be sure". Rows already imported are skipped, but a file with changed amounts or dates is treated as new rows and posted again.
Export any list to Excel or CSV
Every list in the workspace has an Export button above the table. It downloads exactly what you see: the rows matching the current search and filters, in the current order.
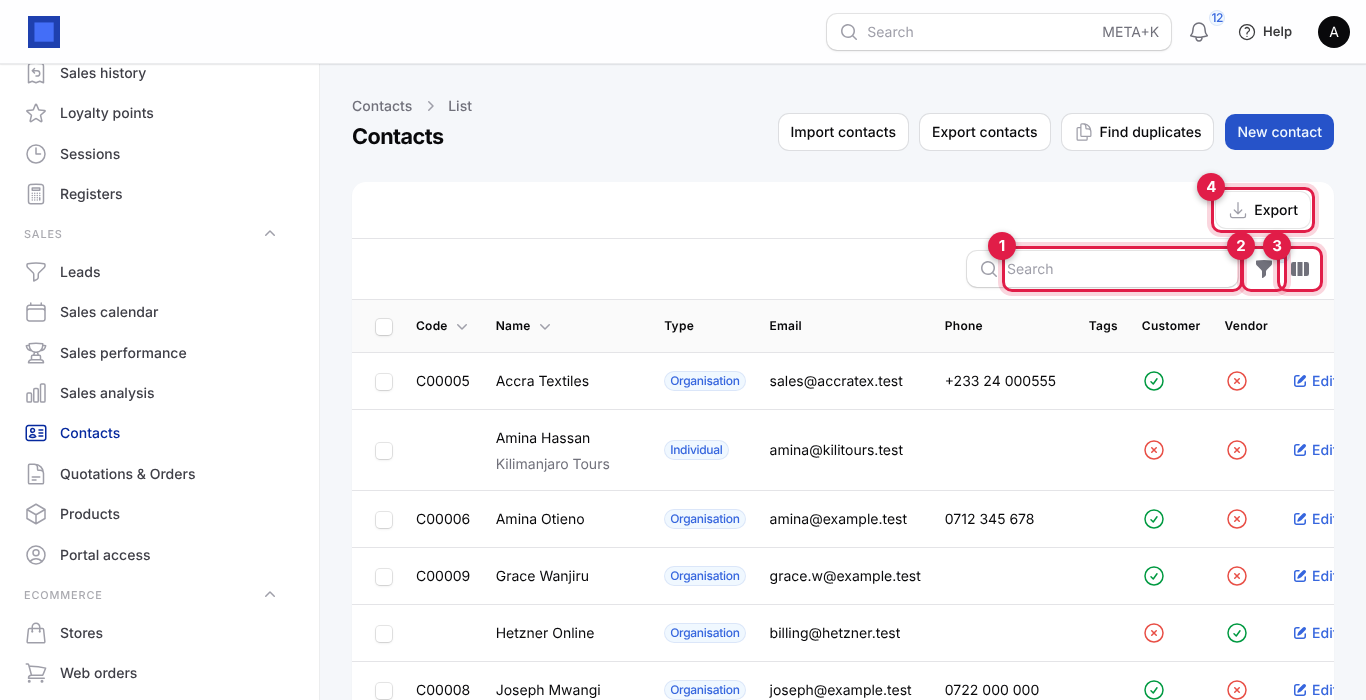
- Open the list, for example Sales → Contacts or Finance → Invoices.
- Narrow it down first if you want: type in Search (marker 1), click the filter icon (marker 2) and choose filters, then Apply filters. Click a column heading to sort.
- Use the column manager (marker 3) to show or hide columns. The export starts with the columns you can see.
- Click Export (marker 4).
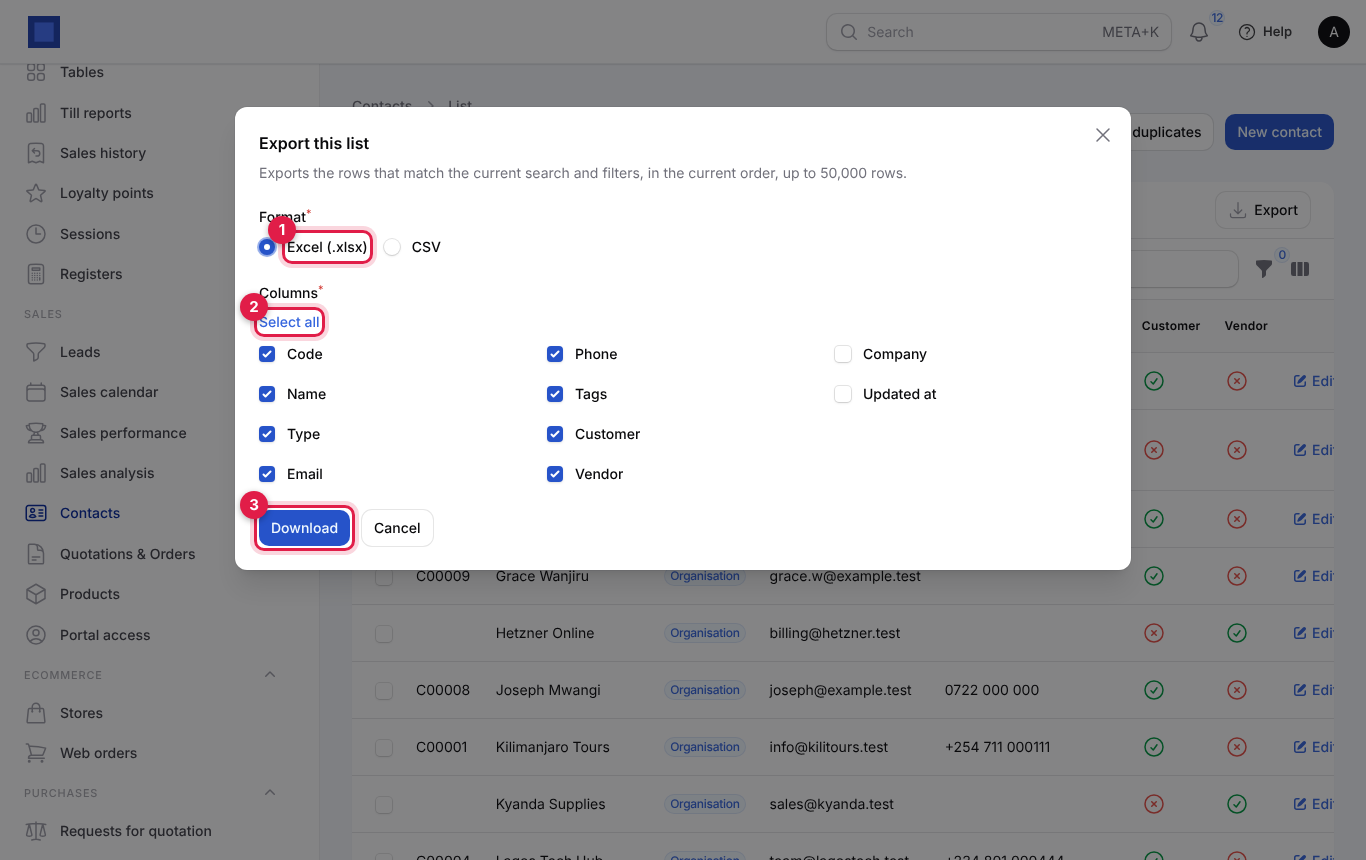
- In Export this list, choose the Format (marker 1): Excel (.xlsx) (default) or CSV.
- Tick the Columns to include. Every column the list has is offered: the ones you can see on screen are already ticked, hidden ones (for example Company or Updated at) are unticked. Click Select all (marker 2) to tick them all, or Deselect all to start from none.
- Click Download (marker 3). The file is named after the list and today's date, for example
contacts-2026-11-12.xlsx.
Good to know:
- Up to 50,000 rows per export ("Exports the rows that match the current search and filters, in the current order, up to 50,000 rows").
- Numbers and dates come out as real values that you can add up and sort in Excel. Yes/no columns read Yes or No. Images are left out.
- CSV files are UTF-8, so names with accents and Arabic text open correctly.
- Record rules apply: if your role only sees your own records, only those are exported.
- You need the
core.data.exportpermission; without it the button is hidden.
The contacts background export
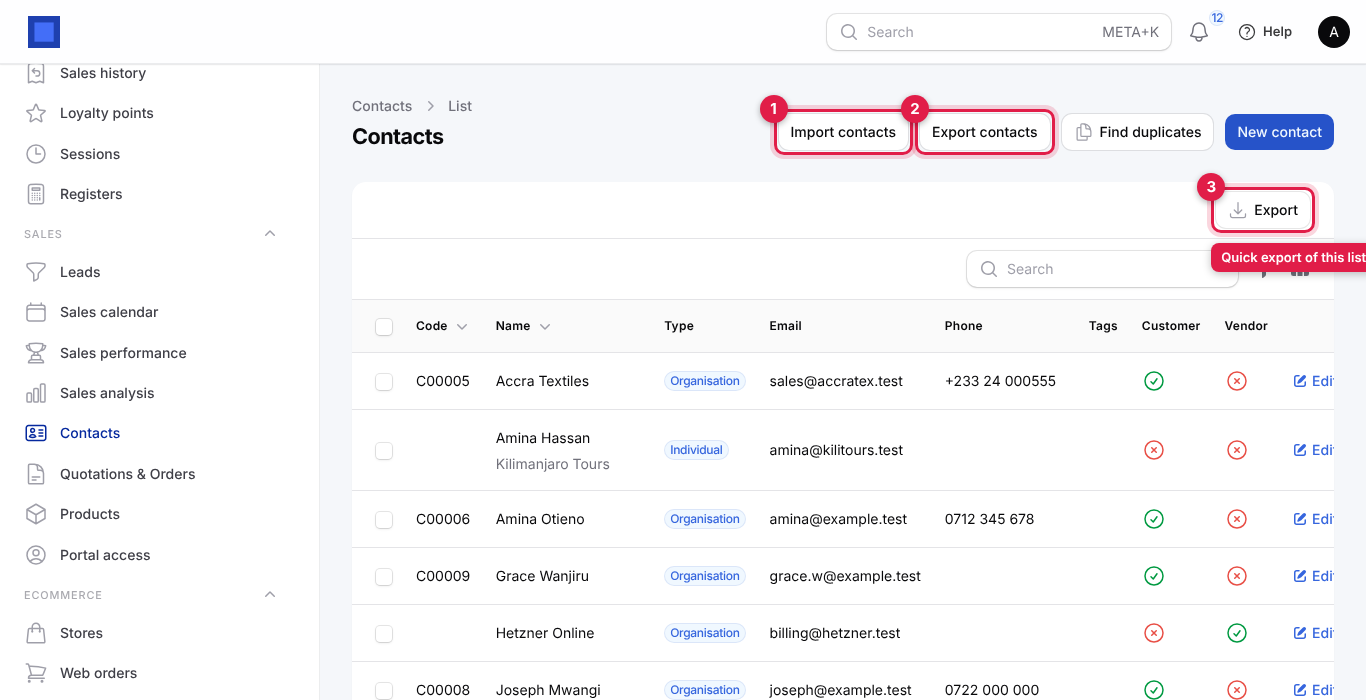
Sales → Contacts has three buttons for getting data in and out: Import contacts (marker 1) at the top of the page, Export contacts (marker 2) next to it, and the quick Export above the table (marker 3) described above. Export contacts is also in Bulk actions when you tick rows, to export just those.
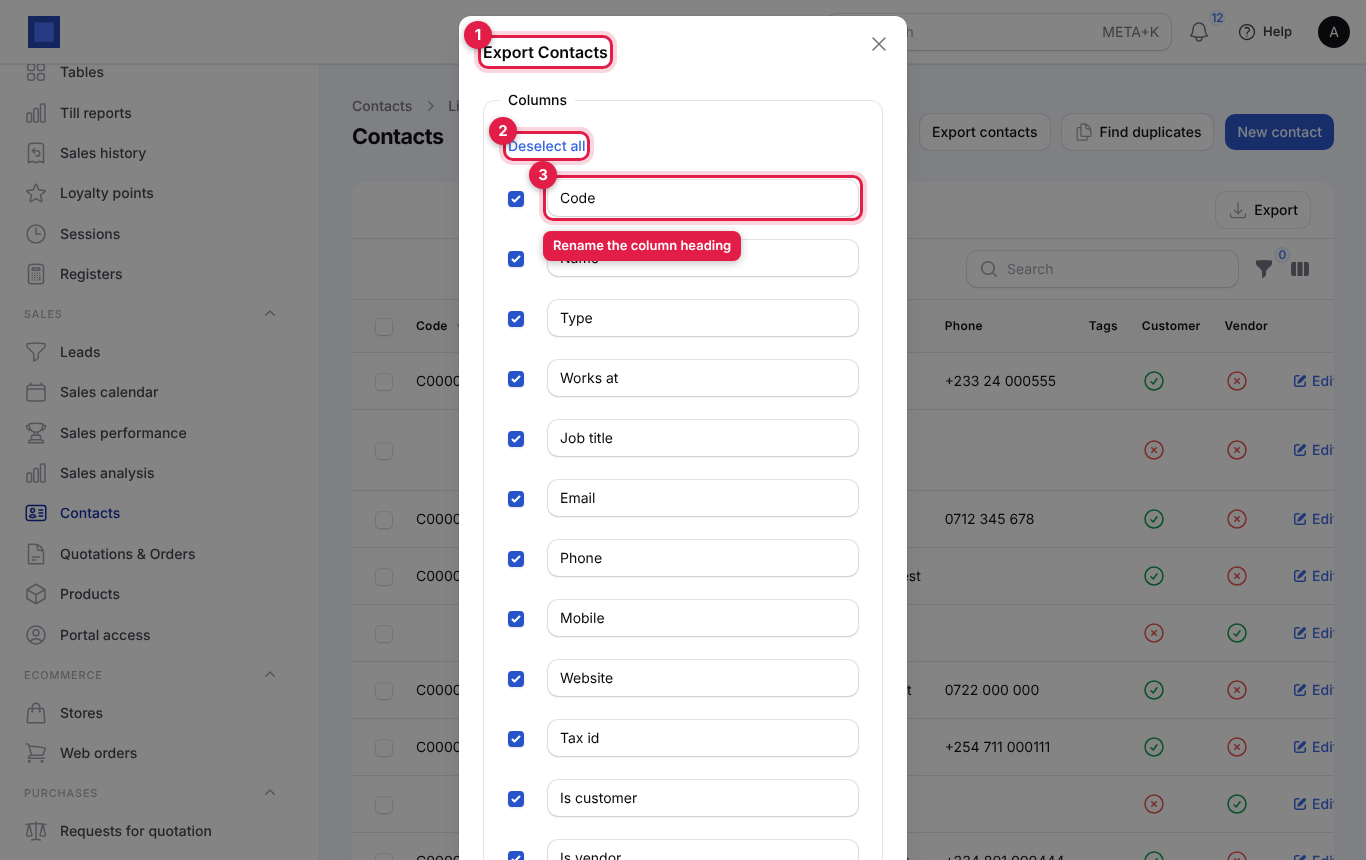
Export contacts opens Export Contacts (marker 1), with every contact field, including ones the list does not show, such as Works at, Job title, Mobile and Website. Untick fields you do not want, or click Deselect all (marker 2) to start from none. Type in a field's box (marker 3) to rename its column heading in the file. Click Export at the bottom. The export runs in the background; a notification in the bell tells you when it is ready, with links to download it as CSV or Excel. It needs contacts.export.
Download all workspace data
Use this for a full backup, before closing the workspace, or to move to another system.
- Open Settings → Preferences.
- Click Export all data at the top right.
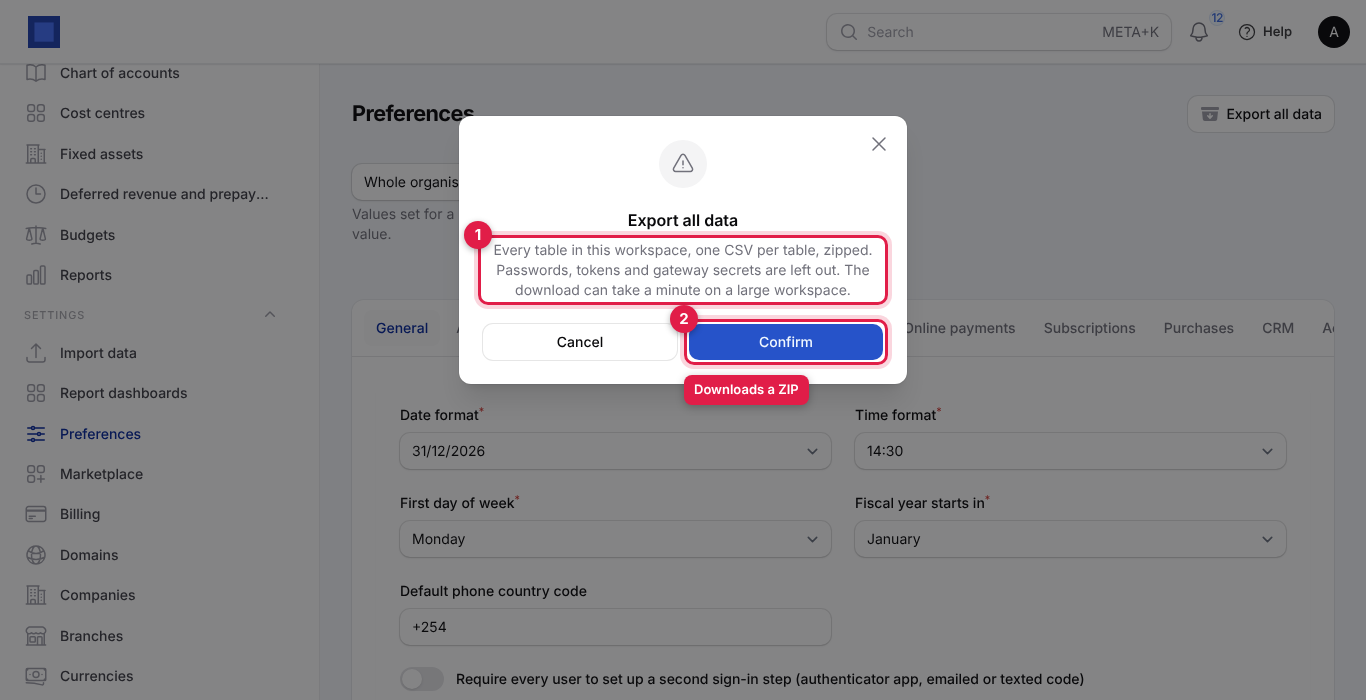
- Read the message (marker 1): "Every table in this workspace, one CSV per table, zipped. Passwords, tokens and gateway secrets are left out. The download can take a minute on a large workspace."
- Click Confirm (marker 2). A ZIP file named like
nalisuite-yourworkspace-20261112-143000.zipdownloads.
The ZIP holds one CSV file per table: contacts, invoices, journal entries, employees and so on. Left out are passwords, API tokens, webhook settings, signing secrets and gateway keys, sign-in sessions, roles and permissions, notifications and system tables. The export is recorded in the activity log ("Exported all workspace data"). Only users who can manage settings see the button.
Tip: Keep the ZIP somewhere safe. It contains your customers' and staff's personal data.
Personal data: give a copy, erase, record consent
Data protection laws such as Kenya's Data Protection Act, Nigeria's NDPA and South Africa's POPIA give people the right to see the data you hold about them, to have it erased, and to withdraw consent to marketing. NaliSuite has tools for each.
Give a person a copy of their data
- Open the contact under Sales → Contacts.
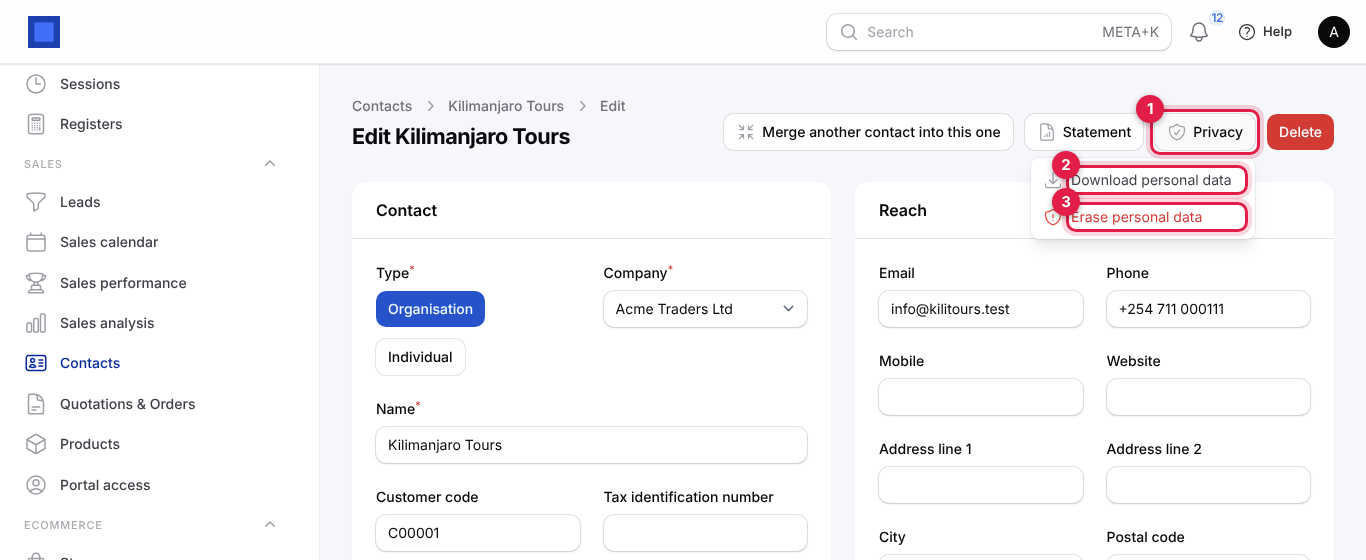
- Click Privacy at the top (marker 1).
- Click Download personal data (marker 2).
A file personal-data-contact-<number>.json downloads. It holds the date of the export, every field of the contact, their consent history, and their quotations and orders, invoices, payments, subscriptions, leads, support tickets, mailing list memberships and portal logins. Send it to the person by a secure channel.
Erase a contact's personal data (right to be forgotten)
- Open the contact and click Privacy → Erase personal data (marker 3 above).
- Read the warning. It explains: name, email, phones, address, tax number, notes, tags, consents, portal logins and mailing list memberships are removed for good, and the history keeps only who erased the record and when. Invoices, payments and orders stay with their numbers and amounts, because tax law requires them, under the anonymous name.
- Type
ERASEin capital letters in Type ERASE to confirm (marker 1). - Click Erase for good (marker 2).
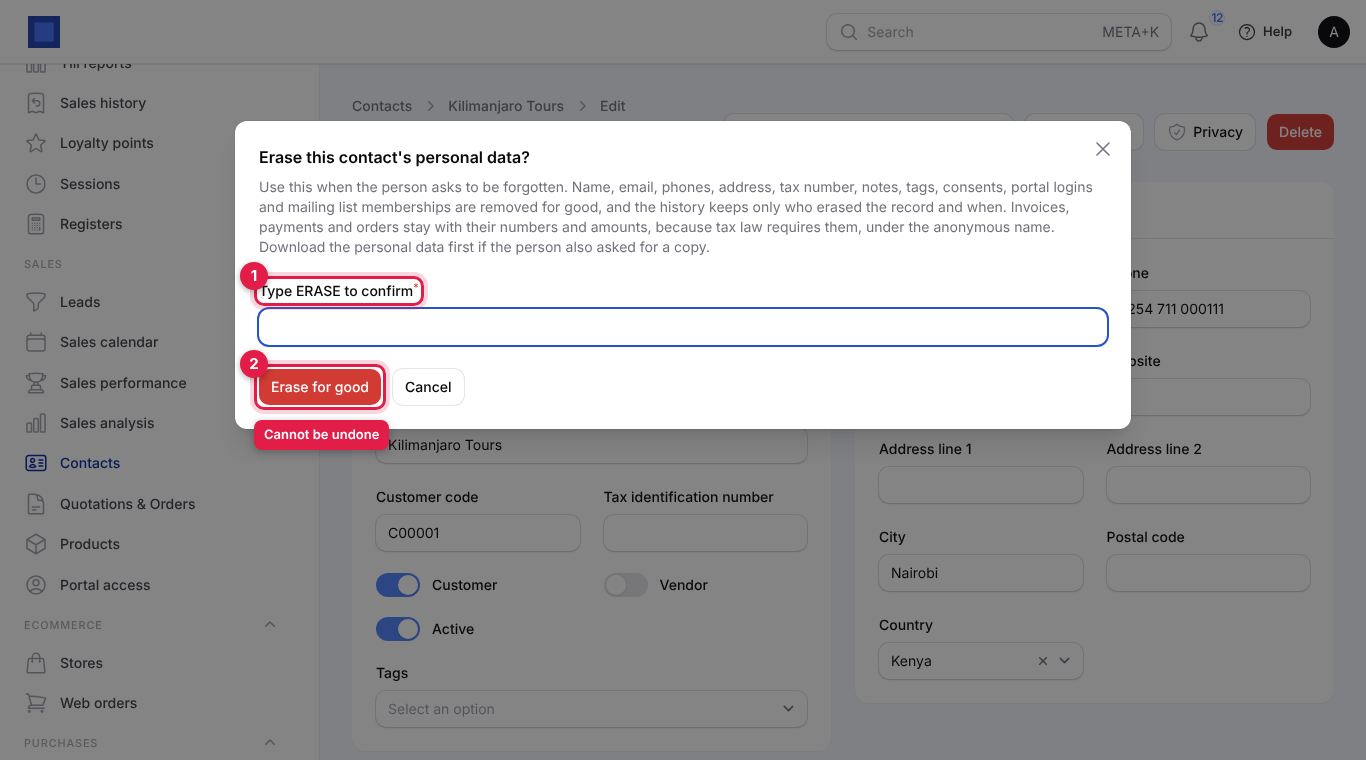
What happens next: "Personal data erased". The contact is renamed "Erased contact ", and tickets from them show "Erased contact". The history records "Personal data erased on request". This cannot be undone.
You cannot erase:
- A contact with unpaid invoices: "This contact still has unpaid invoices. Settle or credit them before erasing the contact."
- A contact already erased (the menu item disappears).
Common mistake: Erasing first and then being asked for a copy. If the person asked for both, Download personal data first.
Erase a former employee's data
On HRM → Employees, open the employee. Erase personal data appears at the top only once the person's status is Left (record their exit first with Start offboarding). Type ERASE and click Erase for good. Names, identity numbers, contact and bank details, emergency contacts, dependants, HR documents, check-in locations and their job application are removed for good. Payslips, pay runs and ledger postings keep their amounts under the employee number ("Former employee"), as payroll and tax law require. You need the hr.manage permission.
Record consent
Each contact has a Consent tab that keeps the history of what they agreed to. The latest row for each purpose is what applies.
- Open the contact and click the Consent tab (marker 1).
- Click Record consent (marker 2).
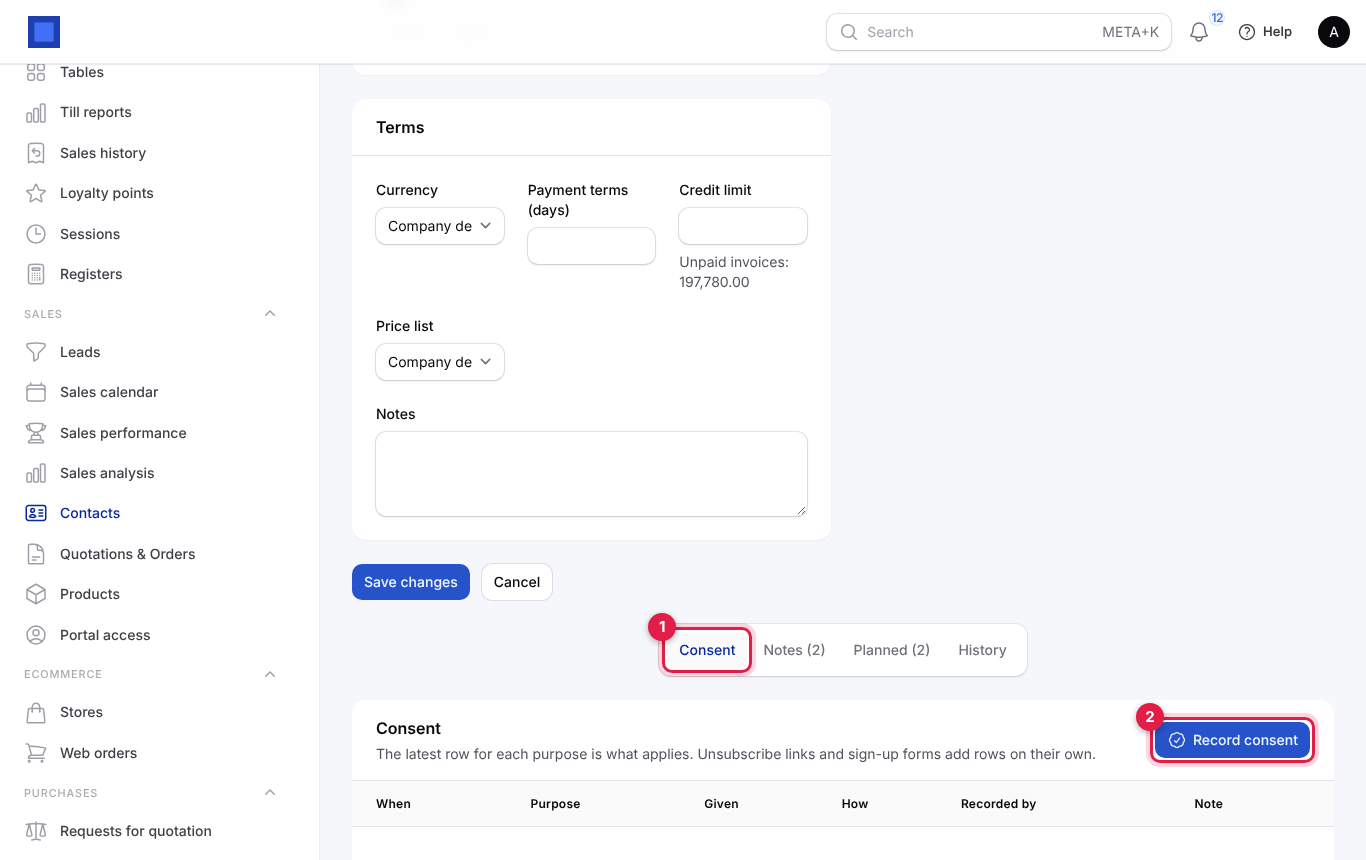
- Fill in the window and click Submit.
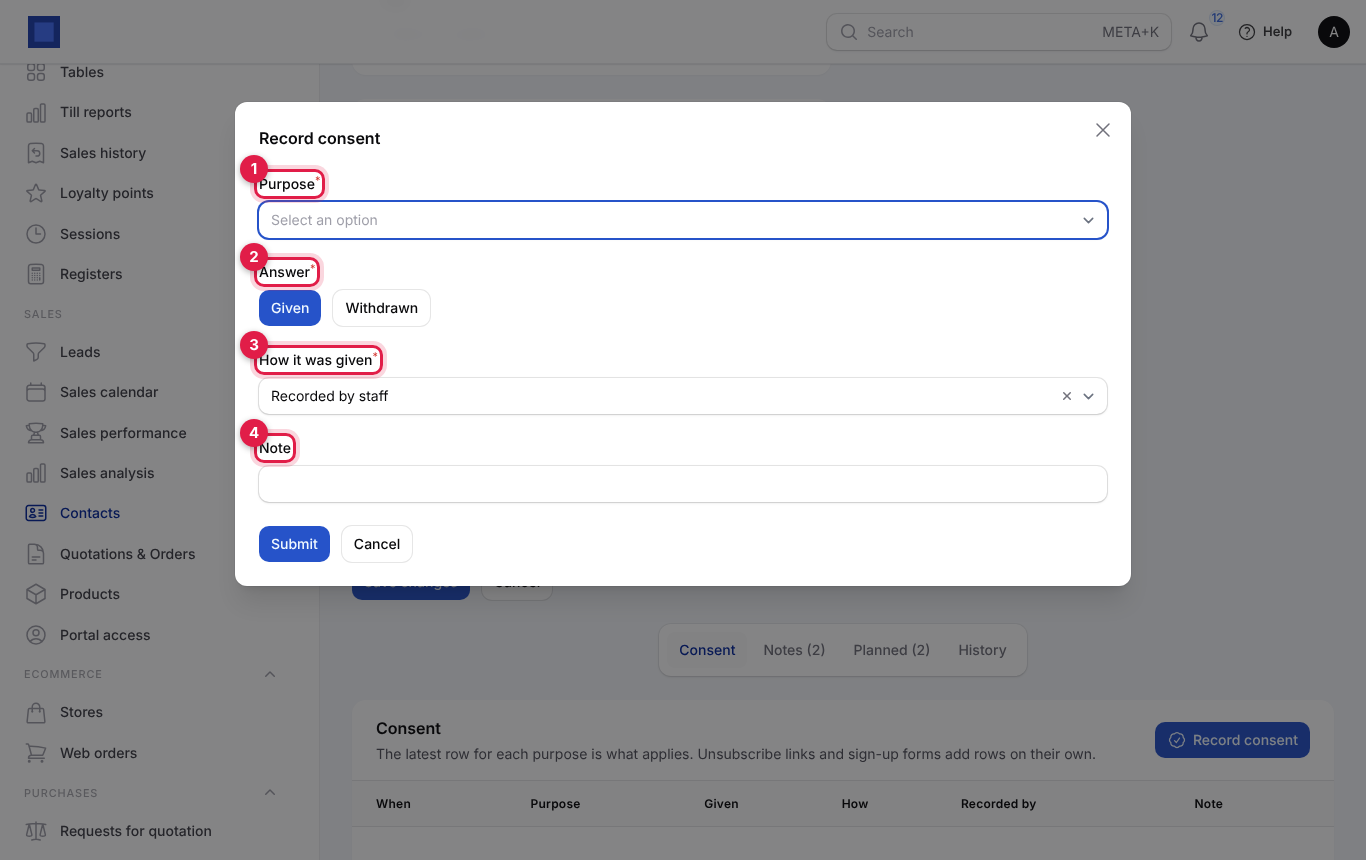
| Field | What to enter |
|---|---|
| Purpose (marker 1) | Required. Marketing by email, Marketing by SMS, Marketing on WhatsApp or Processing of personal data. |
| Answer (marker 2) | Required. Given or Withdrawn. |
| How it was given (marker 3) | Required. Recorded by staff (default), Sign-up form, Landing page, Unsubscribe link, Customer portal, Import or Signed paper form. |
| Note (marker 4) | Optional, up to 250 characters, for example "Ticked the box on the order form, 3 Nov". |
The table shows When, Purpose, Given (tick or cross), How, Recorded by and Note. Rows are evidence, so they cannot be edited or deleted; to change an answer, record a new row. Unsubscribe links in campaigns, sign-up forms and mailing-list changes add rows on their own.
Close the workspace
Closing is permanent for your team: everyone is signed out and nobody can open the workspace again. Only the owner can do it.
- Download your data first: Settings → Preferences → Export all data (see above).
- Open Settings → Billing and click Close workspace (red, top right).
- Read the message (marker 1): "Everyone, including you, is signed out and nobody can open the workspace afterwards. Its data is kept for 90 days in case you change your mind, then deleted for good." (The number of days is set by your provider.)
- Type the workspace name exactly as shown in Type … to confirm (marker 2). If it does not match you see "Type the workspace name exactly as shown."
- Click Close workspace (marker 3).
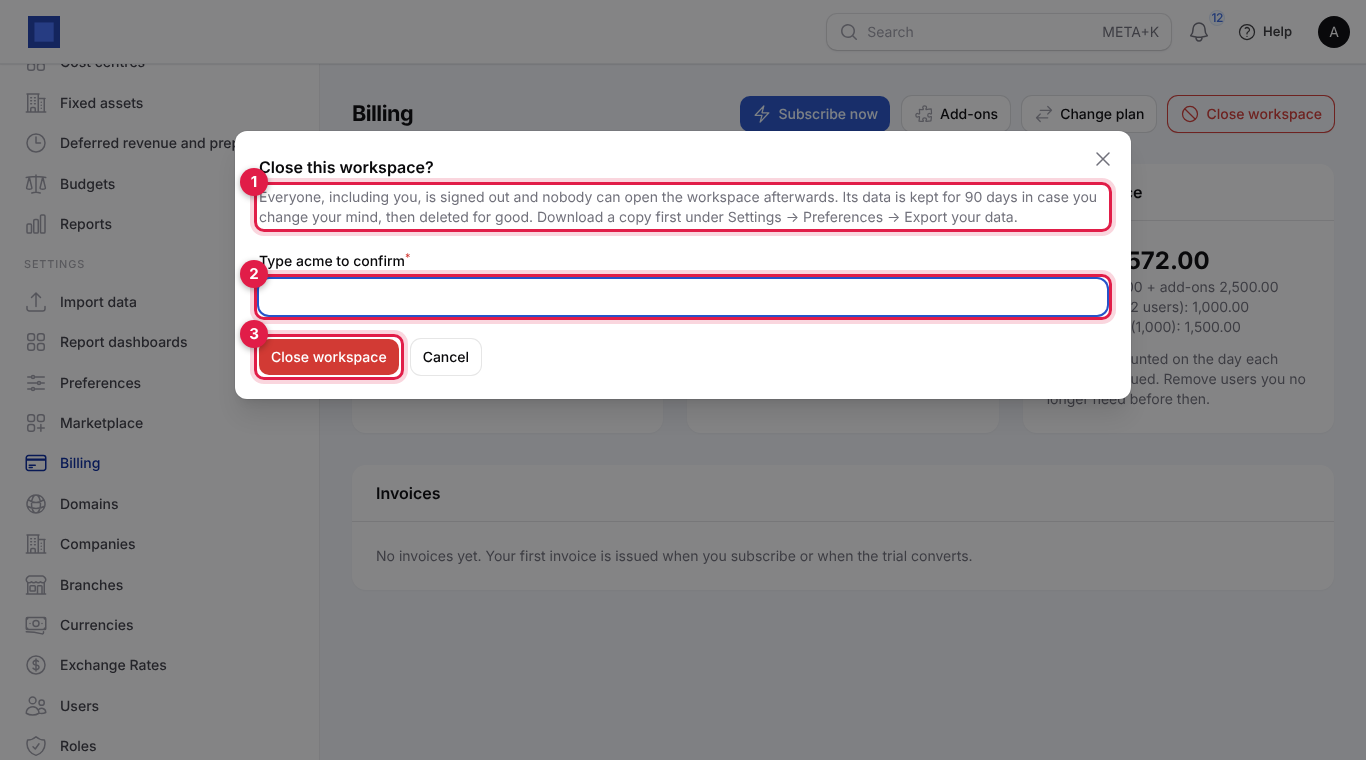
What happens next: you are signed out and sent to the sign-in page. The billing contact receives an email "Your … workspace has been closed" with the date the data will be deleted. Seven days before deletion another email warns you. Until then, contact your provider to reopen the workspace or ask for an export. After that date the data is gone for good.
Common questions
My Excel file is not accepted.
Save it as .xlsx (not .xls) or as CSV, with the column names in the first row of the first sheet.
Some rows failed. Do I import the whole file again? No. Download the failed rows from the notification, fix them and import only that file. Contacts, products and employees are matched, so re-importing updates rather than duplicates; expenses, income and transfers already imported are skipped.
The Export button is missing.
Your role lacks core.data.export. Ask an administrator.
Why does my export have fewer rows than the database? It follows the search, filters and your record rules, and stops at 50,000 rows. Clear the filters, or export in batches by date.
Can I undo an erasure? No. Erasure is permanent by design.
A customer withdrew marketing consent by phone. Open the contact's Consent tab, Record consent with Marketing by email (or SMS/WhatsApp), Withdrawn, Recorded by staff, and a note.
I closed the workspace by mistake. Contact your provider straight away. The data is kept for the retention period and the workspace can be reopened before it is deleted.