Live chat, Messenger and Instagram
This page is for support and sales teams who want to answer customers where they already are: in a chat bubble on your website, in Facebook Messenger or in Instagram direct messages. Every chat and every message becomes a helpdesk ticket, so you answer it from the same ticket screen as email and WhatsApp, with the same teams, response targets and internal notes. This page covers switching live chat on, putting it on your website or any other site, what visitors see, connecting your Facebook Page and Instagram account, and the 24-hour rule for replying on Messenger and Instagram.
The settings are under Settings → Preferences, on the Helpdesk tab and the Facebook and Instagram tab. The chats and messages arrive in Support → Tickets.
Note: Changing the preferences needs the Manage settings permission. Answering chats and messages needs helpdesk.manage, as for any ticket. Set permissions under Settings → Roles.
Live chat, Messenger and Instagram are part of the Helpdesk app, which comes with the Professional plan. An administrator can switch it on or off under Settings → Apps (see Switching apps on and off). For working on tickets, see Helpdesk.
Switch on live chat
- Open Settings → Preferences and click the Helpdesk tab.
- Scroll to Live chat and fill in the settings below.
- Click Save preferences at the bottom of the page.
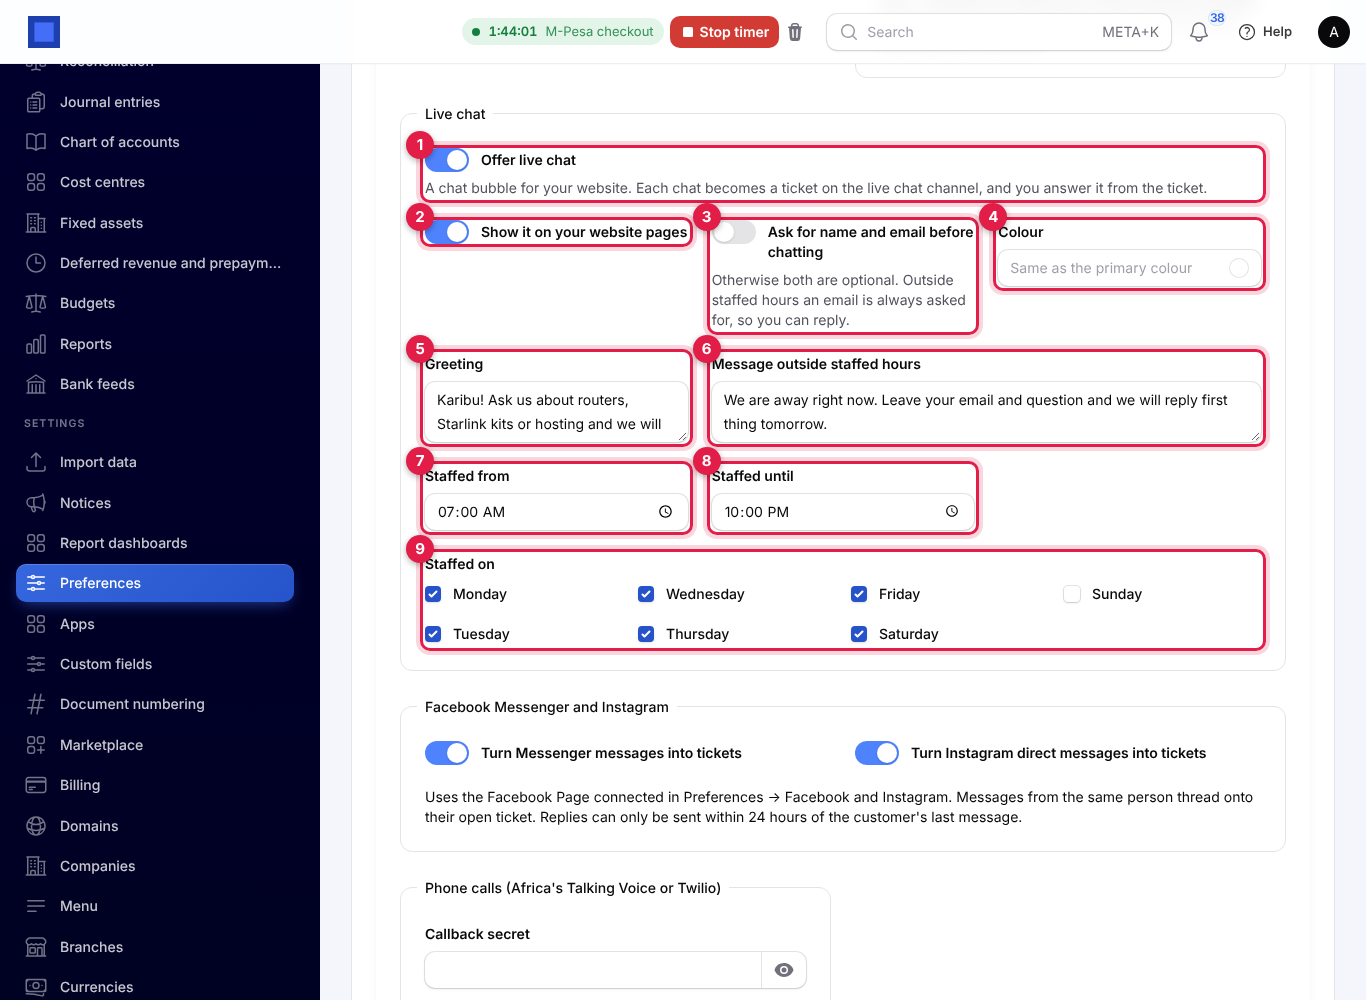
| Setting | What it does |
|---|---|
| Offer live chat (marker 1) | Switches the chat on. While it is off, the bubble, the chat window and the code for other websites stop working. |
| Show it on your website pages (marker 2) | On (the default): the bubble appears on every page of your NaliSuite website. Off: it is kept off your website but still works on another site where you pasted the code. |
| Ask for name and email before chatting (marker 3) | Off: both are optional while the chat is staffed. On: visitors must give both. Outside staffed hours an email is always needed, so you can reply. |
| Colour (marker 4) | The colour of the bubble and the window. Empty uses your workspace's primary colour. |
| Greeting (marker 5) | The first message visitors see while the chat is staffed. Up to 300 characters. Empty: "Hello. How can we help you today?" |
| Message outside staffed hours (marker 6) | Shown instead of the greeting when nobody is on hand. Up to 300 characters. |
| Staffed from and Staffed until (markers 7 and 8) | The hours someone answers chats, 08:00 to 17:00 by default. If Staffed until is the same as or earlier than Staffed from, the chat is staffed until midnight. |
| Staffed on (marker 9) | The days someone answers chats, Monday to Friday by default. |
Put the bubble on your website
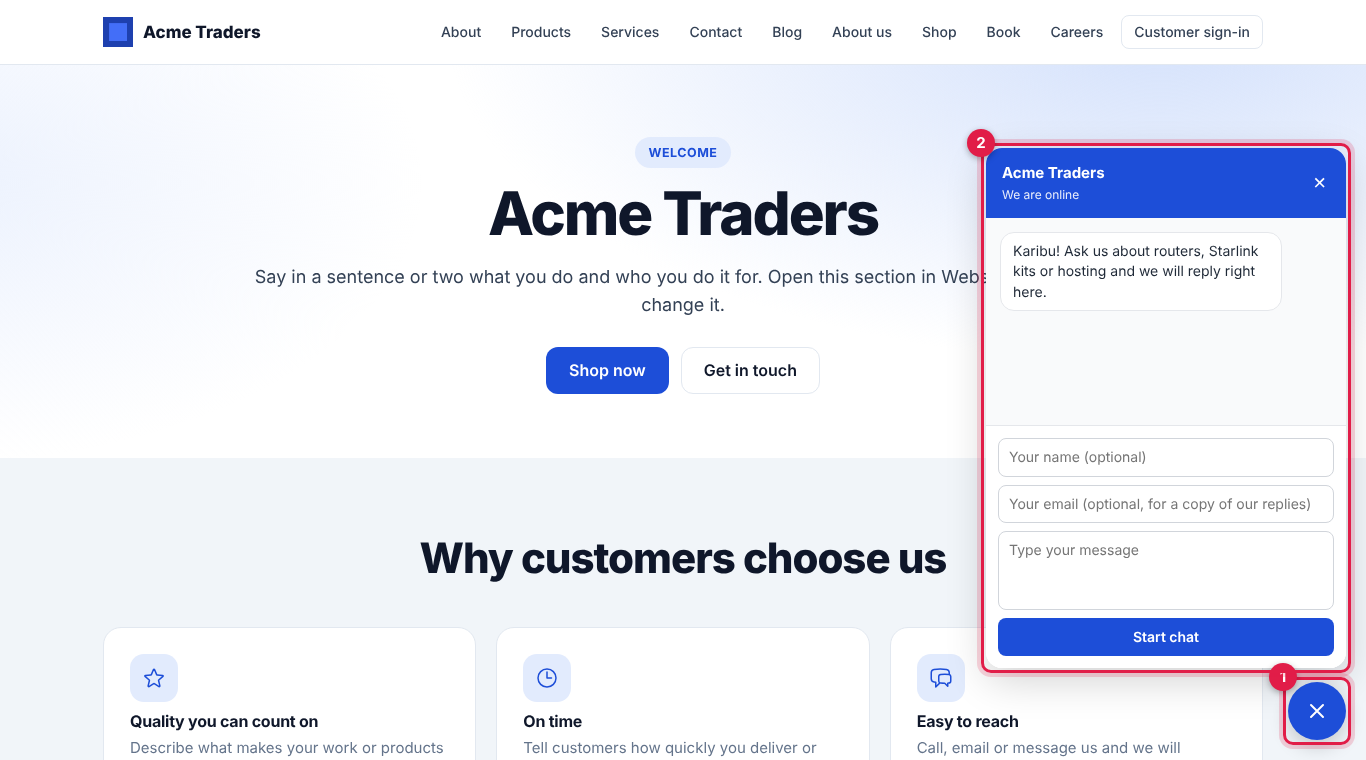
With Show it on your website pages on, every page of your website shows a round chat button at the bottom right (marker 1). Clicking it opens the chat window (marker 2); clicking it again, or the × in the window, closes it. You build the website itself under Website (see Your website).
To add the chat to another website, such as a WordPress or Shopify site:
- On the Helpdesk tab, scroll to Where to point things at the bottom.
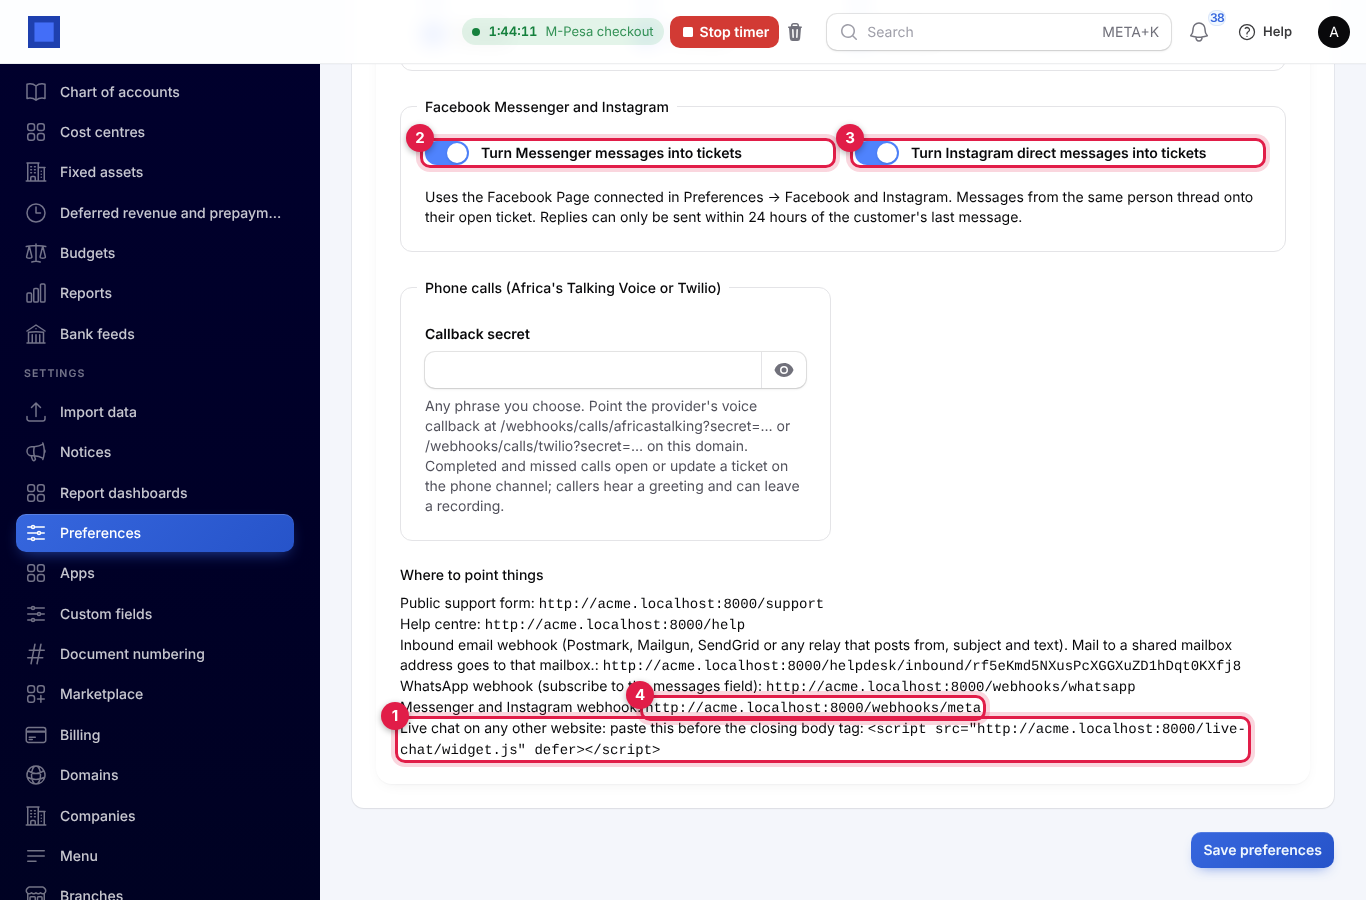
- Copy the line after Live chat on any other website (marker 1). It looks like
<script src="https://yourbusiness.nalisuite.com/live-chat/widget.js" defer></script>. - Paste it into your site's pages just before the closing
</body>tag, or into the "custom code" or "footer scripts" box your site builder offers.
The code loads nothing from other companies. The chat window itself is a page on your workspace address, so it works on any site without cookies on that site. Changes to the colour can take up to five minutes to show on pages that already loaded the chat.
What visitors see
The window shows your business name and We are online or We are away. Leave a message., then your greeting.
- To start, the visitor types a message and, if they like, their name and email, and presses Start chat. Outside staffed hours the button says Send message, and an email is needed.
- Your replies appear in the window within a few seconds, with the name of the person who answered. Internal notes never show.
- The visitor answers in the box at the bottom. Enter sends; Shift+Enter starts a new line.
- A visitor who gave an email also gets each of your replies by email, with a link to the conversation.
- The chat is remembered in the visitor's browser, so it carries on when they move to another page or come back later.
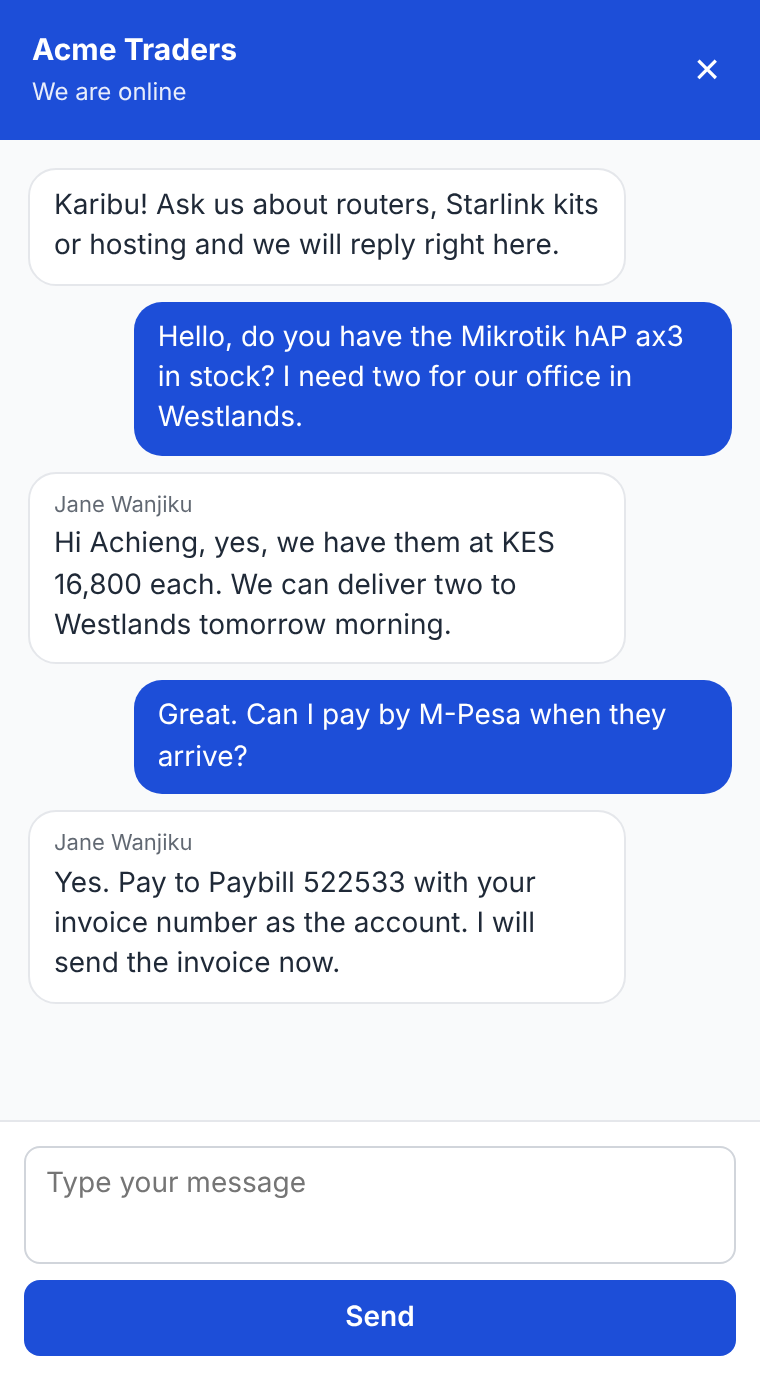
Outside staffed hours the visitor sees "Thank you. We have your message and will reply by email." and gets the usual email acknowledgement with their ticket number.
Answer chats
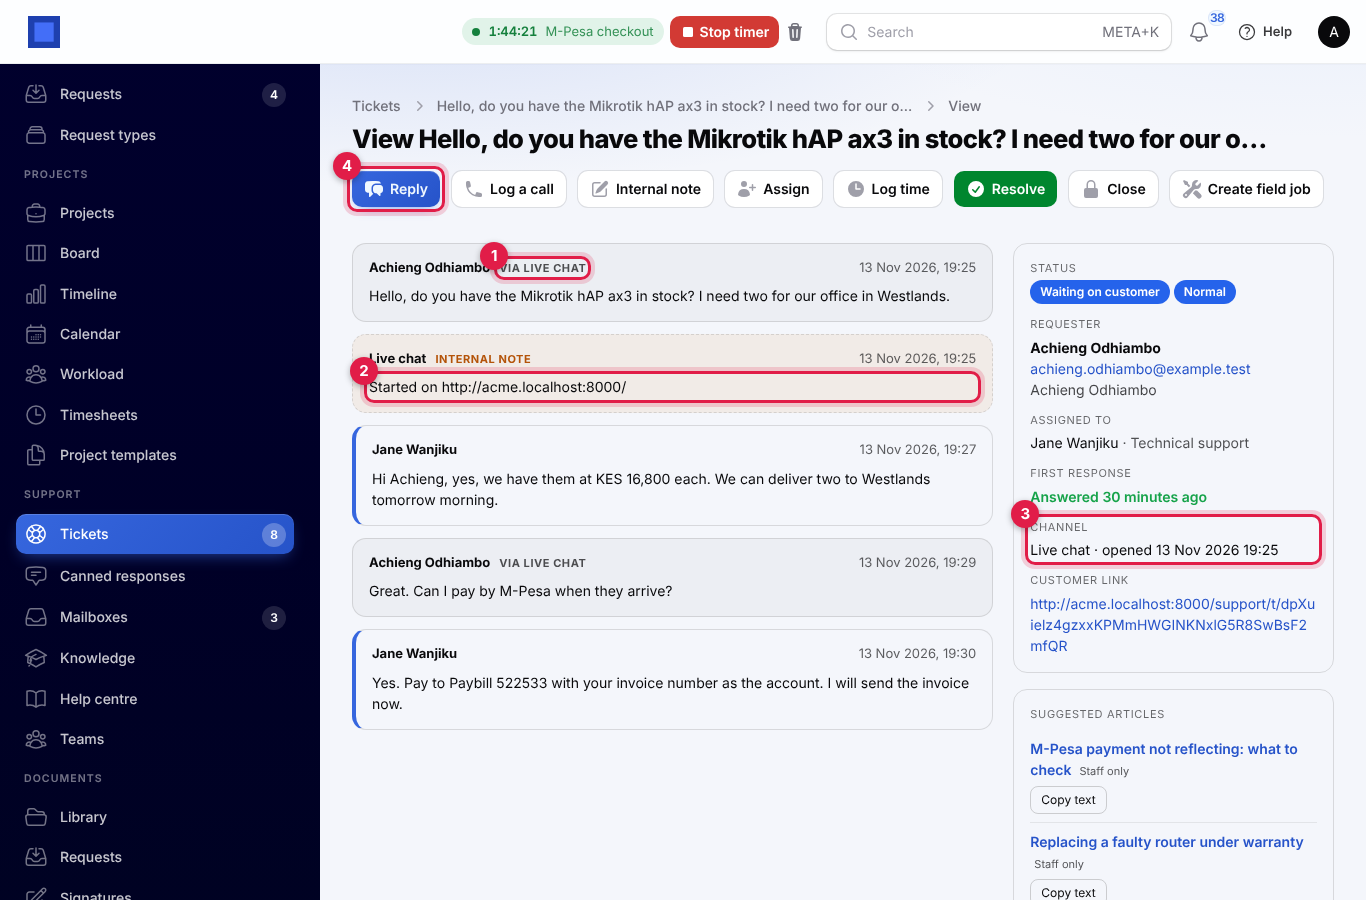
Each new chat is a ticket in Support → Tickets on the Live chat channel, and your team is told as for any new ticket.
- The ticket's subject is the start of the visitor's first message. The requester is the name and email they gave, or Website visitor.
- Messages from the visitor are marked via Live chat (marker 1).
- An internal note says which page the chat was started on (marker 2), and Sent outside live chat hours. when nobody was on hand.
- The Channel shows Live chat (marker 3).
- Press Reply (marker 4) to answer. The reply appears in the visitor's window. Use Internal note, Assign and Resolve as on any ticket.
During staffed hours no acknowledgement email is sent, because the visitor is waiting in the window. When the visitor writes again, the ticket is Open again, even if it was resolved.
Connect Facebook and Instagram
Messenger and Instagram messages come in through your workspace's own Meta app and Facebook Page. The same connection is used by Marketing to publish posts (see Social posts), so you set it up once.
The steps on Meta's websites change from time to time; follow Meta's current help where they differ. What you need from them is:
- A Meta app. At developers.facebook.com, as an admin of the Facebook Page, create an app of type Business. Under App settings → Basic, copy the App secret.
- Your Instagram account linked to the Page. The Instagram account must be a business or creator account connected to the Facebook Page. In the Instagram app, allow access to messages for connected tools.
- A page access token for the Page with the permissions pages_messaging, pages_manage_posts, pages_read_engagement, instagram_manage_messages and instagram_content_publish. A token from a system user in Meta Business Suite does not expire; a token made with your personal account does, and then replies and posts fail until you paste a new one.
- The Page ID and the Instagram account ID. The Page ID is in Meta Business Suite under Settings → Page info, or in the Page's About section. The Instagram account ID is the ID of the Instagram business account linked to the Page.
- A verify token. Make up a phrase, for example acme-meta-2026. You type the same phrase in Meta and in NaliSuite.
Then enter the details in NaliSuite:
- Open Settings → Preferences and click the Facebook and Instagram tab. The tab shows while Helpdesk or Marketing is on.
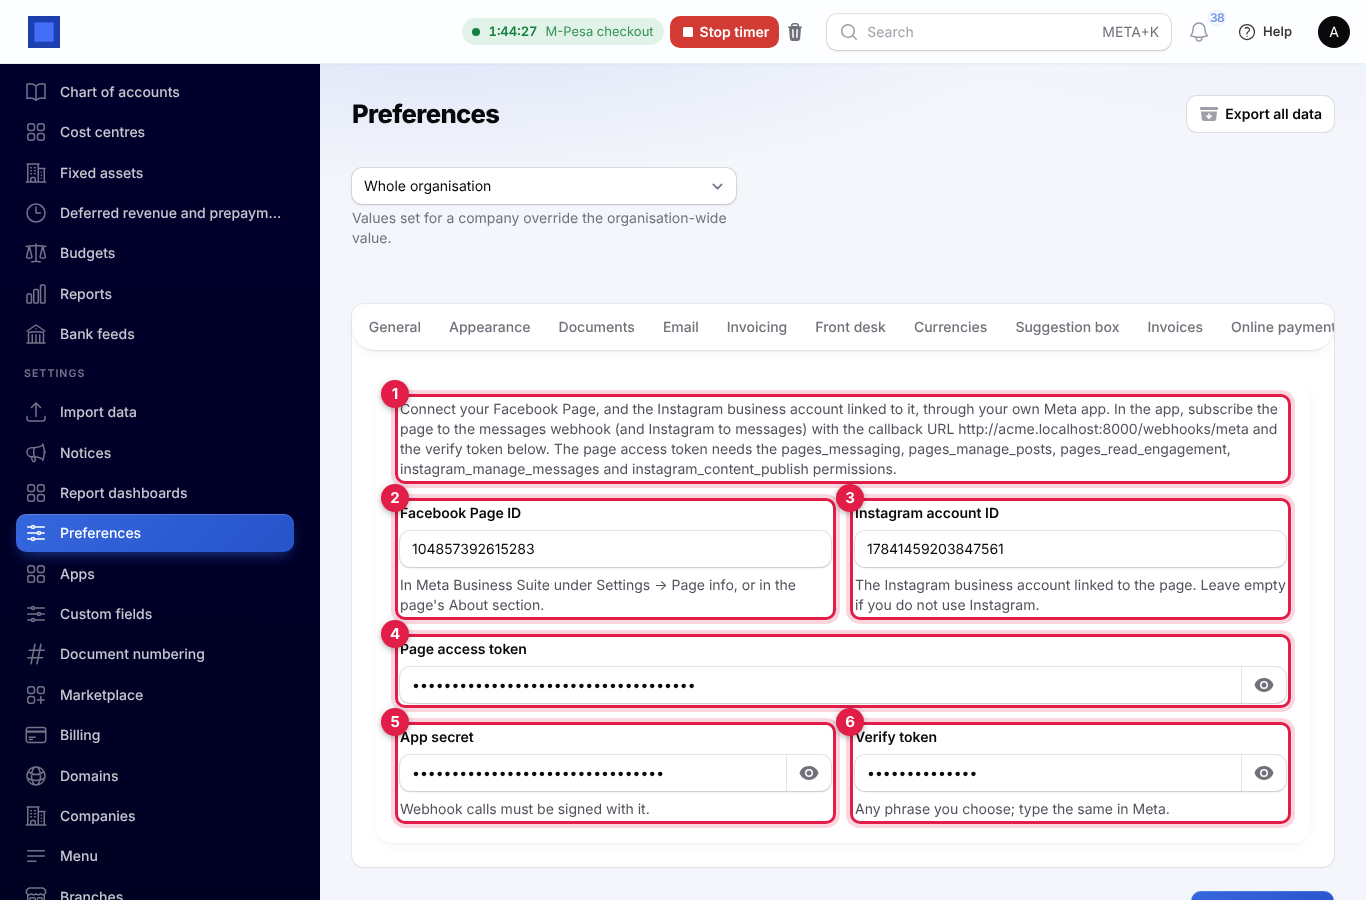
- The text at the top (marker 1) shows your webhook address (your workspace address followed by
/webhooks/meta) and the permissions the token needs. - Fill in the fields and click Save preferences.
| Setting | What to enter |
|---|---|
| Facebook Page ID (marker 2) | The Page's number. |
| Instagram account ID (marker 3) | The Instagram business account linked to the Page. Leave empty if you do not use Instagram. |
| Page access token (marker 4) | The Page token with the permissions above. |
| App secret (marker 5) | From your Meta app. Every message Meta sends must be signed with it; anything unsigned is refused. |
| Verify token (marker 6) | Your phrase. Type exactly the same in Meta. |
The token, secret and verify token are stored encrypted; click the eye to check one.
Finally, point Meta's webhook at NaliSuite. Save the details above first: Meta checks the address straight away, and NaliSuite only answers while Helpdesk is on and the verify token matches.
- In your Meta app, add Messenger (and Instagram), open its webhook settings and enter your webhook address as the Callback URL and your phrase as the Verify token. Click Verify and save.
- Subscribe your Page to the messages field, and Instagram to messages as well.
- While your app is in development mode, Meta only sends messages from people with a role on the app. Switch the app to Live before customers write.
Turn on Messenger and Instagram tickets
- Open Settings → Preferences and click the Helpdesk tab.
- Under Facebook Messenger and Instagram, switch on Turn Messenger messages into tickets (marker 2 in the Helpdesk screenshot above), Turn Instagram direct messages into tickets (marker 3), or both.
- Click Save preferences.
The Messenger and Instagram webhook line under Where to point things (marker 4) shows the same webhook address as the Facebook and Instagram tab.
Messenger needs the Facebook Page ID and Page access token; Instagram also needs the Instagram account ID. Messages that arrive while a channel is switched off are not kept.
Messenger and Instagram tickets
When someone messages your Page or your Instagram account:
- If they already have a ticket on that channel that is not resolved or closed, the message is added to it. Otherwise a new ticket opens on the Messenger or Instagram channel.
- The requester is their name on Facebook, or their username on Instagram. If Meta does not share it, it shows as, for example, Messenger user 0385.
- Pictures and files they send are shown as a line such as [Image sent on Instagram] with a link.
- If Email the requester when a ticket is opened is on, they get a short reply on the same channel: for example "Thanks Wanjiku, we have logged your message as TKT-00010 and will reply here within 24 hours."
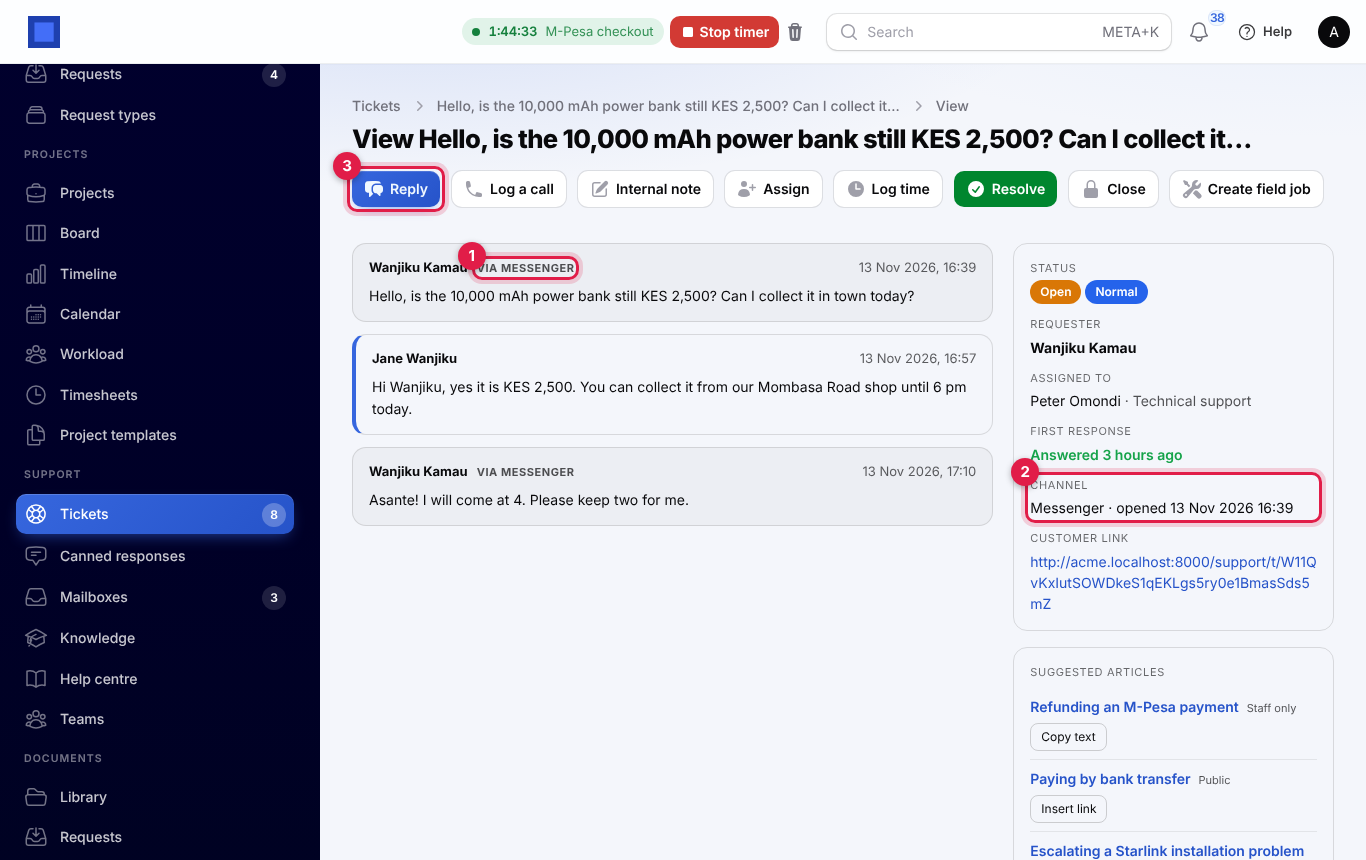
On the ticket, their messages are marked via Messenger or via Instagram (marker 1) and the Channel shows it (marker 2). Press Reply (marker 3): your answer goes back to them in Messenger or Instagram, and you see "Reply sent on Messenger" or "Reply sent on Instagram". No email is sent.
The 24-hour reply window
Meta only lets a business reply within 24 hours of the customer's last message. After that, a normal reply is not delivered.
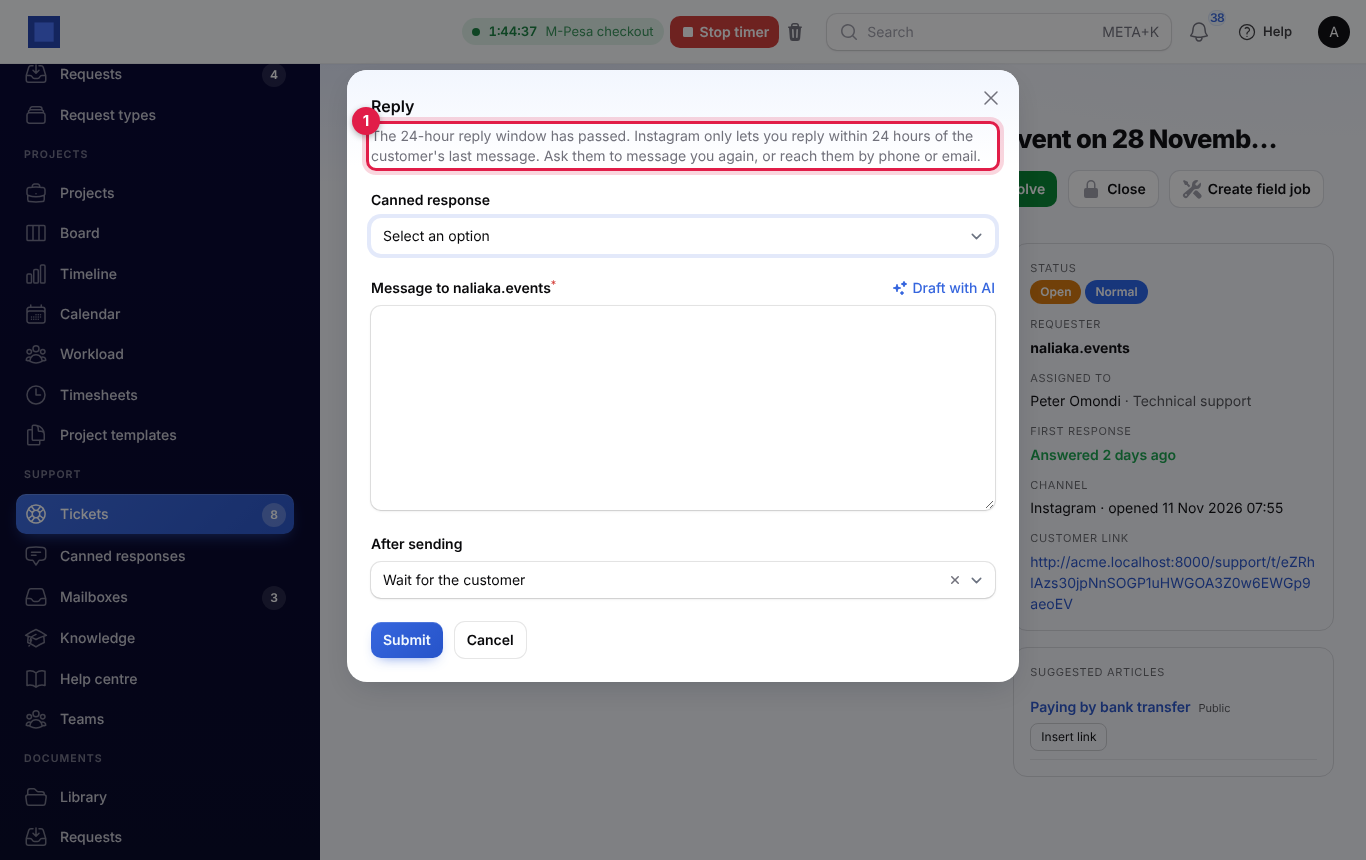
- When the window has passed, the Reply window says so at the top (marker 1): "The 24-hour reply window has passed. Instagram only lets you reply within 24 hours of the customer's last message. Ask them to message you again, or reach them by phone or email."
- If you send it anyway, the reply is not sent and not saved, and you see the same message.
- As soon as the customer writes again, the window opens for another 24 hours.
Internal notes, assigning and resolving work at any time.
Good to know
What if Helpdesk or live chat is switched off? The bubble disappears from your website, the code on other sites stops showing it, and Meta's messages are no longer accepted. Messages sent to your Page meanwhile stay in Meta Business Suite; they are not brought in later.
How is spam kept out of the chat? The chat has a hidden field that people never see but robots fill in, and limits on how often one address can start chats (five a minute) and send messages (twenty a minute).
Can a visitor see our internal notes? No. The chat window only shows the visitor's messages and your replies.
Do I need the Facebook lead ads settings too? No. Lead ads have their own settings tab and app details. See Facebook and Instagram lead ads.
Why does a reply say Messenger is not connected? The Facebook Page ID or Page access token is empty, or for Instagram the Instagram account ID. Fill them in on the Facebook and Instagram tab.
Why did a reply fail with "Facebook said: …"? Meta refused it, often because the page access token expired or lacks a permission. Make a new token and paste it on the Facebook and Instagram tab.