Point of sale
The point of sale (POS) is the till for counter sales: shops, pharmacies, hardware stores, cafés and restaurants. Cashiers open a session with a cash float, tap or scan products, take payment in cash, card, M-Pesa, on the customer's account or with loyalty points, print or send a receipt, and close the session with a cash count. Every sale takes stock out of the register's warehouse and, with Accounting on, posts the takings to the ledger. Everything is in the Point of Sale group of the sidebar: Sell, Kitchen, Tables, Till reports, Sales history, Loyalty points, Sessions and Registers.
Note: Permissions: pos.sell to use the till, pos.view to see sales history, sessions and reports, pos.refund for refunds and exchanges, and pos.manage to set up registers, tables and loyalty adjustments. Give cashiers pos.sell and, if they may refund, pos.refund. Set these under Settings → Roles.
Before you start
- Products. Only active products that Can be sold and are not subscriptions appear on the till. Give each a Sale price, a Sales tax, a Category (categories become filter buttons on the till) and ideally a Barcode and a Picture. See Products and pricing.
- A register. One called Main till is created automatically the first time you open Sell. Add more for each counter (next section).
- Preferences. Decide on tax-inclusive prices, receipt printing, restaurant mode and loyalty under Settings → Preferences → Point of Sale (see Point of sale settings).
- Payments. For M-Pesa prompts, set up the Daraja (M-Pesa) details under Settings → Preferences → Online payments. For SMS receipts, set up an SMS gateway under Preferences → Marketing. For WhatsApp receipts through the API, connect WhatsApp under Preferences → Helpdesk.
Set up registers
A register is one till: a counter, a branch or a tablet. Each register has its own sessions and can sell from its own warehouse.
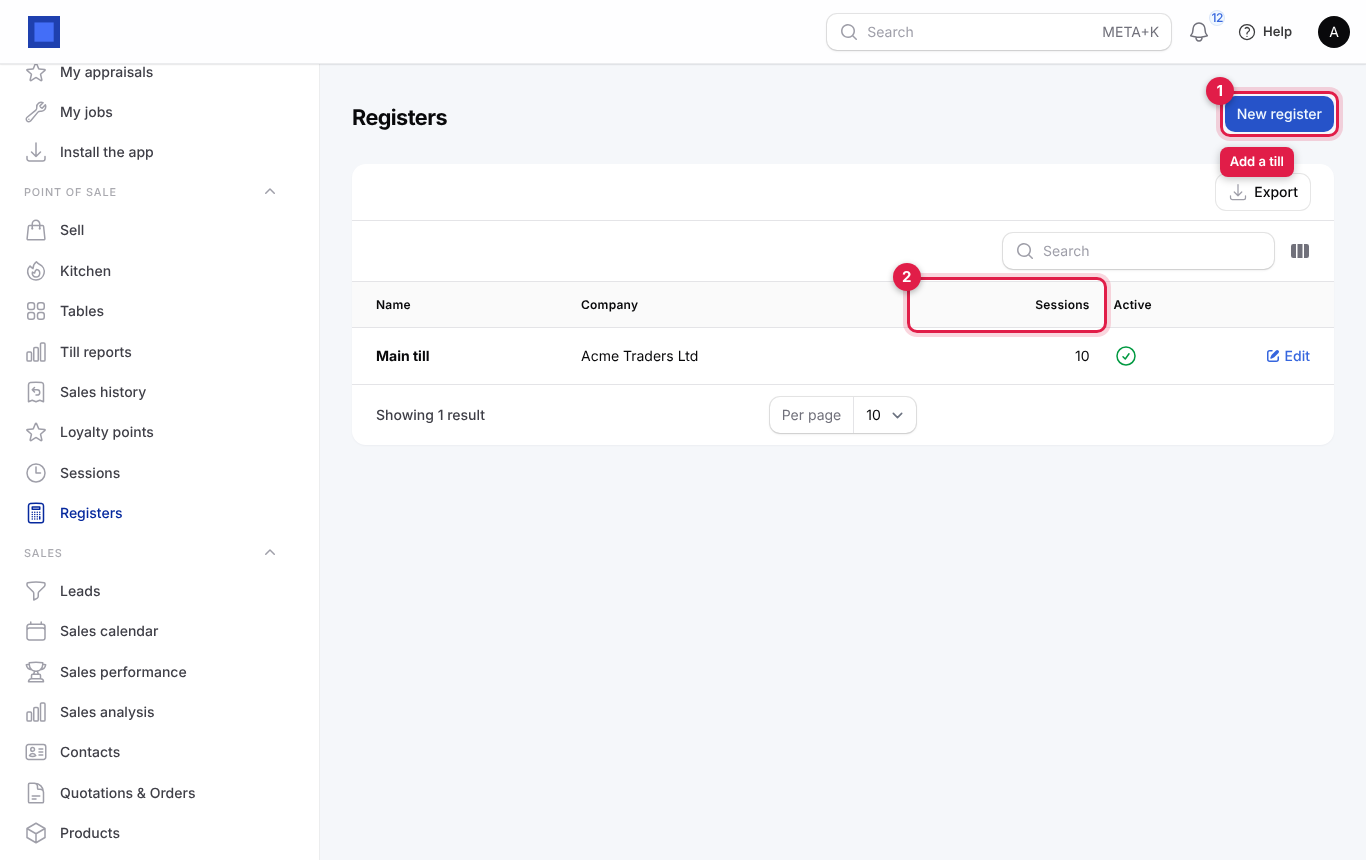
- In the menu, open Point of Sale → Registers.
- Click New register (marker 1). The Sessions column (marker 2) counts how many shifts have been run on each register.
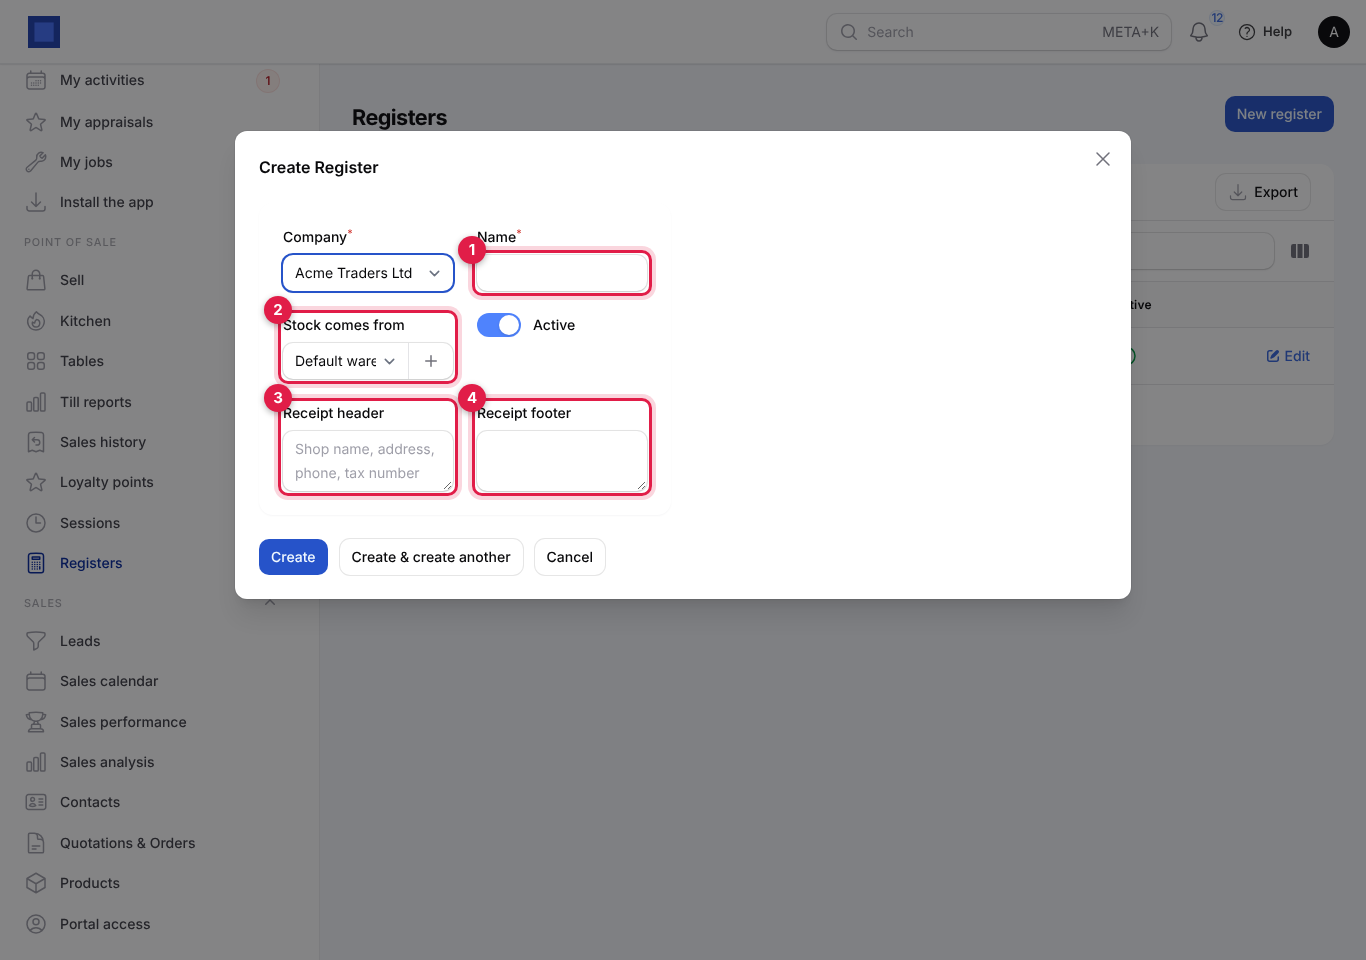
- Fill in the form and click Create.
| Field | What to enter |
|---|---|
| Company | Required. The company whose sales, tax and stock this till records. |
| Branch | Shown only when you have branches. Links the till to a branch for reporting. |
| Name | Required (marker 1). What cashiers pick when they open a session, for example "Counter 1" or "Westlands till". |
| Stock comes from | Optional (marker 2). The warehouse this till sells from. Leave on Default warehouse to use the company's default. A shop with its own stock room should have its own warehouse here. |
| Active | Turn off to retire a till; it disappears from the session choices but keeps its history. |
| Receipt header | Optional (marker 3). Printed at the top of every receipt: shop name, address, phone, KRA PIN or other tax number. |
| Receipt footer | Optional (marker 4). Printed at the bottom of this till's receipts, for example a returns policy or Paybill number. If empty, the footer from Preferences is used. |
Click Edit on a register to change it later.
Open a session
A session is one cashier's shift on one register. You must open one before selling, and only one session can be open on a register at a time.
- In the menu, open Point of Sale → Sell. The till fills the screen.
- If you have no open session, the Open a session box appears. Choose the Register and enter the Opening cash (the float you put in the drawer, for example 2,000).
- Click Start selling.
If another cashier already has that register open you see "Register name already has an open session." Ask them to close it, or use another register.
Tip: If the box says There is nothing to sell yet., click Add your first product and add products first.
Sell on the till
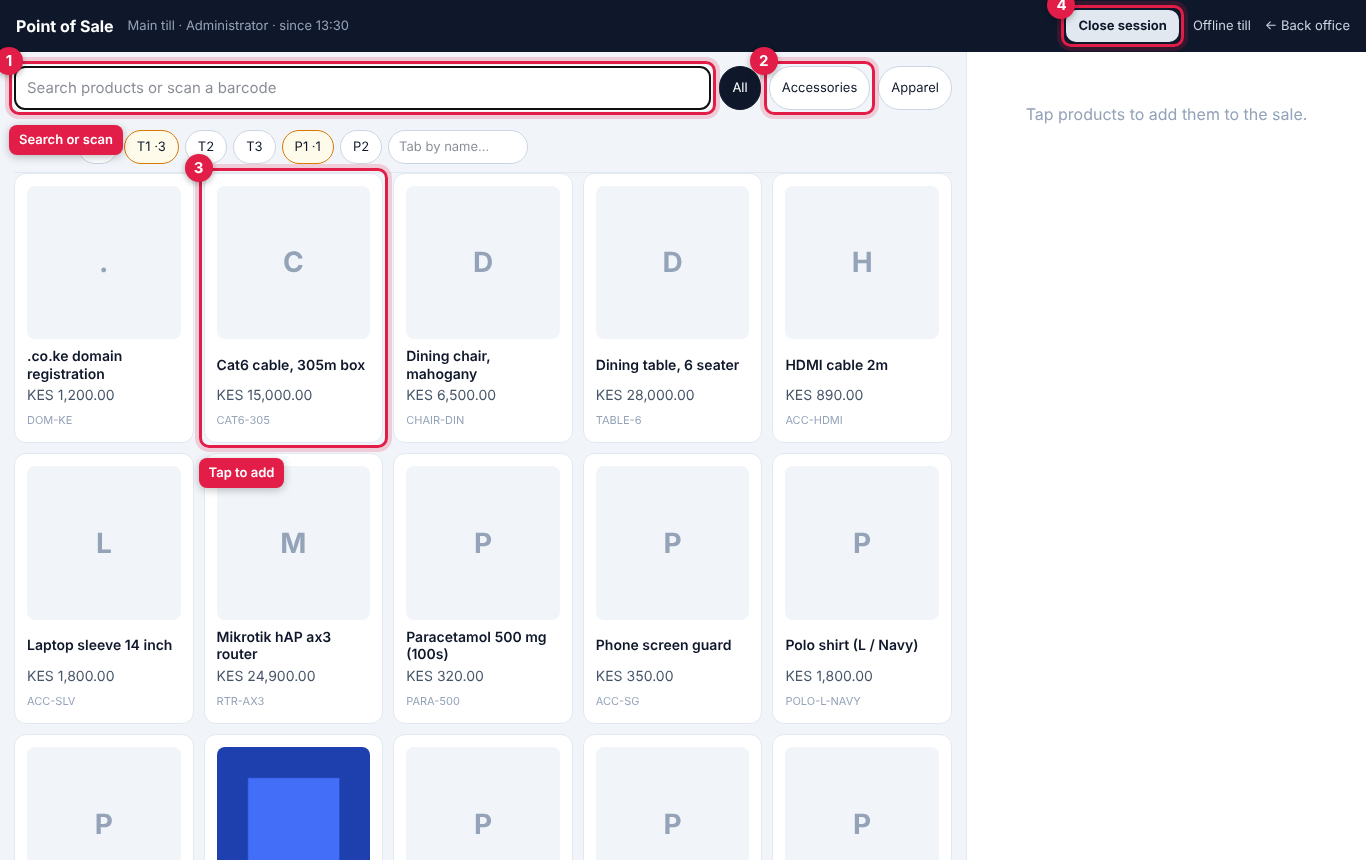
The till has the catalogue on the left and the sale (the cart) on the right. The top bar shows the register and the cashier with the time the session opened. Click the cashier's name for Offline till, Back office and Close session.
- Find the product:
- Search or scan (marker 1): type part of a name, SKU or barcode. As you type, a list drops down under the box with up to eight matching products (picture, name, barcode and SKU with the typed part highlighted, and price), exact codes first; the tiles below filter at the same time. Click a product in the list to add it, or use ↑ and ↓ to choose one and press Enter. If only one product matches, Enter adds it. Esc closes the list. You do not need to type the whole barcode: "20000" finds 2000000000015.
- Barcode scanner: with a USB or Bluetooth scanner, just scan into the search box: an exact barcode or SKU match goes straight into the sale and the box clears. The till beeps when the item goes in, and buzzes when the code matches nothing (see Beep when an item is added under Point of sale settings).
- 📷 Scan: uses the device camera to read barcodes and QR codes. Point the camera at the code; click Close when done. It works in any modern browser with a camera, Windows PCs included (the first scan on Windows, Firefox or Safari takes a moment while the reader loads). A USB or Bluetooth scanner also works in the search box everywhere.
- Categories (marker 2): on a wide screen they are listed down the left with the number of products in each; on a smaller screen they are buttons above the tiles. All products shows everything.
- Tap anywhere on a product tile (marker 3) to add one to the sale. Tap again to add another. The five best sellers of the last 30 days are marked Popular. Tiles show the product's description when the catalogue is small (40 products or fewer); change this under Settings → Preferences → Point of Sale → Product descriptions on the till (Always or Never).
- Repeat for each item.
Then check the sale on the right:
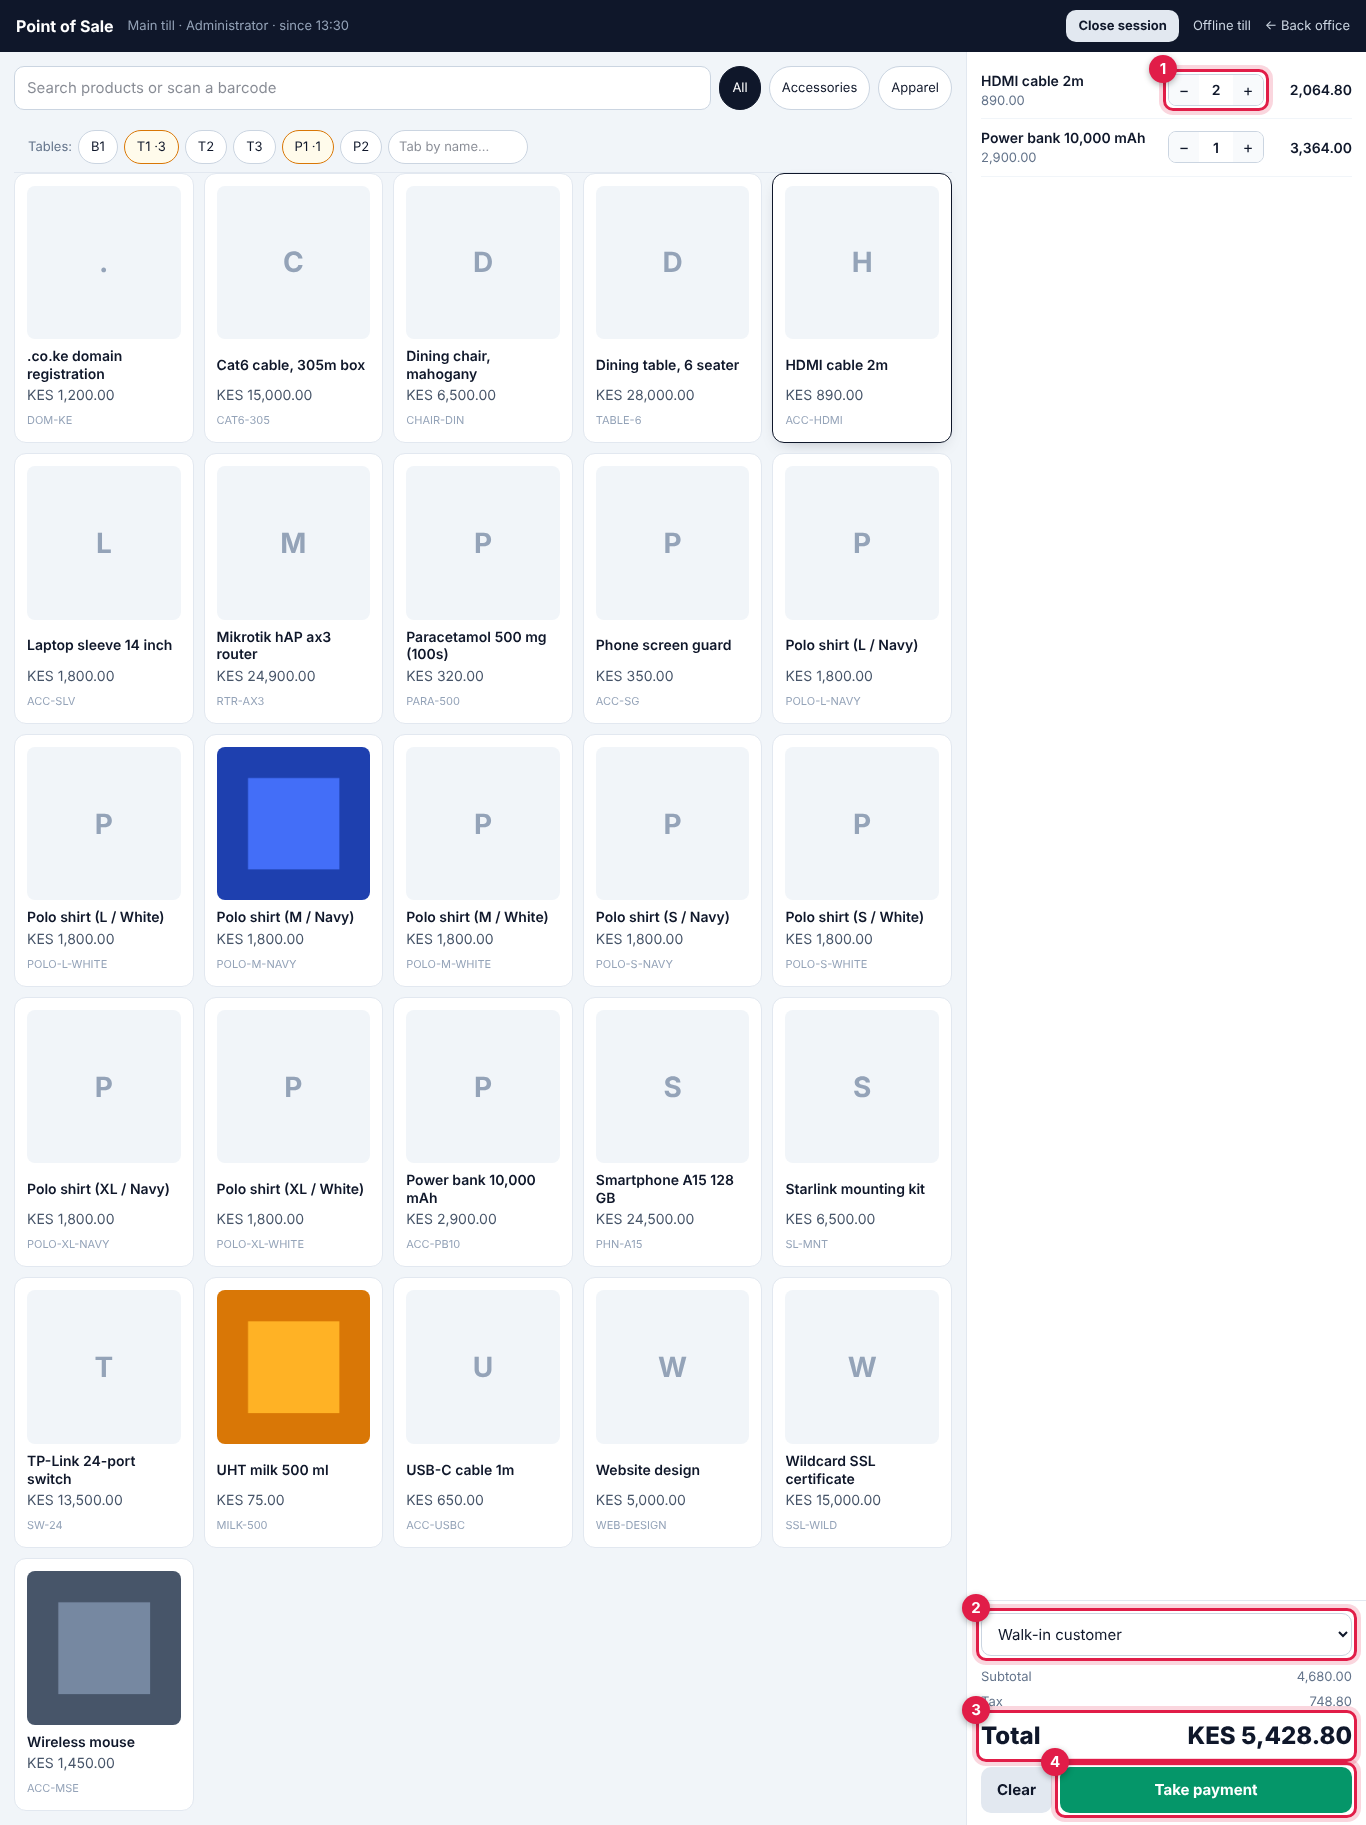
- The sale lists each item with its quantity, price and total. Use − and + (marker 1) to change a quantity, and × to remove a line. Going below 1 also removes the line. A product already in the sale shows its quantity on its tile.
- Click the customer card at the top of the sale (marker 2), or leave Walk-in customer. In the Customer window, search by name, phone or email and click the customer, or type a Name and Phone under Add a new customer and click Add and use this customer: the customer is saved for the till's company and put on the sale straight away. Choosing a customer:
- applies their price list and any promotions, so prices and discounts change on every line (a discount shows as "-10%" under the price);
- lets them pay On account and earn or spend loyalty points;
- links the sale to them for reports.
- Check Subtotal, Tax and Total (marker 3). When every line has the same tax rate, the rate is shown, for example Tax (16%). With Shelf prices include tax on, tax is worked out of the shelf price; otherwise it is added on top.
- Click the green Take payment button (marker 4), which shows the total. Clear at the top of the sale empties it. Under the button, Print last receipt reprints the session's last sale, and More actions has Choose customer, View last sale, Offline till and Clear sale.
Note: Discounts on the till come from price lists and promotions set up under Settings → Price lists and Settings → Promotions. There is no free-typed discount at the till, which protects your margins.
Take payment
The Payment window opens with one Cash line for the full total and the amount due at the top.
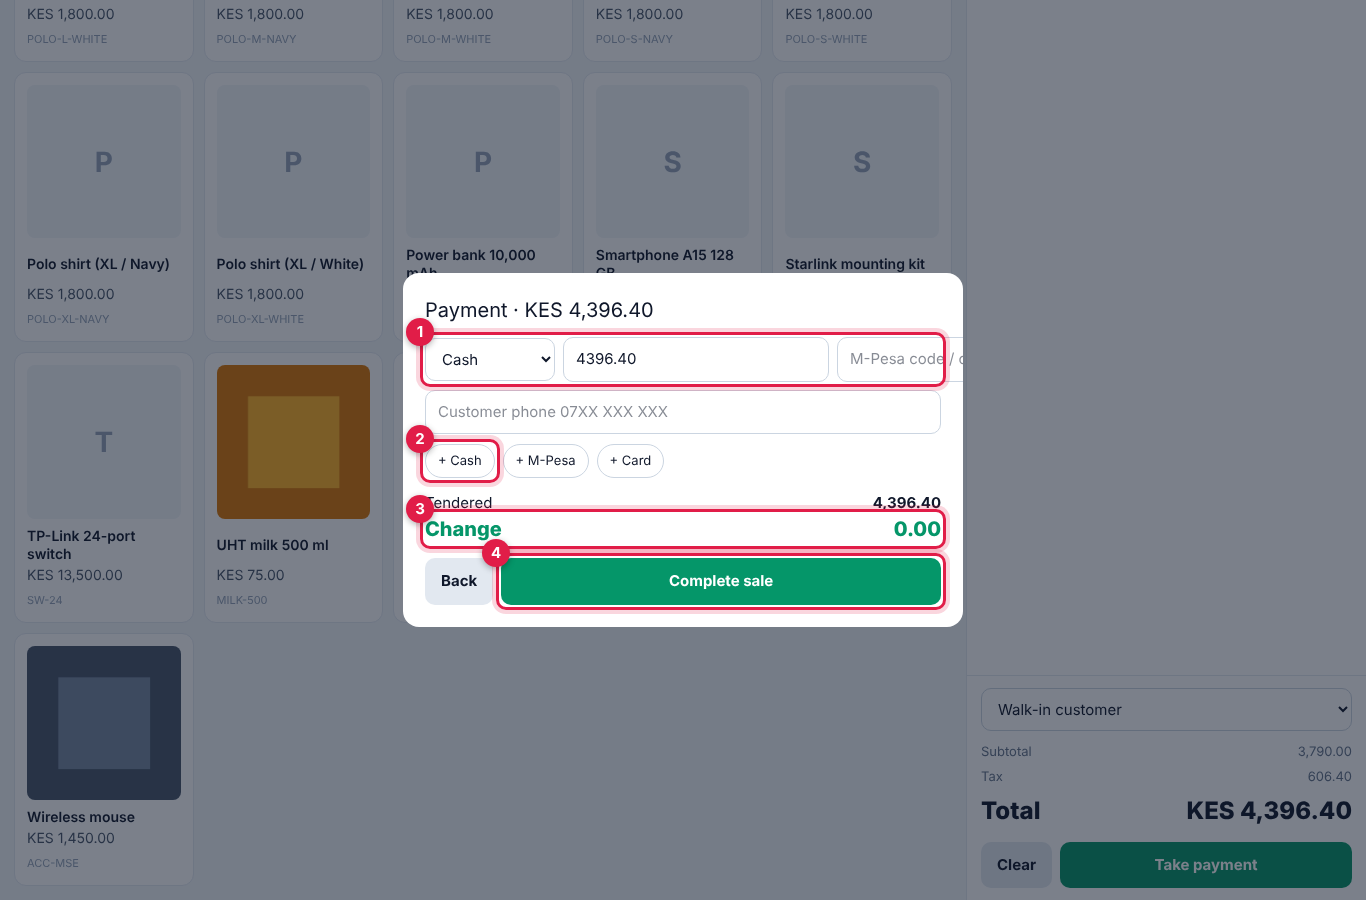
- Check the payment line (marker 1): tap Cash, M-Pesa or Card to choose the method, then check the Amount and an optional reference (the M-Pesa code or card slip number). For cash, tap a quick amount (Exact, or the next round note such as 4,400 or 4,500) or type what the customer handed over, for example 5,000 for a 4,396.40 sale.
- To split the payment, click + Cash, + M-Pesa or + Card (marker 2). Each adds a line for whatever is still owed. Remove a line with ×.
- Tendered shows what has been entered, and Change (marker 3) what to give back, or Still to pay while the payments are short.
- Click Complete sale (marker 4). ← Back to sale returns to the sale without selling.
Rules the till checks:
- The payments must cover the total, or you see "Payments (…) do not cover the total (…)".
- Change can only be given from cash ("Change can only be given from cash.").
- A sale on account must be put on the account in full.
Payment methods
| Method | When to use it | What happens |
|---|---|---|
| Cash | Notes and coins | Counted in the drawer; change comes out of it. |
| M-Pesa / mobile money | M-Pesa, Airtel Money | Enter the M-Pesa code as the reference, or send a prompt (below). Posted to the mobile money account. |
| Card | Card machine (PDQ) | Enter the slip or approval number as the reference. Posted to the bank account. |
| Customer account | Trusted customers who pay later | Shown as 📒 On account once a customer is chosen. The sale becomes an issued invoice to the customer, so it appears in their statement, reminders and the portal. Needs the Invoicing module. |
| Loyalty points | Customers with enough points | Shown as ★ Use points (up to …). |
| Exchange credit | Used automatically in exchanges | Not chosen by hand. |
Send an M-Pesa prompt (STK push)
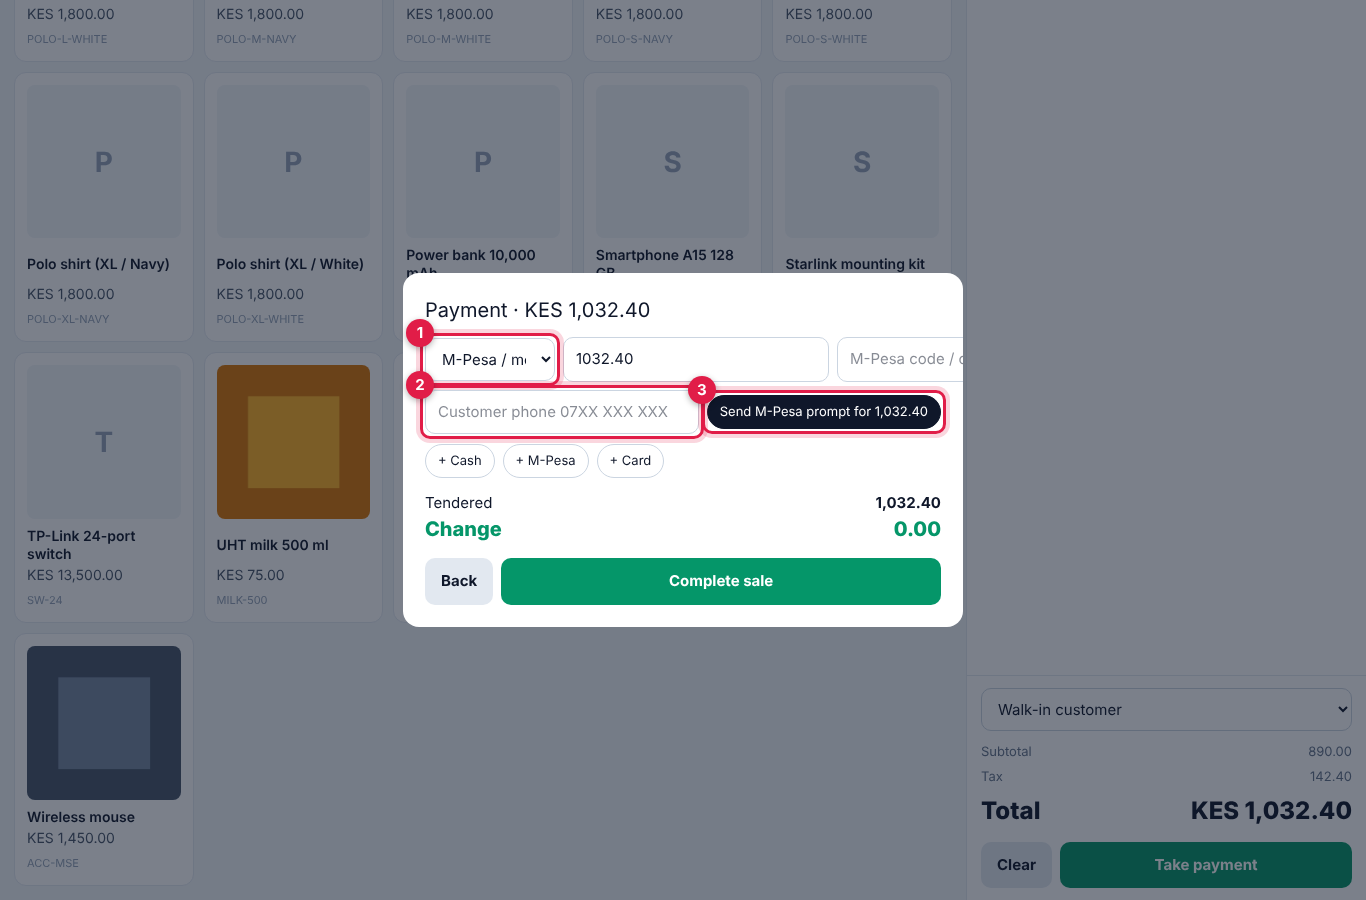
When M-Pesa can be prompted for the company, an M-Pesa payment line shows a phone box and a Send M-Pesa prompt button. The prompt goes through your own Daraja (M-Pesa) details, or, if those are not set up, through Paystack, which sends the same M-Pesa PIN prompt in Kenya.
- Tap M-Pesa on the payment line, or click + M-Pesa (marker 1).
- Check the customer's number in Customer phone 07XX XXX XXX (marker 2). It is filled in from the customer on the sale when they have a phone number.
- Click Send M-Pesa prompt (marker 3). The customer's phone shows the M-Pesa PIN prompt.
- The window shows "Prompt sent to … Waiting for the customer to enter their PIN…" and checks every few seconds. When paid you see "Paid: M-Pesa receipt …" and the receipt code is filled in. If the customer cancels, you see "M-Pesa payment failed: …"; send again or take another method.
- Click Complete sale.
If there is no prompt button, the M-Pesa line says so: add the Daraja (M-Pesa) or Paystack details under Settings → Preferences → Online payments, or type the M-Pesa code from the customer's message as the reference.
Choose who sends the prompt, or take a card with Paystack
When both your Daraja (M-Pesa) details and Paystack are set up, the M-Pesa line shows Send the prompt through with both: pick Paystack to send the M-Pesa prompt through Paystack instead.
On a Card line, with Paystack set up, Pay by card on the customer's phone (Paystack) shows a QR code. The customer scans it with their phone camera and pays by card, bank or mobile money on Paystack's page; the till waits, fills in the Paystack reference by itself, and you click Complete sale. Cancel closes the code if the customer pays another way.
Customer account and loyalty points
Choose the customer before Take payment. The Payment window then shows their points.
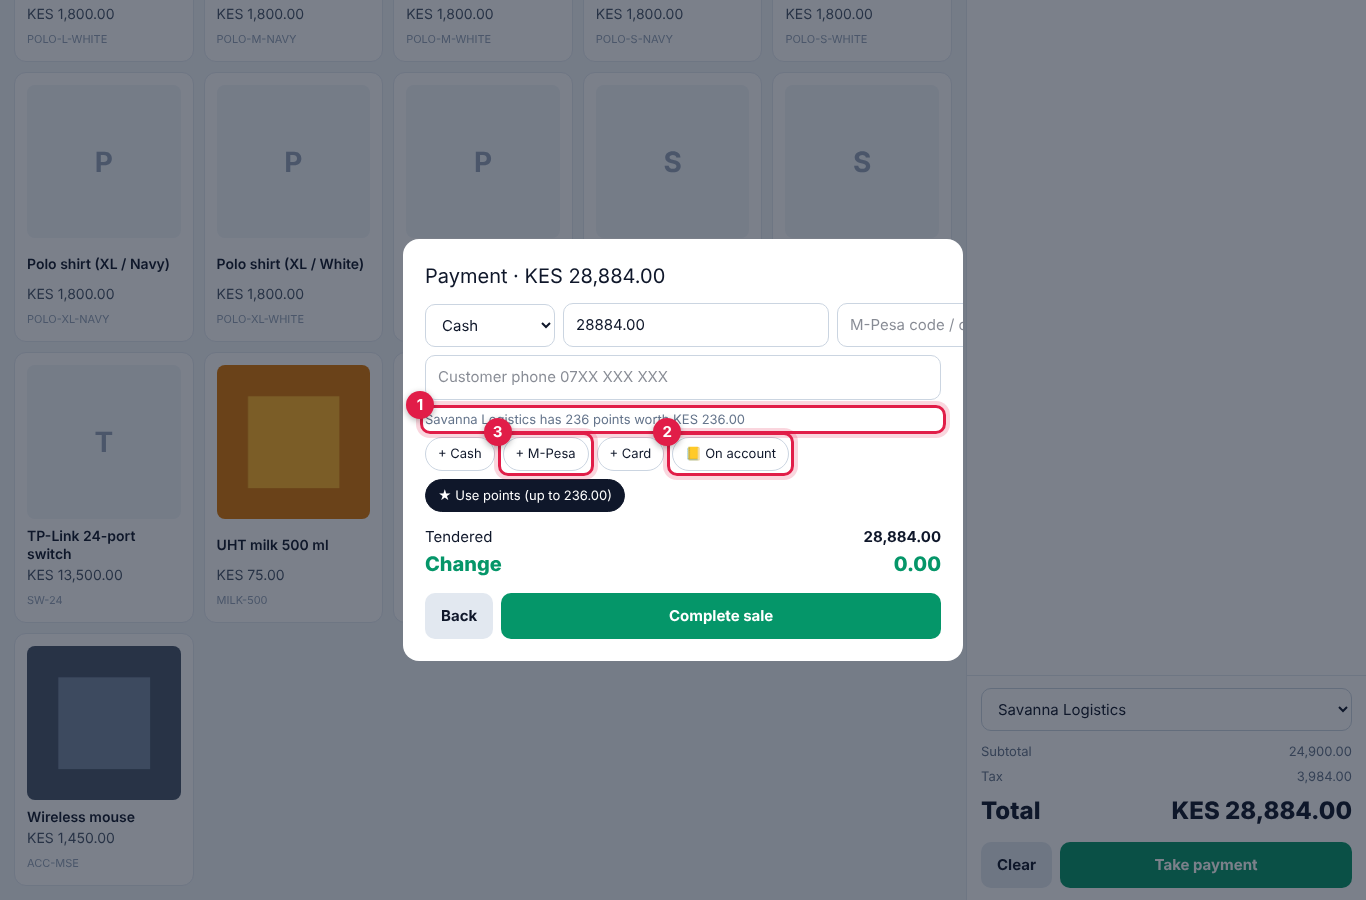
- The line (marker 1) says, for example, "Savanna Logistics has 236 points worth KES 236.00", or "needs 100 to redeem" if they have too few.
- 📒 On account (marker 2) puts the whole sale on their account as an invoice.
- ★ Use points (up to …) pays as much as the points cover; the other payment lines shrink to match.
- Points are earned on every sale to a named customer (the amount paid after points, divided by Spend per point). Refunds take earned points back and return spent points.
After the sale: receipts
When the sale completes, the right side shows Sale complete, the total, the receipt number (for example R-2026-000009), the change, and points used and earned.
| Button | What it does |
|---|---|
| Print receipt | Opens the receipt in a small window ready to print on an 80 mm or 58 mm printer. With Open the receipt for printing after each sale on, it opens by itself. |
| 🖨 Thermal print | Shown when a Thermal printer agent URL is set. Sends the receipt straight to the thermal printer through the agent. If it fails you see "Printer agent not reachable". |
| 🖨 ESC/POS | Shown when no agent is set. Downloads the receipt as ESC/POS printer bytes. |
| ✉ SMS receipt | Type the customer's phone (Customer phone +2547…) and click to send a short text receipt through your SMS gateway. |
| 💬 WhatsApp receipt | Sends it on WhatsApp through the Cloud API if Helpdesk has WhatsApp set up; otherwise opens WhatsApp on the device with the message ready to send. |
| New sale | Clears the screen for the next customer. Tapping a product does the same. |
| Made a mistake? Refund this sale | Shown to people allowed to refund. Takes back the whole sale just made, the money the way it was paid and the goods back into stock, after you confirm. For part of a sale, use Refund in Sales history (below). |
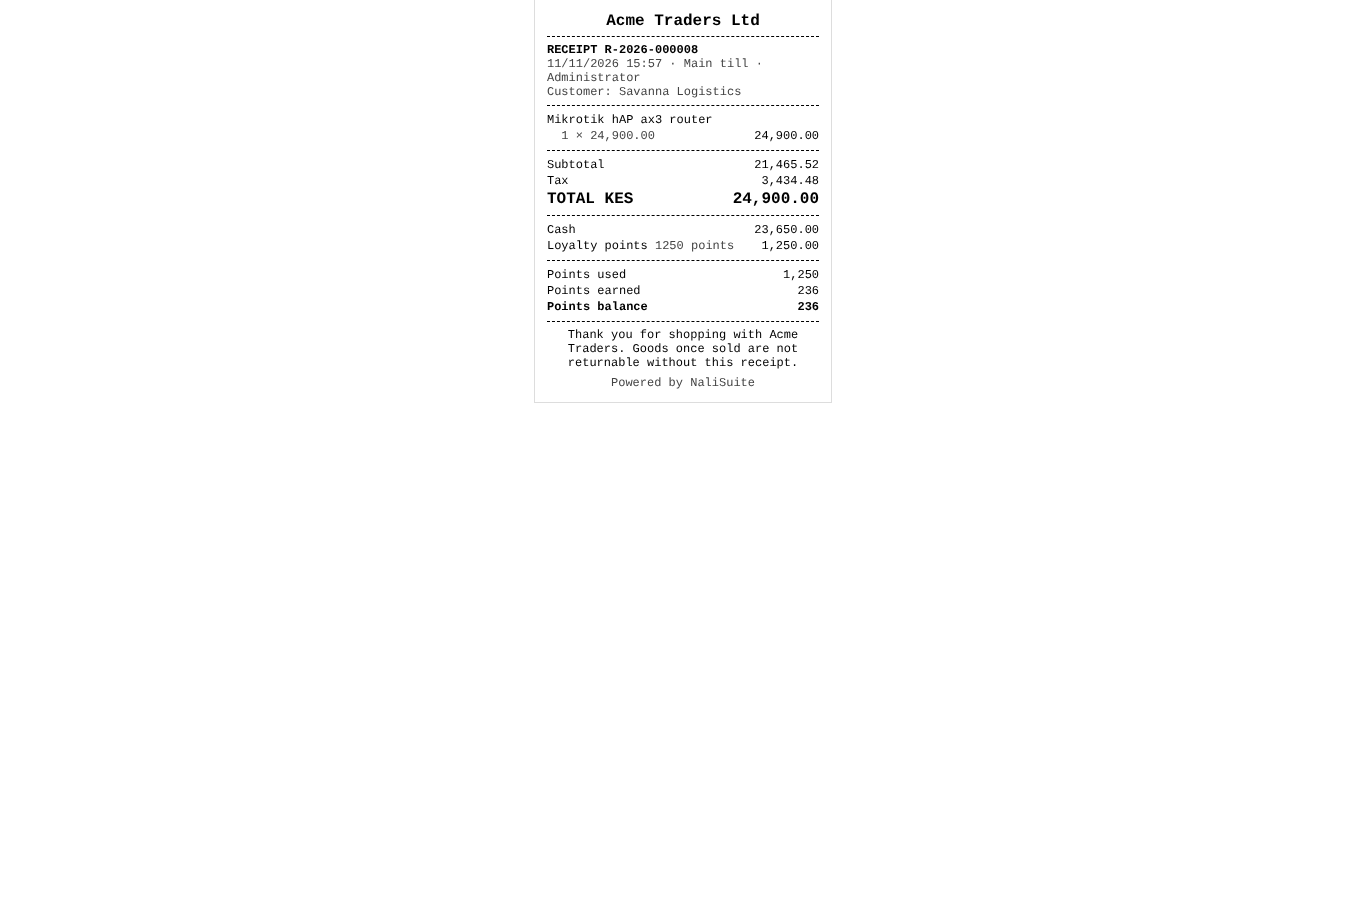
A printed receipt looks like this. It shows the receipt header, the receipt number, date, register and cashier, the customer, each line, subtotal, tax, total, how it was paid, change, loyalty points used, earned and the balance, and the footer.
Restaurants: tables, tabs, the kitchen and split bills
Turn on Restaurant mode under Settings → Preferences → Point of Sale. Then set up tables:
- In the menu, open Point of Sale → Tables and click New table (marker 1).
- Enter the Name (for example T1, Bar 3, Terrace 2), the Area (Indoors, Terrace, Bar), the number of Seats, and leave Active on. Click Create.
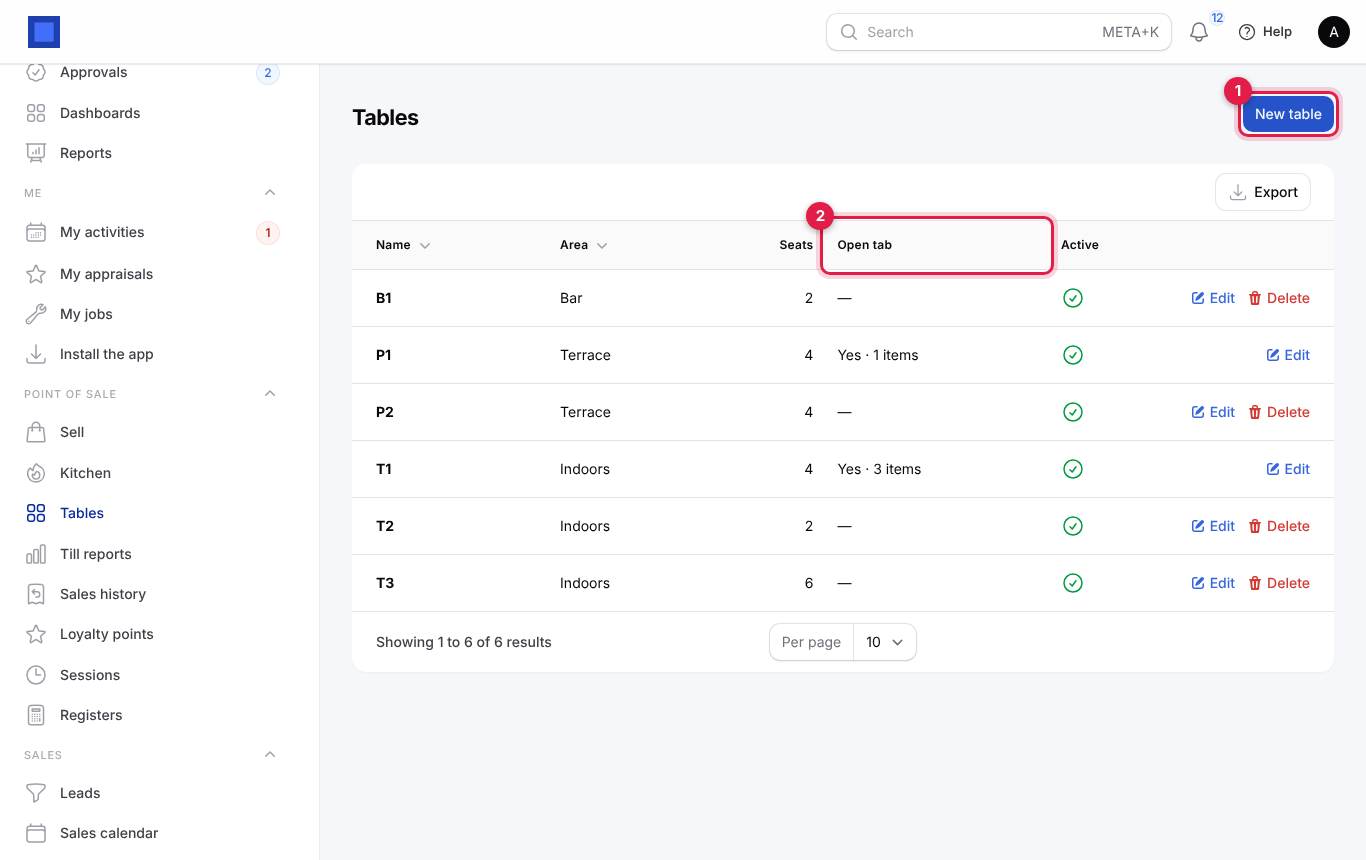
The Open tab column (marker 2) shows which tables are seated and how many items are on their tab. A table with an open tab cannot be deleted.
On the till, a Tables row appears above the products:
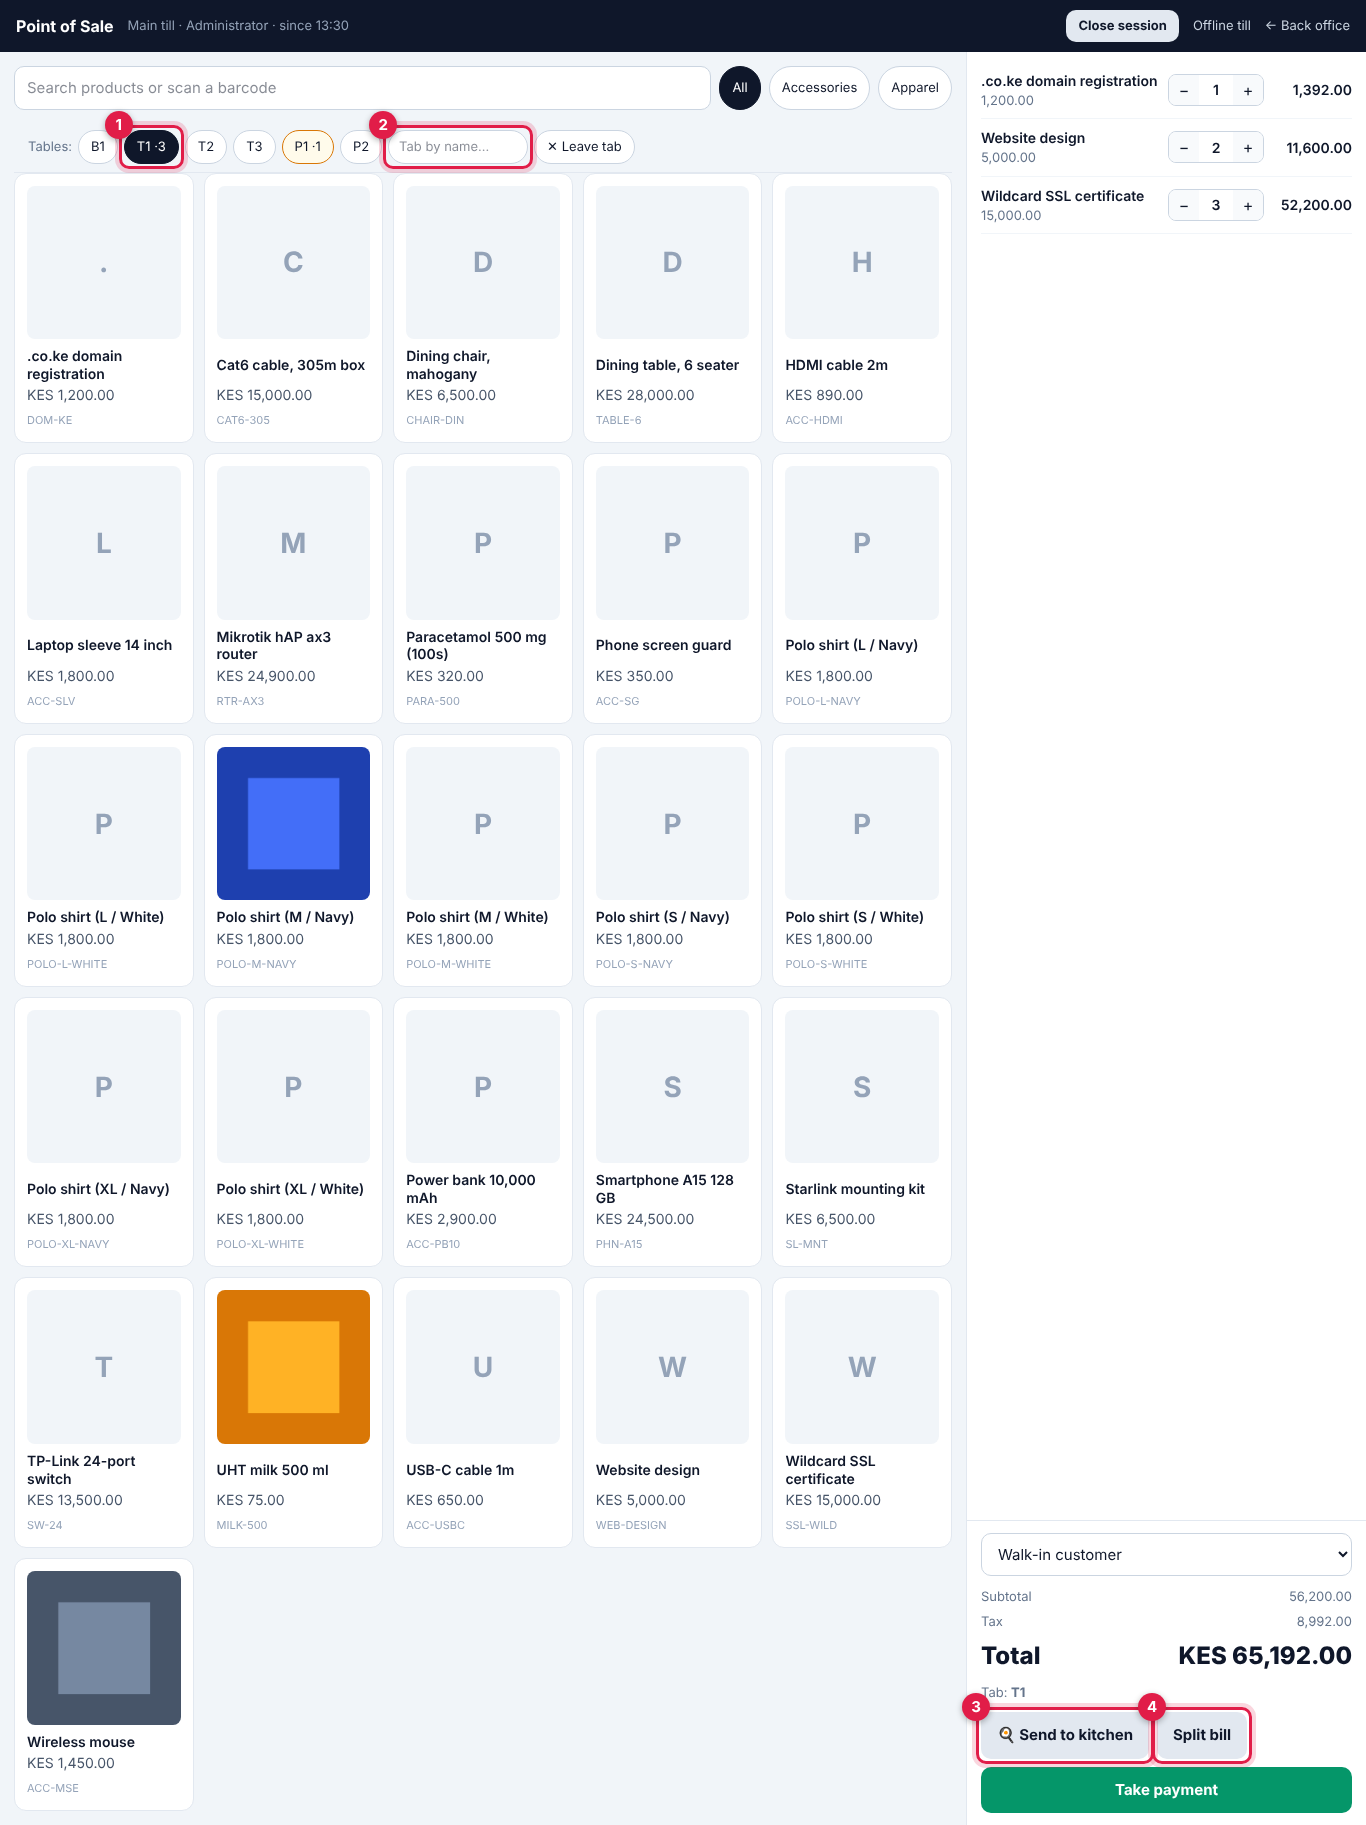
- Tap a table (marker 1) to open its tab. Tables with an open tab are amber and show the item count, for example T1 ·3. To start a tab without a table (a bar customer or a takeaway), type a name in Tab by name… (marker 2) and press Enter.
- Add items as usual. They are saved on the tab.
- Click 🍳 Send to kitchen (marker 3). New items go to the kitchen display; the till shows "n item(s) sent to the kitchen".
- Tap another table to serve it; the first tab is kept. ✕ Leave tab puts the tab aside.
- When the guests want the bill, open the tab and click Take payment to pay all of it, or Split bill (marker 4), tick the items this guest is paying for and click Take payment. Repeat for each guest. Pay all cancels the split.
The kitchen display
Open Point of Sale → Kitchen on a screen or tablet in the kitchen. It refreshes every 10 seconds and shows one card per table or tab with the time the first item was sent.
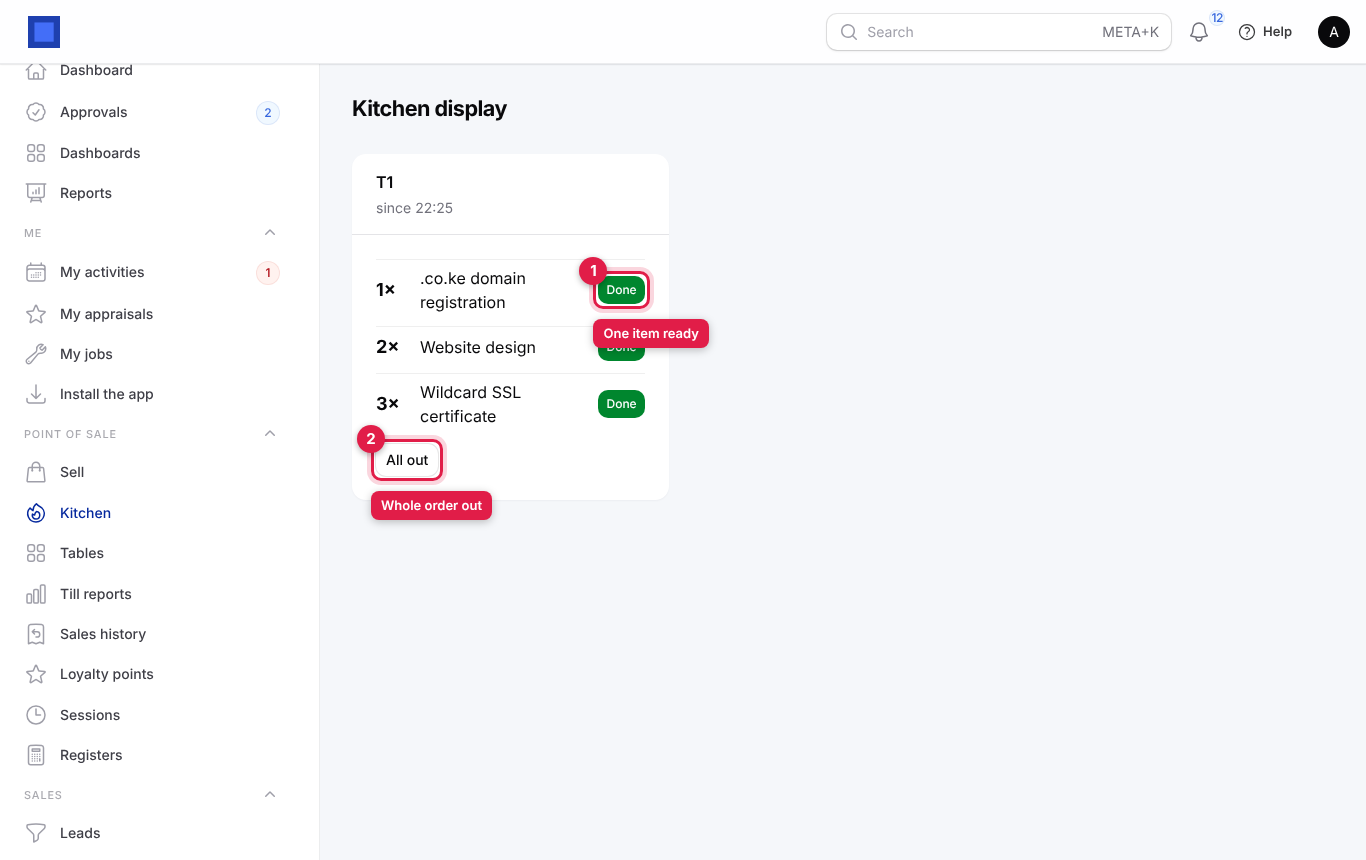
- Done (marker 1) marks one item as ready.
- All out (marker 2) clears the whole card.
Refunds and exchanges
Find the sale in Point of Sale → Sales history. Each sale shows the receipt number, time, register, cashier, customer, items, how it was paid, the total and a status: Paid, Partially refunded, Refunded, or Refund for a refund receipt itself.
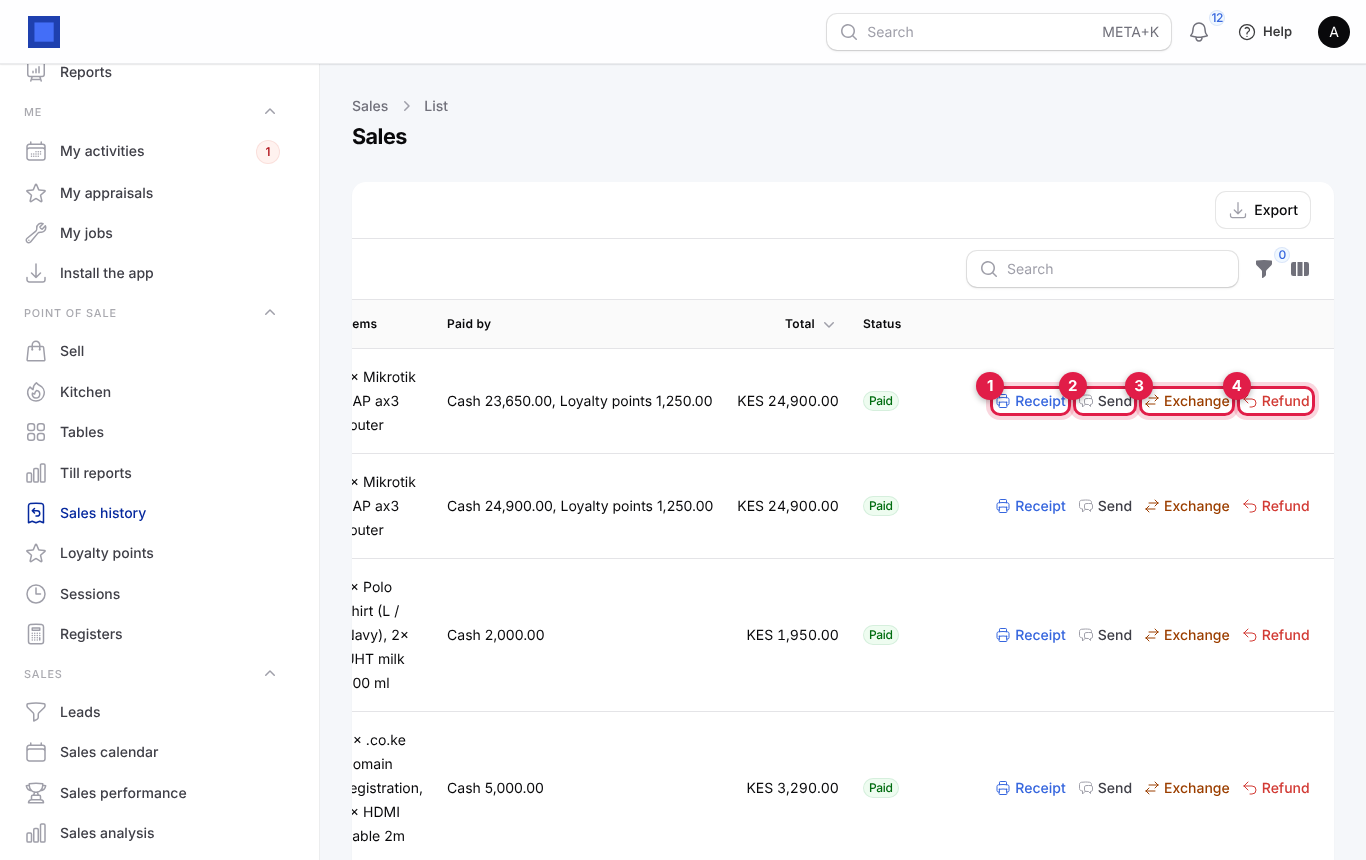
| Button | What it does |
|---|---|
| Receipt (marker 1) | Opens the receipt to reprint. |
| Send (marker 2) | Sends the receipt by SMS or WhatsApp. |
| Exchange (marker 3) | Swaps returned items for other items. |
| Refund (marker 4) | Gives money back for some or all items. |
Use the filters for Status and Register. Sales made on the offline till show "Offline sale, synced …" under the time.
Send a receipt again
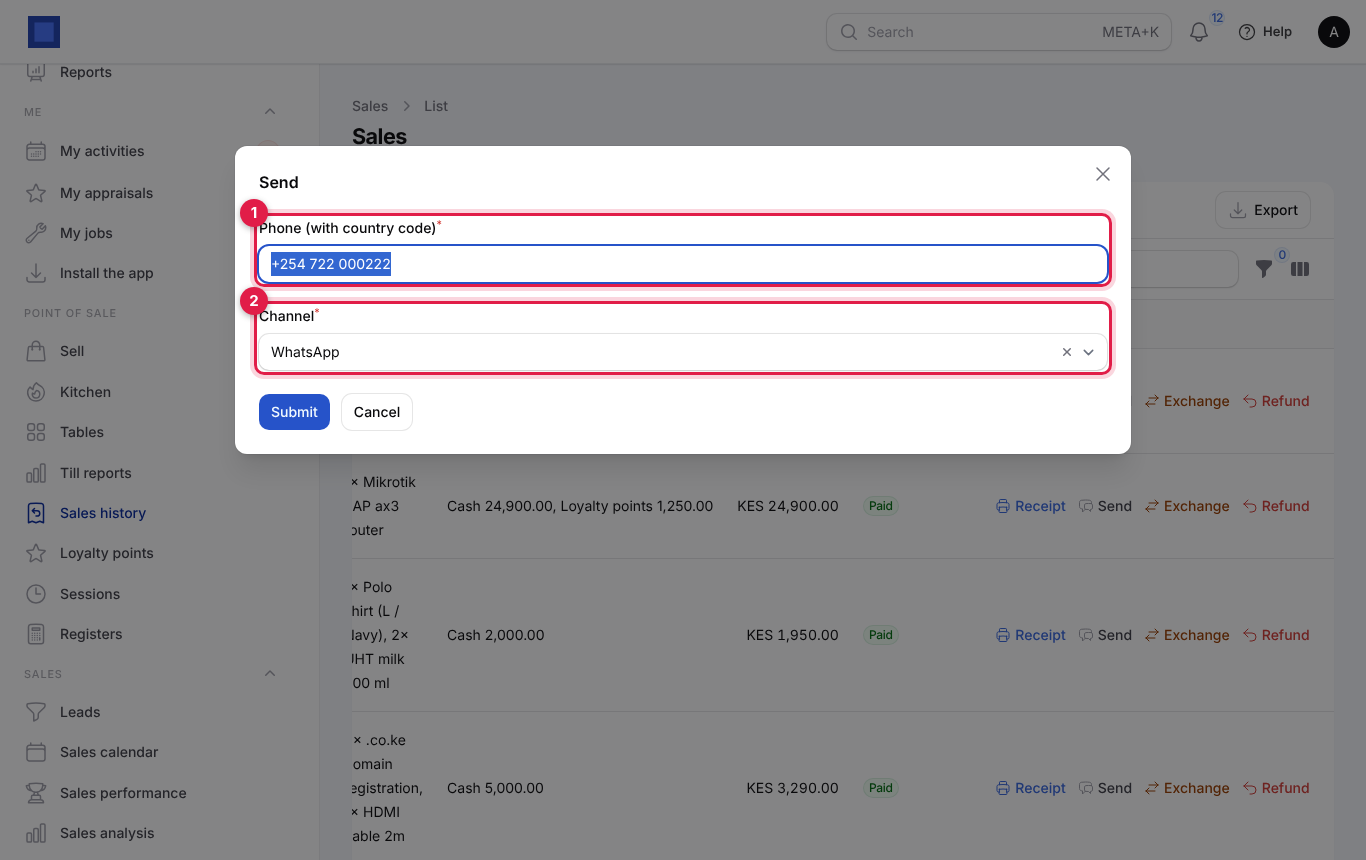
Click Send, check the Phone (with country code) (marker 1), choose the Channel, SMS or WhatsApp (marker 2), and click Submit.
Refund a sale
A session must be open on the register the sale was made on.
- Click Refund on the sale.
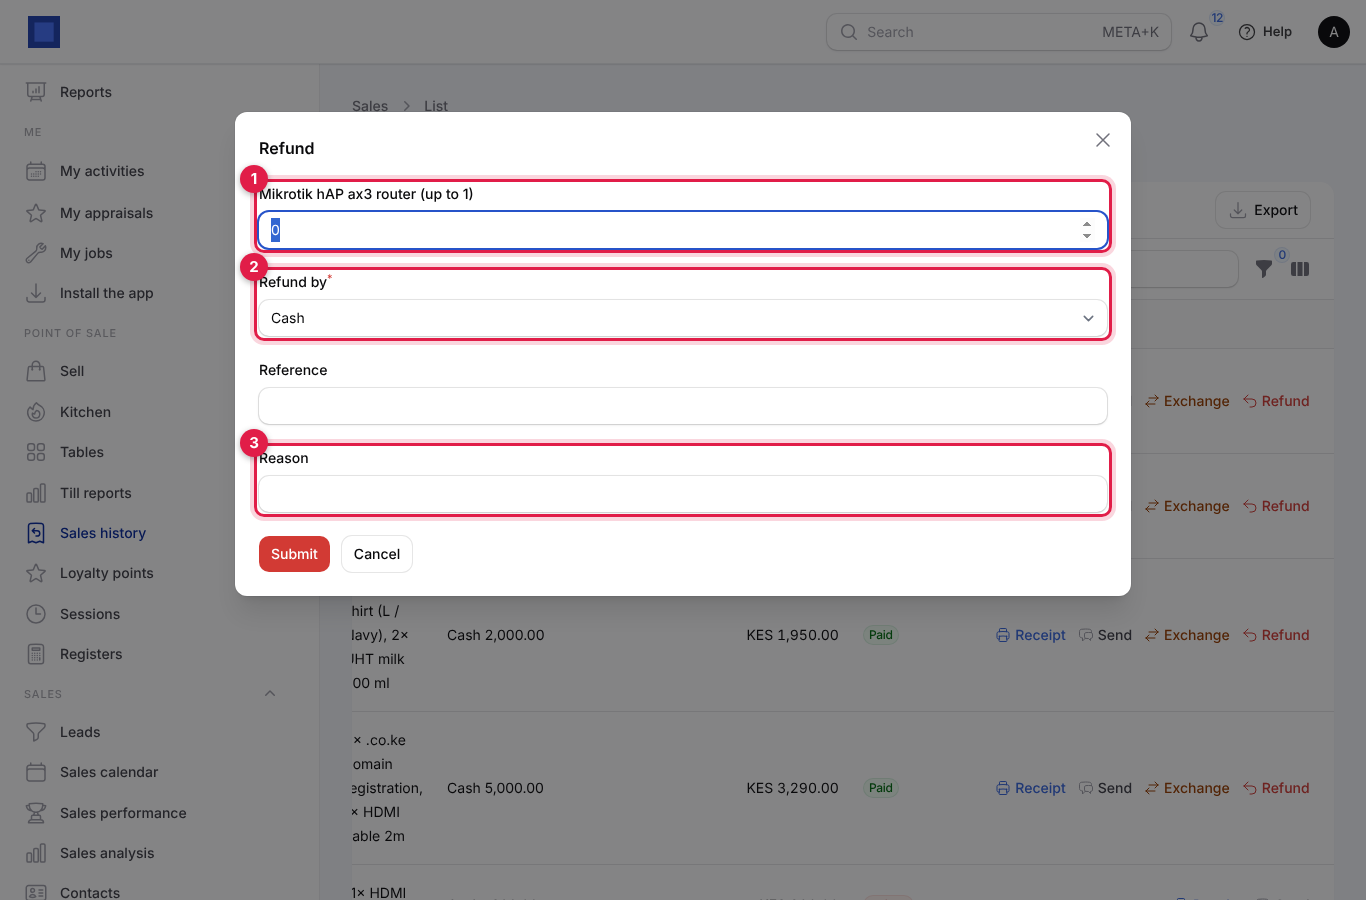
- For each item, enter how many to refund (marker 1). The label shows how many can still be refunded ("up to 1").
- Choose Refund by (marker 2): Cash, M-Pesa / mobile money, Card and so on. Add a Reference (for example the M-Pesa reversal code) and a Reason (marker 3).
- Click Submit.
A refund receipt (shown as a negative sale with status Refund) is created in the open session, the goods go back into stock at the current average cost, loyalty points are reversed, and the original sale becomes Partially refunded or Refunded. Cash refunds reduce the expected cash in the drawer. A refund cannot itself be refunded, and you cannot refund more than was sold ("Only … of … can still be refunded.").
Exchange goods
- Click Exchange on the sale.
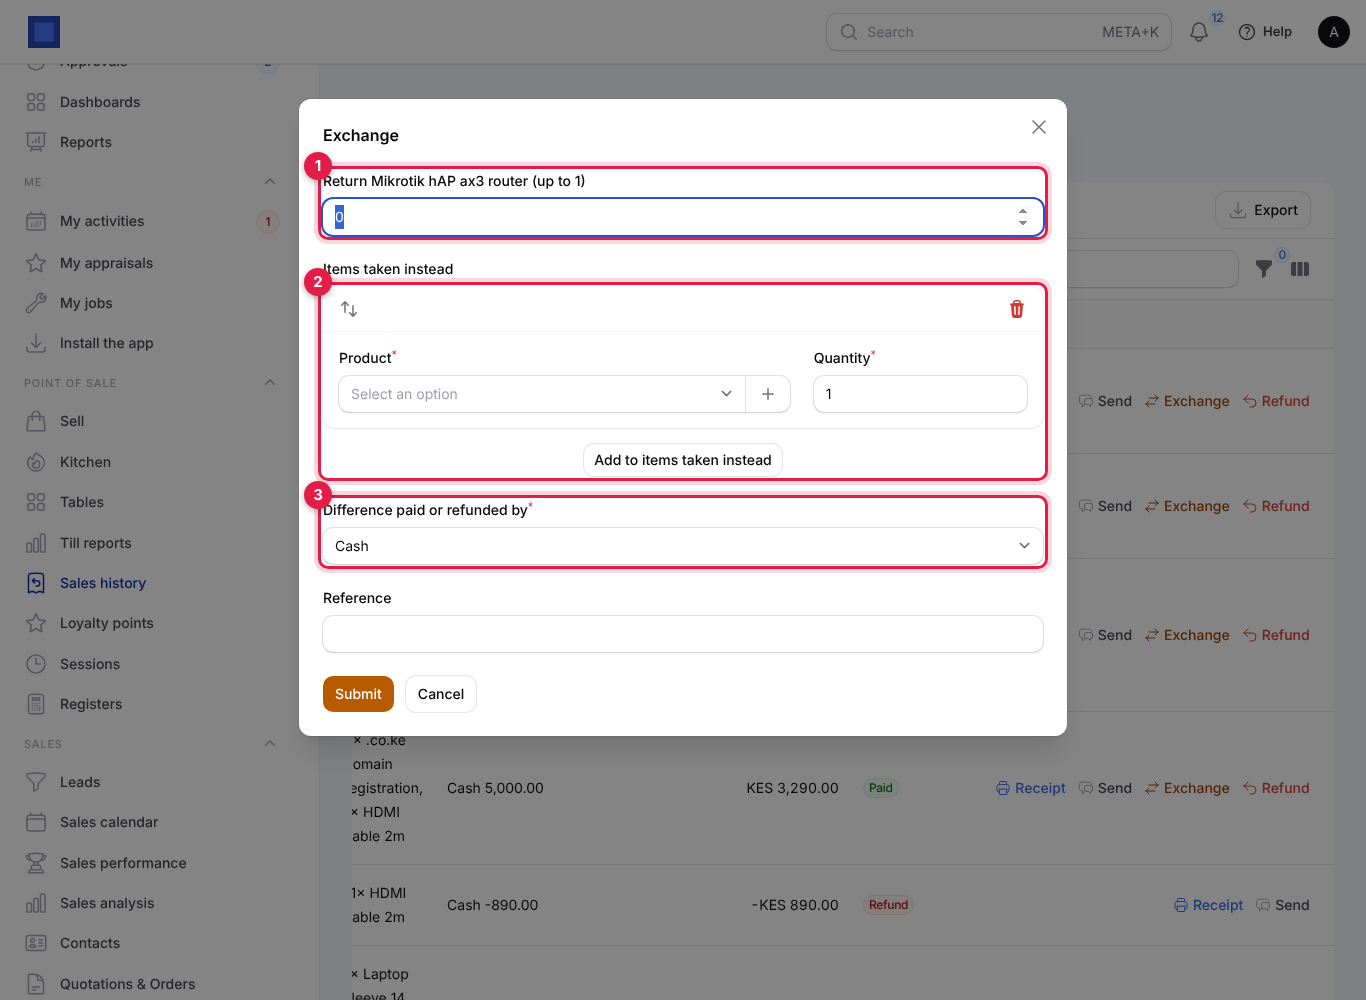
- Enter how many of each item comes back (marker 1).
- Under Items taken instead (marker 2), pick each new Product and Quantity. Click Add to items taken instead for more.
- Choose how the difference is settled in Difference paid or refunded by (marker 3) and add a Reference if needed.
- Click Submit.
NaliSuite records a refund (paid in exchange credit) and a new sale using that credit, so only the difference changes hands. The notification shows both receipt numbers and the difference.
Close the session and count the cash
At the end of the shift:
- On the till, click Close session in the top bar.
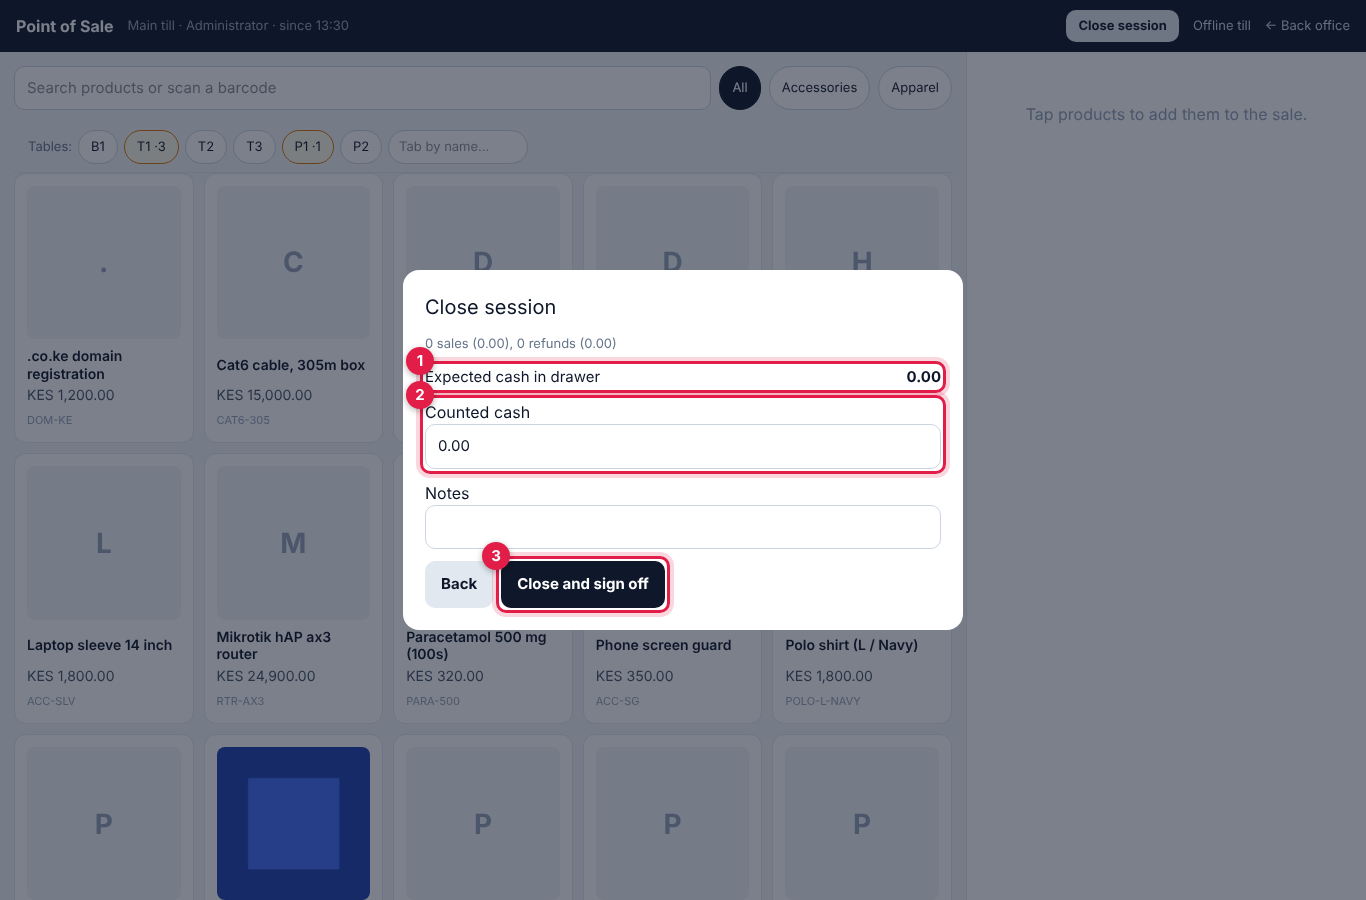
- The window shows how many sales and refunds there were, the takings per payment method, and Expected cash in drawer (marker 1): the opening float plus cash taken, less change given and cash refunded.
- Count the drawer and type the amount in Counted cash (marker 2). Add Notes if there is a difference to explain.
- Click Close and sign off (marker 3).
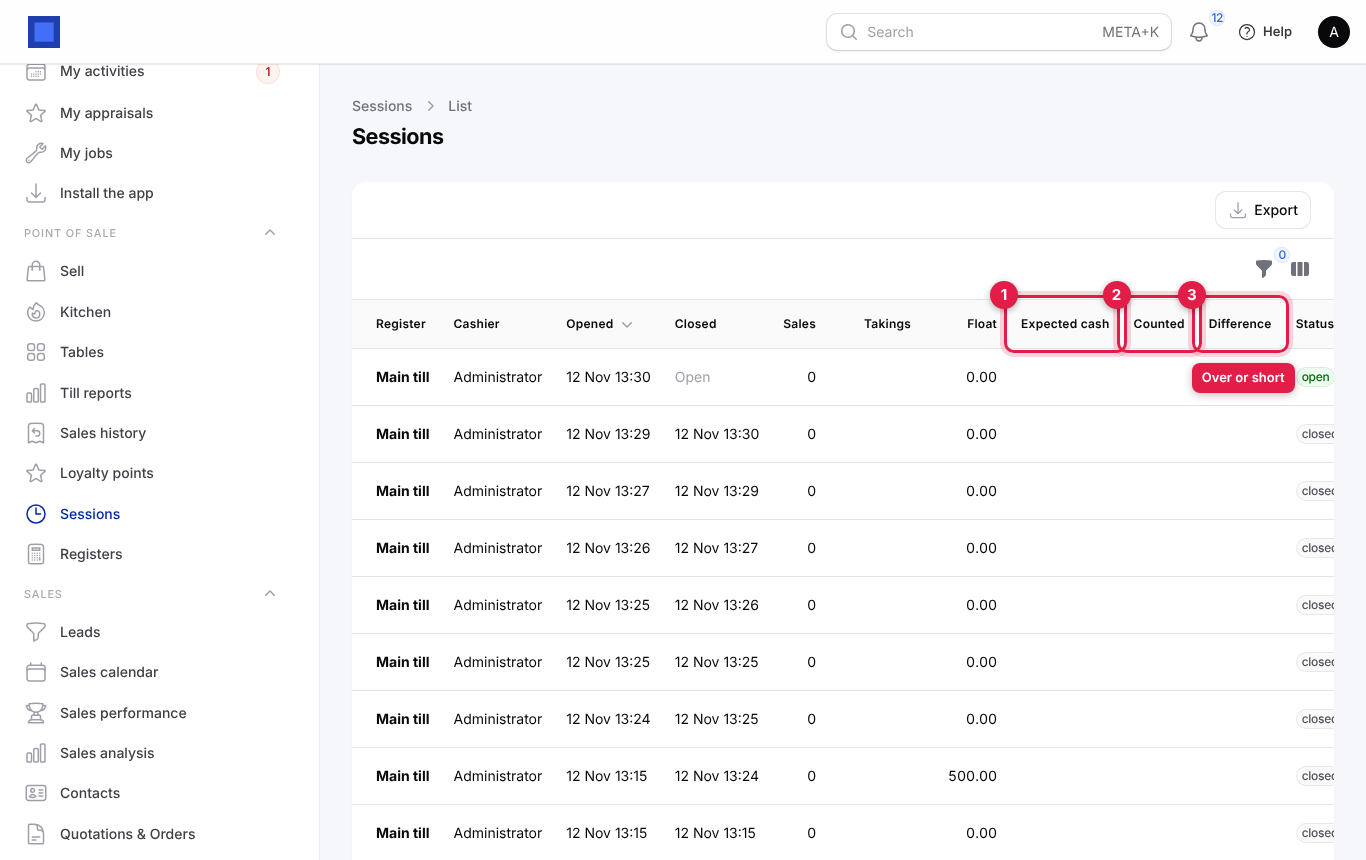
The session is closed with its difference (counted minus expected). A shortage shows as a negative difference in red on Sessions and Till reports. Print the Z report from Till reports.
Review sessions
Point of Sale → Sessions lists every shift: register, cashier, when it opened and closed (Open while running), number of Sales, Takings, Float, Expected cash (marker 1), Counted (marker 2) and Difference (marker 3, red when not zero), with status open or closed. Filter by status.
Till reports, X and Z reports
- In the menu, open Point of Sale → Till reports.
- Choose the company and the period (marker 1): Today, Yesterday, This week or This month.
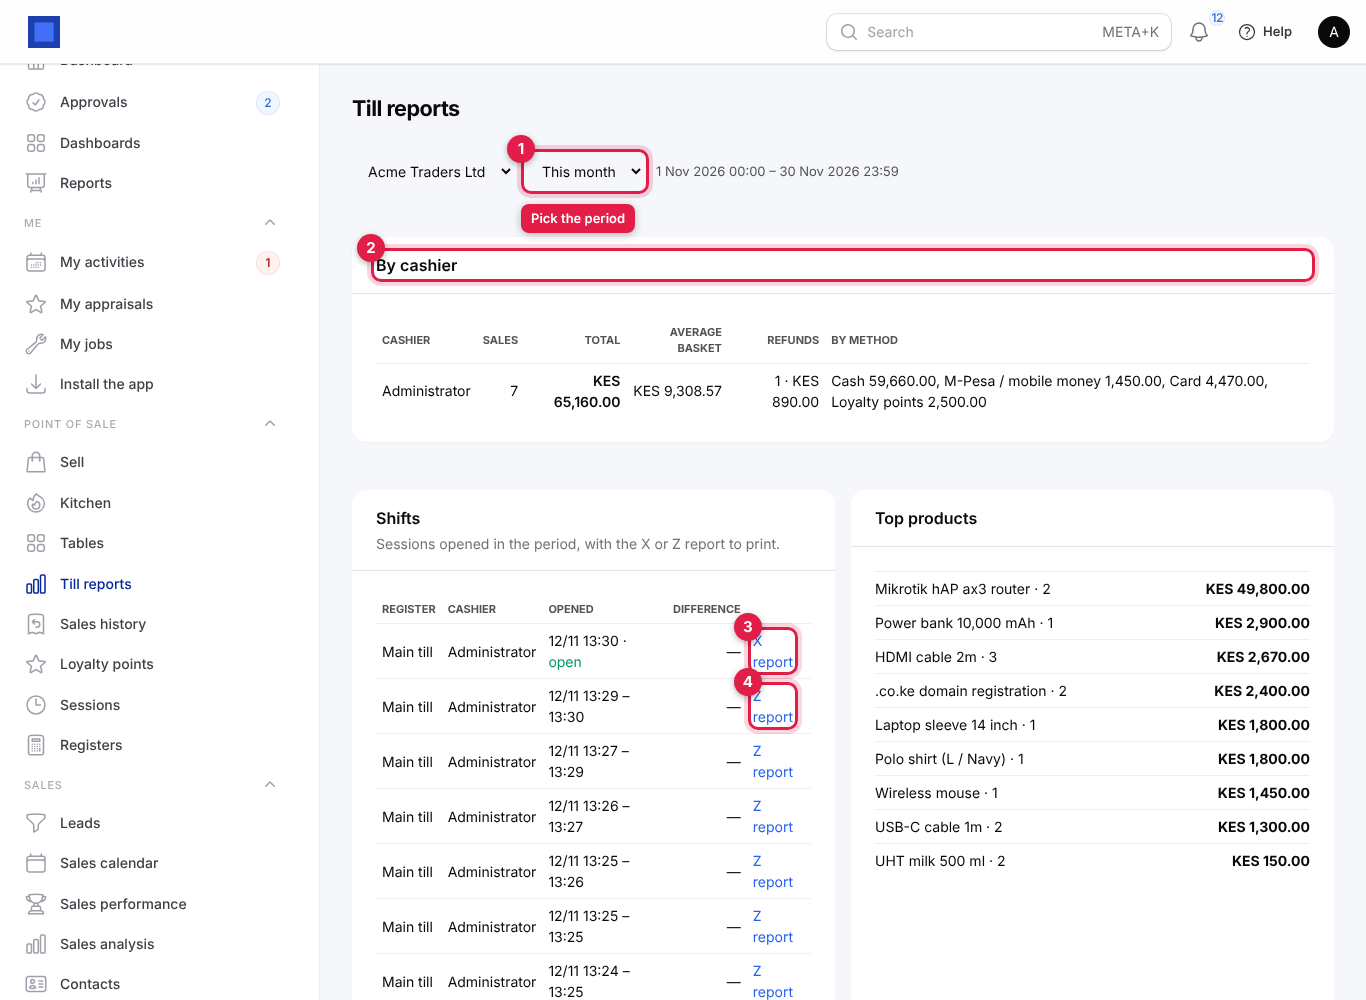
| Section | What it shows |
|---|---|
| By cashier (marker 2) | Sales count, total, average basket, refunds and the split by payment method for each cashier. |
| Shifts | Every session opened in the period with its difference, and the X report (marker 3) for an open session or the Z report (marker 4) for a closed one. |
| Top products | Best sellers by quantity and value. |
| Sales by hour | When you are busiest, to plan staff. |
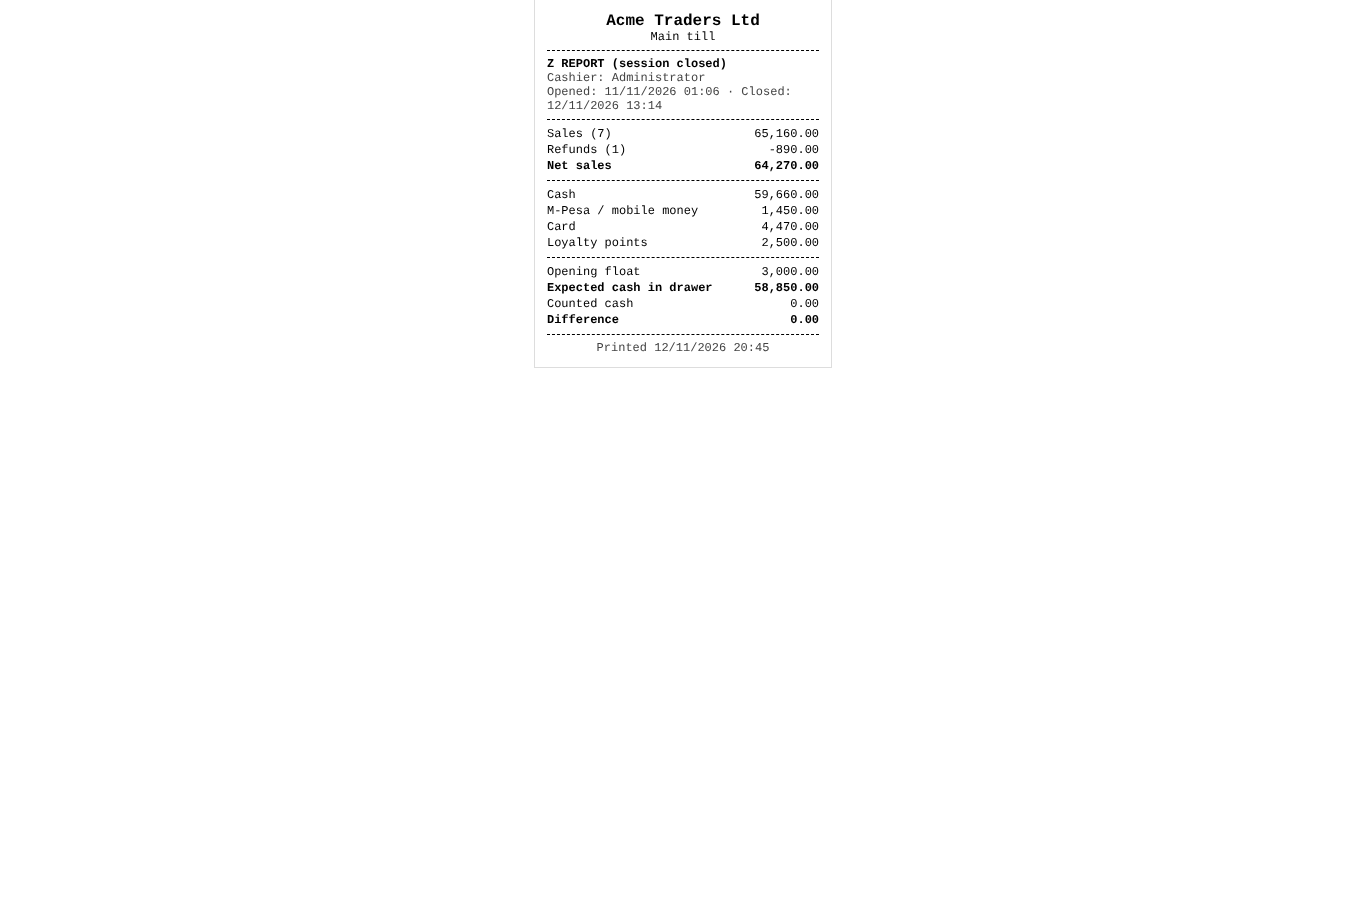
The X report is a mid-shift reading of an open session; the Z report is the final report of a closed session. Both open as a printable page showing the register, cashier, opened and closed times, opening float, sales, refunds, net sales, takings per method, expected cash, counted cash and the difference. Print it and keep it with the cash.
Loyalty points
Turn on Loyalty points under Settings → Preferences → Point of Sale and set the rates (see below). Then:
- Named customers earn points on every sale and spend them at the till.
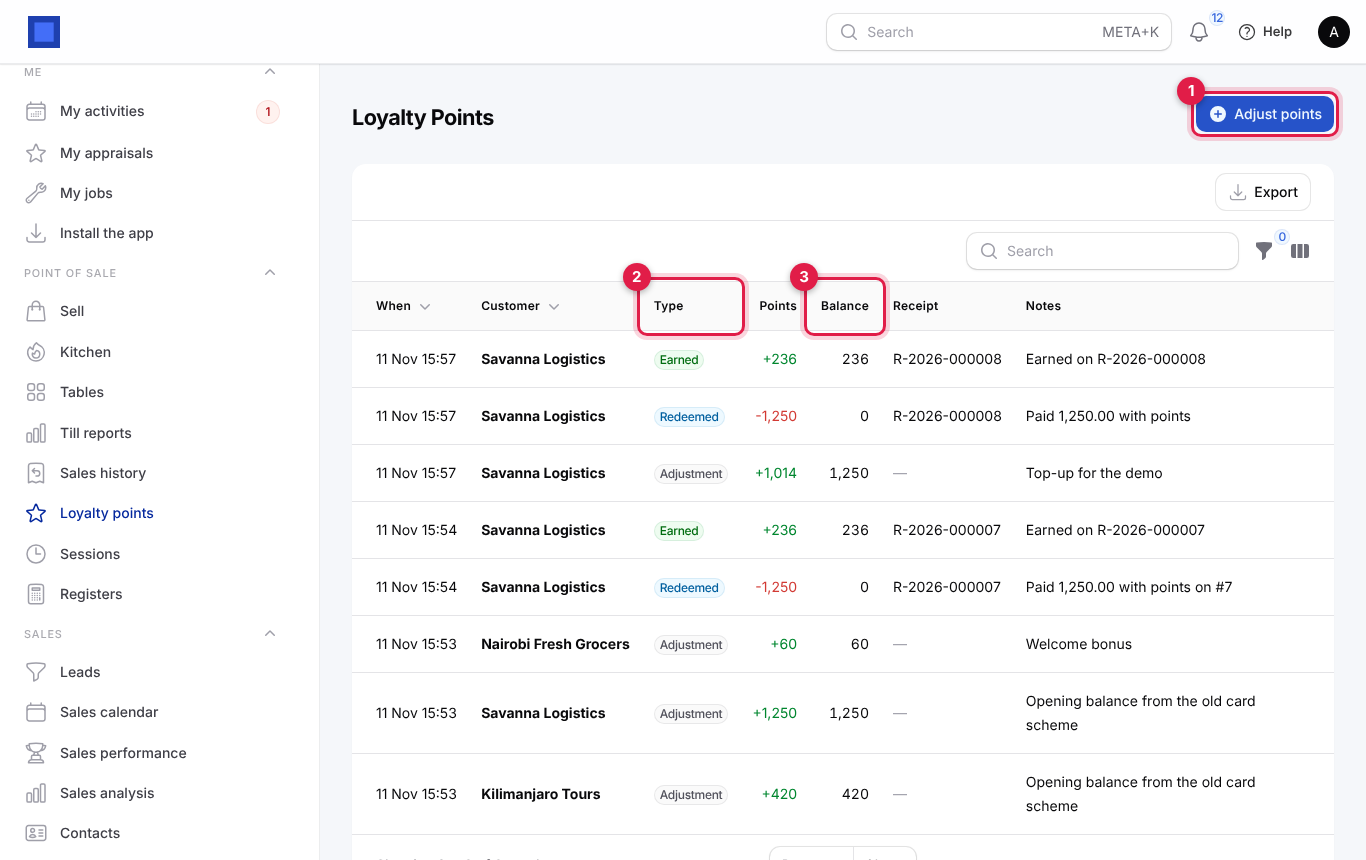
- Point of Sale → Loyalty points lists every movement: When, Customer, Type (marker 2: Earned, Redeemed, Refund, Adjustment), Points, Balance after (marker 3), the Receipt and Notes. Filter by customer or type.
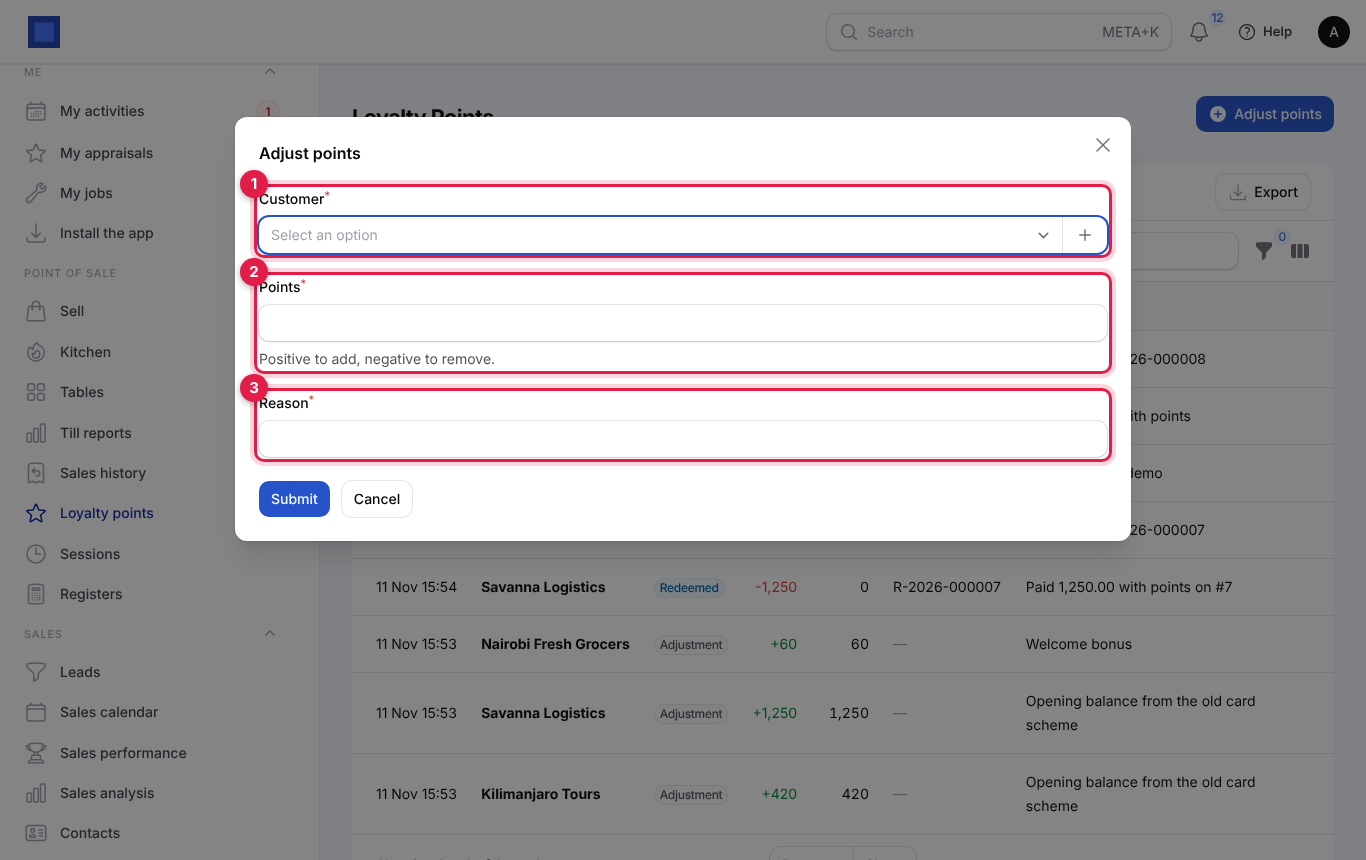
To add or remove points by hand (a welcome bonus, a correction, an opening balance from an old card scheme):
- Click Adjust points (marker 1 above).
- Choose the Customer (marker 1), enter Points (marker 2; positive to add, negative to remove) and a Reason (marker 3, required).
- Click Submit. You see "Balance now … points".
Point of sale settings
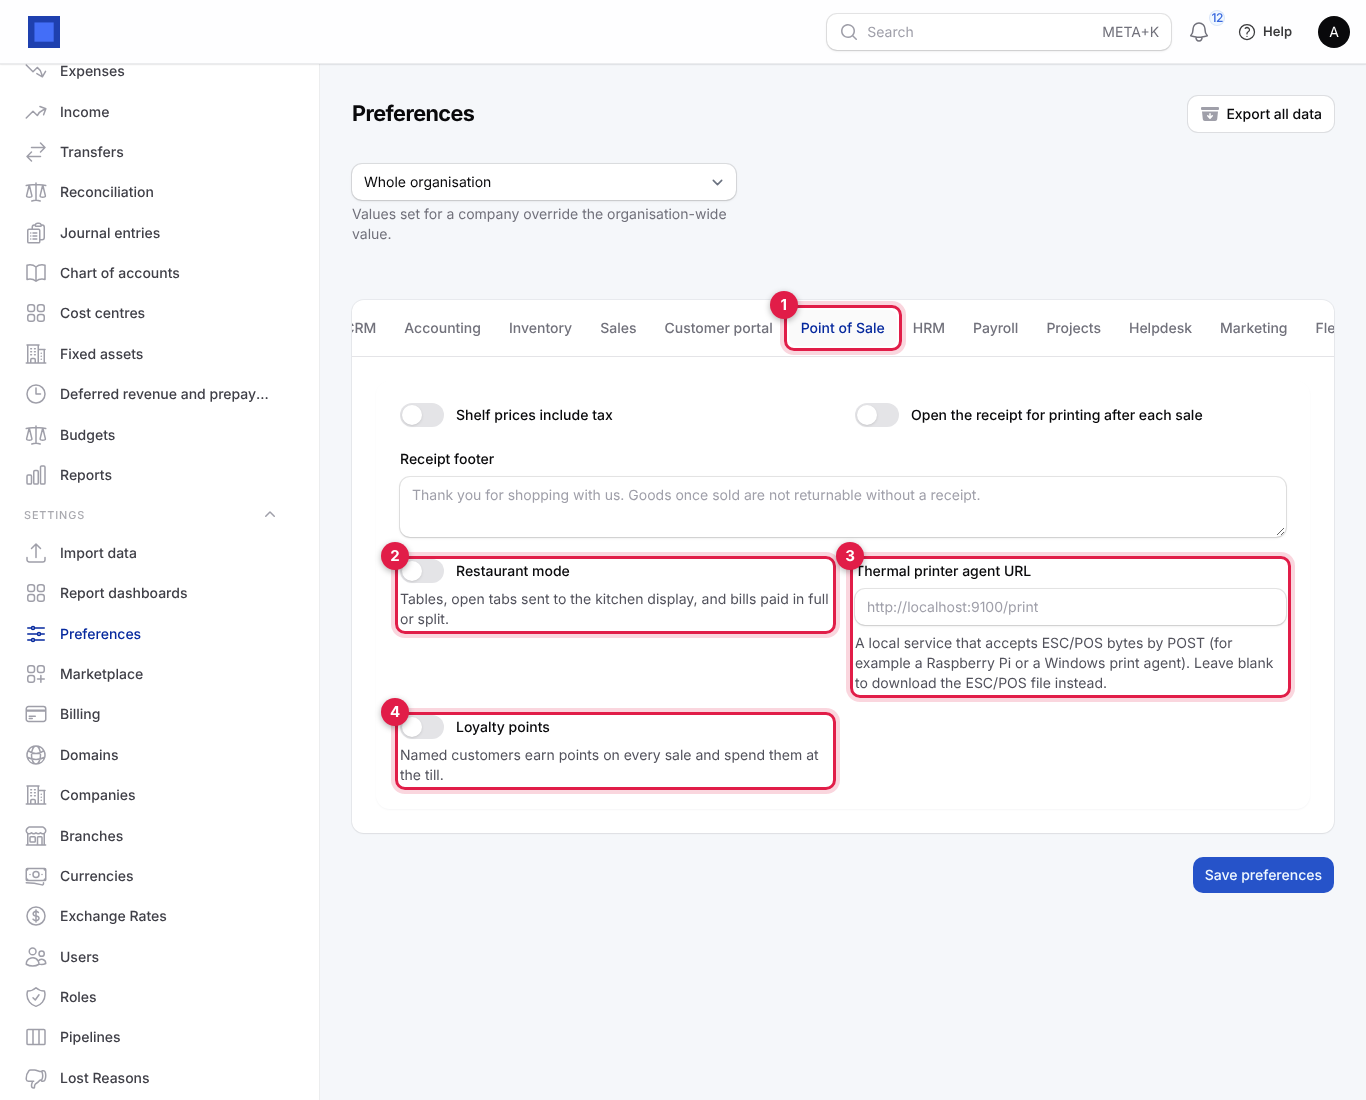
- In the menu, open Settings → Preferences and click the Point of Sale tab (marker 1).
- Change the settings and click Save preferences.
| Setting | What it does |
|---|---|
| Shelf prices include tax | On (default): the price on the tile already includes VAT, and tax is worked out of it. Off: tax is added on top at the till. |
| Open the receipt for printing after each sale | On (default): the receipt window opens after every sale. |
| Beep when an item is added | On (default): a short beep each time an item goes into the sale, and a low double buzz when a scanned or typed code matches nothing, on the till and the offline till. The device's volume must be on; some browsers stay silent until the cashier has clicked or tapped the till once. |
| Receipt footer | Printed at the bottom of receipts when the register has no footer of its own. |
| Restaurant mode (marker 2) | Tables, open tabs sent to the kitchen display, and bills paid in full or split. |
| Thermal printer agent URL (marker 3) | The address of a small print service on your network that accepts ESC/POS bytes, for example http://localhost:9100/print on a Raspberry Pi or Windows print agent. Leave blank to download the ESC/POS file instead. |
| Loyalty points (marker 4) | Turns loyalty on and shows the next three settings. |
| Spend per point | Amount spent (after points used) that earns one point. Default 100: KES 100 earns 1 point. |
| Value of one point | What one point is worth when spent. Default 1: 1 point = KES 1. |
| Minimum points to redeem | Customers need at least this many points before they can spend them. Default 100. |
The offline till
The offline till keeps selling when the internet drops. Sales are saved on the device and sent to NaliSuite when the connection returns.
- While online, click the cashier's name on the till and choose Offline till (or open
/pos/offlineon your workspace address). The catalogue, prices, customers and registers are saved on the device. - Install it as an app: in Chrome or Edge choose Install or Add to home screen. See Me → Install the app.
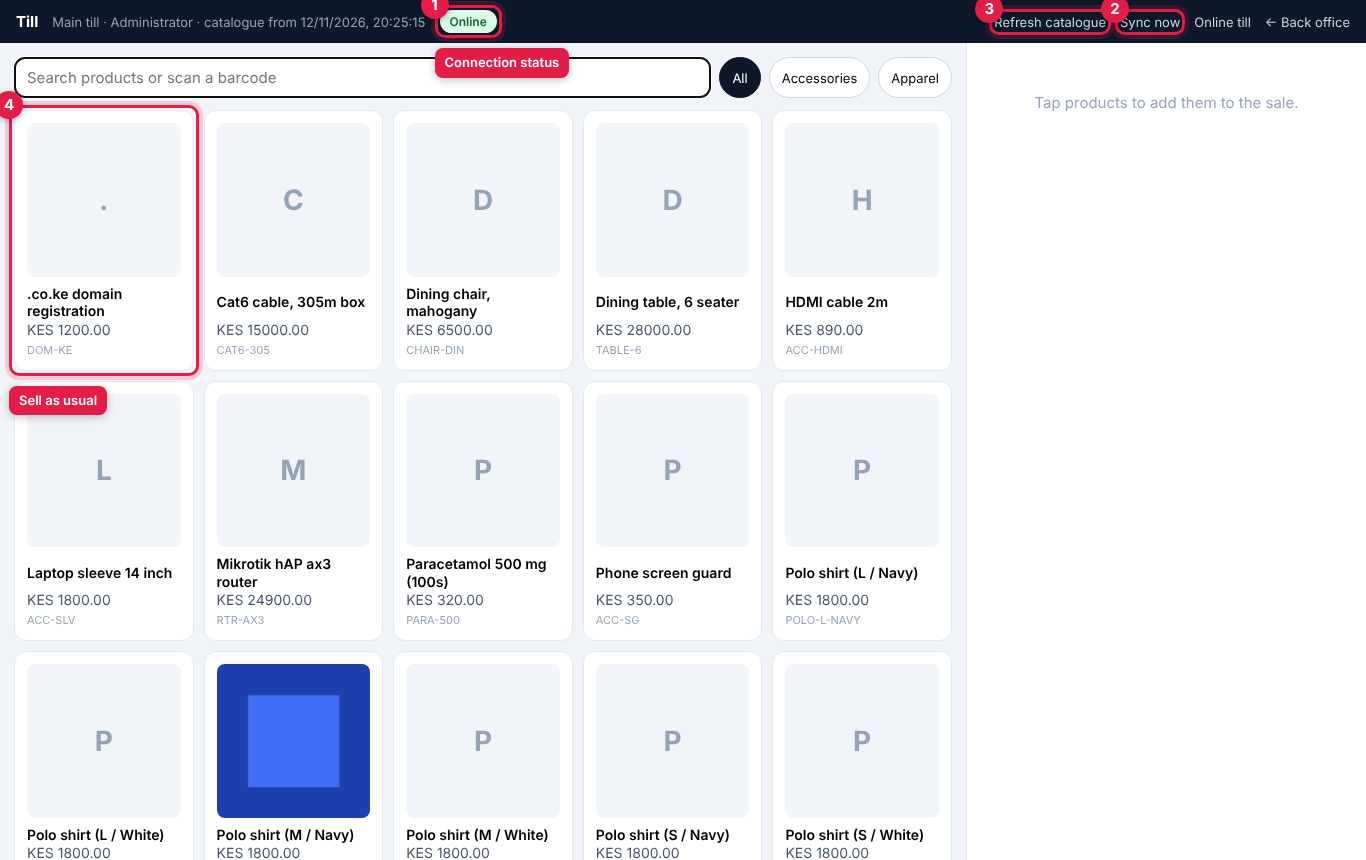
- Sell as usual (marker 4): search or scan, tap tiles, choose a customer, Take payment, Complete sale, Print receipt. Typing part of a name, SKU or barcode shows the same drop-down list of matching products as the online till.
| Item | What it means |
|---|---|
| Online / Offline (marker 1) | The connection status. |
| n sales waiting to sync | Sales kept on this device that have not reached the server yet. |
| Sync now (marker 2) | Sends waiting sales now. Sync also happens on its own when the connection returns. |
| Refresh catalogue (marker 3) | Downloads the latest products and prices. Do this after changing prices. The top bar shows "catalogue from …" with the time it was saved. |
| Online till | Back to the normal till. |
| Open session | Shown when no session is open on the server: choose the register, enter the Opening cash and open it (needs a connection). Until a session is open, sales are kept on the device and sync once a session is open. |
| Recent sales (tap to refund) | Tap a recent sale, choose Refund by and click Queue refund. The refund is applied on sync. |
Offline sales get their receipt number when they sync; until then the receipt says "Offline sale · receipt number issued on sync". If your sign-in expires, queued sales stay safe on the device: open the back office, sign in again, and they sync.
What is posted to the ledger and stock
With Accounting on, each sale posts a journal entry in the Sales journal ("POS sale R-… · register"):
| Debit | Credit |
|---|---|
| Cash (cash taken less change), Mobile money (M-Pesa), Bank (card), Accounts receivable (on account), Loyalty rewards (points spent) | Sales (net of tax) and Tax payable (VAT) |
Refunds post the mirror entry. With Inventory on, each sale takes the goods out of the register's warehouse (posting cost of sales), and refunds put them back. A sale on account also creates an issued invoice to the customer.
Common questions
Why can I not open a session? That register already has an open session, probably from a cashier who forgot to close. Ask them to close it from the till, or use another register.
A product is missing from the till. Check that it is Active, Can be sold is on, it has no Billed every (subscriptions are not sold at the till), and it belongs to the register's company. On the offline till, click Refresh catalogue.
The scanner adds nothing. A scan is added straight away only when it matches the product's Barcode or SKU exactly. Otherwise the matching products are listed under the search box: click the right one. If nothing is listed, check what was typed and the product's Barcode on Products.
How many ways can I find a product? Four: type part of the name, SKU or barcode and pick from the list; scan with a USB or Bluetooth scanner; tap 📷 Scan to use the camera (any modern browser, Windows PCs included); or tap a tile, filtered by category.
The sale was refused for stock. The register's warehouse has less than you are selling and negative stock is not allowed. Receive or transfer stock into that warehouse (see Inventory).
My cash is short at closing. What now? Close the session with the real count and write the reason in Notes. The difference stays on the session and in Till reports. Do not change the count to make it balance.
Can a customer pay part cash, part M-Pesa? Yes. Change the first line's amount and click + M-Pesa for the rest.
Why did the price change when I chose a customer? That customer has a price list or a promotion applies. All lines are repriced for them.
How do I refund a sale made yesterday? Open Sales history, find it, and click Refund. A session must be open on that register today; the refund belongs to today's session.