Timer, project templates and workload
For project managers and anyone who logs time on projects. Start a timer on a task or a support ticket and stop it to save the time, start new projects from a template instead of typing the same tasks again, and see who has room for more work in the coming weeks.
You will find these under Projects → Project templates and Projects → Workload. The timer sits in the top bar of every screen, next to the search box.
Note: You need the projects.view permission to use the timer, see templates and see the workload. Creating and changing templates, creating projects from them, Save as template and setting someone's hours per week need projects.manage. Timing helpdesk tickets also needs the Helpdesk app and the helpdesk.manage permission. Owners and admins have all of these. Set permissions under Settings → Roles; see Workspace settings.
These features are part of the Projects app, which comes with the Professional plan. Switch it on or off under Settings → Apps; see Switching apps on and off. For projects, tasks and timesheets themselves, see Projects and timesheets.
Start a timer
Each person has one timer. You can start it in three places:
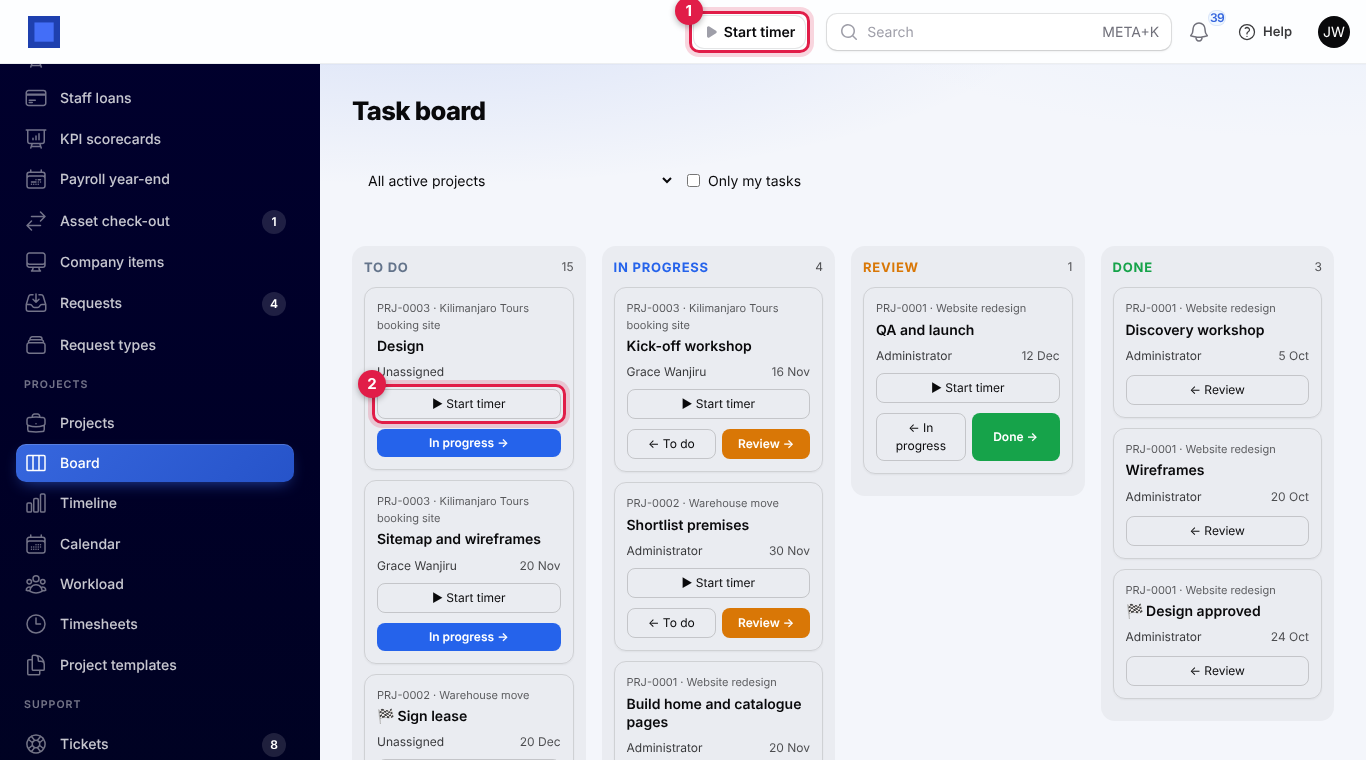
- The top bar. Press Start timer (marker 1). Under Time for, choose A task or A ticket (the choice only appears when Helpdesk is on and you can work on tickets). Pick the Task (open tasks of active projects, grouped by project, with your own tasks first) or the Ticket (open tickets, newest first), add a Note if you like, and press Start.
- A card on the task board. Press ▶ Start timer on the card (marker 2). Cards in the Done column have no button.
- A task row on a project. Open the project and press the ▶ button at the end of the task's row (marker 1).
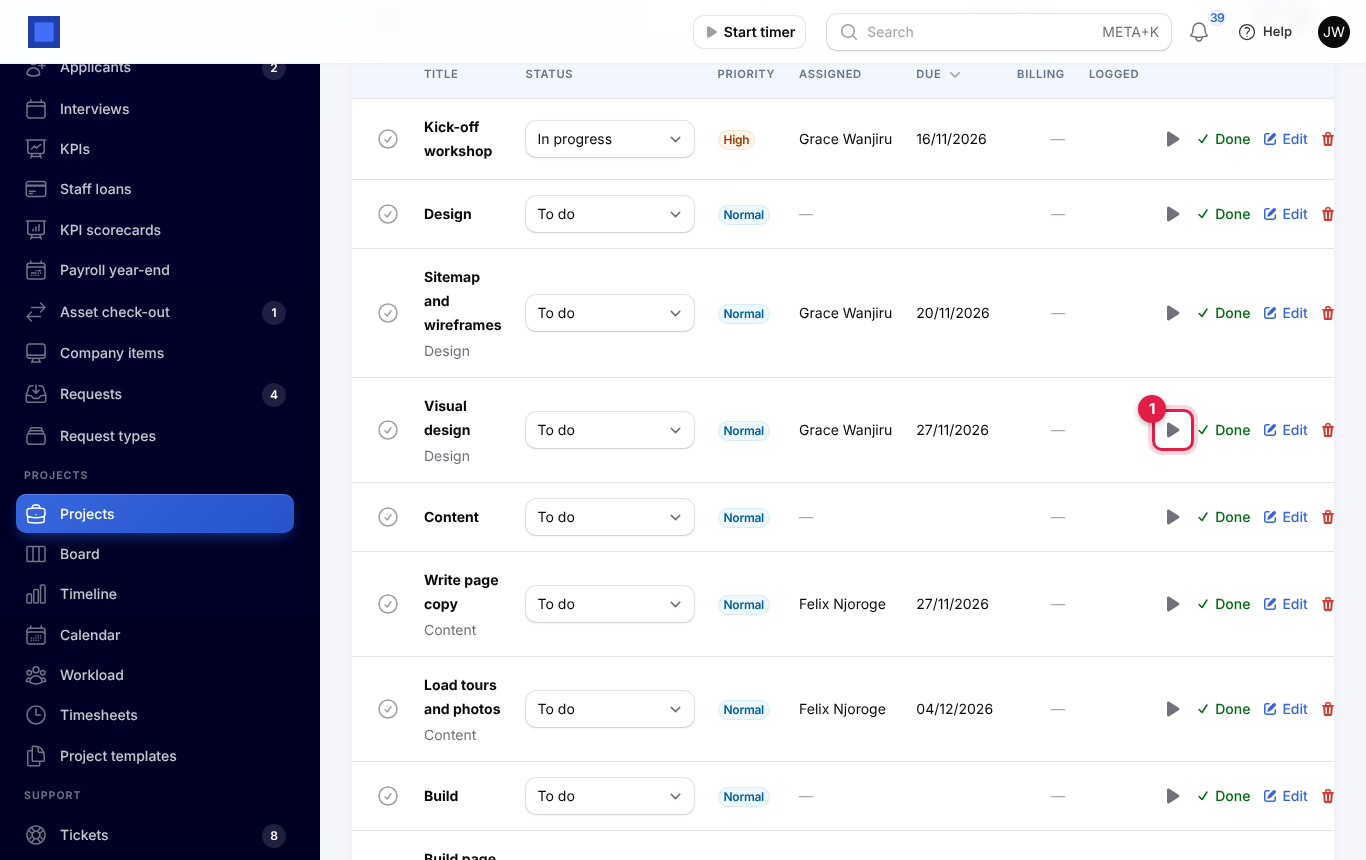
On a card or a task row the task is already chosen, so you only add the note. The start buttons disappear while your timer runs: stop it before you start another.
While the timer runs
The top bar shows the time running and what it is on (marker 1). Hover over it to see the note. It keeps counting when you reload the page or move to another screen, and on your other devices, because the start time is kept by NaliSuite and not in your browser. On a phone only the time is shown.
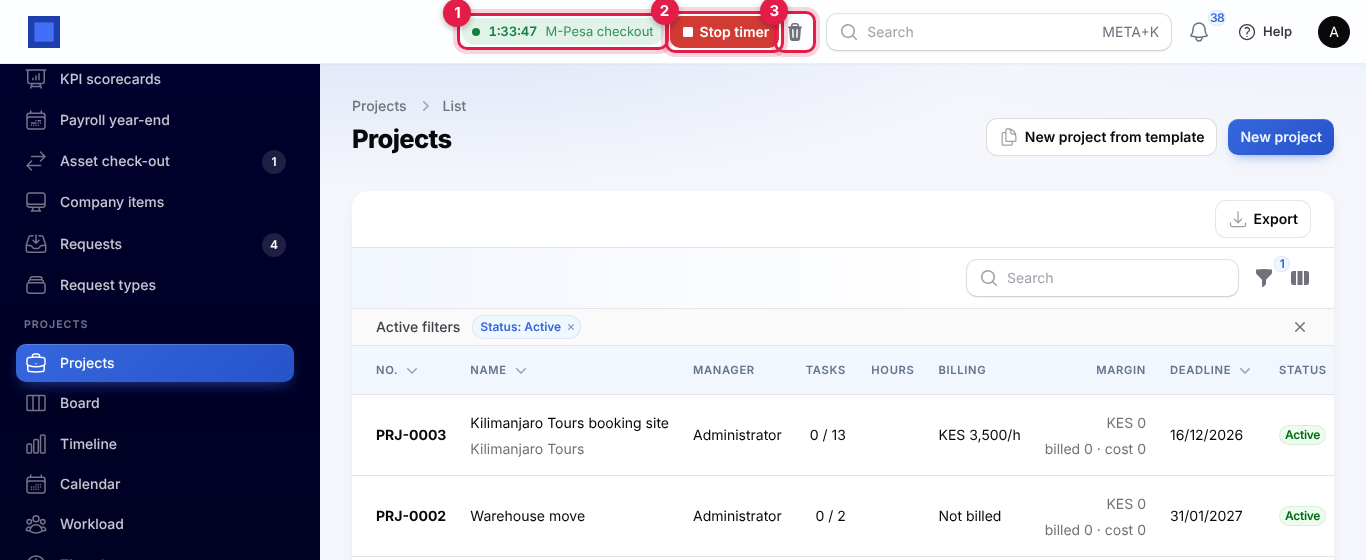
- Stop timer (marker 2) saves the time.
- The bin (marker 3) discards the timer after you confirm. No time is saved.
The time turns amber once the timer has run longer than the limit in your preferences (10 hours unless you change it), as a hint that it was probably forgotten.
Stop the timer and save the time
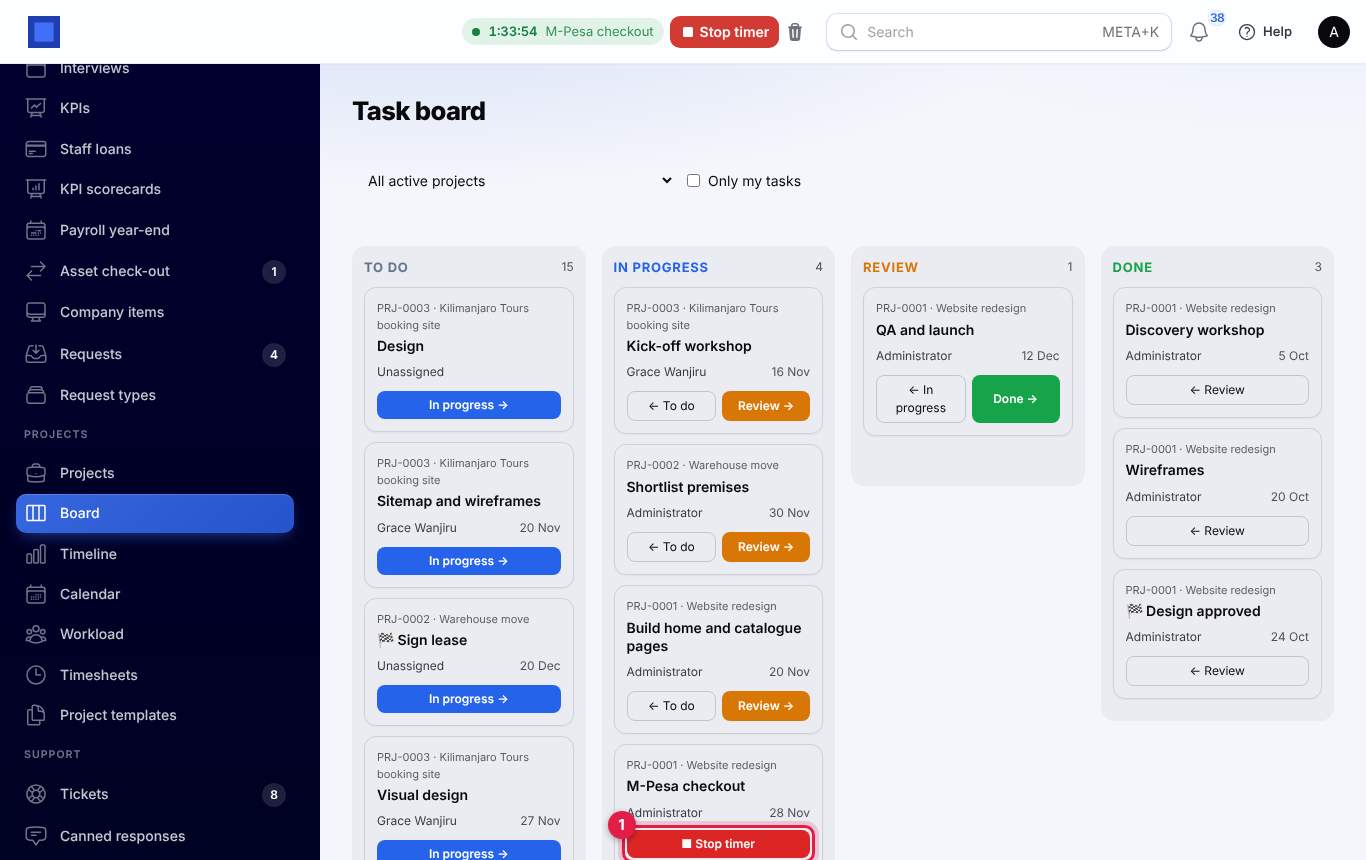
- Press Stop timer in the top bar, on the task's card on the board (marker 1), or the ■ button on the task's row.
- The window says how long it ran and what it is on, for example "Save 1 h 30 min on M-Pesa checkout." (marker 1).
- Press Stop and save (marker 2). You see "Timer stopped" and the time saved.
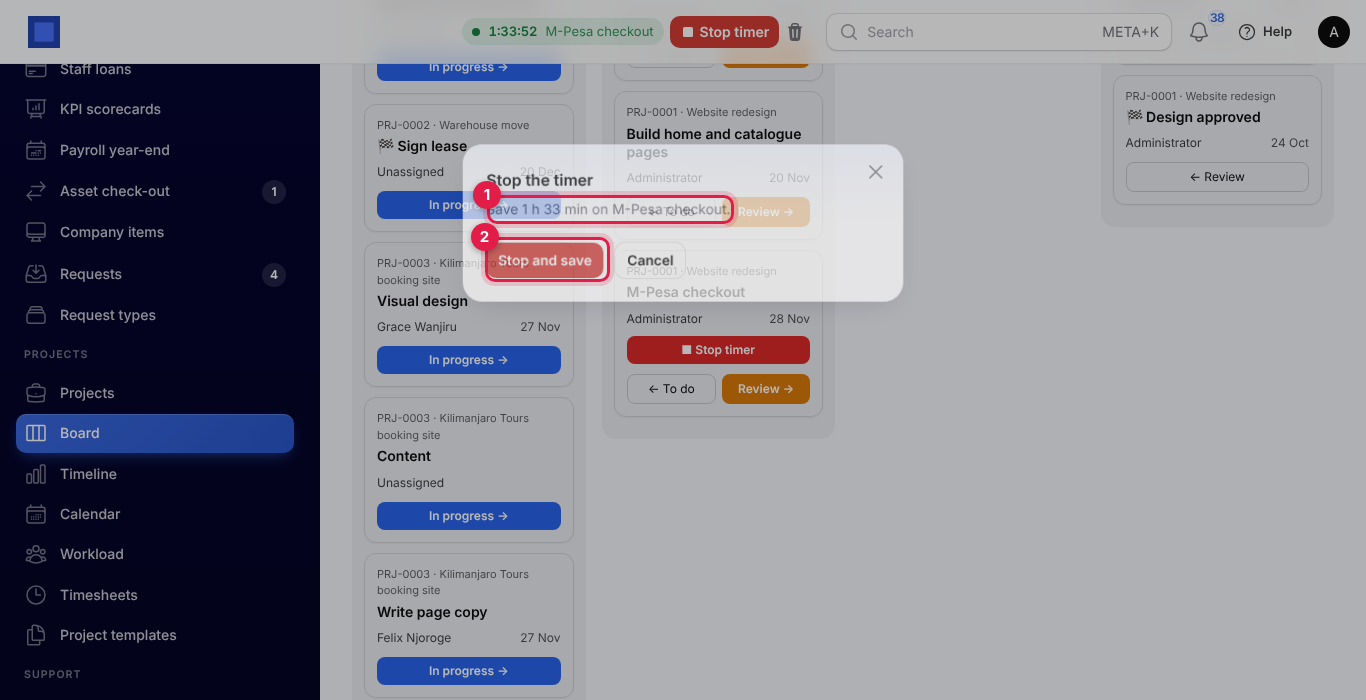
Where the time goes:
- On a task, it becomes a timesheet entry on that task and its project, dated the day the timer started, with your note as the description. It is submitted for approval like any time you log by hand, and billable when the project is billed by the hour. See Log time and Approve or reject time.
- On a ticket, it is added to the ticket's time, billable, at the ticket's rate. See Helpdesk.
The minutes are rounded up to the step set in your preferences before they are saved. With Up to 15 minutes, 7 minutes are saved as 15 and 30 minutes stay 30. Every stopped timer saves at least one step, or one minute without rounding.
A timer left running too long
If the timer has run longer than the limit (10 hours unless you change it), the window says "This timer has been running for … Did you forget to stop it? Enter the time you actually worked." It shows Hours and Minutes, filled in with the time it ran. Correct them to the time you really worked and press Stop and save. The time must be between 1 minute and 24 hours, and it is rounded as usual.
Project templates
A template is a reusable project: its billing and its tasks, each placed a number of days after the project starts. When you create a project from it, every task gets a real date.
Templates are under Projects → Project templates. The list shows each template's number of Tasks, its Length (the deadline in days) and when it was Updated.
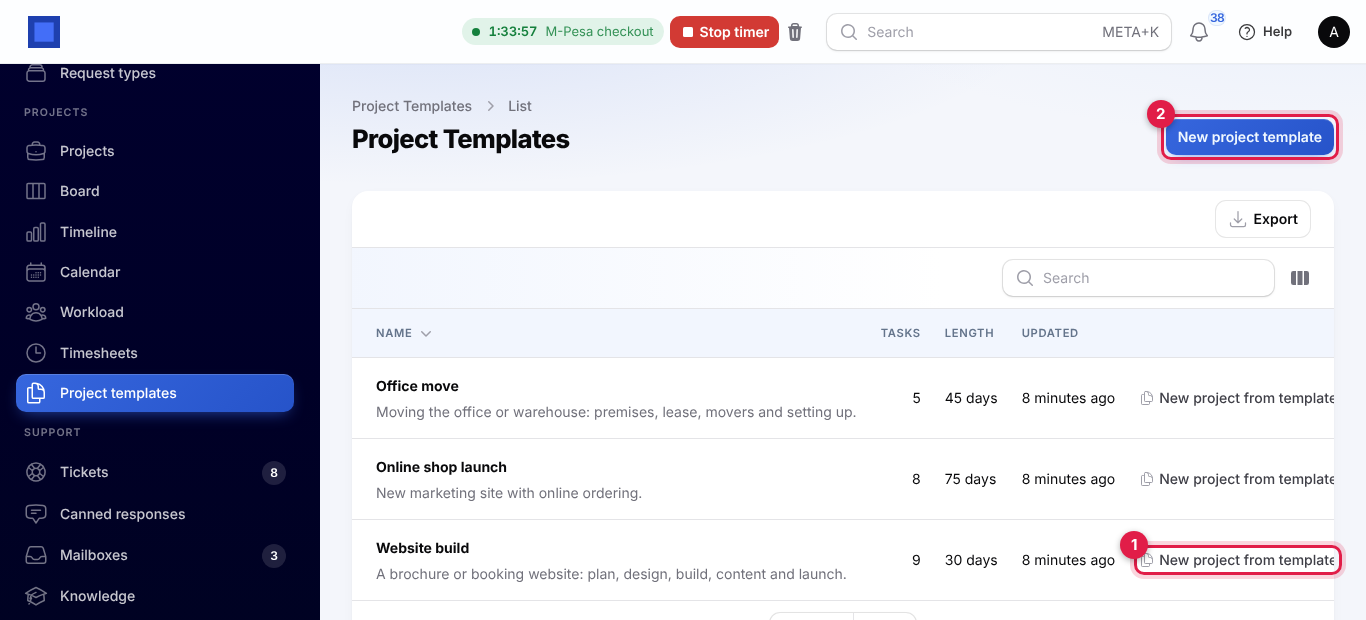
Create a template
- Press New project template (marker 1).
- Fill in the top part:
- Company and Name.
- Billed: By the hour (with an Hourly rate), Fixed price (with the Fixed price), Per milestone or Not billed.
- Budget (hours), if you set one.
- Deadline (days after the start): for example 30 makes the project's deadline 30 days after it starts. Leave it empty for no deadline.
- Description, copied to each new project.
- Under Tasks, press Add a task for each task. Day 0 is the day the project starts.
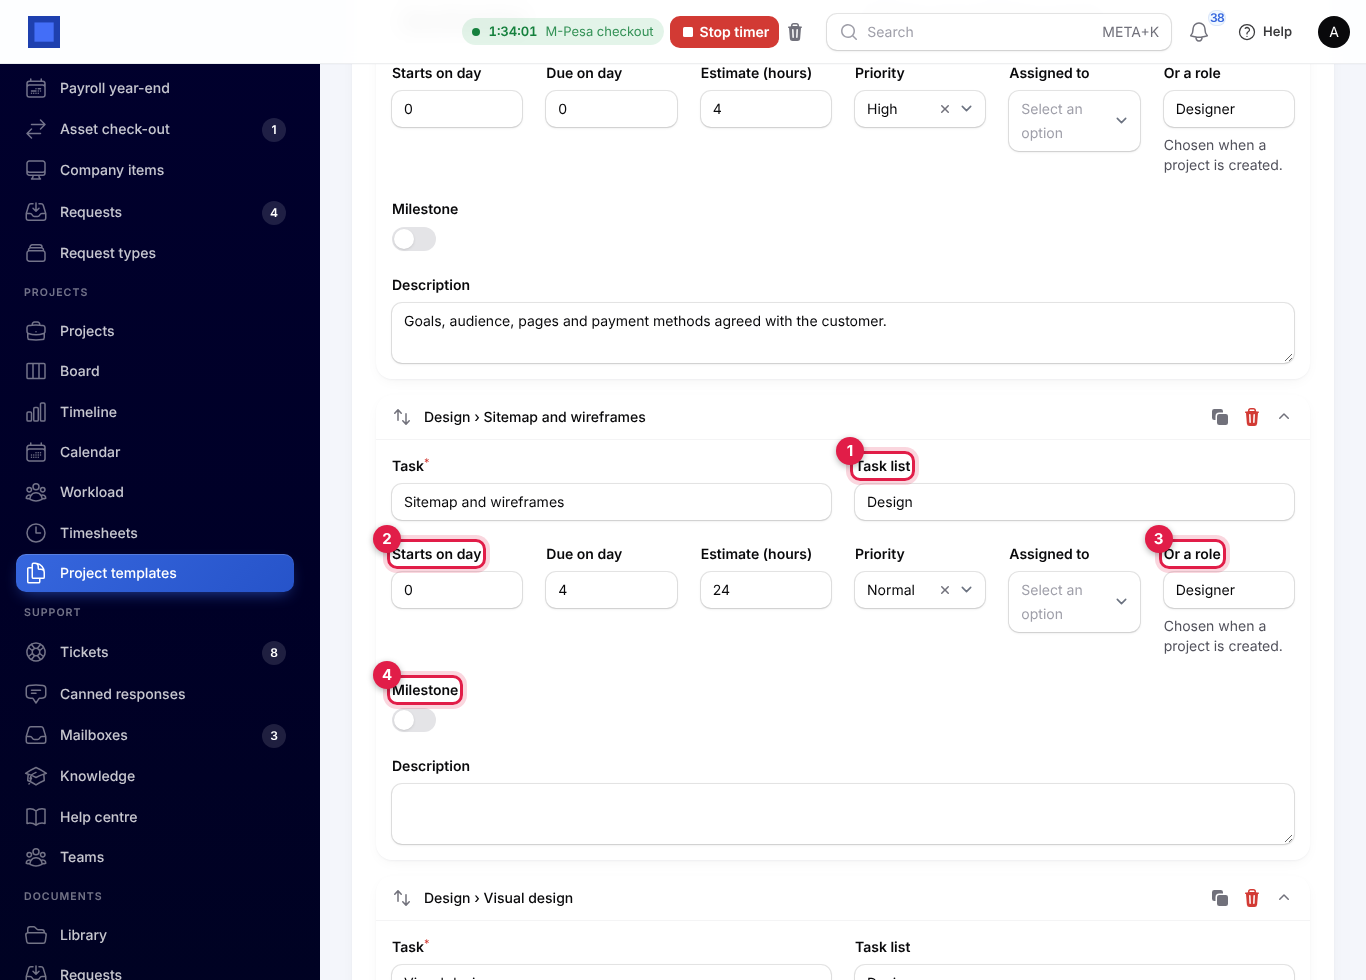
Each task has:
| Field | What it does |
|---|---|
| Task | The task's title. Required. |
| Task list (marker 1) | Optional, such as Design or Launch. Tasks with the same task list are put under one parent task of that name. |
| Starts on day and Due on day (marker 2) | Days after the project starts. Leave Starts on day empty for a task that only has a due date. |
| Estimate (hours) | Copied to the task, and used by the workload view. |
| Priority | Low, Normal, High or Urgent. |
| Assigned to | A named person, who gets the task on every project made from the template. |
| Or a role (marker 3) | Shown when nobody is named, for example Designer. You choose who fills each role when you create a project. |
| Milestone (marker 4) | Makes the task a milestone, with Billed when reached for the amount invoiced when it is done. |
| Description | Copied to the task. |
Drag tasks to reorder them, collapse them to save room, or copy one to start the next. Press Create to save.
Save a project as a template
When a project went well, keep it as a template:
- Open the project and press Save as template.
- Give the Template name (marker 1). It starts as the project's name.
- Leave Keep the people assigned to each task on (marker 2) to keep who did each task, or switch it off to leave the tasks unassigned.
- Press Save template. The message has an Open template button if you want to add roles or change days.
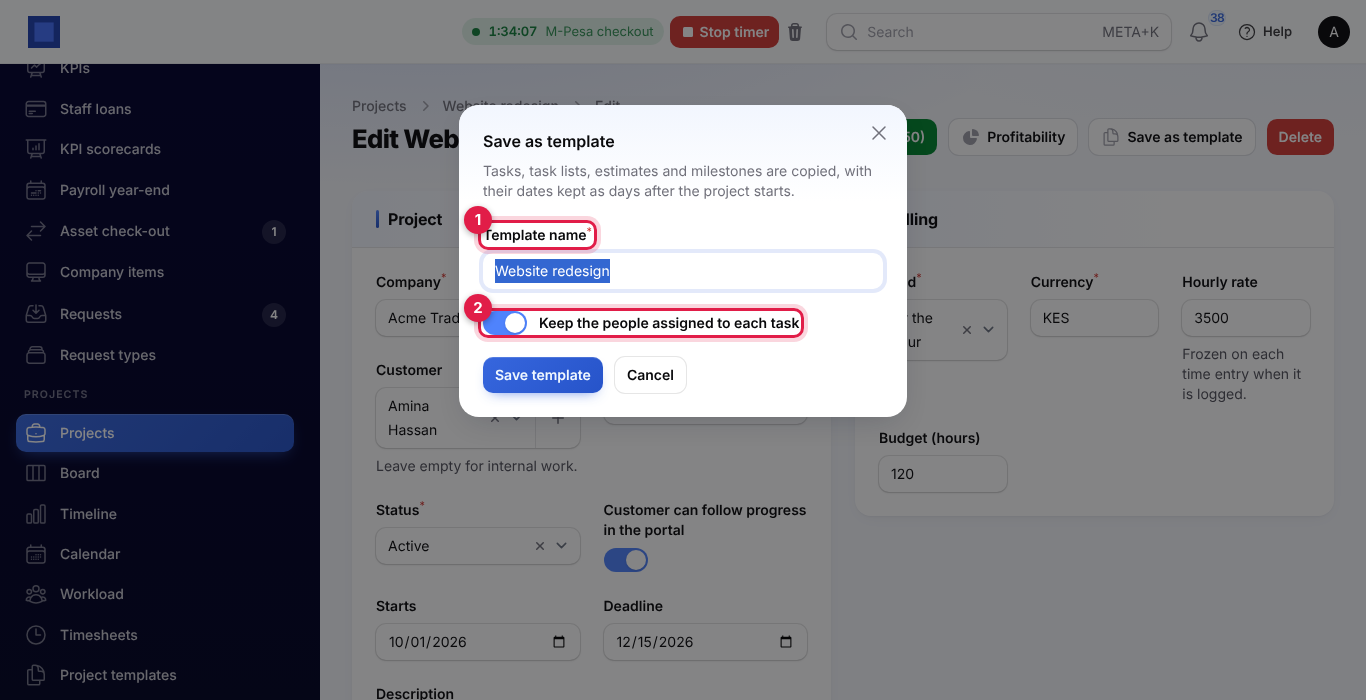
The tasks, task lists (a subtask's parent becomes its task list), estimates, priorities, milestones and their amounts are copied, with each date kept as days after the project's start. The billing, budget and description come too, and the deadline becomes the template's length. Time logged, invoices and task statuses are not copied.
Create a project from a template
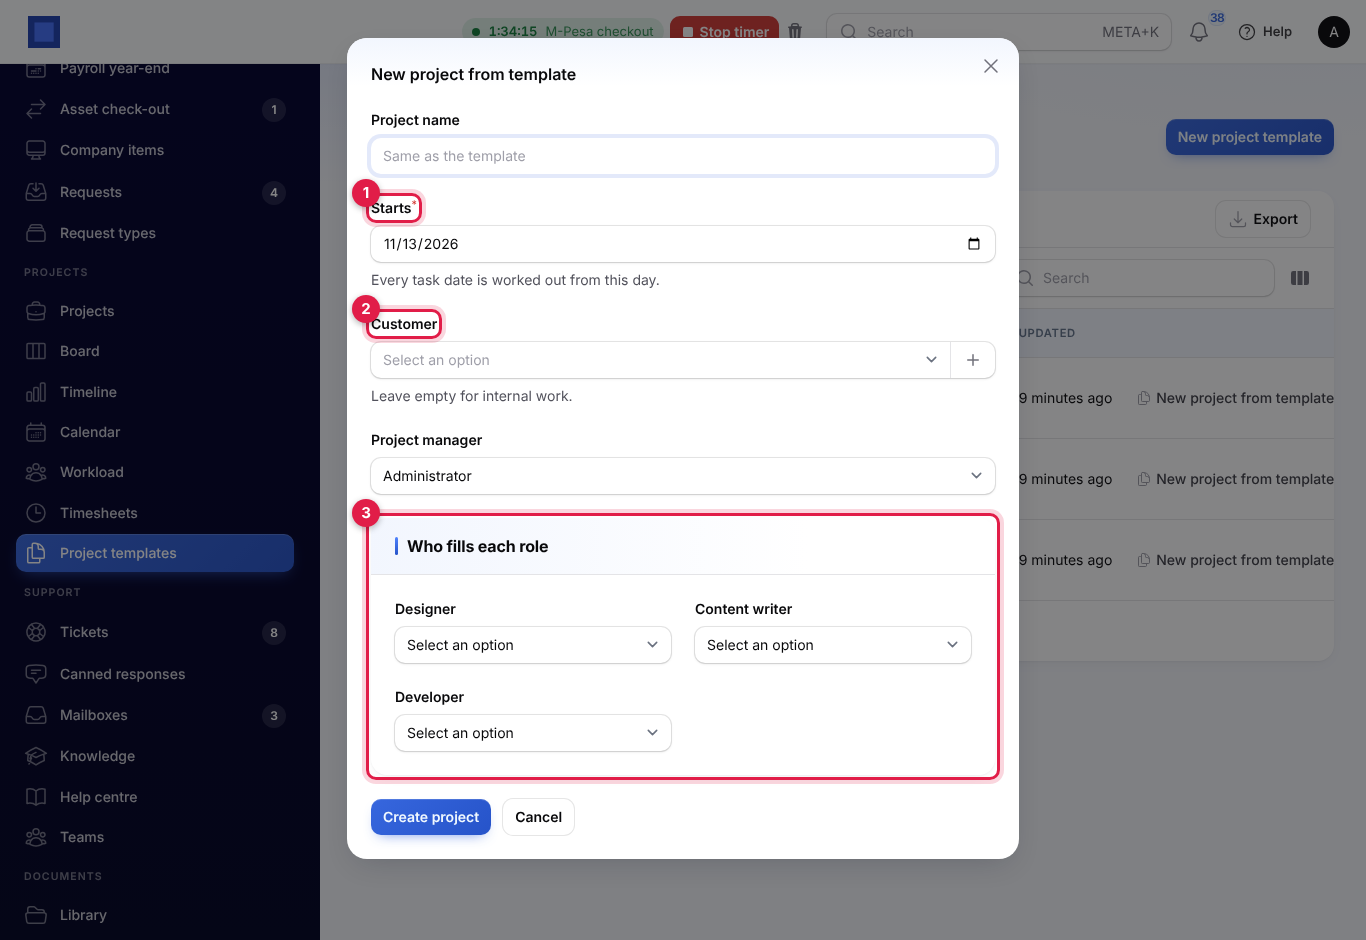
- Press New project from template: on the template's row (marker 2 in the list), on the template's own page, or at the top of Projects → Projects once you have a template, where you also choose the Template.
- Change the Project name if you like; left empty, it is the template's name.
- Choose the day it Starts (marker 1). Every task date is worked out from this day.
- Choose the Customer (marker 2), or leave it empty for internal work.
- Check the Project manager; it starts as you.
- Under Who fills each role (marker 3), choose a person for each role the template's tasks name. A role left empty leaves its tasks unassigned.
- Press Create project. The new project opens.
The project is Active, gets the next project number and your company's currency, and takes the template's billing, rate, budget and description. Its deadline is the start plus the template's length. Every task starts as To do.
Team workload
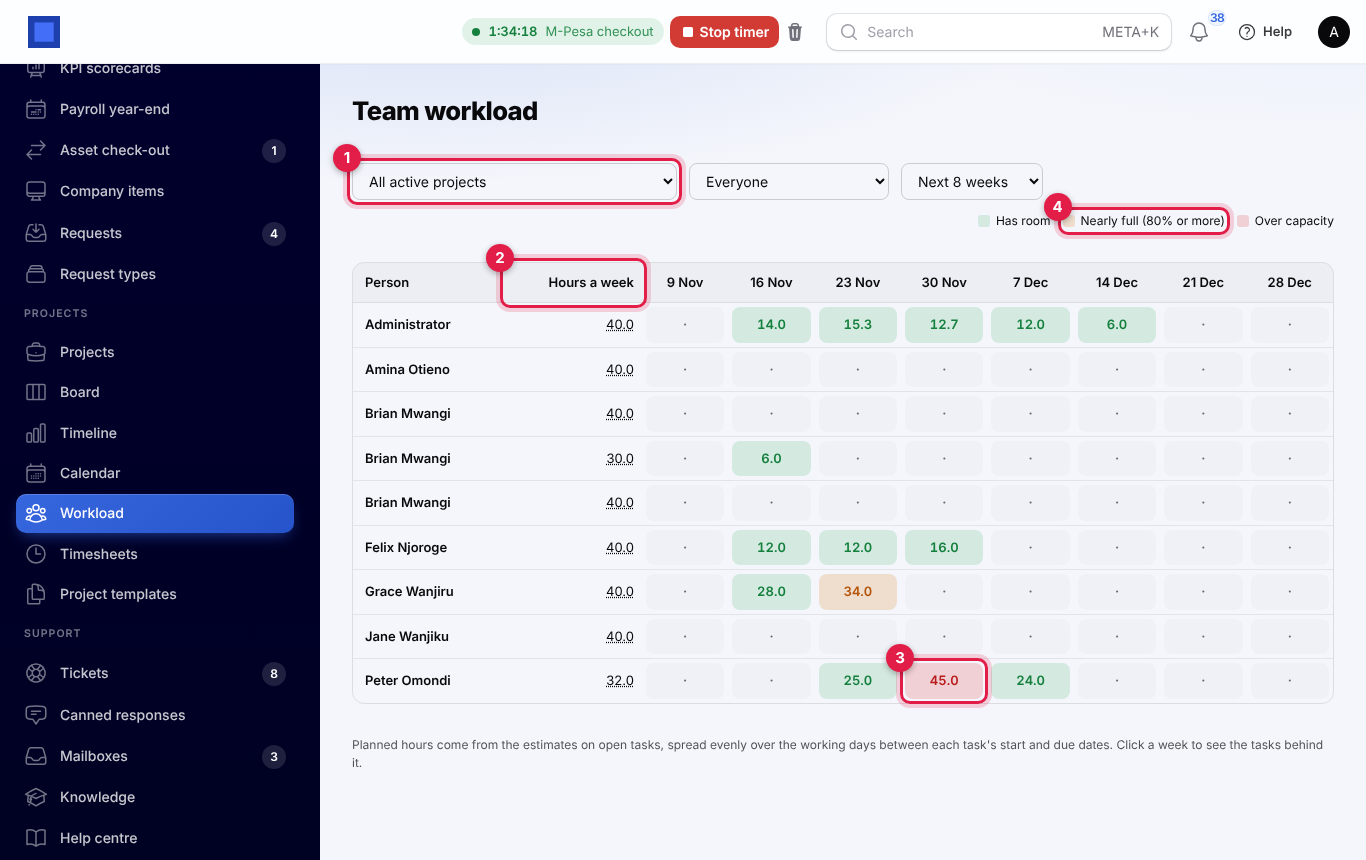
Projects → Workload shows people down the side and the coming weeks across the top, starting with this week. Everyone who can see projects is listed, plus anyone with tasks planned. Each cell is the hours of work planned for that person that week.
How the hours are worked out:
- Only open tasks (not Done) in active projects count, and only those with someone assigned, an Estimate and at least one date.
- Each task's estimate is spread evenly over the working days from its start to its due date. A task with only one date sits on that day. The working days are those ticked under Settings → Preferences → HRM → Working days (Monday to Friday unless you change them).
- Weeks start on the First day of week in your general preferences.
The colours compare the week with the person's hours a week:
| Colour | Means |
|---|---|
| Grey dot | Nothing planned. |
| Green, Has room | Under 80% of their hours. |
| Amber, Nearly full | 80% to 100% (marker 4). |
| Red, Over capacity | More than their hours (marker 3). |
Hover over a cell to see "planned of capacity hours" and the number of tasks.
Filter the view
- All active projects (marker 1): choose one project to see only its tasks, and only the people working on it.
- Everyone: choose a team to see only its members. Sales teams (CRM), support teams (Helpdesk) and departments (HR) are listed, for the apps you have on.
- Next 8 weeks: show 4, 6, 8, 10 or 12 weeks.
See the tasks behind a week
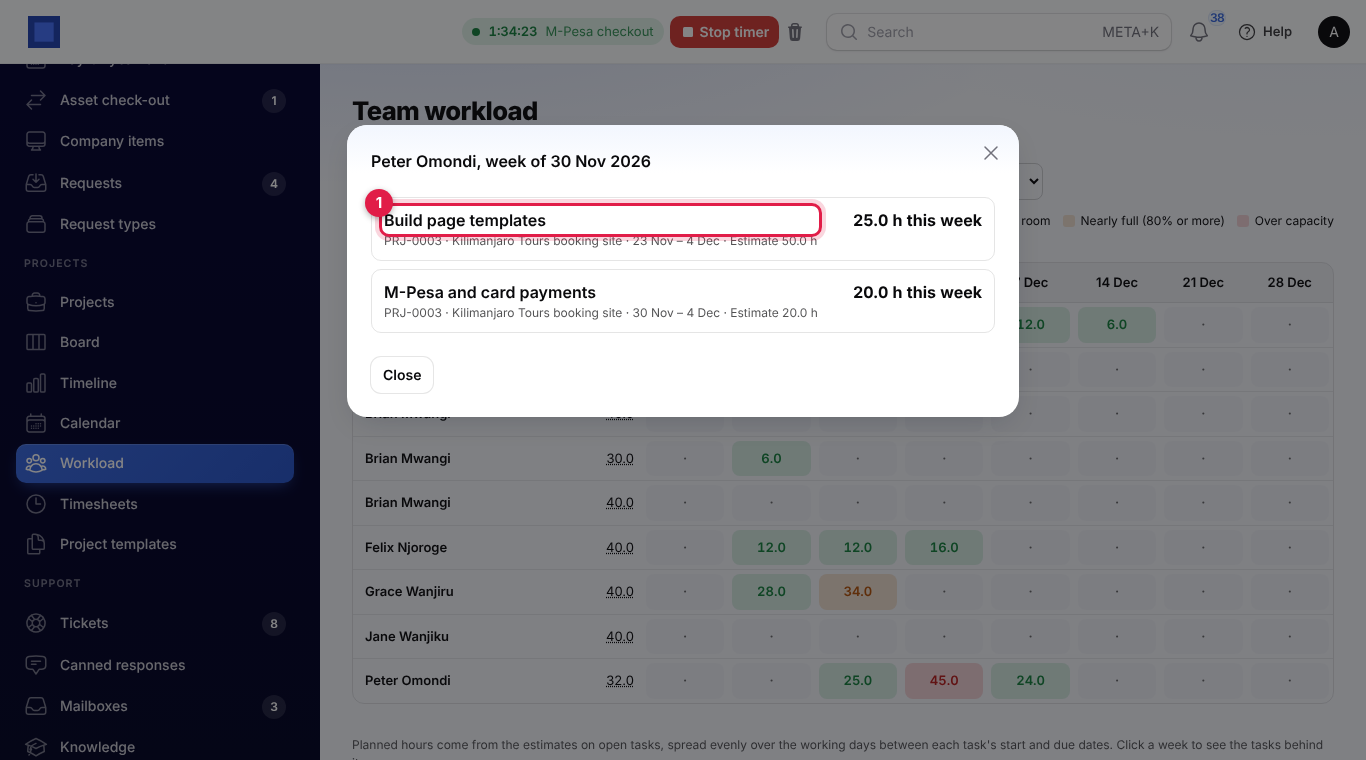
Click a coloured cell. A window lists the tasks planned that week, biggest first (marker 1), each with its project, dates, estimate and the hours it puts in that week. Move a due date or reassign a task on the project to even out a red week.
Hours per week
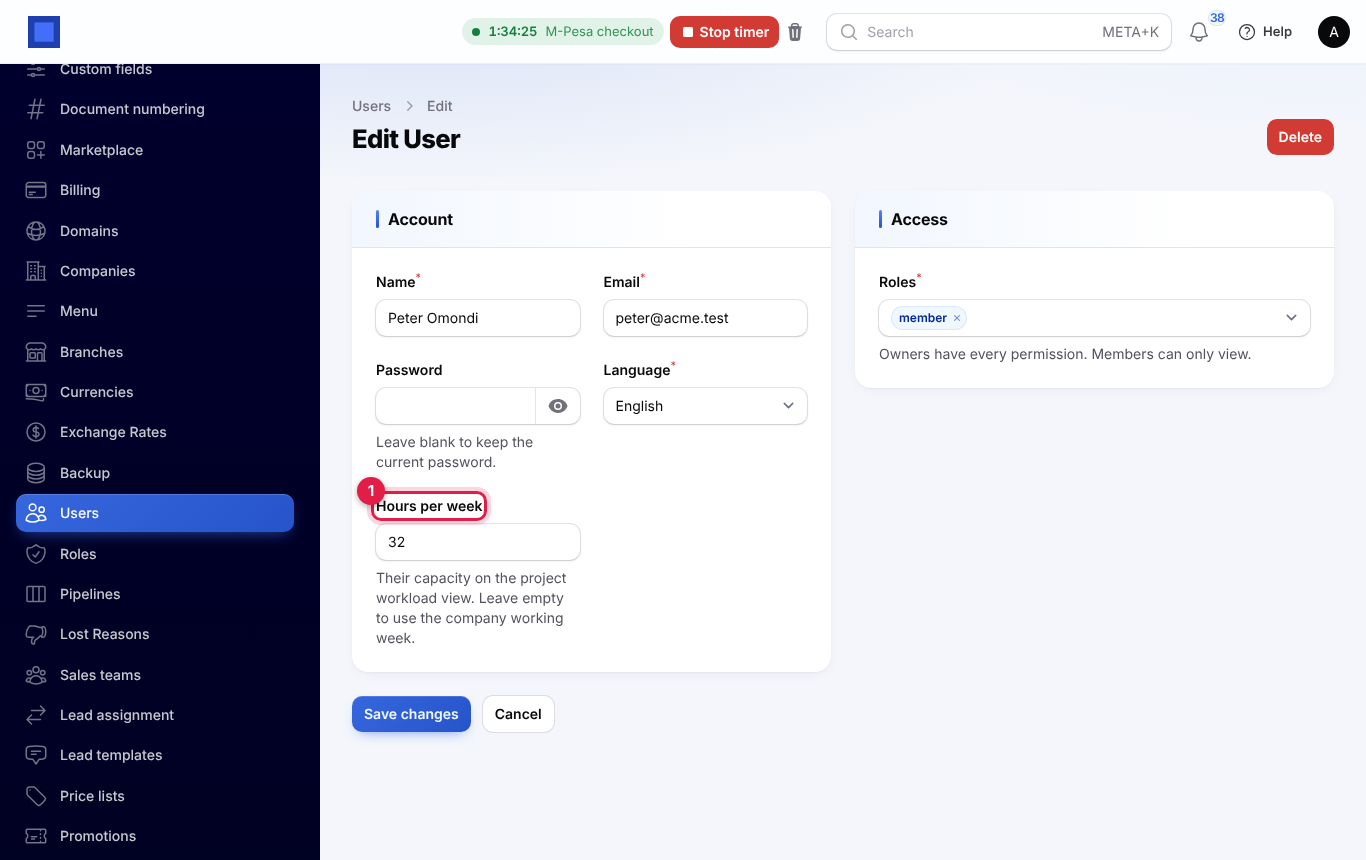
The Hours a week column (marker 2 in the workload screenshot) is each person's capacity. It comes from, in this order:
- Hours per week on their user (under Settings → Users, marker 1 below).
- Hours per week on their employee record, when HR is on and the employee is linked to their login.
- Working hours per week under Settings → Preferences → Projects.
- Otherwise it is worked out from Working hours per month (× 12 ÷ 52), or 40 hours.
With projects.manage, click the number in the Hours a week column to change a person's own hours straight from the workload. Leave it empty to fall back to their employee record or the company's working week. Set 0 for someone who should not be planned: any work then shows red.
Settings
Under Settings → Preferences, open the Projects tab:
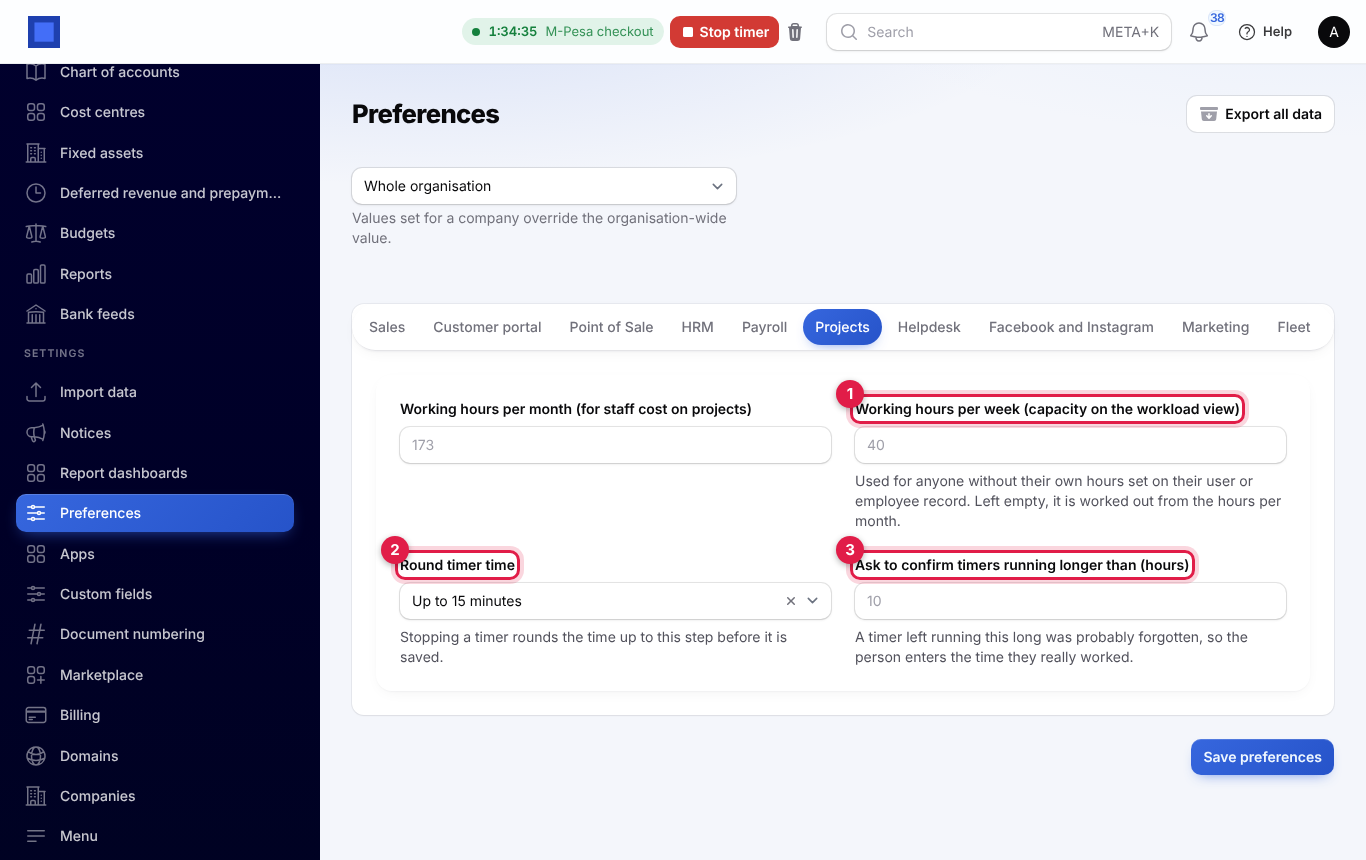
| Setting | What it does |
|---|---|
| Working hours per month (for staff cost on projects) | Used to work out staff cost on projects, and the working week when the next setting is empty. |
| Working hours per week (capacity on the workload view) (marker 1) | The capacity for anyone without their own hours on their user or employee record. Empty means it is worked out from the hours per month, or 40. |
| Round timer time (marker 2) | No rounding, or round up to 5, 6 (a tenth of an hour), 10 or 15 minutes when a timer stops. |
| Ask to confirm timers running longer than (hours) (marker 3) | From 1 to 24. Empty means 10. Longer timers ask for the time really worked before saving. |
Press Save preferences.
Good to know
- One timer per person. Starting a second one tells you "You already have a timer running. Stop it before you start another." Colleagues each have their own.
- A project put on hold cannot be timed; its tasks leave the timer's list and the workload.
- If the task or ticket is deleted while the timer runs, stopping it says so: discard the timer instead.
- Timer time still needs approval. It arrives as a submitted timesheet entry, like time logged by hand.
- The workload is a plan, not a timesheet. It uses estimates and dates, not time logged, so keep estimates and due dates up to date. Tasks without an estimate, a date or an assignee are left out.
- Changing a template does not change projects already created from it.
- Templates belong to a company. A new project from a template is created in the template's company, with its customers.