Online courses
Online courses is for training businesses, colleges, coaches and any company that trains its own staff. You build courses from modules and lessons (videos, reading, files to download and multiple-choice quizzes), sell them on a public catalogue at /courses or give them free, and learners study in your customer portal on their phone or computer. They pick up where they left off, open lessons in order if you want them to, and download a certificate with a code anyone can check. With HR switched on you can also assign courses to employees as training, and the completed course is recorded on their HR record with a skill.
It is in the Online courses group of the left menu: Courses, Learners and Instructor reports.
Note: You need the courses.view permission to see courses, learners and reports and to download certificates, and courses.manage to create and change courses, enrol learners, assign courses to employees and cancel enrolments. Owners and admins have both. Set permissions under Settings → Roles.
Switch on Online courses
Online courses is an add-on sold separately from your plan. It needs the Contacts, Invoicing and Customer portal apps.
- Open Settings → Marketplace and type Online courses in the search box (marker 1).
- On the Online courses card (marker 2), click Start free trial (or Add to subscription) and confirm. The Online courses group appears in the menu, the catalogue goes live at
/courseson your workspace address, and learners get My courses in the portal.
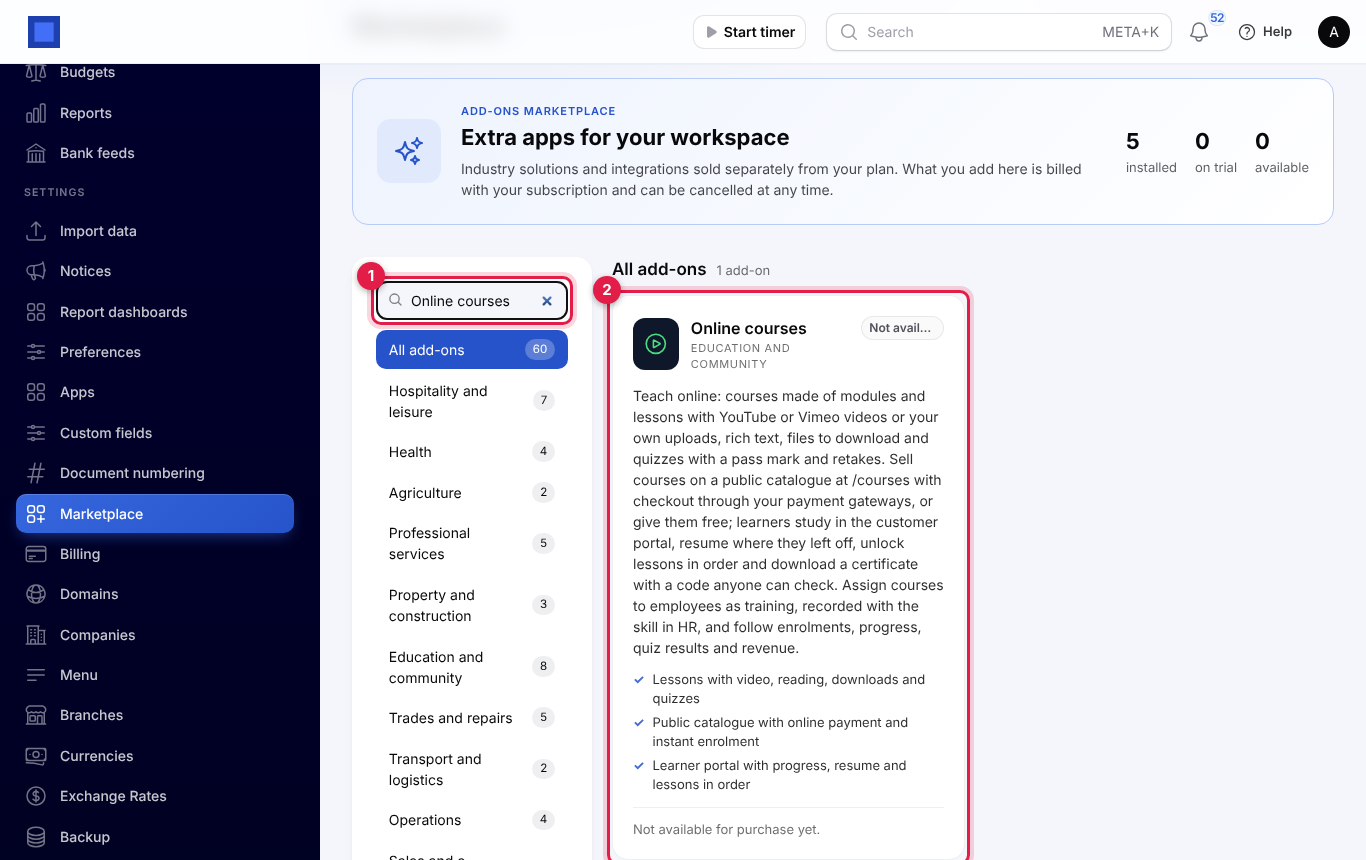
If the card says Not available for purchase yet, ask NaliSuite support to switch it on. See Billing and marketplace.
Course settings
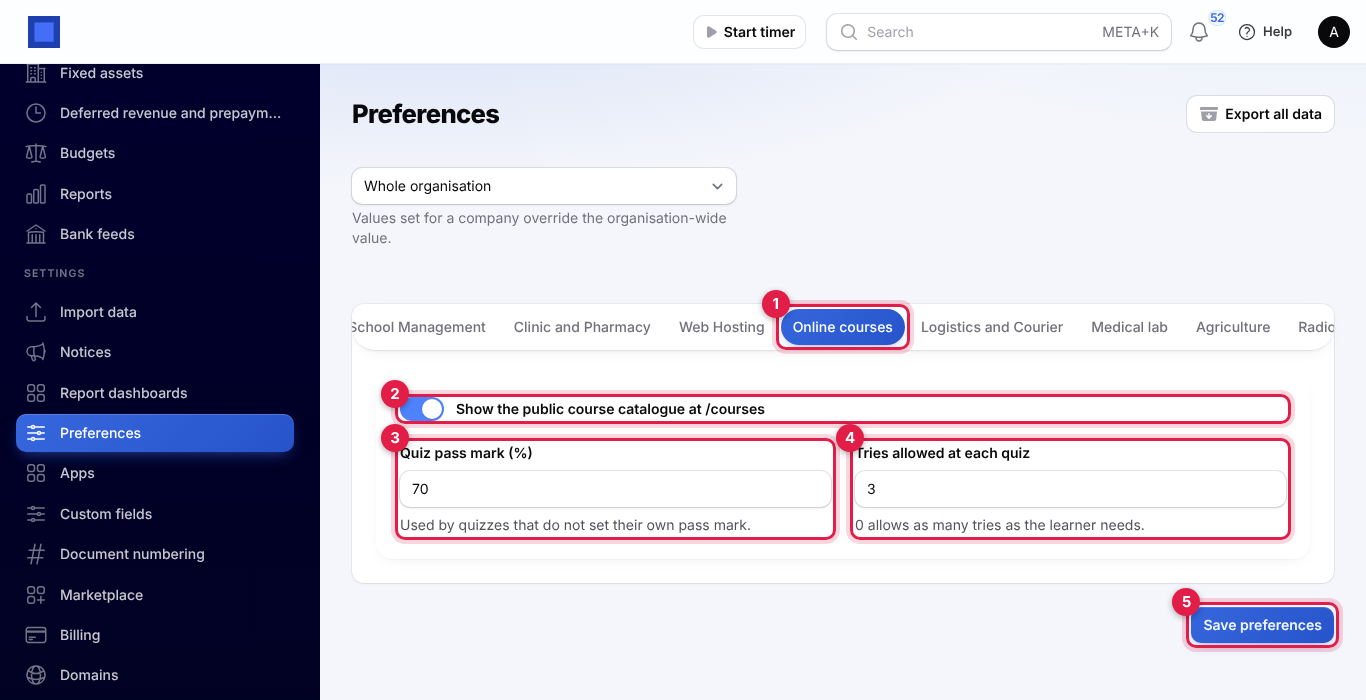
- Open Settings → Preferences and click the Online courses tab (marker 1).
- Change the settings and click Save preferences (marker 5).
| Setting | Default | What it does |
|---|---|---|
| Show the public course catalogue at /courses (marker 2) | On | Turns the public catalogue and course pages on or off. Off: /courses shows "not found" and nobody can sign up online. Learners already enrolled keep learning in the portal, and certificate checks still work. |
| Quiz pass mark (%) (marker 3) | 70 | The score needed to pass a quiz that does not set its own pass mark. |
| Tries allowed at each quiz (marker 4) | 0 | How many times a learner may take each quiz. 0 allows as many tries as they need. |
Create a course
- Open Online courses → Courses. Each course shows its Price (marker 3, or Free), how many Lessons and Learners it has, whether lessons open In order (marker 4) and whether it is Public (marker 5). Open page (marker 6) opens a public course's page in a new tab, and Open the catalogue (marker 2) opens
/courses.
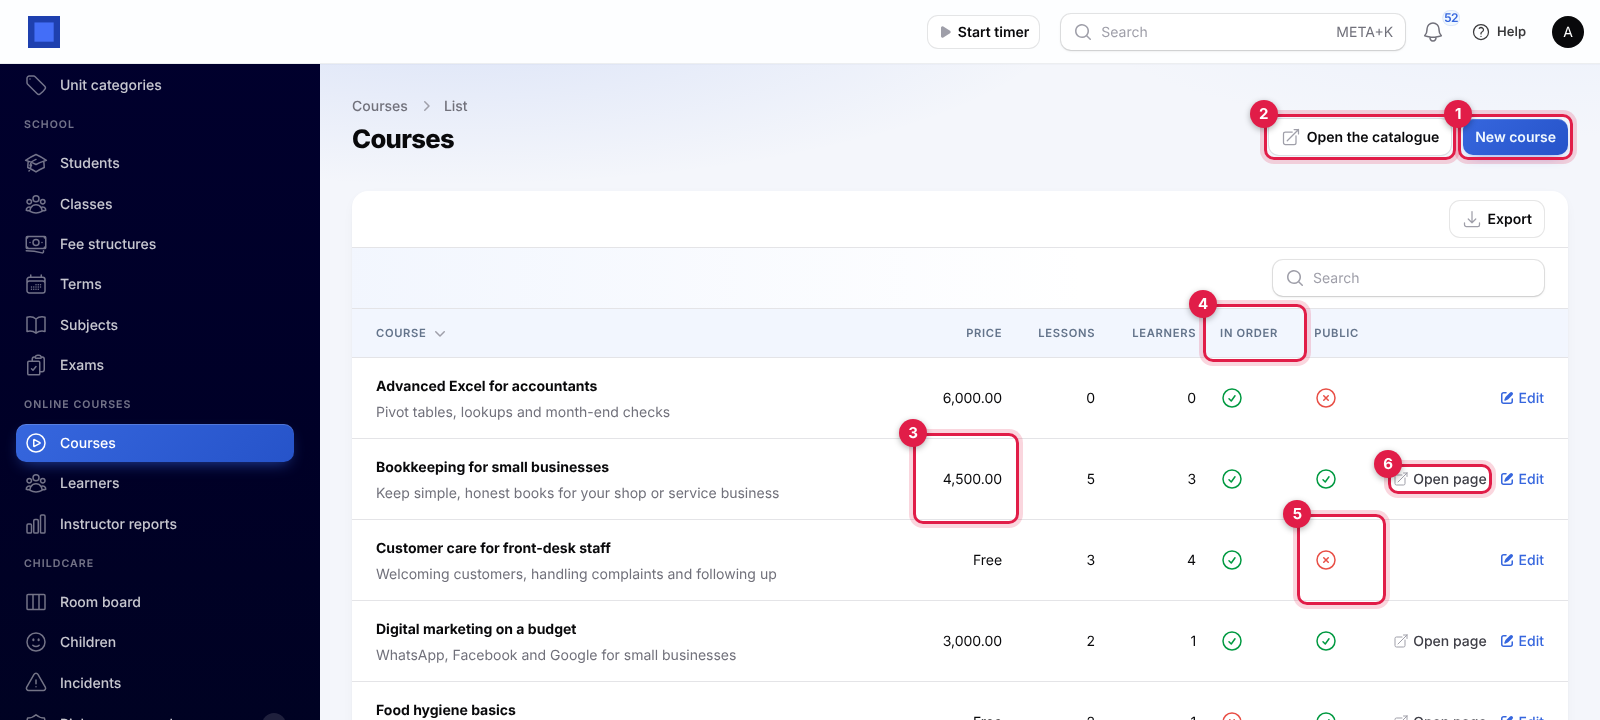
- Click New course (marker 1) and fill in the form.
| Field | What to enter |
|---|---|
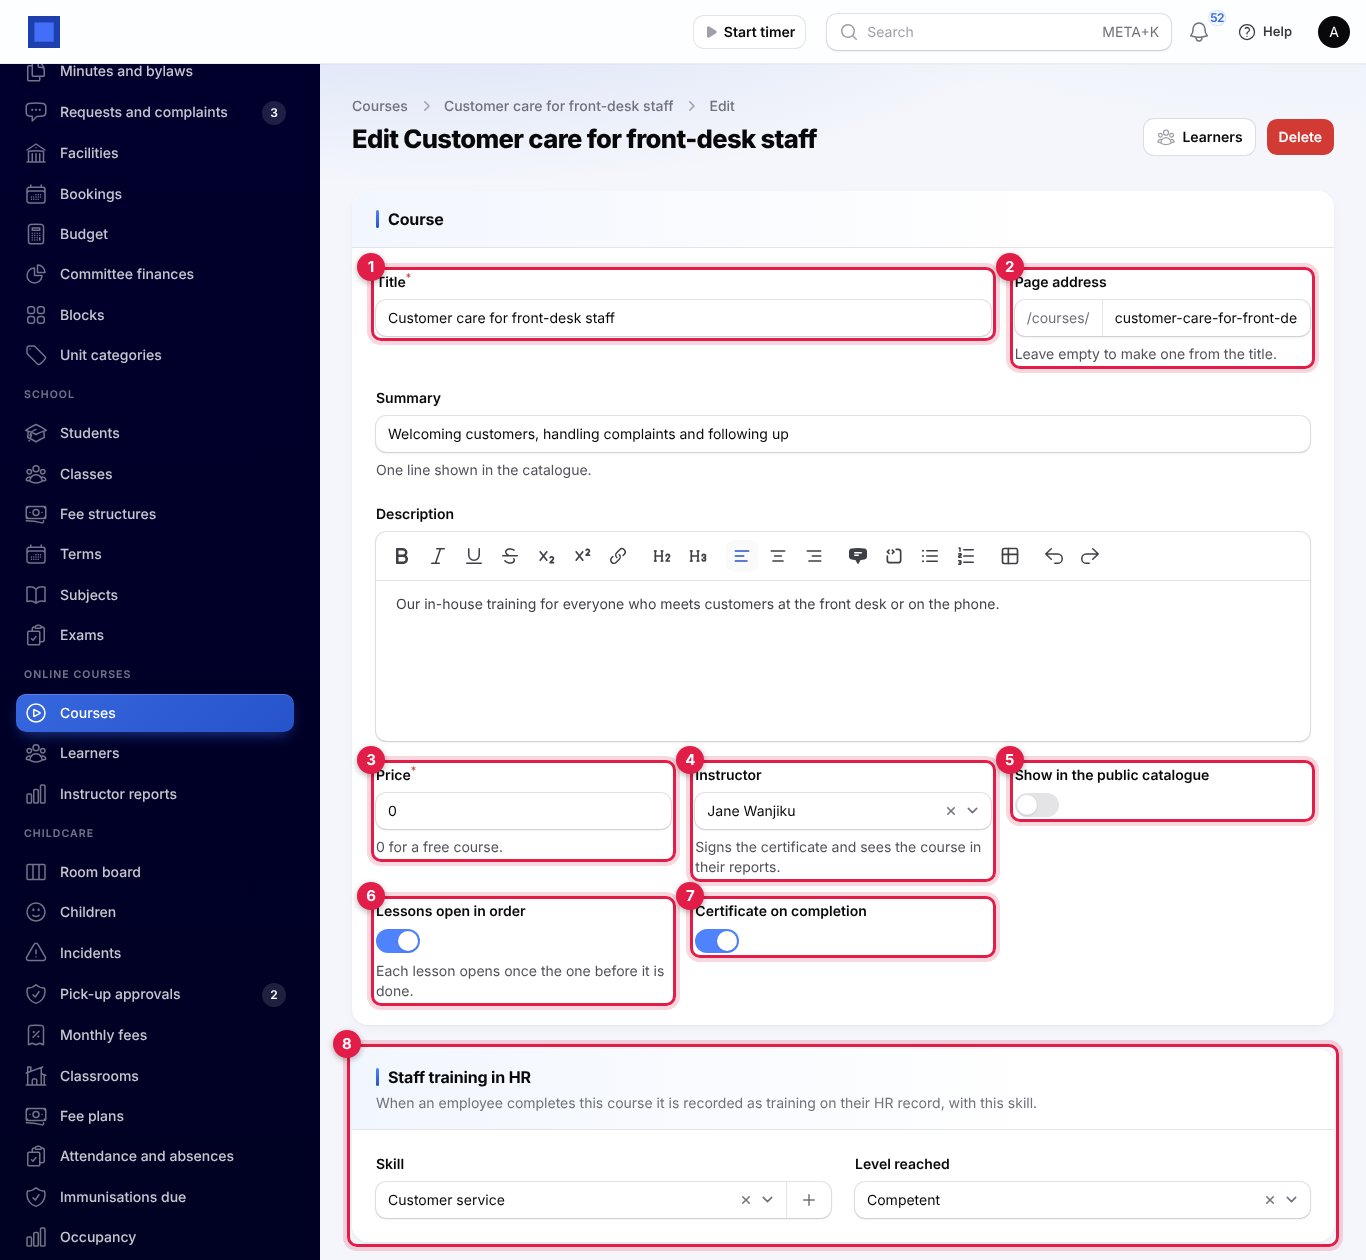
| Title (required, marker 1) | Bookkeeping for small businesses. |
| Page address (marker 2) | The end of the course page's address, /courses/…. Leave it empty and it is made from the title, for example bookkeeping-for-small-businesses. Letters, numbers and dashes only. |
| Summary | One line shown under the title in the catalogue. |
| Description | The full text on the course page: who it is for, what they will learn, how long it takes. |
| Price (required, marker 3) | The price in your currency. 0 makes the course free. |
| Instructor (marker 4) | A user of your workspace. Their name is printed on the certificate as instructor, and they can filter the reports to their own courses. |
| Show in the public catalogue (marker 5) | On to list the course at /courses and let people sign up. Leave it off while you build the course, or for staff-only training. |
| Lessons open in order (marker 6) | On: each lesson opens only once the one before it is done. Off: learners can take lessons in any order. |
| Certificate on completion (marker 7) | On (default): finishing the course gives the learner a certificate with a code. |
| Staff training in HR (marker 8, only with HR on) | The Skill an employee gains when they complete the course and the Level reached (default 3). Pick a skill or click + to add one. See Staff training with HR. |
- Click Create. The course's page opens, with Modules and Lessons tabs below the form. At the top, Learners opens the learners on this course, Open page opens the public page (public courses only) and Delete removes the course.
Add modules
Modules are the headings lessons are grouped under, such as Getting started and Check yourself. Add them before the lessons.
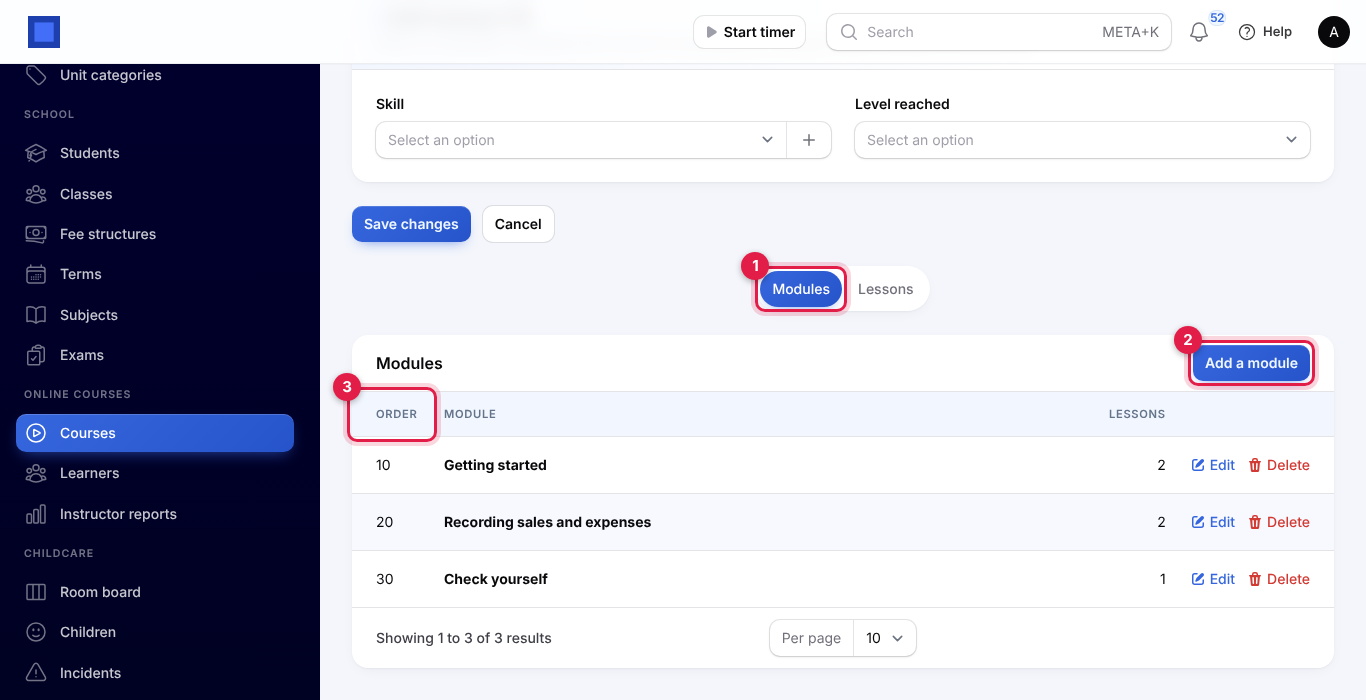
- On the course, click the Modules tab (marker 1), then Add a module (marker 2).
- Type the Module name and its Order (marker 3). Modules are shown from the lowest number up; the order is filled in 10, 20, 30… for you. Click Create.
Add lessons
- Click the Lessons tab (marker 1). Lessons are listed module by module, each with its Kind (marker 3) and, for quizzes, the number of Questions (marker 4).
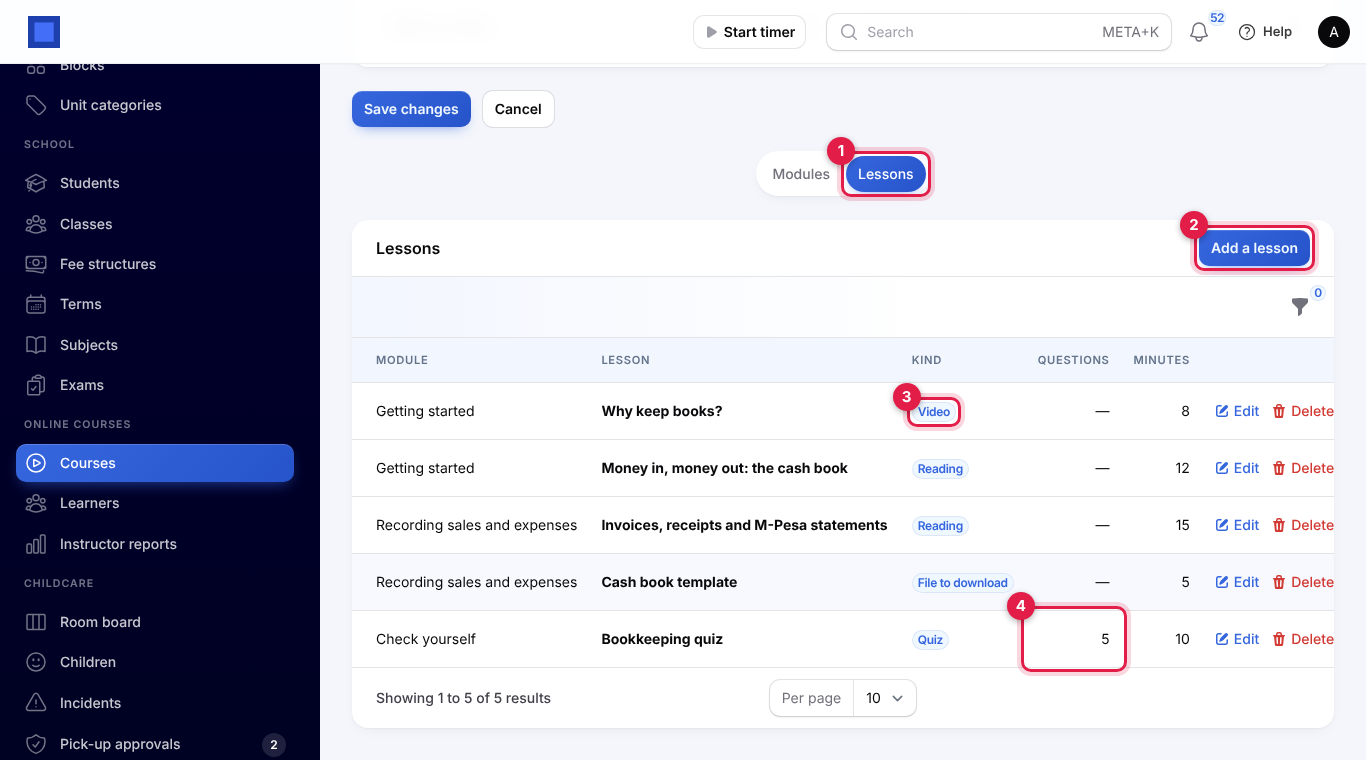
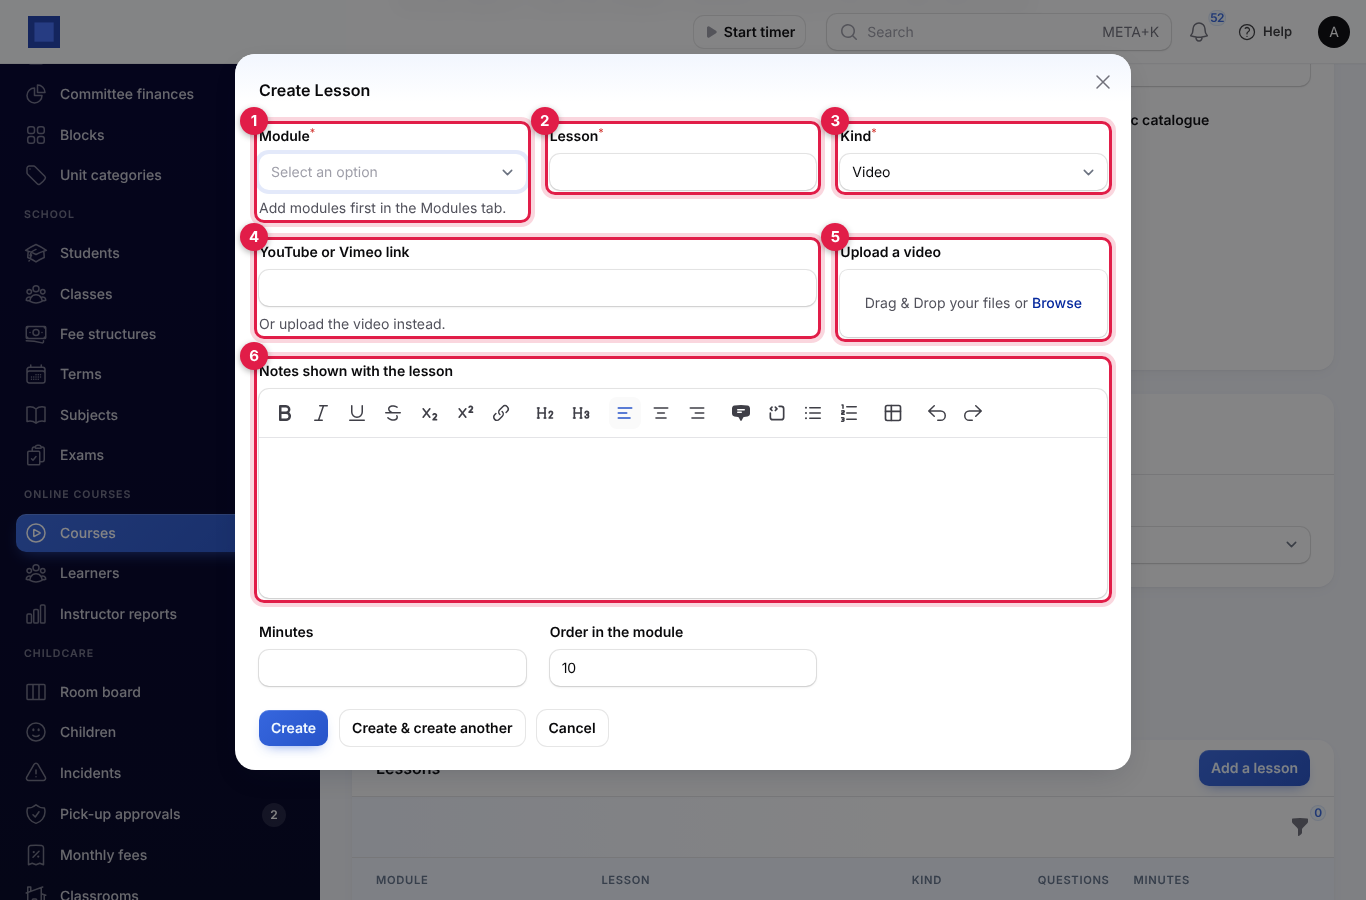
- Click Add a lesson (marker 2) and fill in the window.
| Field | What to enter |
|---|---|
| Module (required, marker 1) | The module the lesson belongs to. |
| Lesson (required, marker 2) | The lesson title. |
| Kind (required, marker 3) | Video, Reading, File to download or Quiz. The fields below change with it. |
| YouTube or Vimeo link (marker 4, video) | The address of the video. YouTube and Vimeo videos play inside the lesson; any other link shows a Watch the video button. |
| Upload a video (marker 5, video) | Or upload your own video instead: MP4, WebM, OGG or QuickTime, up to 500 MB. It plays in the lesson and only signed-in learners on the course can reach it. |
| File to download (file lessons) | The file learners download, up to 50 MB, for example a template or worksheet. |
| Lesson text / Notes shown with the lesson (marker 6) | For a reading, the lesson itself. For the other kinds, notes shown with the video, file or quiz. |
| Minutes | How long the lesson takes, shown on the course page. |
| Order in the module | Lessons are shown from the lowest number up within their module. |
- Click Create. Use Edit and Delete on a row to change or remove a lesson.
Build a quiz
Choose Quiz as the Kind. A Quiz section appears.
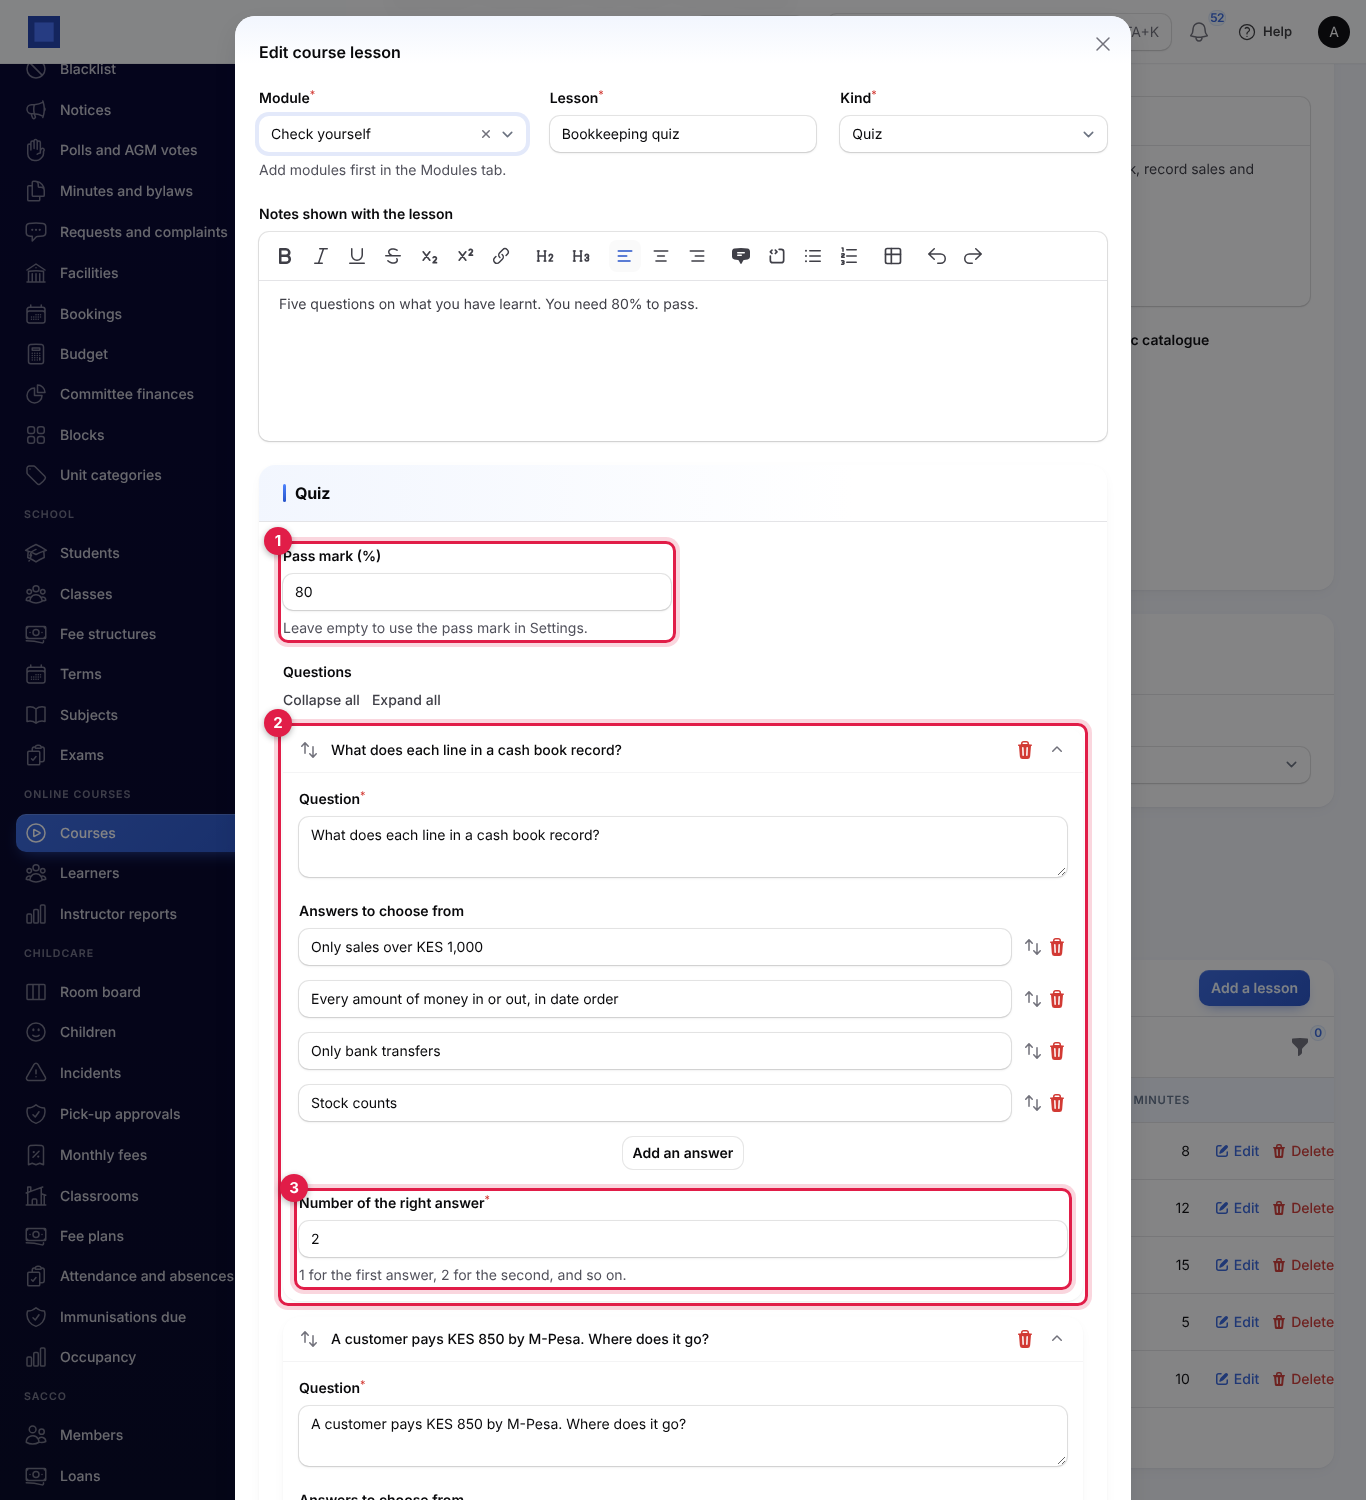
- Type a Pass mark (%) (marker 1), or leave it empty to use the pass mark in Settings.
- Click Add a question for each question (marker 2). Type the Question and the Answers to choose from (two to eight; four boxes are ready, Add an answer adds more).
- In Number of the right answer (marker 3), type which answer is correct: 1 for the first, 2 for the second, and so on.
- Click Save changes.
Quizzes are multiple choice only, with one right answer per question. The score is the share of questions answered correctly, rounded down: 3 right out of 5 is 60%.
The public catalogue
Your catalogue is at /courses on your workspace address, for example https://yourbusiness.nalisuite.com/courses. Link to it from your website. It lists every course with Show in the public catalogue on, with its summary, number of lessons and price.
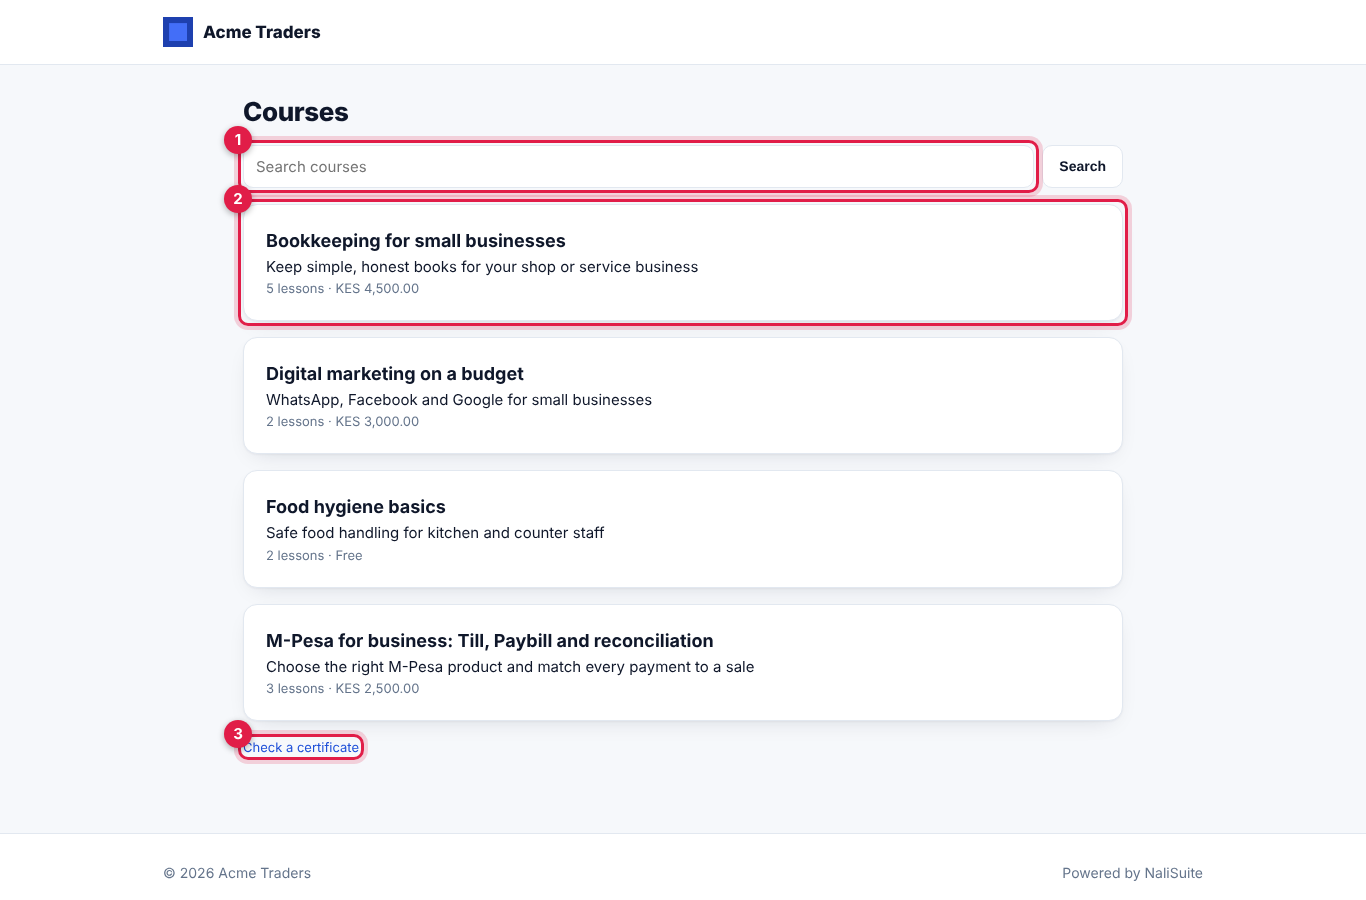
- Visitors can search by title or summary (marker 1) and open a course (marker 2).
- Check a certificate (marker 3) opens the certificate check page (see Certificates).
The course page shows the description and What you will learn (marker 1): each module with its lessons, their kind and minutes, and whether there is a certificate.
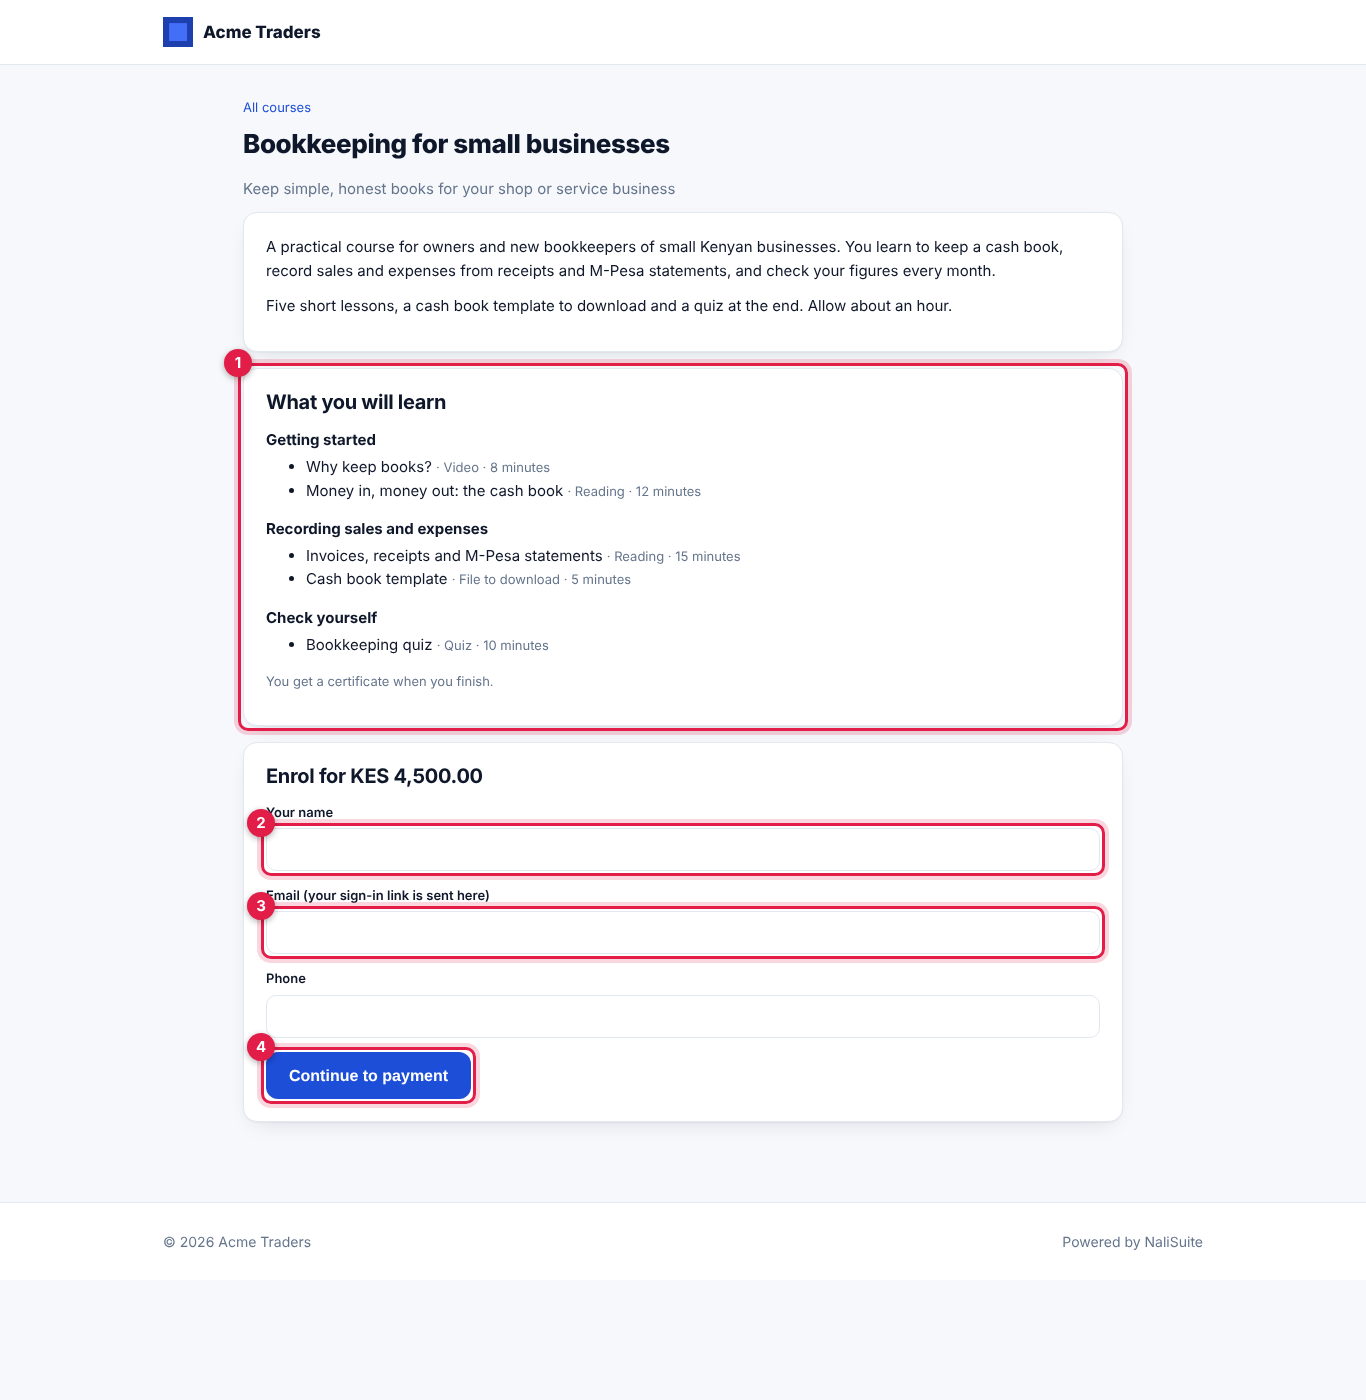
To sign up, the visitor types Your name (marker 2), Email (marker 3, where the sign-in link is sent) and, optionally, Phone, then clicks the button (marker 4):
- Paid course, Continue to payment: they are matched to your contacts by email, or added as a new customer. An invoice is issued for the course (Online course: Bookkeeping for small businesses, at the course price, without tax, due today) and they go straight to its pay page to pay by M-Pesa, card or bank (see Get paid online with the pay link). The enrolment shows Waiting for payment. As soon as the invoice is paid in full, online or when you record the payment by hand, the course opens and the learner is emailed You are enrolled on… with a Start learning button that signs them in to the portal.
- Free course, Enrol now: the course opens at once, they see a welcome page with Sign in to the portal, and the same email is sent.
If the learner has no portal access yet, it is created for them with that email address. Someone who signs up twice for the same course keeps their first enrolment.
Learners and enrolments
Open Online courses → Learners. Everyone on a course is listed, newest first. The page is titled Enrolments.
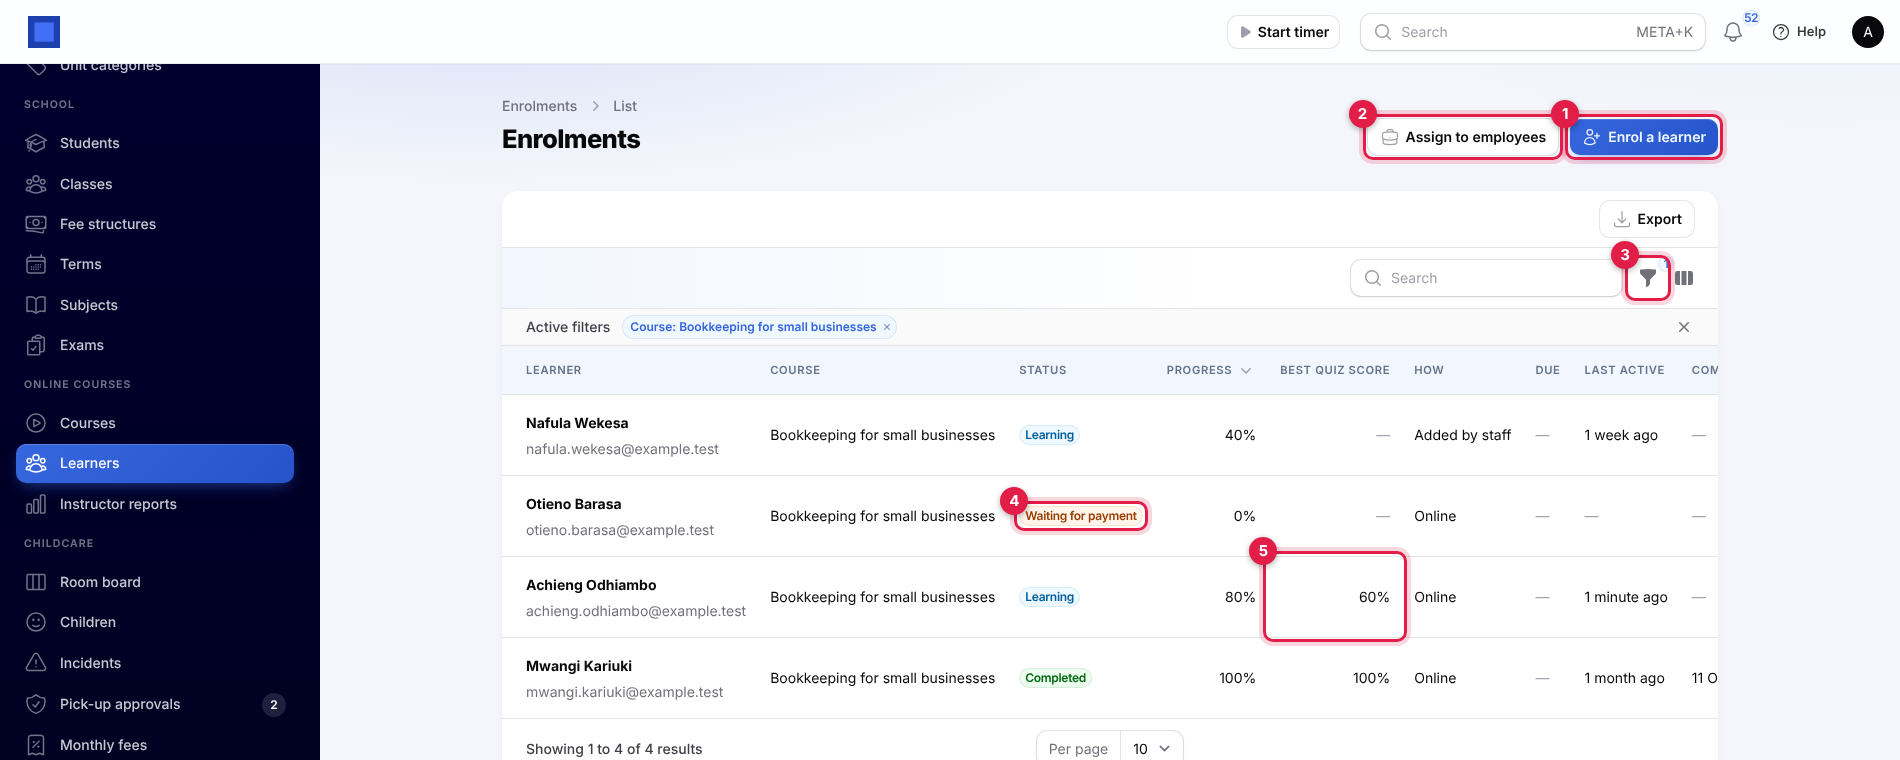
| Column | What it shows |
|---|---|
| Learner | The learner's name, with Employee or their email underneath. |
| Status | Waiting for payment (marker 4), Learning, Completed or Cancelled. |
| Progress | The share of the course's lessons done. |
| Best quiz score (marker 5) | Their best score at any quiz. |
| How | Online (signed up on the catalogue), Added by staff or Staff training. |
| Due, Last active, Completed | The finish-by date of staff training, when they last opened or finished a lesson, and when they completed the course. |
| Certificate | The certificate code. Click it to copy. |
Use the filter (marker 3) to show one Course, one Status, Staff training only or Past the due date (staff still learning after their finish-by date).
The buttons at the end of each row:
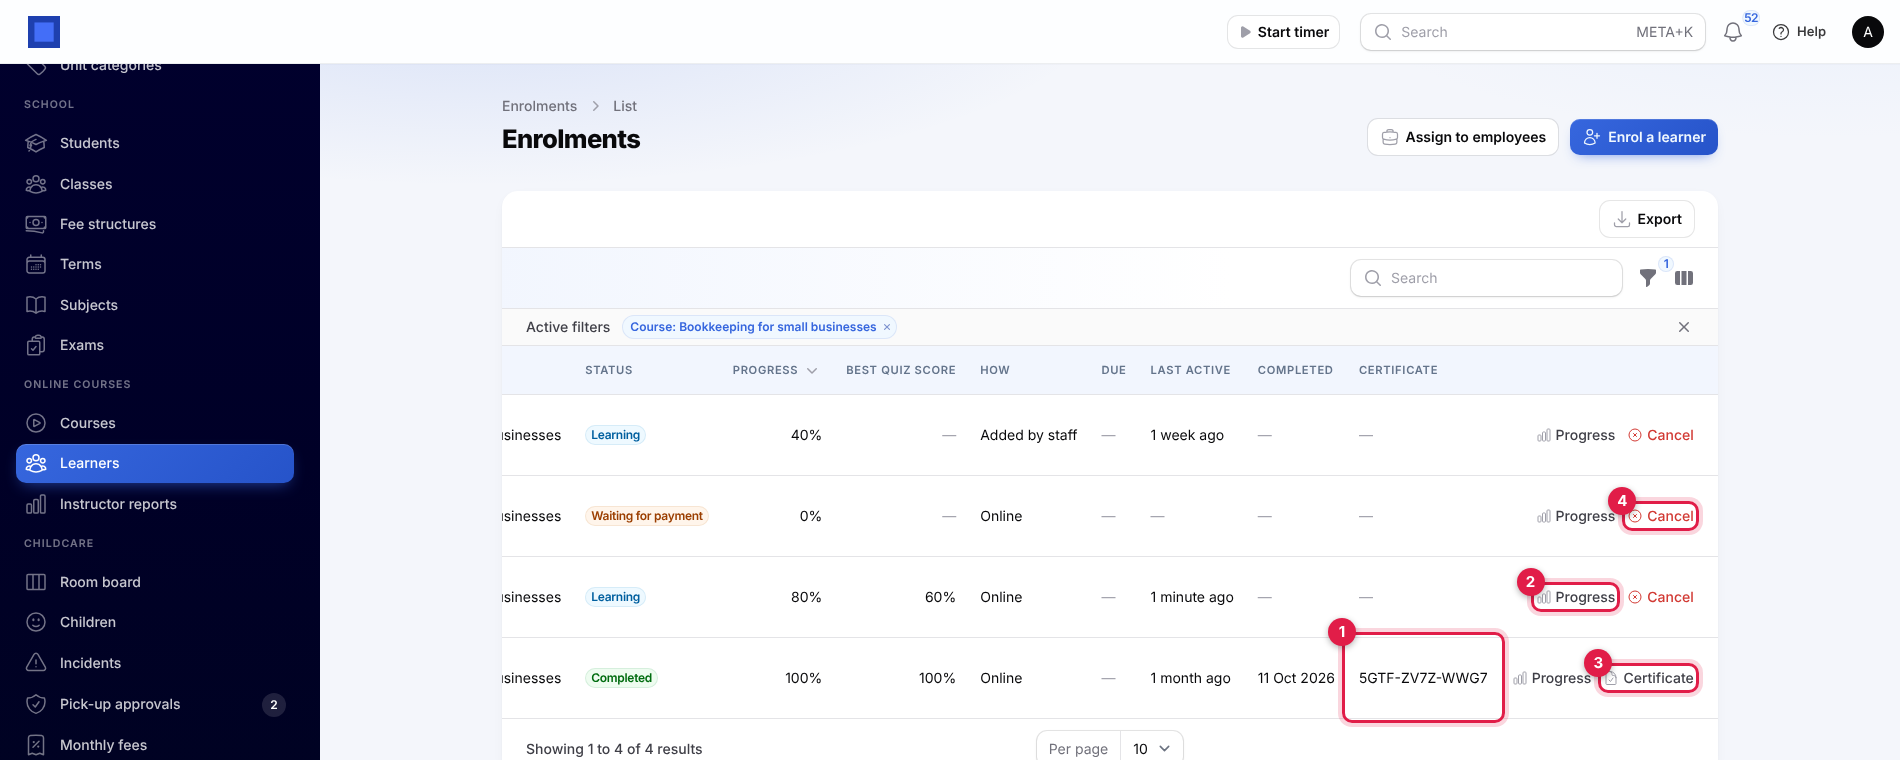
- Certificate code (marker 1) and Certificate (marker 3): the code, and the certificate PDF to print or send.
- Progress (marker 2): the learner's lesson-by-lesson record (below).
- Cancel (marker 4): see Cancel an enrolment.
Enrol a learner yourself
Use this for someone who paid at your office, a scholarship, or a group you are teaching.
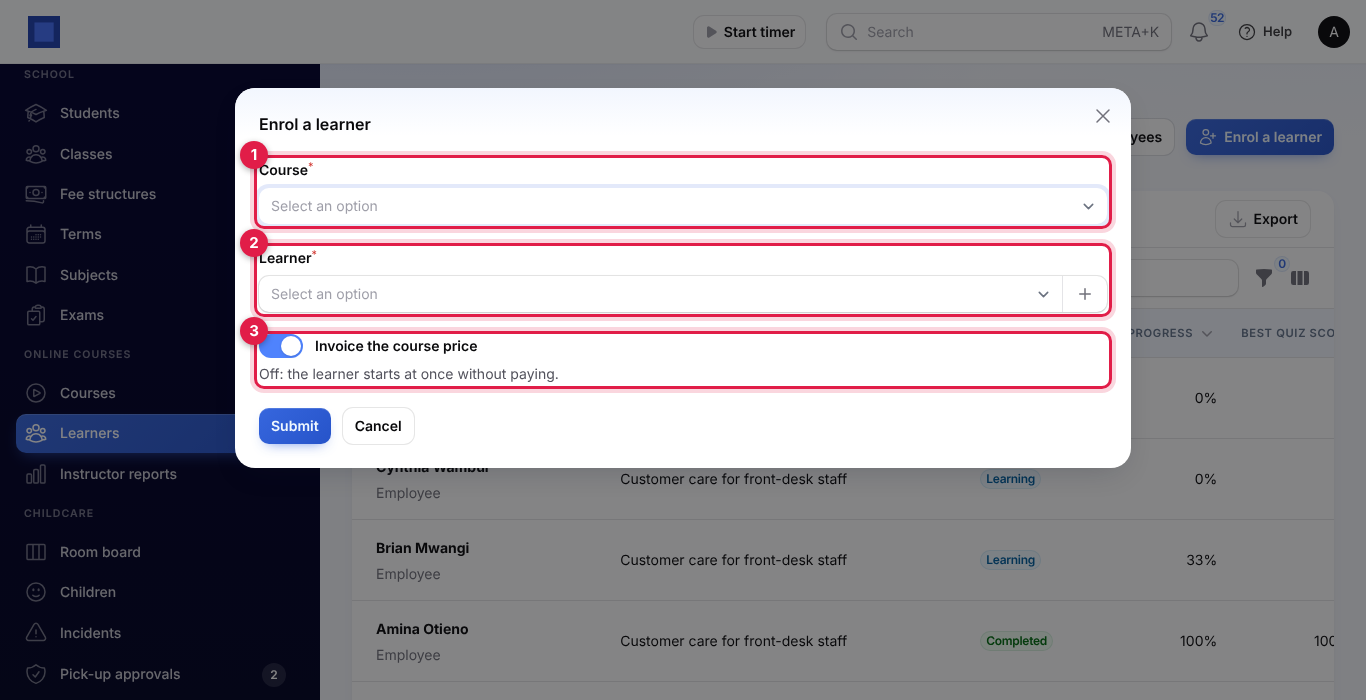
- Click Enrol a learner (marker 1 on the enrolments list).
- Choose the Course (marker 1) and the Learner (marker 2). Search your contacts by name or email, or click + to add a new one with their Name and Email.
- Leave Invoice the course price (marker 3) on to invoice them; the course opens once the invoice is paid. Turn it off to let them start at once without paying.
- Click Submit. You see Enrolled. The course opens once the invoice is paid. or Enrolled. The learner has been emailed a link to start.
Free courses never raise an invoice, whatever the switch says.
Follow a learner's progress
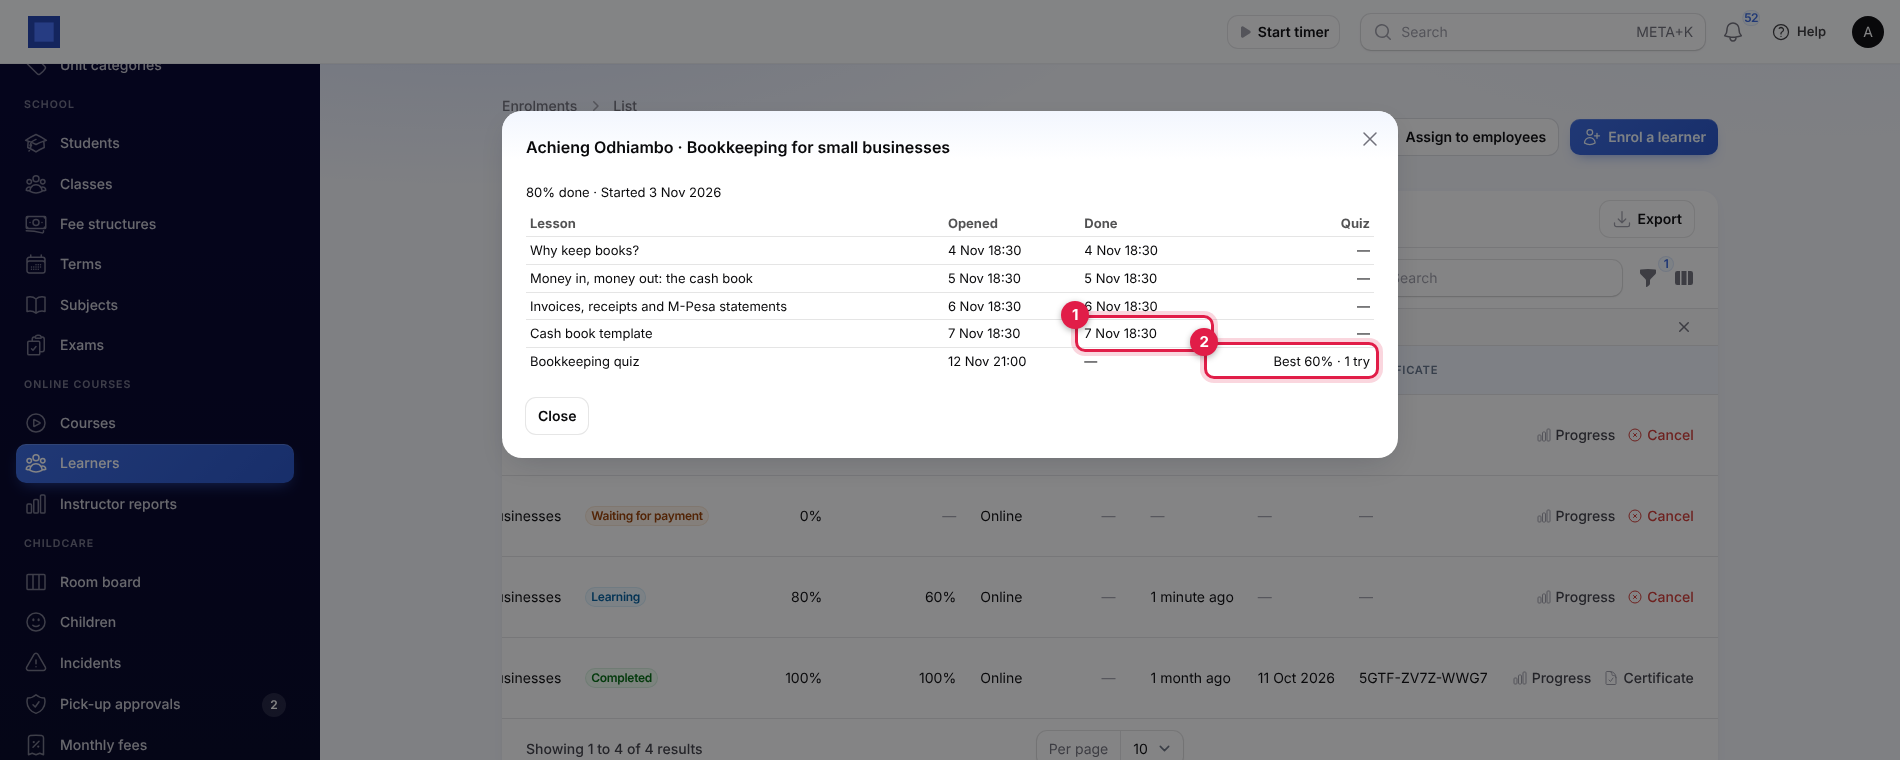
Click Progress on a row. The window shows how much is done and when they started, then each lesson with when it was Opened, when it was Done (marker 1) and, for quizzes, their best score, the number of tries and whether they passed (marker 2).
Cancel an enrolment
Click Cancel on a learner who is waiting for payment or learning, and confirm. They lose access to the course at once. If the course invoice has had no payment, it is cancelled too; a part-paid or paid invoice is left for you to credit (see Credit notes, debit notes and cancelling). A completed course cannot be cancelled.
Staff training with HR
When HR is switched on, you can give courses to employees as training, free of charge.
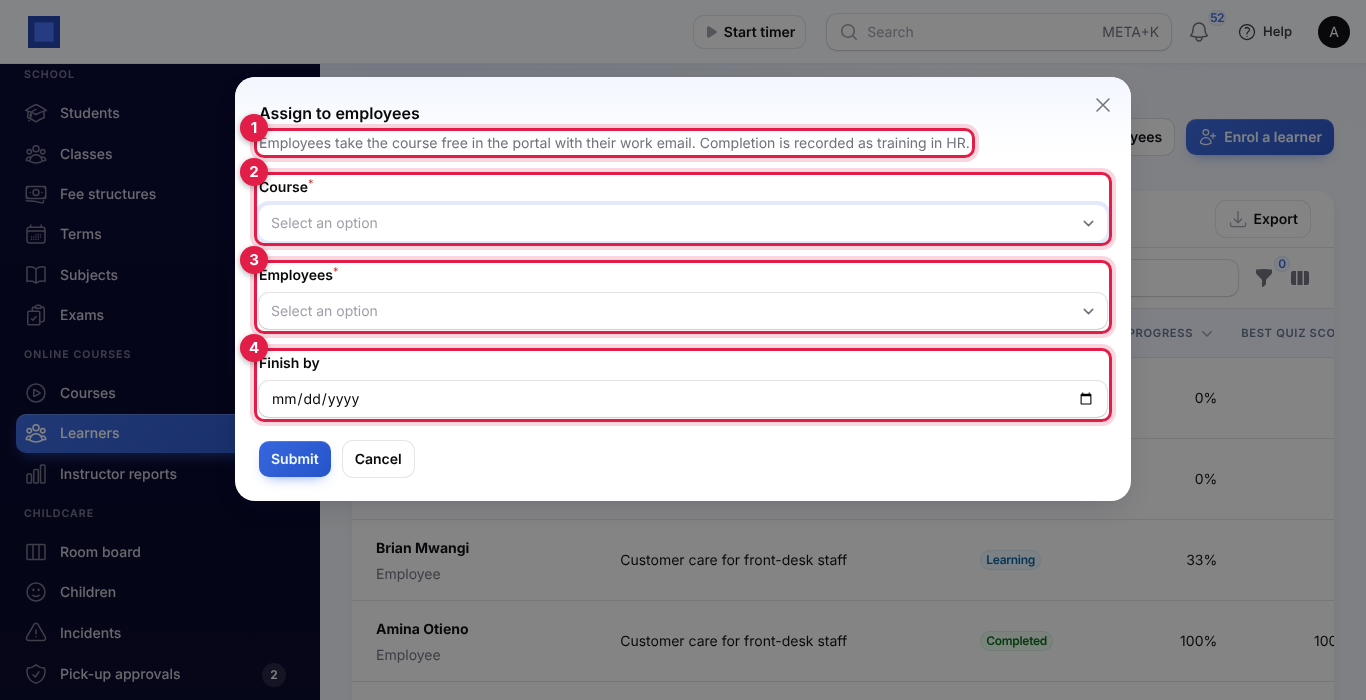
- On Online courses → Learners, click Assign to employees (marker 2 on the enrolments list).
- Read the note at the top (marker 1), then choose the Course (marker 2), the Employees (marker 3; everyone who has not left) and, if you like, Finish by (marker 4). Click Submit.
What happens:
- Each employee is enrolled through their work email on their HR record, and emailed Training for you: Customer care for front-desk staff with the finish-by date and a sign-in button. They take the course in the customer portal, with that email, like any other learner. There is no separate employee screen for courses.
- An employee with no email address is skipped, and the message names them: Grace Njeri has no email address. Add their email in HR and assign again.
- Their row on Learners shows Employee and How: Staff training. Use Past the due date to see who is late.
- When they complete the course, a training called after the course (provider Online course) is added in HRM → Training if it is not there yet, the employee is recorded on it as completed with their average best quiz score, and they get the course's Skill at the Level reached. See Run training and track skills.
The course does not have to be in the public catalogue to be assigned, so keep in-house training private with Show in the public catalogue off.
Learning in the portal
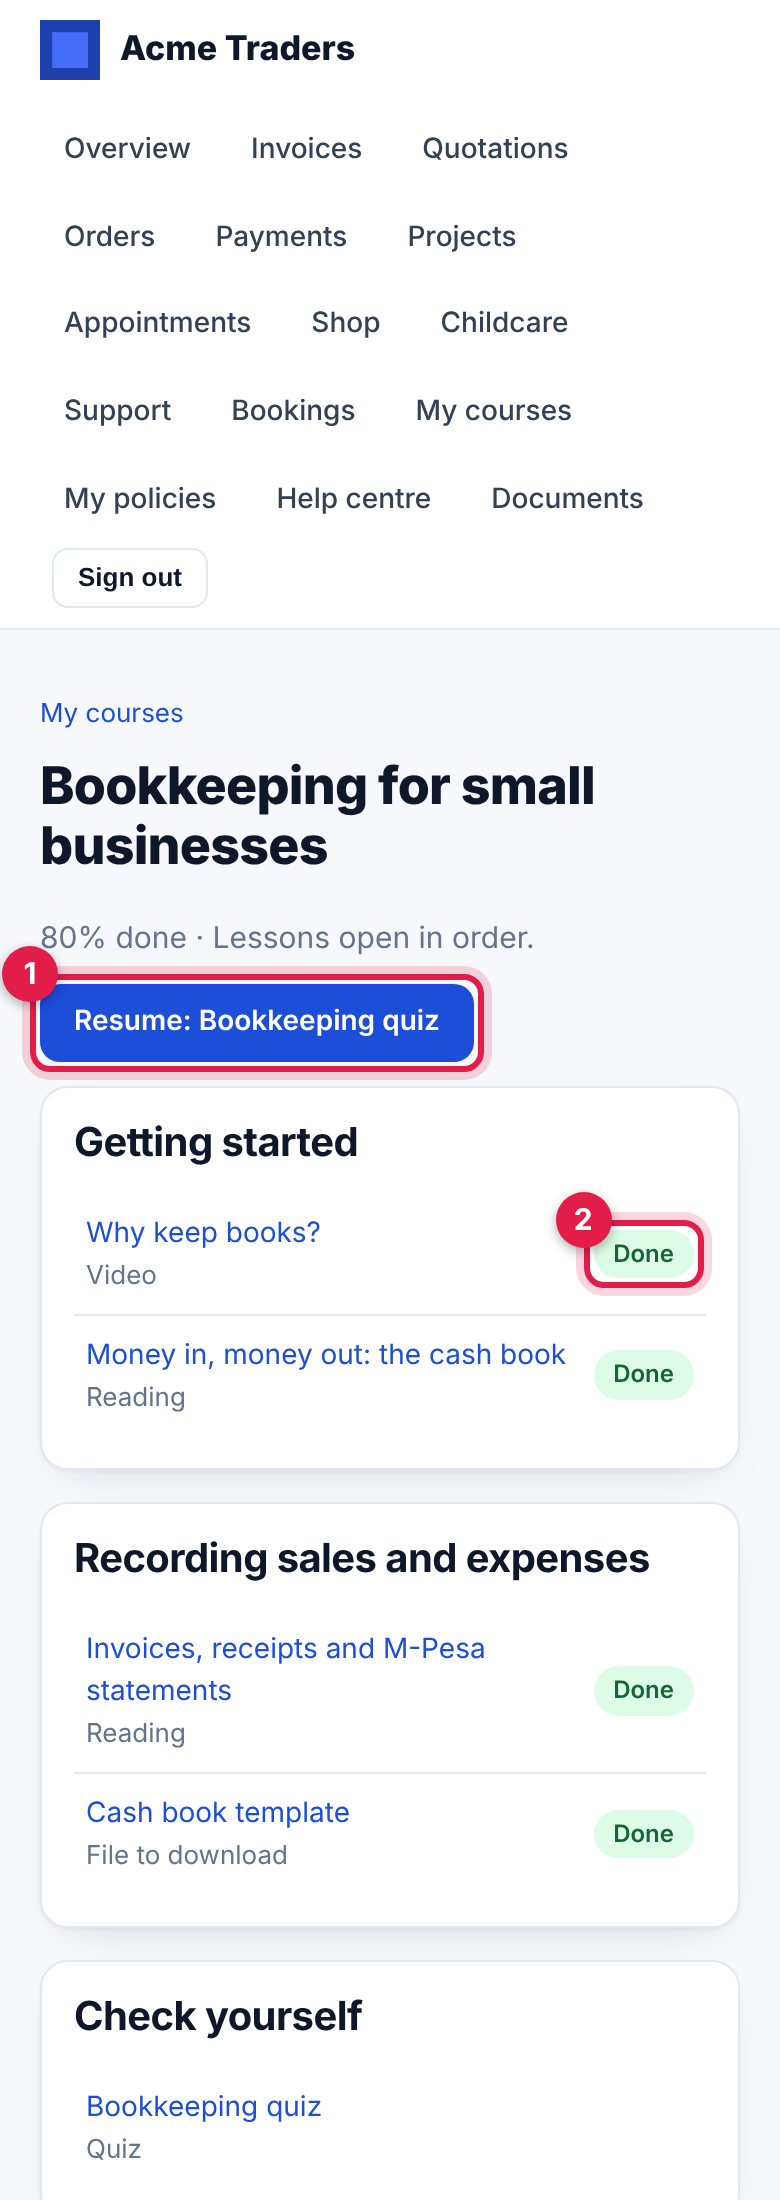
Learners sign in to your customer portal (see How customers sign in) and open My courses. The page appears once they have a course that is not cancelled, and works well on a phone.
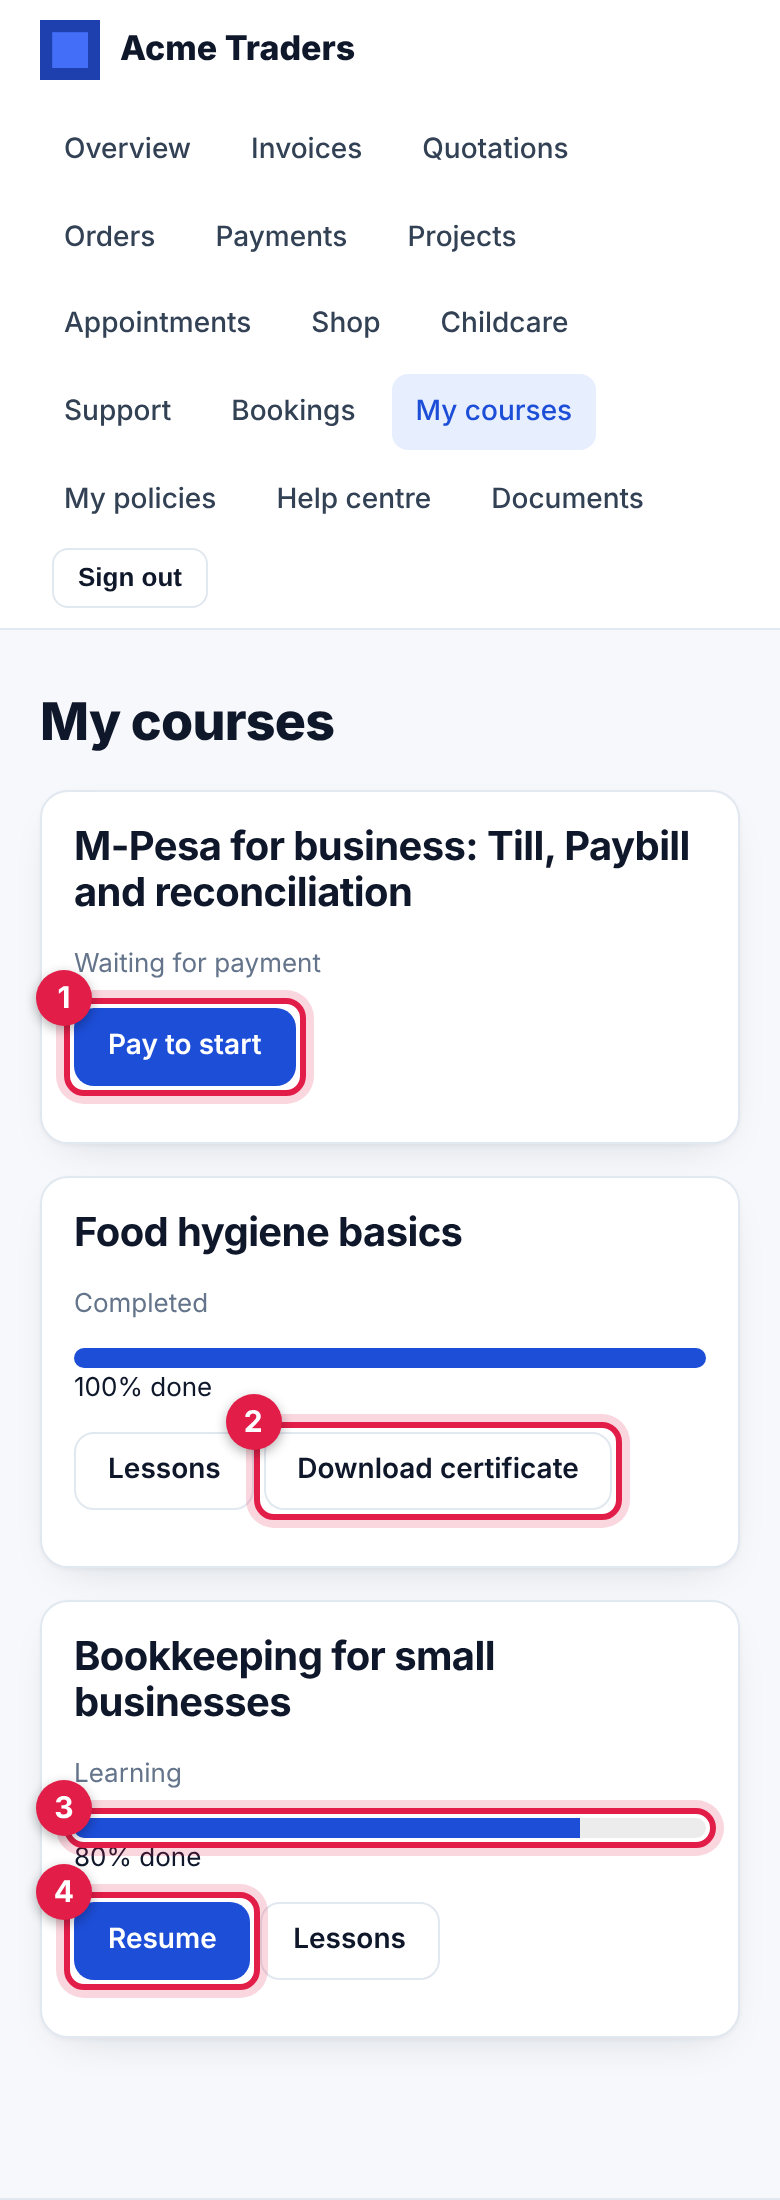
Each course shows its status and, while it is open, a progress bar (marker 3) with the share done.
- Pay to start (marker 1): the course is waiting for payment. It opens the invoice's pay page.
- Start or Resume (marker 4): opens the lesson they were on, or the first lesson not yet done.
- Lessons: the course outline.
- Download certificate (marker 2): once the course is completed with a certificate.
The course outline lists each module and lesson. Finished lessons show Done (marker 2); on a course taken in order, lessons not yet open show Locked and cannot be opened. Resume (marker 1) names the lesson they will go to.
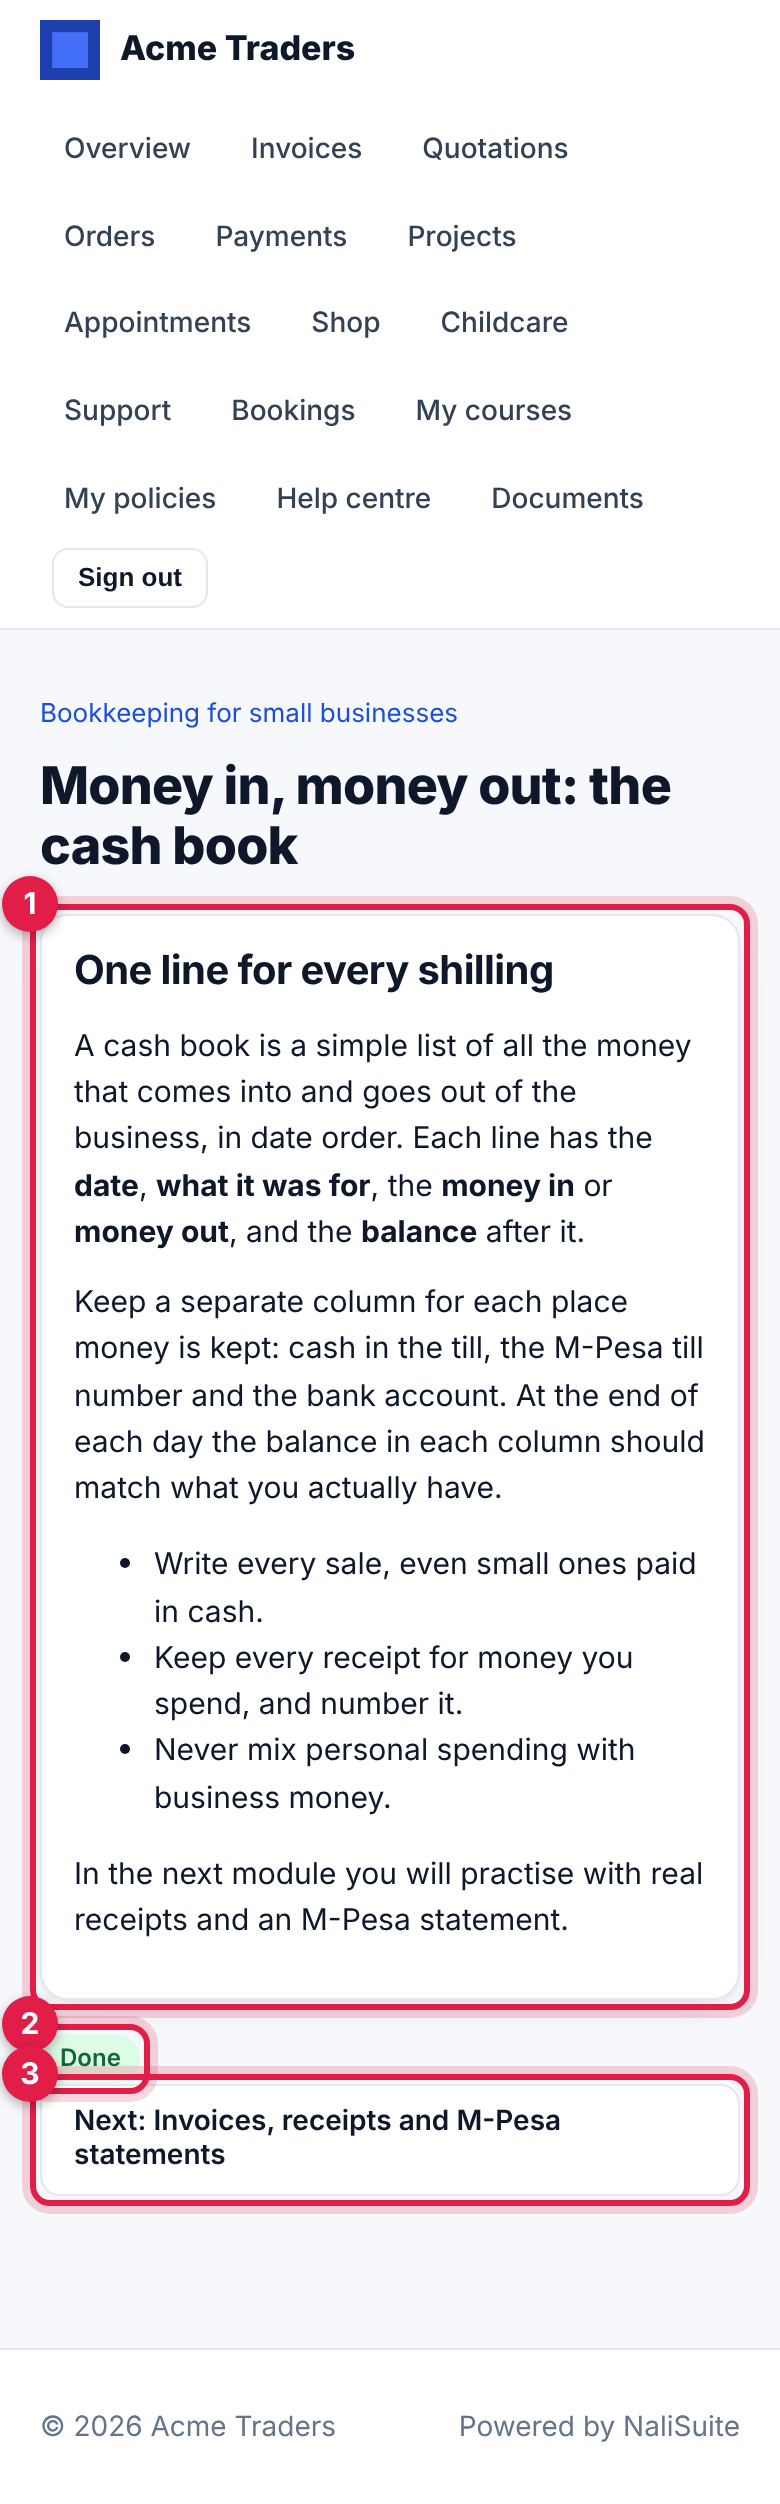
In a lesson, the learner watches the video, reads the text (marker 1) or downloads the file, then taps Mark as done. The lesson shows Done (marker 2) and Next (marker 3) moves on to the next lesson once it is open.
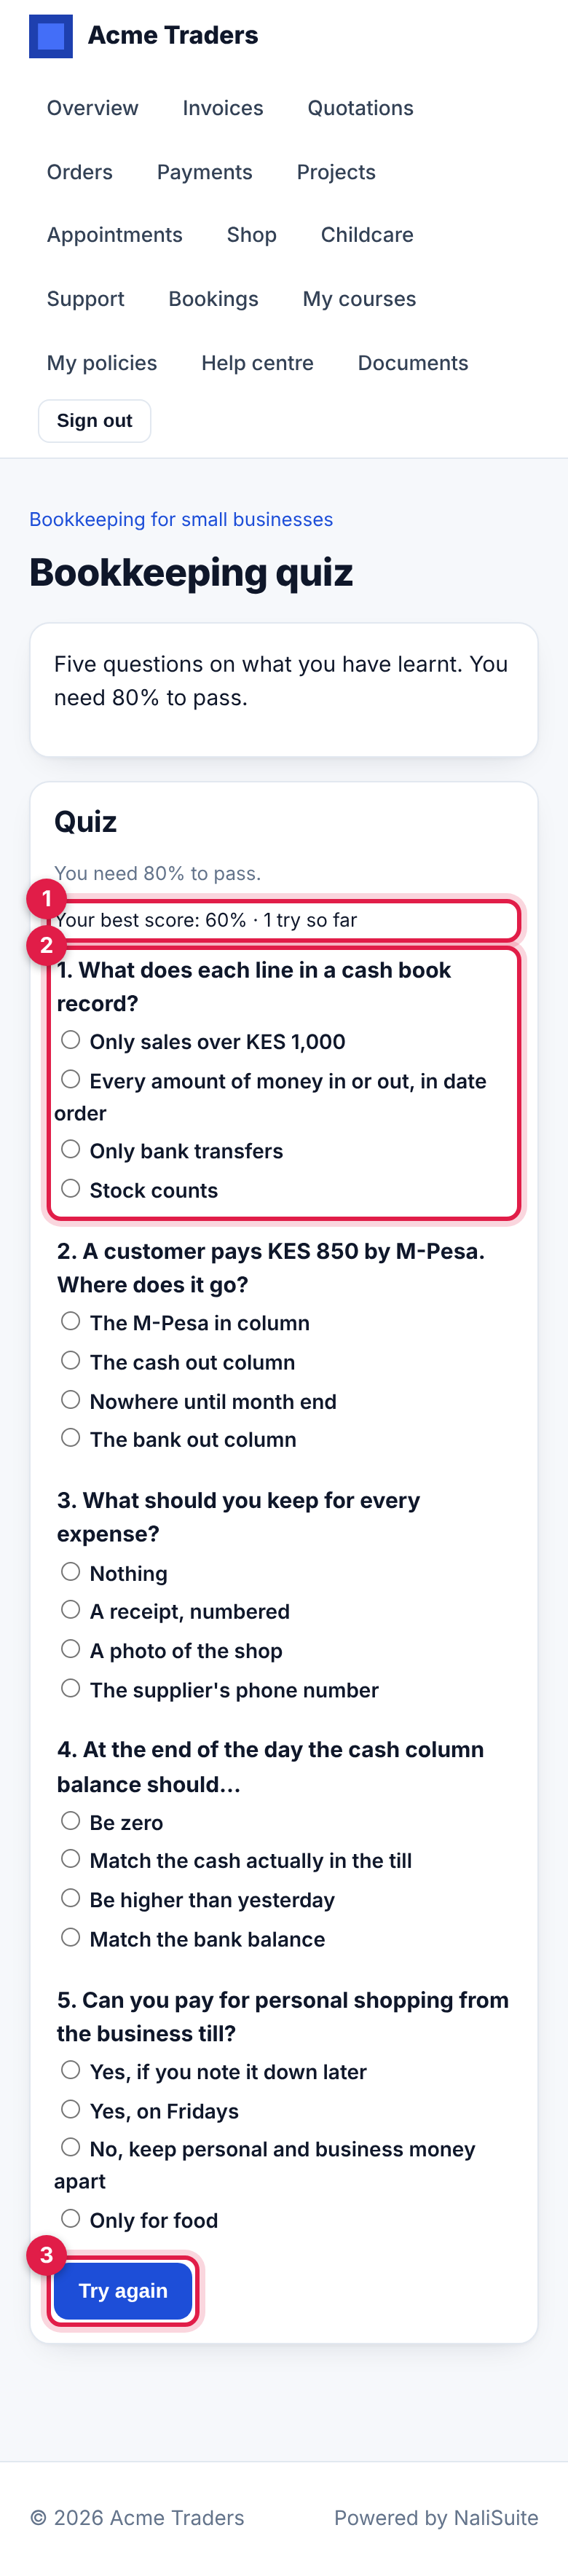
A quiz lesson shows the pass mark, the learner's best score and tries so far (marker 1), and the questions (marker 2). They choose one answer for each and tap Submit answers (or Try again, marker 3). They see You scored 100%. You passed. or You scored 60%. You need 80% to pass. Passing finishes the lesson; failing leaves it open to try again, up to the Tries allowed in Settings. When no tries are left, the quiz says You have no tries left at this quiz. The right answers are not shown to the learner.
When the last lesson is done, the course is Completed: they see You have completed the course. Well done! and are emailed (below).
Certificates
When a learner completes a course with Certificate on completion on:
- The enrolment gets a code such as 5GTF-ZV7Z-WWG7.
- The learner is emailed You have completed Bookkeeping for small businesses with the code and a Check the certificate button. Without a certificate, the email just congratulates them.
- The certificate PDF reads This certifies that [name] has completed the course [title] on [date], with the instructor's name to sign (or your document signatory), your stamp if you have one, the code and the address where it can be checked. Learners download it from My courses; staff use Certificate on Learners.
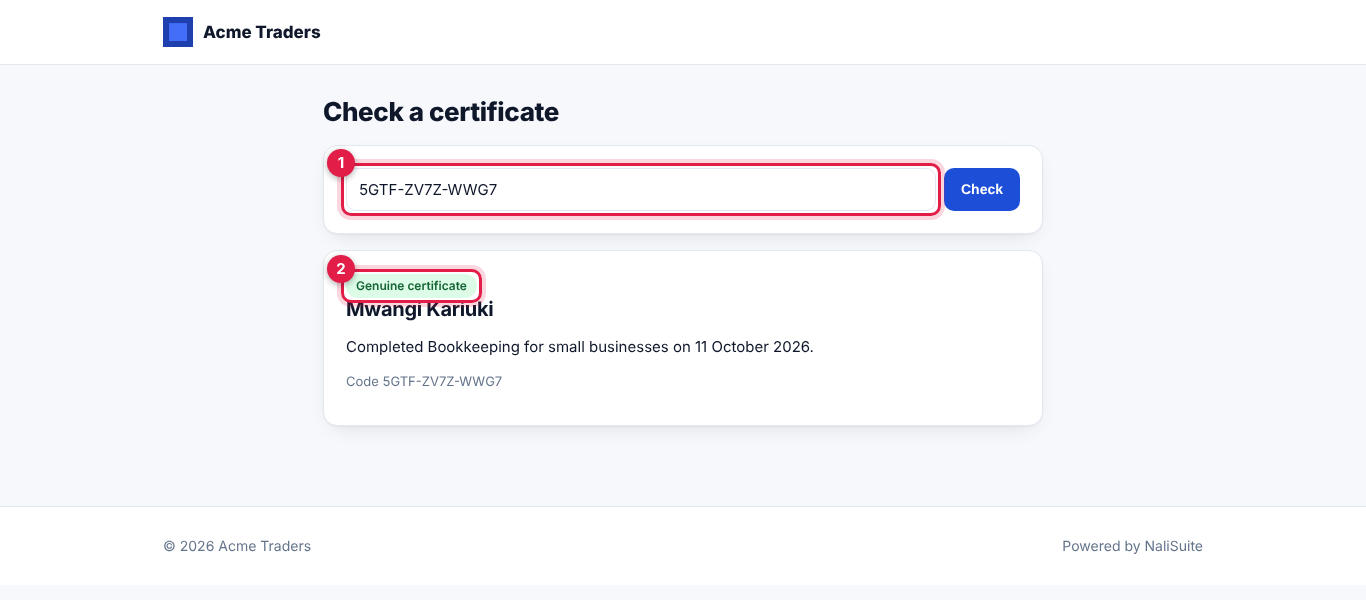
Anyone can check a certificate at /courses/verify, or through Check a certificate on the catalogue. They type the code (marker 1, capital or small letters) and click Check. A real code shows Genuine certificate (marker 2) with the learner's name, the course and the date completed; any other code shows No certificate has this code.
Instructor reports
Open Online courses → Instructor reports.
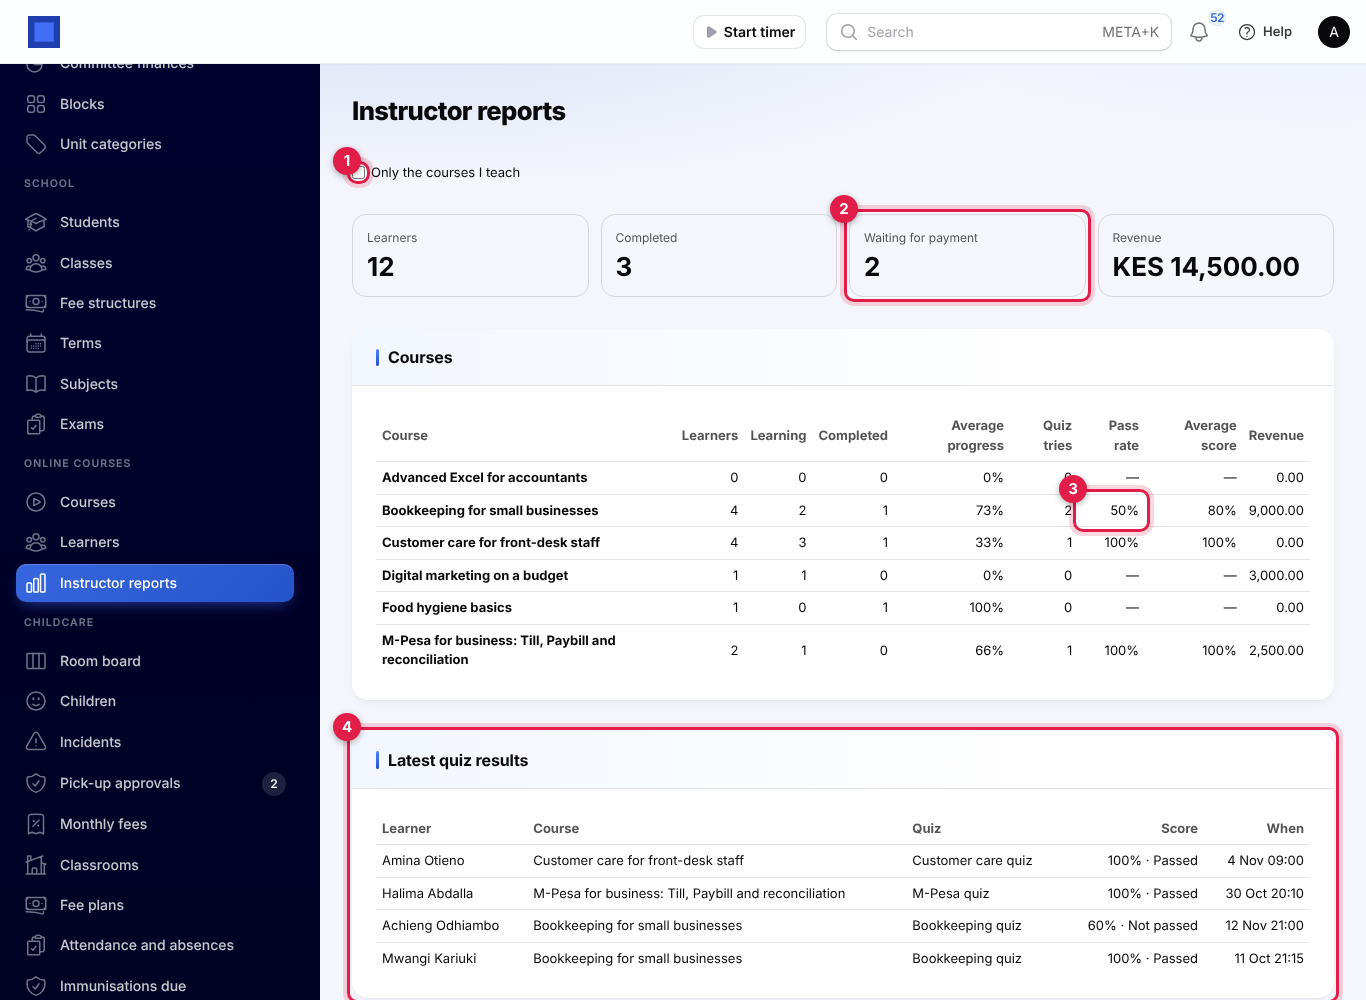
- Only the courses I teach (marker 1): tick to see only the courses where you are the Instructor.
- The tiles: Learners (every enrolment that is not cancelled), Completed, Waiting for payment (marker 2) and Revenue (what has been paid on course invoices).
- Courses: for each course, its learners, how many are learning and have completed, their Average progress, the Quiz tries, the Pass rate (marker 3, the share of tries that passed), the Average score and the Revenue.
- Latest quiz results (marker 4): the last 20 quiz tries with the learner, course, quiz, score and whether they passed.
Good to know
- Quizzes are multiple choice only. Each question has one right answer chosen from two to eight. There are no written answers, true/false with explanations or timed quizzes. For marked written exams, see Exams.
- Employees take assigned courses in the customer portal with their work email. Make sure their HR record has the email they will sign in with. Completion reaches HR only while HR is switched on, and only once.
- Emails need a valid address. A learner without one is still enrolled but gets no sign-in link or completion email, and has no portal access until you invite them under portal access.
- Changing a course after people have started: a learner who has already completed keeps their status and certificate. Learners still on the course need to do any lesson you add before the course completes.
- Paying later: a learner can pay the course invoice from Pay to start in the portal or from the invoice email at any time; the course opens on full payment. Part payments do not open it.
- Unpublishing a course takes it off the catalogue, but learners already on it carry on.
- With School Management: Online courses does not link to School's students or classes. A school can still use it for holiday or revision courses: enrol each student's parent or the student by email, and they learn in the same portal where parents see My children. For school exams and report cards, use Exams instead.