School Management
School Management runs a school office: terms, classes and streams, student records with their parents or guardians, term fees invoiced to every parent in one click, fee balances, daily class registers, exams and marks, report cards with grades and class positions, and a page in the portal where parents follow their children and pay fees. Bursars, class teachers, deputies and head teachers use it. It is in the School group of the sidebar: Students, Classes, Fee structures, Terms, Subjects and Exams.
School Management is a marketplace module. The owner buys it under Settings → Marketplace; the School group appears once it is switched on. It needs the Contacts and Invoicing apps.
Note: You need the school.view permission to see the School pages and download report cards, and school.manage to add and change terms, classes, students, subjects, exams and fee structures, take registers, enter marks, write report comments and invoice students. Owners and admins have both. Give class teachers a role with school.manage so they can take the register and enter marks. Set permissions under Settings → Roles.
Set up the school year in this order
- Terms – the school calendar, with one term marked current.
- Subjects – in the order they appear on report cards.
- Classes – each stream at its level, such as "Grade 4 East" at level "Grade 4".
- Students – with their class and parent or guardian.
- Fee structures – what each level pays in the term; then Invoice students.
- Exams – with how much each counts towards the term mark; then enter marks.
Terms
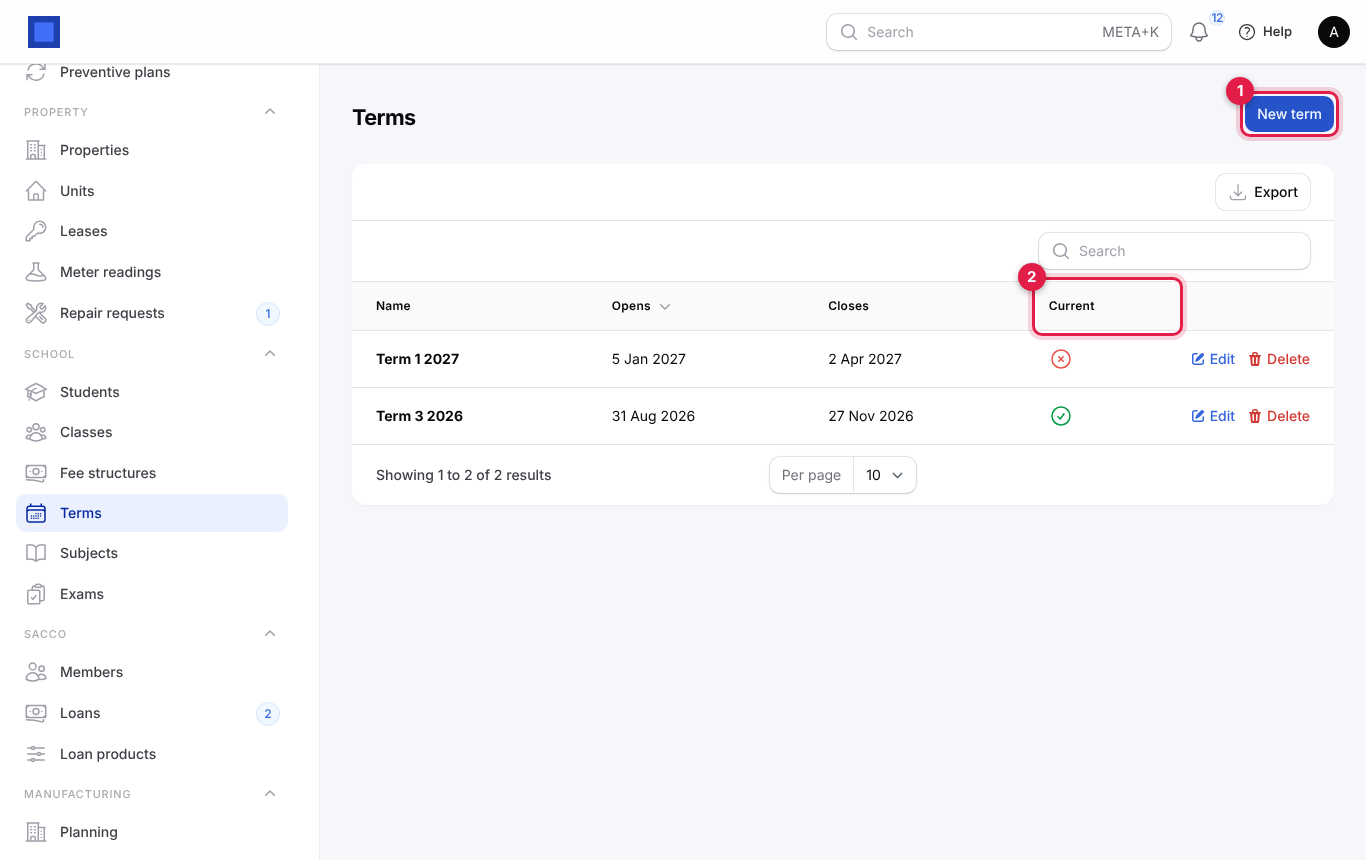
- In the menu, open School → Terms.
- Click New term (marker 1). The Current column (marker 2) shows which term is current.
- Fill in the Name (marker 1), turn on Current term for the running term (marker 2), set Opens (marker 3) and Closes (marker 4), and click Create.
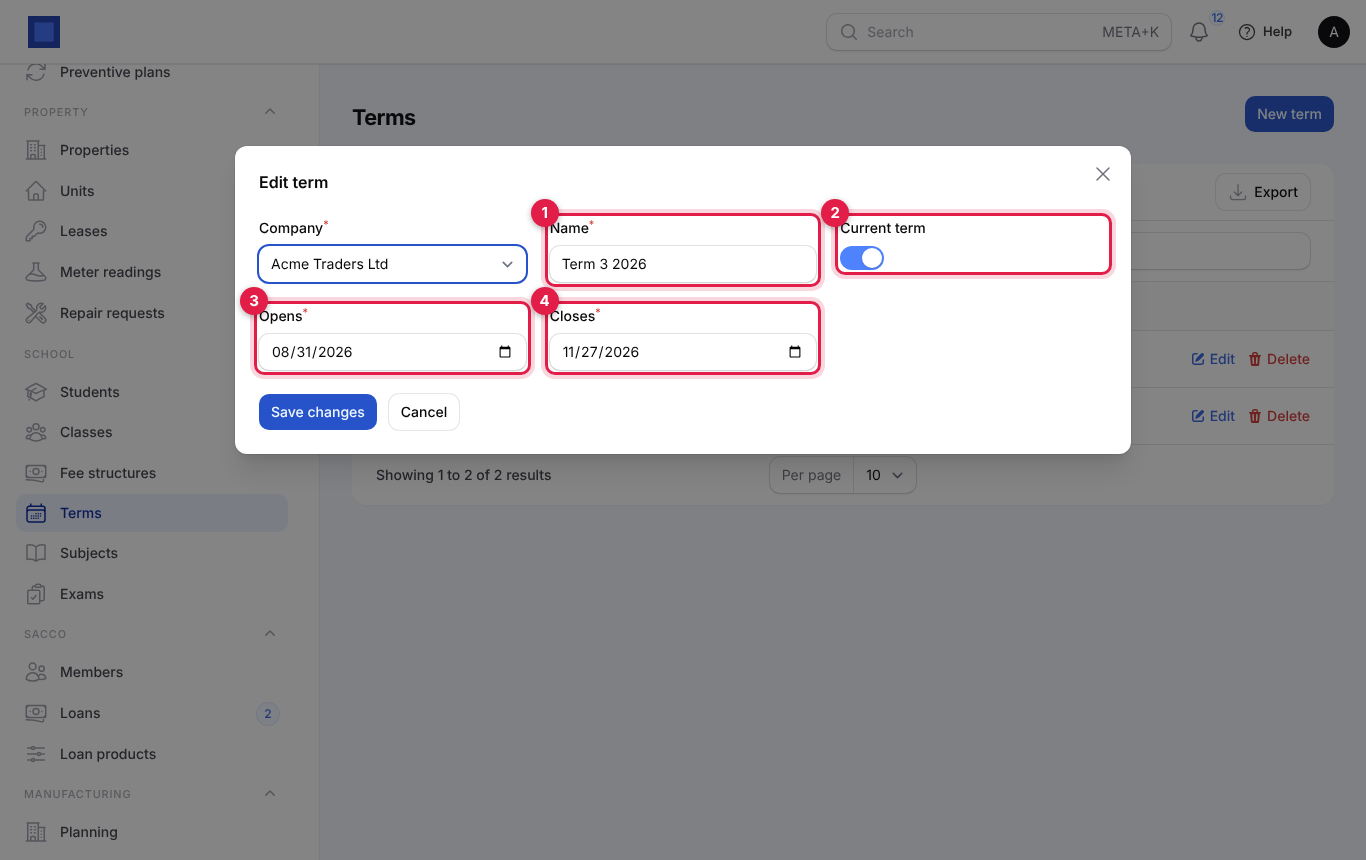
Only one term is current at a time: marking a term current switches the others off. The current term is used as the default on fee structures, exams, report cards and report comments, and for the parent page. If no term is marked current, the latest term that has opened is used.
Subjects
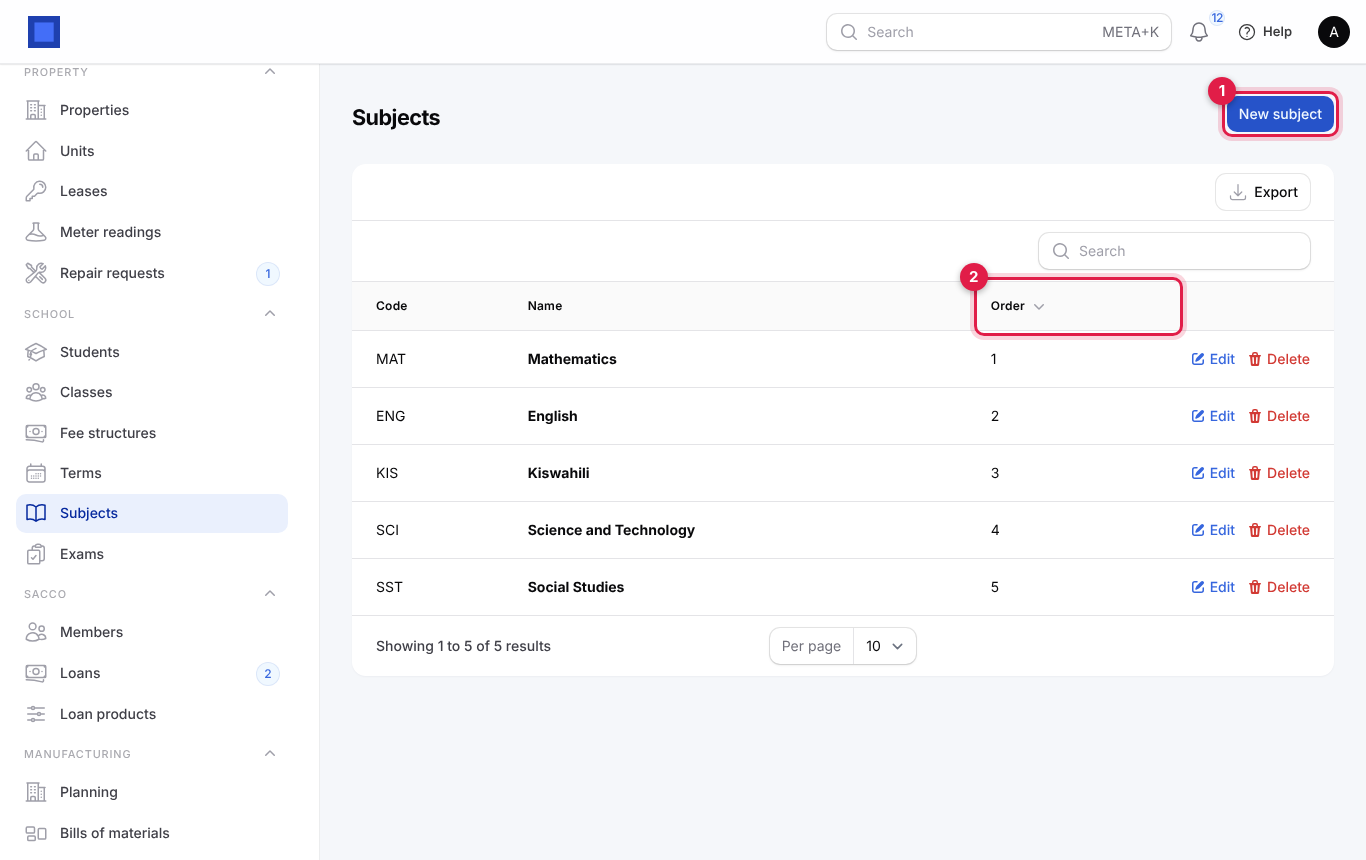
- In the menu, open School → Subjects.
- Click New subject (marker 1), enter a short Code such as
MAT, the Name such as "Mathematics", and the Order on the report card (marker 2 shows the column). Click Create.
Classes
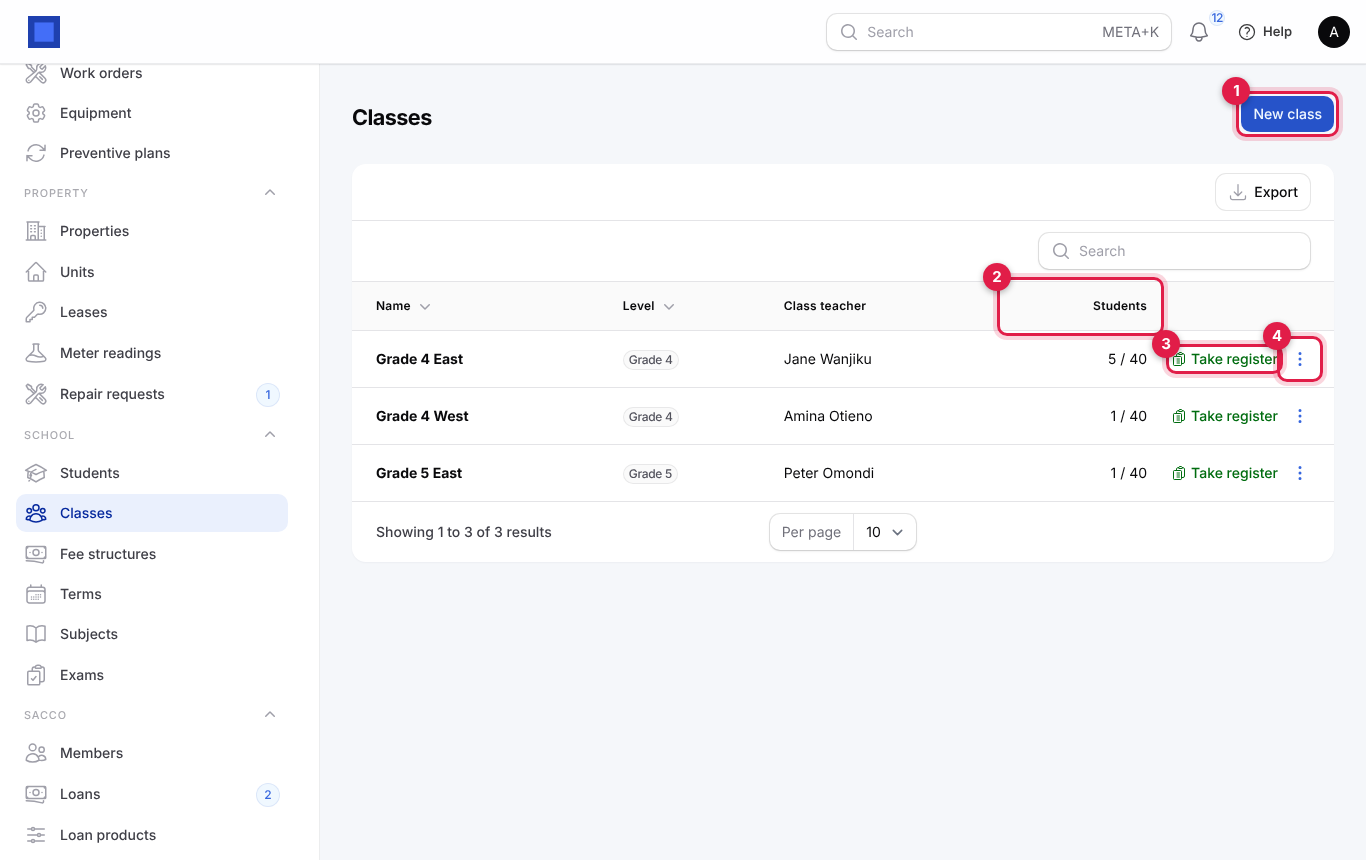
- In the menu, open School → Classes.
- Click New class (marker 1). The Students column (marker 2) shows active students against the capacity, such as "5 / 40". Each row has Take register (marker 3) and, under ⋮ (marker 4), Enter marks, Edit and Delete.
- Fill in the form and click Create.
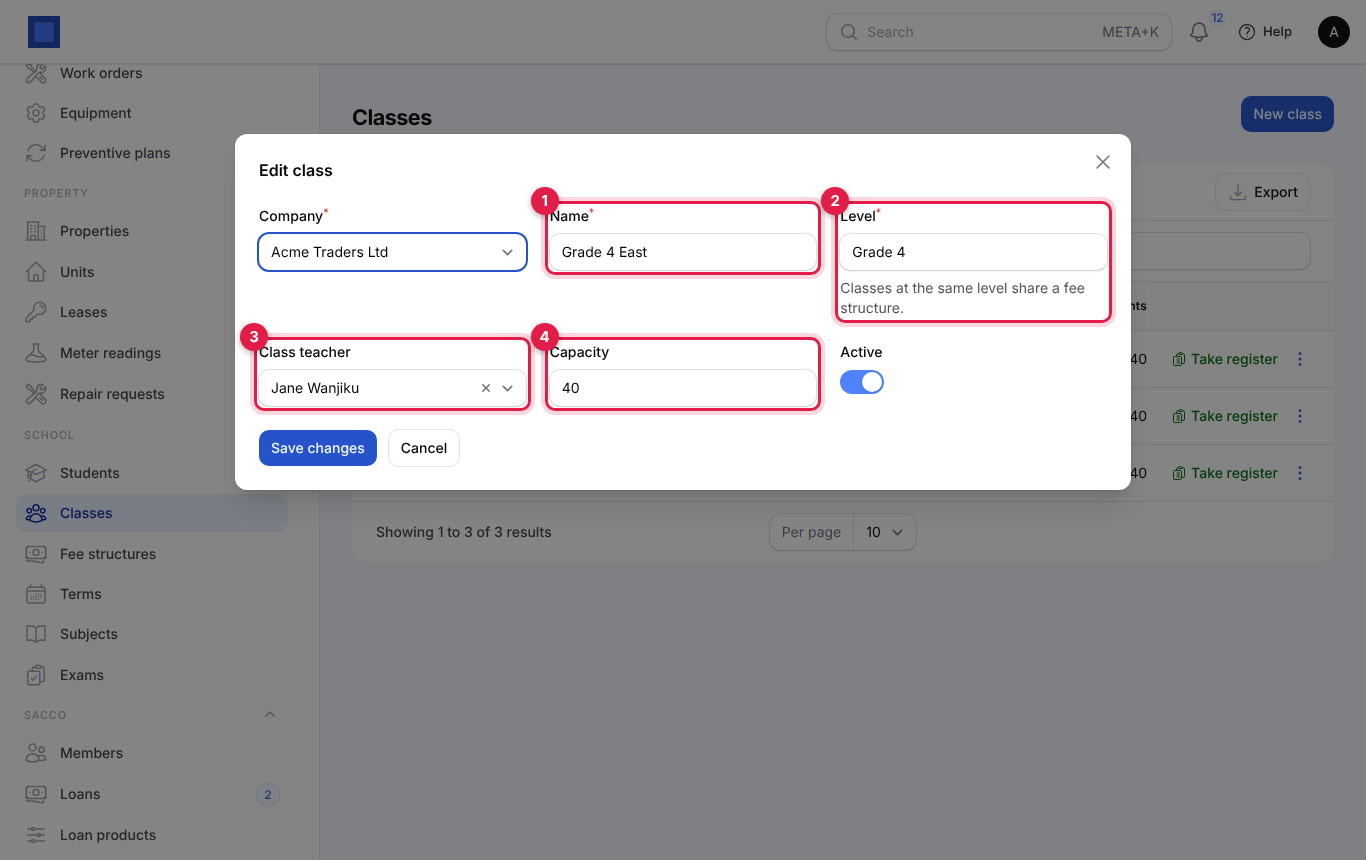
| Field | What to enter |
|---|---|
| Company | Required. |
| Name | Required (marker 1). The stream, for example "Grade 4 East" or "Form 2 North". |
| Level | Required (marker 2). The grade or form, for example "Grade 4". Classes at the same level share a fee structure. Earlier levels are suggested as you type; spell them the same way every time. |
| Class teacher | Optional (marker 3). A workspace user. Printed on the report card. |
| Capacity | Optional (marker 4). The most students the class takes. |
| Active | On by default. Inactive classes are not offered when adding or moving students. |
Students
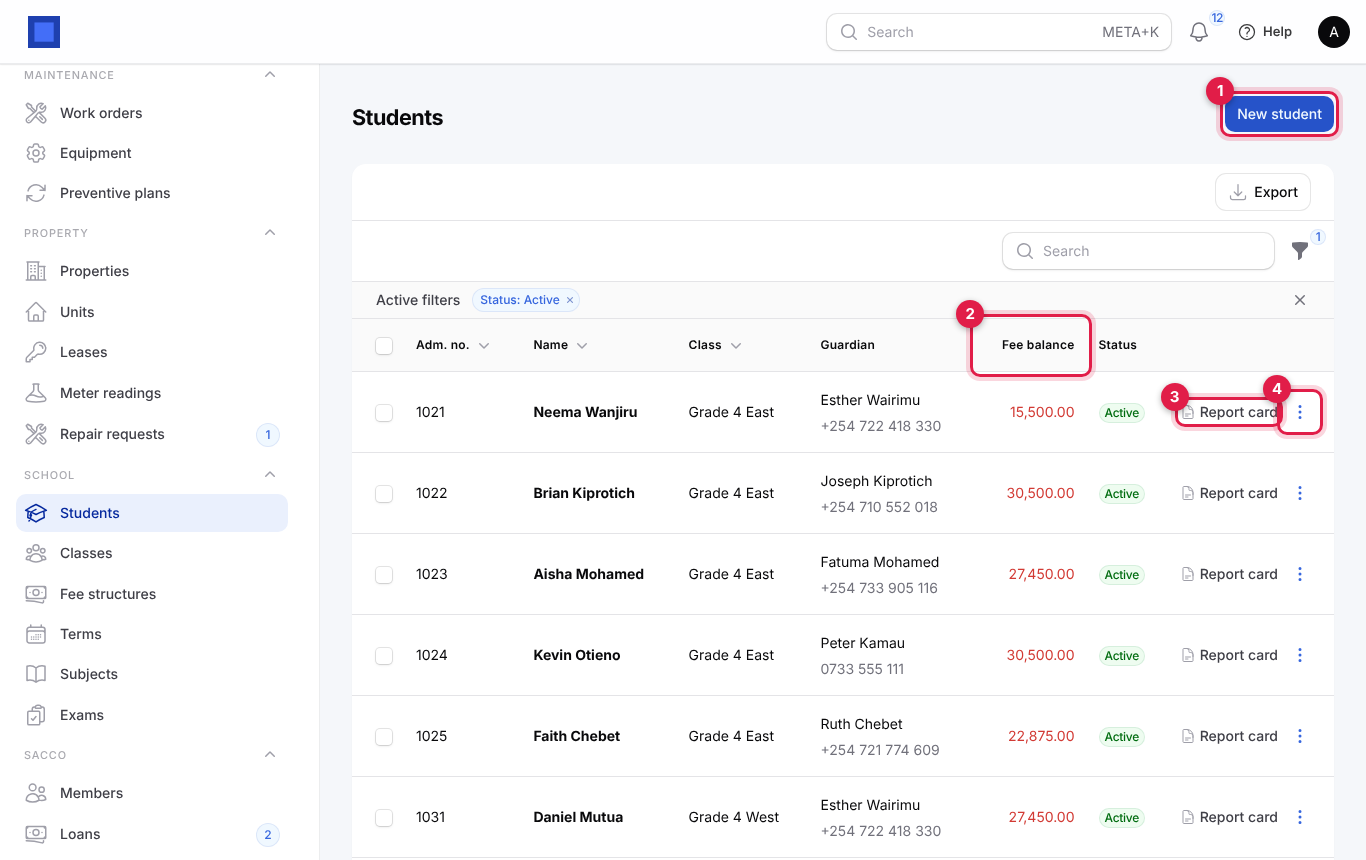
- In the menu, open School → Students. The list opens filtered to Active students.
- Click New student (marker 1). The Fee balance (marker 2) shows what the student still owes across all terms, in red when owing. Report card (marker 3) downloads the report card; ⋮ (marker 4) holds Report comments, Edit and Delete.
- Fill in the form and click Create.
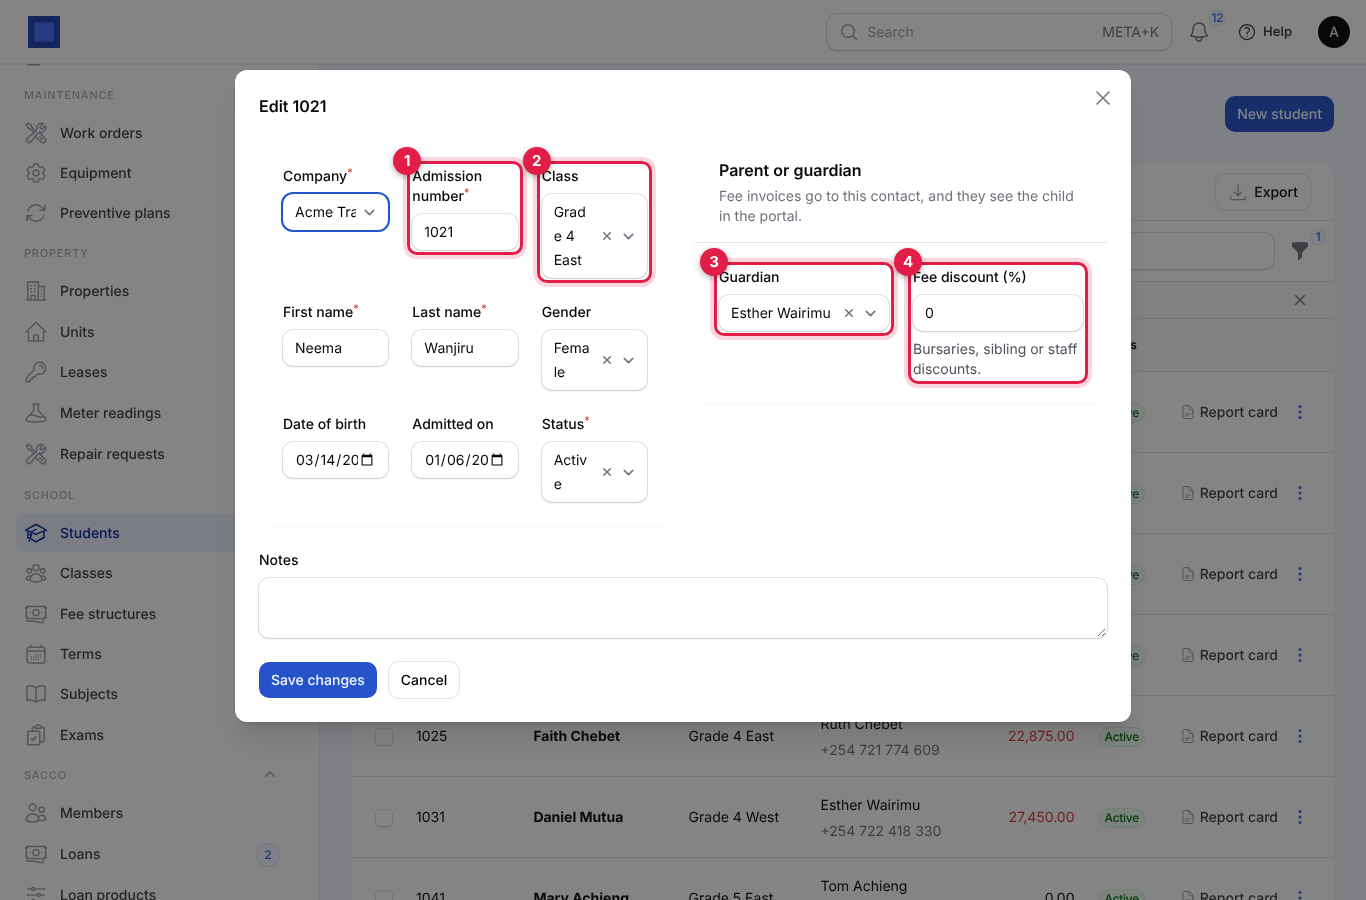
| Field | What to enter |
|---|---|
| Company | Required. |
| Admission number | Required (marker 1), unique, for example 1021. |
| Class | Marker 2. The student's class or stream. |
| First name, Last name | Required. |
| Gender | Female or Male. |
| Date of birth | Optional. |
| Admitted on | Defaults to today. |
| Status | Active, Graduated or Left. Only active students are invoiced, appear on registers and mark sheets and on the parent page. |
| Guardian | In Parent or guardian (marker 3). The contact who receives fee invoices and sees the child in the portal. Type to search your contacts. |
| Fee discount (%) | Marker 4. Bursaries, sibling or staff discounts, for example 10. Taken off every fee invoice. |
| Notes | Anything else, such as allergies or pick-up arrangements. |
Tip: Add each parent as a contact first under Sales → Contacts, with their email and phone, so they can be picked as Guardian. One guardian can have several children; they see all of them in the portal.
Find students
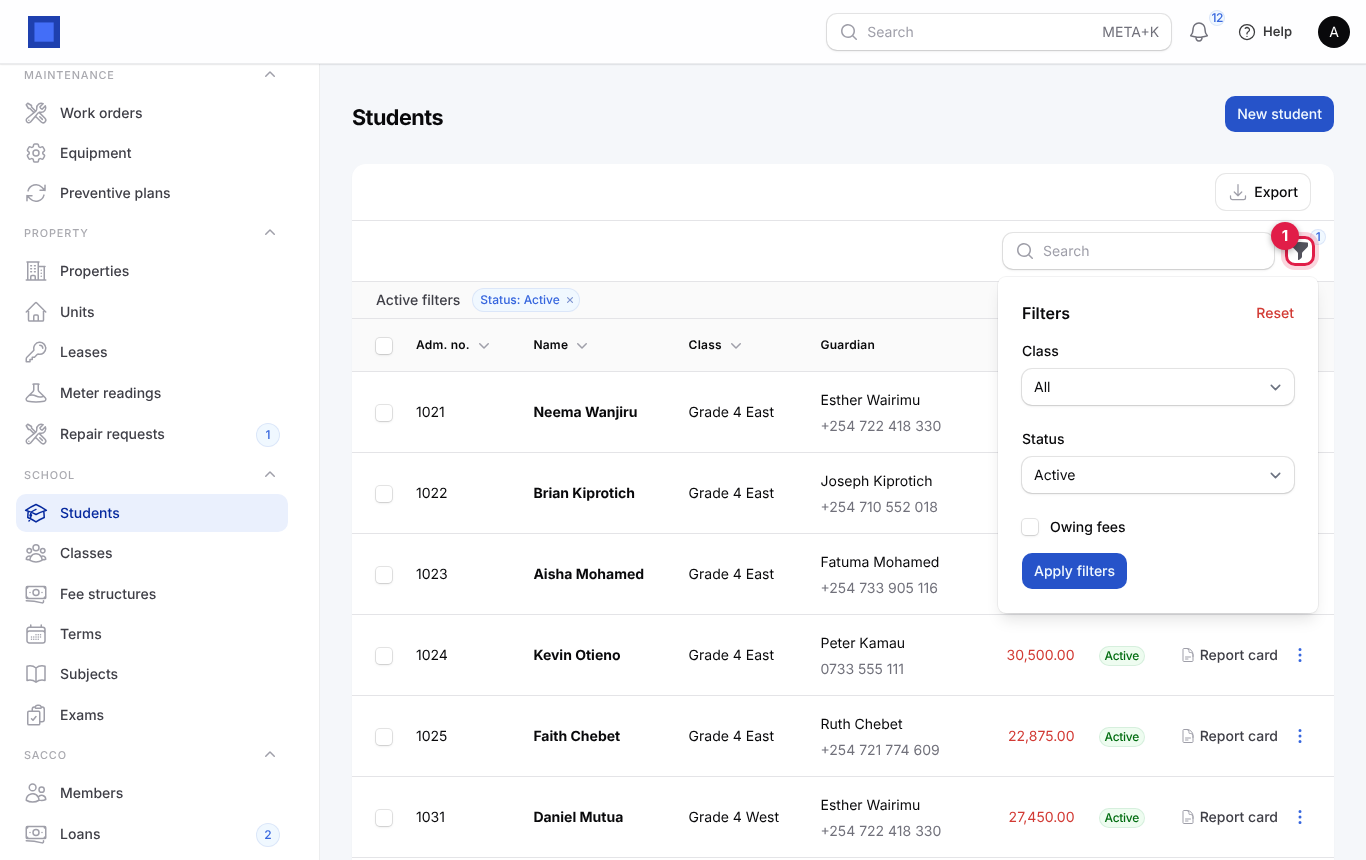
Click the filter icon (marker 1) to filter by Class, Status or Owing fees (students with an unpaid fee invoice), then Apply filters. Search by admission number or name.
Move students to another class or graduate them
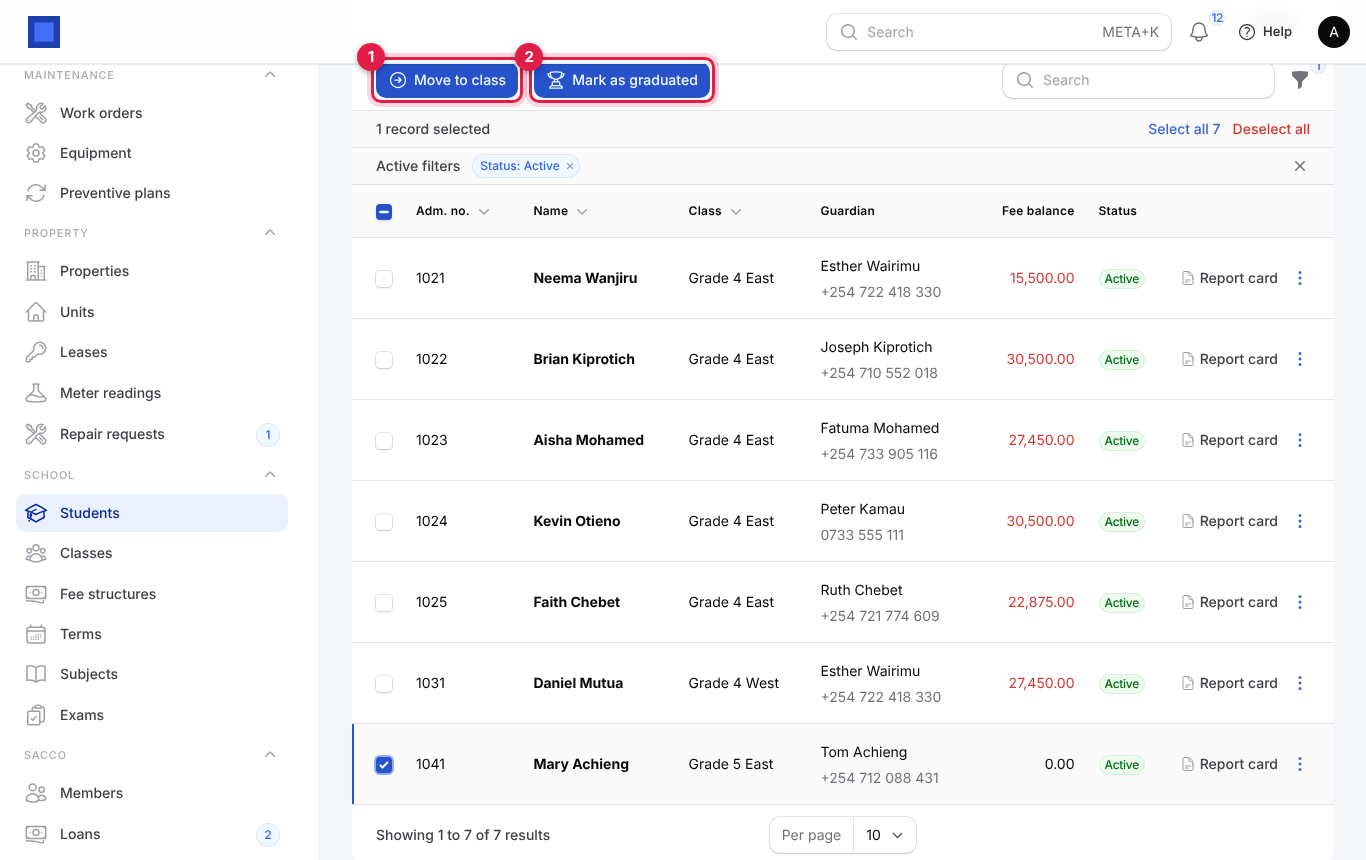
At the end of the year, tick the students in the list. Click Move to class (marker 1), pick the New class and click Submit; or click Mark as graduated (marker 2) and confirm.
Term fees
Set up a fee structure
A fee structure is what one level pays in one term, line by line.
- In the menu, open School → Fee structures.
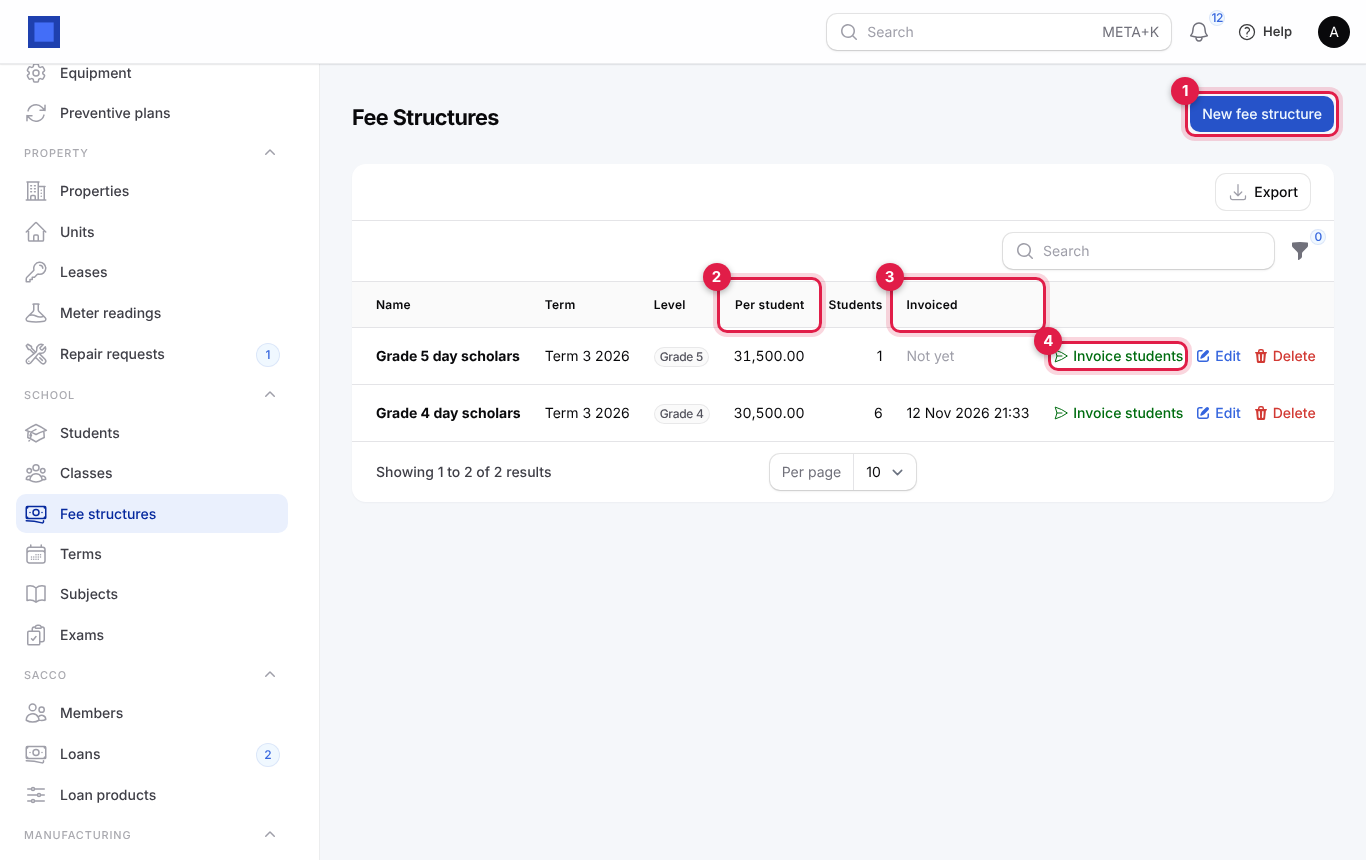
- Click New fee structure (marker 1). The list shows the total Per student (marker 2), how many active students are at the level, and when it was Invoiced (marker 3).
- Pick the Term (marker 1) and Level (marker 2), type a Name (marker 3) such as "Grade 4 day scholars", and add each fee under Fees (marker 4) with its Item and Amount. Click Add to fees for more lines and drag the arrows to reorder. Click Create.
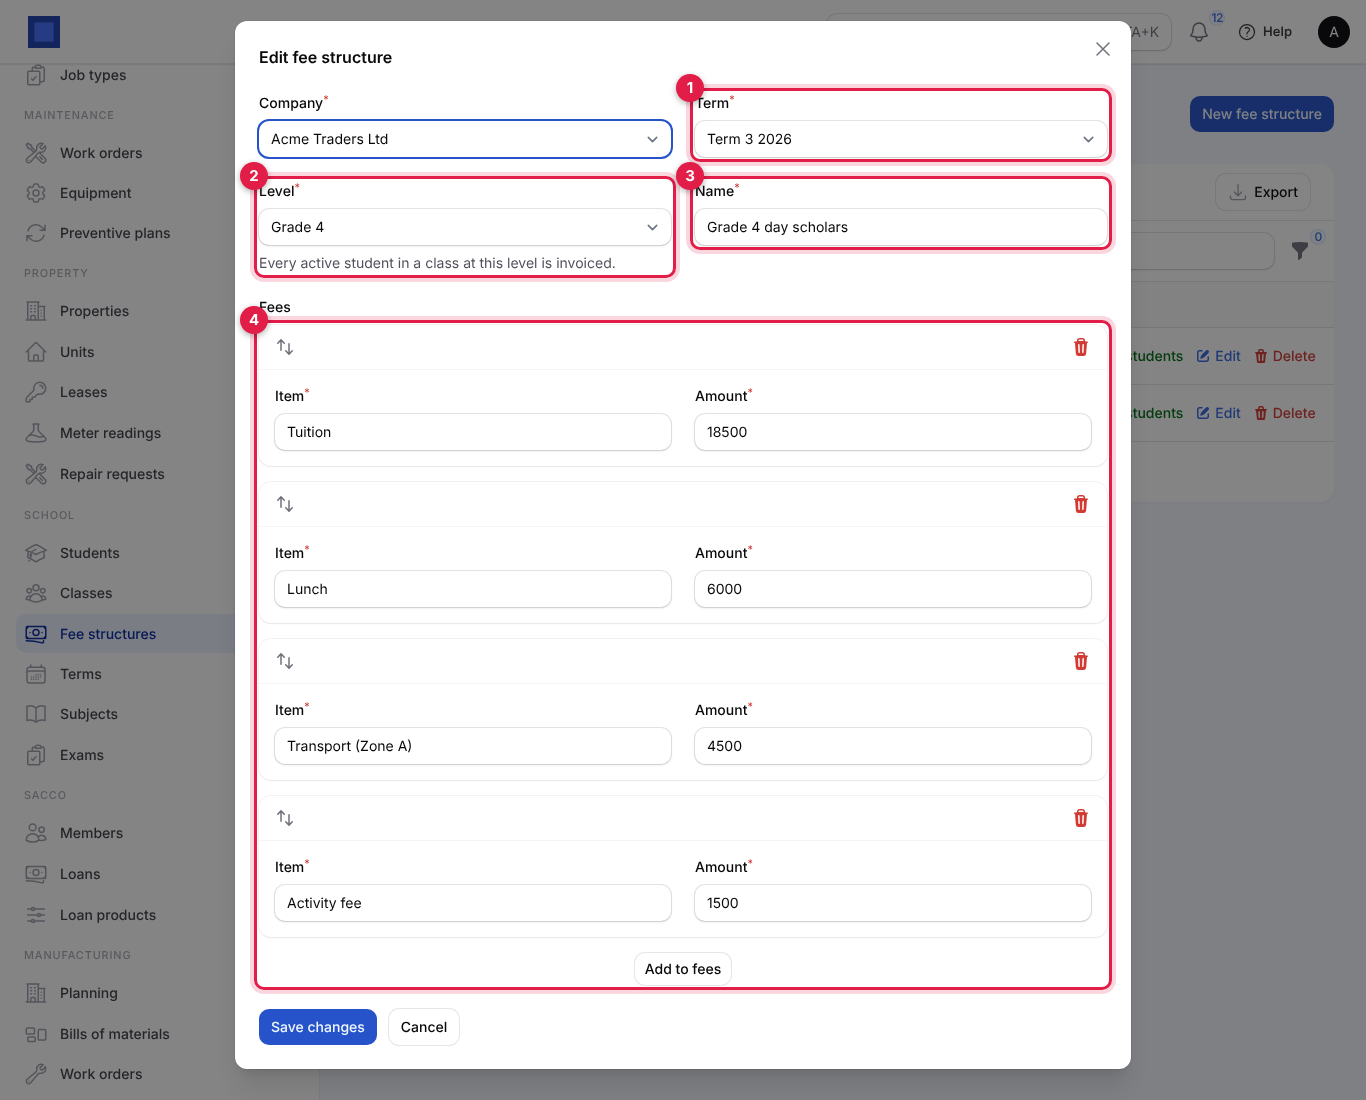
For example, Grade 4 in Term 3: Tuition 18,500, Lunch 6,000, Transport (Zone A) 4,500 and Activity fee 1,500, a total of 30,500 per student. Make a separate structure for boarders or another transport zone at the same level.
Invoice the students
- On the fee structure's row, click Invoice students (marker 4 above).
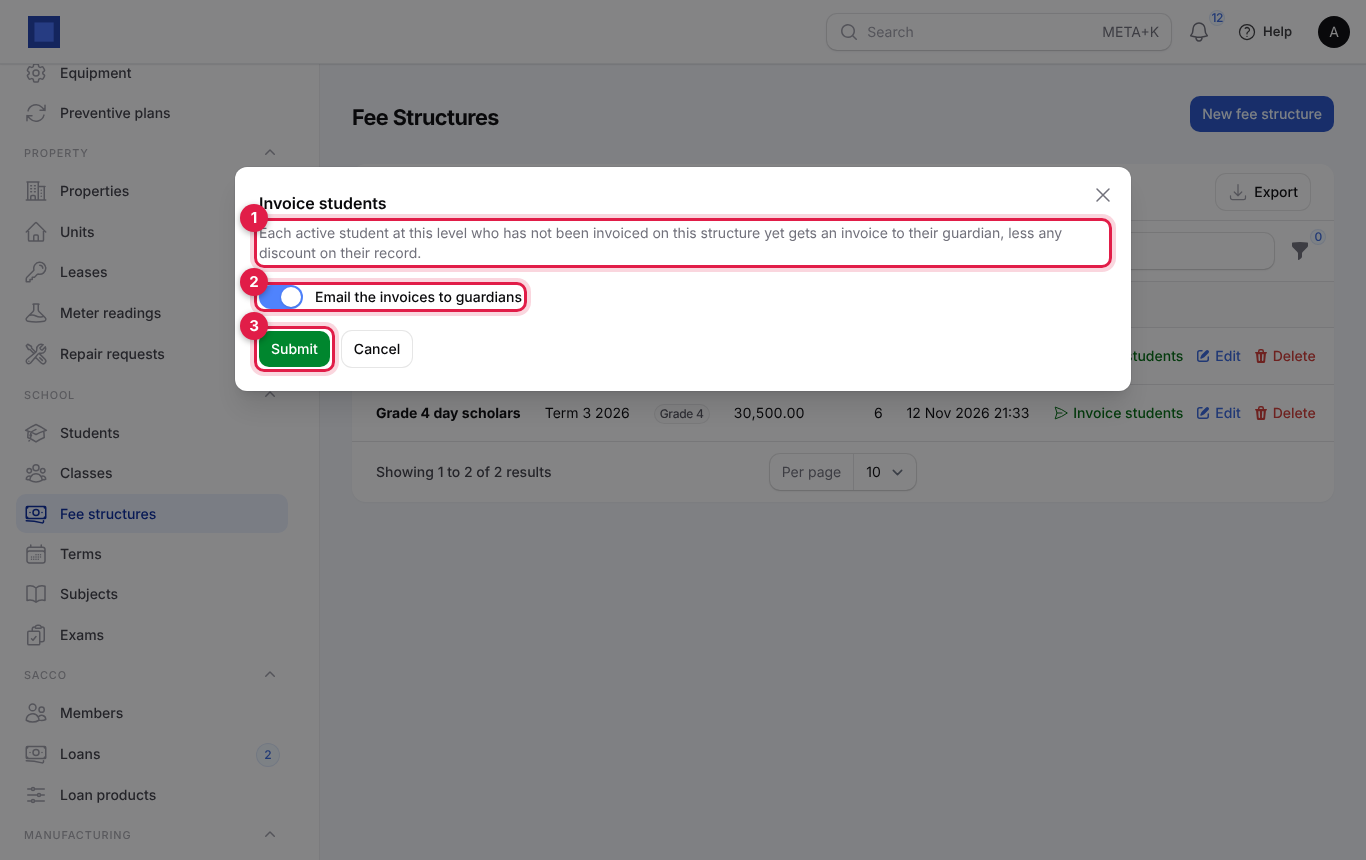
- Read what will happen (marker 1), choose whether to Email the invoices to guardians (marker 2) and click Submit (marker 3).
What happens:
- Each active student in a class at that level gets one invoice, addressed to their guardian. Each fee is a line such as "Tuition · Neema Wanjiru (1021) · Term 3 2026", and a Discount (10%) line is added when the student has a discount. The admission number and name are the customer reference.
- The invoice is due on the day the term opens (or today if it has already opened).
- Students already invoiced on this structure are skipped, so you can run it again after admitting new students. Students with no guardian are skipped and listed in the message.
- You see "n students invoiced". The invoices are under Finance → Invoices, and parents pay them like any other invoice.
Payments update the student's Fee balance straight away.
Take the register
- On School → Classes, click Take register on the class.
- Check the Date (marker 1). Every active student starts as Present.
- Click Absent, Late or Excused for the students who are (markers 2 and 3).
- Click Save register (marker 4).
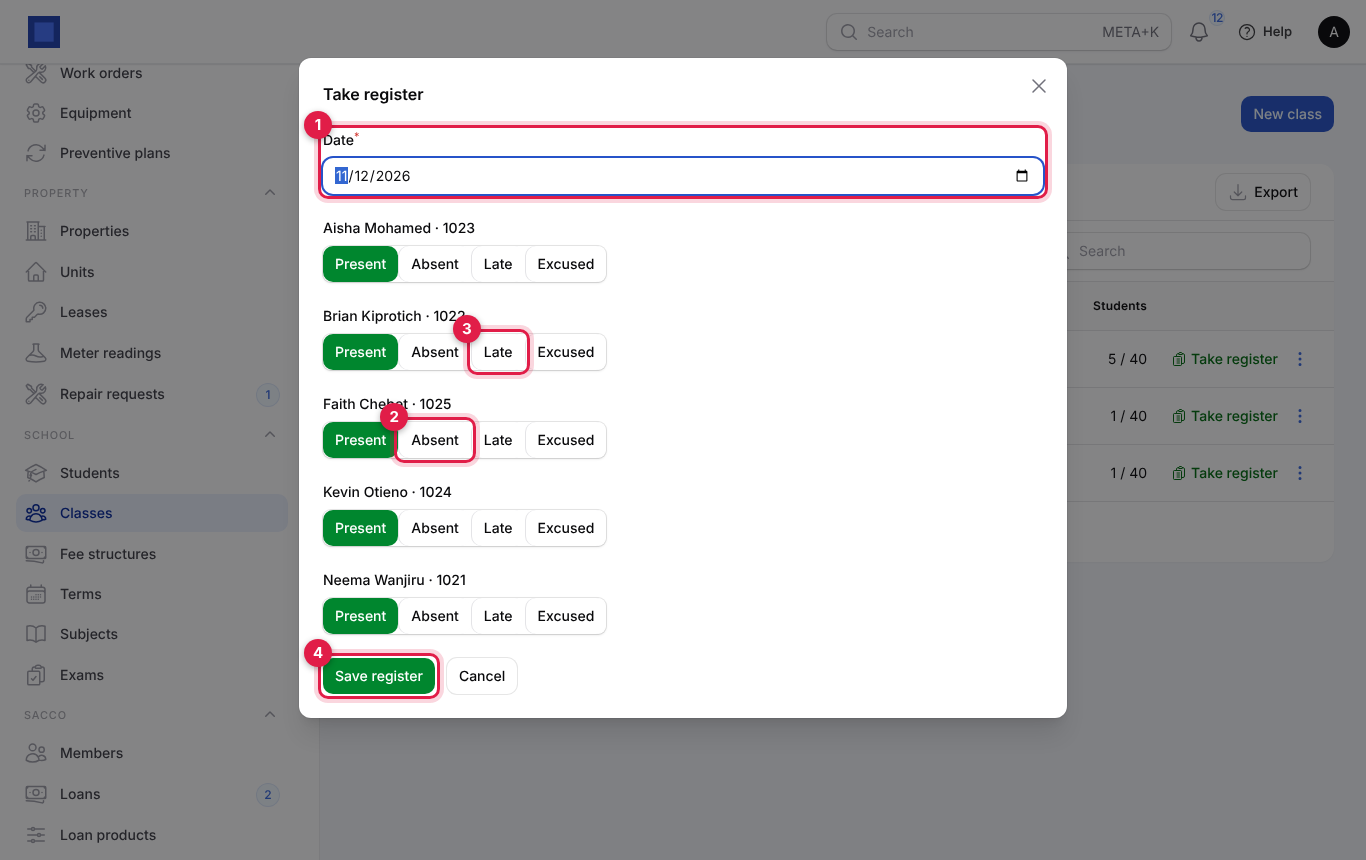
You can take a register for any day up to today. Saving a register again for the same day replaces that day's entries, so check every student before saving a corrected register. Attendance appears on the report card and the parent page.
Exams and marks
Set up exams
- In the menu, open School → Exams.
- Click New exam (marker 1). The list shows each exam's Weight (marker 2) and how many Marks entered (marker 3).
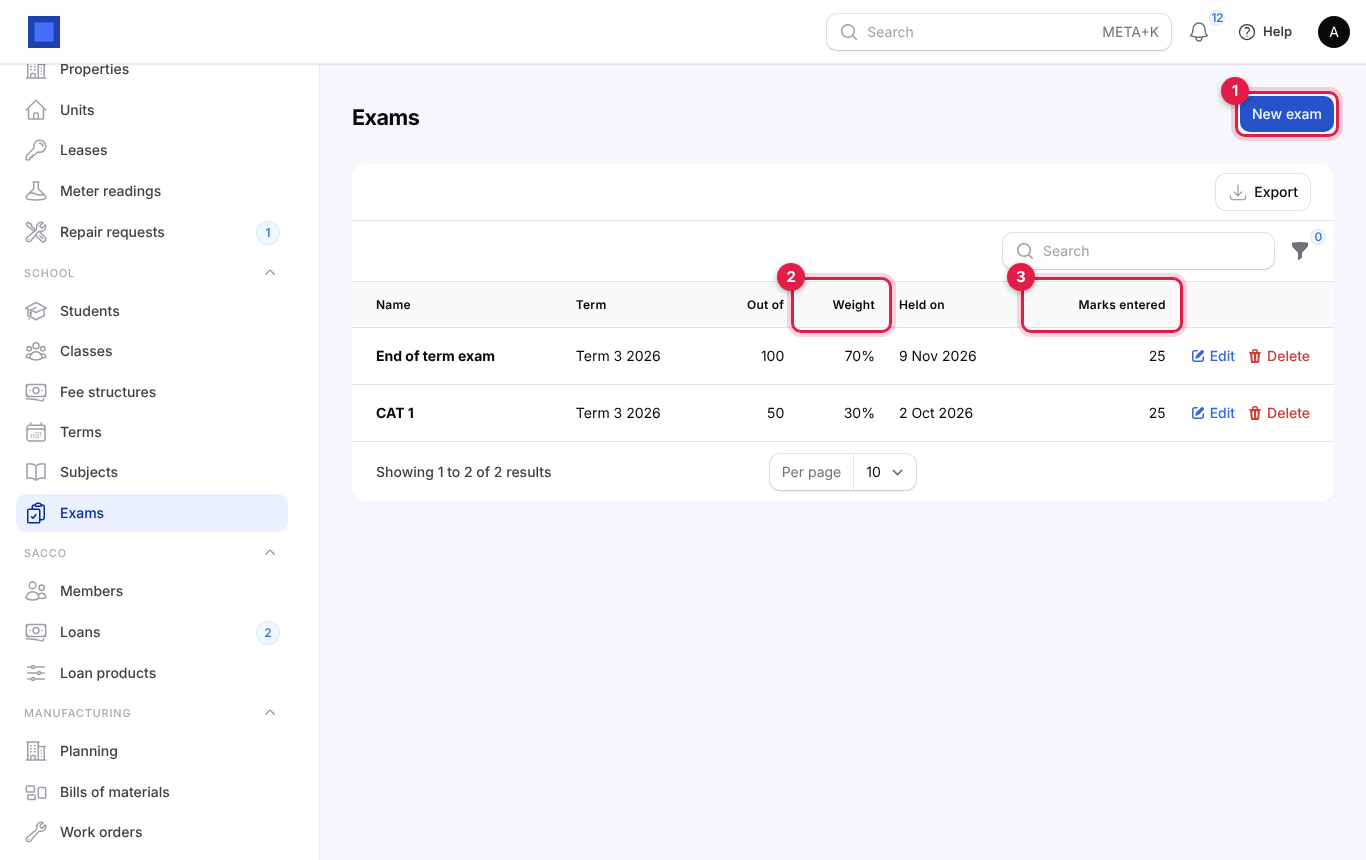
- Pick the Term (marker 1), type the Name, set Marked out of (marker 2), Counts for (%) of the term mark (marker 3) and Held on (marker 4). Click Create.
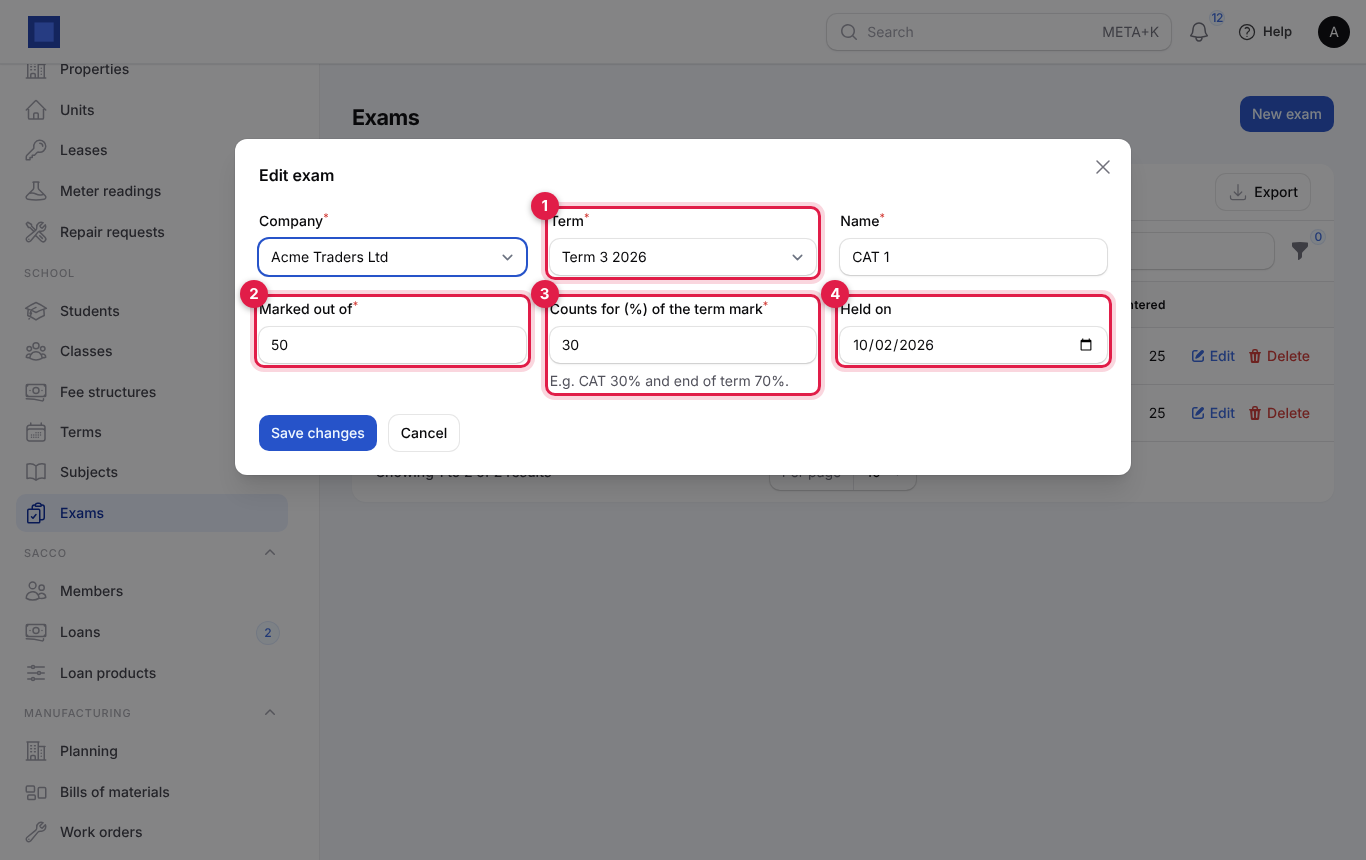
For example, CAT 1 marked out of 50 counting 30%, and End of term exam out of 100 counting 70%. The weights of a term's exams should add up to 100.
Enter marks
- On School → Classes, click ⋮ → Enter marks on the class.
- Pick the Exam (marker 1) and Subject (marker 2). Marks already entered load, so you can correct them.
- Type each student's mark (marker 3), out of the exam's Marked out of. Leave a box empty for a student who did not sit the paper; clearing a mark removes it.
- Click Submit (marker 4). You see "n marks saved." Repeat for each subject.
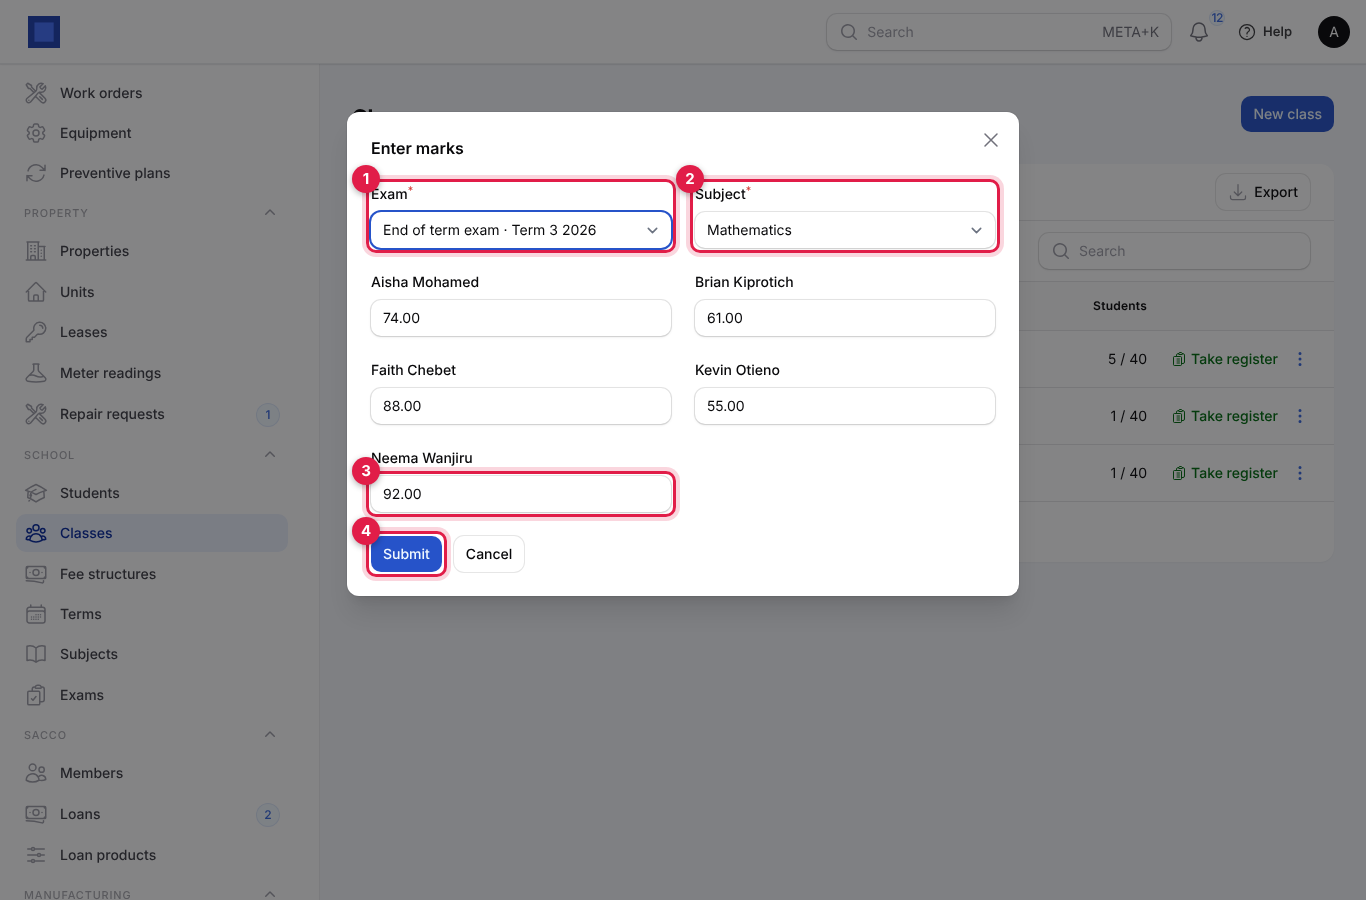
How term marks and grades are worked out
- Each exam mark is turned into a percentage and weighted. With CAT 1 at 38/50 (76%) counting 30% and the end-of-term exam at 74% counting 70%, the subject mark is 76 × 0.3 + 74 × 0.7 = 74.6. If a student missed an exam, the other exams' weights are used.
- The grade comes from the grading scale in settings.
- The average is the average of the subject marks, with its grade.
- The position is the student's place in the class by average, among active students with marks this term.
Report cards
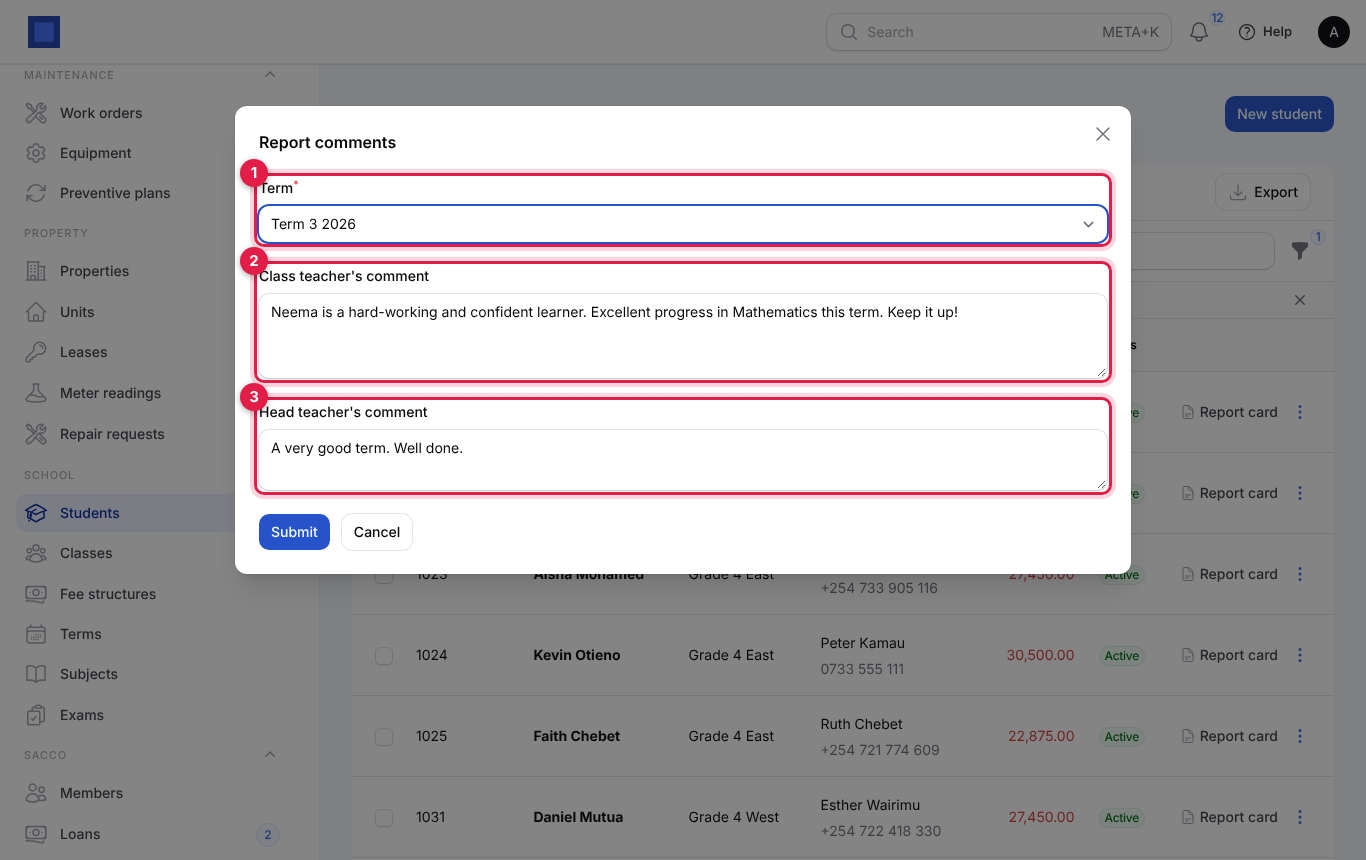
Write report comments
- On School → Students, click ⋮ → Report comments on the student.
- Pick the Term (marker 1), type the Class teacher's comment (marker 2) and Head teacher's comment (marker 3), and click Submit.
Download a report card
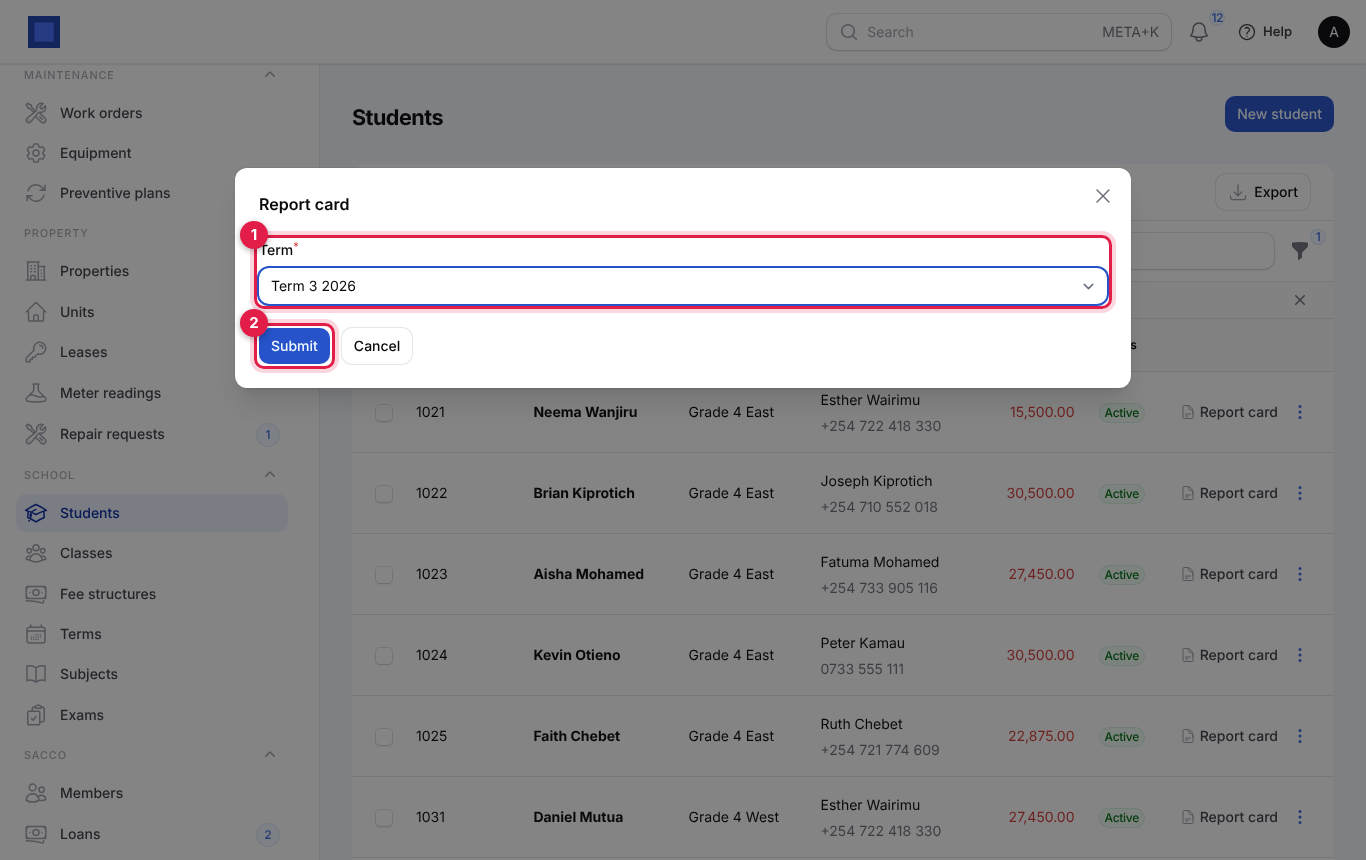
- On School → Students, click Report card on the student.
- Pick the Term (marker 1) and click Submit (marker 2). The report card opens as a PDF to print or save.
The report card shows the student, admission number, class, class teacher, term and parent or guardian; a table of subjects with the mark in each exam, the term Mark and Grade; the Overall average and grade with Position n of n; Attendance (present, absent, late and excused of the days recorded); the class and head teacher's comments; and the grading scale.
What parents see in the portal
Parents who sign in to your customer portal see My children. For each active child: the admission number and class, the Fee balance (marker 1), Days present this term and Average this term with the grade (marker 4). Pay fees (marker 2) opens their invoices to pay online, and Download report card (marker 3) gives the current term's report card once marks are entered.
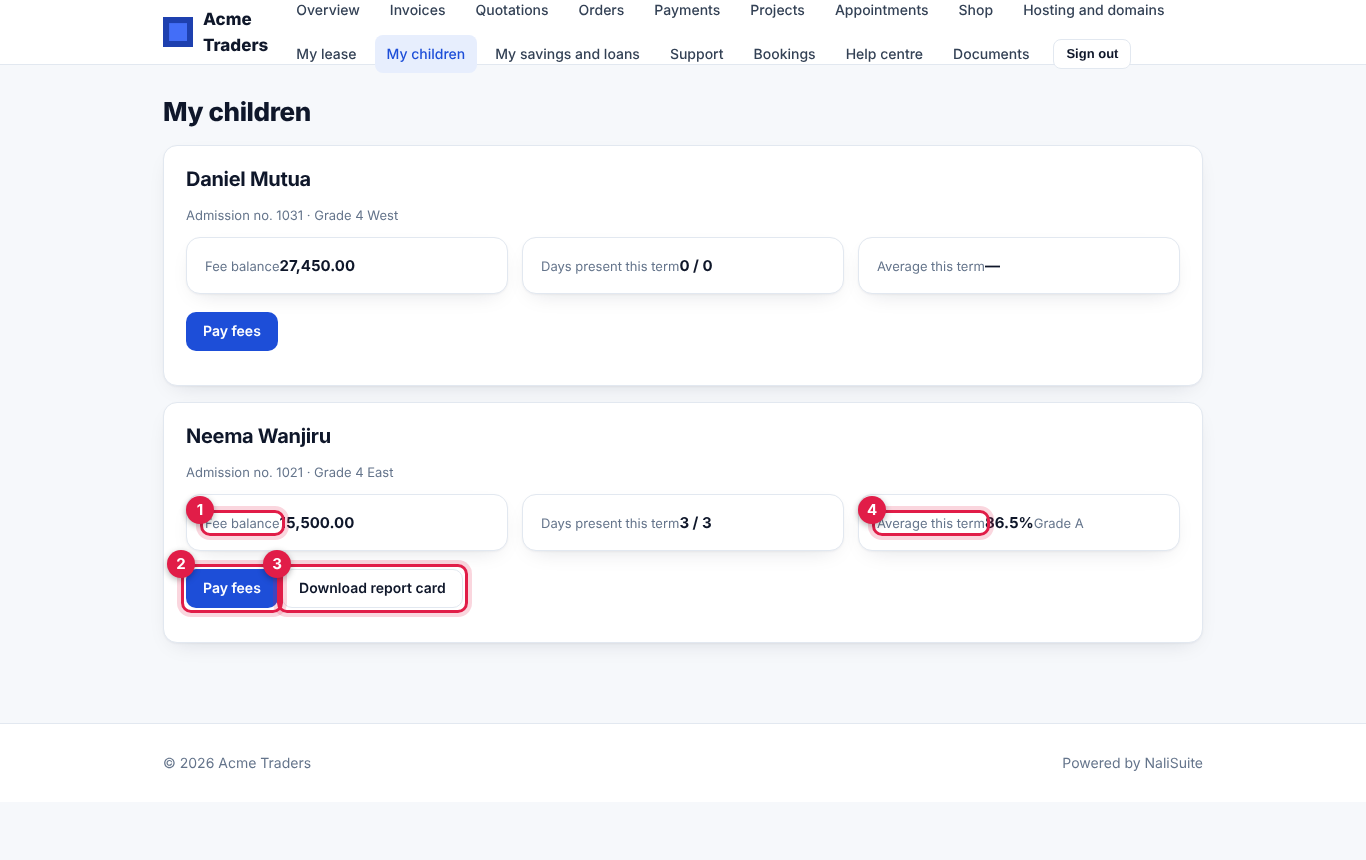
To give a parent access, invite their contact under Sales → Portal access (see Customer and vendor portal).
School settings
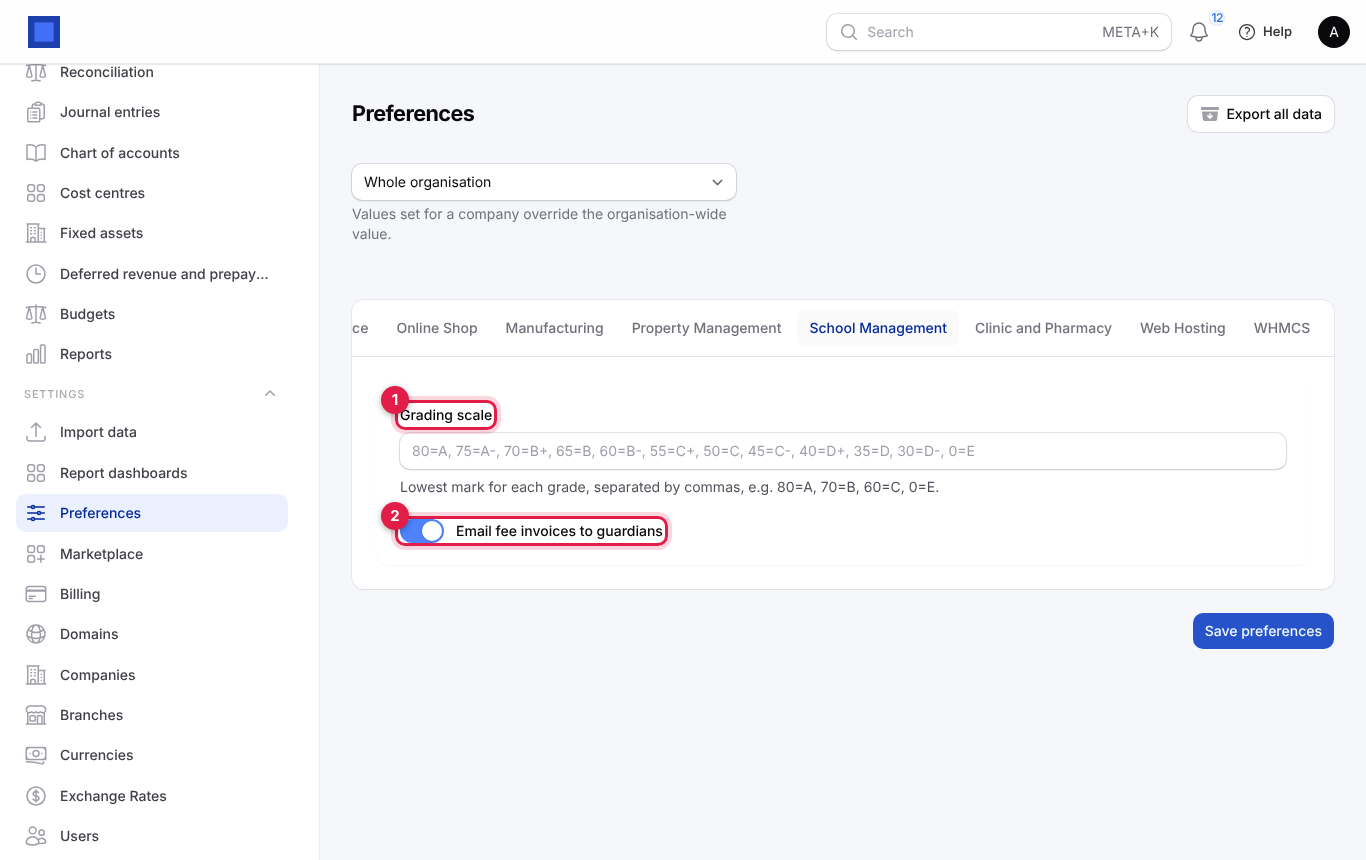
- In the menu, open Settings → Preferences.
- Click the School Management tab, change the settings and click Save preferences.
| Setting | What it does |
|---|---|
| Grading scale (marker 1) | The lowest mark for each grade, separated by commas. Empty uses 80=A, 75=A-, 70=B+, 65=B, 60=B-, 55=C+, 50=C, 45=C-, 40=D+, 35=D, 30=D-, 0=E. For a CBC-style scale you might use 80=EE, 50=ME, 30=AE, 0=BE. |
| Email fee invoices to guardians (marker 2) | Shown here, but fee invoices are emailed according to the Email the invoices to guardians switch in the Invoice students window. |
Common questions
A new student joined mid-term. How do I bill them? Add the student with their class and guardian, then click Invoice students on the level's fee structure again. Only students not yet invoiced on it are billed.
How do I give a sibling discount? Set Fee discount (%) on the student. It applies to future fee invoices, not ones already issued.
A parent paid cash at the office. Where do I record it? Open the invoice (Finance → Invoices, search the parent's name) and click Record payment. The student's Fee balance updates.
Why is a student missing from the register or mark sheet? Only Active students in the class are listed. Check the student's Class and Status.
Can I change the grading scale after marks are entered? Yes. Grades are worked out each time a report card or the parent page is shown, so the new scale applies straight away.
Why can a parent not see their child in the portal? The child's Guardian must be the same contact the parent's portal access is linked to, and the child must be Active.