Agriculture and Outgrowers
Agriculture and Outgrowers is for farms, estates, cooperatives and produce buyers. It has two halves that you can use together or on their own. Own farms tracks your farms and plots and each crop season on them: the work done, the labour and inputs it cost, the harvest and what each kilogram really cost you. Outgrowers handles the smallholders who sell to you: you register them, weigh in their deliveries at the collection centre, give them seed and fertiliser on credit, and pay them monthly with the credit taken back. It is in the Agriculture group of the sidebar: Farms and plots, Crop seasons, Growers, Deliveries, Inputs on credit, Produce prices and Grower payouts.
Agriculture and Outgrowers is a marketplace module. The owner switches it on under Settings → Marketplace (search for Agriculture). It needs the Contacts and Purchases apps. With Inventory on, harvests and deliveries go into stock; with Marketing and an SMS provider set up, growers get a text receipt for each delivery.
Note: agriculture.view shows the Agriculture pages. agriculture.manage adds farms, seasons, growers, prices, inputs on credit and payouts. agriculture.collect is for clerks at the weighbridge: together with agriculture.view it lets them weigh in deliveries without being able to change prices, growers or payouts. Set permissions under Settings → Roles.
Part 1: Your own farms
Add a farm and its plots
- In the menu, open Agriculture → Farms and plots.
- Click New farm (marker 1). The Plots column (marker 2) counts the plots on each farm.
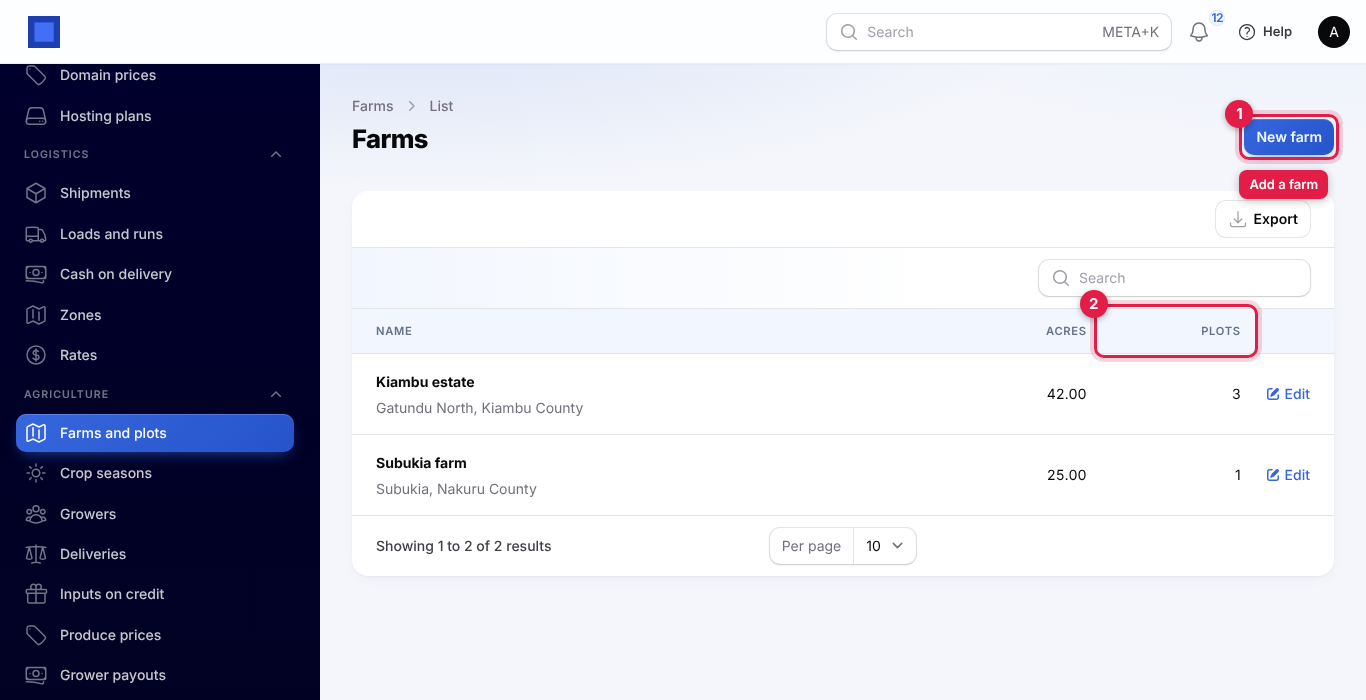
- Pick the Company, type the Name (for example "Kiambu estate"), the Location and the Size (acres), add any Notes and click Create.
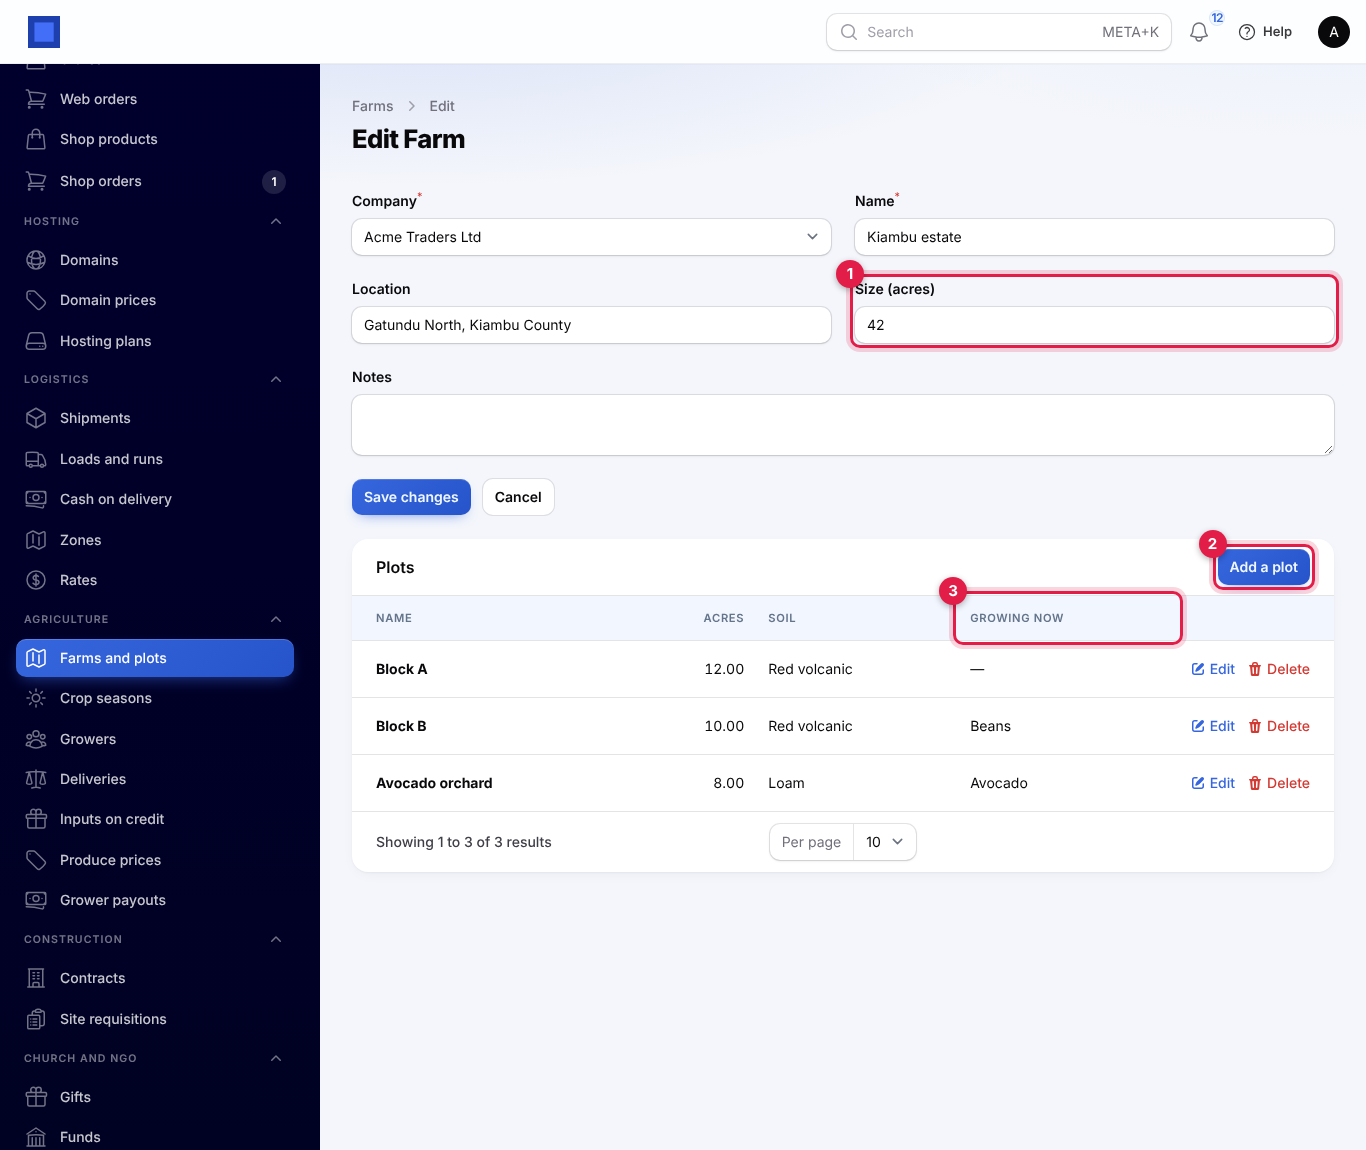
- Click Edit on the farm to open it. Under the farm details (marker 1 is the size), the Plots table lists its plots with their acres, soil and the crop Growing now (marker 3).
- Click Add a plot (marker 2).
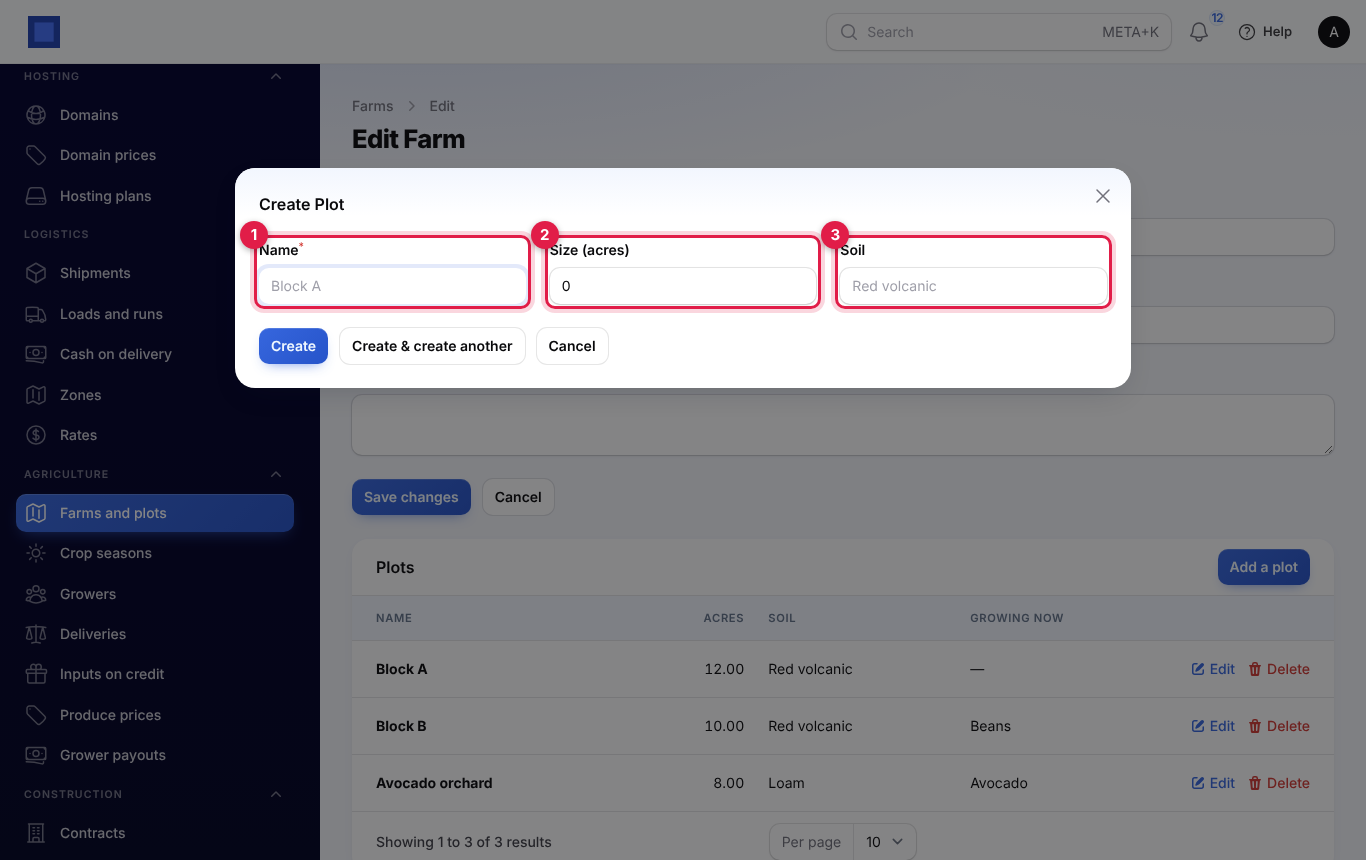
- Type the plot Name (marker 1), for example "Block A", its Size (acres) (marker 2) and the Soil (marker 3), for example "Red volcanic". Click Create.
Use Edit or Delete on a plot's row to change or remove it.
Start a crop season
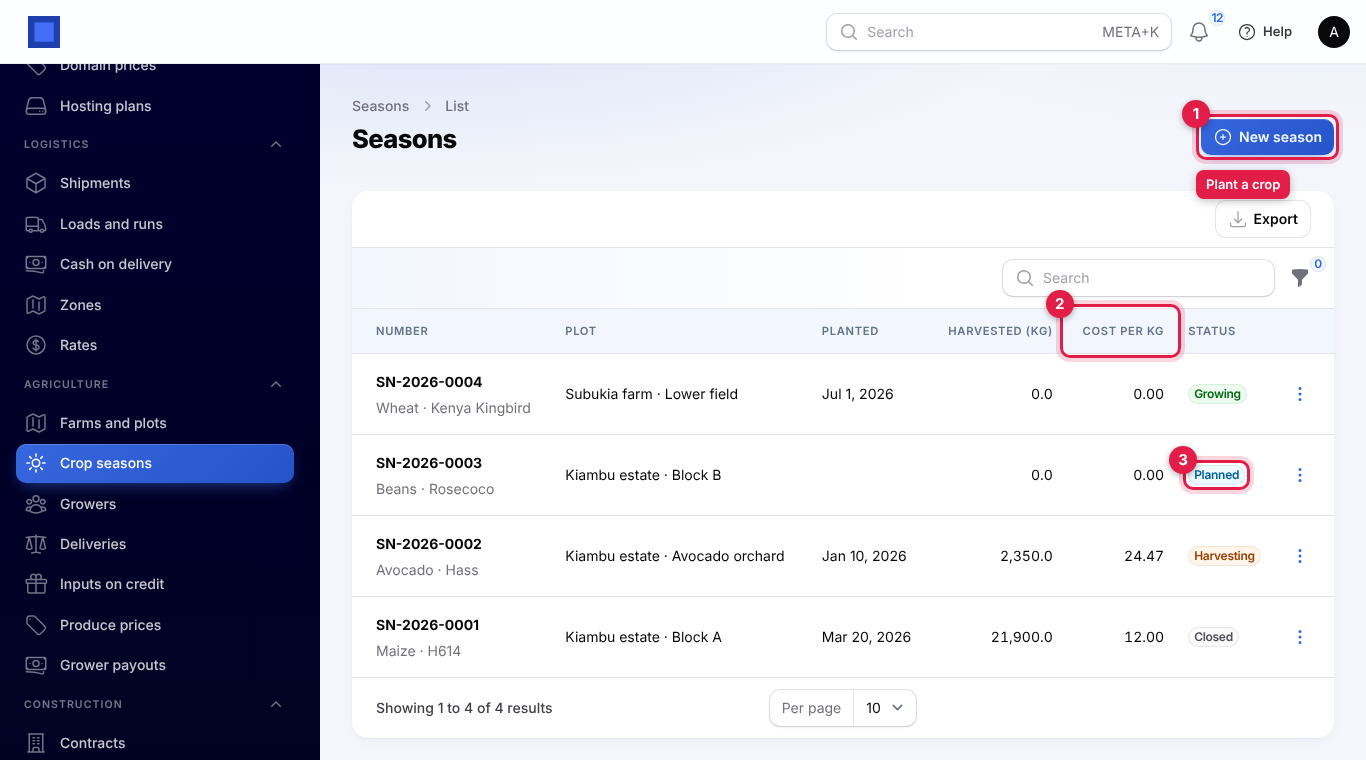
A crop season is one crop on one plot, from planting to the last harvest. Each gets a number such as SN-2026-0001.
- In the menu, open Agriculture → Crop seasons.
- Click New season (marker 1). The list shows each season's plot, planting date, Harvested (kg), Cost per kg (marker 2) and Status (marker 3).
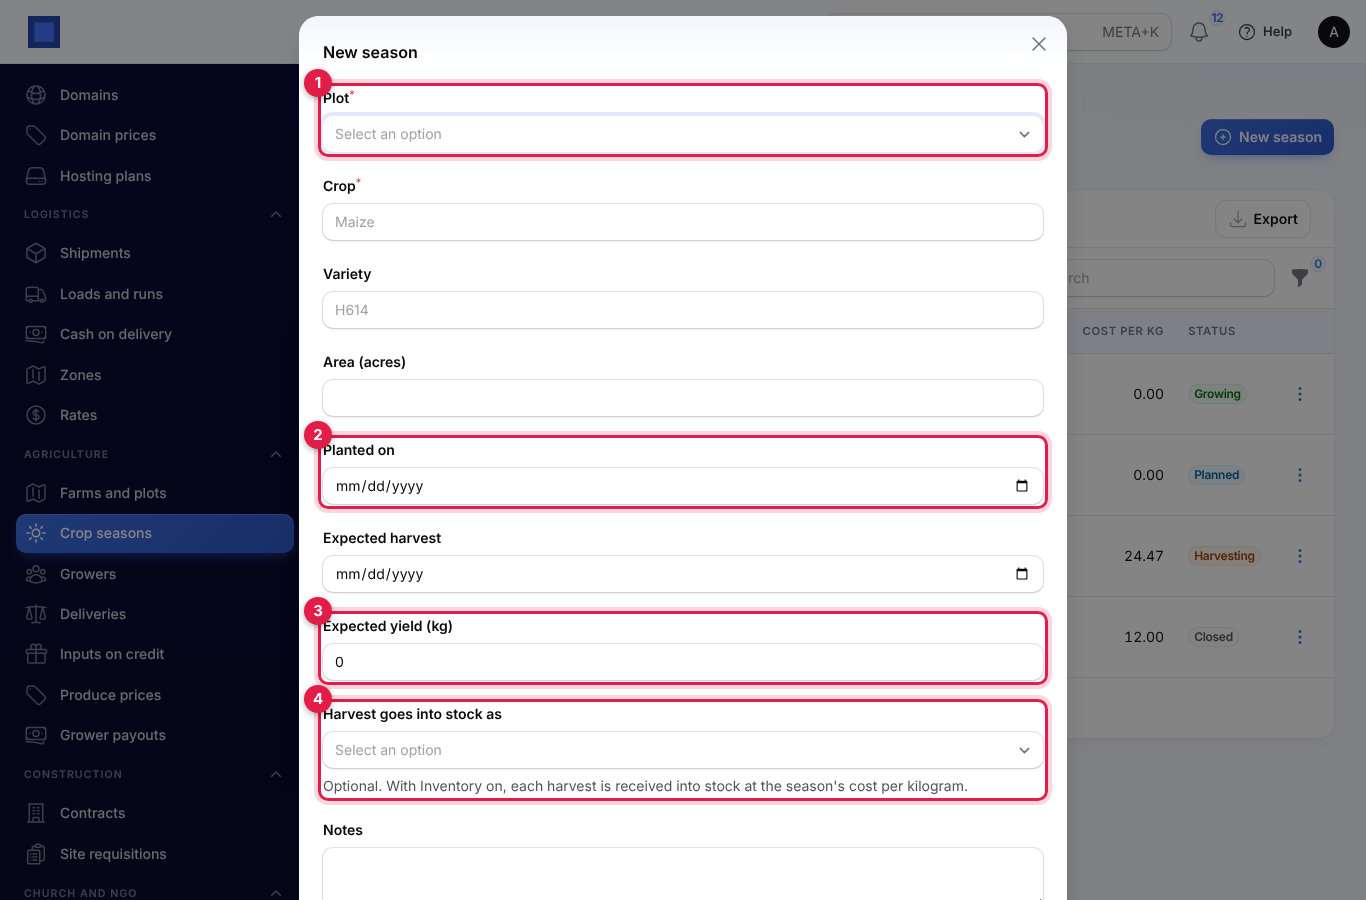
- Fill in the form and click Submit. The season opens.
| Field | What to enter |
|---|---|
| Plot | Required (marker 1). Farm and plot, for example "Kiambu estate · Block A". Cannot be changed later. |
| Crop | Required. For example Maize, Tea, Avocado, Beans. |
| Variety | Optional, for example H614, Hass or Rosecoco. |
| Area (acres) | The area under this crop. Leave empty to use the plot's size. Used for the yield per acre. |
| Planted on | Optional (marker 2). Leave empty if you have not planted yet; the season is then Planned until you record planting work. |
| Expected harvest | Optional. The date you expect to harvest. |
| Expected yield (kg) | Optional (marker 3). Used to show what share of the expected yield you harvested. |
| Harvest goes into stock as | Optional (marker 4). A product such as "Dry maize (90 kg bag)". With Inventory on, each harvest is received into stock at the season's cost per kilogram so far. |
| Notes | Anything else. |
Season statuses
| Status | What it means |
|---|---|
| Planned | Created without a planting date. Recording Planting work makes it Growing. |
| Growing | Planted. Record work as it happens. |
| Harvesting | At least one harvest recorded. You can keep recording work and harvests. |
| Closed | Locked with Close season. No more work or harvests can be recorded. |
Record work and inputs
Record every job done on the season, with the labour paid and any inputs used, so the season's cost is complete.
- Open the season (click Edit on its row) and click Actions (marker 2 below), or use ⋮ on the row in the list.
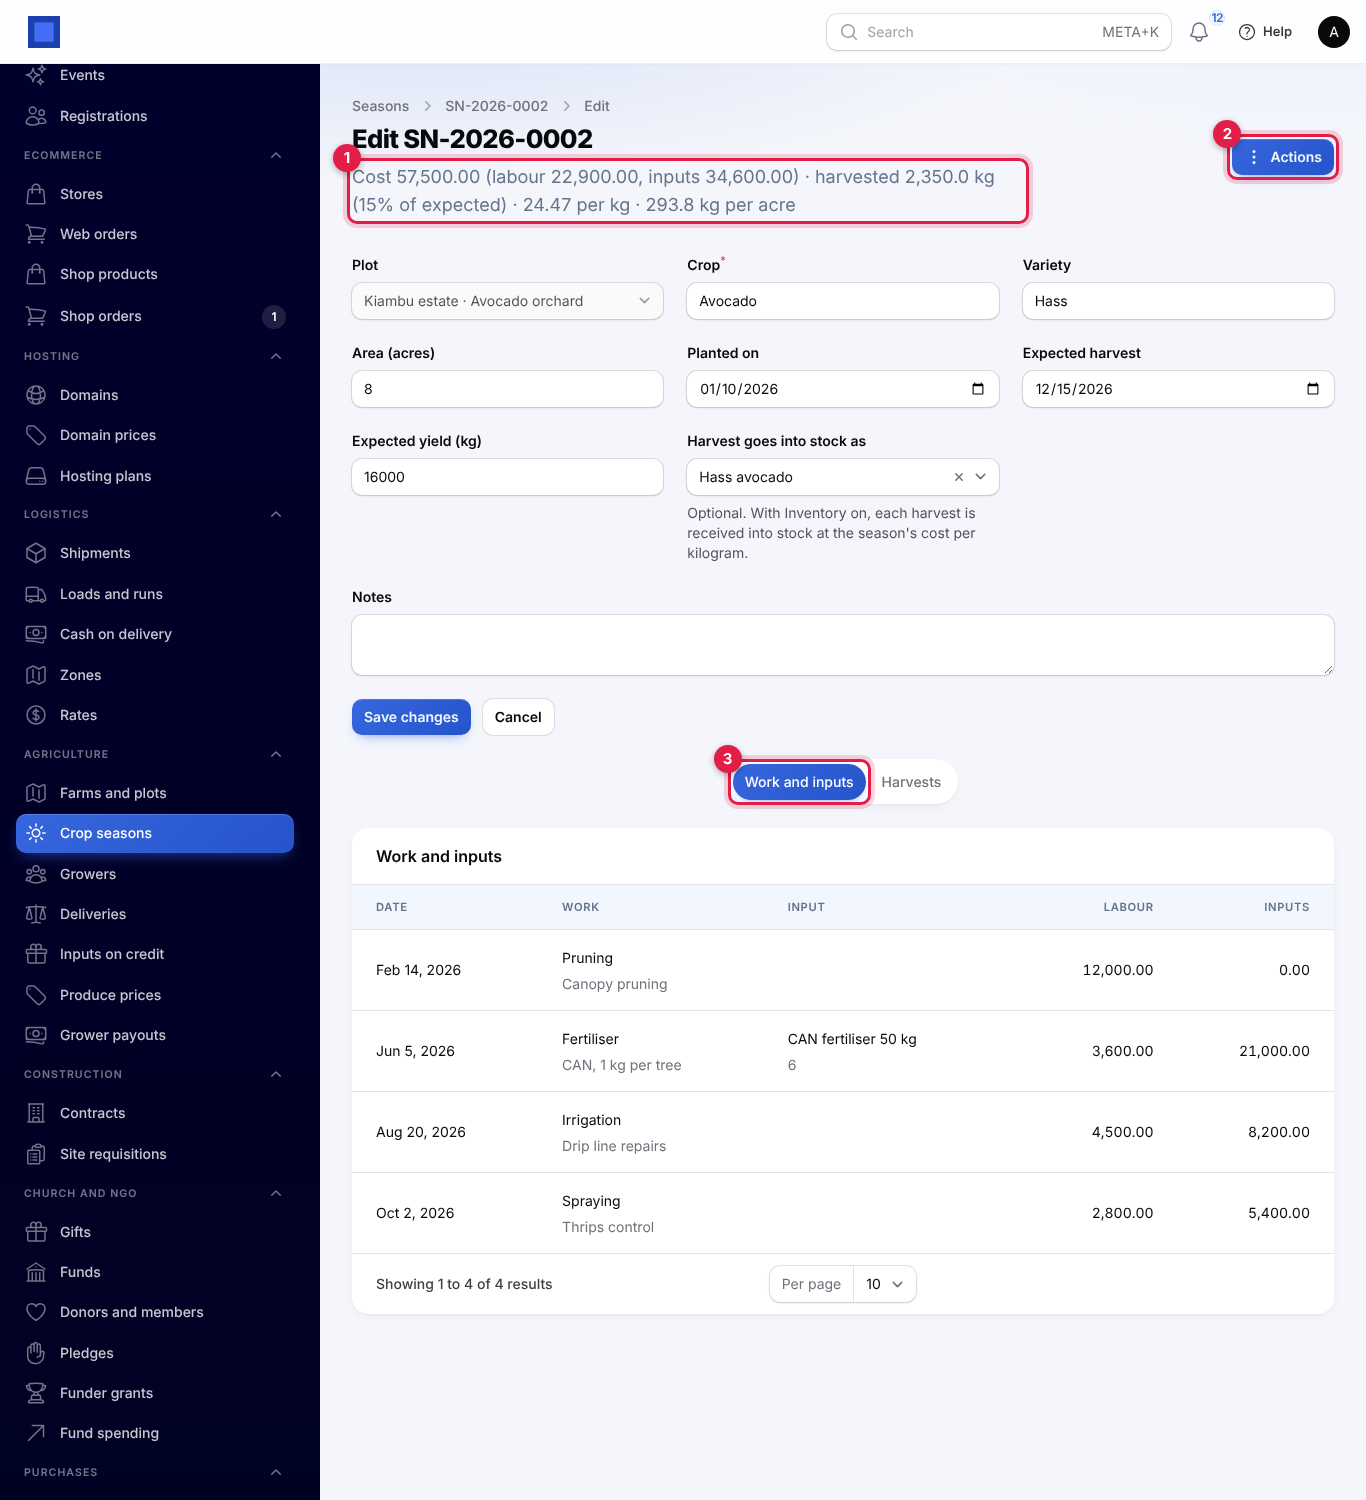
- Click Record work (marker 1).
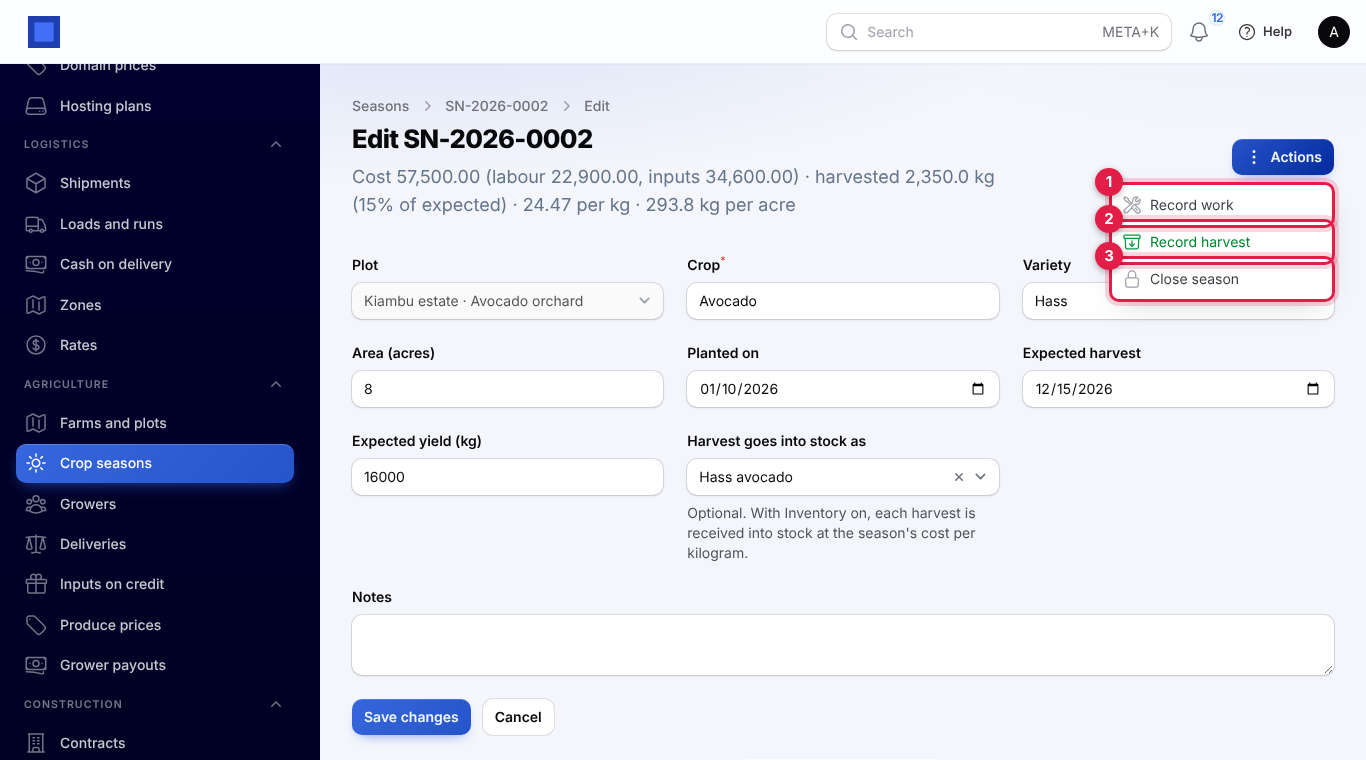
- Set the Date and pick the Work (marker 1): Land preparation, Planting, Fertiliser, Spraying, Weeding, Irrigation, Pruning or Other. Add a Description, for example "First weeding, 8 casuals x 3 days".
- Enter the Labour cost (marker 2) paid for the job.
- If an input was used, pick it under Input used (marker 3) and enter the Quantity, for example 24 bags of CAN fertiliser.
- Leave Input cost (leave 0 to use stock cost) (marker 4) at 0 to let NaliSuite cost the input, or type what it really cost.
- Click Submit.
How the input is costed:
- Inputs with stock tracking (Inventory on): the quantity is taken out of the main store and costed at its stock cost.
- Other inputs: costed at the product's cost price times the quantity.
- A typed input cost always wins.
Record a harvest
- On the season, click Actions → Record harvest (marker 2 in the actions screenshot).
- Set the Date, the Weight (kg) (marker 1), the Grade (marker 2), for example "Grade 1" or "Class 1", and any Notes. Click Submit.
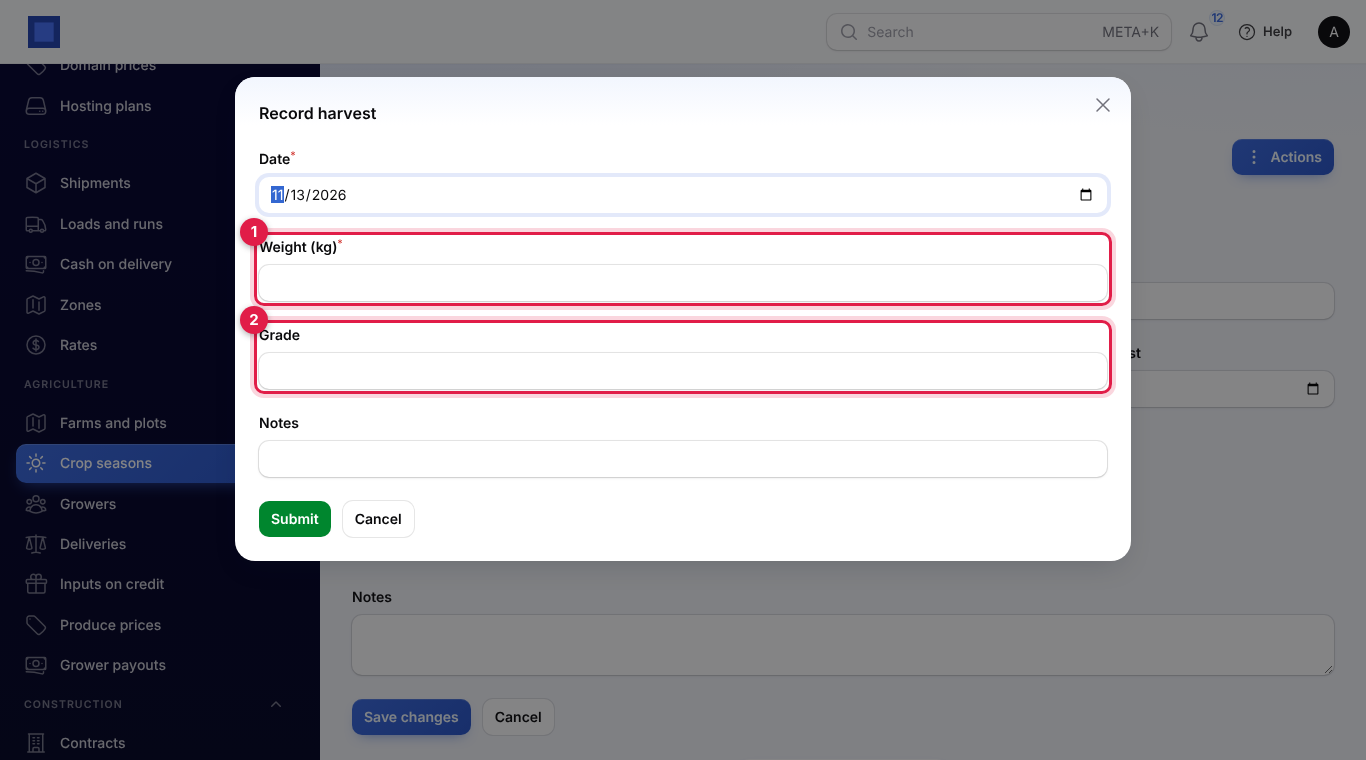
The season becomes Harvesting. When the season has a Harvest goes into stock as product with stock tracking and Inventory is on, the harvest is received into the main store at the season's cost per kilogram so far.
Read the season's results
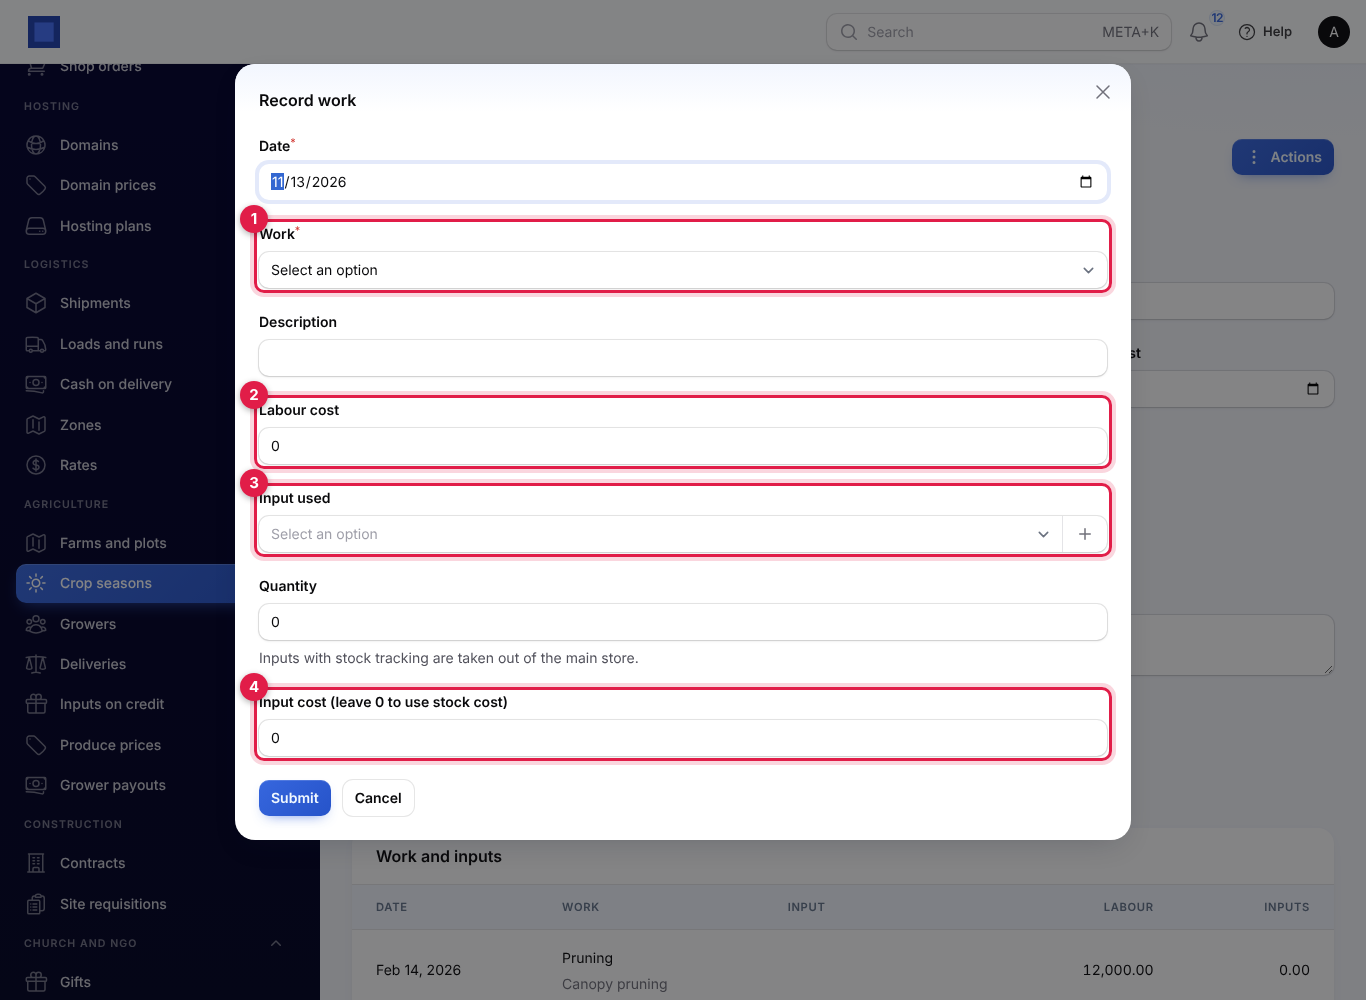
The line under the season's title (marker 1 in the season screenshot) sums it up, for example "Cost 57,500.00 (labour 22,900.00, inputs 34,600.00) · harvested 2,350.0 kg (15% of expected) · 24.47 per kg · 293.8 kg per acre":
- Cost: all labour plus all inputs recorded.
- Harvested: total kilograms from every harvest, and the share of the expected yield.
- Per kg: cost divided by kilograms harvested. Compare it with the market price to see if the crop paid.
- kg per acre: kilograms harvested divided by the season's area.
The tabs below (marker 3) list every job under Work and inputs (date, work, input and quantity, labour, inputs) and every harvest under Harvests (date, kg, grade, notes).
Close a season
When the last harvest is in, click Actions → Close season (marker 3 in the actions screenshot) and confirm. The season becomes Closed and nothing more can be recorded on it. The plot's Growing now column clears, ready for the next season.
Part 2: Outgrowers
How outgrower buying works
- Register each grower. They get a number such as
OG-00001and become a supplier in your contacts. - Set produce prices per kilogram for each produce and grade.
- Weigh in each delivery at the collection centre. It is priced from the list and the grower is texted a receipt.
- Give inputs on credit when a grower takes seed, fertiliser or a cash advance.
- Prepare a payout for a period. It adds up each grower's unpaid deliveries and takes back inputs still owed.
- Approve the payout. Each grower gets a supplier bill for what they are owed, and you download a Payment file for a bulk M-Pesa or bank payment.
Register growers
- In the menu, open Agriculture → Growers.
- Click Register a grower (marker 1). The list shows each grower's number, name and payout phone, centre, kg this month (marker 2) and Inputs owed (marker 3).
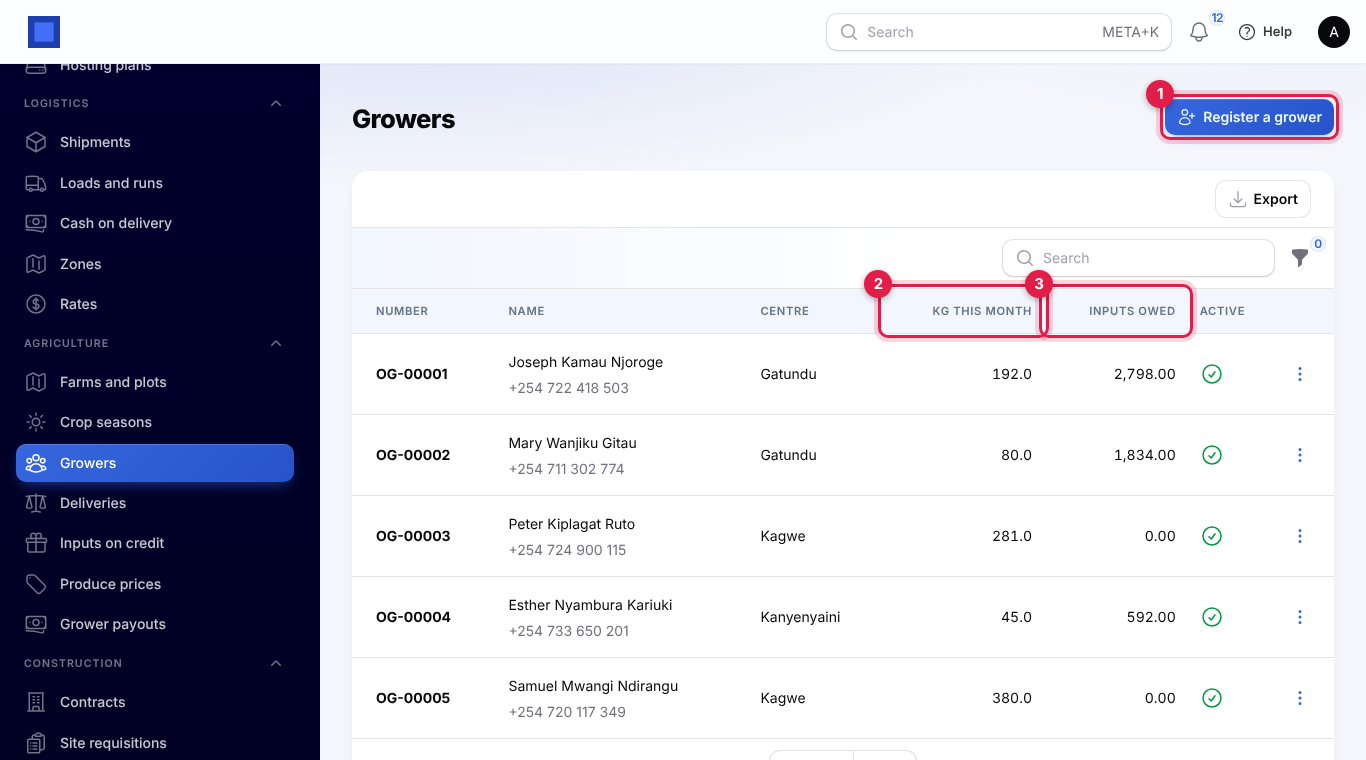
- Pick an Existing contact (marker 1), or leave it empty and type the Name and Phone (marker 2) of someone new. The phone becomes their payout phone.
- Add the National ID, the Collection centre (marker 3) where they deliver, the Crop and the Acres.
- Click Submit. You see "… registered as OG-00006".
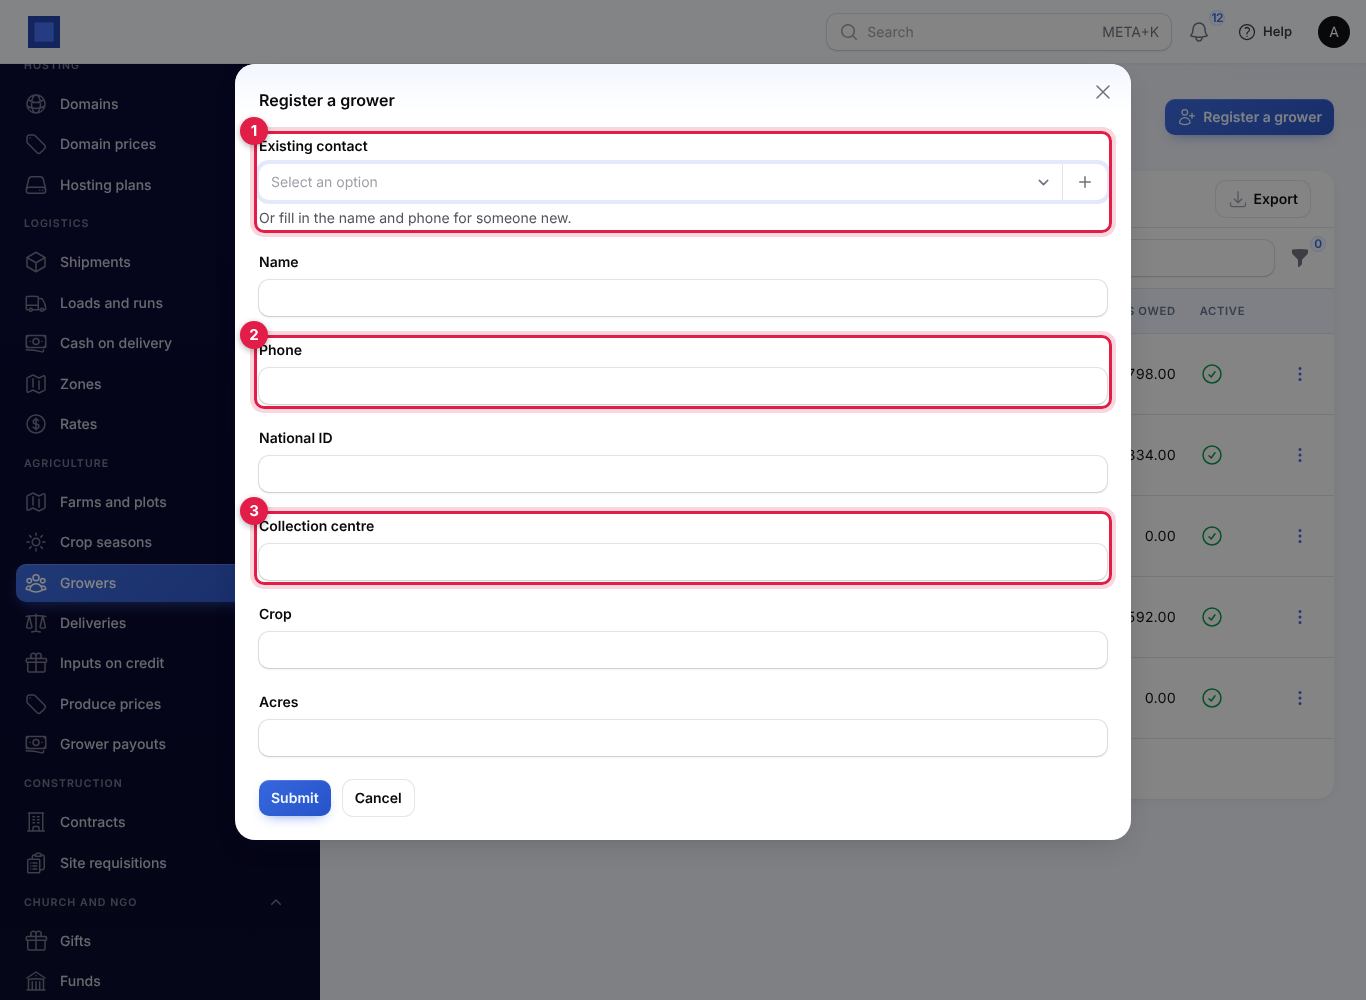
A new grower is created as a supplier contact. An existing contact is marked as a supplier too, so the payout bills can be raised to them. A contact can only be registered once.
To change a grower's Collection centre, Crop, Acres, Payout phone (M-Pesa) or switch them off with Active, click ⋮ → Edit on their row. Inactive growers cannot deliver.
Set produce prices
- In the menu, open Agriculture → Produce prices.
- Click New price (marker 1).
- Pick the Produce (a product, for example "Green leaf tea"), type the Grade (marker 2) or leave it empty for a price that applies to every grade, type the Price per kg and the date it applies From (marker 3). Click Create.
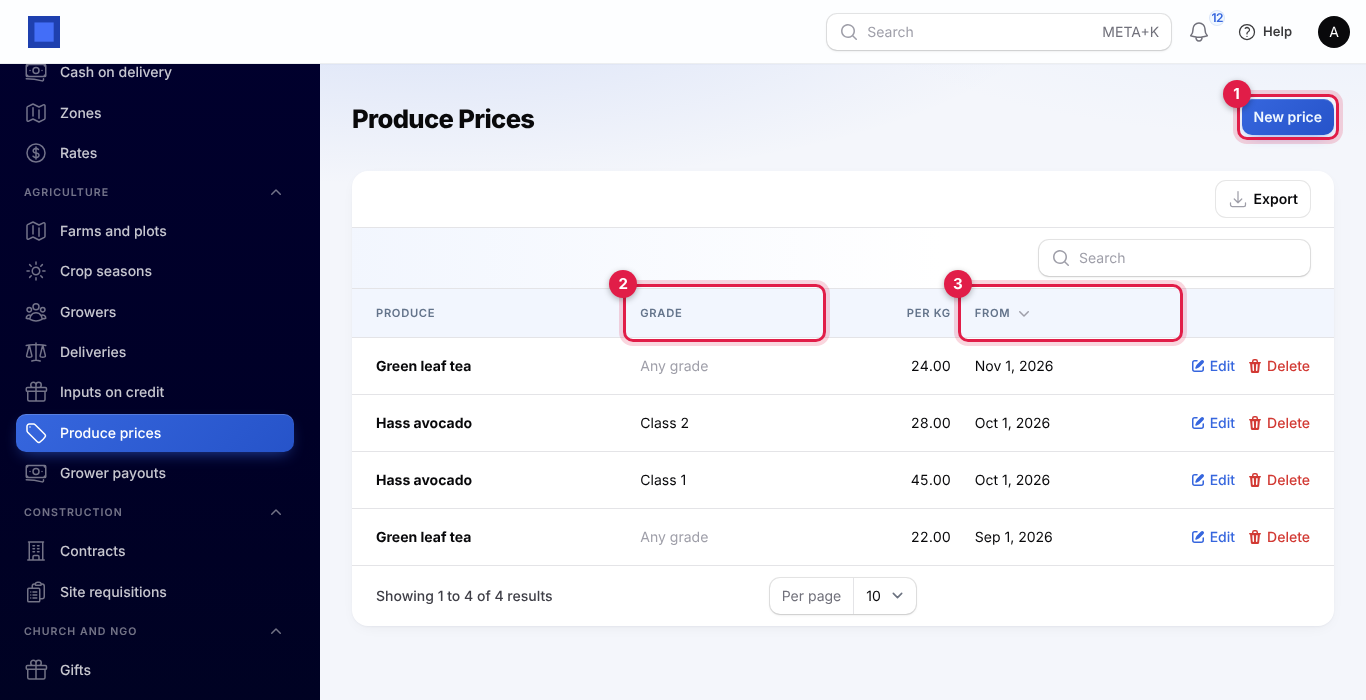
When you weigh in a delivery, NaliSuite uses the latest price that started on or before the delivery date for that produce and grade; a price for the exact grade wins over an "Any grade" price. To change the price from next month, add a new price with the new From date rather than editing the old one, so earlier deliveries keep their price.
Tip: Only produce with at least one price can be picked when weighing in. Add the produce in Sales → Products first if it is not there.
Weigh in a delivery
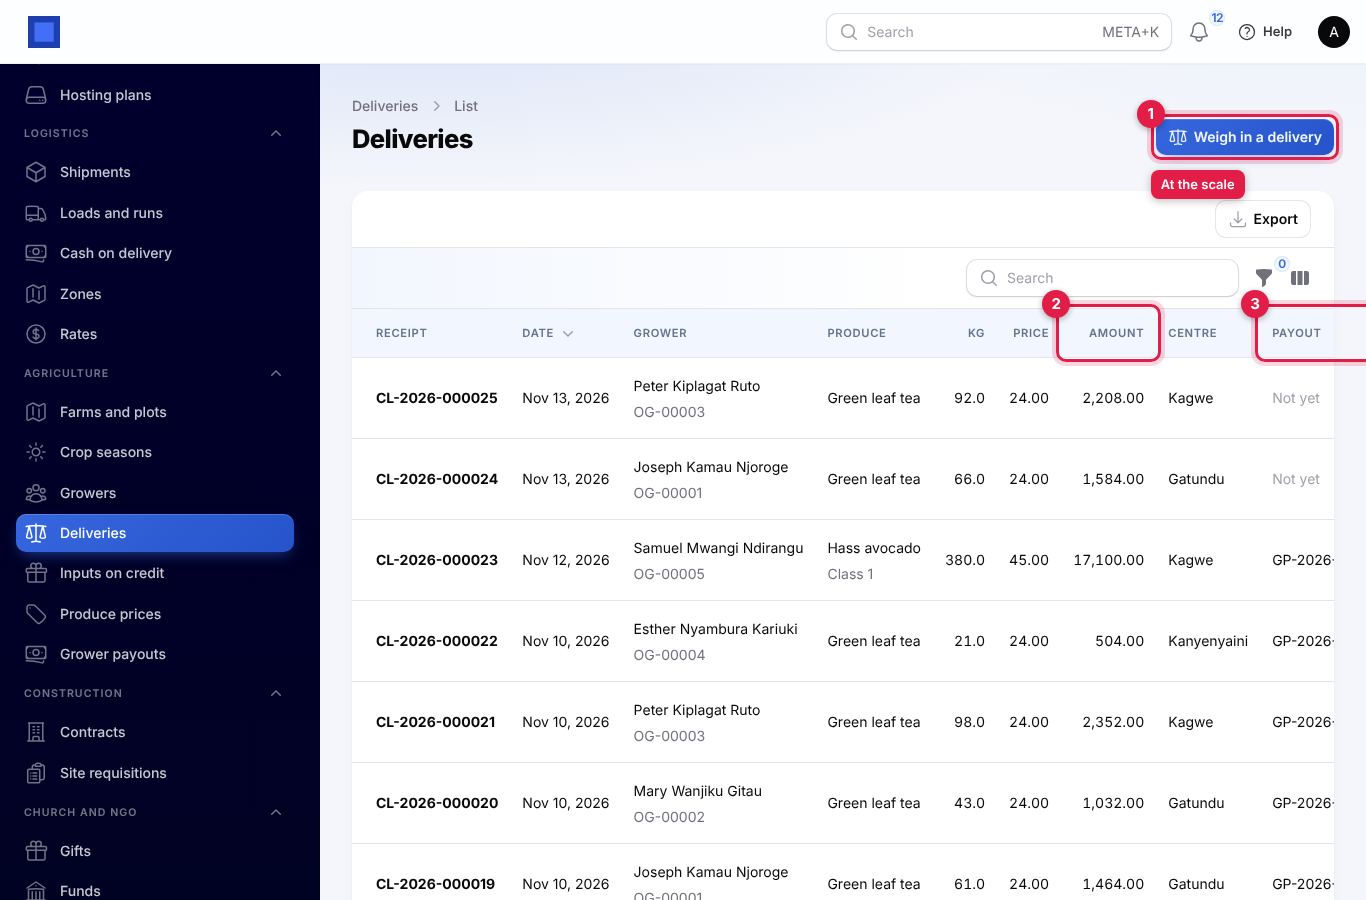
- In the menu, open Agriculture → Deliveries.
- Click Weigh in a delivery (marker 1). The list shows each receipt with the grower, produce and grade, kg, price, Amount (marker 2), centre and the Payout it was paid in (marker 3), or "Not yet". The kg and amount columns are totalled at the bottom.
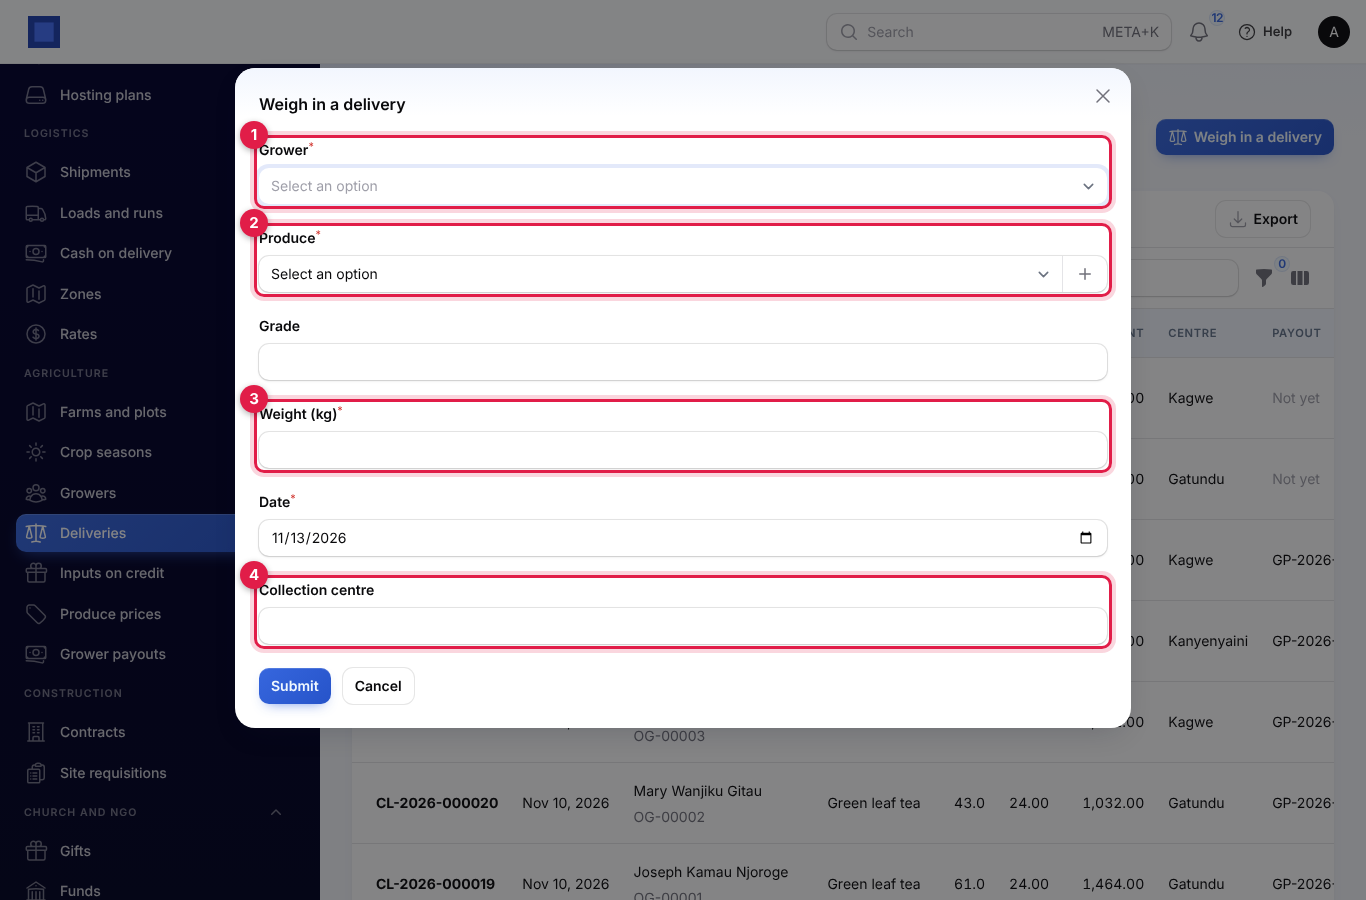
- Search for the Grower (marker 1) by name or number, pick the Produce (marker 2) and type the Grade if you grade it.
- Type the Weight (kg) (marker 3), check the Date and type the Collection centre (marker 4).
- Click Submit. You see the receipt number and amount, for example "CL-2026-000025: 2,208.00".
What happens:
- The delivery is priced from Produce prices. If there is no price for that date, you see "There is no price for … on …. Add one under Agriculture → Produce prices."
- With Inventory on and stock tracking on the produce, the kilograms are received into the main store at the price paid.
- The grower is texted a receipt, for example "Acme Traders Ltd: received 92.0 kg of Green leaf tea from you on 13 Nov (CL-2026-000025), KES 2,208.00. This month: 279.0 kg."
Use the filters for one Centre, Not yet in a payout or Today (for the day's tally at a centre).
Give inputs on credit
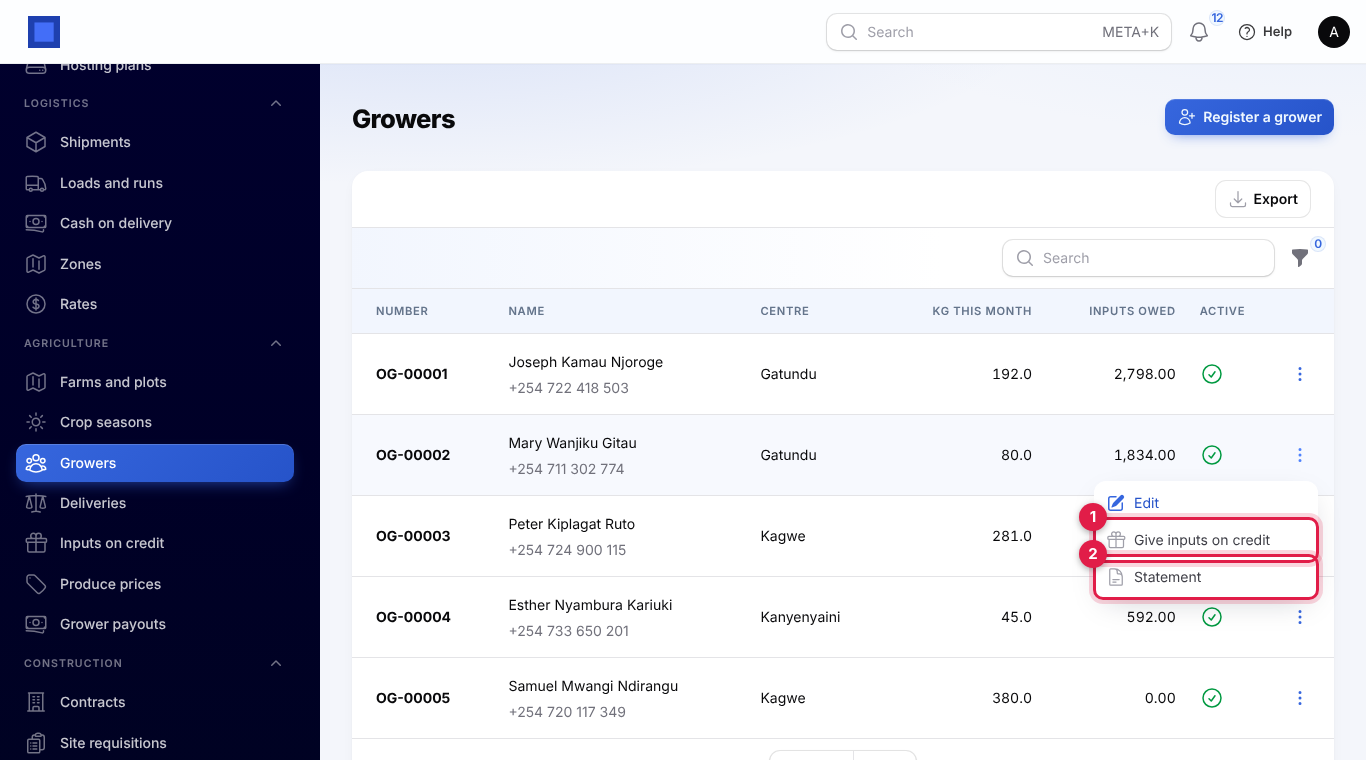
- On Agriculture → Growers, click ⋮ on the grower's row, then Give inputs on credit (marker 1).
- Set the Date, describe What was given (marker 1), for example "2 bags CAN fertiliser", and the Amount (marker 2) in money. Click Submit.
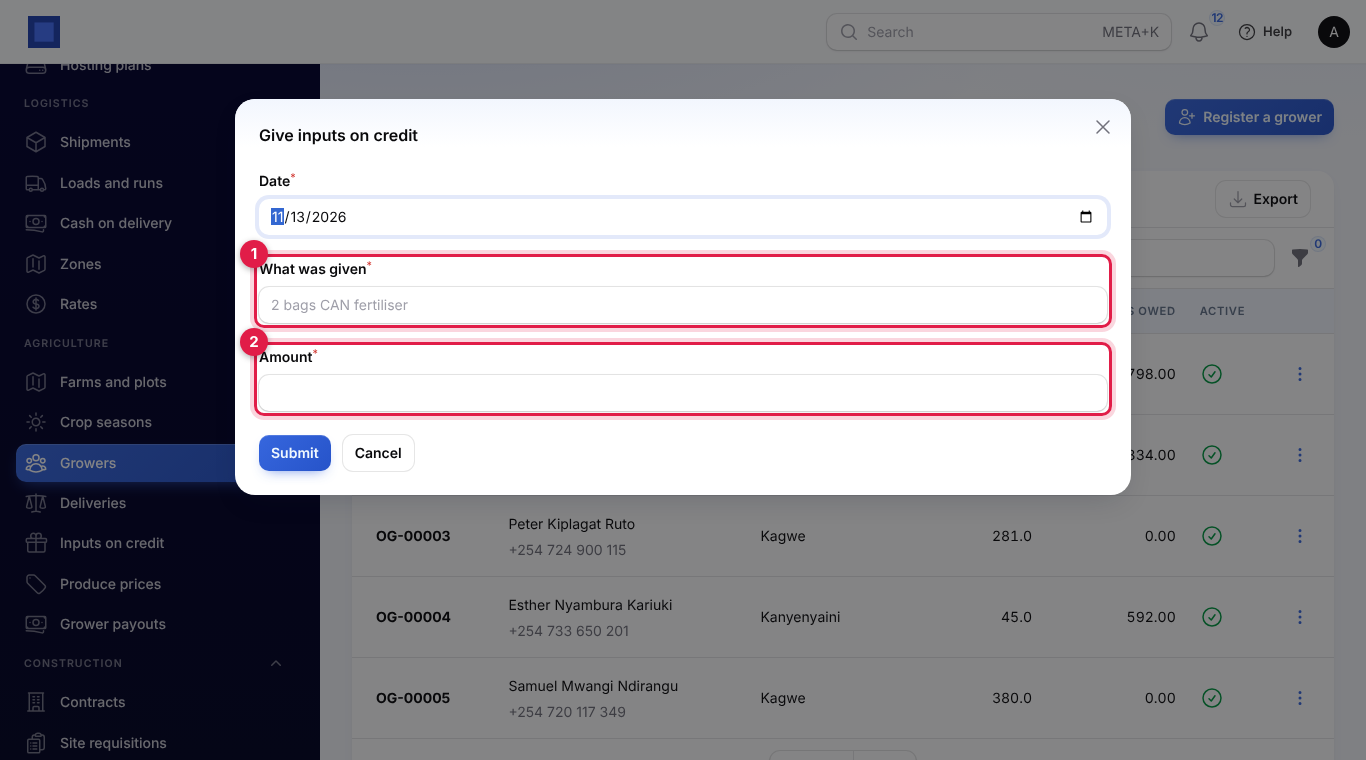
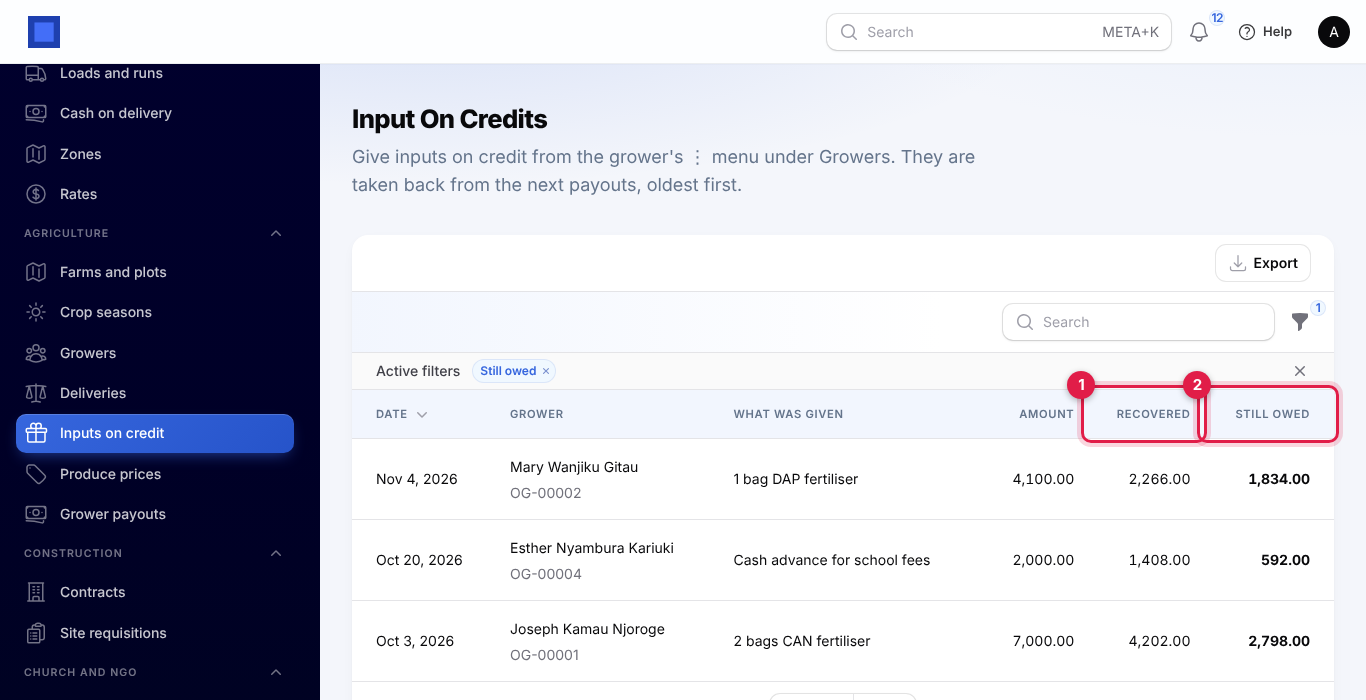
You see "Recorded; it will be recovered from the next payouts". The amount shows in the grower's Inputs owed.
To see everything given on credit, open Agriculture → Inputs on credit. It shows each item with the Amount, what has been Recovered (marker 1) and what is Still owed (marker 2). The Still owed filter is on when the page opens; remove it to see items fully recovered.
Note: Give inputs on credit records the debt only. It does not take the fertiliser out of stock or pay out cash. Issue stock or record the cash payment as you normally do.
Pay growers
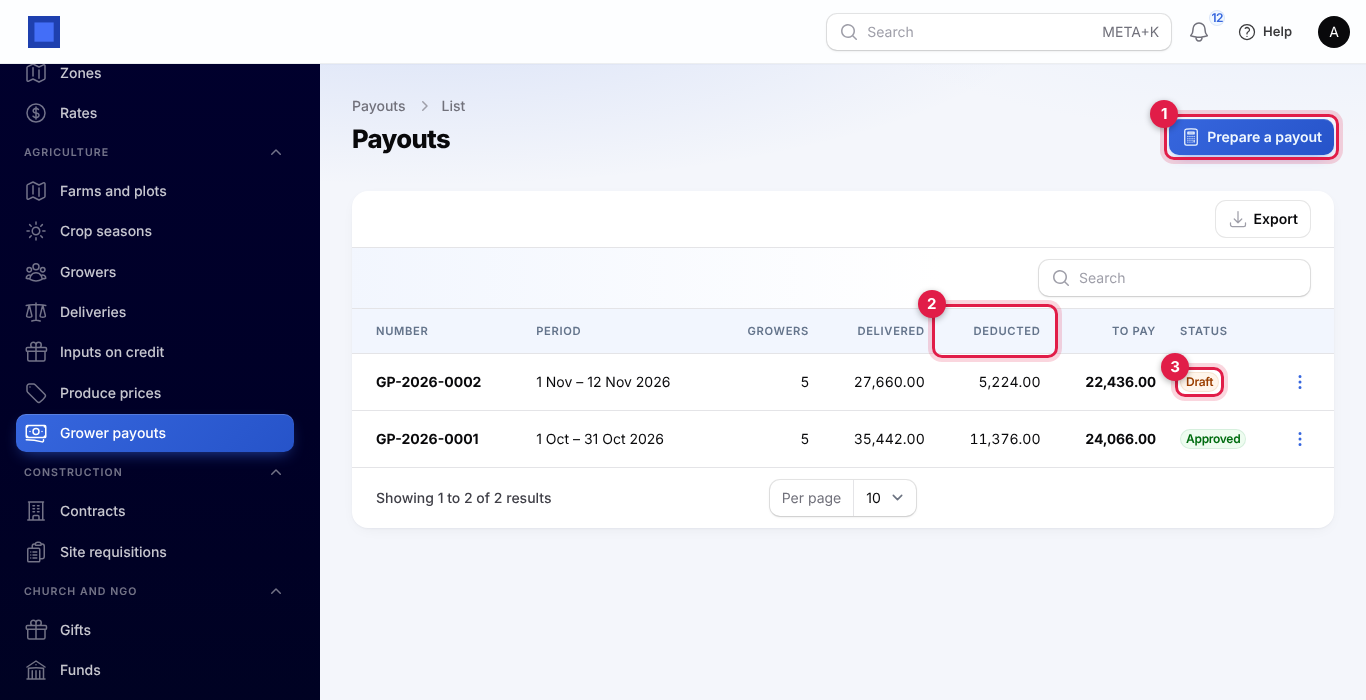
- In the menu, open Agriculture → Grower payouts. Each payout shows its period, the number of growers, what was Delivered, what was Deducted (marker 2), what is To pay and its status (marker 3).
- Click Prepare a payout (marker 1).
- Set From (marker 1) and To (marker 2). They start on last month. Click Submit.
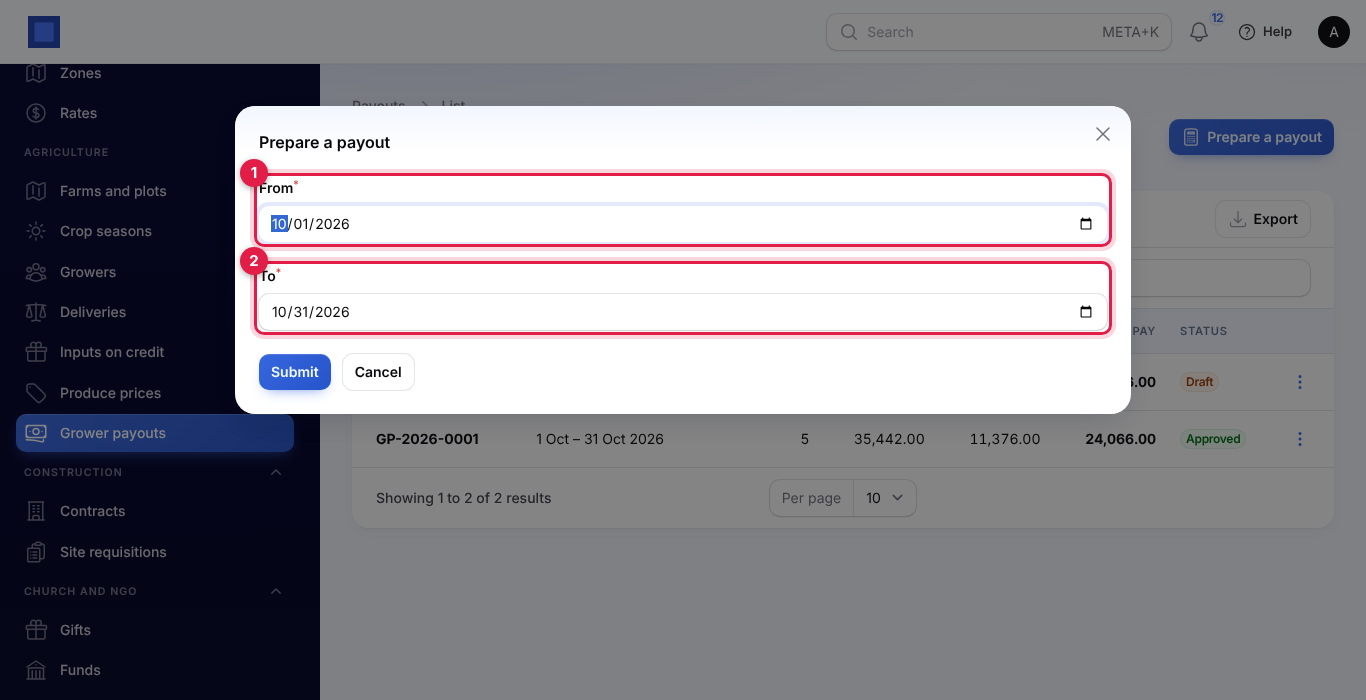
NaliSuite gathers every delivery in that period not already in a payout and makes one line per grower: the kilograms, the amount delivered, the inputs to recover (everything still owed, oldest first, but never more than the grower earned) and the amount to pay. The payout opens as a Draft, numbered for example GP-2026-0002. If nothing is unpaid, you see "No unpaid deliveries between … and …".
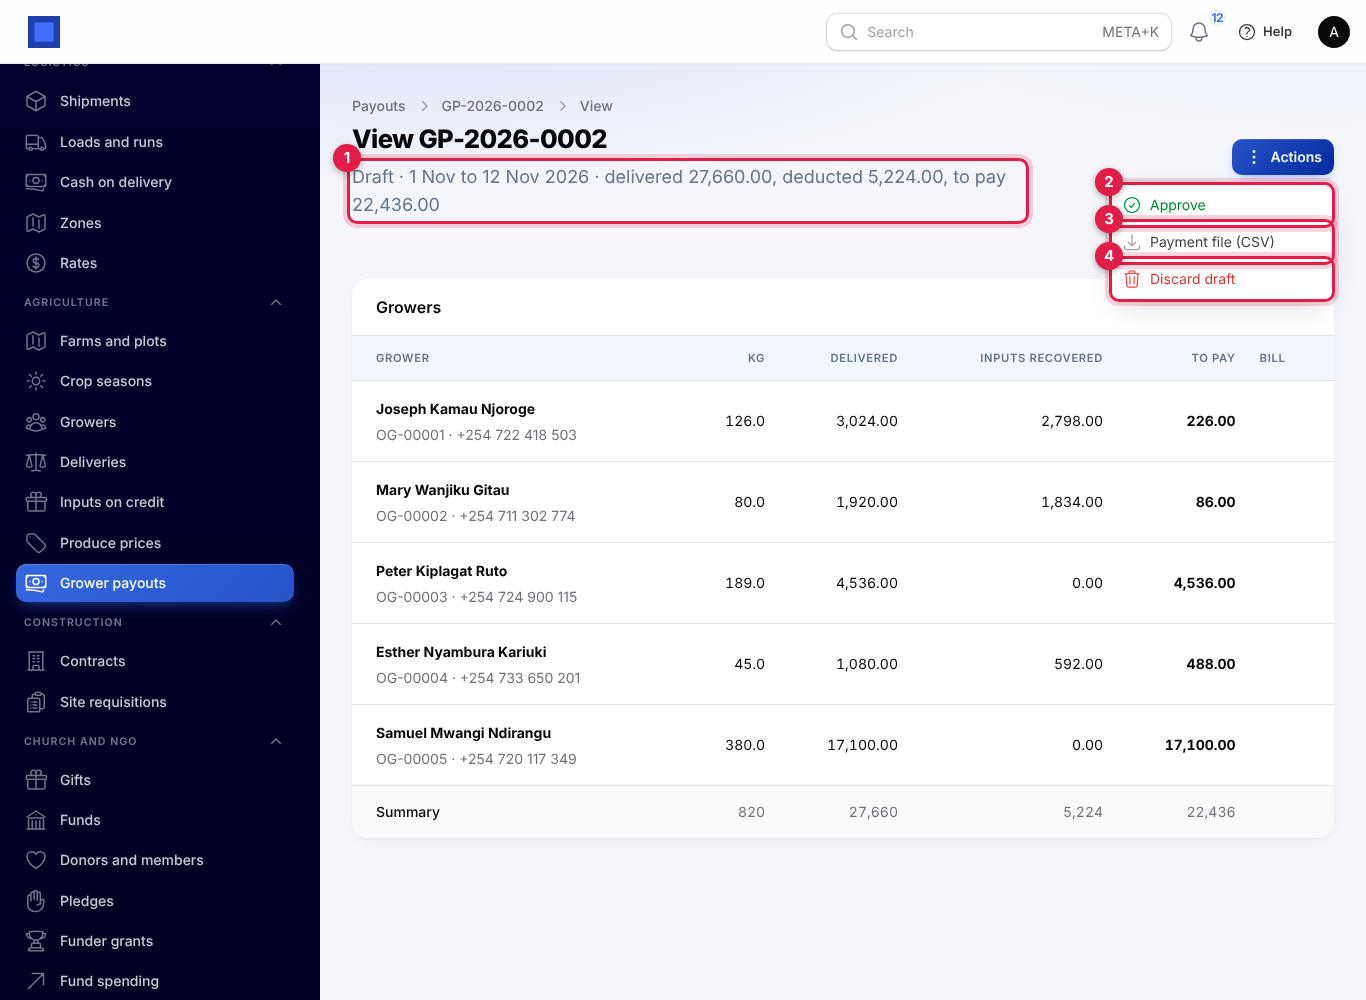
4. Check the Growers table. The line under the title (marker 1) gives the totals.
5. Click Actions:
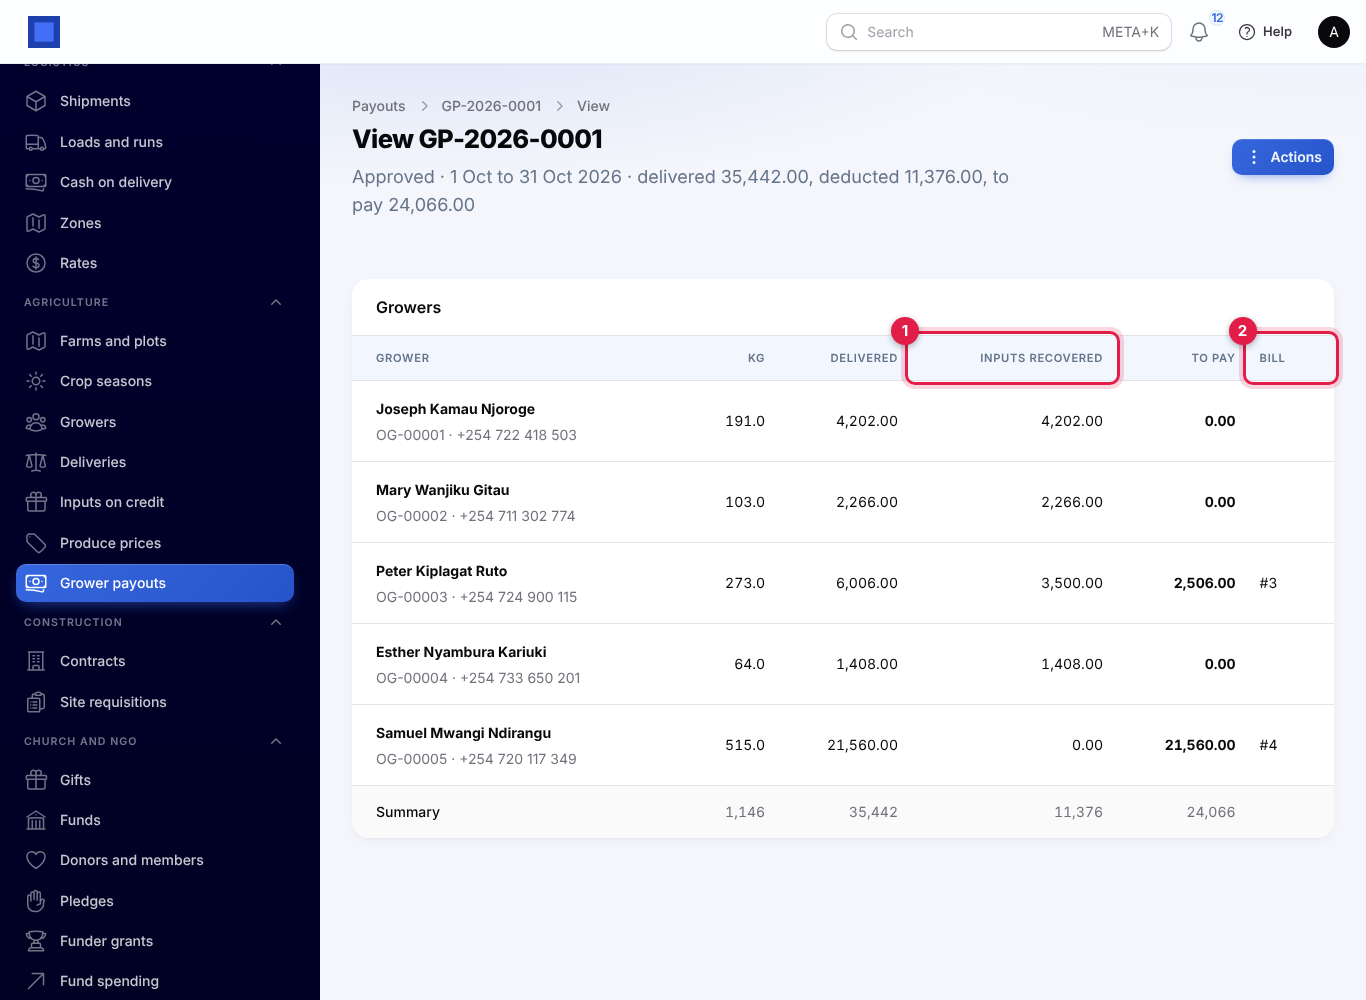
- Approve (marker 2) and confirm. The inputs are marked recovered and each grower with something to pay gets a posted supplier bill, numbered with the payout and grower number, ready to pay in Purchases → Vendor bills.
- Payment file (CSV) (marker 3) downloads a file with each grower's payout phone, amount, name and a reference (payout and grower number), for a bulk M-Pesa or bank upload. Growers with nothing to pay are left out.
- Discard draft (marker 4) throws the draft away and frees its deliveries for another payout.
After approval, the Growers table shows the Inputs recovered (marker 1) and the Bill each grower got (marker 2). A grower whose inputs used up all they earned gets no bill; the rest of their debt waits for the next payout.
Tip: Pay the bills from Purchases → Vendor bills after you upload the payment file, so your books show the growers as paid.
Print a grower statement
- On Agriculture → Growers, click ⋮ → Statement (marker 2 in the grower actions screenshot).
- Set From and To (they start on this month) and click Submit.
The Grower statement PDF lists the grower's deliveries in the period (date, receipt, produce, grade, kg, price, amount and the payout it was paid in), the inputs on credit given (with what was recovered), the approved payouts (delivered, deducted, paid) and the inputs still owed. Print it for the grower or send it by WhatsApp.
Agriculture settings
- In the menu, open Settings → Preferences.
- Click the Agriculture tab.
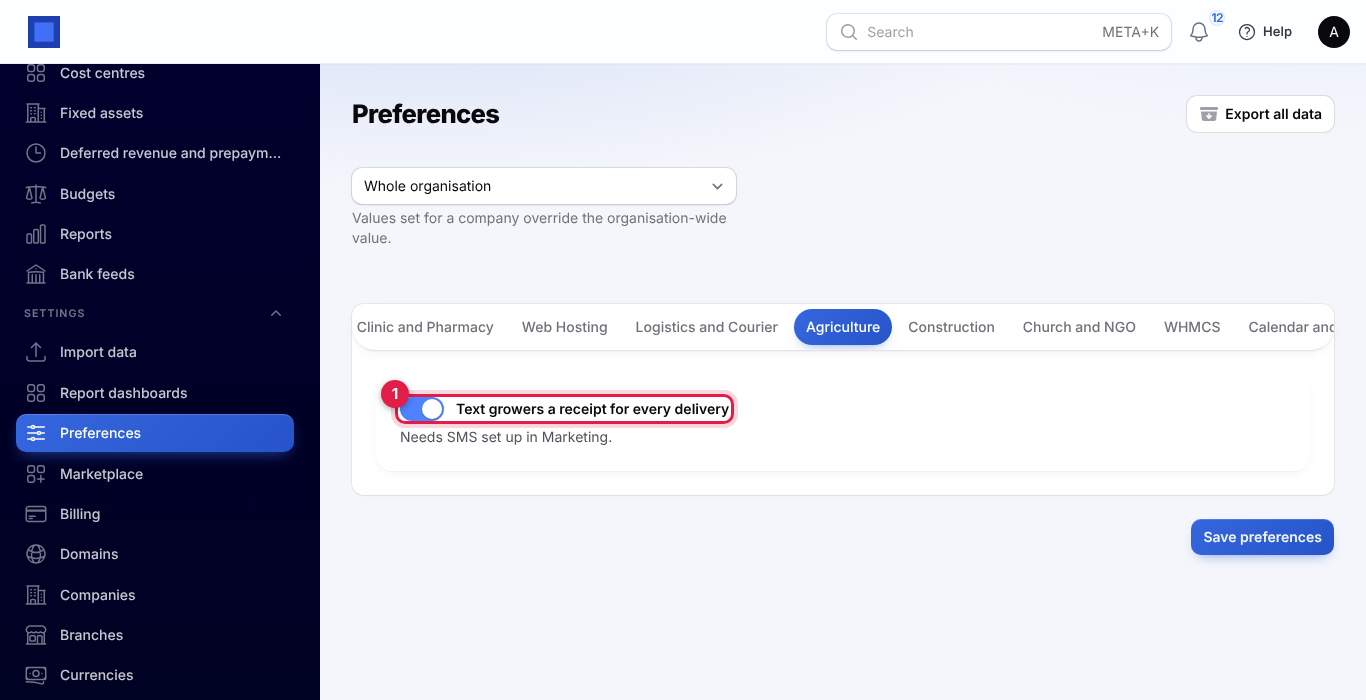
- Switch Text growers a receipt for every delivery (marker 1) on or off and click Save preferences. It is on by default; texts need SMS set up in Marketing.
What growers see in the customer portal
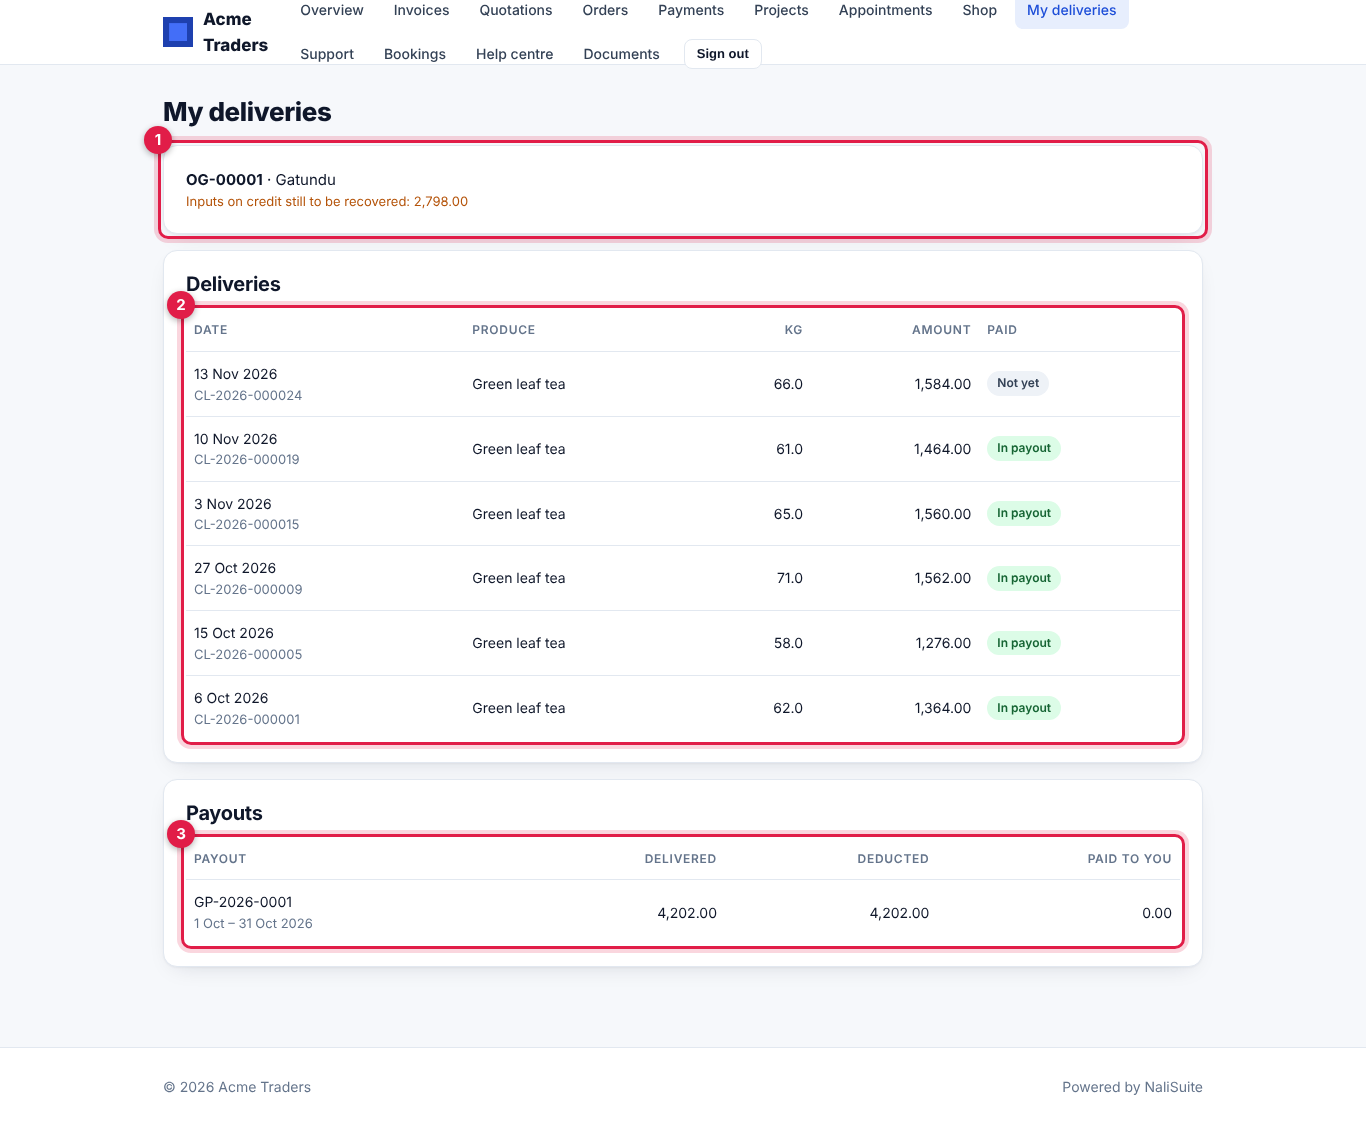
Growers who sign in to your customer portal see My deliveries (when the Customer portal app is on and they are a registered grower). The top box (marker 1) shows their grower number, centre and any inputs on credit still to be recovered. Deliveries (marker 2) lists each delivery with the date and receipt, produce, kg, amount and In payout or Not yet. Payouts (marker 3) lists their approved payouts with what was delivered, deducted and Paid to you.
Common questions
Why is a produce missing from Weigh in a delivery? Only produce with at least one price under Produce prices is listed. Add a price first.
A grower's payout is zero. Why? Their inputs on credit were more than they earned in the period. All they earned went to the debt; the rest is taken from later payouts.
Can I change a delivery after weighing it in? No. Deliveries are receipts and have no edit button. If a weight was too high, record the difference as an input on credit so it comes off the next payout; if it was too low, weigh in the missing kilograms as a new delivery.
Can I pay growers every two weeks? Yes. Prepare a payout for any period, for example the 1st to the 15th. Each delivery is only ever in one payout.
Do I need Inventory? No. Without Inventory, seasons and deliveries still track kilograms and money; nothing goes into stock.
Can my own farm's harvest and outgrower deliveries go into the same stock item? Yes. Use the same product for Harvest goes into stock as and in Produce prices.