Identity checks (Smile ID)
Identity checks are for SACCOs, microfinance lenders, landlords, dealers and anyone who must know that a customer or member is who they say they are before lending or opening an account. You type the person's ID number and the names on their ID, and NaliSuite asks Smile ID to check them against the government's records: national IDs, passports, KRA PINs, NIN and BVN, Ghana Card and more in Kenya, Nigeria, Ghana, Uganda and South Africa. You see straight away whether the number is real and the names match. SACCOs can also refuse to approve a loan until the member's ID is verified. This page covers switching it on, connecting your Smile ID account and its sandbox, checking an ID from a contact or from the checks list, reading the results, what is stored, and the SACCO loan rule.
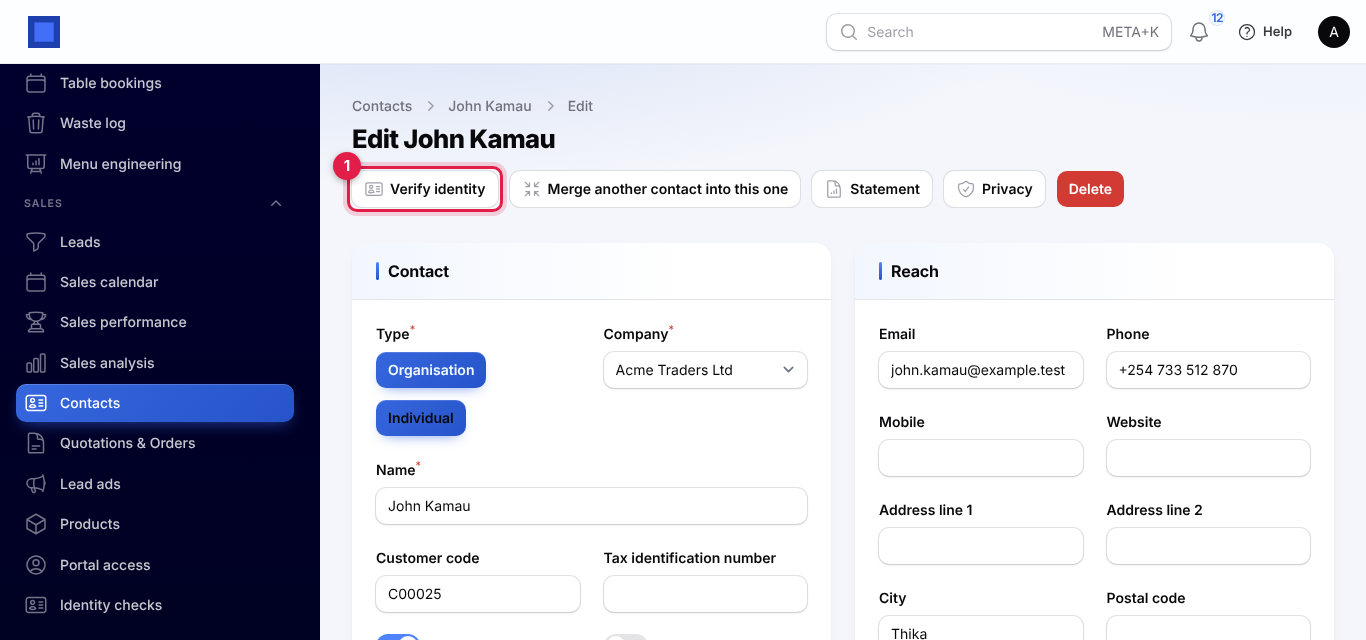
Identity checks is a marketplace module. It needs the Contacts app. The list of checks is Sales → Identity checks, and every contact page gets a Verify identity button.
Note: You need the smile_id.verify permission to see Identity checks and the Verify identity button. Owners and admins have it; the member role does not. Changing the settings under Settings → Preferences needs core.settings.manage. Set permissions under Settings → Roles.
Switch it on
- Open Settings → Marketplace and type Smile ID in the Search add-ons… box (marker 1).
- On the Identity checks (Smile ID) card (marker 2), click Start free trial (or Add to subscription) and confirm. Identity checks appears under Sales in the left menu.
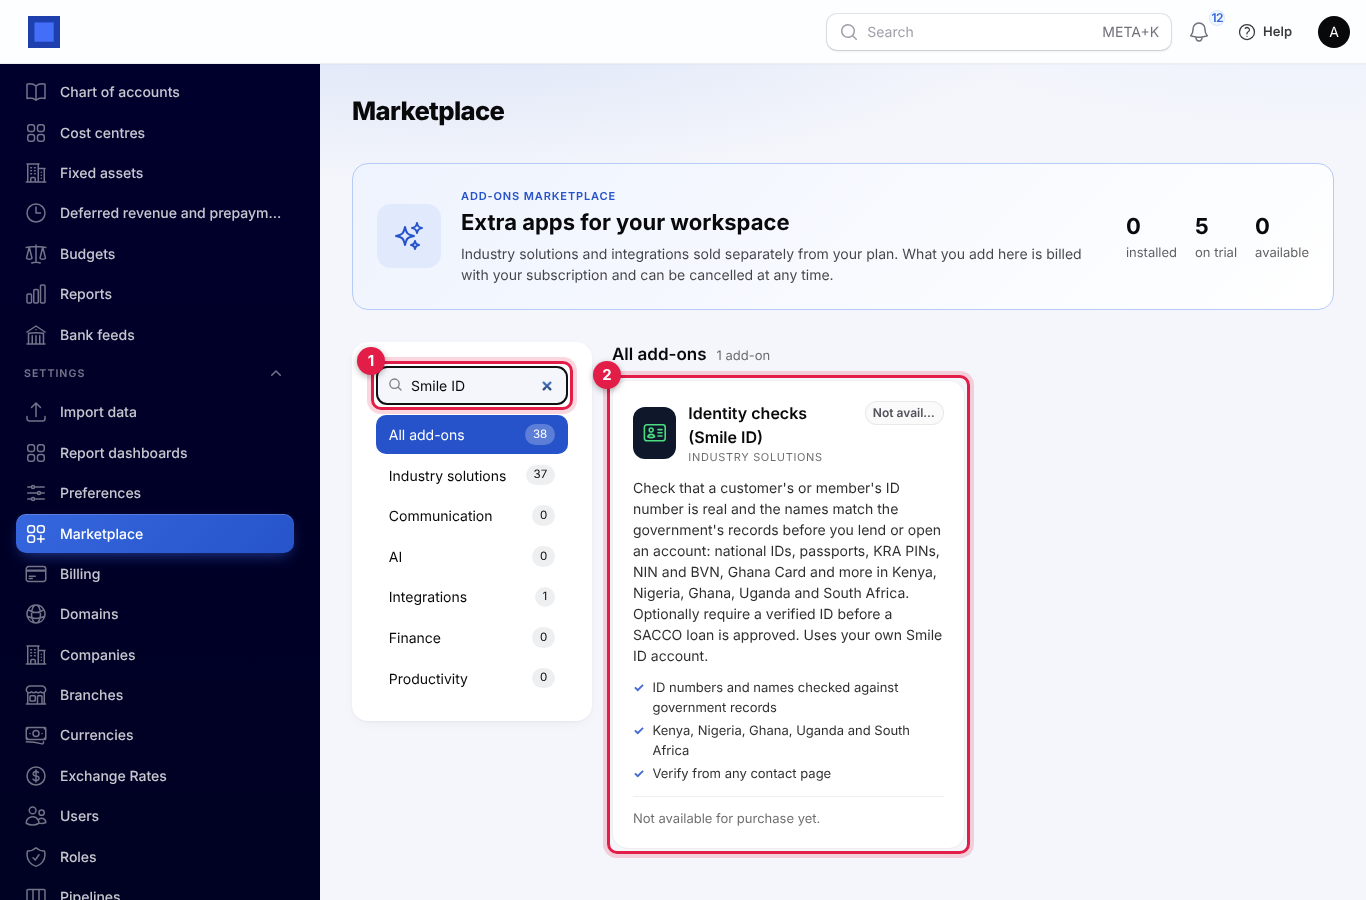
If the card says Not available for purchase yet (as in the screenshot), ask NaliSuite support to switch it on. See Billing and marketplace.
Connect your Smile ID account
Checks use your workspace's own Smile ID account, and each check is billed by Smile ID to that account. NaliSuite does not share one account between businesses.
Get your partner ID and API key
These steps happen on Smile ID's website, not in NaliSuite.
- Sign up with Smile ID (usesmileid.com) and sign in to the Smile ID portal. Smile ID asks for your business documents before it switches on live checks; the sandbox works straight away.
- Note your partner ID: the number Smile ID gives your account, shown in the portal.
- Open Account settings → API keys and copy the API key. The sandbox and production each have their own key: copy the one that matches how you set the sandbox switch in NaliSuite.
Enter them in NaliSuite
- In the menu, open Settings → Preferences and click the Identity checks tab (marker 1).
- Fill in the settings and click Save preferences (marker 6).
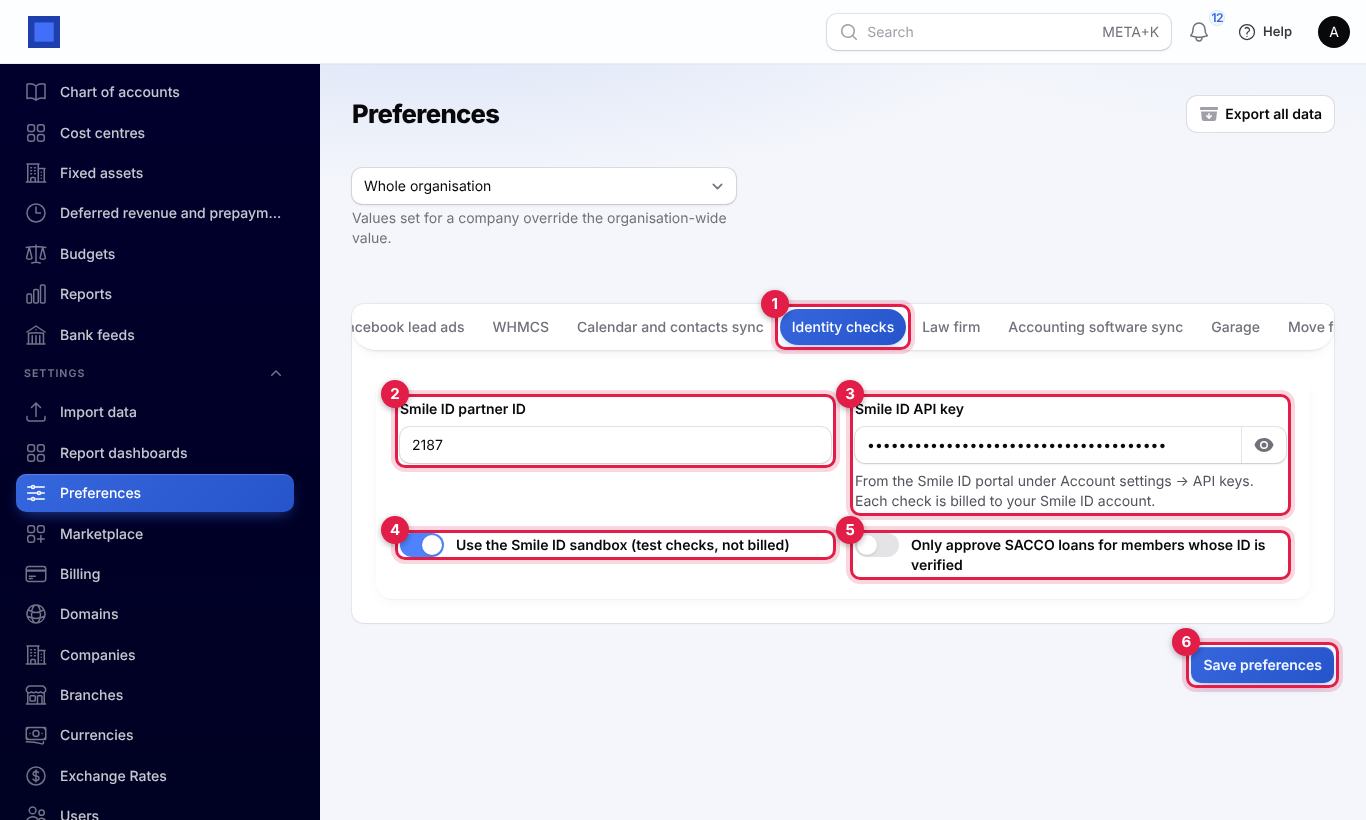
| Setting | What to enter |
|---|---|
| Smile ID partner ID (marker 2) | Your partner ID from the Smile ID portal. |
| Smile ID API key (marker 3) | The API key from Account settings → API keys. It is stored encrypted; click the eye to check it. |
| Use the Smile ID sandbox (test checks, not billed) (marker 4) | On: checks go to Smile ID's test service and are not billed. Use it with the sandbox key while you try things out, with the test ID numbers in Smile ID's documentation. Off: real checks against government records, billed to your account. |
| Only approve SACCO loans for members whose ID is verified (marker 5) | See Require a verified ID before SACCO loans. Off by default. |
Important: Switch the sandbox off before you check real customers. Sandbox results are made up by Smile ID and say nothing about a real person.
Check an ID from a contact's page
- Open the person's page under Sales → Contacts. For a SACCO member, open the contact the member is linked to.
- Click Verify identity (marker 1) at the top of the page.
- The window says when the person was last checked and with what result (marker 1 below), for example "Last check 9 Nov 2026: Partly matches (NATIONAL_ID ending 7310).". If they have never been checked, it says that each check is billed to your Smile ID account.
- Fill in the window. The first and last names and the phone number are filled in from the contact; correct them to match the ID exactly.
- Click Check now (marker 7). The answer comes back in a few seconds as a message that stays on screen until you close it: green for Verified, orange for Partly matches, red for Not verified or Could not check, with the name on the government's record where there is one.
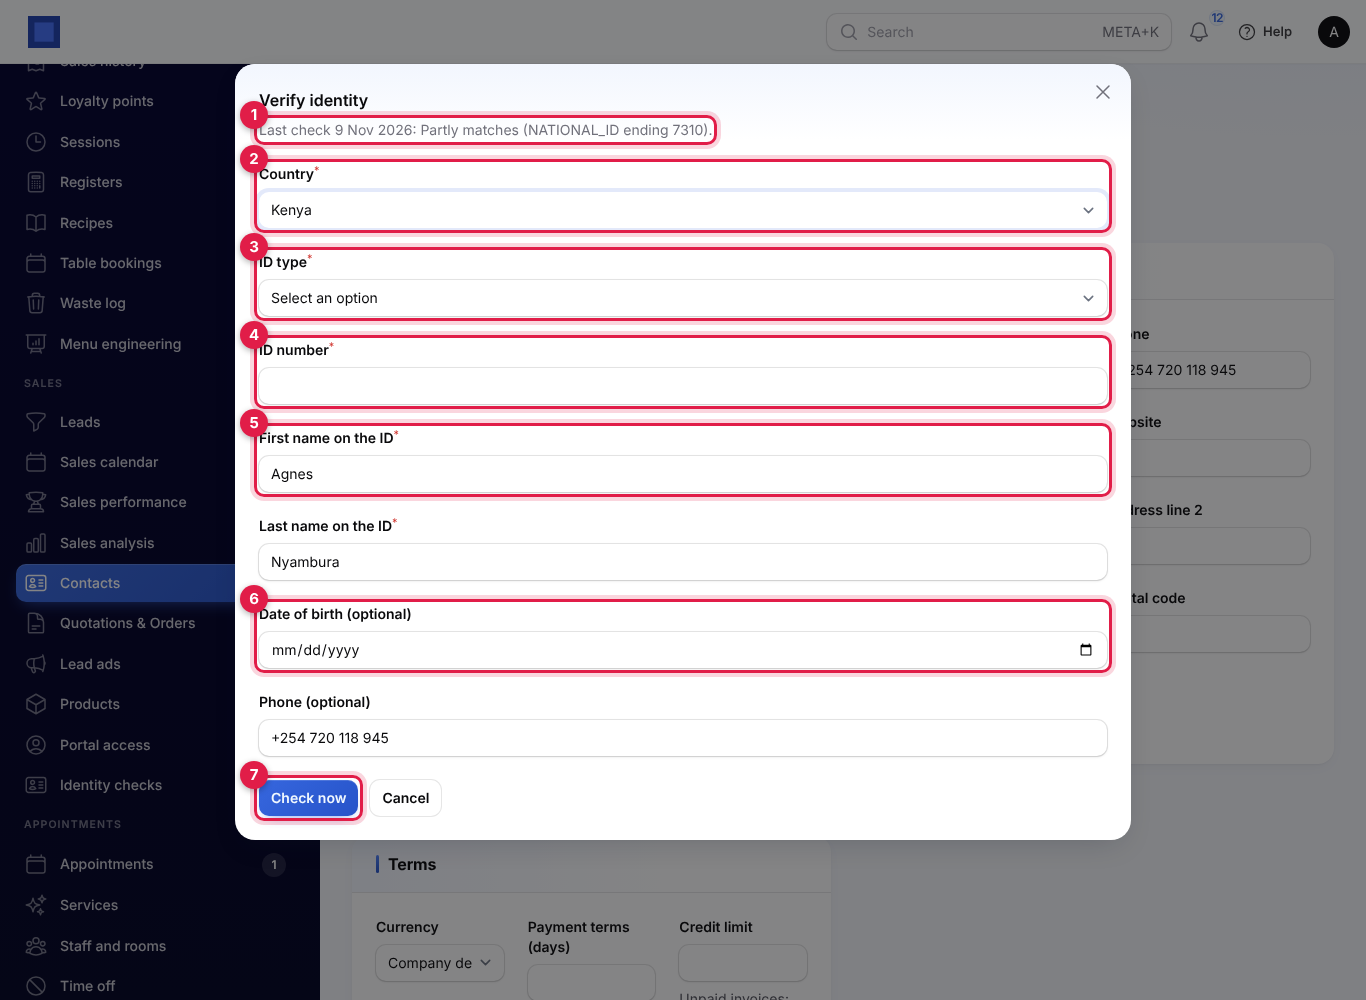
| Field | What to enter |
|---|---|
| Country (required, marker 2) | The country that issued the ID: Kenya (the default), Nigeria, Ghana, Uganda or South Africa. |
| ID type (required, marker 3) | The kind of ID. The list changes with the country (see Countries and ID types). |
| ID number (required, marker 4) | As printed on the ID. Spaces are removed and letters are made capitals for you. |
| First name on the ID and Last name on the ID (required, marker 5) | As they appear on the ID. A first and last name the wrong way round still counts as a match. |
| Date of birth (optional) (marker 6) | If you give it and it does not match the record, the check only Partly matches. |
| Phone (optional) | Sent to Smile ID with the check. |
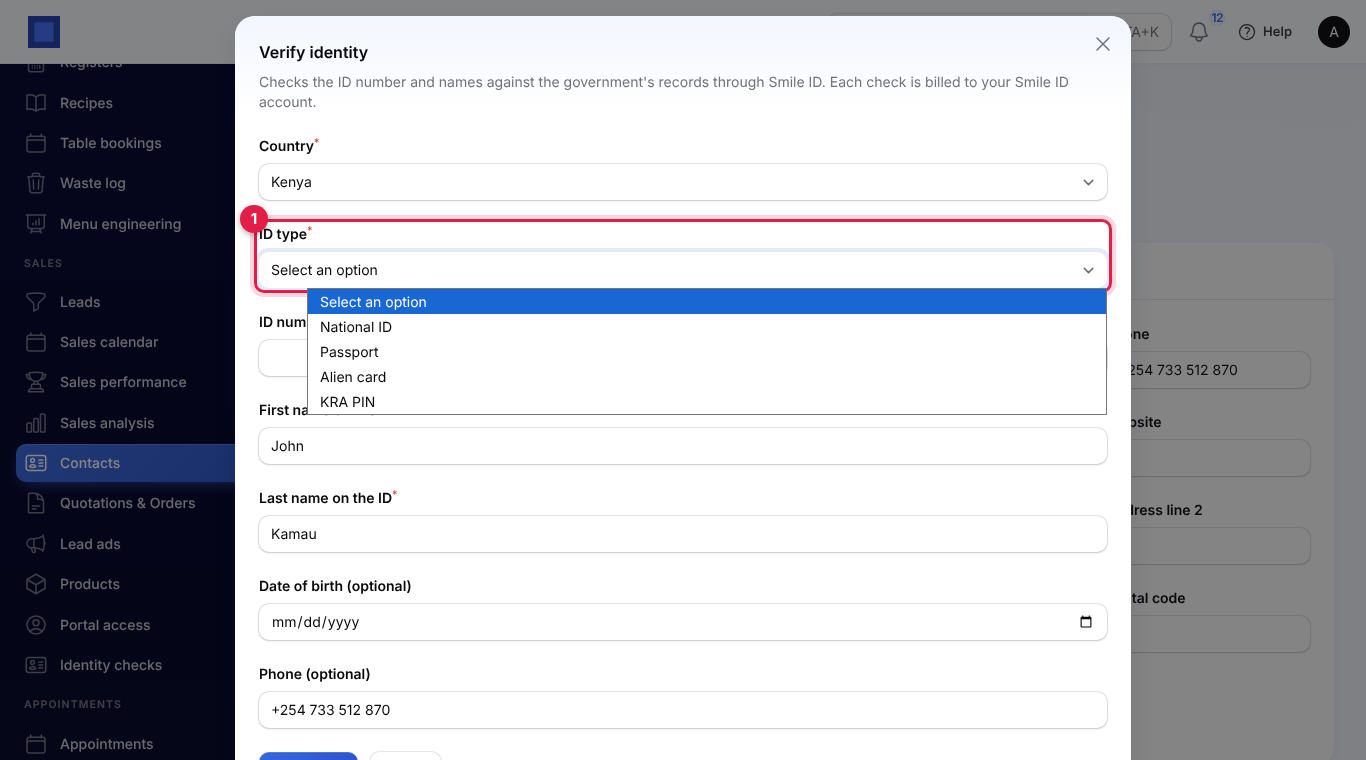
Each click on Check now is a new check, billed by Smile ID (unless the sandbox is on). The details are checked first, so nothing is sent or billed when NaliSuite tells you:
- "Choose an ID type Smile ID checks in that country." (for example after you changed the country);
- "Enter the ID number and the first and last names as they appear on the ID.";
- "Add your Smile ID partner ID and API key under Settings → Preferences → Identity checks first."
Check an ID from the checks list
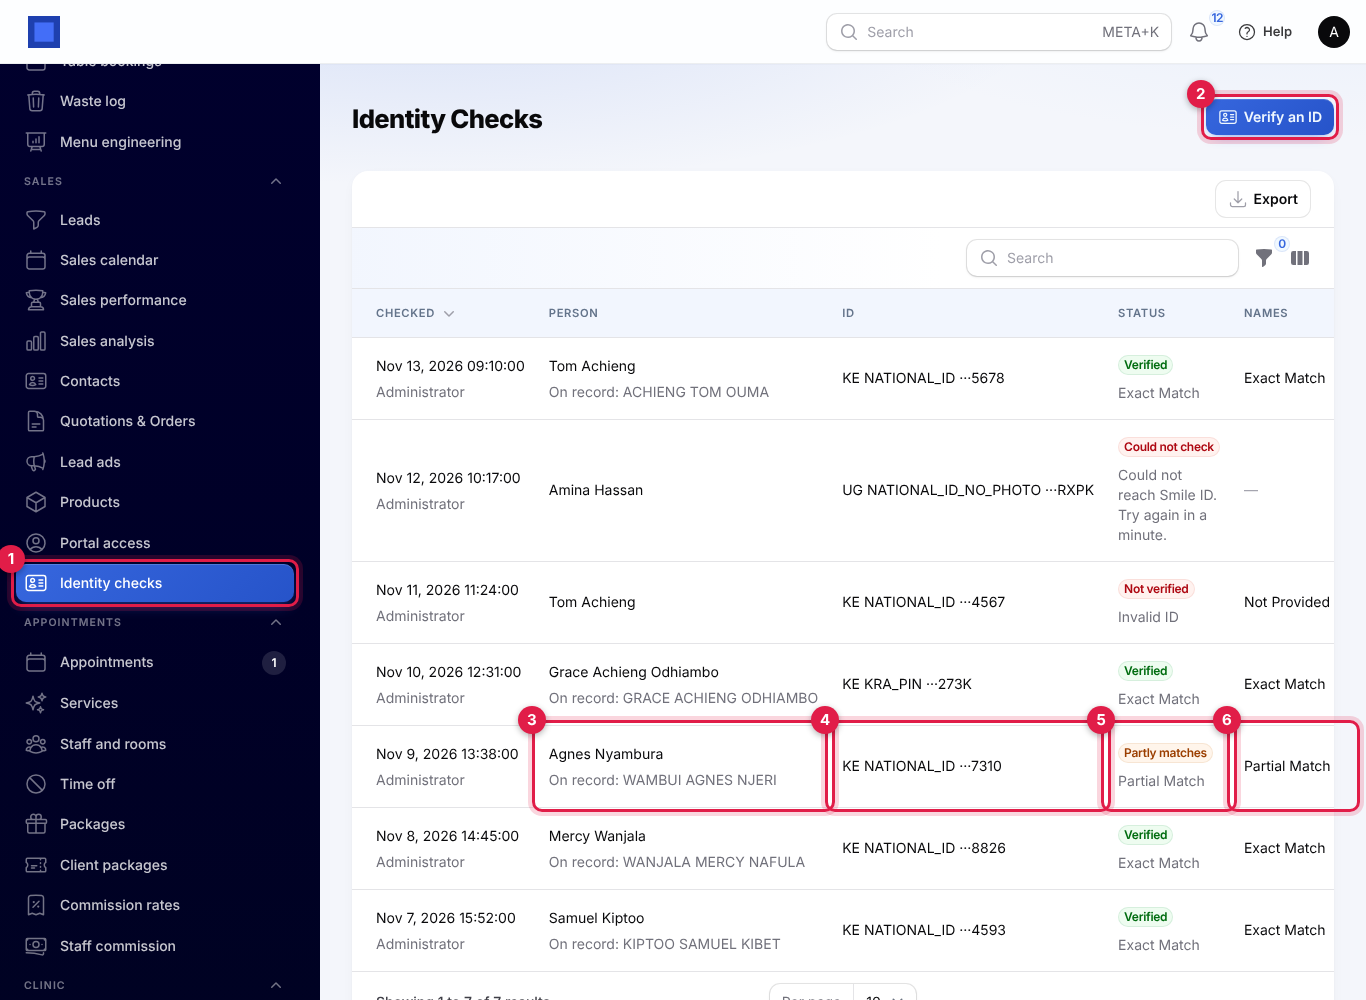
- In the menu, open Sales → Identity checks (marker 1).
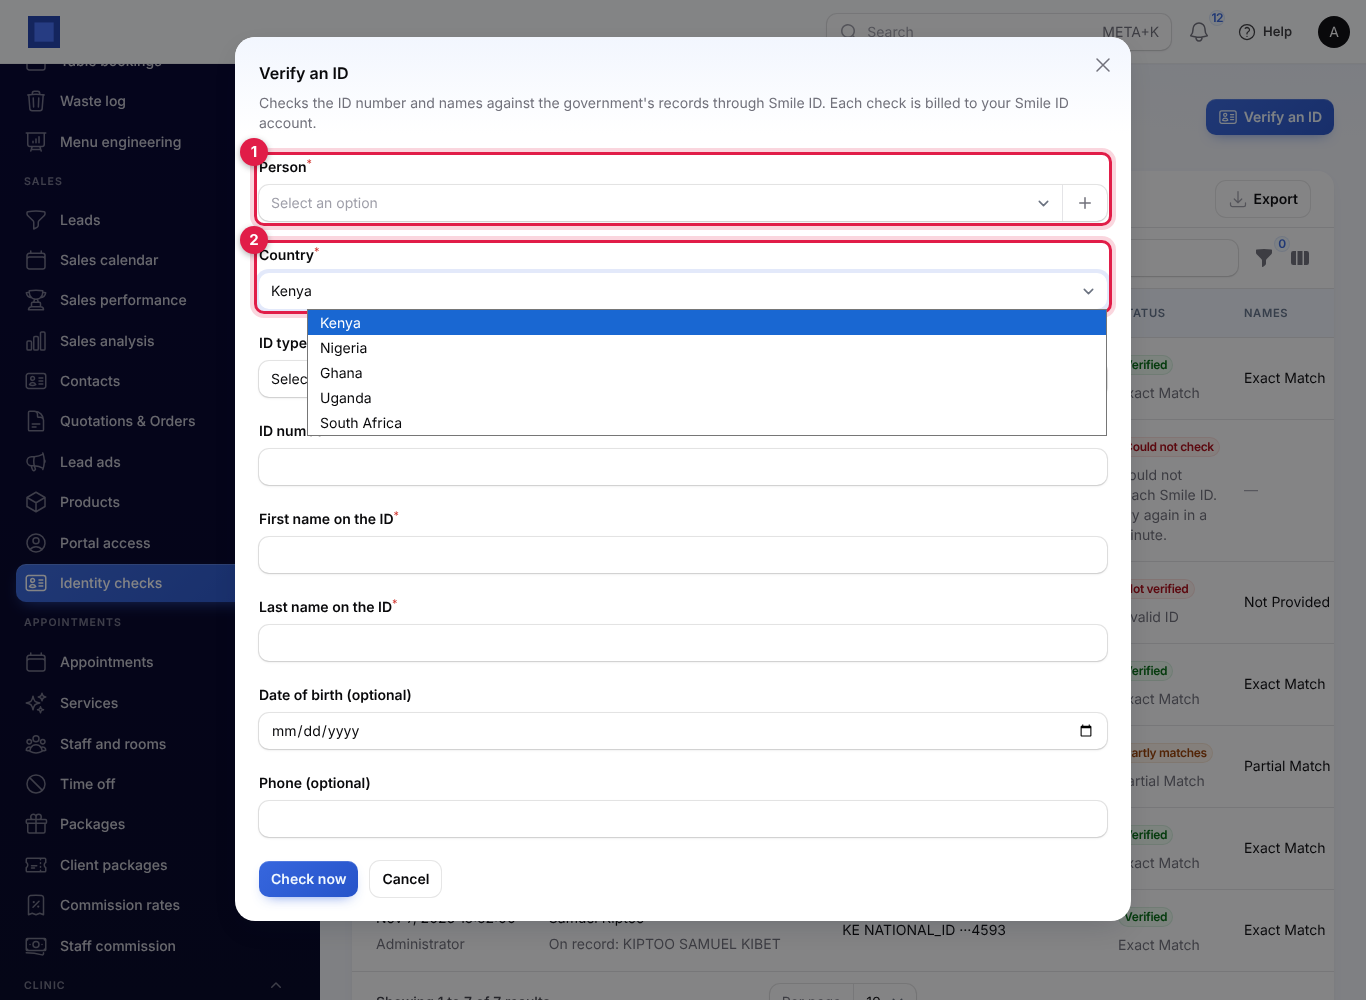
- Click Verify an ID (marker 2).
- Choose the Person (marker 1 below): type part of their name to find the contact. The person must be in your contacts first; add them under Sales → Contacts if they are not.
- Choose the Country (marker 2) and fill in the rest exactly as on a contact's page (the names are not filled in here), then click Check now.
Read the results
Sales → Identity checks lists every check ever made, newest first.
| Column | What it shows |
|---|---|
| Checked | When, and who made the check. |
| Person (marker 3) | The contact, with On record: and the full name on the government's record, so you can compare it with the name you were given. |
| ID (marker 4) | The country, the ID type and the last four characters of the number, for example KE NATIONAL_ID ···7310. |
| Status (marker 5) | The result, with Smile ID's own wording under it. |
| Names (marker 6) | How the names matched: Exact Match, Transposed (first and last swapped), Partial Match or No Match. |
| Date of birth | How the date of birth matched. Hidden at first; show it with the columns icon. |
| Status | What it means | What to do |
|---|---|---|
| Verified (green) | The ID number is on the government's record and the names match, exactly or with first and last swapped. The date of birth, if you gave one, did not disagree. | Nothing more. |
| Partly matches (orange) | The ID number is real, but the names or the date of birth differ from the record. | Compare the On record name with the person and their ID. A married name or a middle name used as a first name often explains it; if not, ask for another ID. |
| Not verified (red) | The ID number was not found, or is not valid. | Check you typed it correctly and chose the right ID type, then check again. If it still fails, do not rely on that ID. |
| Could not check (red) | The check did not get an answer, for example "Could not reach Smile ID. Try again in a minute." or Smile ID's reason, such as a wrong API key. | Fix the cause (the key under Settings → Preferences → Identity checks, or credit on your Smile ID account) and check again. |
Search the list by the person's name, or click the filter icon to see one Status. The latest check of a person is the one that counts: in the screenshot, Tom Achieng's first check was Not verified because a digit was missing, and the second one, with the right number, is Verified.
Countries and ID types
| Country | ID types |
|---|---|
| Kenya | National ID, Passport, Alien card, KRA PIN |
| Nigeria | NIN, BVN, Voter ID, Driver's licence, TIN |
| Ghana | Ghana card, Passport, SSNIT, Voter ID |
| Uganda | National ID |
| South Africa | National ID, National ID (no photo) |
Checks compare the number and the names with the issuing authority's records. No photo or selfie is taken or compared.
What is stored
For each check NaliSuite keeps:
- the person (contact), who made the check and when;
- the country and ID type;
- only the last four characters of the ID number, and a one-way fingerprint (hash) of the full number that cannot be turned back into it;
- the result: the status, Smile ID's result code and wording, how the names and date of birth matched, and the full name on the record;
- Smile ID's reference for the check.
The full ID number, the date of birth and the phone number you typed are sent to Smile ID for the check and are not kept in NaliSuite. No ID photo or other personal data from the government's record is stored. Smile ID keeps its own record of each check under its own terms; see your agreement with Smile ID.
Require a verified ID before SACCO loans
SACCOs and lenders using the SACCO and microfinance app can make sure no loan is approved for someone whose identity has not been confirmed.
- Open Settings → Preferences → Identity checks.
- Switch on Only approve SACCO loans for members whose ID is verified (marker 5 in the settings screenshot) and click Save preferences.
From then on, when someone clicks Approve on an applied loan, NaliSuite looks at the member's latest identity check. Unless it is Verified, the loan stays Applied and they see, for example, "Verify John Kamau's ID first: loans are only approved for members whose ID is verified." Check the member's ID from their contact page, then approve again.
Only approval is held back: applications can still be captured, and loans approved before you switched the rule on are not affected. Because the latest check counts, a member whose last check was Partly matches or Could not check is refused even if an earlier check was verified.
Good to know
What does a check cost? Smile ID bills each check to your Smile ID account at its own price for that country and ID type. Sandbox checks are not billed. NaliSuite does not add a charge per check; the module itself is billed like any marketplace app.
Is it a full KYC with a selfie? No. It checks that the ID number exists on the government's record and that the names (and, if given, the date of birth) match. It does not compare a photo of the person with the ID.
Can someone see the full ID number later? No. Only the last four characters are kept. To check the same person again, ask for the number again.
Can I delete a check? No. Checks are kept as a record of what was checked and when. To correct a mistake, run a new check: the latest one is the one that counts.
Which company are checks for? Each check belongs to the contact's company.