Customer and vendor portal
The portal is a private website for your customers (and, optionally, your suppliers). Customers sign in with a link sent to their email, with no password to remember, and see their invoices, quotations, orders, payments, subscriptions, support tickets, projects, documents and bookings in one place, and pay online. You decide who gets access under Sales → Portal access, and set what the portal shows in Settings → Preferences → Customer portal. The portal's address is your workspace address followed by /portal, for example acme.nalisuite.com/portal.
What you need before you start
| You want to | Permission needed |
|---|---|
| See who has portal access | portal.view |
| Invite customers, add, edit, deactivate portal users, send sign-in links | portal.manage |
The contact you invite needs an email address. See Contacts and CRM.
Invite a customer to the portal
- In the menu, open Sales → Portal access.
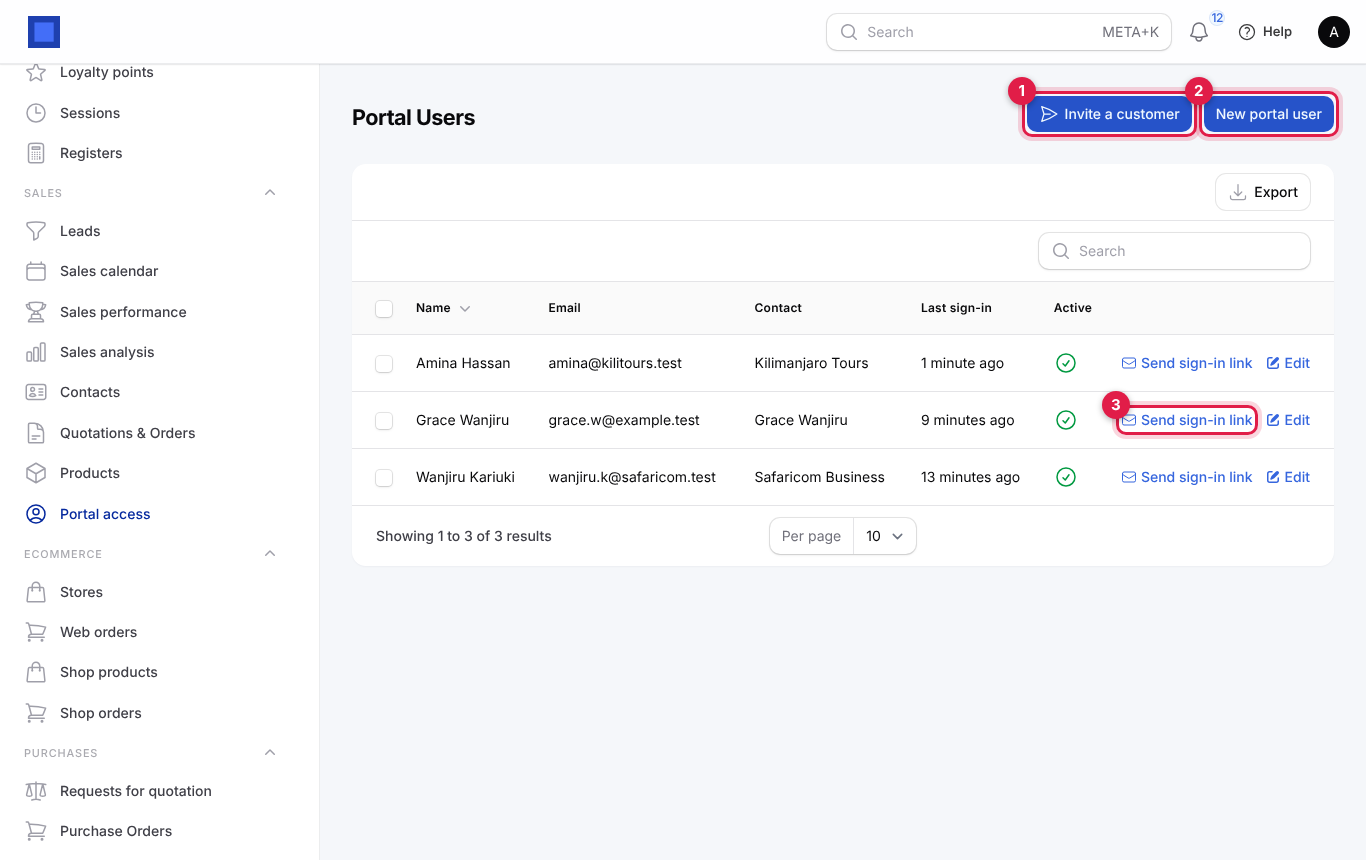
- Click Invite a customer (marker 1).
- Pick the Contact (marker 1). Only contacts with an email address are listed.
- Leave Email (defaults to the contact email) (marker 2) empty to use the contact's email, or type another address, for example the person at the customer who handles payments.
- Click Submit. "Invitation sent to …" confirms it.
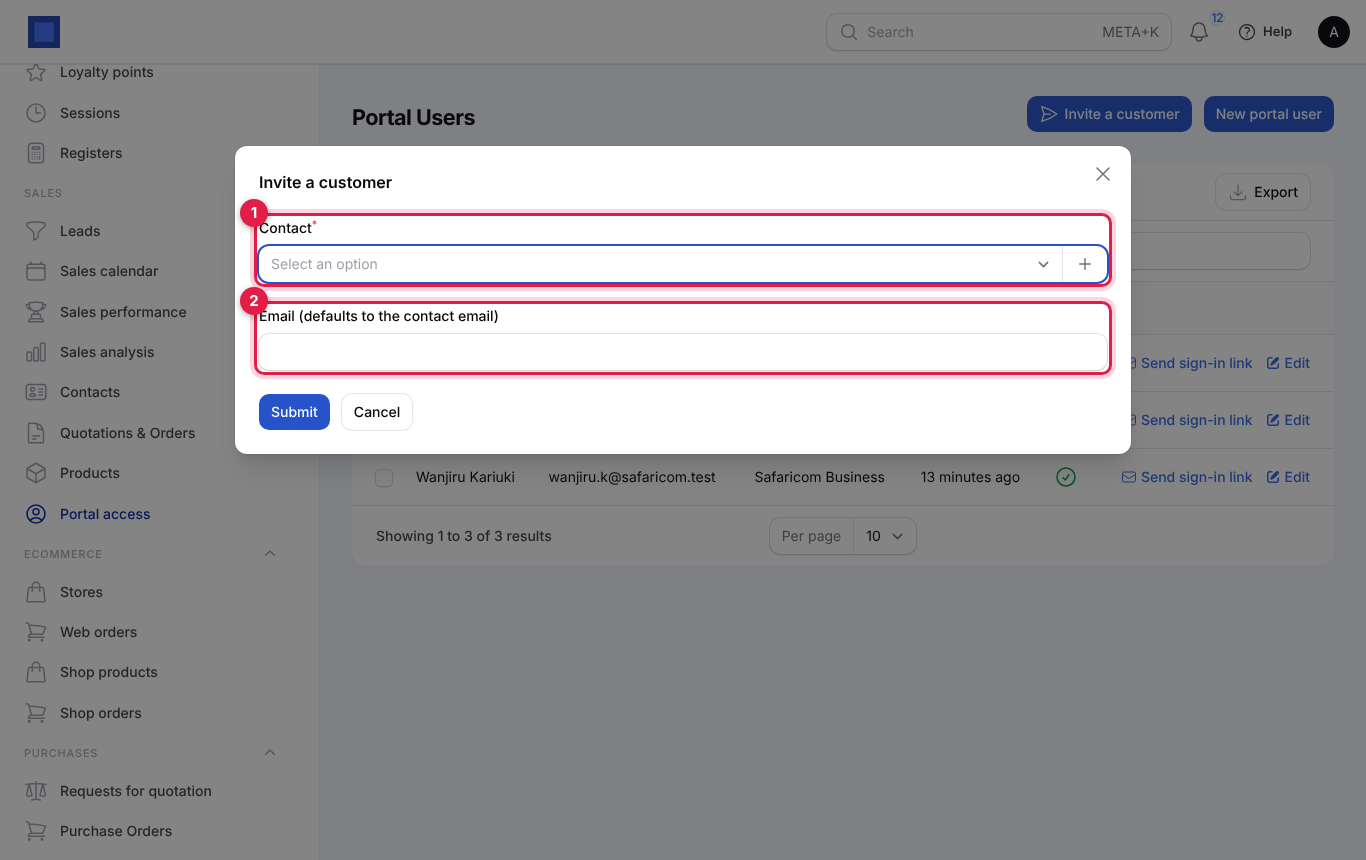
What happens: a portal user is created for that contact (or reactivated if the email already had one) and an invitation email with a sign-in button goes out. The link works for a limited time (30 minutes unless your provider changed it) and can be used to sign in straight away.
The Portal access list shows each user's Name, Email, Contact, Last sign-in ("Never" until they first sign in) and Active.
| Action | What it does |
|---|---|
| Invite a customer (marker 1) | Create access and email an invitation in one step. |
| New portal user (marker 2) | Create access without sending anything; pick the Contact (name and email fill in), adjust Name and Email, keep Active on. Use Send sign-in link when you are ready. |
| Send sign-in link (marker 3) | Emails a fresh sign-in link (an invitation if they have never signed in). Only for active users. |
| Edit | Change the name or email, or switch off Active to block access at once. |
| Bulk Delete | Tick users and delete them. |
Tip: One customer can have several portal users: add one per person (owner, accountant, store manager). Each needs their own email address; an email can belong to only one portal user.
Note: A person contact who Works at an organisation sees the documents of that organisation too. Invite Amina Hassan (who works at Kilimanjaro Tours) and she sees Kilimanjaro Tours' invoices and quotations.
Suppliers are invited the same way, or with Invite to the vendor portal on a purchase order. See The vendor portal.
How customers sign in
Customers never set a password.
- The customer opens your portal address. The Sign in page asks for their email address (marker 1).
- They click Email me a sign-in link (marker 2). The page always answers "If that address has portal access, a sign-in link is on its way.", so nobody can test which emails have access.
- They open the email and click the link. They are signed in and stay signed in on that device until they click Sign out.
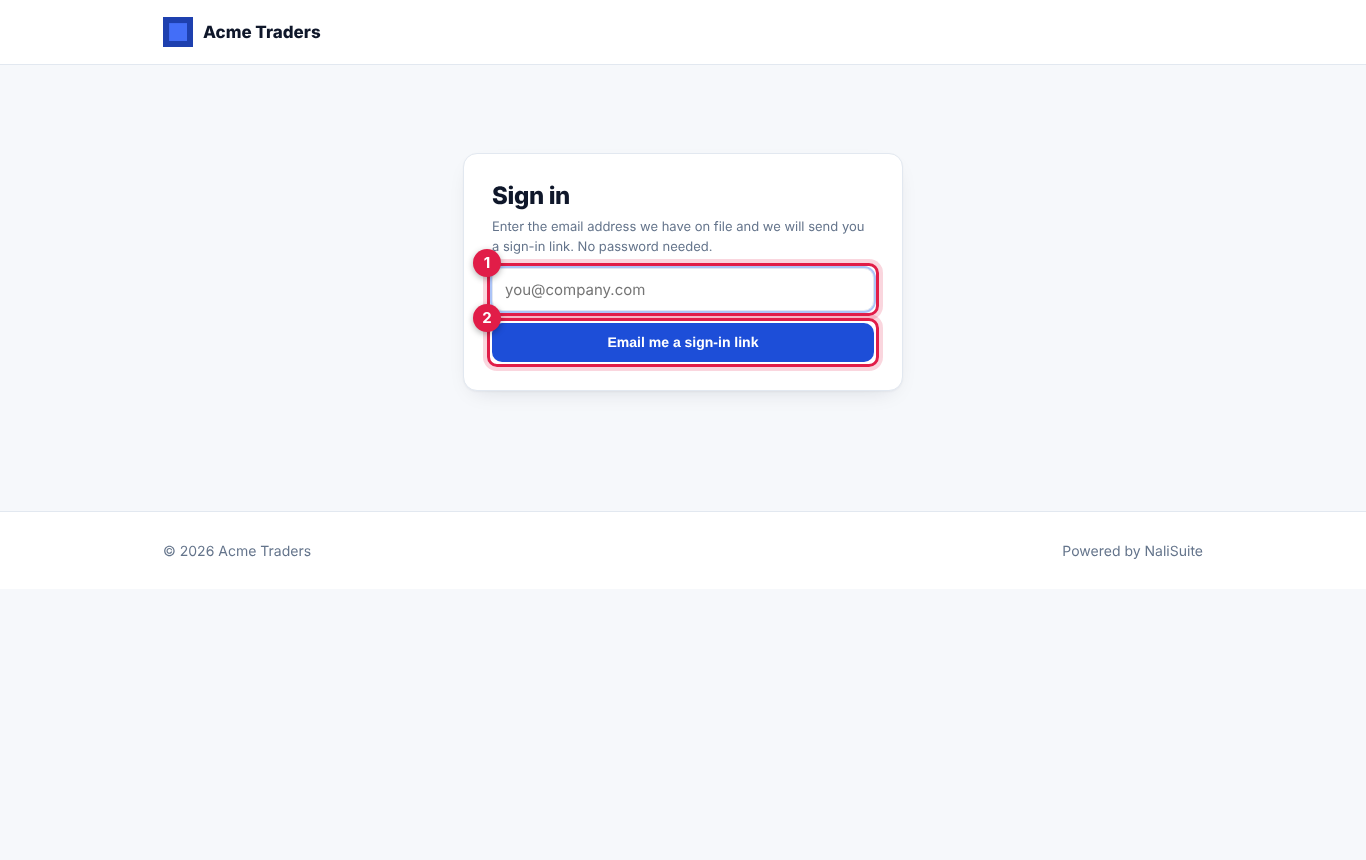
The sign-in link expires after its time limit and works only for active portal users. If a link has expired, they simply ask for a new one. At most six requests a minute are accepted.
What customers see
The top of every portal page has the menu: Overview, Invoices, Quotations, Orders, Subscriptions, Payments, and pages from other apps you use (Projects, Shop, Support, Help centre, Documents, Bookings, Appointments), then Sign out. Each item appears only while its app is on in your workspace.
Overview
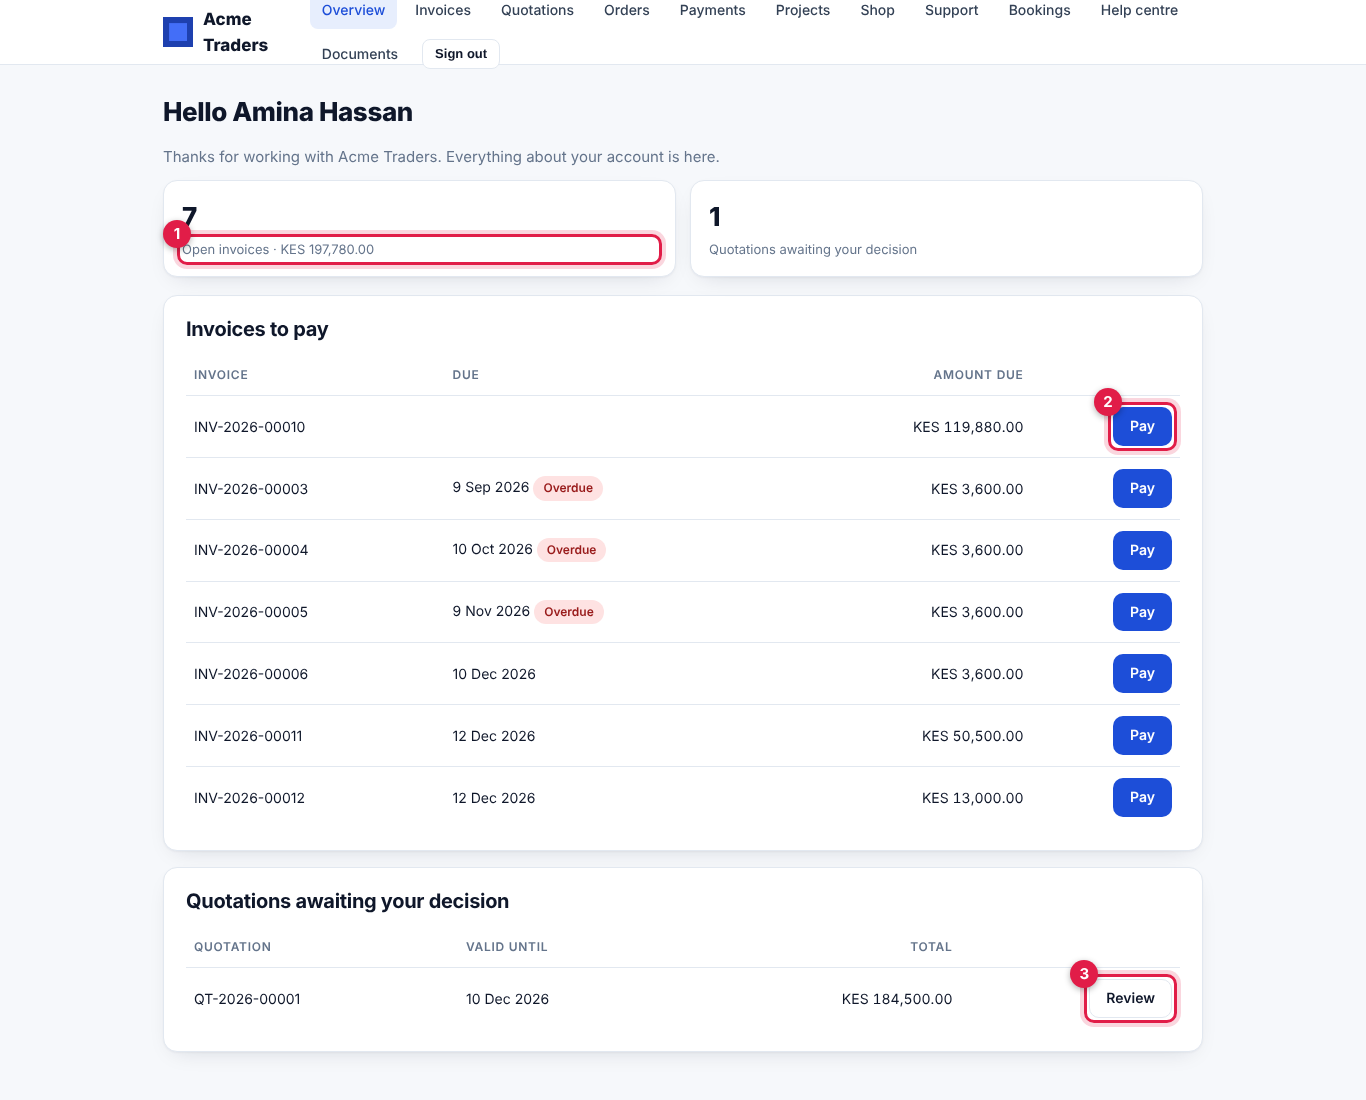
- A greeting and your Welcome message on the portal home (from Preferences).
- Tiles: the number and total of Open invoices (marker 1), Quotations awaiting your decision, and Active subscriptions when subscriptions are shown.
- Invoices to pay: each unpaid invoice with its due date (marked Overdue when late), amount due and a Pay button (marker 2) that opens the pay page.
- Quotations awaiting your decision, with Review (marker 3) to open them.
Invoices
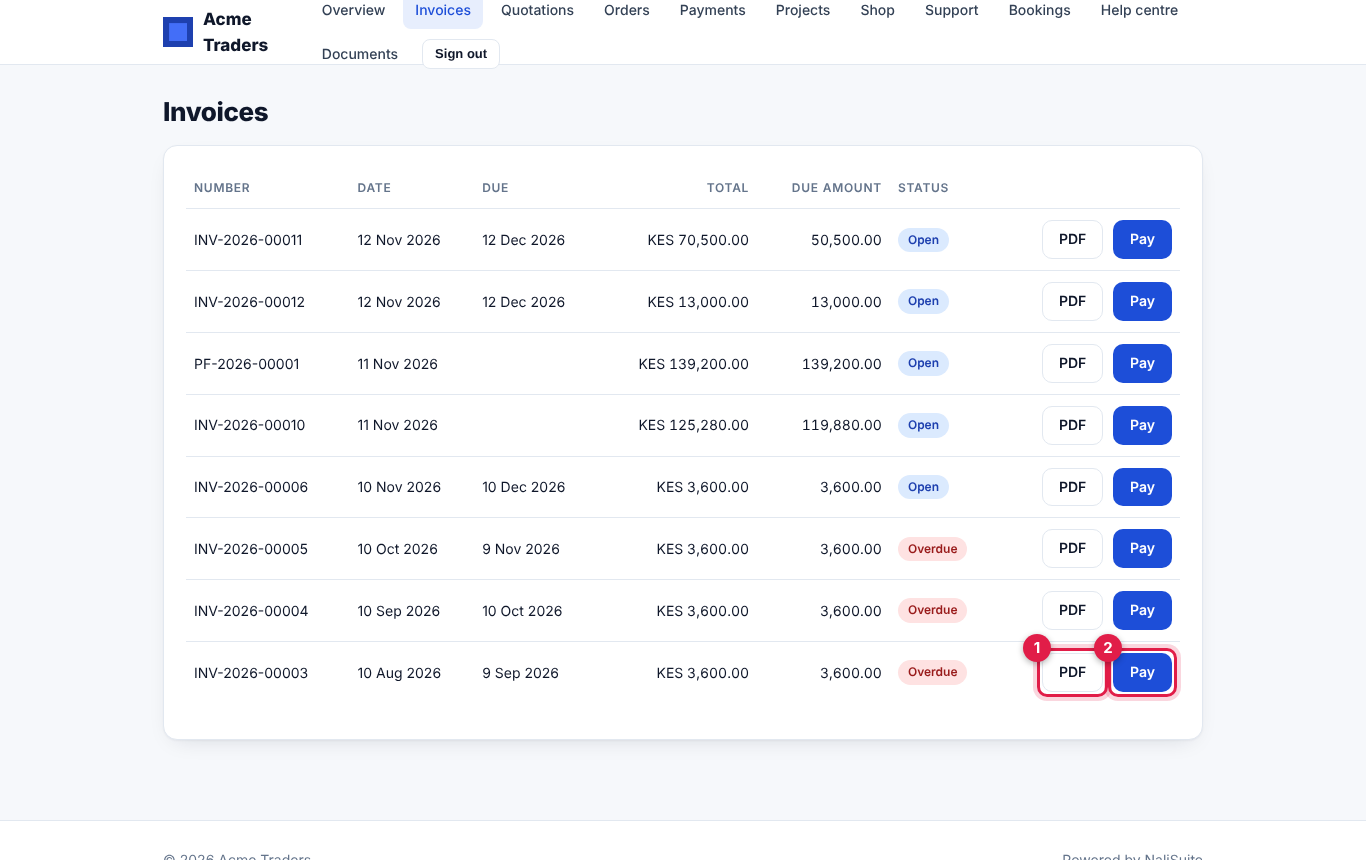
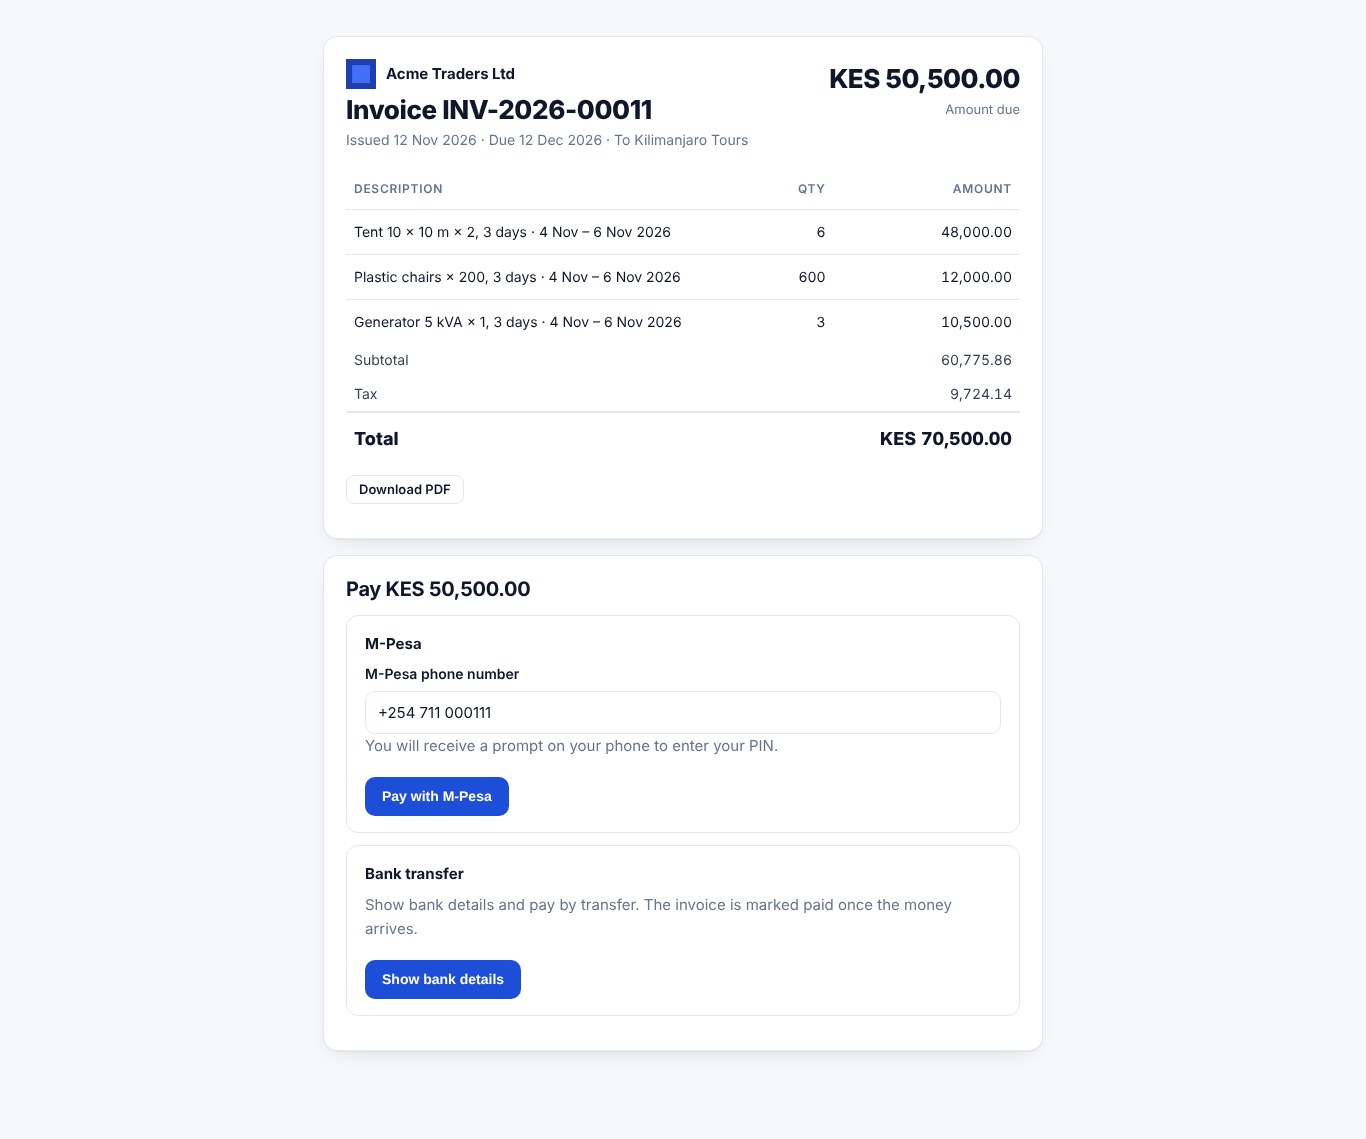
Every issued invoice, debit note, proforma and credit note for the customer, newest first, with Number, Date, Due, Total, Due amount and Status: Open, Overdue, Paid or Credit note. PDF (marker 1) downloads it; Pay (marker 2) opens the pay page, where they pay by M-Pesa, card, bank or another method you switched on. Payments made there are recorded on the invoice automatically. Drafts are never shown. See Invoices and payments.
Quotations
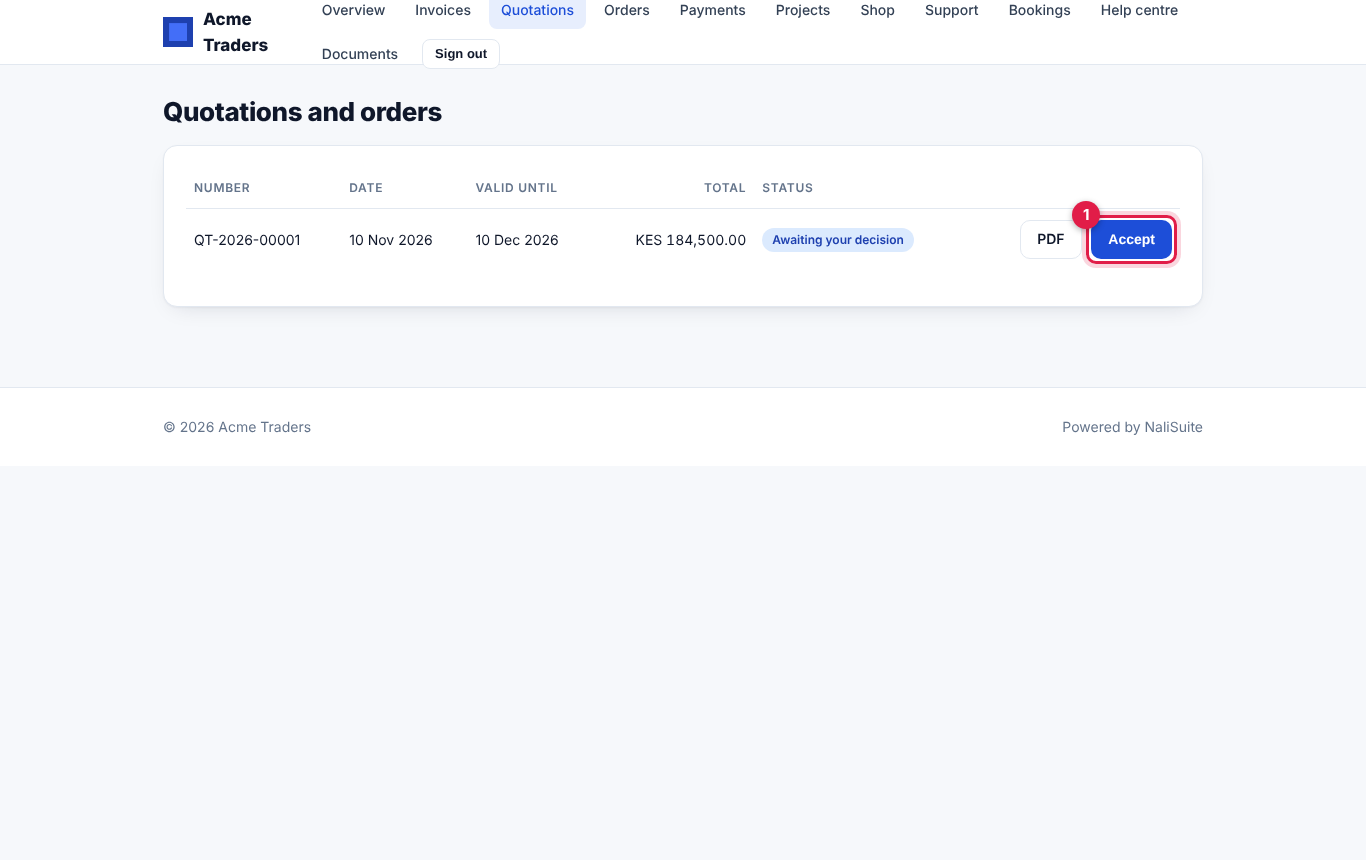
Every quotation with a number, with Date, Valid until, Total and Status: Awaiting your decision, Accepted, Confirmed order or Cancelled. PDF opens the quotation; Accept (marker 1) accepts it, after ticking any Optional extras they want. Expired quotations cannot be accepted ("This quotation has expired. Please ask for a new one."). See Quotations and orders for what acceptance does on your side.
Orders
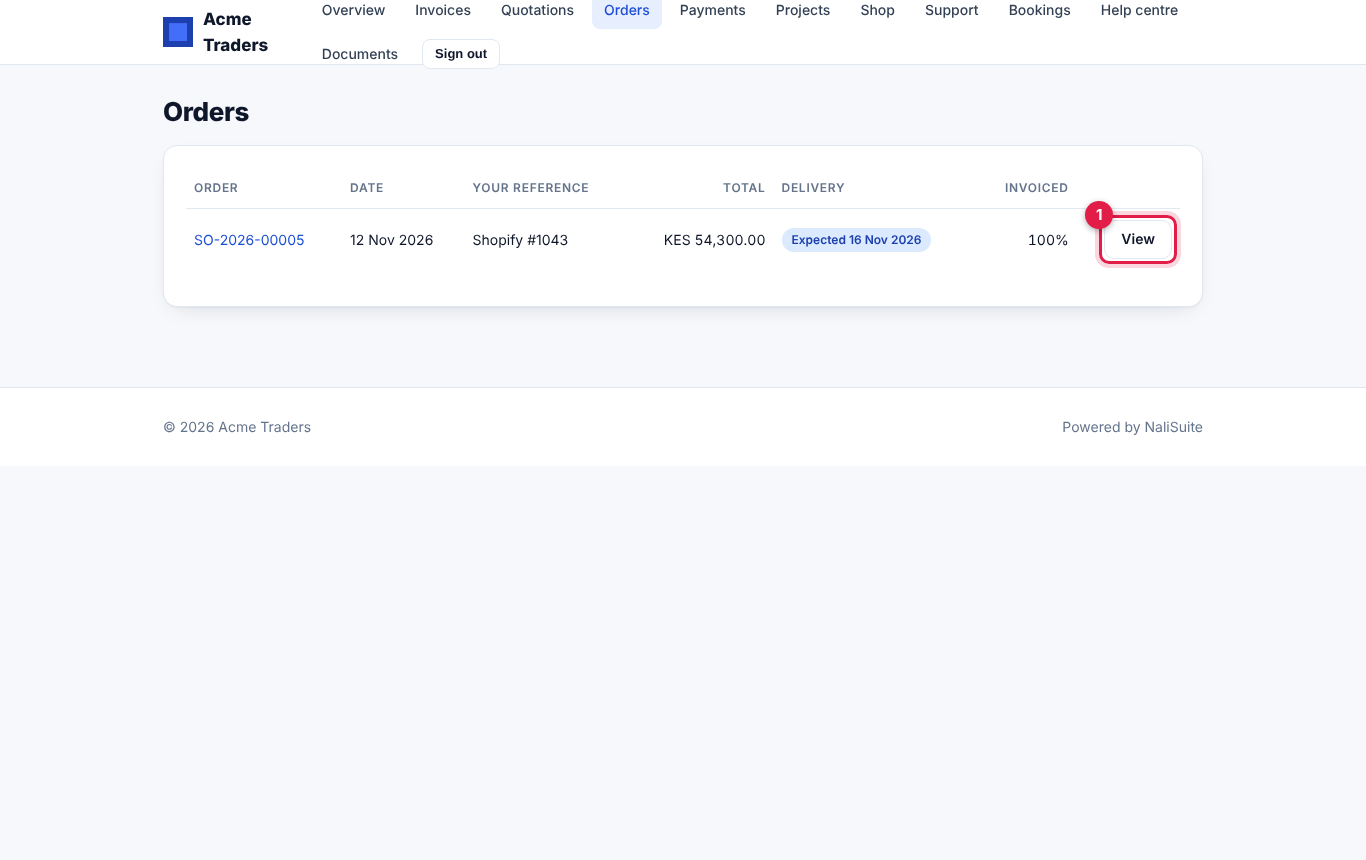
Confirmed orders with Order number, Your reference, Date, Delivery (expected date, delivered, or Being prepared), how much is Invoiced and the Total. View (marker 1) opens the order:
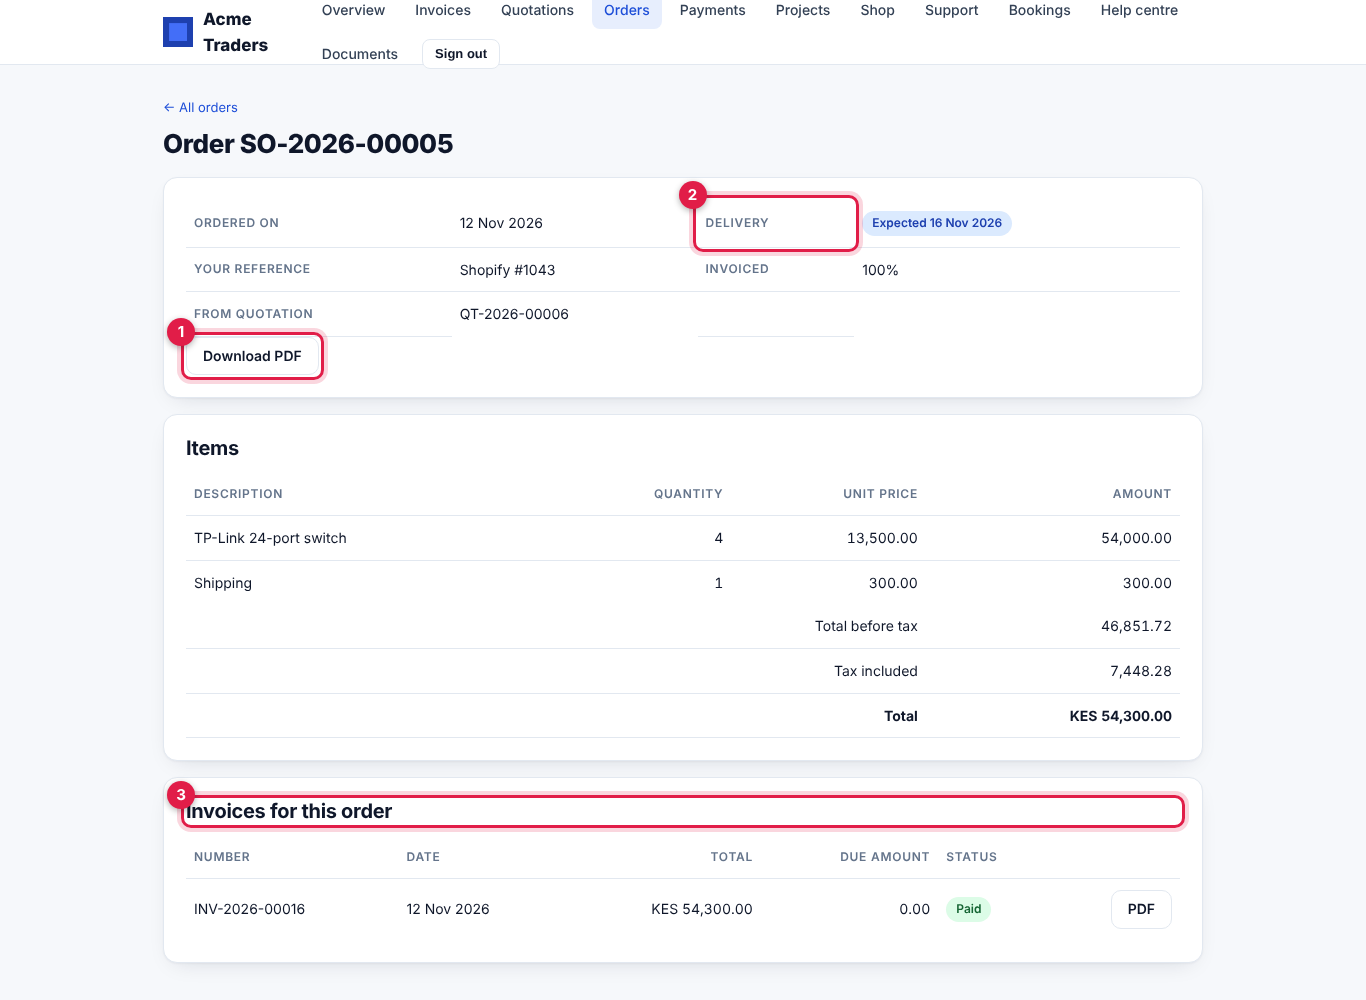
The order page shows when it was ordered, Your reference, the quotation it came from, Download PDF (marker 1), the Delivery status (marker 2), the Items with prices and tax, and Invoices for this order (marker 3) with their status and PDF or Pay buttons.
Payments
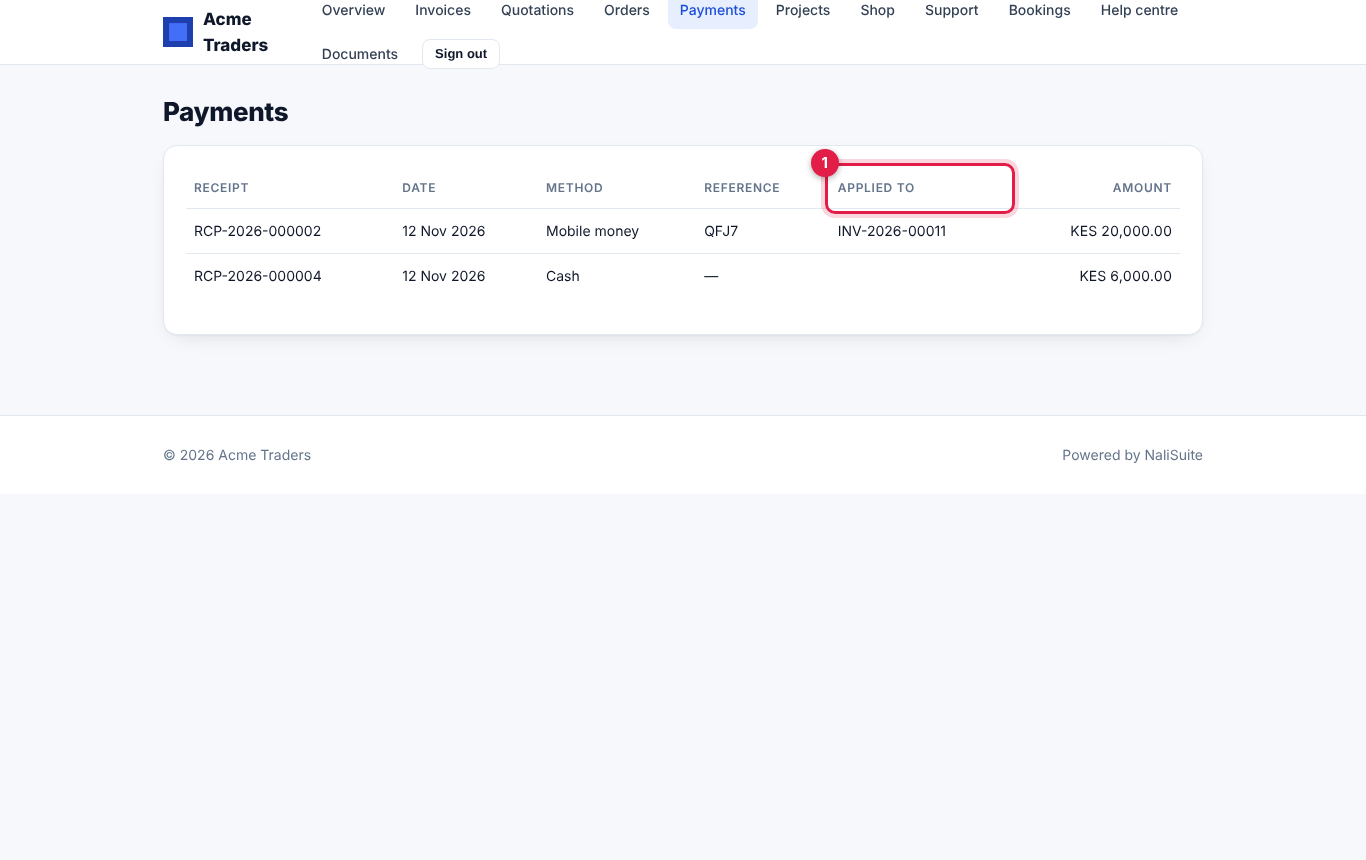
Every completed payment with its Receipt number, Date, Method, Reference, the invoices it was Applied to (marker 1) and the Amount.
Subscriptions
Shown when Show subscriptions to customers is on. Each subscription shows its plan, price, cycle and next renewal. When self-service is allowed (see Subscriptions) the customer can:
- Change plan: choose another plan on the same cycle and click Switch, confirming "Switch plan now? The difference for the rest of this period is invoiced or credited."
- Cancel subscription: confirming "Cancel at the end of the paid period?". The subscription then shows Ends at period end and a Keep my subscription button to undo it.
Support, projects, documents and bookings
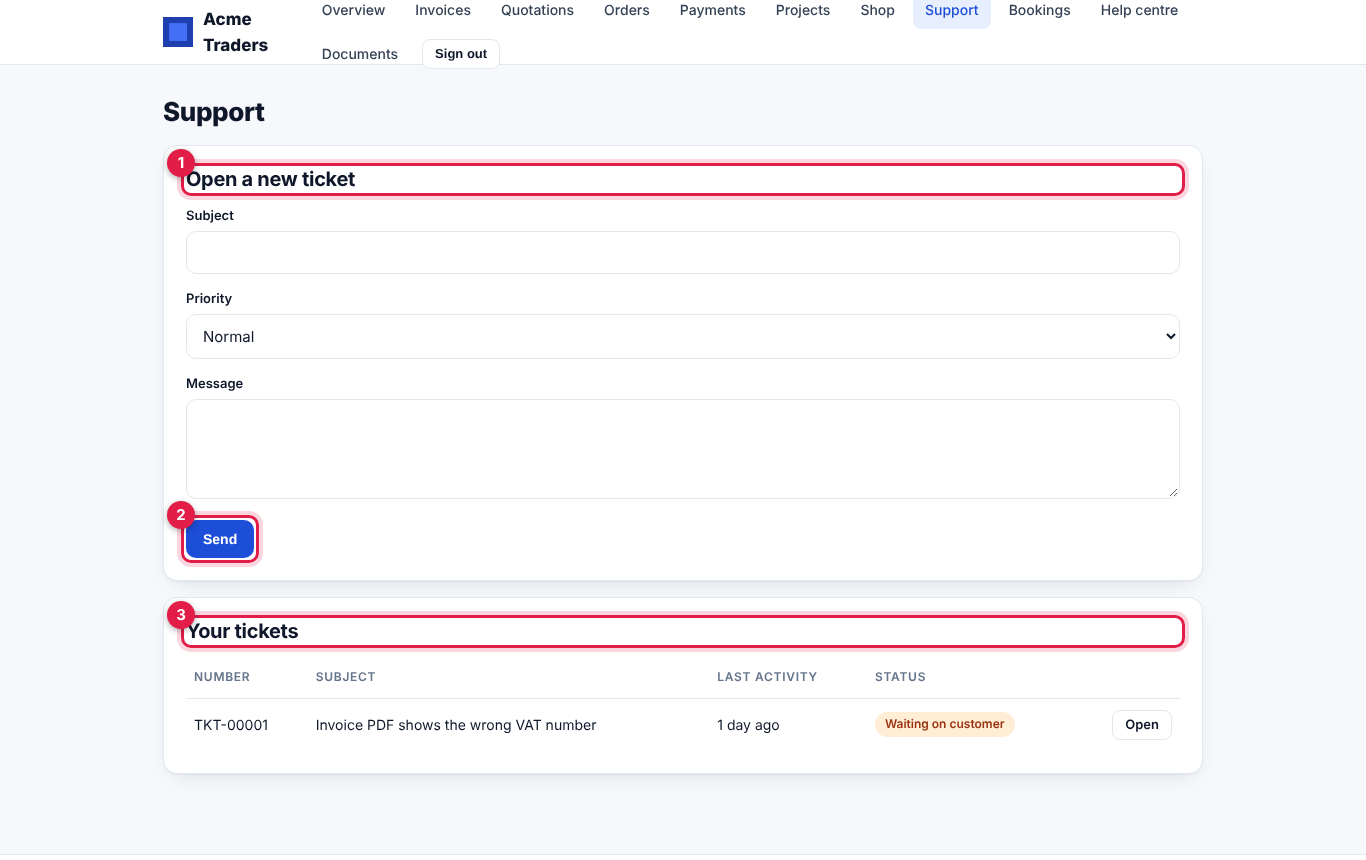
| Menu item | What the customer can do | Set up in |
|---|---|---|
| Support | Open a new ticket (marker 1) with a Subject, Priority and Message, click Send (marker 2), and follow Your tickets (marker 3), replying and rating them. | Helpdesk |
| Help centre | Read your published help articles. | Helpdesk |
| Projects | See their projects with progress, milestones and task counts. | Projects |
| Documents | Download files you shared, upload Documents we need from you, and Review and sign documents Waiting for your signature. | Documents |
| Bookings | See equipment hire bookings with deposits and damage charges. | Rental |
| Appointments | See upcoming and past appointments and Book an appointment. | Booking |
The vendor portal
Suppliers use the same portal with a different menu. A portal user is treated as a vendor when their contact (or the organisation they work for) is marked Vendor. A contact that is both customer and vendor sees both menus.
Vendors see:
| Menu item | What the vendor can do |
|---|---|
| Purchase orders | See your purchase orders with their status (Open, Confirmed, Partly received, Received, Billed, Cancelled), the orders waiting for your confirmation (Please confirm opens the order to confirm it and promise a date), and what is Owed to you on posted bills. |
| Bills | Send an invoice: enter Your invoice number, the Invoice date, the Total, the order it is For (or Not for a purchase order), attach the Invoice (PDF or photo) and a Note, then click Send invoice. Each invoice becomes a bill on your side. The list shows each bill as Being checked, Approved, Partly paid, Paid or Overdue, with what is Still owed. |
| Payments received | Every payment you made to them, and the Remittance advice for each (which of their invoices it paid), which they can Print or save as PDF. |
| Quote requests | Your requests for quotation: Enter prices (or Update prices) before the Reply by date, and see when a quote was Awarded to you. |
How to give a supplier access:
- Make sure Settings → Preferences → Purchases → Vendor portal (marker 1) is on.
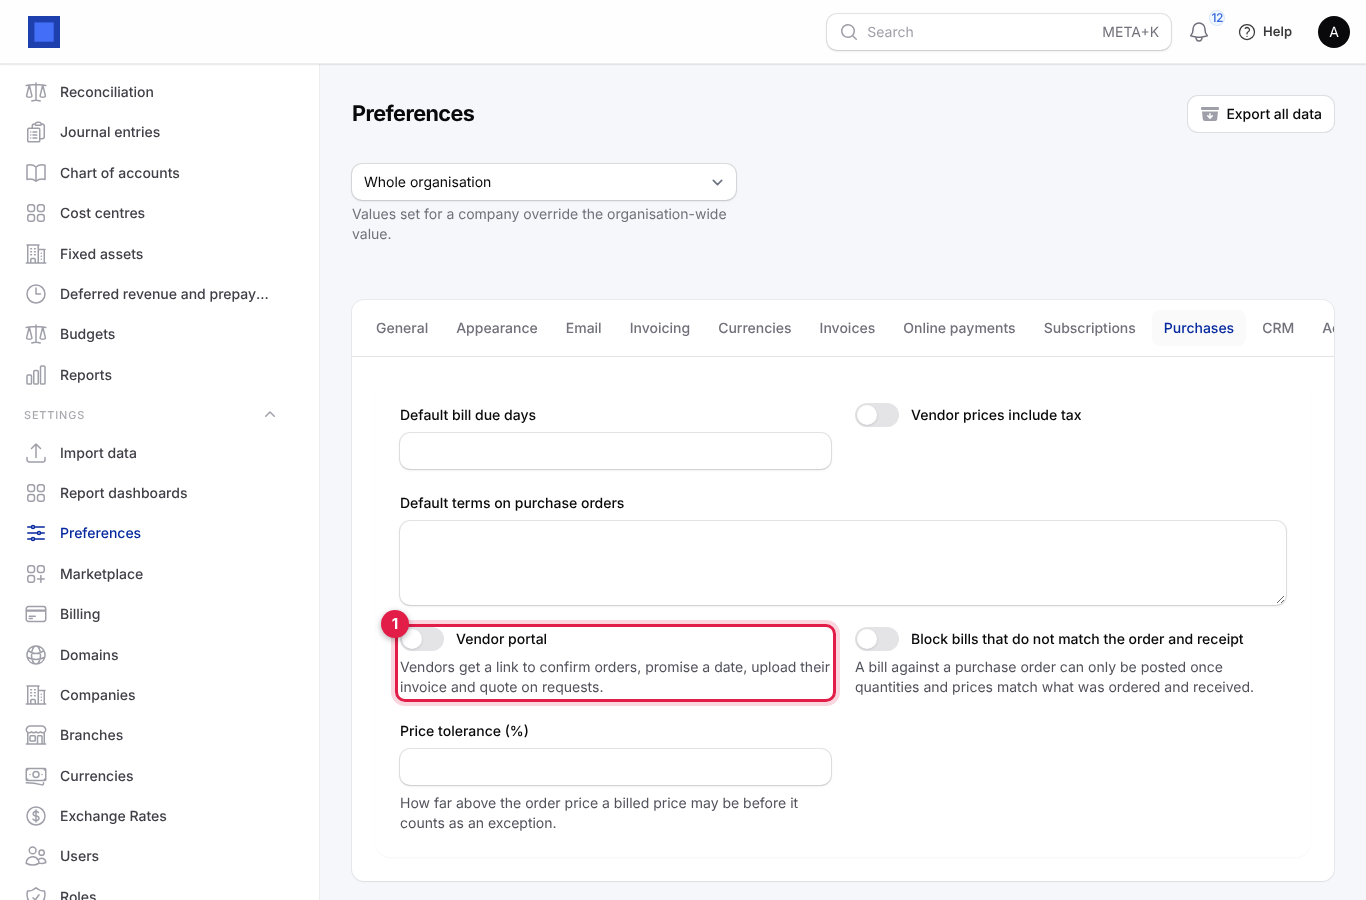
- Invite them from Sales → Portal access → Invite a customer (pick the vendor contact), or open a purchase order and click Invite to the vendor portal, which pre-fills their email.
When Vendor portal is off, vendor users see none of these pages and purchase-order links for vendors stop working. For purchase orders, bills and vendor payments on your side, see Purchases and bills.
Portal settings
Settings → Preferences → Customer portal:
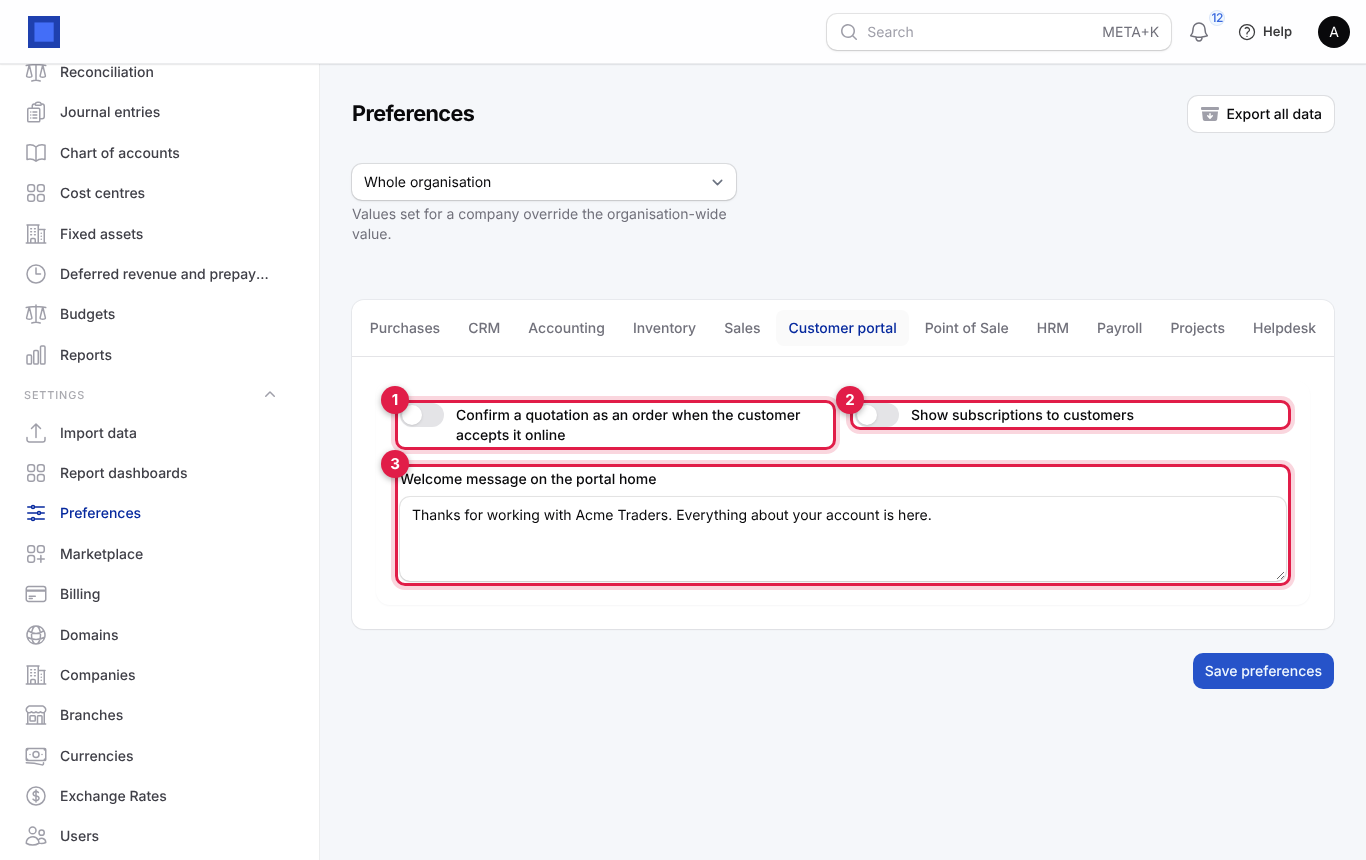
| Setting | What it does |
|---|---|
| Confirm a quotation as an order when the customer accepts it online (marker 1) | On: accepting in the portal confirms the order straight away (order number, invoice per policy, credit check). Off: you confirm it yourself after acceptance. |
| Show subscriptions to customers (marker 2) | Shows the Subscriptions page and the active subscriptions tile. |
| Welcome message on the portal home (marker 3) | A short text under the greeting on the Overview page. |
Related settings: Online payments (which payment methods the pay buttons offer), Subscriptions → Customers may switch plans / cancel in the portal, Purchases → Vendor portal, and Appearance (your name, logo and colour, which the portal uses).
Your team is told about portal activity through notifications: Customer portal activity (a customer accepted a quotation or signed a document) and Subscription changes (upgrades, downgrades and cancellations). Each person chooses how they receive them in their notification settings. See Getting started.
Common questions
The customer says they never got the email. Check the email on their portal user, ask them to look in spam, then click Send sign-in link again. If your workspace sends through its own mail server, use Send test email in Preferences → Email to check it works.
How do I remove someone's access? Open Sales → Portal access, click Edit on them and switch off Active. They can no longer sign in or ask for links.
A customer sees no invoices. Only issued invoices are shown, and only for their own contact (and the organisation they work for). Check the portal user is linked to the right contact.
Can a customer see another customer's documents? No. Each portal user only sees records of their own contact and its organisation. Merging two contacts moves the portal logins too.
The Subscriptions page is missing. Switch on Show subscriptions to customers in Preferences → Customer portal.
A supplier sees only the Overview or other pages, not their purchase orders. The Vendor portal preference is off, or their contact is not marked Vendor.