Device repair
Device repair is for phone, laptop, TV and electronics repair shops. You take a device in at the counter with its IMEI or serial number, the passcode (kept encrypted for your technicians), the accessories left with it and its condition, and print a receipt and a tag with a QR code the customer uses to follow the repair online. You build an estimate of parts and labour, text it to the customer to approve or decline, reserve or order the parts, move the job through the bench with a technician and a time target for each stage, take the balance on an invoice or at the till, and hand the device back against the customer's signature. Repairs carry a warranty, and devices left behind are reminded and flagged for disposal.
Everything is in the Device repair group of the left menu: Repair tickets, Uncollected devices and Repair reports.
Note: device_repair.view lets someone see tickets, print receipts and tags, and see the uncollected devices and reports. device_repair.manage is needed to take devices in, change tickets, build and send estimates, record the customer's answer, reserve and order parts, move tickets, take payments, hand devices back and text reminders. device_repair.technician is needed to see a device's passcode. Owners and admins have all three; the member role has device_repair.view. Set permissions under Settings → Roles (see Roles and permissions).
Switch it on
Device repair is a marketplace app. It needs the Contacts and Sales apps. To take the balance it uses Invoicing or Point of Sale. Inventory lets you reserve spare parts from stock, Purchases lets you order parts from your supplier, and Marketing with an SMS provider sends the texts to customers (see SMS providers).
- Open Settings → Marketplace and type Device repair in the Search add-ons… box (marker 1).
- On the Device repair card (marker 2), click Start free trial (or Add to subscription) and confirm. The Device repair group appears in the menu.
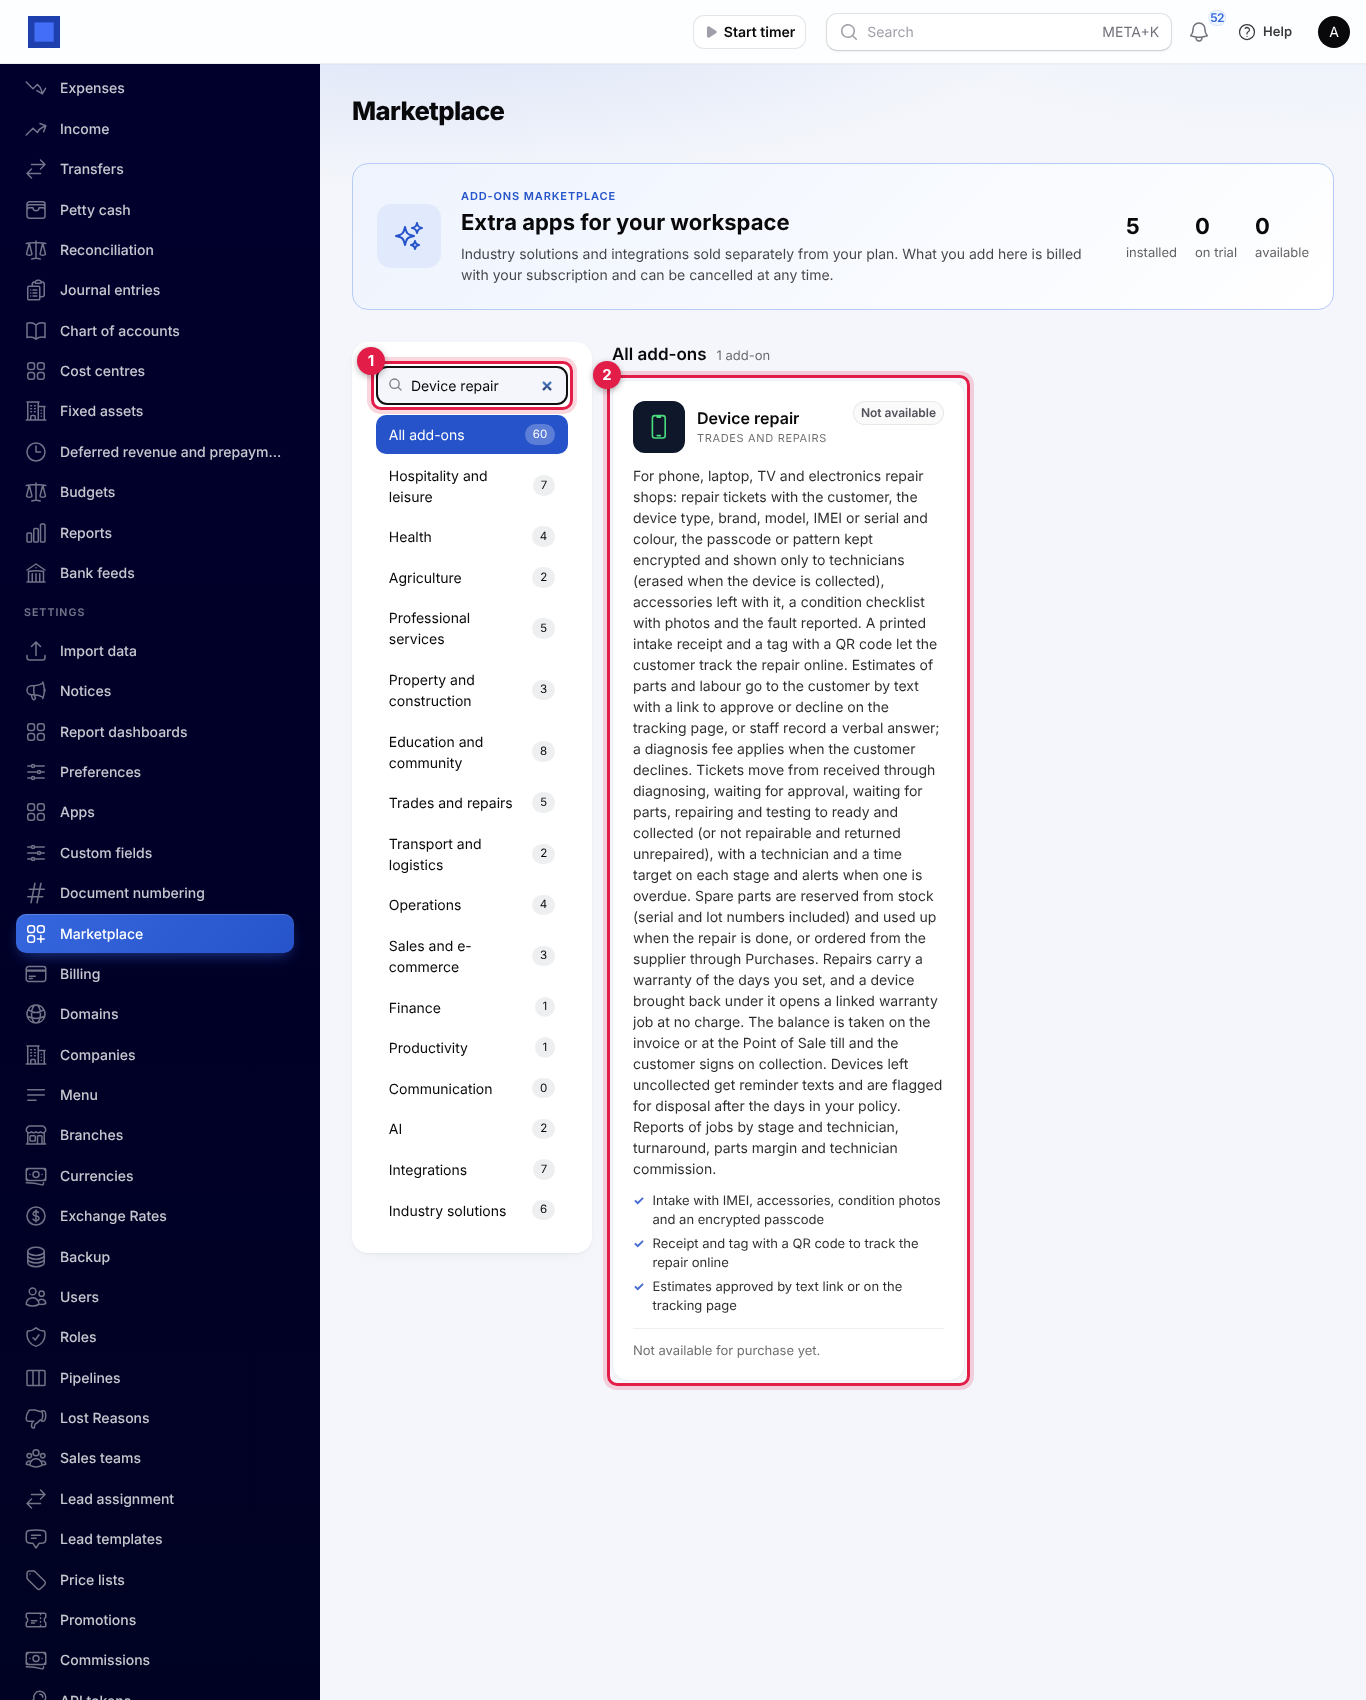
If the card says Not available for purchase yet, ask NaliSuite support to switch it on. See Billing and marketplace.
Settings
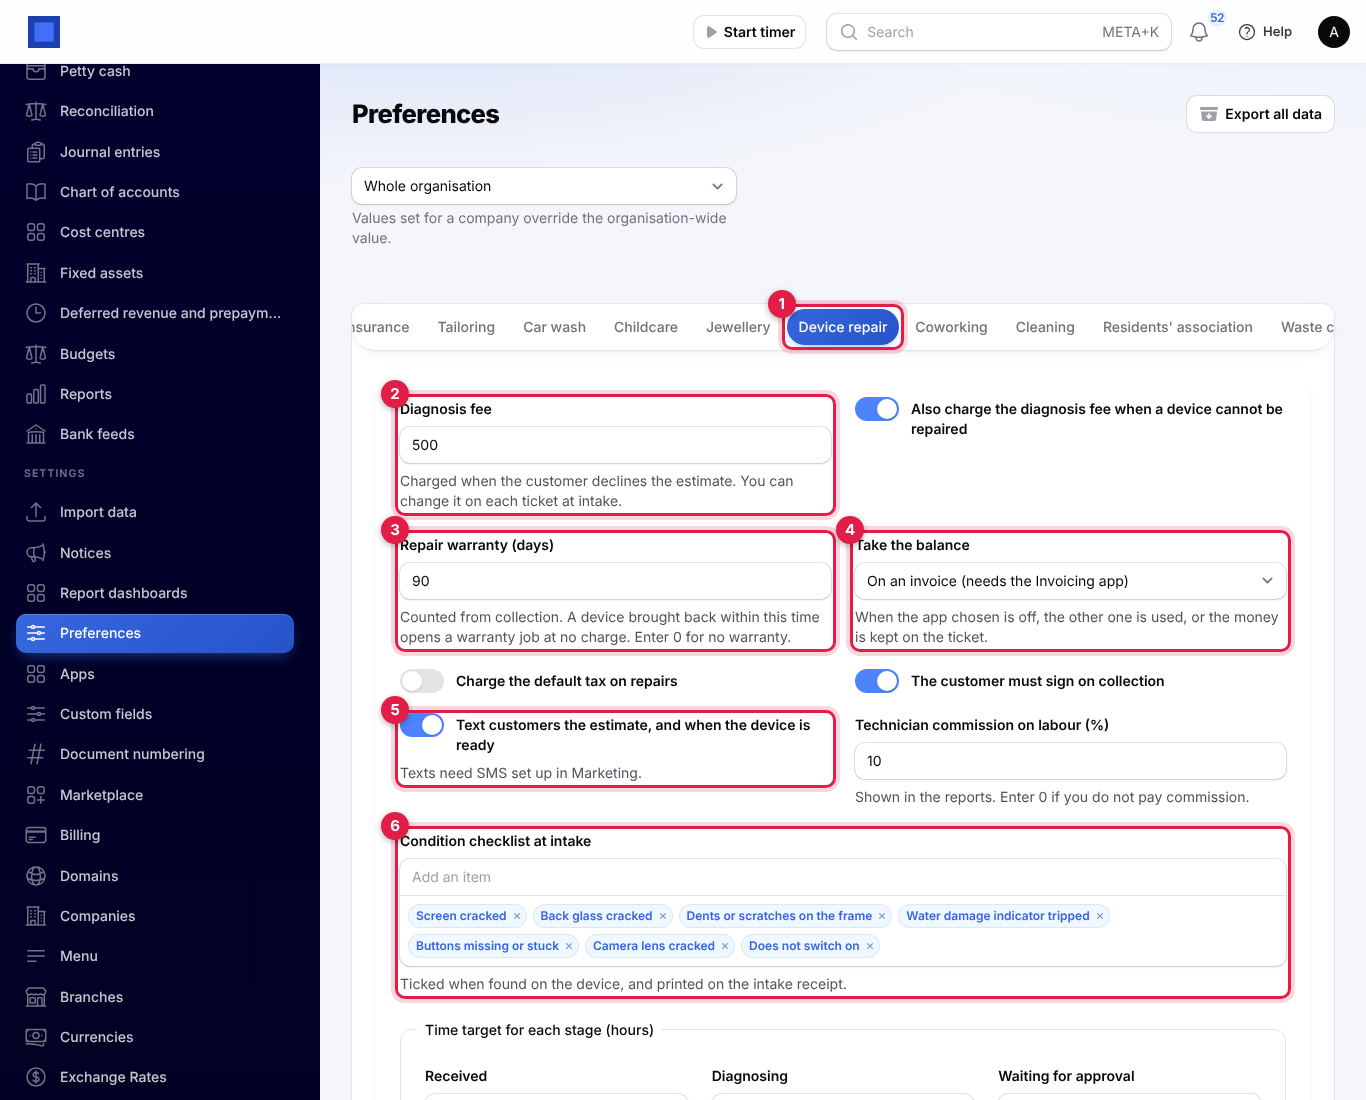
Open Settings → Preferences and click the Device repair tab (marker 1). Click Save preferences when you are done.
| Setting | What it does |
|---|---|
| Diagnosis fee (marker 2) | Charged when the customer declines the estimate. It is filled in on each new ticket, and you can change it there. Leave it at 0 for no fee. |
| Also charge the diagnosis fee when a device cannot be repaired | On by default. When off, a device you could not repair is handed back at no charge. |
| Repair warranty (days) (marker 3) | Counted from the day the customer collects. A device brought back within this time opens a warranty job at no charge. Default 90; enter 0 for no warranty. |
| Take the balance (marker 4) | On an invoice (needs Invoicing) or As a sale at the till (needs Point of Sale). When the app chosen is off, the other one is used; when both are off, payments are only recorded on the ticket. |
| Charge the default tax on repairs | Puts your default sales tax on parts, labour and the diagnosis fee. Off by default. Whether prices include the tax follows your invoicing preference. |
| The customer must sign on collection | On by default. The device cannot be handed back without a signature. |
| Text customers the estimate, and when the device is ready (marker 5) | On by default. Needs SMS set up in Marketing. Reminders you send by hand go out even when this is off. |
| Technician commission on labour (%) | Shown in the reports. Enter 0 if you do not pay commission. |
| Condition checklist at intake (marker 6) | The damage you tick at the counter, such as Screen cracked or Water damage indicator tripped. Type an item and press Enter to add it, click × to remove one. Printed on the receipt. |
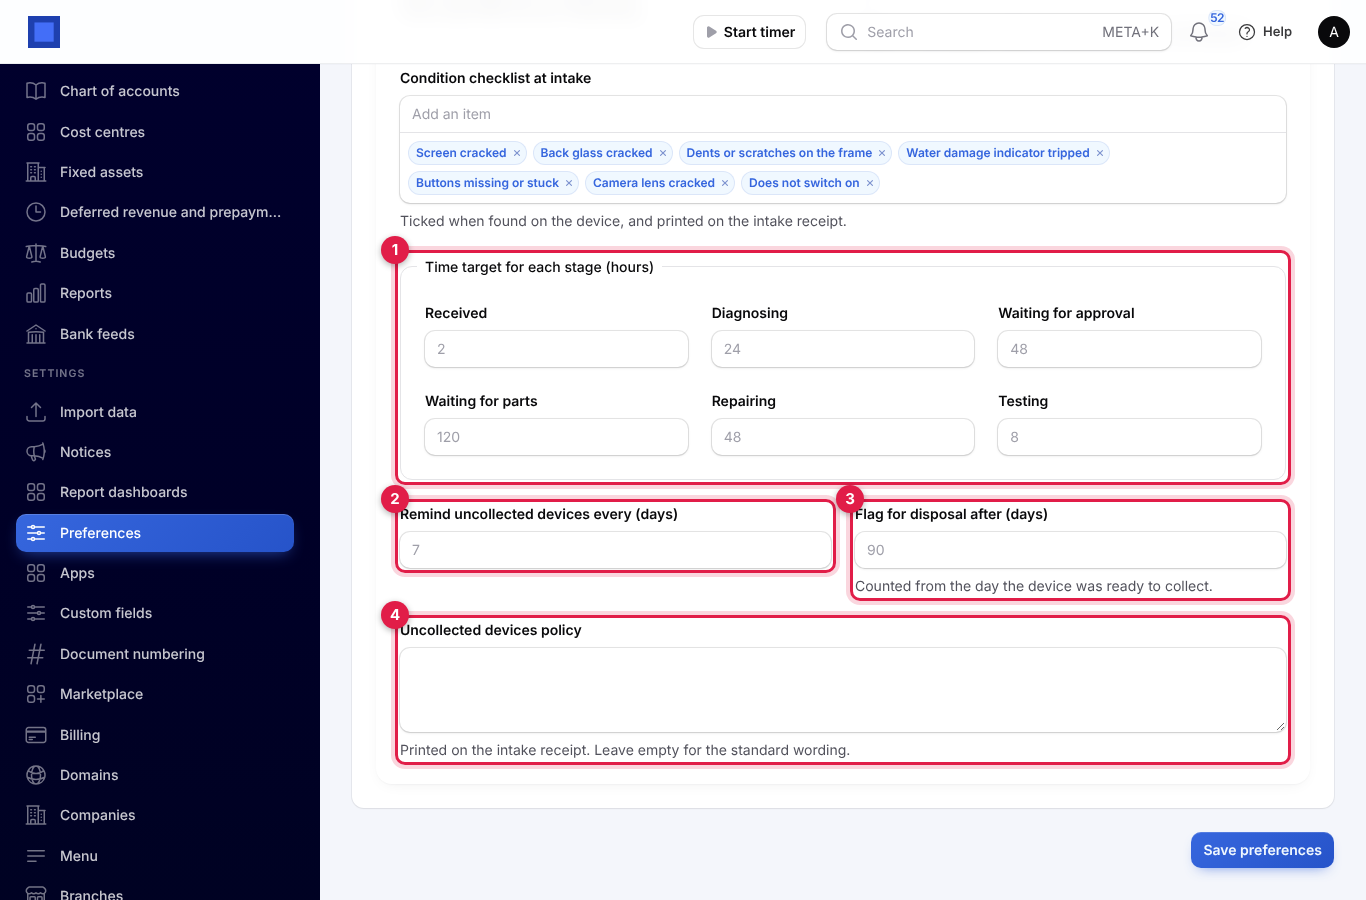
Further down the tab:
| Setting | What it does |
|---|---|
| Time target for each stage (hours) (marker 1) | How long a ticket may stay in Received (2), Diagnosing (24), Waiting for approval (48), Waiting for parts (120), Repairing (48) and Testing (8) before it counts as overdue. Enter 0 for no target on a stage. |
| Remind uncollected devices every (days) (marker 2) | How often a reminder text goes to customers who have not collected. Default 7. |
| Flag for disposal after (days) (marker 3) | Counted from the day the device was ready. Default 90. |
| Uncollected devices policy (marker 4) | Printed on the receipt. Leave it empty for the standard wording: Devices not collected within 90 days of being ready may be disposed of or sold to cover the cost of the repair. |
Repair tickets
Open Device repair → Repair tickets. The line under the title (marker 1) counts the tickets on the bench, waiting for approval, waiting for parts, past the time target and waiting to be collected.
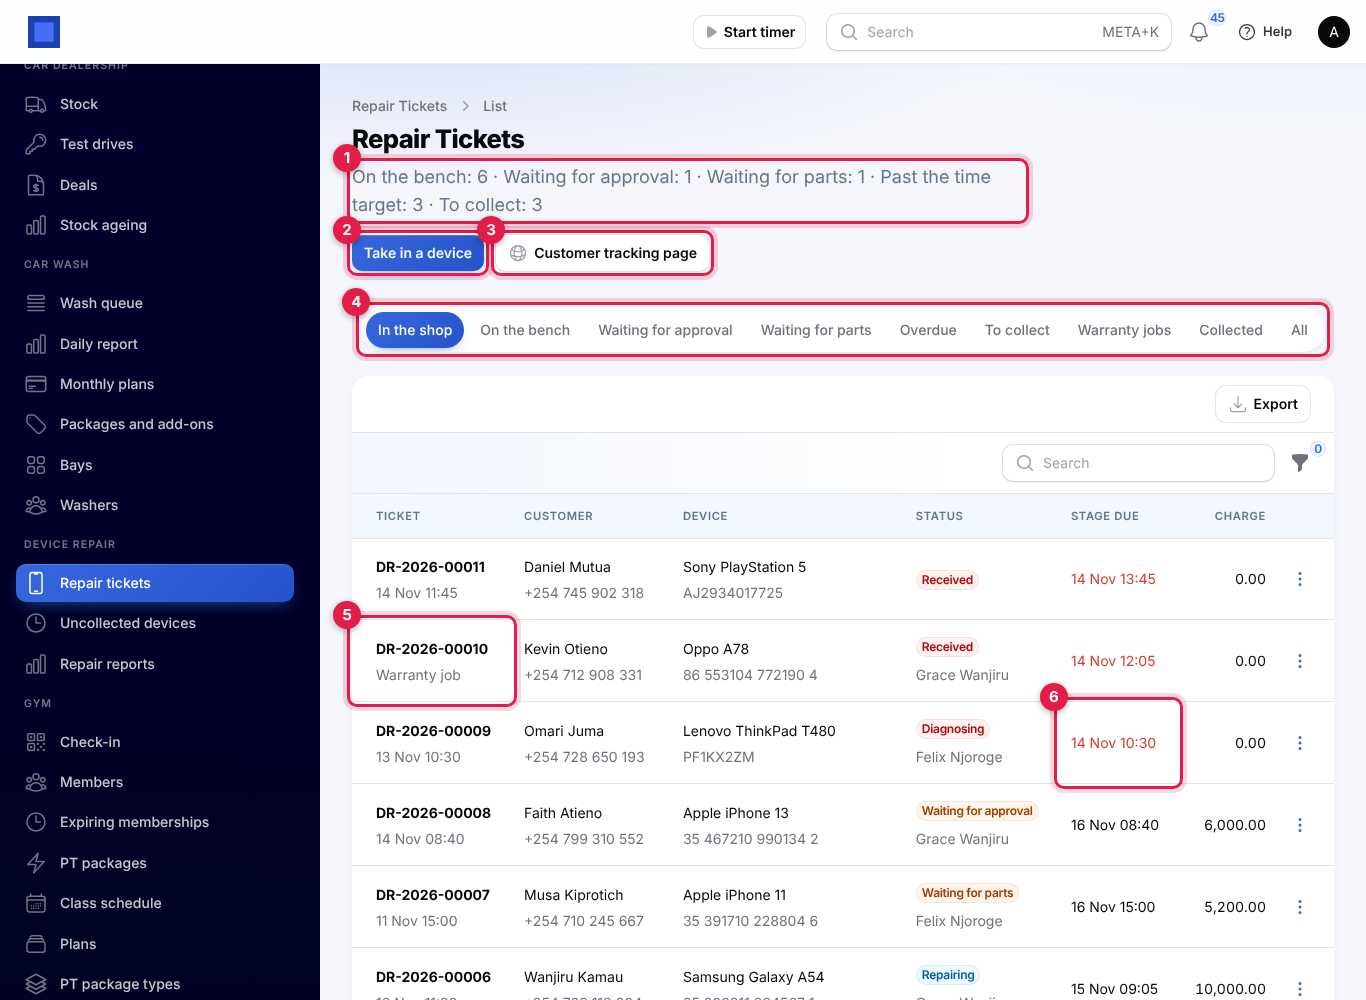
- Take in a device (marker 2) opens the intake form.
- Customer tracking page (marker 3) opens the public page where customers follow their repair (see The customer's tracking page).
- The tabs (marker 4) are In the shop (the default), On the bench, Waiting for approval, Waiting for parts, Overdue, To collect, Warranty jobs, Collected and All.
Each row shows the ticket number with the day it came in, or Warranty job (marker 5), the customer and phone, the device with its IMEI or serial, the stage with the technician, Stage due and the Charge with what has been paid. A stage past its time target shows its due time in red (marker 6) and a red badge.
Search finds a ticket by its number, the customer's name or phone, or the brand, model or serial. The filters are Status (several at once), Technician, Device and Past the time target. Click ⋮ at the end of a row for Edit and the same actions as the ticket's Actions button.
Take in a device
- Click Take in a device.
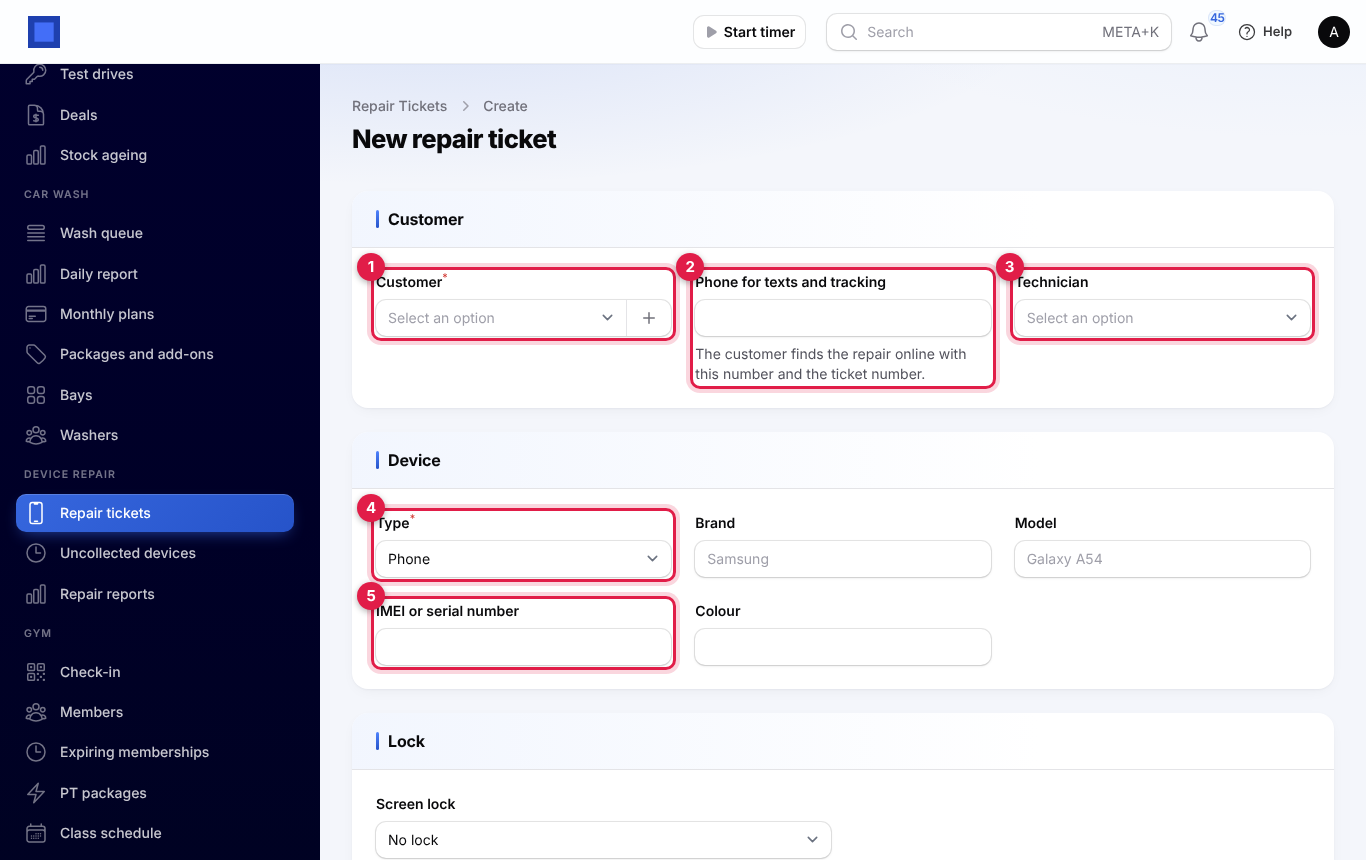
- Under Customer, choose the Customer (marker 1). Search by name or phone, or click + to add a new customer with a name, mobile and email.
- Check Phone for texts and tracking (marker 2). It is filled from the customer's mobile; the customer finds the repair online with this number and the ticket number.
- Choose the Technician (marker 3) if you know who will do the job.
- Under Device, choose the Type (marker 4): phone, tablet, laptop, desktop computer, TV, games console, smartwatch, speaker or headphones, or other. Enter the Brand, Model, IMEI or serial number (marker 5) and Colour.
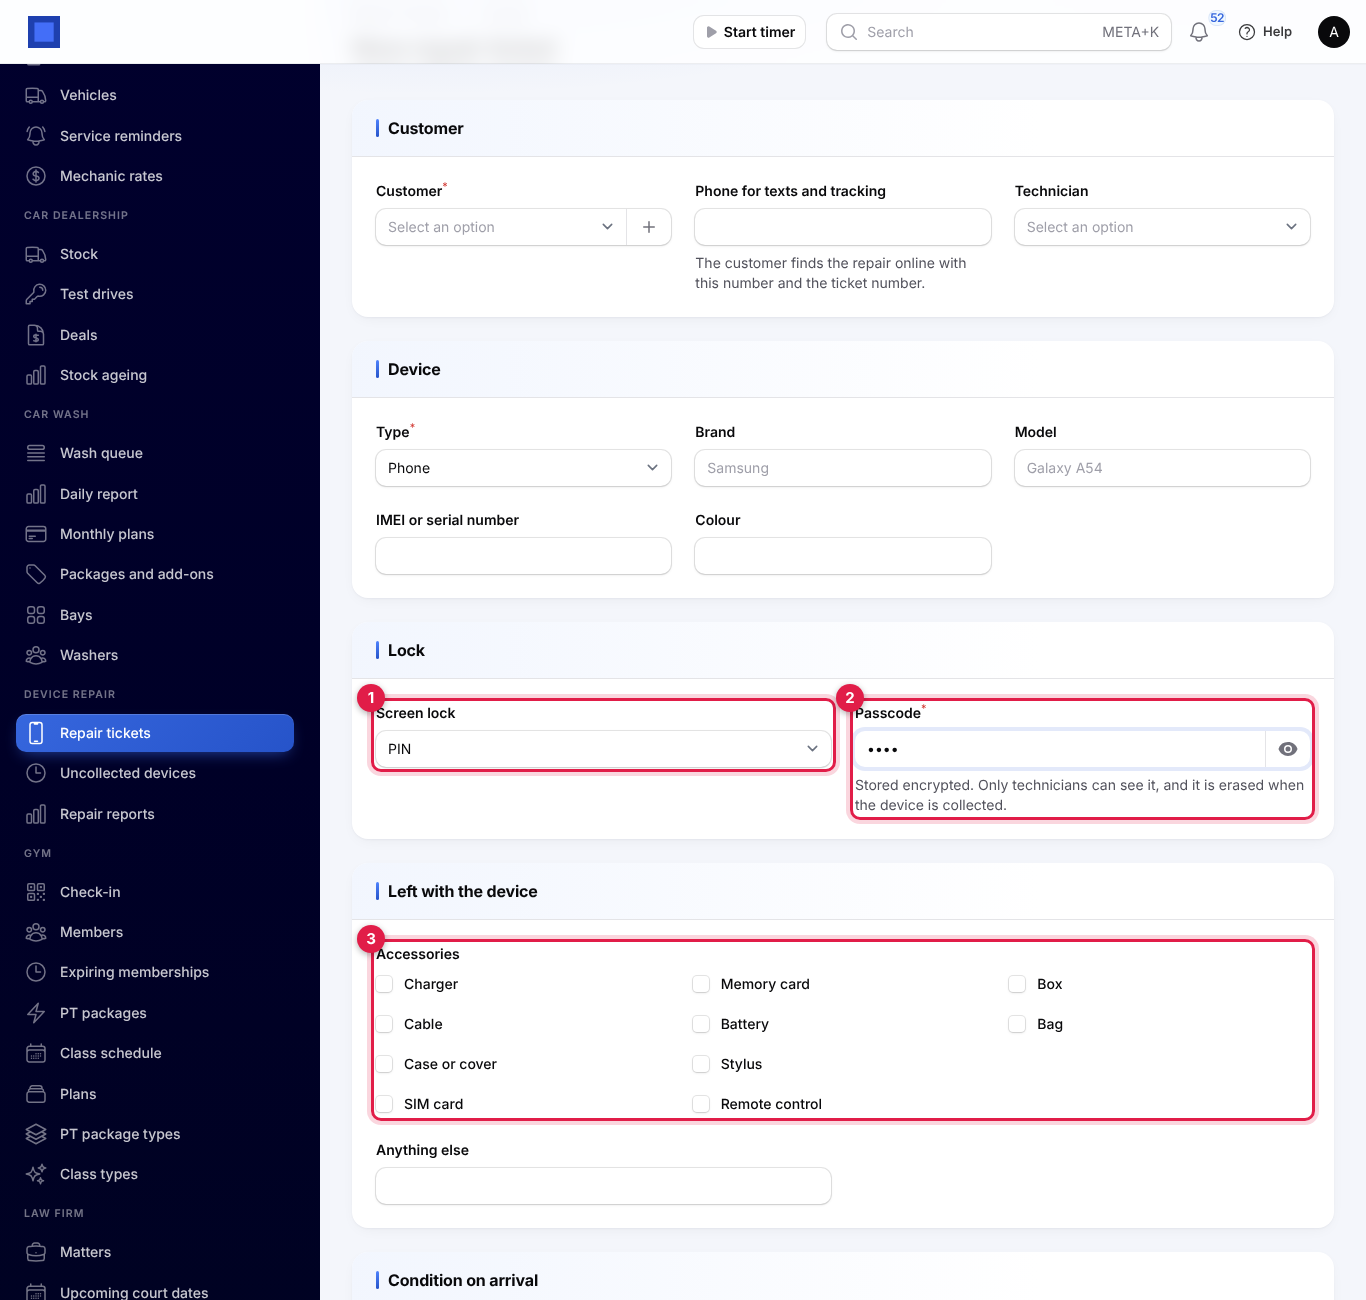
- Under Lock, choose the Screen lock (marker 1): No lock, PIN, Password or Pattern. For a lock, type the Passcode (marker 2); for a pattern, the dots 1 to 9 in order, such as 1-4-7-8-9. Click the eye to check what you typed.
- Under Left with the device, tick the Accessories (marker 3): charger, cable, case or cover, SIM card, memory card, battery, stylus, remote control, box or bag. Type anything else in Anything else.
- Under Condition on arrival, tick what you find in Found on the device (marker 4), add Condition notes, and add up to 10 Photos (marker 5) of the damage, 8 MB each.
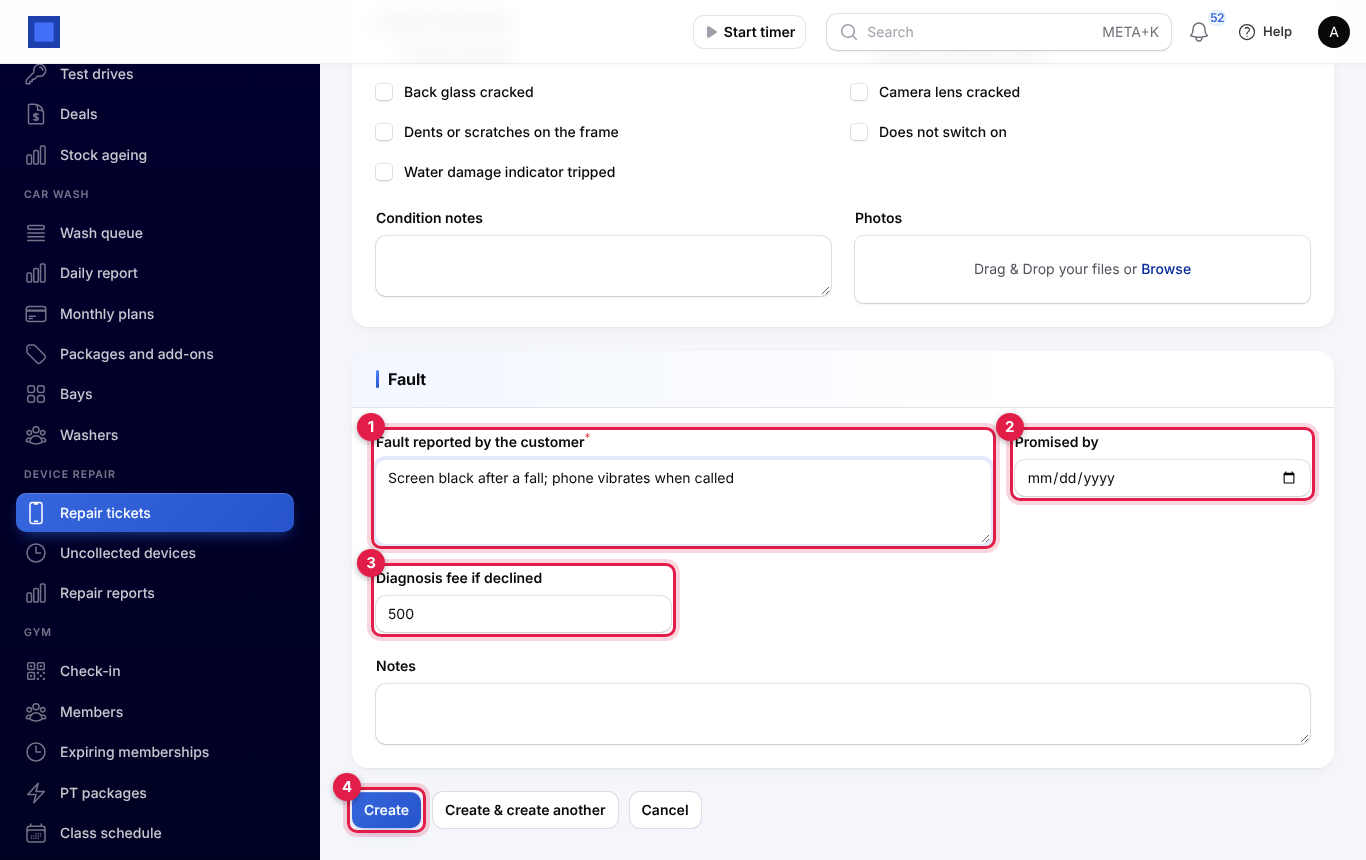
- Under Fault, write the Fault reported by the customer (marker 1) and, if you agree a date, Promised by (marker 2).
- Check the Diagnosis fee if declined (marker 3), filled in from your settings.
- Add any Notes and click Create (marker 4).
The ticket is numbered, such as DR-2026-00012, and starts in Received. A message Ticket DR-2026-00012 taken in offers Print receipt and Print tag.
The device's type, brand, model, serial, colour, accessories and condition cannot be changed after intake. You can still change the phone, technician, fault, Diagnosis notes, condition notes, photos, promised date and notes on the ticket, then click Save changes.
Important: The passcode is stored encrypted and is never shown on the ticket, the receipt or the tracking page. See Passcodes.
Print the receipt and tag
Both are under Actions on the ticket (or ⋮ in the list) and open as PDFs in a new tab.
- Print receipt: the intake receipt for the customer, with the ticket number, the customer, the device and serial, the kind of lock (not the code), what was left with it, the condition found, the estimate once there is one, the diagnosis fee, your uncollected devices policy and warranty days, a QR code to follow the repair, and lines for the customer's signature. After collection it prints as the collection receipt, with who collected it, the signature and the warranty end date.
- Print tag: an A4 sheet with two tags, one for the device and one for its accessories, each with the ticket number, the QR code, the customer and phone, the device, serial and fault, and the day in and the promised day. A warranty job is marked WARRANTY.
Warranty returns
When the customer brings back a device you repaired and collected, and its warranty has not run out:
- Click Take in a device and type the device's IMEI or serial number (marker 1). Spaces, dashes and capitals do not matter.
- NaliSuite shows This device was repaired on DR-… and is under warranty until … (marker 2).
- Leave Open a warranty job at no charge on (marker 3) if the same fault has come back. Turn it off to charge for a new fault as usual.
- Fill in the rest and click Create.
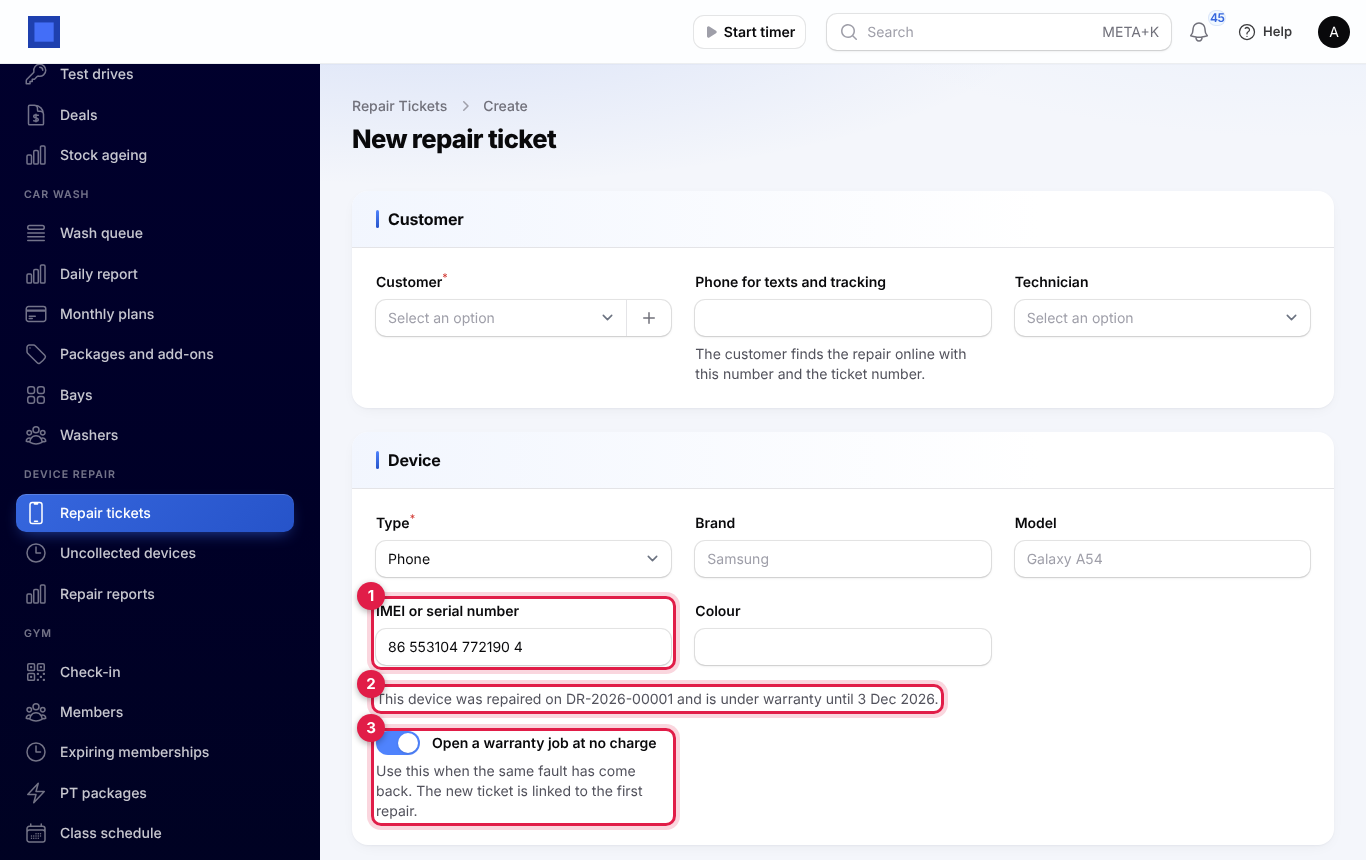
The warranty job is linked to the first repair, approved straight away at no charge, and shows Warranty job in the list. You can still add the parts and labour you use, at a price of nothing, so stock is updated. It is collected like any repair, and keeps the warranty end date of the first repair.
The estimate
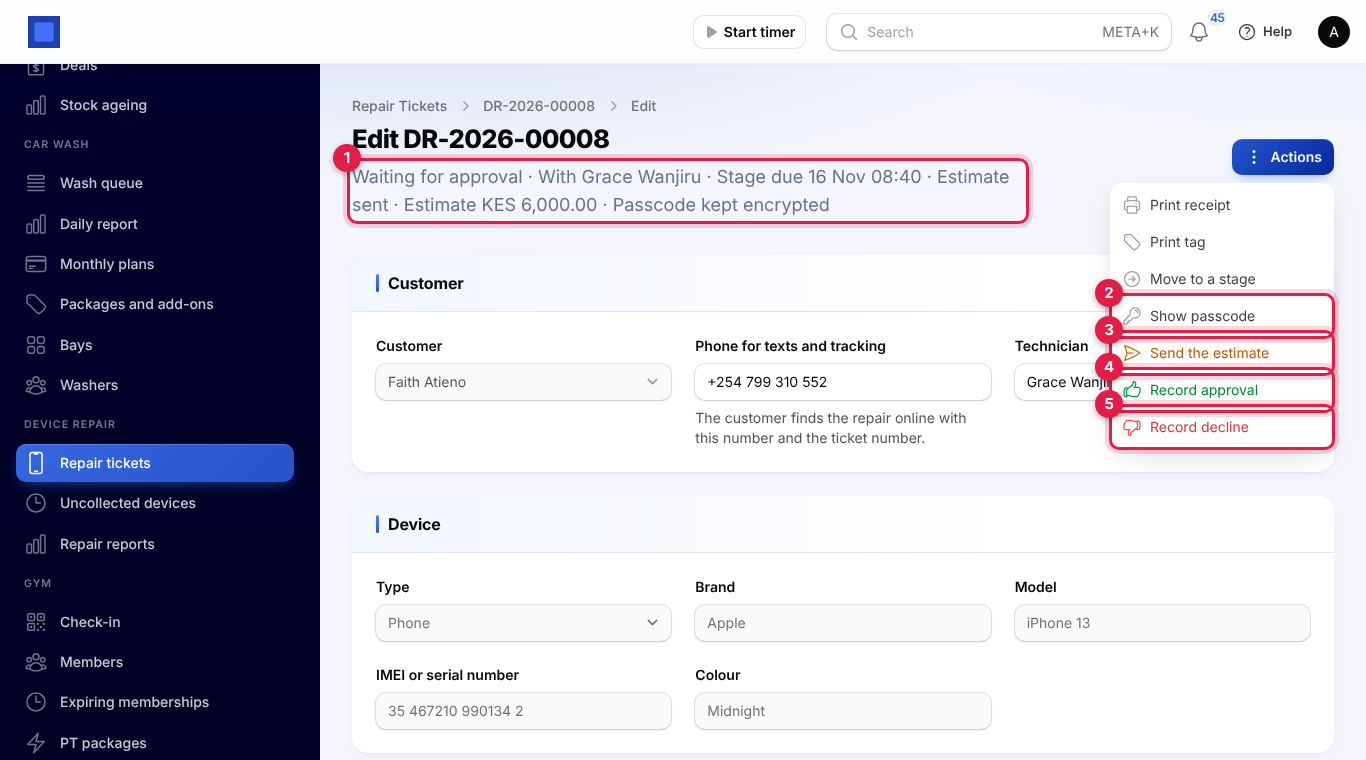
Open a ticket. The line under the title (marker 1) shows the stage, the technician, when the stage is due, the estimate status and amount, what is left to pay once it is ready, and whether a passcode is kept.
Build the estimate in the Estimate and parts tab under the form:
- Click Add a part or labour (marker 1).
- Choose the Line: Part or Labour.
- For a part, choose the Part from the product list to fill in the description and selling price. With Inventory on, the field shows how many are Free to reserve. For a product kept by serial or lot number, choose the Serial or lot number, or leave it empty to use the one expiring first, else the oldest.
- Check the Description, Quantity and Price, and click Submit.
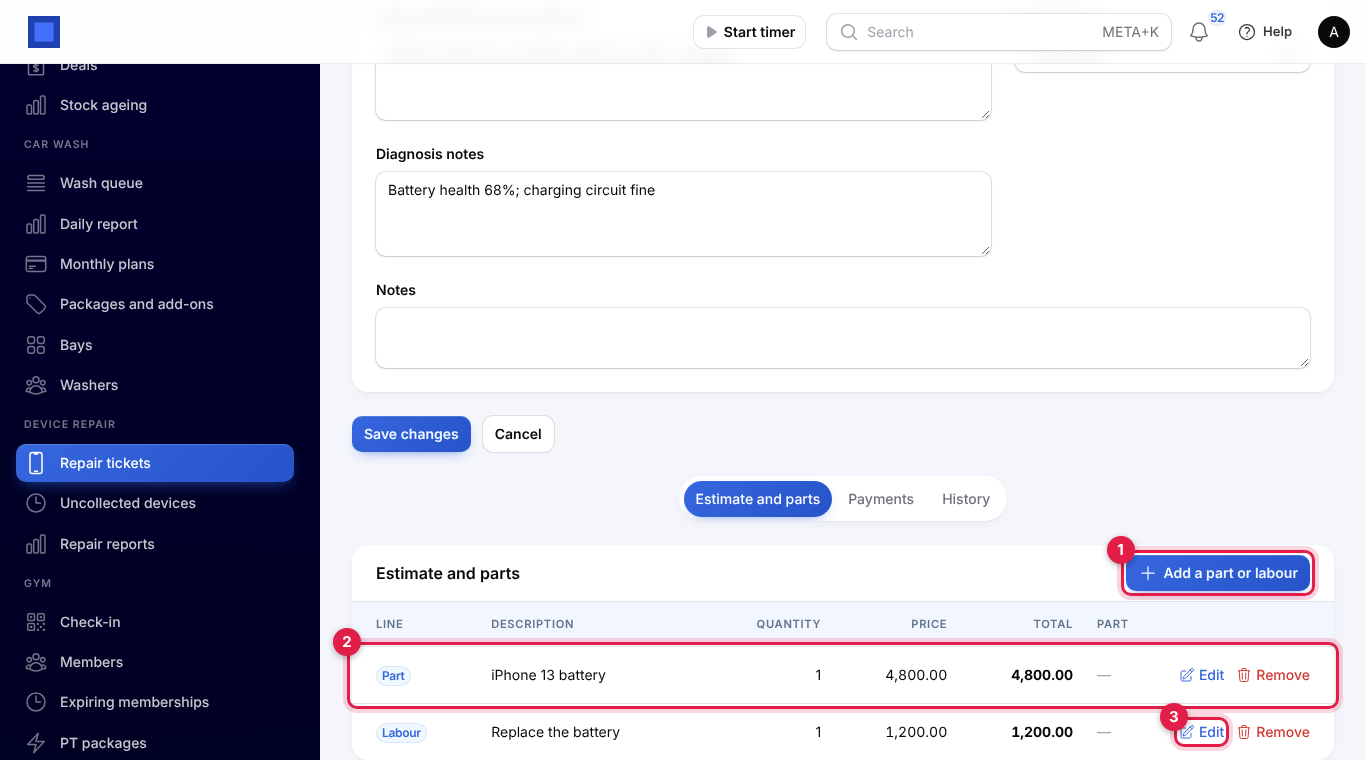
Each line shows its Total and, for parts, its status in Part: Reserved, To order, On order, Used or Released. Use Edit (marker 3) or Remove to change a line. Lines can be changed until the customer approves or declines; after that they are locked. A serial number is one unit, so add a line for each serial number.
Send the estimate and get an answer
Under Actions (marker 1 in the ticket screenshot above):
- Send the estimate (marker 3): texts the total to the customer with a link to approve or decline it online, for example Acme Traders: the repair of your Apple iPhone 13 (DR-2026-00008) comes to KES 6,000.00. Approve or decline it here: … If you decline, the diagnosis fee of KES 500.00 applies. Confirm the message. The ticket moves to Waiting for approval. If no text could be sent (no phone number, or SMS not set up), you see a warning; share the tracking link with the customer yourself.
- Record approval (marker 4): for a yes given by phone or at the counter. Check Approved by, say How it was approved (By phone, at the counter) and click Submit. The parts are reserved and the ticket moves to Repairing, or to Waiting for parts if some must be ordered.
- Record decline (marker 5): for a no. Enter Declined by and a Reason. Any parts held are released, the ticket moves to Not repairable and only the diagnosis fee is charged.
The customer can also answer on the tracking page; see The customer's tracking page. The history shows who decided and how: by the link in the text, on the tracking page, or recorded by staff.
Parts
When the customer approves, each part on the estimate is set aside:
- A part kept in stock in Inventory is Reserved if enough is free in your main warehouse. Free means on hand less what other open repairs have reserved.
- If not enough is free, it is marked To order.
- A part not kept in stock (or typed in without a product) is simply set aside.
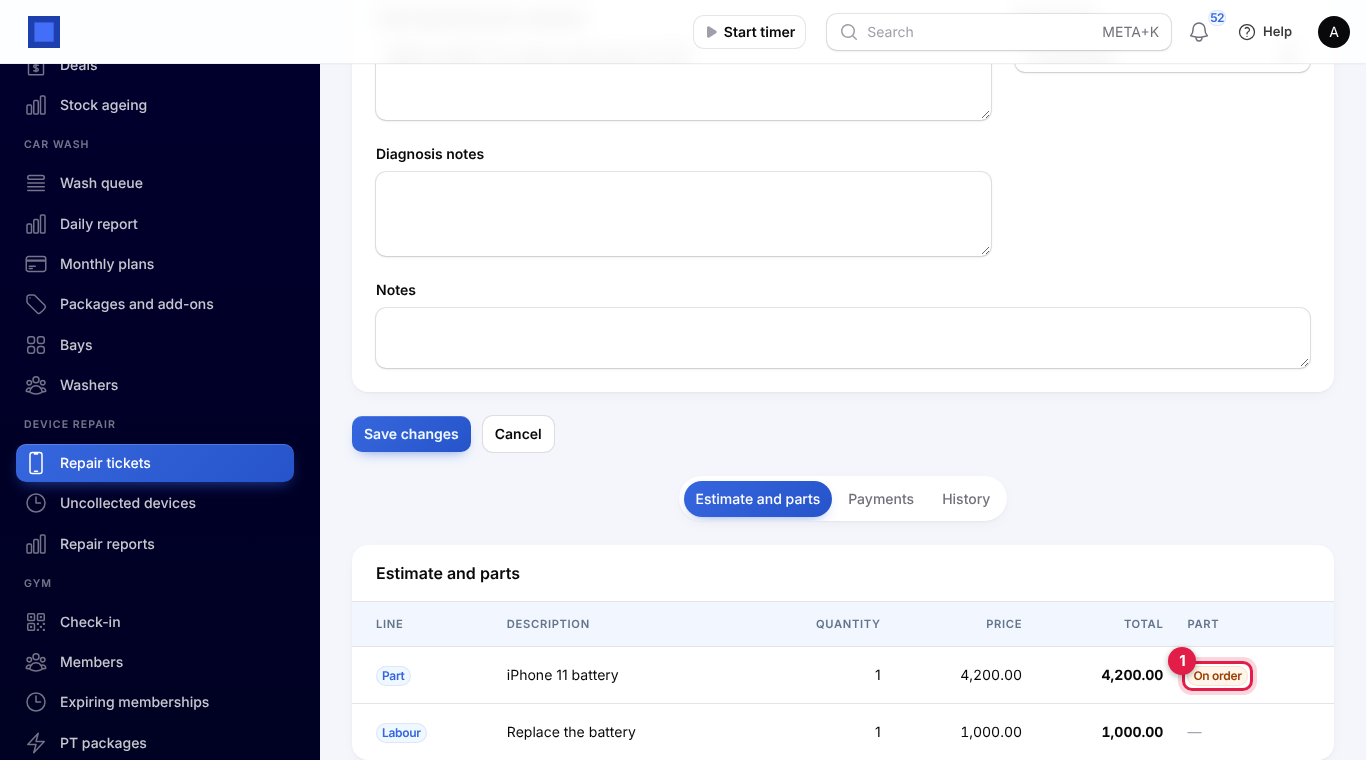
To order the missing parts, click Actions → Order parts (with Purchases on). Choose a Supplier, or leave it empty to order each part from its product's preferred vendor, and click Submit. NaliSuite drafts one purchase order per supplier, with the note Parts for repair DR-…, and the parts show On order (marker 1). The ticket moves to Waiting for parts. Send and receive the purchase order as usual in Purchases (see Purchases and bills); when the delivery is received, the parts are reserved for the repair and the history says All parts are in.
If stock arrives another way, click Actions → Reserve parts to try again. When the ticket is moved to Ready, the reserved parts leave stock at their cost (the serial or lot chosen, else the one expiring first), and the cost is kept for the parts margin report. When a repair does not go ahead, its parts are released.
Move a ticket through the bench
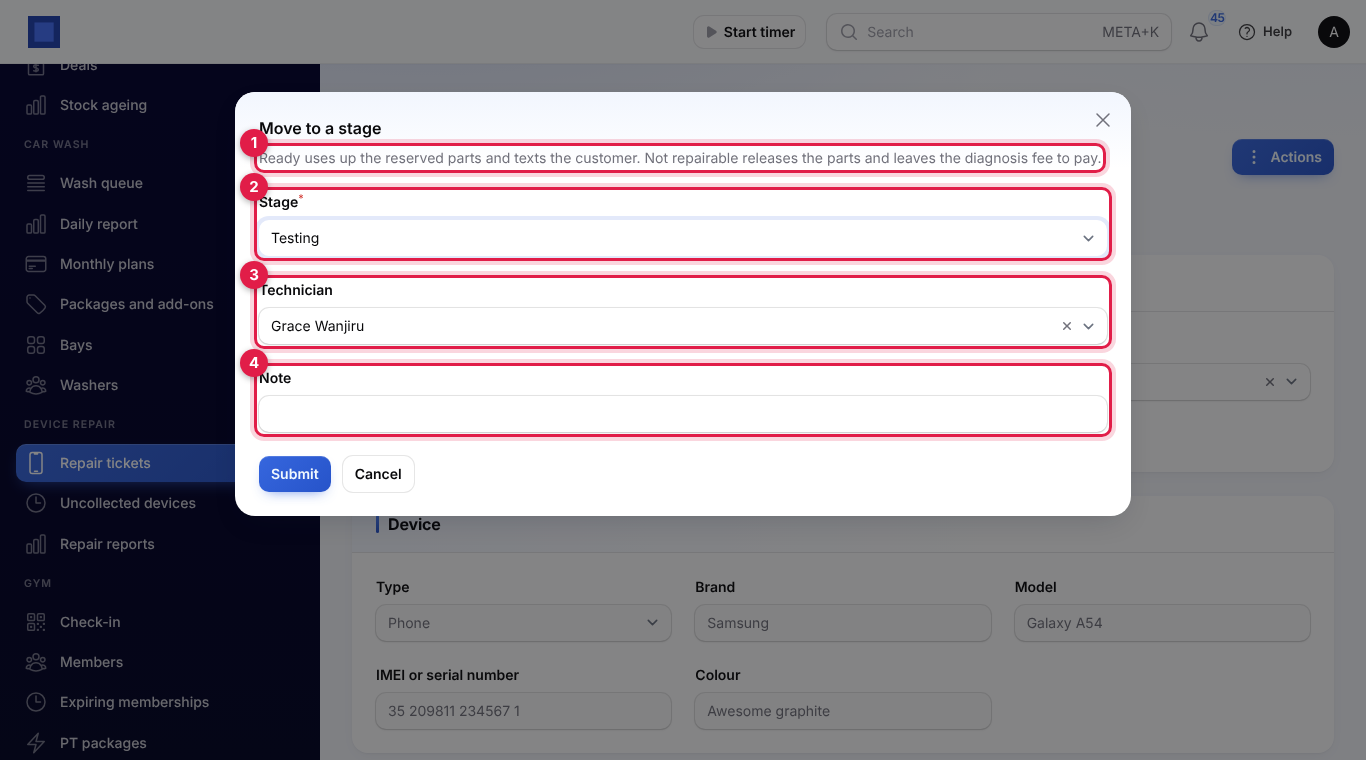
Click Actions → Move to a stage:
- Choose the Stage (marker 2). Only the stages the ticket can go to next are offered.
- Change the Technician (marker 3) if someone else takes it over.
- Add a Note (marker 4), and click Submit.
| From | Can move to |
|---|---|
| Received | Diagnosing, Repairing, Not repairable |
| Diagnosing | Repairing, Waiting for parts, Not repairable |
| Waiting for approval | Diagnosing, Not repairable |
| Waiting for parts | Repairing, Not repairable |
| Repairing | Testing, Waiting for parts, Ready, Not repairable |
| Testing | Ready, Repairing |
| Ready | Repairing |
Waiting for parts, Repairing, Testing and Ready need the customer's approval first (a warranty job is approved already). Moving from Waiting for parts to Repairing is refused while a part is still to order or on its way.
Each move restarts the stage's time target. When a ticket passes its target, its technician gets an alert in NaliSuite (or the people who manage repairs, when nobody has the ticket), once per stage. NaliSuite checks every 30 minutes.
When a ticket reaches Ready or Not repairable, the customer gets a text, for example Hello Achieng, your Tecno Camon 20 (DR-2026-00004) is repaired and ready to collect at Acme Traders. To pay: KES 5,200.00. Details: …
Passcodes
Only people with device_repair.technician see Actions → Show passcode. Confirm the message Every look at a passcode is recorded in the ticket history, and the code shows in a message that stays until you close it. The history records who looked and when (not the code). The passcode is erased when the device is collected, and the ticket then shows Passcode erased.
Take payment and hand the device back
Payments are taken once the device is Ready or Not repairable. What is charged:
- A repaired device: the estimate lines.
- A declined estimate: the diagnosis fee only.
- A device that could not be repaired: the diagnosis fee, unless you turned that off in settings.
- A warranty job: nothing.
To take money before collection, click Actions → Take payment, check the Amount, choose Paid by (cash, mobile money, card, bank transfer or other), add a Reference and click Submit. Depending on Take the balance:
- Invoice: the ticket's invoice is raised and issued the first time money is taken (lines for the parts and labour, or the diagnosis fee), and the payment is recorded against it. Actions → Open invoice opens it.
- Point of Sale: choose the Till, a register with an open session. The payment is rung up there as a sale named after the ticket.
- Neither app on: the payment is only recorded on the ticket.
The Payments tab on the ticket lists every payment, how it was paid, where it was recorded and who took it.
To hand the device back, click Actions → Collected:
- Read the message (marker 1): it says what is still to pay, or Fully paid.
- Check Collected by.
- If money is owed, enter what is Paid now (marker 2) and how it was Paid by (marker 3), and the Till for Point of Sale.
- Only if you agree the customer pays later, turn on Hand over even if not fully paid (marker 4). Otherwise the hand-over is refused while anything is owed.
- The customer signs in the Signature box (marker 5) with a finger or the mouse. Clear starts again.
- Click Submit.
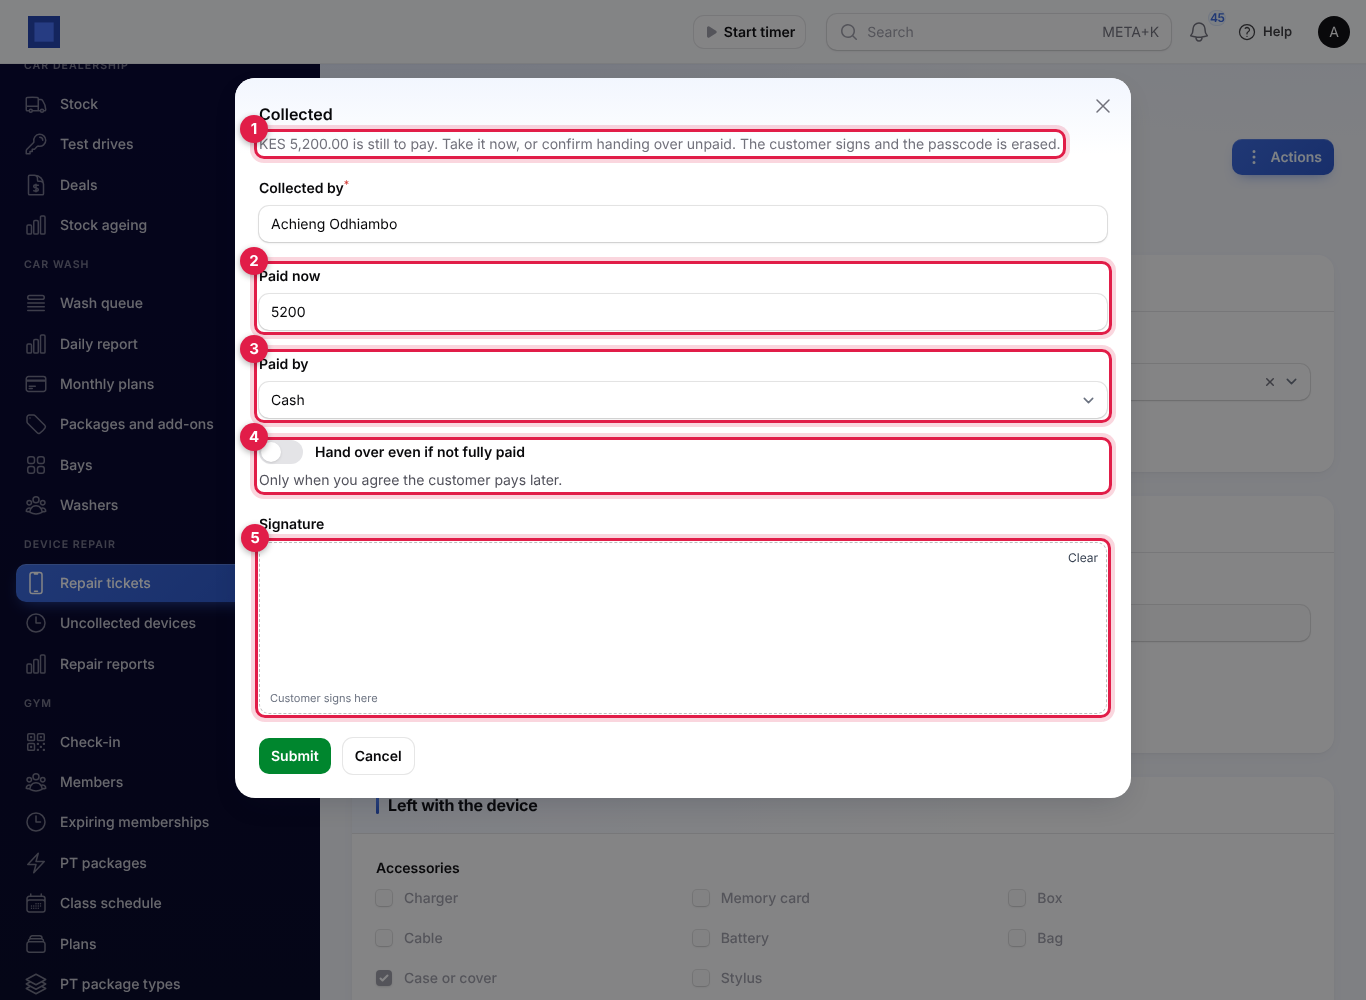
A repaired device becomes Collected and its warranty starts; a device not repaired becomes Returned unrepaired. The passcode is erased and the ticket opens read only from then on. With invoices, the invoice is raised now if it was not already. Print the receipt again for the customer's copy.
The customer's tracking page
The customer opens the page from the QR code on the receipt or tag, from the link in a text, or at your workspace address followed by /repair-status (the Customer tracking page button opens it).
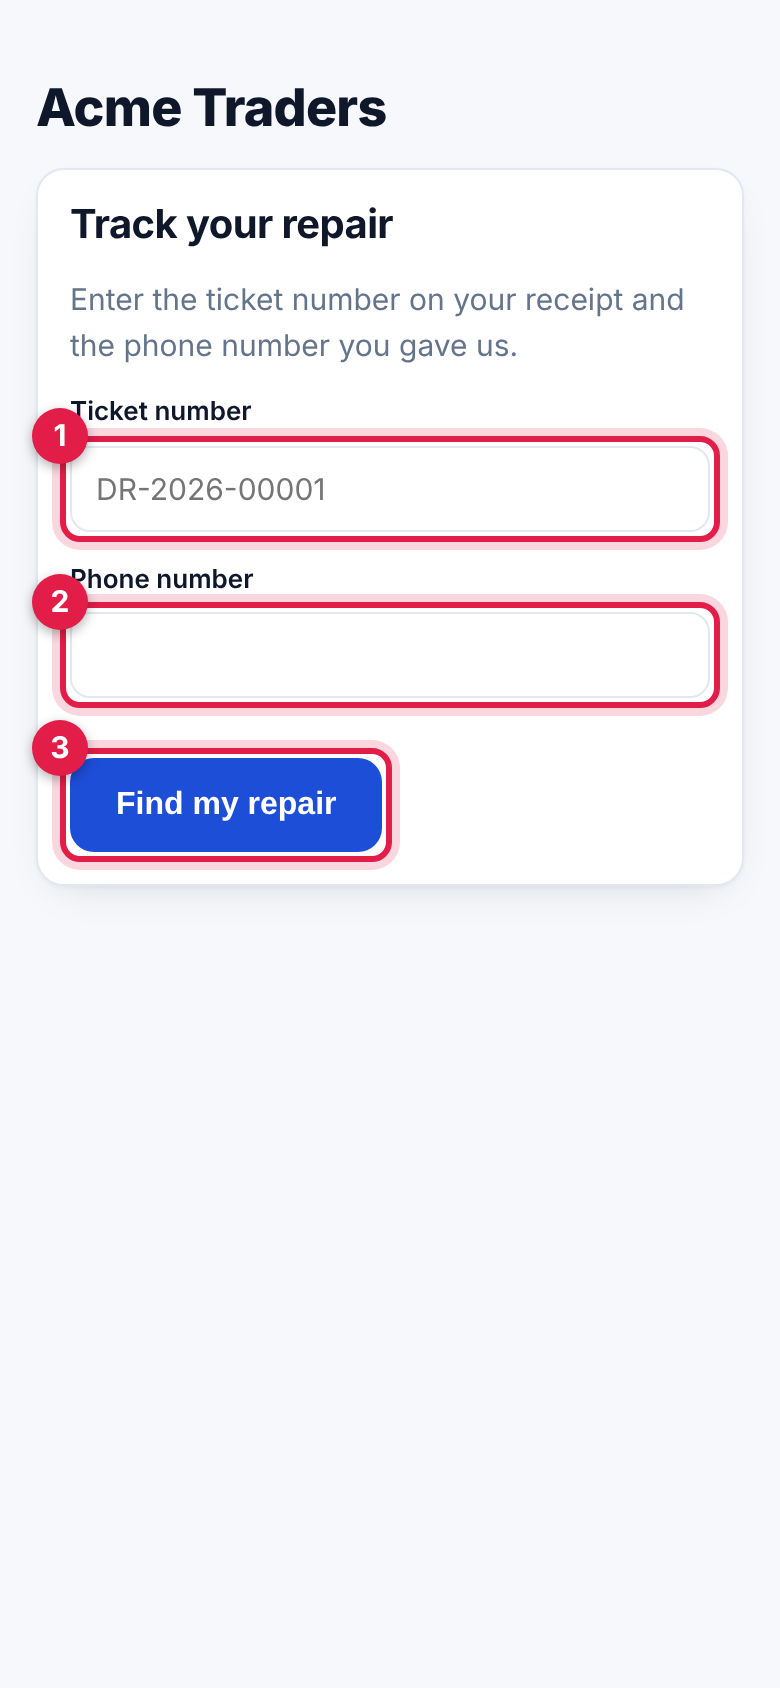
To find a repair, the customer enters the Ticket number (marker 1) and the Phone number (marker 2) they gave you, in any format, and taps Find my repair (marker 3).
The repair page shows the stage (marker 1), the device, the fault and the diagnosis, the promised date, the estimate (marker 2) with the diagnosis fee, what is left to pay once it is ready, the warranty end date after collection, and the progress so far. While an estimate waits for an answer, the customer types their name, an optional note, and taps Approve the repair (marker 3) or Decline (marker 4). They see a thank-you message and the ticket moves on as if you had recorded it.
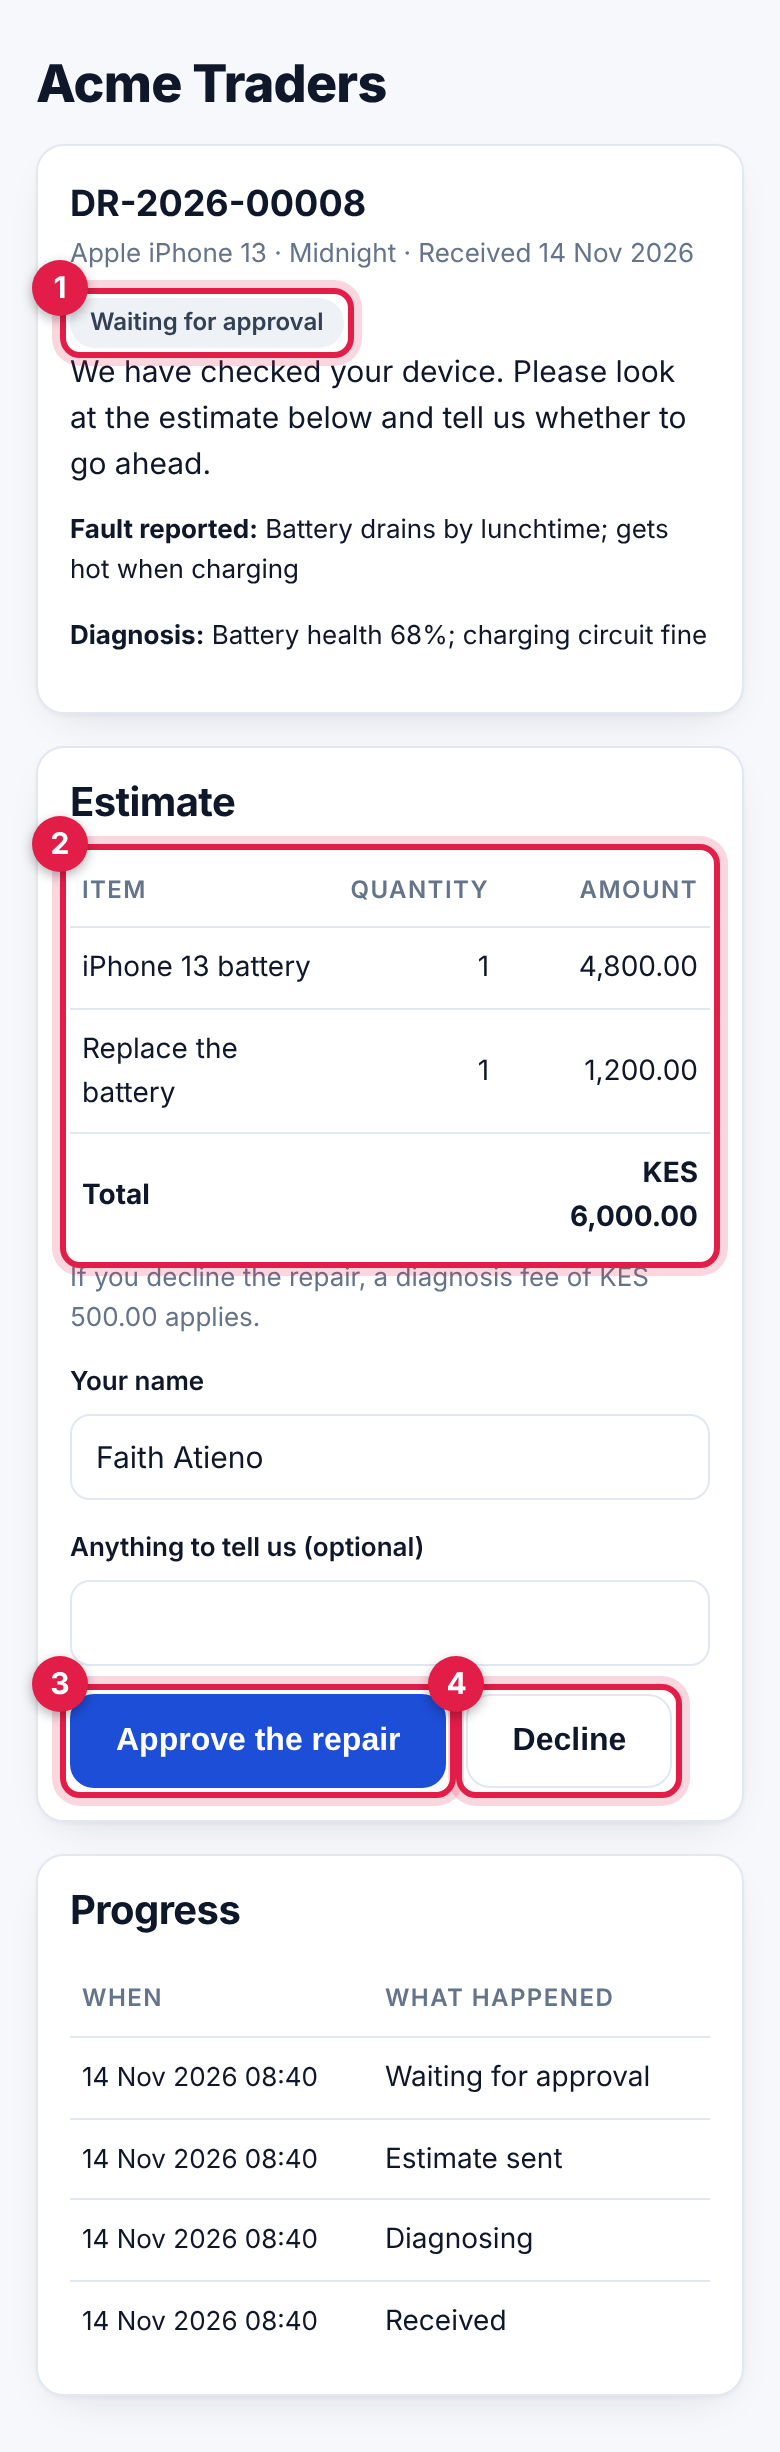
The progress lists each stage, the estimate's steps, payments, and when parts were ordered and arrived, by date, without your notes. Changes of technician, parts reserved or used, passcode views, reminders and overdue alerts stay inside NaliSuite; you see everything in the History tab of the ticket, where Customer sees it marks what is on the page.
Uncollected devices
Open Device repair → Uncollected devices for every device that is Ready or Not repairable and not yet collected, oldest first. The boxes at the top count the devices and the money owed Up to a week, 8 to 30 days, 31 to 60 days and Over 60 days (marker 1). Your policy is printed under them.
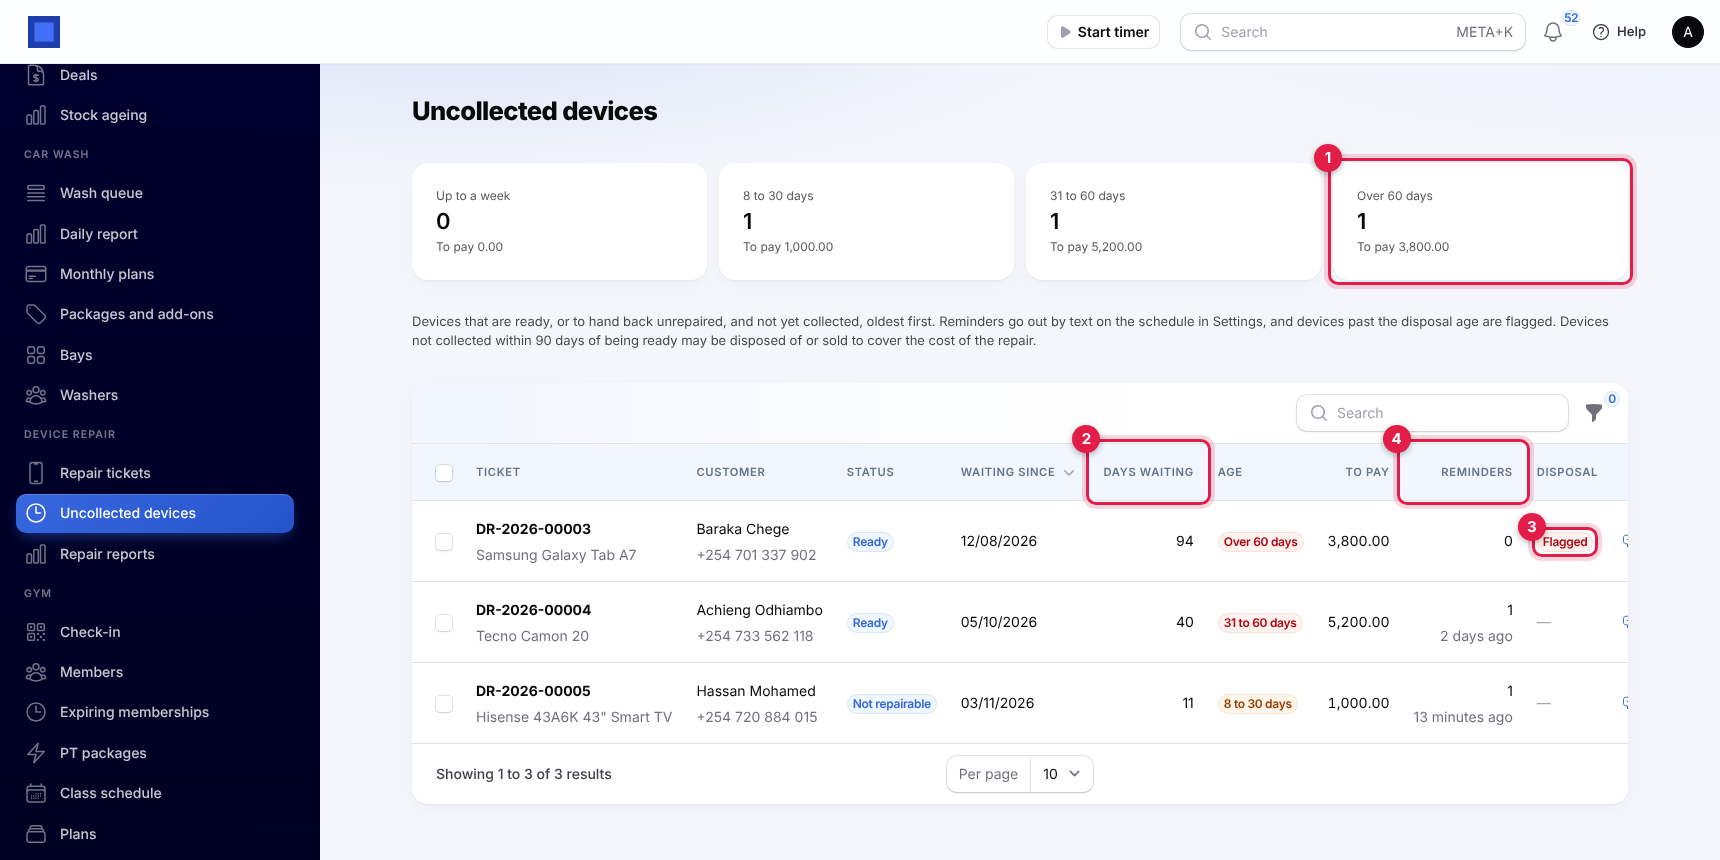
Each row shows the ticket, customer, stage, Waiting since, Days waiting (marker 2), the age band, To pay, how many Reminders went out and when (marker 4), and Disposal (marker 3). Filter by Age or Flagged for disposal.
- Text a reminder on a row, or tick several rows and use Text a reminder above the table. On a ticket it is under Actions, and shows when the last reminder went.
- Every morning NaliSuite texts a reminder to each customer whose device has waited longer than Remind uncollected devices every (days) since it was ready or last reminded.
- A device waiting longer than Flag for disposal after (days) is marked Flagged, reminders stop, and the people who manage repairs get an alert. What you do with it is up to you and your policy; NaliSuite does not sell or write it off.
Repair reports
Open Device repair → Repair reports and choose the From and To days (marker 1); the period starts at the beginning of this month.
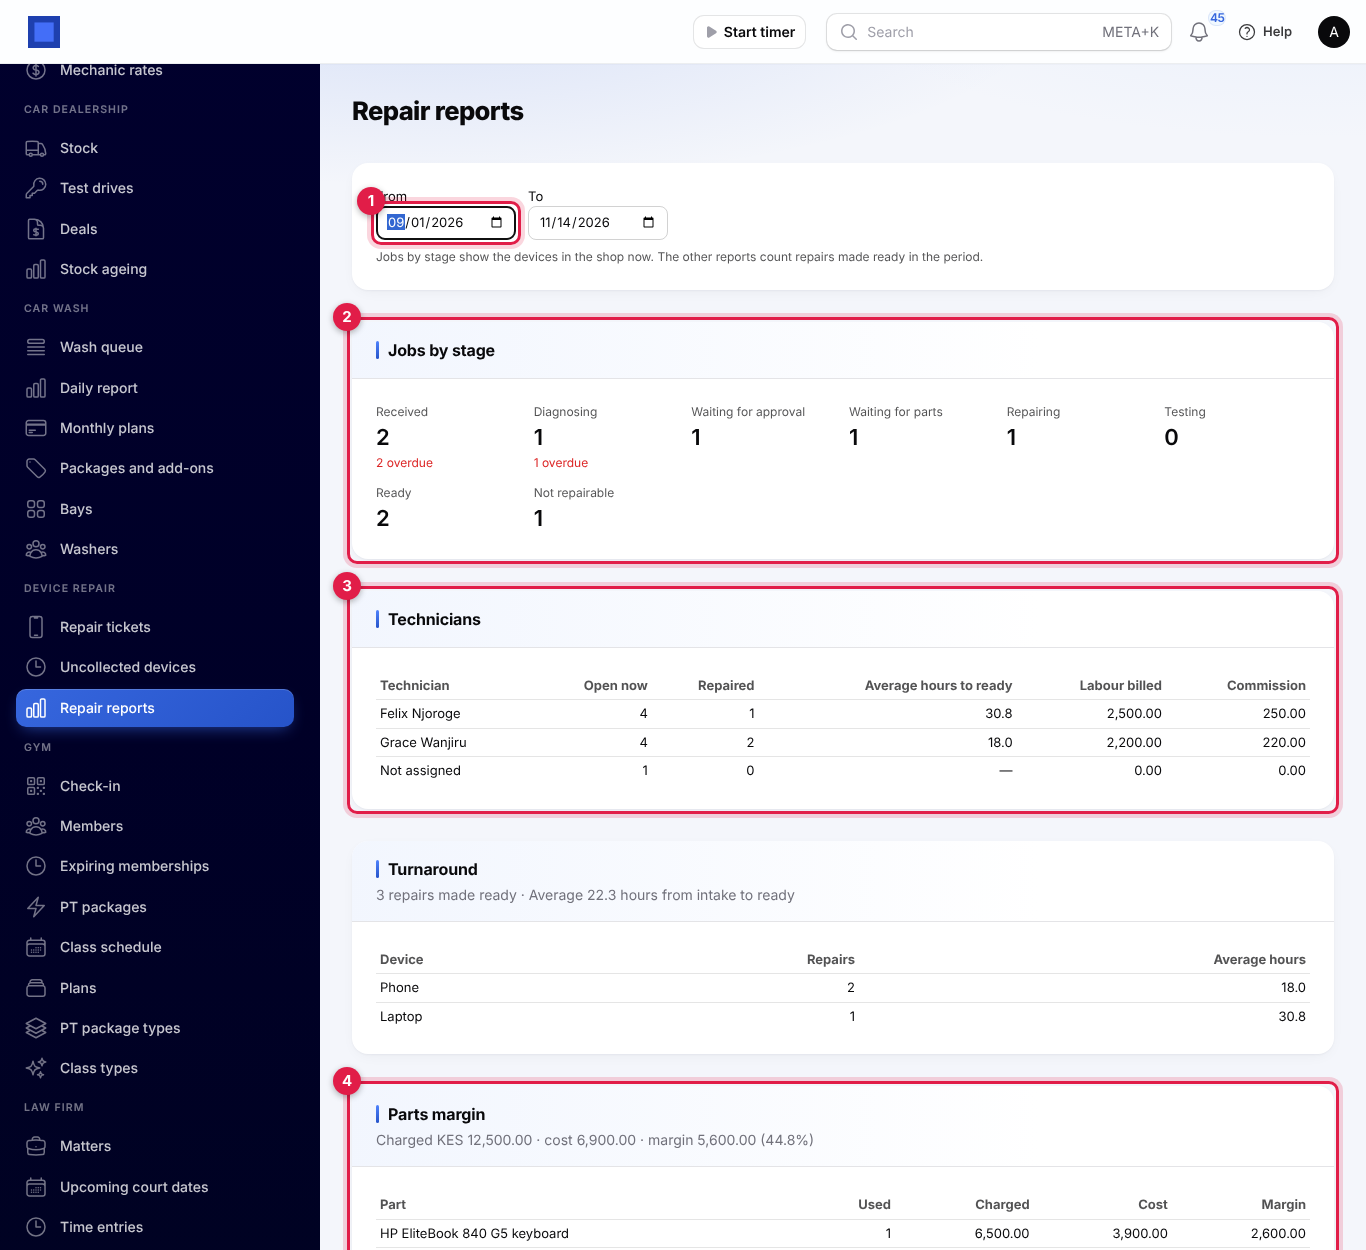
- Jobs by stage (marker 2): the devices in the shop now at each stage, with how many are overdue. This one ignores the period.
- Technicians (marker 3): for each technician, the jobs open now, the repairs made ready in the period, the average hours from intake to ready, the labour billed and, if you pay commission, the Commission at your percentage.
- Turnaround: repairs made ready in the period and the average hours from intake to ready, by type of device.
- Parts margin (marker 4): every part used in the period with what was charged, what it cost and the margin, and the totals with the margin percentage.
Good to know
Is a deposit taken at intake? No. Nothing is paid when the device comes in; the customer pays the repair or the diagnosis fee once it is ready. If you want money up front, record it on an invoice in Invoicing yourself.
Are estimates emailed? No. The estimate goes by text with a link to the tracking page, so the customer needs a mobile number and you need SMS set up in Marketing. Without SMS, read the estimate out by phone and use Record approval or Record decline, or send the customer the tracking link yourself.
The customer cannot find the repair online. They need the ticket number on the receipt and the phone number on the ticket (only the last nine digits are compared). Check Phone for texts and tracking on the ticket.
Can I change the estimate after the customer approved it? No, its lines are locked. If more work is needed, take the device in again on a new ticket, or agree the extra with the customer and invoice it separately.
A part is reserved but I used another one. Reserved parts leave stock only when the ticket moves to Ready. Until the customer decides, edit the line and choose the right serial or lot.
Why can't I move a ticket to Repairing? The customer has not approved the estimate yet, or a part is still to order or on its way.
What happens to texts while SMS is not set up? Nothing is sent and nothing is queued. The ready text, estimate texts and reminders only go out through the SMS provider set up in Marketing.
Can I reopen a collected ticket? No. A collected or returned ticket is a record. If the fault comes back under warranty, take it in again as a warranty return.