Tailoring and boutique
Tailoring is for tailors, fashion houses and boutiques. You keep each customer's measurements as named sets taken from garment templates; take made-to-measure orders and quick alterations, with fabric and trims cut from your stock; move each order through the workroom with a tailor and a piece rate on every stage; book fittings; take the deposit and the balance on an invoice or at the till; text the customer when the garment is ready; and see each tailor's piece-rate pay and the garments nobody has collected. Ready-to-wear clothes are sold from Inventory with size and colour variants.
Everything is in the Tailoring group of the left menu: Orders, Fittings, Measurements, Uncollected garments, Piece-rate pay, Garment templates and Ready-to-wear.
Note: tailoring.view lets someone see orders, fittings, measurements and the reports, and print tags. tailoring.manage is needed to take measurements and orders, move orders between stages, book fittings, take payments, hand garments over, send reminders, cancel, and edit garment templates. Owners and admins have both; the member role has tailoring.view. Opening an order's invoice also needs invoicing.view. Set permissions under Settings → Roles.
Switch it on
Tailoring is a marketplace app. It needs only the Contacts app, but works best with Invoicing or Point of Sale for the money, Inventory for fabric and trims in stock, and Marketing with an SMS provider for the texts (see SMS providers).
- Open Settings → Marketplace and type Tailoring in the Search add-ons… box (marker 1).
- On the Tailoring and boutique card (marker 2), click Start free trial (or Add to subscription) and confirm. The Tailoring group appears in the menu.
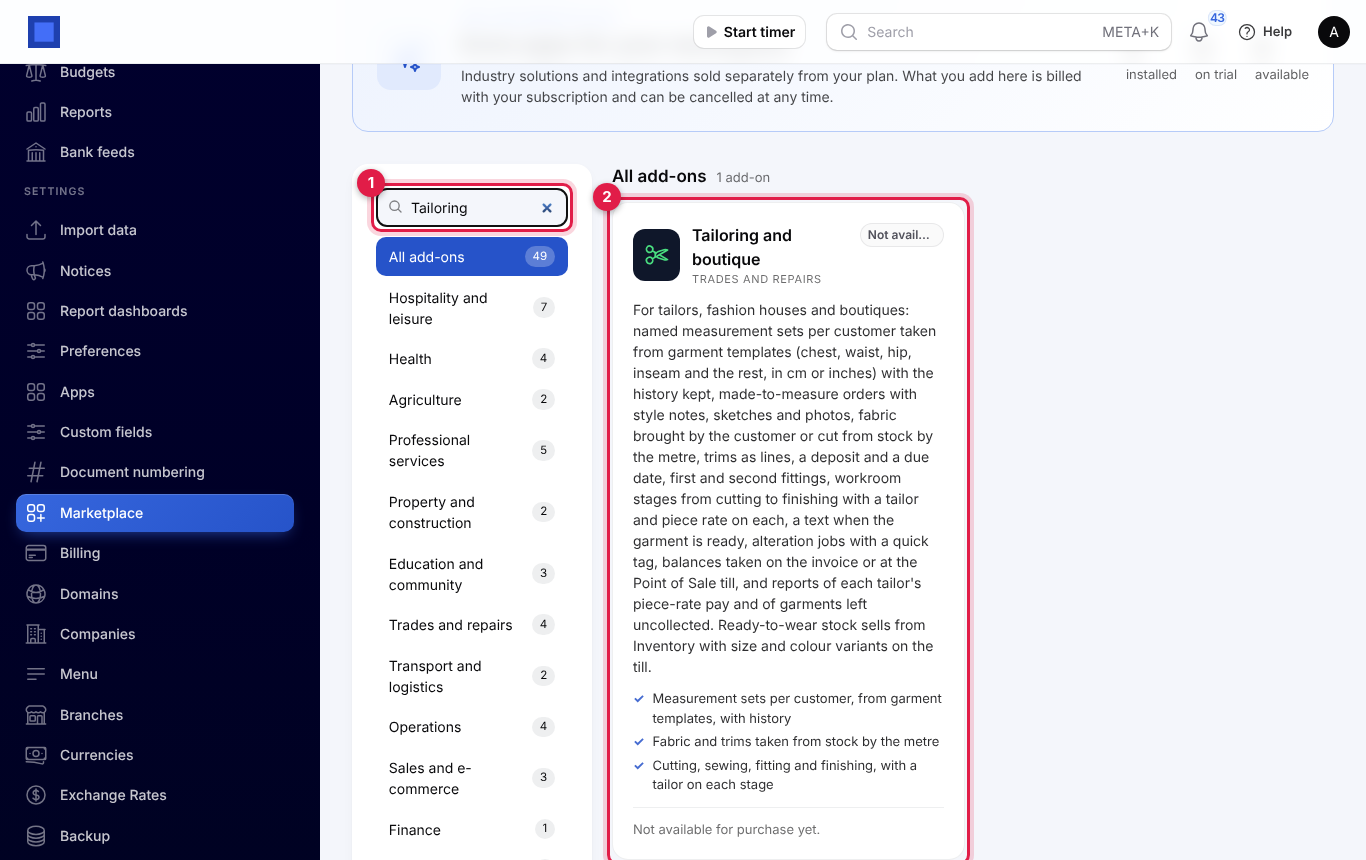
If the card says Not available for purchase yet, ask NaliSuite support to switch it on. See Billing and marketplace.
Tailoring settings
Open Settings → Preferences, click the Tailoring tab, change what you need and click Save preferences.
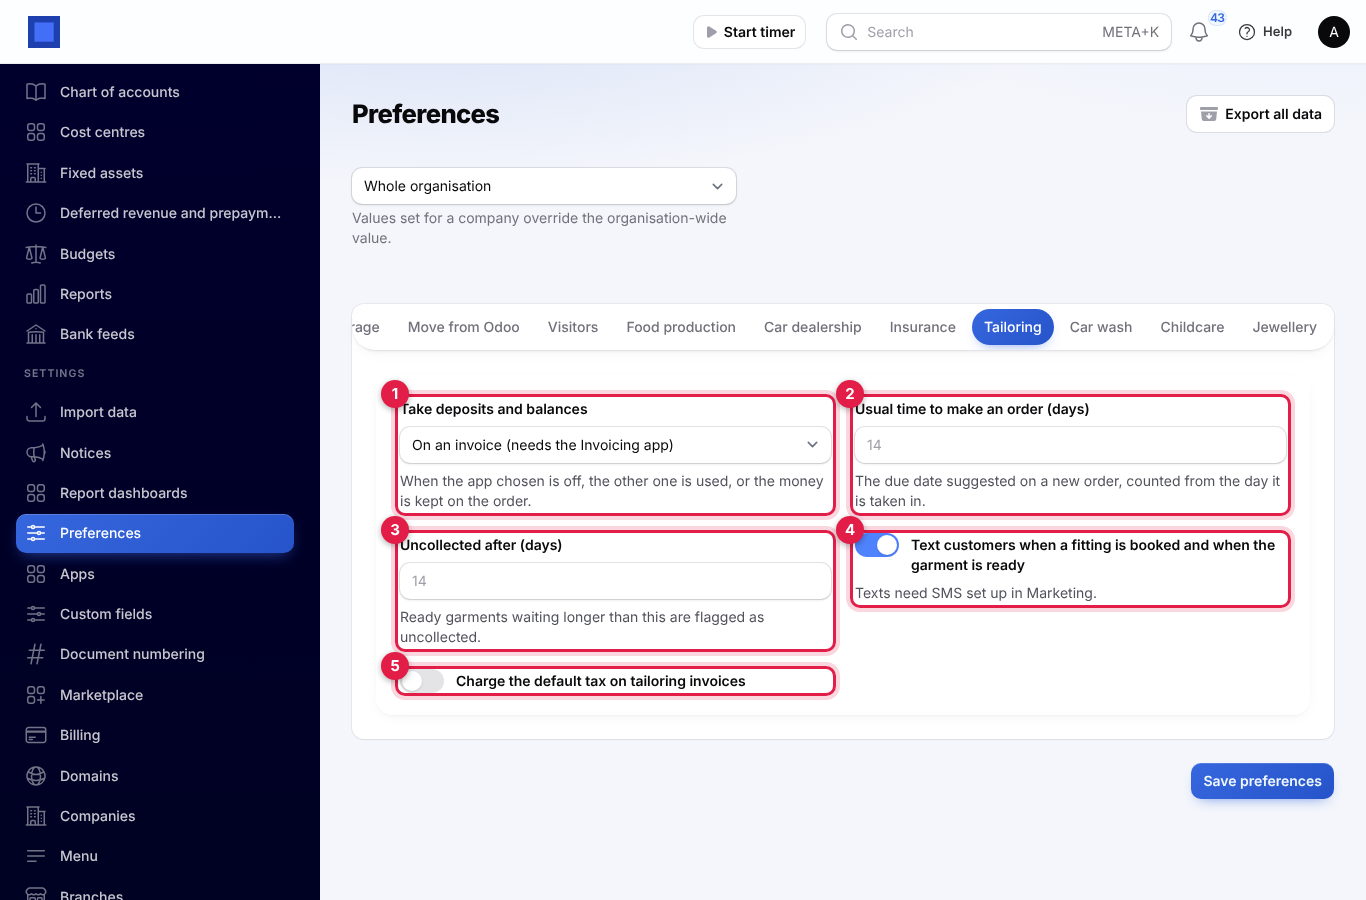
| Setting | Default | What it does |
|---|---|---|
| Take deposits and balances (marker 1) | On an invoice | On an invoice (needs the Invoicing app) or As a sale at the till (needs the Point of Sale app). When the app chosen is off, the other one is used; with neither, the money is kept on the order only. |
| Usual time to make an order (days) (marker 2) | 14 | The due date suggested on a new order, counted from the day it is taken in. |
| Uncollected after (days) (marker 3) | 14 | Ready garments waiting longer than this count as uncollected. |
| Text customers when a fitting is booked and when the garment is ready (marker 4) | On | Sends those texts automatically. Texts need SMS set up in Marketing and a phone number on the order. |
| Charge the default tax on tailoring invoices (marker 5) | Off | Adds your default tax (for example VAT 16%) to every line of tailoring invoices. |
Each order keeps the way it was paid when it was taken in, even if you change this setting later.
Garment templates
A template lists the measurements to take for a garment, its usual price and fabric, and what a tailor earns at each stage.
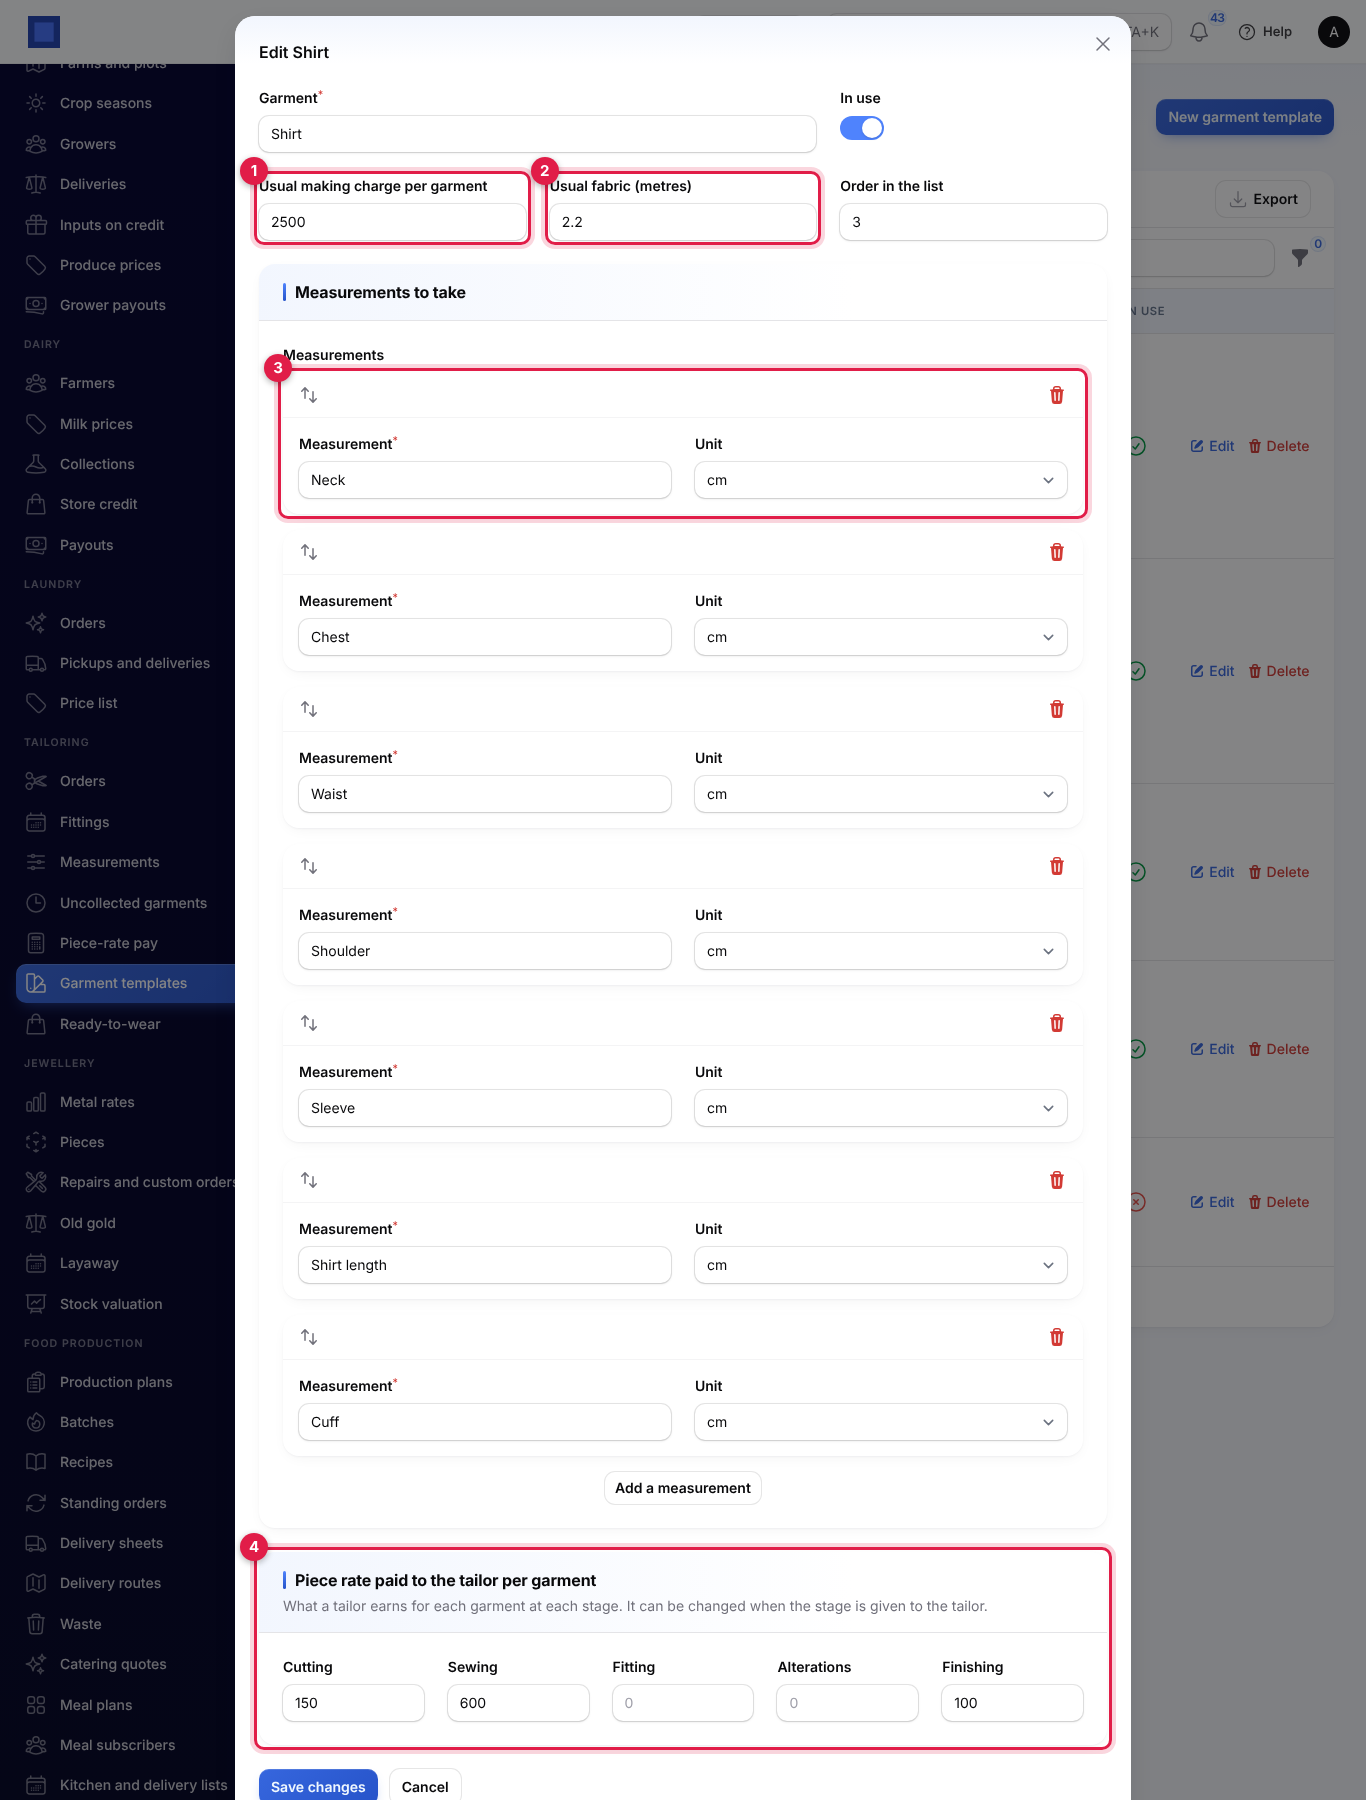
- Open Tailoring → Garment templates and click New garment template, or Edit on a template.
- Fill in the window and click Create (or Save changes).
| Field | What to enter |
|---|---|
| Garment (required) | Two-piece suit, Kitenge dress, Kanzu. |
| In use | Off to hide the template from new orders. |
| Usual making charge per garment (marker 1) | Filled in on new orders; you can change it on each order. |
| Usual fabric (metres) (marker 2) | Filled in when the fabric comes from stock. |
| Order in the list | Lower numbers come first. |
| Measurements to take (marker 3) | Add a measurement for each: its name (Chest, Inseam) and the Unit (cm or inches). Drag to put them in the order you measure. |
| Piece rate paid to the tailor per garment (marker 4) | What a tailor earns for each garment at Cutting, Sewing, Fitting, Alterations and Finishing. It can be changed when the stage is given to a tailor. |
Measurements
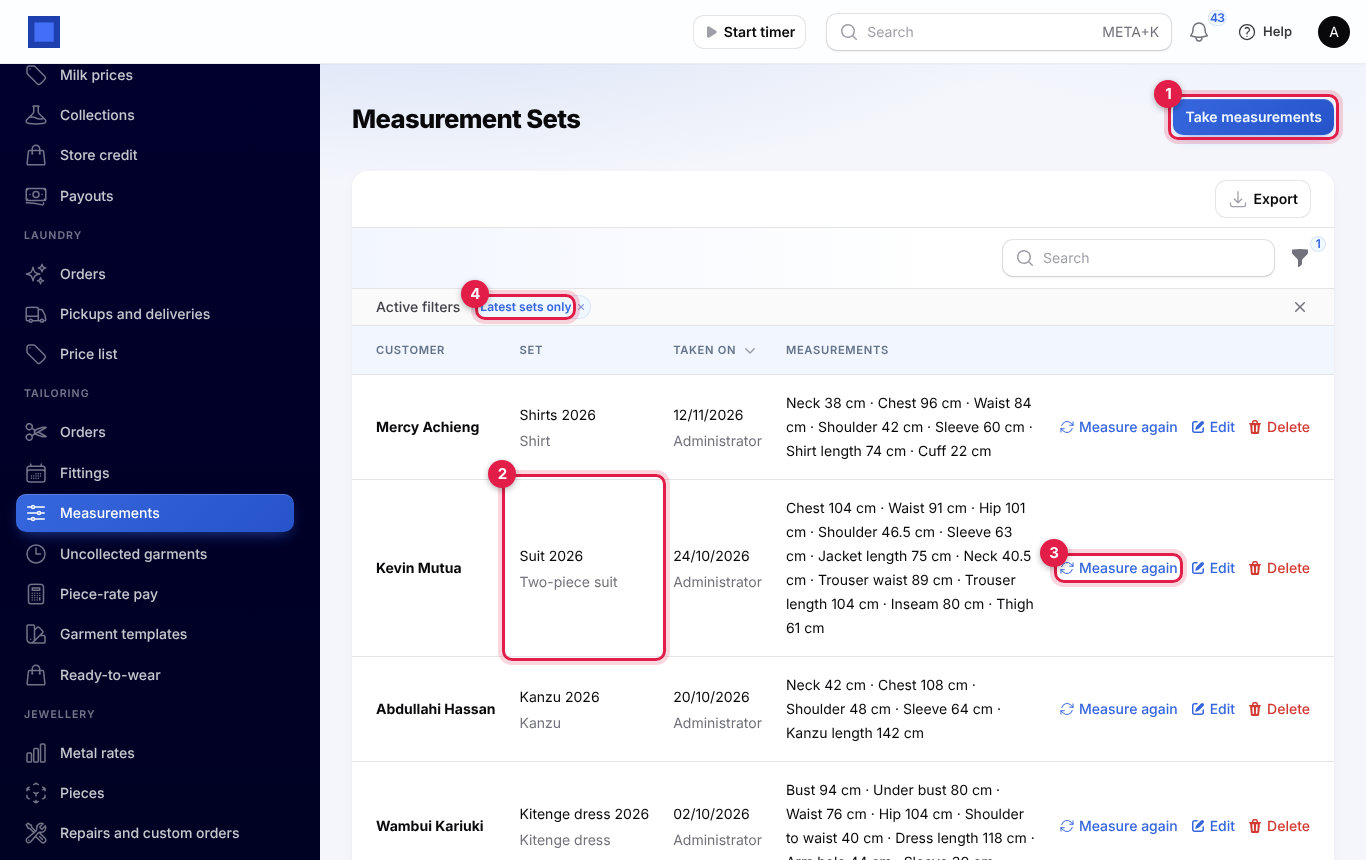
Open Tailoring → Measurements. Each set shows the customer, its name and garment (marker 2), the day it was taken and by whom, and every measurement. Only the latest set of each kind is listed (the Latest sets only filter, marker 4); remove it to see the history. Search by the customer's name or phone.
Take measurements
- Click Take measurements (marker 1).
- Choose the Customer, or click + to add a new one with their Name, Mobile and Email.
- Choose the Garment. Its measurements are filled in as empty rows, and the set is named for you (Shirt 2026).
- Type each Value. Add or remove rows as you need; rows left empty are not saved.
- Add Notes (posture, how they like the fit) and click Create.
Measure again
When a customer comes back, click Measure again (marker 3) on their set. The old values are filled in; change what has changed and click Submit. The new values are saved as a new set, and the old one is kept as history, marked Replaced by a newer set.
Take an order
Open Tailoring → Orders and click New order.
-
Customer: choose the Job (Made to measure or Alteration) and the Customer (or + to add one). The Phone for texts and their latest measurement set are filled in.
-
Garment: choose the Garment template (the making charge, description and fabric metres are filled in), the number of Garments, and What to make (Three-piece wedding suit). Pick the Measurements set; its values show underneath. Add Style notes (slim fit, notch lapel, two buttons) and up to eight Sketches and photos.
-
Fabric and trims: choose the Fabric:
- Customer brings the fabric: nothing is charged for fabric.
- From our stock: choose the Fabric from stock, the Metres and the Price per metre (empty uses the fabric's selling price).
- No fabric needed.
Under Trims, Add a trim for buttons, zips or lining: a product From stock or Or describe it, the Quantity and the Price (empty uses the product's price).
-
Price and dates: the Making charge per garment, Taken in, Due (today plus the usual making time), the First fitting, the Deposit paid now, Paid by and, when money goes through the till, the Till. The line underneath adds it up as you type, for example Making 14,000.00 · fabric 7,680.00 · trims 1,410.00 · total KES 23,090.00.
-
Click Create.
What happens:
- The order is numbered TL-2026-00001 (alterations AL-2026-00001) and is Received.
- Fabric and trims from stock leave your default store straight away (with Inventory on).
- When money goes through Invoicing, one invoice is issued for the making charge, the fabric and the trims, due on the due date. The deposit is recorded against it.
- When money goes through the till, the deposit is rung up as a sale at the till you chose.
- The first fitting is booked and the customer is texted the day and time.
After it is taken in, the job, customer, garment, quantity, price, fabric and trims are fixed, because stock and the invoice follow them. You can still change the phone, description, measurements, style notes, photos, due date and notes, and click Save changes.
The order page
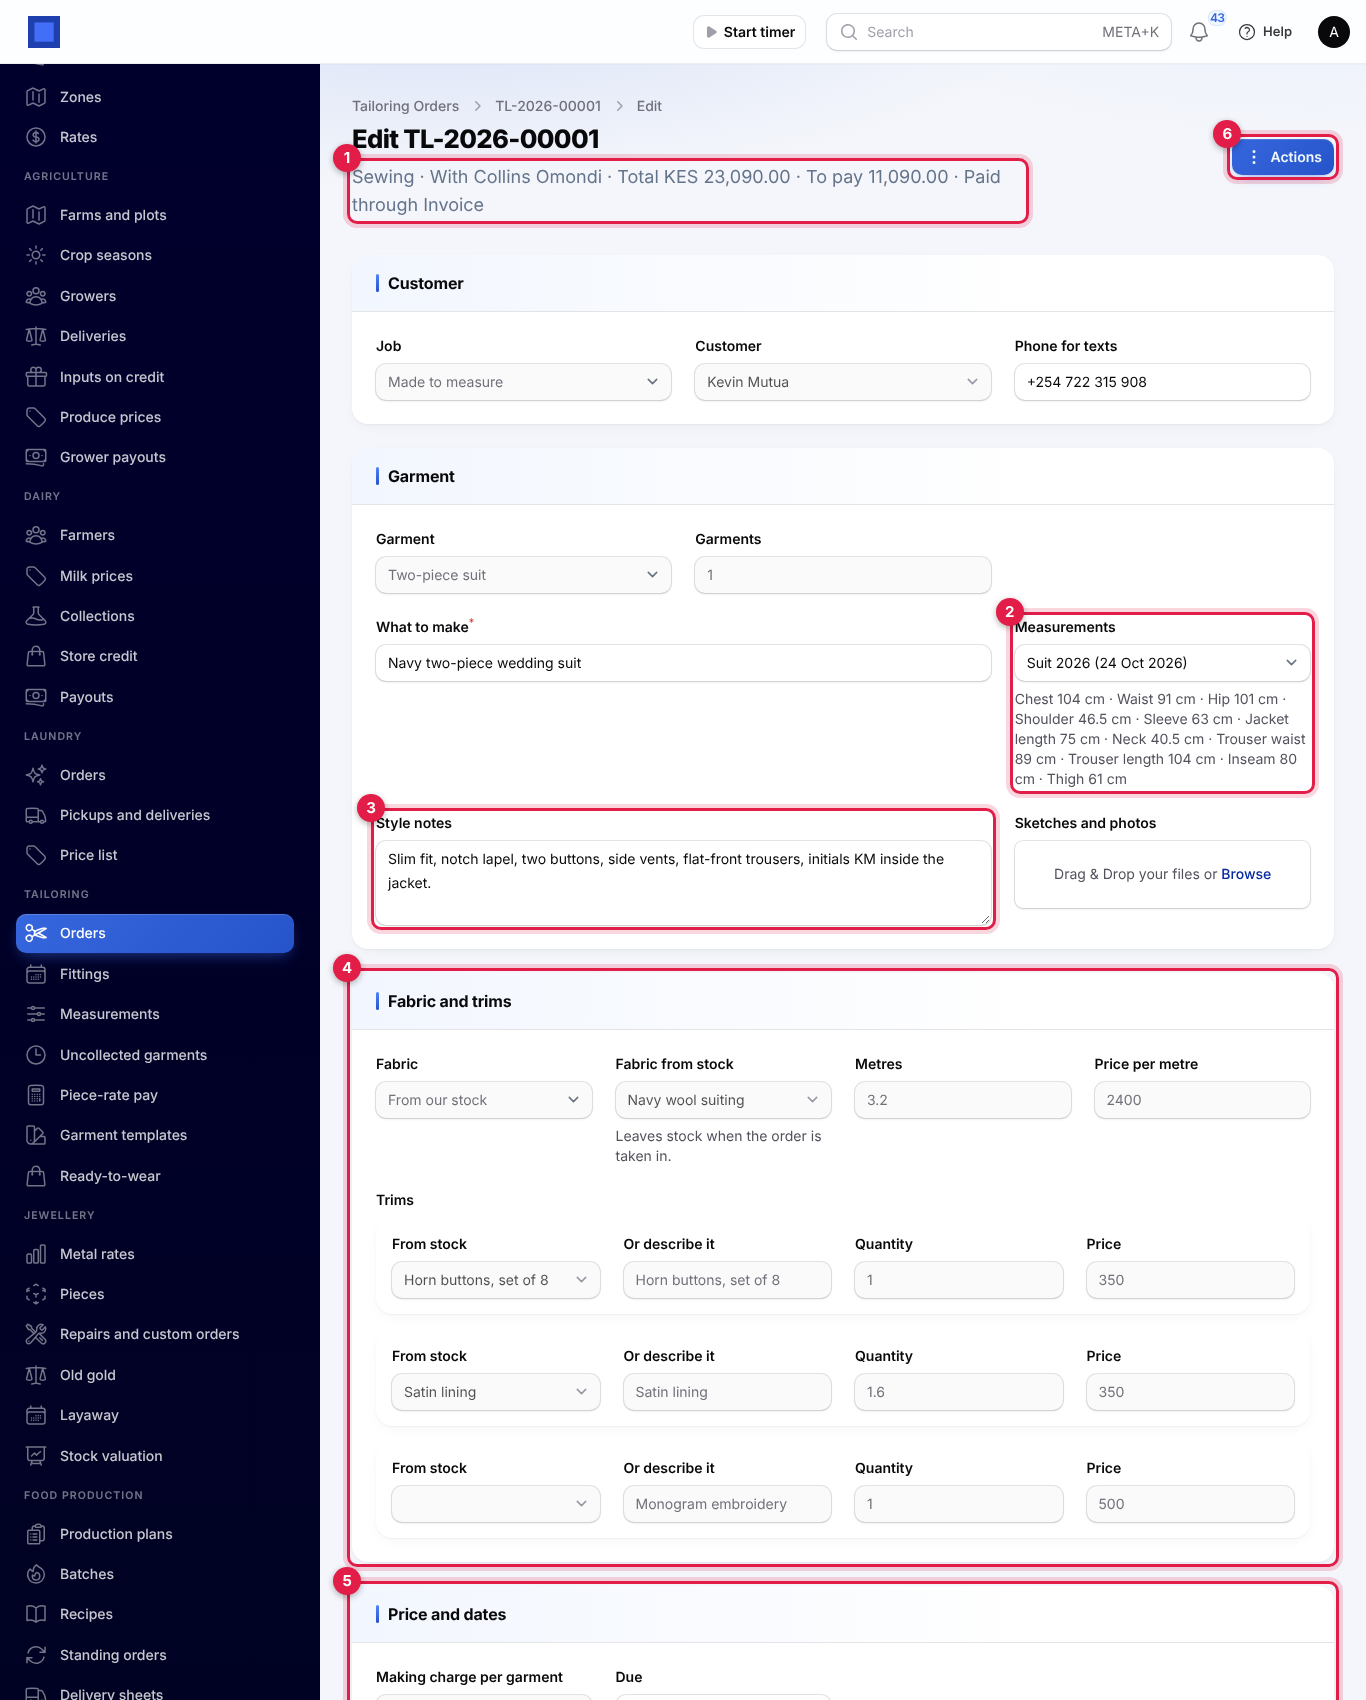
The line under the title (marker 1) shows the stage, the tailor with it now, the total, what is still To pay and whether it is paid through Invoice, Point of Sale or on the order only. You see the measurement set (marker 2), the style notes (marker 3), the fabric and trims (marker 4) and the price and dates with the money so far (marker 5). Actions (marker 6) holds everything you can do with the order.
At the bottom, three tabs:
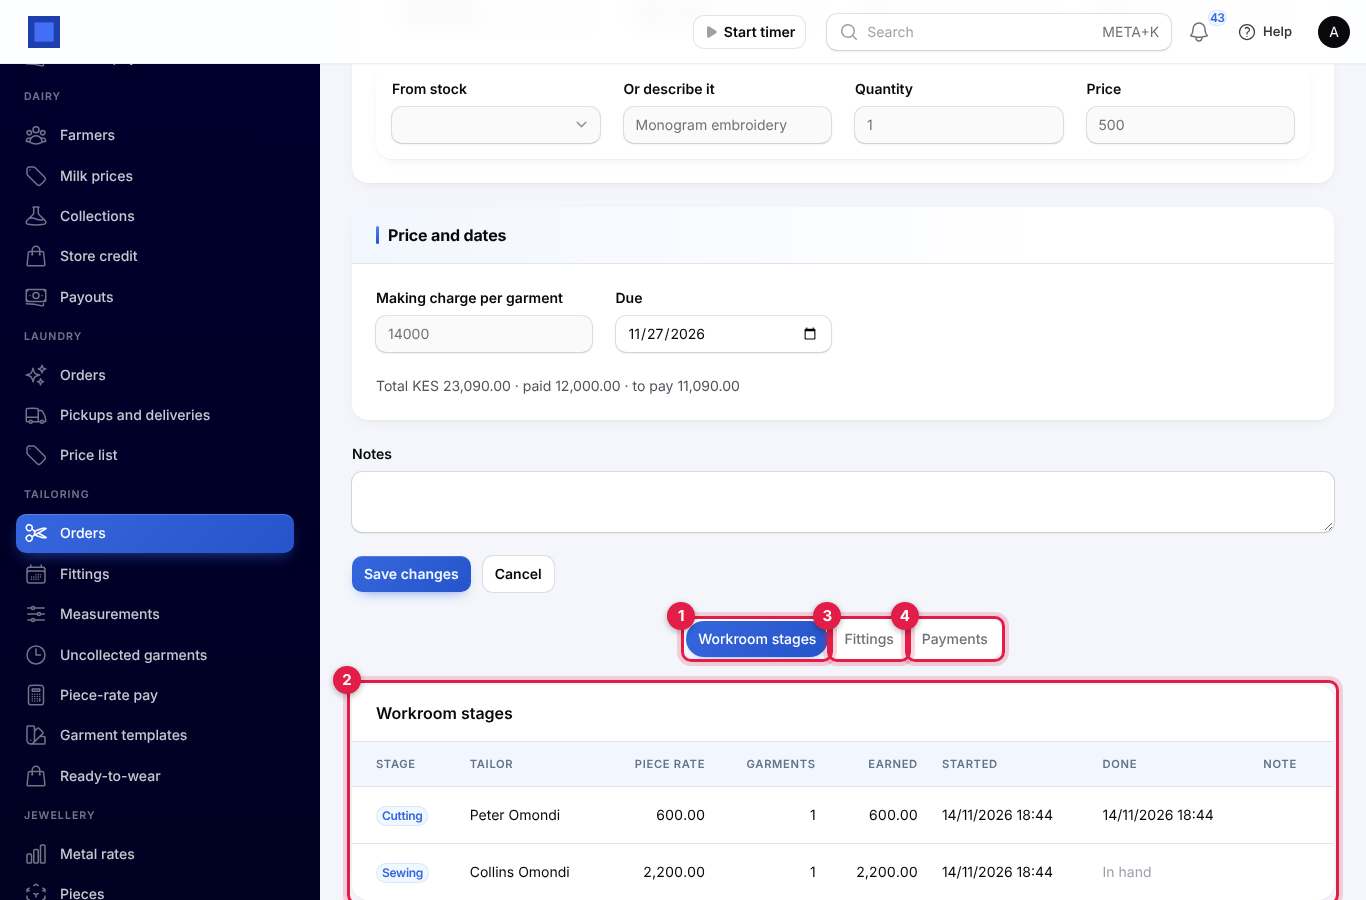
- Workroom stages (markers 1 and 2): each stage, the tailor, the Piece rate, the garments, what they Earned, when it started and was Done (In hand while still going).
- Fittings (marker 3): each fitting with its outcome.
- Payments (marker 4): every deposit and balance payment, how it was paid, where it was Recorded and who took it.
The orders list
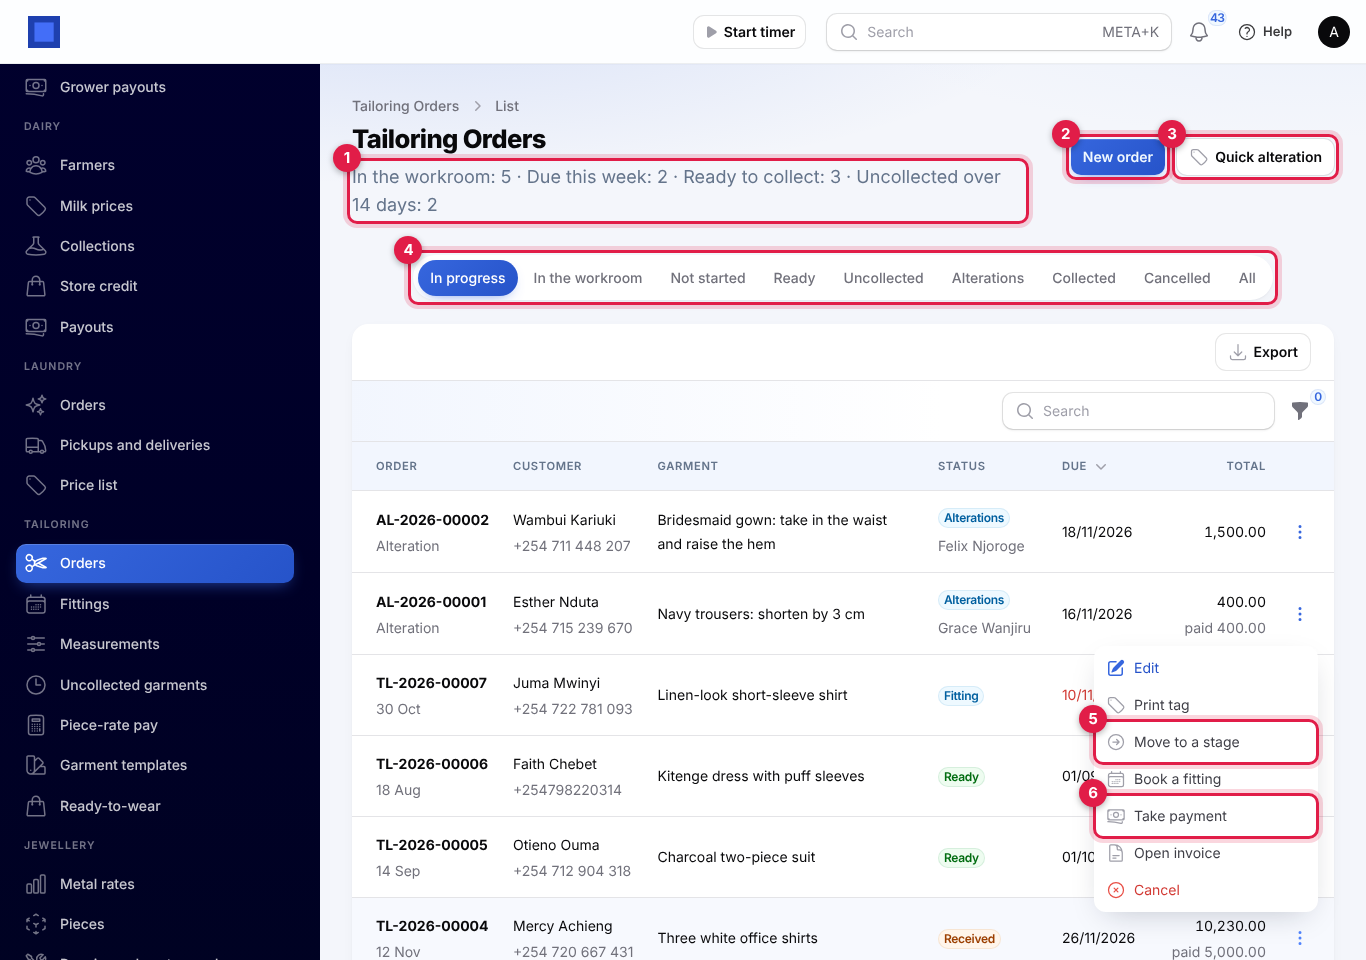
The line under the title (marker 1) counts orders in the workroom, due this week, ready to collect and uncollected. Click New order (marker 2) or Quick alteration (marker 3). The tabs (marker 4) are In progress (the default), In the workroom, Not started, Ready, Uncollected, Alterations, Collected, Cancelled and All. A due date shows in red once it has passed and the order is not ready. Filters: Status, Job and Past the due date.
The ⋮ menu of an order (and Actions on its page) has:
| Action | What it does |
|---|---|
| Edit | Opens the order. |
| Print tag | A PDF of small tags to pin on the garment: the order number (with -01, -02 for each garment), customer, phone, description, due date and what is still to pay. |
| Move to a stage (marker 5) | See Stages and tailors. |
| Give to a tailor | Changes the tailor or rate on the stage in hand. |
| Book a fitting | See Fittings. |
| Take payment (marker 6) | See Deposits and balances. |
| Collected | Hands the garment over (ready orders). |
| Text a reminder | For ready orders; see Ready texts and uncollected garments. |
| Open invoice | Opens the order's invoice. |
| Cancel | Cancels the order (below). |
Cancel an order
Click ⋮ → Cancel and confirm. The unpaid invoice is cancelled, booked fittings are called off, and fabric and trims go back into stock if the order had not yet gone past Received (not cut). An order with money paid on it cannot be cancelled: refund the money in Invoicing or at the till first. A collected or cancelled order opens read only.
Stages, tailors and piece rates
Orders move through Received, then the workroom stages Cutting, Sewing, Fitting, Alterations and Finishing, to Ready, and finally Collected (or Cancelled). You can skip stages and go back: a ready order can return to Fitting, Alterations or Finishing.
- Click ⋮ → Move to a stage.
- Choose the Stage (marker 1), the Tailor (marker 2) and, if this job pays differently, the Piece rate per garment (marker 3; the template's rate is shown in grey). Add a Note if you like.
- Click Submit.
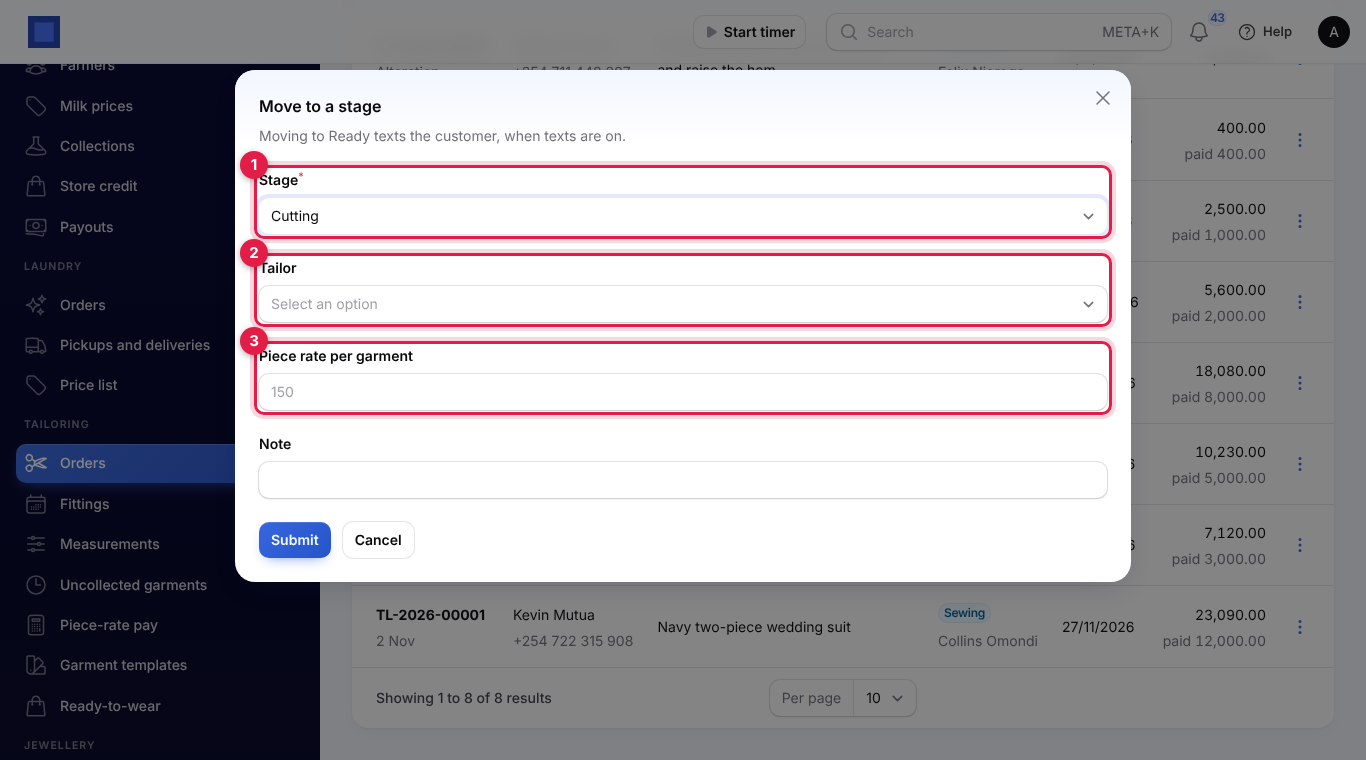
The stage it leaves is marked done and counts towards its tailor's pay. The new stage is given to the tailor at the rate times the number of garments. Tailors are your staff users. Moving to Ready texts the customer (see below).
To hand the stage in progress to someone else, use ⋮ → Give to a tailor and choose the Tailor and Piece rate per garment.
Piece-rate pay
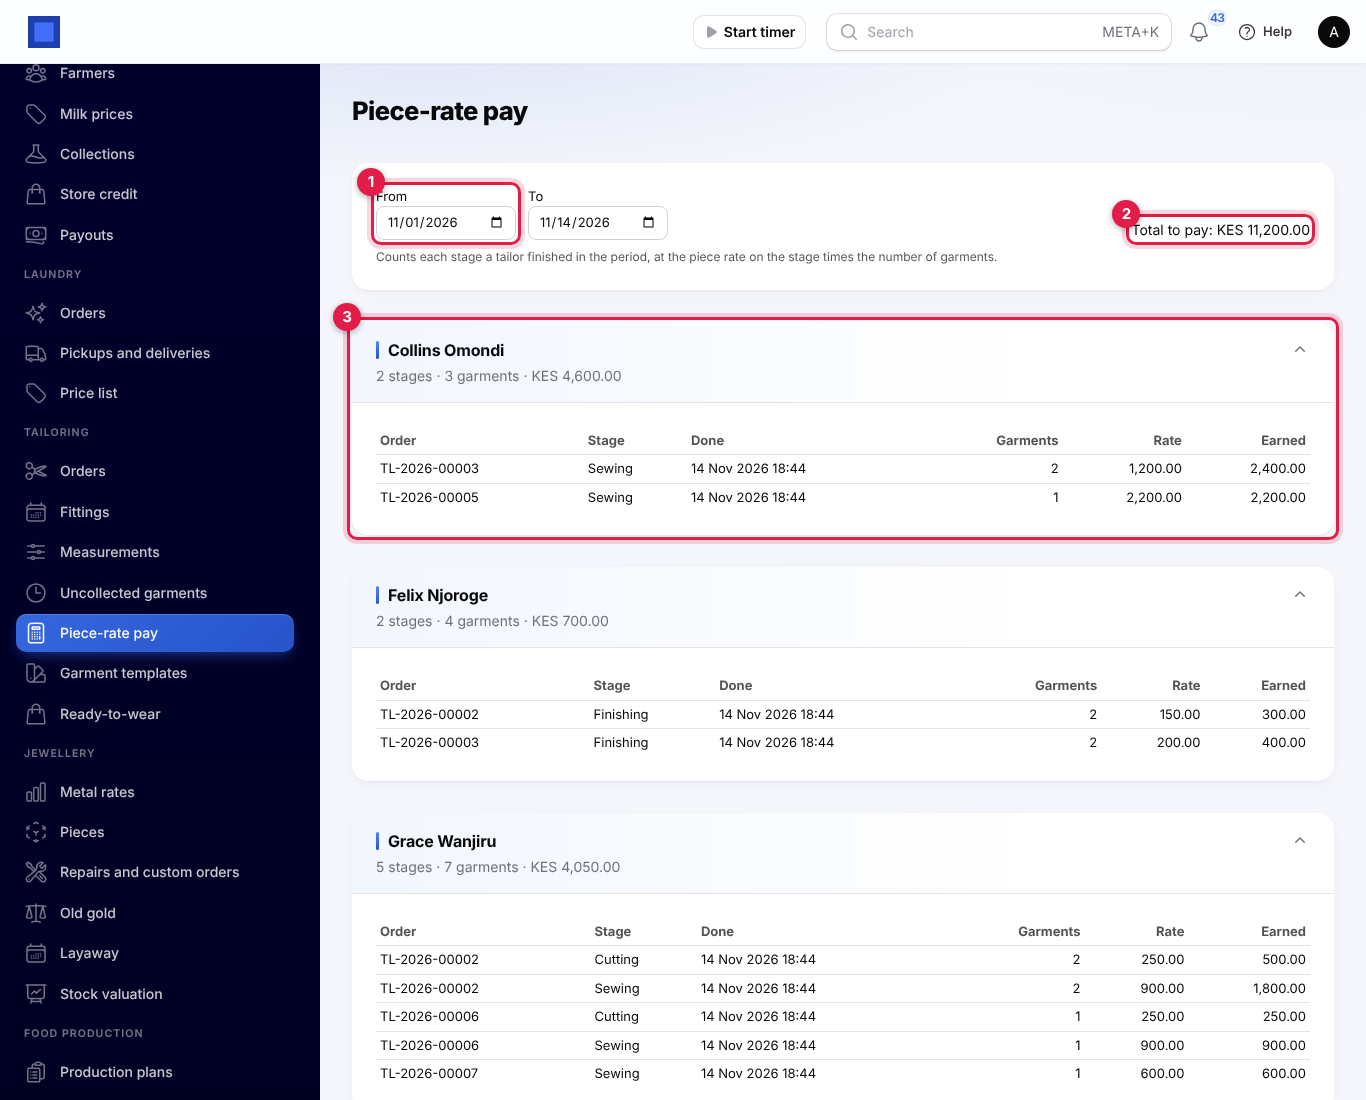
Open Tailoring → Piece-rate pay and choose From and To (marker 1; the month so far is shown first). Every stage a tailor finished in the period is counted at its rate times the garments. Each tailor has a section (marker 3) with their stages, garments and amount, and the Total to pay is at the top (marker 2). A stage still in hand is not counted until the order moves on.
Fittings
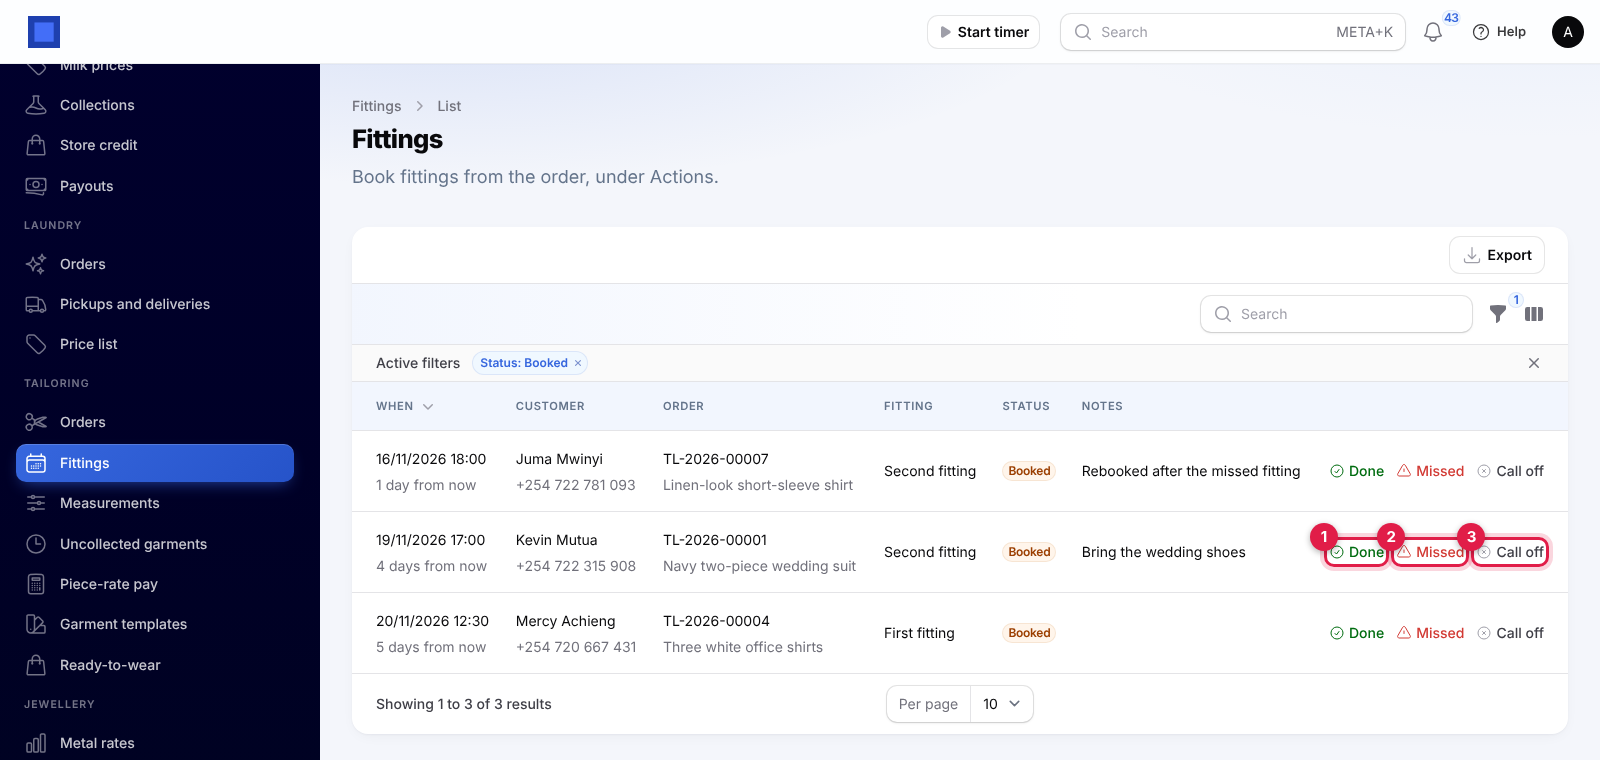
To book one, click ⋮ → Book a fitting on the order, choose the Fitting (First, Second or Final; the next one is suggested), the Day and time and any Notes, and click Submit. With texts on, the customer gets, for example, Hello Kevin, your second fitting for TL-2026-00001 is booked for Thu 19 Nov at 17:00 at (your business name).
Open Tailoring → Fittings to see who is coming in. Booked fittings are listed, the soonest first; filter by status or the Next seven days. After each fitting, click Done (marker 1) and note What to change, Missed (marker 2), or Call off (marker 3). The same buttons are on the order's Fittings tab.
Deposits and balances
How money is taken depends on the Take deposits and balances setting:
- On an invoice: the order's invoice is issued when it is taken in. Deposits and balances are recorded as payments against it, by cash, mobile money, card, bank transfer or other. What is owed is the invoice's balance. See Invoices and payments.
- At the till: each payment is rung up as a sale (Deposit for TL-2026-00004, Balance for …) at a till with an open session, by cash, mobile money or card. See Point of sale.
- Neither app on: the money is kept on the order.
To take money at any time, click ⋮ → Take payment, check the Amount (the balance is filled in), choose Paid by, add a Reference (the M-Pesa code) and, for the till, the Till, then click Submit. You cannot take more than is owed.
Hand the garment over
On a ready order, click ⋮ → Collected.
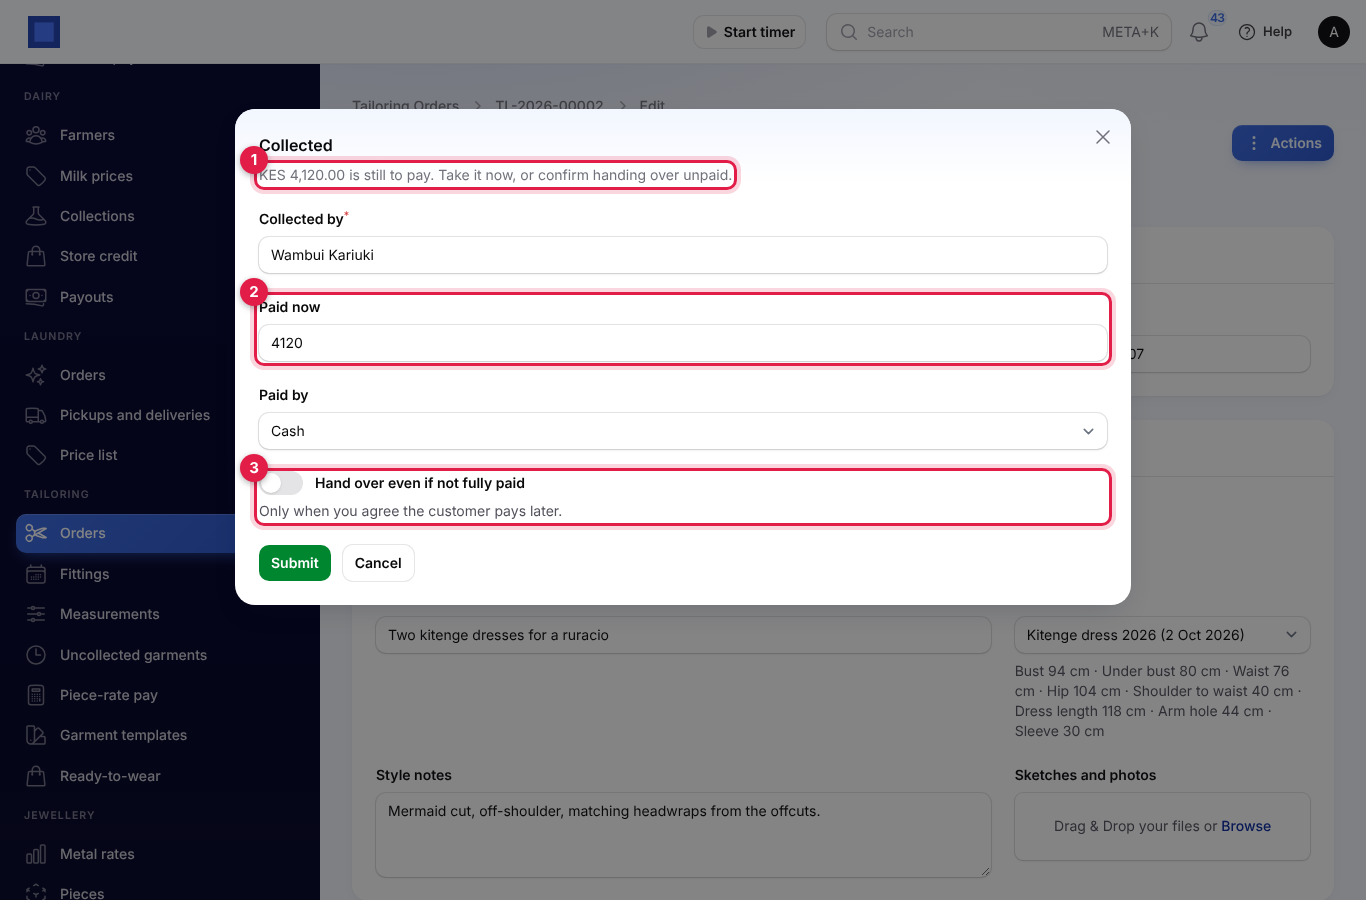
- The top line (marker 1) says what is still to pay, or Fully paid.
- Check Collected by (the customer's name is filled in).
- Enter what is Paid now (marker 2; the balance is filled in), Paid by and, for the till, the Till.
- If the customer will pay later, switch on Hand over even if not fully paid (marker 3). Without it, an order with money owing is refused.
- Click Submit. The order is Collected, and its page shows who collected it, when, and Handed over unpaid if so.
Ready texts and uncollected garments
When an order moves to Ready, the customer is texted, for example Hello Wambui, your TL-2026-00002 is ready for collection at (your business name). Balance to pay: KES 4,120.00. This needs the texts setting on, SMS set up in Marketing, and a phone number.
Open Tailoring → Uncollected garments to chase ready garments. The boxes at the top count them, with what is still owed, by how long they have waited: Up to a week, 8 to 30 days, 31 to 60 days and Over 60 days (marker 1).
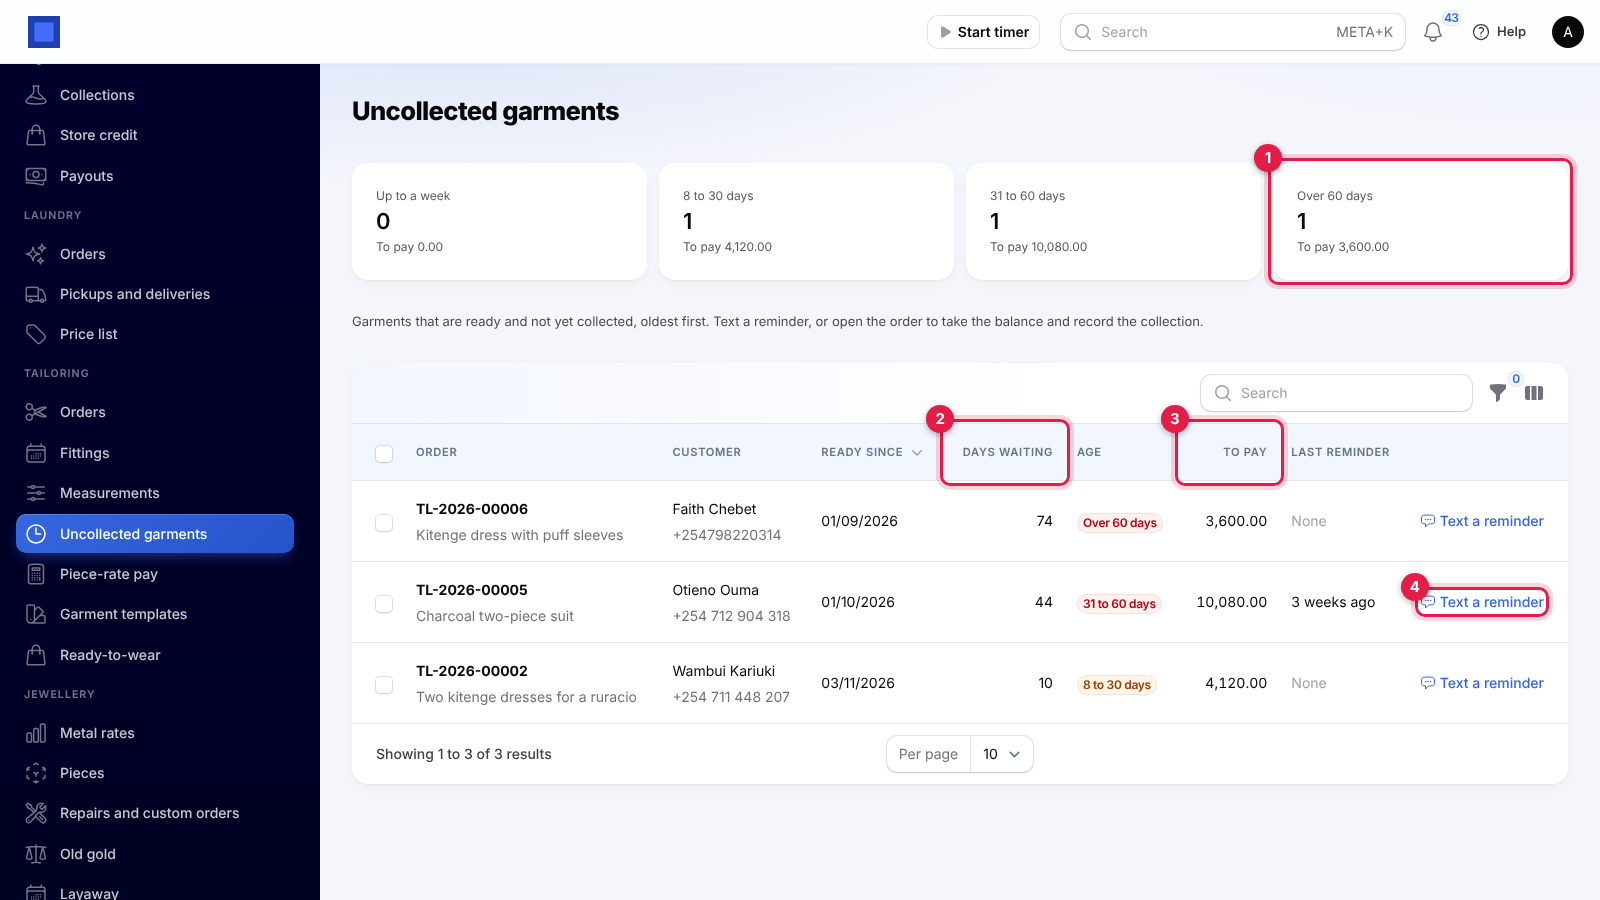
The list shows each order, the customer, Ready since, Days waiting (marker 2), the age, what is To pay (marker 3) and the Last reminder. Filter by Age. Click Text a reminder (marker 4) on one, or tick several and use Text a reminder above the list: Hello Otieno, a reminder that your TL-2026-00005 has been ready since 1 Oct. Please collect it at (your business name). Reminders are sent even with automatic texts off. If nothing was sent, you see No text was sent. Check the phone number and that SMS is set up in Marketing.
Quick alterations and tags
For a hem or a waist taken in while the customer waits at the counter:
- On Tailoring → Orders, click Quick alteration.
- Choose the Customer, describe the Garment and alteration (marker 1, Navy trousers: shorten by 3 cm), and whether The garment was Bought here or Brought in (marker 2).
- Enter the Price and Ready by (two days from today is suggested).
- Choose a Tailor (marker 3) to start the alteration straight away.
- Enter anything Paid now (marker 4), Paid by and, for the till, the Till. Click Submit.
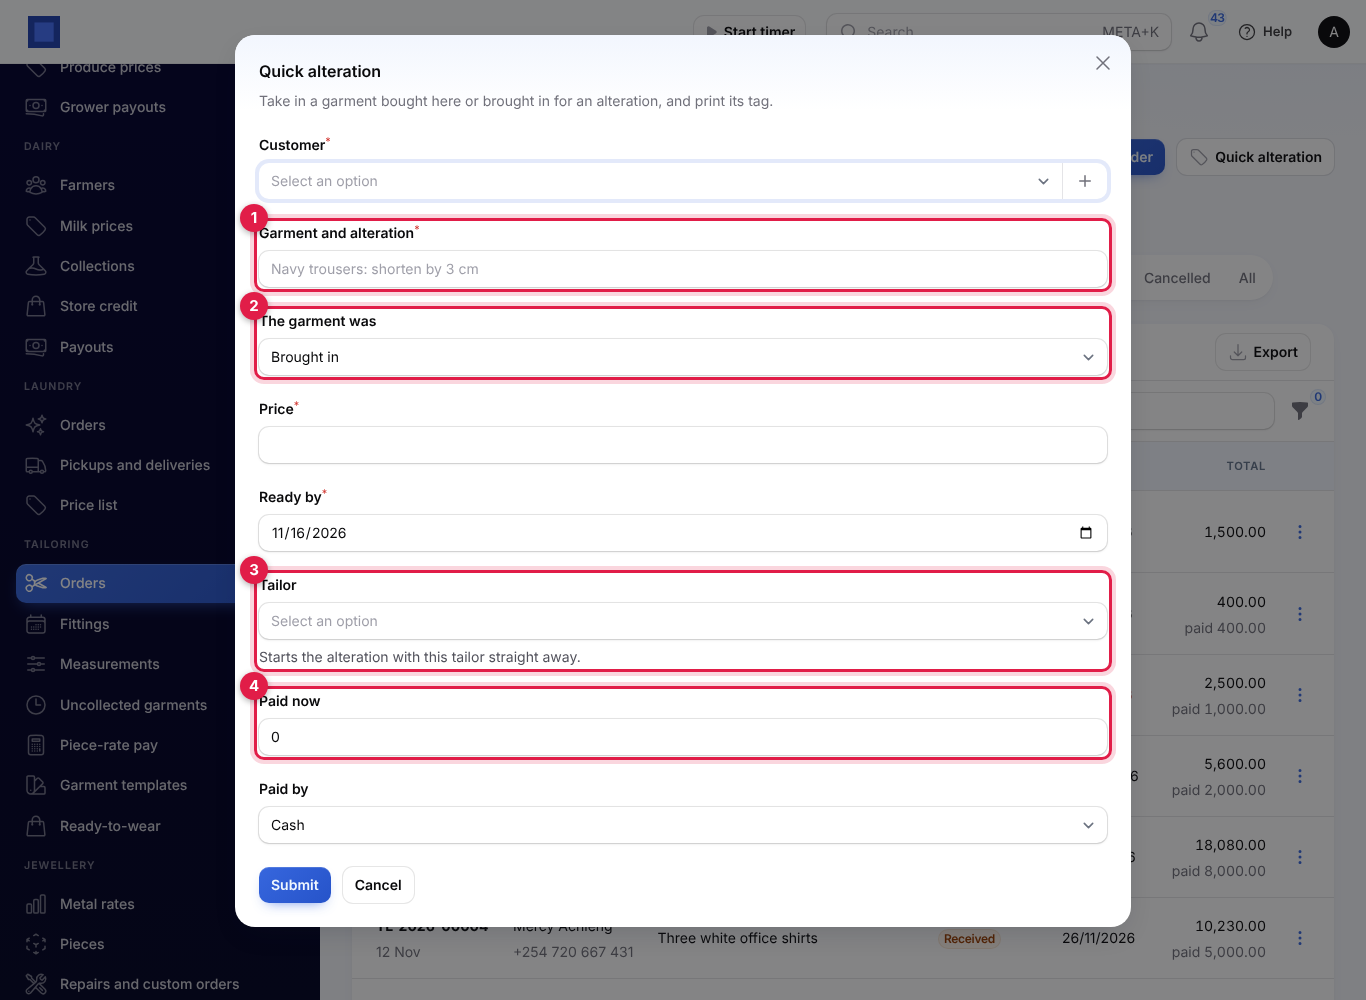
The alteration is numbered AL-2026-00001 and the message has a Print tag button: print the tag and pin it on the garment. You can print it again any time with ⋮ → Print tag.
Ready-to-wear
Open Tailoring → Ready-to-wear for the boutique side. Ready-to-wear clothes are ordinary products in Inventory: make one product per design and give it size and colour variants, so each size and colour has its own stock and barcode (see Products and pricing). Sell them at the Point of Sale till like any other product.
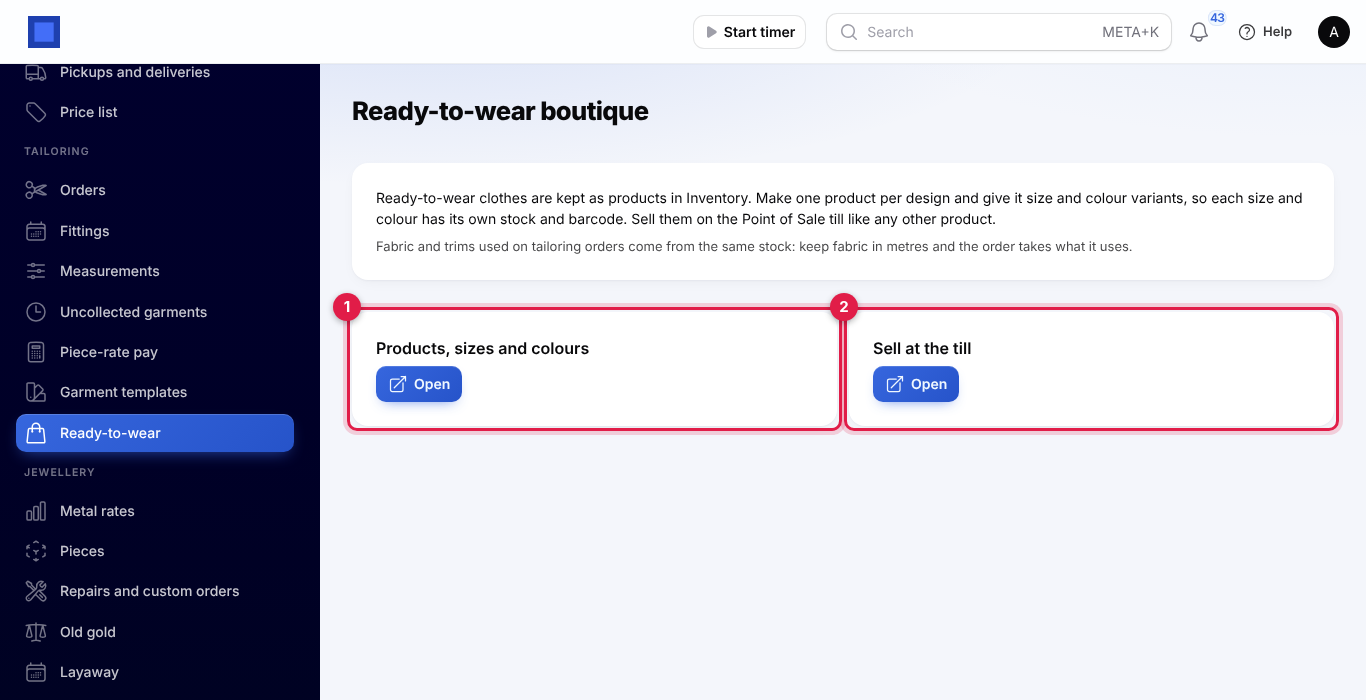
Open under Products, sizes and colours (marker 1) goes to your products (it needs Sales and Inventory); Open under Sell at the till (marker 2) goes to the till (it needs Point of Sale). Keep fabric in metres in the same stock, and orders take what they use.
Good to know
What does an order cost the customer? The making charge times the garments, plus fabric metres times the price per metre, plus the trims.
Can I change the price after taking the order in? No. Cancel it (if nothing is paid) and take it in again, or add a separate invoice for extras.
Why did no text go out? Check that Text customers… is on, that SMS is set up in Marketing (see SMS providers) and that the order has a phone number. Manual reminders ignore the switch but still need SMS and a number.
Which tailors can I choose? Any staff user in your workspace. Add tailors under Settings → Users so they appear.
Does piece-rate pay go to Payroll? No. Use the Piece-rate pay total to pay tailors, or add it to their payslip in Payroll.
Are measurements in cm or inches? Each measurement has its own unit, set on the template and changeable per set.