Medical lab
The Medical lab app is for clinic laboratories and stand-alone labs. You keep a catalogue of tests with their normal ranges by sex and age and their critical values, group tests into panels such as a lipid profile, and take orders from clinic visits, walk-in patients and referring doctors. Samples get printed barcode labels, results are flagged high, low or abnormal when you save them, critical values alert the clinician at once, and a second person checks the results before the report is released as a PDF to the patient portal. Tests are charged on the patient's clinic visit, with the insurer's share claimed as for any visit, and two reports show the lab's workload and turnaround times.
It works with the Clinic app: patients, visits, billing and insurance claims come from there (see Clinic and Pharmacy). Everything is in the Laboratory group of the left menu: Lab orders, Test catalogue, Panels, Workload and Turnaround times.
Note: Four permissions control the lab (under Settings → Roles). medical_lab.view lets people see orders, results and the reports. medical_lab.manage is needed to build the catalogue and panels, place and cancel orders, collect samples and email reports. medical_lab.results is for the bench: receiving samples, entering results and marking them resulted. medical_lab.verify is for whoever checks results: verifying, sending back for correction and releasing reports. Owners and admins have all four; the member role has medical_lab.view.
Switch it on
The Medical lab is a marketplace app and needs the Clinic app, which is switched on with it.
- Open Settings → Marketplace and type Medical lab in the Search add-ons… box (marker 1).
- On the Medical lab card (marker 2), click Start free trial (or Add to subscription) and confirm. The Laboratory group appears in the menu.
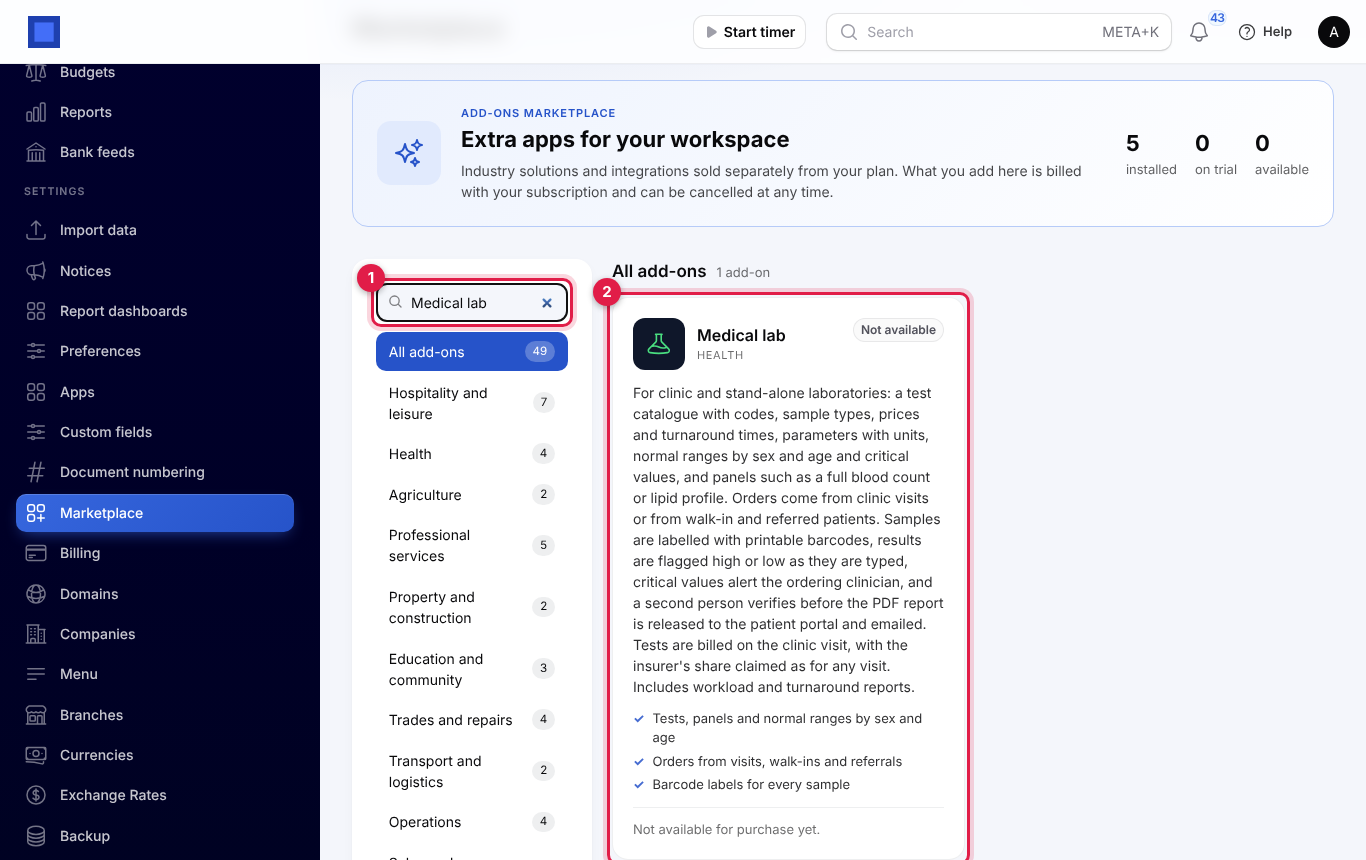
If the card says Not available for purchase yet, ask NaliSuite support to switch it on. See Billing and marketplace.
Settings
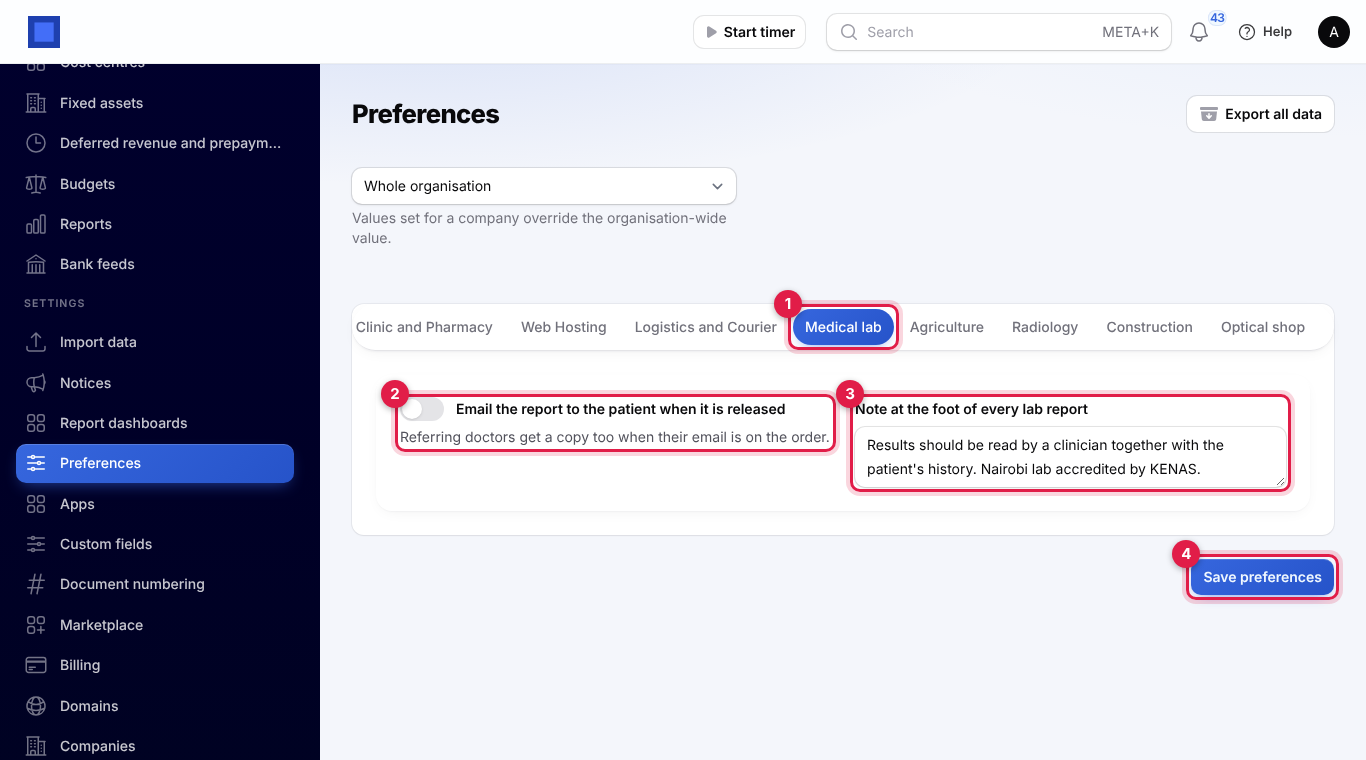
Open Settings → Preferences, click the Medical lab tab (marker 1), and click Save preferences (marker 4) when you are done.
| Setting | Default | What it does |
|---|---|---|
| Email the report to the patient when it is released (marker 2) | Off | The PDF report is emailed to the patient on release. Referring doctors get a copy too when their email is on the order. |
| Note at the foot of every lab report (marker 3) | — | A short note printed under the results on every report, for example Results should be read by a clinician together with the patient's history. |
The test catalogue
Open Laboratory → Test catalogue. The list shows each test's code, name, section, sample, number of parameters, turnaround and price, and filters by section.
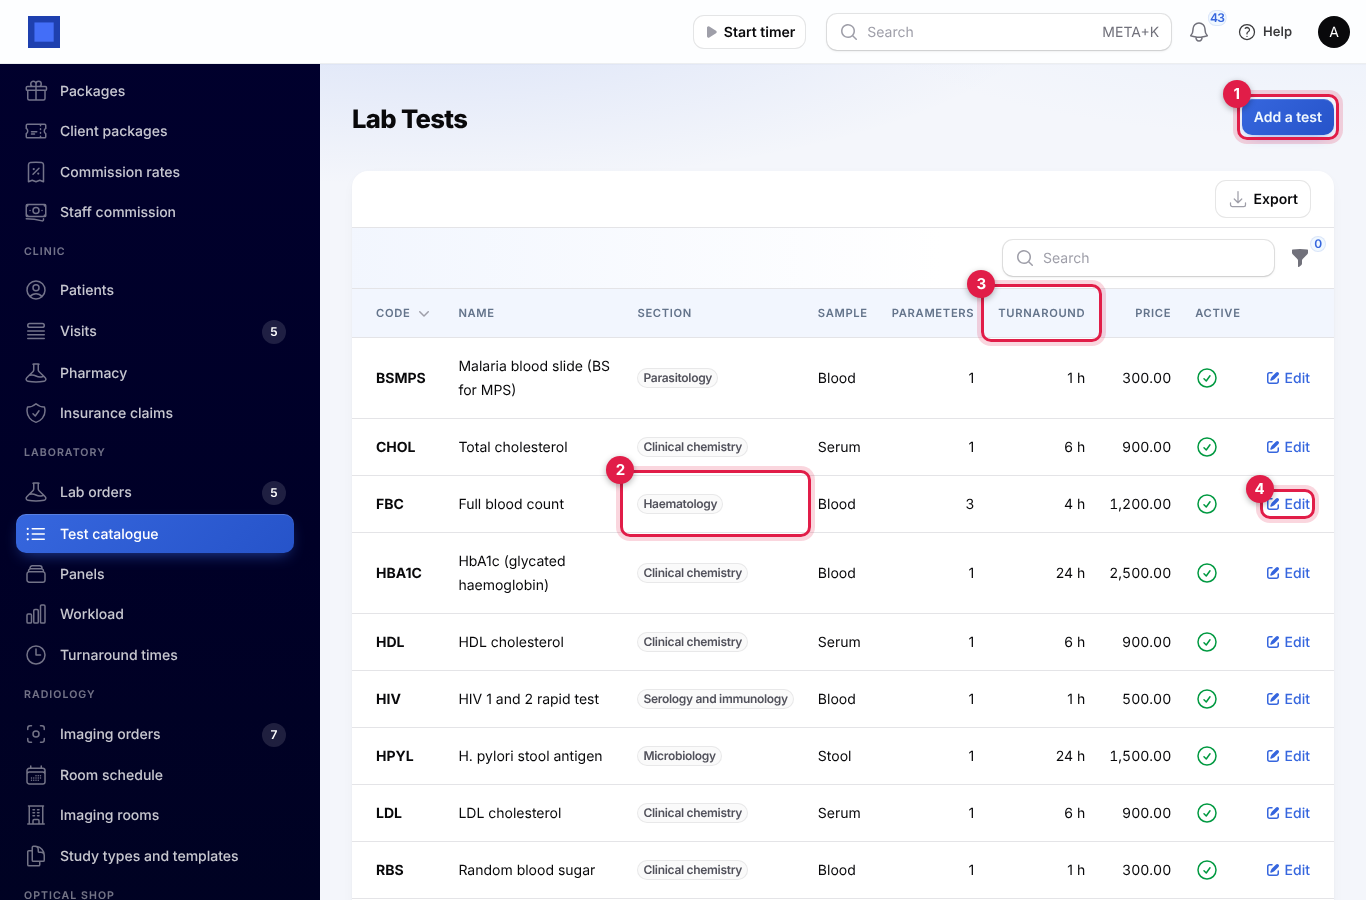
- Click Add a test (marker 1), or Edit (marker 4) on a test.
- Fill in the Code (for example FBC, unique in your catalogue) and the Name.
- Choose the Section (marker 2): haematology, clinical chemistry, microbiology, serology and immunology, parasitology, urinalysis, histology or other.
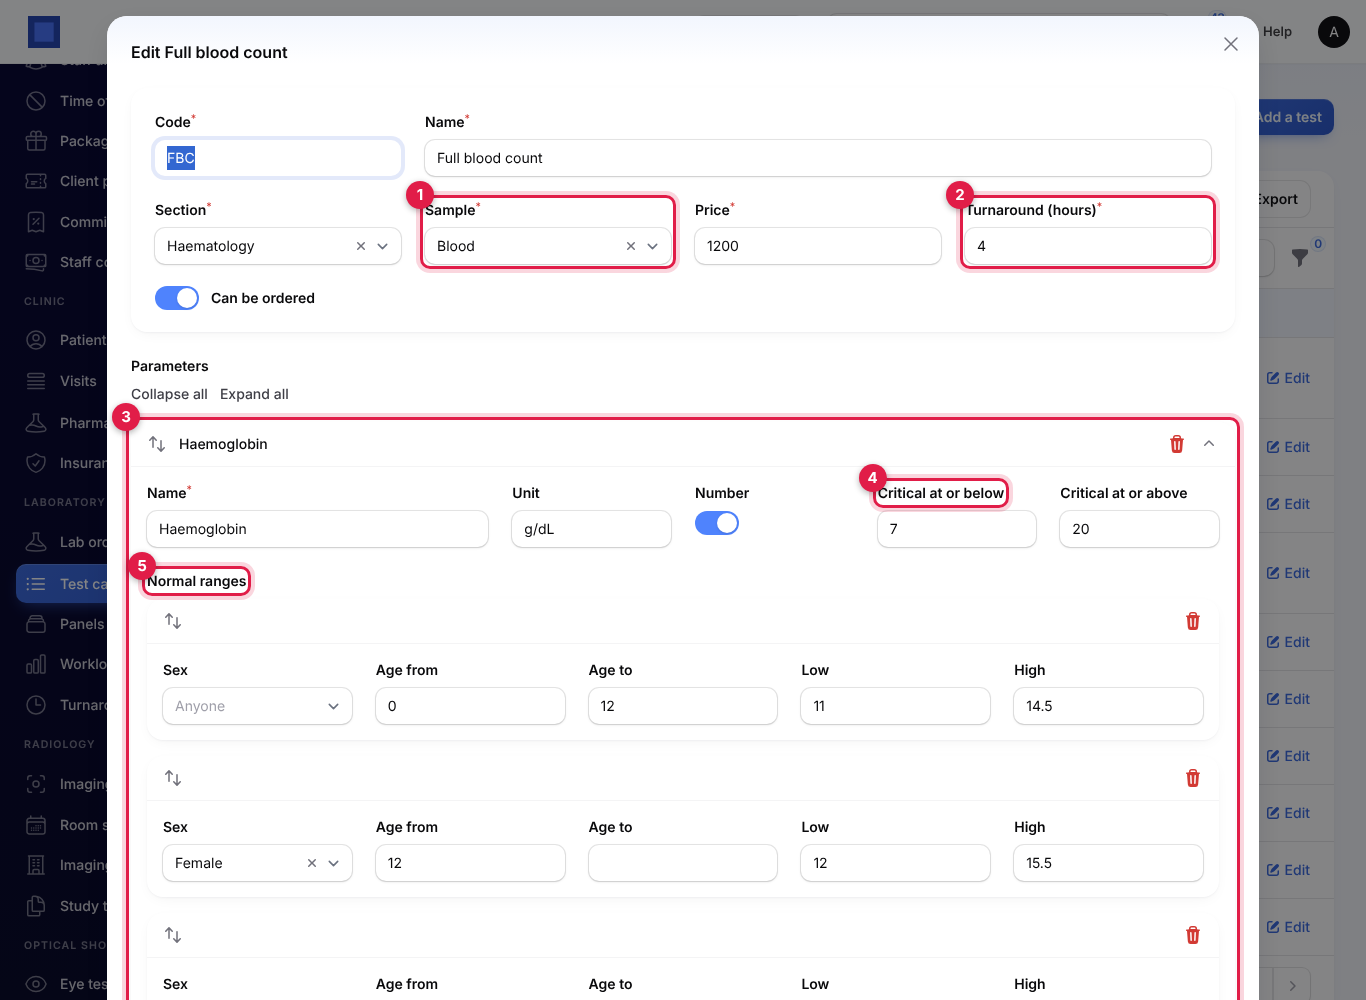
- Choose the Sample (marker 1 in the form): blood, serum, plasma, urine, stool, sputum, swab, cerebrospinal fluid, semen, tissue or other.
- Type the Price and the Turnaround (hours) (marker 2 in the form), the time you promise from receiving the sample to the released report. The turnaround report measures you against it.
- Leave Can be ordered on.
- Under Parameters (marker 3), add each value the test reports. A full blood count has haemoglobin, white cells and platelets; a malaria slide has one. For each one:
- Name and Unit, for example Haemoglobin in g/dL.
- Number: on for a measured value, off for a written answer.
- For a number, Critical at or below and Critical at or above (marker 4): values that need the clinician straight away.
- For a written answer, Expected result, for example Negative. Any other answer is flagged as abnormal.
- For a number, Normal ranges (marker 5): add a range with Sex, Age from, Age to, Low and High.
- Click Save changes (or Create).
How the normal range is chosen:
- Leave Sex or the ages empty for a range that fits everyone.
- A range for the patient's sex is used before one for everyone.
- Ages are in years: Age from is included, Age to is not. A range from 0 to 12 is for children up to their 12th birthday.
- You can give only Low (for example HDL cholesterol at least 1.2) or only High (total cholesterol up to 5.2).
The range is copied onto each order when it is placed, for that patient's sex and age, so changing the catalogue later does not change old reports.
Panels
A panel is several tests ordered together at one price, such as a lipid profile or a diabetes review. Open Laboratory → Panels, click Add a panel, give the Code and Name, choose the Tests in the panel and type the Panel price, charged once for the whole panel. Turn Can be ordered off to stop offering it.
Order tests
Orders are placed from the lab, for a patient at a clinic visit, a walk-in or a referral.
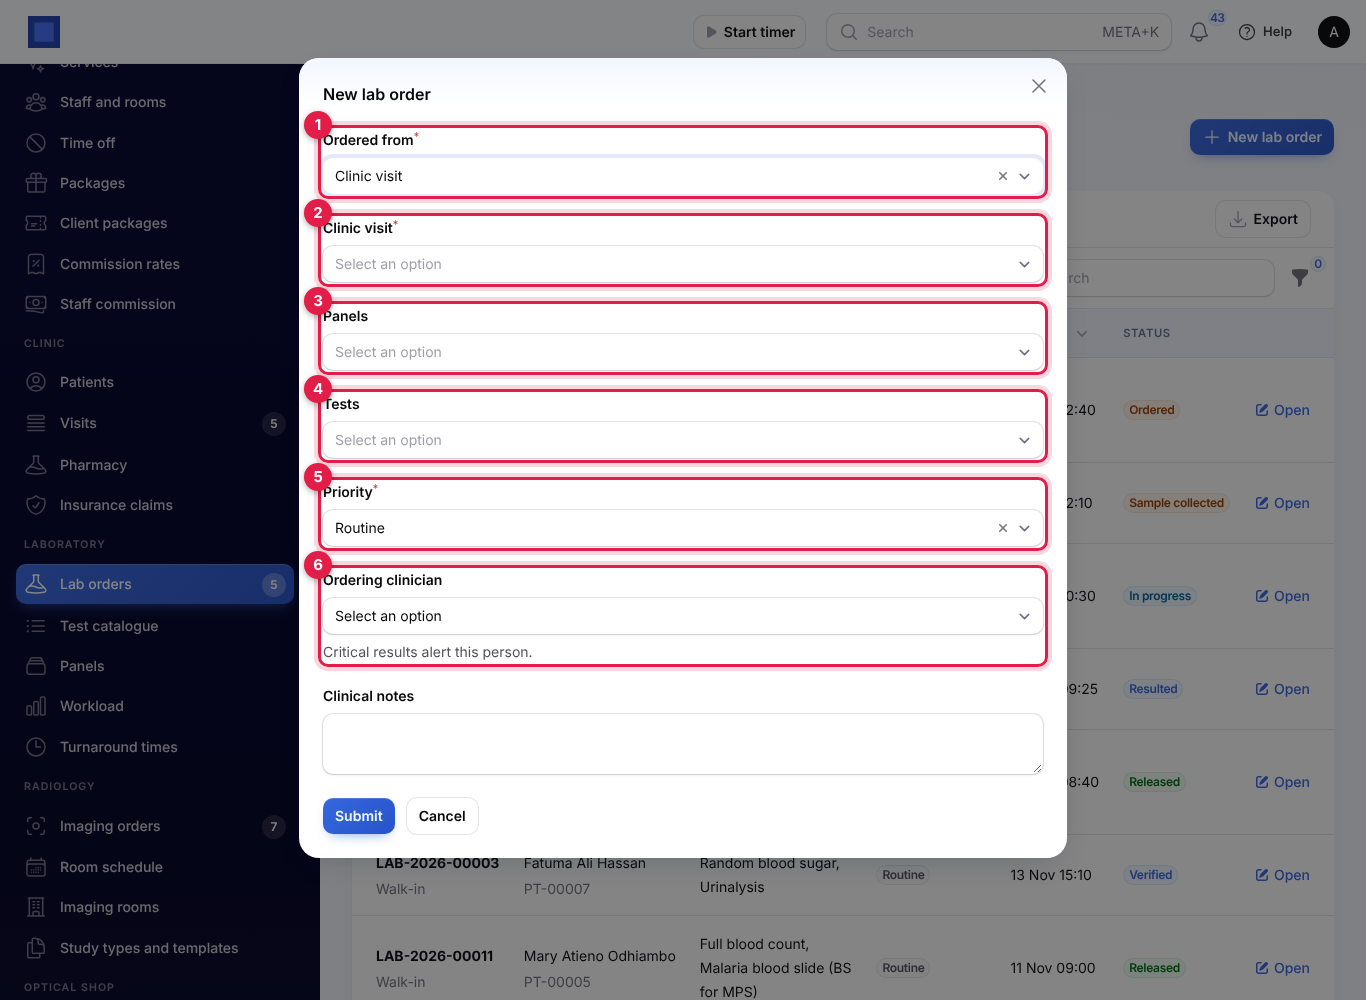
- Open Laboratory → Lab orders and click New lab order.
- Choose where it is Ordered from (marker 1):
- Clinic visit: choose the Clinic visit (marker 2). Only visits waiting or in consultation are listed.
- Walk-in or Referral: choose the Patient. Search by name, number or phone, or click + to register a new patient with their name, phone, email, date of birth and gender. For a referral, type the Referring doctor and their email.
- Choose Panels (marker 3) and Tests (marker 4). A test already in a chosen panel is not charged twice.
- Choose the Priority (marker 5): Routine, Urgent or Immediate (STAT).
- Choose the Ordering clinician (marker 6). Critical results alert this person.
- For walk-ins and referrals, leave Claim from the insurer on for an insured patient.
- Add Clinical notes and click Submit. The order gets a number such as LAB-2026-00004 and opens.
How tests are billed
Each panel or test becomes a charge on the clinic visit, such as "Lab: Full blood count (LAB-2026-00001)":
- From a Clinic visit, the charges join the visit's bill, invoiced when the visit is completed in the Clinic. See Clinic and Pharmacy.
- For a Walk-in or Referral, NaliSuite opens a lab-only visit and bills it at once. For an insured patient with Claim from the insurer on, the insurer's share goes on a claim as for any visit (see Insurance claims). If the patient already has a visit waiting or in consultation, the tests join that visit's bill instead.
More → Open the bill on the order opens the invoice once there is one.
The lab orders list
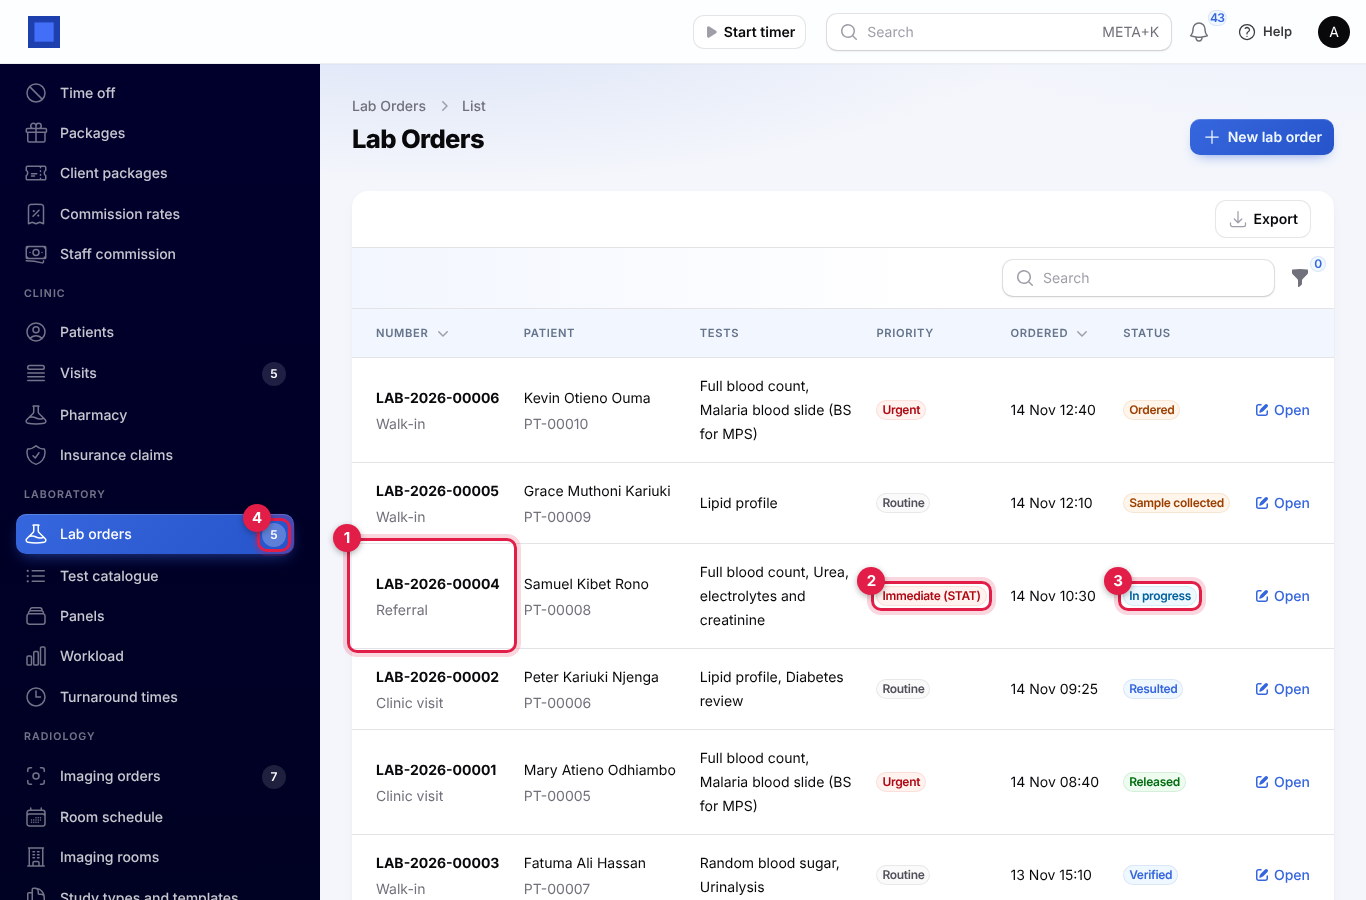
Each row shows the order number with where it came from (marker 1), the patient and their number, the tests, the priority (marker 2), when it was ordered and its status (marker 3). The number next to Lab orders in the menu (marker 4) counts orders not released or cancelled yet. Filter by Status, Source or Patient, and click Open to work on an order.
An order goes through these statuses:
| Status | What happens next |
|---|---|
| Ordered | Collect the samples. |
| Sample collected | The lab receives them. |
| Received in the lab | Enter the results. |
| In progress | Some results are in; finish and mark as resulted. |
| Resulted | A second person verifies. |
| Verified | Release the report. |
| Released | The report is in the portal and on the clinic visit. |
| Cancelled | Called off before the samples were taken. |
The order's page shows the patient, number and age in the title, and the status, source, clinician and tests below it. Its Request section lets you correct the priority, referring doctor and clinical notes until the report is released.
Collect samples and print barcodes
- Open an Ordered order and click Collect samples (marker 1), then confirm. One sample is made for each sample type the tests need, with its own barcode, for example LAB-2026-00005-1 for the blood and -2 for the serum.
- Click More (marker 2) → Print sample labels. A sheet of labels opens, three to a row, each with the patient's name and number, the sample type, the time collected and a barcode. Stick one on each container.
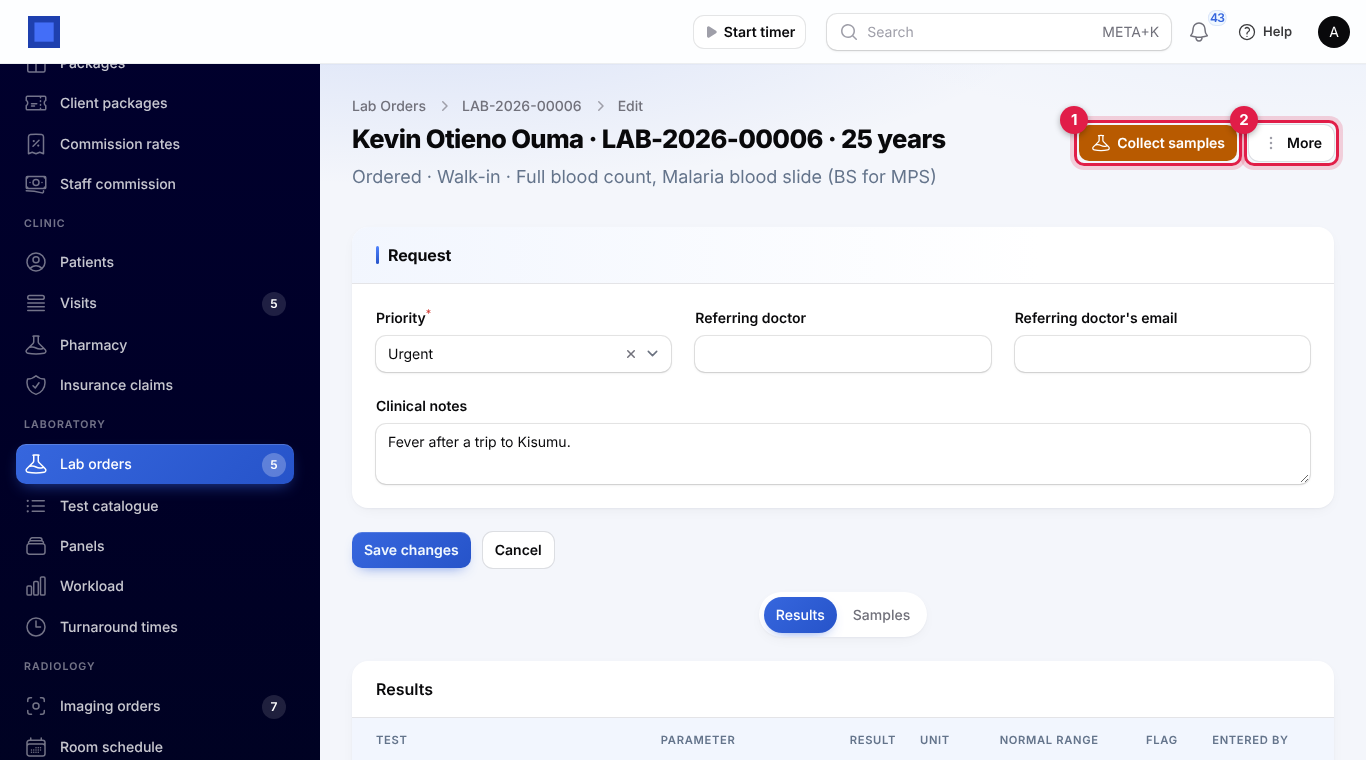
- When the samples reach the bench, click Receive in the lab (marker 1).
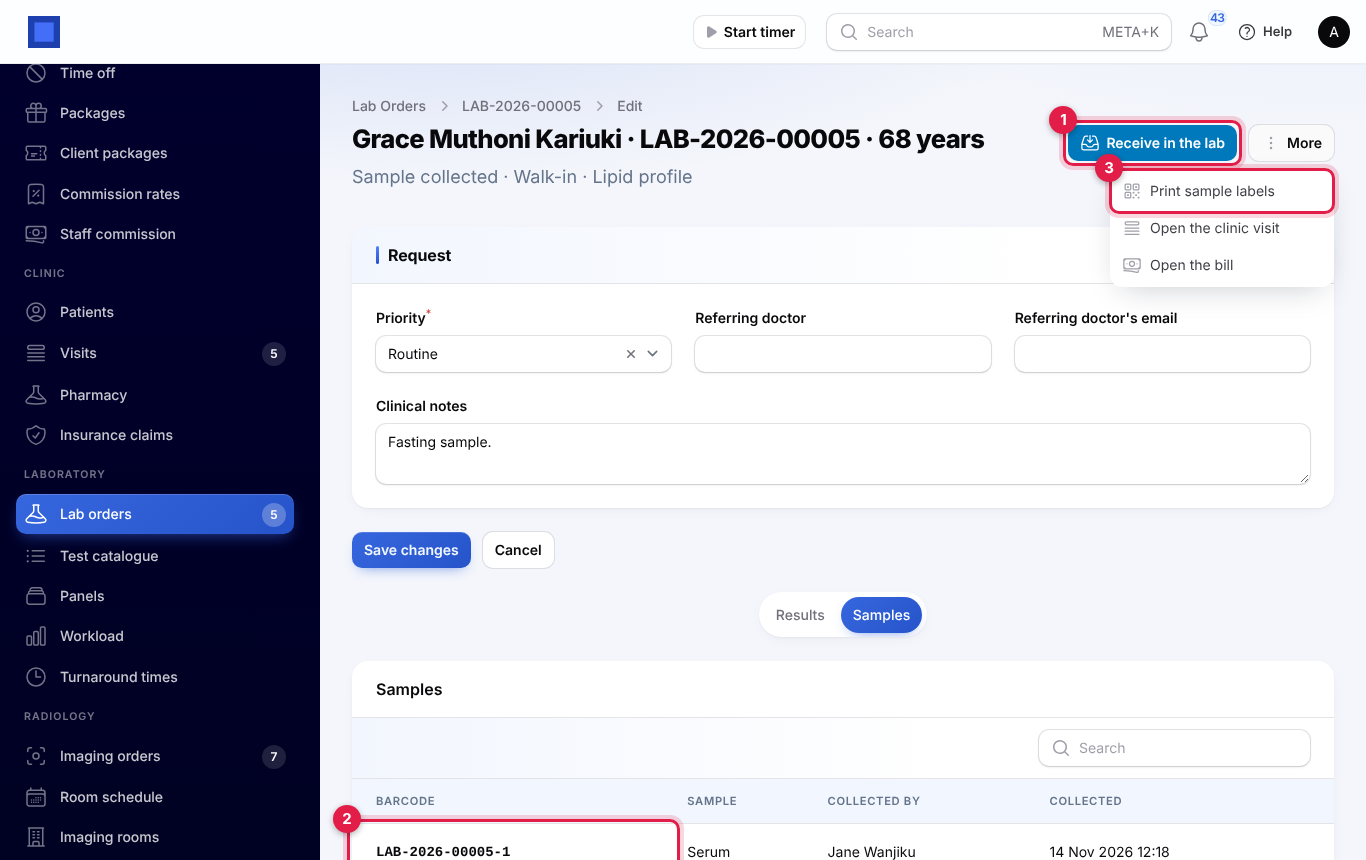
The Samples tab lists each barcode (marker 2), the sample type, who collected it and when. Print sample labels (marker 3) prints the labels again at any time.
To call an order off before the samples are taken, click More → Cancel the order. The charges come off the visit while it is still open; if the tests are already billed, credit the invoice in Invoicing instead.
Enter results and flags
- Click Enter results. Every parameter of the order is listed with its normal range under it (marker 2).
- Type each result (markers 1 and 3), and a Comment where needed, for example Send for urine culture.
- Click Submit. The order moves to In progress.
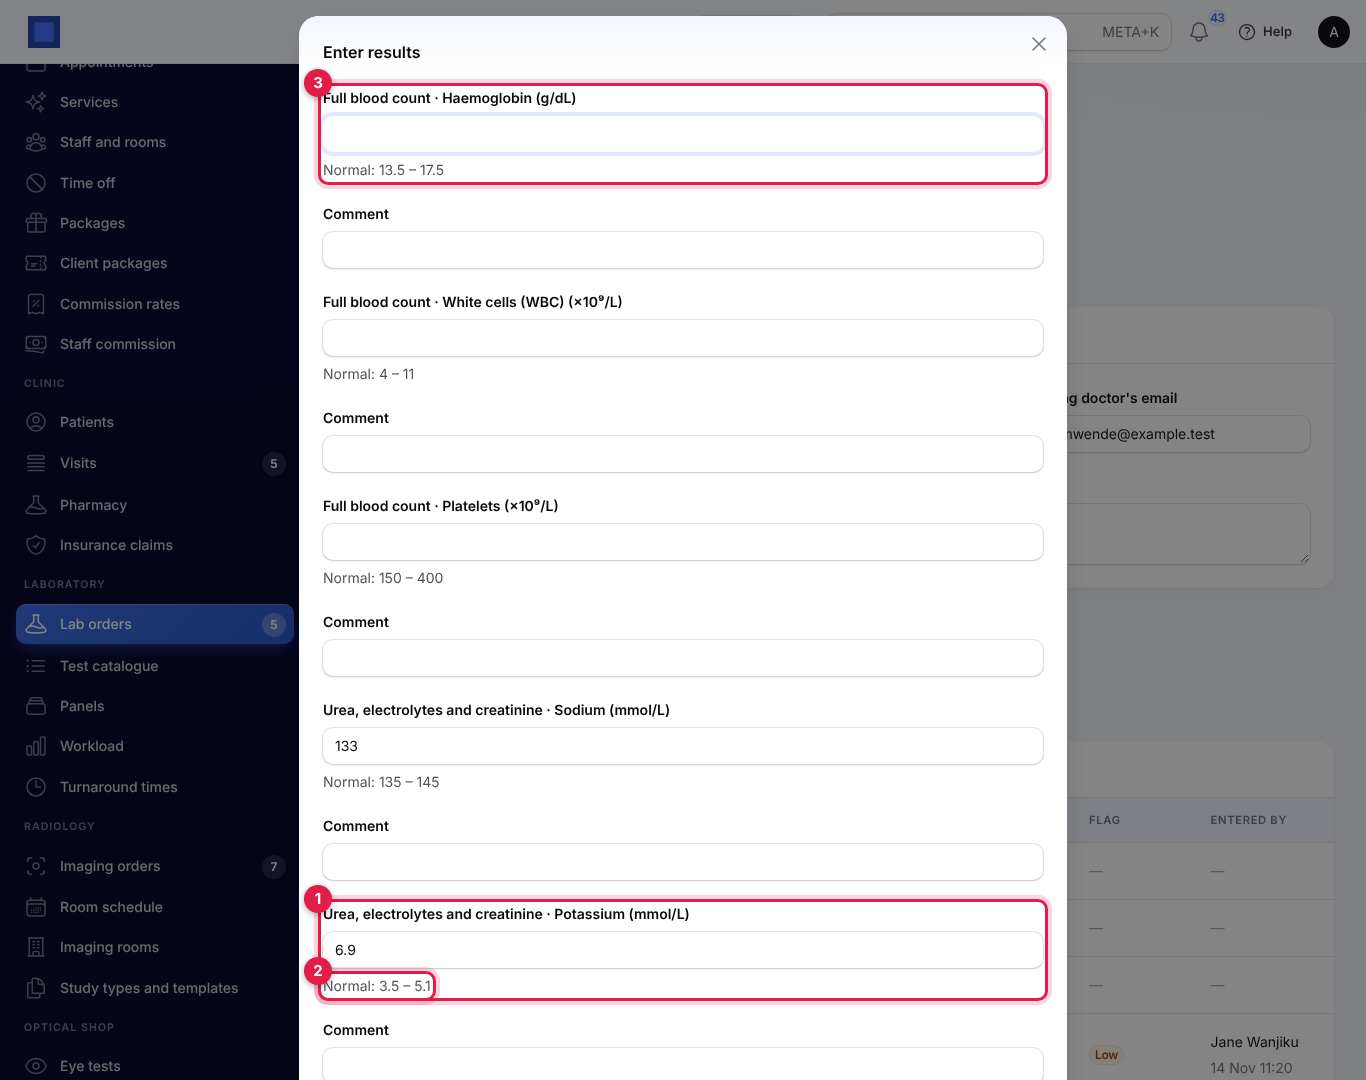
You can enter results in several goes, for example the chemistry now and the blood count later. A measured parameter only takes a number.
Each result is flagged when you save:
| Flag | When |
|---|---|
| Critically low / Critically high | At or below, or at or above, the critical value. Shown in red. |
| Low / High | Below or above the patient's normal range. |
| Abnormal | A written answer that is not the expected result. |
| Normal | Within the range, or the expected answer. |
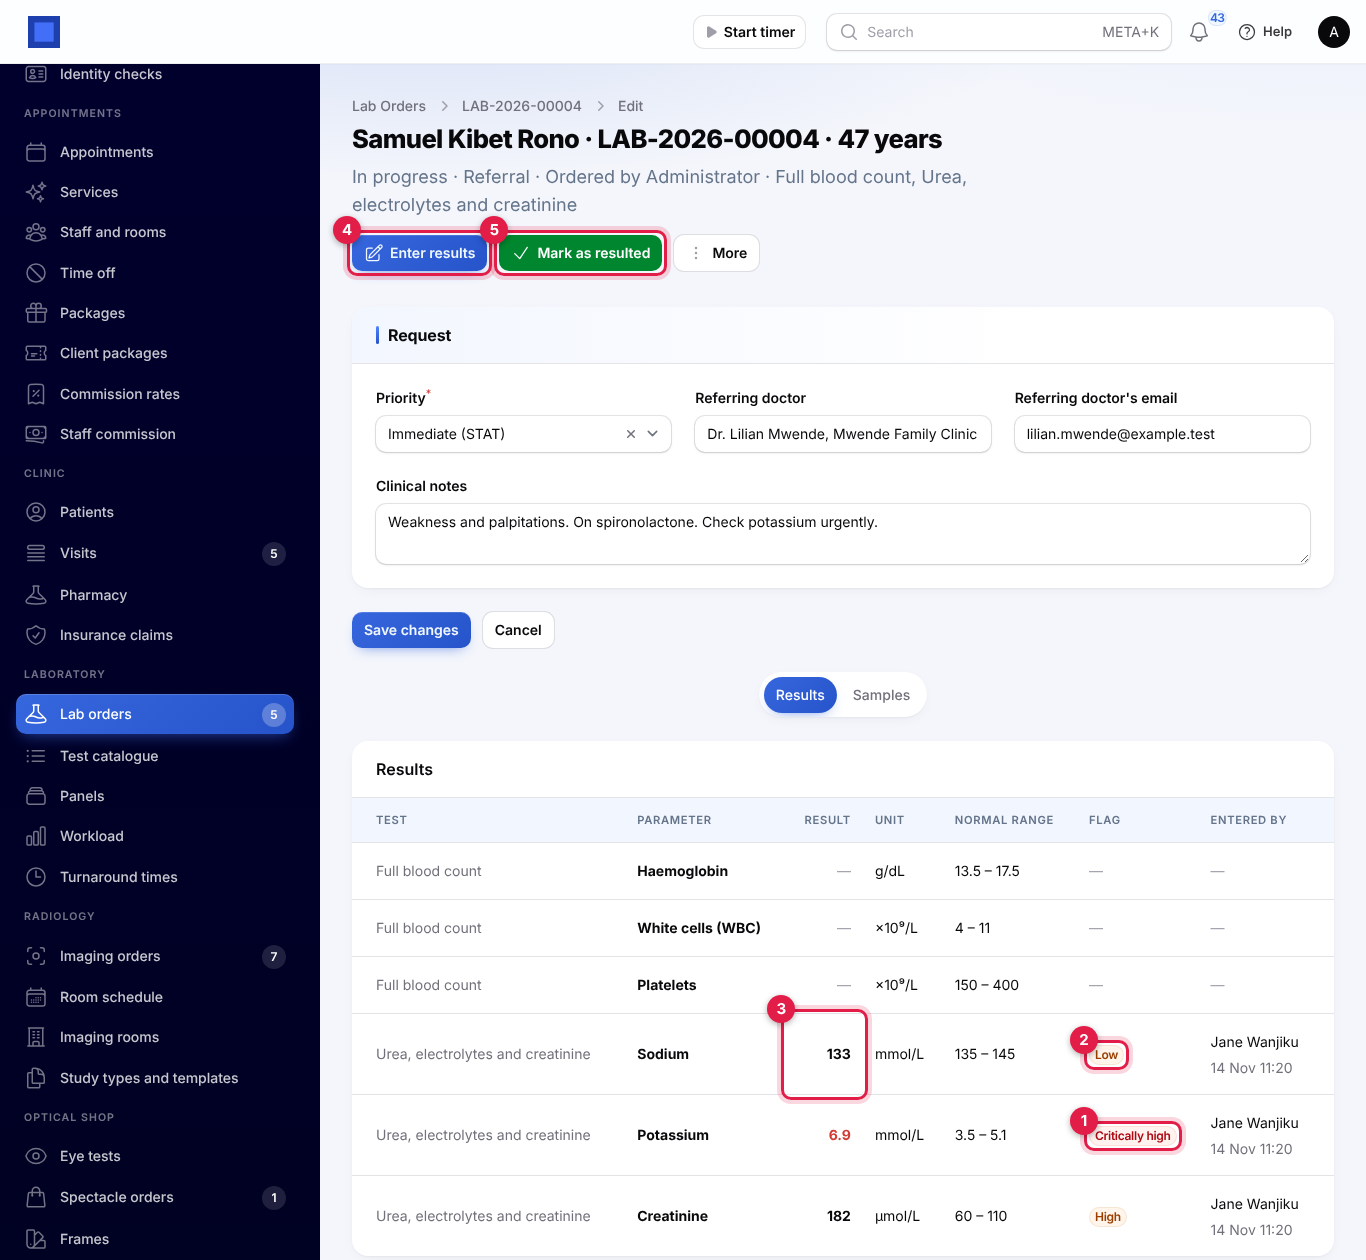
The Results tab shows each parameter's result, unit, normal range and flag, and who entered it and when. A critical flag (marker 1) is red, a low or high flag orange (marker 2) and a normal one green. Results outside the range are in bold (marker 3), critical ones in red, and results not entered yet show a dash.
Critical alerts
When a result is critical, the person who saved it sees "1 critical value: the clinician has been alerted.", and the ordering clinician gets an alert straight away, for example "Critical result for Samuel Kibet Rono: Potassium 6.9 mmol/L", with the normal range and a link to the order. Without an ordering clinician, the visit's clinician is alerted; without either, everyone with medical_lab.verify. Each critical result alerts once. Clinicians choose how they receive Critical lab results in their notification settings.
Mark as resulted
When every result is in, click Mark as resulted (marker 5) and confirm. NaliSuite refuses while any result is empty and says how many. Results can still be corrected with Enter results (marker 4) until they are verified.
Verify and release
A second person checks every report before it goes out.
- A colleague with medical_lab.verify opens the Resulted order, reads the results and flags (marker 2), sees who entered them (marker 3), and clicks Verify (marker 1). Nobody can verify results they entered or marked as resulted themselves.
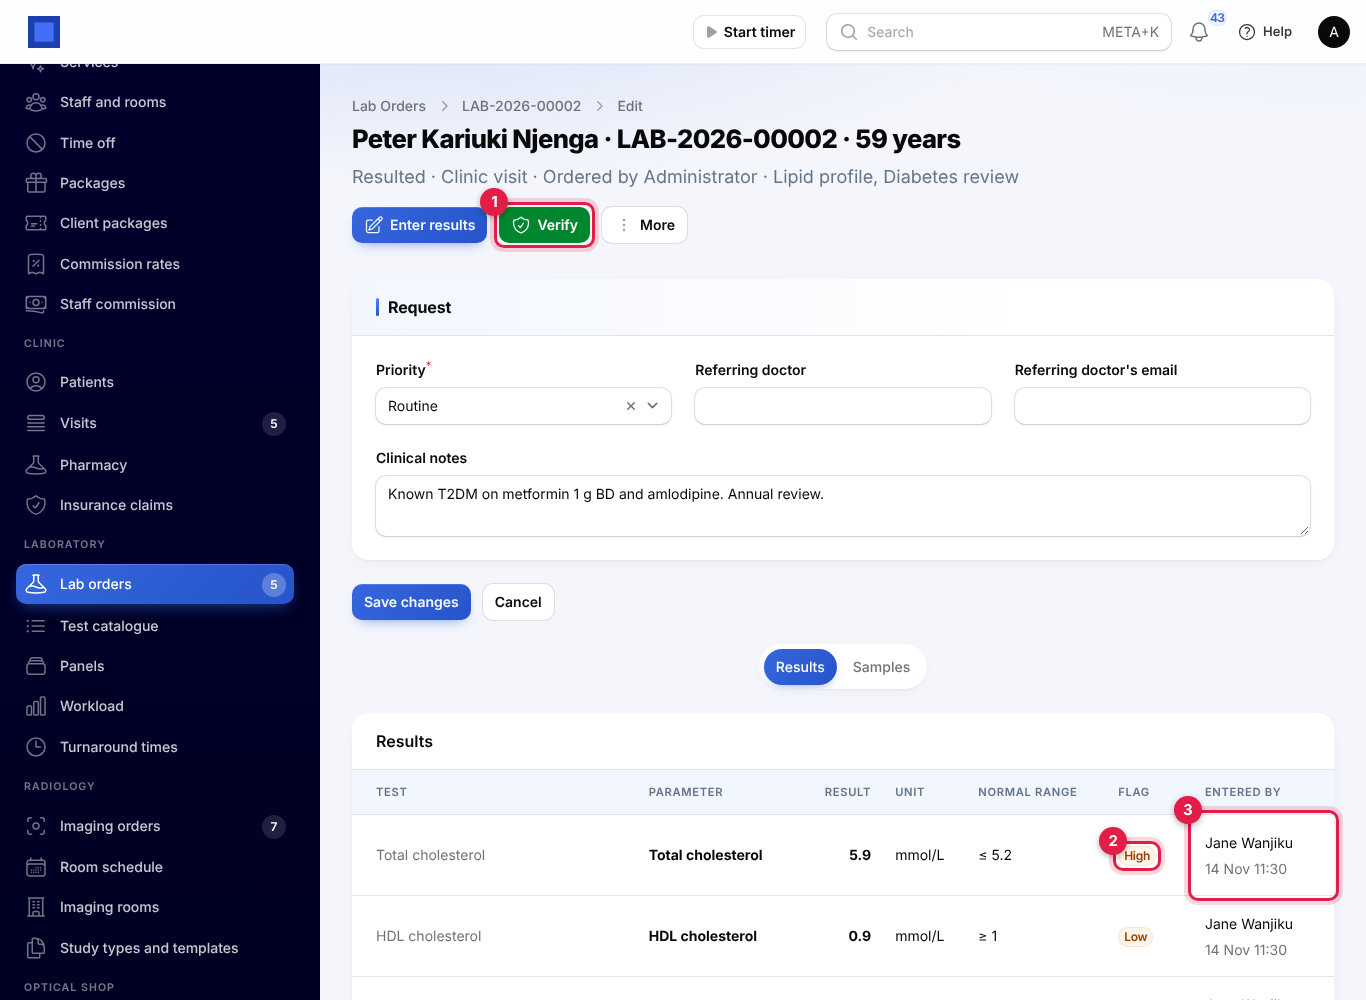
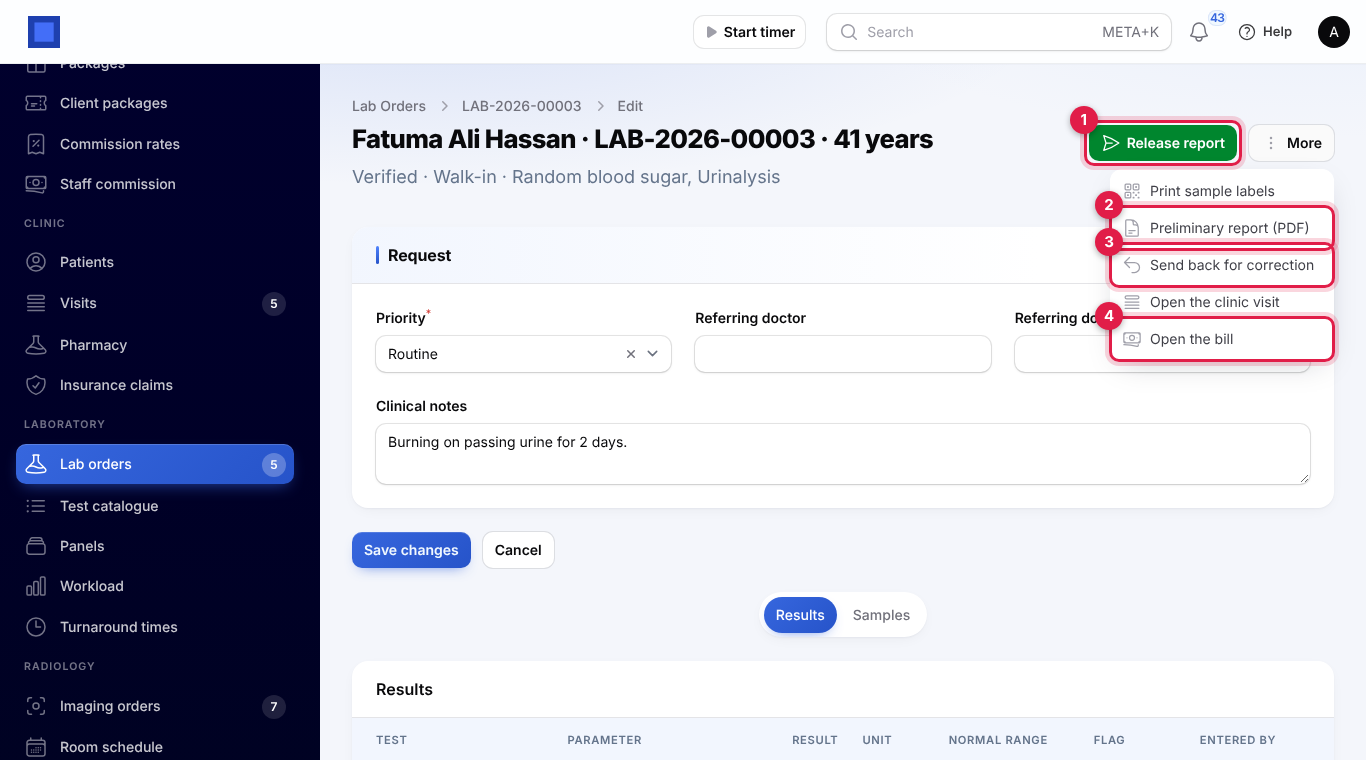
- Click Release report (marker 1) and confirm.
On release:
- the report shows in the patient portal,
- each lab charge on the clinic visit gets a summary, such as "Report LAB-2026-00001 released: 3 of 4 results out of range.", and a flag the clinician sees in the consultation,
- the report is emailed when the setting is on.
If something is wrong before release, click More → Send back for correction (marker 3). The order goes back to In progress and has to be resulted and verified again. Open the clinic visit and Open the bill (marker 4) are in the same menu.
The PDF report
More → Lab report (PDF) opens the report: the patient's details, who requested it, when samples were collected and received, the clinical notes, and each test's results with the flag (L low, H high, LL and HH critical, * not the expected result), unit and normal range. It names who entered and who verified the results, and ends with your report note. Before release the menu says Preliminary report (PDF) (marker 2) and the report is marked "Not released: preliminary results only."
More → Email the report sends the released report to the patient's email and, for a referral, to the referring doctor.
The patient portal
Patients with customer portal access see My lab results in the portal menu once they have a released report. Nothing shows before release. See Customer and vendor portal to invite a patient.
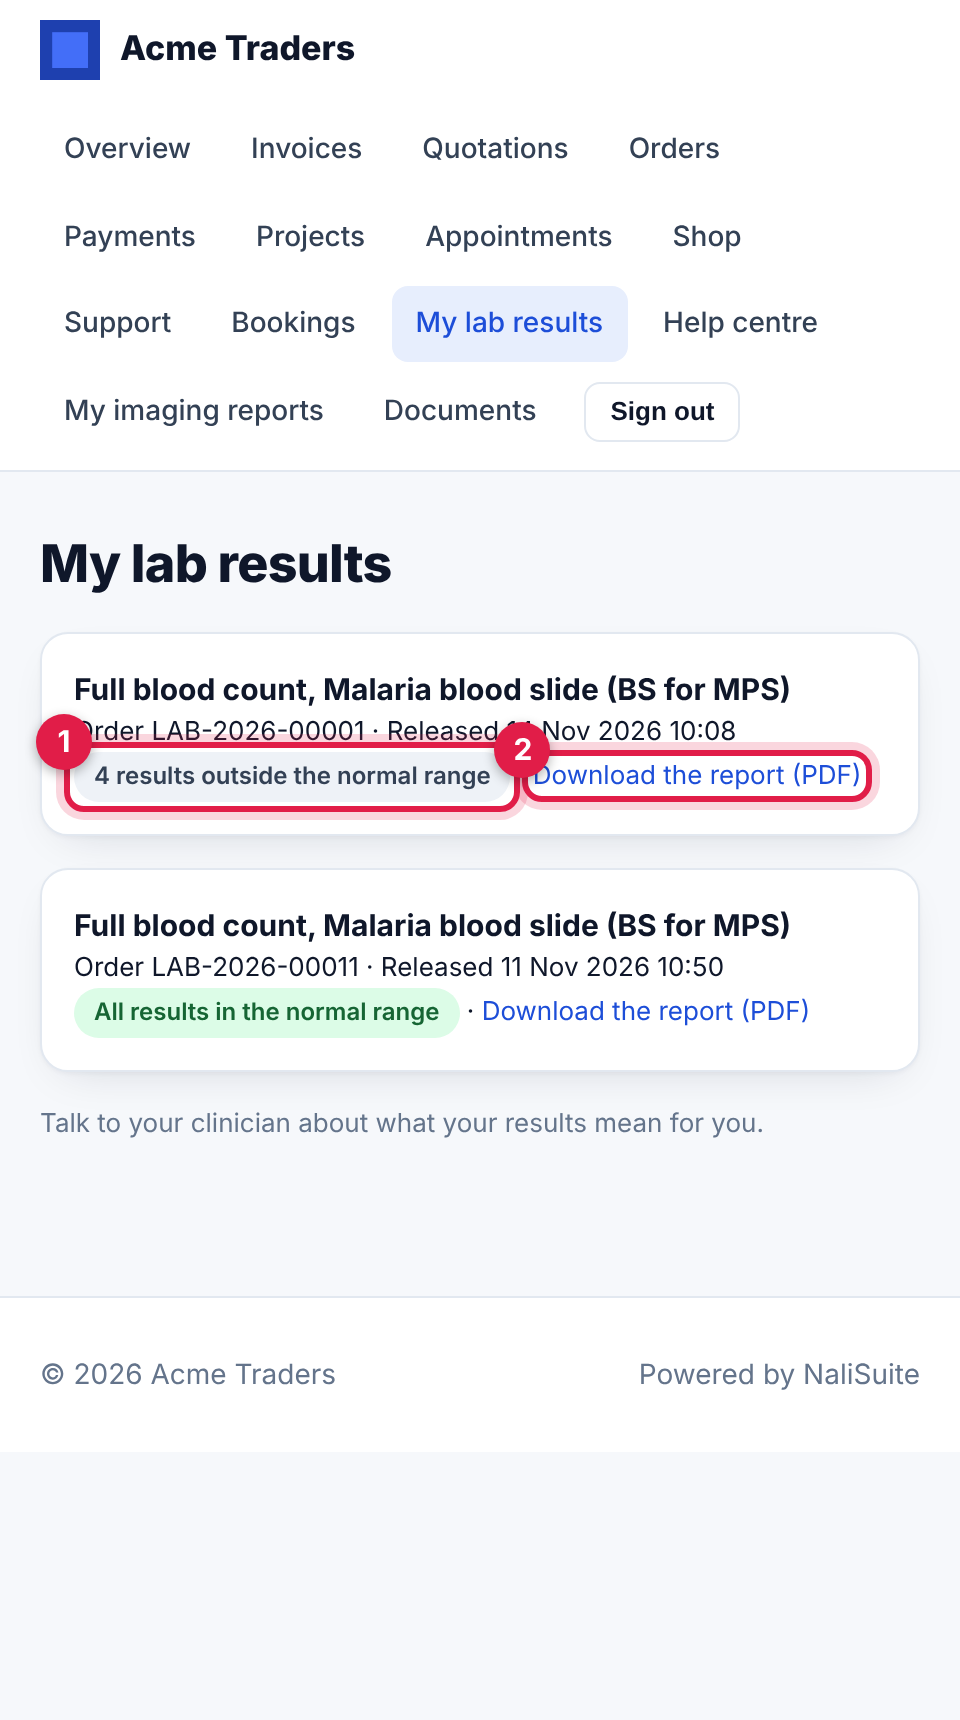
Each report shows the tests, the order number and when it was released, whether results are outside the normal range or all in it (marker 1), and Download the report (PDF) (marker 2). The page reminds patients to talk to their clinician about what the results mean.
Workload and turnaround reports
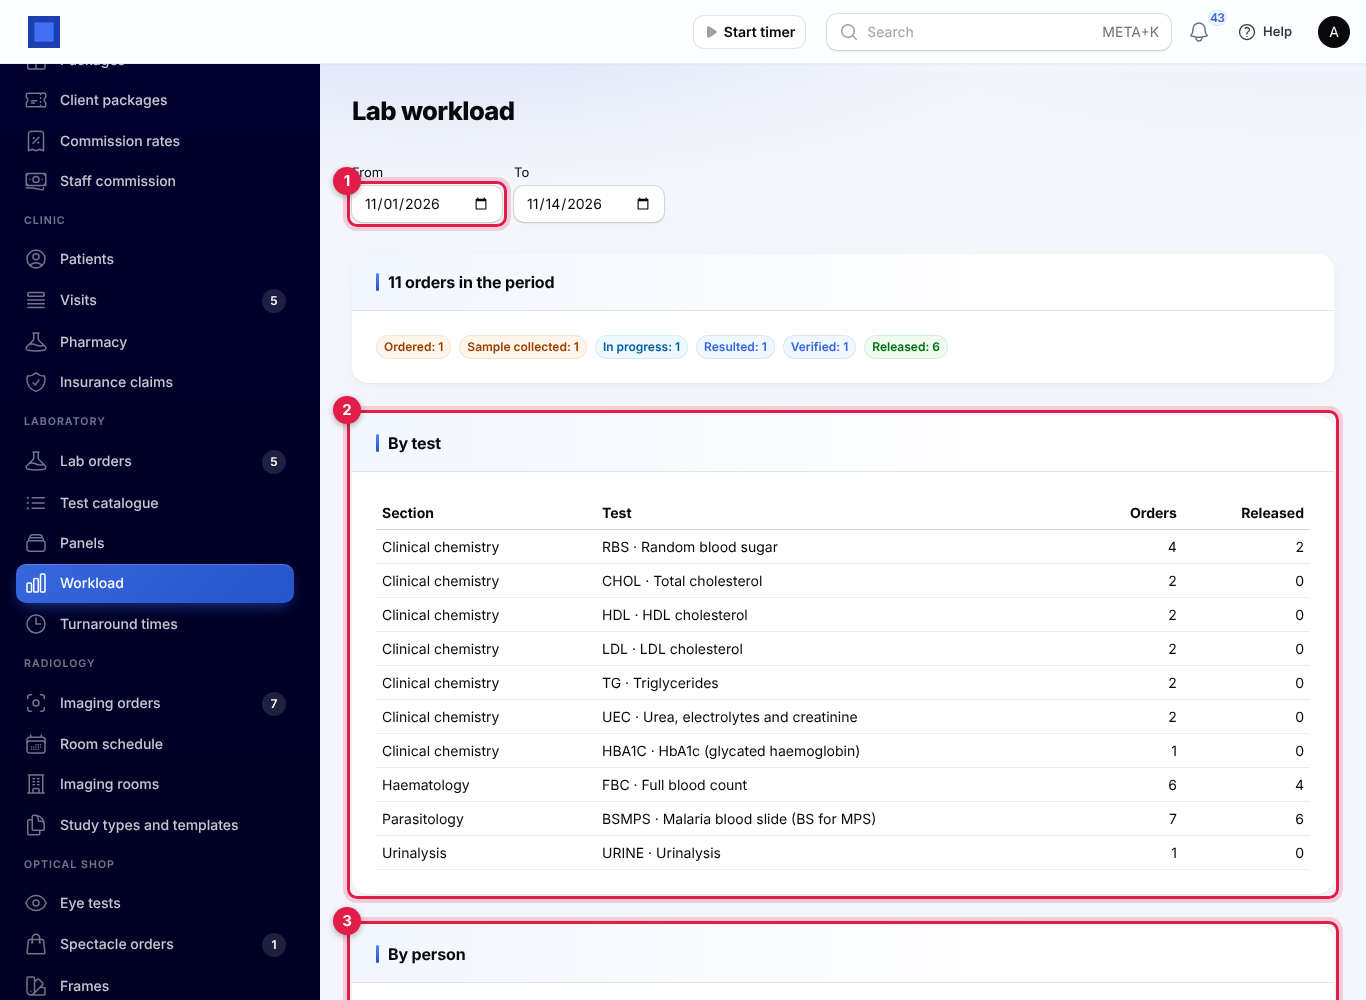
Laboratory → Workload covers the days between From and To (marker 1), this month so far when you open it. It shows how many orders were placed and where they stand by status, By test (marker 2) the orders and releases per test and section, and By person (marker 3) who collected samples, resulted and verified orders.
Laboratory → Turnaround times covers reports released in the period. Time runs from the lab receiving the samples (or collecting them, when they were not received separately) to the release, in hours. You see the average and how many reports were within target, then per test the Target (h), Reports, Average (h), Longest (h) and Within target, shown in red below 80%. An order with several tests is measured against the longest target among them.
Good to know
Can a clinician order tests from the consultation? Orders are placed from Laboratory → Lab orders, choosing the patient's open visit. The charges then show on that visit in the Clinic, and the result summary appears on them once the report is released.
What if a test has no parameters? It cannot be ordered: NaliSuite asks you to add them in the test catalogue first.
Does editing the normal range change old reports? No. Each order keeps the range that applied to the patient when it was placed.
Can I re-open a released report? No. Released reports are final. If a correction is needed, order the test again and explain in the clinical notes.
Who sees the reports? Staff with medical_lab.view, and the patient in the portal after release. The PDF is never on a public link.