Appointment Booking
Appointment Booking gives your business a public booking page where customers choose a service, a day and a free time, leave their details and, when you ask for one, pay a deposit online. Your team sees every booking in one list, books walk-ins and phone bookings, moves or cancels them, and invoices the balance in one click when the work is done. Salons, spas, clinics, consultants, studios and anyone who rents a room by the hour use it. It is in the Appointments group of the sidebar: Appointments, Services, Staff and rooms and Time off.
Appointment Booking is a marketplace module. The owner buys it under Settings → Marketplace; the Appointments group appears once it is switched on. It needs the Contacts and Invoicing apps, which every workspace has.
Note: You need the booking.view permission to see the Appointments pages and booking.manage to book, move, complete or cancel appointments and to add services, staff, rooms and time off. Owners and admins have both. Set permissions under Settings → Roles.
How booking works
- A service is what customers book: how long it takes, how much free time to keep after it, the price and whether a deposit is asked for online.
- Staff and rooms are who or what the service is booked with. Each one has weekly working hours and a list of the services it offers. A service only appears on the booking page once at least one active person or room offers it.
- Free times are worked out for you: a start time is offered only when someone who offers the service is working, is not on time off and has no other booking that overlaps it (including the gap kept after each booking).
- Every booking gets a number such as
APT-2026-00004, and the customer is saved as a contact (matched by email or phone, or created new). - Deposits are taken only on online bookings. A booking made by staff is confirmed straight away with no deposit.
- The balance is invoiced when you complete the appointment. The invoice takes the deposit off when one was paid.
Set up your services
- In the menu, open Appointments → Services.
- Click New service (marker 1). The Deposit online column (marker 2) shows what is taken when a customer books online, and Staff and rooms (marker 3) shows how many people or rooms offer the service.
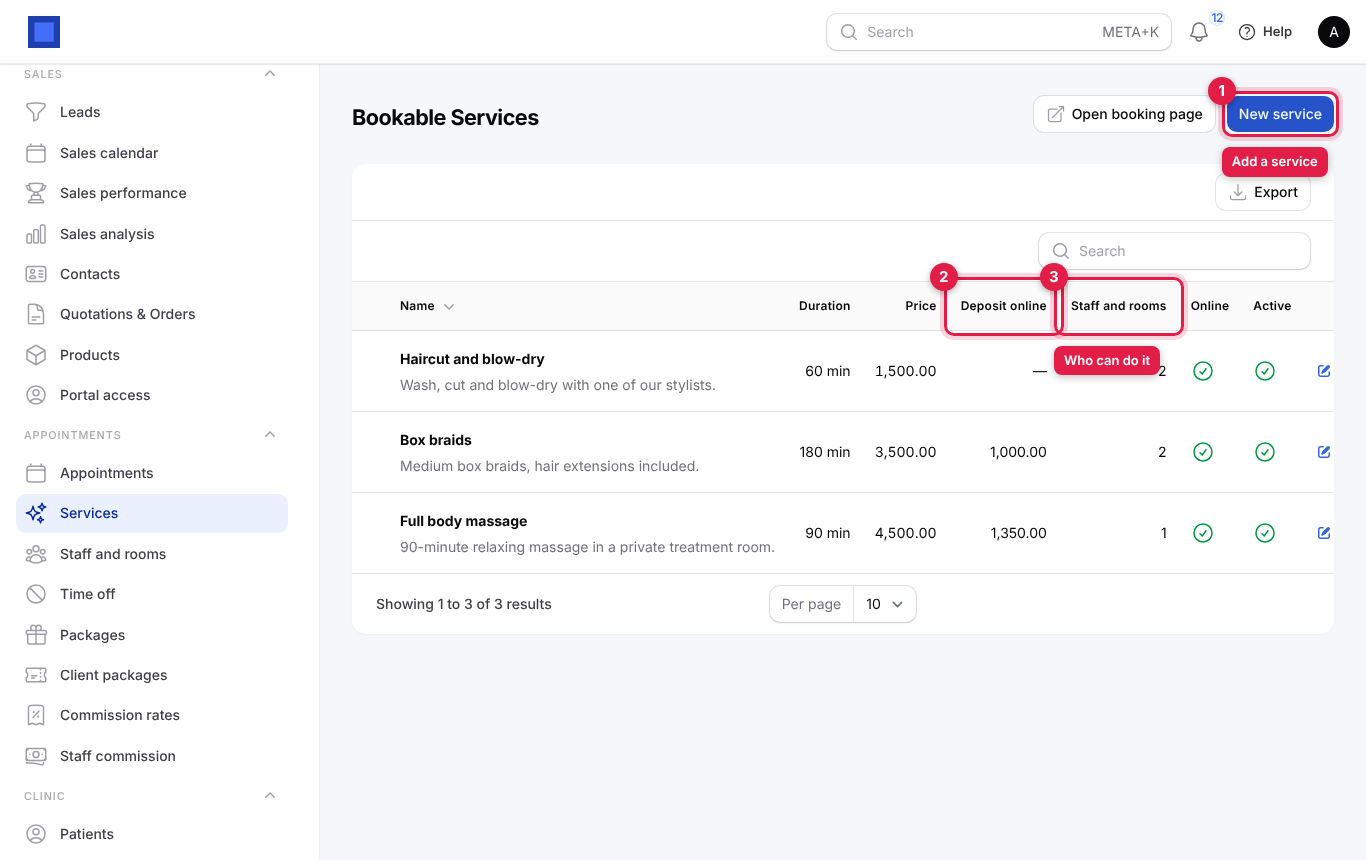
- Fill in the form and click Create. To change a service later, click Edit on its row.
| Field | What to enter |
|---|---|
| Company | Required. The company that sells the service. Starts on your default company. |
| Name | Required. What customers see, for example "Haircut and blow-dry" or "Full body massage". |
| Calendar colour | Optional. A colour dot shown next to the service in the list. |
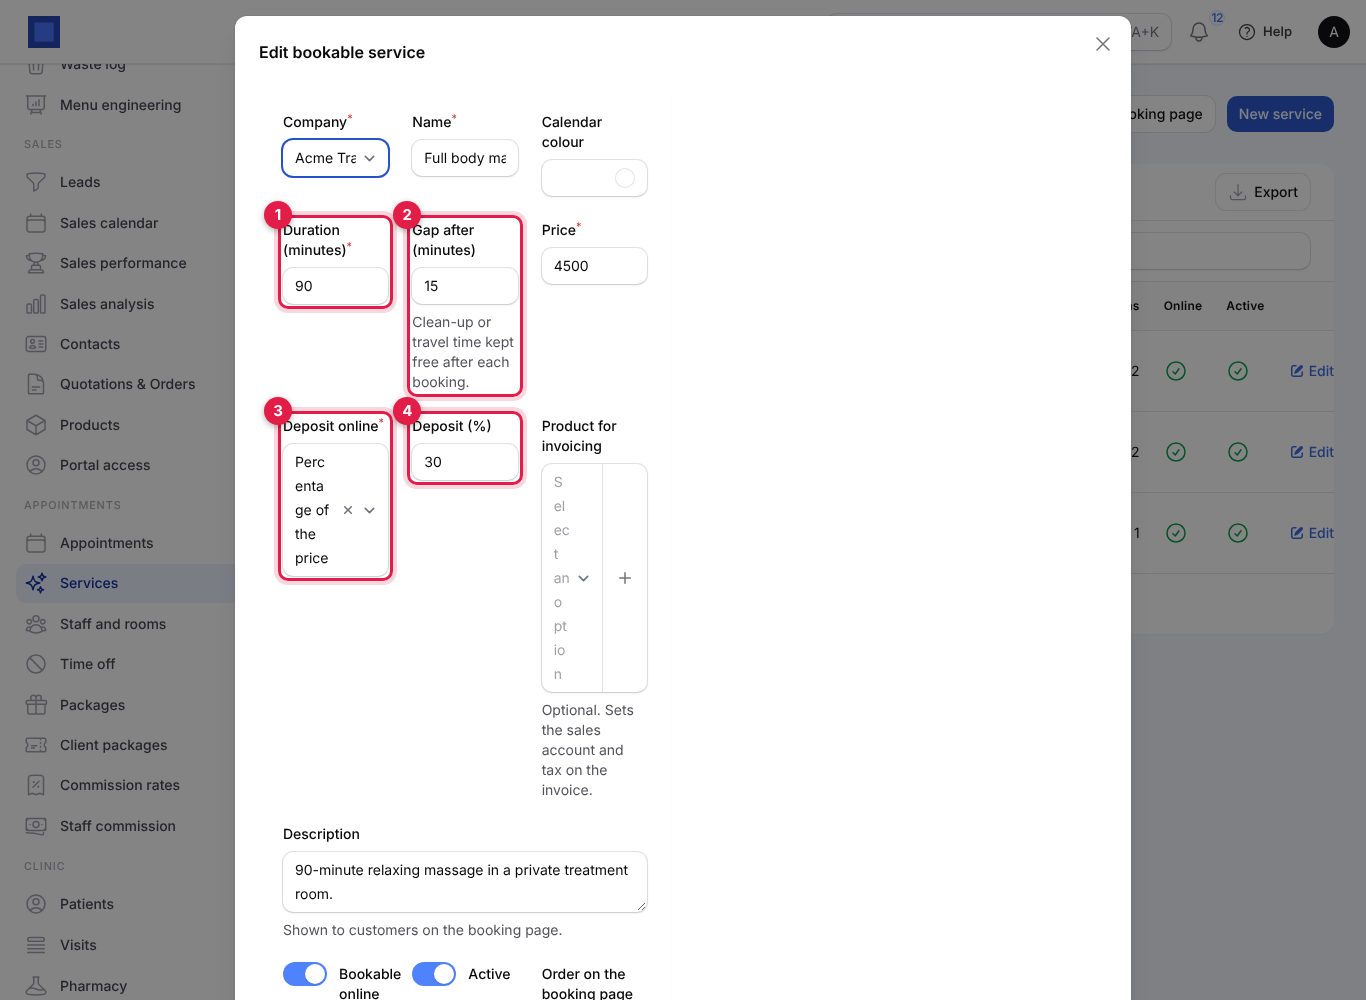
| Duration (minutes) | Required, 5 to 1,440 (first screenshot, marker 1). How long the appointment lasts. |
| Gap after (minutes) | Optional (marker 2). Clean-up or travel time kept free after each booking, for example 15. The next booking for the same person or room cannot start inside this gap. |
| Price | Required. The full price. Invoiced when you complete the appointment. Enter 0 for a free consultation. |
| Deposit online | Required (marker 3). No deposit, Fixed amount or Percentage of the price. |
| Deposit amount / Deposit (%) | Appears when a deposit is chosen (marker 4). The amount, or the percentage of the price. A deposit is never more than the price. |
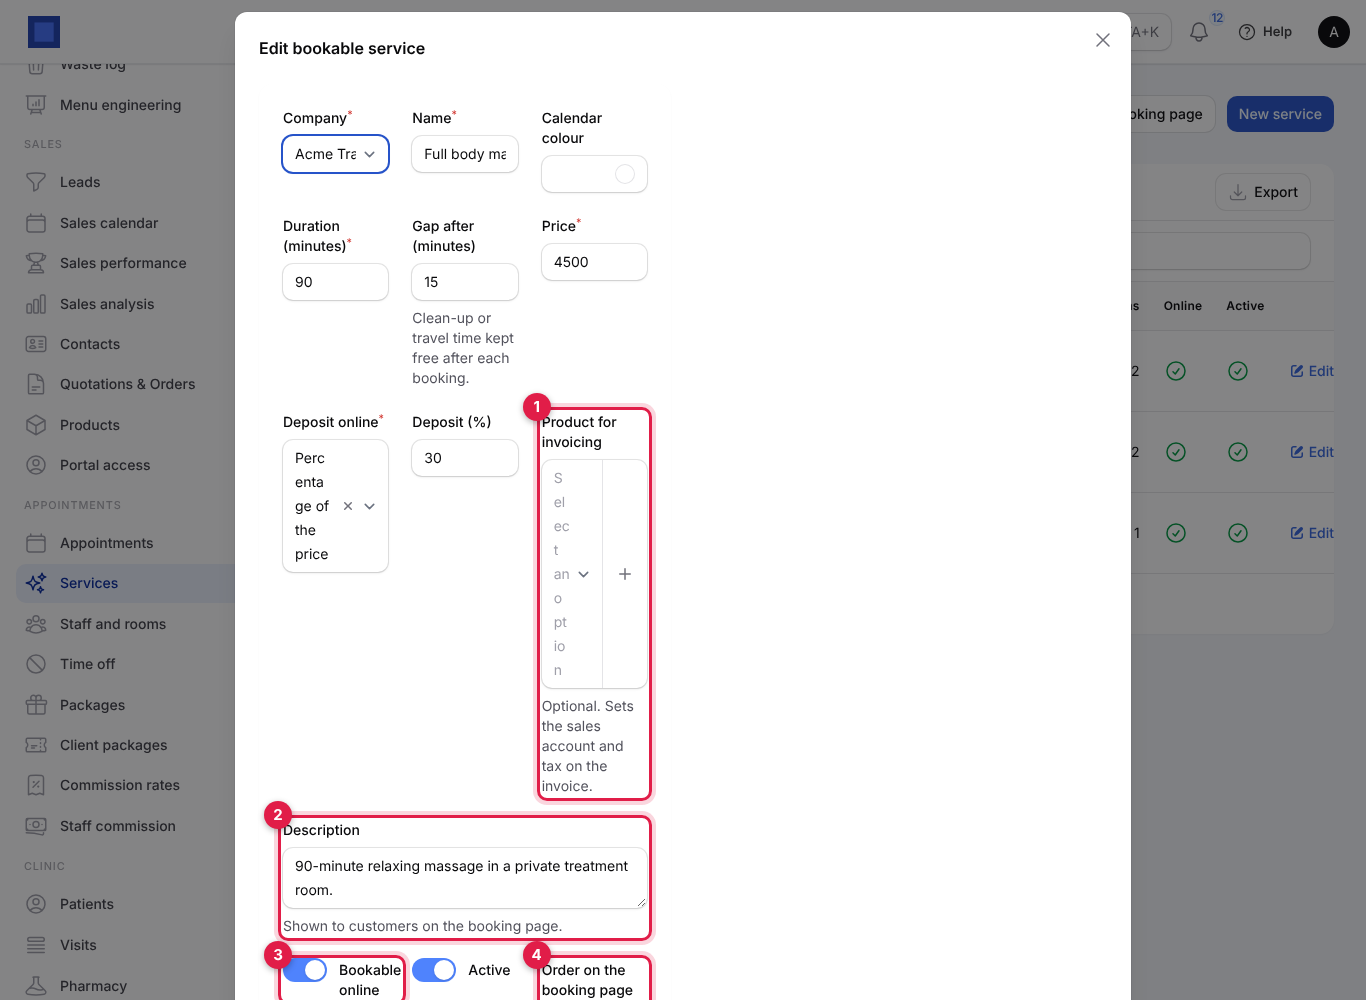
| Product for invoicing | Optional (second screenshot, marker 1). A product from Sales → Products that sets the sales account and tax on the final invoice. Click + beside it to add a product without leaving the form. |
| Description | Optional (marker 2). Shown to customers under the service name on the booking page. |
| Bookable online | On by default (marker 3). Turn off for services you only book yourself; they stay available under New appointment. |
| Active | On by default. Turn off to stop booking the service altogether. |
| Order on the booking page | Optional (marker 4). Lower numbers are listed first. |
Tip: Use a deposit for long or expensive services, such as braids or a massage, where a no-show costs you most. A 30% deposit on a KES 4,500 massage is KES 1,350.
Add your staff and rooms
Add each person who takes bookings and each room or piece of equipment that is booked on its own.
- In the menu, open Appointments → Staff and rooms.
- Click Add staff or room (marker 1). The list shows the Kind (marker 3), the services each one offers and their Hours a week (marker 2).
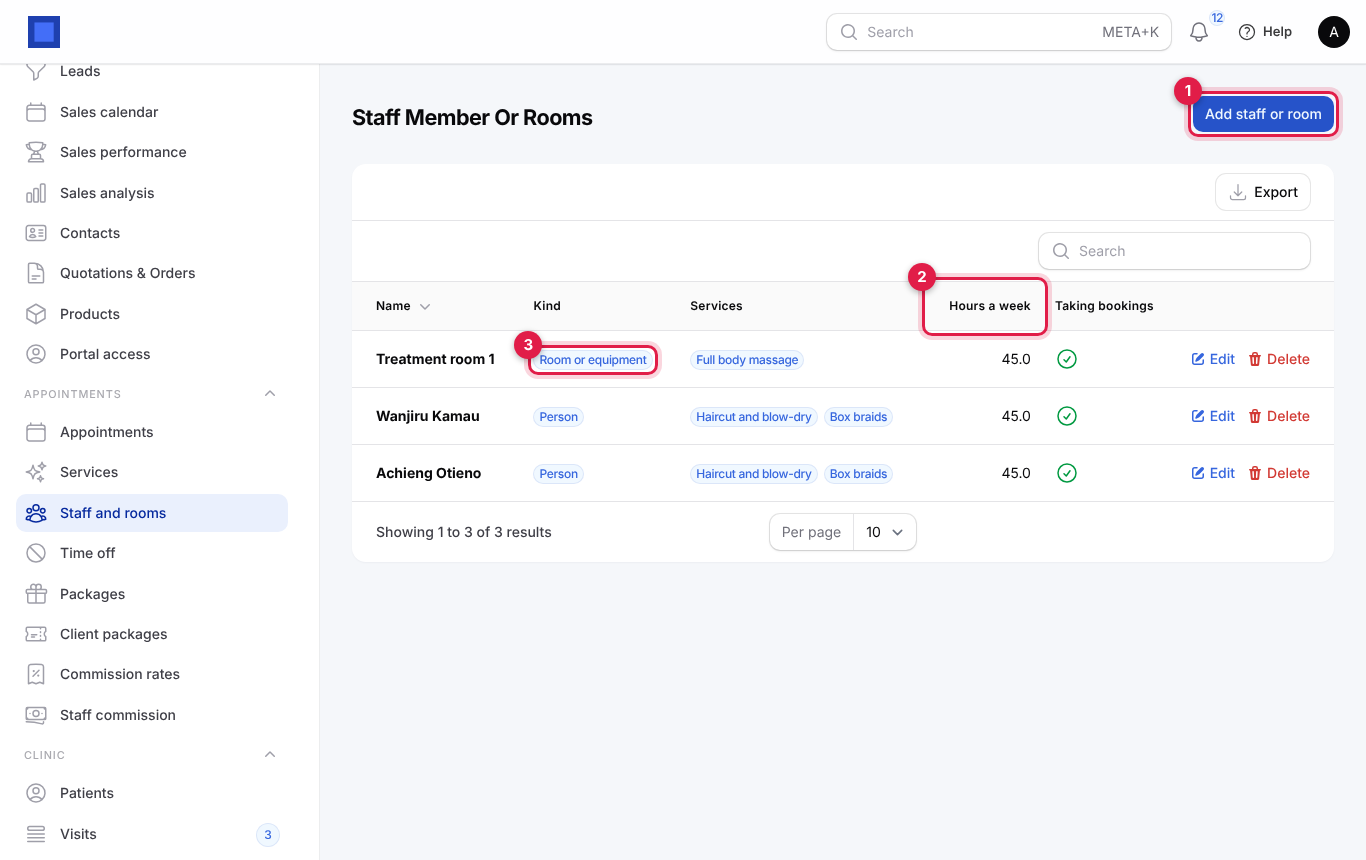
- Fill in the form, tick the services, set the weekly hours and click Create.
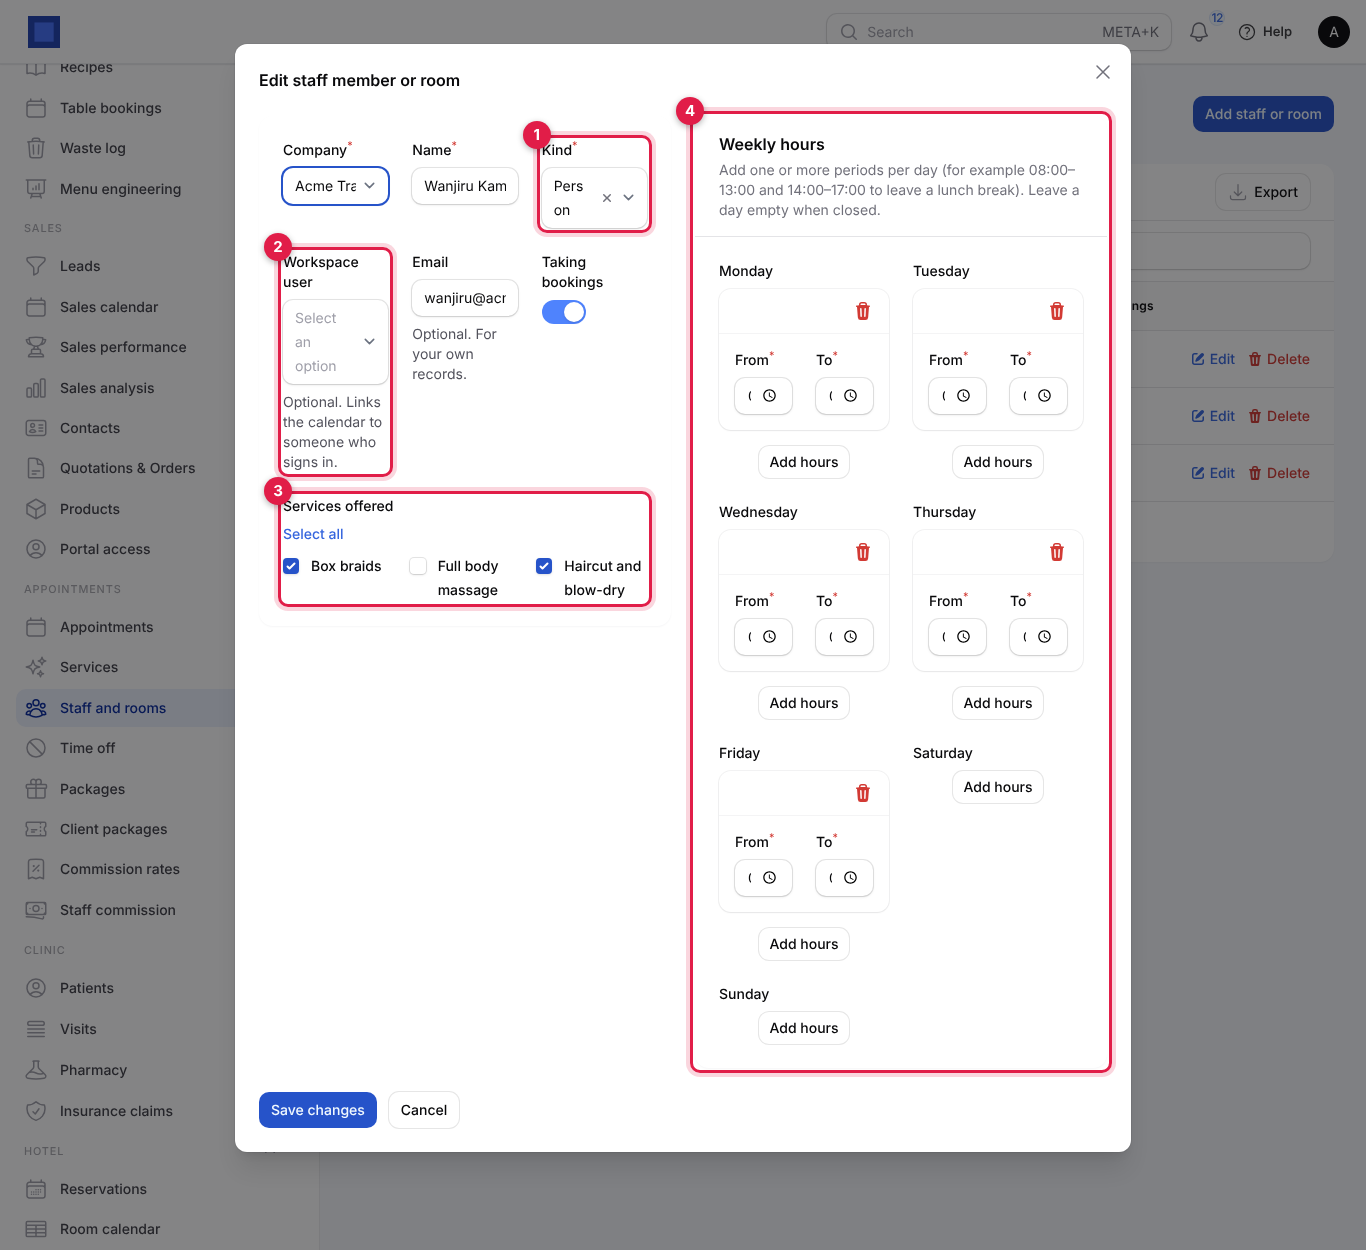
| Field | What to enter |
|---|---|
| Company | Required. Pick the company first: the list of services under Services offered follows it. |
| Name | Required. For example "Wanjiru Kamau" or "Treatment room 1". Customers see this name when they choose who to book with. |
| Kind | Required (marker 1). Person or Room or equipment. |
| Workspace user | Optional (marker 2). Links the calendar to someone who signs in to NaliSuite. |
| Optional, for your own records. | |
| Taking bookings | On by default. Turn off while someone is away for a long time or has left; they stop appearing on the booking page and in free times. |
| Services offered | Tick every service this person or room can do (marker 3). Select all ticks them all. |
| Weekly hours | One block per day (marker 4). Click Add hours under a day to add a period with From and To. Add two periods to leave a lunch break, for example 08:00–13:00 and 14:00–17:00. Leave a day empty when closed. Use the bin icon to remove a period. |
A new person or room starts with Monday to Friday, 08:00 to 17:00. Change it to their real hours before you open online booking.
Note: When the Add staff or room form opens, check that Company and Kind are filled in. If they are empty, pick them; the form will not save without them.
Block time off
Use time off for leave, public holidays, training, or a room closed for repairs. No booking can be made in that time, online or by staff.
- In the menu, open Appointments → Time off.
- Click Add time off.
- Pick Who or what (marker 1), type a Reason (marker 2), and set From (marker 3) and To (marker 4) with a date and time. Click Create.
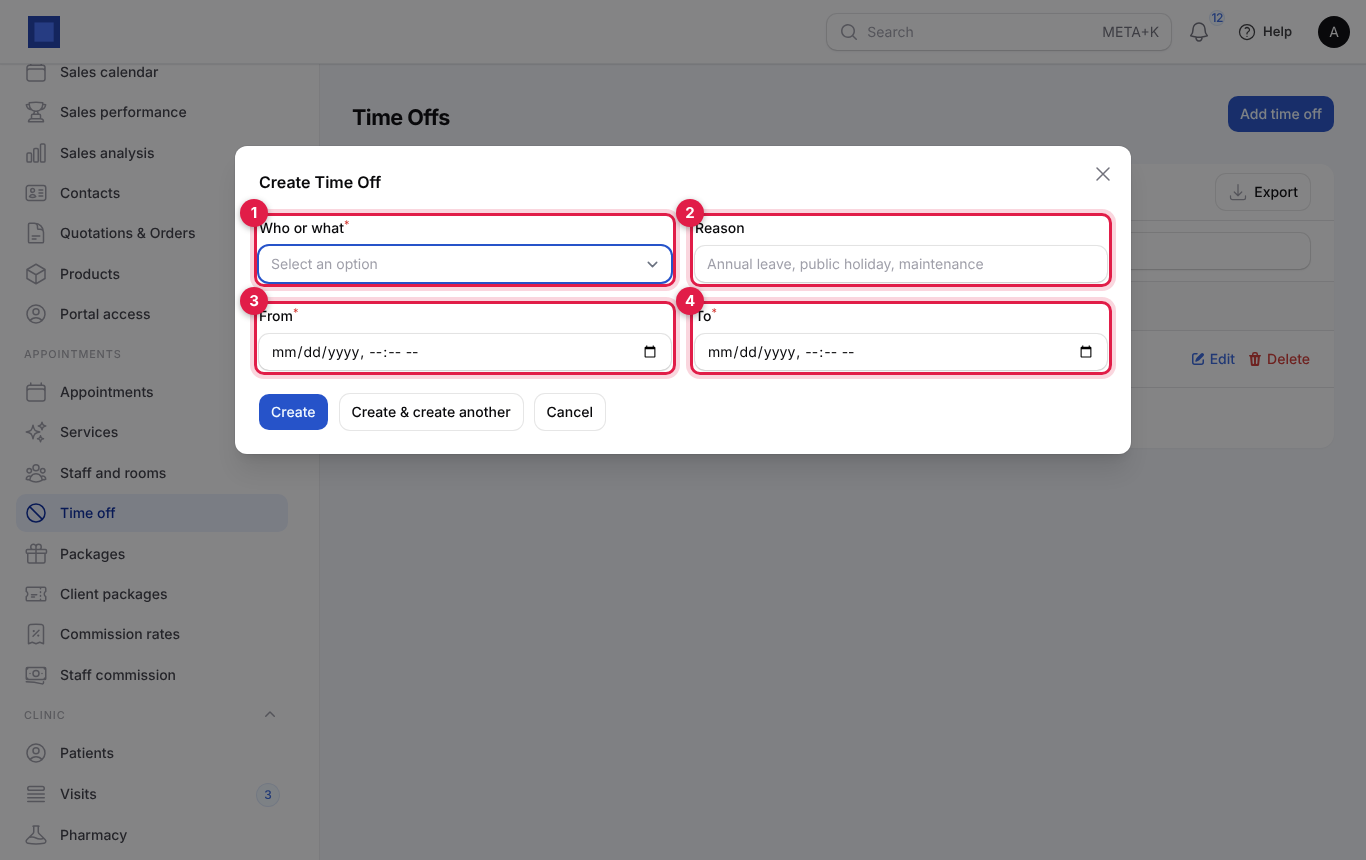
Bookings that already exist in that time are not moved or cancelled for you. Check the Appointments list and move them with Move (see below).
See your appointments
- In the menu, open Appointments → Appointments. The menu shows a badge with the number of confirmed appointments today.
- The list shows When, Customer (with phone or email), Service, With (the person or room), Price (with the deposit under it; a ✓ means the deposit is paid) and Status (marker 3).
- The Upcoming only filter is on when the page opens. Remove it (click the × on the filter chip) to see past appointments too. Use the filter icon to filter by Status, With or Service, and the columns icon to show the Source (Online or Staff) and Number columns.
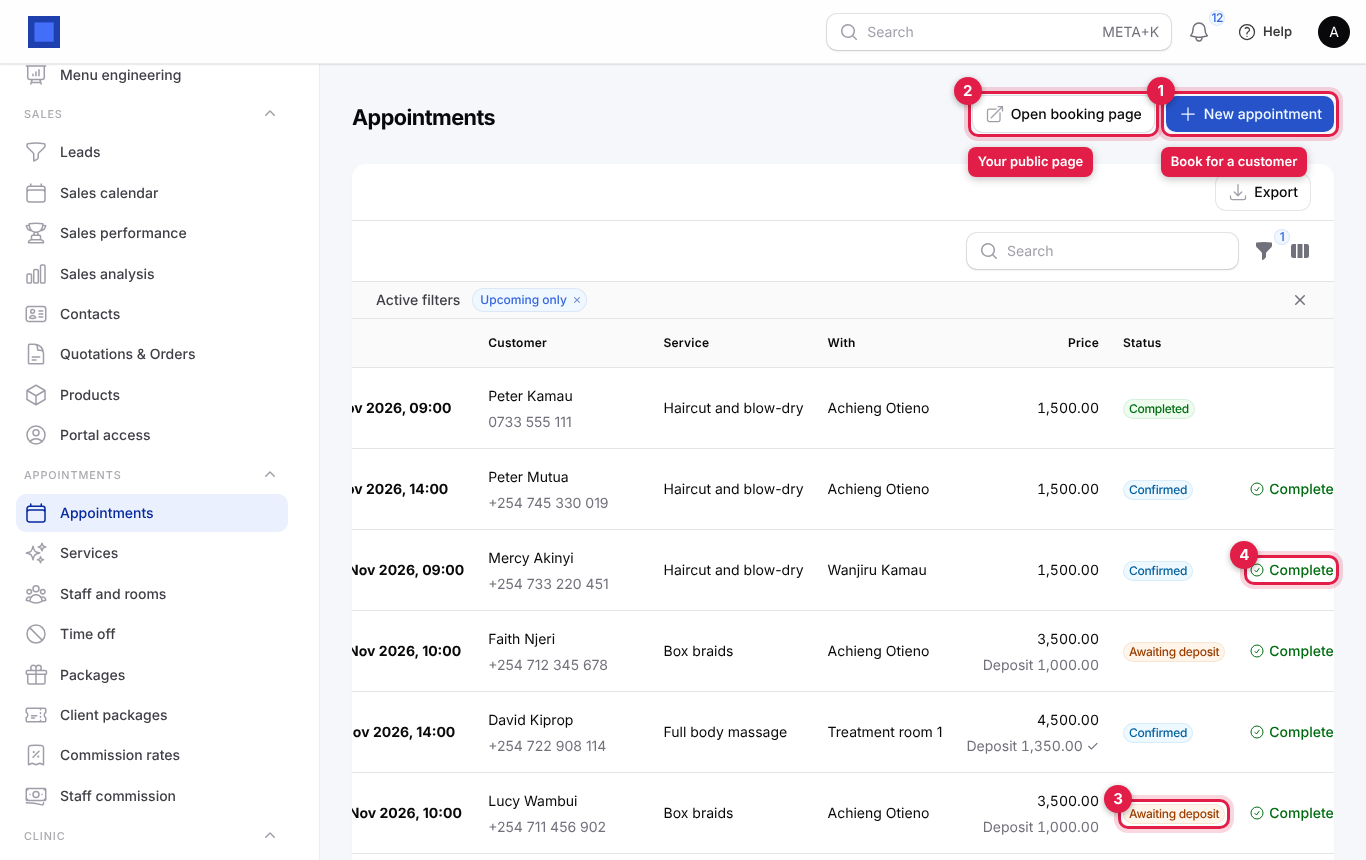
The buttons on this page:
| Button | What it does |
|---|---|
| New appointment (marker 1) | Book an appointment for a customer who phoned or walked in. |
| Open booking page (marker 2) | Opens your public booking page in a new tab, so you can copy its address and share it. |
| Complete (marker 4) | Marks the appointment as done and issues the invoice for the balance. |
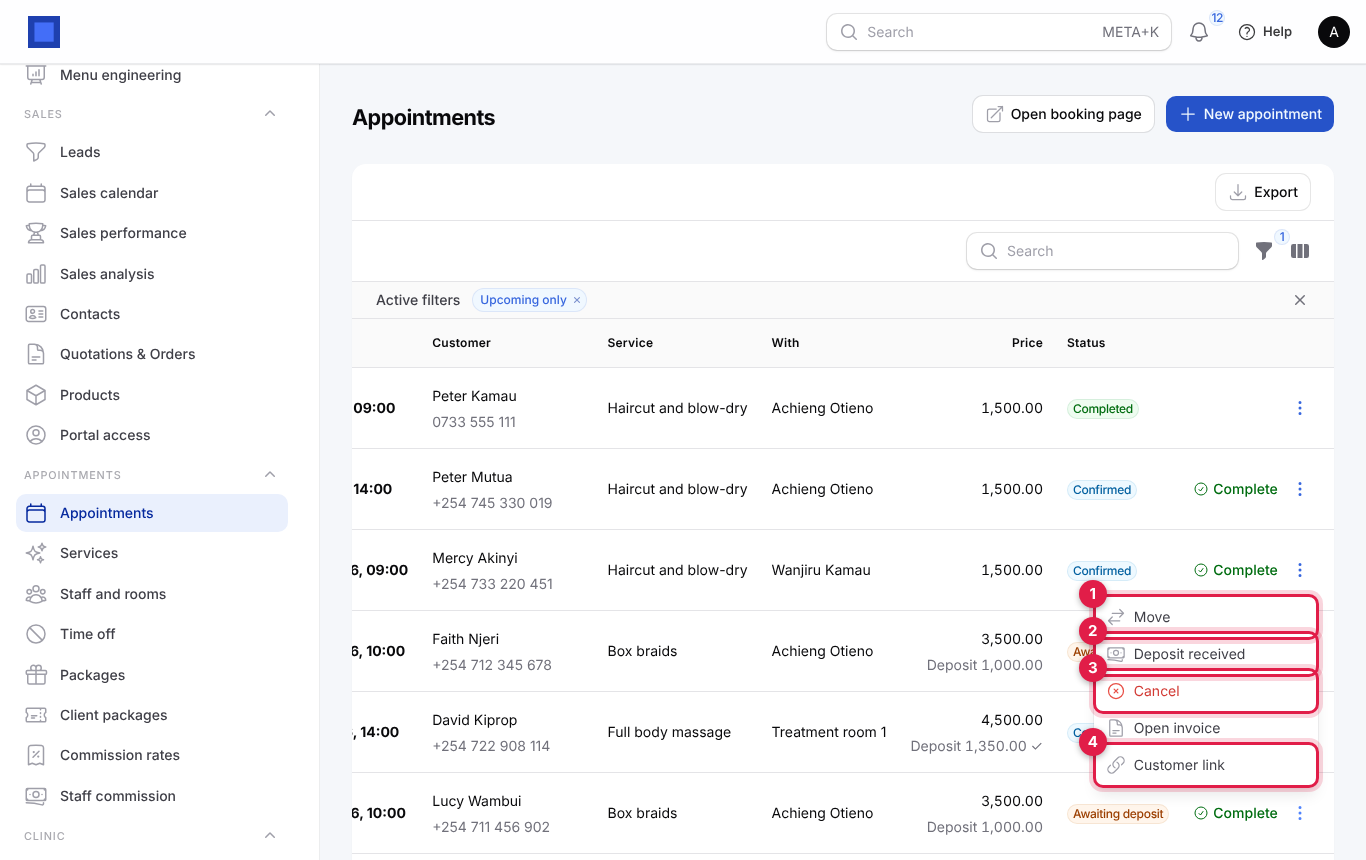
| ⋮ (Actions) | Move, No-show, Deposit received, Cancel, Open invoice and Customer link. Each appears only when it applies. |
Appointment statuses
| Status | What it means | What moves it on |
|---|---|---|
| Awaiting deposit | Booked online for a service that asks for a deposit. The time is held for the customer. | The customer pays the deposit invoice online, or you click Deposit received. It becomes Confirmed. |
| Confirmed | The time is booked. | Complete, No-show or Cancel. |
| Completed | The service was delivered and the balance invoiced. | Final. |
| Cancelled | Cancelled by you or by the customer. The time is free again. | Final. |
| No-show | The customer did not come. The time stays blocked in the history. | Final. |
Book an appointment for a customer
Use this for phone calls, walk-ins and regulars. Staff bookings are confirmed straight away and never ask for a deposit.
- On Appointments → Appointments, click New appointment.
- Pick the Service (marker 1) and the Day (marker 2).
- Open Time (marker 3). It lists only the free start times on that day, each with the person or room who is free, for example "11:00 · Wanjiru Kamau". If it is empty, nobody who offers the service is free that day.
- Pick the Customer (marker 4). Their name, email and phone fill in for you. For a new customer, either leave Customer empty and type the Name, Email and Phone, or click + next to the field to add them as a contact first.
- Add any Notes and click Submit.
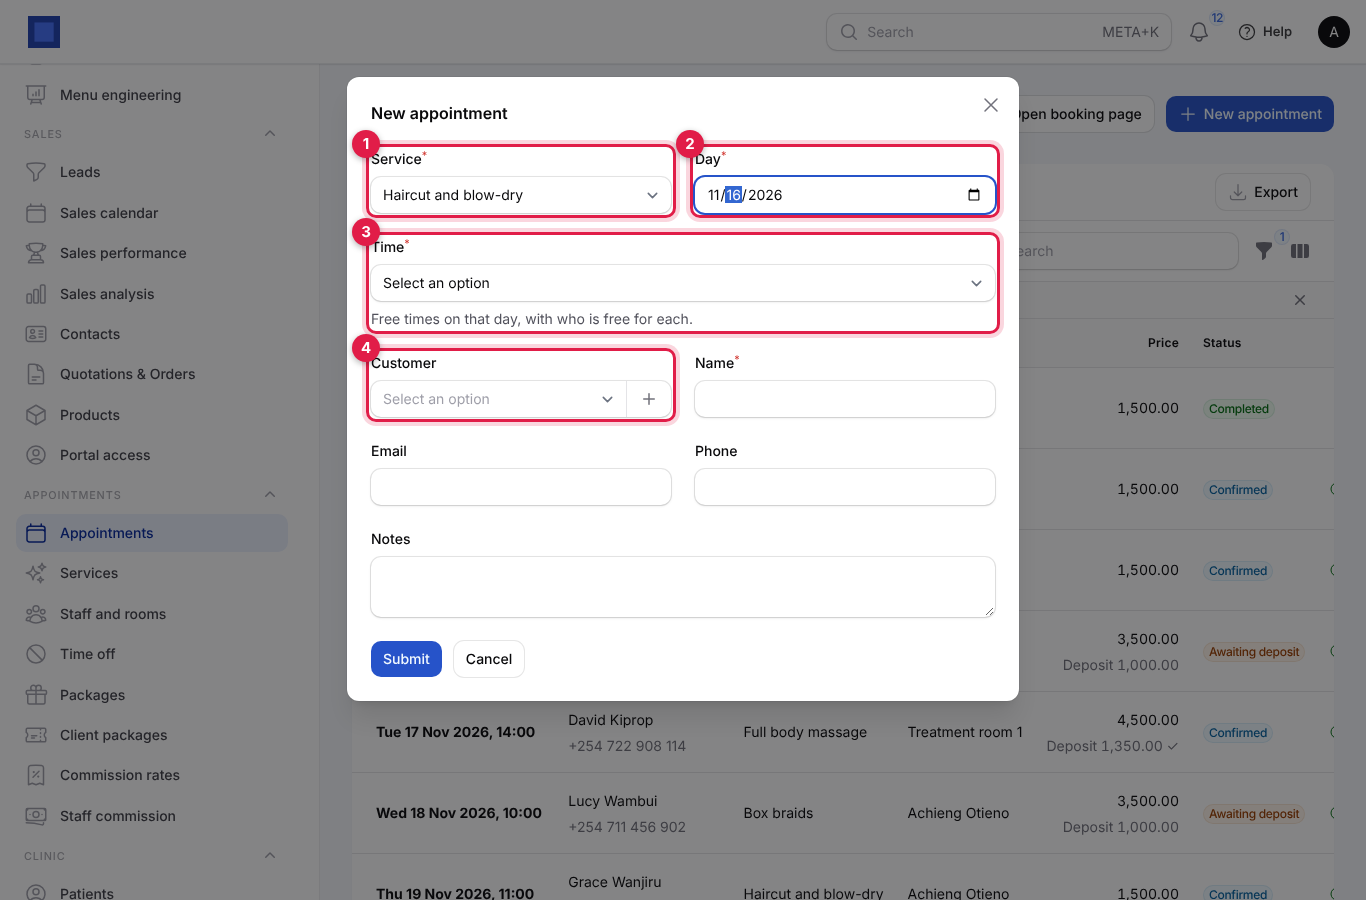
You see Booked: APT-2026-…. When the customer has an email address, they receive a confirmation email with a View booking button that opens their booking page.
| Field | What to enter |
|---|---|
| Service | Required. Every active service, whether or not it is bookable online. |
| Day | Required. Starts on today. Earlier days are not offered times. |
| Time | Required. Free start times on that day and who is free for each. The times follow the Start times every (minutes) setting. |
| Customer | Optional. Your existing customers. If you leave it empty, NaliSuite looks for a contact with the same email or phone, and creates one if there is none. |
| Name | Required. The name on the booking. |
| Optional, but without it the customer gets no confirmation or reminder. | |
| Phone | Optional. Used for text reminders when an SMS provider is set up. |
| Notes | Optional, for example "Prefers Wanjiru" or "Allergic to latex". |
Move an appointment
- On the appointment's row, click ⋮ and then Move (marker 1).
- Set the New time (marker 1) and pick who it is With (marker 2). Only people and rooms that offer the service are listed.
- Click Submit. If the new time is not free you see That time is not free. and nothing changes.
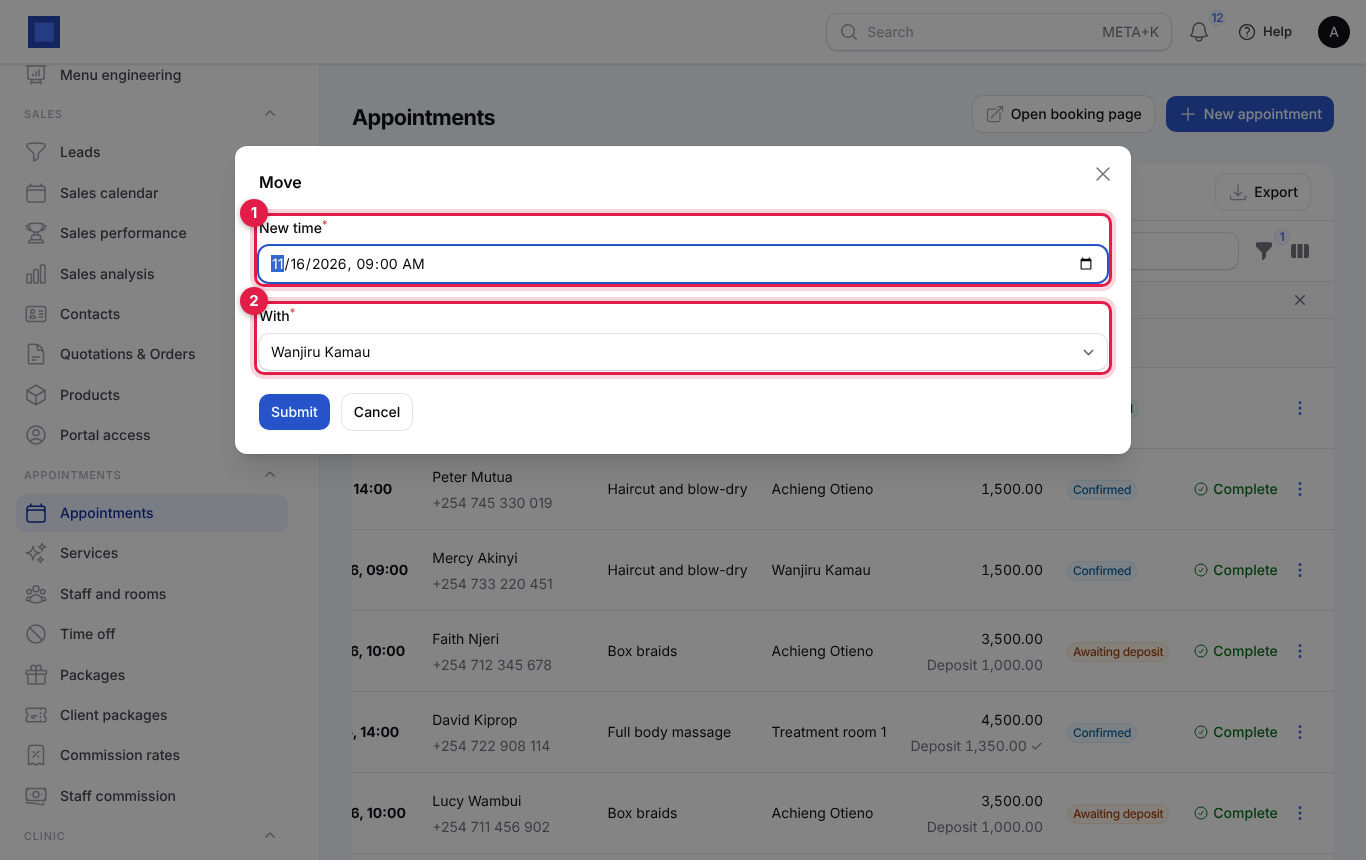
You see Moved. The customer has been told. The customer gets a "Your booking has moved" email, and a fresh reminder is sent before the new time.
Confirm a deposit paid another way
When a customer pays the deposit in cash, by bank transfer or to your till instead of on the pay page:
- On the row, click ⋮ and then Deposit received (marker 2 in the actions screenshot above).
- Click Confirm. The appointment becomes Confirmed and the customer gets the confirmation email.
- Record the payment on the deposit invoice as well (click ⋮ → Open invoice, then Record payment), so your books show the money.
Complete an appointment and invoice the balance
- When the service is done, click Complete on the row.
- The window tells you what will be invoiced, for example "An invoice for the balance of 1,500.00 will be issued to the customer" (marker 1). Click Confirm (marker 2).
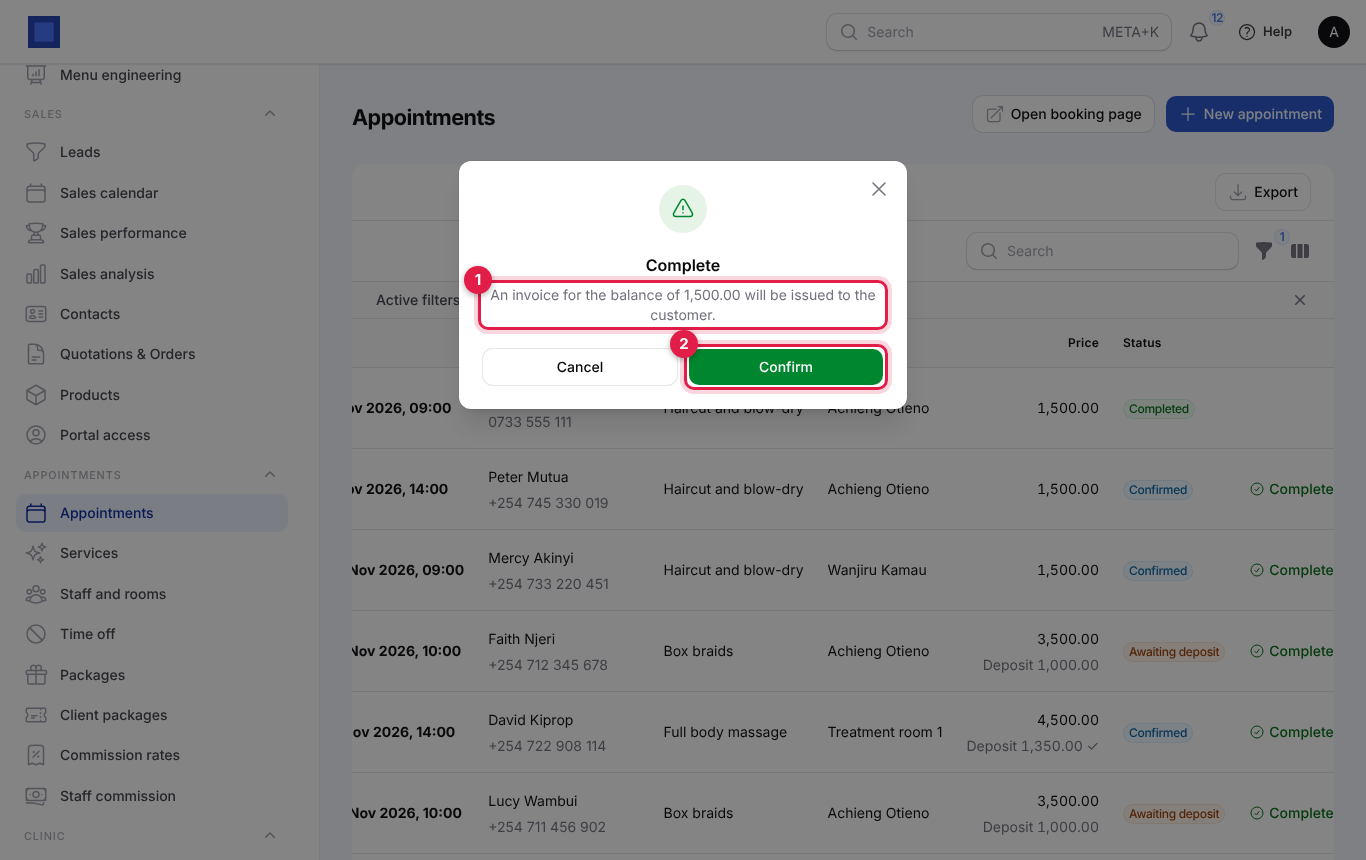
What happens:
- The appointment becomes Completed.
- An invoice is issued to the customer with the service and date as the line, at the service price, with your default tax and the Product for invoicing (if set). If a deposit was paid, a second line Less deposit paid takes it off. The appointment number is the customer reference.
- You see Completed. Invoice INV-… issued. Use ⋮ → Open invoice to send it, print it or record the payment.
- Nothing is invoiced when the price is 0 or the deposit already covered it.
Cancel or mark a no-show
- Cancel: click ⋮ → Cancel (marker 3 in the actions screenshot), type a Reason if you like and click Submit. The time is freed, an unpaid deposit invoice is cancelled, and the customer gets a "Your booking is cancelled" email with a Book again button. If they had paid a deposit, the email says you will be in touch about it; refund it with a credit note if needed.
- No-show: click ⋮ → No-show and confirm. It appears only for confirmed appointments whose start time has passed. Nothing is invoiced.
Tip: ⋮ → Customer link (marker 4) opens the customer's own booking page, the same one linked in their emails. Copy it into a WhatsApp message if the customer lost the email.
What your customers see
The booking page
Your booking page is at /book on your workspace address, for example https://yourbusiness.nalisuite.com/book. Click Open booking page on Appointments or Services to open it, then share the address on your website, social media and WhatsApp status.
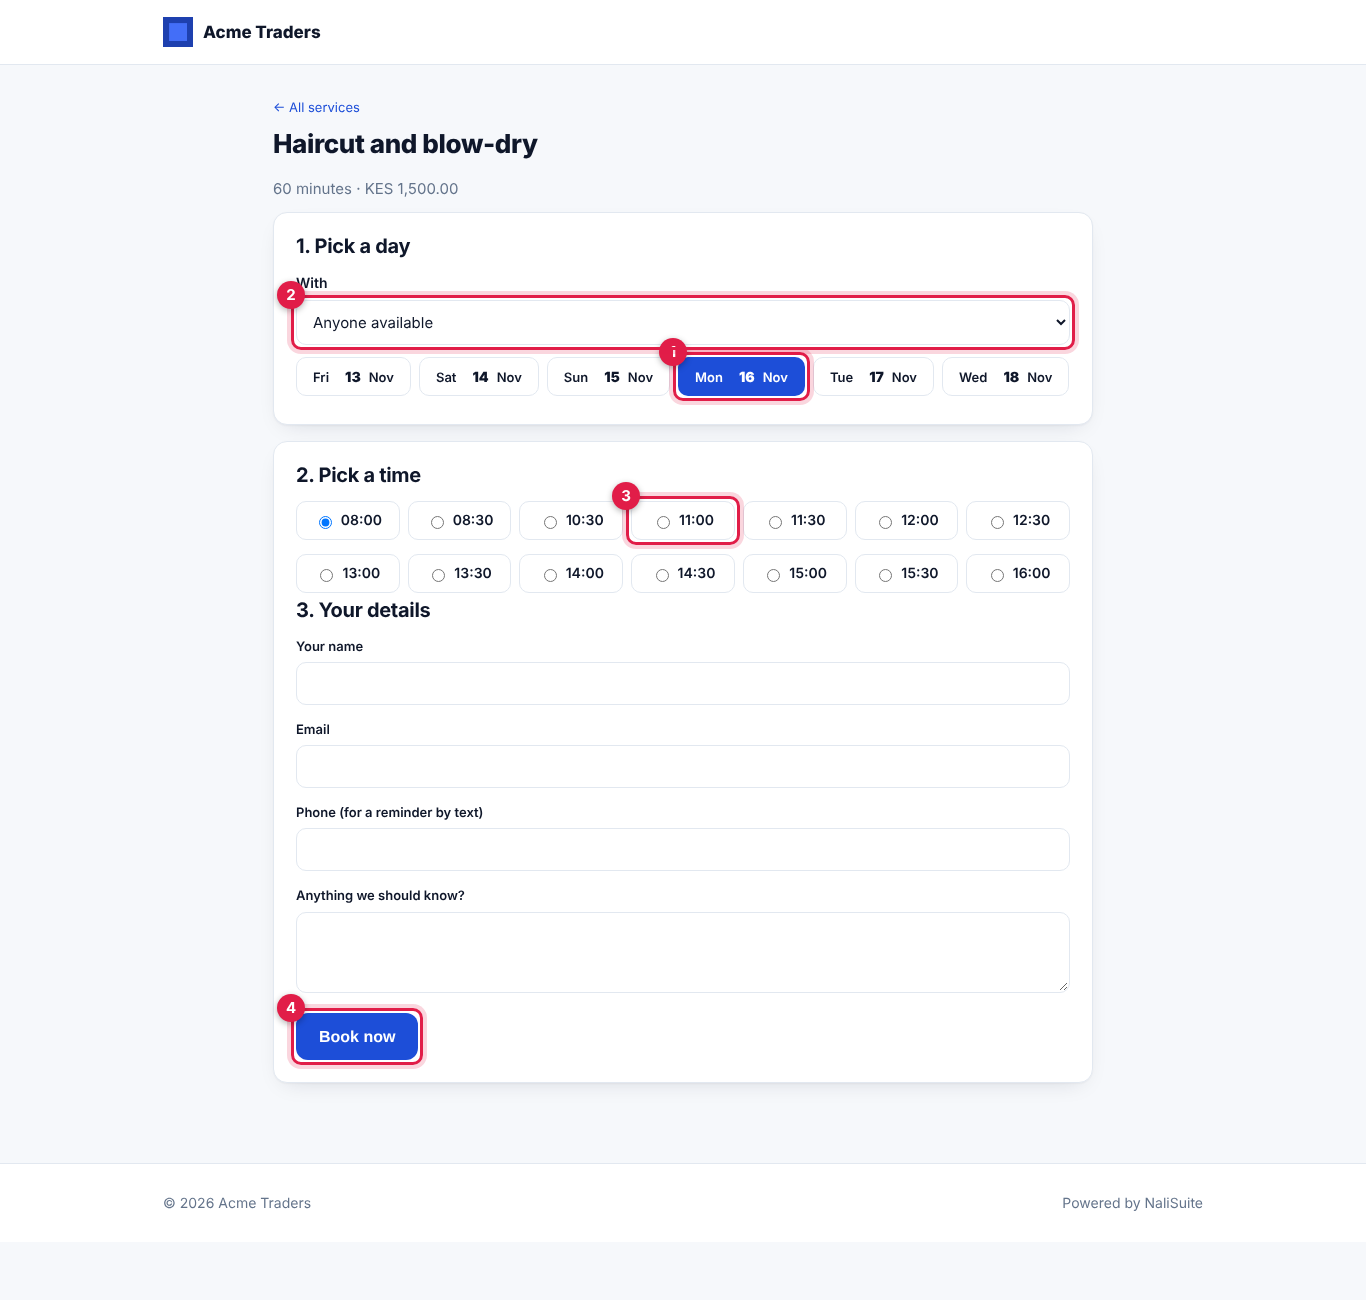
Customers see every active service that is Bookable online and offered by at least one person or room, with its length, price and description. They click Choose (marker 1).
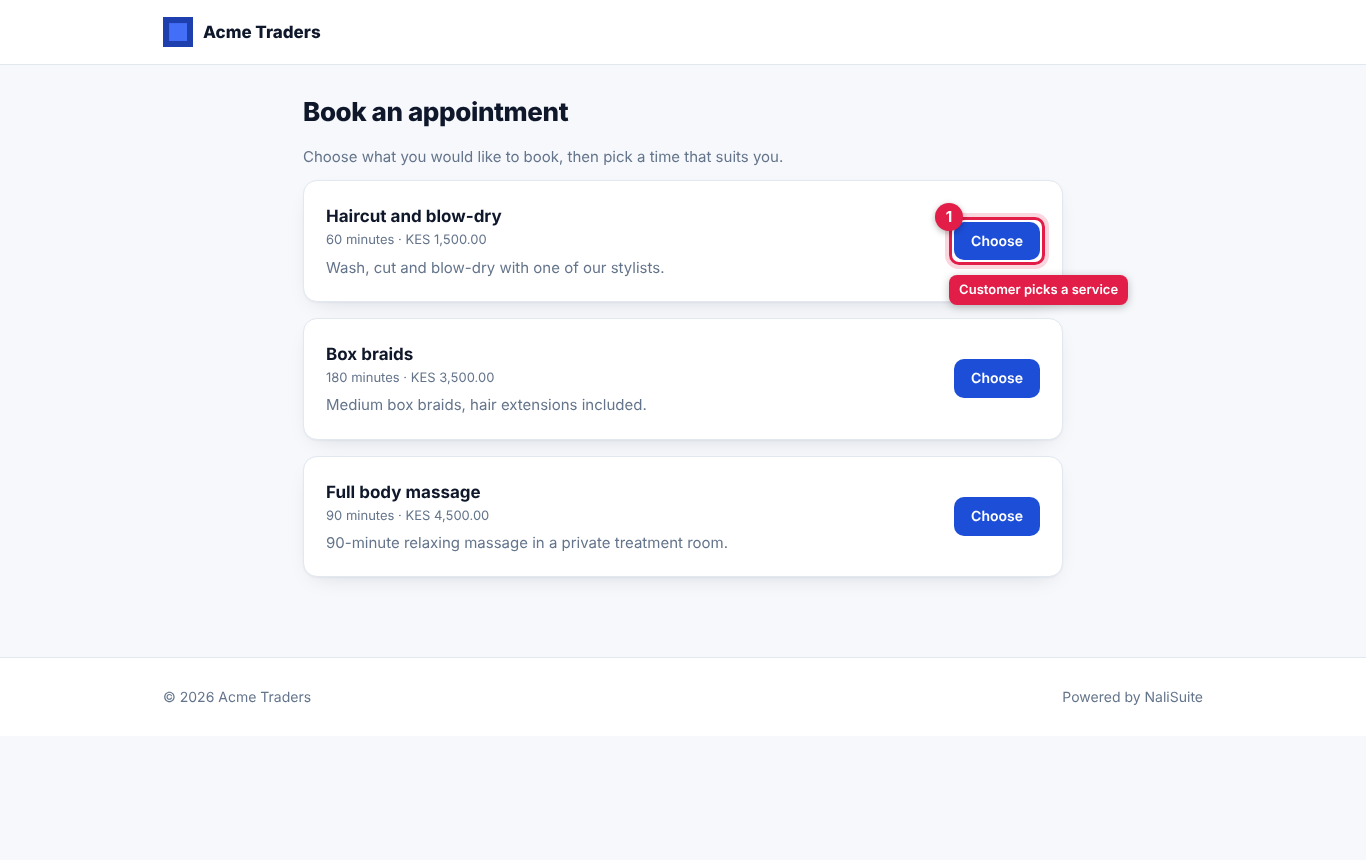
On the service page they:
- Optionally pick who they want under With (marker 2). Anyone available gives the earliest free person or room. The list appears only when more than one person or room offers the service.
- Pick a day (marker 1). Up to 30 days are shown, starting today.
- Pick a time (marker 3). Only free times are shown; times inside the minimum notice are left out.
- Fill in Your name, Email, Phone (for a reminder by text) and Anything we should know?, then click Book now (marker 4). For a service with a deposit, the button reads Continue to pay the deposit.
- No deposit: the booking is Confirmed at once. The customer lands on their booking page with "You are booked in. We have emailed you the details." and receives a confirmation email.
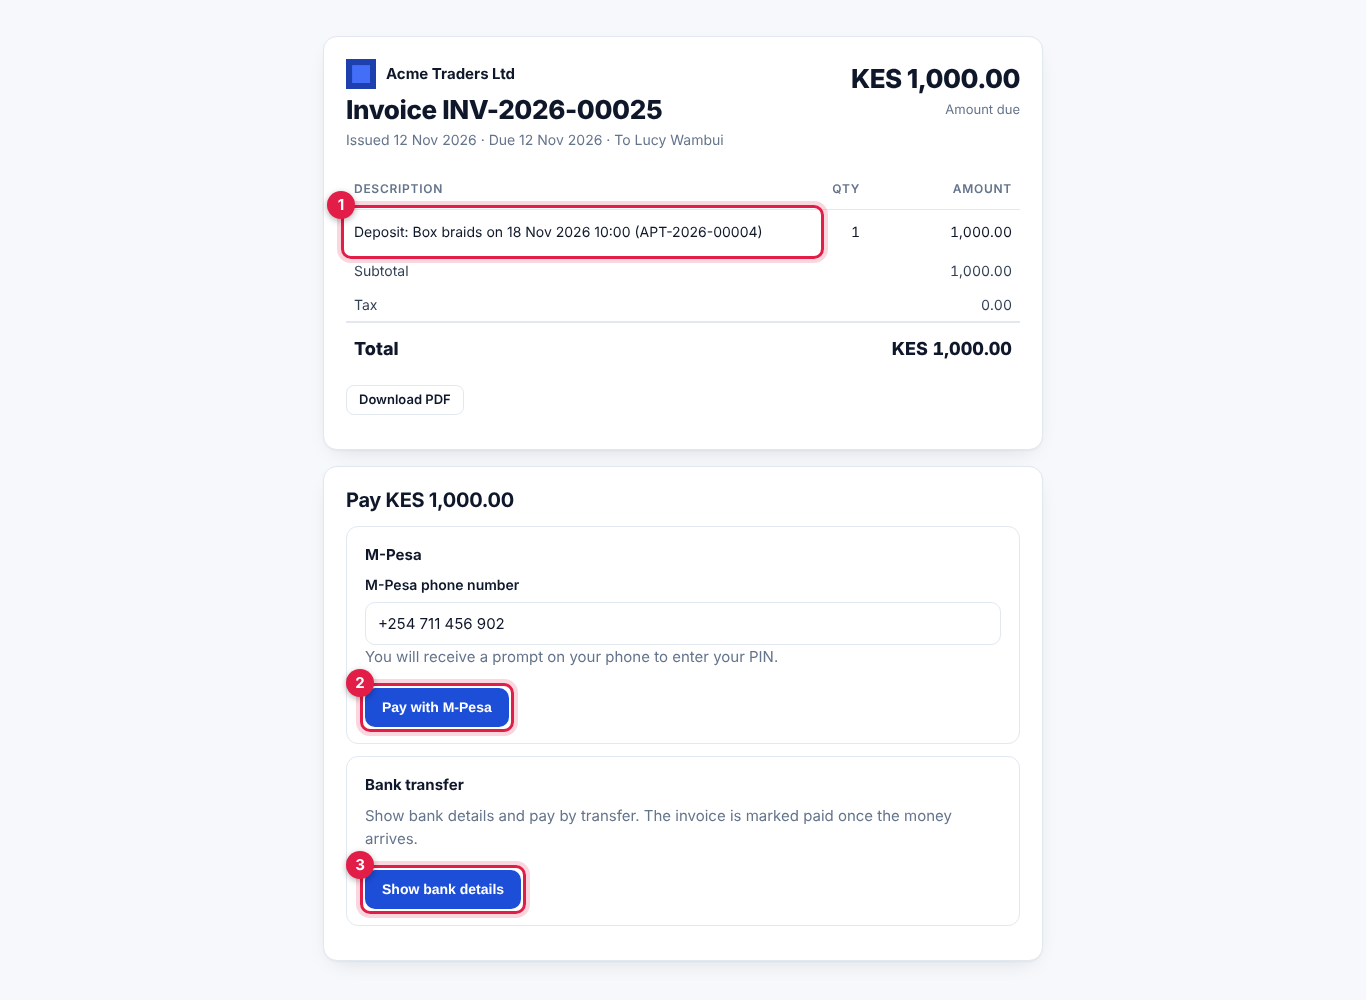
- With a deposit: the booking is held as Awaiting deposit, a deposit invoice is issued, and the customer is taken to the invoice pay page to pay with your payment gateways: the deposit line (marker 1), then each gateway you have set up, such as Pay with M-Pesa (marker 2) or Show bank details (marker 3). They also receive a "Pay your deposit to confirm your booking" email with a Pay deposit button. When the payment comes in and the invoice is fully paid, the booking is confirmed and the confirmation email is sent.
The customer's booking page
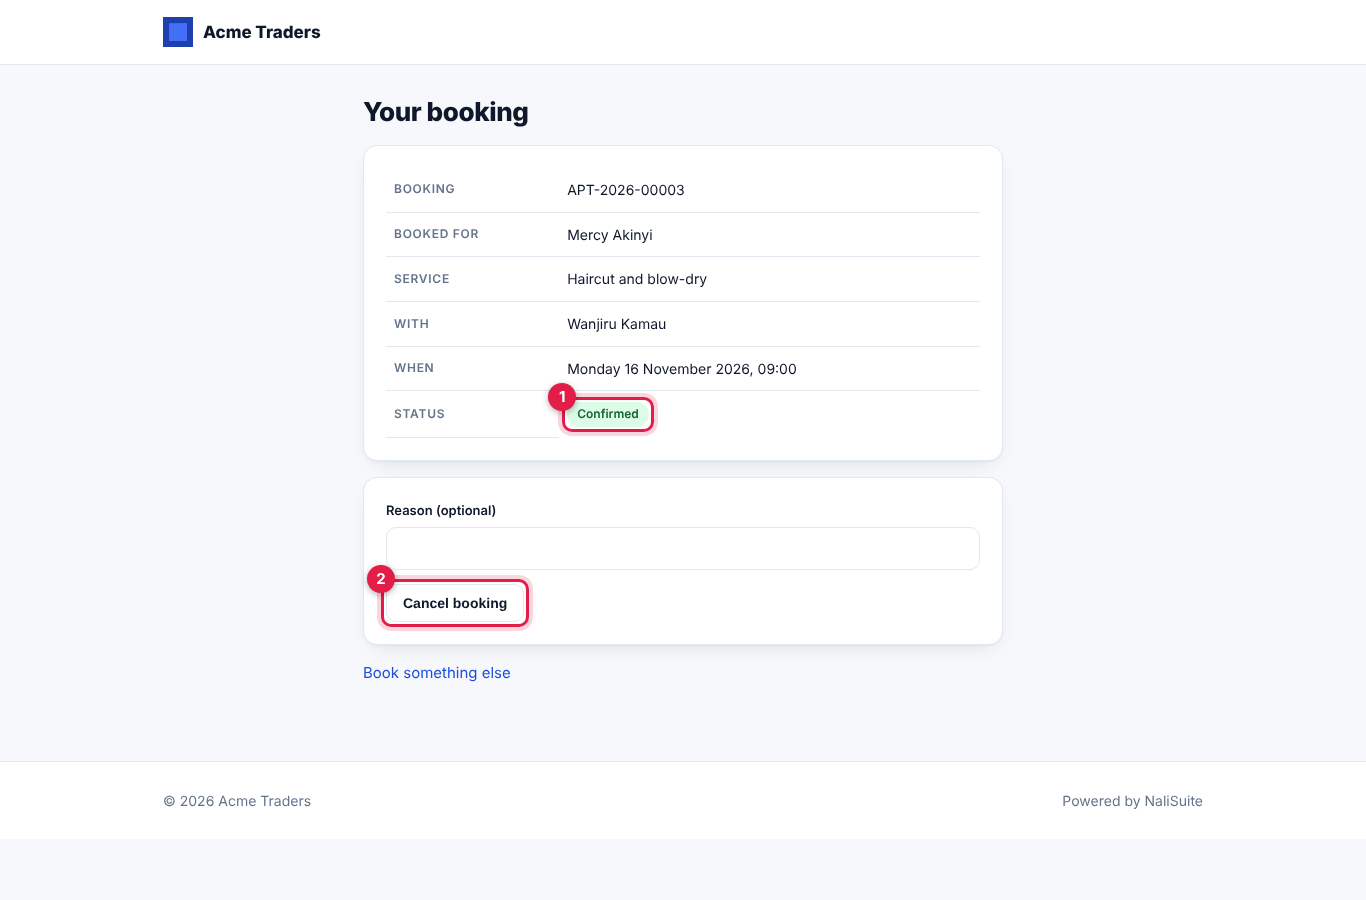
The link in every email opens Your booking: the number, service, who with, when and the Status (marker 1). Until the cancellation cut-off, the customer can type a reason and click Cancel booking (marker 2). After the cut-off the page says "To change or cancel this booking now, please contact us."
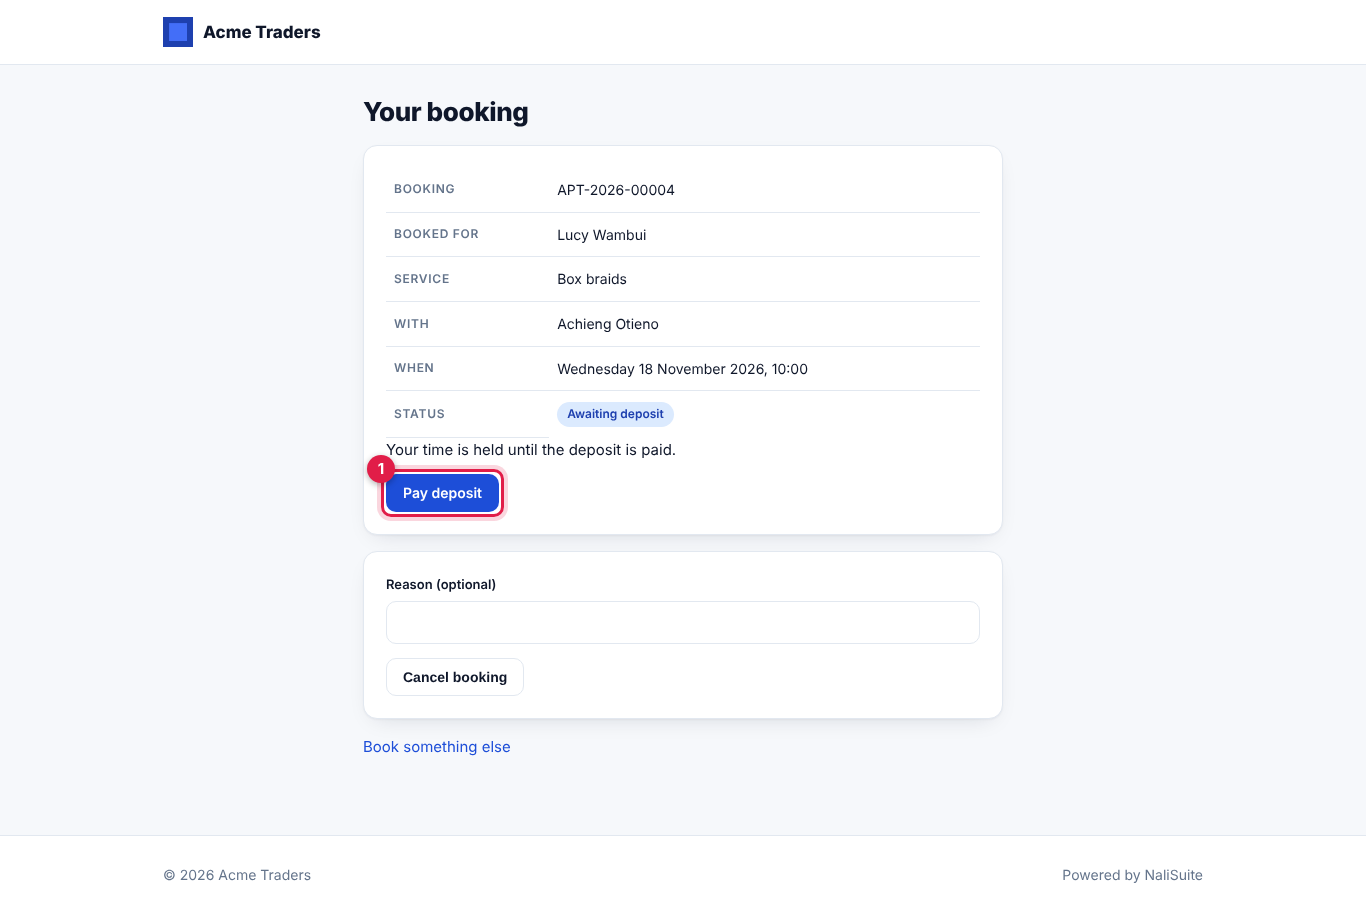
While a deposit is unpaid, the page says "Your time is held until the deposit is paid." with a Pay deposit button (marker 1).
Emails and reminders
| When | Email subject | Button |
|---|---|---|
| Booked with a deposit to pay | Pay your deposit to confirm your booking | Pay deposit |
| Booked, or deposit paid | Your booking is confirmed | View booking |
| Moved by staff | Your booking has moved | View booking |
| Cancelled (by staff or customer) | Your booking is cancelled | Book again |
| Within 24 hours of the start | Reminder: your booking tomorrow | View booking |
Reminders are sent once per booking, every hour for confirmed appointments starting in the next 24 hours. When the Marketing app is on and an SMS provider is set up, a text reminder goes to the customer's phone as well. Emails are only sent when the booking has an email address.
The customer portal
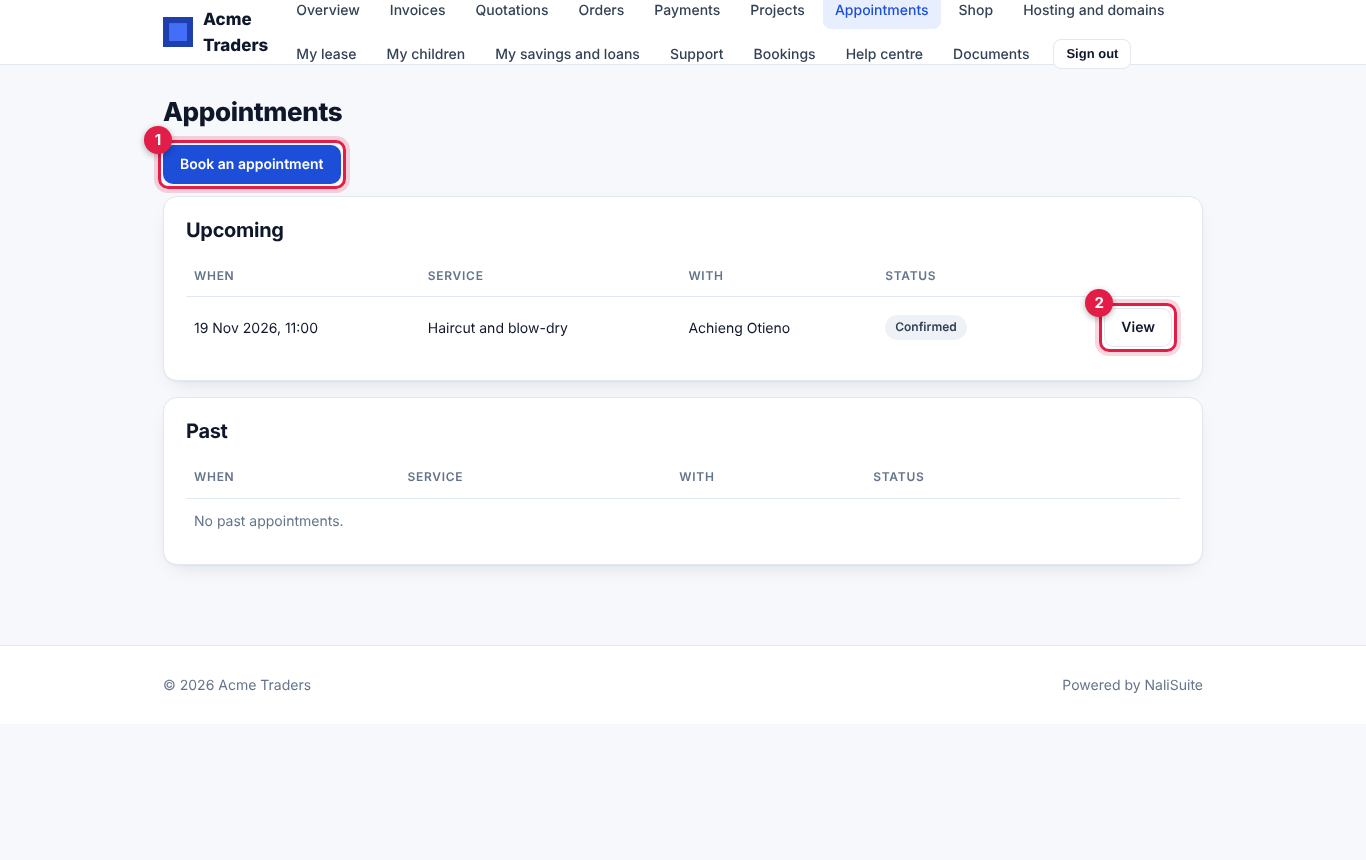
Customers who sign in to your customer portal see an Appointments page with their Upcoming and Past appointments, a Book an appointment button (marker 1) and a View button (marker 2) that opens the booking page where they can cancel. The page appears when the Customer portal app is on.
Booking settings
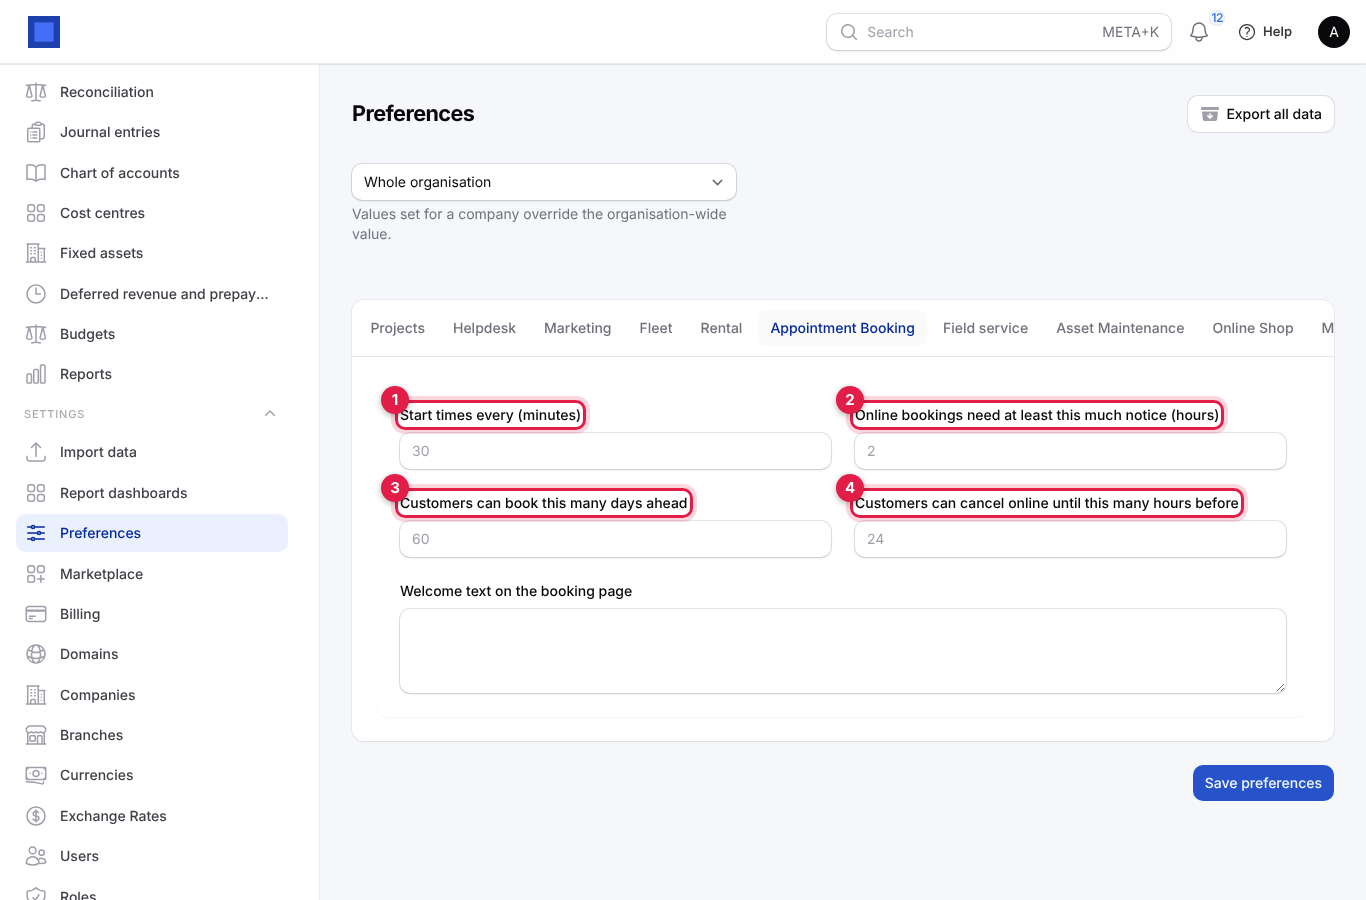
- In the menu, open Settings → Preferences.
- Click the Appointment Booking tab.
- Change the settings and click Save preferences. Leave a box empty to use the default shown in grey.
| Setting | Default | What it does |
|---|---|---|
| Start times every (minutes) (marker 1) | 30 | The grid of start times offered: 30 gives 08:00, 08:30, 09:00… Use 15 for short services or 60 for long ones. |
| Online bookings need at least this much notice (hours) (marker 2) | 2 | Customers cannot book a time sooner than this. Staff can still book any free time today. |
| Customers can book this many days ahead (marker 3) | 60 | The furthest date customers can book. The booking page shows at most 30 days of buttons. |
| Customers can cancel online until this many hours before (marker 4) | 24 | After this, the Cancel booking button disappears and customers must contact you. |
| Welcome text on the booking page | — | Replaces "Choose what you would like to book, then pick a time that suits you." at the top of the booking page. |
The dropdown at the top of Preferences lets you set different values for one company; company values override the organisation-wide ones. Times on the booking page and in emails follow the company's time zone (set under Settings → Companies).
Common questions
Why does a service not show on my booking page? It must be Active, Bookable online, and offered by at least one person or room that is Taking bookings. Check Services offered on Staff and rooms.
A customer says there are no free times. Why? Check the person's Weekly hours for that day, any Time off, and the minimum notice. A long service only fits where the whole duration plus the gap after is free before the end of working hours.
Can a customer book two services at once? No. Each booking is for one service. They book the second one separately.
Can I take a deposit on a booking I make myself? Not automatically: deposits are only asked for on online bookings. Send the customer an invoice for the deposit from Finance → Invoices if you need one.
What happens to the deposit if the customer cancels? An unpaid deposit invoice is cancelled. A paid deposit stays on the customer's account; the cancellation email tells them you will be in touch. Refund it with a credit note, or keep it if your terms say so.
Do reminders go out on weekends? Yes. Reminders run every hour, every day, for appointments in the next 24 hours.
Can two people be booked for the same time? Yes, if they are different people or rooms. The same person or room can never be double-booked, even when two customers book at the same moment.