Facebook and Instagram lead ads
This page is for business owners and marketers who run lead ads on Facebook or Instagram, and for whoever sets up the business's Meta account. When someone fills in one of your lead ad forms (Meta calls them Instant forms), NaliSuite receives it within seconds and adds a lead to CRM with every answer they gave, the form, the ad and the campaign. Your usual assignment rules and lead scoring apply, so the right salesperson can call while the customer is still interested. This page covers switching it on, connecting your own Meta app, how leads land in CRM, what to do when one could not be fetched, and bringing in older leads from a form.
Facebook and Instagram lead ads is a marketplace module. It needs the CRM app. Its screen is Sales → Lead ads; the leads themselves appear under Sales → Leads.
Note: You need the meta_leads.manage permission to see Lead ads. Owners and admins have it; the member role does not. Changing the settings under Settings → Preferences needs core.settings.manage. Set permissions under Settings → Roles.
Switch it on
- Open Settings → Marketplace and type lead ads in the Search add-ons… box (marker 1).
- On the Facebook and Instagram lead ads card (marker 2), click Start free trial (or Add to subscription) and confirm. Lead ads appears under Sales in the left menu.
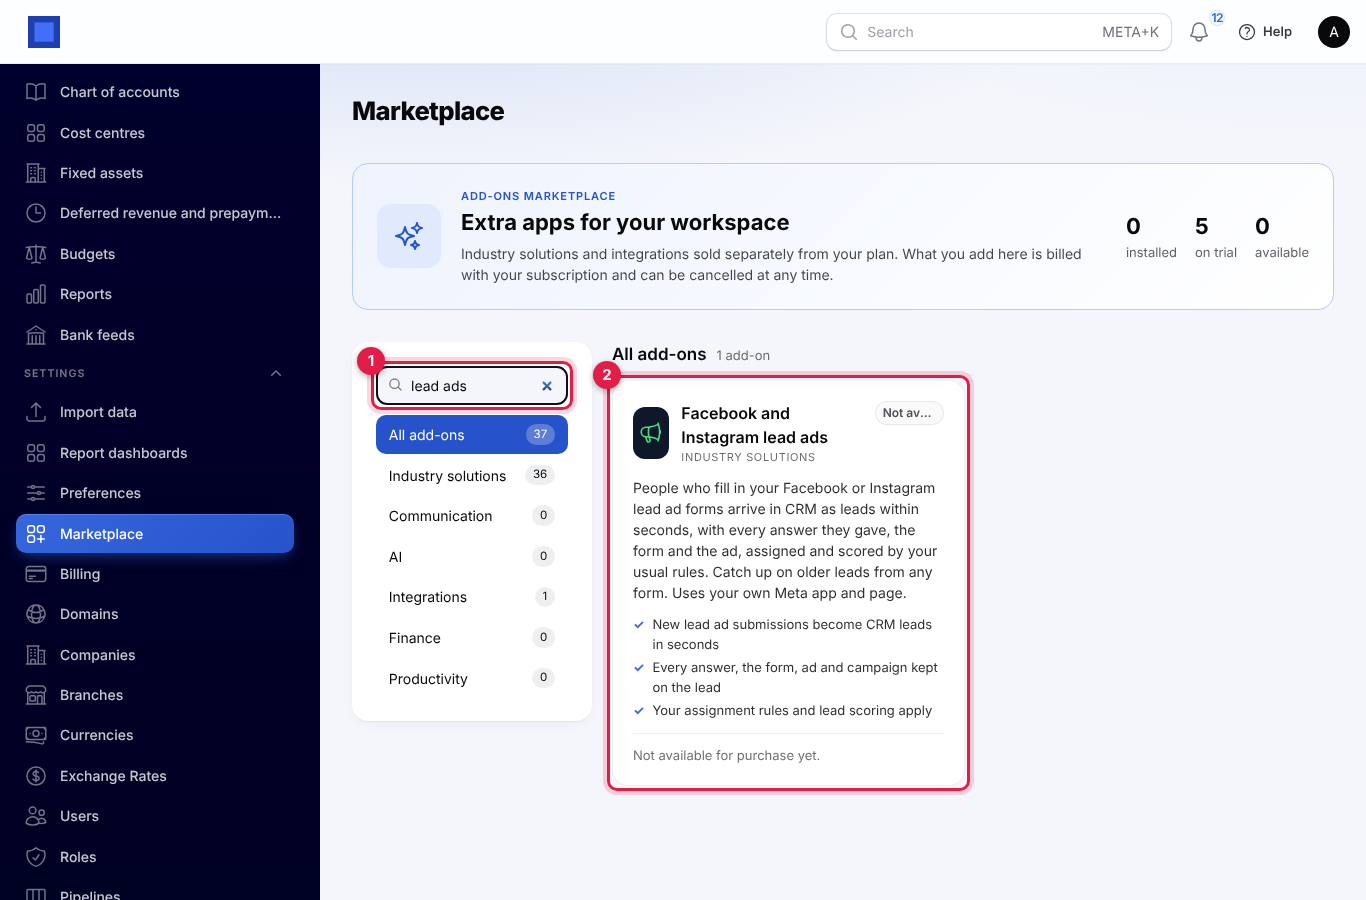
If the card says Not available for purchase yet (as in the screenshot), ask NaliSuite support to switch it on. See Billing and marketplace.
Set up your Meta app
Each workspace connects through its own Meta app and Facebook Page. NaliSuite does not share one app between businesses. You do this once, as someone who is an admin of the Facebook Page and of the business in Meta Business Suite.
The steps below happen on Meta's websites, not in NaliSuite. Meta's screens change from time to time, so follow their current help pages where they differ; what you need from each step is listed here.
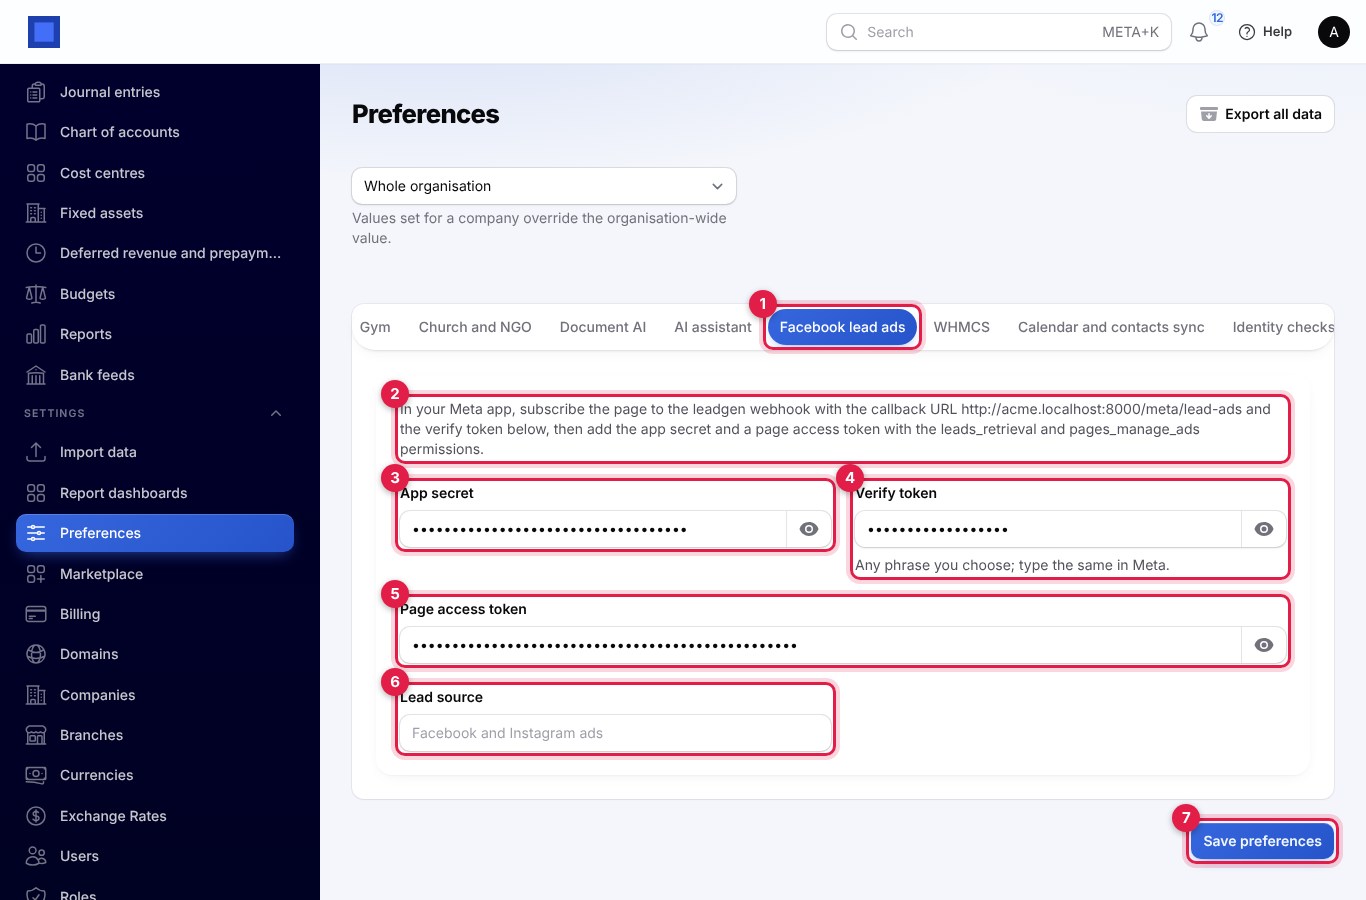
Before you start, open Settings → Preferences → Facebook lead ads in NaliSuite and keep it open. The text at the top (marker 2 in the settings screenshot below) shows your webhook address: your workspace address followed by /meta/lead-ads, for example https://yourbusiness.nalisuite.com/meta/lead-ads.
1. Create the app and copy its secret
- Sign in at developers.facebook.com with the Facebook account that manages your Page, and create an app of type Business, connected to your business portfolio.
- Open App settings → Basic, click Show next to App secret and copy it. It goes into App secret in NaliSuite.
2. Choose a verify token
Make up a phrase, for example acme-lead-ads-2026. It is not a password for anything else; it only lets Meta check that the webhook address is yours. You type the same phrase in Meta and in Verify token in NaliSuite.
3. Point the leadgen webhook at NaliSuite
- In the app, add the Webhooks product and choose the Page object.
- Click Subscribe to this object. For Callback URL, paste your webhook address (ending in
/meta/lead-ads). For Verify token, type your phrase. Click Verify and save. - In the list of Page fields, find leadgen and click Subscribe.
Save the app secret and the verify token in NaliSuite (see Enter the details in NaliSuite) before you click Verify and save: Meta checks the address straight away, and NaliSuite only answers when the module is on and the verify token matches.
4. Get a page access token
NaliSuite reads each lead's answers with a Page access token that has the leads_retrieval and pages_manage_ads permissions.
The most reliable token is one that does not expire, from a system user:
- In Meta Business Suite → Settings → Users → System users, add a system user (role Admin), then Assign assets: your Page (with full control) and your app.
- Click Generate new token, choose your app and tick leads_retrieval, pages_manage_ads, pages_show_list, pages_read_engagement and pages_manage_metadata.
- Use that token to get the Page's own token (in the Graph API Explorer, ask for
me/accountsand copy theaccess_tokenshown for your Page). It goes into Page access token in NaliSuite.
A token you make in the Graph API Explorer with your personal account also works, but it expires; leads then show Could not fetch with "Error validating access token" until you paste a new one.
5. Subscribe your Page to the app
The webhook only receives leads from Pages that are subscribed to your app. In the Graph API Explorer, with your app and the Page token selected, send a POST to <your page ID>/subscribed_apps with the field subscribed_fields set to leadgen. The answer "success": true means it is done.
If your business uses Leads access (in Meta Business Suite → Settings → Integrations → Leads access), give your app (or the system user) access to the Page's leads there too.
6. Test it
Open Meta's Lead Ads Testing Tool (developers.facebook.com/tools/lead-ads-testing), choose your Page and form and click Create lead. Within a few seconds it shows under Sales → Lead ads in NaliSuite. While your app is in development mode, Meta sends only test leads like this one; switch the app to Live before your ads run.
Enter the details in NaliSuite
- In the menu, open Settings → Preferences and click the Facebook lead ads tab (marker 1).
- The text at the top (marker 2) shows your webhook address and the permissions the token needs.
- Fill in the fields and click Save preferences (marker 7).
| Setting | What to enter |
|---|---|
| App secret (marker 3) | From your Meta app, App settings → Basic. NaliSuite uses it to check that every notification really comes from Meta: a notification that is not signed with this secret is refused. |
| Verify token (marker 4) | The phrase you chose. Type exactly the same in Meta. |
| Page access token (marker 5) | The Page token with leads_retrieval and pages_manage_ads. |
| Lead source (marker 6) | What the leads' Source is set to. Leave empty for Facebook and Instagram ads. Up to 60 characters. |
The three keys are stored encrypted; click the eye to check one.
Tip: Add the same name you use in Lead source to the list under Settings → Preferences → CRM → Lead sources. The lead form's Source field only offers names from that list, so otherwise it shows empty on these leads, and assignment rules cannot choose it. See CRM preferences.
How leads land in CRM
- Someone submits your lead ad form on Facebook or Instagram.
- Meta tells NaliSuite at once. NaliSuite records the submission (status Fetching), then reads the answers from Meta with your Page access token.
- A lead is added to the first stage of your default pipeline, for your default company, and the submission shows Lead created.
What goes on the lead:
| On the lead | Comes from |
|---|---|
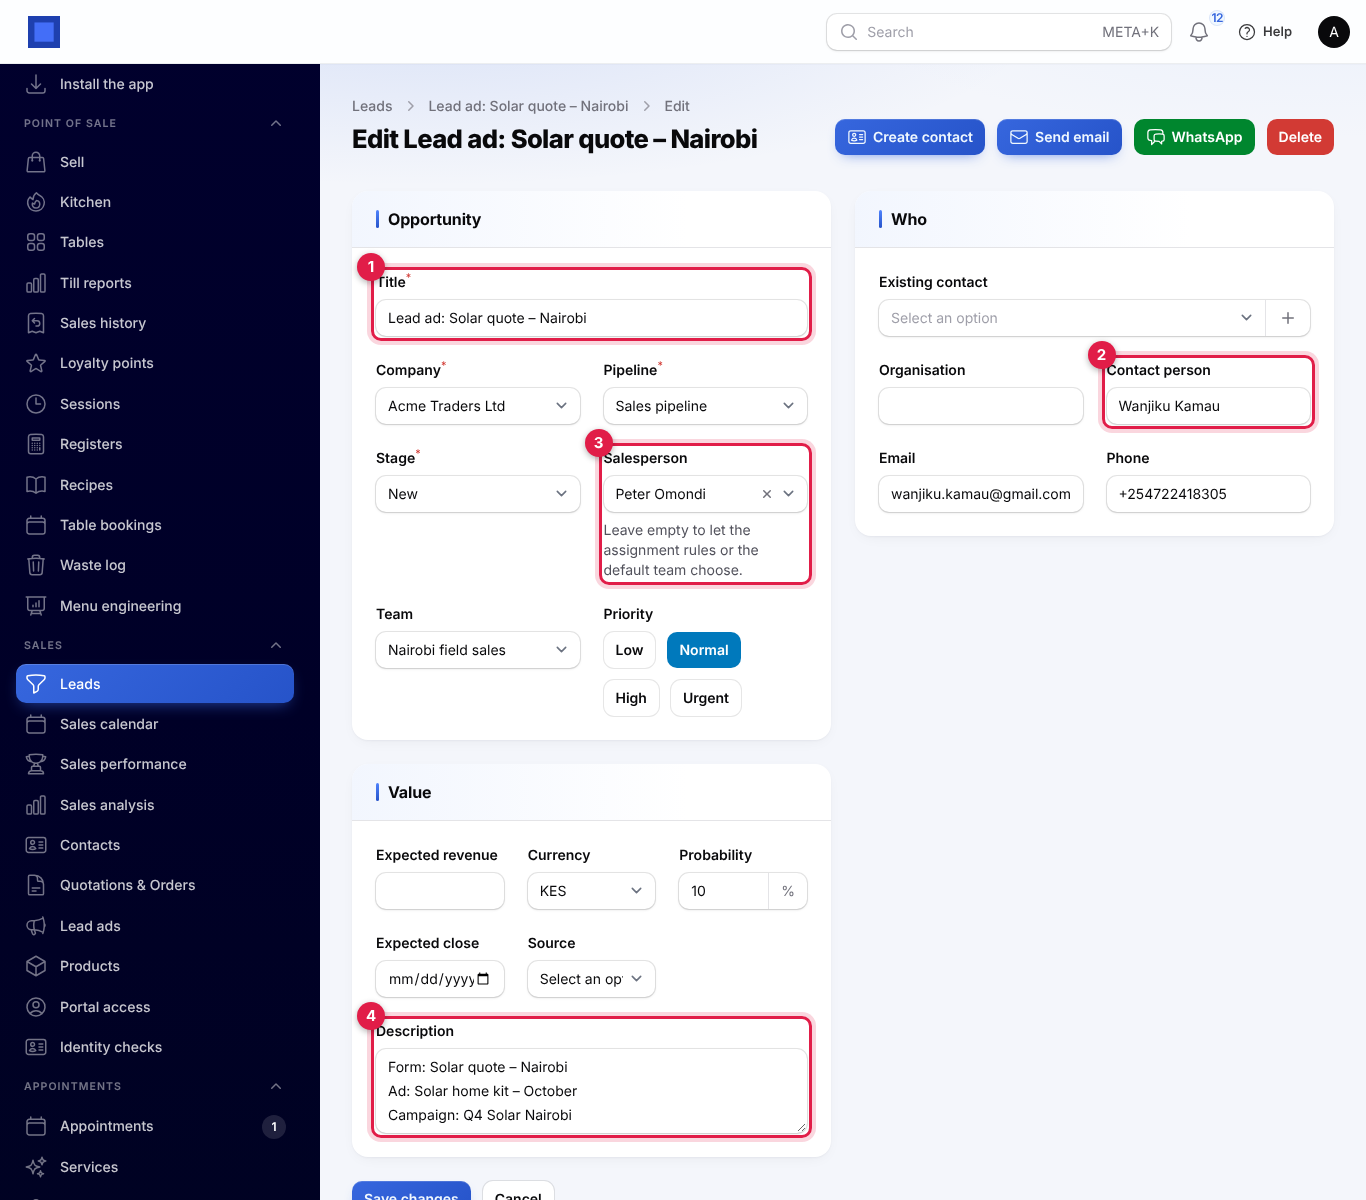
| Title (marker 1) | "Lead ad: " and the form's name, for example Lead ad: Solar quote – Nairobi. If the form's name cannot be read, the ad's name. |
| Contact person (marker 2) | The full name answer, or the first and last names. With no name, the email or phone number. |
| Organisation, Email, Phone | The company name, email (or work email) and phone number (or work phone) answers. |
| Salesperson and Team (marker 3) | Chosen by your assignment rules, as for web enquiries. See Assign leads automatically. |
| Description (marker 4) | The form, ad and campaign names, then every other answer, for example City: Nairobi and What Size Of System Do You Need?: 3 kW. |
| Source | Your Lead source setting, or Facebook and Instagram ads. |
| Score | Your lead scoring rules, as for any new lead. |
Each submission becomes one lead. NaliSuite remembers every submission it has seen, so a notification Meta sends twice, or a lead you also fetch from the form later, is not added again. No contact is created yet: when the lead is worth keeping, click Create contact on the lead, as for any lead.
The Lead ads screen
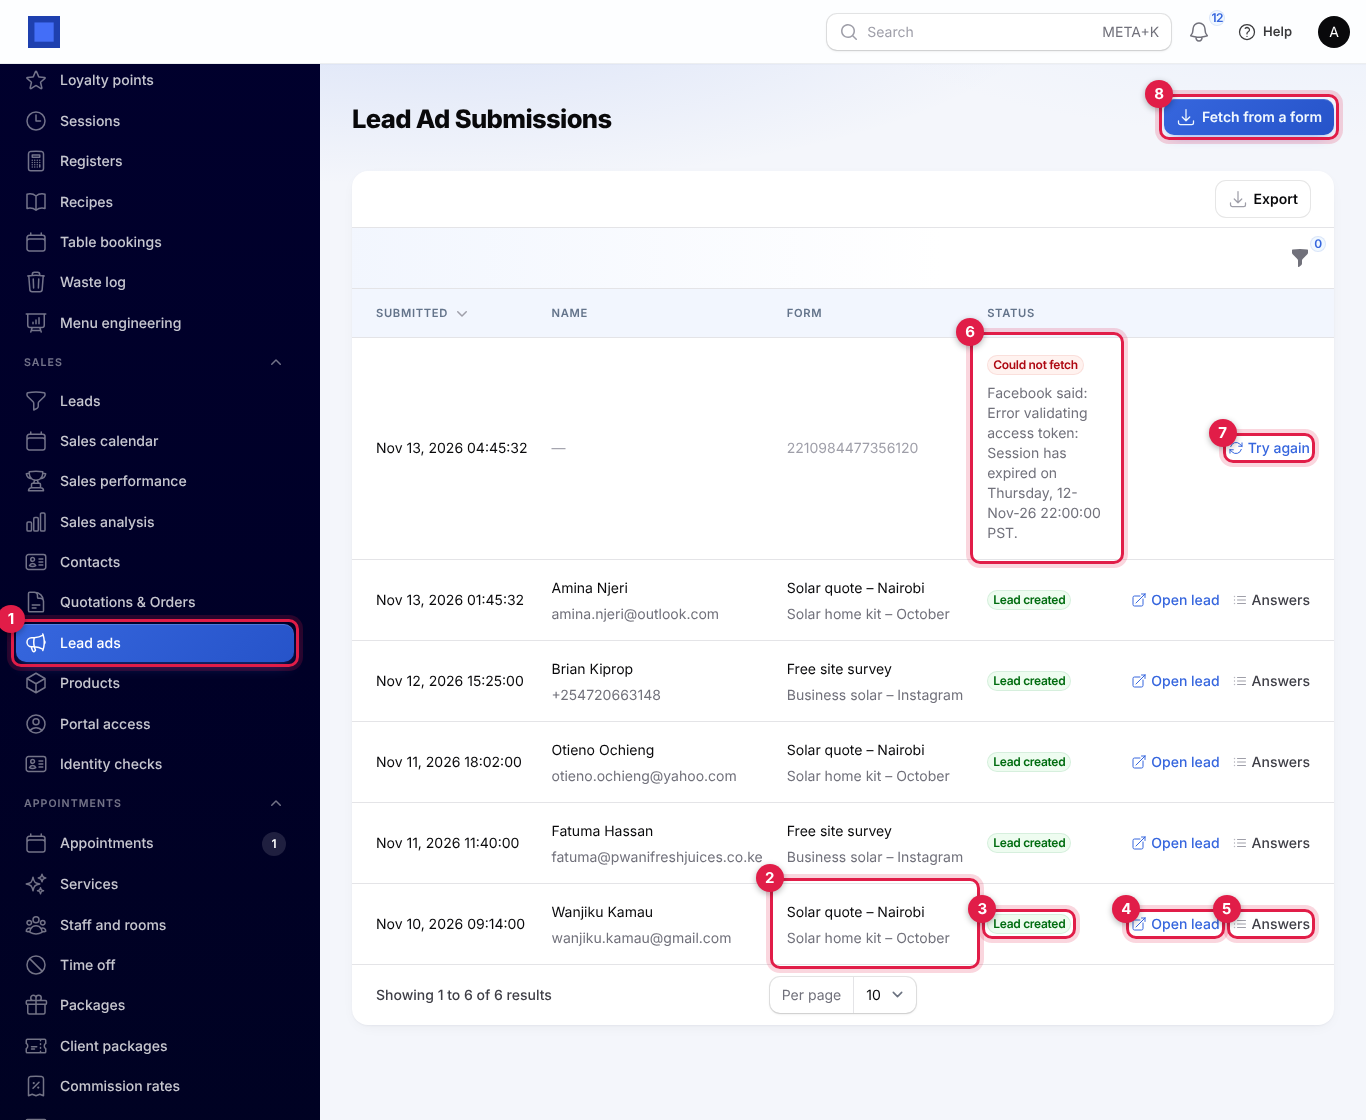
Open Sales → Lead ads (marker 1). Every submission is listed, newest first, with when it was Submitted, the person's Name with their email or phone, the Form with the ad under it (marker 2) and the Status (marker 3).
| Status | What it means |
|---|---|
| Fetching (grey) | Received from Meta; the answers are being read. |
| Lead created (green) | The lead is in CRM. |
| Could not fetch (red) | The answers could not be read. The reason shows under the status (marker 6). |
On each row:
- Open lead (marker 4) opens the CRM lead.
- Answers (marker 5) shows what the person typed in each field of the form, under the field names your form uses (marker 1 below).
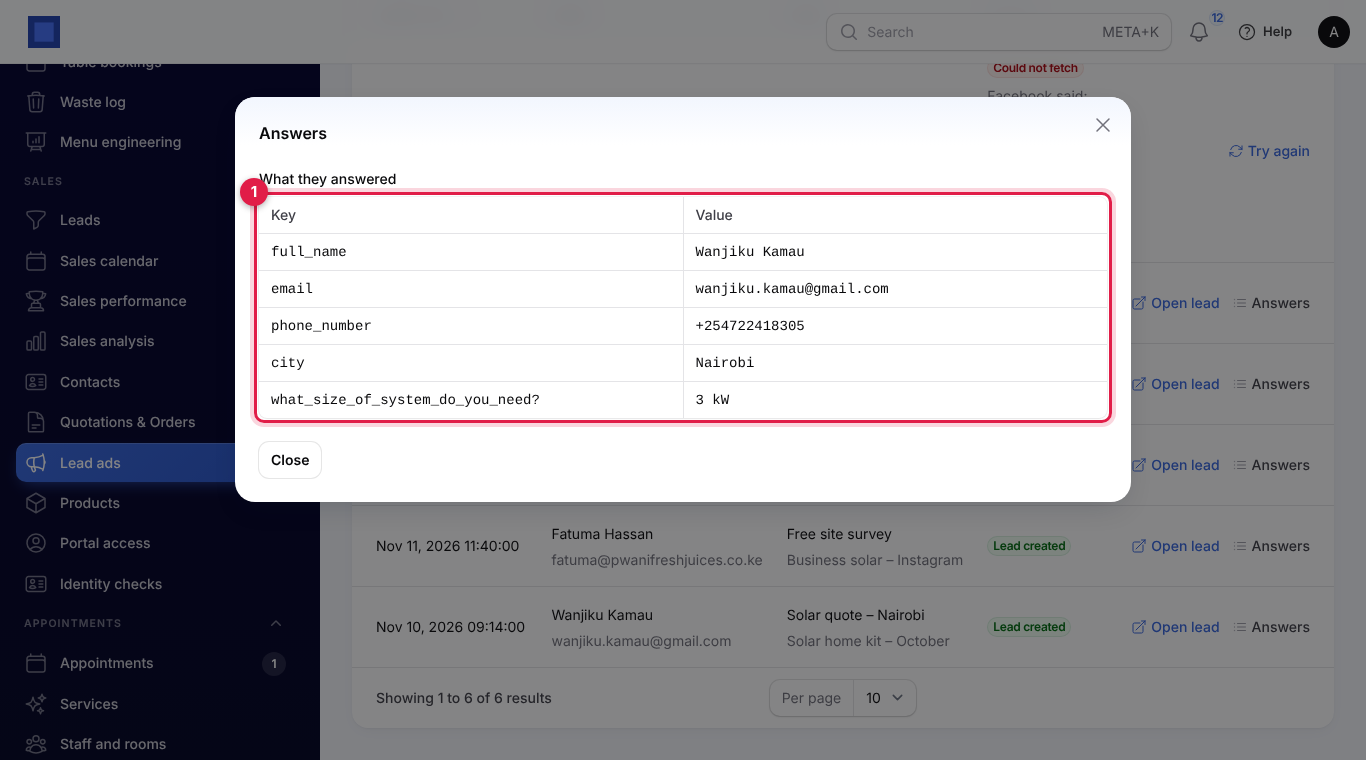
To see only one status, click the filter icon and choose a Status.
When a lead could not be fetched
A submission that could not be read is kept with the reason, so no lead is lost.
- Read the reason under Could not fetch (marker 6 in the list screenshot) and fix the cause:
- Facebook said: Error validating access token…: the Page access token has expired or was revoked. Make a new one (see Get a page access token), paste it under Settings → Preferences → Facebook lead ads and save.
- Facebook said: … about permissions: the token is missing leads_retrieval or pages_manage_ads, or the app has no access to the Page's leads under Leads access.
- Add the page access token under Settings → Preferences → Facebook lead ads.: the token is empty.
- Could not reach Facebook. It will be tried again.: a connection problem.
- Click Try again (marker 7). You see "Lead created", or the reason it still fails.
NaliSuite does not try again by itself: click Try again on each submission once the cause is fixed. For many failed submissions from one form, Fetch from a form (below) brings them all in at once.
Fetch older leads from a form
Use this for leads sent before the webhook was set up, or while it was not working.
- Find the form's ID: in Meta Business Suite → All tools → Instant forms, the number shown under the form's name.
- On Sales → Lead ads, click Fetch from a form (marker 8 in the list screenshot).
- Paste the Form ID (marker 1). It must be the number only.
- Choose Submitted since (marker 2). It starts 30 days ago and cannot be later than today.
- Click Submit (marker 3). You see, for example, "3 new leads from 12 submissions".
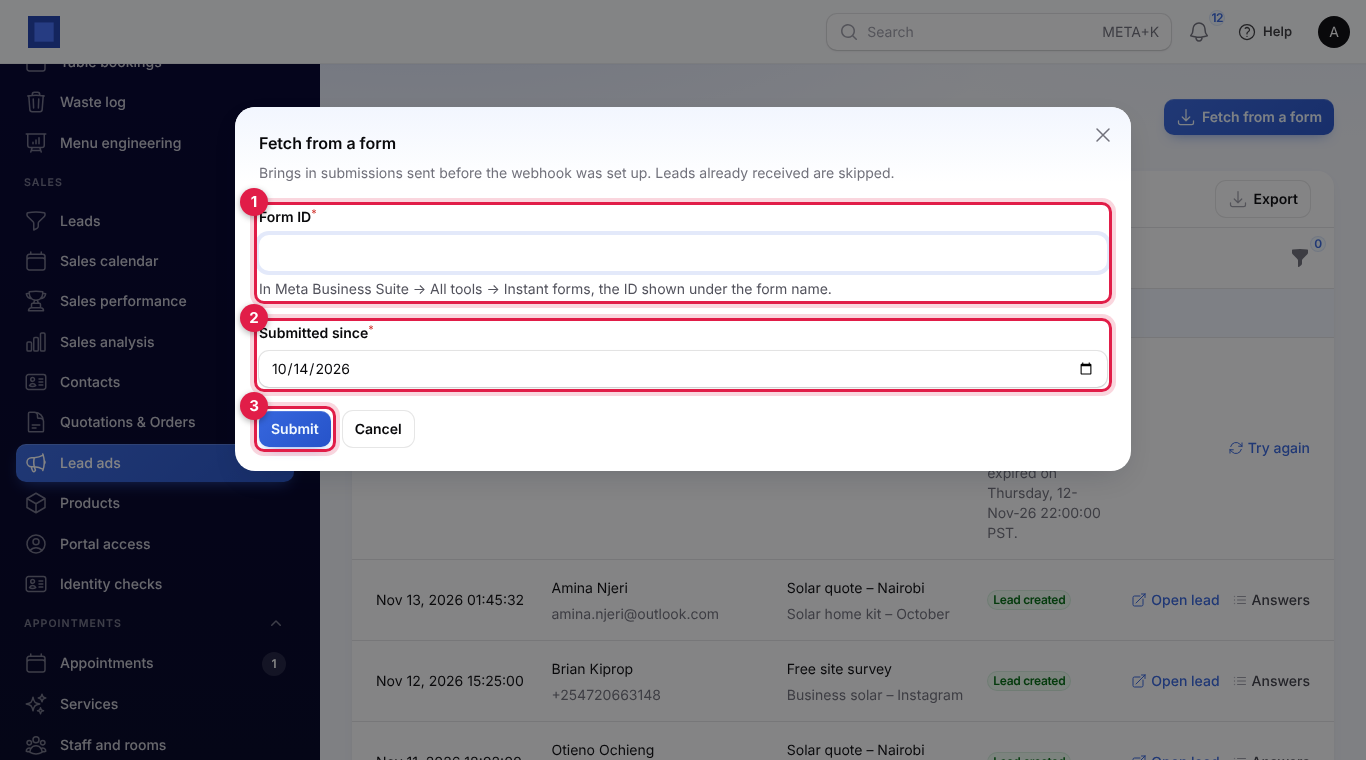
Submissions NaliSuite already has are skipped, so you can fetch the same form again safely. Leads fetched this way are created exactly like new ones, with the form's name, the ad and campaign, and your assignment and scoring rules. One fetch reads up to 2,000 submissions; for more, fetch again with a later Submitted since date.
If you see "Enter the form ID: the number shown for the form in Meta Business Suite → Instant forms.", the ID has letters or spaces in it.
Good to know
How fast do leads arrive? Usually within seconds of the person submitting the form.
Does it work for Instagram ads? Yes. Instagram lead ads use the same Instant forms and the same Facebook Page, so they arrive the same way.
What happens if the module is switched off? NaliSuite stops accepting Meta's notifications, so leads submitted while it is off are not received. Meta keeps them: switch the module on again and use Fetch from a form to bring them in.
Is the webhook safe? Yes. Meta's verification only succeeds with your verify token, and every notification must be signed with your app secret; anything else is refused. The answers themselves are read from Meta with your own token, never taken from the notification.
Where do I see how many leads my ads bring in? Every lead from your ads has the same Source, so the win rate by source in the sales analysis shows how many became customers. See Contacts and CRM. The report builder can also count leads by source.