Document AI: bills and receipts read for you
Document AI is for anyone who types supplier bills and till receipts into NaliSuite: owners, bookkeepers and purchasing staff. You upload a PDF bill or a photo of a receipt taken with your phone, and Claude (Anthropic's AI) reads the supplier, invoice number, dates, lines, VAT and totals for you. You check what was read, then make it a draft bill or, for a receipt already paid, an expense in the books. This page covers switching it on, adding your Anthropic API key, uploading, checking and correcting, creating bills and expenses, and what to do when a document could not be read.
Document AI is a marketplace module. It works with the Purchases app; recording receipts as expenses also needs the Accounting app. Its screen is Purchases → Scan bills and receipts.
Note: You need the document_ai.use permission to see and use Scan bills and receipts. Owners and admins have it. Set permissions under Settings → Roles.
Switch it on
- Open Settings → Marketplace and type Document AI in the Search add-ons… box (marker 1).
- On the Document AI card (marker 2), click Start free trial (or Add to subscription) and confirm. Scan bills and receipts appears under Purchases in the left menu.
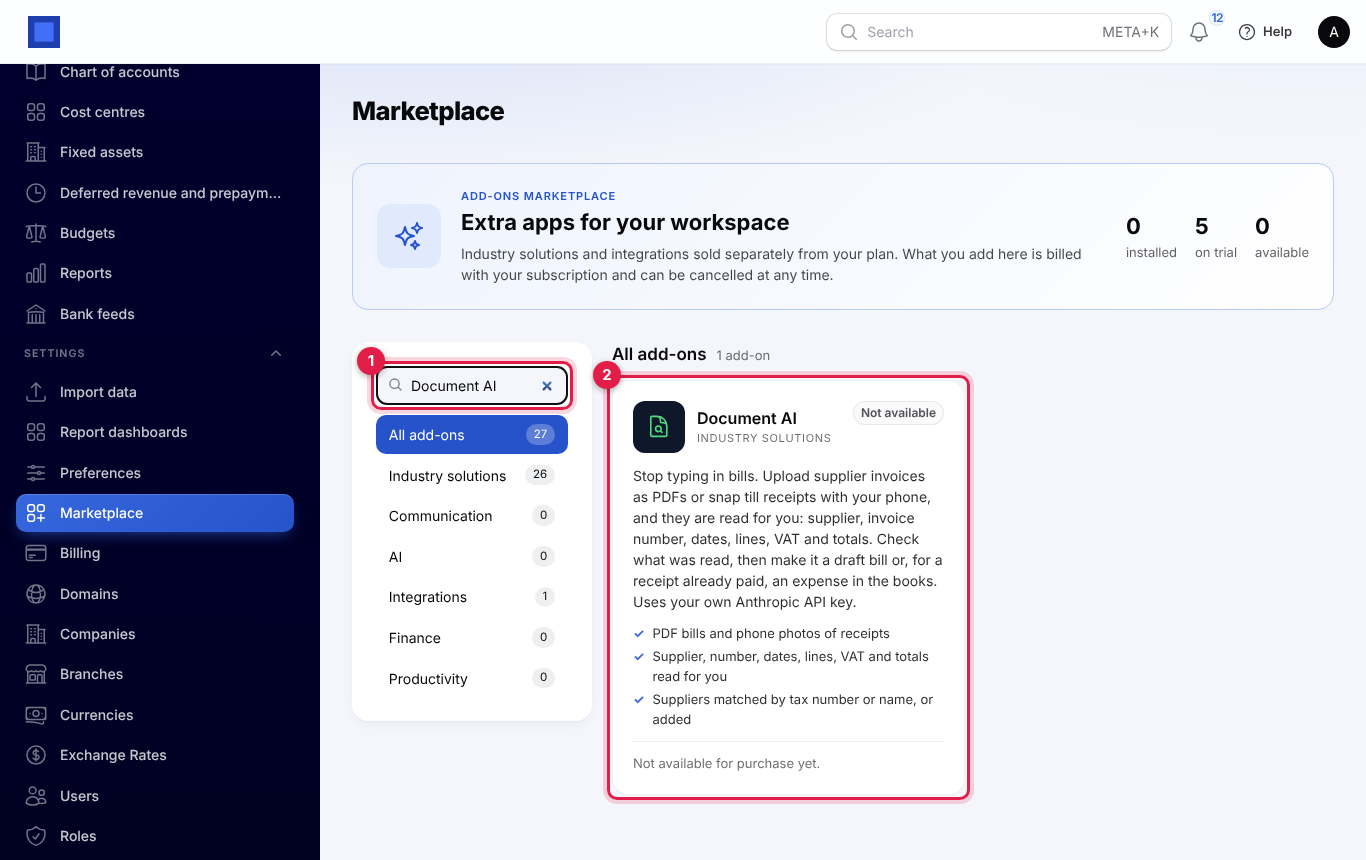
If the card says Not available for purchase yet (as in the screenshot), the add-on has not been priced for your plan: ask NaliSuite support to switch it on. See Billing and marketplace.
Add your Anthropic API key
Document AI reads with your workspace's own Anthropic API key. NaliSuite does not share one key between businesses, so reading is billed to your Anthropic account (see Good to know).
Get a key from Anthropic
These steps happen on Anthropic's website, not in NaliSuite.
- Sign in, or create an account, at console.anthropic.com.
- Add a payment method or credit under billing, so the key can be used.
- Open API keys and create a key, for example named "NaliSuite Document AI". Copy it straight away: Anthropic shows it only once. It starts with
sk-ant-.
Enter it in NaliSuite
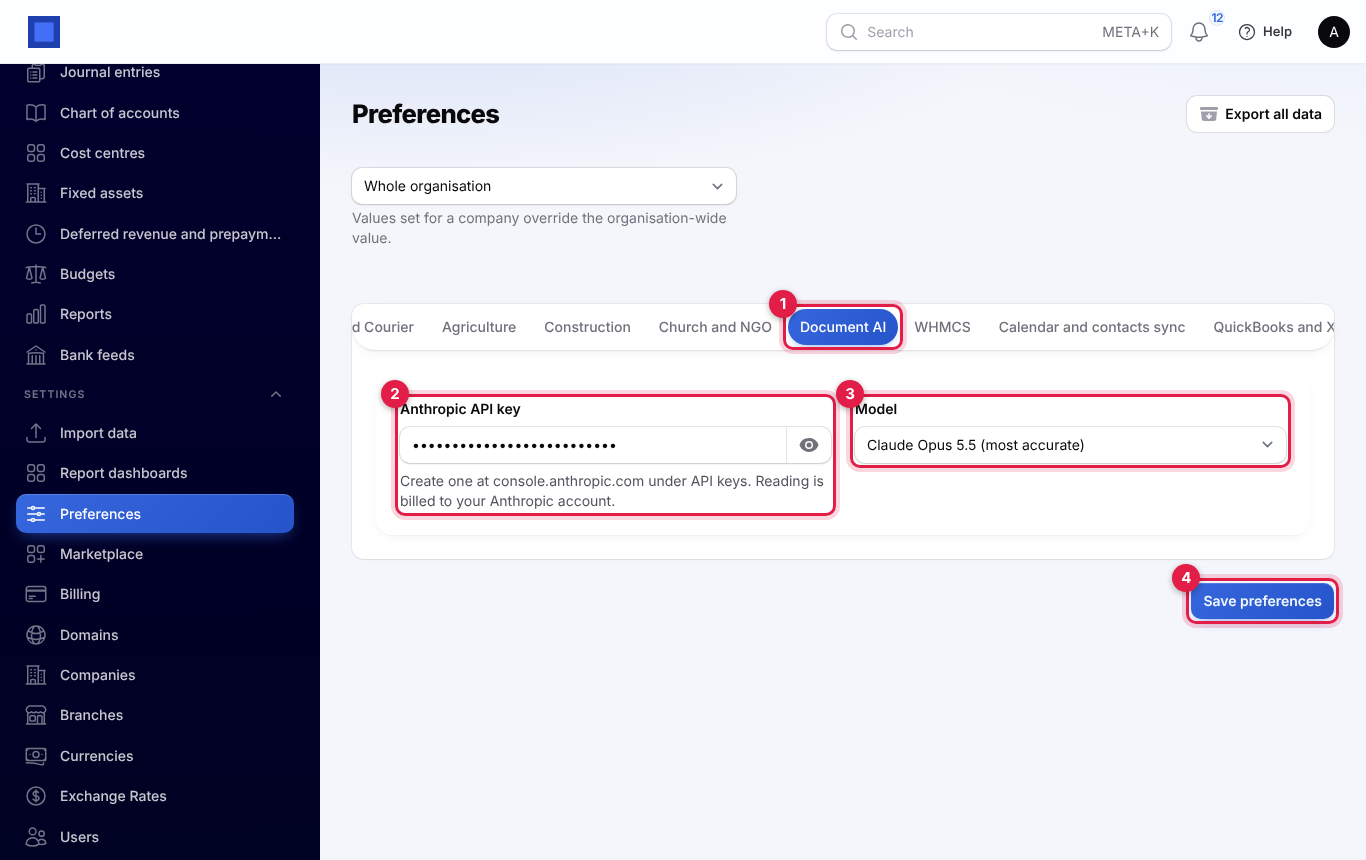
- In the menu, open Settings → Preferences.
- Click the Document AI tab (marker 1).
- Paste the key into Anthropic API key (marker 2). It is stored encrypted; click the eye to check it.
- Choose the Model (marker 3):
- Claude Opus 5.5 (most accurate): the default.
- Claude Sonnet 5.5 (faster, lower cost).
- Claude Haiku 5.5 (fastest, lowest cost).
- Click Save preferences (marker 4).
Tip: Start with the default model. If your bills are clear, printed PDFs, try Sonnet or Haiku to spend less, and check a few results before you rely on them.
Upload bills and receipts
- In the menu, open Purchases → Scan bills and receipts.
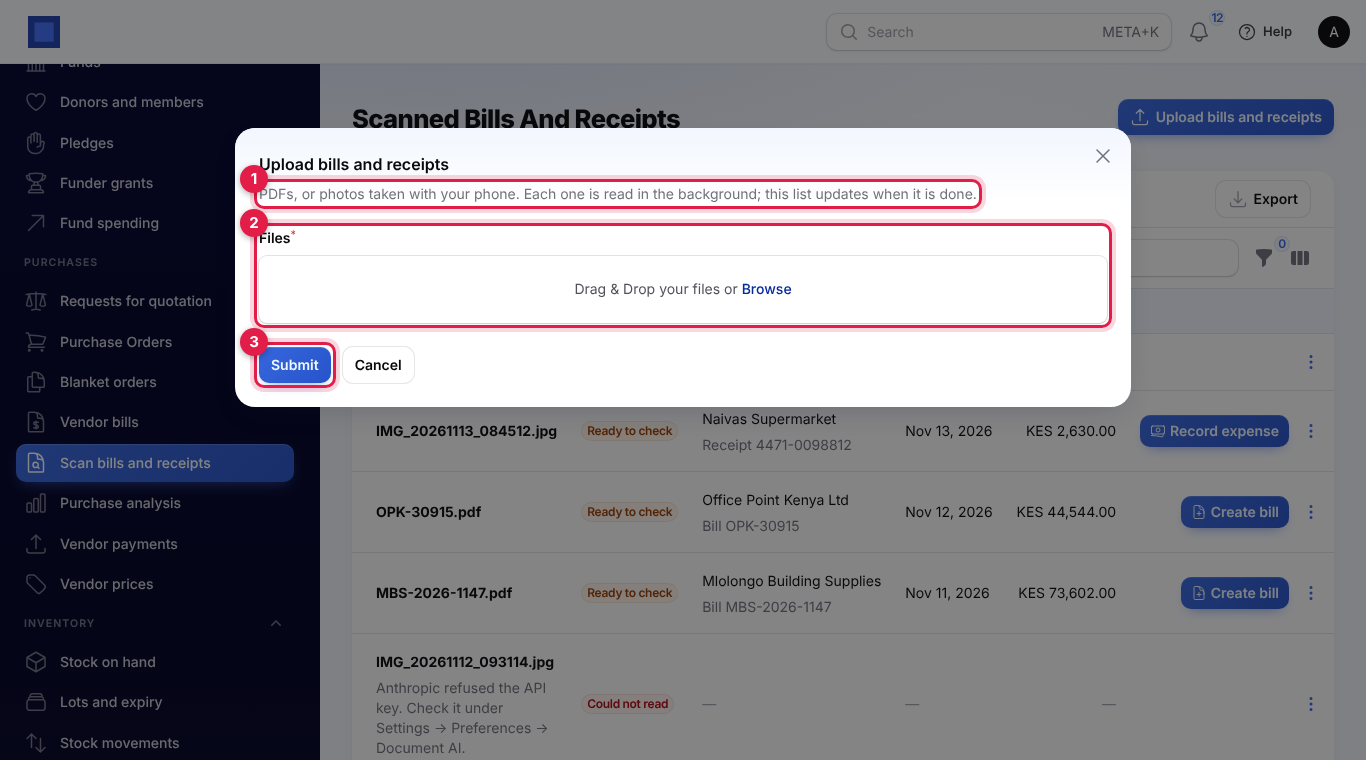
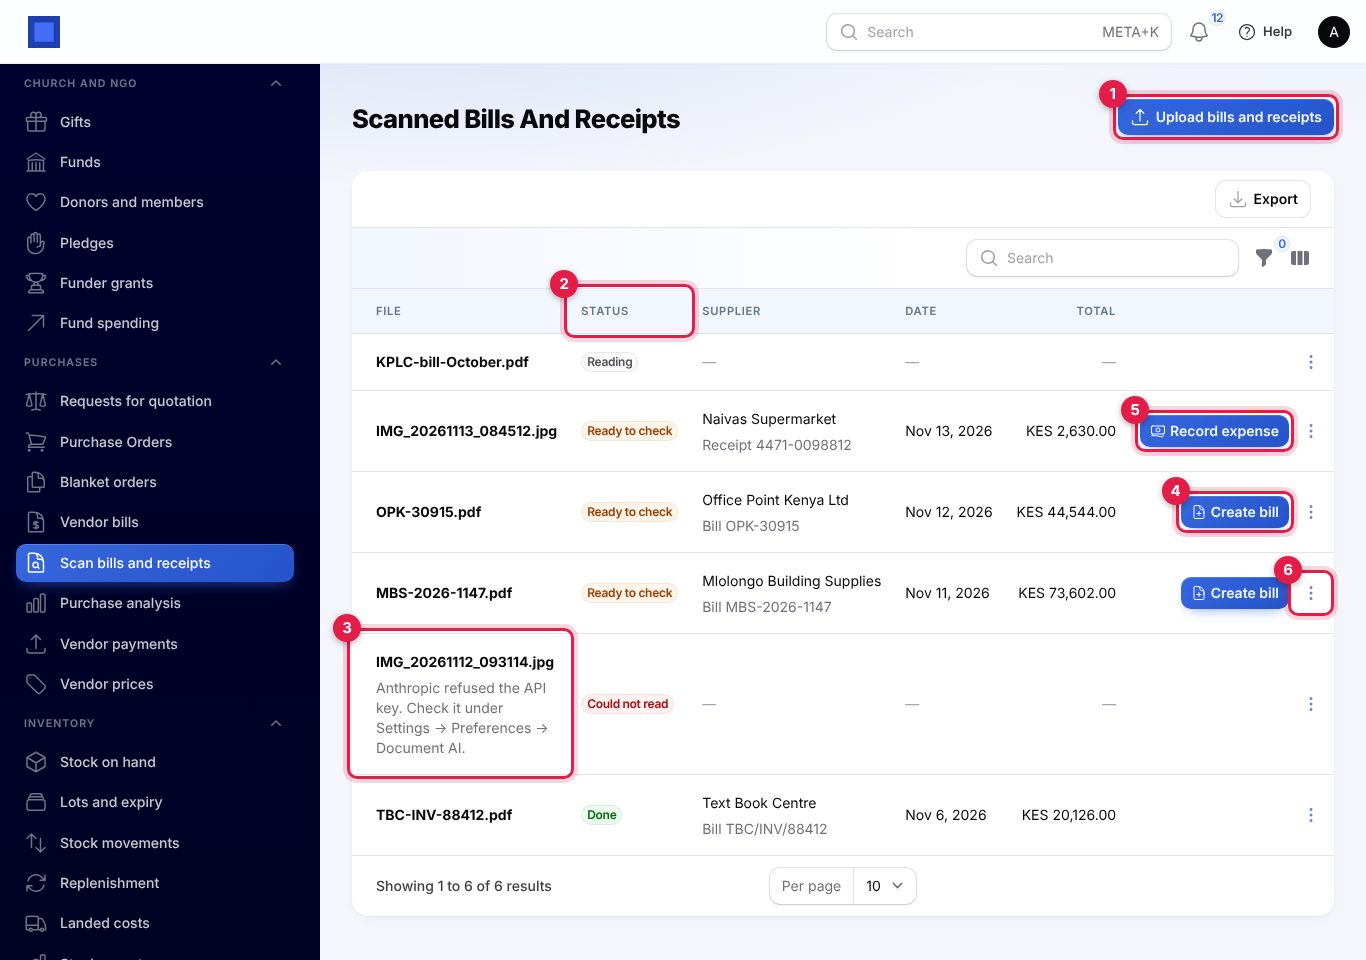
- Click Upload bills and receipts (marker 1 in the list screenshot below).
- Drag your files into Files (marker 2), or click Browse. On a phone, Browse lets you take a photo of the receipt.
- Click Submit (marker 3). You see "Reading one document" or "Reading 3 documents".
What you can upload:
| Limit | |
|---|---|
| File types | PDF, or a JPEG, PNG, GIF or WebP photo. |
| How many | Up to 20 files at a time. |
| PDF size | Up to 30 MB each. |
| Photo size | Up to 5 MB each. A larger photo uploads but cannot be read; take it again at a lower resolution or upload a PDF. |
Other file types are refused by the upload box. Each file is stored privately in your workspace and read in the background, one document per file. You can leave the page; the list updates by itself while anything is being read.
Important: If the window says "Add your Anthropic API key under Settings → Preferences → Document AI first.", the key is missing. Files you upload anyway show Could not read; add the key, then use Read again.
Tip: For photos, lay the receipt flat in good light and fill the frame. A sharp photo reads better than a large one.
The list and its statuses
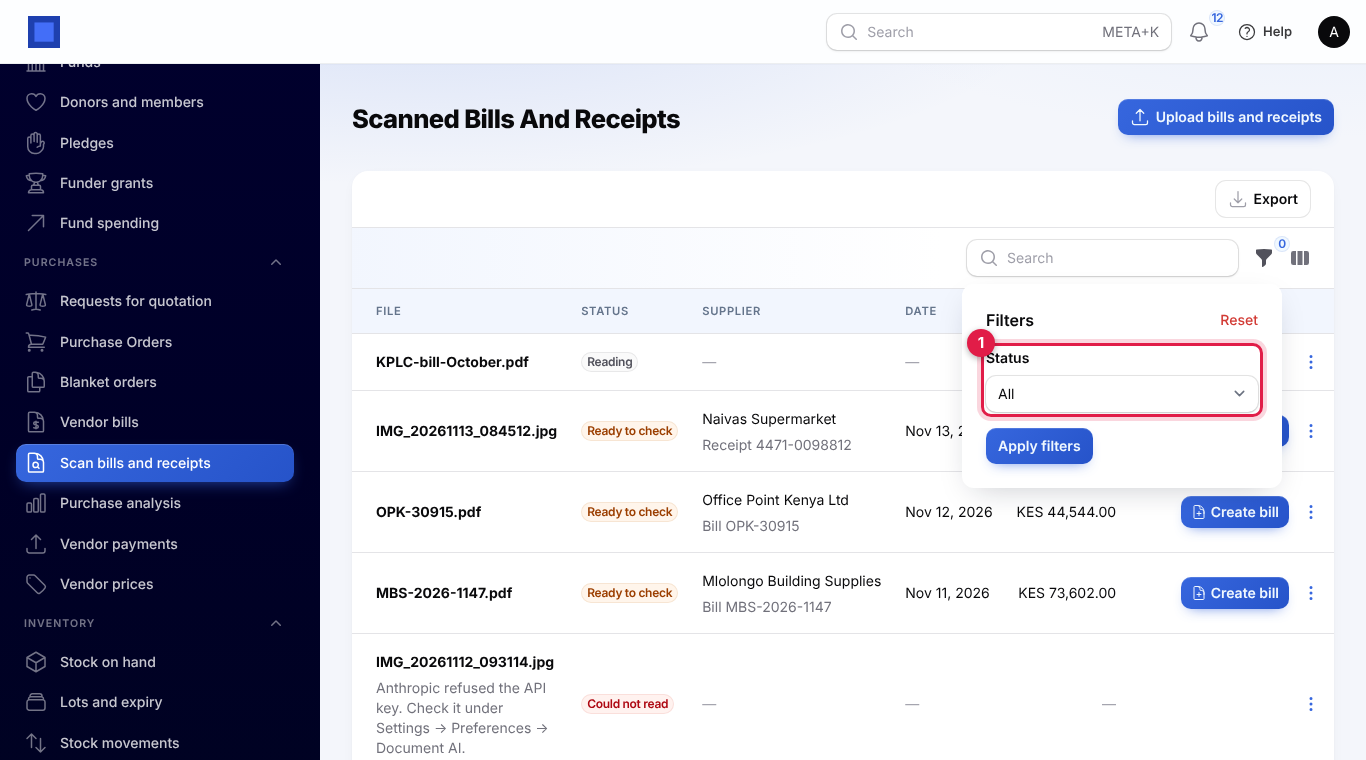
The list shows every uploaded file with its Status (marker 2), the Supplier with "Bill" or "Receipt" and the number that was read, the Date on the document and the Total with its currency.
| Status | What it means | What you do |
|---|---|---|
| Reading (grey) | Waiting to be read, or being read now. | Wait. The list refreshes every few seconds. |
| Ready to check (orange) | Read. Nothing has been created yet. | Check it, then Create bill (marker 4) or Record expense (marker 5). |
| Could not read (red) | Reading failed. The reason shows under the file name (marker 3). | See When something could not be read. |
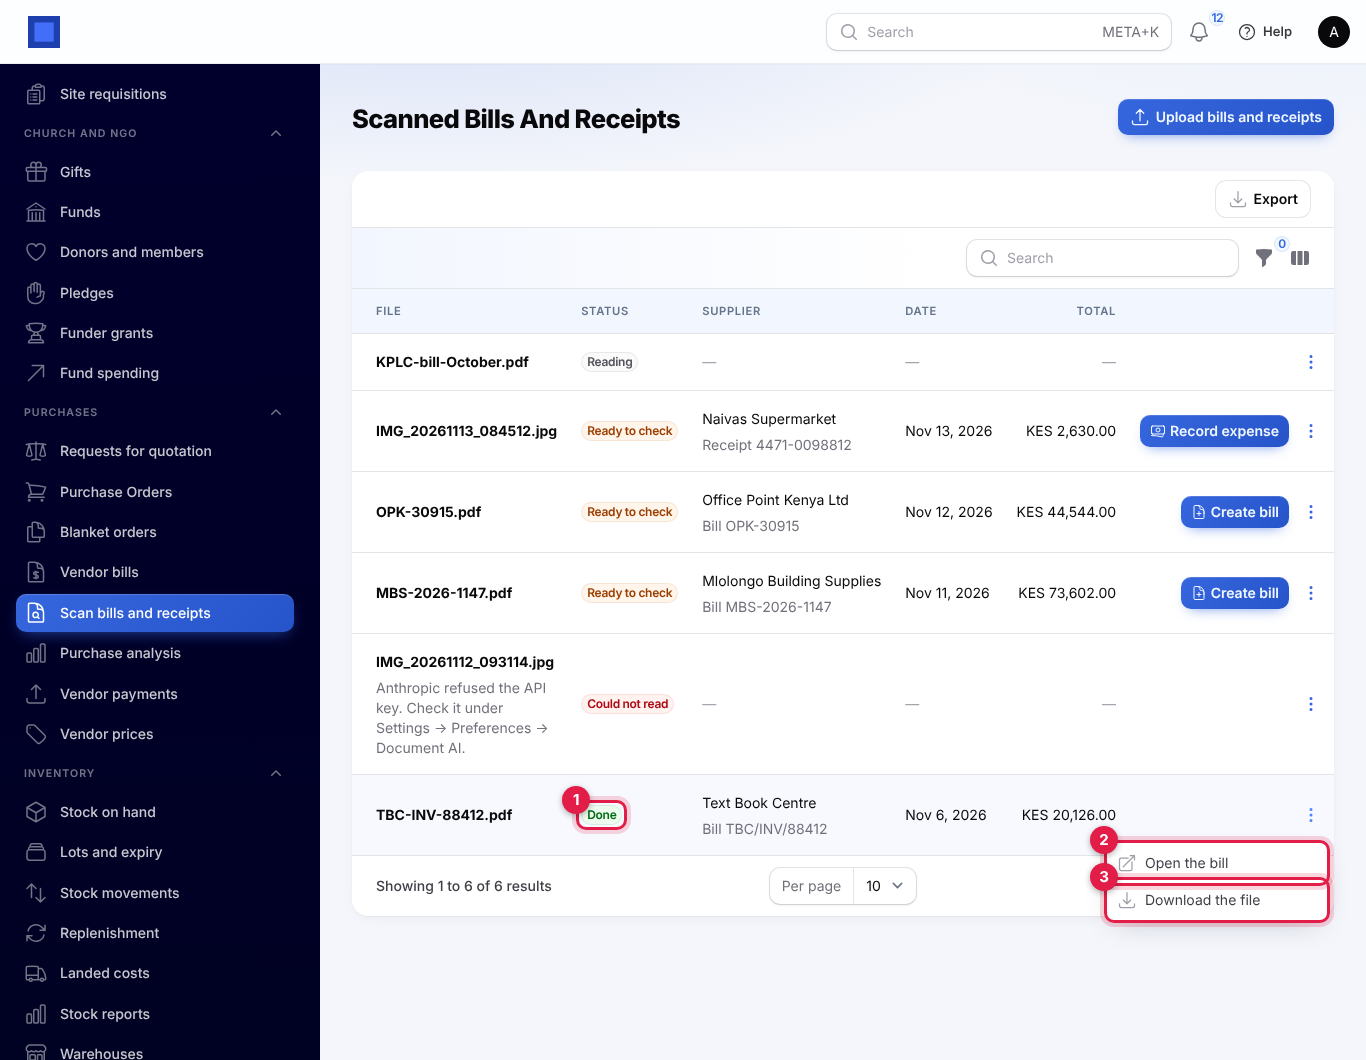
| Done (green) | A draft bill or an expense was created from it. | Nothing. Open the bill from ⋮ if you need it. |
More actions are under ⋮ at the end of each row (marker 6).
To see only one status, click the filter icon and choose a Status (marker 1), then Apply filters. The search box finds documents by file name. A column called Uploaded (when each file was uploaded) can be shown or hidden with the columns icon next to the filter.
Check and correct what was read
Always check a document before you create anything from it. The AI copies what the document says and leaves empty anything it cannot see, but it can still misread a blurred figure.
- Click ⋮ on a document that is Ready to check, then Check and correct.
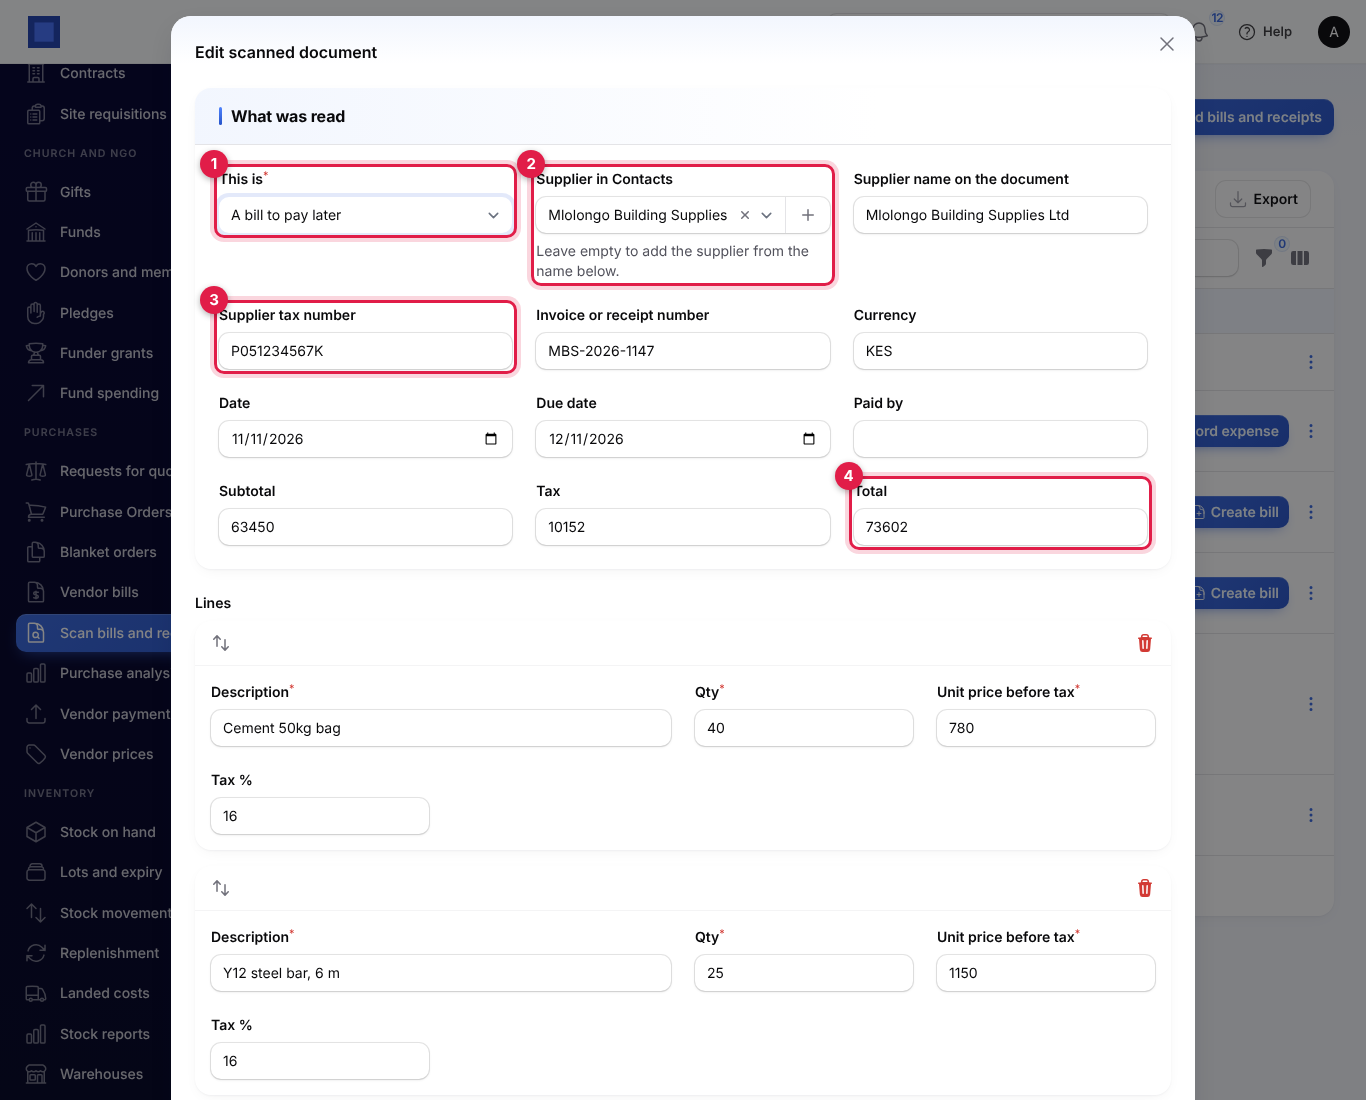
- Check the top part, What was read:
- This is (marker 1): A bill to pay later or A receipt, already paid. This decides whether you get Create bill or Record expense.
- Supplier in Contacts (marker 2): the supplier NaliSuite found in your contacts, by tax number first and then by name. Choose another supplier if it is wrong, or leave it empty to add the supplier from Supplier name on the document when you create the bill.
- Supplier tax number (marker 3), for example a KRA PIN or TIN.
- Invoice or receipt number, Currency (a three-letter code such as KES), Date, Due date and Paid by (for example M-Pesa or cash).
- Subtotal, Tax and Total (marker 4).
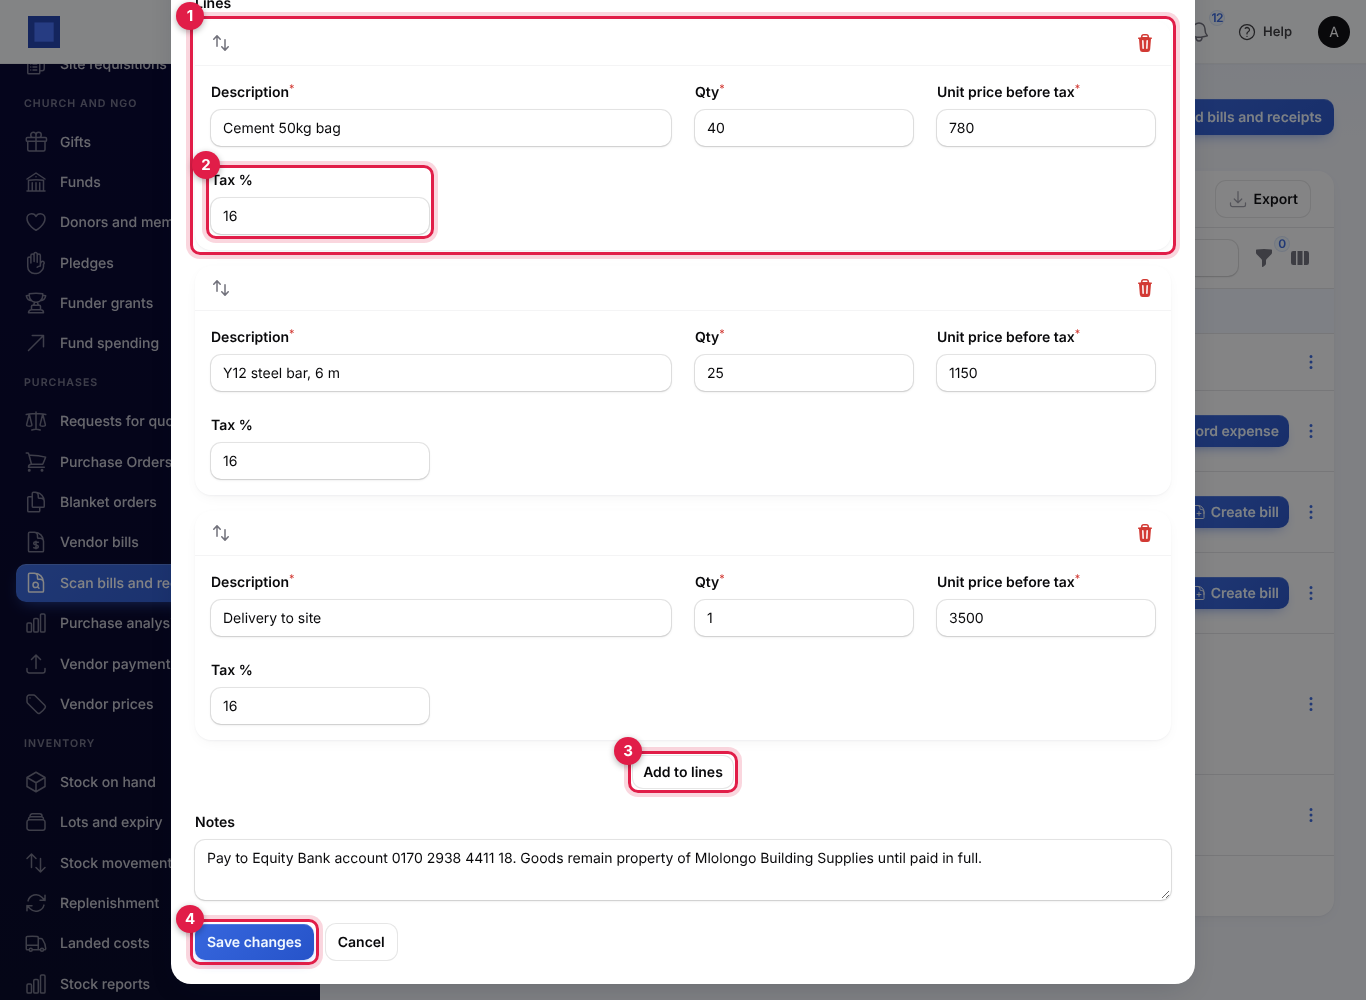
- Scroll down to Lines. Each line (marker 1) has a Description, Qty, Unit price before tax and Tax % (marker 2), for example 16 for 16% VAT, or empty when the line has no tax. Correct any line, click the bin to remove one, or click Add to lines (marker 3) to add one.
- Fix the Notes if needed; they go onto the bill.
- Click Save changes (marker 4).
When you save, a date that is not a full date and a currency that is not a three-letter code are cleared, and a line without a description is dropped.
Create a draft bill
- On a bill that is Ready to check, click Create bill (marker 4 in the list screenshot).
- NaliSuite creates a draft bill, shows "Draft bill created; check it and post it" and opens the bill. The document's status becomes Done.
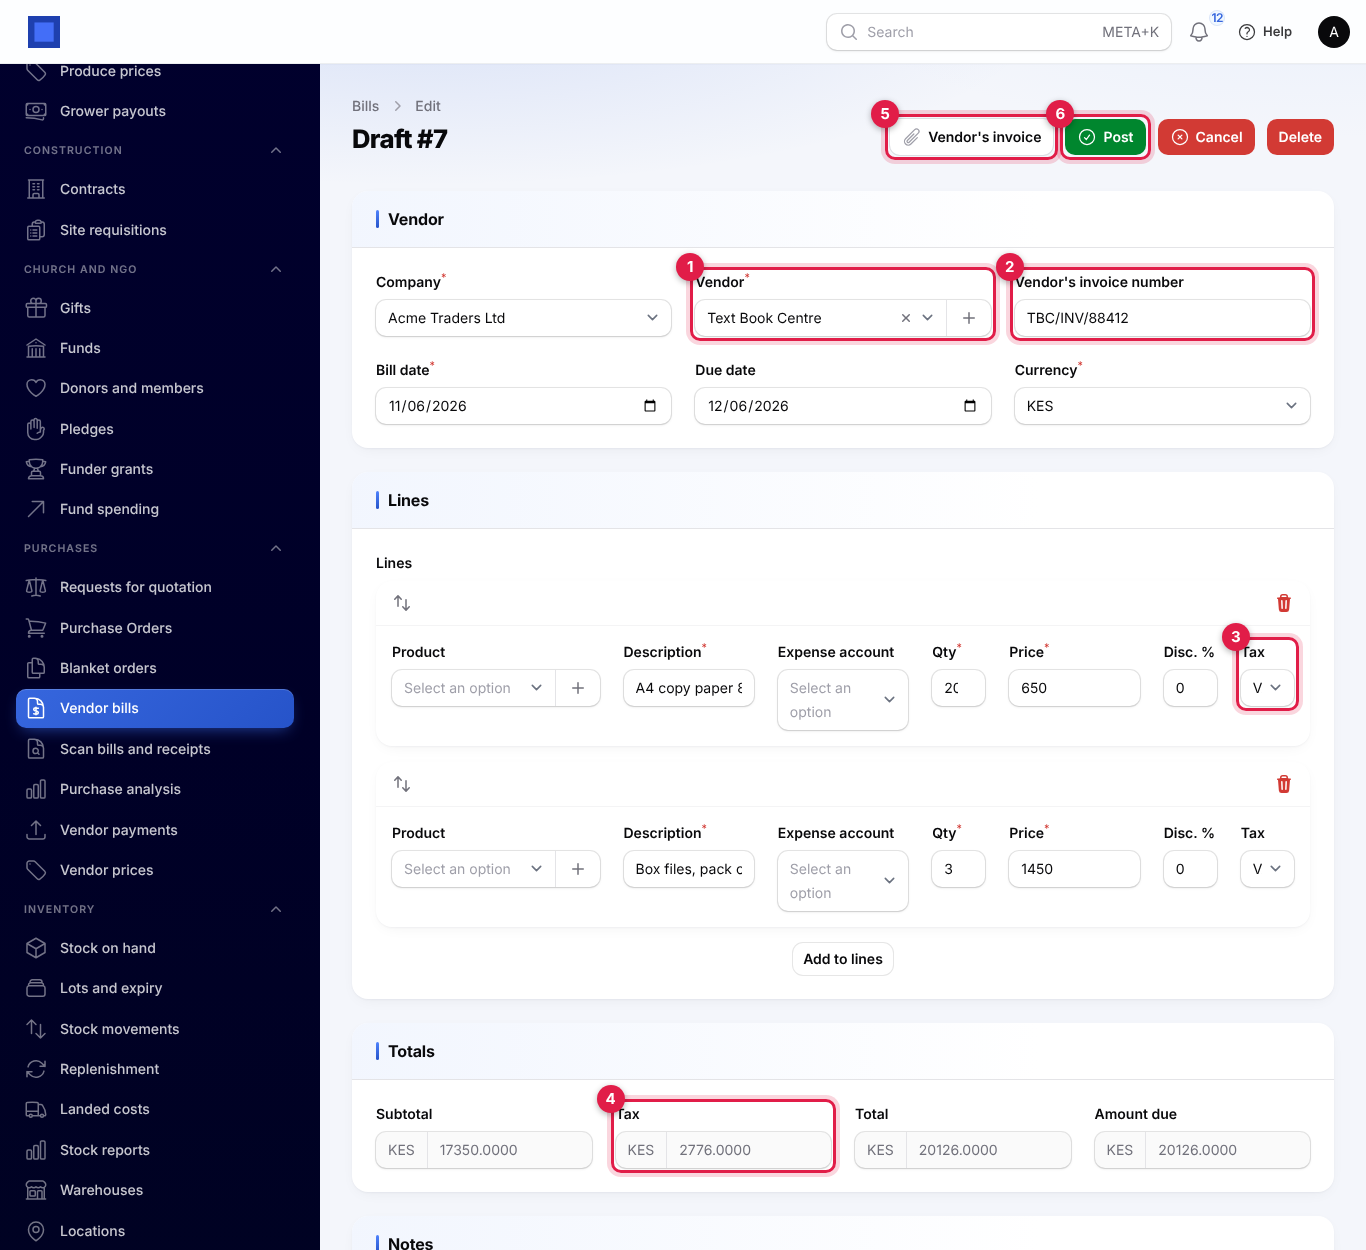
- Check the bill and click Post (marker 6) when it is right, as for any vendor bill. See Purchases and bills.
What lands on the bill:
| On the bill | Comes from |
|---|---|
| Vendor (marker 1) | Supplier in Contacts if you chose one. Otherwise the supplier in your contacts with the same tax number (spaces and capitals ignored), then one with exactly the same name. If none matches, a new supplier is added with the name, tax number and currency on the document. |
| Vendor's invoice number (marker 2) | The invoice number that was read. |
| Bill date and Due date | The dates that were read. With no date, today. With no due date, the supplier's payment terms or your default from purchase settings. |
| Currency | The currency that was read, otherwise the supplier's, otherwise your company's. |
| Lines | One line per line that was read: description, quantity and price before tax. |
| Tax on each line (marker 3) | Your active purchase tax with the same rate, for example VAT 16% for 16. Withholding taxes are never chosen. If no tax has that rate, the line has no tax: choose one before you post. |
| Totals (marker 4) | Worked out from the lines, as on any bill. Compare them with the document. |
| Vendor's invoice (marker 5) | The original file you uploaded, attached as the vendor's invoice. |
| Notes | The notes that were read. |
If the document had no itemised lines, the bill gets one line for the amount before tax (the subtotal, or the total less the tax), with the tax rate worked out from the tax and the amount.
Important: The bill is a draft. Nothing is in your books until you post it, so check the vendor, amounts and taxes first.
Record a paid receipt as an expense
A till or cash receipt that was paid on the spot can go straight into the books as an expense. This needs the Accounting app; without it, Record expense is not shown and you can still use Create bill instead.
- On a receipt that is Ready to check, click Record expense (marker 5 in the list screenshot).
- Choose the Expense category (account) (marker 1), for example office supplies, from your expense accounts.
- Choose where it was Paid from (marker 2): one of your bank, cash or mobile-money accounts, for example your M-Pesa account.
- Click Submit. You see "Expense recorded with the receipt attached".
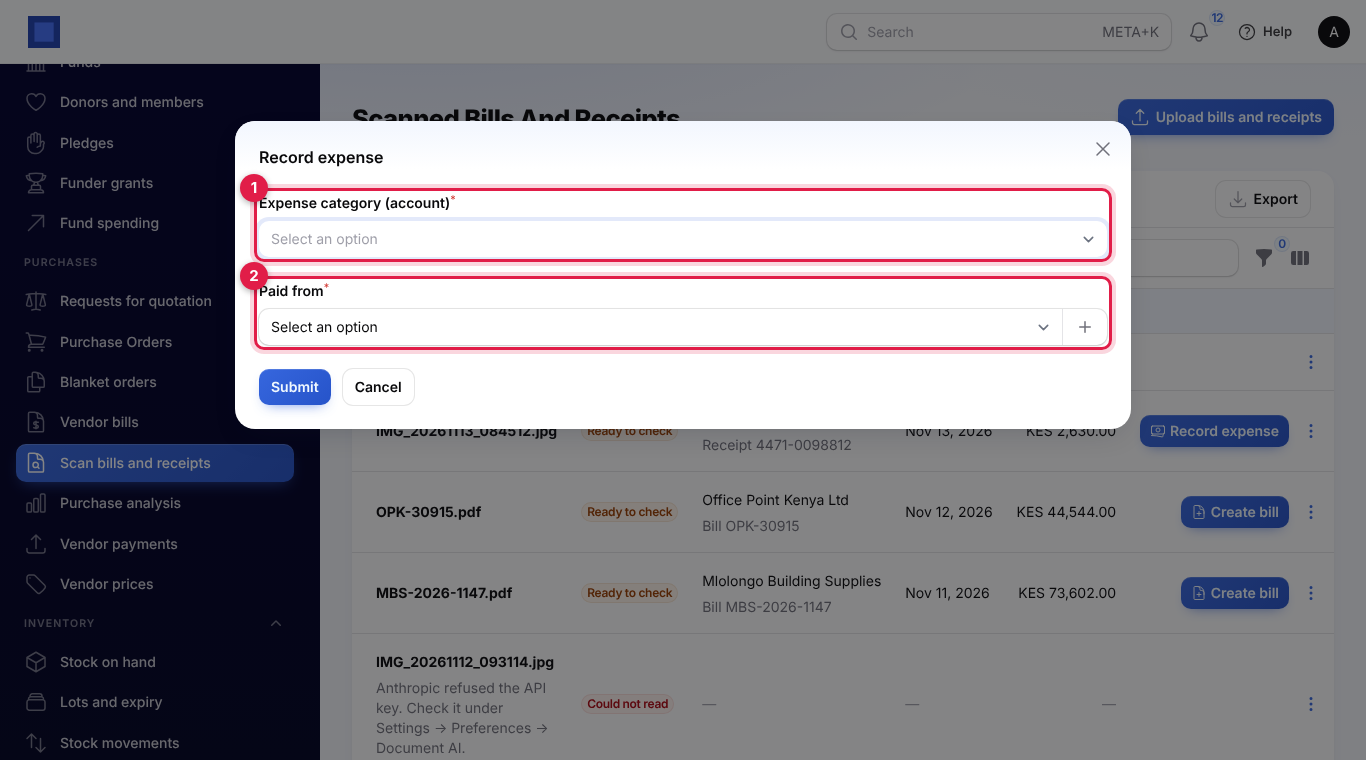
The expense is posted for the Total that was read, dated with the receipt's date, with the receipt number as its reference and a description such as "Receipt: Naivas Supermarket 4471-0098812". The tax is your purchase tax with the receipt's rate, so the VAT is split out of the total (on a KES 2,320 receipt at 16%, KES 2,000 goes to the expense category and KES 320 to VAT you can claim). If none of your purchase taxes has that rate, the whole total is the expense. The supplier is the one in Supplier in Contacts; no new contact is added for a receipt. A copy of the photo or PDF is attached to the expense, which you find under Accounting → Expenses. If you have approval rules for expenses, they apply as usual.
Create bill instead
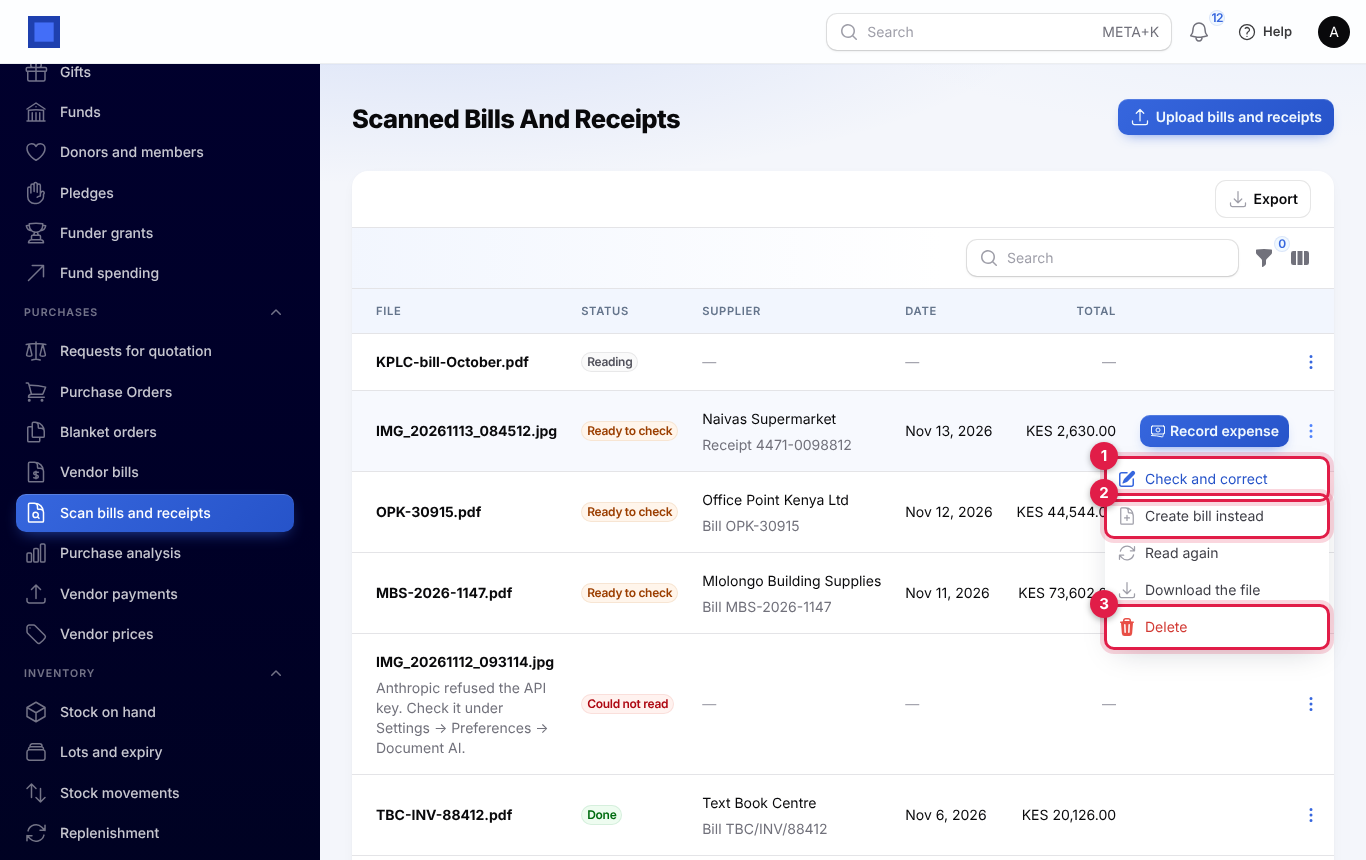
To pay a receipt later, or treat it as a supplier bill for another reason, click ⋮ on it, then Create bill instead (marker 2). You get a draft bill exactly as for a bill. Check and correct (marker 1) and Delete (marker 3) are in the same menu.
Read again, download and delete
All of these are under ⋮ on the document.
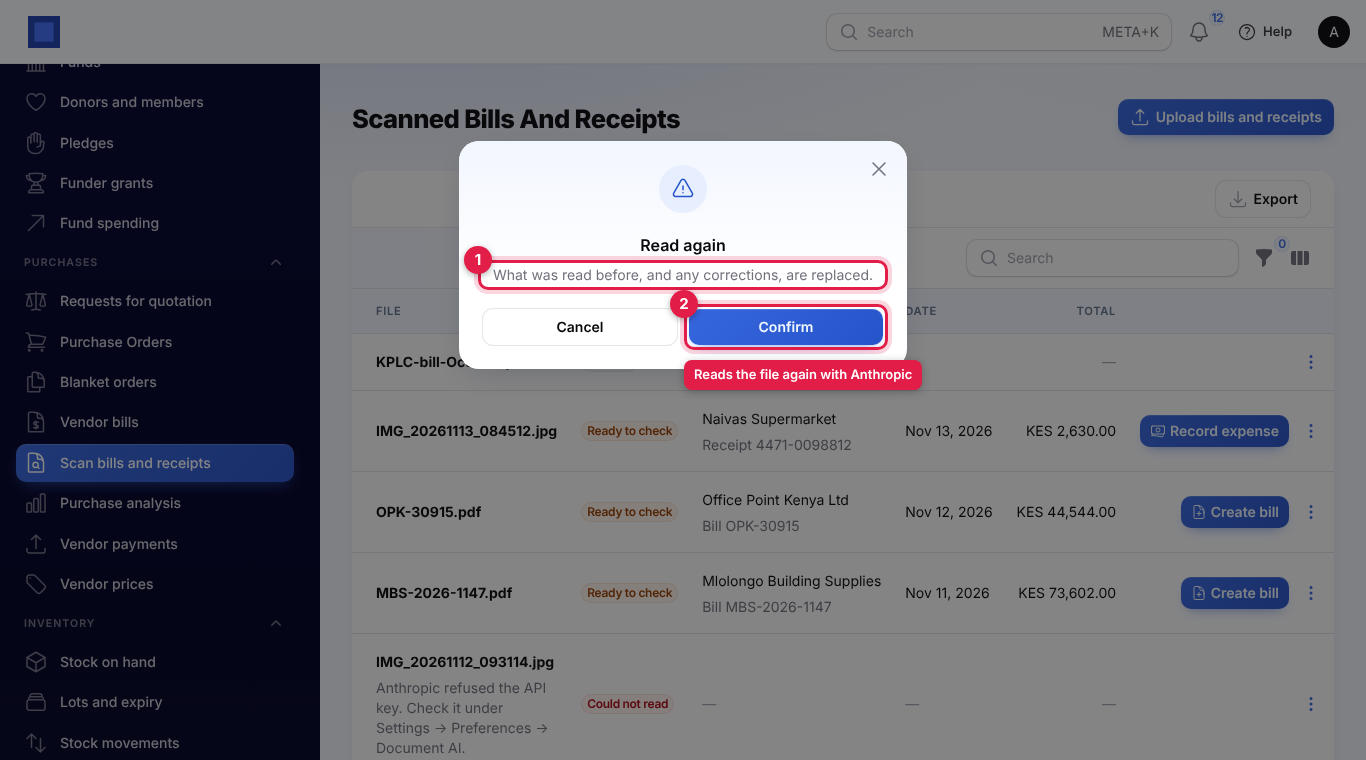
- Read again (for Ready to check and Could not read): reads the file again with Anthropic, straight away, using the key and model in your preferences. Confirm the message (marker 1). What was read before, and any corrections you made, are replaced. Clicking Confirm (marker 2) sends the file to Anthropic again and is billed like the first read. You see "Read again", or the reason it failed.
- Download the file: downloads the original file you uploaded. Available for every document.
- Open the bill: on a Done document (marker 1) that became a bill, opens that bill (marker 2). Download the file (marker 3) is still there.
- Delete: removes the document from the list after you confirm. It is offered for every status except Done, so a document that became a bill or expense stays as a record of where it came from.
When something could not be read
The reason shows in red under the file name. Fix the cause, then click ⋮ → Read again.
| Message | What to do |
|---|---|
| Add your Anthropic API key under Settings → Preferences → Document AI first. | Enter the key (see Add your Anthropic API key), then Read again. |
| Anthropic refused the API key. Check it under Settings → Preferences → Document AI. | The key is wrong, or was deleted or disabled on the Anthropic console. Create a new key if needed, paste it under Settings → Preferences → Document AI, click Save preferences, then Read again. |
| Anthropic is busy or your account has reached its limit. Try reading it again in a minute. | Wait a minute and Read again. If it keeps happening, check your usage limits on the Anthropic console. |
| Could not reach Anthropic. Try reading it again in a minute. | A connection problem. Read again in a minute. |
| Anthropic could not read the file: … | Anthropic's own reason follows the colon. If it says your credit balance is too low, add credit on the Anthropic console and Read again. If the file is damaged or password-protected, save or scan it again and upload the new file. |
| The document could not be read automatically. Enter the bill by hand. | The AI declined this document. Enter the bill under Purchases → Vendor bills, then delete the scanned document. |
| The document is too long to read in one go. Enter the bill by hand or upload fewer pages. | Upload only the pages with the bill on them, or enter the bill by hand. |
| Nothing could be read from the document. | Usually a blank, blurred or very dark photo. Take it again and upload the new file. |
| The photo is larger than 5 MB. Take it again at a lower resolution or upload a PDF. | Lower the camera resolution, or scan it to PDF, and upload again. |
| The PDF is larger than 30 MB. | Split the PDF or scan at a lower resolution. |
| Upload a PDF or a JPEG, PNG, GIF or WebP photo. | Convert the file to JPEG or PDF and upload it again. |
| The uploaded file is missing. Upload it again. | Delete the document and upload the file again. |
Messages you may see when creating something:
| Message | What to do |
|---|---|
| Choose the supplier: no name could be read from the document. | Open Check and correct and choose Supplier in Contacts, or type the Supplier name on the document. |
| Enter the lines or the total before creating the bill. | Add the lines, or at least the Subtotal or Total, in Check and correct. |
| Enter the total paid before recording the expense. | Type the Total in Check and correct. |
| Turn on Accounting to record receipts as expenses. | Switch on Accounting, or use Create bill instead. |
| This document has already been recorded. | It is Done already. Open the bill or expense instead of creating another. |
| The document has not been read yet. | Wait for Reading to finish, or Read again if it failed. |
Good to know
What does it cost? Each read, including Read again, is one request billed by Anthropic to your own Anthropic account, at the price of the model you chose. NaliSuite does not add a charge per document; the module itself is billed like any marketplace app. Claude Sonnet 5.5 costs less than the default Claude Opus 5.5, and Claude Haiku 5.5 costs least. You can set a monthly spending limit on the Anthropic console.
Where do my files go? Uploaded files are stored privately in your workspace, never on a public link. For reading, each file is sent only to Anthropic, with your API key. The original is attached to the bill it becomes, and a copy is attached to an expense.
Is it always right? No. It copies what it can see and leaves the rest empty rather than guessing, but check every document before you create a bill or expense, and post bills only after checking them.
Can I upload from my phone? Yes. Open NaliSuite in your phone's browser or the installed app, go to Purchases → Scan bills and receipts, click Upload bills and receipts and take a photo.
Does it work for purchase orders or sales invoices? No. It reads supplier bills and receipts only, and creates draft vendor bills or expenses. A draft bill it creates is not linked to a purchase order.