Visitor Management
Visitor Management is for offices, schools, hospitals, factories and gated sites that want to know who is on the premises. Reception and hosts invite visitors for a date and time, and each visitor gets an email or text with a QR code and a link to fill in their details before they come. At the desk, or at a self-service tablet kiosk, invited guests scan their code and walk-ins fill in a short form; a badge prints with a QR code that signs them out again. Hosts are told when their visitor arrives. A watch list turns people away or alerts reception and security, each site keeps its own visiting hours and rules, visitors who stay too long raise an alert, and a printable roll call shows who is on site in an emergency. Personal data is erased automatically after the number of days you choose.
It is in the Visitors group of the left menu: Today, Roll call, Visit history, Visitors, Reports, Watch list and Sites and entrances.
Note: Three permissions control the app (under Settings → Roles). visitors.view lets someone open Today, Roll call, Visit history and Reports, and invite visitors for themselves as the host. visitors.reception adds signing visitors in and out, walk-ins, the scan box, turning people away, badges, inviting for any host and the Visitors list. visitors.manage adds the watch list, sites and entrances, the kiosk link, and downloading or erasing a visitor's data. Owners and admins have all three; the member role has visitors.view. See Roles and permissions.
Switch it on
Visitor Management is a marketplace add-on. It needs the HRM app, because hosts are chosen from your staff. To text visitors and hosts, set up SMS in Marketing (see SMS providers).
- Open Settings → Marketplace and type Visitor in the Search add-ons… box (marker 1).
- On the Visitor management card (marker 2), click Start free trial (or Add to subscription) and confirm. The Visitors group appears in the menu.
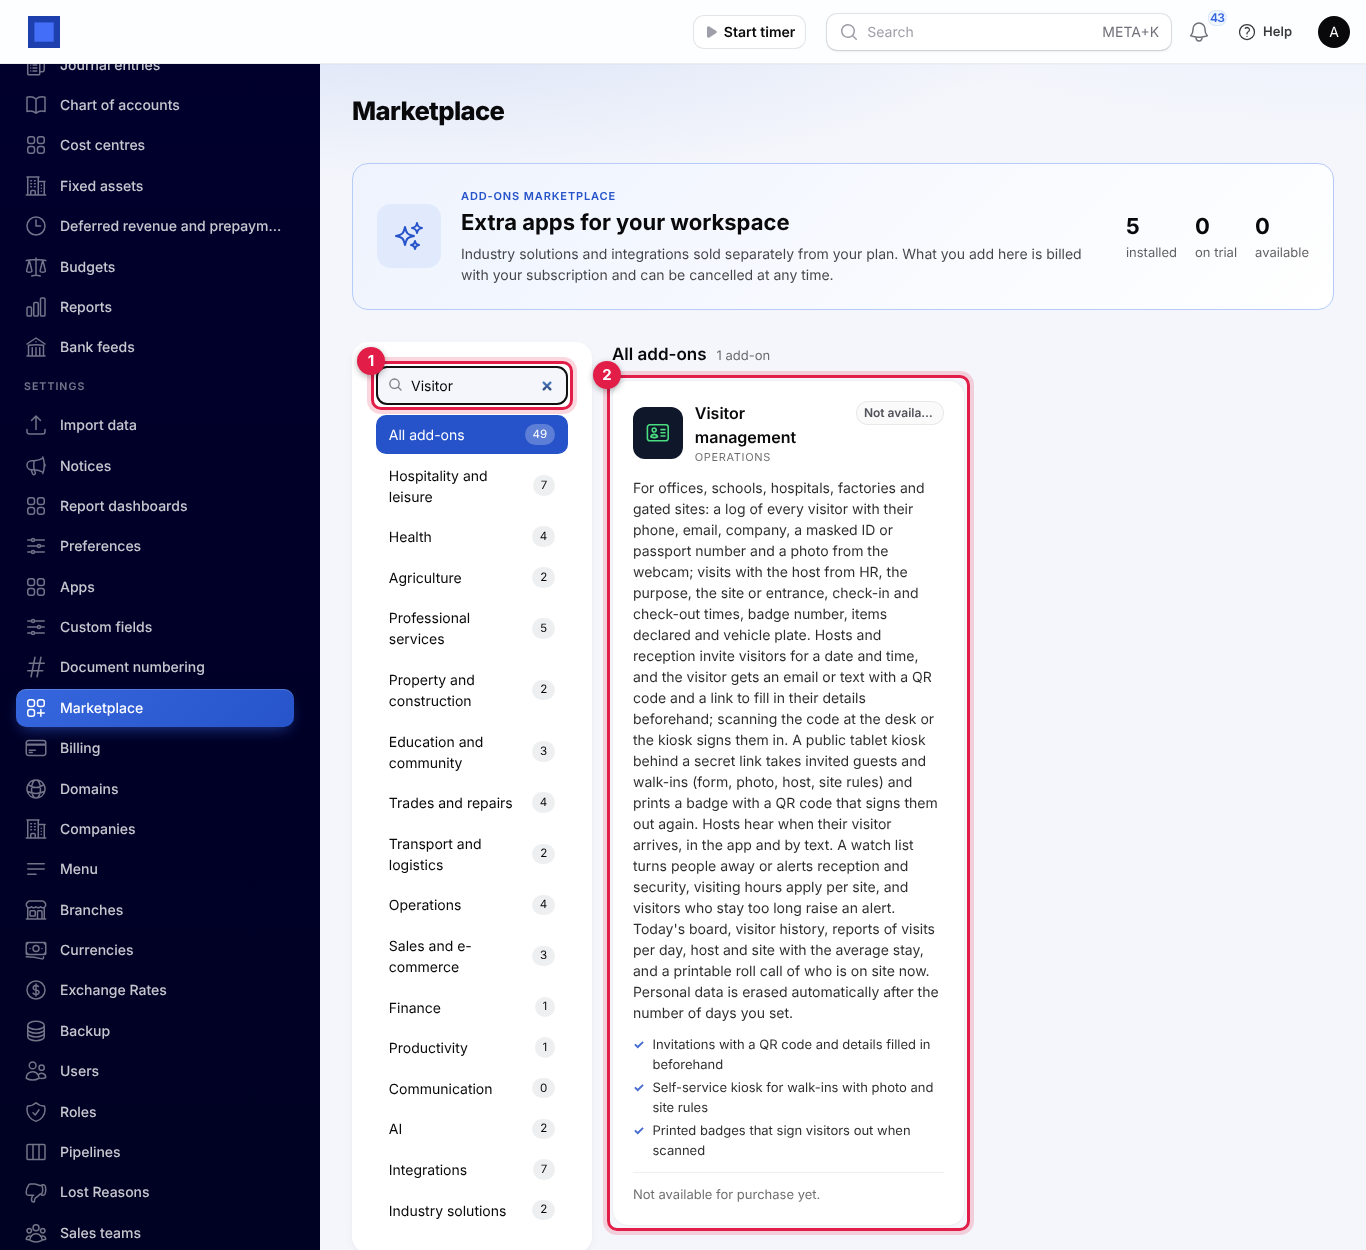
If the card says Not available for purchase yet (as in the screenshot), the add-on has not been priced for your plan: ask NaliSuite support to switch it on. See Billing and marketplace.
Visitor settings
- Open Settings → Preferences and click the Visitors tab (marker 1).
- Fill in the fields and click Save preferences (marker 11).
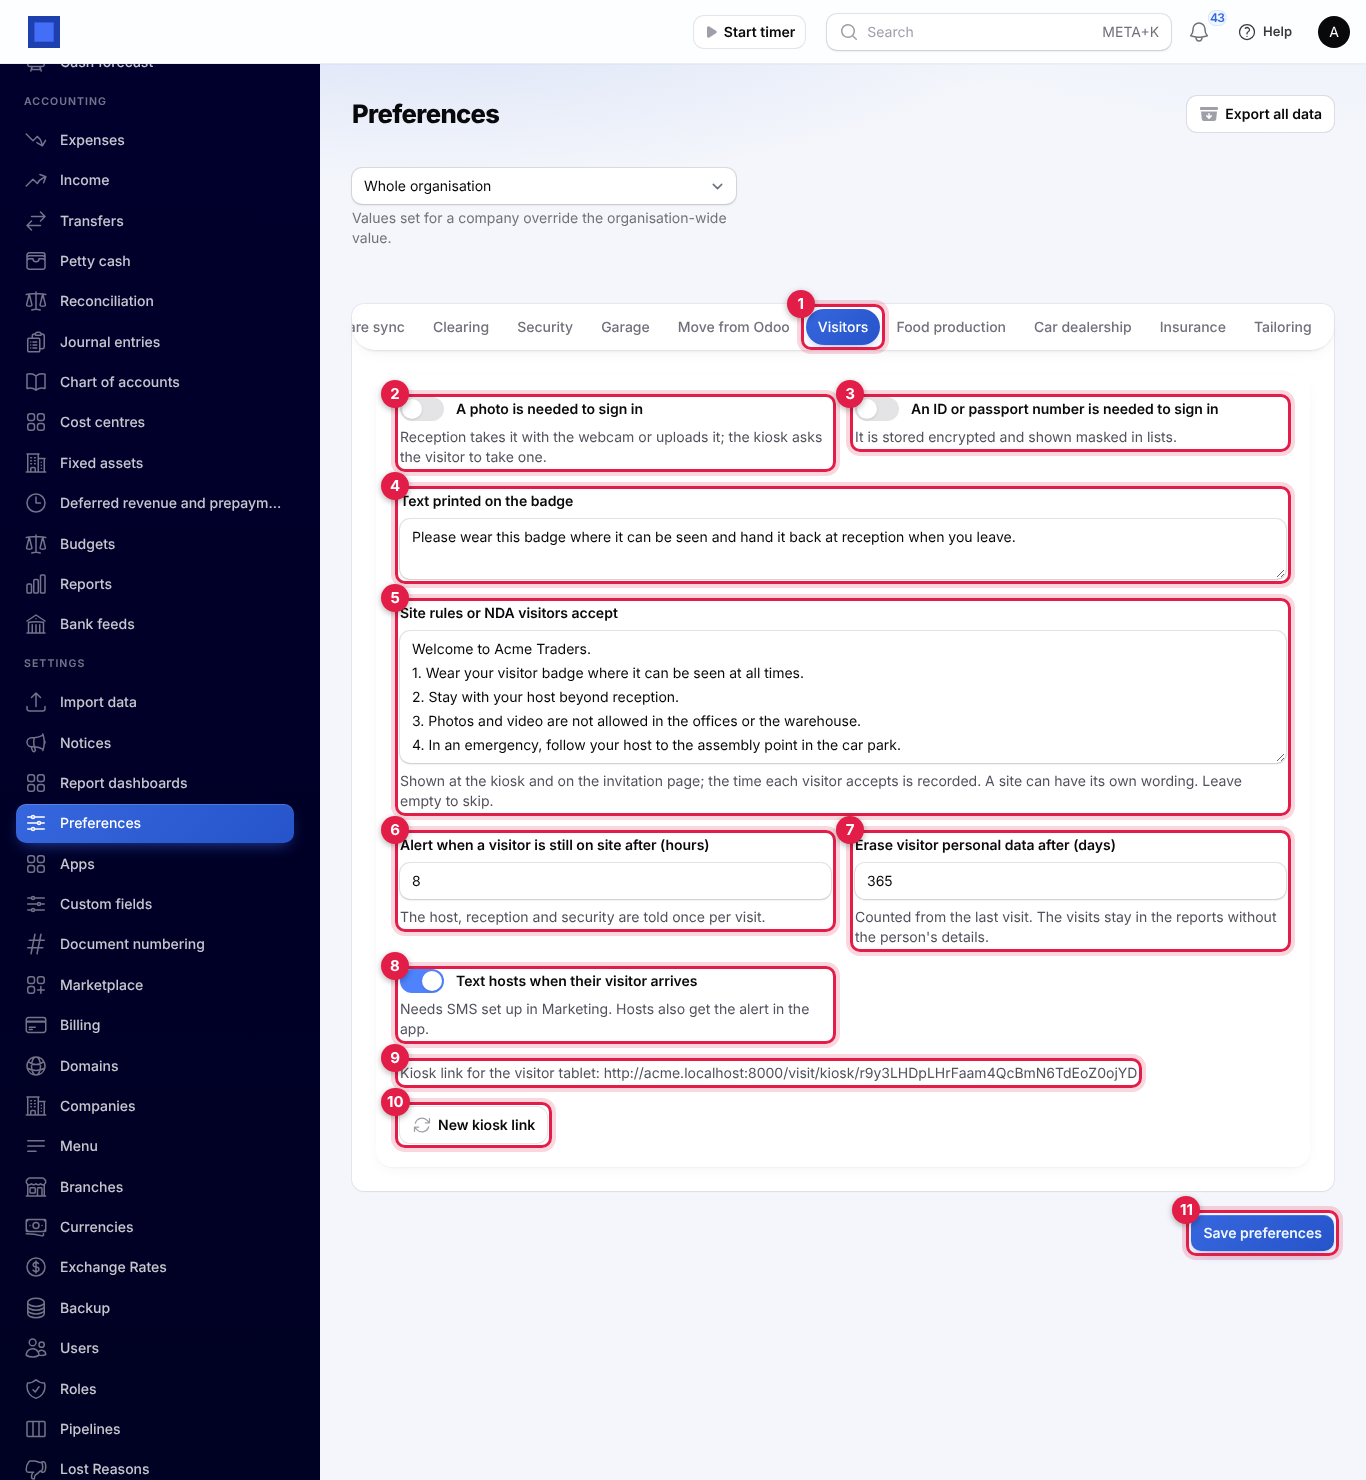
| Setting | Default | What it does |
|---|---|---|
| A photo is needed to sign in (marker 2) | Off | Reception must take a photo with the webcam or upload one, and the kiosk asks the visitor to take one. An invited visitor who already has a photo on their record is not asked again. |
| An ID or passport number is needed to sign in (marker 3) | Off | The number is asked for at the desk, at the kiosk and on the invitation page. It is stored encrypted and shown masked in lists, for example •••••093. |
| Text printed on the badge (marker 4) | "Please wear this badge where it can be seen and hand it back when you leave." | The note at the bottom of every badge. |
| Site rules or NDA visitors accept (marker 5) | Empty | Shown at the kiosk, on the invitation page and in the desk forms. While there is text, every visitor must tick that they accept it before signing in, and the time and the exact wording are kept with the visit. A site can have its own wording (see Sites, visiting hours and rules). Leave it empty to skip. |
| Alert when a visitor is still on site after (hours) (marker 6) | 8 | 1 to 72. See Overstay alerts. |
| Erase visitor personal data after (days) (marker 7) | 365 | 30 to 3,650, counted from the last visit. See Personal data: download, erase and the automatic purge. |
| Text hosts when their visitor arrives (marker 8) | On | Hosts also get a text, as well as the alert in the app. Needs SMS set up in Marketing. |
| Kiosk link for the visitor tablet (marker 9) | — | The secret address of the kiosk. Open it on the tablet at reception. See The kiosk. |
| New kiosk link (marker 10) | — | Gives the kiosk a new address, for example when a tablet is lost. Tablets on the old address stop working until you open the new link on them. |
The kiosk link and New kiosk link are shown only to people with visitors.manage. The dropdown at the top of Preferences lets one company use different settings from the rest of the organisation.
Who can be a host
The host is the person the visitor comes to see. The Host list shows your active staff from HRM (and staff on leave), with their job title, then any users of the workspace who have no staff record. To add a host, add them as an employee in HRM (see HR).
Someone with only visitors.view sees only themselves in the Host list, so staff can invite their own visitors but nobody else's.
Today's board
Open Visitors → Today. This is reception's screen for the day. It refreshes by itself every 30 seconds.
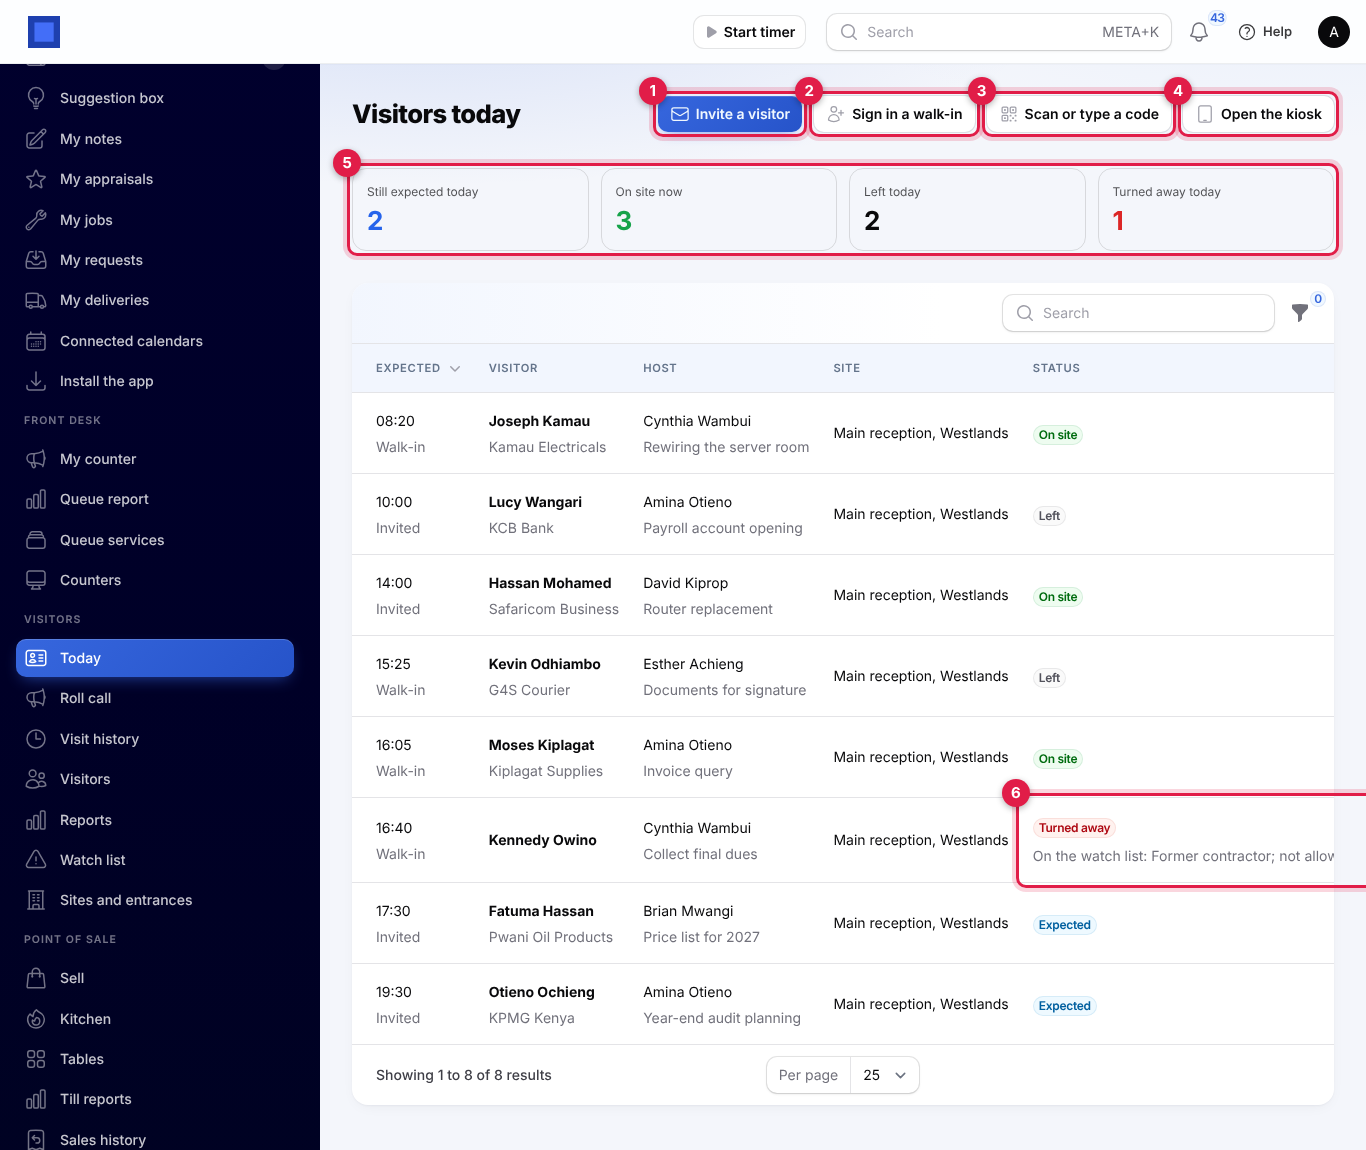
- The buttons at the top (markers 1 to 4) are described in the sections below.
- The four counts (marker 5) are Still expected today, On site now, Left today and Turned away today.
- The list shows everyone expected today, everyone on site now (even if they came on an earlier day), everyone who signed in or out today and everyone turned away today. Each row shows the Expected time with Invited or Walk-in under it, the Visitor and their company, the Host and the purpose, the Site and the Status: Expected, On site, Left or Turned away, with the reason under a turned-away visitor (marker 6).
- Use the filter icon to show one Status or one Site, and the search box to find a visitor by name.
The table is wider than the screen; scroll it to the right to see the rest of each row and its buttons.
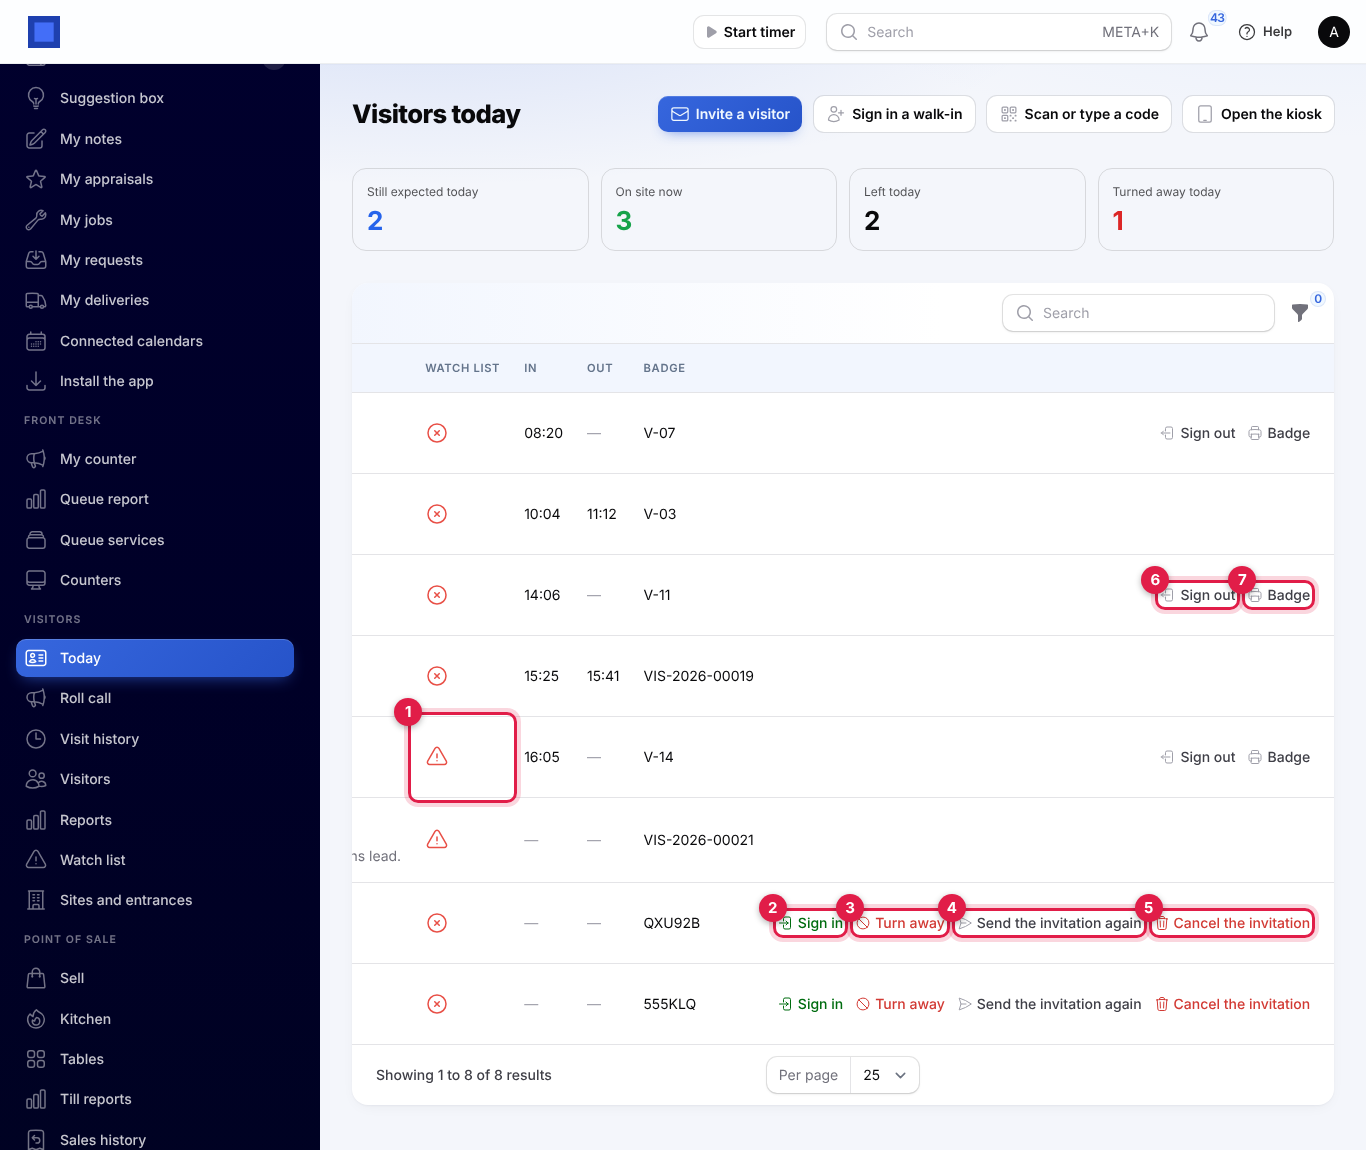
- Watch list (marker 1): a warning triangle when the visitor matched the watch list.
- In and Out: the times they signed in and out.
- Badge: for an expected visitor, their six-character visit code; once signed in, the badge number, or the visit number (such as VIS-2026-00019) when no badge number was given.
- For an expected visitor: Sign in (marker 2), Turn away (marker 3), Send the invitation again (marker 4) and Cancel the invitation (marker 5).
- For a visitor on site: Sign out (marker 6) and Badge (marker 7), which opens the badge to print again.
Invite a visitor
- On Today, click Invite a visitor.
- Fill in the form and click Send the invitation (marker 6).
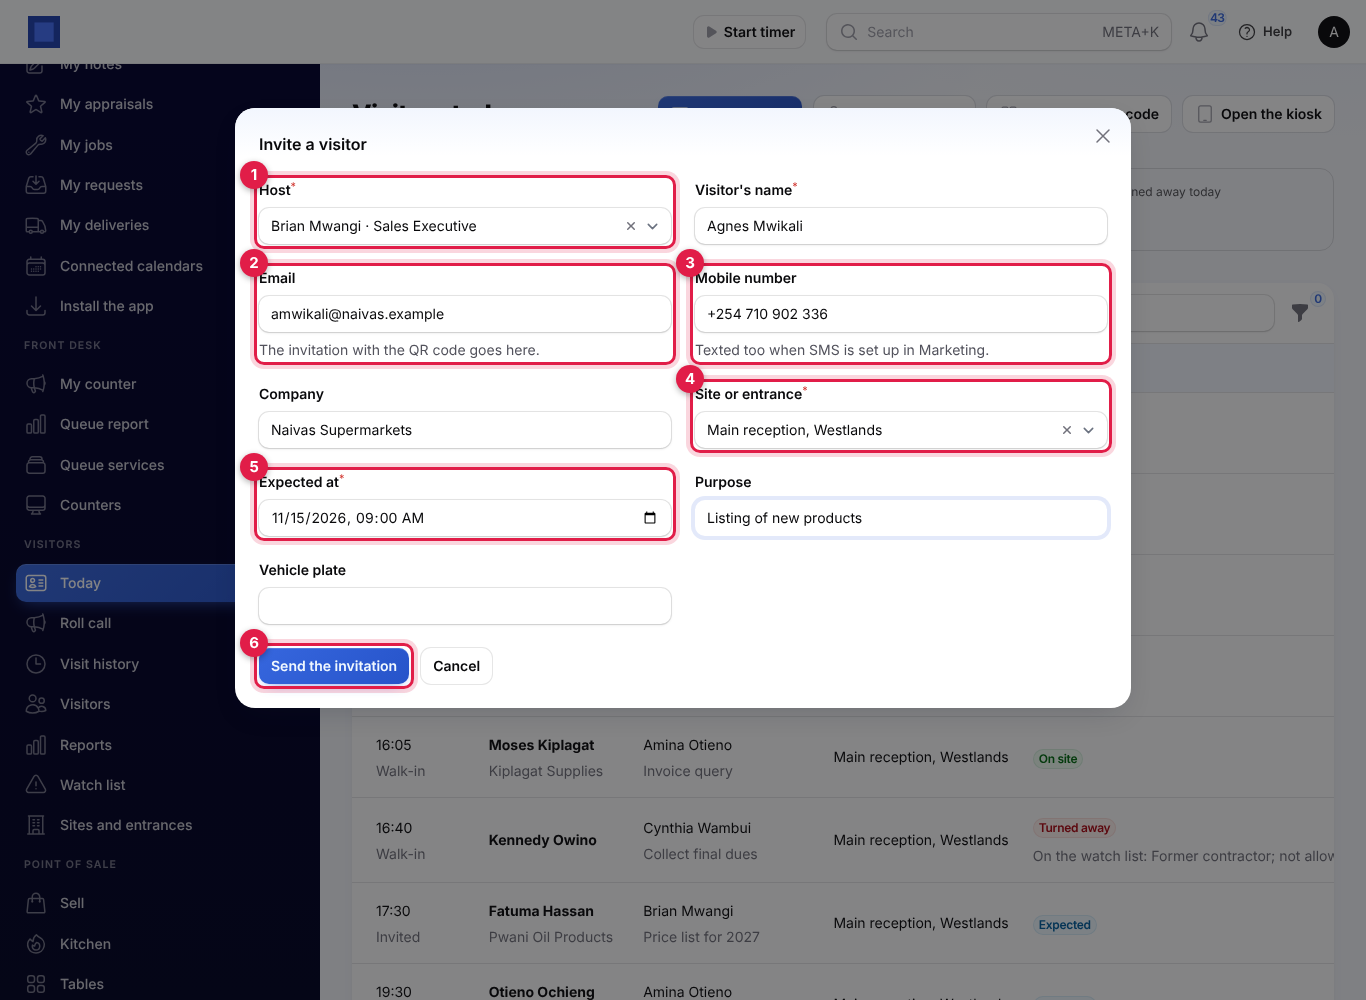
| Field | What to enter |
|---|---|
| Host (required, marker 1) | Who the visitor is coming to see. Defaults to you. |
| Visitor's name (required) | Their full name. |
| Email (marker 2) | The invitation with the QR code goes here. |
| Mobile number (marker 3) | The invitation is texted too when SMS is set up in Marketing. |
| Company | The organisation they come from. |
| Site or entrance (marker 4) | Where they will sign in. Required once you have any sites; chosen for you when there is only one. |
| Expected at (required, marker 5) | The date and time. Defaults to tomorrow at 09:00. It cannot be more than an hour in the past, and it must fall within the site's visiting hours. |
| Purpose | For example Quarterly supply review. Shown to the host. |
| Vehicle plate | Saved in capitals, for the gate. |
You see "Invitation QXU92B ready" with "Sent to the visitor with the QR code and link". If the visitor has no email and SMS is not set up, nothing is sent: you see "Nothing was sent: there is no email, or SMS is not set up. Give the visitor the code."
What the visitor receives:
- An email titled "Your visit to Acme Traders on Monday 16 November 2026, 10:00", with who invited them, where to go, their visit code, the QR code attached and a button to fill in their details.
- A text with the date, the host, the visit code and the link.
Each visit gets a number such as VIS-2026-00024 and a six-character visit code. The same person is recognised again by their phone number, email or ID number, so a returning visitor keeps one record with all their visits.
If the visitor is on the watch list to be turned away, the invitation is refused with the reason.
The visitor's invitation page
The link in the invitation opens a page on the visitor's phone. It shows the host, when and where they are expected, the QR code and the visit code (marker 1), and a form to fill in their details before they come (marker 2): full name, mobile number, email, company, ID or passport number, vehicle plate, items they are bringing in and a photo from the phone. If there are site rules, they read them and tick I have read and accept the site rules (marker 3). Save my details (marker 4) saves everything; they can come back and change it until they sign in.
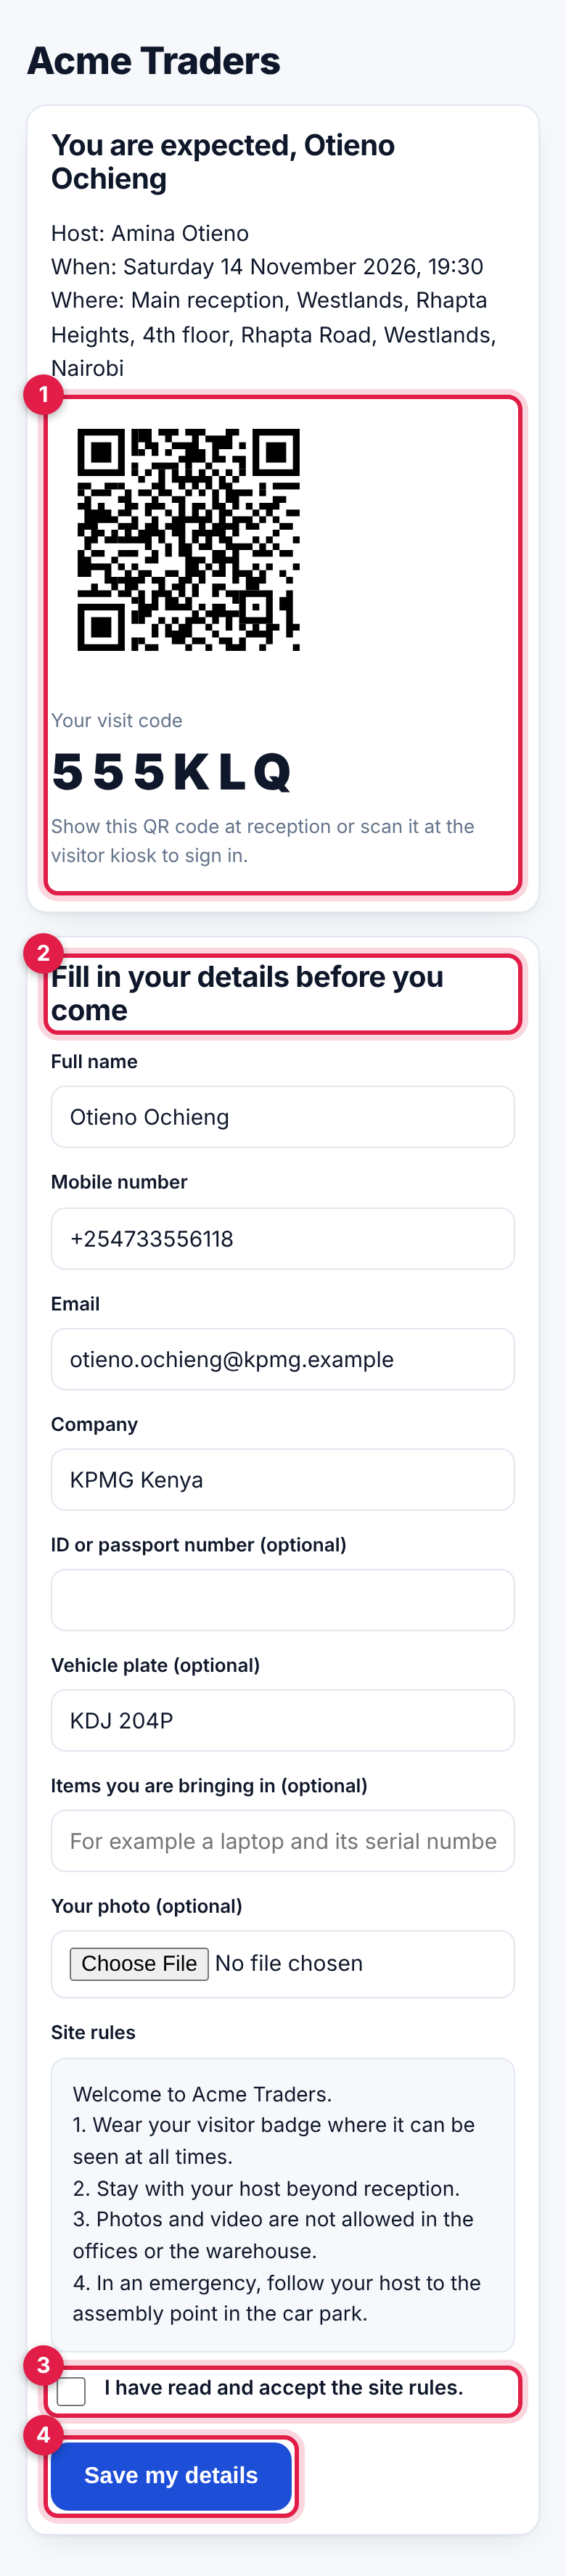
Details filled in here make signing in faster: a visitor who has accepted the rules and given what is required goes straight through at the desk or kiosk. Once they have signed in, the page says they are signed in; after they leave, it says the visit has ended.
Resend or cancel an invitation
On Today, on the visitor's row:
- Send the invitation again emails and texts the same code and link again.
- Cancel the invitation deletes the expected visit after you confirm.
Hosts can resend and cancel the invitations they made or that are for them; reception can do it for anyone.
Sign in an expected visitor
- On Today, click Sign in on the visitor's row.
- In the window, type a Badge number if you hand out numbered badges, or leave it empty to use the visit number.
- If something is still missing, the window asks for it: the ID or passport number (when required and not yet given), a Photo from the webcam or Or upload a photo (when required and the visitor has none), and the tick The visitor has read and accepted the site rules (when they have not accepted them yet).
- Click Sign in.
You see "Hassan Mohamed signed in" and either "David Kiprop has been told." or, if the host could not be reached, "The host could not be reached. Call them." Click Print the badge in the message to print it (see Print the badge).
Turn a visitor away
Click Turn away on an expected visitor's row, type the Reason and click Submit. The visit shows Turned away with the reason, and counts in Turned away today and the reports.
Sign in a walk-in
For someone who arrives without an invitation:
- On Today, click Sign in a walk-in.
- Fill in the form and click Sign in (marker 8).
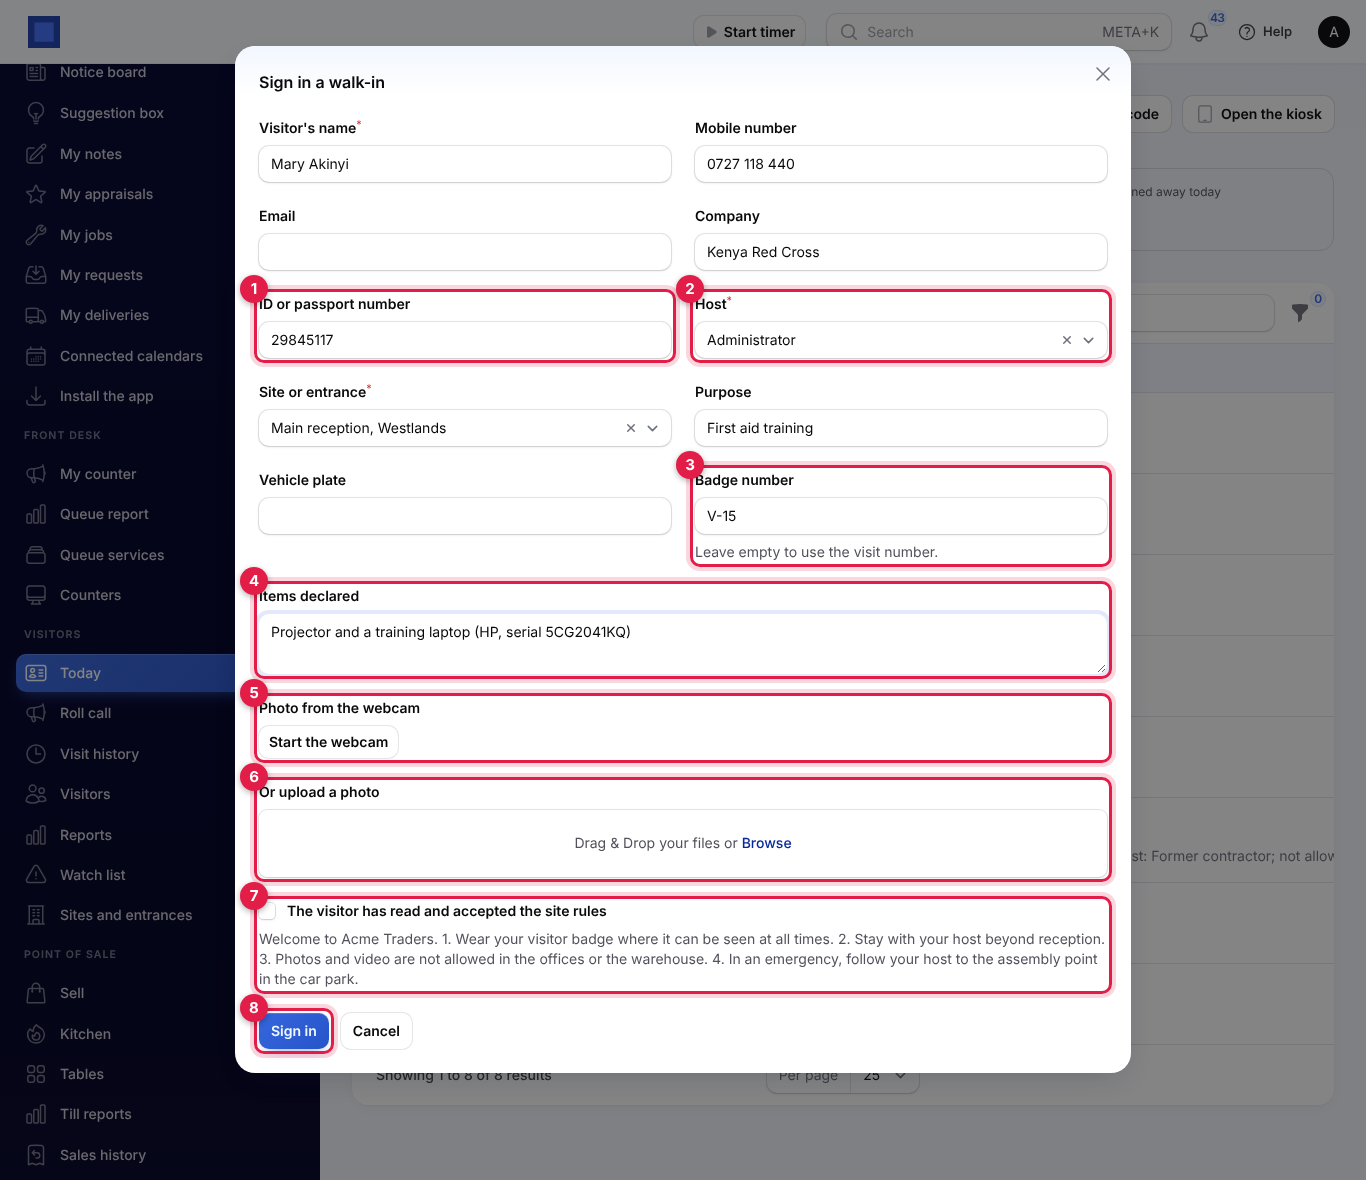
| Field | What to enter |
|---|---|
| Visitor's name (required) | Their full name. |
| Mobile number, Email, Company | Optional. |
| ID or passport number (marker 1) | Required when An ID or passport number is needed to sign in is on. |
| Host (required, marker 2) | Who they are here to see. |
| Site or entrance | Where they are signing in. |
| Purpose, Vehicle plate | Optional. |
| Badge number (marker 3) | The number on the badge you hand them. Leave empty to use the visit number. |
| Items declared (marker 4) | What they bring in, for example a laptop and its serial number, so it can be checked when they leave. |
| Photo from the webcam (marker 5) | Click Start the webcam, let the browser use the camera, then take the photo. |
| Or upload a photo (marker 6) | A picture up to 5 MB instead of the webcam. Required when photos are required. |
| The visitor has read and accepted the site rules (marker 7) | Shown when there are site rules, with the start of the wording. Tick it once the visitor has read them. |
The visitor is checked against the watch list, signed in, and the host is told. Click Print the badge in the message that follows.
The scan box
Scan or type a code handles both arrivals and departures from one box, with a USB or Bluetooth QR scanner or by typing:
- On Today, click Scan or type a code.
- Scan the QR code on the visitor's invitation or badge into Code, or type the visit code, the badge number or the visit number.
- For an arriving visitor, type the Badge number if you use one, and tick the site rules box if they have just read them.
- Click Go.
An expected visitor is signed in; a visitor on site is signed out ("Joseph Kamau signed out"). If nothing matches, you see "No visit matches that code."
Print the badge
Open the badge from Print the badge in the sign-in message, or from Badge on the visitor's row. The badge opens in a new tab and the print window opens by itself. Print it on a label or card printer, or on A4 and cut it out.
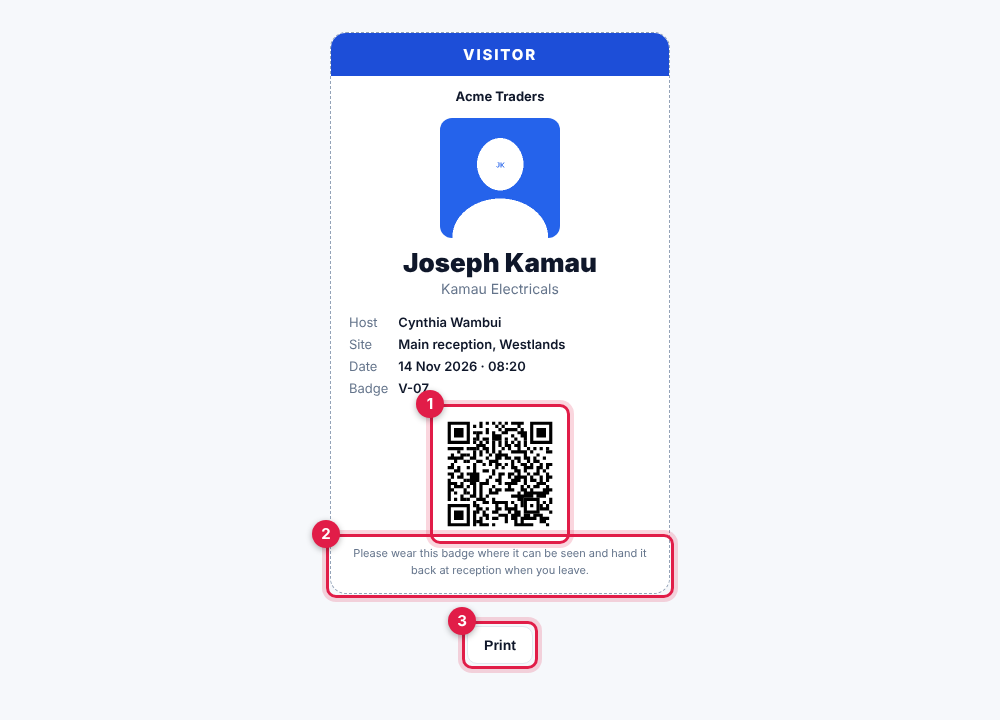
The badge shows VISITOR, your business name, the visitor's photo, their name and company, the Host, Site, Date and Badge number, the QR code (marker 1) and the text from settings (marker 2). Click Print (marker 3) to print it again.
The QR code signs the visitor out: scan it at the kiosk's Check out or in the desk's scan box when they leave.
Sign visitors out
Any of these signs a visitor out and records the time:
- Sign out on their row on Today or on Roll call, then confirm.
- Scanning their badge, or typing the badge number, in Scan or type a code.
- Check out at the kiosk (see below).
A visit that has ended cannot be signed in again; invite or sign in the visitor again for a new visit.
The kiosk
The kiosk is a sign-in screen for a tablet at reception. It needs no login: it works behind its secret link. Open it on the tablet from the link in Settings → Preferences → Visitors, or with Open the kiosk on Today or on Sites and entrances (people with visitors.manage), and keep it open full screen.
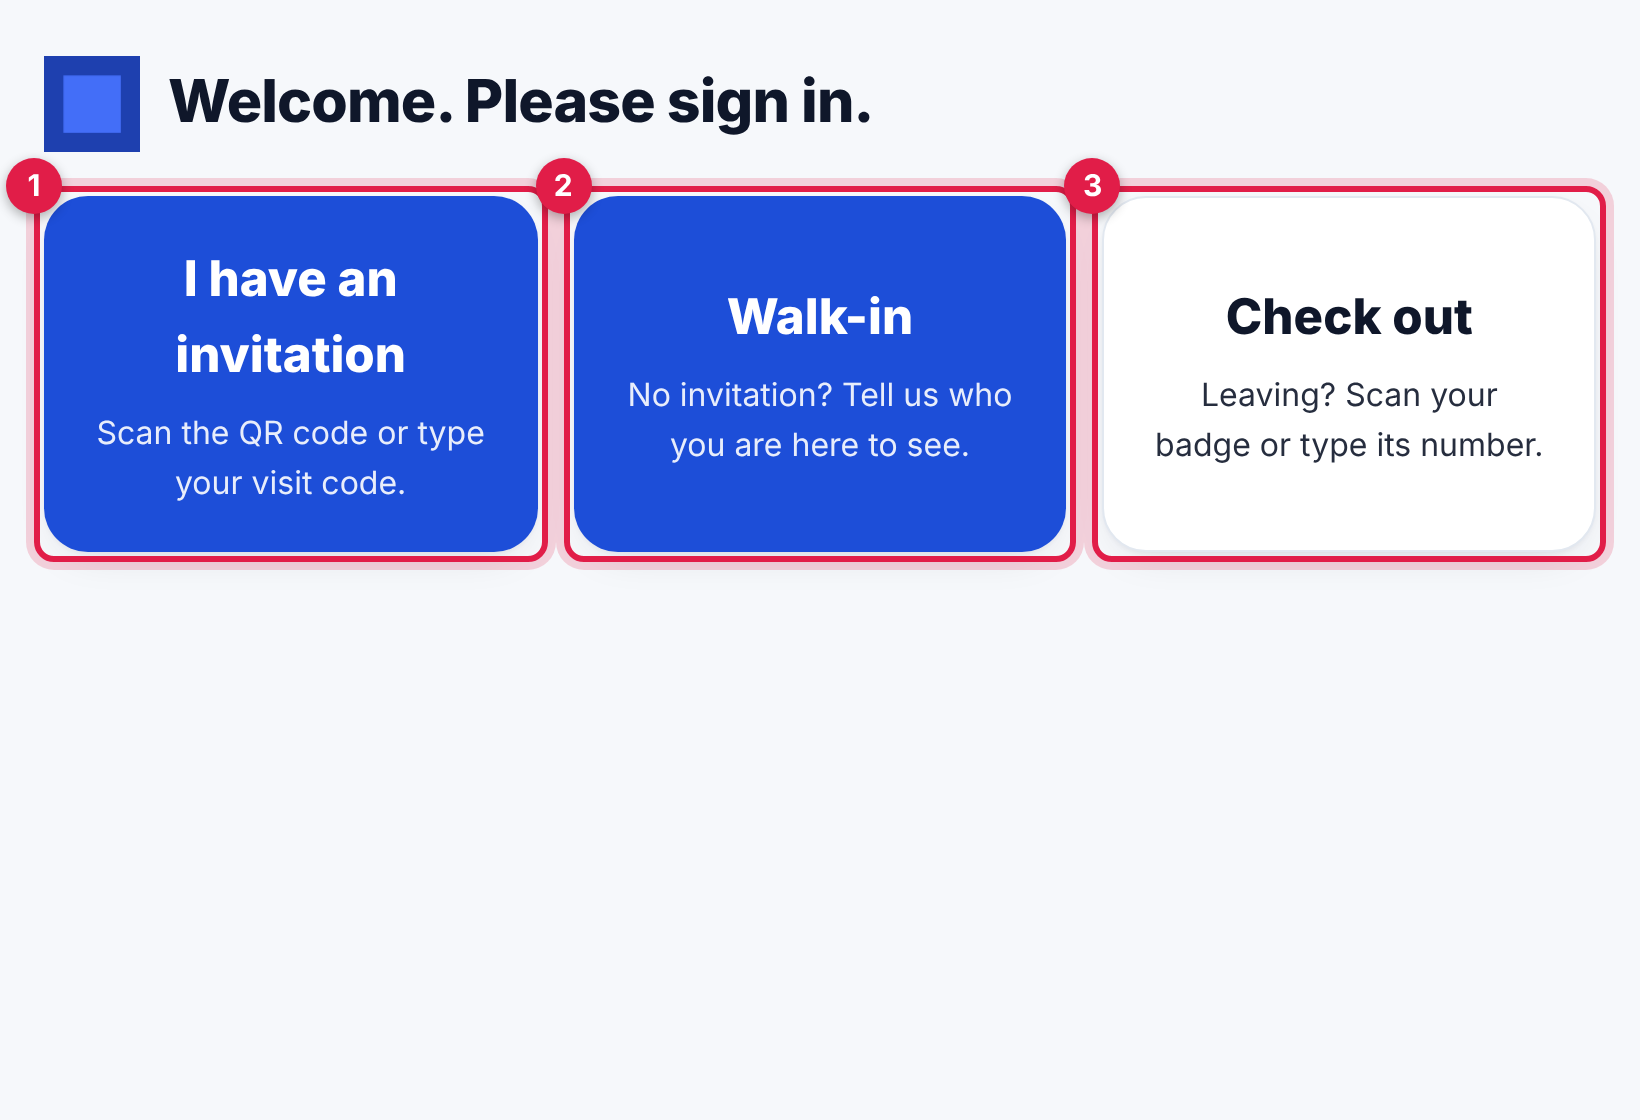
- I have an invitation (marker 1): the visitor holds the QR code from their email or text up to the tablet's camera, or types their visit code, and taps Sign in. Scanning with the camera works in browsers that can read QR codes, such as Chrome on Android; elsewhere the visitor types the code. If a photo, the ID number or accepting the site rules is still missing, a "Just one more step" page asks for it.
- Walk-in (marker 2): a form with the visitor's name, mobile number, email, company, ID or passport number, Who are you here to see?, Where are you signing in? (only when you have more than one site), the reason for the visit, vehicle plate and items they are bringing in. They can take a photo with Start the camera and Take the photo, or choose a picture, read and accept the site rules, then tap Sign in and print my badge.
- Check out (marker 3): the visitor scans the QR code on their badge or types the badge number, and sees "Goodbye, … You are signed out. Thank you for your visit."
After signing in, the badge page opens and prints. Done returns to the start; the kiosk also goes back by itself after 20 seconds. The host is told as for a sign-in at the desk.
What the kiosk refuses:
- Outside a site's visiting hours: "Visiting hours at … are …. Please ask at reception."
- A code it cannot find: "We could not find that code. Please check it or ask at reception."
- Someone on the watch list to be turned away: "We cannot sign you in here. Please speak to reception." The visit is recorded as turned away and reception and security are alerted.
Tip: If a kiosk tablet is lost or someone copied the link, click New kiosk link in Settings → Preferences → Visitors or on Sites and entrances, then open the new link on your tablets.
Host alerts
When a visitor signs in, at the desk or the kiosk, their host is told:
- In the app: a notification "Hassan Mohamed has arrived to see you" with the visitor's company, the site, the purpose and the badge number, and Open to go to Today. This is the Your visitors alert in your notification settings (see Choose how you are notified).
- By text: "Acme Traders: Hassan Mohamed has arrived to see you at Main reception, Westlands. Badge V-11." It goes to the phone on the host's staff record (or on their user) when Text hosts when their visitor arrives is on and SMS is set up in Marketing. A host who already gets the Your visitors alert by SMS in their notification settings is not texted twice.
A host who is staff without a login is told by text only. The time the host was told shows in the visit's details as Host told.
The watch list
The watch list holds people reception must look out for. Open Visitors → Watch list.
- Click Add to the watch list.
- Fill in the form and click Create (marker 6).
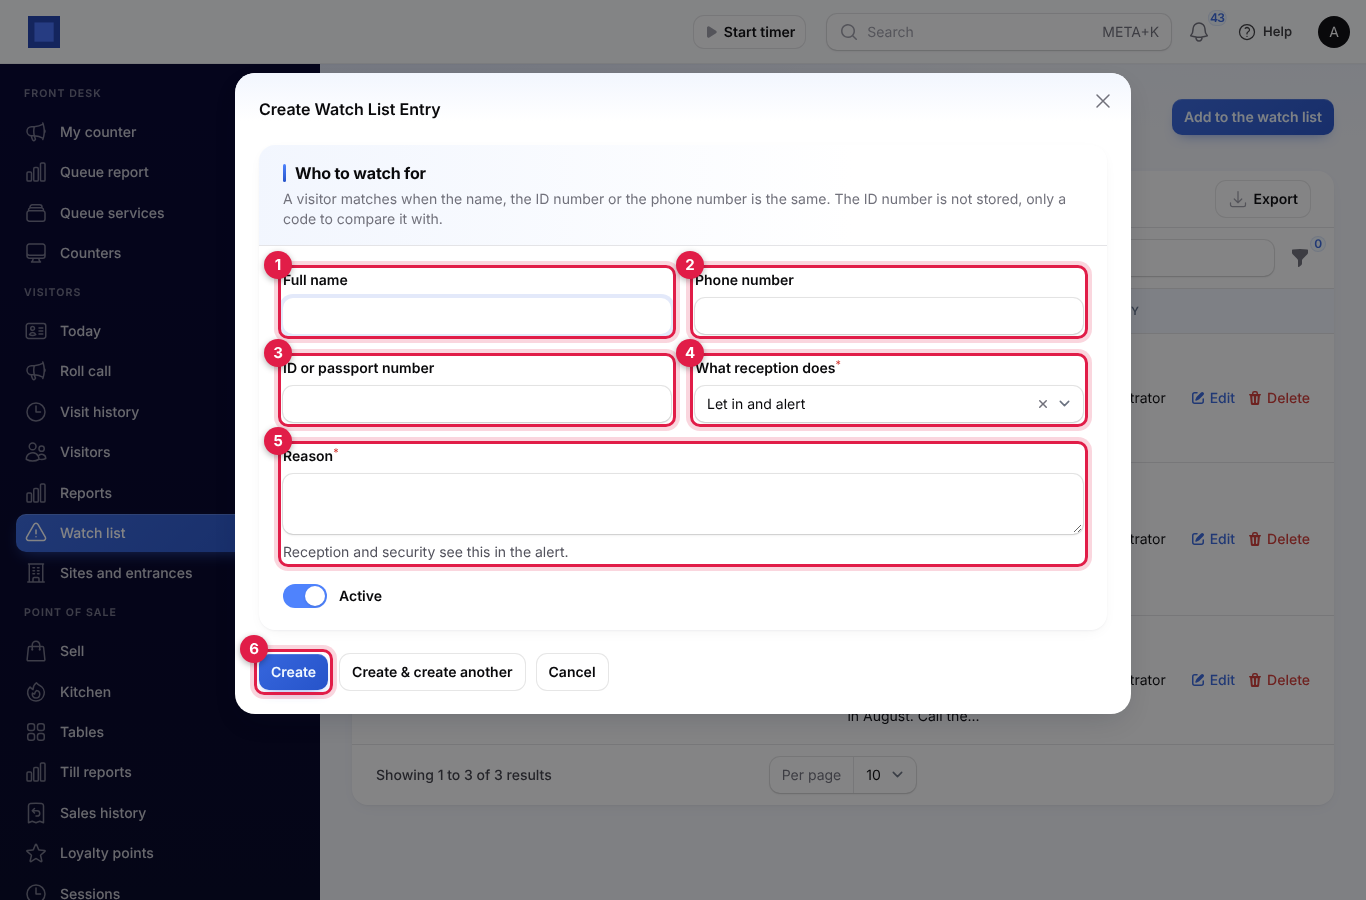
| Field | What to enter |
|---|---|
| Full name (marker 1) | Matches a visitor with the same name, ignoring capitals and extra spaces. |
| Phone number (marker 2) | Matches the same number, written with or without +254 or spaces. |
| ID or passport number (marker 3) | Matches the same number. It is not stored: only a code to compare with and its last three characters, shown as •••X99. When editing, type a number to replace it. |
| What reception does (required, marker 4) | Turn away: the visitor cannot be invited or signed in. Let in and alert: they are signed in, and reception and security are told. |
| Reason (required, marker 5) | Reception and security see this in the alert. |
| Active | Turn off to keep the entry without matching on it. |
Fill in at least one of the name, phone or ID number. A visitor matches when any one of them is the same. If someone matches both kinds of entry, Turn away wins.
You can also put a known visitor on the list from Visitors → Visitors: click Add to the watch list on their row, choose What reception does and type the Reason. Their name, phone and ID number are copied.
What happens on a match:
- Turn away at the desk: the visit is recorded as turned away with "On the watch list: …" and the reason, and you see why.
- Let in and alert: the visitor is signed in and the warning triangle shows in the Watch list column.
- Either way, everyone with visitors.reception gets a "Watch list: … was turned away" or "Watch list: … is signing in" alert with the site, host and reason, and so do security supervisors (security.supervise) when the Security app is on. This is the Visitor alerts notification.
- When the site is linked to a guarded site in Security and reception signed the visitor in at the desk, the match is also written in that site's occurrence book (see Security services).
Sites, visiting hours and rules
Sites are the receptions, gates and entrances visitors sign in at. Open Visitors → Sites and entrances. The list shows each site with its address, Visiting hours, how many visitors are On site now and whether it is Active.
- Click Add a site or entrance, or Edit on a site.
- Fill in the form and click Create or Save changes.
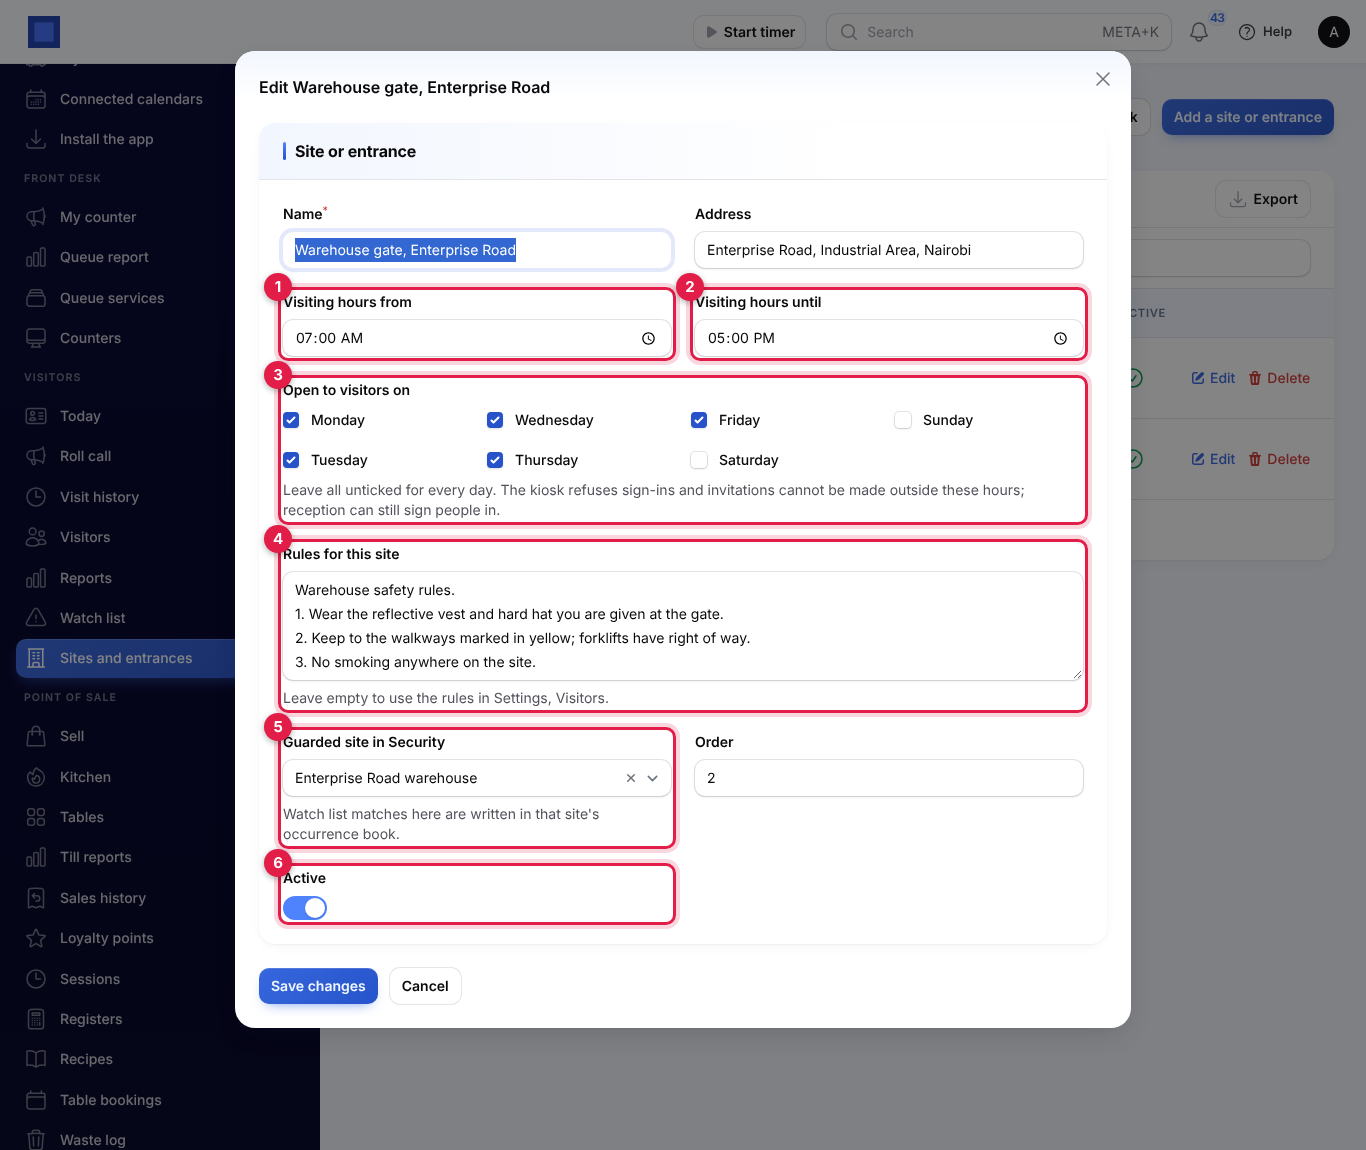
| Field | What to enter |
|---|---|
| Name (required) | For example Main reception, Westlands. Shown on badges, invitations and the kiosk. |
| Address | Printed in the invitation. |
| Visiting hours from (marker 1) and Visiting hours until (marker 2) | Leave empty for any time. |
| Open to visitors on (marker 3) | The days visitors may come. Leave all unticked for every day. |
| Rules for this site (marker 4) | This site's own rules or NDA, for example warehouse safety rules. Leave empty to use the rules in settings. |
| Guarded site in Security (marker 5) | Shown when the Security app is on. Watch list matches here are written in that site's occurrence book. |
| Order | Where the site comes in lists. |
| Active (marker 6) | Turn off to stop using a site without deleting its visits. |
Visiting hours are on your company's clock. Outside them, the kiosk refuses sign-ins and invitations cannot be made for that time; reception can still sign people in at the desk.
Overstay alerts
Every 15 minutes NaliSuite looks for visitors still signed in after the number of hours in Alert when a visitor is still on site after (hours). For each one, the host, reception (visitors.reception) and, with the Security app, security supervisors get a "Joseph Kamau is still on site" alert with the time they signed in, the site, the host and the badge. Each visit raises the alert once. Visitors are never signed out automatically: check whether they have left without signing out, and sign them out.
The roll call
In an emergency, open Visitors → Roll call to see everyone signed in right now, by site.
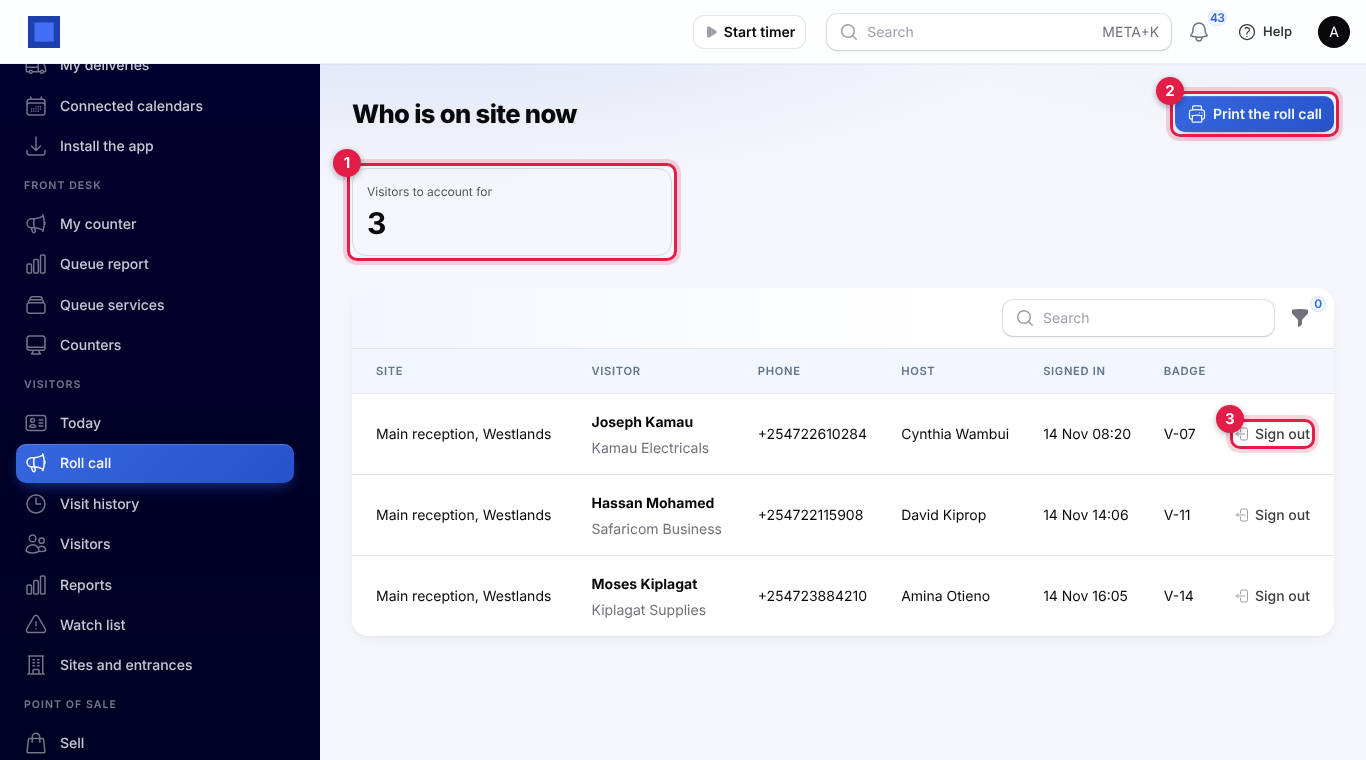
- Visitors to account for (marker 1) is the number on site.
- The list shows each visitor's Site, name and company, Phone, Host, the time they Signed in and their Badge. Filter by Site with the filter icon. It refreshes every 30 seconds.
- Sign out (marker 3) signs out someone who has left.
- Print the roll call (marker 2) opens the printable list in a new tab.
The printed roll call is grouped by site, with the time it was printed and the number of People to account for (marker 1). Take it to the assembly point and tick the Safe box (marker 2) as each person is found. Click Print to print it.
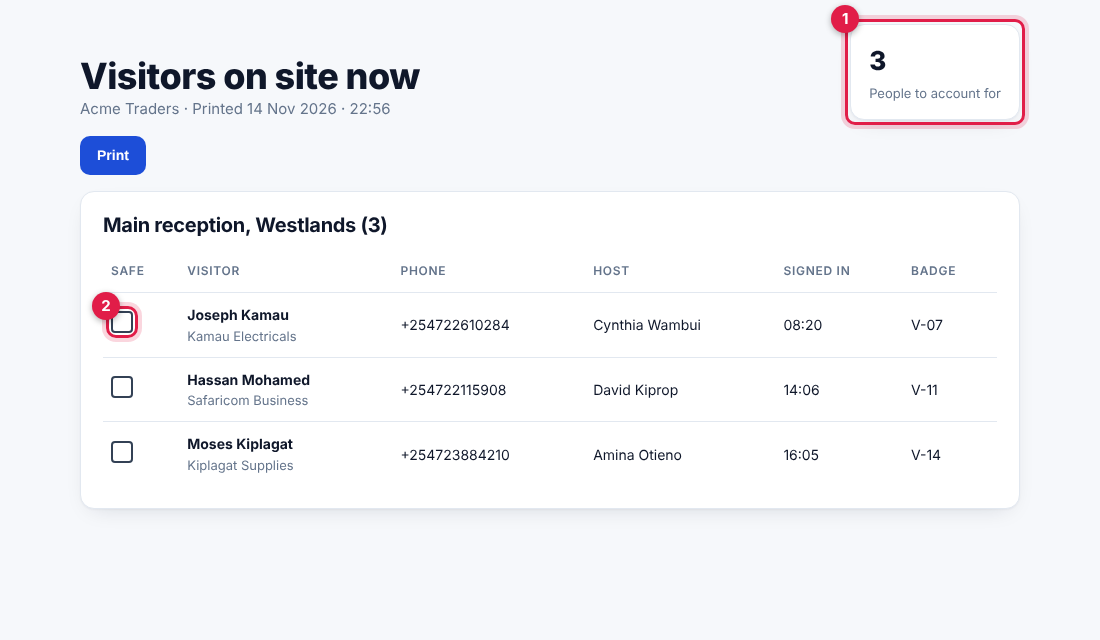
Tip: Print the roll call at the start of a drill, or keep the page open on a phone, so you have it even if the building is evacuated.
Visit history
Visitors → Visit history lists every visit there has been, newest first: the Visit number with Invited or Walk-in, the Visitor, the Host and purpose, the Site, the Status, when they Signed in and Signed out, how long they stayed (Stay) and the Vehicle plate. The Expected column can be shown with the columns icon.
- Filter by Status, Kind (Invited or Walk-in), Site or Period (From and Until, by the day the visit was made).
- Search by visit number, visitor name or vehicle plate.
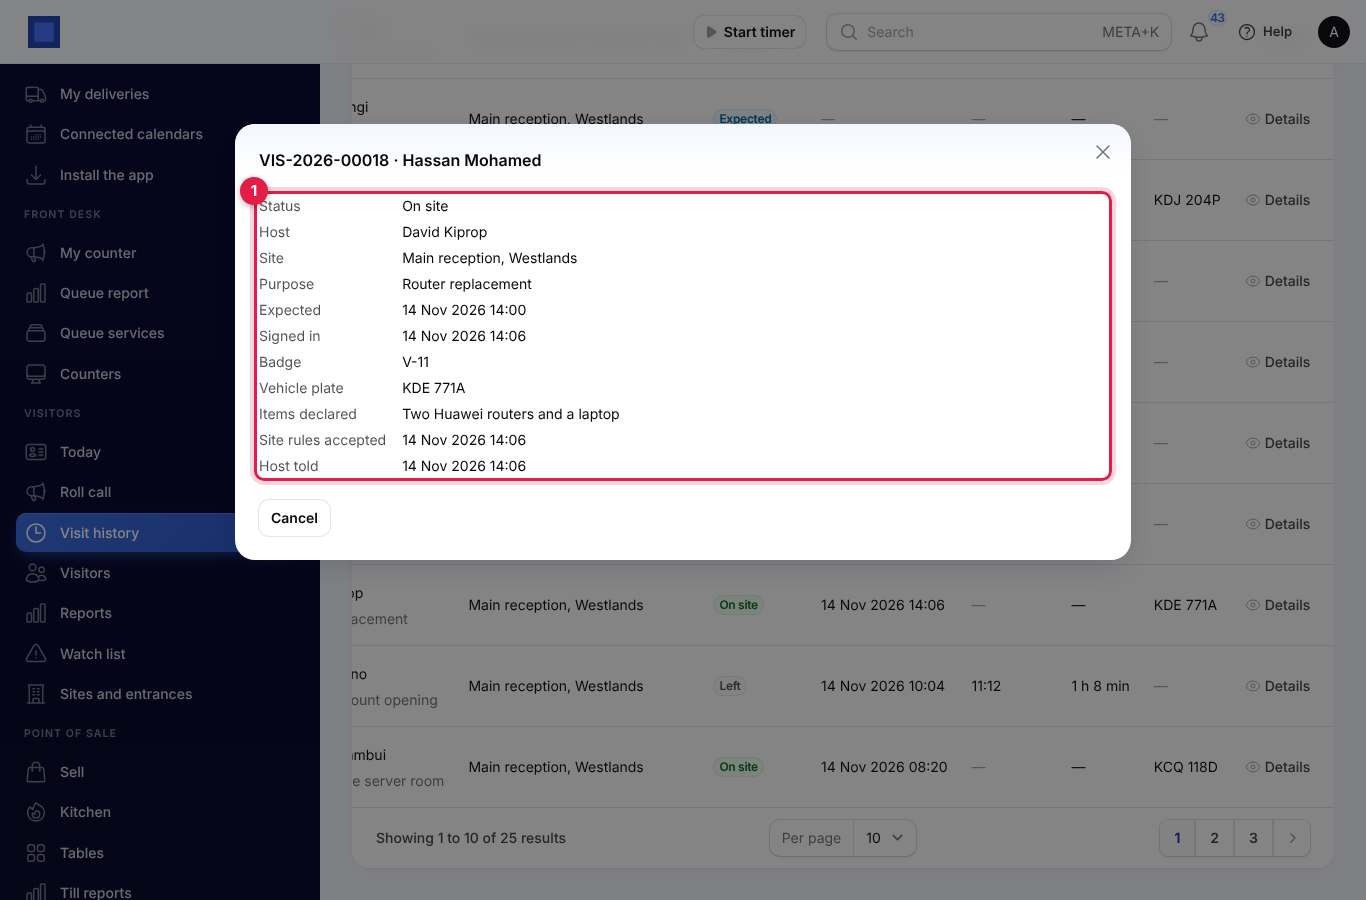
- Click Details on a visit to see everything recorded about it (marker 1): status, host, site, purpose, the times expected, signed in and out, badge, vehicle plate, items declared, when the site rules were accepted, any watch list match, the reason a visitor was turned away and when the host was told.
Reports
Visitors → Reports shows the visits signed in over a period.
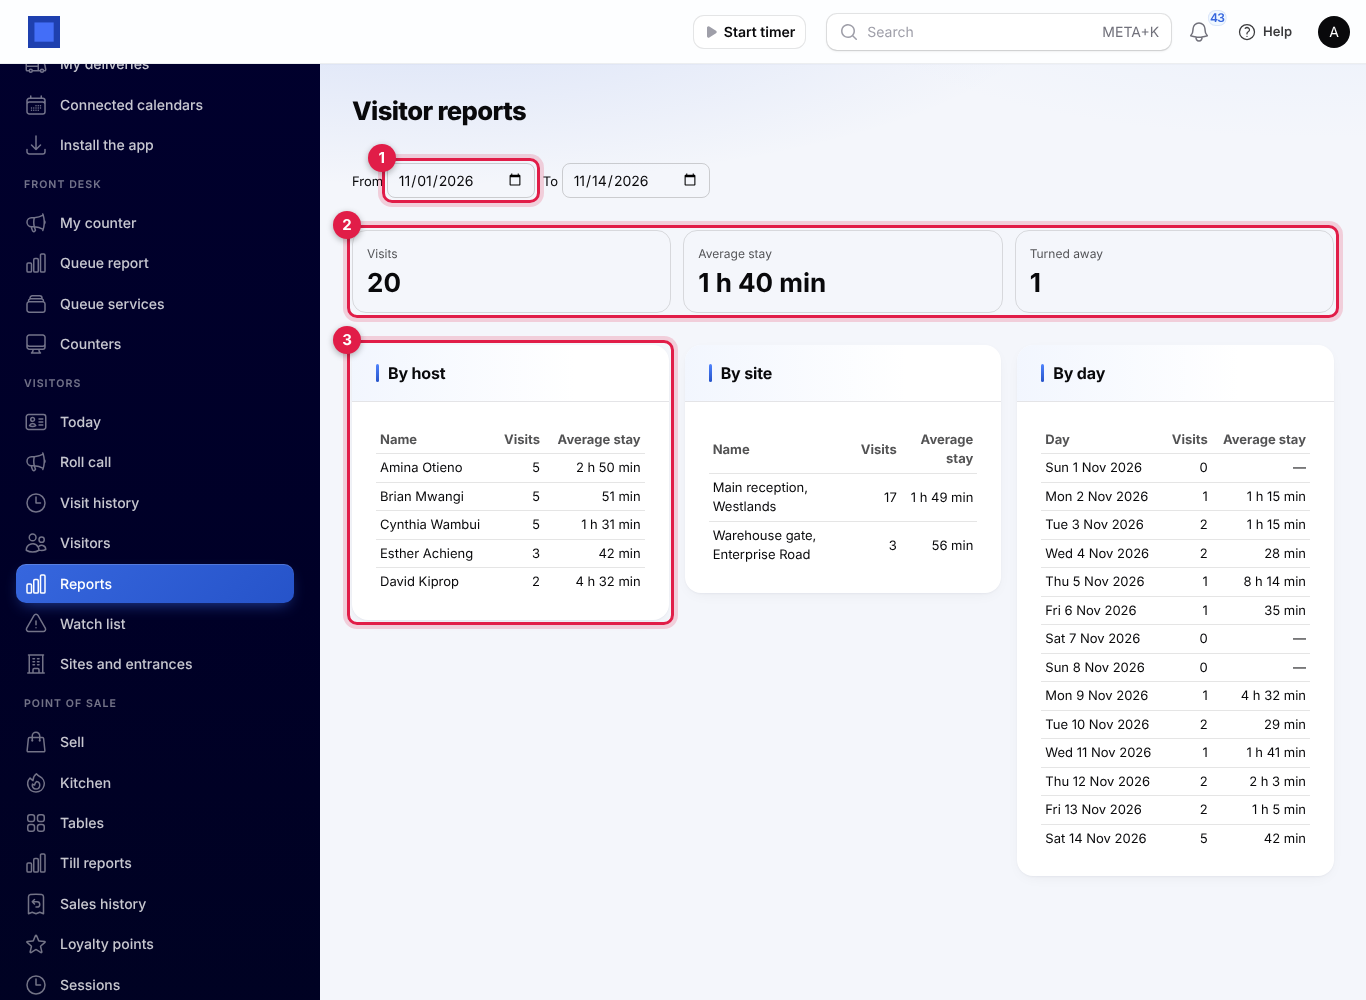
- Choose the period with From and To (marker 1). It starts on the first of this month and ends today.
- Read the totals (marker 2): Visits (visitors signed in during the period), Average stay (for visits with both a sign-in and a sign-out) and Turned away.
- The tables show visits and the average stay By host (marker 3), By site and By day, every day of the period included.
The Visitors list
Visitors → Visitors (reception and above) lists everyone who has visited: name and company, Phone, the masked ID number, the number of Visits and the Last visit. Visitors are added by invitations and sign-ins; they cannot be created here.
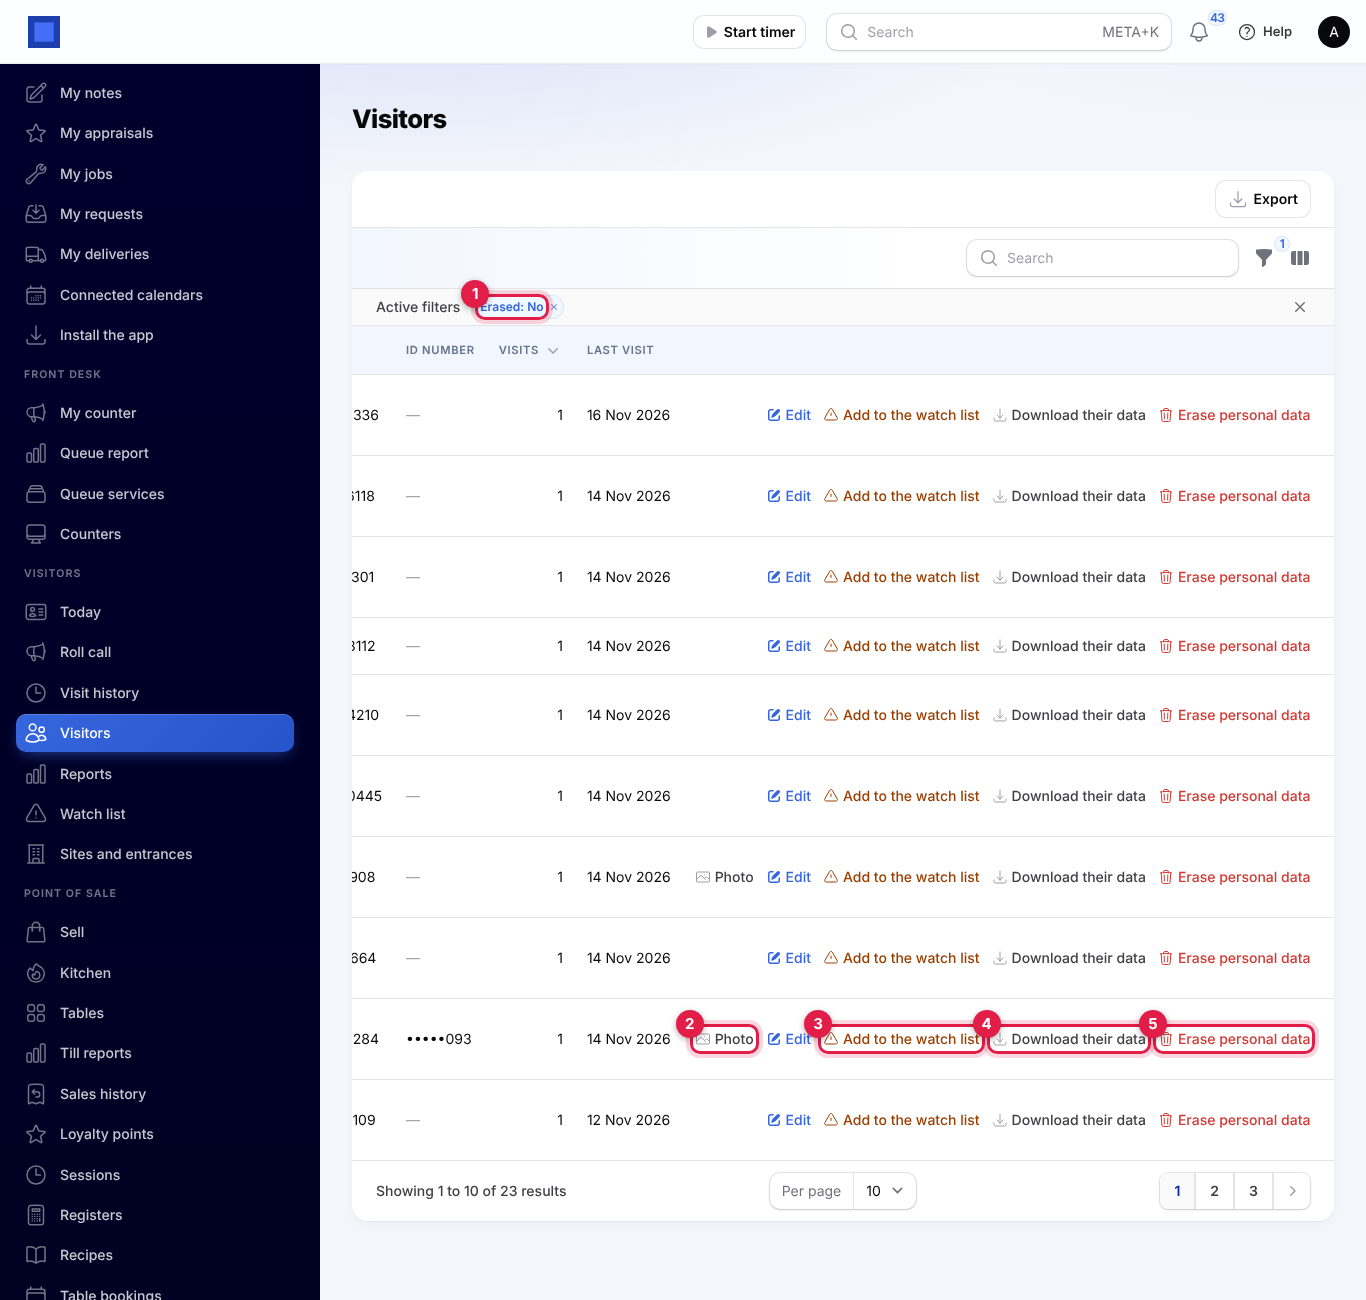
- Photo (marker 2) opens the visitor's photo, when they have one.
- Edit changes the name, company, mobile number, email, ID or passport number (hidden; click the eye to see it) and the photo.
- Add to the watch list (marker 3) is described in The watch list.
- Download their data (marker 4) and Erase personal data (marker 5) are below.
- The Erased filter (marker 1) hides erased visitors; set it to Yes to list only them.
Personal data: download, erase and the automatic purge
Visitor data is personal data. NaliSuite helps you answer requests and keep it no longer than needed. These actions need visitors.manage.
Download their data. Click Download their data on the visitor's row. A file (for example visitor-16.json) downloads with their name, phone, email, ID number, company, whether there is a photo, when they were first seen, and every visit: the number, status, site, host, purpose, times, badge, items declared, vehicle plate and the site rules they accepted with the time. Send it to the person who asked.
Erase personal data. Click Erase personal data on the visitor's row and confirm. The name becomes "Erased visitor 16", and the phone, email, ID number, company and photo are removed for good. Their vehicle plates, items declared and visit codes are cleared from every visit, and any visit still expected is deleted. The visits themselves stay in the history and reports (date, site, host, times) without the person. Erasing is refused while the visitor is on site: sign them out first. Each erasure is written in the activity log.
The automatic purge. Every night NaliSuite erases, in the same way, every visitor who has not visited for longer than Erase visitor personal data after (days). Nobody is erased while on site, or if they had a visit, invitation, sign-in or sign-out within that period.
Good to know
What does the visitor need? Nothing to install. The invitation email or text and the invitation page work on any phone. Showing the QR code on the phone screen at the desk or kiosk is enough.
Can a visitor sign in on an earlier or later day than invited? Yes. An invited visit stays Expected until it is signed in, turned away or cancelled. Only the kiosk checks the visiting hours at the moment of signing in.
Does a visitor who forgets to sign out stay on site? Yes, until someone signs them out. They stay on Today, on the roll call and in On site now, and raise one overstay alert. Check the roll call at the end of each day.
Can visits be signed in to another company of the workspace? No. Visitors sign in to the workspace's default company.
What do texts cost? Invitations and host texts are sent through your own SMS provider and charged by them. Without SMS set up, invitations go by email only and hosts are told in the app only.
Can I change a visit after it is made? No. Cancel an invitation and invite again, or turn the visitor away with a reason. The visitor's own details can be corrected in Visitors → Visitors.