Accounting basics
NaliSuite keeps a full double-entry ledger for every company in your workspace. Most of it fills itself in: invoices, customer payments, vendor bills, bill payments, stock movements, payroll runs and till sessions all post their own journal entries. This page covers the day-to-day accounting work you do by hand: recording simple expenses, income and transfers between your money accounts, keeping the chart of accounts tidy, writing manual journal entries, splitting figures by cost centre, setting budgets, locking closed periods and giving your accountant access. Everything here lives in the sidebar under Accounting, except the lock date (Settings → Preferences) and users (Settings → Users).
Who can do what. Looking at accounting screens needs the accounting.view permission. Recording expenses, income and transfers, and editing the chart of accounts, cost centres and budgets, needs accounting.manage. Posting and reversing journal entries needs accounting.post. The financial reports need accounting.reports. The owner and admin roles have all of these; the accountant role has them too (see Give your accountant access); the member role can only look.
How the ledger works in one minute
- Every money event becomes a journal entry: two or more lines whose debits equal their credits.
- Each line hits an account in your chart of accounts (for example 1010 · Bank account, 6300 · Internet and telephone).
- Accounts have a type (asset, liability, equity, income, expense) that decides which report they appear on, and some have a role ("Used automatically for") that tells NaliSuite where automatic postings go. For example, the account with the role Accounts payable receives every vendor bill.
- A journal groups entries by where they came from: Sales, Purchases, Bank, Cash, Mobile money and General.
- Entries are created as Draft, become Posted (numbered, for example JE-2026-00064, and counted in the reports) and, if wrong, are Reversed by a mirror entry. A posted entry is never edited or deleted.
Record an expense
Use Expenses for simple costs that do not need a purchase order or a vendor bill: fuel, airtime, a lunch meeting, a software subscription, a KPLC token. If a supplier sends you an invoice you will pay later, you can still use an expense (switch off Already paid), but for anything ordered with a purchase order use a vendor bill instead (see Purchases and bills).
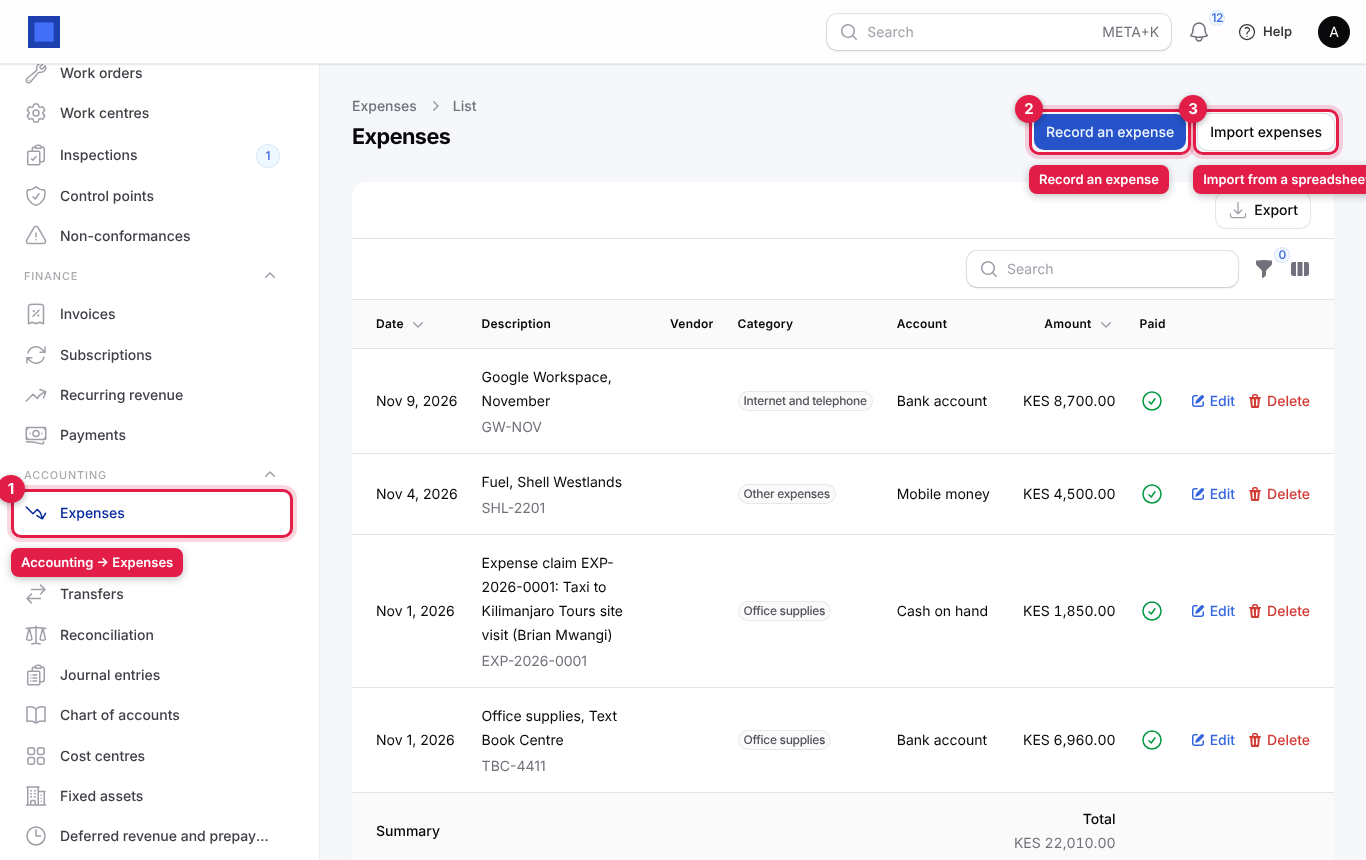
- In the menu, open Accounting → Expenses (marker 1).
- Click Record an expense (marker 2). To load many expenses at once from a spreadsheet, click Import expenses instead (marker 3; see Import expenses, income or transfers from a spreadsheet).
- Fill in the top of the form: the Date (marker 1), the Reference printed on the receipt (marker 2), what the money was for in What was it for? (marker 3) and who you paid in Paid to (vendor) (marker 4).
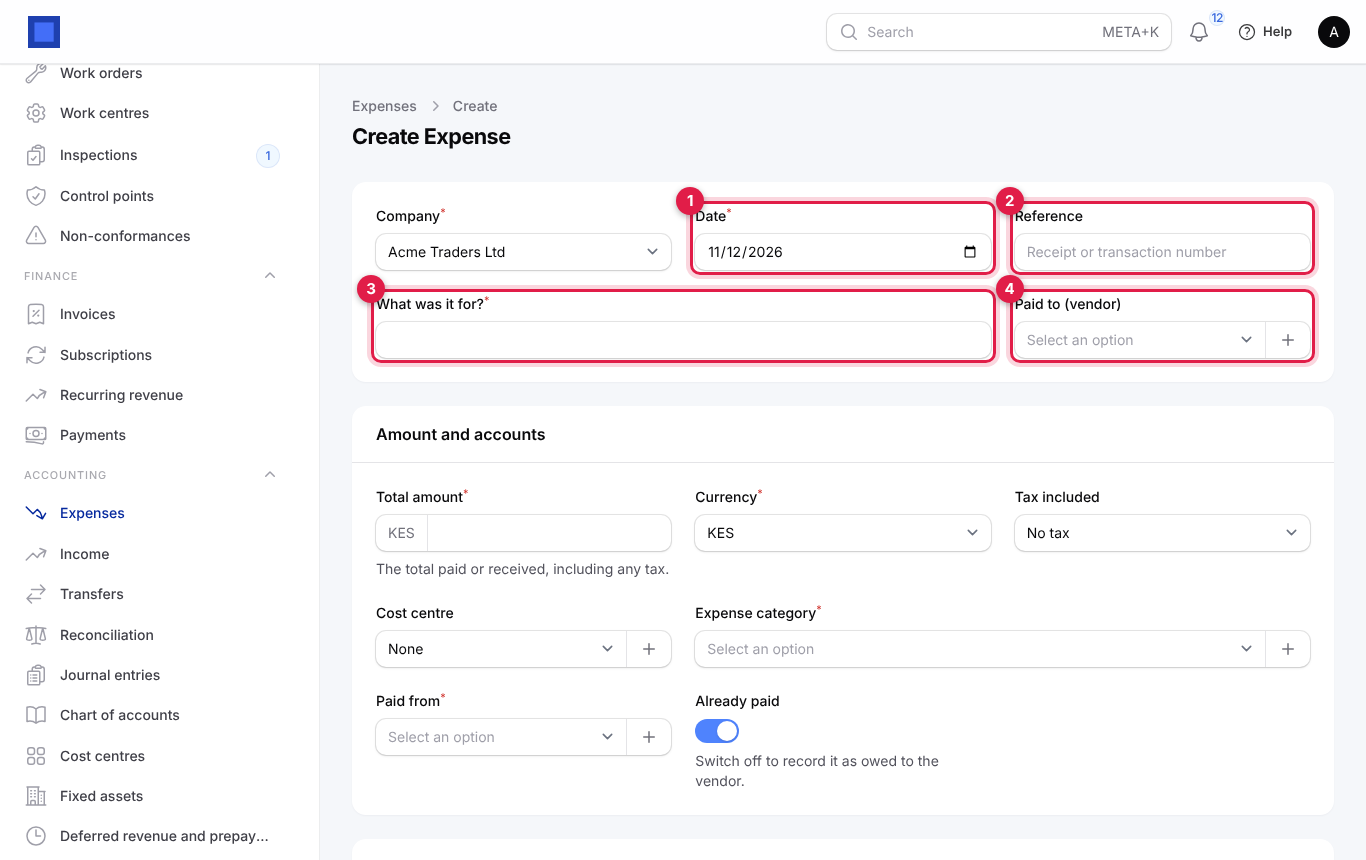
| Field | What to enter |
|---|---|
| Company | The company that spent the money. It only matters if you run more than one company; it defaults to your default company and sets the currency. Required. |
| Date | The date on the receipt, not the date you type it in. This is the date the ledger entry uses, so it decides which month the cost lands in. It cannot be on or before the lock date. Required. |
| Reference | The receipt number, M-Pesa transaction code (for example RKT55XY) or cheque number. Optional, but it makes the expense easy to find and to match against a bank statement later. |
| What was it for? | A short plain description, for example Fuel, Shell Westlands or Google Workspace, November. It appears in the list, on the journal entry and in reports. Required. |
| Paid to (vendor) | The supplier. Optional for small cash costs. If the supplier is not in the list, click + next to the field to add them without leaving the form (see below). |
- Fill in Amount and accounts: the Total amount you paid (marker 1), any Tax included in that total (marker 2), a Cost centre if you use them (marker 3) and the Expense category (marker 4).
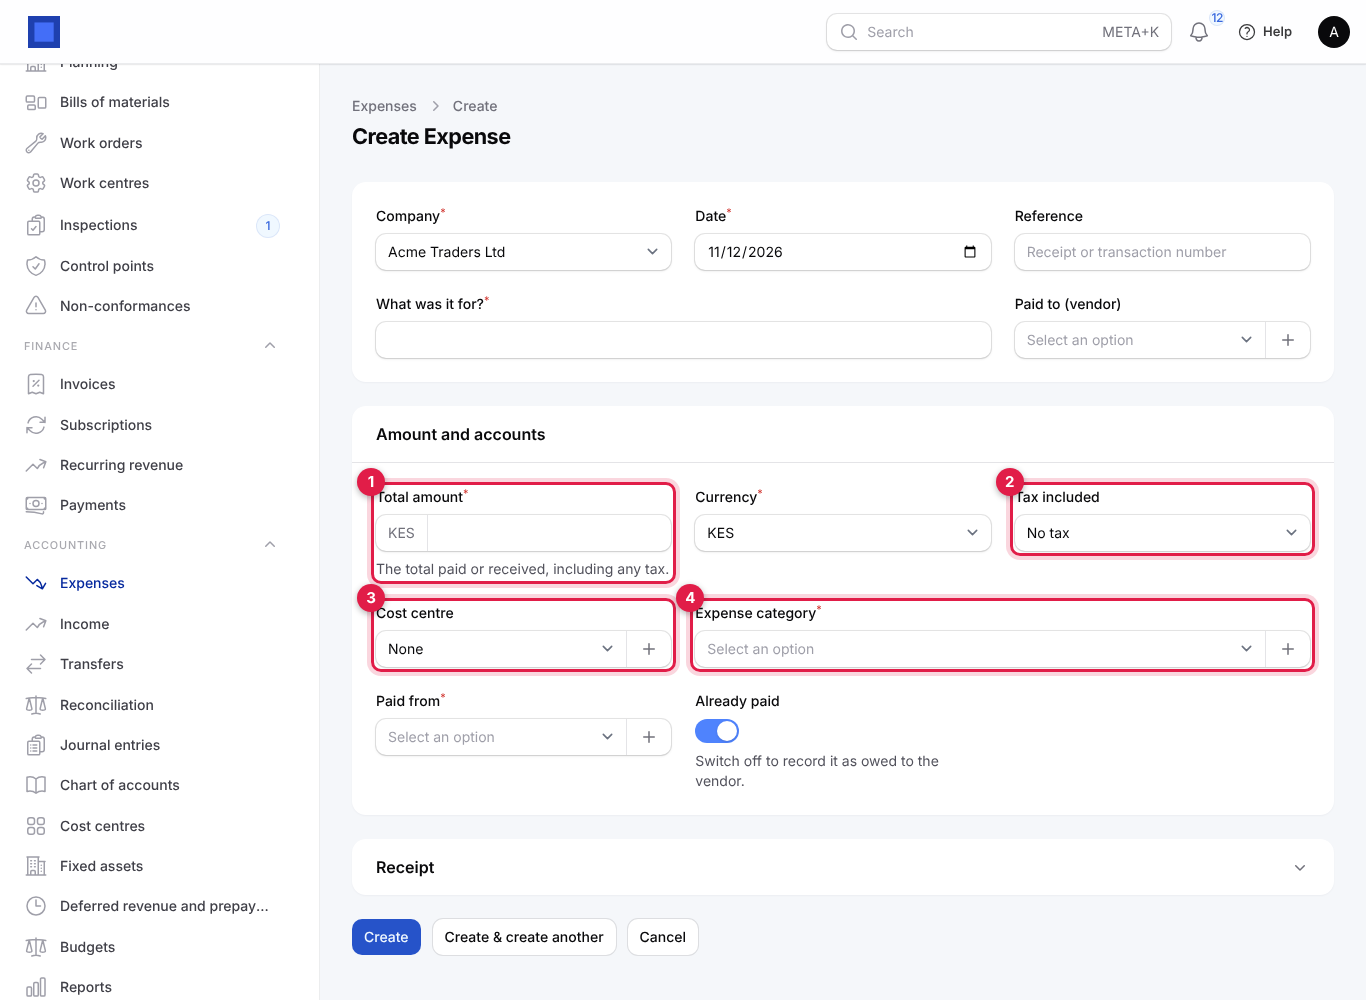
| Field | What to enter |
|---|---|
| Total amount | Everything you paid, including tax. Must be more than 0. Required. |
| Currency | The currency you paid in. Defaults to the company currency. If you pick another currency, the day's exchange rate converts it for the ledger (see Currencies and exchange rates). Required. |
| Tax included | The purchase tax contained in the total, for example VAT 16%. NaliSuite splits the tax out: the net goes to the expense category and the tax goes to your Tax receivable (input) account, so you can claim it back. Leave No tax if the receipt has no VAT. |
| Cost centre | Only shown once you have at least one cost centre. Tags the cost to a branch, department or project so the By cost centre report can split it. Optional. |
| Expense category | The expense account the cost belongs to, for example 6500 · Office supplies. Only expense accounts are listed. If the category you need does not exist, click + to create it on the spot (see below). Required. |
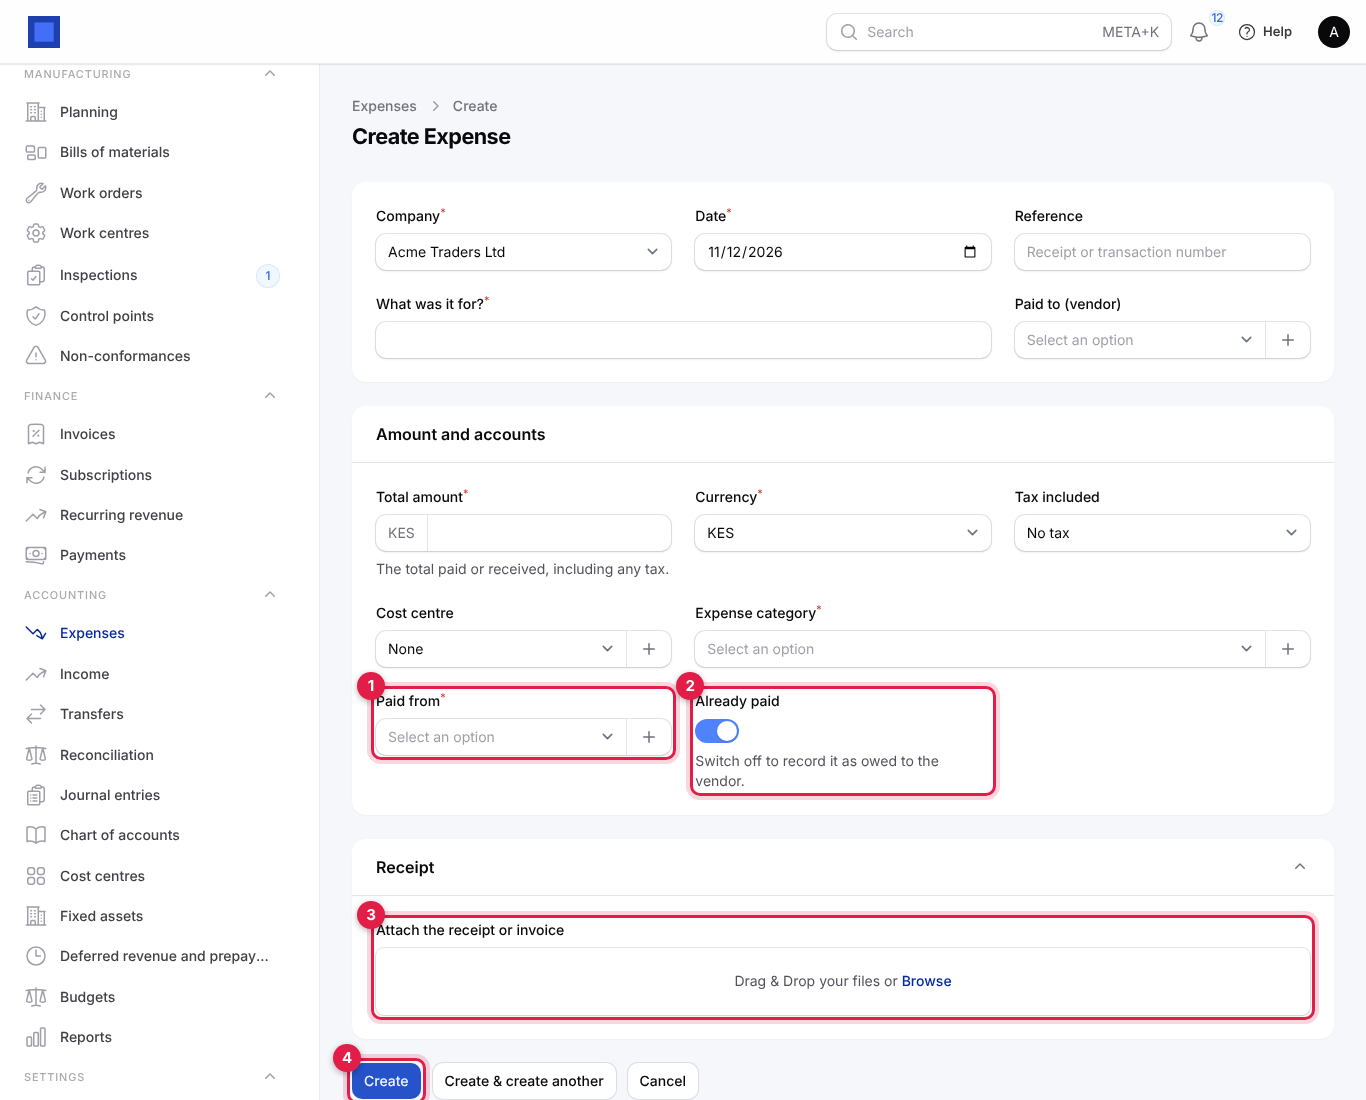
- Say how it was paid. Choose the account the money came out of in Paid from (marker 1): your bank, cash or M-Pesa account. Leave Already paid on (marker 2) if the money has left your account. Switch it off if you still owe the vendor; Paid from then disappears and the cost is recorded as owed to the vendor (in Accounts payable).
- Open the Receipt section and drop a photo or PDF of the receipt into Attach the receipt or invoice (marker 3). Images and PDFs are accepted.
- Click Create (marker 4), or Create & create another to stay on a fresh form for the next receipt.
What happens next. The expense is posted to the ledger straight away, in the journal that matches the money account (Bank, Cash or Mobile money; Purchases when it is unpaid):
| Already paid | Debit | Credit |
|---|---|---|
| On | Expense category (net amount) and Tax receivable (tax) | The Paid from account (total) |
| Off | Expense category (net amount) and Tax receivable (tax) | Accounts payable (total), against the vendor |
If an approval rule covers expenses of this size, the expense is saved but not posted until an approver says yes; you see a yellow message "Sent for approval…" and the approver gets a notification. Once approved it posts automatically.
Tip: Staff who spend their own money and want it back should use Me → My expenses to submit a claim instead. Approved claims appear in this list too, with the claim number in the description.
Add a vendor or category without leaving the form
Most dropdowns in NaliSuite have a + next to them. It opens a short form, saves the new record for the same company as the expense, and selects it for you.
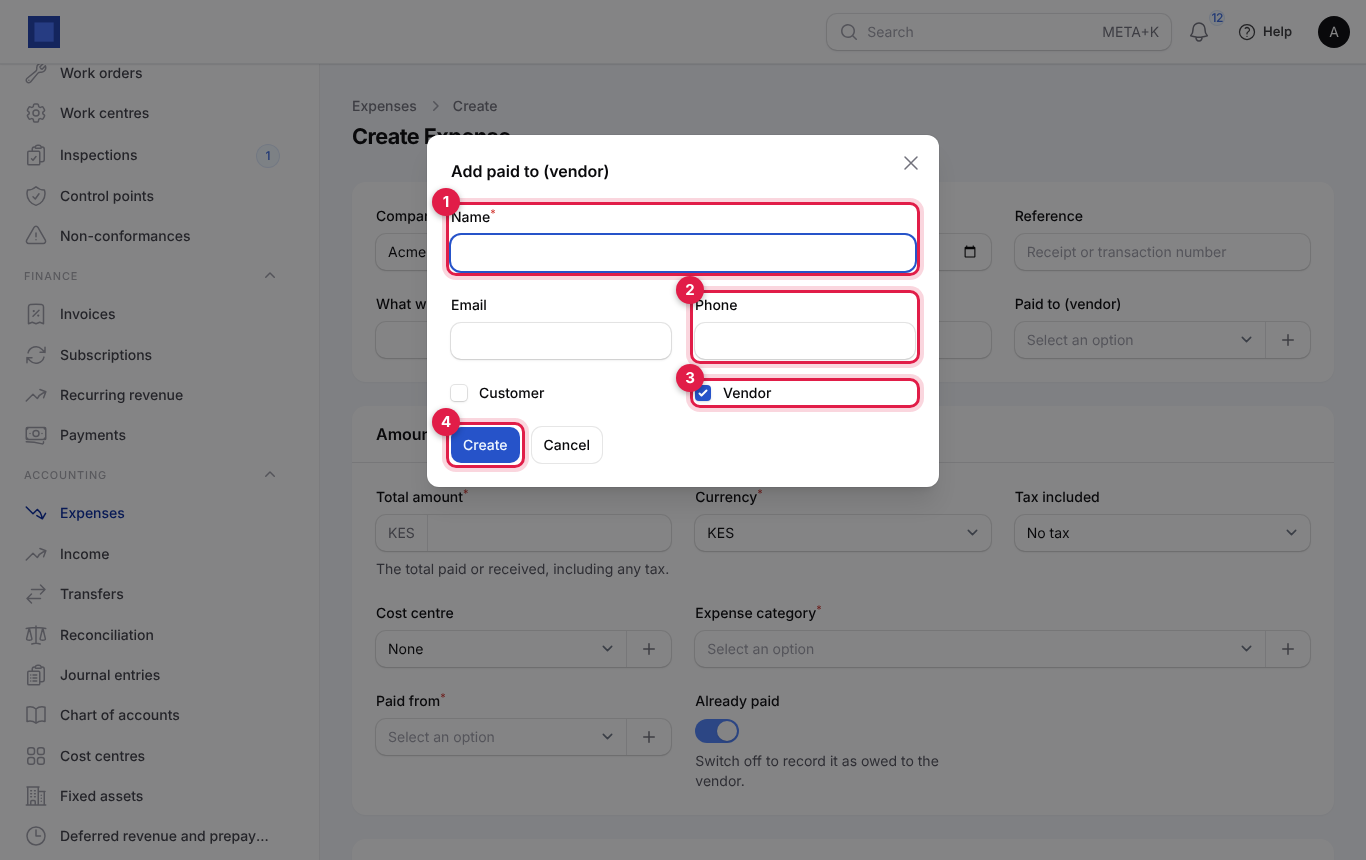
- + next to Paid to (vendor) opens Add paid to (vendor). Type the Name (marker 1, required), and if you have them the Email and Phone (marker 2). Vendor is already ticked (marker 3); tick Customer too if you also sell to them. Click Create (marker 4).
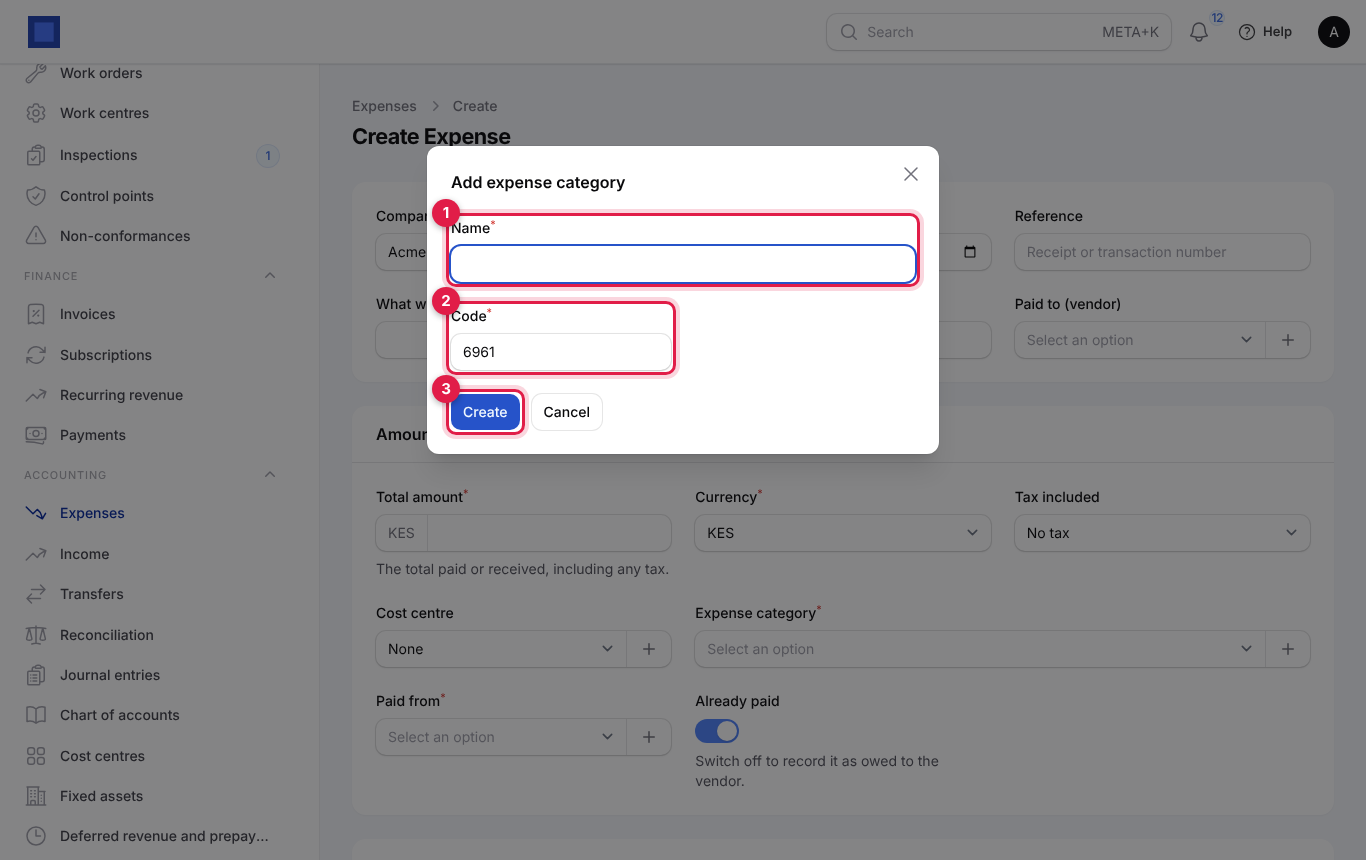
- + next to Expense category opens Add expense category. Type the Name (marker 1), check the suggested Code (marker 2; NaliSuite proposes the next free number in your expense range, and refuses a code that is already used) and click Create (marker 3). The new account is created as an active expense account in the chart of accounts.
The same + works for Cost centre (asks for a name and a short code), for Paid from, Received into, From account and To account (creates a bank, cash or mobile money account; pick the Kind), and on vendor, customer, product and warehouse fields across the app. You only see the + if your role is allowed to create that kind of record.
Find, change or delete expenses
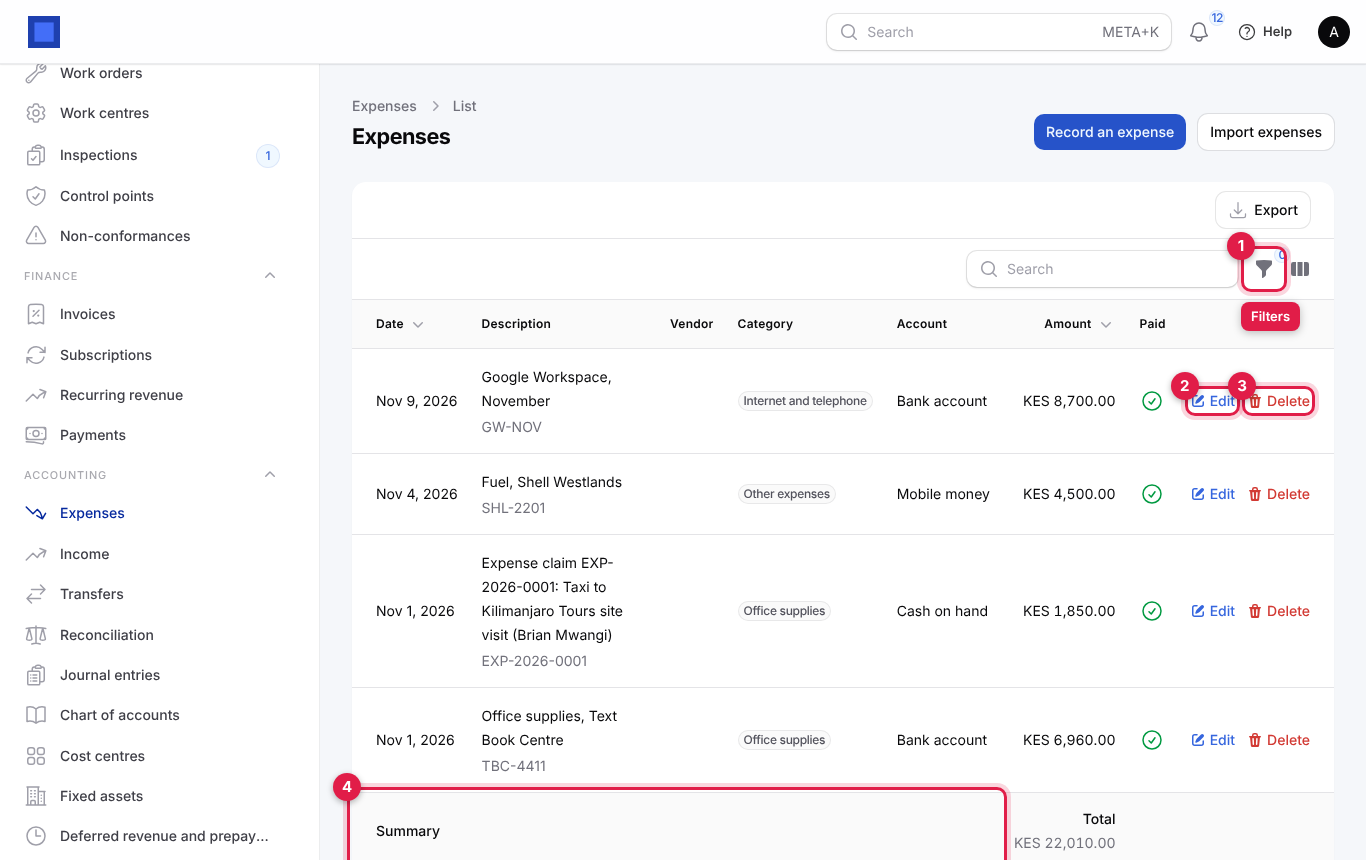
The list shows the newest expenses first, with the vendor, the Category, the Account it was paid from (or Unpaid), the Amount and a tick when Paid.
- Click the Filters icon (marker 1) to show only one Category, only This month, or Unpaid only. Use Search to find a description, vendor or reference.
- Edit (marker 2) opens the expense. Saving it re-posts the ledger entry with the new figures, so the books stay right.
- Delete (marker 3) removes the expense and reverses its ledger entry.
- The Summary row (marker 4) totals the amounts in the list in your default currency; it follows your filters, so "This month" plus a category gives you a month's spend on that category.
- Export (top of the table) downloads the list as a spreadsheet.
Note: You cannot edit or delete an expense dated on or before the lock date; you get the message "The period up to … is locked." Record a correcting expense or income in an open period instead.
Record income
Use Accounting → Income for money received that is not on an invoice: a one-off consulting fee paid in cash, interest, a refund from a supplier, a grant. For sales to customers, raise an invoice instead so the customer statement and receivables stay right.
- Open Accounting → Income and click Record income at the top right.
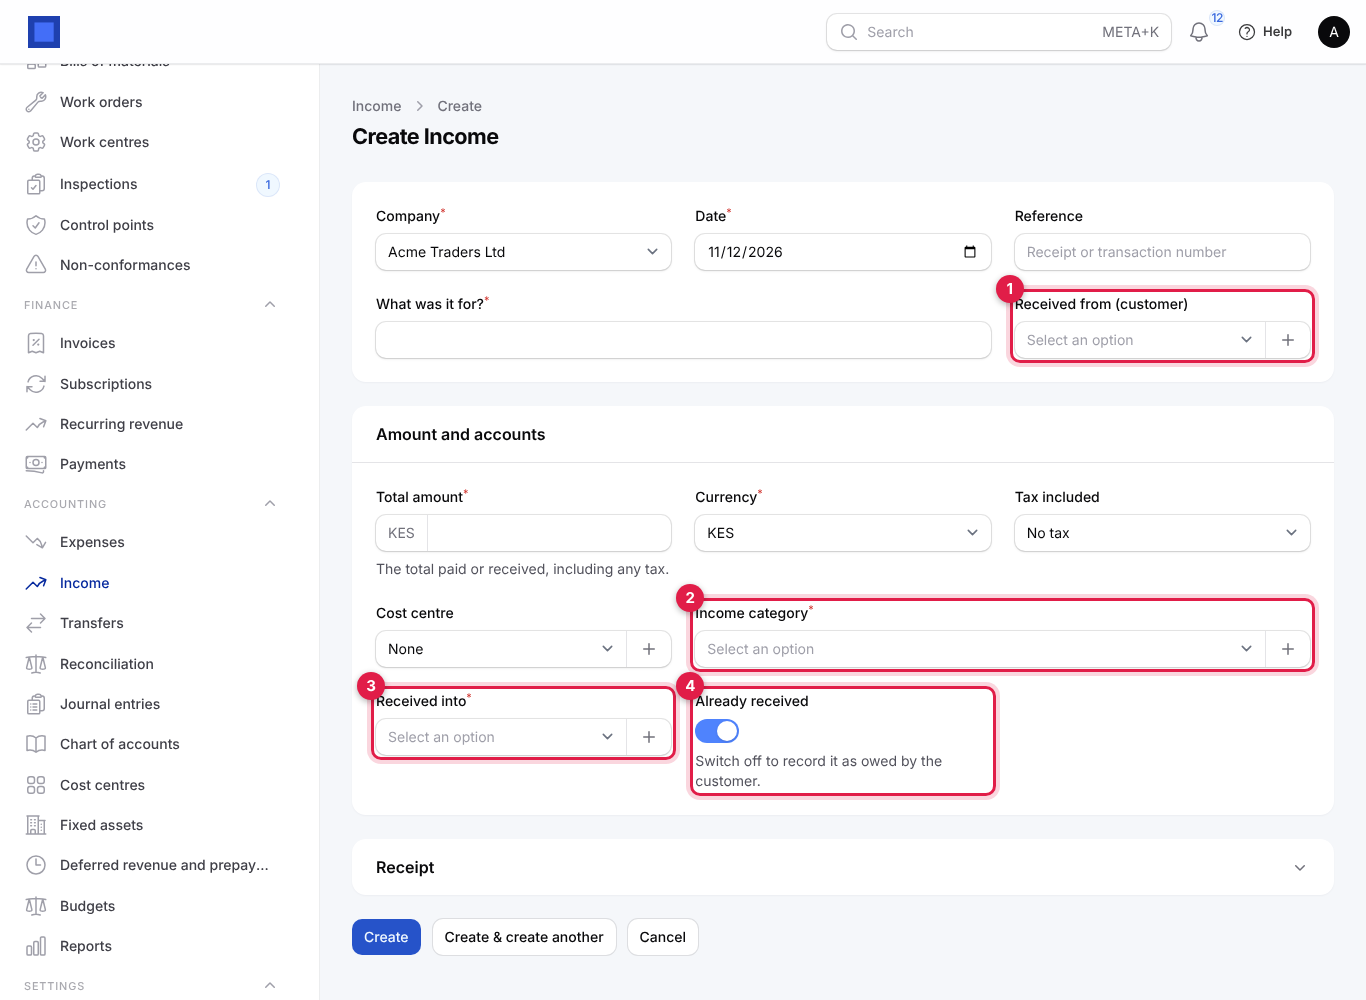
- Fill in the form. It works exactly like the expense form, with these differences:
| Field | What to enter |
|---|---|
| Received from (customer) (marker 1) | Who paid you. Optional. + adds a new customer. |
| Tax included | Sales tax contained in the amount. The tax part goes to Tax payable (output). |
| Income category (marker 2) | The income account, for example 4100 · Service revenue. Only income accounts are listed. + creates a new one. Required. |
| Received into (marker 3) | The bank, cash or M-Pesa account the money went into. Required while Already received is on. |
| Already received (marker 4) | Leave on if you have the money. Switch off to record income the customer still owes you (it goes to Accounts receivable). |
- Click Create. The ledger gets: debit the money account (or receivables), credit the income category (net) and tax payable (tax).
Move money between your accounts (transfers)
A transfer moves money between two of your own money accounts: banking cash takings, topping up the M-Pesa float from the bank, withdrawing petty cash. It is neither income nor an expense, so it does not change your profit.
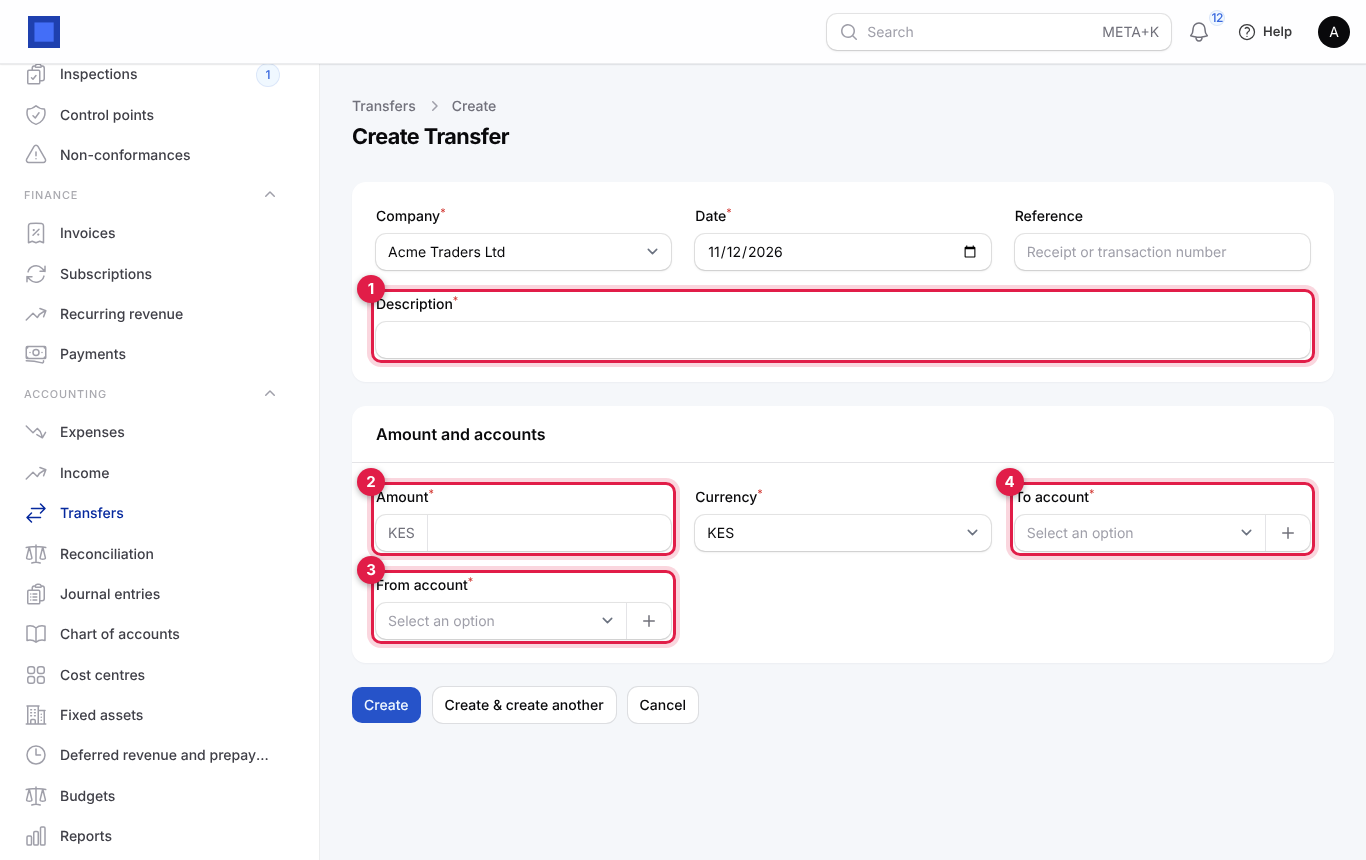
- Open Accounting → Transfers and click Record a transfer.
- Fill in the form and click Create.
| Field | What to enter |
|---|---|
| Company, Date, Reference | As for expenses. |
| Description (marker 1) | For example Bank cash to M-Pesa float. Required. |
| Amount (marker 2) | The amount moved. Required. |
| Currency | The currency moved. |
| From account (marker 3) | Where the money left. Only bank, cash and mobile money accounts are listed. Required. |
| To account (marker 4) | Where the money arrived. Must be different from From account. Required. |
The entry is: debit To account, credit From account. Bank charges on a transfer are a separate expense.
Tip: An M-Pesa withdrawal charge or a bank fee is easiest to record from the bank statement itself during reconciliation, with Record expense on the statement line.
Import expenses, income or transfers from a spreadsheet
The Import expenses, Import income and Import transfers buttons (only for people with accounting.manage) load a CSV or Excel file. You map your columns to these fields, and NaliSuite guesses the mapping from usual column names:
| Column | Required | Notes |
|---|---|---|
| Date | Yes | Any common date format, for example 2026-03-15. |
| Amount | Yes | The total, more than 0. |
| Description | No | If empty, the category name is used. |
| Expense category / Income category / To account | Yes | The account code or name, for example 6500 or Office supplies. |
| Paid from / Received into / From account | No | The money account code or name. |
| Reference | No | Receipt or transaction number. |
| Vendor / Customer | No | Matched by name. |
| Tax included | No | The tax name or rate. |
| Already paid / Already received | No | yes/no. |
Each imported row is posted like a hand-typed one. Rows that need approval wait for it.
Keep the chart of accounts
The chart of accounts is the list of every account the ledger can use. Each company gets a ready-made chart for its country (Kenya, Nigeria, Ghana, South Africa, the OHADA zone and more) the first time you open an accounting screen, with the roles already set, so most businesses only add a few expense categories.
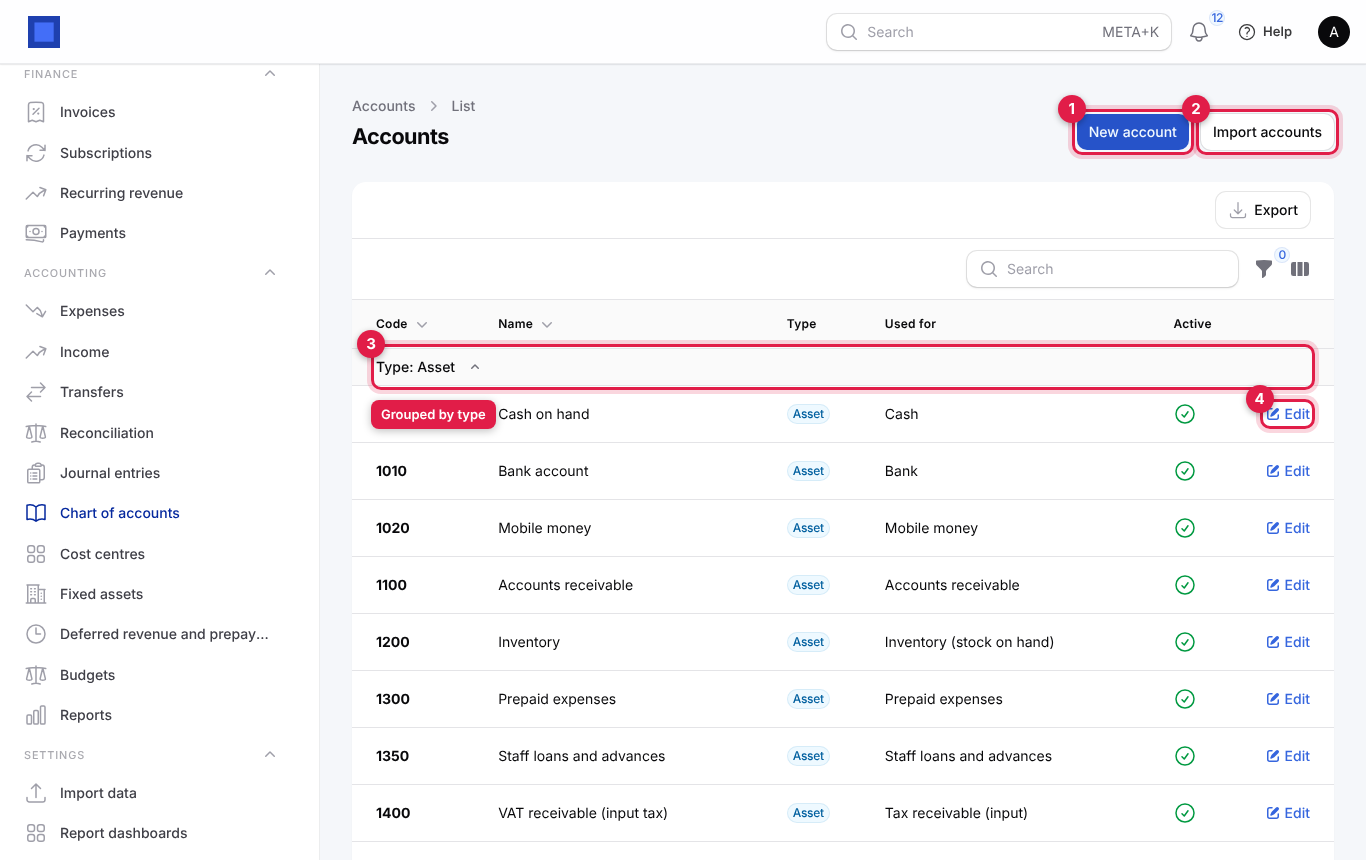
- Open Accounting → Chart of accounts. Accounts are grouped by type (marker 3); click a group heading to fold it.
- Click New account (marker 1) to add one, Import accounts (marker 2) to load a chart from a spreadsheet (columns Code, Name, Type, optional Parent code and Description), or Edit on a row (marker 4) to change one.
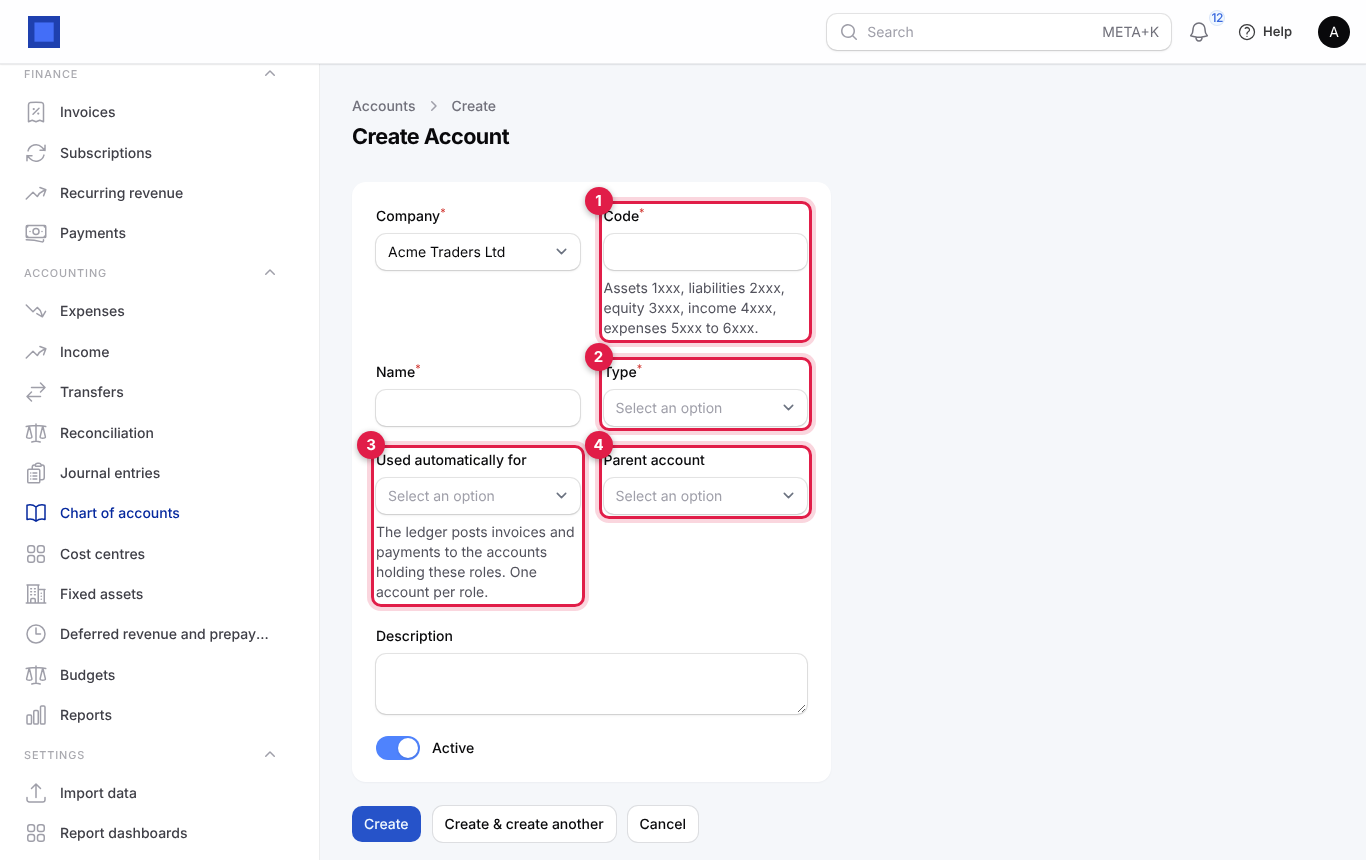
- Fill in the account form and click Create (or Save changes).
| Field | What to enter |
|---|---|
| Company | The company whose chart this account belongs to. Cannot be changed after the account is created. Required. |
| Code (marker 1) | A number unique within the company. Follow the ranges: assets 1xxx, liabilities 2xxx, equity 3xxx, income 4xxx, expenses 5xxx to 6xxx. Reports sort by code. Required, up to 20 characters. |
| Name | What people see, for example Motor vehicle expenses. Required. |
| Type (marker 2) | Asset, Liability, Equity, Income or Expense. Assets, liabilities and equity appear on the balance sheet; income and expenses on the profit and loss. Required. |
| Used automatically for (marker 3) | The role this account plays in automatic postings, for example Bank, Mobile money, Accounts receivable, Accounts payable, Sales revenue, Tax payable (output), Tax receivable (input), Cost of sales, Inventory (stock on hand), Salaries and wages, Income tax (PAYE) payable, Depreciation expense, Deferred revenue, Foreign exchange gains and losses and more. One account per role per company. Leave empty for ordinary accounts. |
| Parent account (marker 4) | Optional. Groups this account under another, for example several bank accounts under Cash and bank. |
| Description | Optional notes for whoever posts to it. |
| Active | Switch off to hide an account from dropdowns without losing its history. Accounts with postings should be deactivated, not deleted. |
Note: Changing an account's role changes where future automatic entries go; past entries stay where they were posted. If you add a second bank account, give it the role Bank only if you want automatic bank postings (bill payments by bank transfer, for example) to go there instead of the first one.
Write a manual journal entry
Use a manual journal for anything the other screens do not cover: opening balances, accruals, corrections, owner's capital, loan movements, a reclassification your accountant asks for.
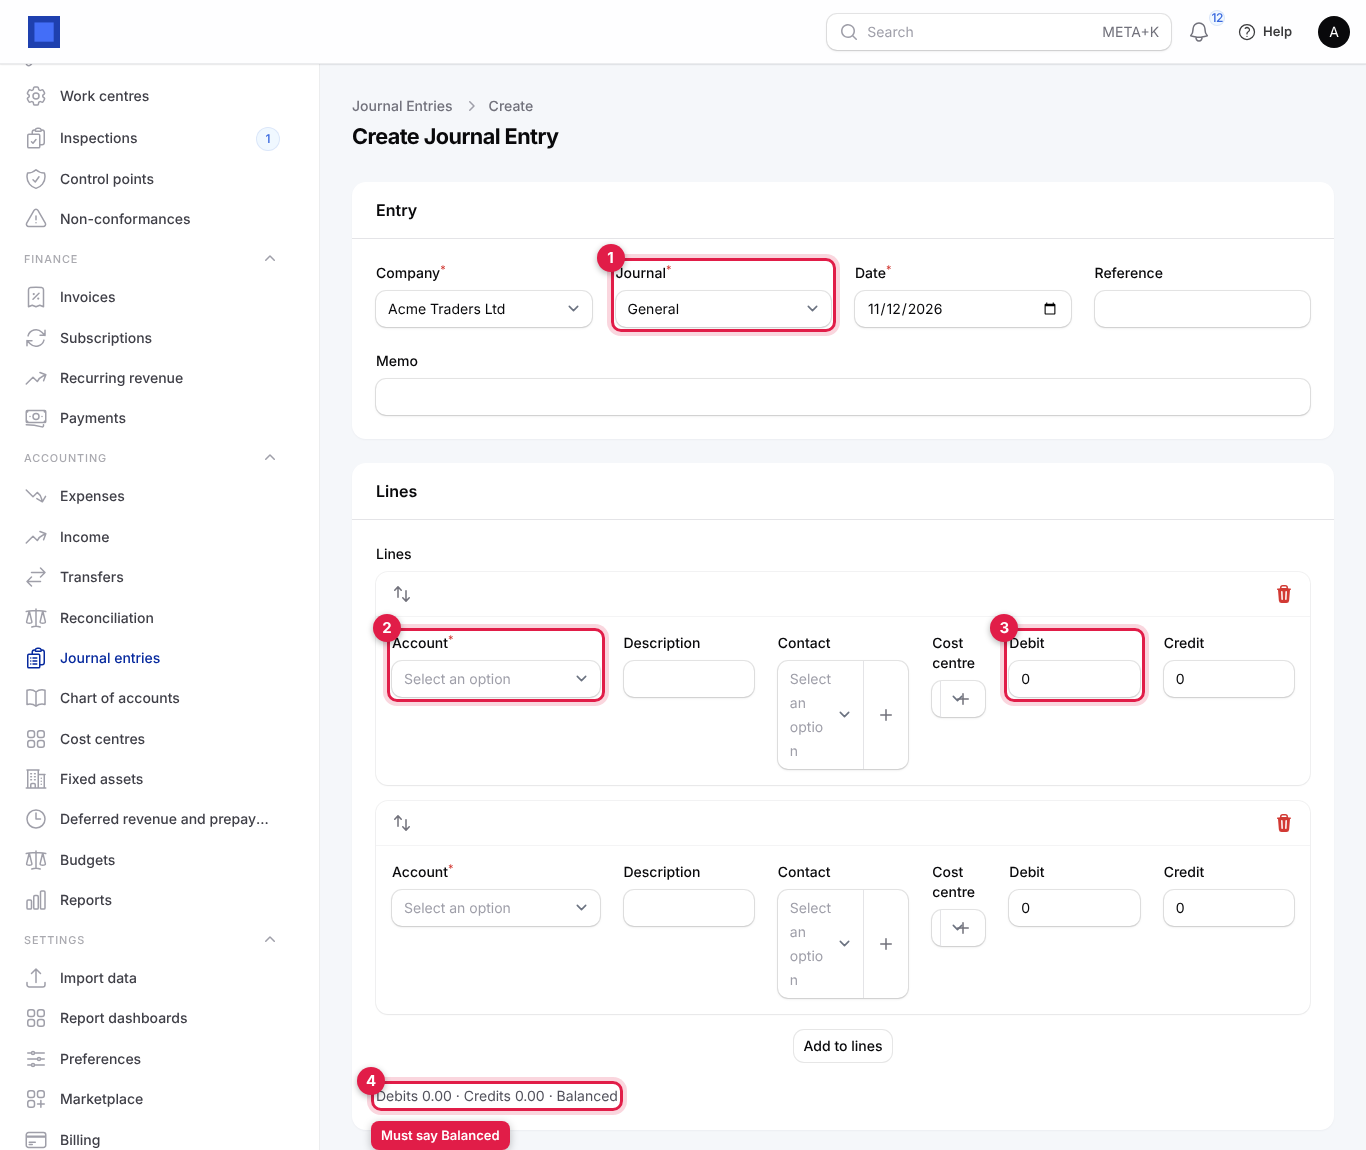
- Open Accounting → Journal entries and click New entry (marker 1).
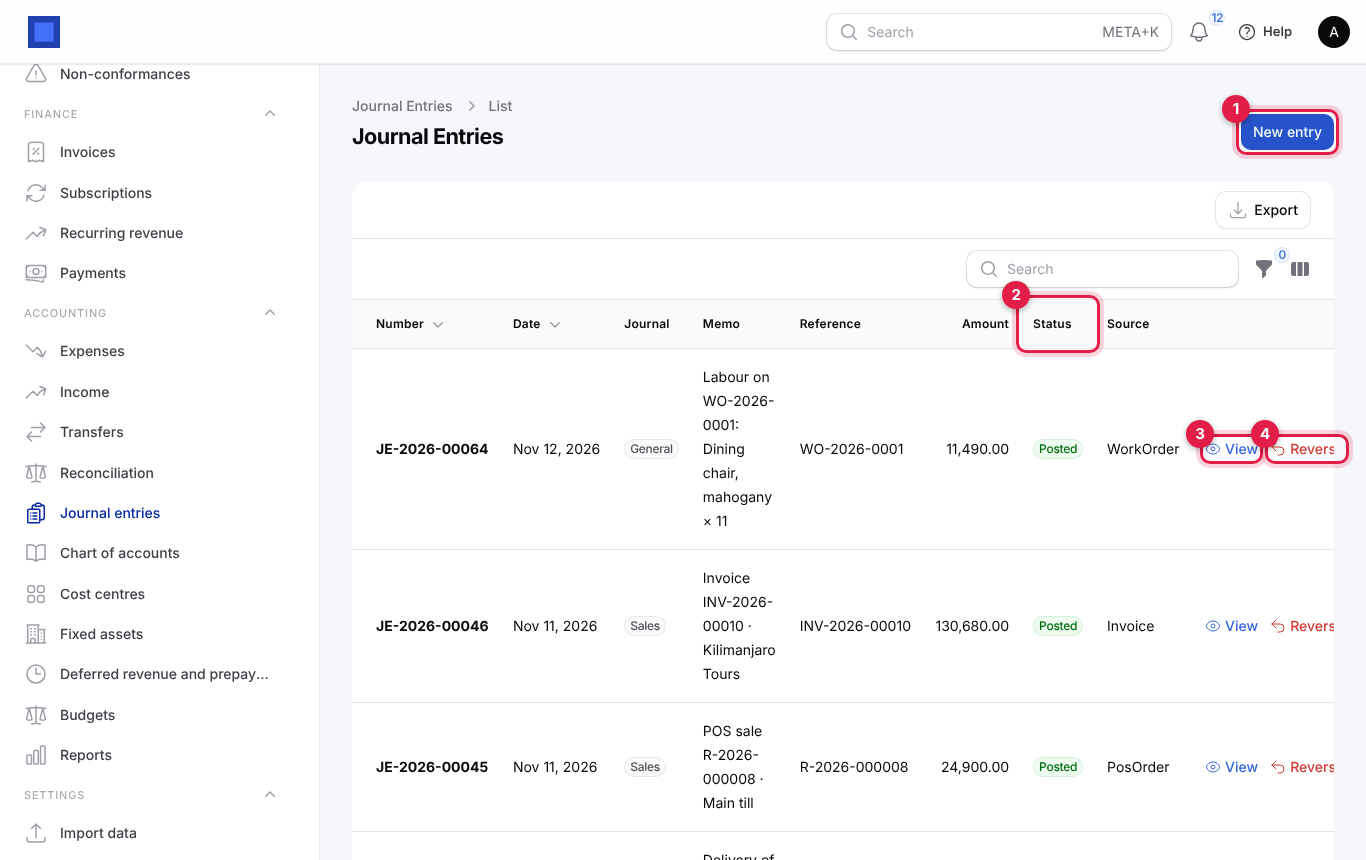
- Fill in the Entry section: Company, Journal (marker 1 below; General for most manual entries), Date, an optional Reference and a Memo explaining why.
- In Lines, fill one line per account: pick the Account (marker 2), add a Description, a Contact and a Cost centre if useful, and type the amount in either Debit (marker 3) or Credit. Click Add to lines for more lines; drag the arrows to reorder; use the bin to remove one. You need at least two lines.
- Watch the totals line under the lines (marker 4). It reads "Debits … · Credits … · Balanced" when the entry is right, or "Out of balance by …" when it is not.
| Field | What to enter |
|---|---|
| Company | Which company's books. Required. |
| Journal | General for adjustments; Bank, Cash or Mobile money for money movements; Sales or Purchases to keep them with similar entries. Required. |
| Date | The accounting date. Must be after the lock date to post. Required. |
| Reference | Optional document number. |
| Memo | A sentence that explains the entry to someone reading it in a year. |
| Line Account | Any active account of the company. Required. |
| Line Description | Optional text for the general ledger. |
| Line Contact | Optional customer or vendor, so the line shows on their account. |
| Line Cost centre | Optional. |
| Line Debit / Credit | Put the amount in one column only. |
- Click Create. The entry is saved as a Draft and opens again, ready to check.
- Click Post at the top of the entry (or Post on its row in the list) and confirm. NaliSuite checks that it balances and that the date is not locked, gives it a number and counts it in the reports. Posted entries cannot be edited, only reversed.
Statuses
| Status | Meaning | How it changes |
|---|---|---|
| Draft | Saved but not in the books. Can be edited or deleted. | Post makes it Posted. Delete removes it. |
| Posted | Numbered and counted in every report. Read-only. | Reverse makes it Reversed and creates a mirror entry. |
| Reversed | Cancelled by a later entry; both stay visible for the audit trail. | Final. |
The Source column shows where an entry came from: Manual for your own, or the document that created it (Invoice, Payment, Bill, PosOrder, WorkOrder and so on). The list can be filtered by Status and Journal.
Reverse a posted entry
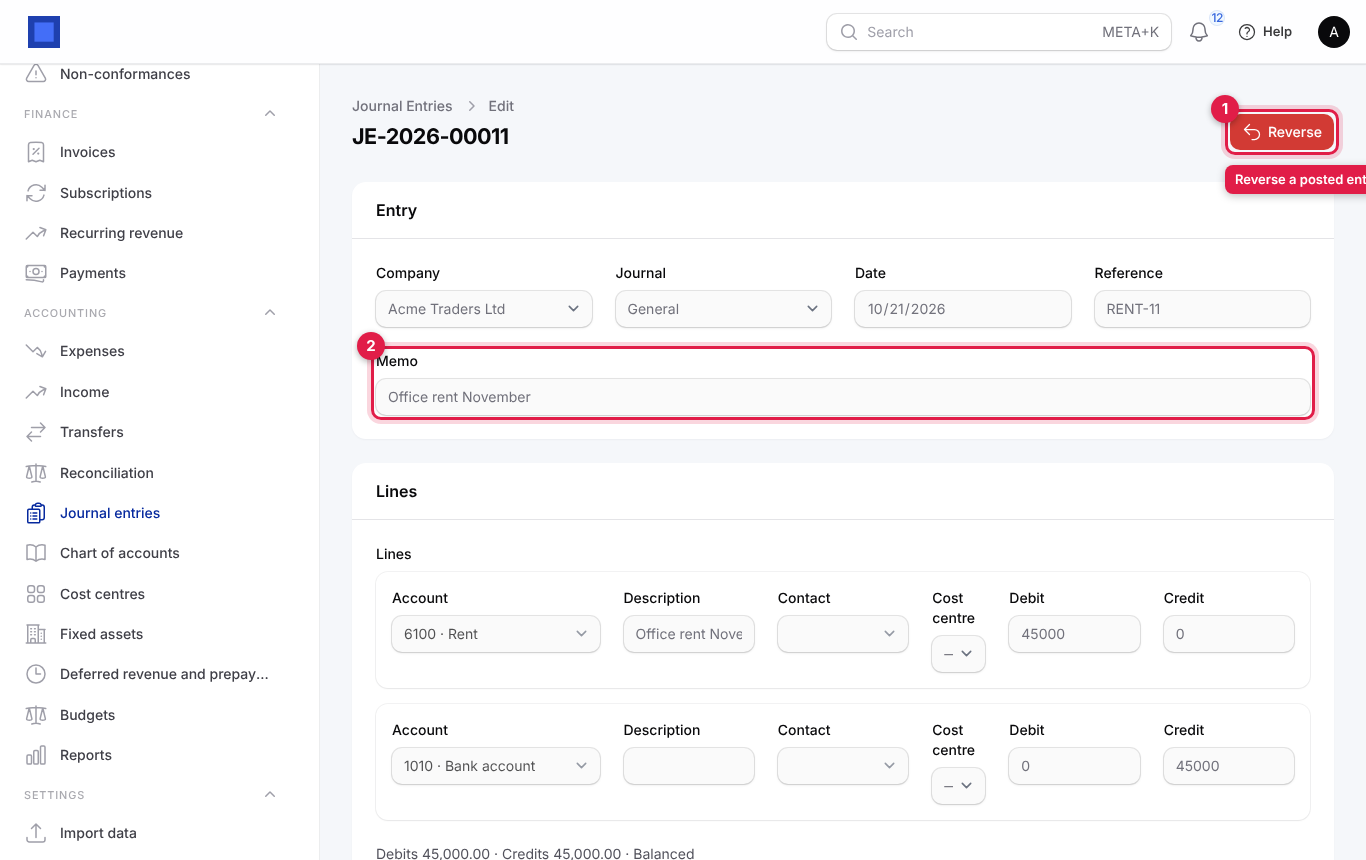
- In the list, click Reverse on the entry's row, choose the Reversal date and confirm. Or open the entry with View and click Reverse at the top (marker 1).
- A new posted entry with every debit and credit swapped is created on that date and opens. The original becomes Reversed.
Tip: Do not reverse entries that came from an invoice, bill or payment. Cancel or refund the document itself; that reverses its posting and keeps the customer or vendor balance right.
Split figures by cost centre
Cost centres let you see income and expenses by branch, department, vehicle or project without adding separate accounts.
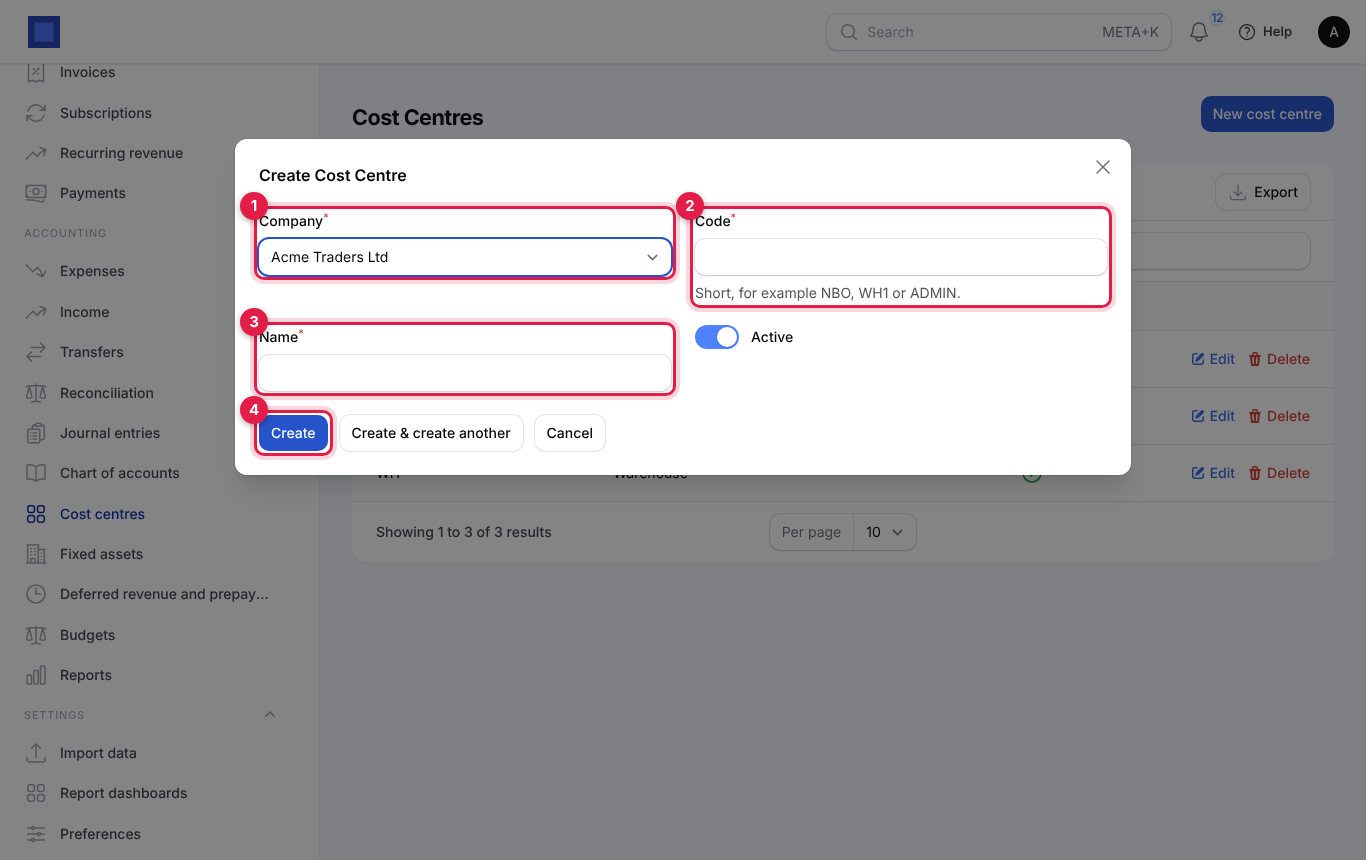
- Open Accounting → Cost centres and click New cost centre.
- Choose the Company (marker 1), type a short Code such as NBO, WH1 or ADMIN (marker 2) and a Name (marker 3), leave Active on, and click Create (marker 4).
Once a company has a cost centre, a Cost centre field appears on expenses, income, journal entry lines, fixed assets, deferrals and budget lines. The By cost centre report under Accounting → Reports shows the totals. Switch Active off to retire a cost centre; Delete removes one that has never been used.
Set a budget
A budget is the amount you plan to earn or spend per account over a period. The Budget against actual report compares it with what was really posted.
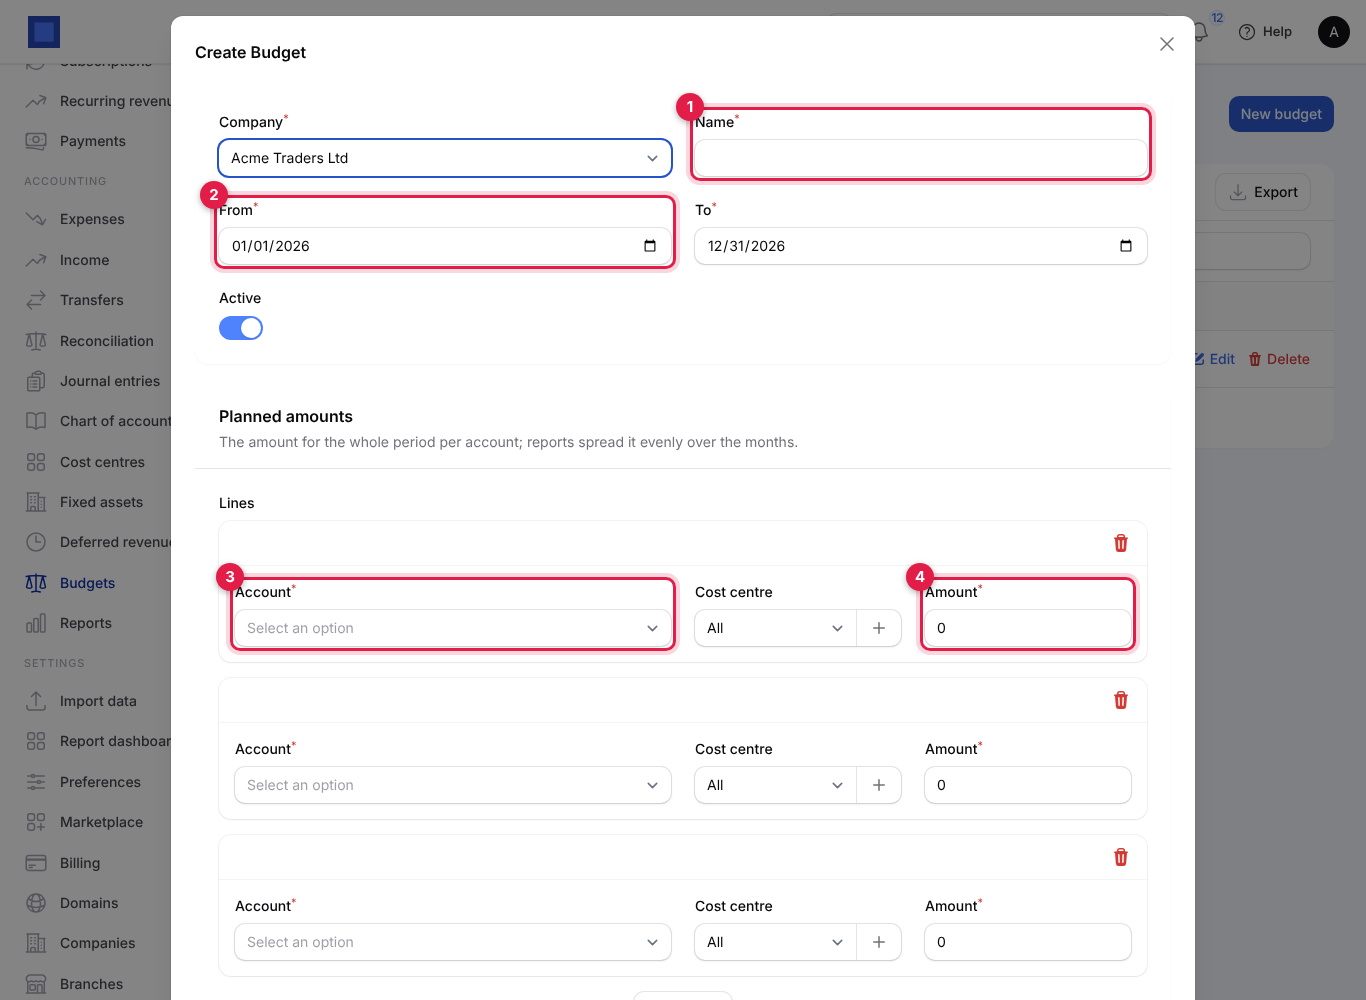
- Open Accounting → Budgets and click New budget.
- Fill in the window:
| Field | What to enter |
|---|---|
| Company | Required. |
| Name (marker 1) | For example Budget 2027. Required. |
| From (marker 2) / To | The budget period, usually your financial year. To must be after From. |
| Active | Switch off for old or draft budgets. |
| Line Account (marker 3) | An income or expense account. Required. |
| Line Cost centre | Leave All for the whole company, or pick one to budget a branch separately. |
| Line Amount (marker 4) | The amount for the whole period. Reports spread it evenly over the months, so a 1,200,000 rent budget for a year counts as 100,000 a month. |
- Add as many lines as you need with Add to lines and click Create. Use Edit on the row to change it later and Delete to remove it.
See Budget against actual for the report.
Lock a closed period
Once a month or year is closed and filed, set a lock date so nobody can post into it by mistake.
- Open Settings → Preferences.
- At the top, leave Whole organisation selected to lock every company, or pick one company to set its own lock date (a company's value overrides the organisation-wide one).
- Click the Accounting tab (marker 1). If you cannot see it, scroll the tab row sideways.
- Set the Lock date (marker 3). Nothing can be posted, edited or deleted on or before this date: invoices, bills, payments, expenses, journal entries and automatic postings dated in the locked period are refused with "The period up to … is locked."
- Click Save preferences (marker 4).
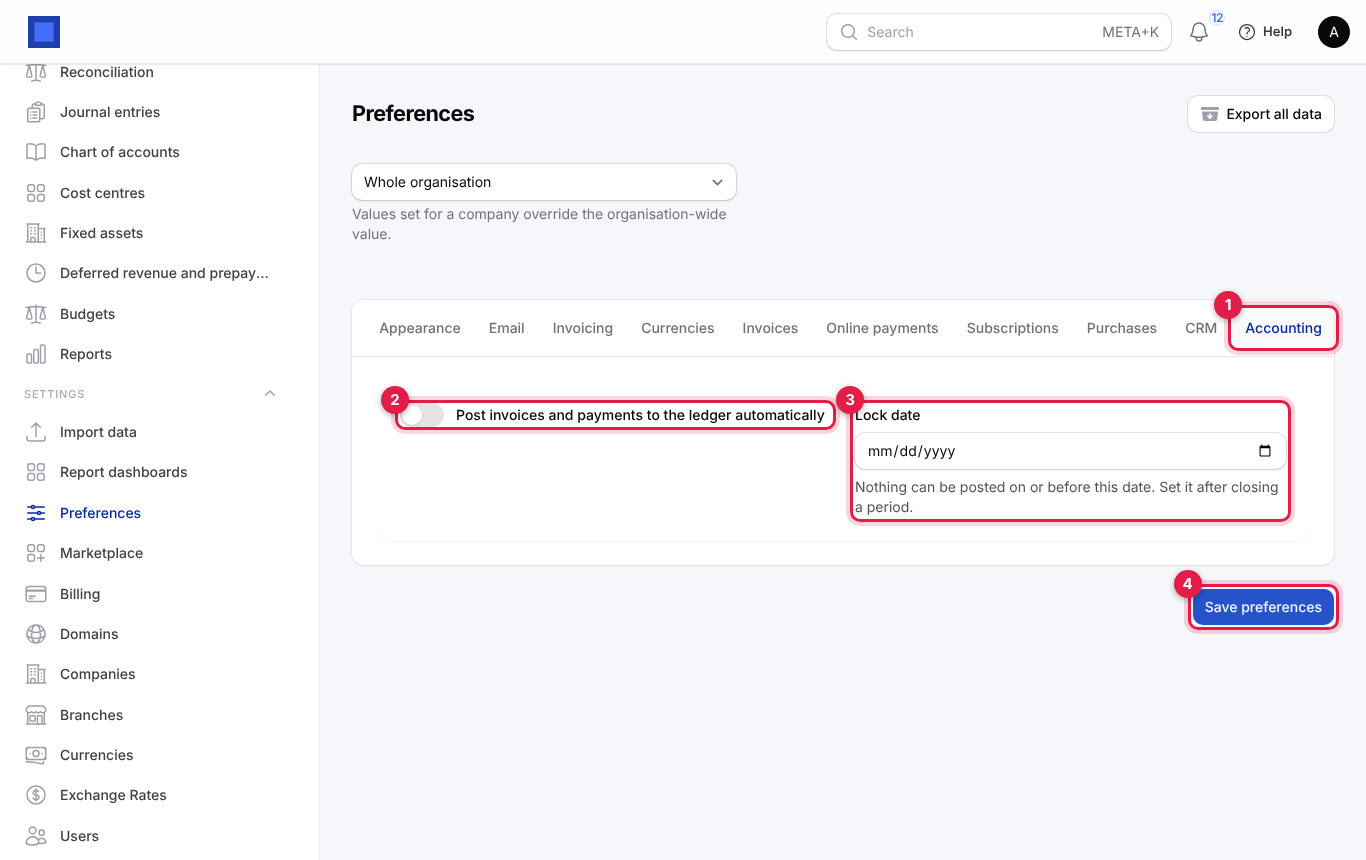
The same tab has Post invoices and payments to the ledger automatically (marker 2). It is on by default; keep it on unless your accountant keeps the books elsewhere and only wants NaliSuite for invoicing.
Closing a financial year with Close fiscal year sets the lock date for you (see Close the financial year). To correct something in a locked period, an owner or accountant can clear or move the lock date back, post the correction, and set it again.
Give your accountant access
Every workspace has an accountant role made for an in-house bookkeeper or an outside accounting firm. It can see everything in the workspace (read-only) and has full rights in Accounting (including posting, reversing, reports, closing the year and revaluation), Payroll, vendor bills and bill payments, customer payments and taxes. It cannot change settings, users, billing or other modules' records.
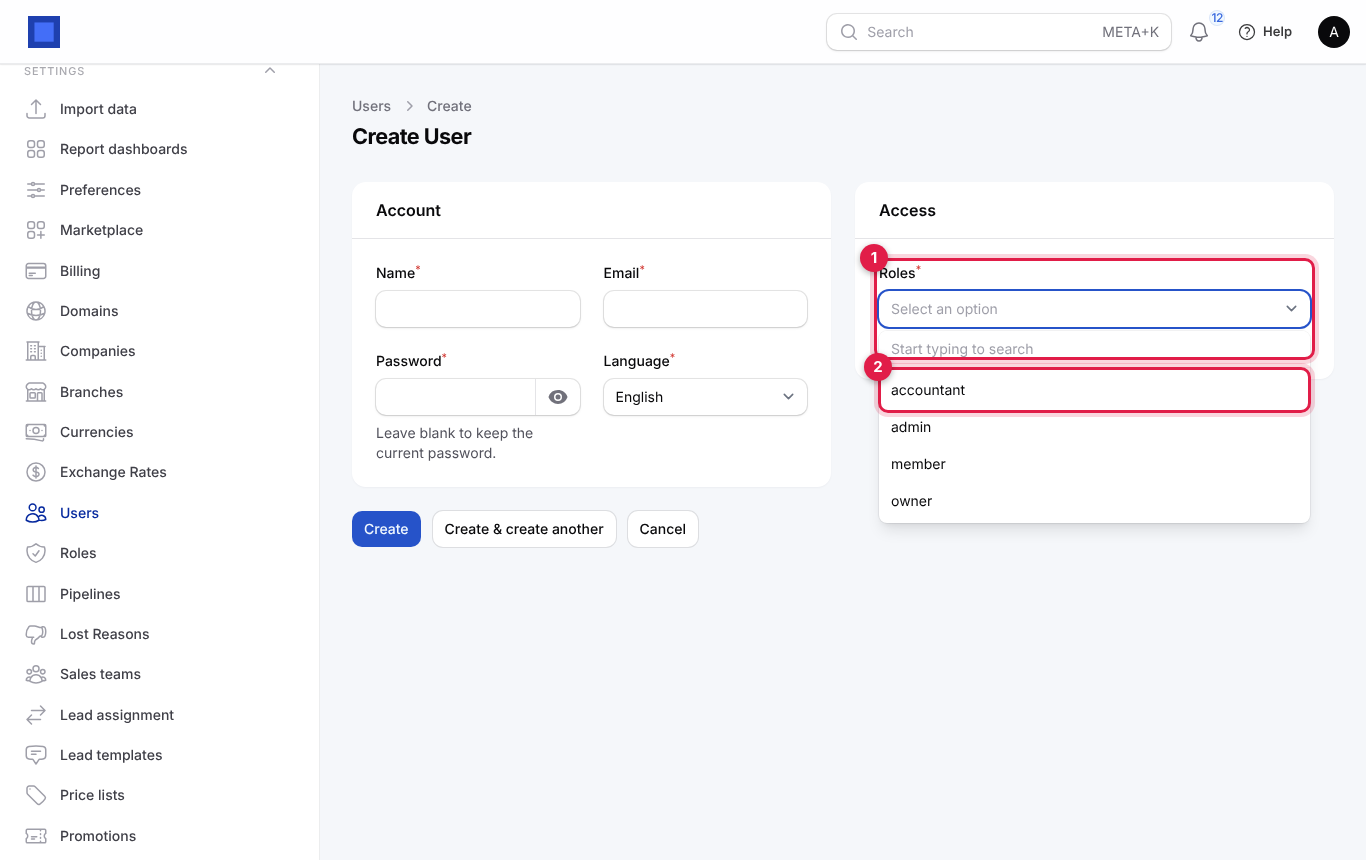
- Open Settings → Users and click New user.
- Type the accountant's Name, Email, a Password and their Language.
- In Roles (marker 1), choose accountant (marker 2).
- Click Create. Send them the sign-in address of your workspace and the password, or ask them to use Forgot password.
Tip: You can give a person more than one role, and you can make your own roles under Settings → Roles if the accountant should, for example, also manage purchases.
Common questions
I recorded an expense in the wrong category. How do I fix it? Open it with Edit, change the Expense category and save. The ledger entry is re-posted. If the date is locked, record a journal entry in the current period that moves the amount from the wrong account to the right one.
Why can't I see the + next to a field? Your role is not allowed to create that kind of record (for example, a member cannot add accounts), or the module behind it is switched off.
What is the difference between an expense and a vendor bill? An expense is a quick record of money already spent (or owed) with one category. A vendor bill has lines, can be checked against a purchase order and goods received, has a due date, and is paid with one or several payments. Use bills for suppliers you order from regularly.
Why does a journal entry say "Out of balance"? Total debits and total credits differ. Every entry must balance before it can be posted; check for a typo or a missing line.
Can I delete a posted journal entry? No. Reverse it. Both entries stay visible so your accountant can see what happened.
Do I need cost centres? Only if you want profit and loss by branch, department or project. They are optional and the fields stay hidden until you create one.
Where do I record the owner putting money into the business? Use a manual journal entry: debit the bank or M-Pesa account, credit your capital (equity) account.