Food production
Food production is for bakeries, caterers and meal-subscription kitchens: anyone who makes food in batches before it is sold. You write recipes with a yield and see what each unit costs; plan each day's baking from orders, standing orders and shop shelves; record batches that use up ingredients and put the finished goods into stock with a lot number and a use-by date; print allergen labels; send vans out with delivery sheets and take back what did not sell; quote and book catering events with a deposit; and run tiffin or lunch-box meal plans with pauses, skipped days and monthly billing. This page covers every screen of the app.
Everything is in the Food production group of the left menu: Production plans, Batches, Recipes, Standing orders, Delivery sheets, Delivery routes, Waste, Catering quotes, Meal plans, Meal subscribers, Kitchen and delivery lists and Food reports.
Note: food_production.view lets someone see every Food production screen, print labels, delivery sheets, event sheets and drivers' lists, and read the reports. food_production.manage is needed to change anything: write recipes, plan days, finish batches, send vans out, record returns, book events and bill subscribers. Owners and admins have both; the member role has food_production.view. Set permissions under Settings → Roles.
Switch it on
Food production is a marketplace app. It needs the Sales and Inventory apps, because recipes use products and batches move stock. Delivery invoices, catering deposits and meal billing also need Invoicing.
- Open Settings → Marketplace and type Food production in the Search add-ons… box (marker 1).
- On the Food production card (marker 2), click Start free trial (or Add to subscription) and confirm. The Food production group appears in the menu.
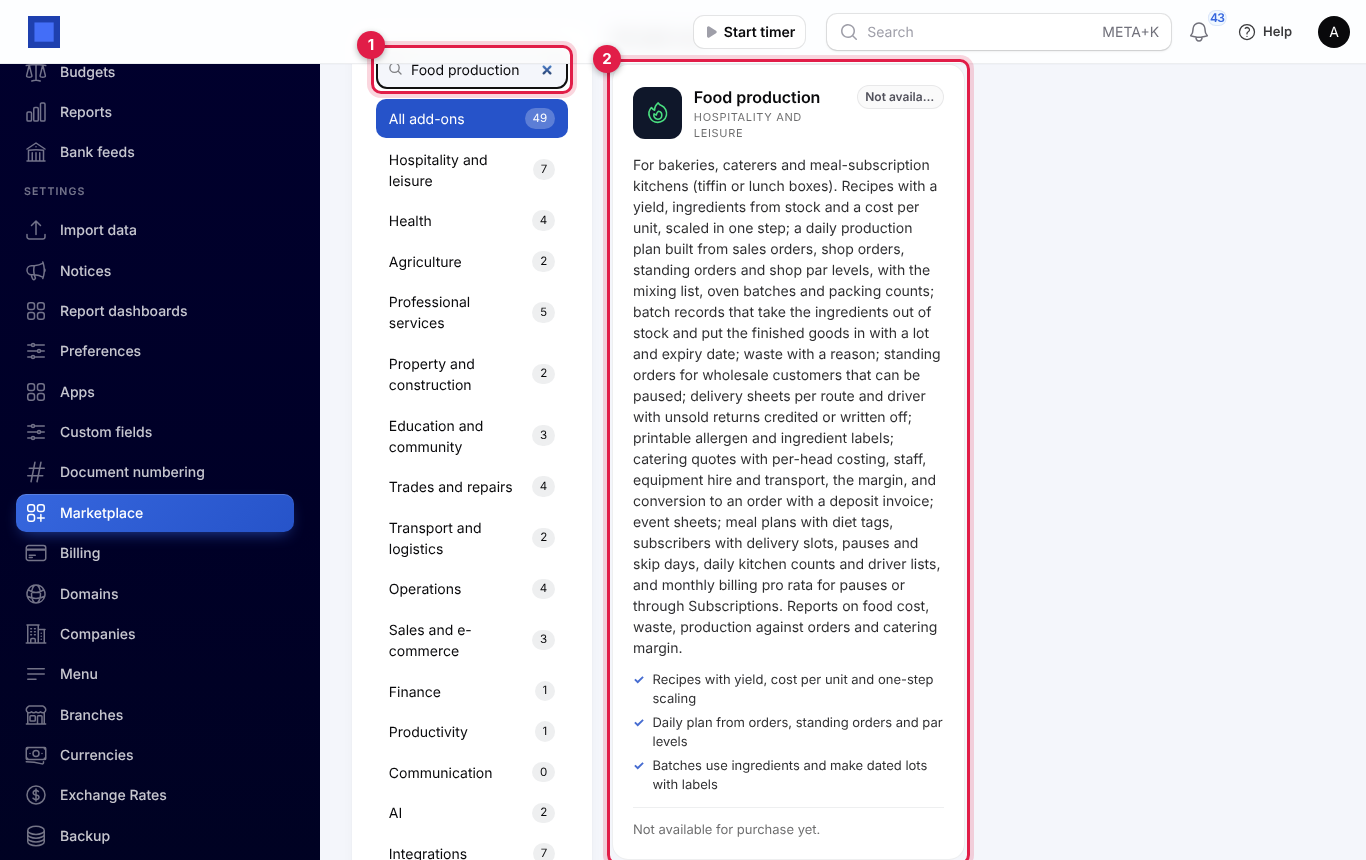
If the card says Not available for purchase yet, ask NaliSuite support to switch it on. See Billing and marketplace.
Why its recipes are separate from Restaurant Pro's
If you also use Restaurant Pro, you will see two kinds of recipe. They do different jobs:
- A Restaurant Pro recipe is one portion of a dish sold at the till. Its ingredients leave stock by themselves the moment the dish is sold.
- A Food production recipe is a whole batch (40 loaves, 50 portions). Its ingredients leave stock when you finish a batch, and the finished loaves go into stock with a lot and use-by date. You then sell the loaves themselves.
Keep each product in one app only. If a loaf had a recipe in both, its flour would leave stock twice: once when it was baked and again when it was sold.
Food production settings
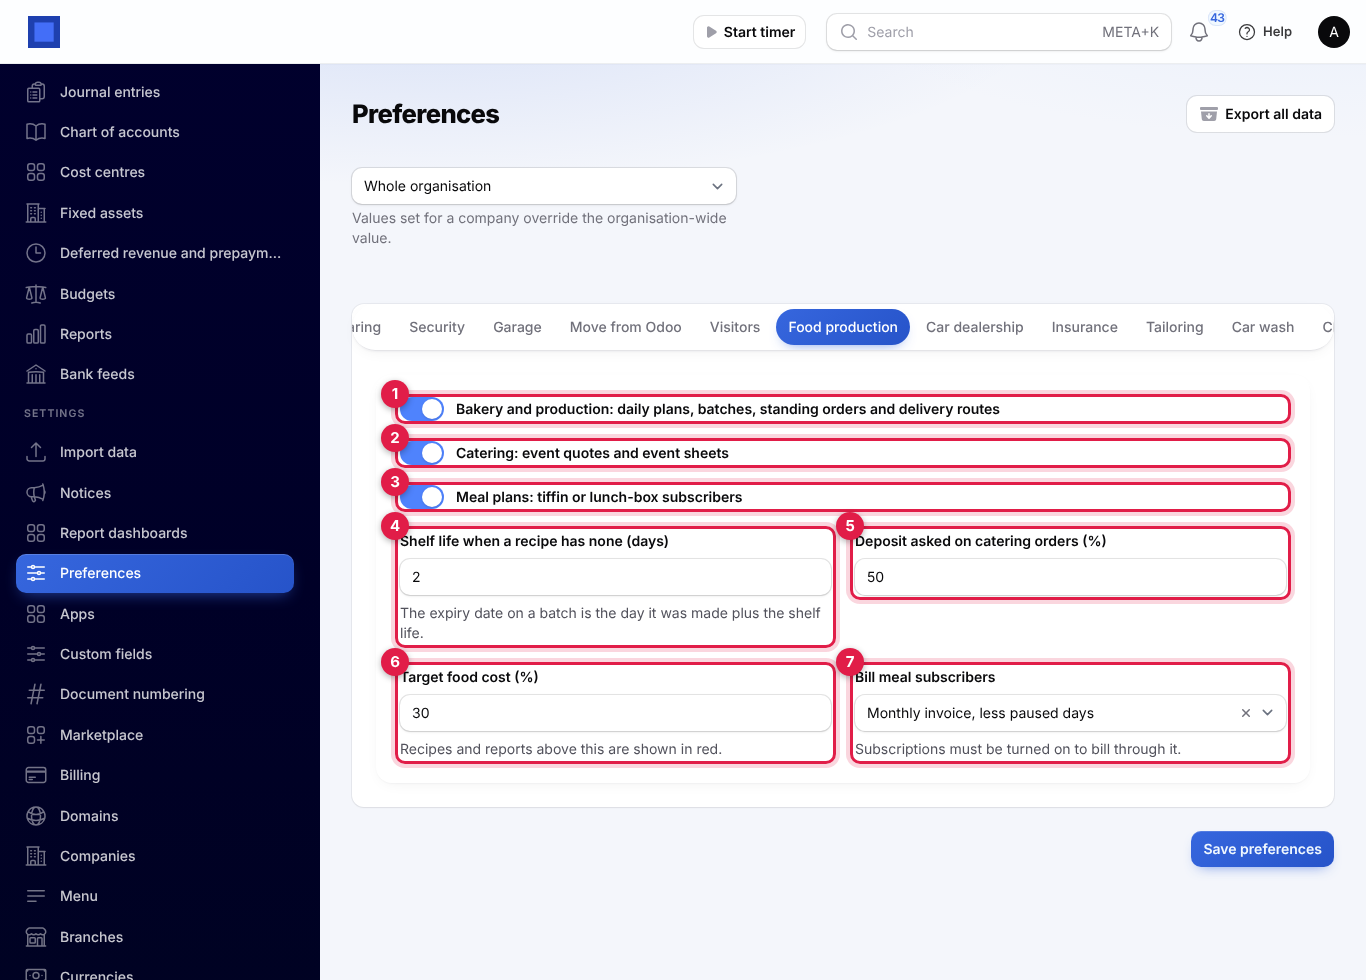
- Open Settings → Preferences and click the Food production tab.
- Change what you need and click Save preferences.
| Setting | Default | What it does |
|---|---|---|
| Bakery and production (marker 1) | On | Shows Production plans, Batches, Standing orders and Delivery sheets, and the food cost and production parts of the reports. |
| Catering (marker 2) | On | Shows Catering quotes, event sheets and the catering margin report. |
| Meal plans (marker 3) | On | Shows Meal plans, Meal subscribers and Kitchen and delivery lists. |
| Shelf life when a recipe has none (days) (marker 4) | 2 | The use-by date on a batch is the day it was made plus the recipe's shelf life, or this number when the recipe has none. |
| Deposit asked on catering orders (%) (marker 5) | 50 | Suggested when you book an event. You can change it each time. |
| Target food cost (%) (marker 6) | 30 | Recipes and report lines whose food cost is above this show in red. |
| Bill meal subscribers (marker 7) | Monthly invoice, less paused days | Or Through Subscriptions, the full monthly price. Subscriptions must be switched on for the second choice. See Bill meal subscribers. |
Turn off the sections you do not use: a caterer with no bakery can switch off Bakery and production and Meal plans and keep a short menu. Recipes, Delivery routes, Waste and Food reports stay while any section that uses them is on.
Recipes
Open Food production → Recipes. Each recipe shows its Yield (marker 2), the number of ingredients, the Cost per unit (marker 3), the Food cost (marker 4), how long it Keeps and its Allergens (marker 5). Only recipes in use are listed; remove the In use filter to see the others.
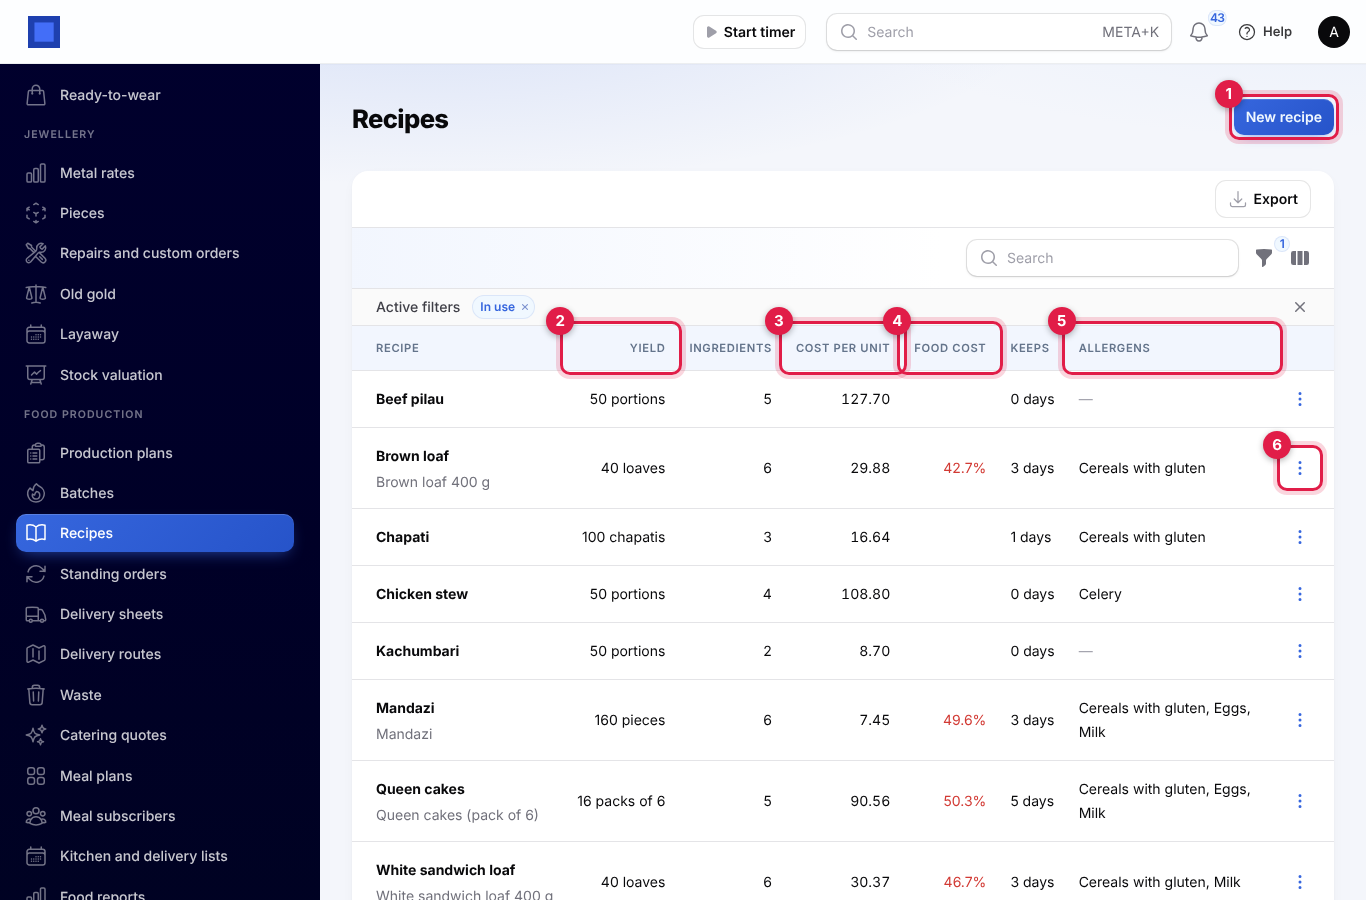
- Cost per unit is the ingredient cost of the whole yield divided by the yield. Each ingredient is costed at its average stock cost, or at its cost price when none is in stock, so the cost follows what you pay your suppliers.
- Food cost is the cost per unit as a share of the selling price of the product the recipe makes. It is red above your target and green below. Catering dishes that make no product show "—".
Write a recipe
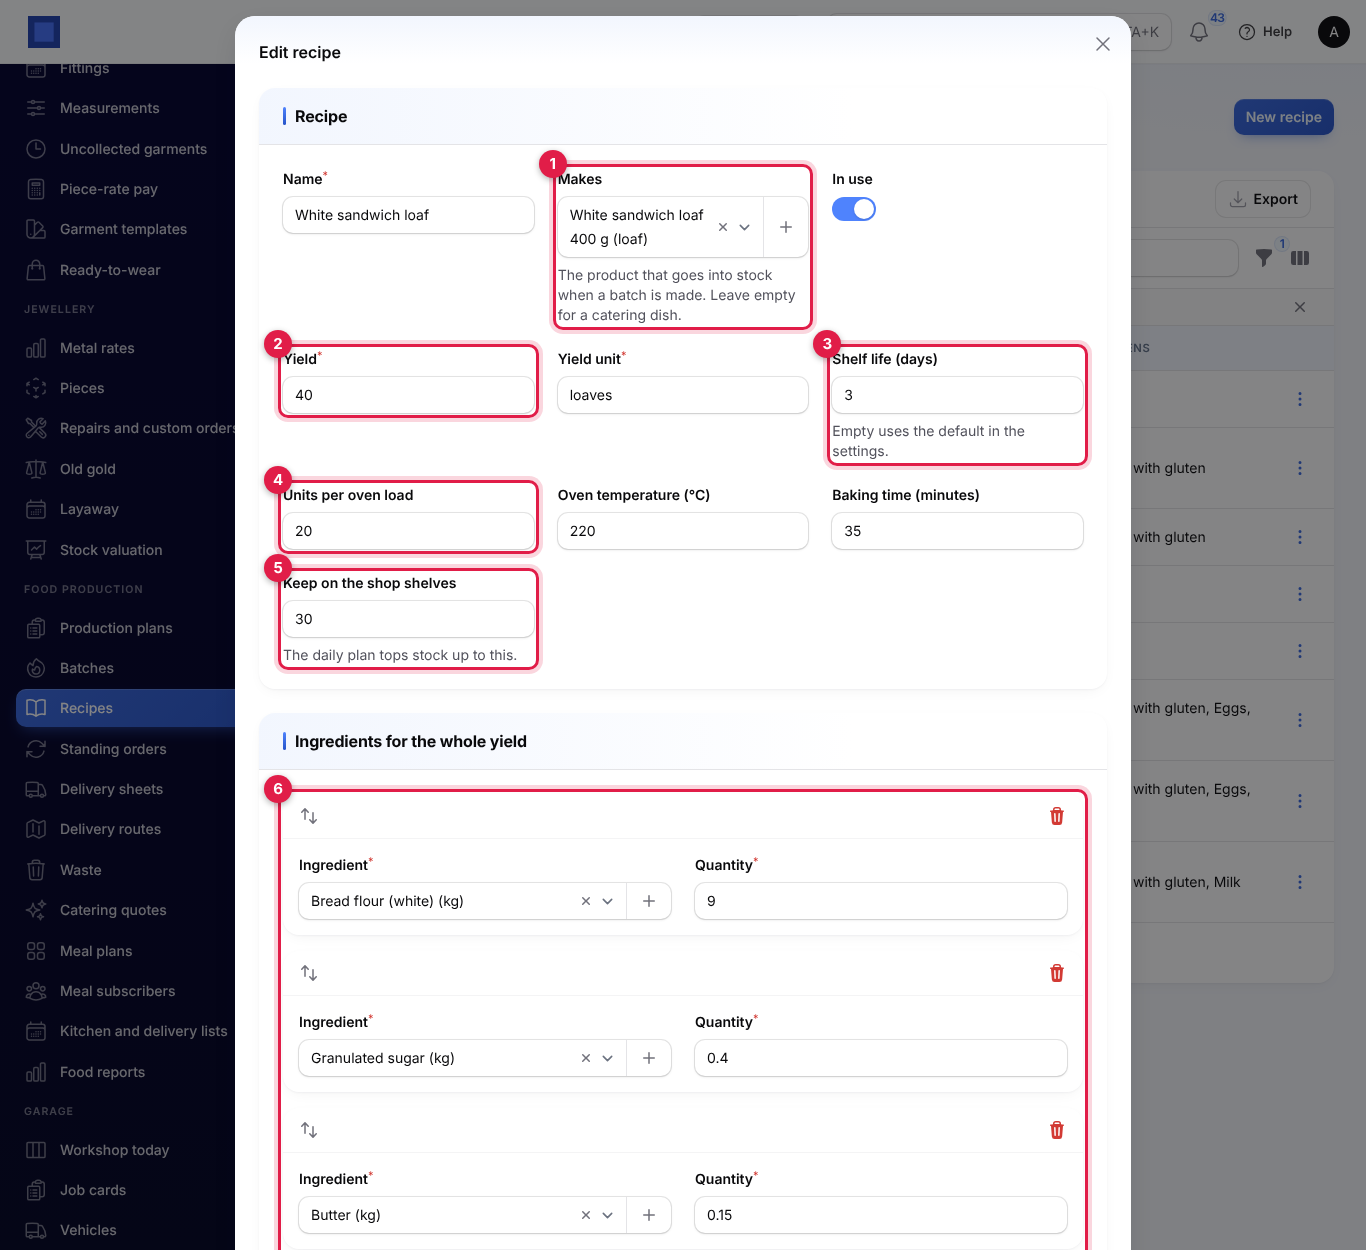
- Click New recipe (marker 1), or ⋮ → Edit (marker 6) on a recipe.
- Fill in the window and click Create (or Save changes).
| Field | What to enter |
|---|---|
| Name (required) | White sandwich loaf. |
| Makes (marker 1) | The product that goes into stock when a batch is made. Leave it empty for a catering dish that is never stocked. |
| In use | Off to hide an old recipe from the pickers. |
| Yield and Yield unit (required, marker 2) | What the ingredients below make: 40 loaves, 50 portions. |
| Shelf life (days) (marker 3) | Sets the use-by date of each batch. Empty uses the setting. |
| Units per oven load (marker 4) | How many fit in the oven at once. The day plan works out the oven loads from it. |
| Oven temperature (°C) and Baking time (minutes) | Shown on the day plan's oven list. |
| Keep on the shop shelves (marker 5) | Your par level. The day plan tops stock up to this number. |
| Ingredients for the whole yield (marker 6) | Click Add ingredient for each: the Ingredient (a stocked product) and the Quantity for the whole yield, in the product's unit. |
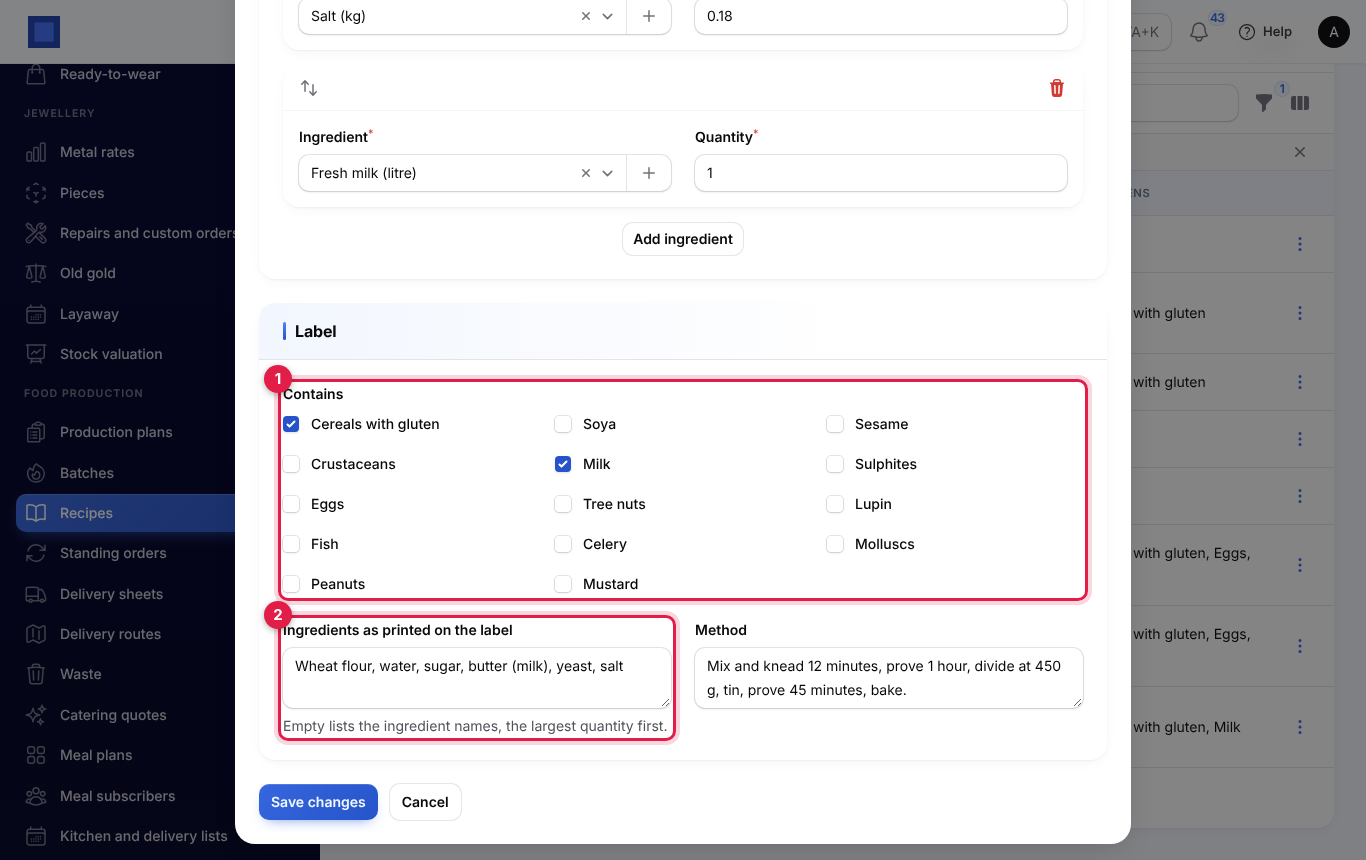
The Label section sets what is printed on the batch labels:
| Field | What to enter |
|---|---|
| Contains (marker 1) | Tick each of the fourteen allergens the food contains: cereals with gluten, crustaceans, eggs, fish, peanuts, soya, milk, tree nuts, celery, mustard, sesame, sulphites, lupin, molluscs. |
| Ingredients as printed on the label (marker 2) | The wording for the label, for example Wheat flour, water, sugar, butter (milk), yeast, salt. Empty lists the ingredient names, the largest quantity first. |
| Method | Your notes for the bakers. |
Scale a recipe
To make a recipe for a new yield, click ⋮ → Scale, type the New yield and click Submit. Every ingredient quantity changes in proportion, and the recipe now makes the new yield. You see, for example, White sandwich loaf now makes 80 loaves.
You do not need to scale a recipe to bake more one day: the day plan and batches scale the ingredients for you.
A recipe can be deleted only while no batch or plan has used it. Switch In use off instead.
Production plans
The production plan tells the bakery what to make for a day, what to weigh out and what to pack for whom.
Plan a day
- Open Food production → Production plans and click Plan a day.
- Choose the Day (tomorrow is suggested) and click Submit.
The plan, numbered PP-2026-00004, gathers what is wanted that day of every product that has a recipe in use:
- Orders: confirmed sales orders due that day (their expected delivery date, or the order date when there is none). Paid online shop orders are sales orders too.
- Standing orders: every active standing order delivered that day, unless it is paused. See Standing orders.
- Shop top-up: for products kept in stock, what is needed to bring stock on hand up to the recipe's Keep on the shop shelves number.
Planning the same day again rebuilds its draft.
Read the plan
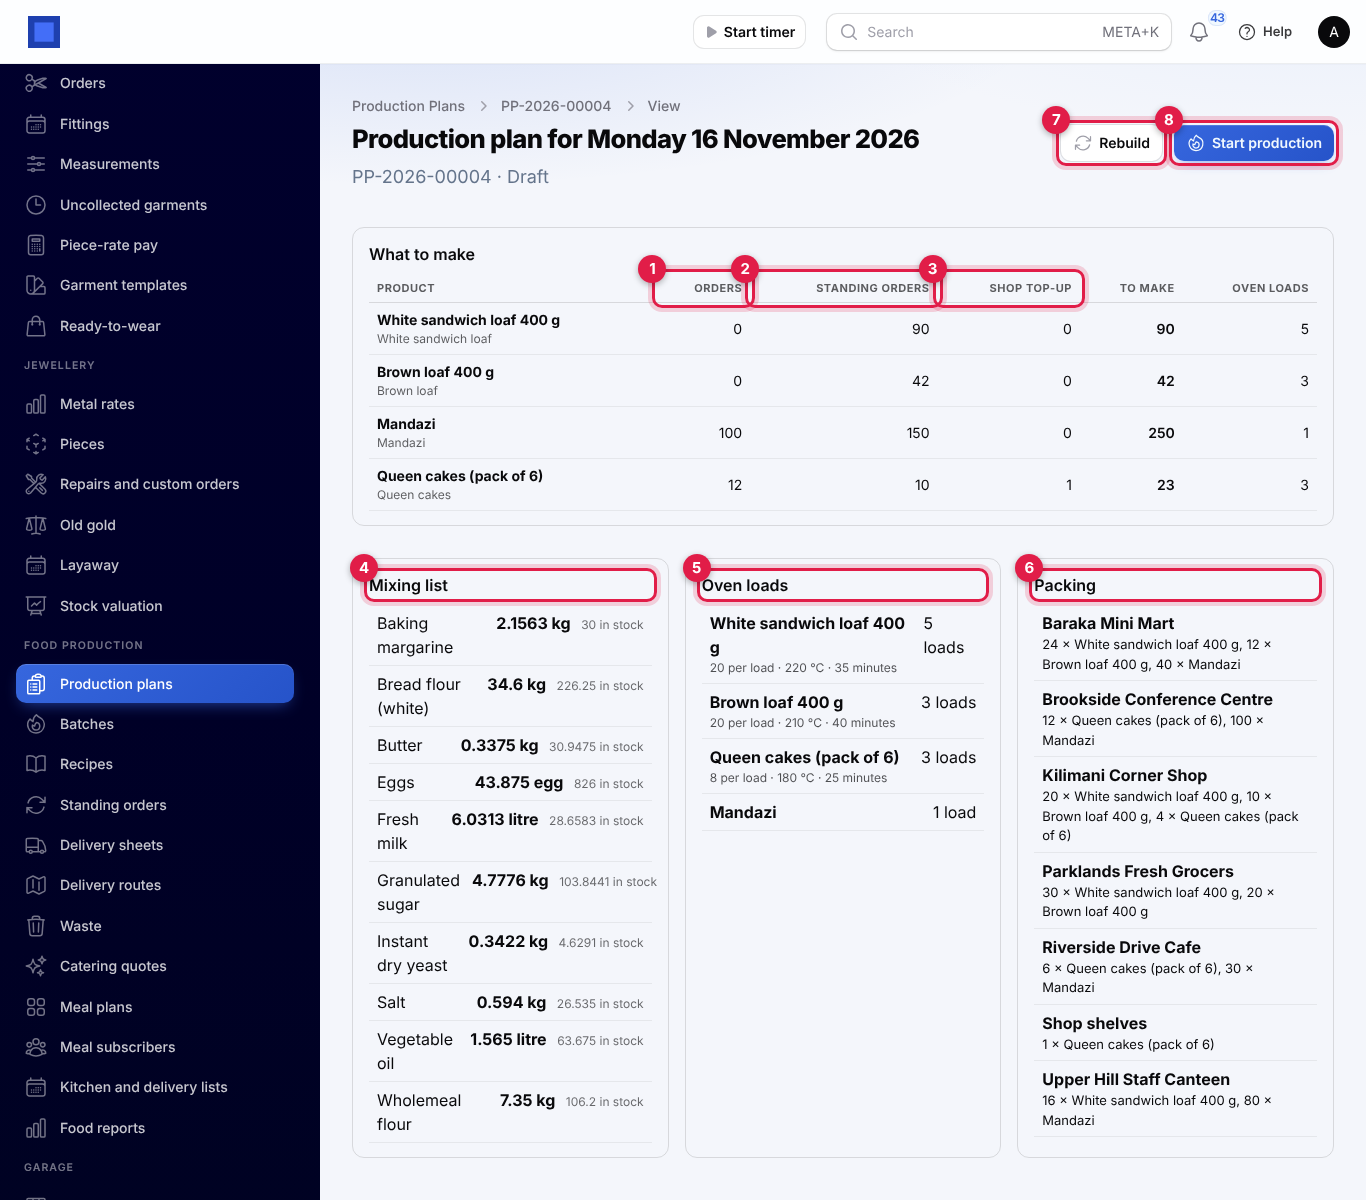
- What to make: each product with what came from Orders (marker 1), Standing orders (marker 2) and the Shop top-up (marker 3), the total To make and the Oven loads: the quantity divided by the recipe's units per oven load, rounded up (one load when the recipe gives none).
- Mixing list (marker 4): every ingredient to weigh out for the whole day, with what is in stock. A shortfall shows in red, for example 2.5 short, so you can buy before you start.
- Oven loads (marker 5): the hottest first, so the oven only cools through the day, with the units per load, temperature and baking time.
- Packing (marker 6): what to pack for each customer, with Shop shelves for the top-up and Walk-in for orders without a customer.
Click Rebuild (marker 7) after new orders come in. When you are ready, click Start production (marker 8) and confirm: a batch is made for every product on the plan and the plan becomes In production. It can no longer be rebuilt.
Batches, lots and labels
Open Food production → Batches. Each batch (BAT-2026-00012) shows the product, the Planned quantity, what came out Good, what was Wasted, the Cost each, the Use by date (marker 2) and its status (marker 3): Planned or Done.
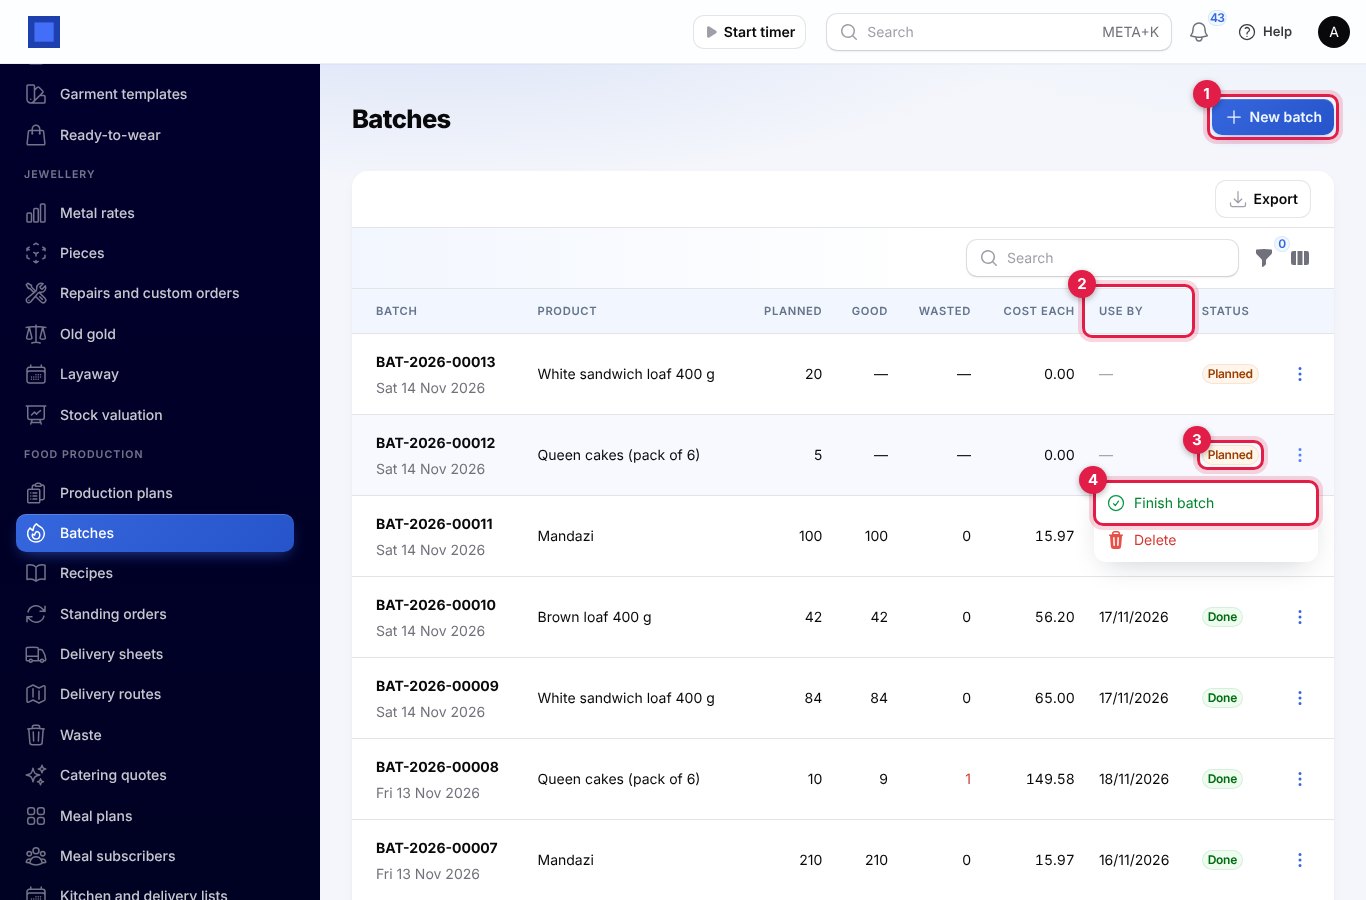
To make something outside the day plan, click New batch (marker 1), choose the Recipe (only recipes that make a product), Made on and Quantity to make, and click Submit.
Finish a batch
When a batch comes out of the oven:
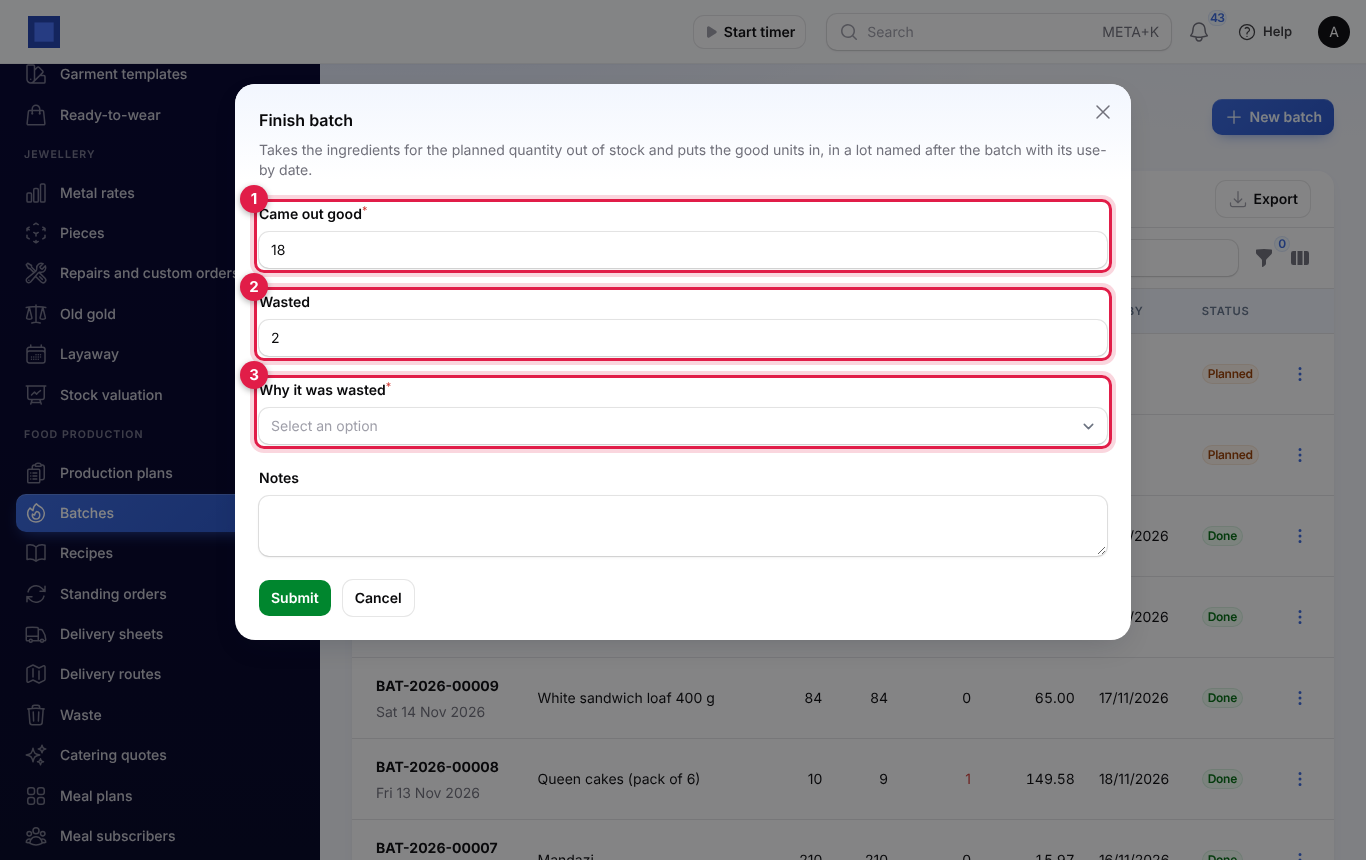
- Click ⋮ → Finish batch (marker 4).
- Enter how many Came out good (marker 1; the planned quantity is filled in) and how many were Wasted (marker 2).
- If anything was wasted, choose Why it was wasted (marker 3): Burnt or overbaked, Did not rise, Spoiled, Past its date, Dropped or damaged, Unsold return, Failed quality check or Other. Add Notes if you like.
- Click Submit.
What happens:
- The ingredients for the planned quantity leave the default store. Ingredients you do not keep in stock (yeast bought by the packet, say) are costed at their cost price.
- The good units go into stock in a lot named after the batch (BAT-2026-00012) with its use-by date, when the product is tracked by lot (see Inventory). Lots that expire first are sold first, and stock past its date cannot be sold or delivered.
- Cost each is the whole ingredient cost divided by the good units. The wasted units are logged under Waste with their share of the cost.
If there is not enough of an ingredient in stock, the batch is refused, for example Only 3.5 kg of Butter in Main store. Receive the stock first. A planned batch can be deleted; a finished one cannot.
Print labels
On a finished batch, click ⋮ → Print labels. A PDF opens with one label per unit made (up to 24), three to a row. Each label shows your company, the product, the ingredients, Contains: and the allergens (or No listed allergens), the Use by date, the day it was made and the lot.
Waste
Open Food production → Waste to see everything thrown away: the date, product and batch, quantity, reason, Where it happened (In production, From stock or Returned unsold) and the cost, with a total. Filter by reason or by where.
Waste from finished batches and from van returns is logged for you. To throw away something from stock (milk past its date, a spoiled tray):
- Click Record waste.
- Choose the Product, the Quantity, the Reason and the Date, add Notes if you like, and click Submit.
The quantity leaves the default store at its average cost, and you see the cost, for example Waste recorded, costing 260.00.
Standing orders
A standing order is the same delivery to a wholesale customer on fixed weekdays: a shop that takes 24 loaves every morning, Monday to Saturday.
Open Food production → Standing orders. Each shows the customer, the route, the Days (marker 2), what goes in each delivery and the status (marker 3): Active, Paused (with its dates underneath) or Stopped.
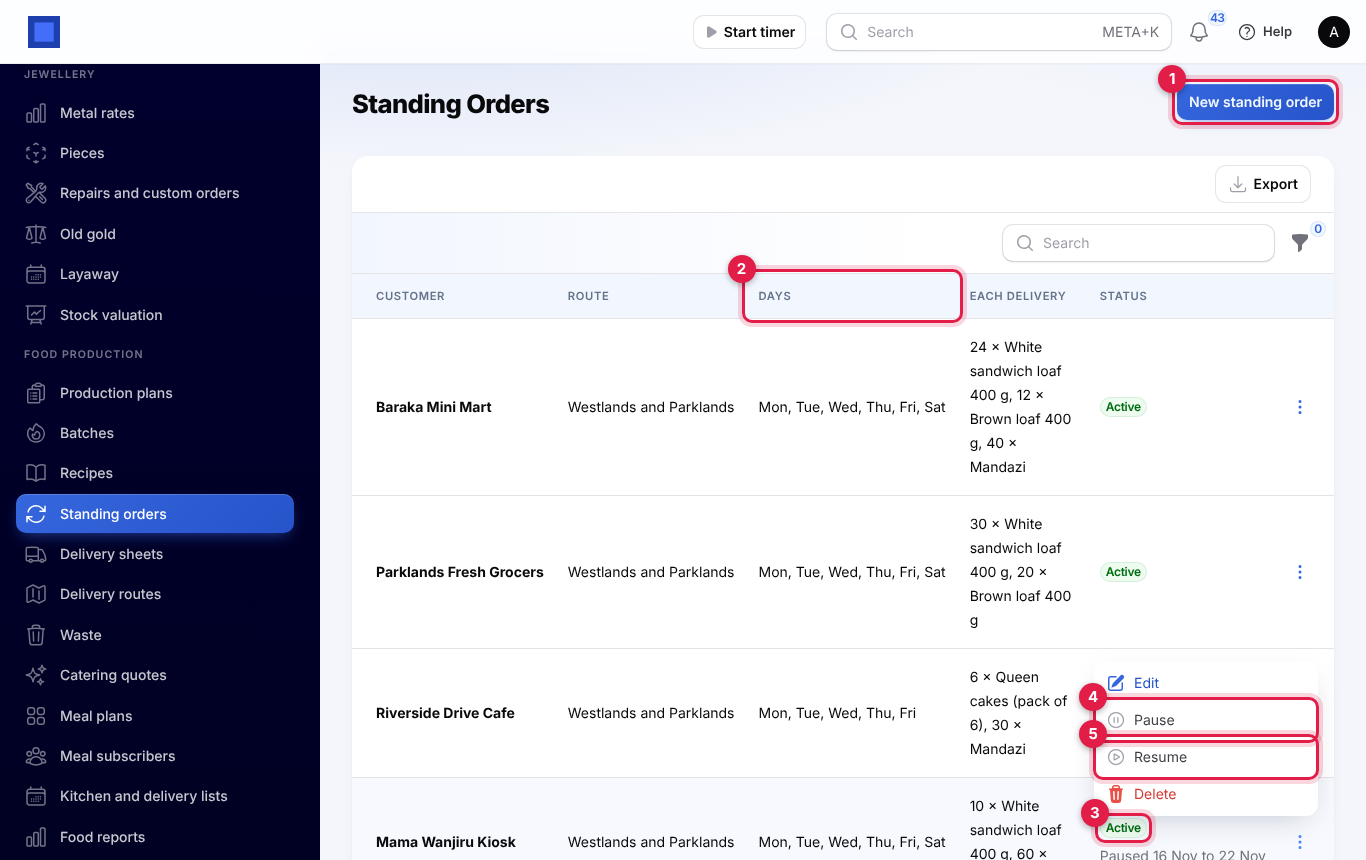
- Click New standing order (marker 1).
- Choose the Customer, the Delivery route and, if it starts later, From.
- Tick the days under Delivered on (Monday to Friday is ticked for you).
- Under Every delivery, click Add product for each line: the Product, the Quantity and the Price each (your selling price is filled in; change it to the customer's wholesale price).
- Click Create.
To stop deliveries for a while, click ⋮ → Pause (marker 4) and give From and Until. Leave Until empty to pause until you click Resume (marker 5). You can also set Paused from and Paused until in the form, or switch off Active to stop the order for good.
Standing orders feed the day plan and the delivery sheets on every day they are due.
Delivery routes and sheets
Routes
Open Food production → Delivery routes and click New route. Give the Route a name (Westlands and Parklands), the usual Driver, Driver phone and Vehicle (KCD 482T), and click Create. Switch off In use for a route you no longer run. Routes are used by standing orders and by meal subscribers.
Prepare and send out a sheet
- Open Food production → Delivery sheets and click Prepare a sheet.
- Choose the Route and the Day, and click Submit.
The sheet (DS-2026-00005) is loaded with every standing order on that route due that day, customer by customer. Each route has one sheet a day. While it is Being loaded, use Add a drop to add a one-off delivery, or Edit and Delete on a drop to change it.
When the van leaves, click Actions → Send out and confirm. The goods leave stock and, with Invoicing on, each customer gets one issued invoice for their priced drops, dated that day with the sheet number as its reference. The sheet is now Out on the road.
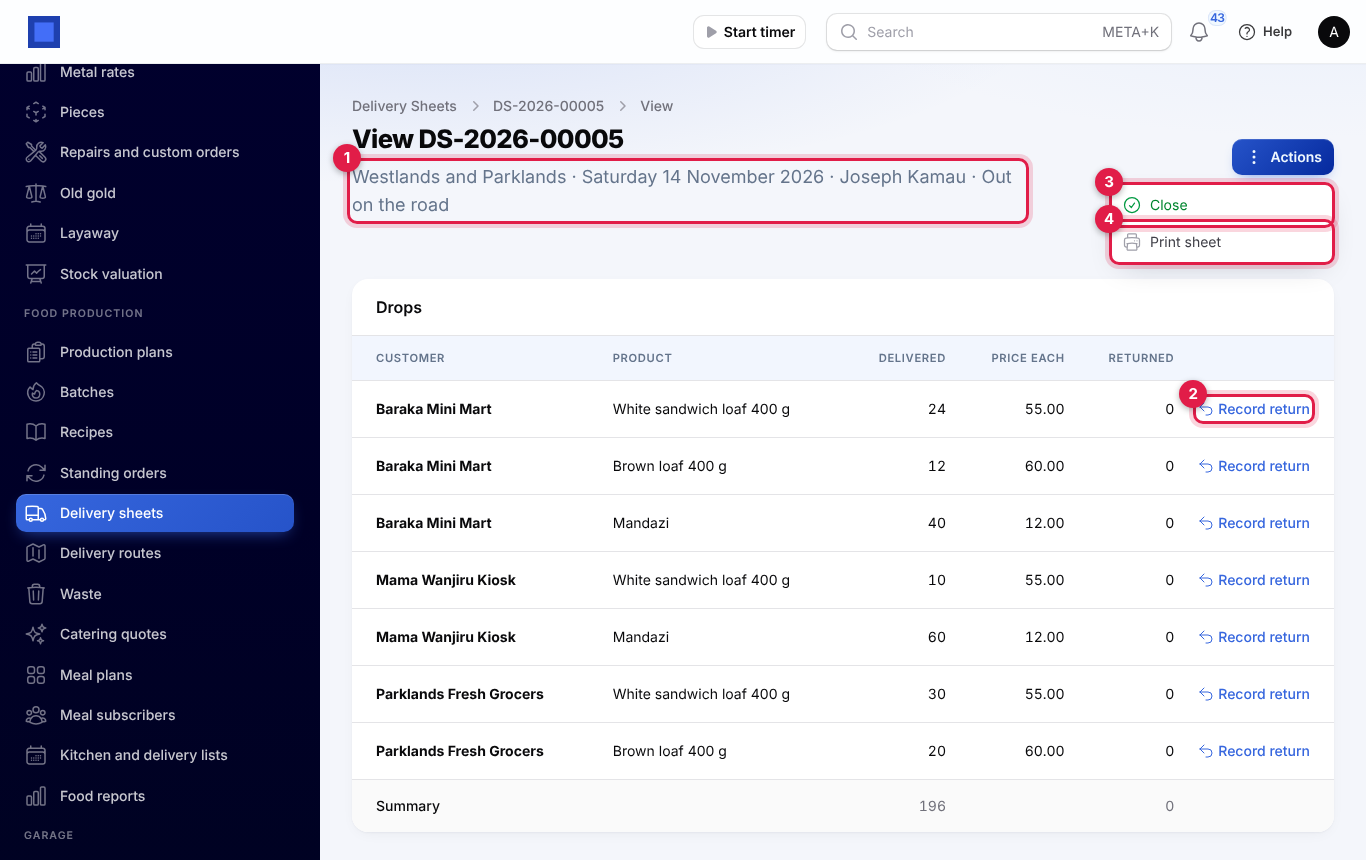
The line under the title (marker 1) shows the route, the day, the driver and the status. Actions → Print sheet (marker 4) opens a PDF for the driver with each drop, a Returned column and a Received by space for each customer to sign.
Record unsold returns
When the driver comes back with goods that did not sell:
- On the drop, click Record return (marker 2).
- Enter how many were Brought back unsold (no more than were delivered).
- Choose What happens to it:
- Credit the customer and put back in stock: a credit note is issued against that customer's delivery invoice, and the goods go back into stock at the cost they left at.
- Write off as waste, no credit: the customer is not credited, and the units are logged as waste (Unsold return, Returned unsold).
- Click Submit.
Each drop takes one return. When all returns are in, click Actions → Close (marker 3) and confirm. A closed sheet takes no more returns.
Catering quotes
Open Food production → Catering quotes. Each quote (CQ-2026-00002) shows the event, customer, date, guests, price and Margin with its percentage (red when below zero), and its status: Draft, Sent, Booked or Lost.
Write a quote
- Click New catering quote.
- Under Event, fill in the Customer, Event (Wedding reception), Date, Starts at, Venue, number of Guests and the Tax on the order (for example VAT 16%).
- Under Menu and services, click Add a line for each item and choose its Type:
- Menu item (per guest): choose the Recipe; the description and Cost each (the recipe's cost per portion, From the recipe) are filled in. Enter the portions Per guest and your Price each. Menu items are multiplied by the number of guests.
- Staff, Equipment hire, Transport or Other: a Description, Quantity, Cost each and Price each.
- Click Create. The quote is numbered and costed, and opens for editing.
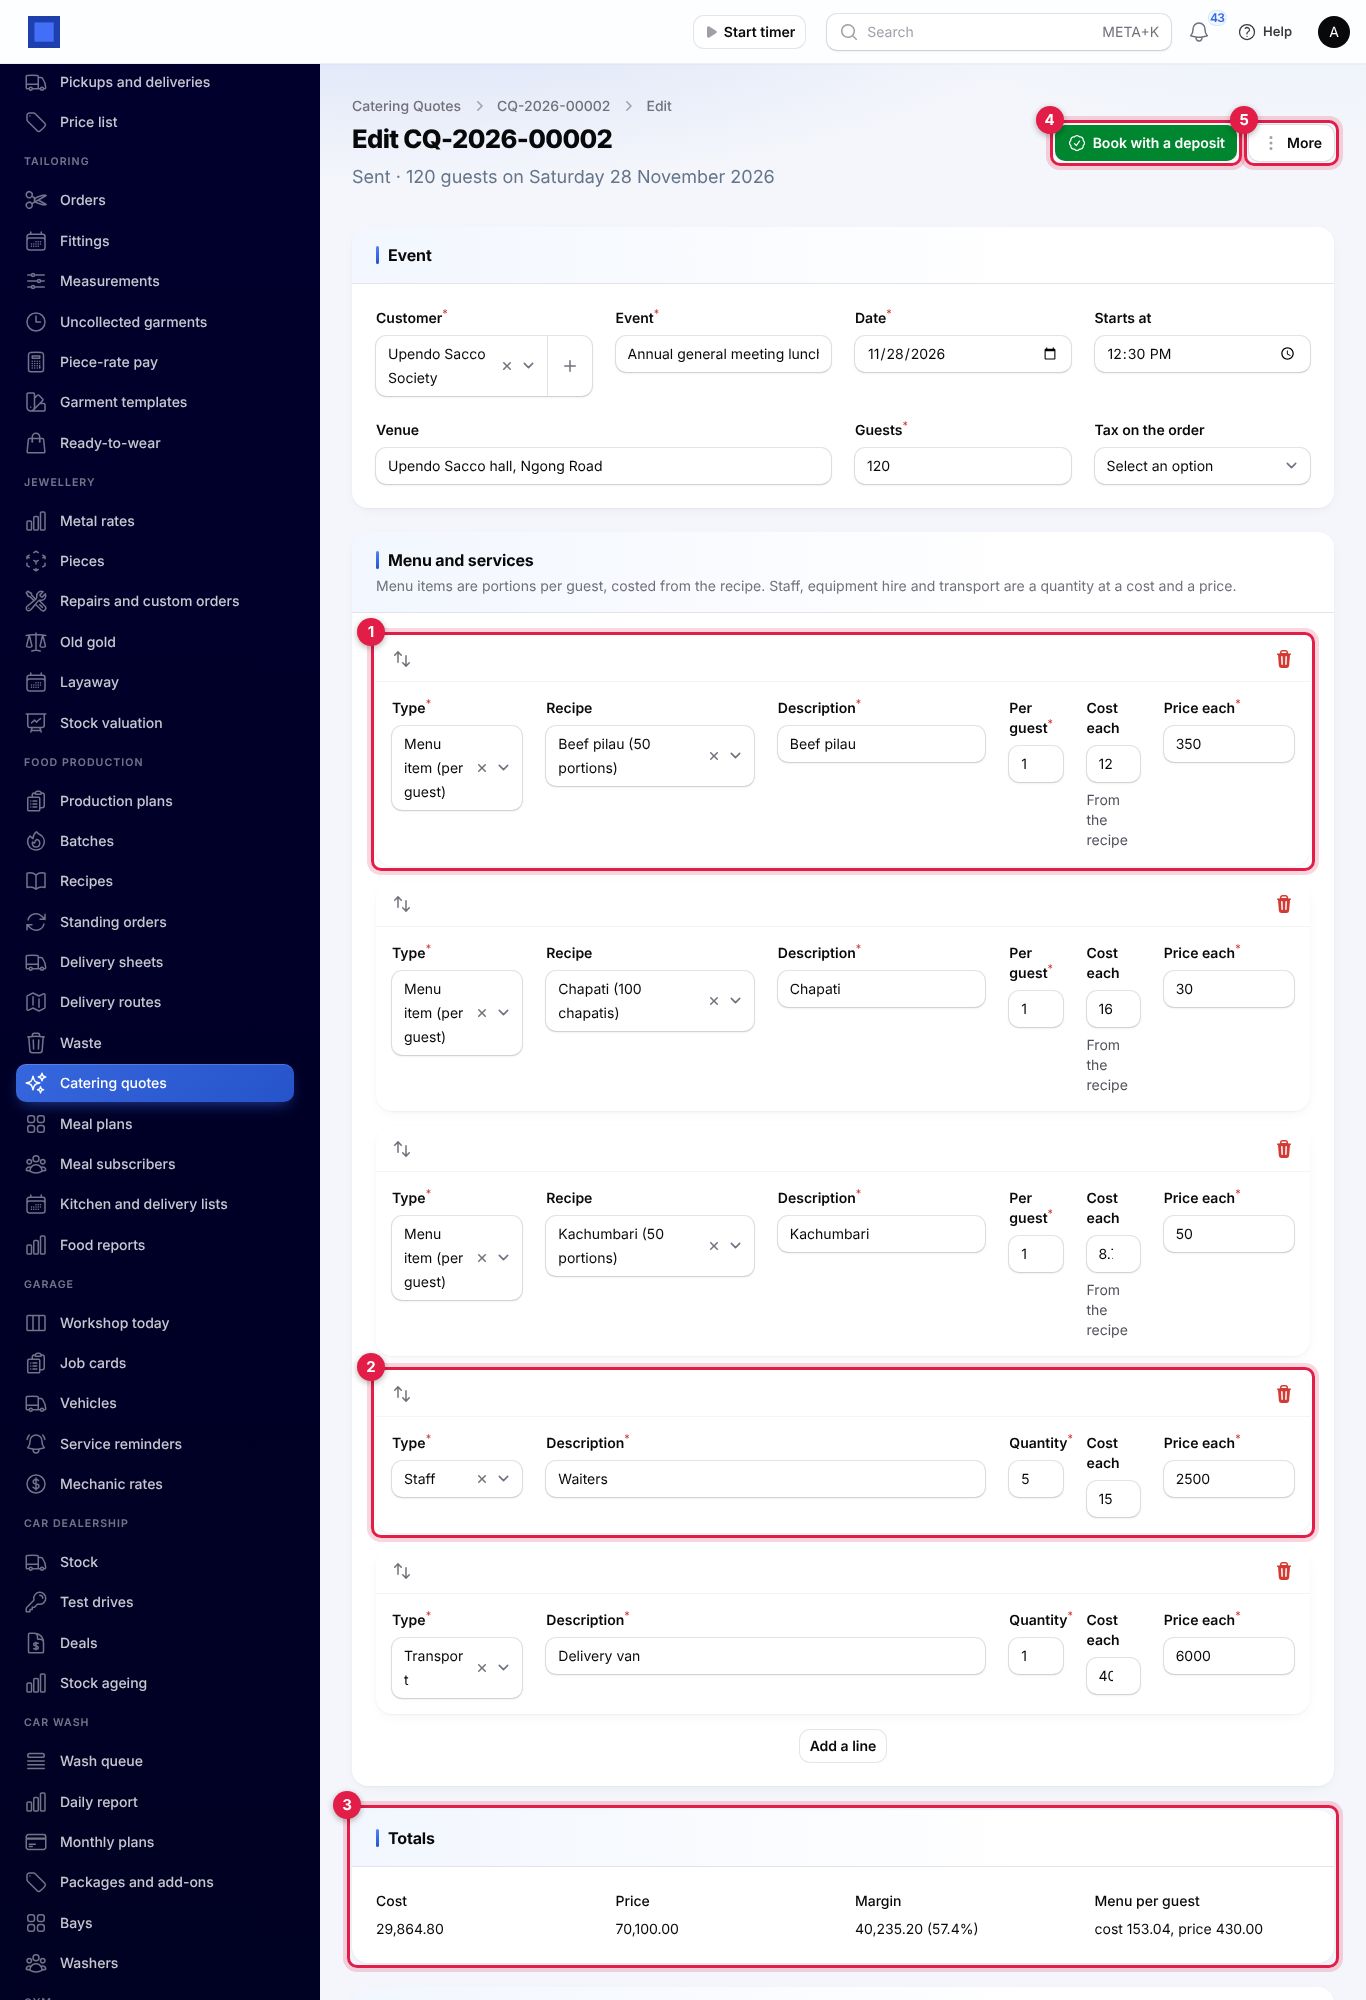
The quote shows a menu line (marker 1) and a service line (marker 2). Under Totals (marker 3) you see the Cost, the Price, the Margin with its percentage, and the Menu per guest cost and price. Each time you save, menu costs are taken again from the recipes, so the margin follows your ingredient prices.
Lower down are two lists for the day itself:
- Staff on the day: Assign someone with their Name, Role (Chef, waiter, driver), Phone and Arrives at.
- Packing and equipment checklist: Add to the checklist with the Type (Packing or Equipment), the Item, How many, and Loaded to tick it off.
Under More (marker 5): Mark as sent when you have sent it to the customer, Mark as lost if they went elsewhere, and Event sheet.
Book the event with a deposit
- Click Book with a deposit (marker 4).
- Check the Deposit (%) (the setting is suggested) and click Submit.
NaliSuite makes a confirmed sales order with every line of the quote (menu lines in portions, for example Beef pilau (1 per guest) × 250) due on the event date, and issues the deposit invoice for that share of it. You see Event booked; deposit invoice INV-2026-00140 issued for 145,750.00. Invoice the balance from the sales order when the event is done (see Quotations and orders).
Booking needs Invoicing, and at least one priced line. Once booked, the customer, guests and lines are fixed; the staff list and checklist can still change.
The event sheet
More → Event sheet opens a PDF for the kitchen and the team: each dish with its portions for the number of guests and the ingredients scaled to match, the packing and equipment checklist with tick boxes, the staff with their phones and arrival times, and your notes.
Meal plans and subscribers
Meal plans are for tiffin or lunch-box services: a box a day to an office or a home, paid monthly.
Set up a plan
- Open Food production → Meal plans and click New meal plan.
- Fill in the Name (Office veg lunch box), Meals a day, Price a month, the days it is Delivered on, its Diet tags (Vegetarian, Vegan, No pork, Halal, No beef, Gluten free, Dairy free, Low sugar, Jain), the Tax and a Description. Taking subscribers off stops new sign-ups.
- Under Menu, Add a dish for each: the Day (leave Every day for a dish in every box), the Meal (Lunch), the Dish and, if you like, its Recipe.
- Click Create.
Add subscribers
Open Food production → Meal subscribers and click New subscriber (marker 1).
| Field | What to enter |
|---|---|
| Customer, Meal plan (required) | Who, and which plan. |
| Boxes | How many boxes each delivery day. |
| Starts on (required), Ends on | Their dates. |
| Status | Active, or Cancelled when they stop. |
| Delivery address (required), Delivery slot | Delta Towers, 6th floor, Westlands, 12:30 to 13:00. |
| Route | The delivery route that takes their box. |
| Diet notes | No chilli, nut allergy. Printed for the kitchen and the driver. |
| Never on | Weekdays they never take, even when the plan runs (for example Friday). |
| Pauses and skipped days | Each pause From, Until and a Reason. |
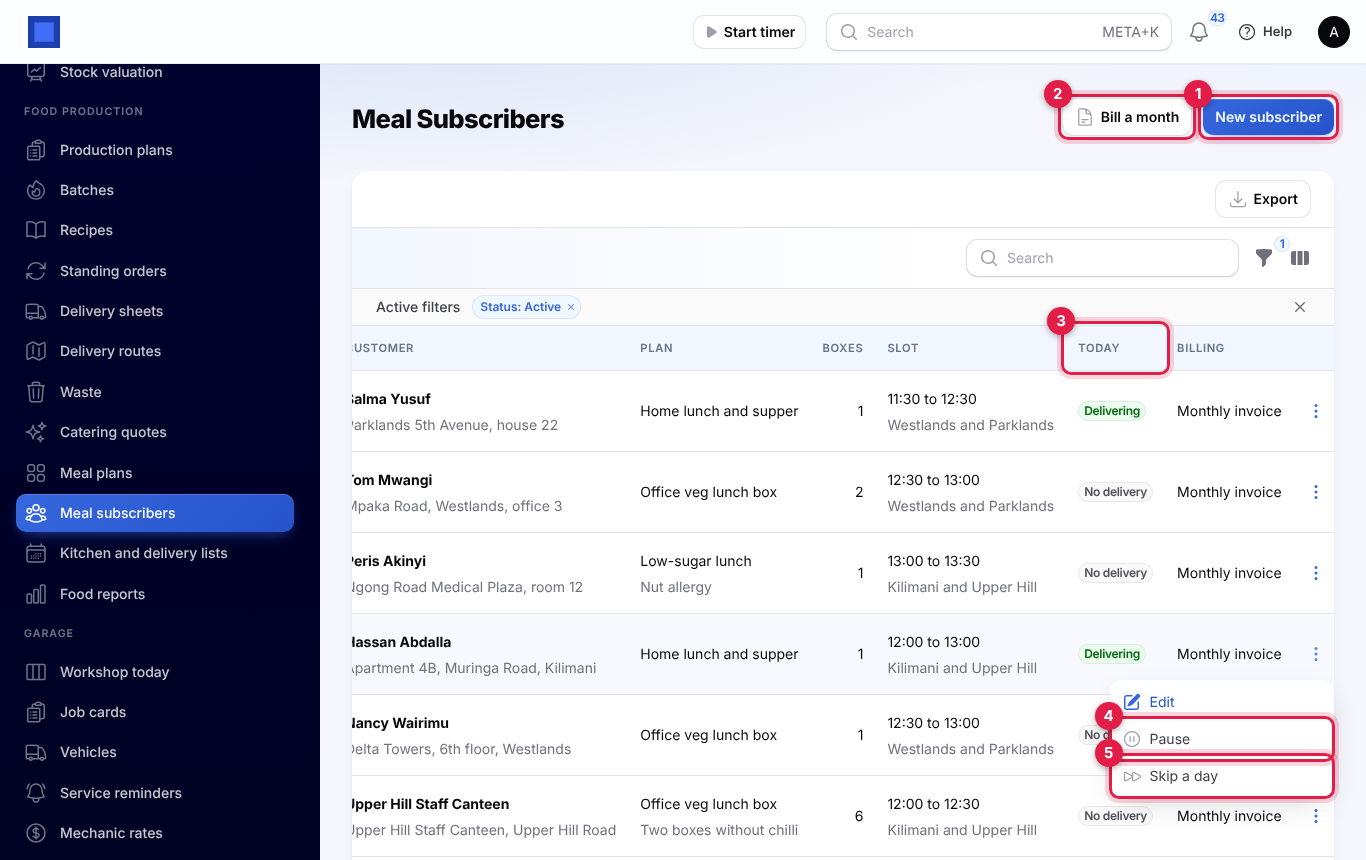
The Today column (marker 3) shows Delivering, Paused, No delivery or Cancelled. The Billing column shows Monthly invoice or Subscriptions. Only active subscribers are listed; change the Status filter to see the rest.
- ⋮ → Pause (marker 4): no boxes from From to Until, with a reason (Away on holiday).
- ⋮ → Skip a day (marker 5): no box on one Day (tomorrow is suggested).
- ⋮ → Bill through Subscriptions (only when the setting says so): see below.
Paused and skipped days are left off the kitchen lists and are not charged on a monthly invoice.
Kitchen and delivery lists
Open Food production → Kitchen and delivery lists. Choose the day with the date box, or Day before and Day after (marker 1). The line on the right shows how many boxes go out.
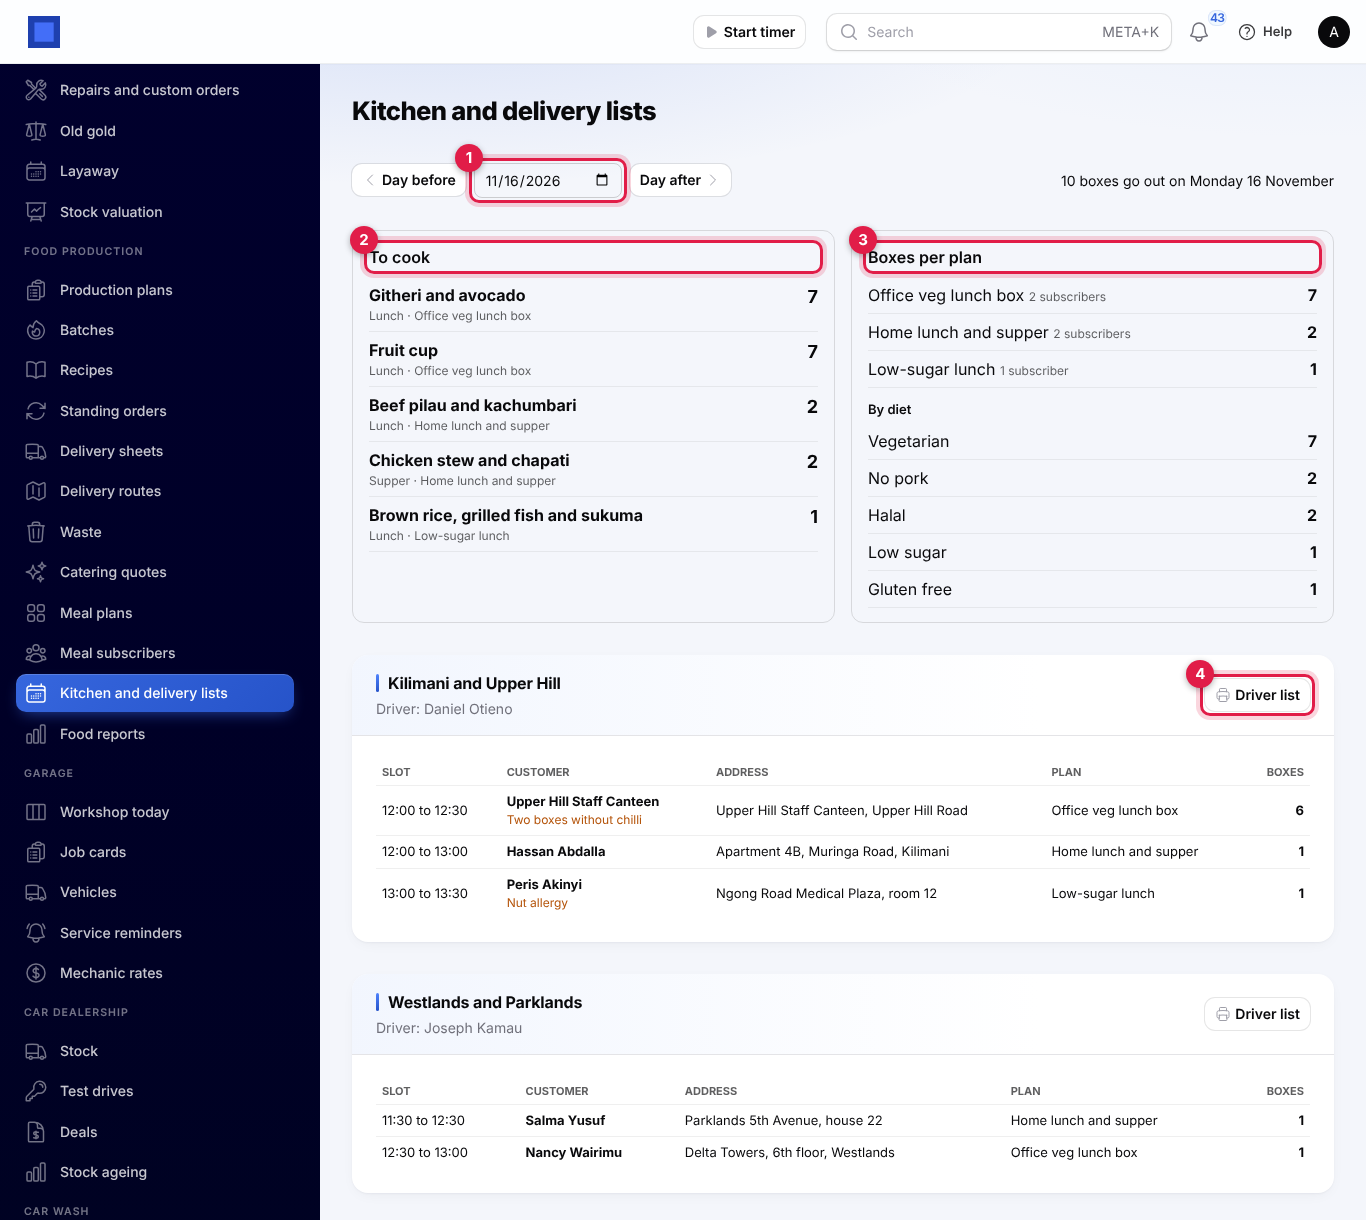
- To cook (marker 2): how many of each dish, by meal and plan. A plan with no dish that day shows as Office veg lunch box box times its meals a day.
- Boxes per plan (marker 3), and By diet underneath.
- One section per route, with the driver, and each stop in slot order: the slot, the customer with their diet notes in orange, the address, the plan and the boxes. Driver list (marker 4) prints that route's stops for the driver. Subscribers without a route are under No route.
Only active subscribers within their dates, on a day the plan runs, not on a Never on day and not paused, are counted.
Bill meal subscribers
With a monthly invoice (the default):
- On Meal subscribers, click Bill a month (marker 2 in the subscribers picture).
- Pick Any day in the month (last month is suggested) and click Submit.
Each subscriber who was served that month gets one issued invoice. The price is pro rata: the monthly price times the delivery days served, divided by the delivery days they would have had in the whole month, times their boxes. Delivery days are the plan's days less their Never on days; days before they started, after they ended, and paused or skipped days are not charged. The line reads, for example, Office veg lunch box, November 2026 (15 of 21 delivery days), and the invoice notes the paused days. You see 4 invoices raised for November 2026.
Subscribers already billed for that month, and those billed through Subscriptions, are left out, so running it twice is safe. Billing needs Invoicing.
Through Subscriptions: set Bill meal subscribers to Through Subscriptions, the full monthly price, then click ⋮ → Bill through Subscriptions on each subscriber. A monthly subscription at the plan's full price starts from their start date, and Subscriptions sends the invoices from then on. Pauses are not taken off.
Food reports
Open Food production → Food reports and choose From and To (marker 1). The month so far is shown first.
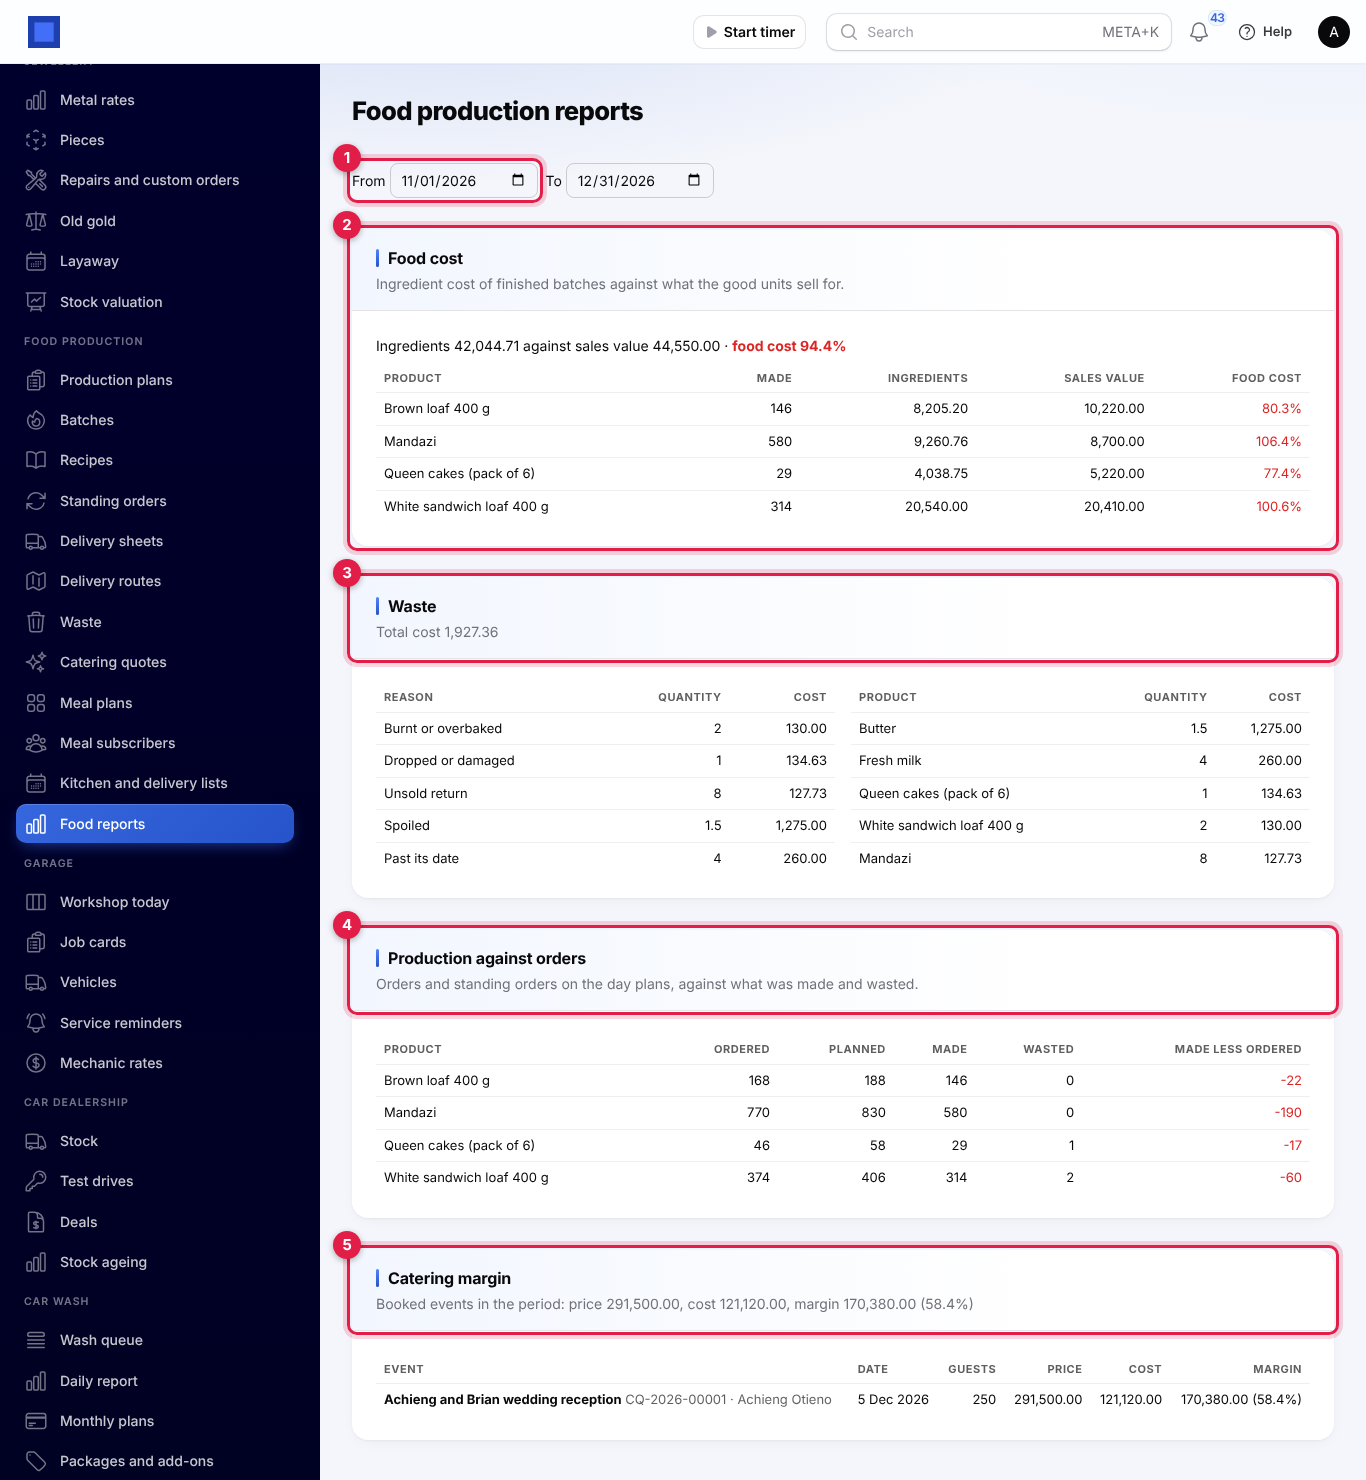
- Food cost (marker 2): for each product made in finished batches, the units Made, the Ingredients cost, the Sales value (good units at the selling price) and the Food cost percentage, red above your target.
- Waste (marker 3): the cost by reason and by product, and the total.
- Production against orders (marker 4): for each product, what customers Ordered (orders and standing orders on the day plans), what was Planned (with shop top-ups), Made and Wasted, and Made less ordered, red when you made less than was ordered. Plans for days not yet baked show as short.
- Catering margin (marker 5): booked events in the period, with their price, cost and margin.
Food cost and production show only with Bakery and production on; catering margin only with Catering on.
Good to know
What does a recipe cost me? Ingredient quantities times their average stock cost (or cost price when none is in stock). Change your supplier prices and the recipe cost, quote costs and the day's batches follow. A finished batch keeps the cost it was made at.
Can I make a batch without a plan? Yes, with New batch on Batches. It is not counted in Production against orders.
Why was my batch refused? An ingredient kept in stock ran short. Receive it in Inventory and finish the batch again.
What if the van comes back with bread past its date? Record the return as Write off as waste, no credit, or credit it and then throw it out with Record waste.
Do standing orders create sales orders? No. They go straight onto the day plan and the delivery sheets, and the customer is invoiced when the van is sent out.
Can I change a booked catering quote? Only its staff, checklist and notes. Change quantities on the sales order instead.
Meal plan prices with VAT? Choose the Tax on the plan; it is added to the monthly invoice or subscription line.