Quotations and orders
A quotation is a priced offer you send a customer. When they say yes you confirm it, and it becomes a sales order with its own number, ready to deliver and invoice. Quotations and orders are the same record at different stages, so nothing is typed twice. Salespeople and sales managers use these screens; they are under Sales → Quotations & Orders, with Sales analysis next to them and the commission rates under Settings → Commissions.
What you need before you start
| You want to | Permission needed |
|---|---|
| See quotations and orders, and the sales analysis | sales.view |
| Create and edit quotations, send them, apply promotion codes, cancel | sales.manage |
| Confirm a quotation into an order | sales.confirm |
| Create an invoice from an order | invoicing.manage (and the Invoicing app) |
| Set commission rates | sales.manage |
| Export the list | sales.export |
The role's Can see setting applies: a salesperson limited to their own records sees only quotations where they are the Salesperson (or their teammates' with "team" visibility).
How a quotation moves through its life
| Status | Meaning | What moves it on |
|---|---|---|
| draft | Being prepared. It already has a quotation number such as QT-2026-00012. | Mark as sent, or Send by email (which marks it sent). |
| sent | The customer has it. | Confirm order (by you), or the customer clicking Accept in the portal (which confirms it only if the portal preference says so). |
| confirmed | It is now a sales order with an order number such as SO-2026-00004. | Mark delivered, Create invoice; or Cancel. |
| cancelled | Dropped. | Reopen puts it back to draft. |
A quotation can be confirmed straight from draft too; sending is optional. The list's Accepted column shows when a customer accepted online.
Find your way around the list
- In the menu, open Sales → Quotations & Orders.
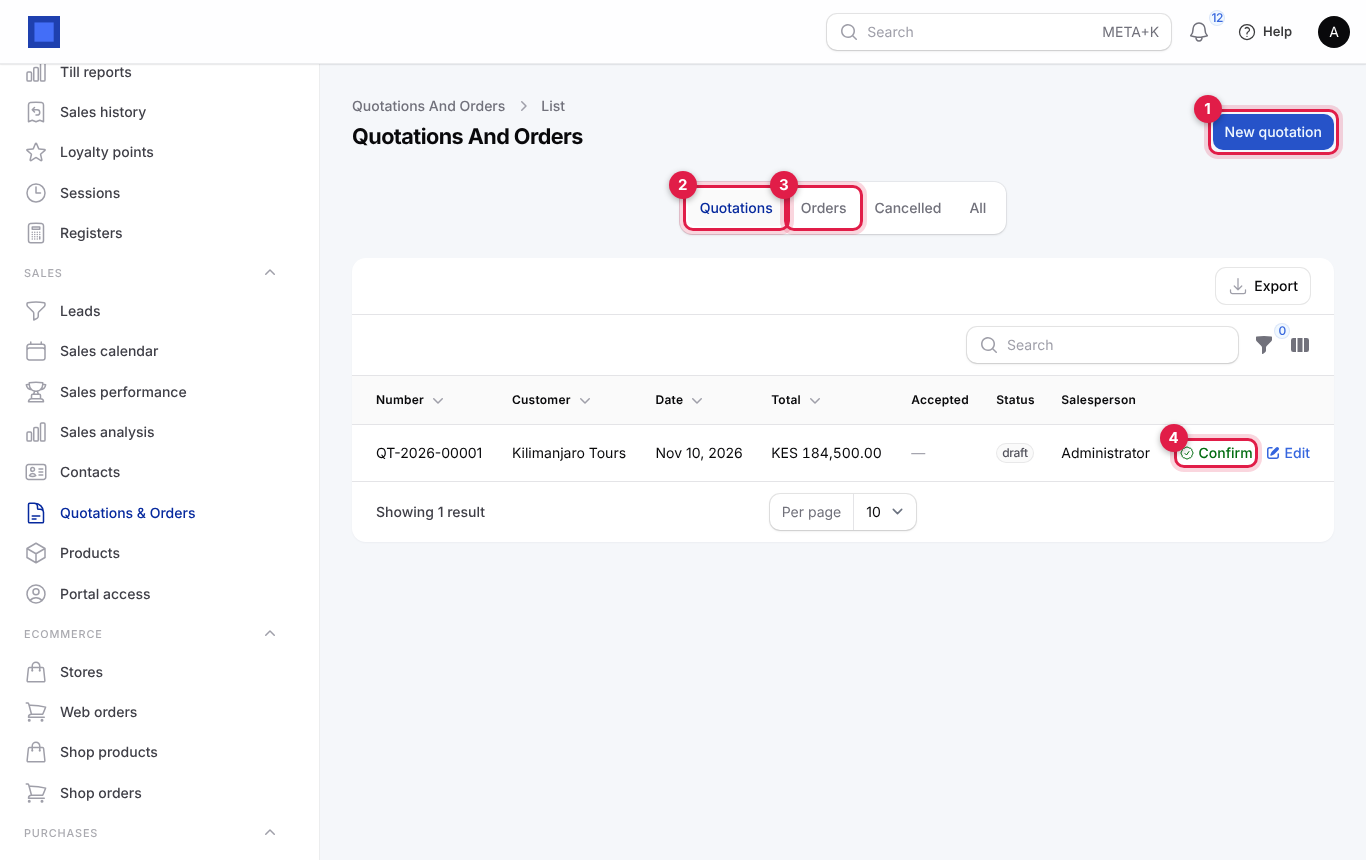
| Item | What it does |
|---|---|
| New quotation (marker 1) | Opens a new quotation. |
| Quotations tab (marker 2) | Drafts and sent quotations. This is where the list opens. |
| Orders tab (marker 3) | Confirmed sales orders. |
| Cancelled, All tabs | Cancelled ones, or everything. |
| Confirm (marker 4) | Confirms a draft or sent quotation into an order without opening it. Needs sales.confirm. |
| Edit | Opens the quotation or order. |
| Export | Downloads the list as a spreadsheet. |
| Filter | Status (Draft, Sent, Confirmed, Cancelled) and Customer. |
Columns: Number (the order number once confirmed, otherwise the quotation number), Customer, Date, Total, Accepted, Status, Salesperson, and the hidden Valid until.
Create a quotation
- Open Sales → Quotations & Orders and click New quotation. (From a lead, Create quotation opens the same form with the customer filled in. See Contacts and CRM.)
- Pick the Customer (marker 1). If they are new, click + next to the field to add them without leaving the form. Their currency, payment terms and price list fill in.
- Check Valid until (marker 2). Leave it empty to use the default validity (30 days unless changed in Preferences → Sales).
- Check the Price list (marker 3) and how the order will be invoiced in Invoice (marker 4).
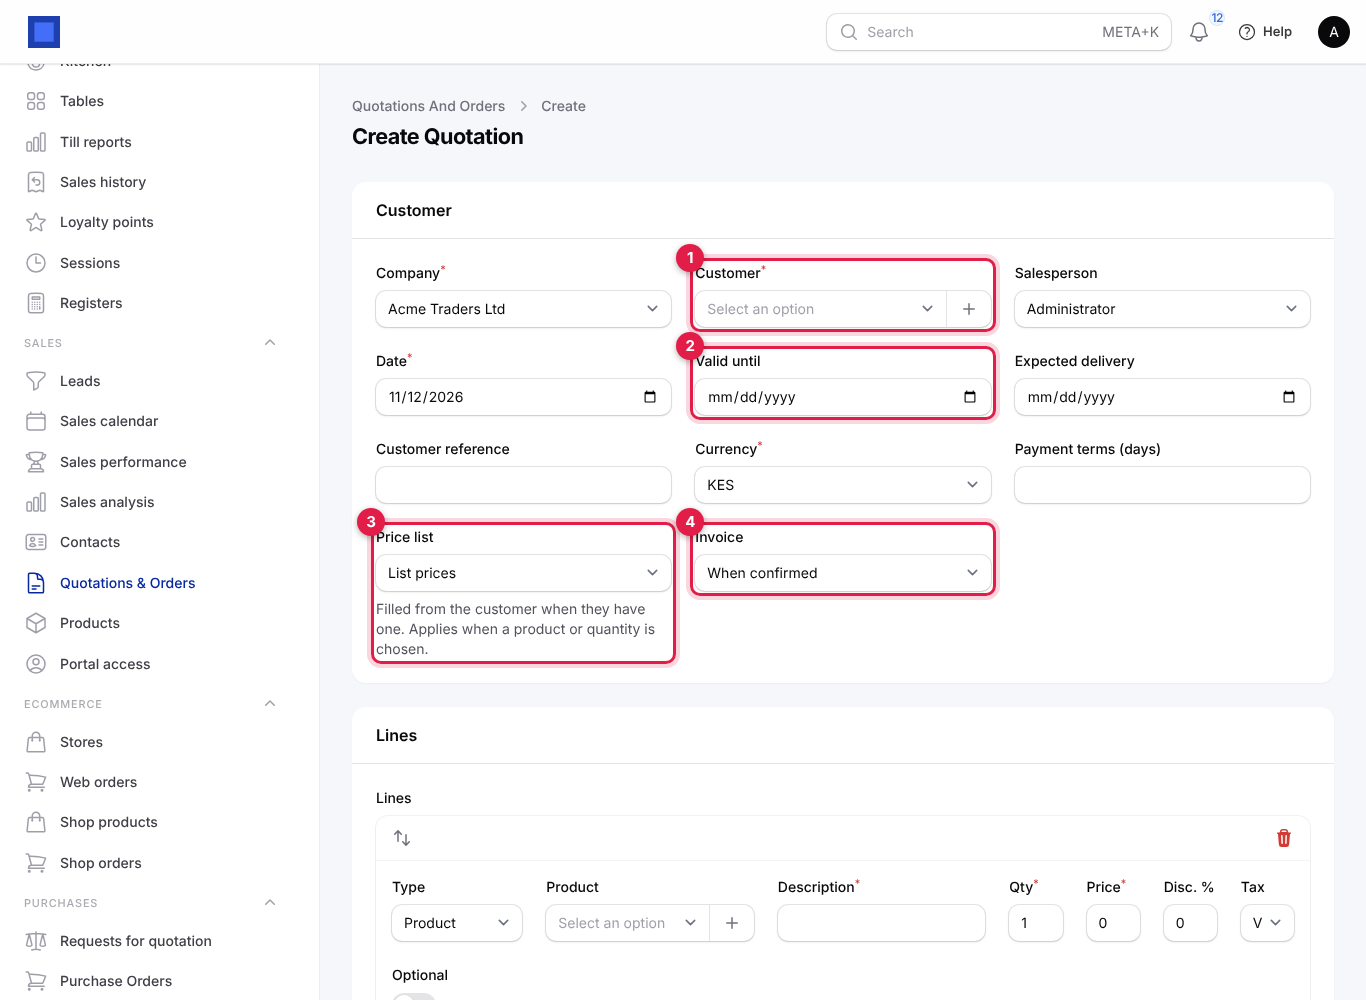
Every field at the top of the quotation
| Field | What to enter |
|---|---|
| Company (required) | Your company making the offer. Locked once the order is confirmed. Changing it sets the company currency. |
| Customer (required) | Only contacts marked as customers of this company are offered. + adds a new one. |
| Salesperson | Who gets the credit and commission. Defaults to you. |
| Date (required) | The quotation date; defaults to today. Numbers are taken from the sequence of this date's year. |
| Valid until | The last day the customer can accept. After it, the portal refuses acceptance ("This quotation has expired"). |
| Expected delivery | When you plan to deliver. Shown to the customer. |
| Customer reference | Their LPO or order number, printed on the quotation and copied to the invoice. |
| Currency (required) | From the customer, or the company currency. |
| Payment terms (days) | From the customer, else Preferences → Invoicing → Default payment terms (days). Becomes the invoice's due date. |
| Price list | Filled from the customer when they have one; List prices means product sale prices. It applies when you pick a product or change a quantity on a line. See Products and pricing. |
| Invoice | The invoicing policy for this order: When confirmed, When marked delivered, or By hand, in parts or at milestones. Defaults from Preferences → Sales. See Choose how orders are invoiced. |
Add the lines
Each line has a Type (marker 1): Product for something you charge, Section for a heading that groups the lines below it (for example "Hardware", "Installation"), or Note for a line of text such as delivery conditions. Sections and notes have only a description and do not affect the total.
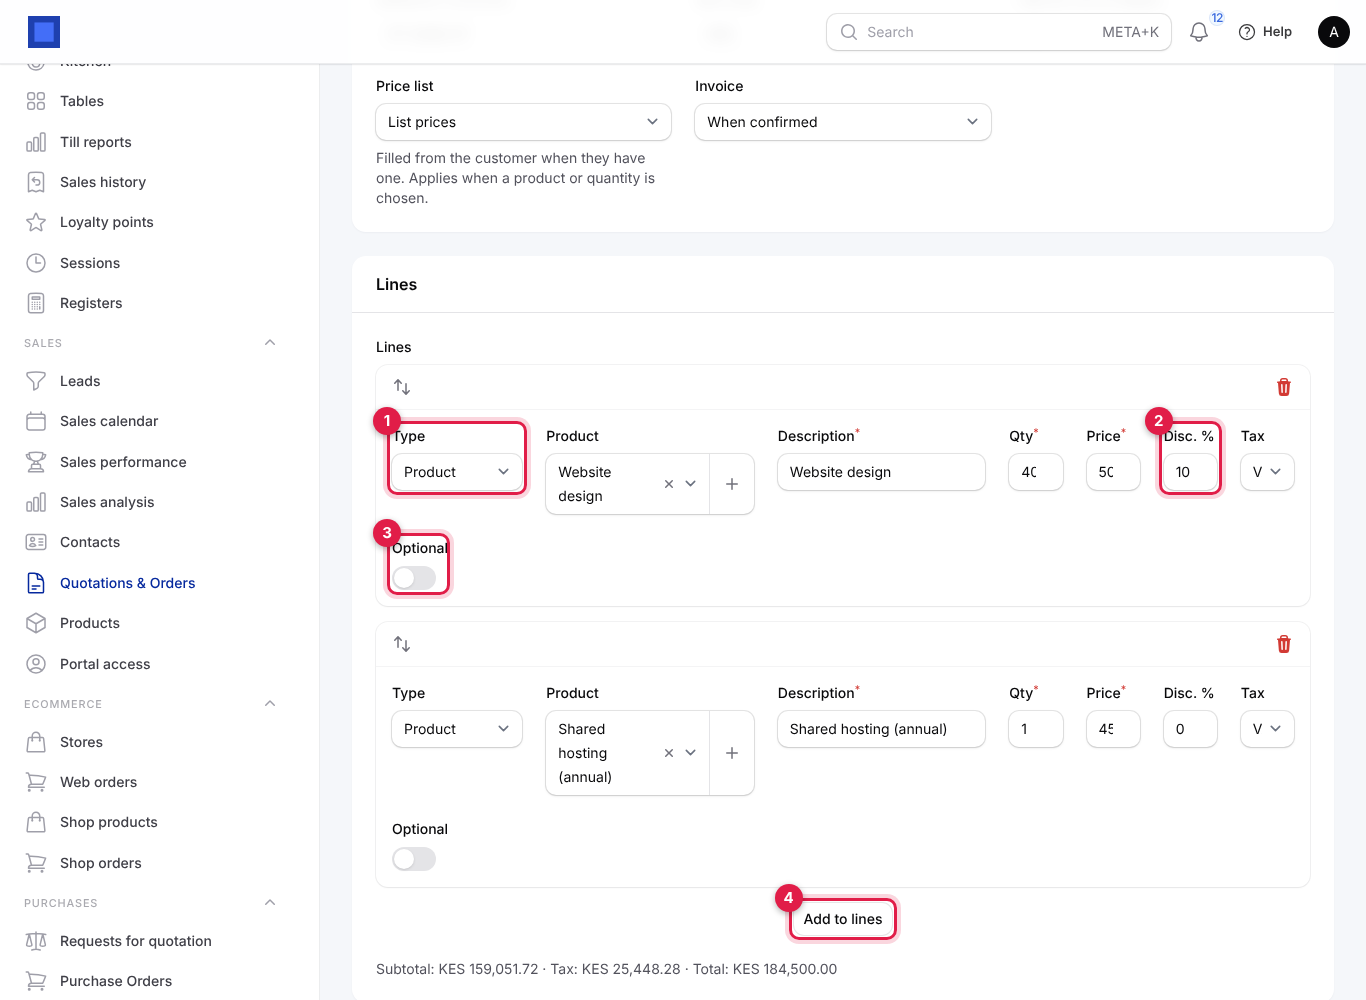
- On the first line, keep Type as Product and pick the Product. Its name, price, tax and unit fill in, with the price list applied.
- Change the Description, Qty, Price, Disc. % (marker 2) or Tax if needed.
- Switch on Optional (marker 3) for extras the customer may choose, for example an extended warranty. A Taken switch appears: optional lines count in the total only when Taken is on. In the portal the customer ticks the optional extras they want when accepting.
- Click Add to lines (marker 4) for the next line. Drag the arrows to reorder lines and click the bin to remove one.
To add a heading, click Add to lines and change the new line's Type to Section (marker 1). The line becomes one wide Description (marker 2).
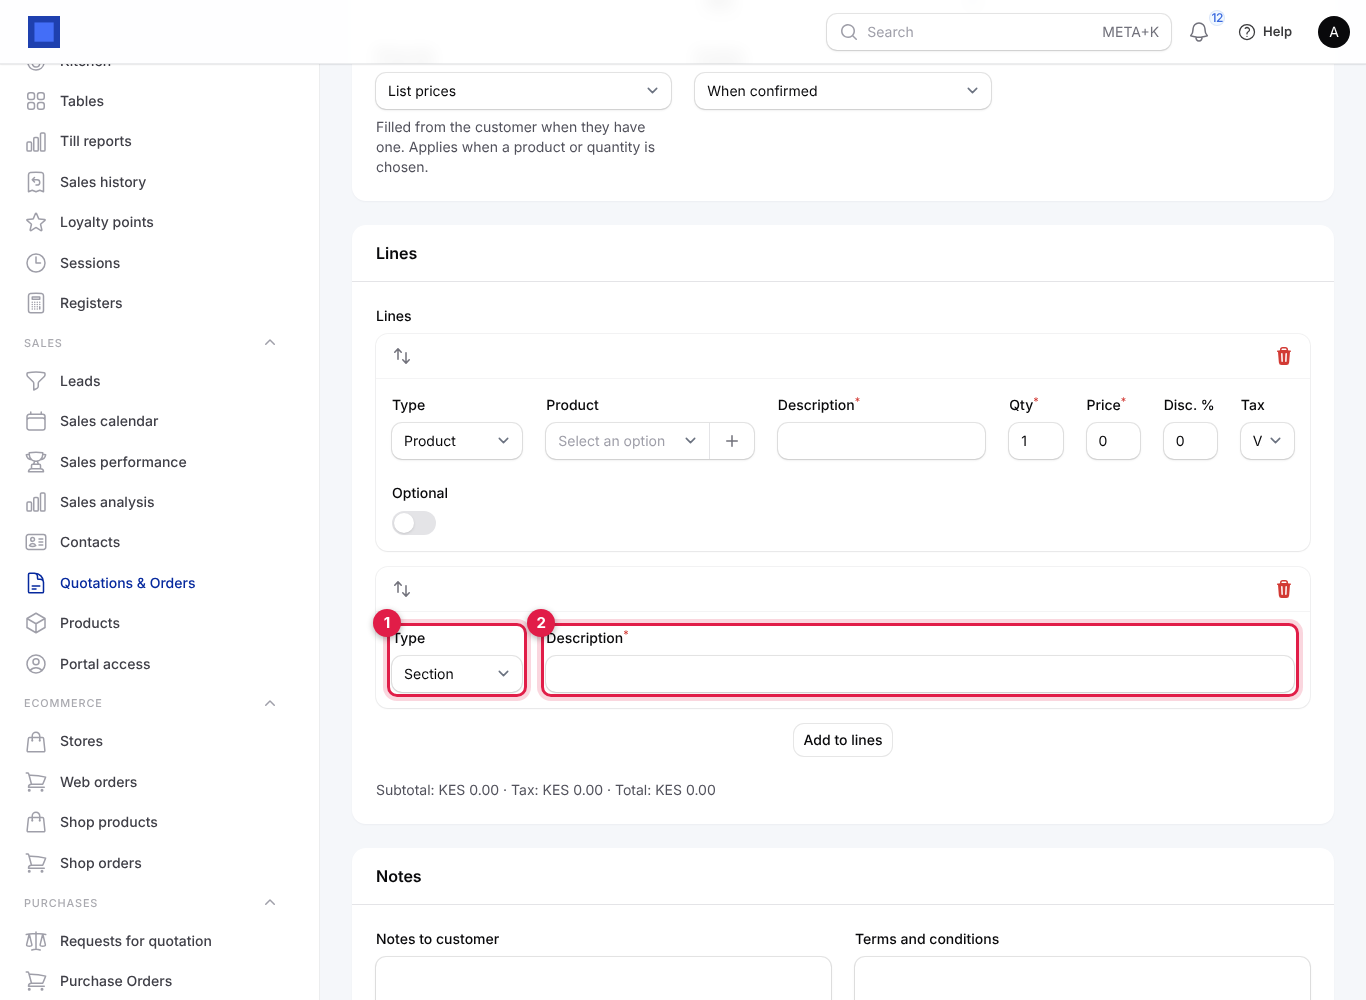
| Line field | What to enter |
|---|---|
| Type | Product, Section or Note. |
| Product | The item sold. + creates a missing product. Optional: you can type a free description with a price for one-off items. |
| Description (required) | Printed on the quotation. |
| Qty (required) | Quantity. Changing it re-applies quantity breaks from the price list. |
| Price (required) | Unit price. Includes tax when Preferences → Invoicing → Prices include tax is on. |
| Disc. % | Discount on this line, 0 to 100. Filled by the price list when it gives a percentage. |
| Tax | The sales tax for the line. |
| Optional / Taken | See step 3. |
Below the lines, a line of text shows the live Subtotal, Tax and Total (marker 1). When other customers often buy certain products together with the ones on your quotation, a grey "Often bought together" hint lists them so you can upsell.
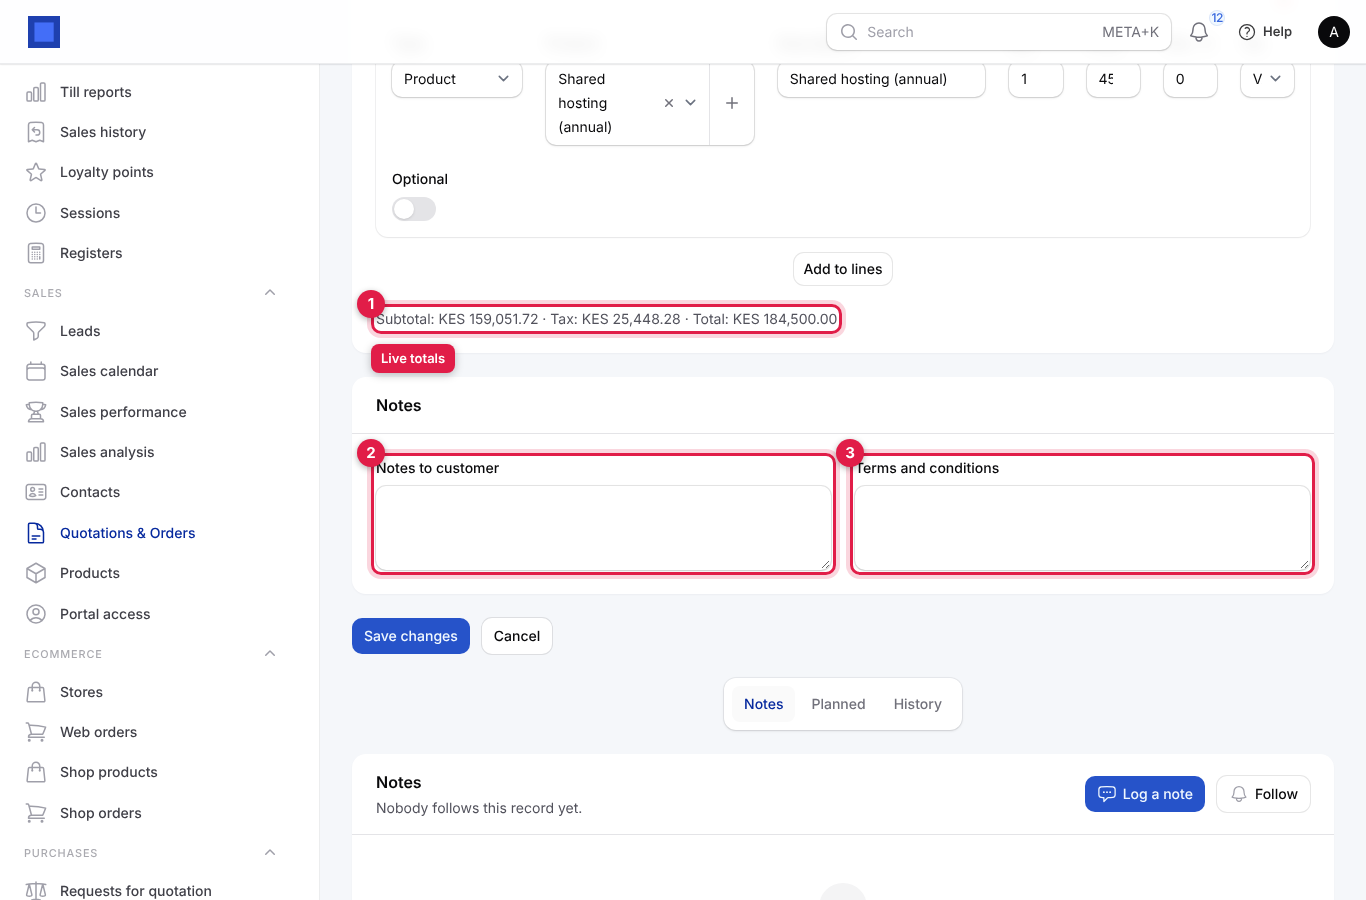
- Under Notes, type Notes to customer (marker 2), printed above the totals, and Terms and conditions (marker 3). Terms are filled from Preferences → Sales → Default terms and conditions when you leave them empty.
- Click Create. The quotation gets its number and you stay on it.
Common mistake: choosing the price list after adding lines. The list applies when a product or quantity is chosen, so pick the price list first, or re-pick the products.
Send, print and follow up
Open the quotation. The header holds every action:
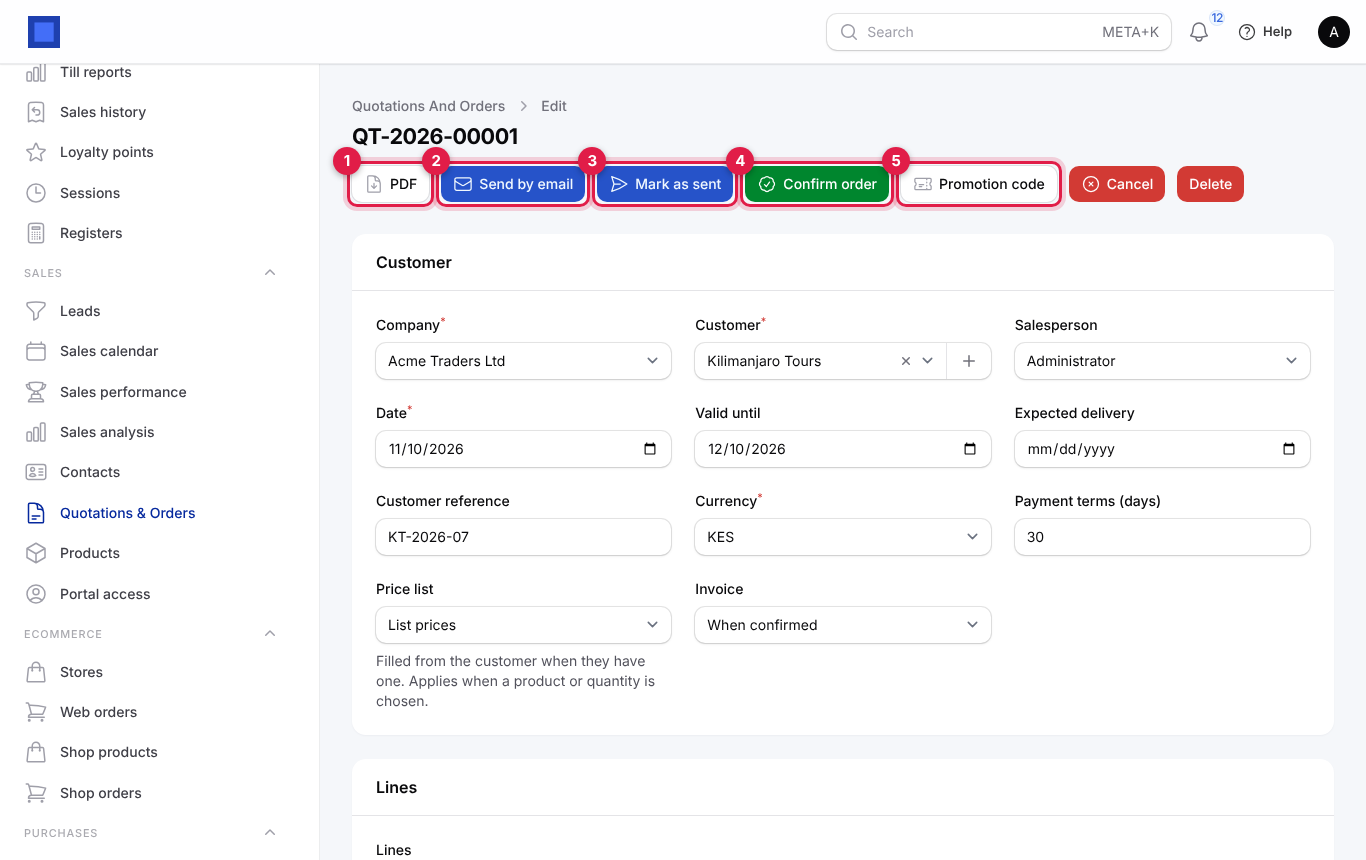
| Action | When it shows | What it does |
|---|---|---|
| PDF (marker 1) | Always | Downloads the quotation (or order confirmation) as a PDF with your logo, bank details and terms. |
| Send by email (marker 2) | Not cancelled | Emails it with the PDF attached. A draft becomes sent. |
| Mark as sent (marker 3) | Draft | Records that you sent it another way (printed, WhatsApp, hand delivery). |
| Confirm order (marker 4) | Draft or sent, with sales.confirm |
Turns it into an order. See below. |
| Promotion code (marker 5) | Draft or sent | Applies or removes a discount code. Shows Code: LAUNCH10 once one is applied. |
| Cancel | Not cancelled | Cancels it after you confirm. |
| Reopen | Cancelled | Back to draft. |
| Delete | Draft only | Deletes it for good. |
Email a quotation
- Click Send by email.
- Check To (marker 1). It is the customer's email.
- Add copies in Cc (marker 2): type an address and press Enter.
- Edit the Subject and Message (marker 3). The message says what is attached, the amount and the validity date.
- Click Submit. "Email queued to …" confirms it.
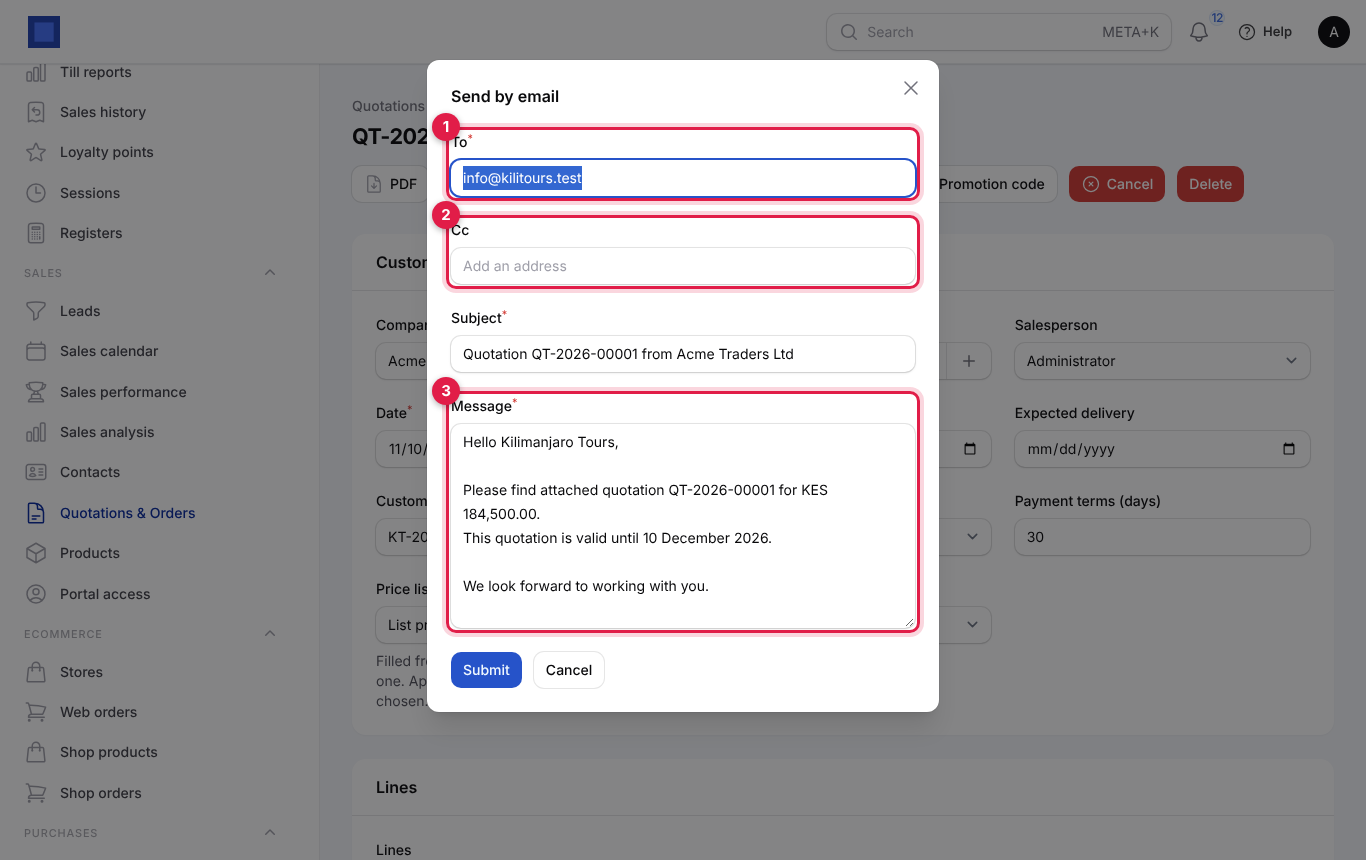
The email goes out from your workspace (or your own mail server, see Preferences → Email) with the PDF attached; replies go to the reply-to address in Preferences → Email.
Apply a promotion code
- Click Promotion code.
- Type the Code (marker 1) and click Submit. "Code applied: KES 1,500.00 off" confirms it, and the total drops.
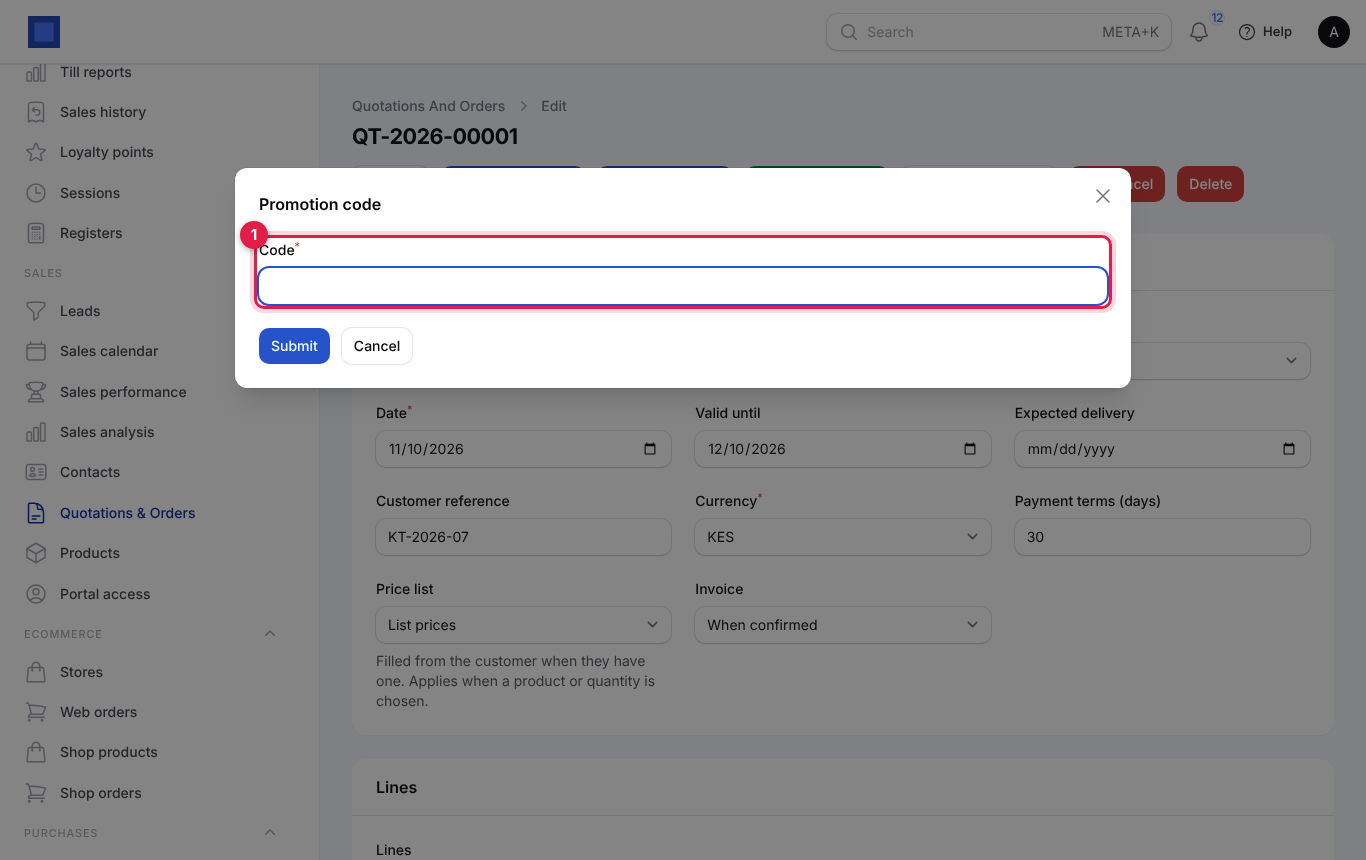
To take it off, open Promotion code again and click Remove code. A code is refused when it is unknown, not active, outside its dates, used up, or the order is below its minimum. Codes are set up under Settings → Promotions (Products and pricing); the use is counted when the order is confirmed.
Confirm a quotation into a sales order
- Open the quotation and click Confirm order (or Confirm in the list).
- Click Confirm (marker 1) in the window.
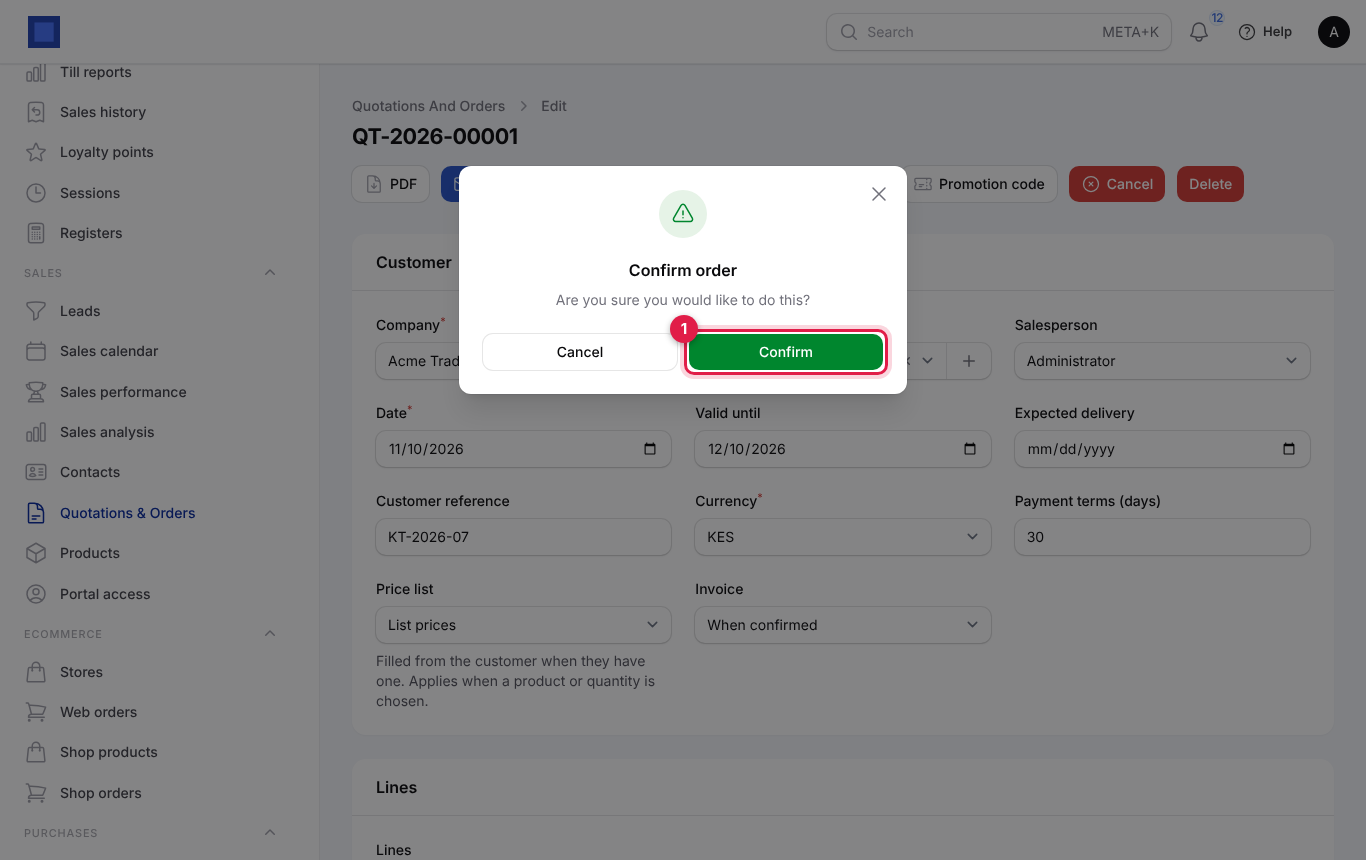
What happens:
- The quotation becomes a confirmed sales order and gets an order number (SO-…). The quotation number is kept on it.
- Totals are recalculated, and the promotion code use is counted.
- If the customer has a credit limit, the credit check runs: with "Warn" you see a yellow "Over the credit limit" message; with "Block" confirming is refused. See Contacts and CRM.
- If the invoicing policy is When confirmed and Preferences → Invoices → Create a draft invoice when a sales order is confirmed is on, a draft invoice is created for the whole order.
- Products set to Dropship raise purchase orders to their preferred vendor (with Purchases on). See Purchases and bills.
- Commissions on the The order is confirmed basis count it for the salesperson.
- Webhooks subscribed to "order.confirmed" are called.
"An order needs at least one line before it can be confirmed" means the quotation is empty.
Deliver and invoice an order
Open the order. Once confirmed, the header changes:
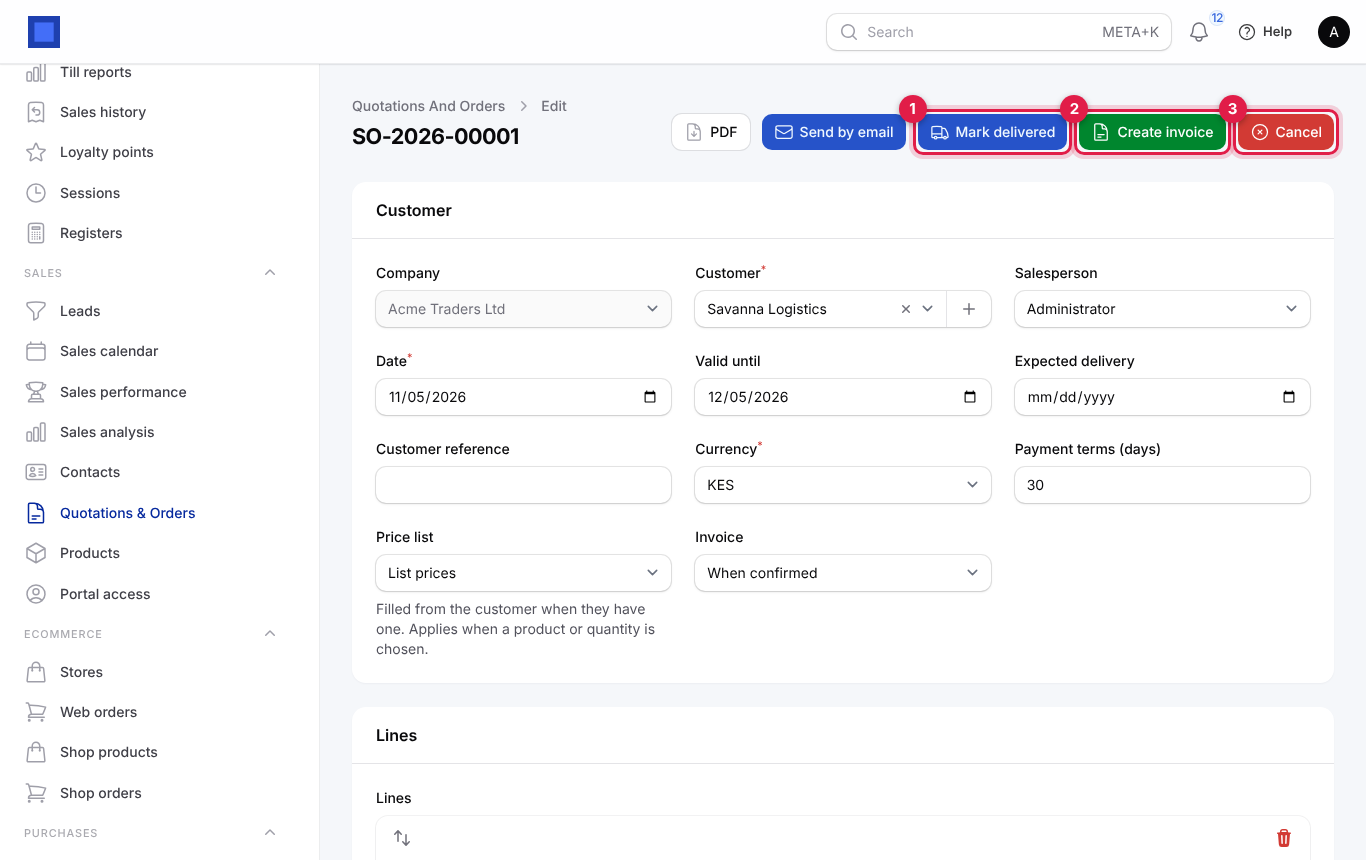
| Action | What it does |
|---|---|
| Mark delivered (marker 1) | Records the delivery date. When the order's policy is When marked delivered, a draft invoice is created for it. Online-store orders are marked fulfilled in the store. |
| Create invoice (marker 2) | Makes a draft invoice for all or part of the order. Shown while less than 100% is invoiced, with Invoicing on and invoicing.manage. |
| Cancel (marker 3) | Cancels the order. Invoices already made are not touched; cancel or credit them separately. |
To invoice a deposit or a milestone:
- Click Create invoice.
- In Share of the order to invoice (%) (marker 1), type the percentage, for example 50 for a 50% deposit. The default is whatever is left; the note under it says how much is already invoiced.
- Click Submit. "Draft invoice created" appears with an Open button.
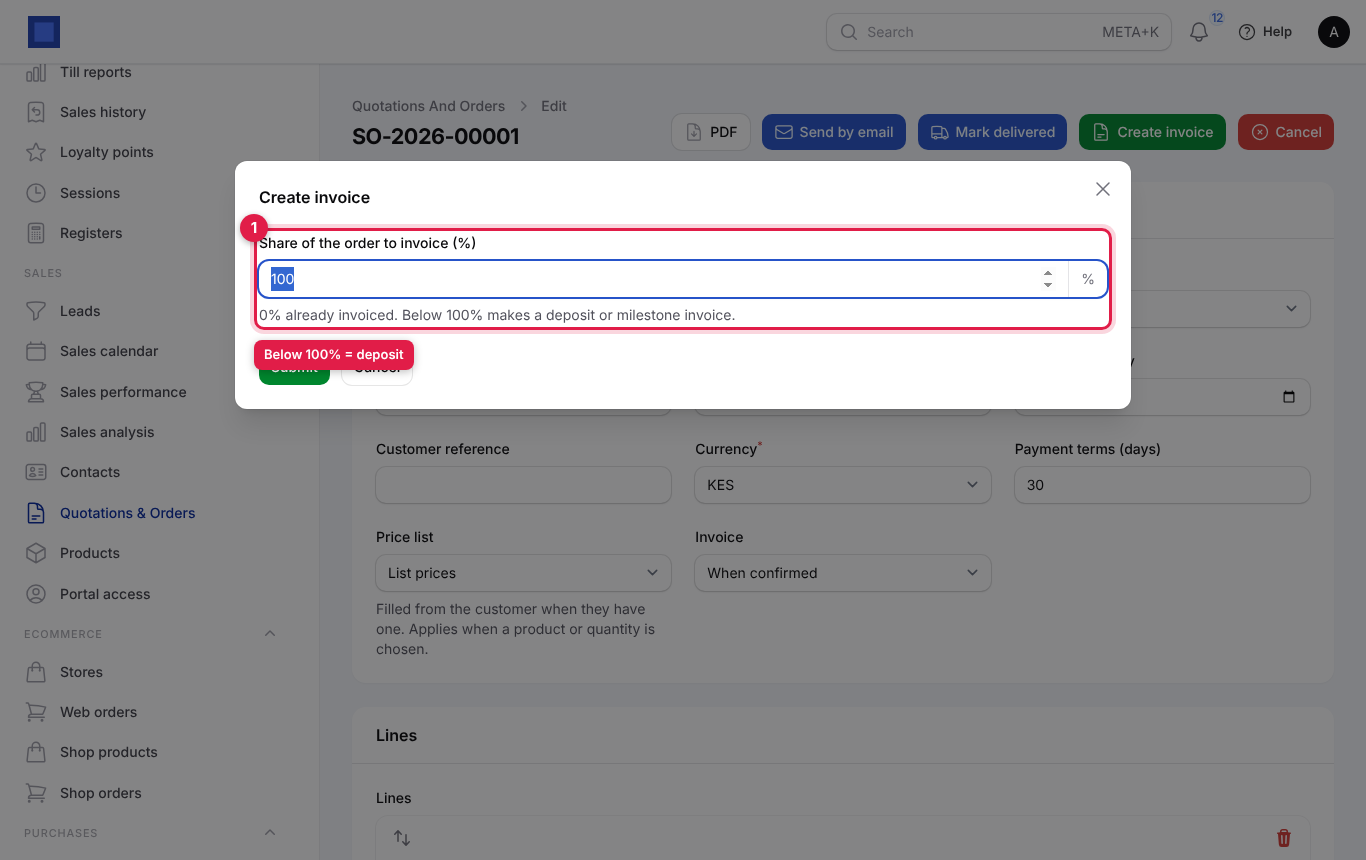
Open the draft, check it, and Issue it. See Invoices and payments. Repeat for the next milestone until 100% is invoiced; the button then disappears.
When Inventory is on, stock leaves the warehouse when the invoice for goods is issued, and the delivery note is printed from the invoice. See Inventory.
Choose how orders are invoiced
| Policy | When the invoice is created | Good for |
|---|---|---|
| When confirmed | A draft invoice for the whole order when it is confirmed, if Preferences → Invoices → Create a draft invoice when a sales order is confirmed is on. Otherwise use Create invoice. | Services, pay-before-delivery, simple sales. |
| When marked delivered | A draft invoice when you click Mark delivered. | Goods delivered later. |
| By hand, in parts or at milestones | Only when you click Create invoice, for the percentage you choose. | Deposits, projects, staged payments. |
Set the default in Settings → Preferences → Sales → Invoice orders; each quotation can choose differently in its Invoice field.
What the customer sees in the portal
Customers with portal access see every quotation that has a number under Quotations, with PDF (marker 1) and Accept (marker 2) while it is awaiting their decision and still valid.
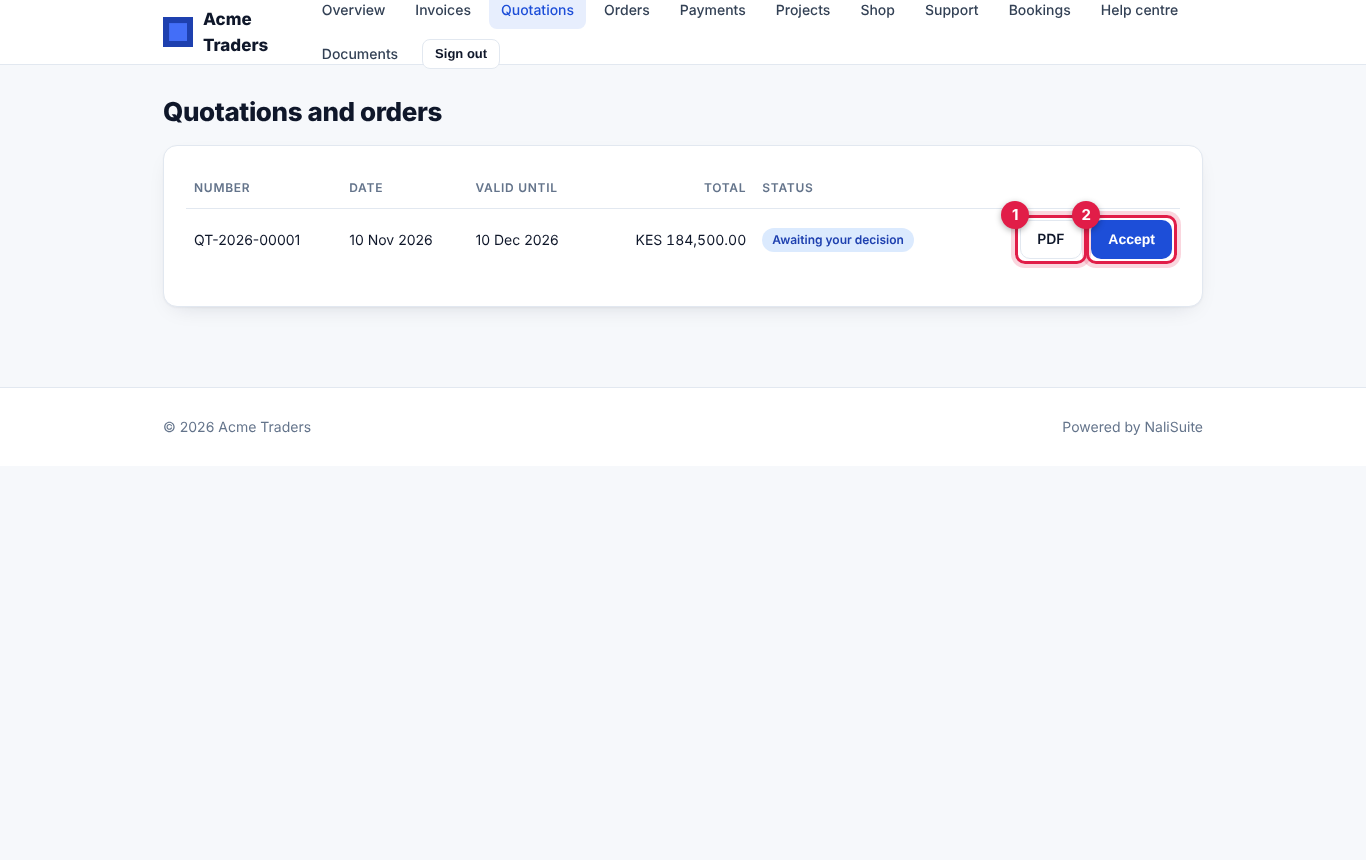
When the customer accepts:
- If the quotation has optional lines, they tick the Optional extras they want first; the total is recalculated from their choice.
- The quotation records who accepted it and when (the Accepted column in your list).
- Your team gets a "Quotation … accepted by …" notification (Customer portal activity).
- If Preferences → Customer portal → Confirm a quotation as an order when the customer accepts it online is on, it is confirmed straight away, with everything described under Confirm a quotation into a sales order. Otherwise confirm it yourself.
Confirmed orders show under Orders in the portal with what is delivered and invoiced, and pay buttons for their invoices.
Read the sales analysis
Sales → Sales analysis shows what was sold, by whom and to whom.
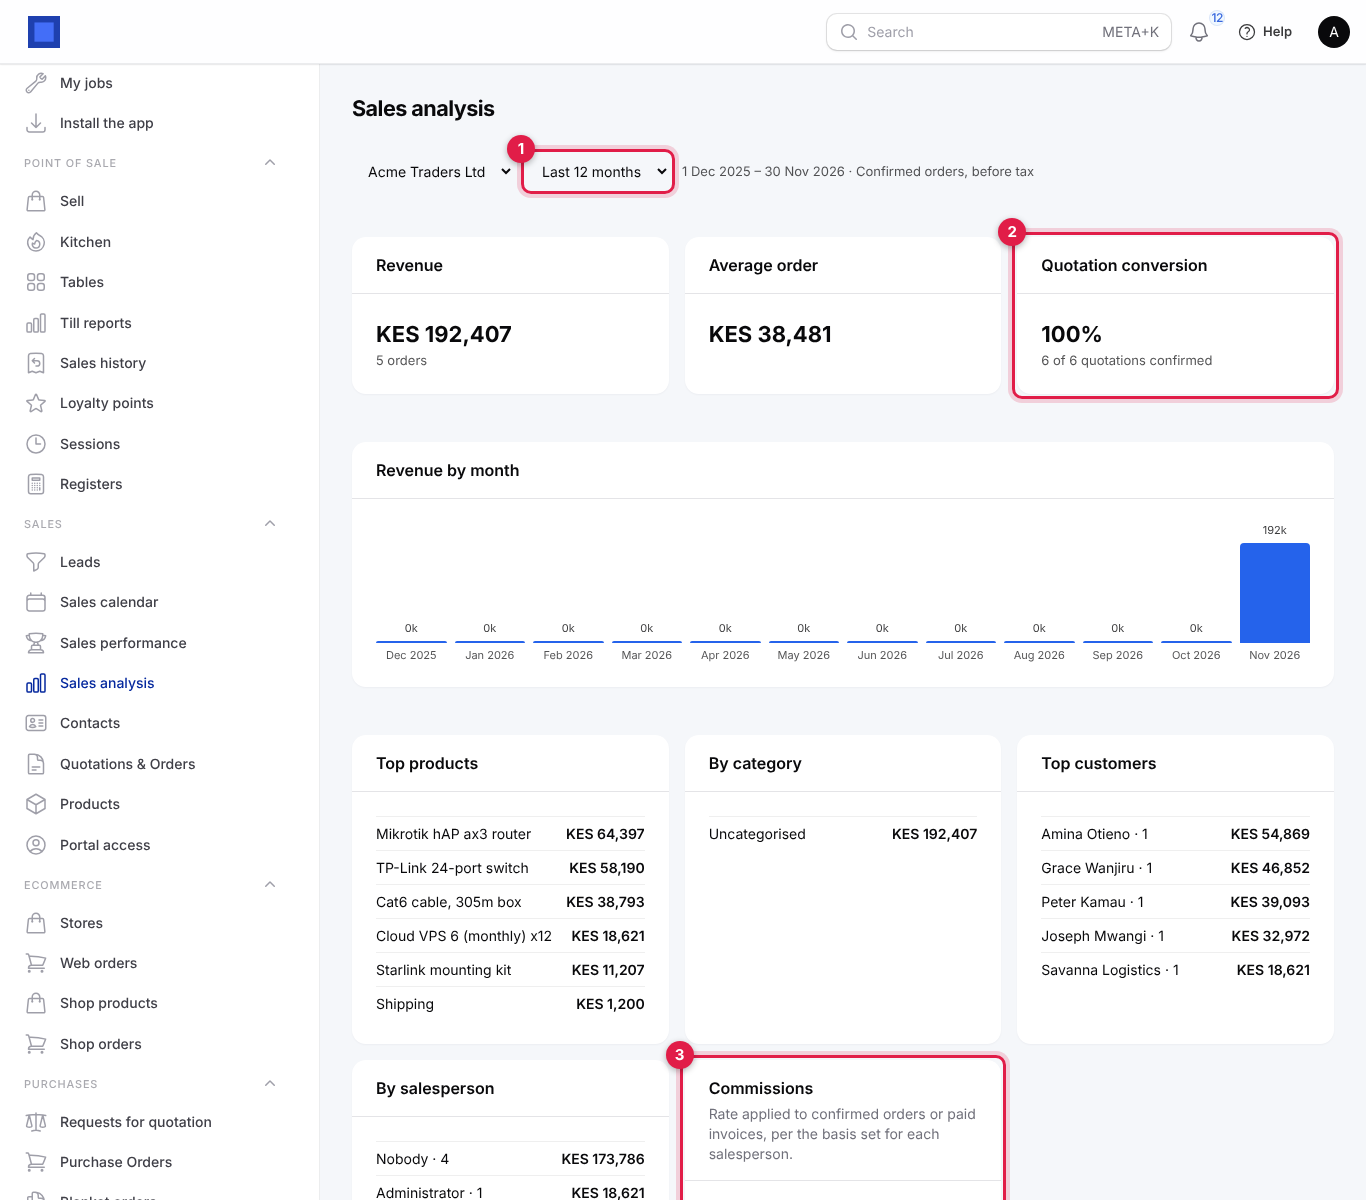
- Choose the company and the period (marker 1): This month, This quarter, This year or Last 12 months.
- Read the figures. All amounts are confirmed orders before tax.
| Box | What it shows |
|---|---|
| Revenue, orders, Average order | Totals for the period. |
| Quotation conversion (marker 2) | Quotations sent against quotations that became orders. |
| Revenue by month | A bar per month. |
| Top products, By category, Top customers, By salesperson | Where the money came from. |
| Commissions (marker 3) | What each salesperson earned at their rate. "No commission rates set" means none are set up yet. |
Pay sales commissions
- Open Settings → Commissions and click New commission rate.
- Choose the Salesperson (marker 1), type the Commission (%) (marker 2) and choose when it is Earned when (marker 3): The order is confirmed or The invoice is paid.
- Click Create.
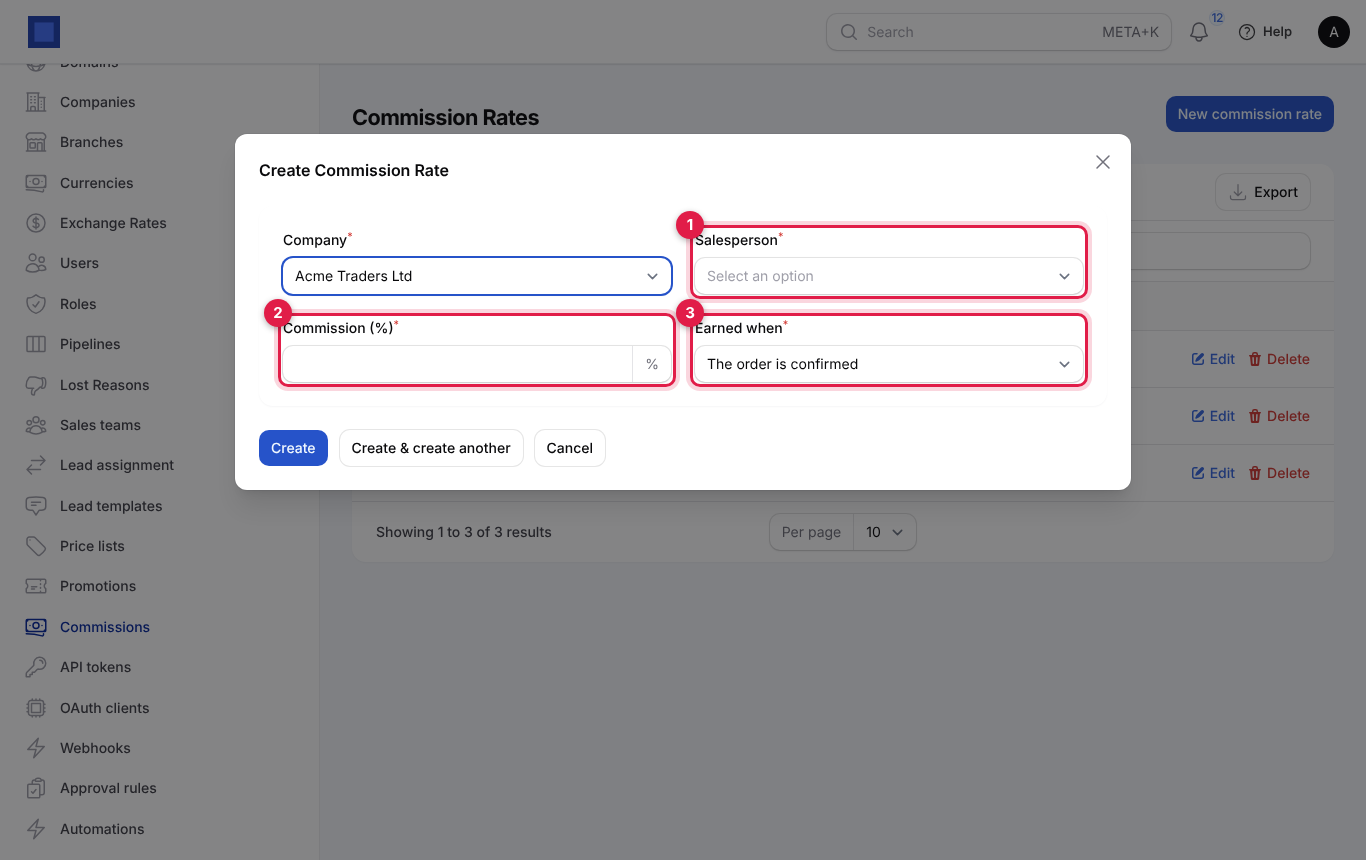
The commission appears in the Commissions box of the sales analysis for the period, calculated on the orders they confirmed or the paid invoices of their orders. Pay it through payroll or as an expense; NaliSuite does not post commission to the ledger on its own.
Sales preferences
Settings → Preferences → Sales (choose a company at the top to set different values per company):
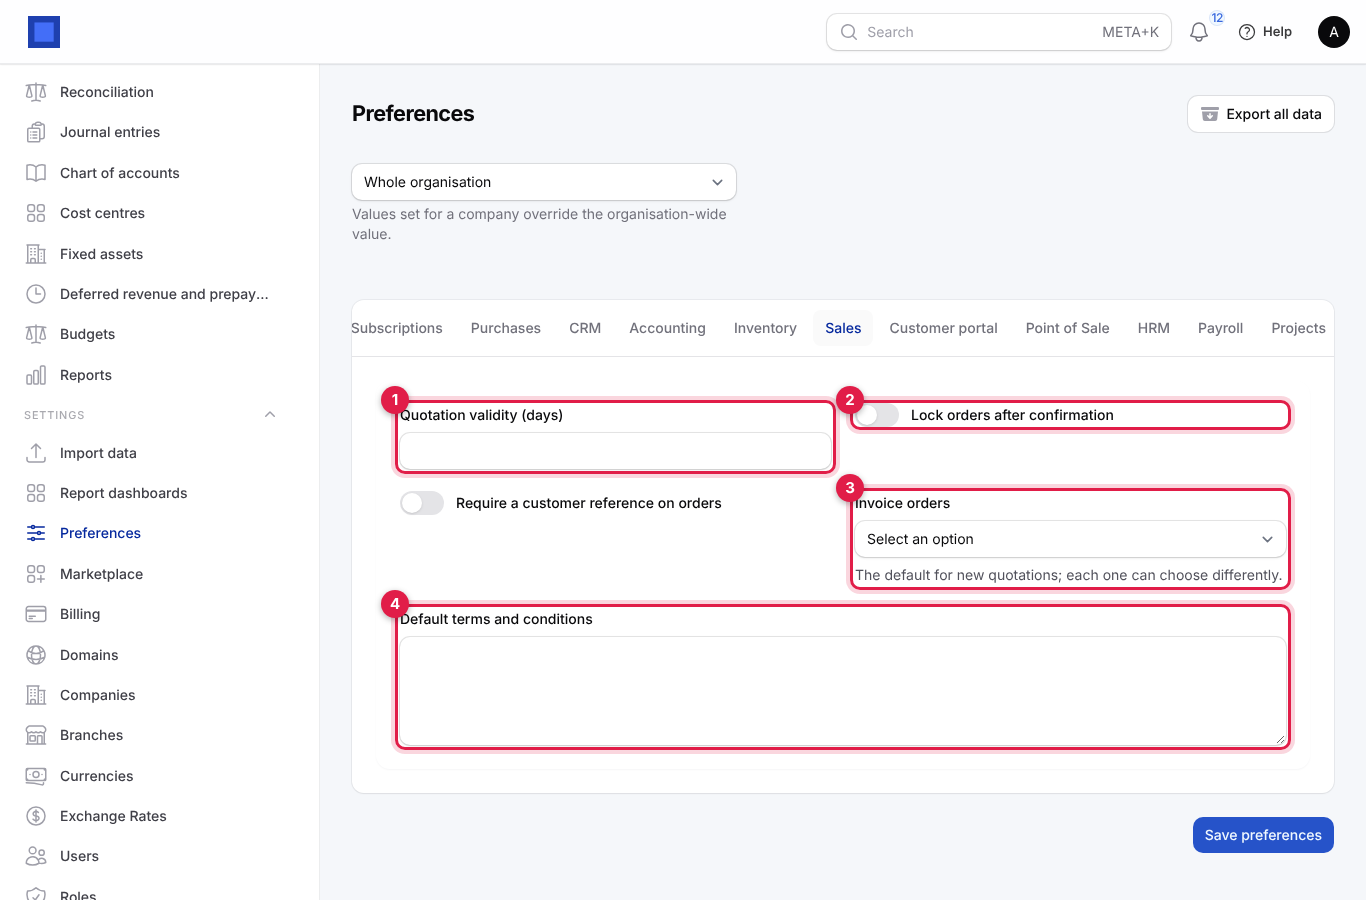
| Setting | What it does |
|---|---|
| Quotation validity (days) (marker 1) | Sets Valid until on new quotations when left empty. Default 30. |
| Lock orders after confirmation (marker 2) | A stored preference; in this version confirmed orders can still be edited, so agree a rule in your team. |
| Require a customer reference on orders | A stored preference; not yet enforced on the form. |
| Invoice orders (marker 3) | The default invoicing policy for new quotations. |
| Default terms and conditions (marker 4) | Printed on every new quotation that has no terms of its own. |
Related preferences elsewhere: Invoices → Create a draft invoice when a sales order is confirmed; Invoicing → Prices include tax and Default payment terms (days); Customer portal → Confirm a quotation as an order when the customer accepts it online.
Common questions
Can I change a quotation after sending it? Yes, while it is draft or sent. Send it again so the customer has the latest version.
The Confirm order button is missing.
You need sales.confirm, and the quotation must be draft or sent.
The customer accepted online but nothing happened. Acceptance only records the decision unless the portal preference confirms it automatically. Open the quotation and click Confirm order.
How do I take a deposit? Set the quotation's Invoice to By hand, in parts or at milestones, confirm it, then Create invoice with, say, 50%.
Where are the delivery notes? With Inventory on, open the invoice for the goods and click Delivery note.
Why are no invoices created when I confirm? Preferences → Invoices → Create a draft invoice when a sales order is confirmed is off, or the order's Invoice policy is not When confirmed. Use Create invoice.