Staff-only articles and shared mailboxes
This page is for support teams and the people who answer the shared addresses of a business, such as sales@ or accounts@. It covers two parts of the Helpdesk app. Knowledge lets you keep articles for your staff next to the ones your customers read: each article and category says who can read it, so internal playbooks never reach the public help centre. Shared mailboxes let several people answer one email address together, with replies sent from that address, internal notes, assignment and a status for every conversation.
You will find them in the Support group of the menu: Knowledge, Help centre (where articles are written) and Mailboxes.
Note: You need the helpdesk.view permission to read Knowledge and the article list, and helpdesk.manage to write articles and set up mailboxes. A shared mailbox is seen only by the people and teams chosen for it. Owners and admins can set mailboxes up, but they read only the mailboxes they were given themselves. Set permissions under Settings → Roles.
Both are part of the Helpdesk app, which comes with the Professional plan. An administrator can switch it on or off under Settings → Apps (see Switching apps on and off). For tickets, the support form and the public help centre, see Helpdesk.
Who can read an article
Every article, and every category, has a Who can read it setting:
| Setting | Who reads it |
|---|---|
| Public: help centre and portal | Anyone, in the public help centre, and signed-in customers in the portal. |
| Customers only: portal sign-in | Only customers signed in to the customer portal, on its Help centre page. See Customer and vendor portal. |
| Staff only | Only your staff, inside the app under Support → Knowledge. |
Staff-only articles never show in the help centre, the portal or the help centre's search. Staff see every published article, whatever its setting.
A category's setting caps the articles in it: the narrower of the two wins. An article set to Public in a Staff only category stays inside the app. The badge you see on an article always shows who can really read it.
Write a staff-only article
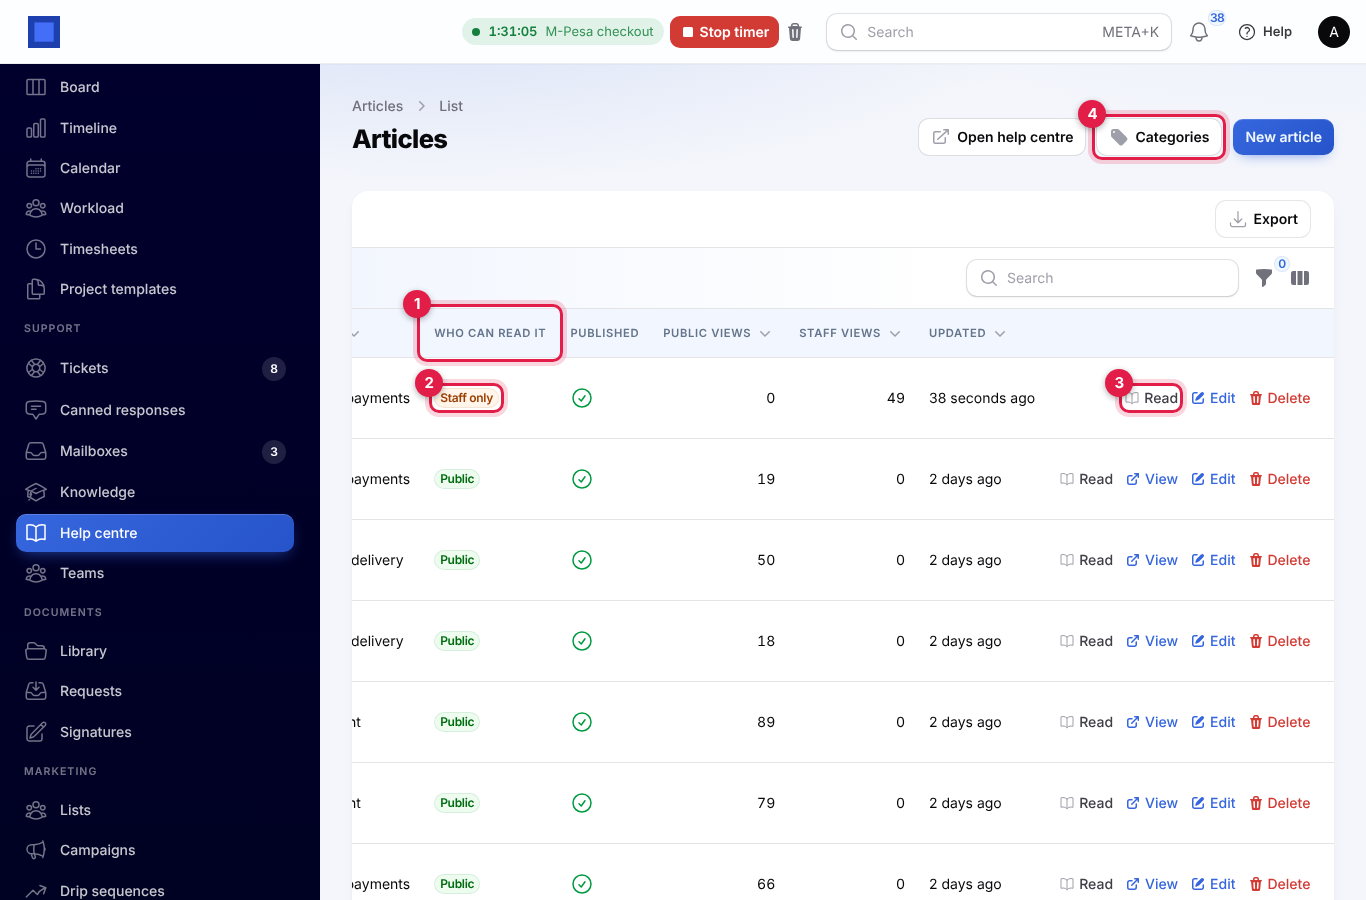
- Open Support → Help centre. The Who can read it column (marker 1) shows each article's audience; staff-only articles have an orange Staff only badge (marker 2).
- Press New article, or Edit on an article.
- Fill in the Title, Category, Article text and, if you like, a Summary.
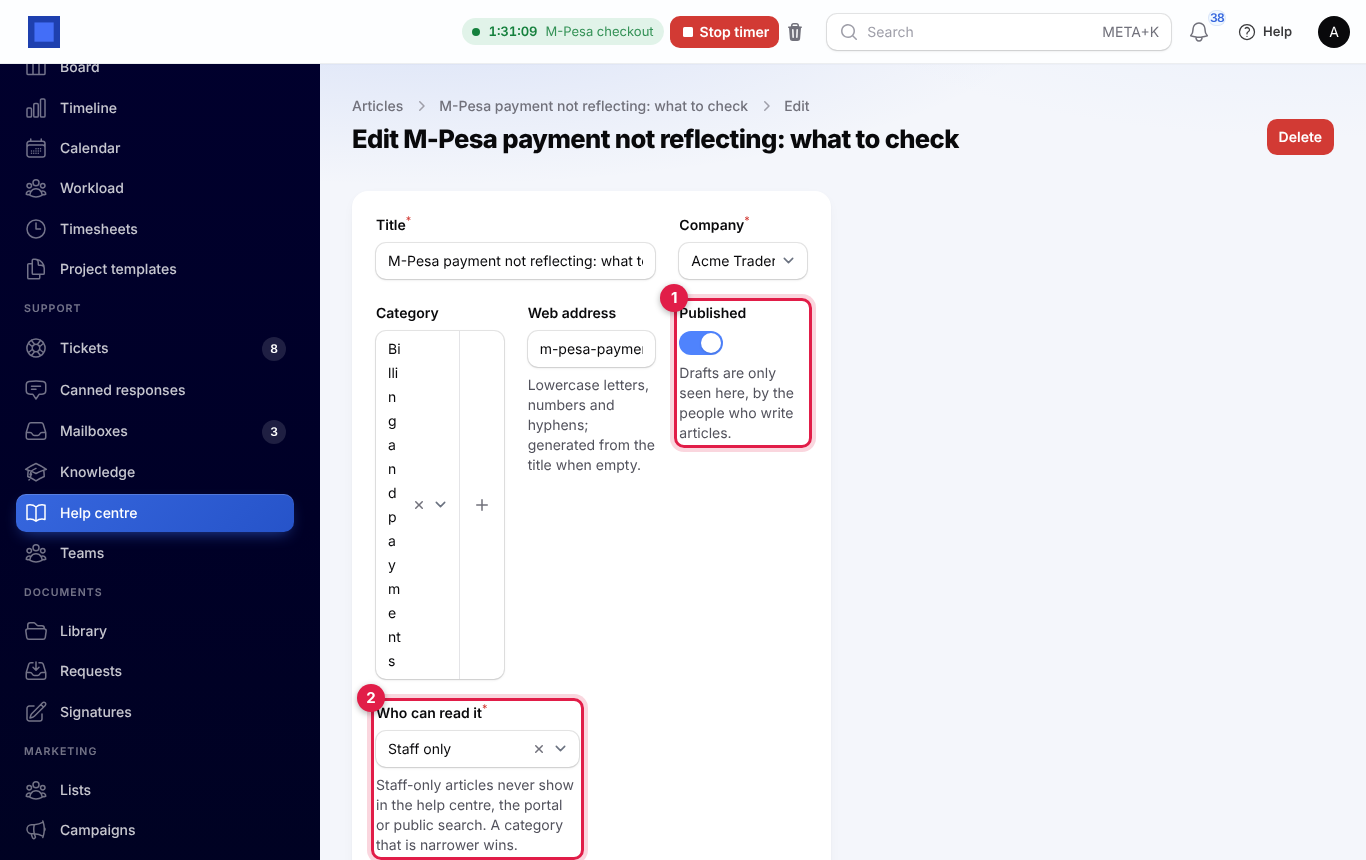
- Switch on Published (marker 1) when it is ready. Drafts are only seen in this list, by the people who write articles.
- Choose Who can read it (marker 2) and press Save changes.
On each row, Read (marker 3 in the list screenshot) opens the article in Knowledge. View opens it where customers read it, in the help centre or the portal, so staff-only articles have no View. The list also shows Public views and Staff views, and you can filter it by category, by Who can read it and by Published.
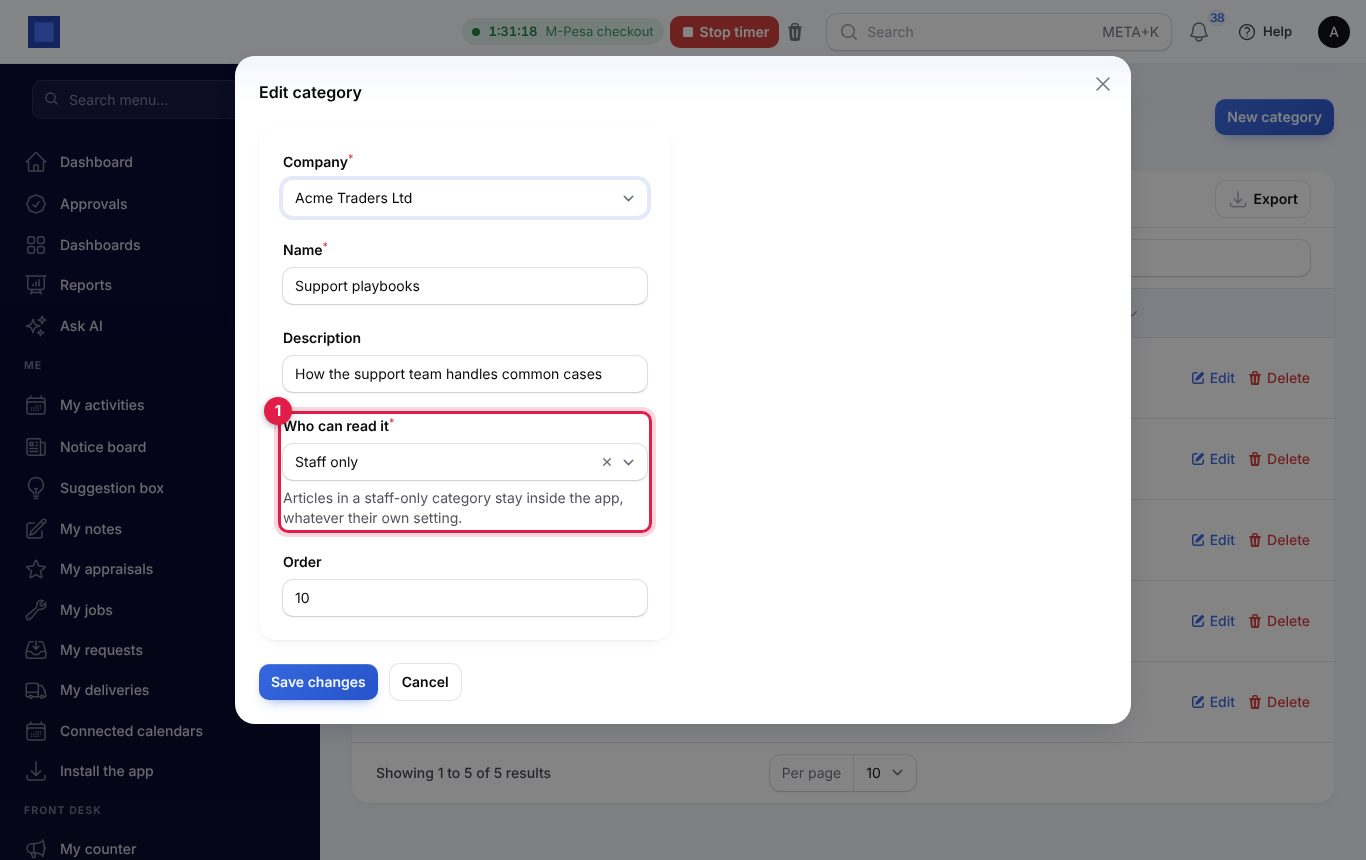
To make a whole section staff-only, press Categories (marker 4), then Edit on the category (or New category), and set its Who can read it (marker 1). Every article in a staff-only category stays inside the app, whatever its own setting.
Read articles in Knowledge
Support → Knowledge is where staff look things up. It lists every published article, staff-only ones included, with its badge, its summary, its category and how often staff have read it.
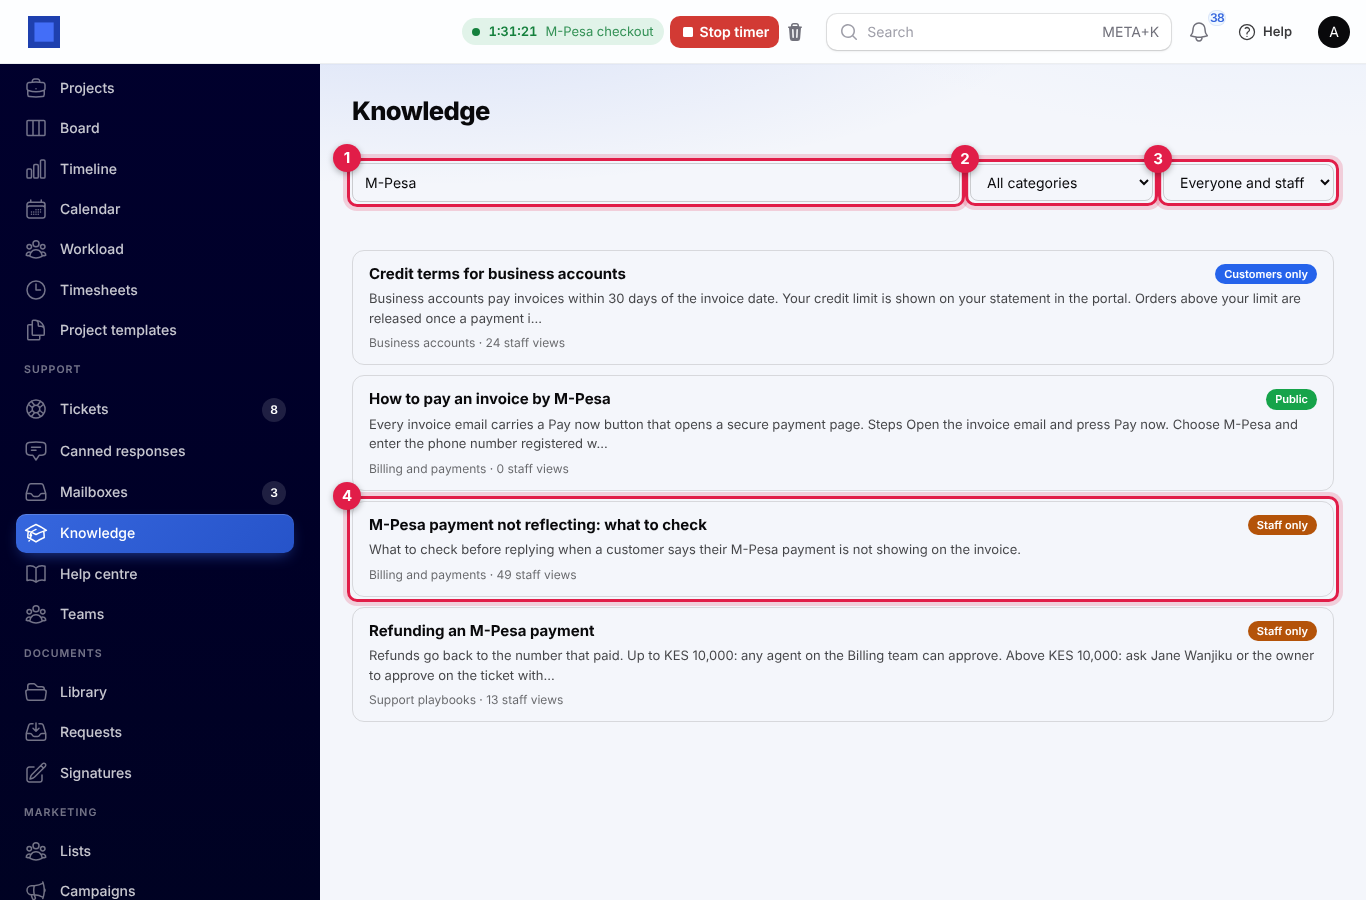
- Type in Search every article (marker 1). Titles, summaries and article text are searched.
- Narrow the list with the category (marker 2) and Who can read it (marker 3): Everyone and staff, Public, Customers only or Staff only.
- Click an article (marker 4) to read it.
The article opens with its badge and category at the top.
- Was this helpful? (marker 1): press Yes or No. Each person has one answer and can change it; the numbers show how many colleagues said yes and no, and your own answer is coloured.
- Views (marker 2): how many times staff opened it here, and how many times it was read in the help centre and portal.
- Share (marker 3): Copy text copies the title and text, ready to paste into a reply. Public and customers-only articles also have Copy link, which copies the address customers use (the portal address for customers-only articles). People who can write articles also see Edit.
- History (marker 4): who wrote and changed the article, and when, with the parts that changed (for example Article text or Who can read it). Reading an article does not count as a change.
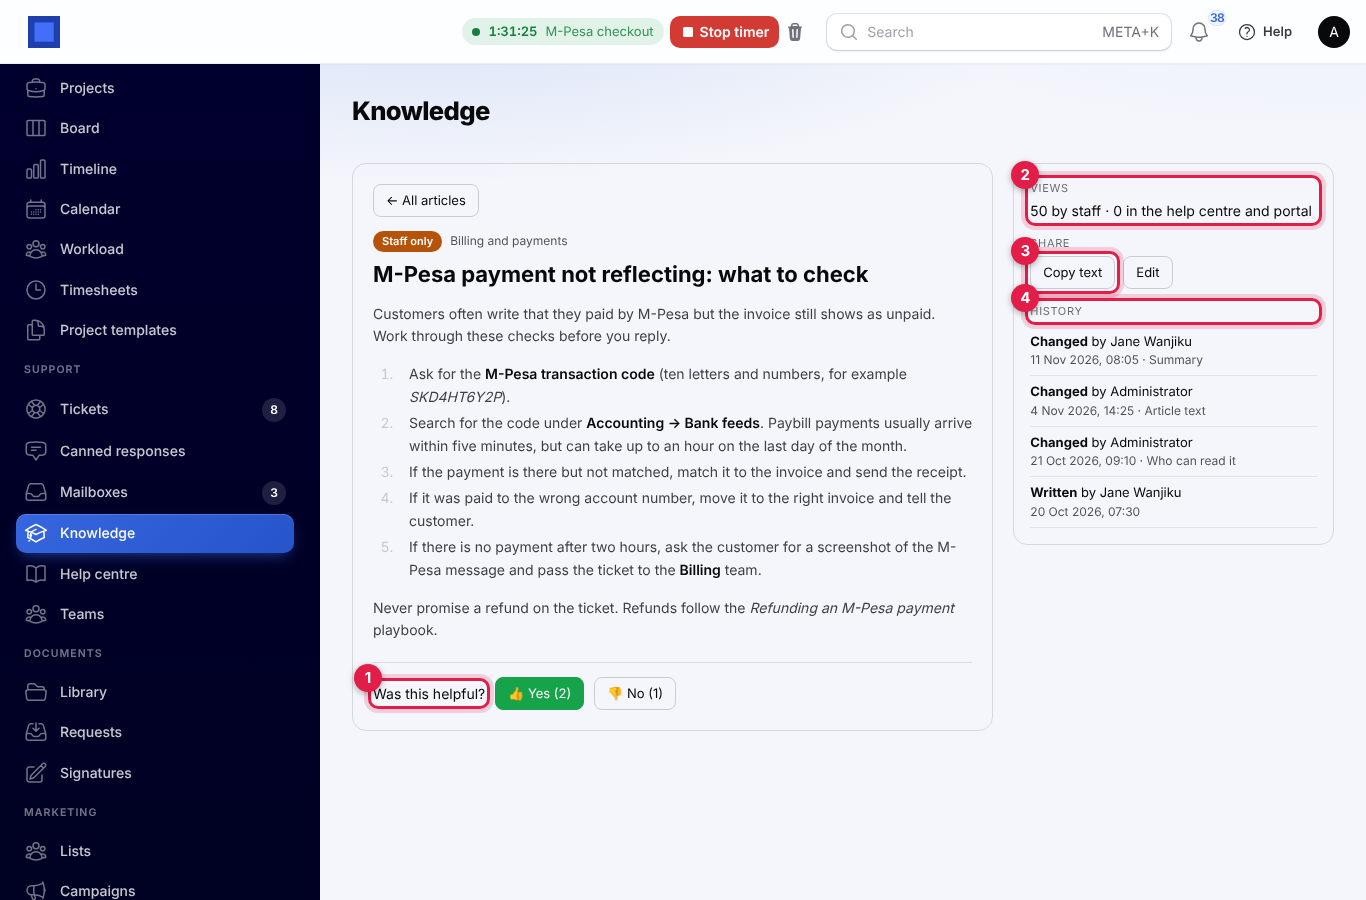
Press ← All articles to go back to the list.
Suggested articles on a ticket
When you open a ticket, the Suggested articles box (marker 1) on the right lists up to five published articles that match the words in the ticket's subject, staff-only ones included. Articles with the words in their title come first. Common words such as help or please, and ticket numbers, are ignored.
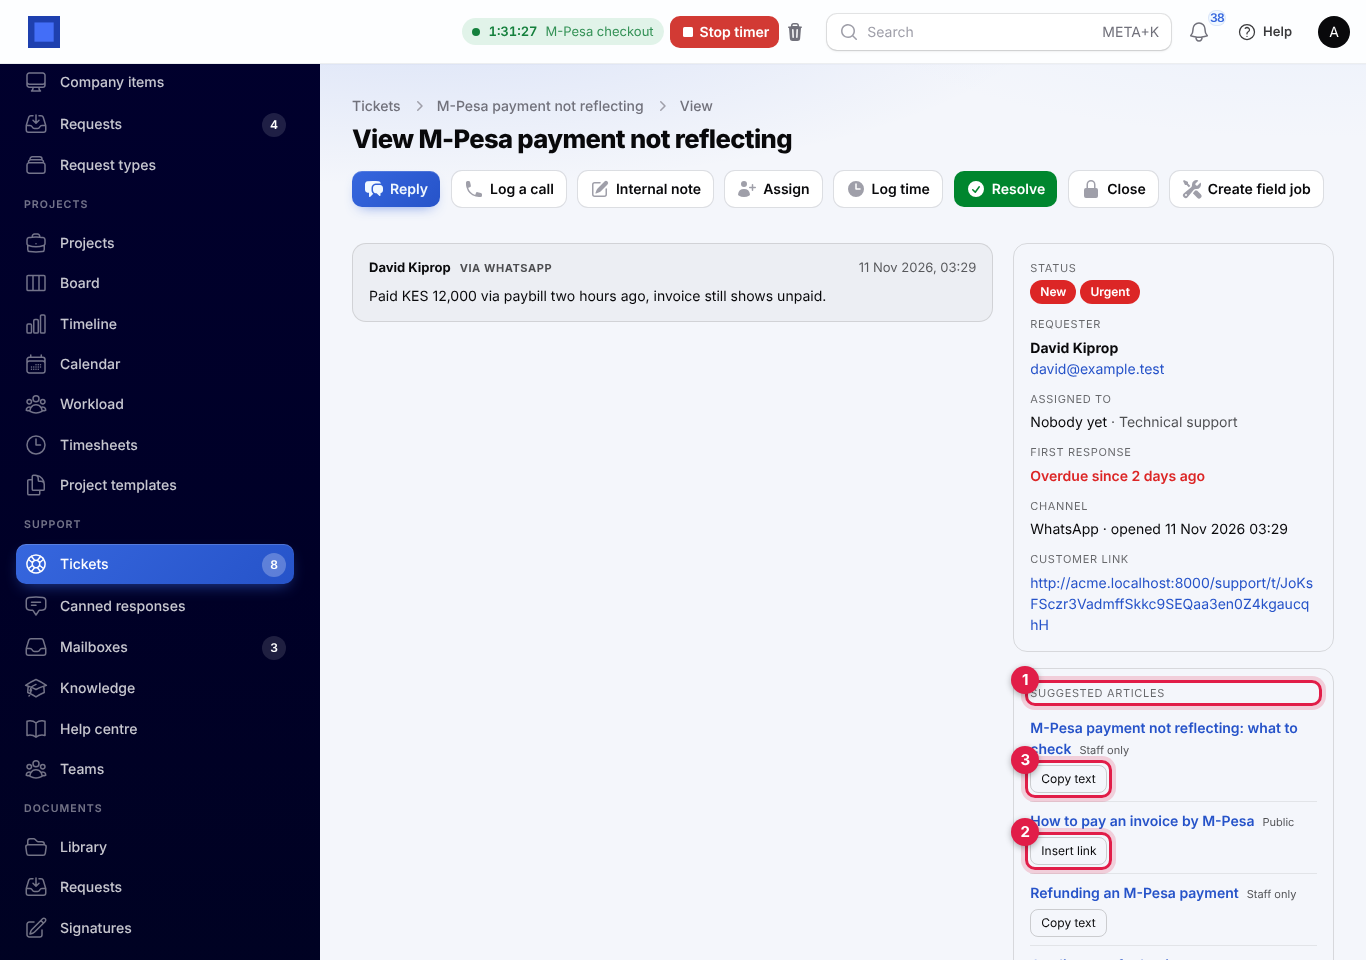
- Click an article's title to read it in Knowledge, in a new tab.
- Insert link (marker 2), on public and customers-only articles, opens Reply with a short message ready: a greeting, "This article should help:" with the title, and the link. Change it if you like and send it. It shows while you can reply to the ticket.
- Copy text (marker 3), on staff-only articles, copies the article so you can use it in your own words. The customer cannot open a staff-only article, so there is no link to send.
If nothing matches, the box says "No articles match this subject yet."
The shared mailboxes
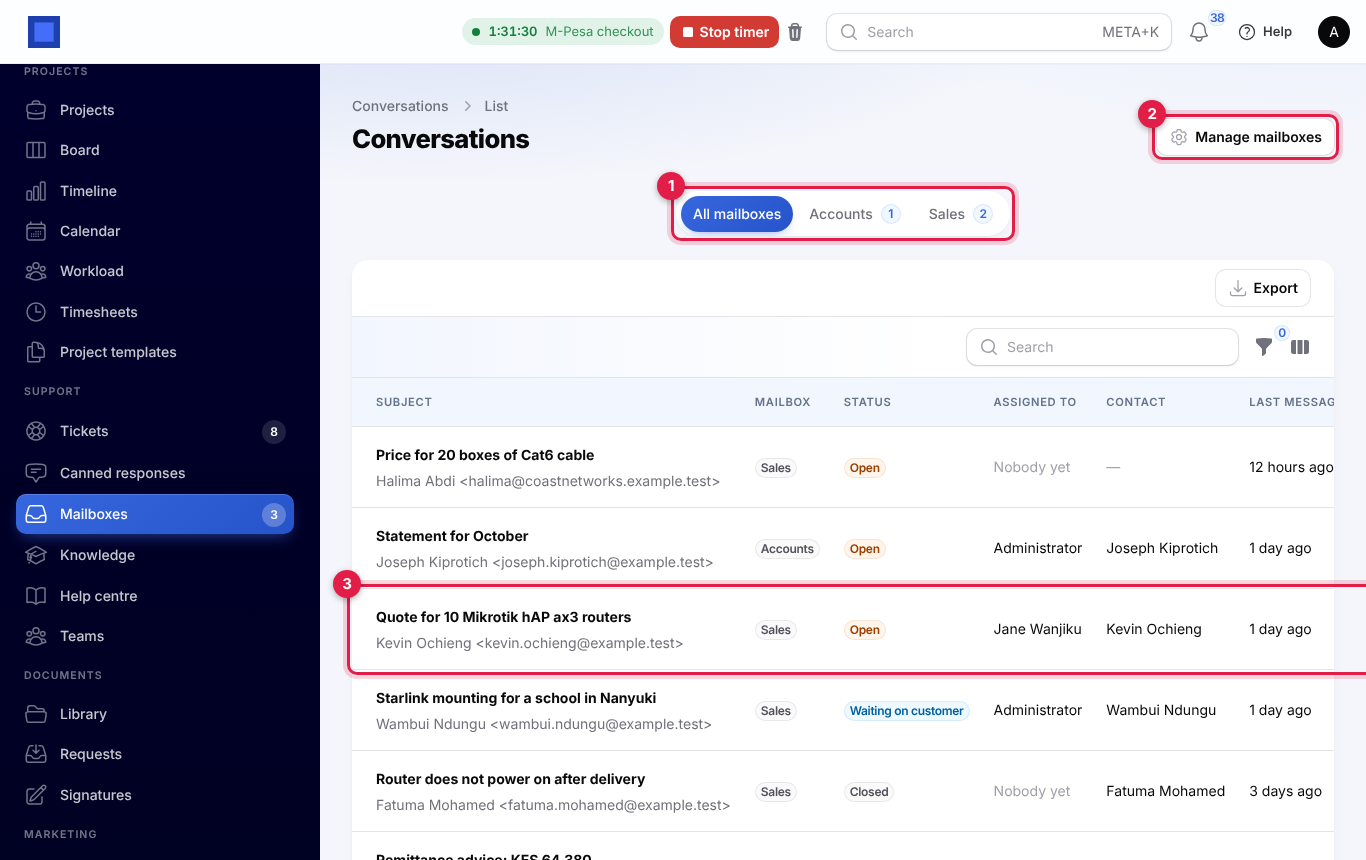
Open Support → Mailboxes. The number beside it in the menu counts the open conversations in your mailboxes.
- The tabs (marker 1) show All mailboxes and one tab for each mailbox you read, with its number of open conversations.
- Manage mailboxes (marker 2) opens the mailbox settings. Only people with helpdesk.manage see it.
- Each row (marker 3) is one conversation: the subject with the sender's name and address, the mailbox, the Status, who it is Assigned to, the linked Contact and when the Last message came.
- Use the filter icon to show one Status, or switch on Assigned to me.
A conversation has one of three statuses:
| Status | Meaning |
|---|---|
| Open (orange) | The customer is waiting for you. Every new email from the customer sets the conversation back to Open. |
| Waiting on customer (blue) | You replied and are waiting for an answer. |
| Closed (grey) | Done. |
Answer a conversation
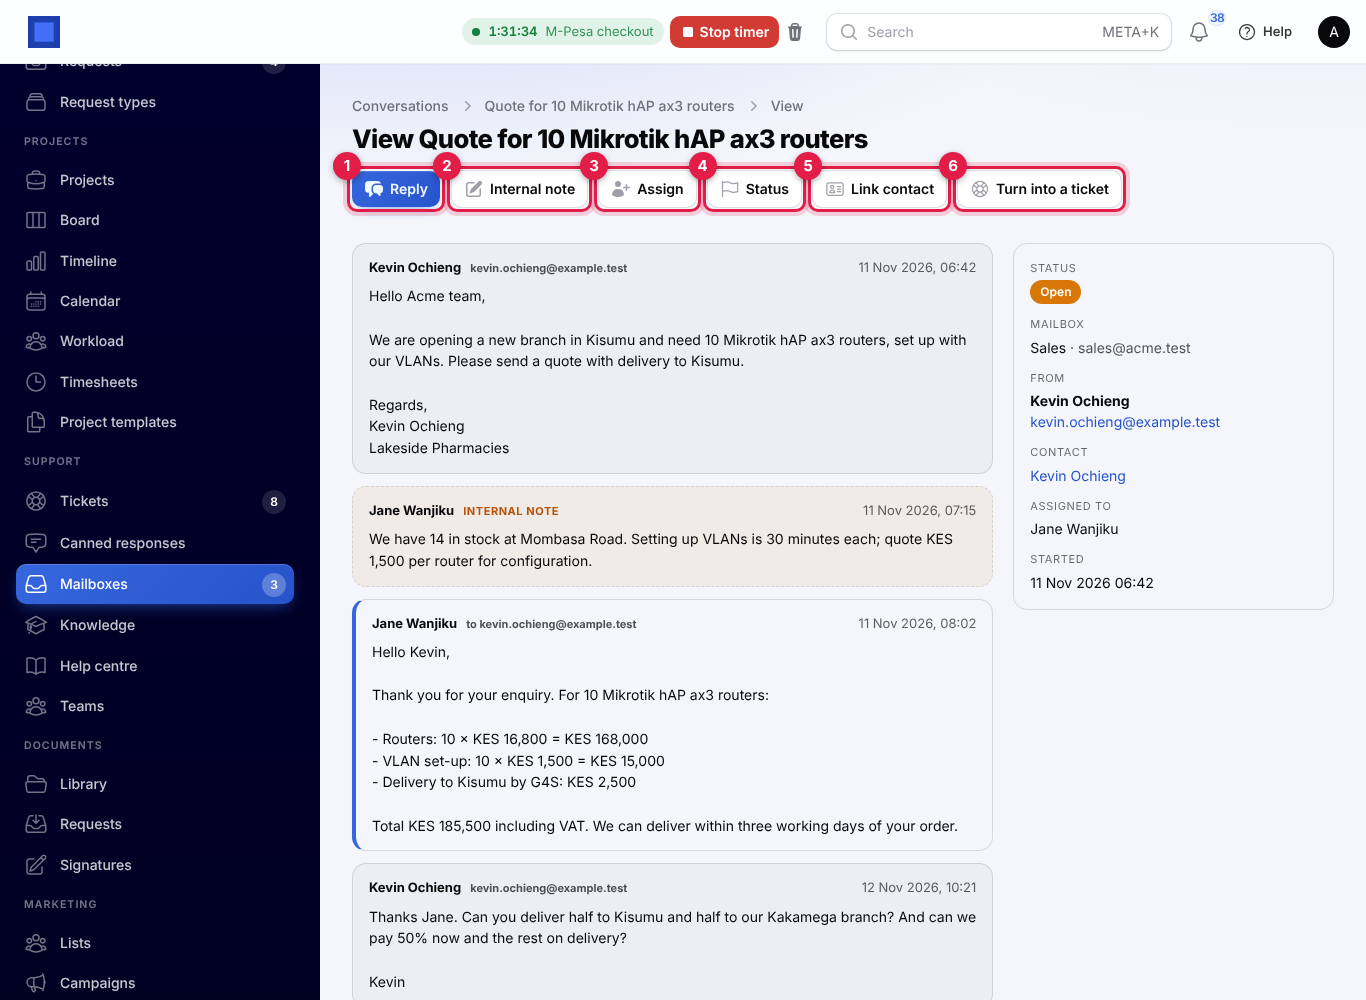
Click a conversation to open it. The emails and notes are shown oldest first: the customer's emails on grey, your replies with a coloured edge and internal notes on a dashed, amber background. The box on the right shows the status, the mailbox, the sender, the linked contact, who it is assigned to and when it started.
Reply
- Press Reply (marker 1).
- The window says which address the reply is sent from (marker 1 below). Write your Message (marker 2).
- Choose what happens After sending (marker 3): Waiting on customer (the default), Open or Closed.
- Press Submit. You see "Reply sent to" and the customer's address.
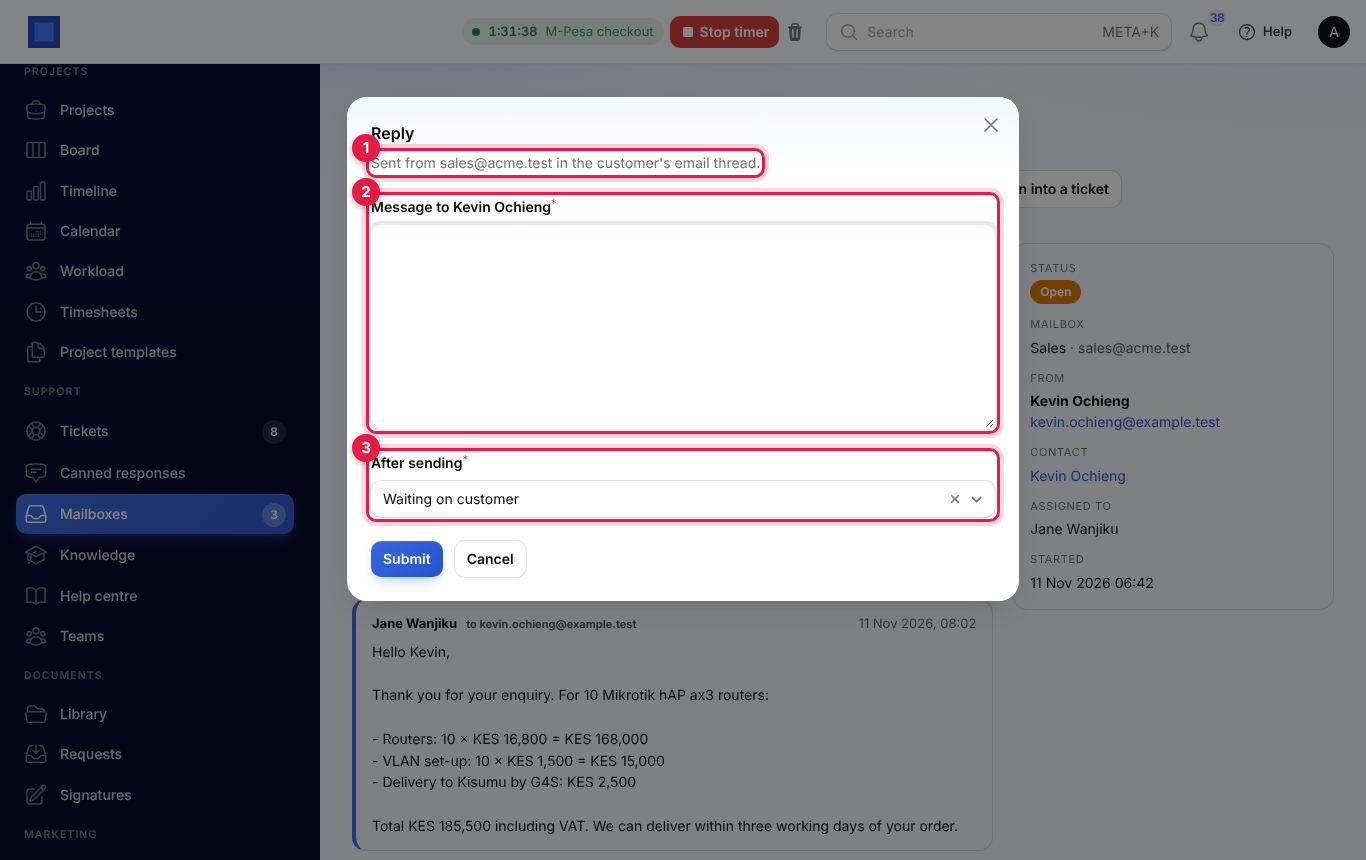
The reply goes to the customer in the same email thread, with "Re:" before the subject and the mailbox's signature at the end. If nobody was assigned, the conversation is assigned to you.
Internal note
Press Internal note (marker 2), write the note and press Submit. The customer never sees it. Use notes to share prices, stock checks or who should answer.
Assign
Press Assign (marker 3) and choose a person, or Nobody. Only people who read the mailbox can be chosen. They are told in the app, unless they assigned it to themselves.
Status
Press Status (marker 4) and choose Open, Waiting on customer or Closed.
Link contact
Press Link contact (marker 5) and choose the contact. The contact whose email matches the sender is suggested. The conversation then shows on the right, and a line such as Email conversation in Sales (sales@acme.test): Quote for 10 routers is added to the contact's notes so it appears on their timeline. When a new conversation arrives from an address that belongs to a contact, it is linked for you.
Turn into a ticket
When an email turns out to be a support request, press Turn into a ticket (marker 6) and confirm. A ticket is opened on the Email channel with the conversation so far (internal notes are left out), and the customer gets the usual ticket acknowledgement. The conversation is closed with a note "Turned into ticket TKT-…", and the button becomes Open ticket. A conversation can only become a ticket once.
Set up a mailbox
- Open Support → Mailboxes and press Manage mailboxes. The page shows your inbound email webhook address at the top (marker 1). You need it to bring mail in (see How email reaches a mailbox).
- Press New mailbox (marker 2), or Edit on a mailbox.
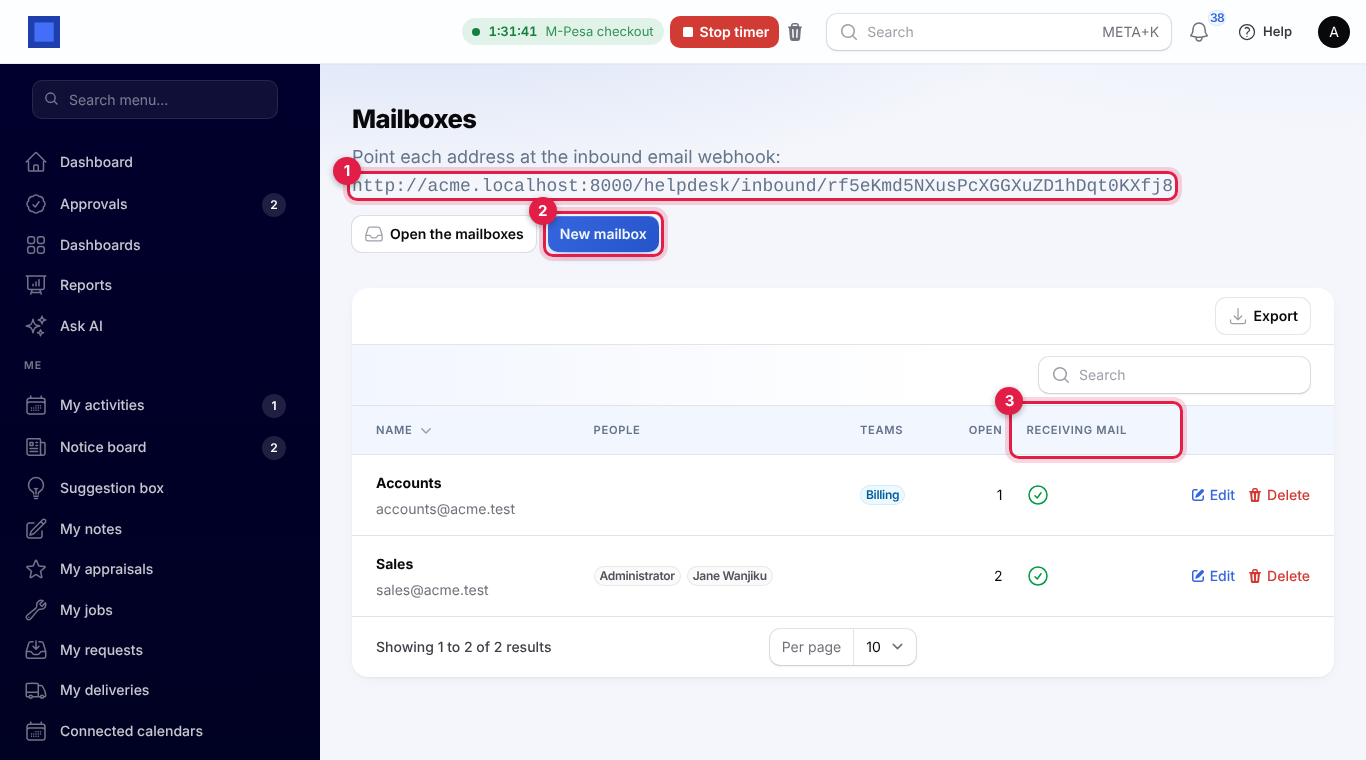
- Fill in the fields and press Create (or Save changes).
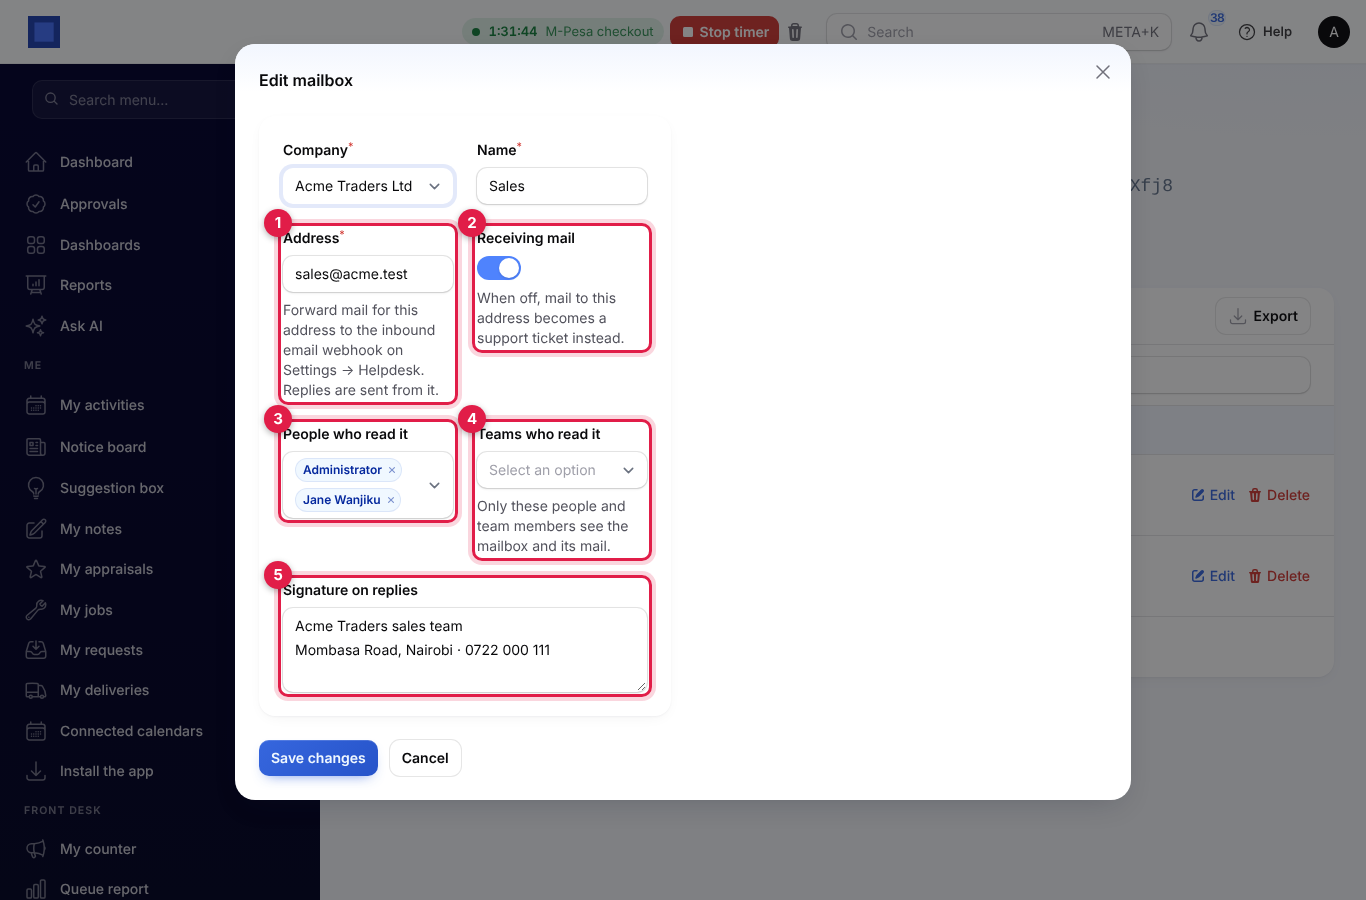
| Field | What to enter |
|---|---|
| Company | The company the mailbox belongs to. |
| Name | What staff see, for example Sales or Accounts. It is also the sender's name on replies. |
| Address (marker 1) | The email address, for example sales@yourcompany.co.ke. Each address can be used once per company. Replies are sent from it. |
| Receiving mail (marker 2) | On: mail to the address comes into this mailbox. Off: mail to it becomes a support ticket instead. |
| People who read it (marker 3) | The people who see the mailbox and its mail. |
| Teams who read it (marker 4) | Helpdesk teams whose members also see it. Only these people and team members see the mailbox. See Set up teams and assignment. |
| Signature on replies (marker 5) | Added at the end of every reply sent from the mailbox. |
The list shows each mailbox with its address, its people and teams, how many conversations are Open and whether it is Receiving mail (marker 3 in the settings screenshot).
How email reaches a mailbox
NaliSuite does not log in to your email account. Instead, your mail provider forwards each email to your workspace's inbound email webhook, the same one that turns email into tickets. You find its address at the top of the mailbox settings, and under Settings → Preferences → Helpdesk in Where to point things.
- Use a provider that can post incoming mail to a web address: Postmark, Mailgun, SendGrid, or any relay that sends the sender, subject and text.
- Set up an inbound route for each shared address (for example sales@yourcompany.co.ke) that posts to the webhook address.
- Add the same address as a mailbox in NaliSuite.
When an email arrives:
- If it was sent to the address of a mailbox that is Receiving mail (in To, Cc or the envelope), it goes to that mailbox. Anything else becomes a support ticket, as before.
- An answer to an earlier email joins that conversation. NaliSuite follows the email's thread headers, so the customer can change the subject and it still lands in the right place. An email that is not an answer starts a new conversation.
- The same email sent twice by the provider is only added once.
- A new conversation alerts everyone who reads the mailbox. A customer's answer alerts the person it is assigned to, or everyone when nobody is.
Choose how you are alerted in your initial at the top right → Notification settings → Shared mailboxes.
How replies are sent
- If your workspace sends email through its own mail server (Settings → Preferences → Email), replies leave from the mailbox's own address. See Email: reply-to, signature and your own mail server.
- Otherwise they leave from the platform's address, with the mailbox's name as the sender, and the mailbox's address as the reply-to address, so the customer's answers still come back to the mailbox.
- Every reply carries the thread headers of the conversation, so it appears in the customer's existing email thread.
- Replies are sent to the address the customer wrote from, with the mailbox's signature.
Good to know
Who can see a mailbox? Only the people chosen on it and members of the teams chosen on it. People who manage the helpdesk can change who reads a mailbox but do not see its mail unless they add themselves.
Can a staff-only article be sent to a customer? Not as a link: customers cannot open it. Use Copy text and write the answer in your own words.
Where do customers-only articles show? On the portal's Help centre page, for signed-in customers. The page appears in the portal once there is at least one article customers can read.
What happens to mailbox mail when a customer asks for their data or to be forgotten? Conversations linked to the contact are included in the data export, and erased with the contact's other records. See Handle a data protection request.
Can I delete a conversation? No. Close it instead. A closed conversation opens again when the customer writes back.
What if Helpdesk is switched off? Knowledge, the articles and the mailboxes leave the menu. Nothing is deleted; switch Helpdesk on again and everything is where you left it.