Vehicle inspections
For anyone who checks vehicles: a fleet manager doing the monthly roadworthiness check, a driver's walk-round before the first trip, or a service adviser walking round a customer's car at the workshop door. You build checklists once, then do the inspection on a phone in the yard: pass or fail each item, type readings such as tyre tread depth, take photos and sign. A failed critical item takes a fleet vehicle off the road and schedules the repair; at the workshop it goes onto the job card's estimate. Every inspection prints as a signed PDF report.
Inspections work in the Fleet and Garage and auto workshop apps. Switch them on as those pages explain (Fleet, Garage).
You will find Inspection checklists under Fleet (or under Garage when only Garage is on), Fleet → Inspections, the Inspections tab on a fleet vehicle, and the Inspections tab on a job card and a garage vehicle.
Note: Building checklists and carrying out inspections needs fleet.manage (for fleet vehicles) or garage.manage (for job cards). People with only fleet.view or garage.view can see inspections and open the reports. Set permissions under Settings → Roles.
Inspection checklists
A checklist is a list of sections, each with items to check. Open Inspection checklists.
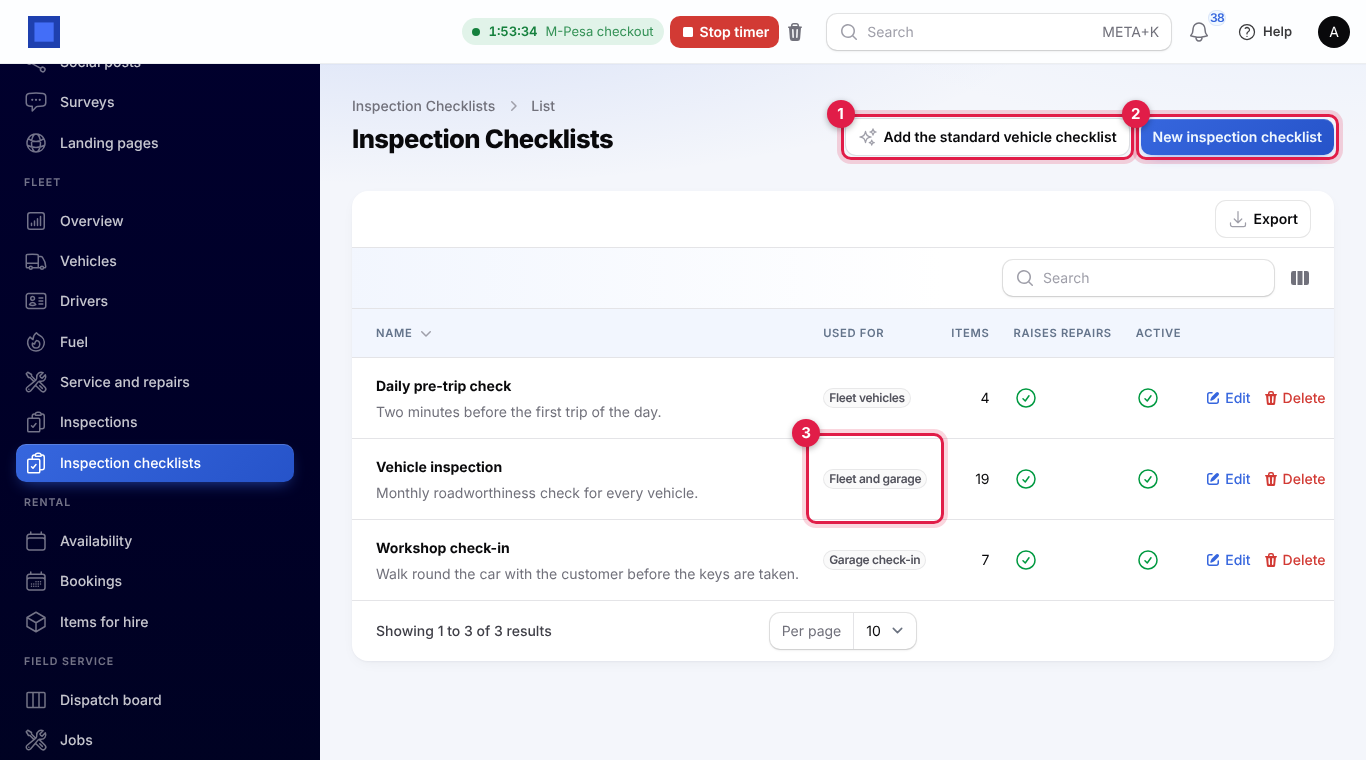
- Add the standard vehicle checklist (marker 1) adds a ready-made Vehicle inspection with tyres and wheels, brakes and steering, lights and visibility, engine and fluids, and safety and body. It opens so you can change it to suit your vehicles.
- New inspection checklist (marker 2) starts an empty one.
- Used for (marker 3) shows where each checklist can be used. The list also shows the number of items, whether it raises repairs, and whether it is active.
Build a checklist
- Give it a Name, for example Daily walk-round check, and a Description if you like.
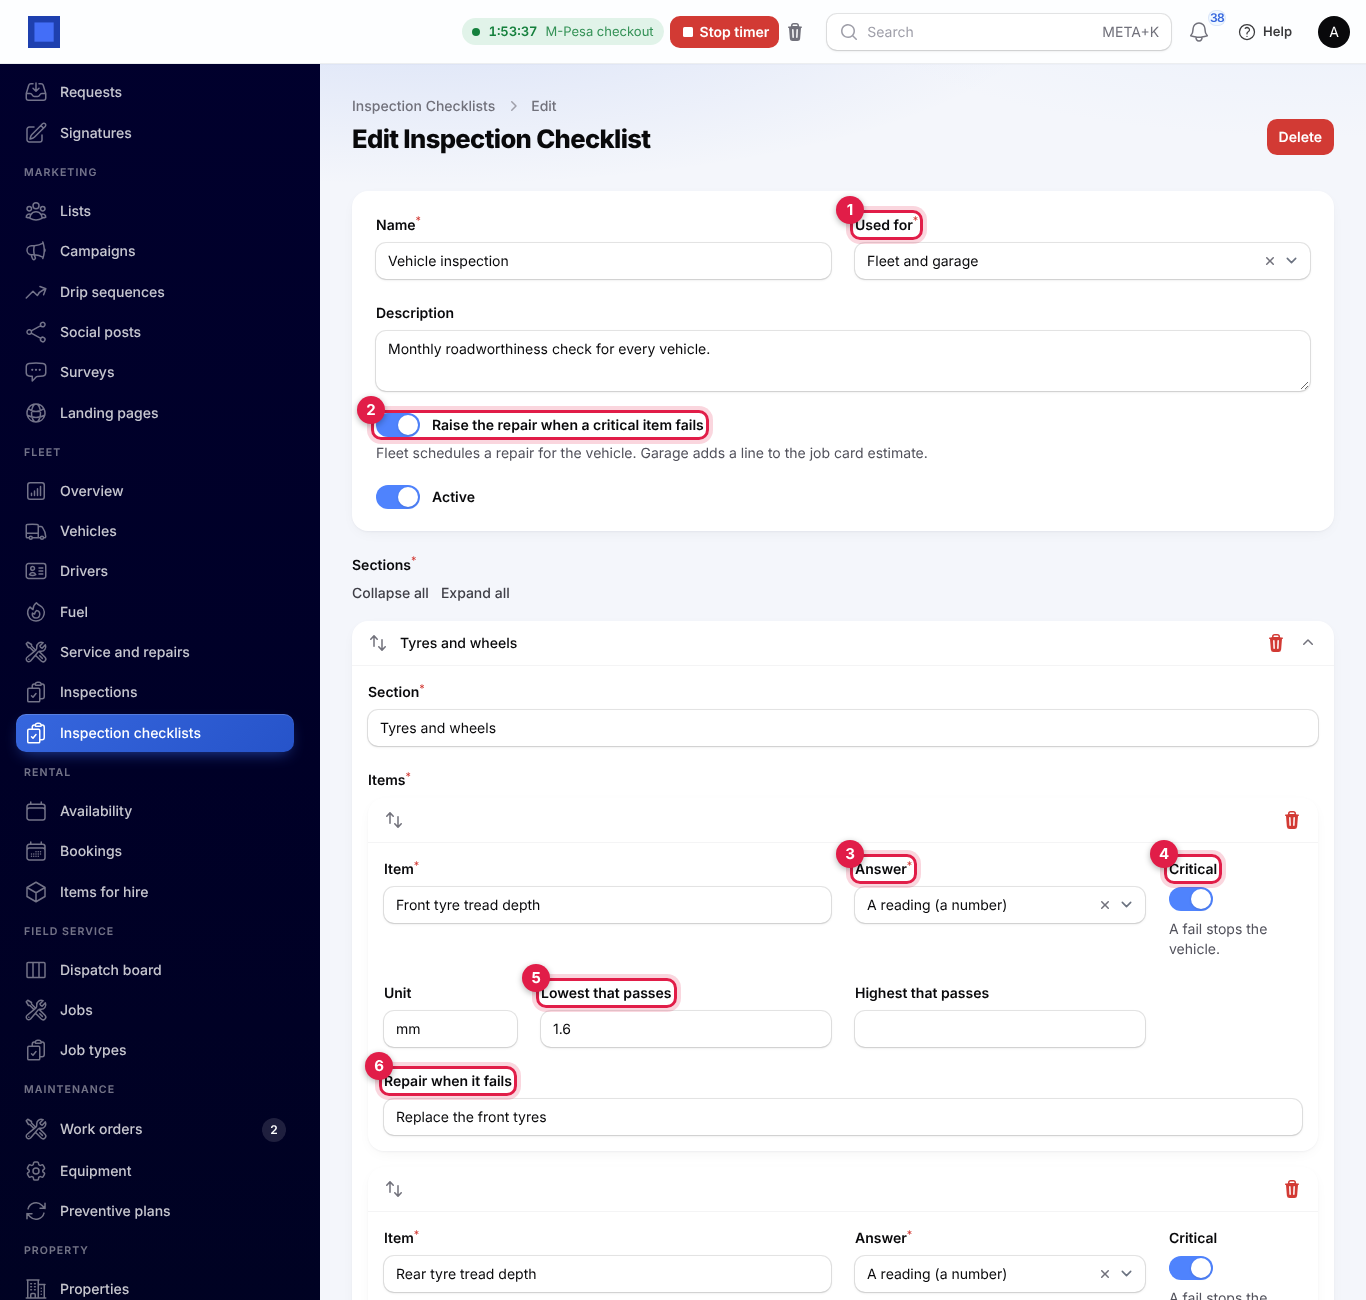
- Choose Used for (marker 1): Fleet and garage, Fleet vehicles or Garage check-in.
- Leave Raise the repair when a critical item fails on (marker 2). Fleet then schedules a repair for the vehicle, and Garage adds a line to the job card's estimate. Turn it off to only record the result.
- Leave Active on. Inactive checklists cannot be chosen for new inspections.
- Under Sections, give each section a title, then add its items with Add an item:
- Item: what to check, for example Front tyre tread depth.
- Answer (marker 3): Pass, fail or not applicable, A reading (a number) or A photo.
- Critical (marker 4): a fail on this item stops the vehicle.
- For a reading: the Unit (mm, %, bar), and the Lowest that passes (marker 5) and/or Highest that passes. A reading outside them fails by itself.
- Repair when it fails (marker 6): the repair to schedule, for example Replace the front tyres. Leave it empty and the repair reads Put right: Front tyre tread depth.
- Use Add a section for more sections. Drag sections and items to reorder them. Click Save changes.
Items with no name and sections with no items are dropped when you save. Changing a checklist does not change inspections already started: each keeps the items it began with.
Start an inspection
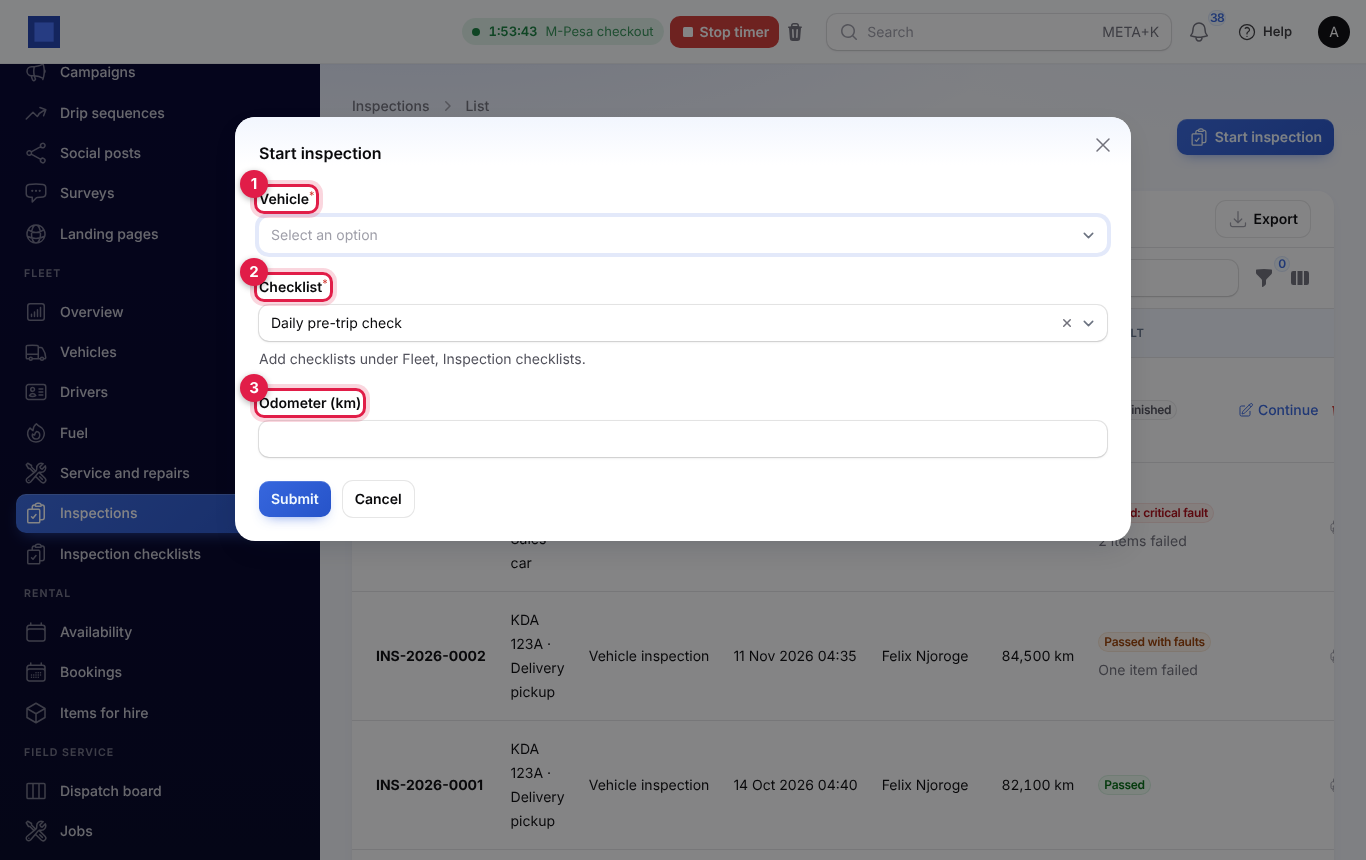
From Fleet → Inspections, click Start inspection. From a vehicle, open its Inspections tab and click Start inspection there.
- Choose the Vehicle (marker 1), unless you started from the vehicle.
- Choose the Checklist (marker 2). Only active checklists for fleet vehicles are offered.
- Check the Odometer (km) (marker 3). It is filled with the vehicle's reading.
- Click Submit. The inspection opens, numbered INS-2026-0004 and so on.
Do the inspection on a phone
The inspection screen is made for a phone. It shows one section after another, with the vehicle and the inspection number at the top.
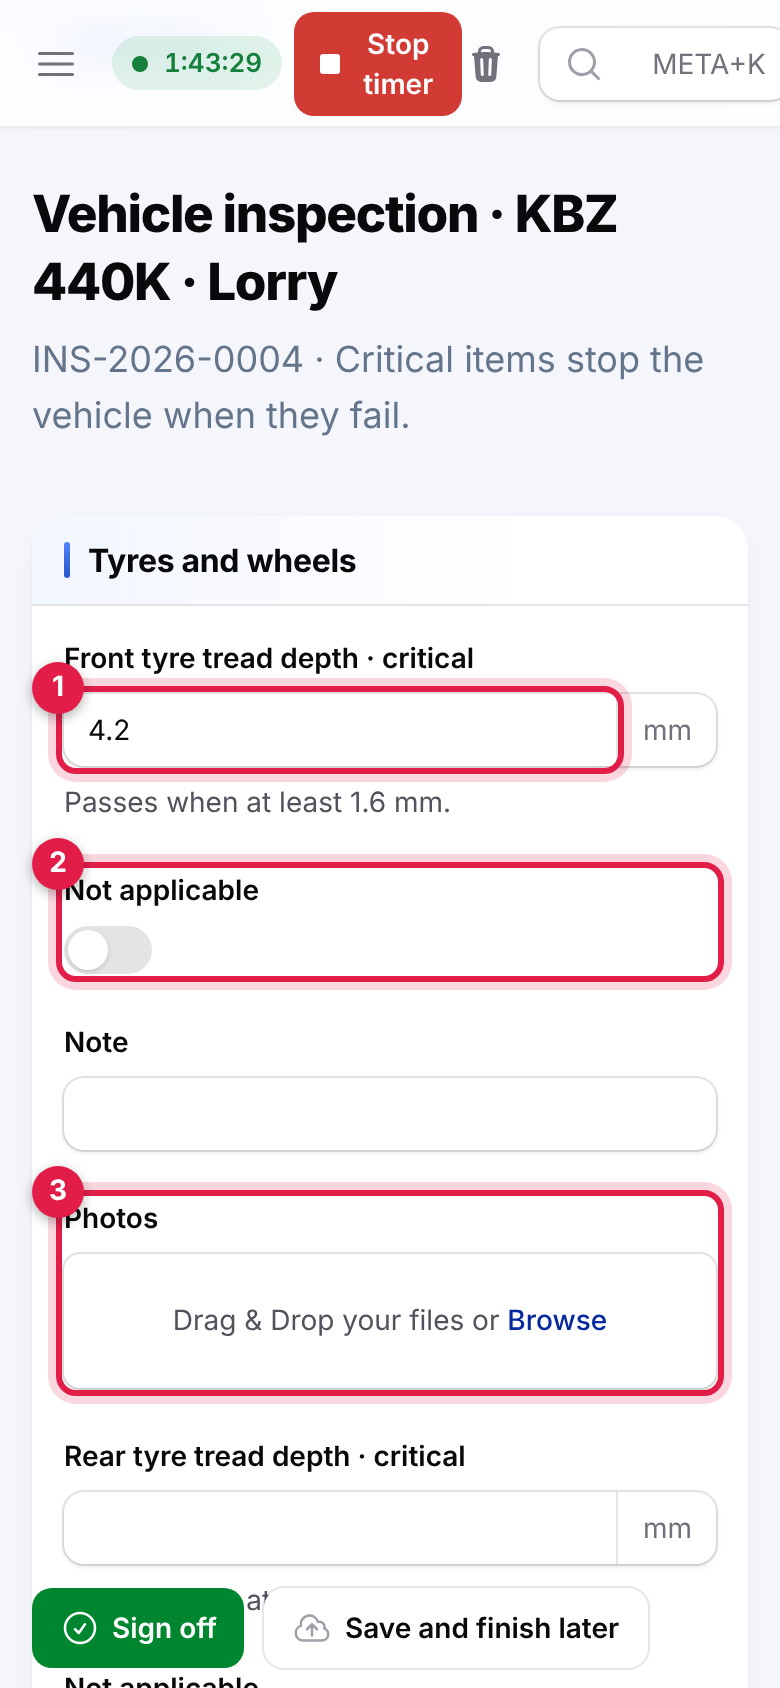
- Readings (marker 1): type the number. The line under it says what passes, for example Passes when at least 1.6 mm.
- Not applicable (marker 2): for a reading that does not apply to this vehicle.
- Photos (marker 3): take up to four photos per item straight from the camera, or choose them from the phone.
- Every item also has a Note, for example Front left worn on the inside edge.
For pass or fail items, tap Pass (marker 1), Fail (marker 2) or Not applicable. Critical items say critical after their name.
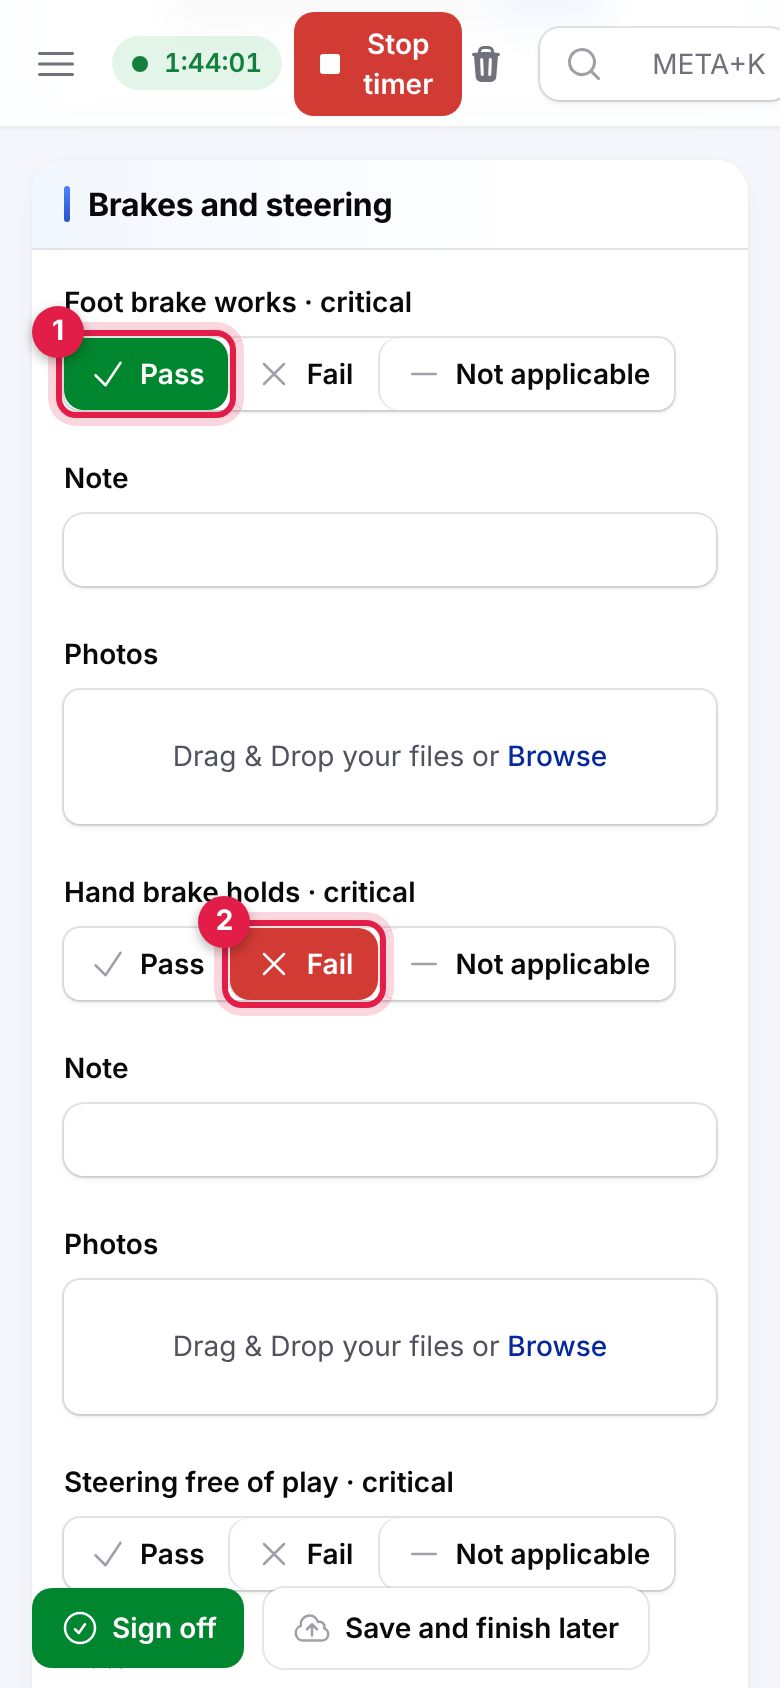
Photo items need a photo, or Not applicable; adding a photo passes the item unless you mark it Fail.
Sign off, or finish later
At the bottom, under Sign off, check the Odometer (km), the name under Signed by (marker 1) and any Notes. Sign with a finger in the Signature box (marker 2); Clear starts it again.
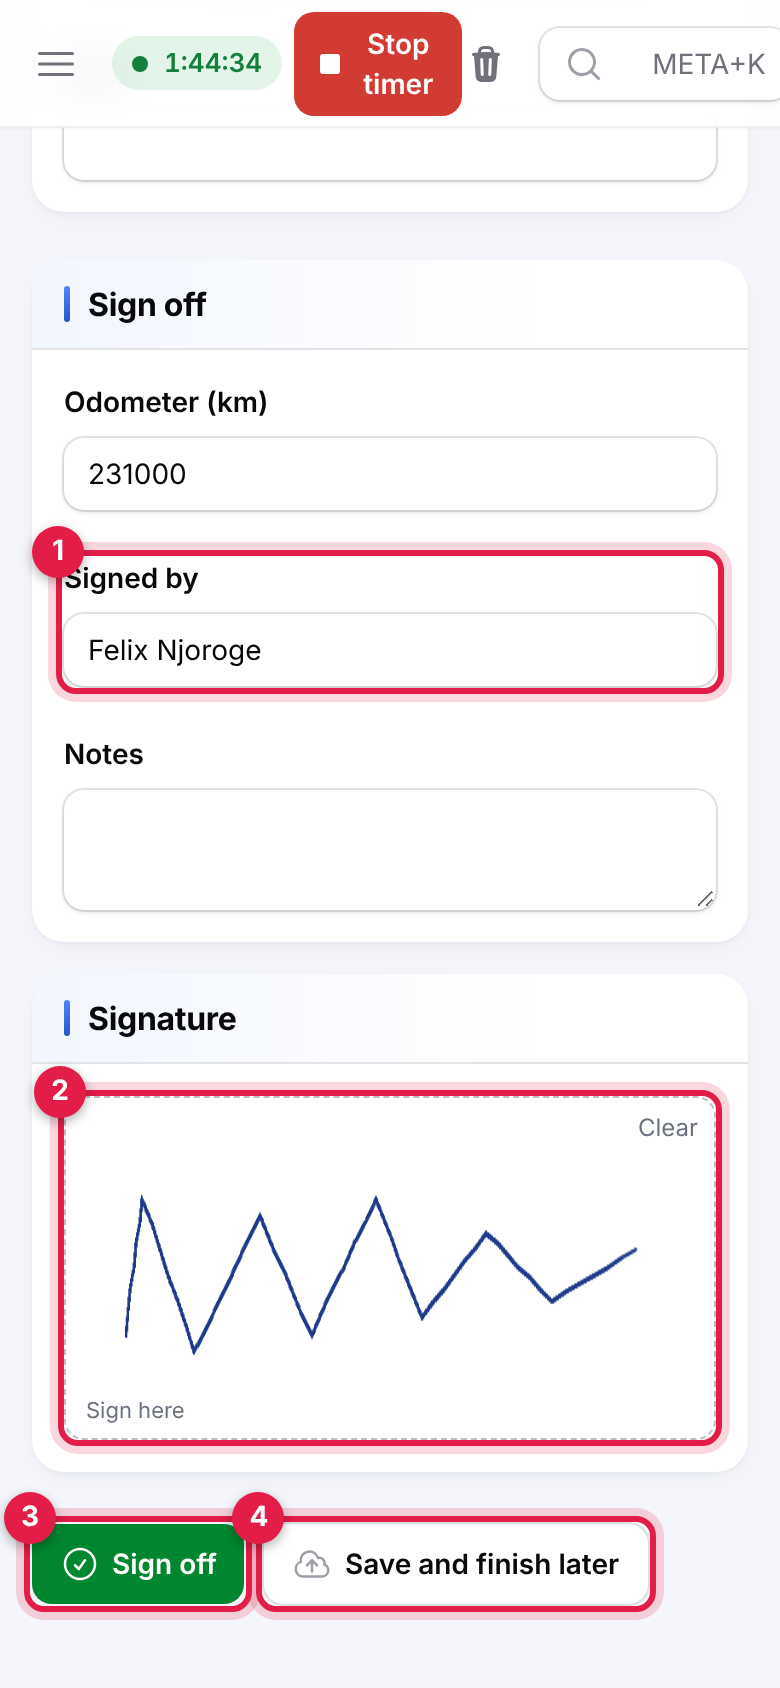
- Sign off (marker 3) finishes the inspection. Every item must be answered first; otherwise you see, for example, "Answer “Rear tyre tread depth” before signing off." The result is worked out and shown: Passed, Passed with faults (something failed, nothing critical) or Failed: critical fault.
- Save and finish later (marker 4) keeps the answers so far, for example when the signal drops. Find it again with Continue in the inspections list.
A signed-off inspection cannot be changed. Opening it again shows its report.
Fleet → Inspections and the vehicle's tab
Fleet → Inspections lists every fleet inspection, newest first, with the vehicle, checklist, when it was done, by whom, the odometer and the result.
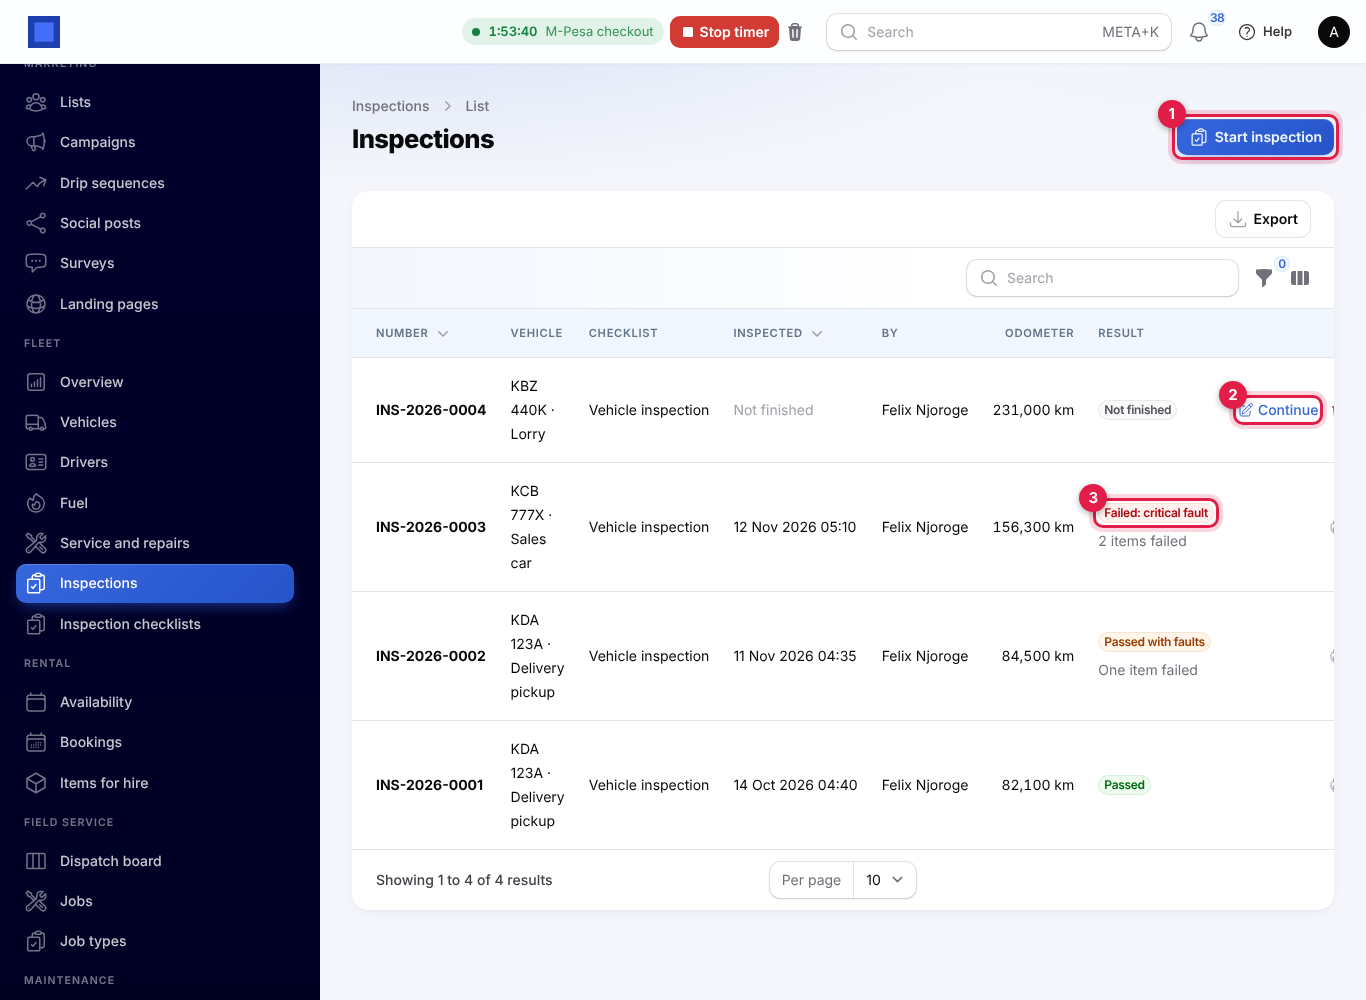
- Start inspection (marker 1) starts a new one.
- Continue (marker 2) reopens an unfinished inspection. Unfinished ones can also be deleted.
- The result (marker 3) shows how many items failed under it.
- Report opens the PDF of a signed-off inspection.
- Filter by Result, or by Status: Not finished or Signed off.
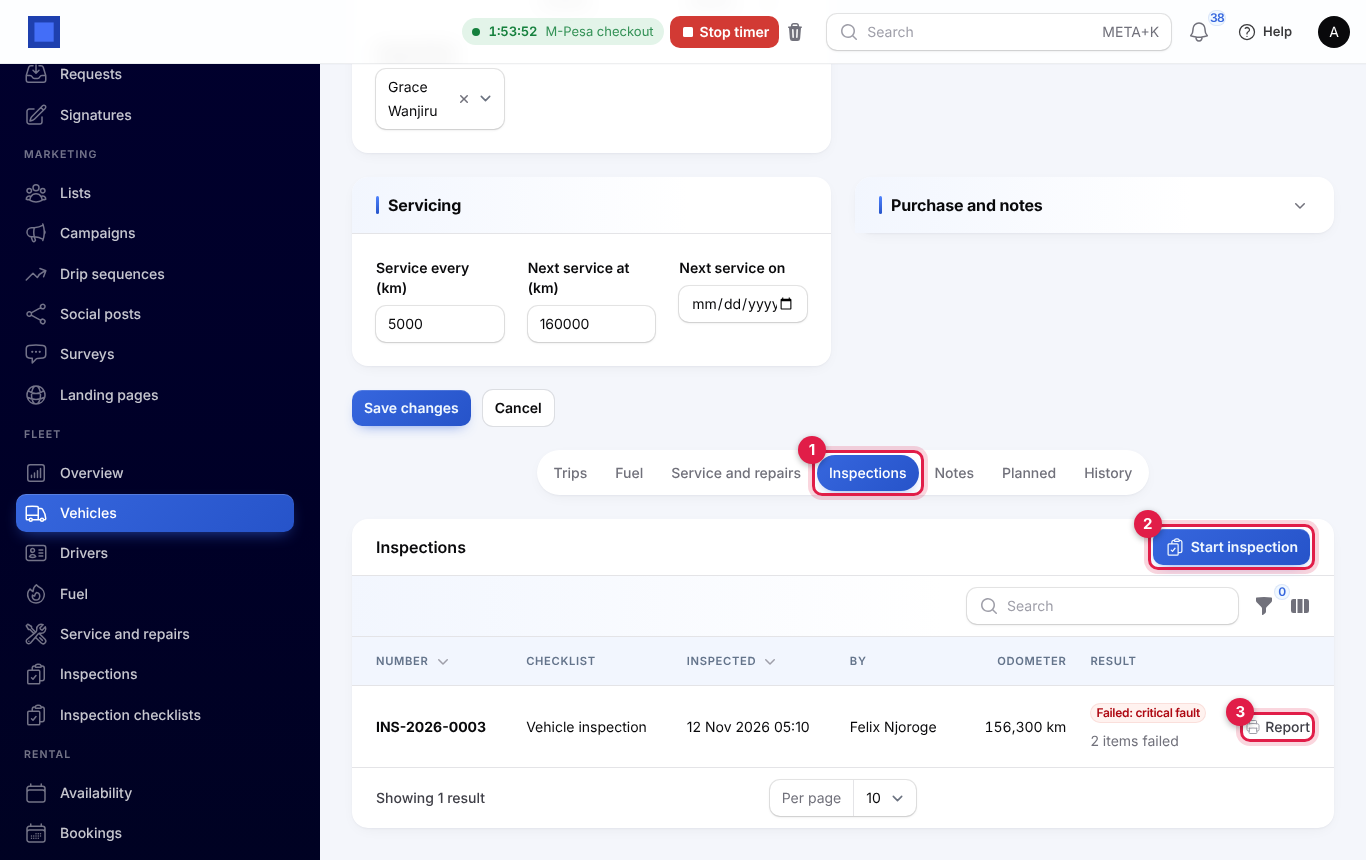
Each fleet vehicle has an Inspections tab (marker 1) with its own history and a Start inspection button (marker 2). Report (marker 3) opens the PDF.
Not roadworthy
When a critical item fails on a fleet vehicle:
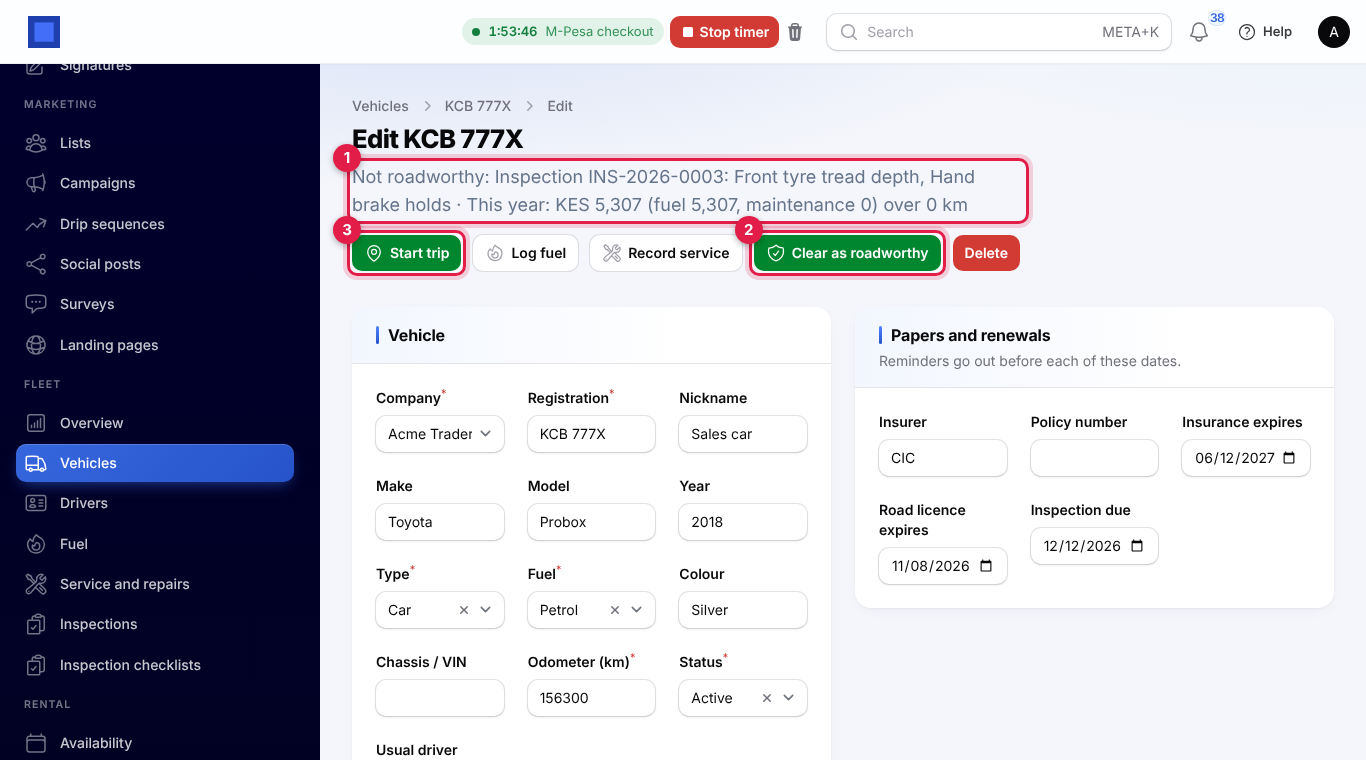
- the vehicle is marked Not roadworthy, with the inspection number and the failed items (marker 1);
- Start trip (marker 3) refuses: "This vehicle is not roadworthy. Clear it once the repair is done.";
- in Fleet → Vehicles its status shows Not roadworthy underneath, and the Roadworthy filter finds these vehicles;
- the fleet reminders list it until it is cleared.
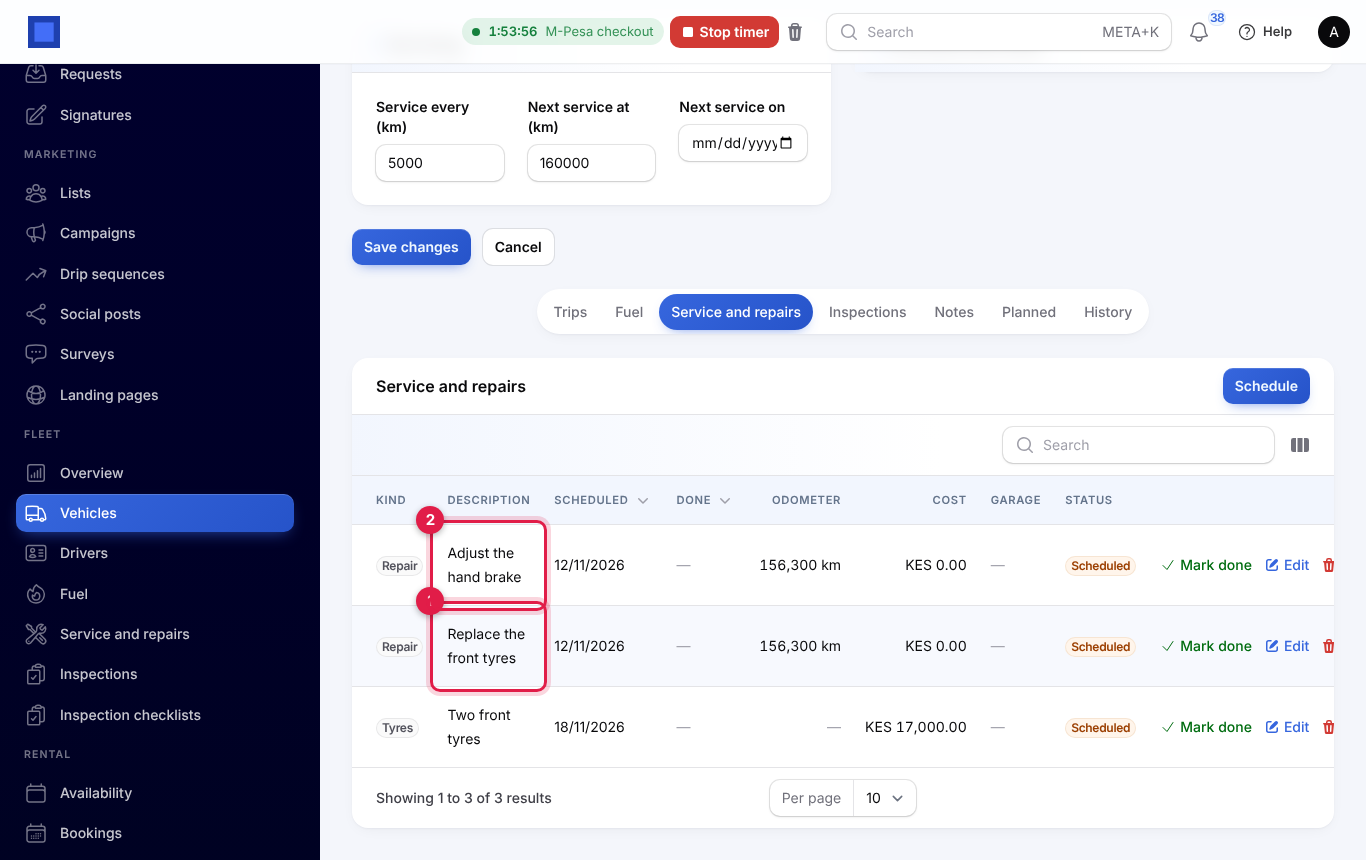
If the checklist raises repairs, each failed critical item becomes a scheduled repair on the vehicle's Service and repairs tab (markers 1 and 2), dated the day it was signed off. Its description is the item's Repair when it fails text, and its notes name the inspection. Mark it done there as usual; see Plan services and repairs.
To put the vehicle back on the road:
- Clear as roadworthy (marker 2 on the vehicle screenshot) once the repair is done, and confirm; or
- do a new inspection. When the latest inspection has no critical fault, the vehicle is cleared by itself.
When the next inspection is due
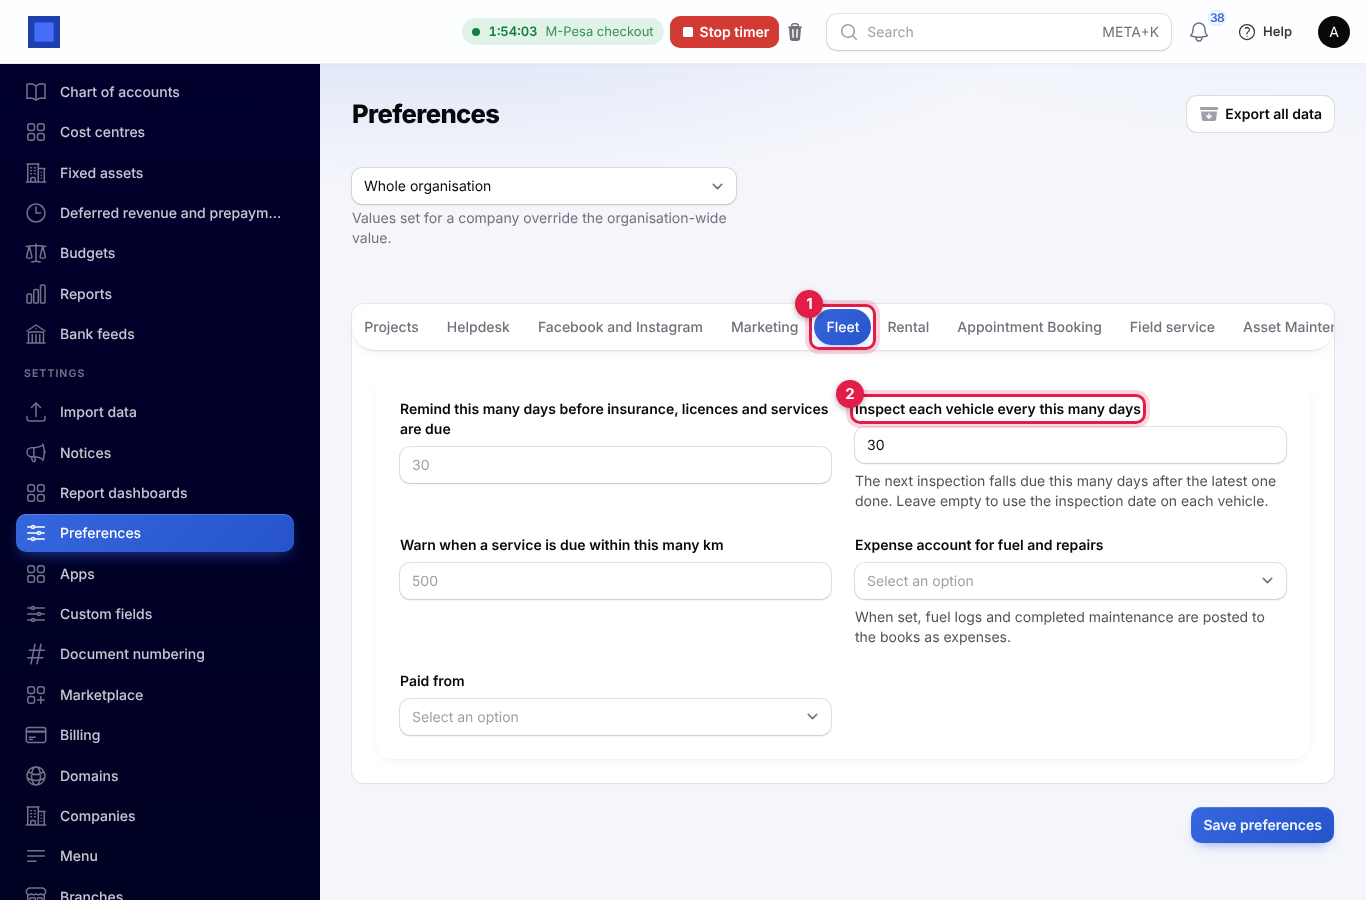
Each signed-off fleet inspection updates the vehicle's odometer and its last inspection date. Set how often vehicles are inspected under Settings → Preferences, Fleet tab (marker 1):
| Setting | What it does |
|---|---|
| Inspect each vehicle every this many days (marker 2) | The next inspection falls due this many days after the latest one signed off, for example 30. The vehicle's Inspection due date and the reminders follow it. Leave it empty to use the Inspection due date typed on each vehicle. |
Entering an older inspection late does not pull the date back, and unfinished inspections do not count. In Fleet → Vehicles, the Inspection column (hidden at first; show it from the columns button) gives the due date and the last inspection date.
At the workshop: check-in inspections
In Garage, inspect the customer's car when it comes in, with a checklist Used for Garage check-in or Fleet and garage.
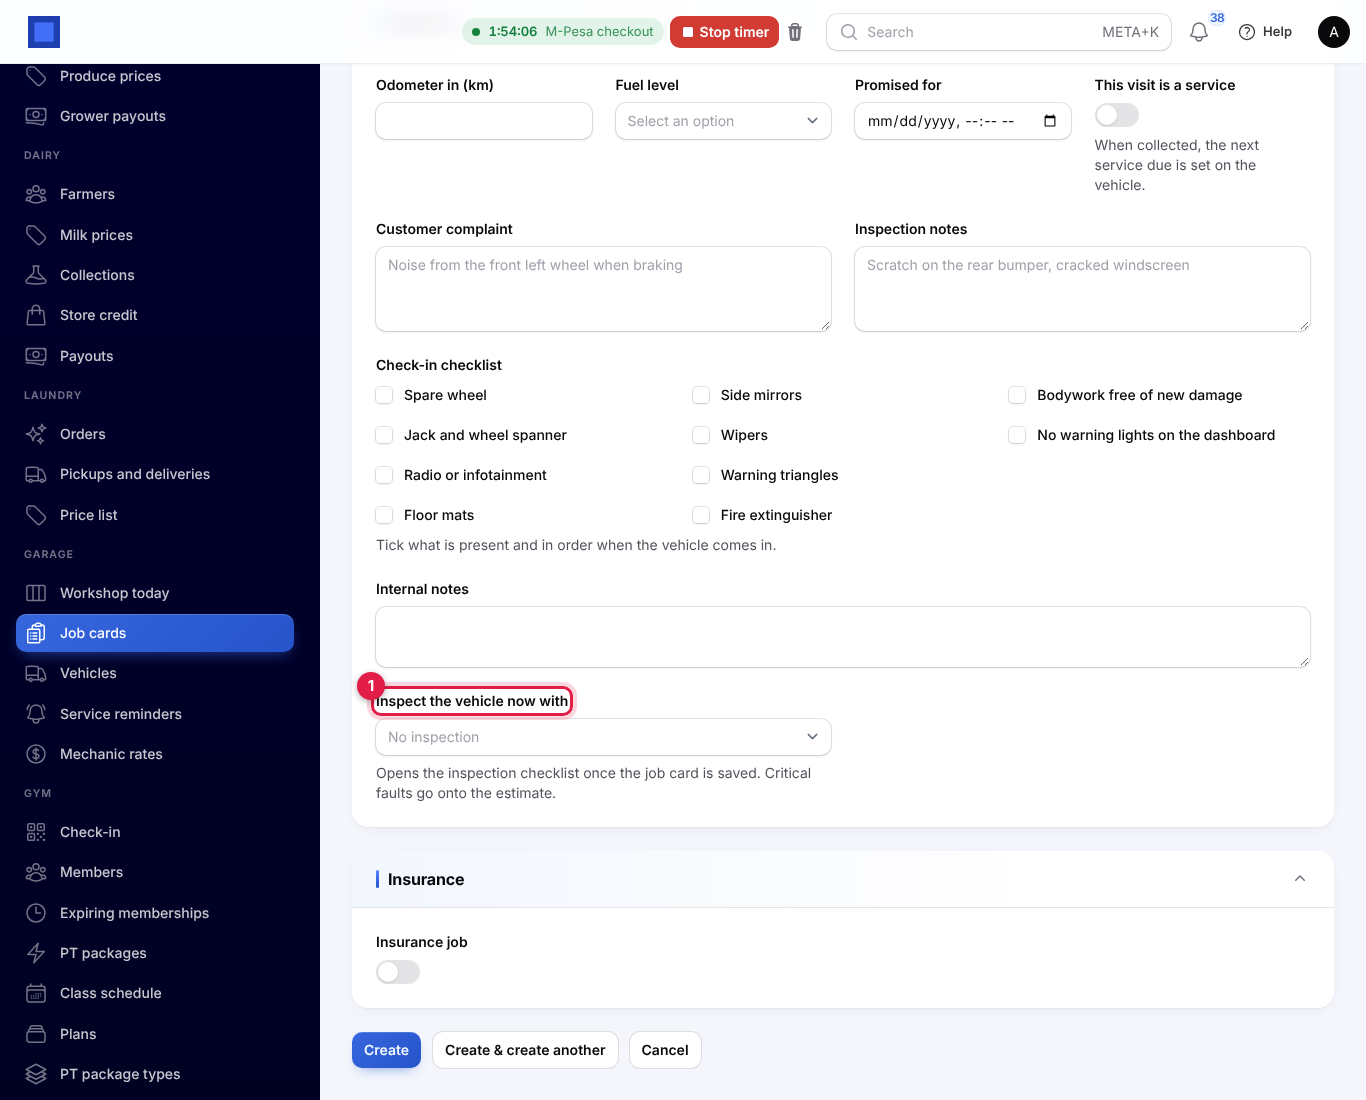
When you check a vehicle in, choose a checklist in Inspect the vehicle now with (marker 1) on the new job card. After Create, the inspection opens straight away. The field shows only when there is a checklist for the garage.
Later, open the job card's Inspections tab (marker 1) and click Inspect the vehicle (marker 2). This works while the job is booked in or being worked on. Report (marker 3) opens a signed-off inspection's PDF. Once you sign off, you return to the job card.
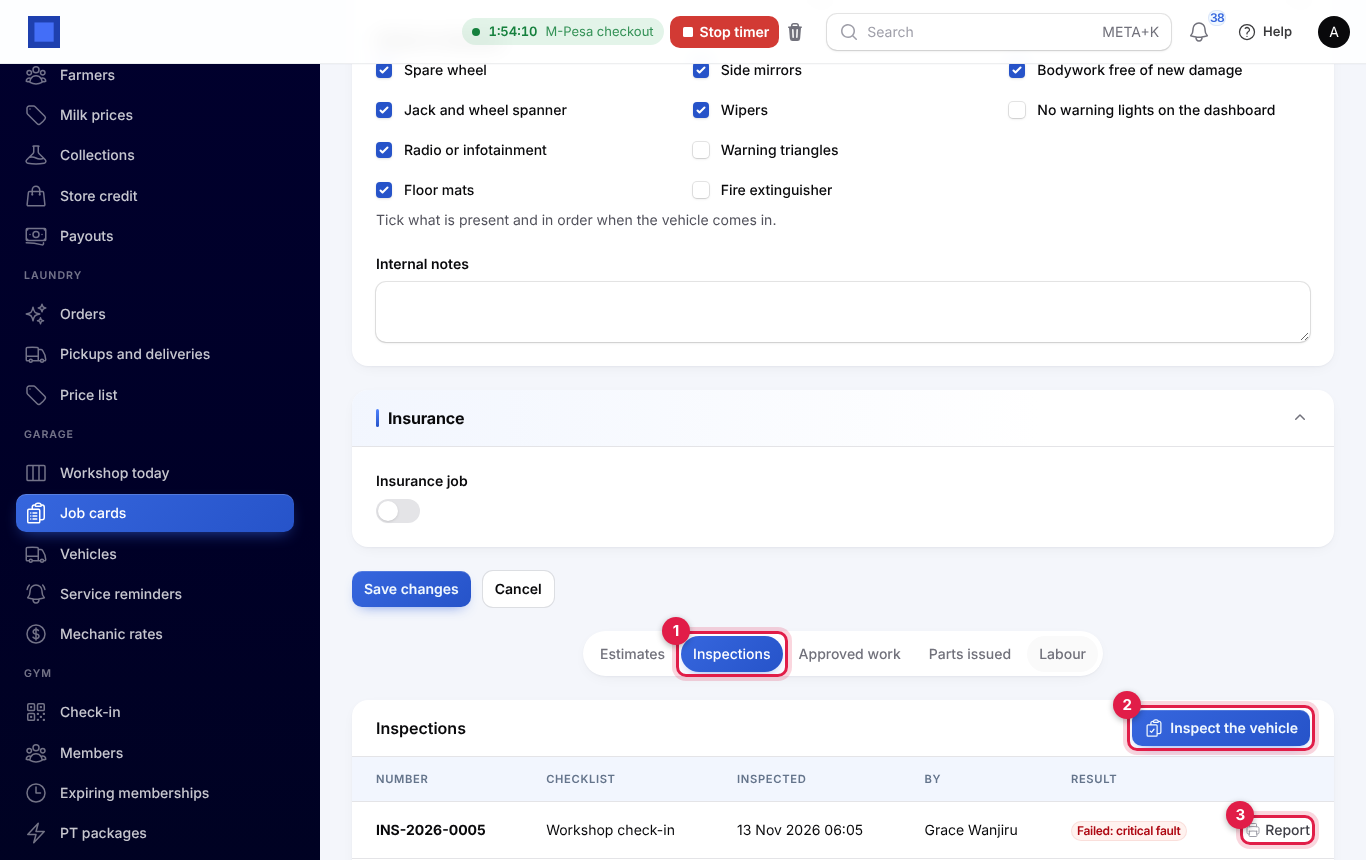
The garage vehicle's own page also has an Inspections tab, listing every inspection it has had across all its job cards.
Failed critical items go on the estimate
When a check-in inspection signs off with critical faults, and its checklist raises repairs, each failed critical item becomes a labour line on the job's estimate:
- the line reads the item's Repair when it fails text (marker 1), or Put right: …;
- it is one hour at your workshop labour rate (marker 2); see Garage settings;
- the estimate's Notes for the customer say which inspection it came from (marker 3).
Click Edit on the estimate in the Estimates tab to see them.
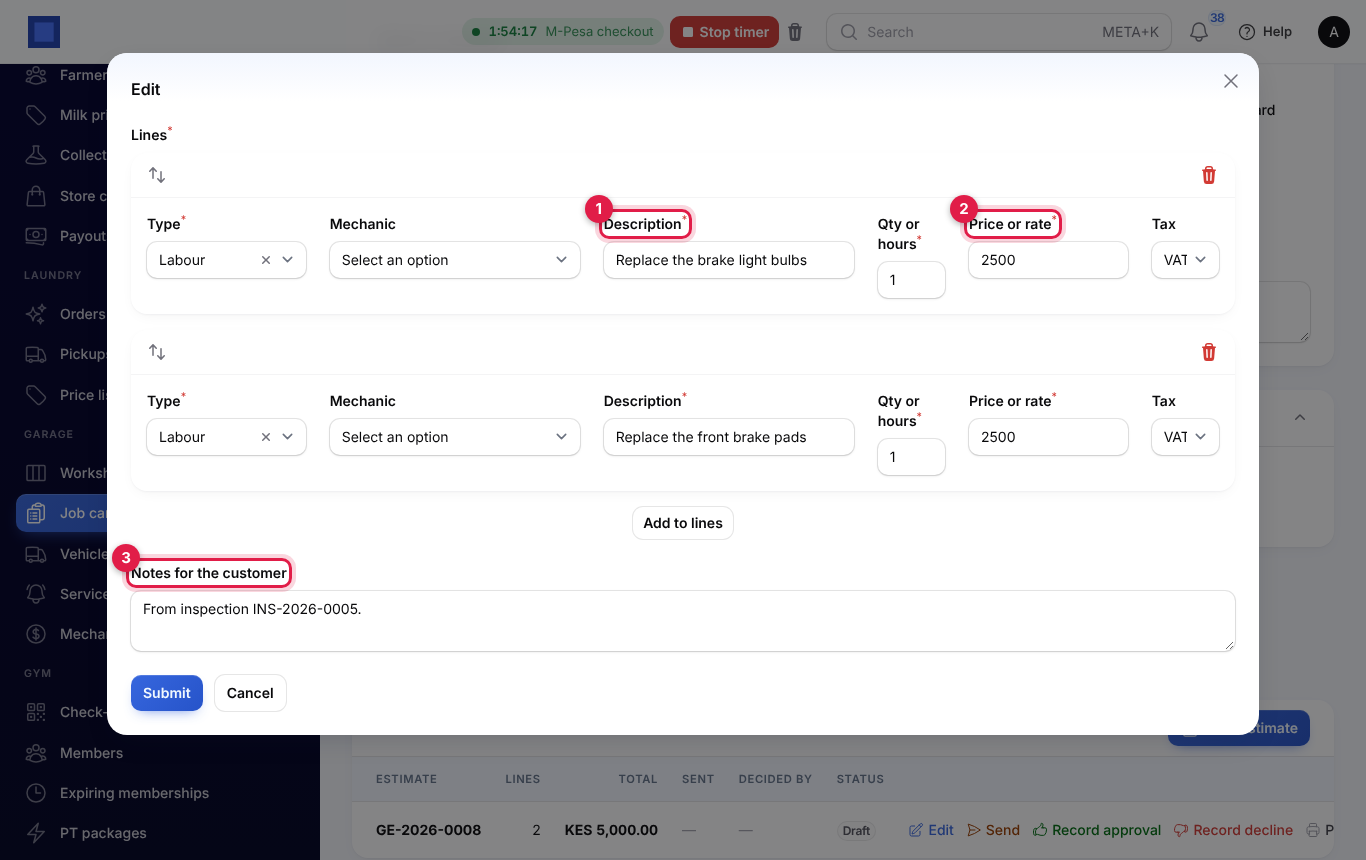
The lines go on the draft estimate not yet sent when there is one, or on a new draft. Price the lines, add parts, then send the estimate as usual; see Estimates. A garage inspection never changes a fleet vehicle.
The inspection report
Report on a signed-off inspection opens a PDF in your document style, with:
- the vehicle, odometer and, at the workshop, the job card;
- the checklist, who inspected it, when, and the result;
- every item by section with its result, the reading and what it must be, the notes and up to two photos;
- the general notes, the signature and the name of who signed.
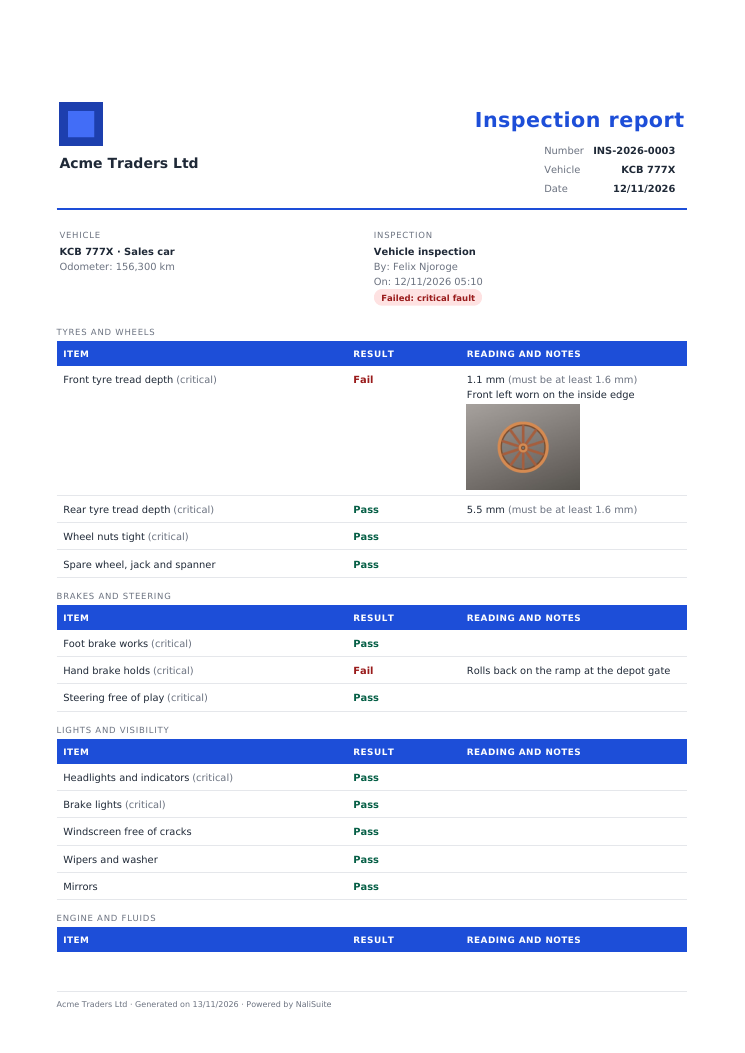
Print it, attach it to an email, or keep it for the insurer or the licensing office.
Good to know
- Numbers run INS-2026-0001, INS-2026-0002 and so on, for fleet and garage together.
- Checklists are kept with the inspection. Deleting or changing a checklist later does not change inspections already done; each keeps its checklist name and items.
- Repairs are raised once. A failed item that already has its repair or estimate line does not get another.
- Garage lines are only added while the job card is booked in or being worked on, not once it is done or collected.
- Photos are up to 8 MB each, four per item. The report prints the first two of each item to keep the PDF small.
- Fleet only or Garage only. With one app on, the checklists show under that app and only its kind of checklist is listed. With both on, they show under Fleet.