KPIs, lent items and staff requests
For HR managers, team leaders and staff. Set targets and track results against them with KPIs, keep track of the laptops, phones, tools and keys you lend to staff, and let staff raise requests such as stationery, IT help or a letter from HR, with approval where it is needed.
You will find these under HRM → KPIs, HRM → KPI scorecards, HRM → Company items, HRM → Asset check-out, HRM → Requests and HRM → Request types. Staff see their own under Me → My KPIs, Me → My items and Me → My requests.
Note: The HRM screens need the hr.view permission. Adding and changing KPIs, recording results, adding items, lending and checking in, changing request types and marking requests done need hr.manage. Approvers decide requests without any HR permission. Owners and admins have all of these. Everyone whose login is linked to an employee record sees their own pages under Me. See Workspace settings.
These features are part of the HR app, which comes with the Professional plan. Switch it on or off under Settings → Apps; see Switching apps on and off. For employees, departments and positions, see HR.
KPIs
A KPI is something you measure against a target, such as sales closed, new customers won or days to collect payment. It can be for one employee, for everyone in a position, or for a department as a whole.
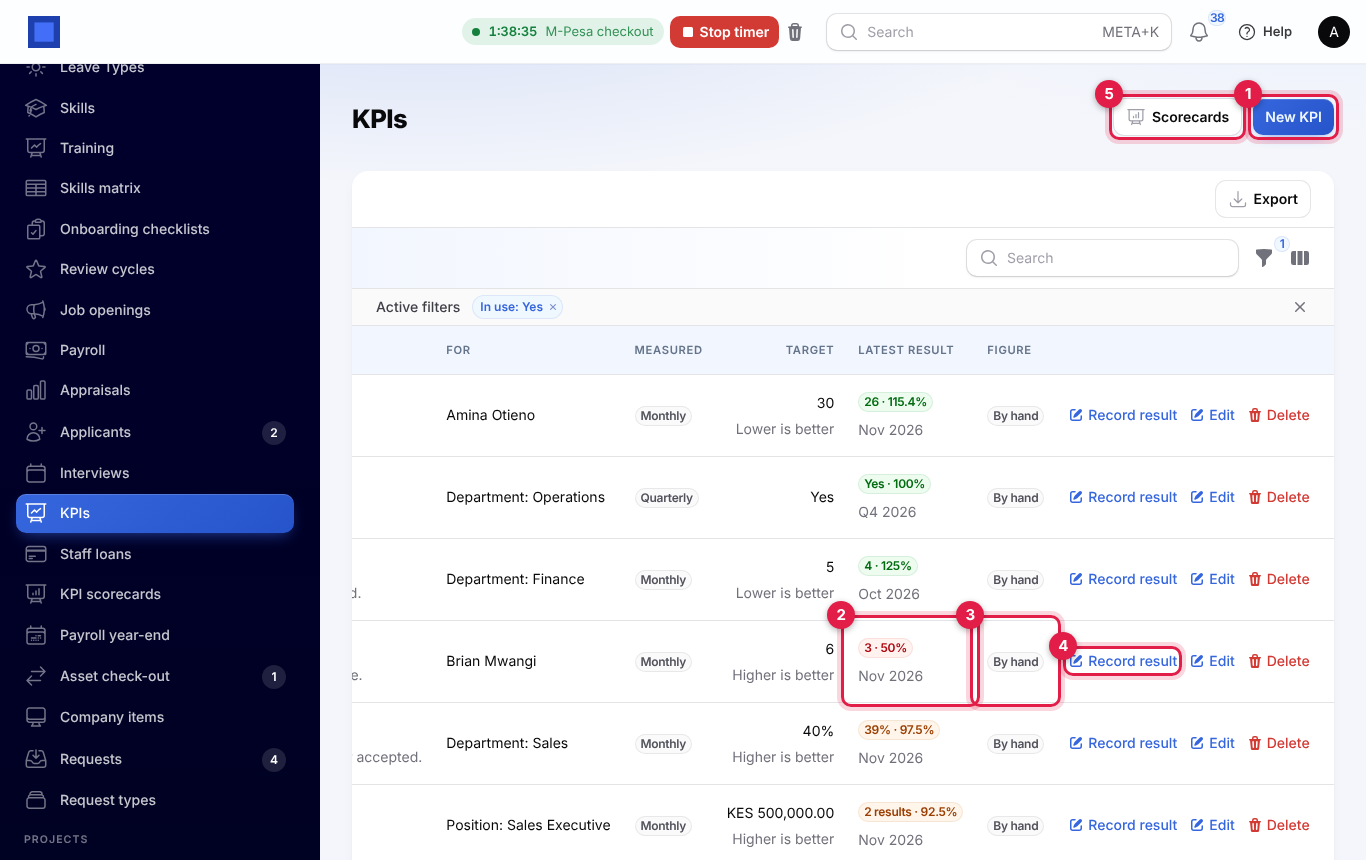
HRM → KPIs lists them, with the target and the Latest result (marker 2): the figure for the most recent period with results and how much of the target it reached, coloured green, amber or red. When several people have a result, as on a position, it shows how many there are and their average. The Figure column (marker 3) says whether results are typed in By hand or come from another app. By default only KPIs In use are shown; the filter also picks by For and Measured.
Set up a KPI
- Press New KPI (marker 1 above).
- Give it a Name and, if you like, a Description saying what counts.
- Fill in the rest of the form and press Create.
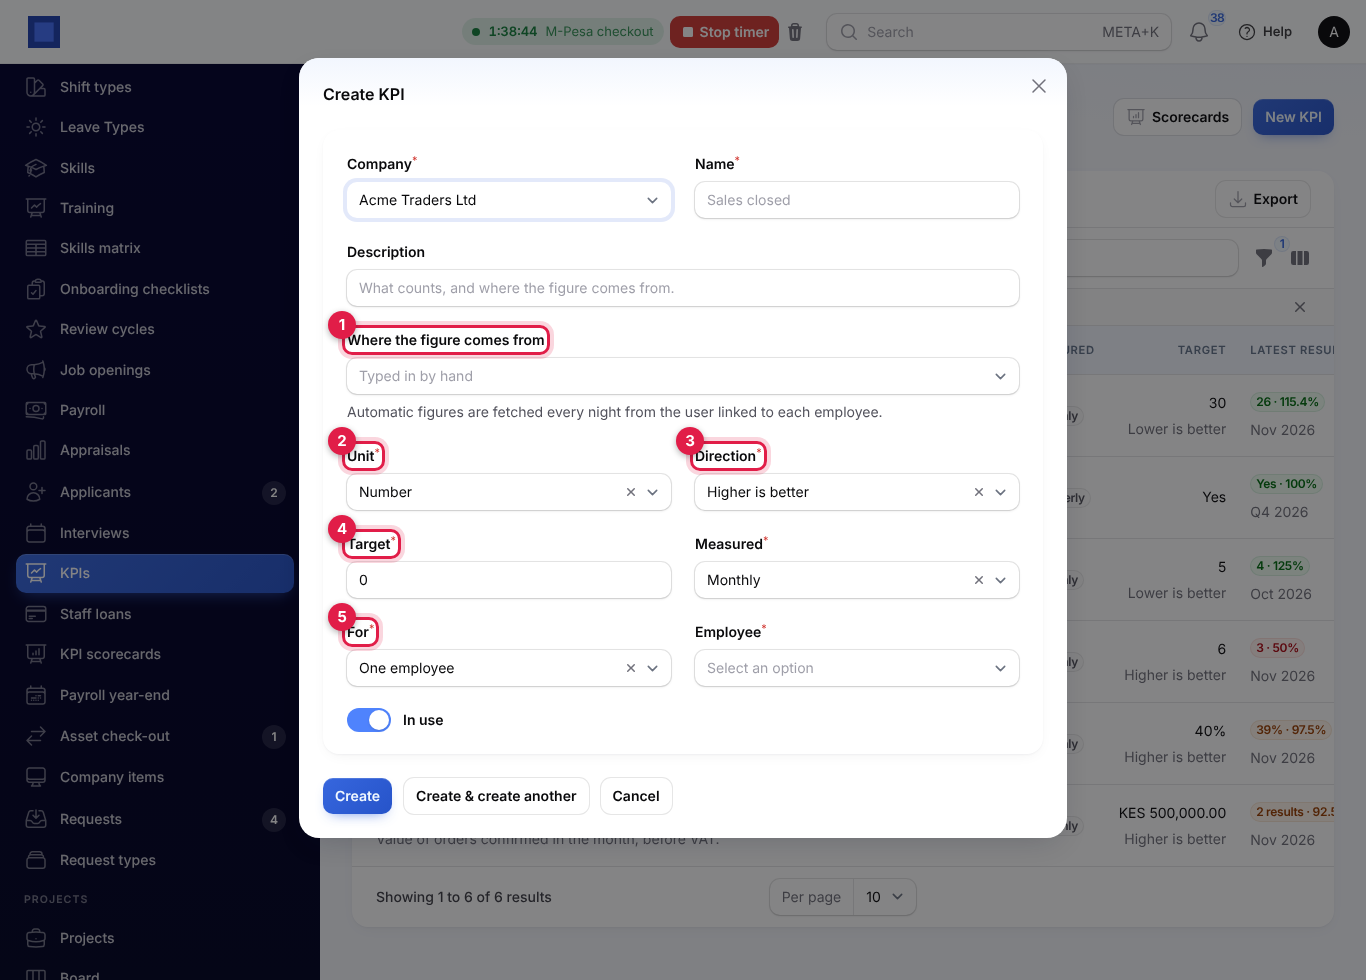
| Field | What it does |
|---|---|
| Where the figure comes from (marker 1) | Empty means Typed in by hand. Or pick a figure fetched from another app; see Automatic KPI figures. |
| Unit (marker 2) | Number, Money (in your company's currency), Percent or Yes or no. |
| Direction (marker 3) | Higher is better (sales) or Lower is better (days to collect payment, complaints). For a yes-or-no KPI this is the Aim: Yes is the aim or No is the aim. |
| Target (marker 4) | The figure to reach each period. Not asked for a yes-or-no KPI. |
| Measured | Monthly, Quarterly or Yearly: how often a result is recorded. |
| For (marker 5) | One employee, Everyone in a position (each person in the position gets their own result) or A department as a whole (one result for the department). Then choose the Employee, Position or Department. |
| In use | Switch off to stop using the KPI and hide it from scorecards. Its results are kept. |
Record a result
- Press Record result on the KPI's row (marker 4 in the list).
- For a personal KPI, choose the Employee: the employee, or anyone currently in the position.
- Choose the Period. The last 12 months, quarters or years are offered, newest first.
- Type the Actual, or choose Yes or No for a yes-or-no KPI, add a Note if you like, and press Submit.
Recording a period again replaces the earlier figure.
How results are scored
Each result is turned into a share of the target:
- Higher is better: actual ÷ target. 45 sales against a target of 50 is 90%.
- Lower is better: target ÷ actual. 6 days against a target of 5 is 83%; 4 days is 125%.
- Yes or no: 100% when the answer is the aim, 0% when it is not.
Scores are capped at 200%, so one very good month does not swamp an average. The colours are the same everywhere:
| Colour | Means |
|---|---|
| Green, On target | 100% or more. |
| Amber, Close | 80% to 99%. |
| Red, Off target | Below 80%. |
| Grey, No result yet | Nothing recorded for the period. |
Automatic KPI figures
Instead of typing results, a KPI can take its figure from another app. Only the sources whose apps are on are offered:
| Source | Needs | What is counted |
|---|---|---|
| Sales invoiced on their sales orders (before tax) | Sales and Invoicing | Issued, part-paid and paid invoices dated in the period, from sales orders where they are the salesperson. |
| Point of sale takings they rang up | Point of Sale | Their till sales in the period, not counting refunds. |
| Support tickets they solved | Helpdesk | Tickets assigned to them and resolved in the period. |
Choosing a source sets the Unit for you. Figures are counted for the login linked to each employee, so link employees to their logins (an employee without one is skipped). For a department KPI, the figures of all its active staff with logins are added up.
Figures for the current and the previous period are fetched every night. To fetch them now, press Fetch figures on the KPI's row, or Fetch automatic figures at the top of the list for all of them. While a source's app is switched off, nothing is fetched, the Figure column says By hand (app switched off) and you can type results with Record result. Earlier figures are kept.
KPI scorecards
HRM → KPI scorecards (or Scorecards, marker 5 in the list) puts target against actual for one person or one department.
- Choose By employee or By department (marker 1).
- Choose the employee (only people with at least one KPI are listed) or the department.
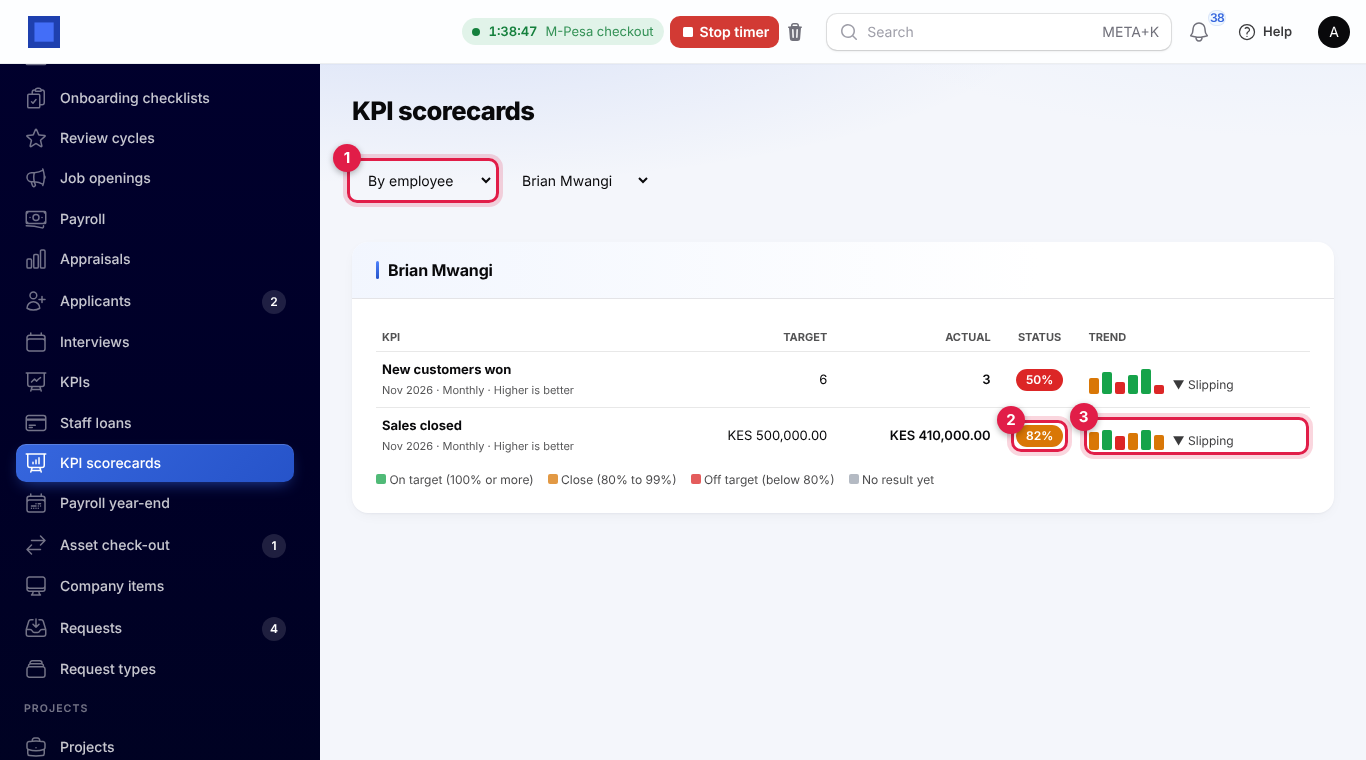
By employee shows each of their KPIs, their own and their position's, for this period: the Target, the Actual and the Status (marker 2) as a coloured percentage. The Trend (marker 3) has one bar per period for the last six, coloured the same way, and says Improving, Slipping or Steady by comparing the last two periods with results.
By department shows the department's own KPIs in the same way, then Members this period: each person in the department, how many KPIs they have and their Average score on them.
My KPIs
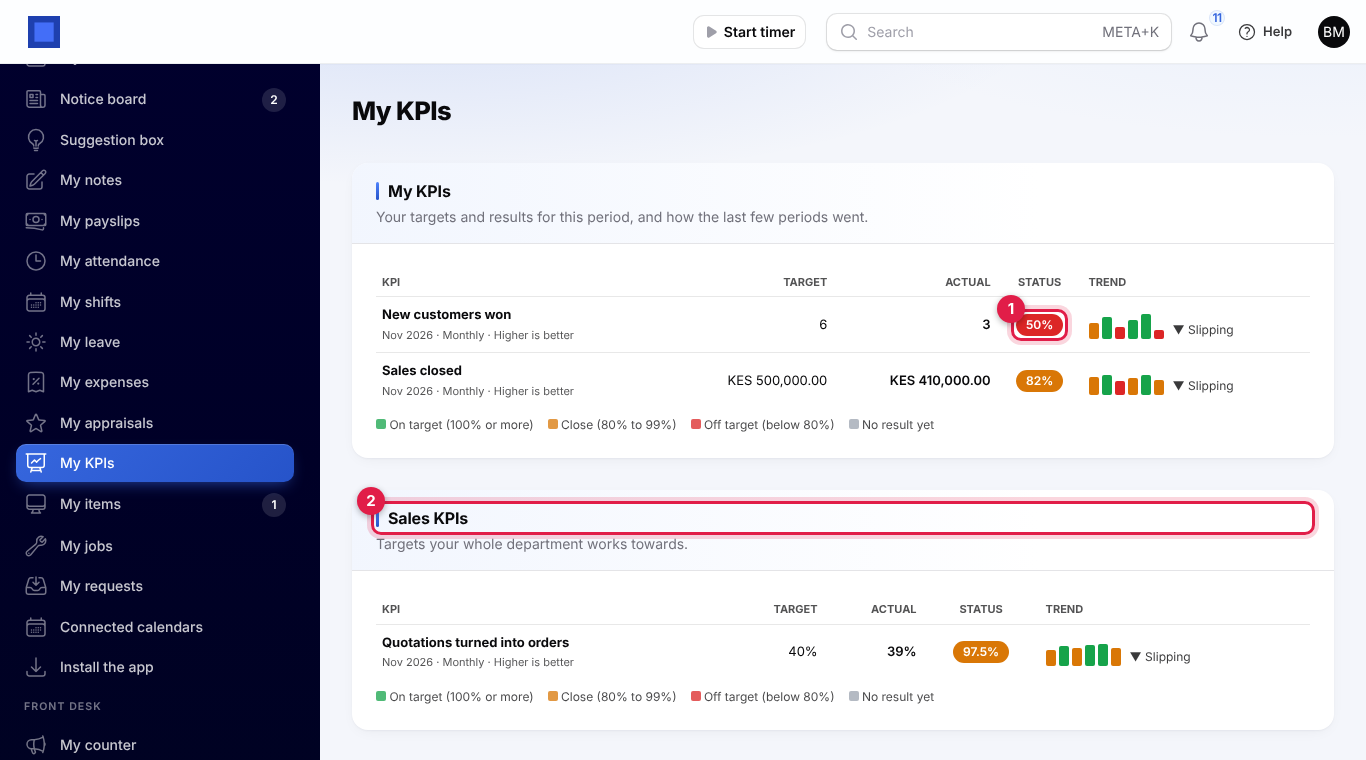
Staff see their own scorecard under Me → My KPIs: their KPIs and their position's, with the status (marker 1), and below it their department's KPIs (marker 2), the targets the whole team works towards. They never see other people's KPIs.
KPIs in appraisals
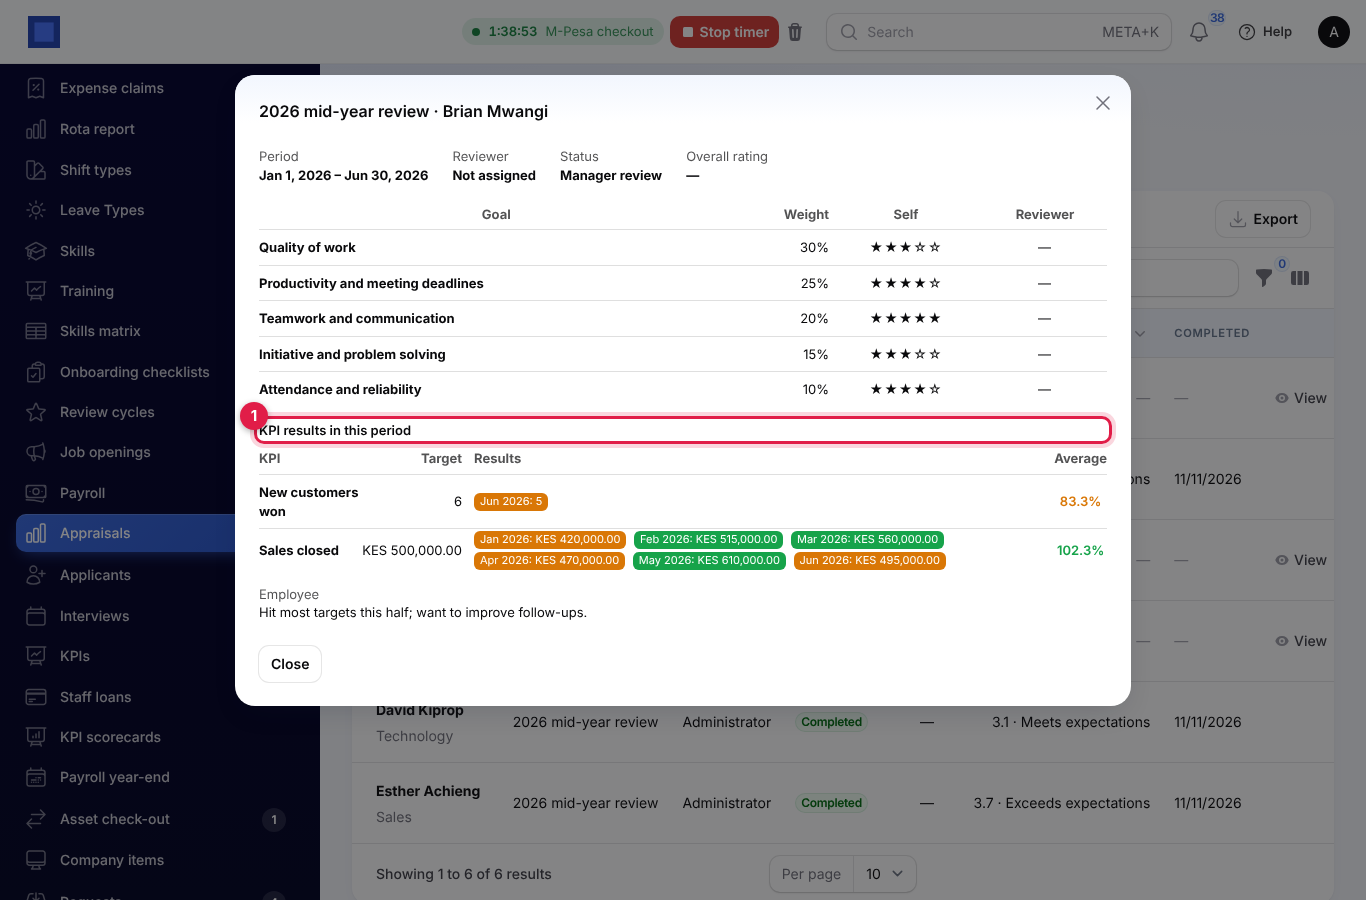
When you View an appraisal, under HRM → Appraisals or Me → My appraisals, a KPI results in this period table (marker 1) lists each of the employee's KPIs with results in the review cycle's dates: the target, each period's result coloured by how it did, and the average. Use it to back up the goal ratings. See Run appraisals and 360° feedback.
Company items
HRM → Company items is the list of things you lend to staff. The Status shows Available, Out with a name, Overdue with a name in red (marker 2) or Not in use.
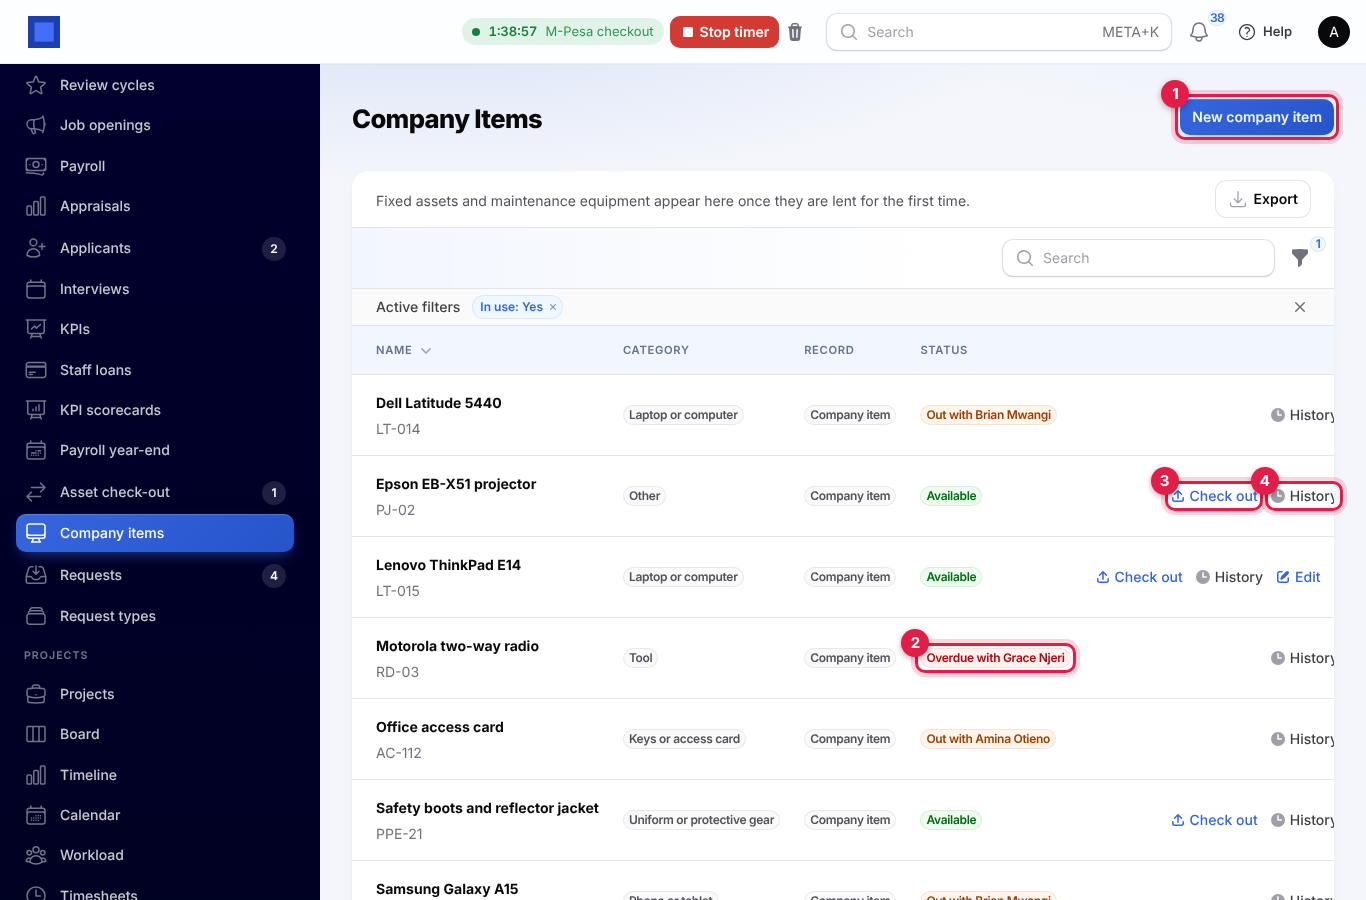
To add an item, press New company item (marker 1) and fill in:
- Name, such as Dell Latitude 5440;
- Category: laptop or computer, phone or tablet, tool, vehicle keys, uniform or protective gear, keys or access card, or other;
- Tag or serial number;
- Notes;
- In use: switch off for items sold, written off or lost.
You do not need to add your fixed assets (with Accounting on) or maintenance equipment (with Maintenance on) here. You can lend them straight away, and they appear in this list, marked Fixed asset or Equipment under Record, the first time they are lent.
On each row:
- Check out (marker 3) lends an available item; see the next section.
- History (marker 4) lists everyone who has had the item: when it went out and came back, the condition both ways and when it was signed for.
- Delete is only offered for items never lent. Switch off In use for the others.
Lend an item
- Press Check out under HRM → Asset check-out, on the item's row in Company items, or on the employee's Items lent tab.
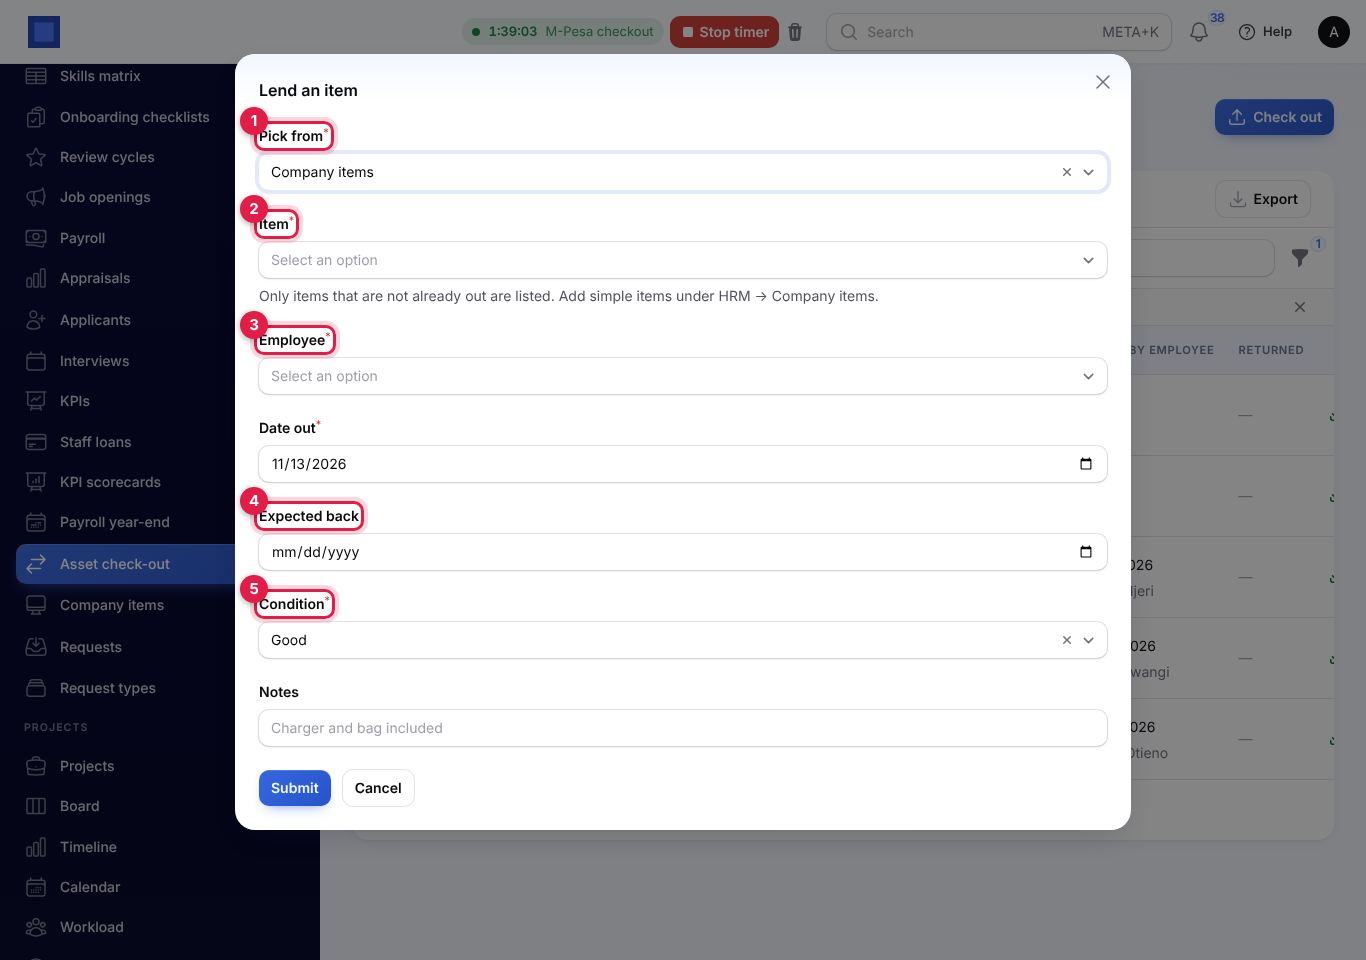
- Under Pick from (marker 1), choose Company items, Fixed assets or Maintenance equipment.
- Choose the Item (marker 2). Only items that are not out already are listed. (From an item's row, the item is already chosen.)
- Choose the Employee (marker 3). (From the employee's tab, the employee is already chosen.)
- Check the Date out, and set Expected back (marker 4) if it should come back by a date; it cannot be before the date out. Leave it empty for something kept for the job, such as a work laptop.
- Choose the Condition (marker 5): New, Good, Fair, signs of wear, Damaged or Not working. Add Notes, such as "Charger and bag included".
- Press Submit.
The employee is told the item has been lent to them and asked to acknowledge it under Me → My items.
Follow what is out
HRM → Asset check-out lists every check-out. It shows what is Out now at first; the filter also shows Overdue or Returned items, one employee or one item. The number next to Asset check-out in the menu is how many are overdue.
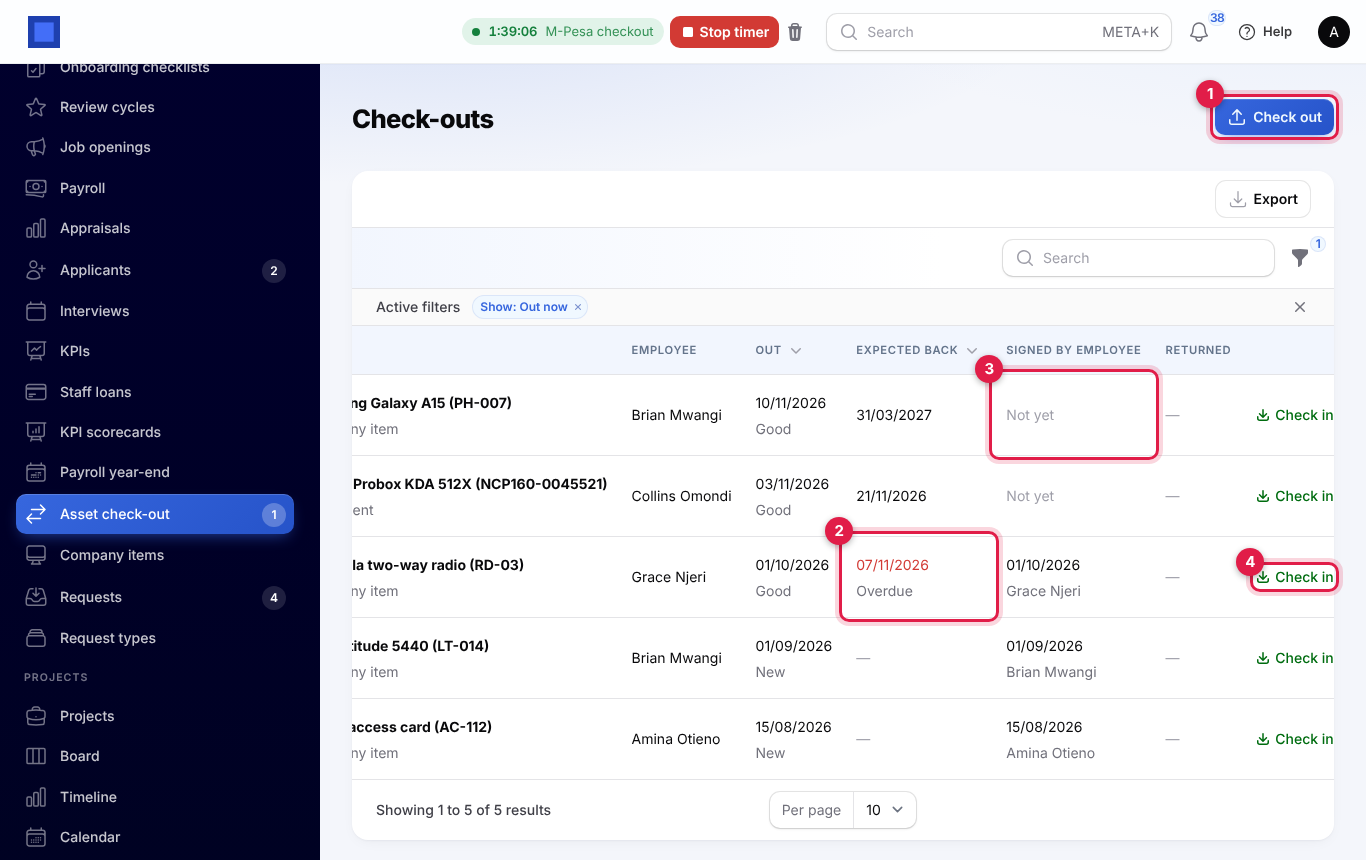
- Expected back turns red and says Overdue (marker 2) once the date has passed.
- Signed by employee shows when and with what name the employee acknowledged the item, or Not yet (marker 3).
Check an item back in
- Press Check in on the row (marker 4).
- Enter the Date returned, the Condition it came back in and any Notes, such as "Screen cracked".
- Press Submit.
Choose Lost or not returned as the condition for an item that will not come back: the check-out is closed and the item is switched to Not in use.
On the employee's record
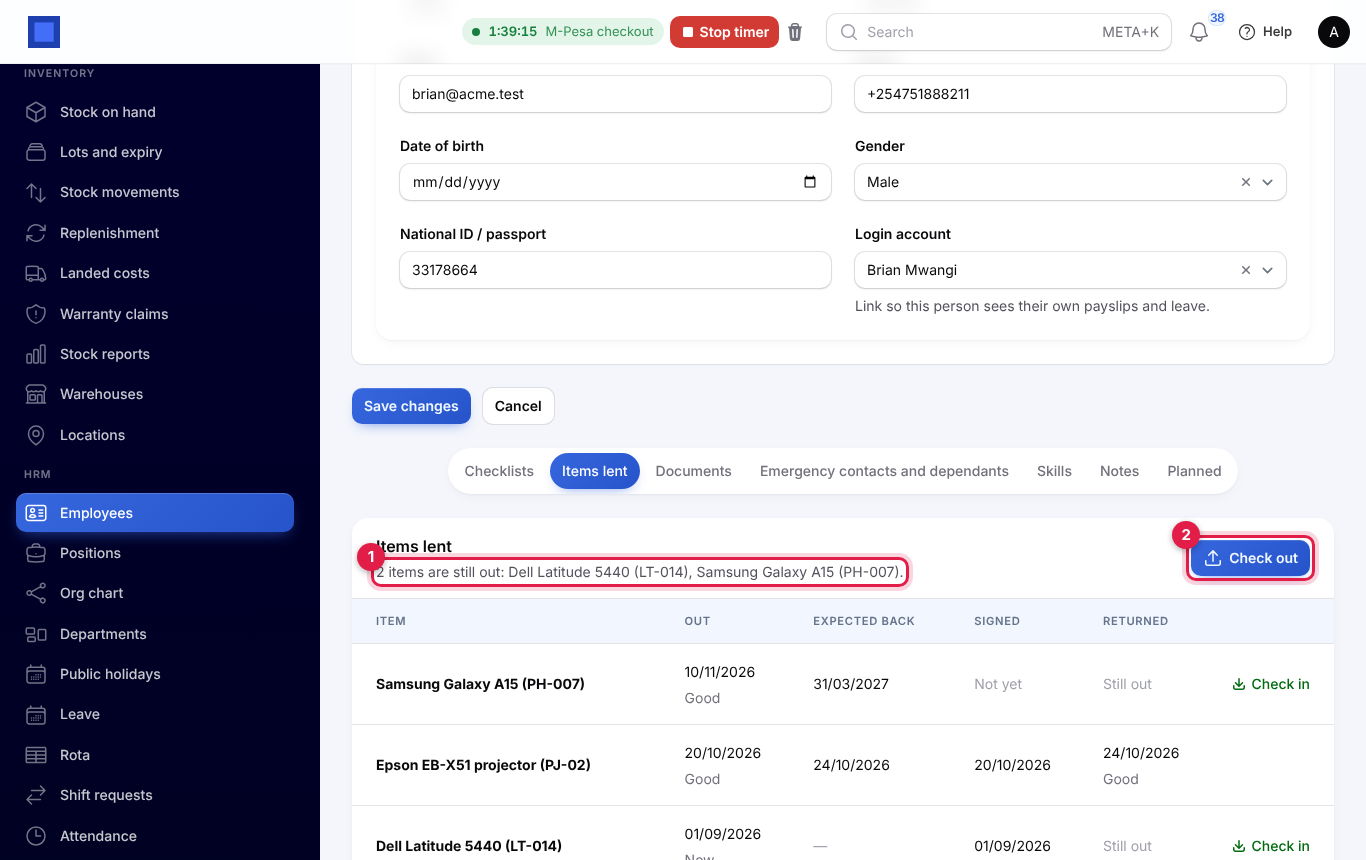
Open the employee under HRM → Employees and click the Items lent tab. It lists everything they have had, says which items are still out (marker 1), and has Check out (marker 2) to lend them something and Check in on each row.
When someone leaves
When you press Start offboarding on an employee, the window lists the items still out, for example "2 items are still out: Dell Latitude 5440 (LT-014), Samsung Galaxy A15 (PH-007).", and so does the message once offboarding has started. The Checklists tab keeps showing it until everything is checked in. See Offboard a leaver.
My items
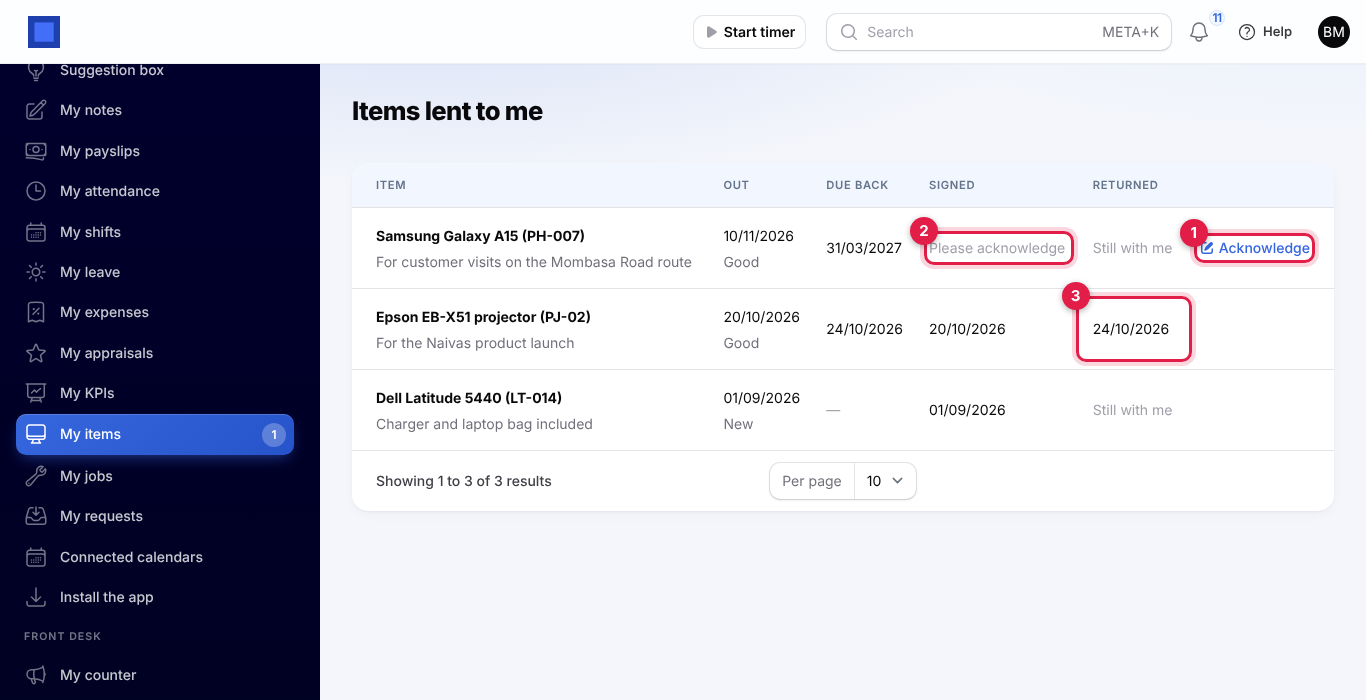
Under Me → My items, staff see Items lent to me: what they have now and what they have returned, with the date each is Due back. The number in the menu is how many are waiting to be acknowledged.
To acknowledge an item:
- Press Acknowledge (marker 1) on an item that says Please acknowledge (marker 2).
- Tick I have received this item as described, will look after it and return it when asked.
- Type your full name to sign, and press Submit.
The date and the name you typed show in HR's list. Returned items show the date they came back (marker 3).
Overdue reminders
Every morning, NaliSuite checks for items past their Expected back date:
- Each employee is told "… was due back …" and asked to return it to HR or ask for more time.
- Everyone with hr.manage gets one message listing the overdue items, with a button to Asset check-out.
The reminder repeats every 7 days while the item stays out.
Request types
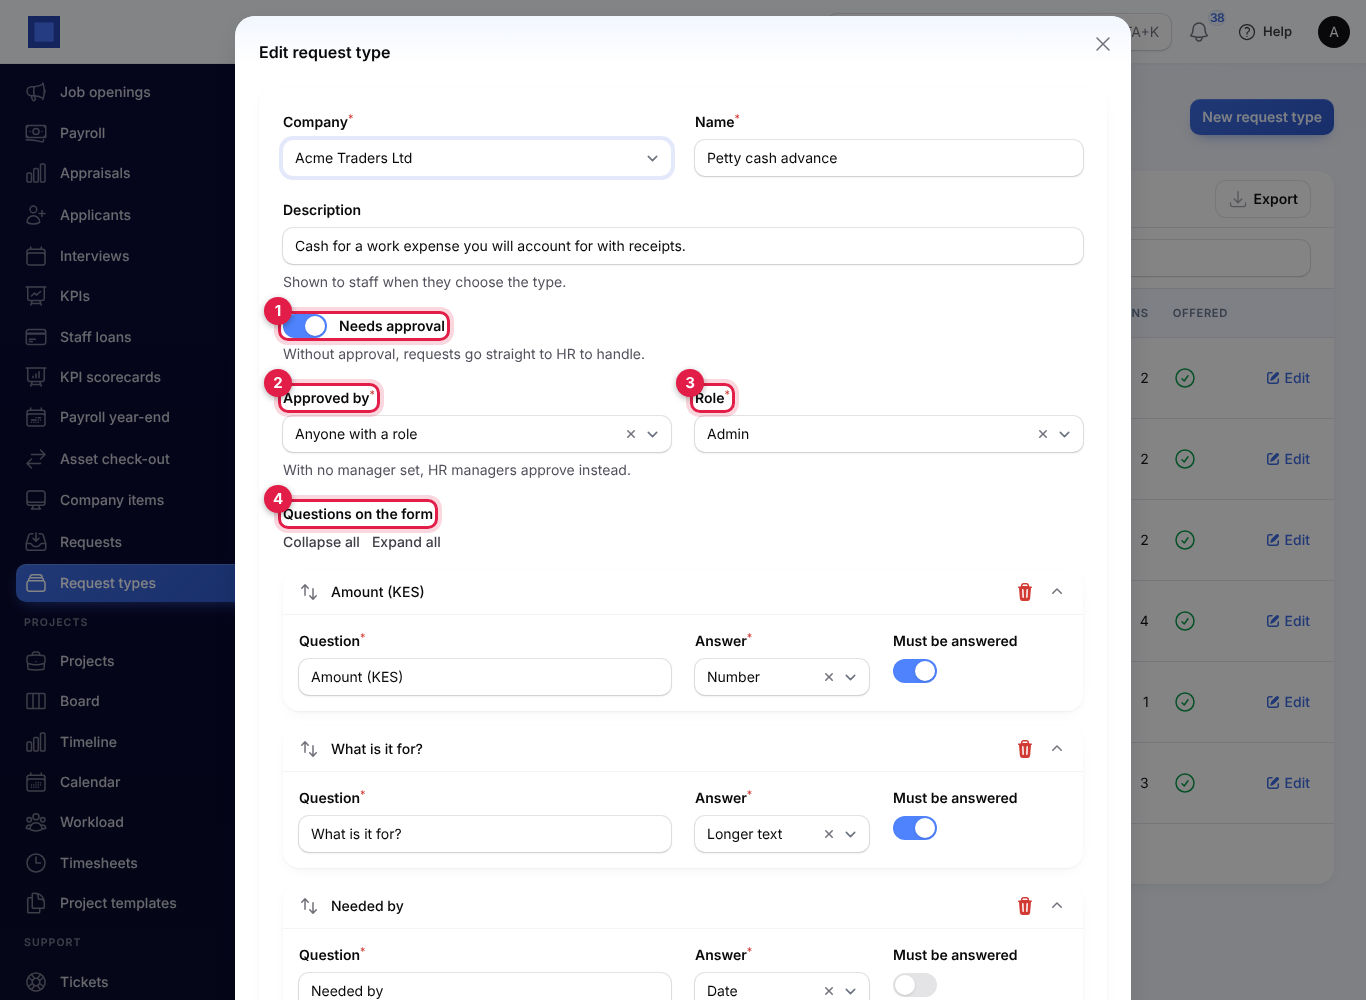
HRM → Request types sets up what staff can ask for. Five types are ready the first time it is opened: Stationery, IT help and Letter from HR, which need no approval, and Time off in lieu and Equipment, approved by the employee's manager. Change them freely, or press New request type.
| Field | What it does |
|---|---|
| Name and Description | The description is shown to staff when they choose the type. |
| Needs approval (marker 1) | Without approval, requests go straight to HR to handle. |
| Approved by (marker 2) | The employee's manager, Anyone with a role (choose the Role, marker 3) or A named person (choose the Person). |
| Questions on the form (marker 4) | Up to 8. Each has the Question, the kind of Answer (Short text, Longer text, Number, Date or Pick from a list, with the Choices, separated by commas) and whether it Must be answered. |
| Offered to staff | Switch off to stop offering the type. Requests already raised are kept. |
A type can only be deleted while no request uses it.
Who approves
The approvers are fixed when a request is submitted:
- The employee's manager is the person in the employee's Reports to, or else their department's manager, as long as that person has a login.
- Anyone with a role is everyone with that role; the first to decide settles it.
- Nobody approves their own request. When no one is left, HR managers (people with hr.manage) approve instead, and failing them the owner.
The workspace owner can always approve or reject.
Raise a request
Staff raise requests under Me → My requests.
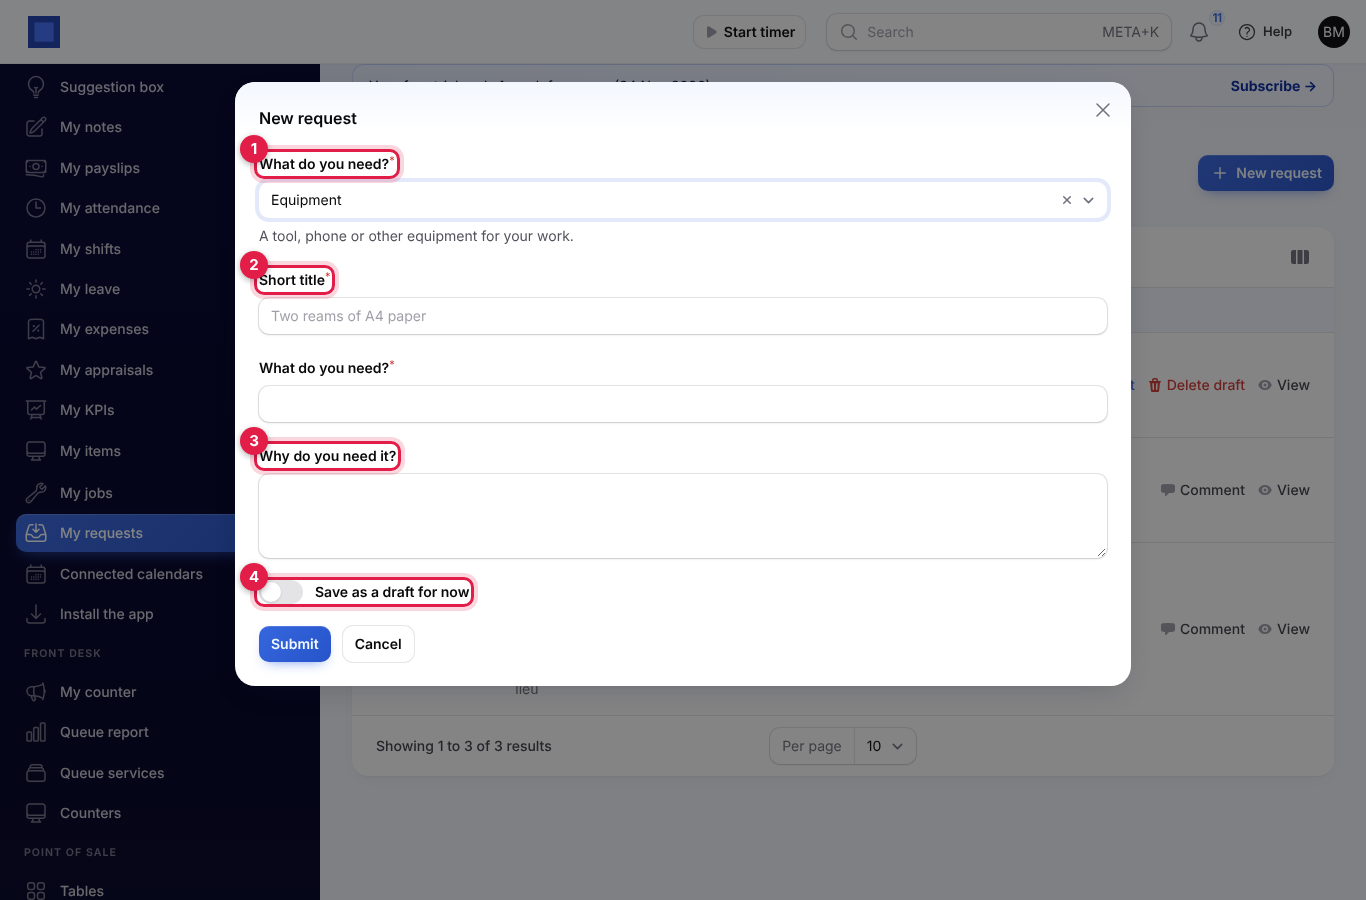
- Press New request.
- Under What do you need? (marker 1), choose the type. Its description shows below.
- Give a Short title (marker 2), such as "A second monitor".
- Answer the type's questions (marker 3).
- Press Submit to send it, or tick Save as a draft for now (marker 4) to finish it later.
Each request gets a number such as REQ-2026-0004. A draft has Submit and Delete draft on its row; it cannot be submitted until every question that must be answered is answered.
My requests lists your own requests ("Me" under From), with their status and the note left by whoever decided. Approvers also find the requests waiting for them here, with the number in the menu, even if they are not in HR.
| Status | Means |
|---|---|
| Draft | Saved, not sent. Only the requester sees it. |
| Submitted | Waiting for the approver, or for HR when no approval is needed. |
| Approved | Approved; HR still has to handle it. |
| Rejected | Turned down, with the reason. |
| Done | Handled. |
Handle requests
HRM → Requests lists every request except drafts. The number in the menu counts those Submitted or Approved, which still need someone. Filter by Status or Type.
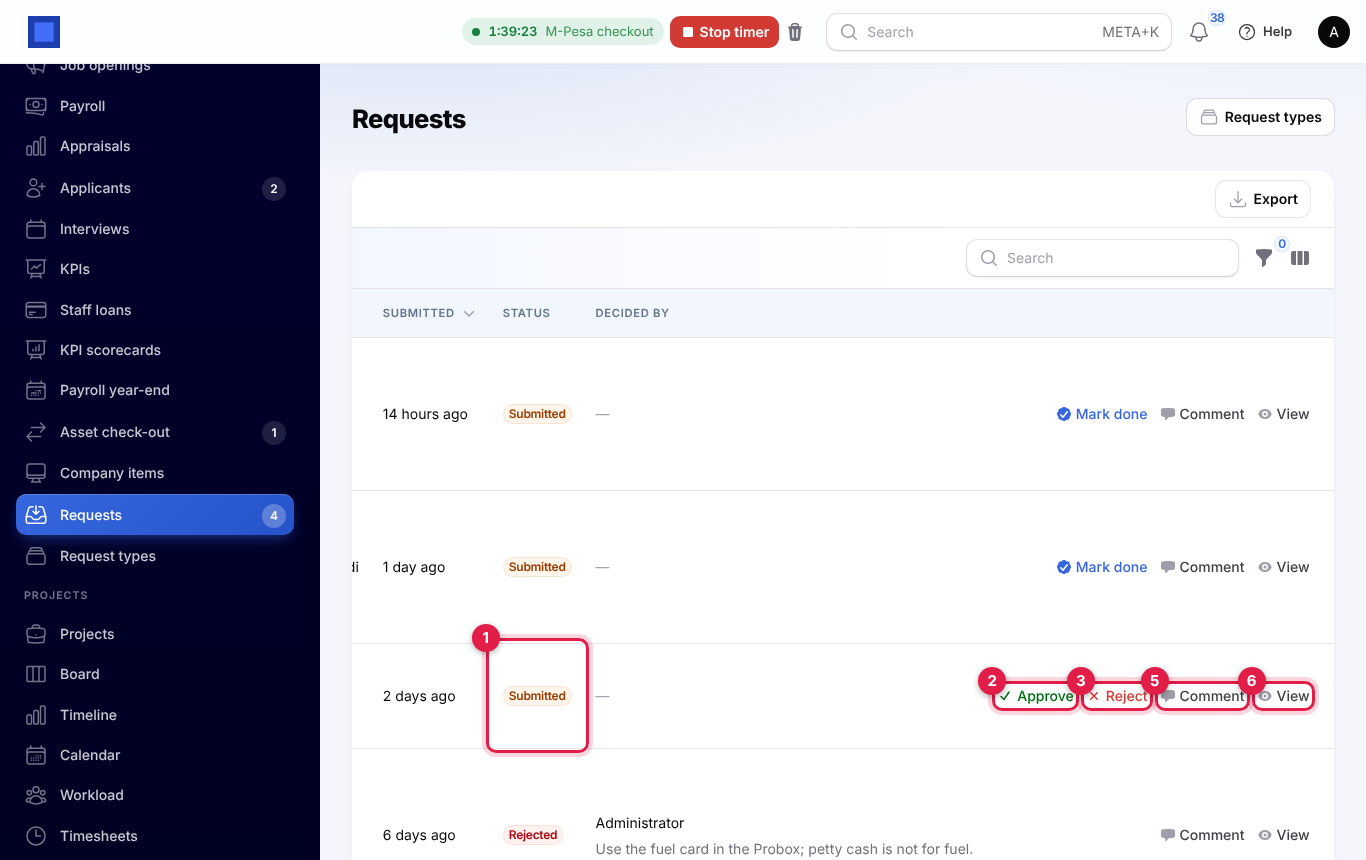
The buttons on each row (marker 1 is the status):
- Approve (marker 2), with an optional note. Shown to the request's approvers.
- Reject (marker 3). Say Why?; the requester sees it.
- Mark done (marker 4) once it has been handled, with an optional note for the requester, such as "Collect it from IT". It is offered on approved requests and on submitted ones that need no approval, to people with hr.manage and to the approvers.
- Comment (marker 5), to ask a question or give an update.
- View (marker 6) shows the answers, who decided and who closed it, and Comments and history (marker 1 below): every comment and every step, such as "Approved by Jane Wanjiku.".
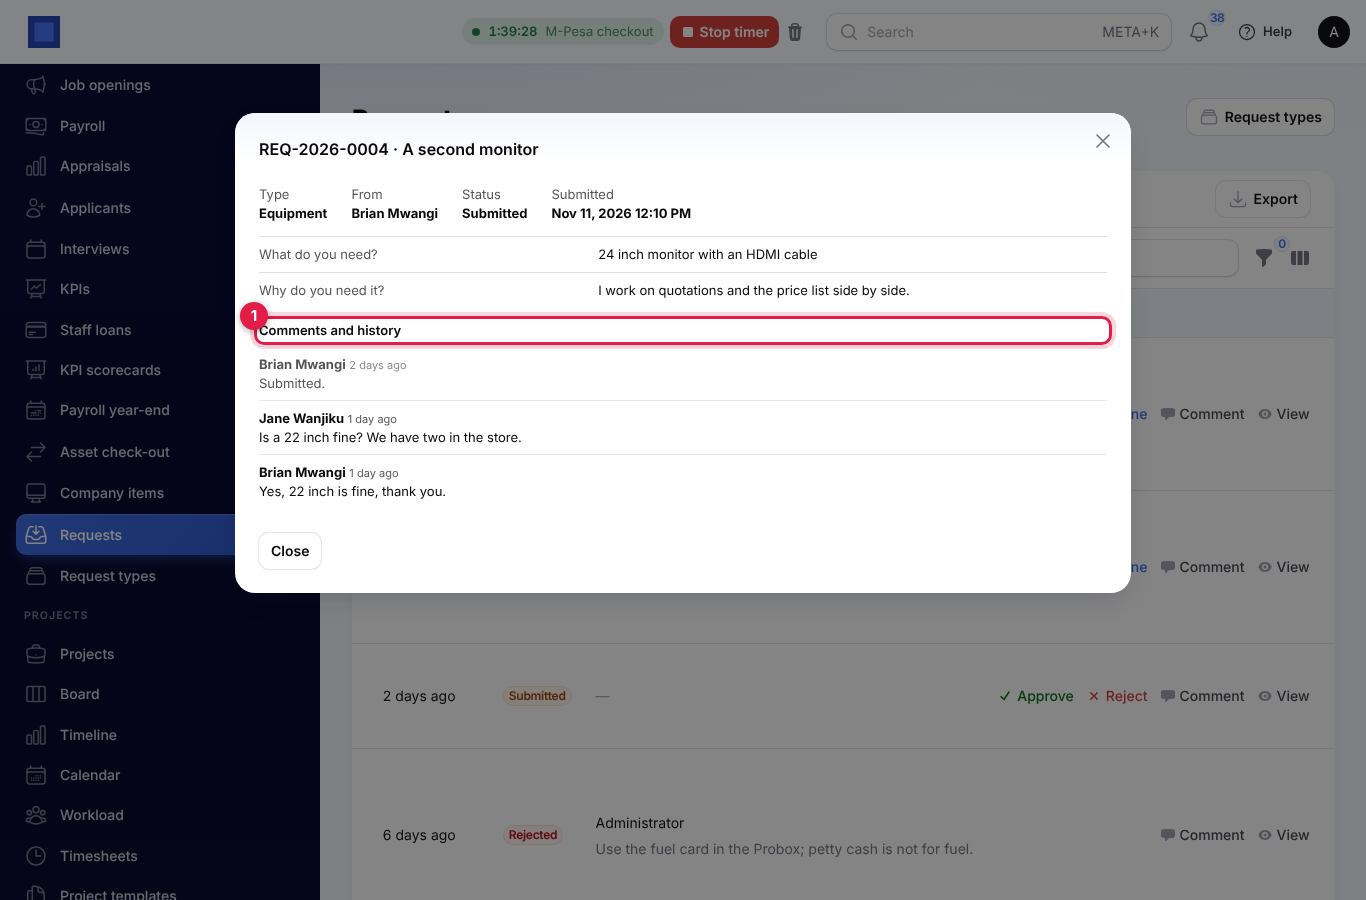
Approvers have the same Approve, Reject and Comment buttons under Me → My requests.
Who is told
| When | Who hears |
|---|---|
| A request is submitted | The approvers, or HR managers when no approval is needed. |
| It is approved | The requester, and HR managers to handle it. |
| It is rejected or marked done | The requester, with the note. |
| Someone comments | The requester; or, when the requester comments, the approvers while it waits for a decision and HR managers after. |
Each person chooses how they receive these under Notification settings: Staff requests for requests and Lent company items for items lent and overdue. See Choose how you are notified.
Good to know
- Link employees to their logins (the Login account on the employee) so they see My KPIs, My items and My requests, are told about items and requests, and get automatic KPI figures.
- KPIs on a position follow the people. Someone who joins the position is scored from then on. Results already recorded are kept when someone moves on.
- Results are per period. A monthly KPI has one result a month per person; recording again replaces it.
- An item can only be out with one person at a time. Check it in before lending it again.
- Lent items are not stock. Lending does not move inventory or change the value of a fixed asset.
- Requests are not leave. Use Me → My leave for time off with balances; "Time off in lieu" is a request HR acts on. See Employee self-service.
- When HR is switched off, these screens and the notifications about them disappear. Everything is kept and comes back with the app.