Front-desk queue
Run a fair, numbered queue at your front desk, banking hall or service centre. Customers take a ticket on a tablet by the door, or staff issue one, and wait for their number to show on a screen in the waiting area. Staff call the next customer from their counter with one button. Customers can follow their place on their phone, and get a text message when their turn is near. At the end of the day the queue report shows how many people each service and counter saw, and how long they waited.
You will find it under Front desk in the menu: My counter, Queue report, Queue services and Counters. Its settings are under Settings → Preferences → Front desk.
Note: The front-desk queue comes with every plan; there is no app to switch on. Calling customers from My counter and issuing tickets needs the core.queue.serve permission, which the owner, admin and member roles have by default. Anyone who can see the settings can see the services and counters; adding and changing them, and opening the kiosk and display, needs the Manage settings permission (owner and admin). The Queue report needs permission to view reports.
Set up your queue services
A queue service is something customers queue for, such as Cash deposits, Enquiries or Collections. Each has its own ticket letter.
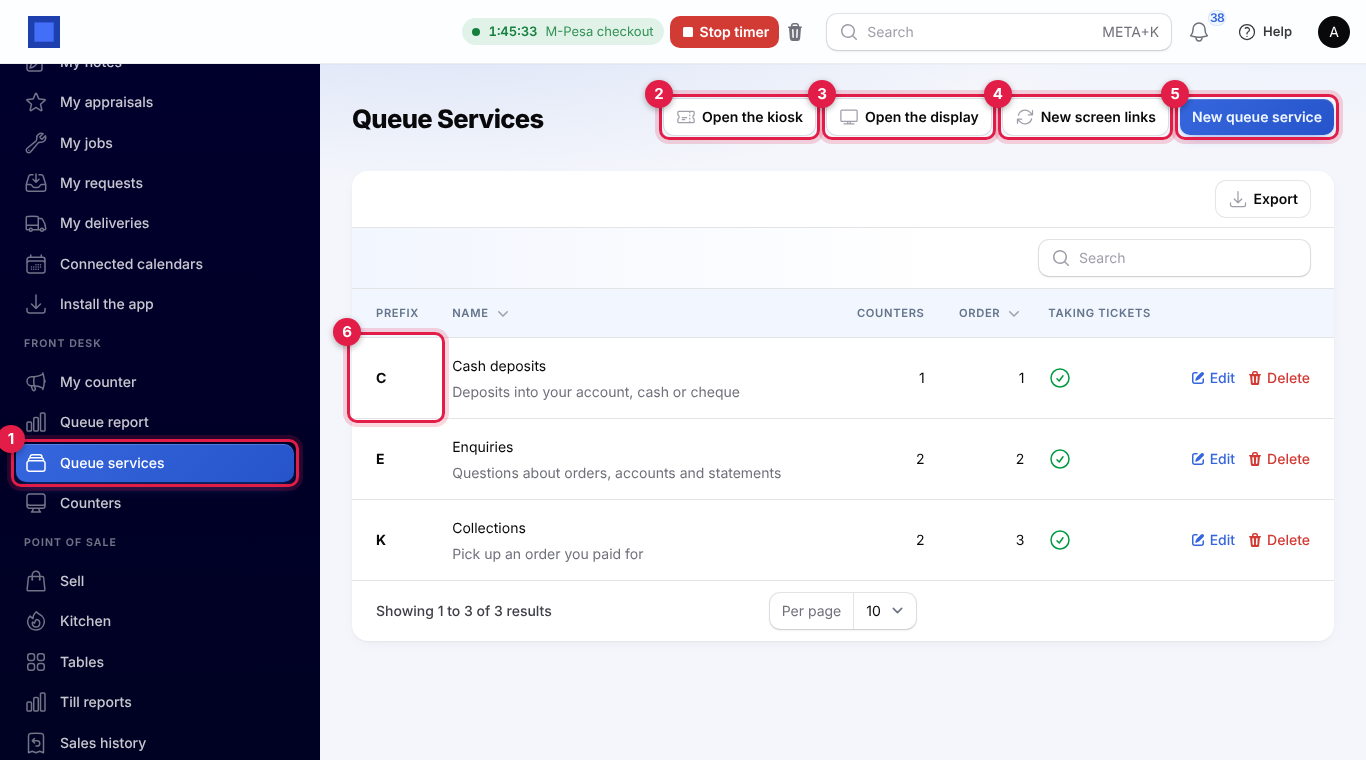
- Open Front desk → Queue services (marker 1). Each service shows its prefix (marker 6), name and description, how many counters call it, its order on the kiosk and whether it is taking tickets.
- Press New queue service (marker 5).
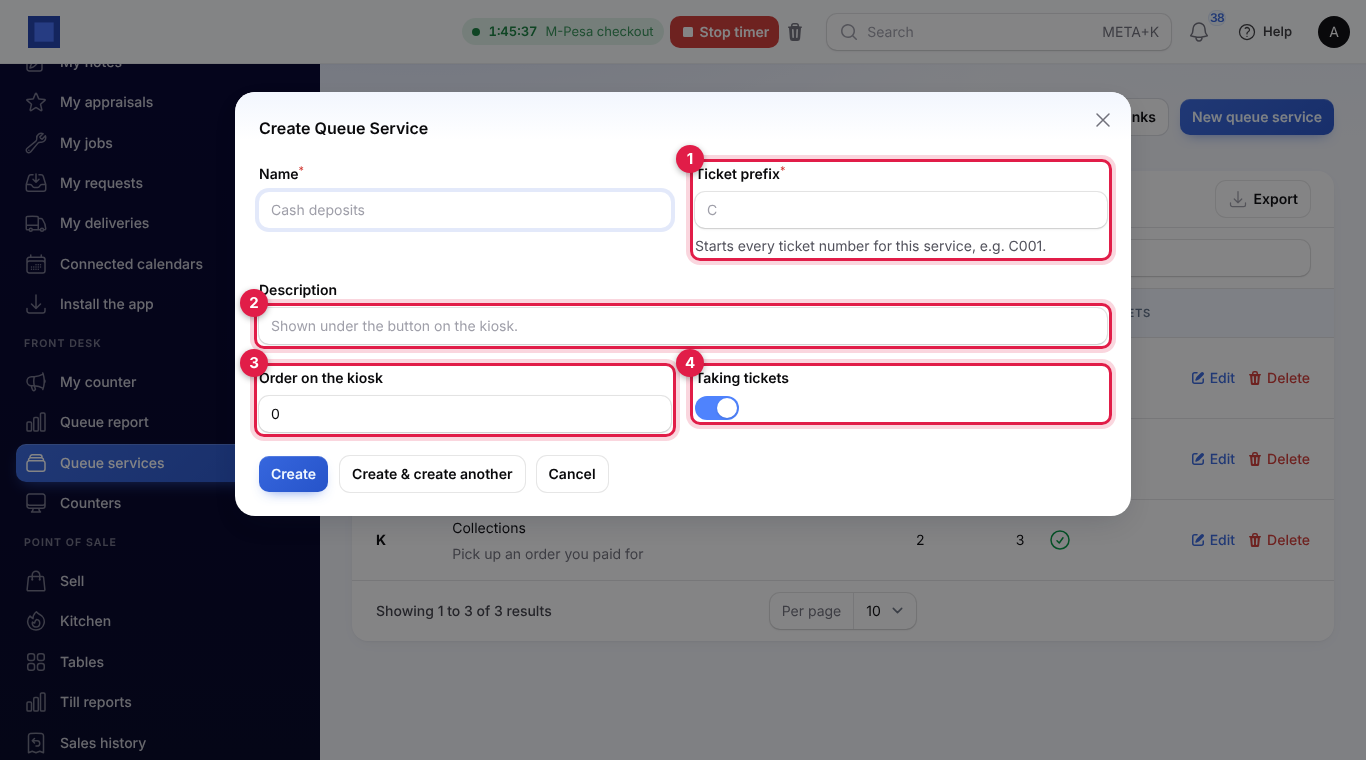
- Fill in the service:
- Name: what customers see on the kiosk button, such as Cash deposits.
- Ticket prefix (marker 1): one to four letters or numbers that start every ticket number, so
Cgives C001, C002 and so on. Each service needs its own prefix. Letters are saved in capitals. - Description (marker 2): a short line shown under the button on the kiosk.
- Order on the kiosk (marker 3): lower numbers come first.
- Taking tickets (marker 4): switch off to close the service for now. It leaves the kiosk, staff cannot issue tickets for it, and no ticket can be moved to it.
- Press Create.
The buttons at the top of the page open the kiosk (marker 2) and the display (marker 3), and New screen links (marker 4) changes their addresses. See Screen links.
Add your counters
A counter is a desk or window where someone serves customers. Each counter calls the services you tick for it.
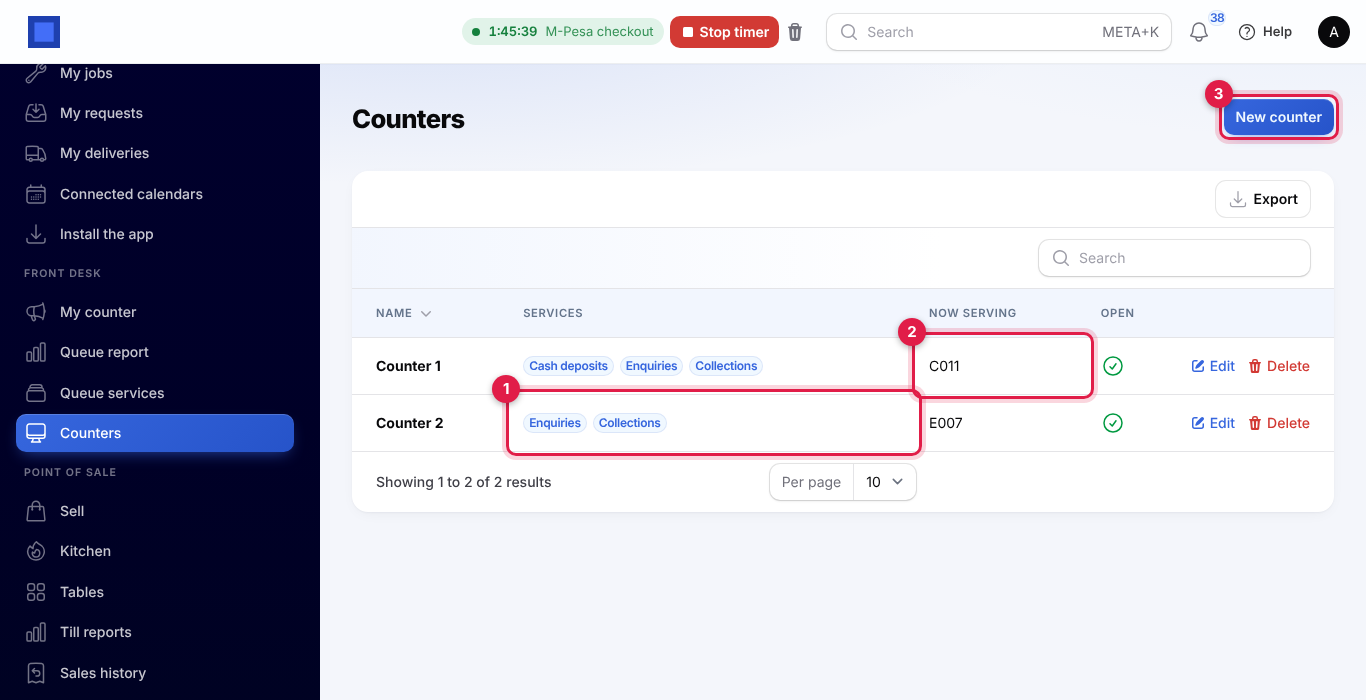
- Open Front desk → Counters and press New counter (marker 3). The list shows each counter's services (marker 1) and who it is serving now (marker 2).
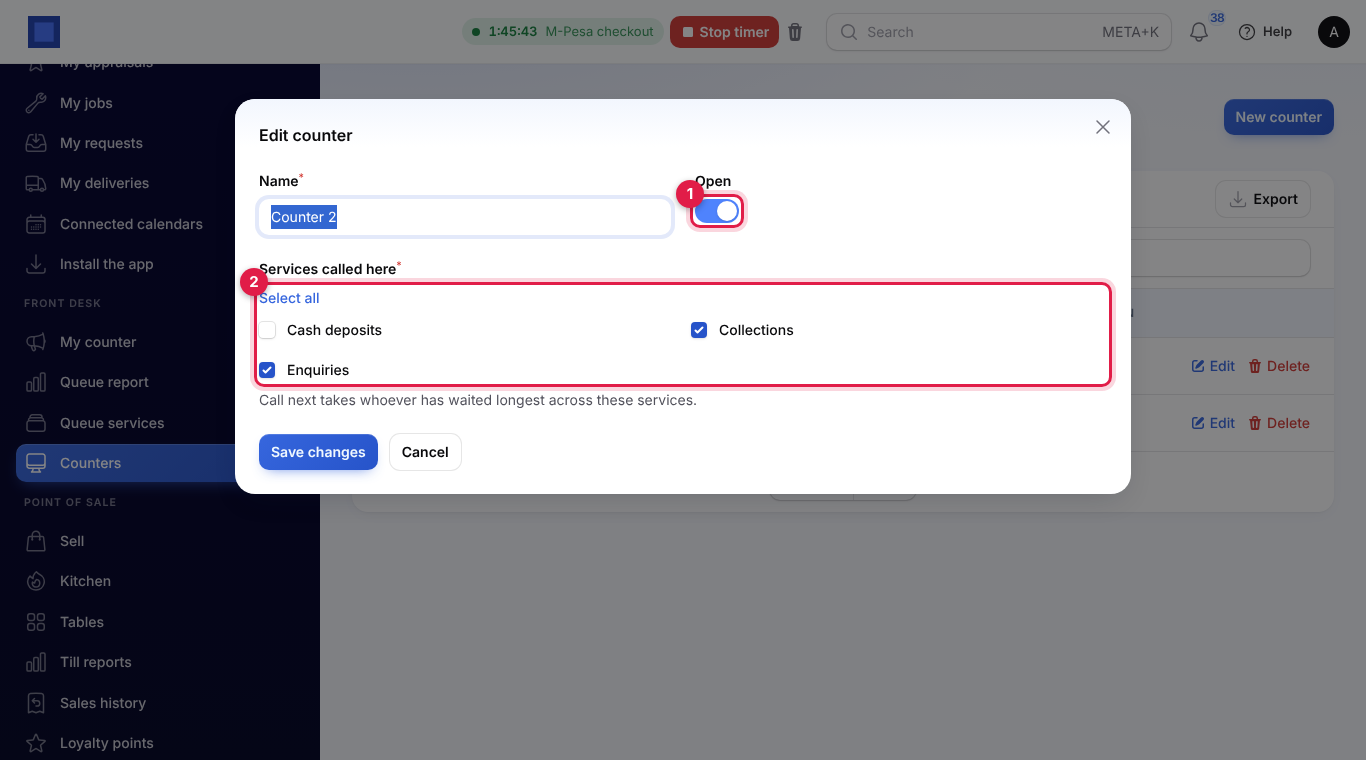
- Give it a Name, such as Counter 1 or Teller 3. Each counter needs its own name.
- Leave Open on (marker 1). A closed counter leaves My counter and the display.
- Tick the Services called here (marker 2). Pressing Call next at this counter takes whoever has waited longest across these services.
- Press Create.
Serve customers at your counter
- Open Front desk → My counter.
- Pick your counter at the top (marker 1). The page remembers it until you sign out. Under it, Calls for lists the services your counter calls.
- Press Call next (marker 3). The customer you were serving is marked done, and the customer who has waited longest is called. Their number shows under Now serving (marker 2) and on the display, with a chime.
- While the customer is at your counter:
- Recall (marker 4) calls the same number again. The display chimes and shows it again.
- Did not come (marker 5) closes the ticket if nobody comes forward.
- Done (marker 6) closes the ticket once you have served them, if you are not calling anyone else yet.
- Transfer (marker 7): pick another service in Transfer to… and press Transfer to send the customer to it, for example from Enquiries to Cash deposits. They keep their number and their phone page, and go to the front of that queue.
- Up next (marker 8) lists who is waiting for your counter, in the order they will be called, with how long each has waited.
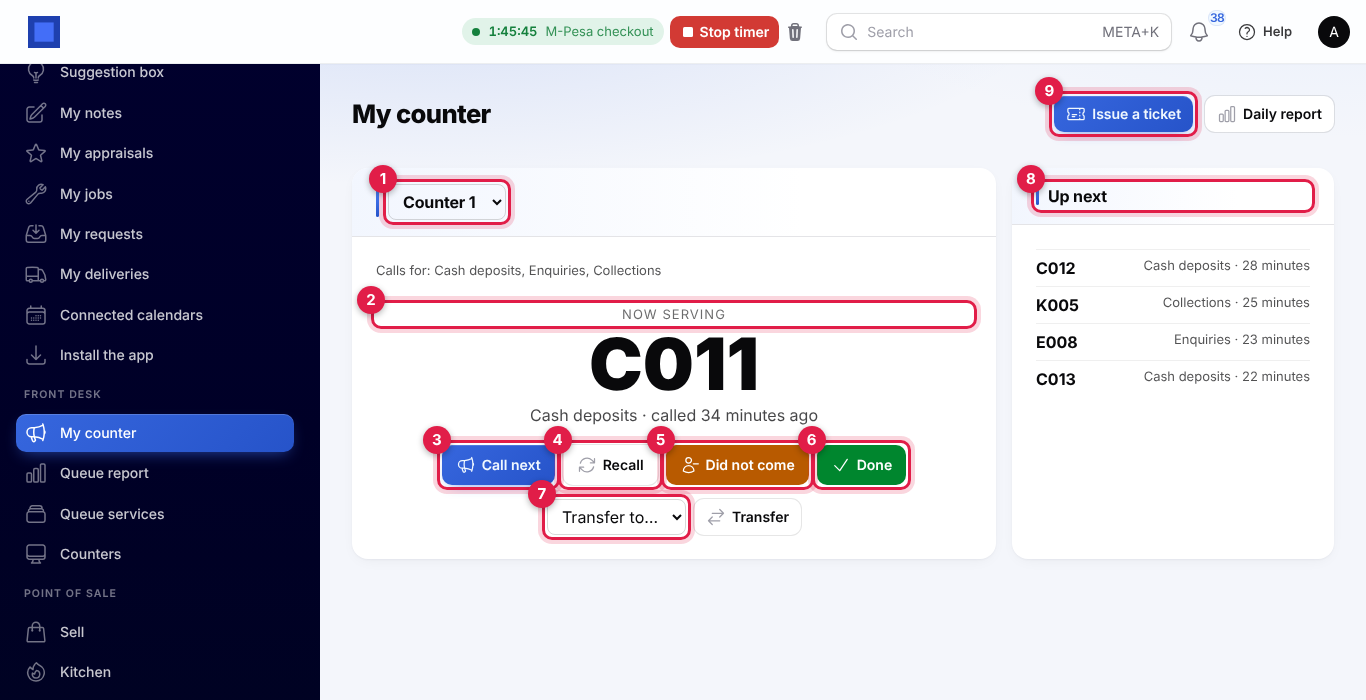
The page refreshes by itself every few seconds, so the list stays up to date while colleagues call customers. Daily report opens the queue report.
Issue a ticket from the app
For a customer at the desk, or one who calls ahead:
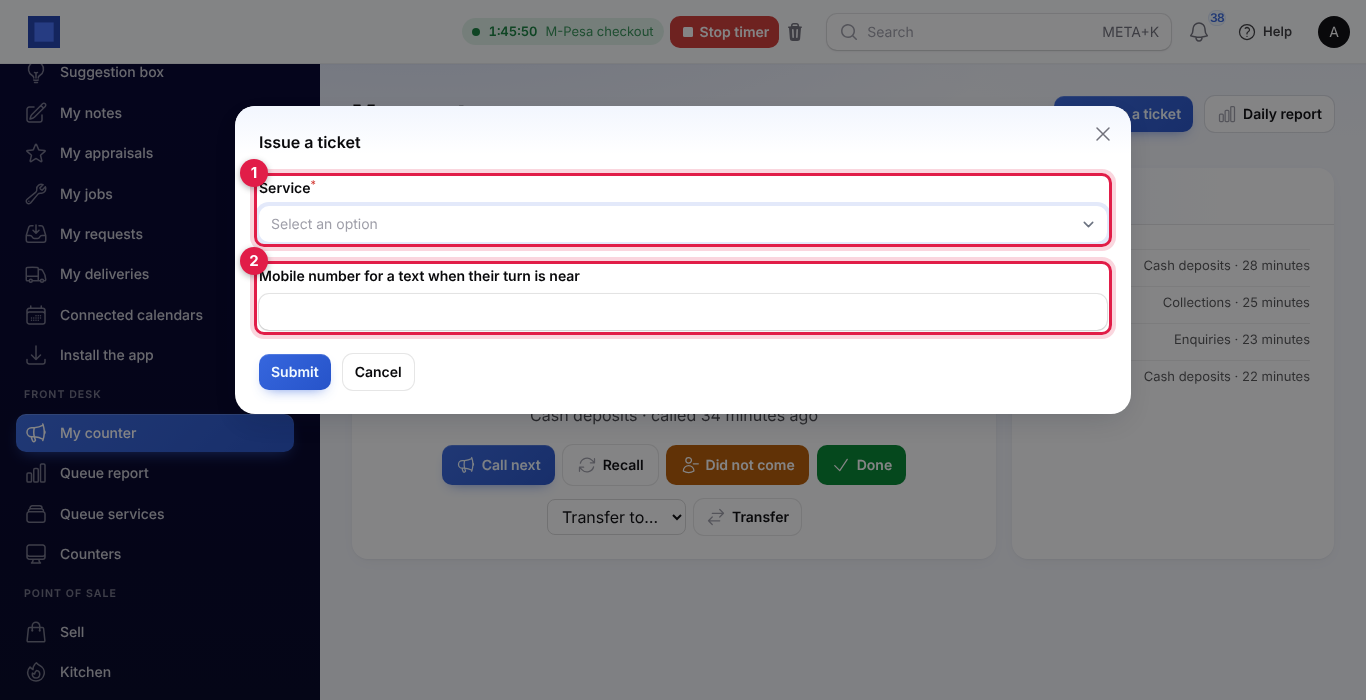
- On My counter, press Issue a ticket (marker 9 above).
- Choose the Service (marker 1).
- To have them texted when their turn is near, type their Mobile number (marker 2). This box only shows when text messages are set up; see Text messages when a turn is near.
- Press Submit. A message gives the new ticket number, with a Print button for the ticket slip.
The kiosk
The kiosk is a page for a tablet or touch screen by the door, where customers take their own ticket. No one signs in on it.
- On Front desk → Queue services, press Open the kiosk. It opens in a new tab; open the same link on the kiosk tablet and leave it there.
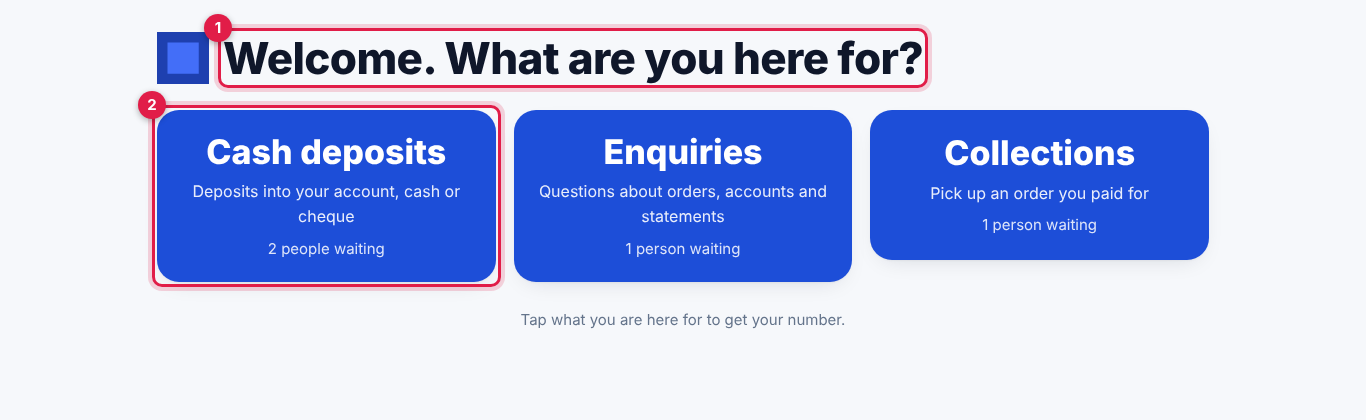
- Customers see your heading (marker 1) and a button for each service taking tickets (marker 2), with how many people are waiting for it.
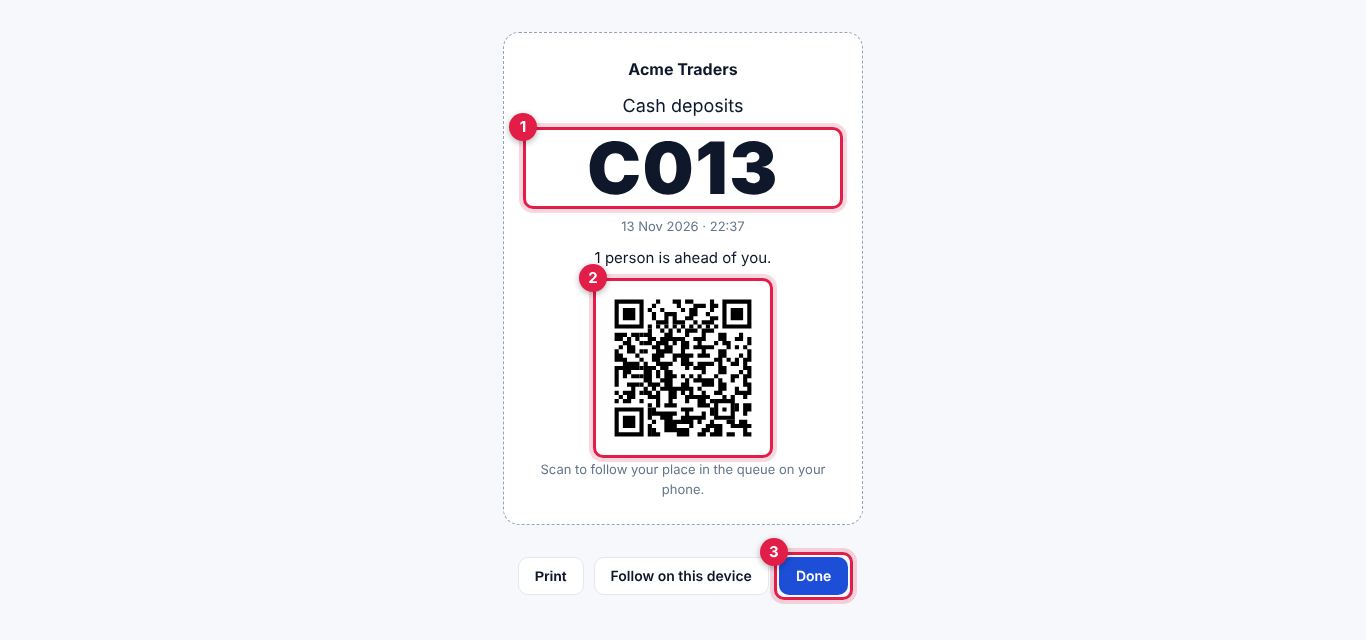
- A customer taps their service. The kiosk shows their ticket: the number (marker 1), the time, how many people are ahead of them, and a QR code (marker 2) to follow their place on their phone.
- With a printer attached, the ticket prints by itself. Done (marker 3), or 15 seconds, takes the kiosk back to the service buttons for the next customer.
The display
The display is a page for a TV or monitor in the waiting area. No one signs in on it.
- On Front desk → Queue services, press Open the display, and open the same link on the screen's browser, full screen.
- The display shows:
- the last number called and the counter to go to, large, flashing when it changes (marker 1);
- each open counter with the number it is serving, or Free (marker 2);
- the last six numbers called (marker 3);
- how many people are waiting for each service (marker 4).
- Press Turn the chime on (marker 5) once after opening the page. Browsers only play sound after someone has tapped the page, so the chime stays silent until you do.
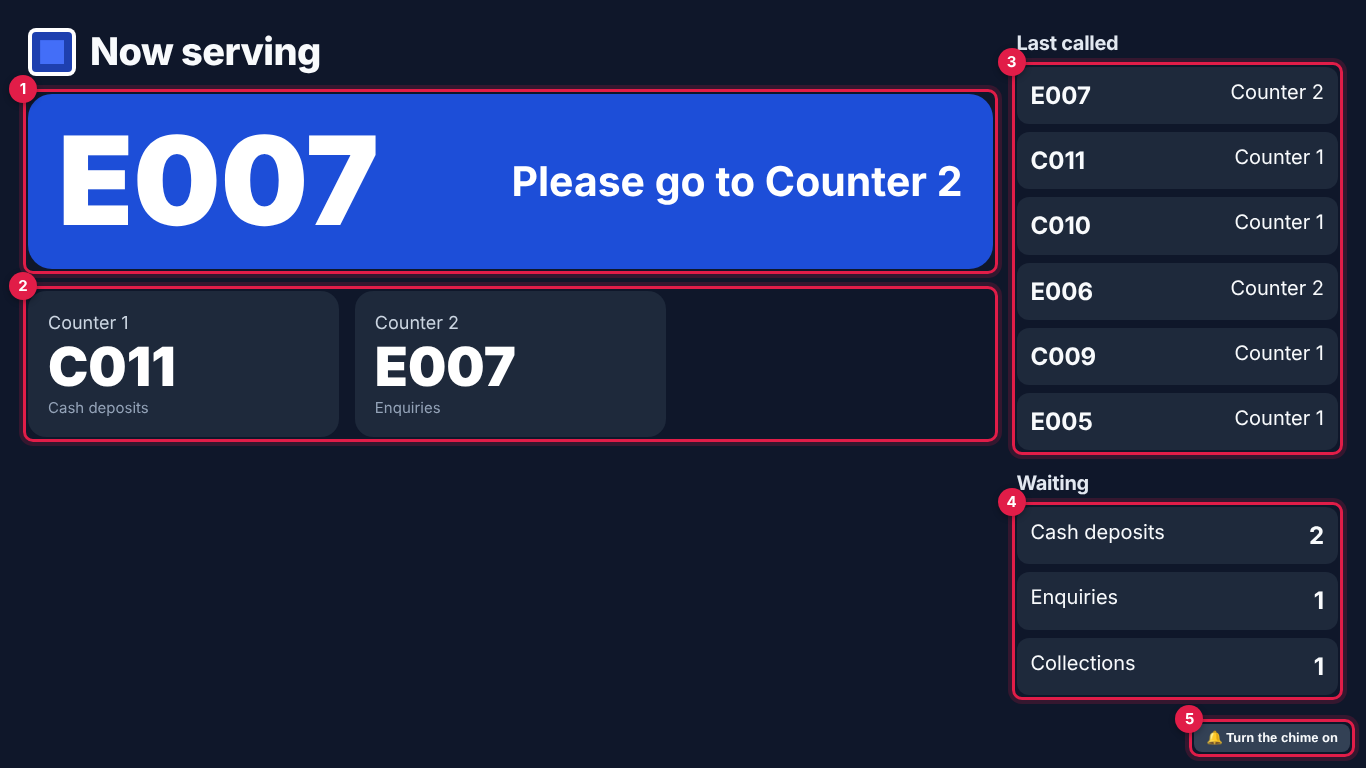
The display updates every few seconds, and chimes for each call and recall.
The customer's own page
Scanning the QR code on a ticket opens the customer's own page on their phone, with no sign-in.
- It shows their number and service (marker 1), how many people are ahead of them and a message (marker 2), such as There is 1 person ahead of you or You are next. Please stay close.
- When they are called, it says which counter to go to, and the phone vibrates if it can.
- If they were transferred, missed their call or have been served, the page says so.
- While they wait, they can type their mobile number under Text me when my turn is near (marker 3) and press Save my number. This box only shows when text messages are set up.
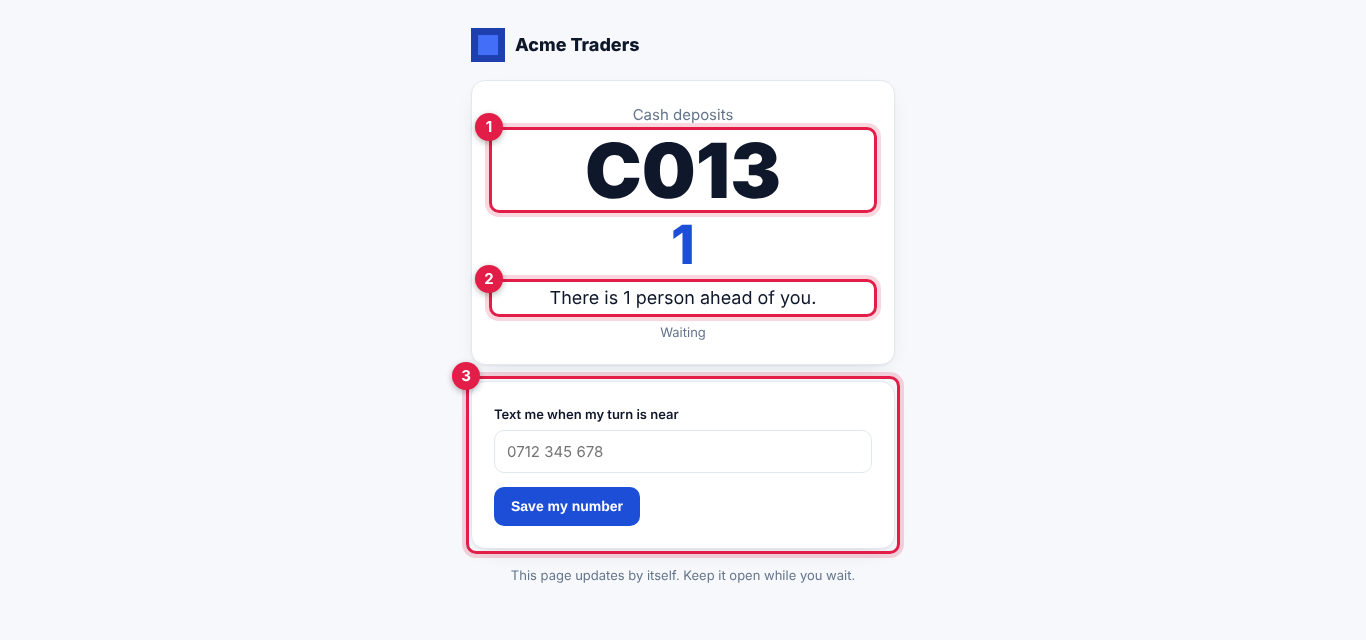
The page updates itself while it is open. Each ticket's page only works for that ticket.
Text messages when a turn is near
Customers who leave a mobile number (on their own page, or when staff issue the ticket) get one text message when only a few people are ahead of them, and a different one when they are next.
- The number of people ahead is set in Settings → Preferences → Front desk. It is 2 to start with.
- It needs the Marketing app with an SMS gateway set up in its settings. See Marketing.
- Each customer gets the message once. If they change their number, it can be sent again to the new one.
Screen links
The kiosk and display addresses contain a secret part, so only screens you set up can show your queue or issue tickets.
- If a link gets out, or a tablet is lost, press New screen links on Front desk → Queue services, then Confirm. The old addresses stop working at once.
- Then open the kiosk and display again from the buttons, and open the new links on your kiosk and screen.
Only people who can manage settings see these buttons.
The queue report
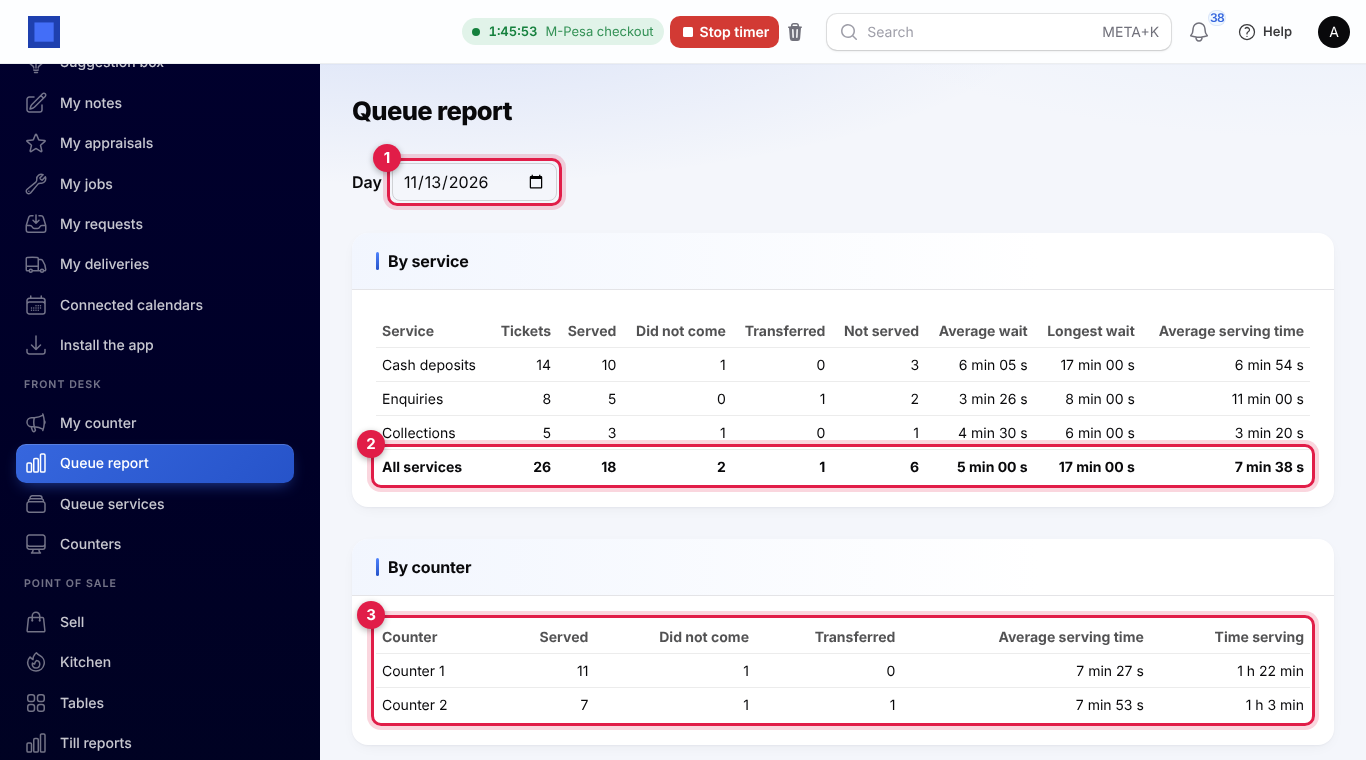
Open Front desk → Queue report, or Daily report on My counter. It shows one day; pick another in Day (marker 1).
By service has a row for each service and a total for all services (marker 2):
| Column | What it shows |
|---|---|
| Tickets | Tickets issued. In the total, a transferred customer counts once |
| Served | Tickets marked done |
| Did not come | Tickets closed with Did not come |
| Transferred | Customers sent on to another service |
| Not served | Still waiting, or still at a counter |
| Average wait, Longest wait | Time from taking the ticket to being called |
| Average serving time | Time from being called to being finished |
By counter (marker 3) shows, for each counter, how many customers it served, how many did not come and how many it transferred, its average serving time and its total Time serving that day.
Settings
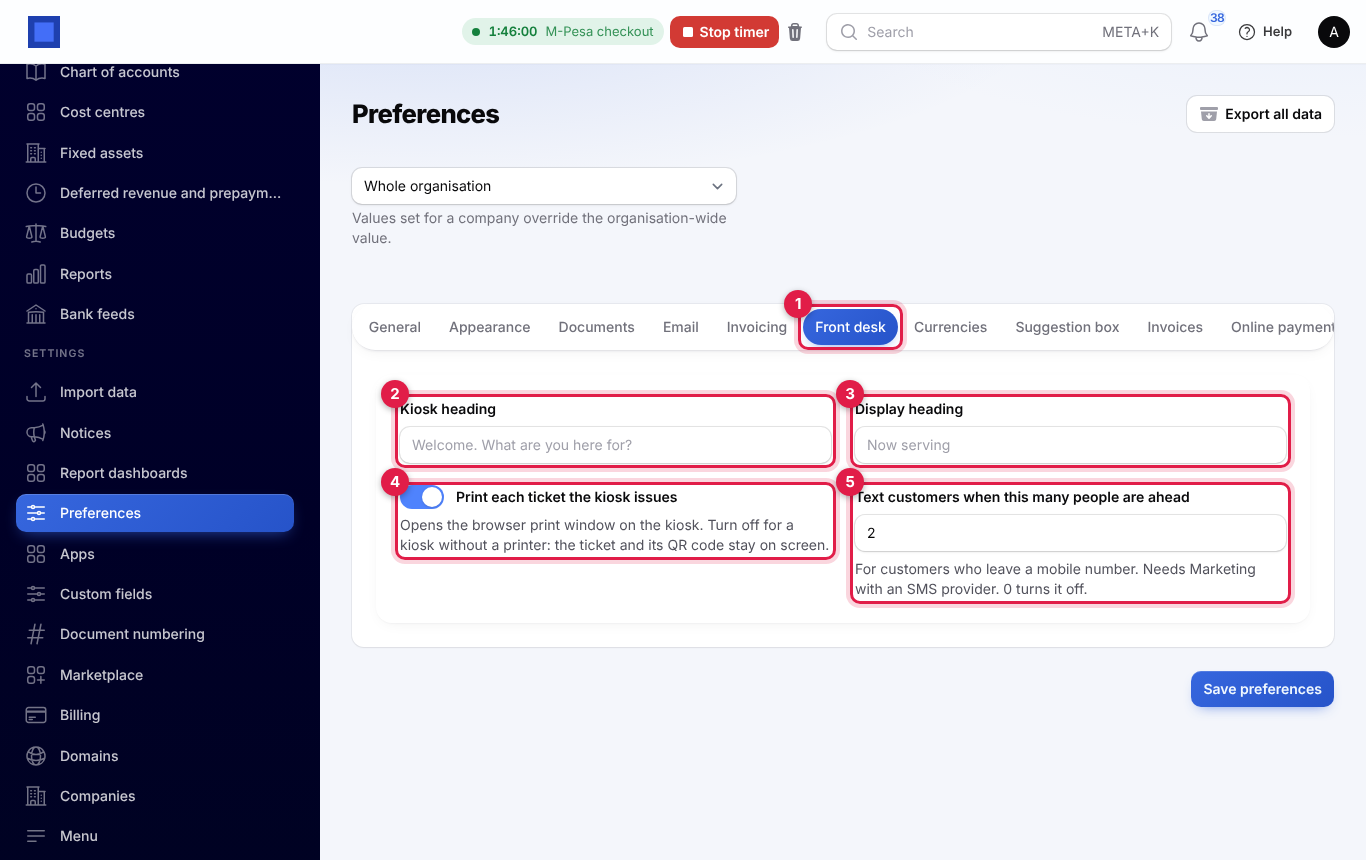
Open Settings → Preferences and the Front desk tab (marker 1):
- Kiosk heading (marker 2): the question at the top of the kiosk. Empty shows Welcome. What are you here for?
- Display heading (marker 3): the title of the display. Empty shows Now serving.
- Print each ticket the kiosk issues (marker 4): opens the print window on the kiosk for every ticket. Turn it off for a kiosk without a printer; the ticket and its QR code stay on screen.
- Text customers when this many people are ahead (marker 5): from 0 to 20. 0 turns the text messages off.
Press Save preferences.
Good to know
- Numbers start again every day, at midnight in your company's time zone, so the first cash deposit each morning is C001.
- Who is called next: customers transferred from another service go first, then whoever took their ticket earliest.
- Call next finishes the current customer. If you need a moment between customers, press Done and call the next one when you are ready.
- Closing a service or counter does not delete its tickets. A closed service's waiting customers are not called until you open it again.
- Deleting a service also deletes its tickets, so they drop out of past reports too. Deleting a counter keeps its tickets, but they no longer count under any counter. Switch a service or counter off instead if you want to keep its figures.
- The kiosk, display and customers' pages need no sign-in, but each needs its own secret link, so nobody can find them by guessing.