Projects
Projects lets you plan client and internal work, break it into tasks and milestones, log the hours people spend, approve them, and turn approved time or completed milestones into invoices. You can see every task on a board, a timeline and a calendar, and check whether each project is making money. Project managers, team members and the person who invoices clients use it. Everything is in the Projects group of the sidebar: Projects, Board, Timeline, Calendar and Timesheets.
Note: Permissions: projects.view to see projects and log your own time, projects.manage to create and change projects and tasks (and move cards on the board), projects.timesheets.approve to approve or reject other people's time and see everyone's timesheets, and projects.invoice to create invoices from a project (the Invoicing module must be on). Set these under Settings → Roles.
How a project flows
- Create the project with its customer and how it is billed.
- Add tasks (with dates, people and estimates) and milestones.
- The team logs time against the project and its tasks. New time is Submitted for approval.
- A manager approves (or rejects) the time.
- You invoice: approved hours (hourly projects), the fixed price, or completed milestones. A draft invoice opens for you to check and send.
- Watch progress on the board and timeline, and the margin on the project list.
Create a project
- In the menu, open Projects → Projects.
- Click New project (marker 1).
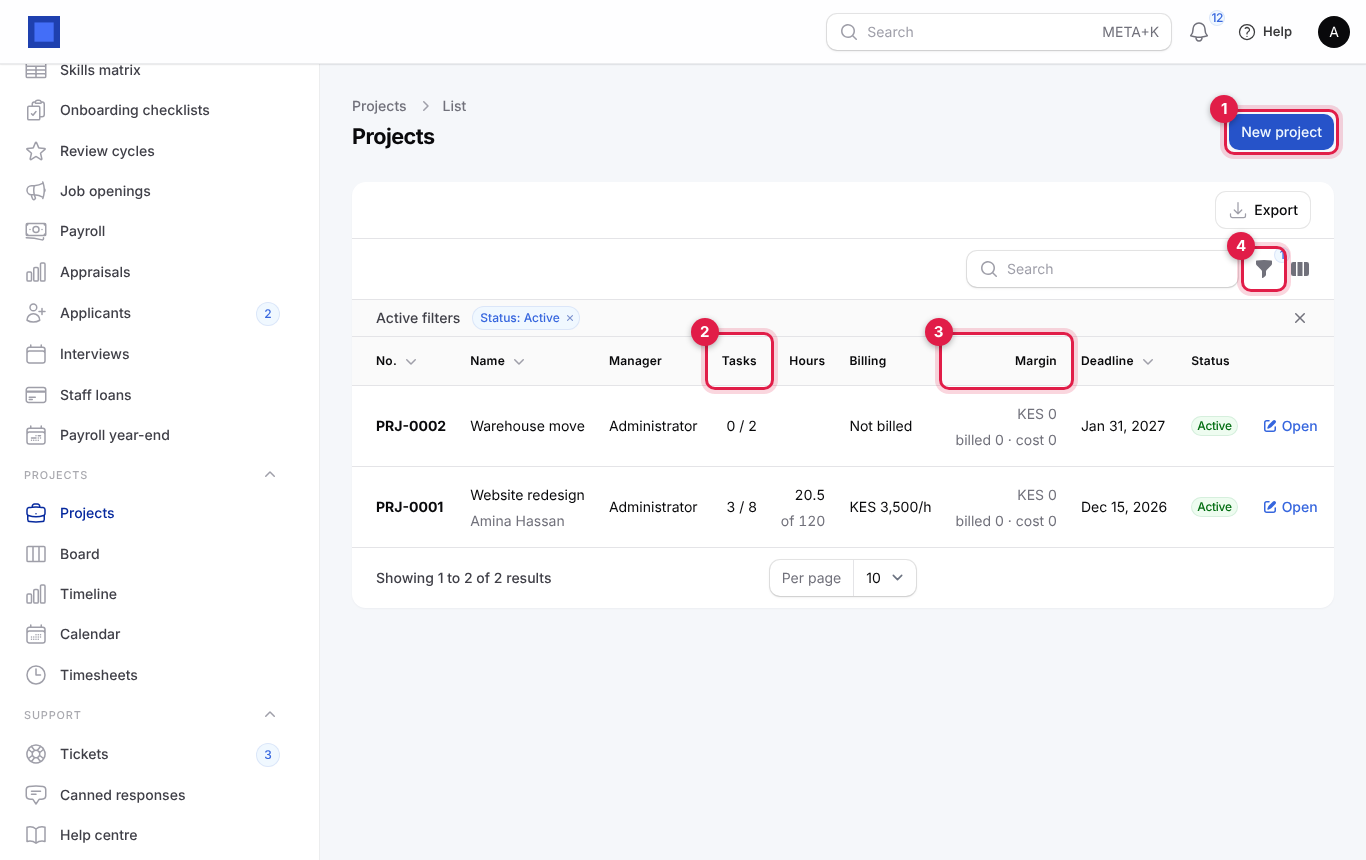
The list shows each project's number (for example PRJ-0001), name and customer, Manager, Tasks done out of total (marker 2), Hours logged against the budget ("20.5 of 120"), Billing, Margin (marker 3: billed minus staff cost, with "billed … · cost …" under it; red when negative), Deadline and Status. The Status: Active filter is on by default; use the filter button (marker 4) to see projects on hold, done or cancelled.
- Fill in the form and click Create. The project opens so you can add tasks.
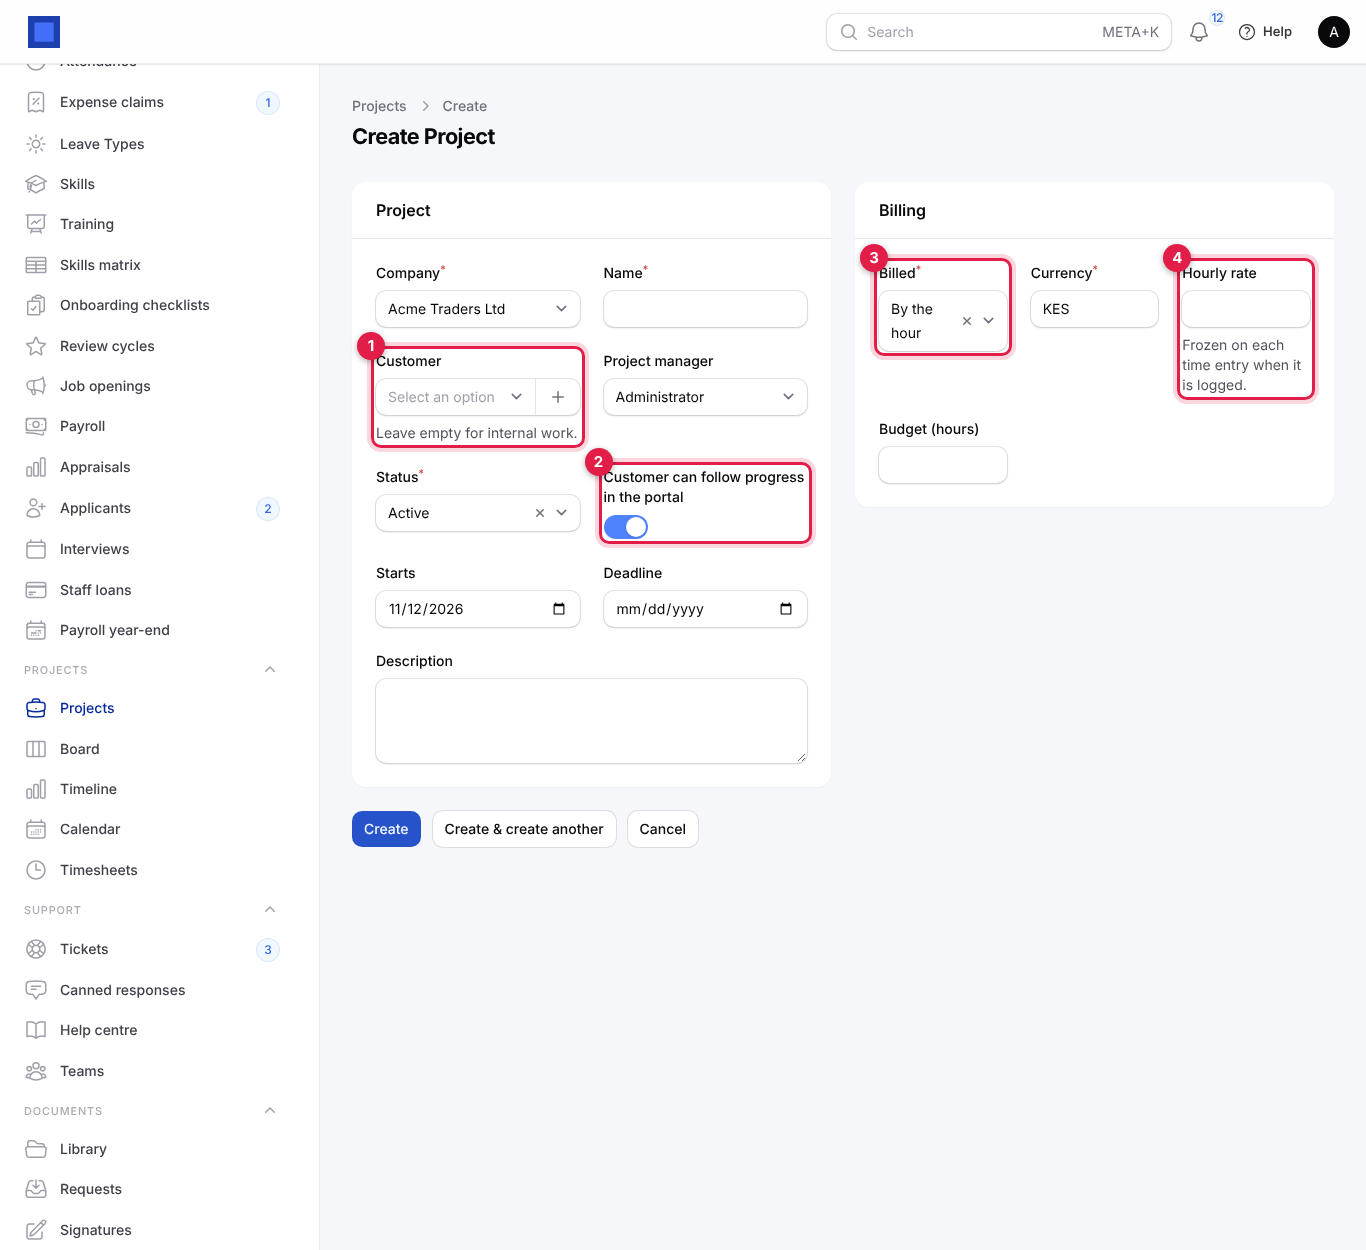
Project section
| Field | What to enter |
|---|---|
| Company | Required. The company doing the work. It sets the currency. |
| Name | Required. For example "Website redesign – Kilimanjaro Tours". |
| Customer | Optional (marker 1). The client. Leave empty for internal work. Needed to invoice. Click + to add a new customer without leaving the form. |
| Project manager | Defaults to you. The person responsible. |
| Status | Active (default), On hold, Done or Cancelled. Only active projects appear on the board, timeline, calendar and in the time entry project list. |
| Customer can follow progress in the portal | On by default (marker 2). The customer sees the project, its progress and milestones in the customer portal. Turn off for sensitive work. |
| Starts | Defaults to today. |
| Deadline | Optional. Shown on the list and as "Project ends" on the calendar. |
| Description | Optional. Scope, goals or notes. |
Billing section
| Field | What to enter |
|---|---|
| Billed | Required (marker 3). By the hour (invoice approved time), Fixed price (one agreed amount), Per milestone (each milestone has its own price) or Not billed (internal). |
| Currency | Required. Starts with the company currency, for example KES. |
| Hourly rate | For By the hour (marker 4). The rate charged to the client, for example 3,500. It is frozen on each time entry when it is logged, so changing it later does not reprice old time. |
| Fixed price | For Fixed price. The total agreed. |
| Milestones | For Per milestone, a reminder: give each milestone task a price; completed milestones are invoiced from the project page. |
| Budget (hours) | Optional. The hours you expect; shown as "of 120" next to hours logged on the list. |
The project number is given automatically when you save.
Work on a project
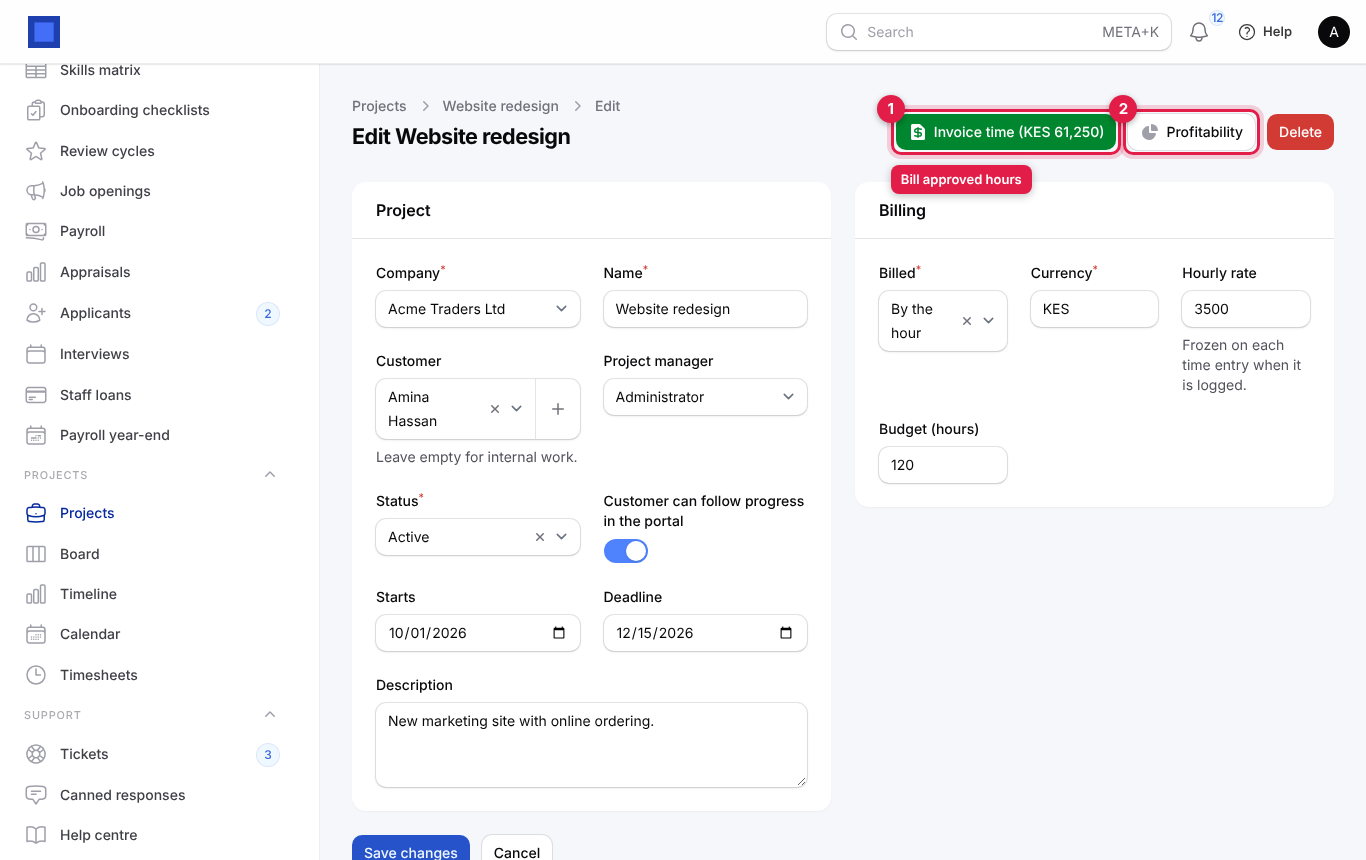
Open a project from the list (click Open). The top of the page is the same form as above; change anything and click Save changes. The header buttons are:
| Button | Shown when | What it does |
|---|---|---|
| Invoice time (KES …) (marker 1) | Billed By the hour | Turns all approved, billable time not yet invoiced into a draft invoice. The amount waiting is in the label. |
| Create invoice | Billed Fixed price | Makes a draft invoice for the fixed price. |
| Invoice milestones (KES …) | Billed Per milestone | Makes a draft invoice for every completed milestone with a price not yet invoiced. |
| Profitability (marker 2) | Always | Shows billed, staff cost and margin. |
| Delete | Always | Deletes the project. Asks you to confirm. Use Status: Cancelled instead if there is history to keep. |
The invoice buttons need the Invoicing module and the projects.invoice permission.
Below the form are tabs: Tasks, Time, Notes (messages and a log of changes; you can log a note and follow the project) and Planned (scheduled activities such as calls and meetings).
Add tasks and milestones
- On the project, stay on the Tasks tab and click Add task (marker 1).
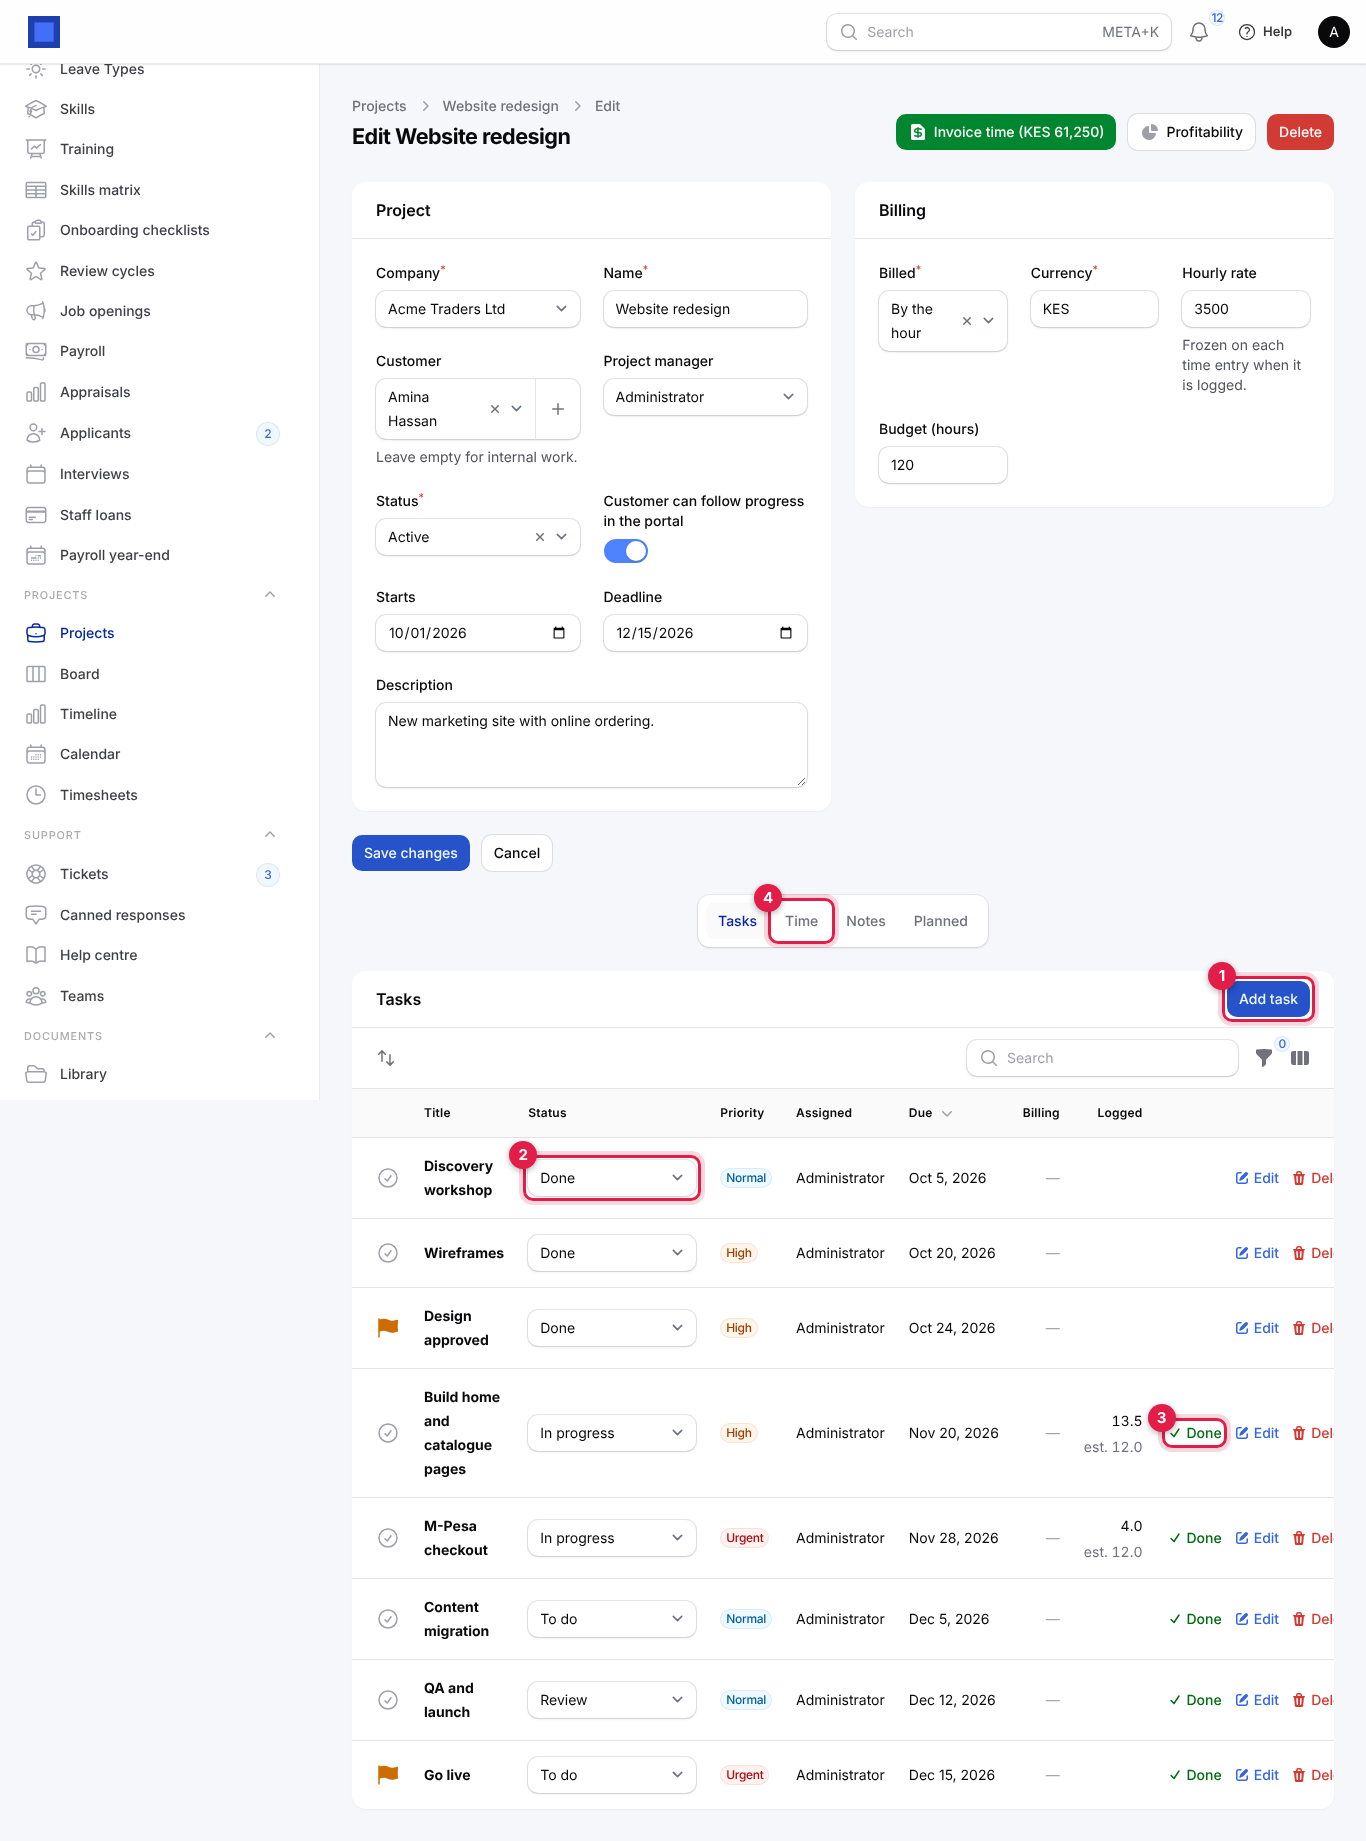
- Fill in the task and click Create (or Create & create another).
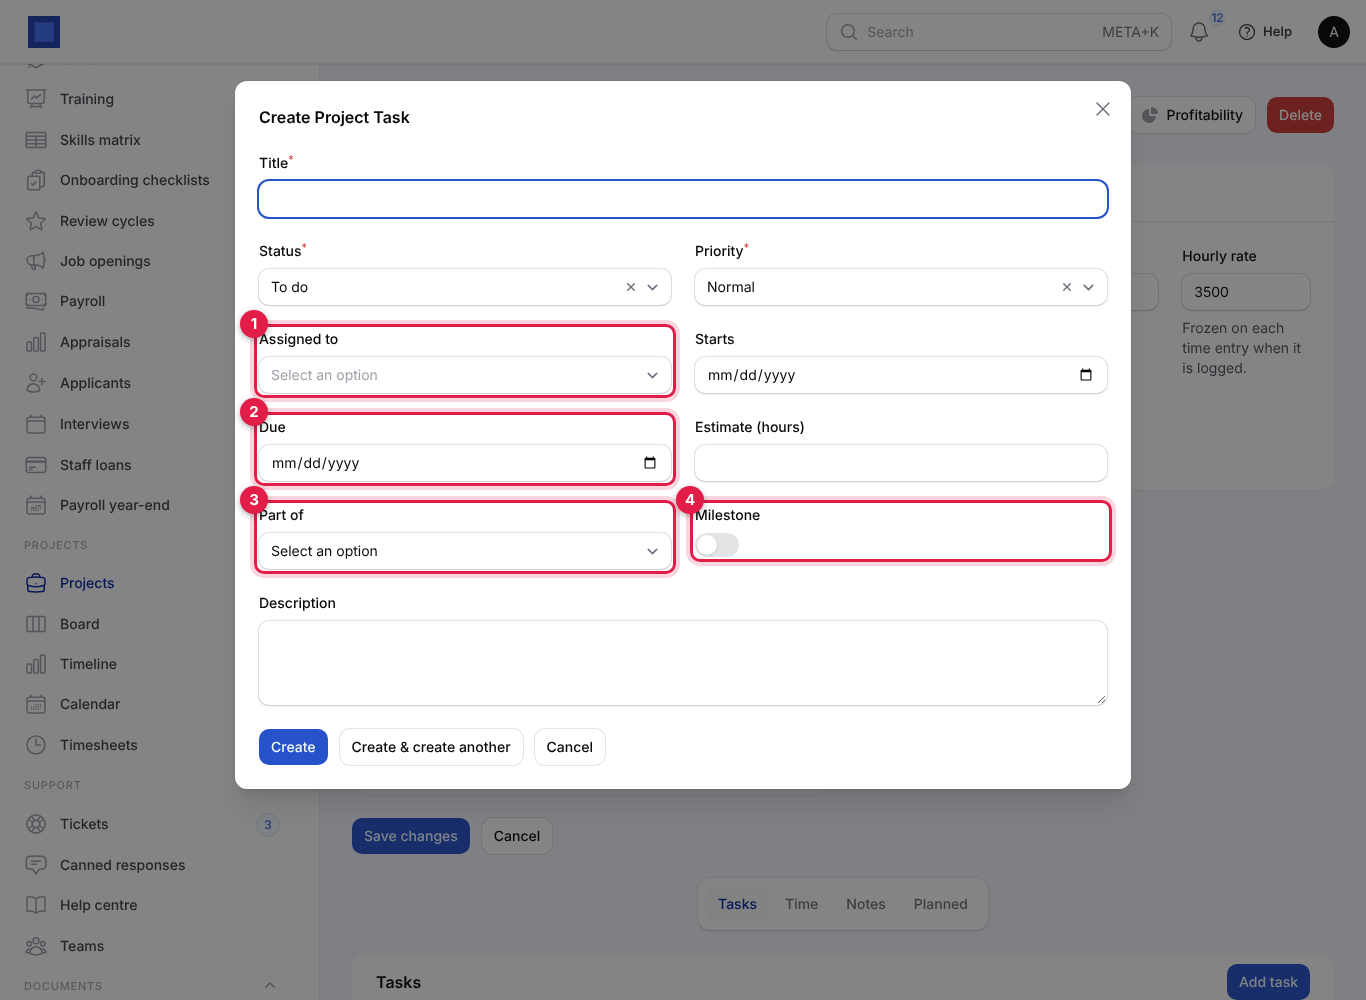
| Field | What to enter |
|---|---|
| Title | Required. A short action, for example "Build home and catalogue pages". |
| Status | To do (default), In progress, Review or Done. |
| Priority | Low, Normal (default), High or Urgent. Shown as a coloured badge. |
| Assigned to | Optional (marker 1). The person doing it. They can filter the board to their own tasks. |
| Starts | Optional. Needed, with Due, to show the task as a bar on the timeline. |
| Due | Optional (marker 2). Must be on or after Starts. Overdue open tasks show the date in red. |
| Estimate (hours) | Optional. Shown as "est. 12.0" under hours logged. |
| Part of | Optional (marker 3). Makes this a sub-task of another task; its parent shows under the title. |
| Milestone | Turn on for a key point such as "Design approved" or "Go live" (marker 4). Milestones show a flag in the list, a diamond on the timeline and a 🏁 on the board. |
| Billed when reached | Shown for milestones. The amount invoiced once the milestone is done, for example 50,000. Used by Per milestone projects. |
| Description | Optional detail, acceptance criteria or links. |
In the task list:
- Change Status straight from the drop-down in the row (marker 2). Only people with projects.manage can change it.
- Click Done (marker 3) to finish a task in one click.
- Edit and Delete are on each row.
- Drag rows by the handle to reorder them.
- Billing shows a milestone's amount and Invoiced once billed. Logged shows hours logged against the task.
- Filter by Status or Assigned to.
Log time
Anyone with access to a project can log their own hours, from the project or from Timesheets.
From the project:
- On the project, click the Time tab, then Log time (marker 1).
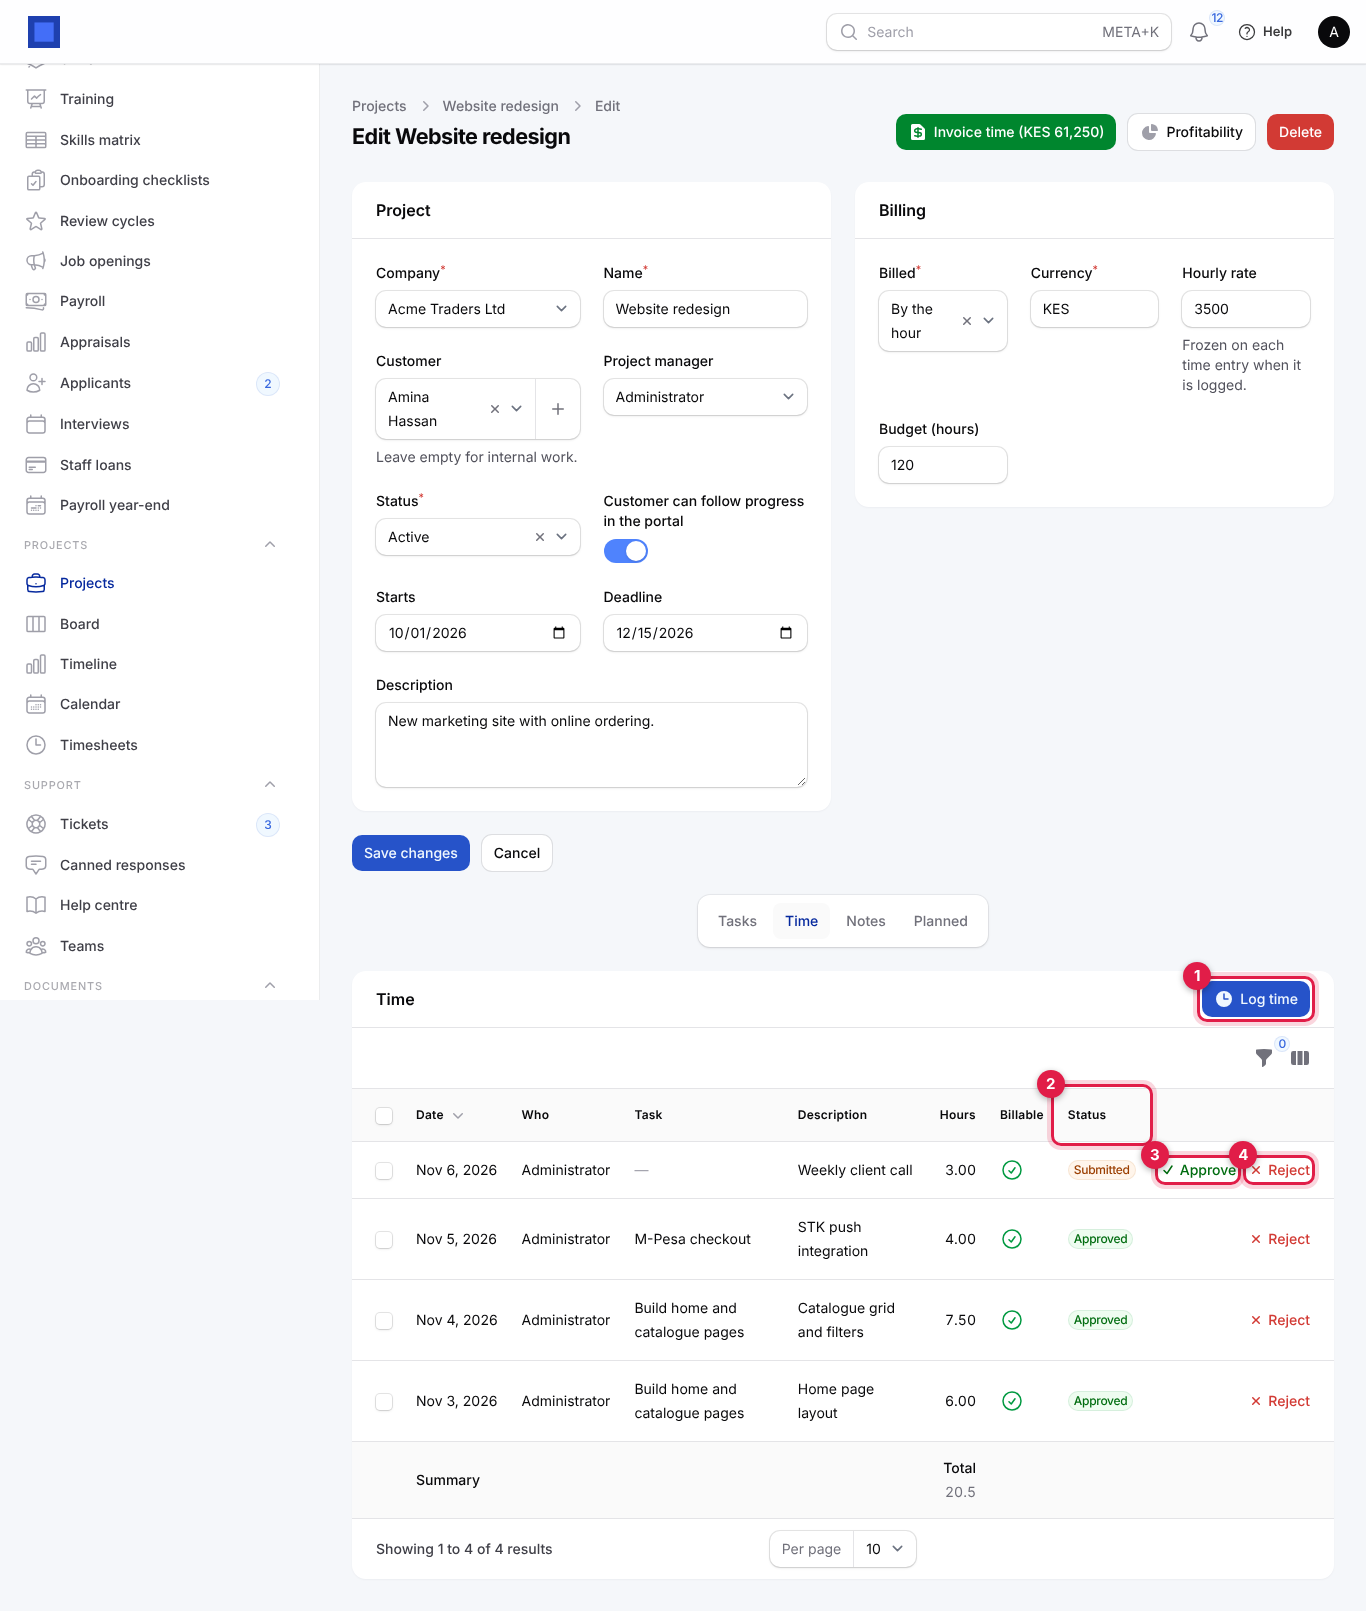
- Fill in the entry and click Submit.
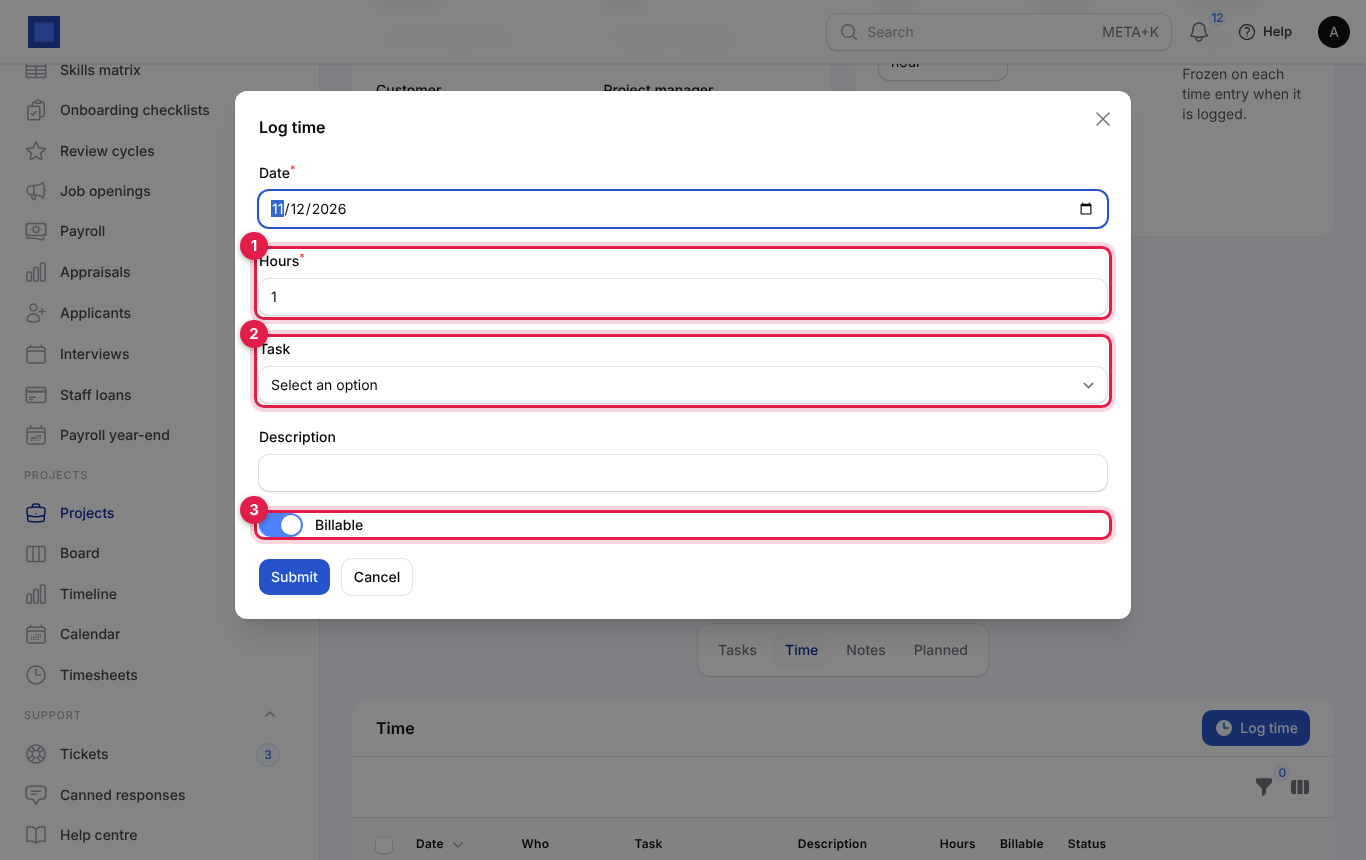
| Field | What to enter |
|---|---|
| Date | Required. Defaults to today. |
| Hours | Required (marker 1). In quarter hours, from 0.25 to 24. For example 1.5 for an hour and a half. |
| Task | Optional (marker 2). Only open tasks of this project. Time against a task shows on the task and as its own line on the invoice. |
| Description | Optional. What you did, for example "STK push integration". It can appear on the invoice, so write it for the client. |
| Billable | On by default for hourly projects (marker 3). Turn off for internal time such as travel or rework you will not charge. |
From Timesheets:
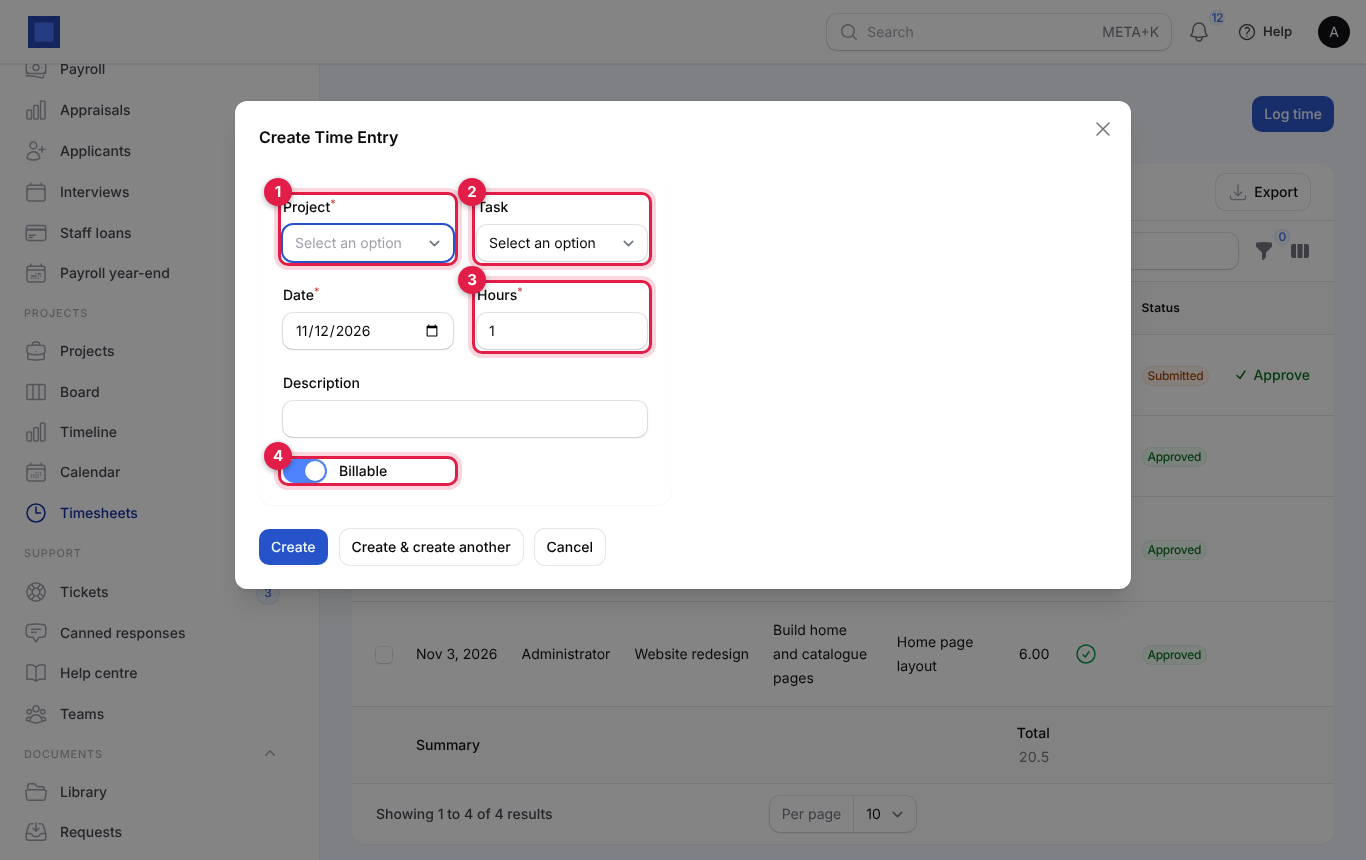
- In the menu, open Projects → Timesheets (headed Time Entries) and click Log time (marker 1).
- Choose the Project (marker 1; active projects only), then the Task (marker 2), the Date, Hours (marker 3), Description and Billable (marker 4). Click Create.
Tip: Log time daily. It is easier to remember what you did, and managers can approve a week at a time.
Approve or reject time
New time is Submitted straight away. Someone with projects.timesheets.approve reviews it.
- In the menu, open Projects → Timesheets. Approvers see everyone's time; others see only their own.
- Use the filter button (marker 3) to show Status: Submitted, one person (Who) or This week.
- Click Approve on each entry (marker 2), or tick several and choose Approve selected from the bulk actions.
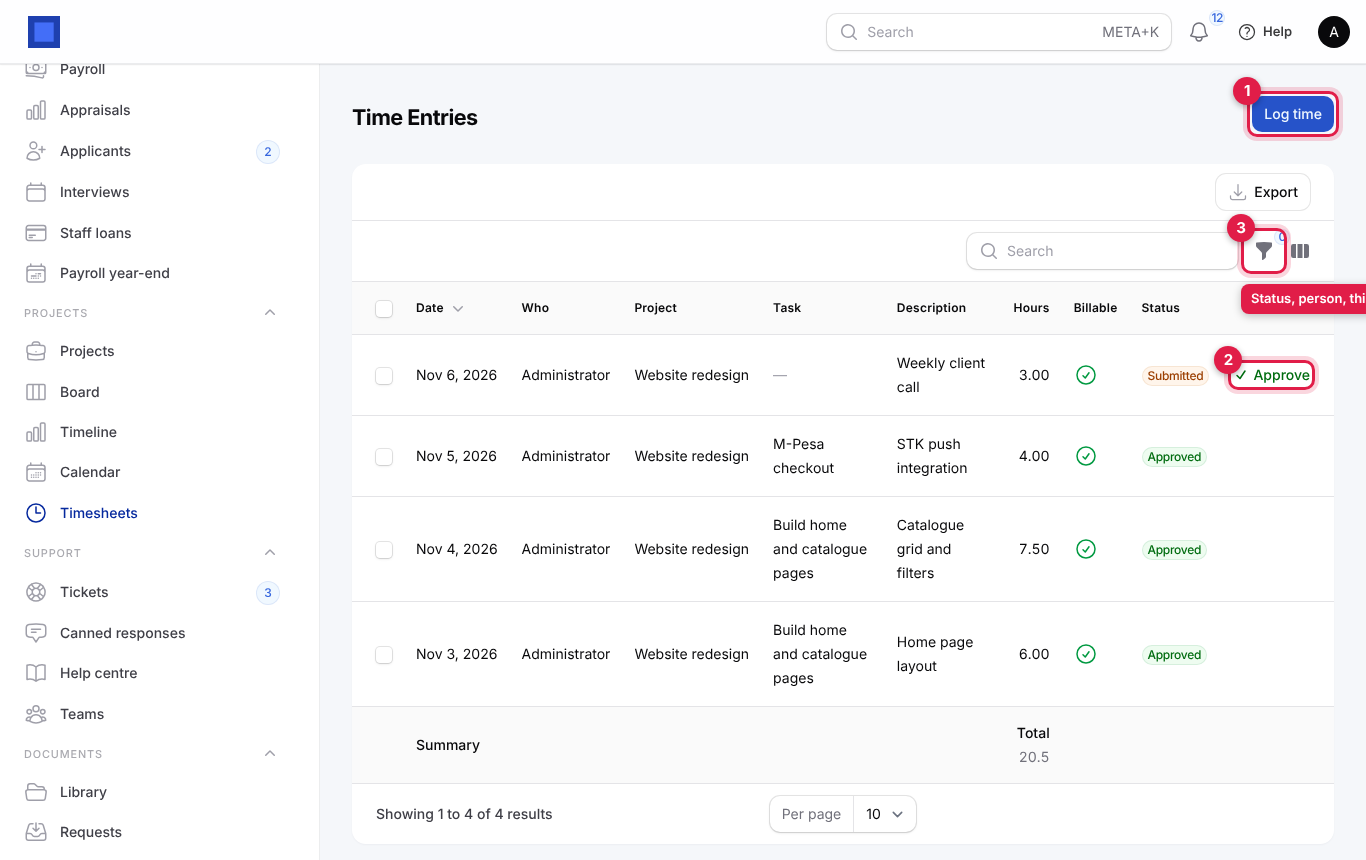
On the project's Time tab you can also Approve and Reject each entry (markers 3 and 4 on the project Time tab picture). The total of the hours shows at the foot of the list.
Time statuses
| Status | Meaning | What moves it on |
|---|---|---|
| Draft | Not yet sent for approval (rare; time logged in the app is submitted at once). | Approve. |
| Submitted | Waiting for a manager. Cannot be edited. | Approve or Reject. |
| Approved | Accepted and, if billable, ready to invoice. | Invoice time, or Reject to send back. |
| Rejected | Sent back. The person can Edit or Delete it. Not counted in profitability. | Approve after it is corrected. |
| Invoiced | On a draft or issued invoice. Cannot be changed or rejected. | — |
Invoice time, a fixed price or milestones
The project must have a Customer.
Hourly projects:
- On the project, click Invoice time (KES …).
- Read the message ("All approved, billable time not yet invoiced becomes a draft invoice, one line per task.") and click Confirm (marker 1).
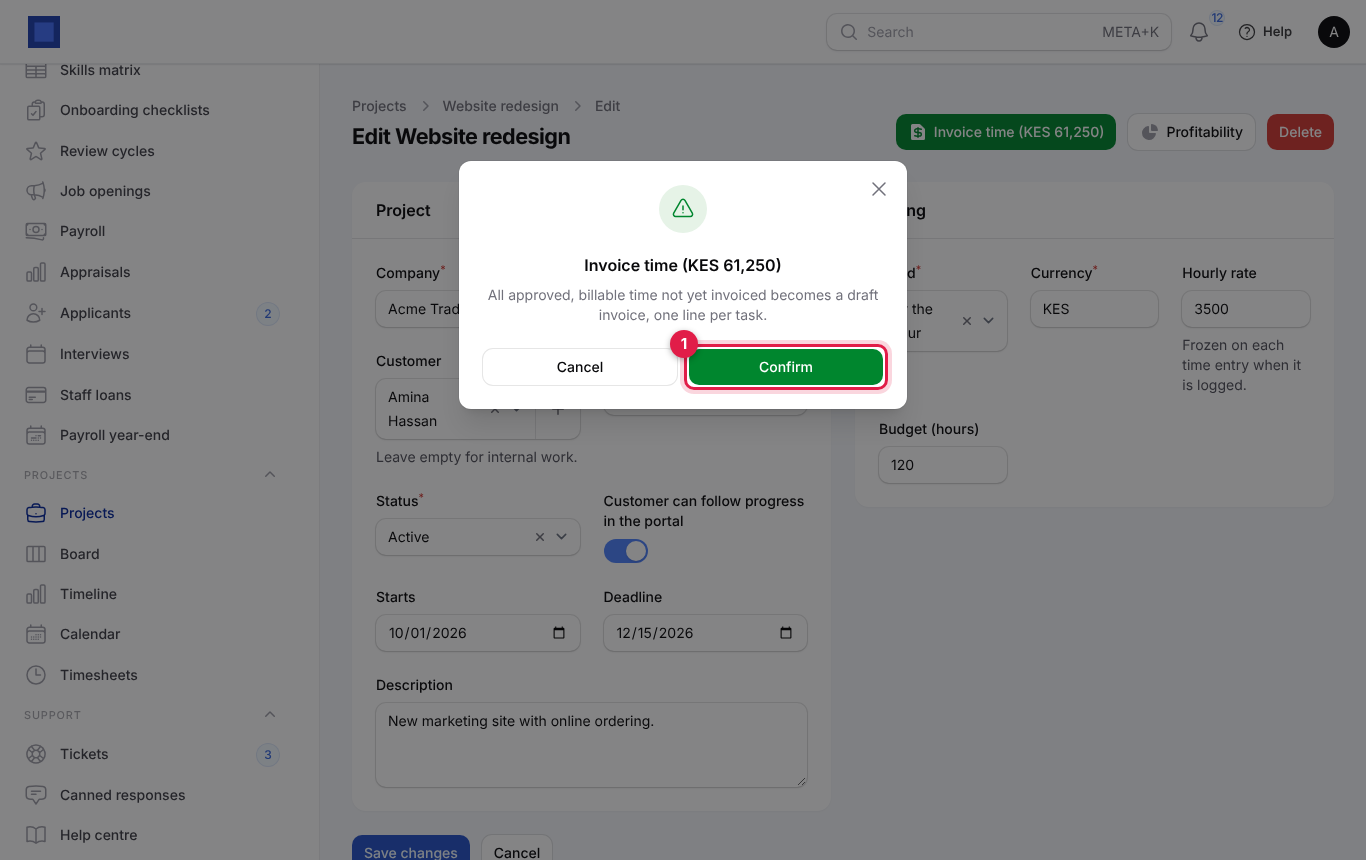
A draft invoice opens with one line per task (hours × the rate frozen on the time). The time becomes Invoiced so it is never billed twice. If nothing is waiting you see "There is no approved, billable time waiting to be invoiced."
Fixed-price projects: click Create invoice and confirm. A draft invoice for the fixed price opens, with one line named after the project.
Milestone projects:
- Mark the milestone Done on the Tasks tab when it is reached.
- Click Invoice milestones (KES …) and confirm. A draft invoice opens with a line per completed milestone ("Website redesign – Design approved"). Each milestone shows Invoiced under its amount and is billed only once. If none is ready you see "No completed milestone with a price is waiting to be invoiced. Mark the milestone done first."
In every case, check the draft invoice, add tax if needed, then Issue and send it from Finance → Invoices. See Invoices and payments.
Check profitability
Click Profitability on the project.
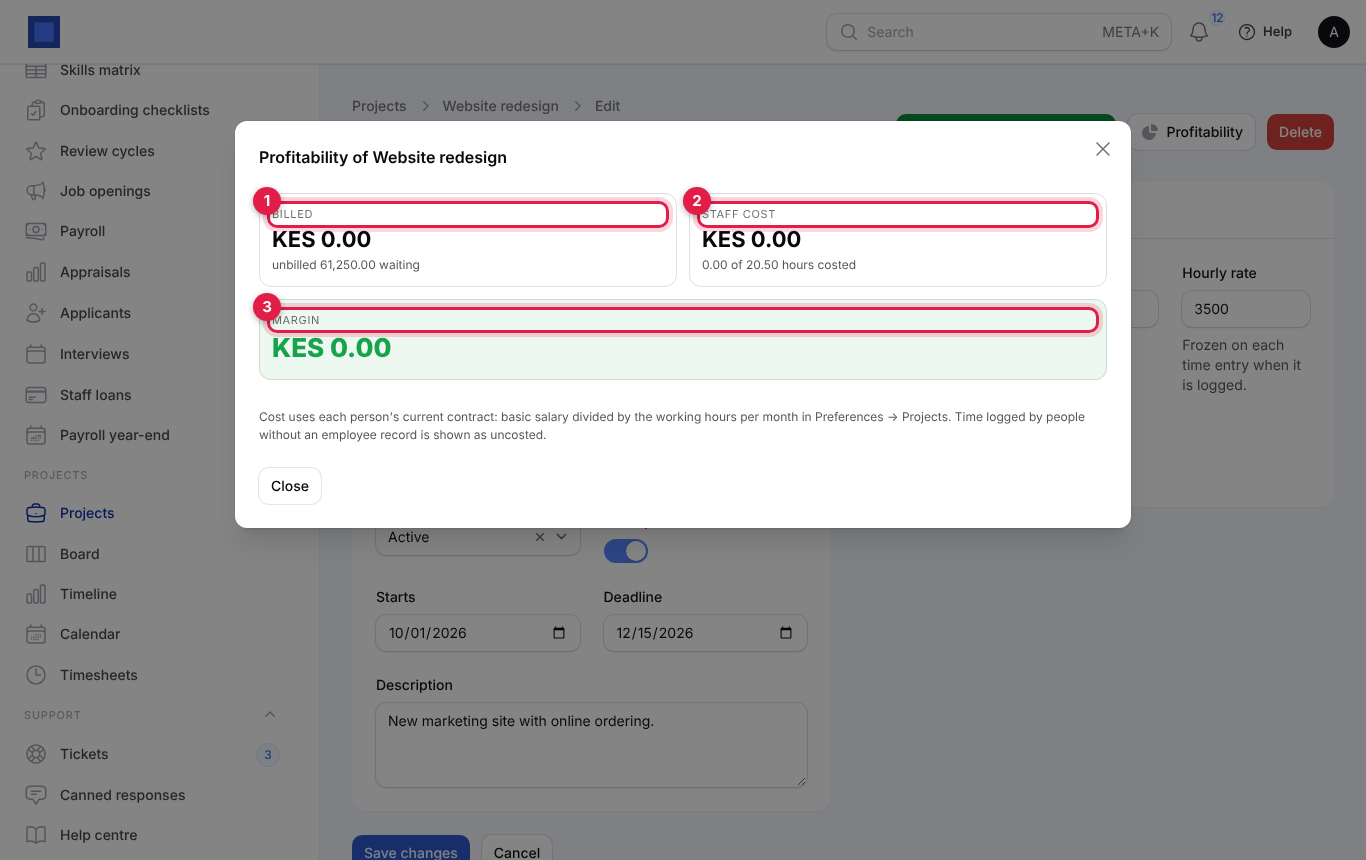
- Billed (marker 1): invoiced time plus the fixed price once invoiced, with the unbilled amount waiting under it.
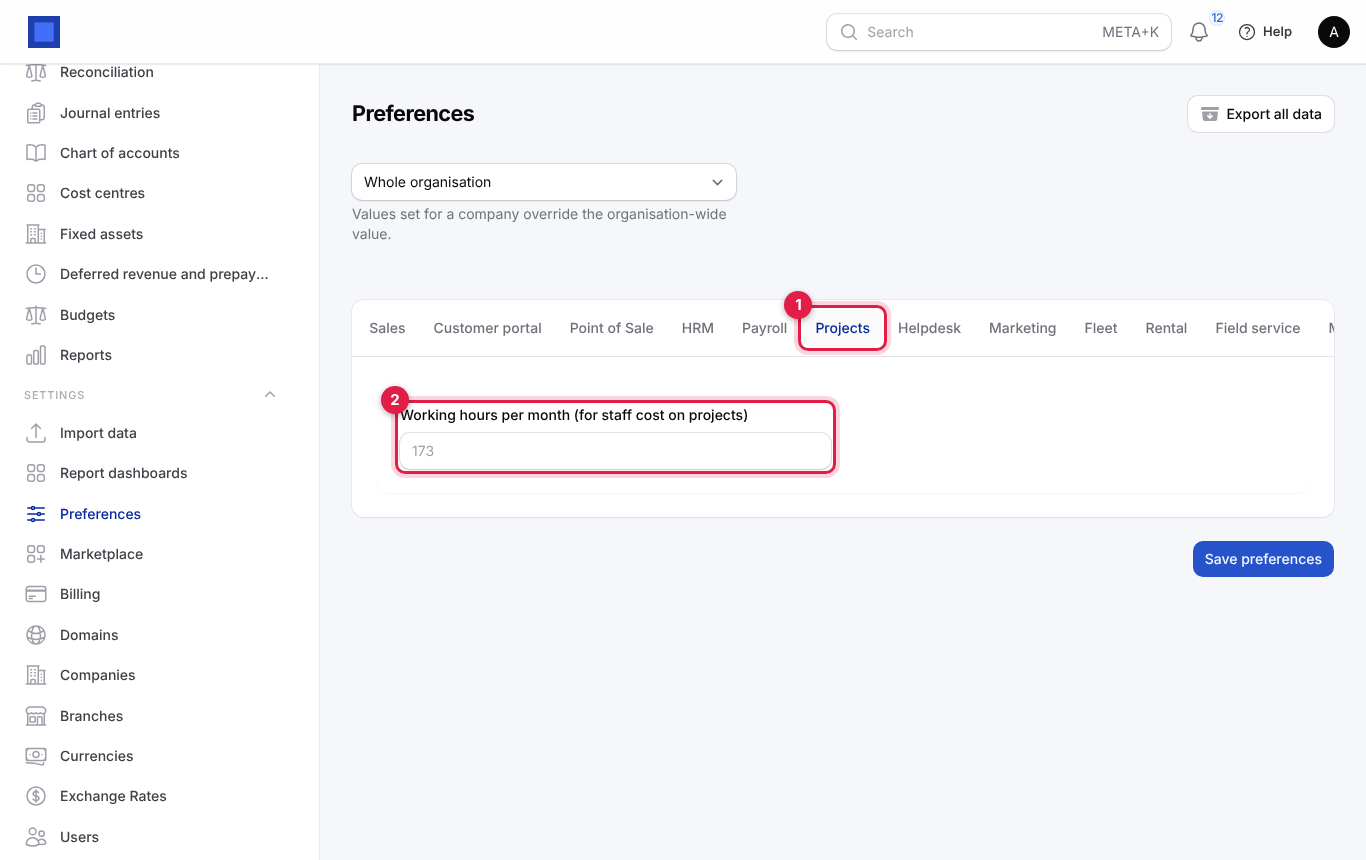
- Staff cost (marker 2): hours × each person's hourly cost. The hourly cost is their current contract's basic salary divided by the Working hours per month in Preferences (173 by default). People without an employee record or contract are "uncosted" and shown as, for example, "0.00 of 20.50 hours costed".
- Margin (marker 3): billed minus staff cost, with the percentage. Green when positive, red when negative.
To set the working hours, open Settings → Preferences, click the Projects tab (marker 1) and fill in Working hours per month (for staff cost on projects) (marker 2), then Save preferences.
Tip: For staff cost to work, link each team member's user to their employee record and give them a contract with a basic salary in HRM → Employees.
The task board
Projects → Board shows tasks from all active projects in four columns: To do, In progress, Review and Done.
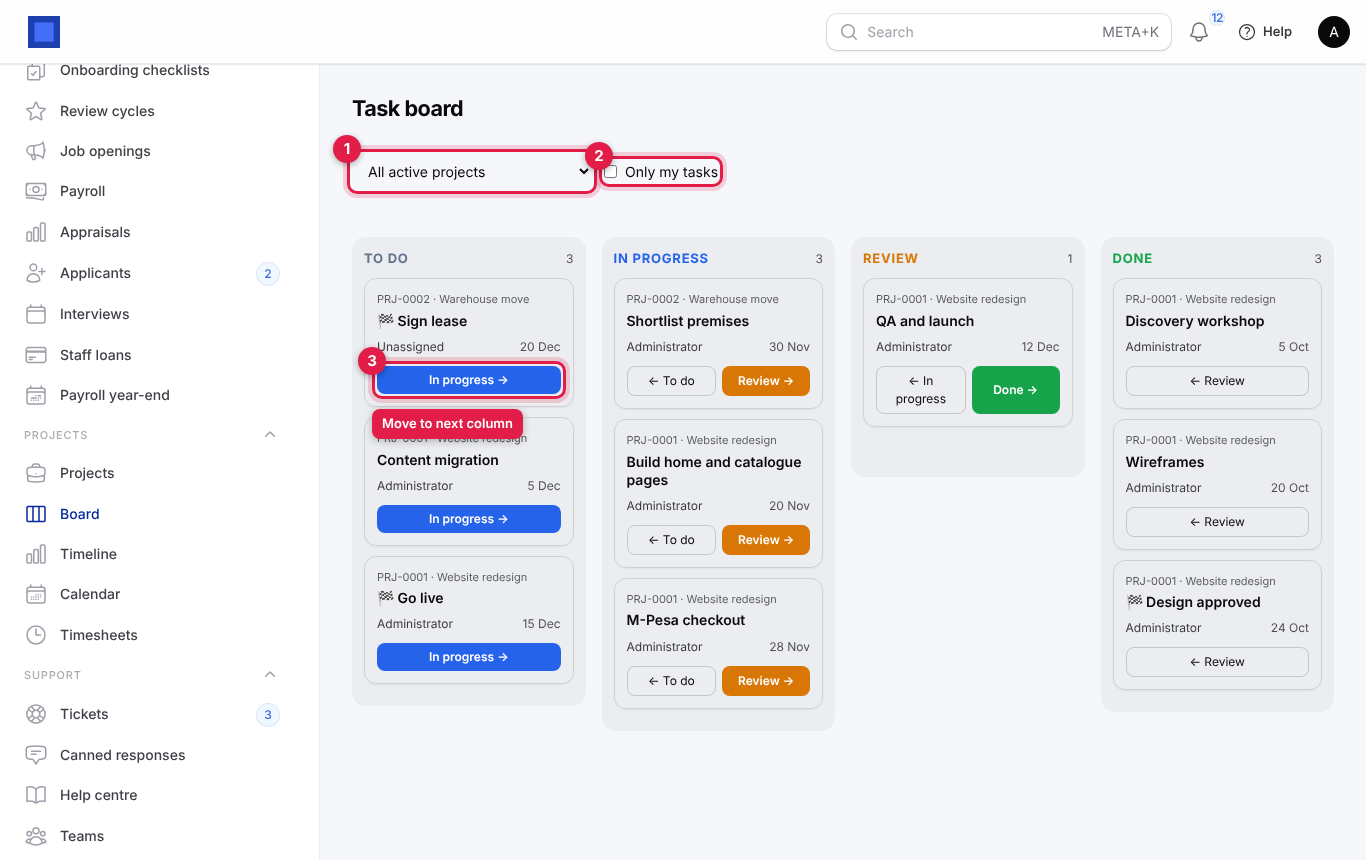
- Choose one project (marker 1) or leave All active projects.
- Tick Only my tasks (marker 2) to see just yours.
- Each card shows the project, the title (🏁 for milestones), the person (or Unassigned) and the due date (red when overdue).
- Click the coloured button (marker 3), for example In progress →, to move a card to the next column, or ← To do to move it back. Moving needs projects.manage.
The timeline
Projects → Timeline is a Gantt chart of dated tasks, grouped by project.
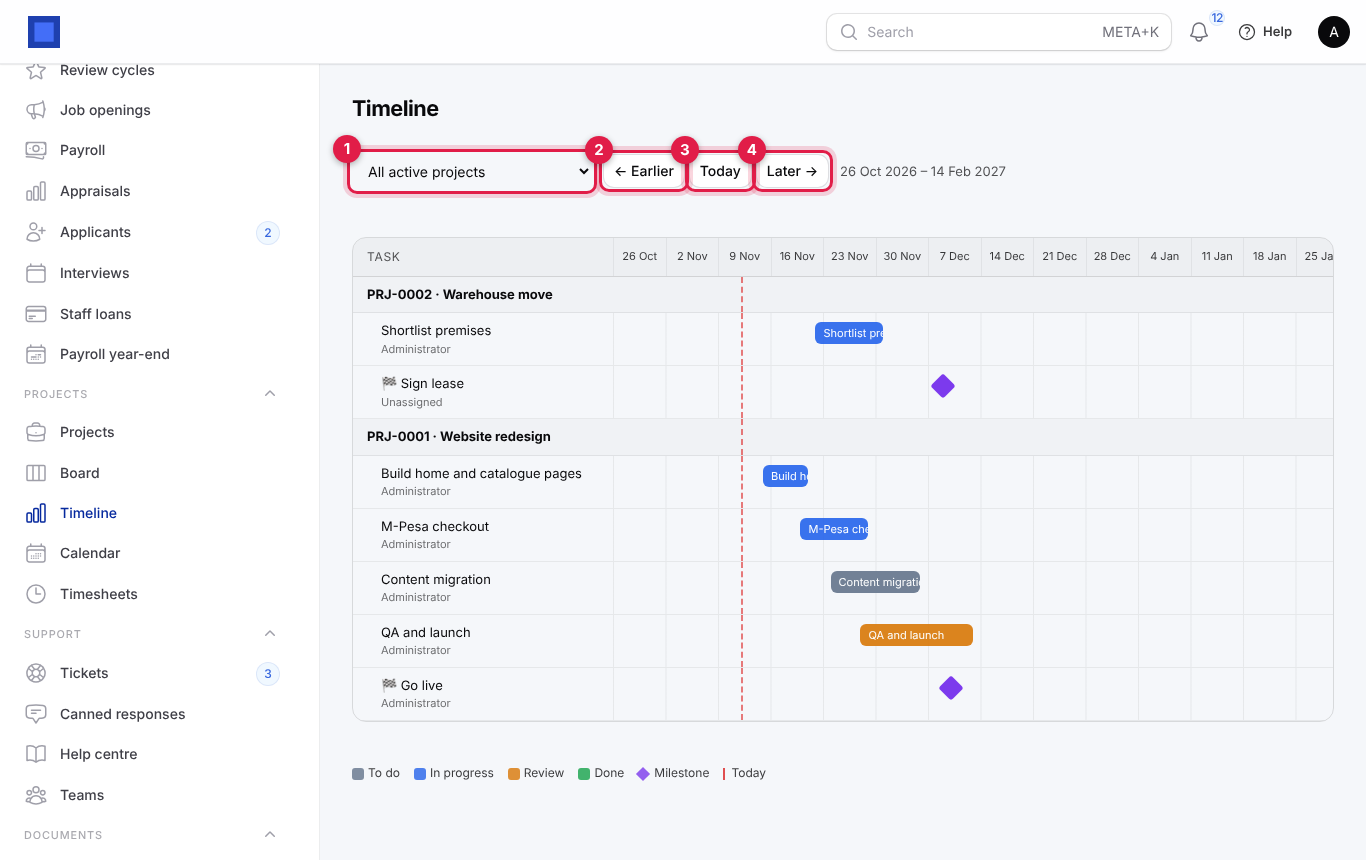
- Choose a project (marker 1) or All active projects.
- ← Earlier (marker 2) and Later → (marker 4) move four weeks at a time; Today (marker 3) returns to now. The red dashed line is today.
- Bars are coloured by status (To do, In progress, Review, Done); milestones are diamonds. The person is shown under each task.
- Only tasks with dates appear. If you see "No dated tasks in this window. Give tasks a start and due date to see them here.", add Starts and Due dates to the tasks.
The calendar
Projects → Calendar shows a month with each task on its due date and "Project ends: …" on each project's deadline.
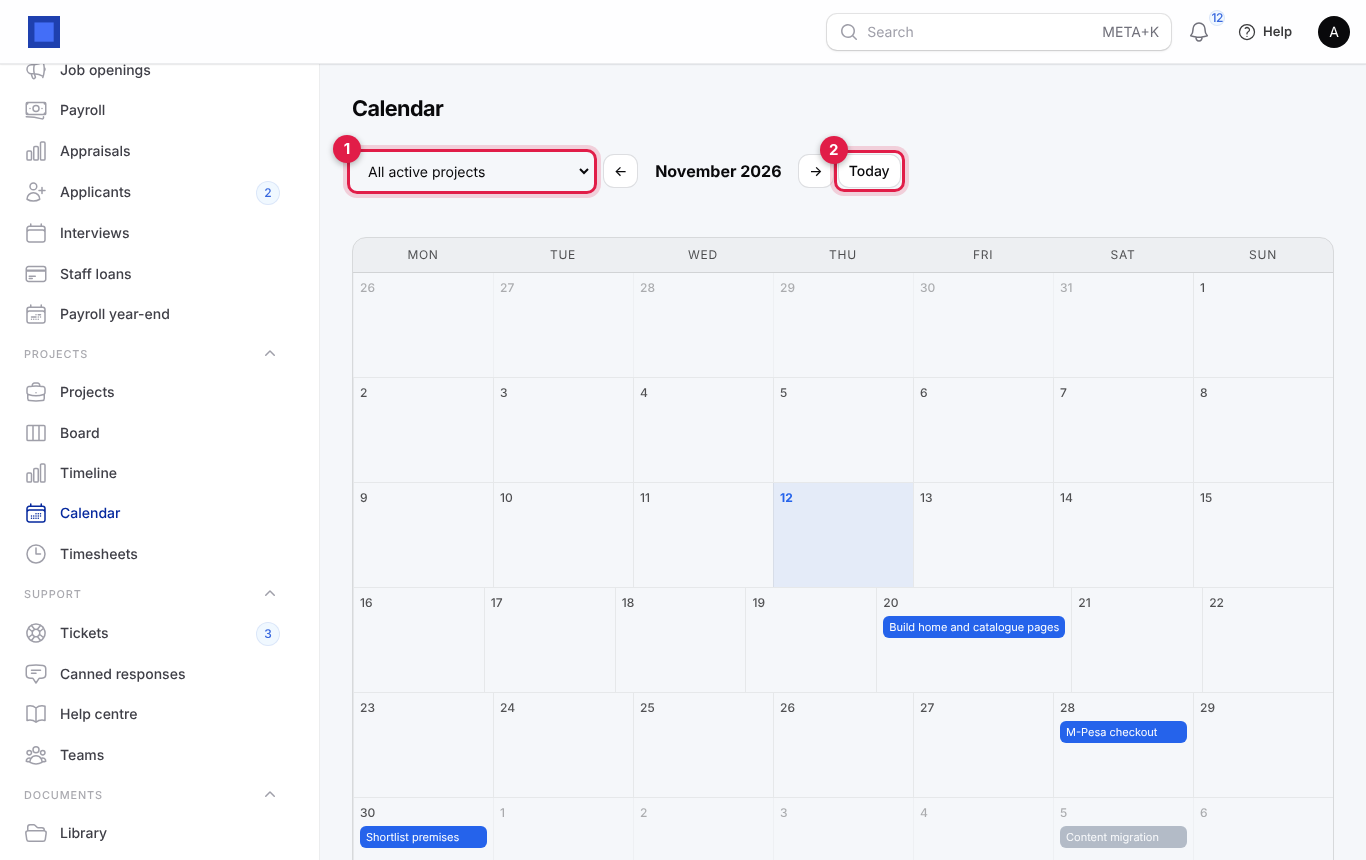
Choose a project (marker 1), use ← and → to change month, and Today (marker 2) to come back to this month.
What the customer sees
When Customer can follow progress in the portal is on and the customer has portal access, the portal's Projects page shows each of their projects with its manager ("Managed by …"), deadline, a progress bar (tasks done out of total), and the milestones marked Done, In progress or Overdue. They do not see time, rates or internal notes. Give customers portal access from Sales → Portal access; see Customer and vendor portal.
Common questions
Why can I not edit my time entry? Submitted, approved and invoiced time is locked. Ask a manager to Reject it; you can then edit or delete it.
Why is the Invoice time button missing? The project is not billed By the hour, the Invoicing module is off, or you do not have projects.invoice.
I changed the hourly rate. Why did the invoice use the old one? The rate is frozen on each entry when it is logged. Entries logged after the change use the new rate.
Why is my project not on the board or in the time entry list? Only Active projects appear there. Check its Status.
Why is the margin zero? Nothing has been invoiced yet, and staff cost needs employee contracts. Invoice the approved time and link users to employees.
Can I bill time and milestones on the same project? A project has one billing method. Use Per milestone for staged payments, and log time anyway (non-billable) to track effort and cost.