Garage and auto workshop
Garage and auto workshop is for motor garages, service centres and body shops. You keep your customers' vehicles by registration plate with their full service history, open a job card when a vehicle comes in (odometer, fuel level, what the customer says is wrong and a check-in checklist), send the customer an estimate and wait for their approval, issue parts from stock and log each mechanic's time against the approved work, then complete the job and invoice it, split between the insurer and the customer on insurance jobs. When a service is done, NaliSuite works out when the next one is due and can text the owner a reminder.
It is in the Garage group of the left menu: Workshop today, Job cards, Vehicles, Service reminders and Mechanic rates.
Note: You need the garage.view permission to see the garage screens, job card PDFs and estimates, and garage.manage to add vehicles, check vehicles in, write and send estimates, record the customer's answer, issue parts, log labour, complete, release and cancel jobs, set mechanic rates and text reminders. Owners and admins have both; the member role has garage.view. Anyone with garage.view can be picked as a mechanic. Set permissions under Settings → Roles (see Workspace settings).
Switch it on
Garage and auto workshop is an add-on sold separately from your plan. It needs the Contacts and Sales apps. Invoicing (to invoice jobs), Inventory (to take parts out of stock) and Marketing with an SMS provider (to text customers) are optional but recommended.
- Open Settings → Marketplace and type Garage in the Search add-ons… box (marker 1).
- On the Garage and auto workshop card (marker 2), click Start free trial (or Add to subscription) and confirm. The Garage group appears in the left menu.
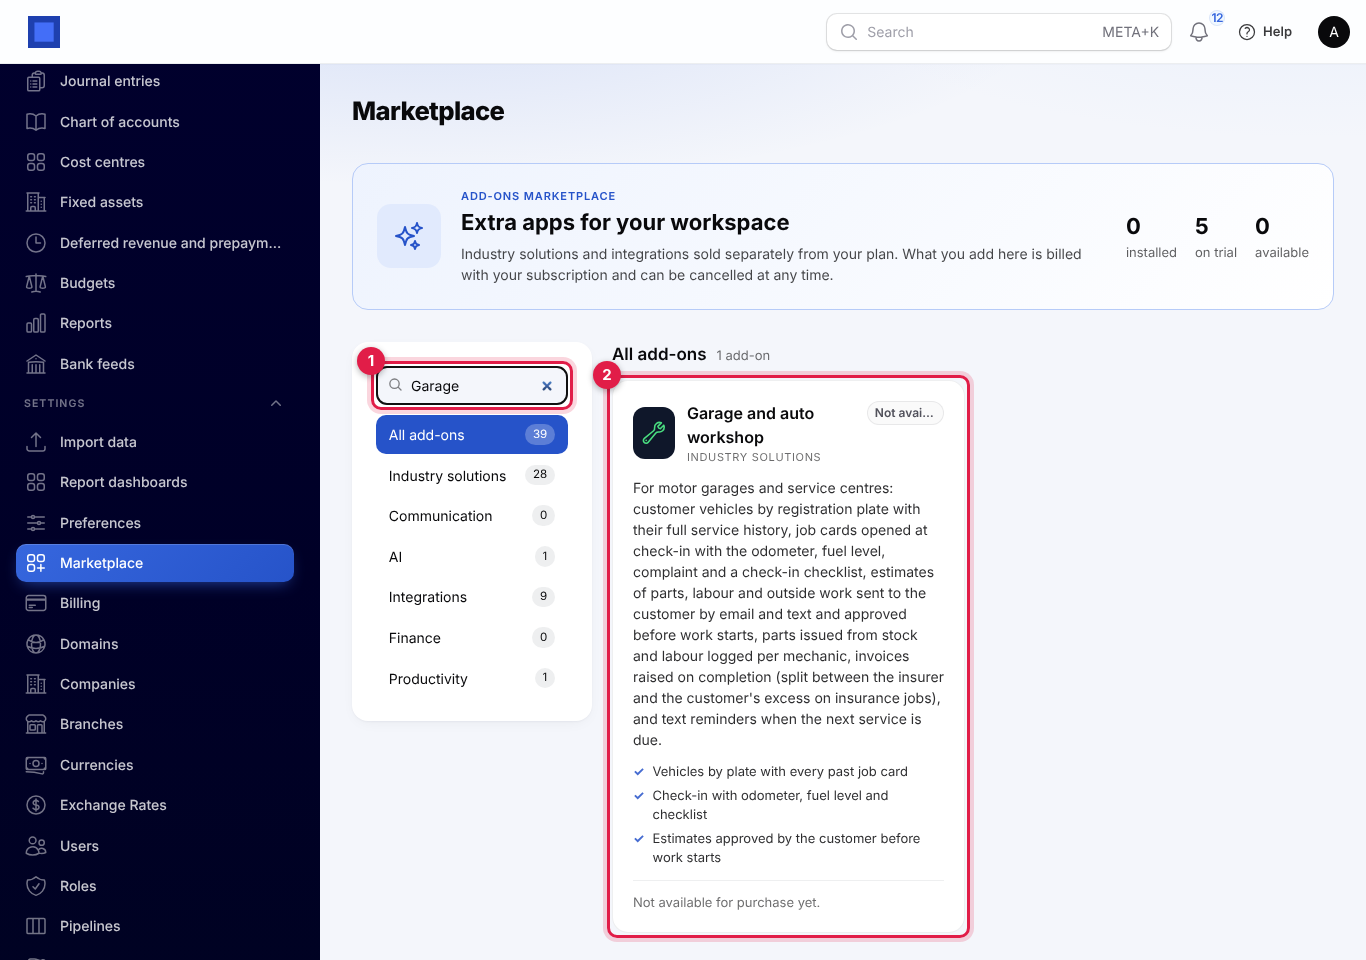
If the card says Not available for purchase yet (as in the screenshot), the add-on has not been priced for your plan: ask NaliSuite support to switch it on. See Billing and marketplace.
Garage settings
- Open Settings → Preferences and click the Garage tab (marker 1).
- Fill in the fields and click Save preferences (marker 8).
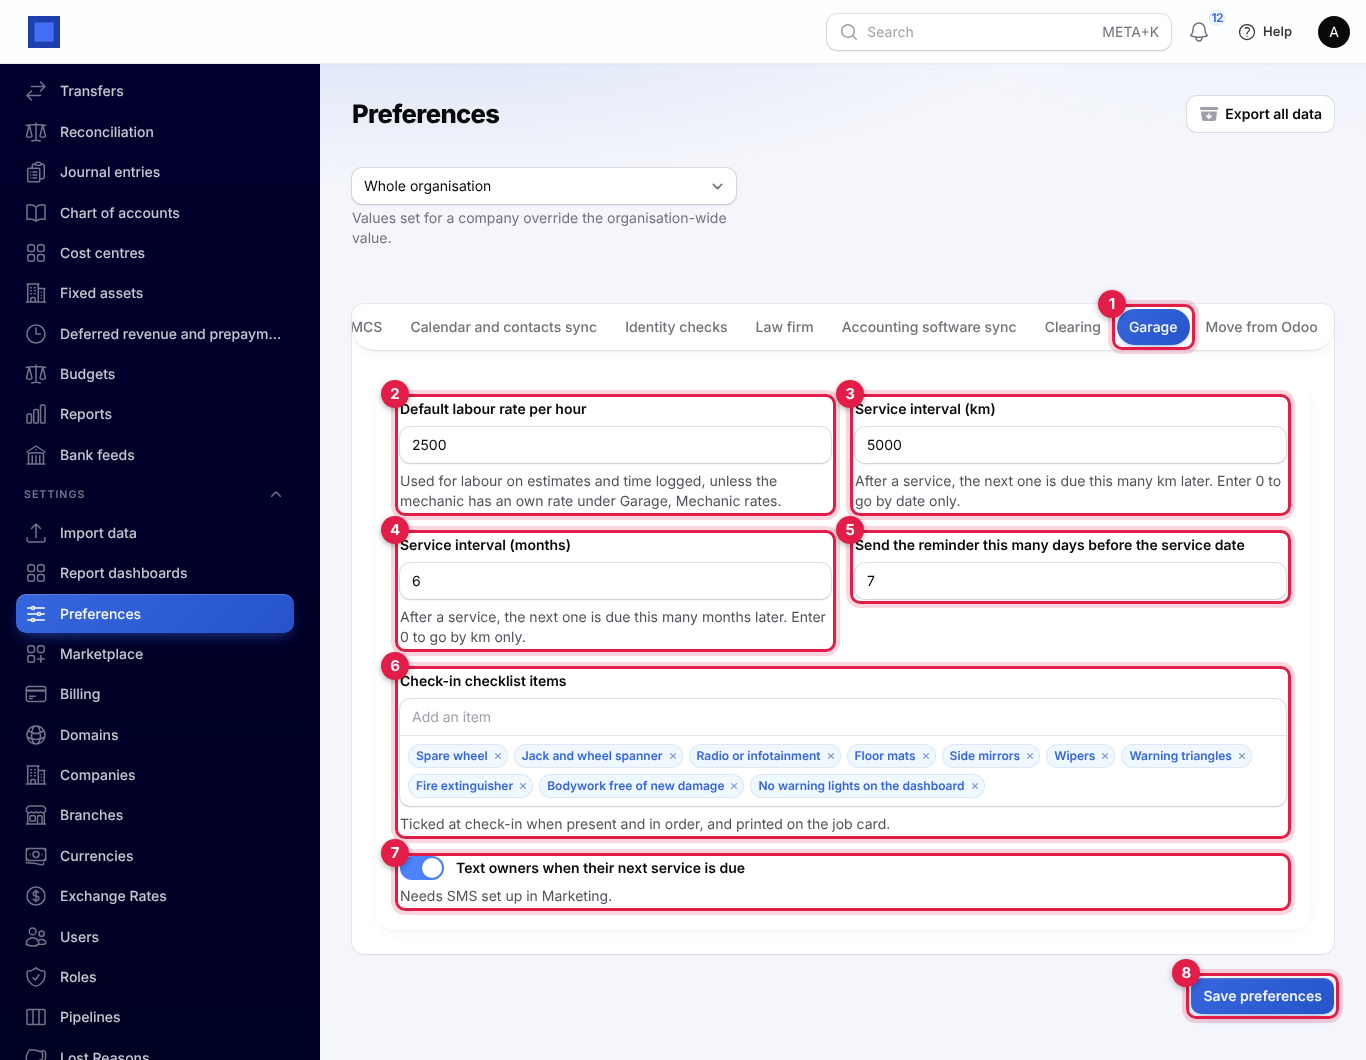
| Setting | Default | What it does |
|---|---|---|
| Default labour rate per hour (marker 2) | Empty | The hourly rate for labour on estimates and for time logged, unless the mechanic has their own rate under Garage → Mechanic rates. If you leave it empty, labour is priced at 0, so fill it in. |
| Service interval (km) (marker 3) | 5,000 | After a service, the next one is due this many km later. Enter 0 to go by date only. |
| Service interval (months) (marker 4) | 6 | After a service, the next one is due this many months later. Enter 0 to go by km only. |
| Send the reminder this many days before the service date (marker 5) | 7 | How early the reminder text goes out (0 to 60 days). |
| Check-in checklist items (marker 6) | Spare wheel, jack and wheel spanner, radio, floor mats, side mirrors, wipers, warning triangles, fire extinguisher, bodywork free of new damage, no warning lights | The items ticked at check-in when present and in order, printed on the job card. Type an item and press Enter to add it; click × to remove one. |
| Text owners when their next service is due (marker 7) | On | Sends the automatic service reminder texts. Needs an SMS provider under Settings → Preferences → Marketing (see Marketing). |
The dropdown at the top of Preferences lets one company use different settings from the rest of the organisation.
Estimates and job totals follow your invoicing setting for whether prices include tax (see Invoices and payments). Each line is taxed with the part's own sales tax, or your default tax.
Vehicles and plates
Open Garage → Vehicles. Each vehicle shows its plate with the make, model, year and colour underneath, the owner, the last odometer reading, the Next service date with the km underneath (red when it is due), the number of Visits and the Last visit.
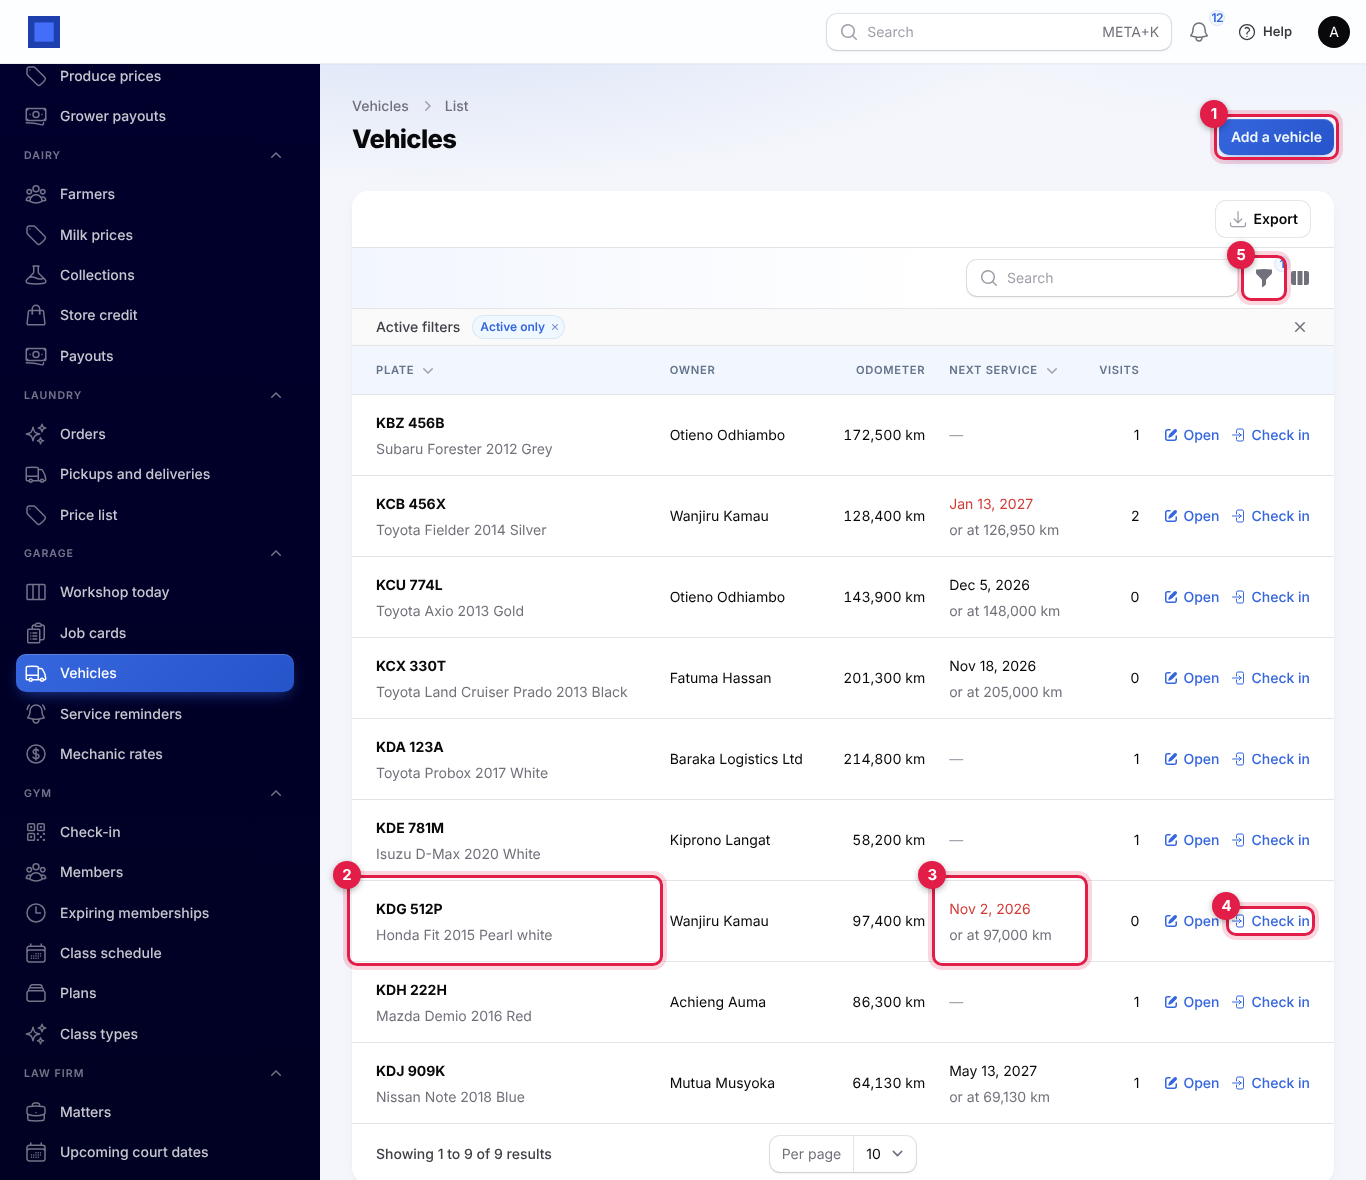
- Add a vehicle (marker 1) opens the vehicle form.
- The plate and model (marker 2). Search by plate with or without spaces.
- A red Next service (marker 3) means the date has come or the last reading has passed the service km.
- Check in (marker 4) opens a new job card for that vehicle. Open opens the vehicle.
- The filter (marker 5) has Service due and Active only (on by default; inactive vehicles are hidden).
Add a vehicle
- Click Add a vehicle.
- Fill in the form and click Create.
| Field | What to enter |
|---|---|
| Registration plate (required) | Type it any way: kda123a, KDA-123A. It is saved the standard way, KDA 123A. A plate can be registered only once; spaces and dashes are ignored when checking, so you see "A vehicle with plate KDA 123A is already registered." |
| Make, Model, Year, Colour | Toyota, Probox, 2017, White. |
| Owner | Search your contacts, or click + to add a new one with name, mobile and email. Service reminders go to the owner, and the owner is the customer on new job cards unless you choose someone else. |
| VIN / chassis number, Engine number | Optional. The VIN is saved in capitals. |
| Odometer (km) | The last known reading. It goes up by itself at each check-in and collection. |
| Next service due on, Next service due at (km) | Fill these in for a vehicle you are taking on, so it is reminded. After the first service in NaliSuite they are set for you. |
| Last serviced on | Set by NaliSuite when a service is collected; you cannot type it. |
| Active | Turn off for a vehicle that no longer comes in. |
| Notes | Anything to remember about the vehicle. |
You can also add a vehicle while checking one in, with + next to Vehicle.
The vehicle page
Click Open on a vehicle.
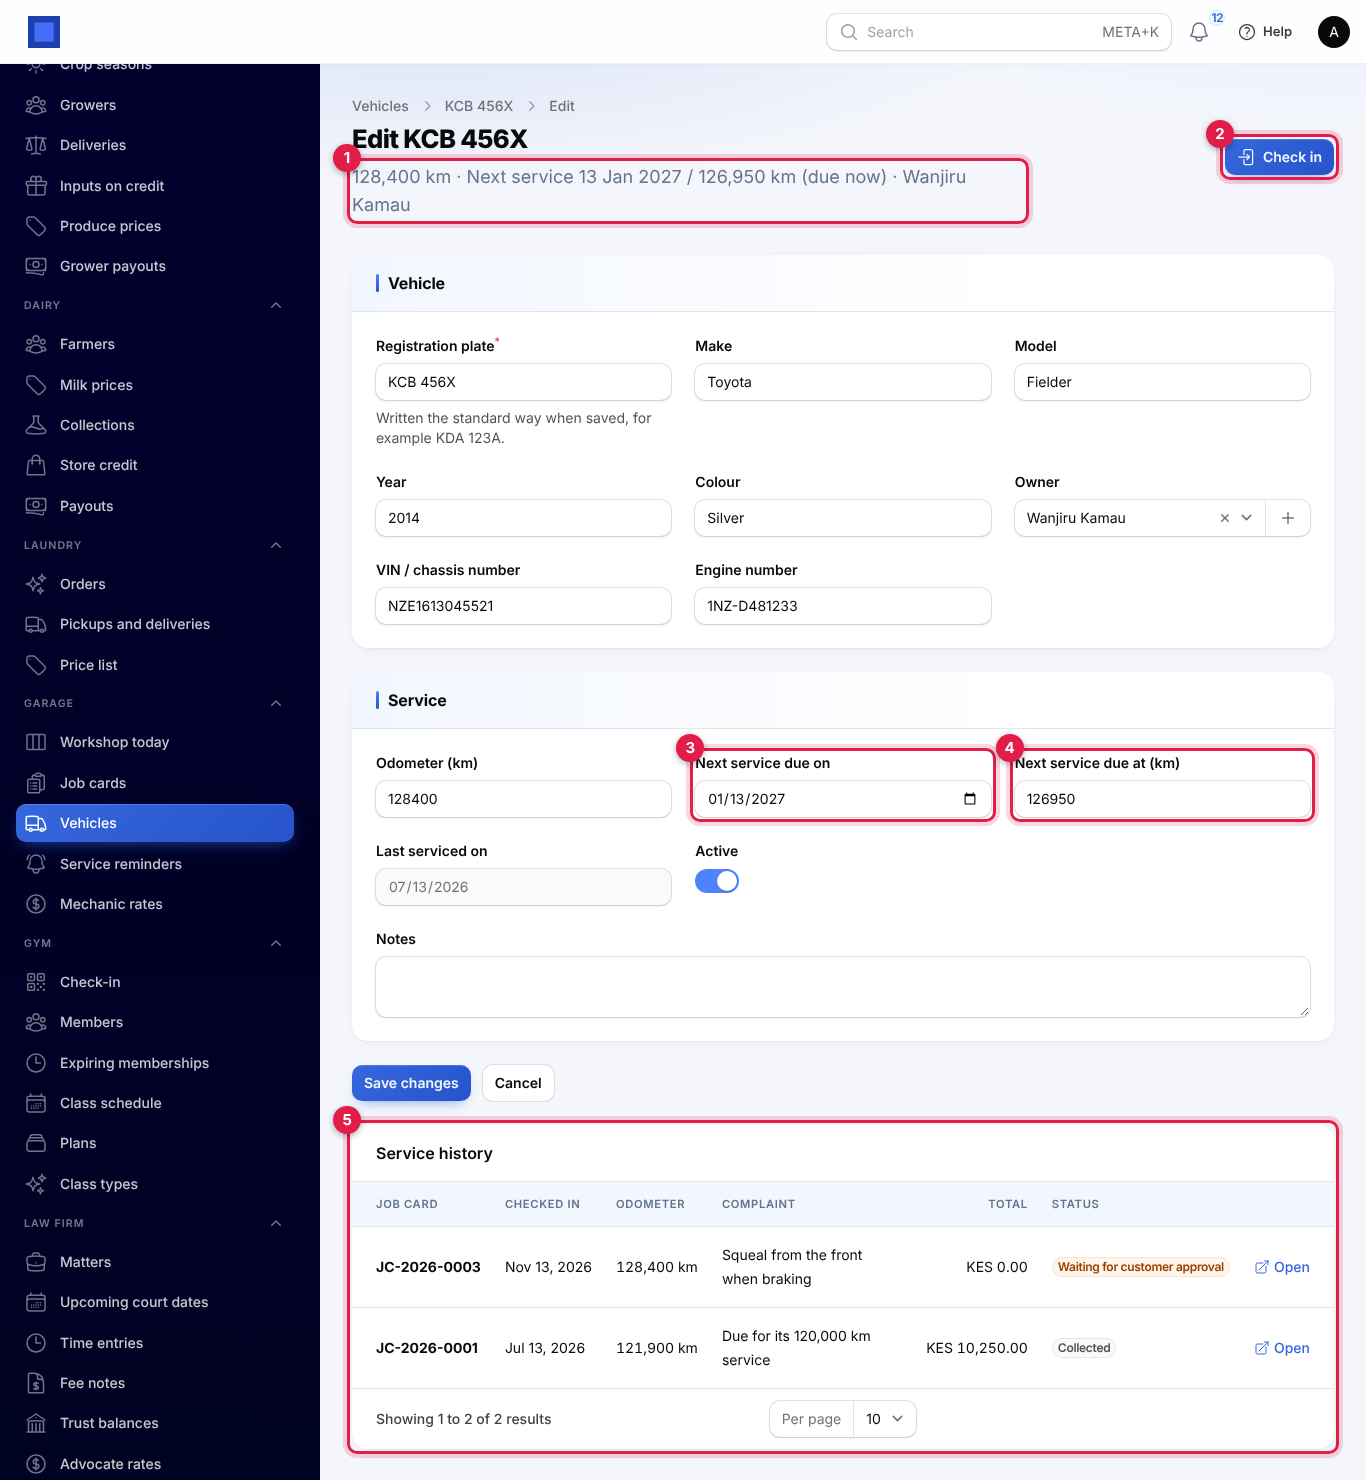
- Under the title (marker 1): the odometer, the next service (with due now when it is due) and the owner.
- Check in (marker 2) opens a new job card.
- Next service due on (marker 3) and Next service due at (km) (marker 4) can be corrected by hand. Click Save changes.
- Service history (marker 5) lists every job card the vehicle has had, newest first, with the date, odometer, complaint, total and status. Open opens the job card.
Check a vehicle in
When a vehicle arrives, open a job card for it. Click Check in on the vehicle, or Job cards → Check in a vehicle.
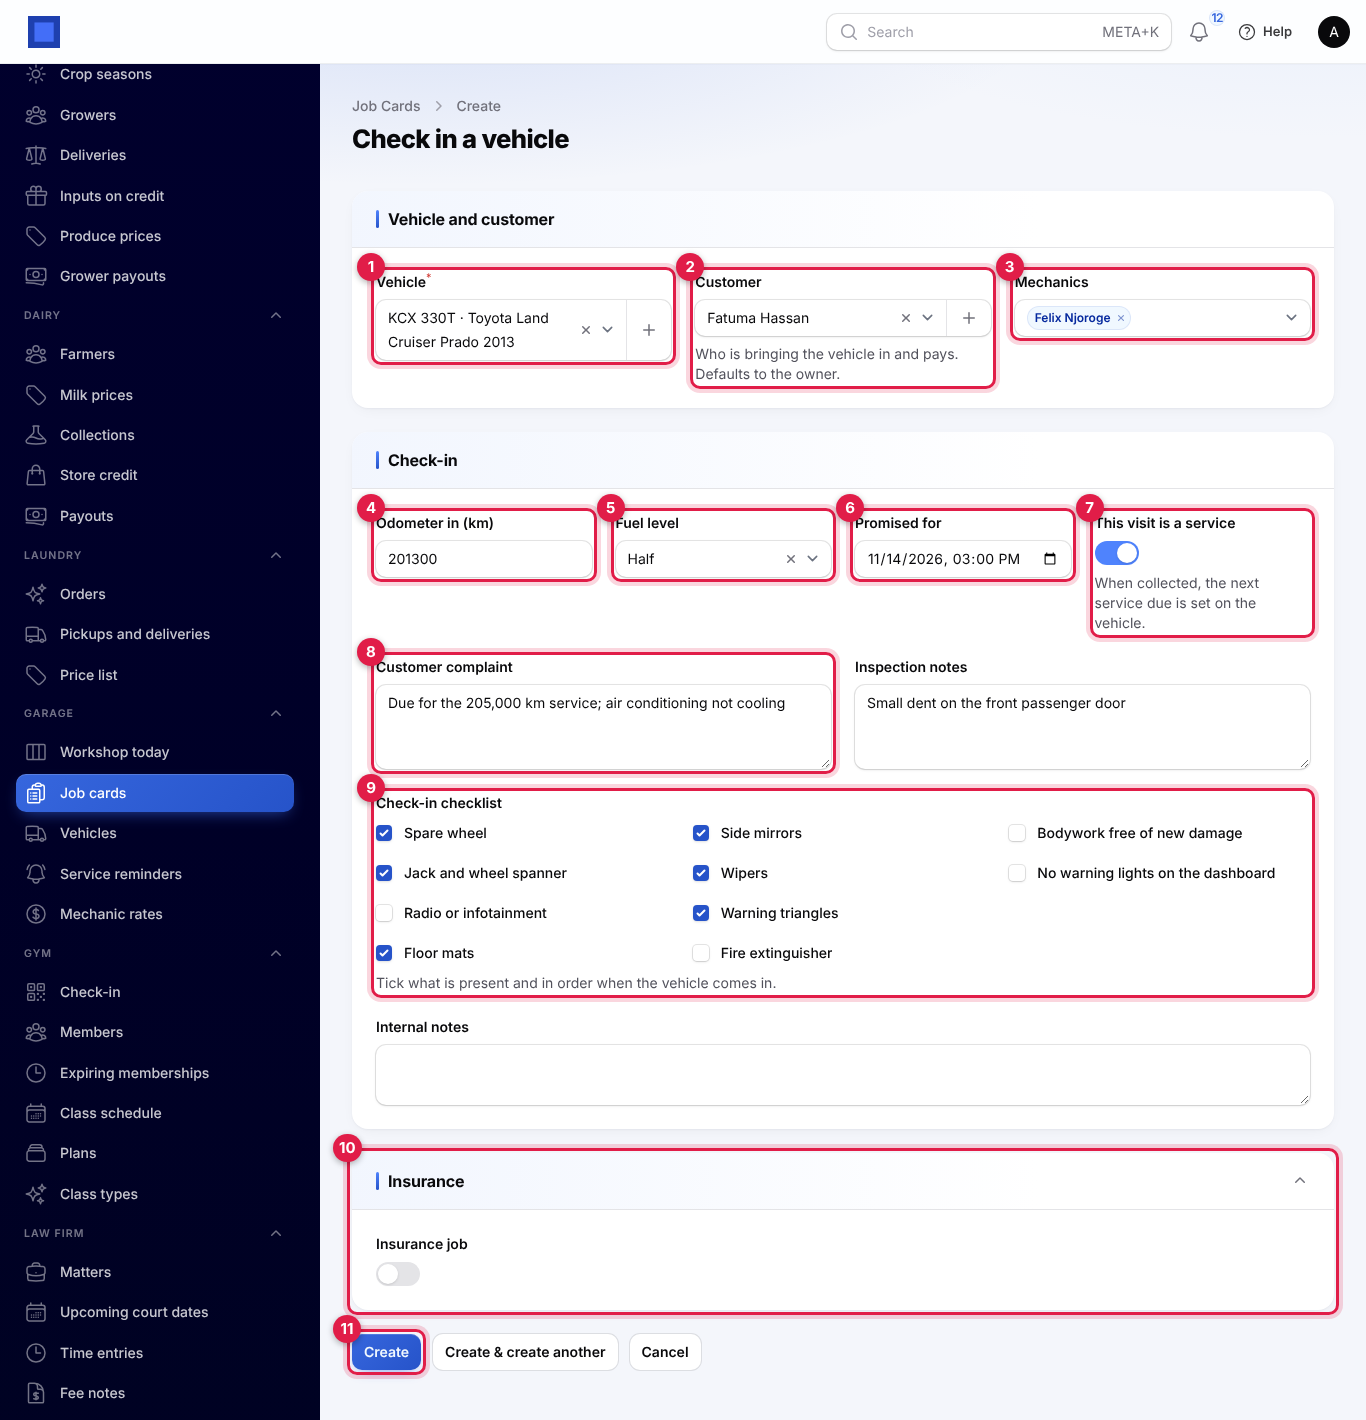
| Field | What to enter |
|---|---|
| Vehicle (required, marker 1) | Search by plate or make, or click + to add a new vehicle. Choosing a vehicle fills in the customer and the odometer. The vehicle cannot be changed after saving. |
| Customer (marker 2) | Who is bringing the vehicle in and pays. Defaults to the owner. A fleet driver can bring a company's vehicle; choose the company. |
| Mechanics (marker 3) | The mechanics working on it. Anyone who logs time is added by themselves. |
| Odometer in (km) (marker 4) | The reading now. It updates the vehicle when it is higher. |
| Fuel level (marker 5) | Empty, Quarter, Half, Three quarters or Full. |
| Promised for (marker 6) | When you told the customer it would be ready. After this time the job shows as overdue. |
| This visit is a service (marker 7) | On for a routine service. When the vehicle is collected, the next service due is set on the vehicle. |
| Customer complaint (marker 8) | What the customer says is wrong. |
| Inspection notes | What you found walking round the vehicle: scratches, a cracked windscreen. |
| Check-in checklist (marker 9) | Tick what is present and in order. Items not ticked are printed as missing on the job card. |
| Internal notes | For your team only. |
| Insurance (marker 10) | Turn on Insurance job for an insurance repair (see Insurance jobs). |
Click Create (marker 11). The job card gets the next number, for example JC-2026-0008, with the status Booked in, and opens.
Job cards and their statuses
Open Garage → Job cards.
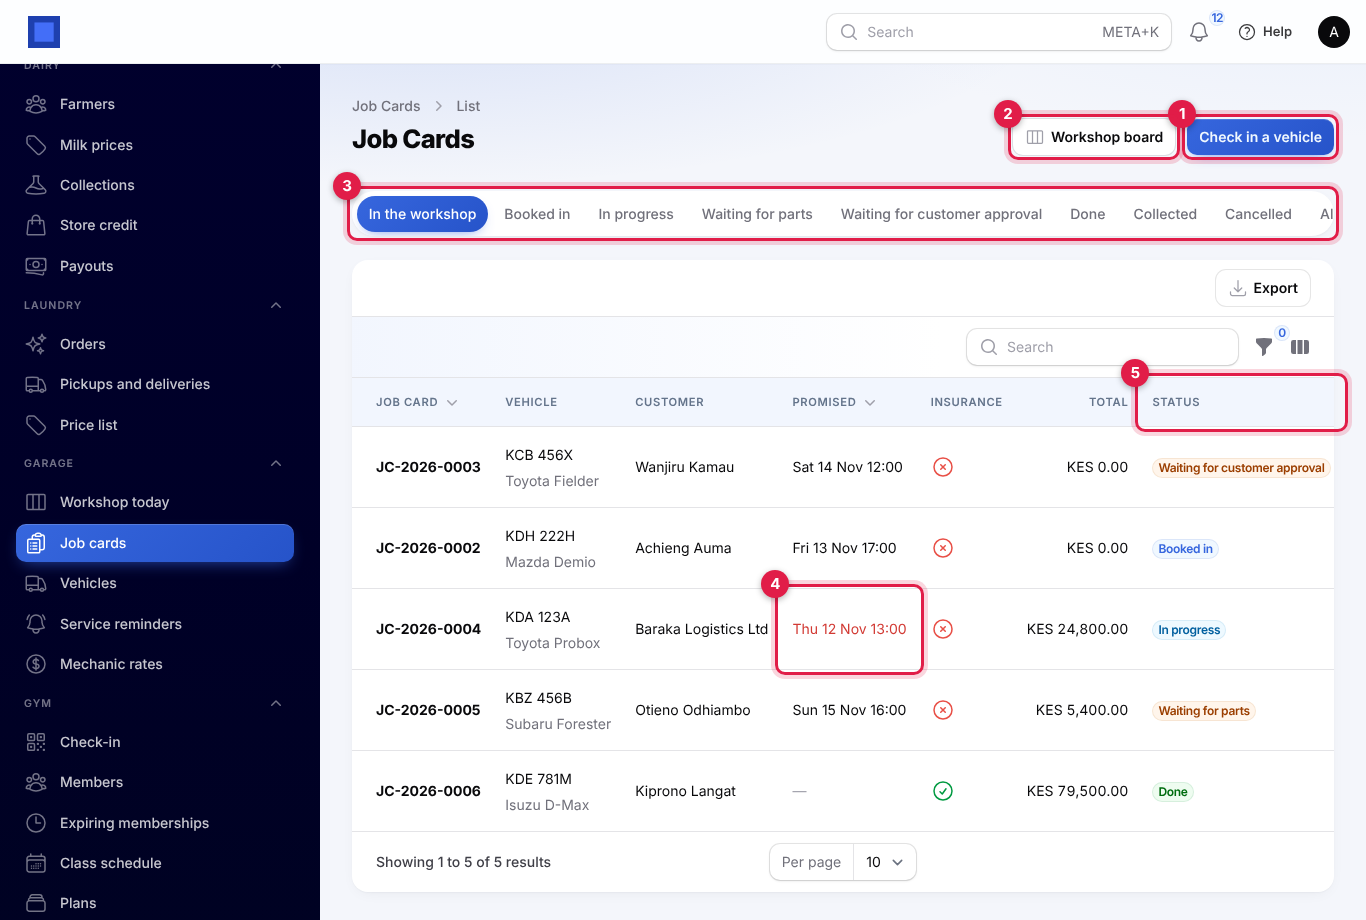
- Check in a vehicle (marker 1) opens the check-in form, and Workshop board (marker 2) the board below.
- The tabs (marker 3): In the workshop (everything from booked in to done, the default), one tab per status, and All.
- The Promised time turns red (marker 4) when the job is past it and not yet done.
- Status (marker 5). The filter icon has Status, Mechanic, Past the promised time and Insurance jobs.
| Status | What it means | What moves it on |
|---|---|---|
| Booked in | Checked in, no approved work yet. | Sending an estimate, or recording the customer's approval. |
| Waiting for customer approval | An estimate has been sent. | Recording the approval (to In progress) or the decline (back to Booked in if nothing else is approved). |
| In progress | The customer approved work; parts and labour can be recorded. | Waiting for parts, a supplementary estimate, or Complete and invoice. |
| Waiting for parts | Work stopped until a part arrives. | Resume work. |
| Done | Work finished and invoiced; ready for collection. | Release vehicle. |
| Collected | The customer has taken the vehicle. | Nothing; it stays in the history. |
| Cancelled | The job was cancelled. | Nothing. |
The top search finds job cards by number, claim number, plate or customer.
The workshop board
Open Garage → Workshop today, or click Workshop board.
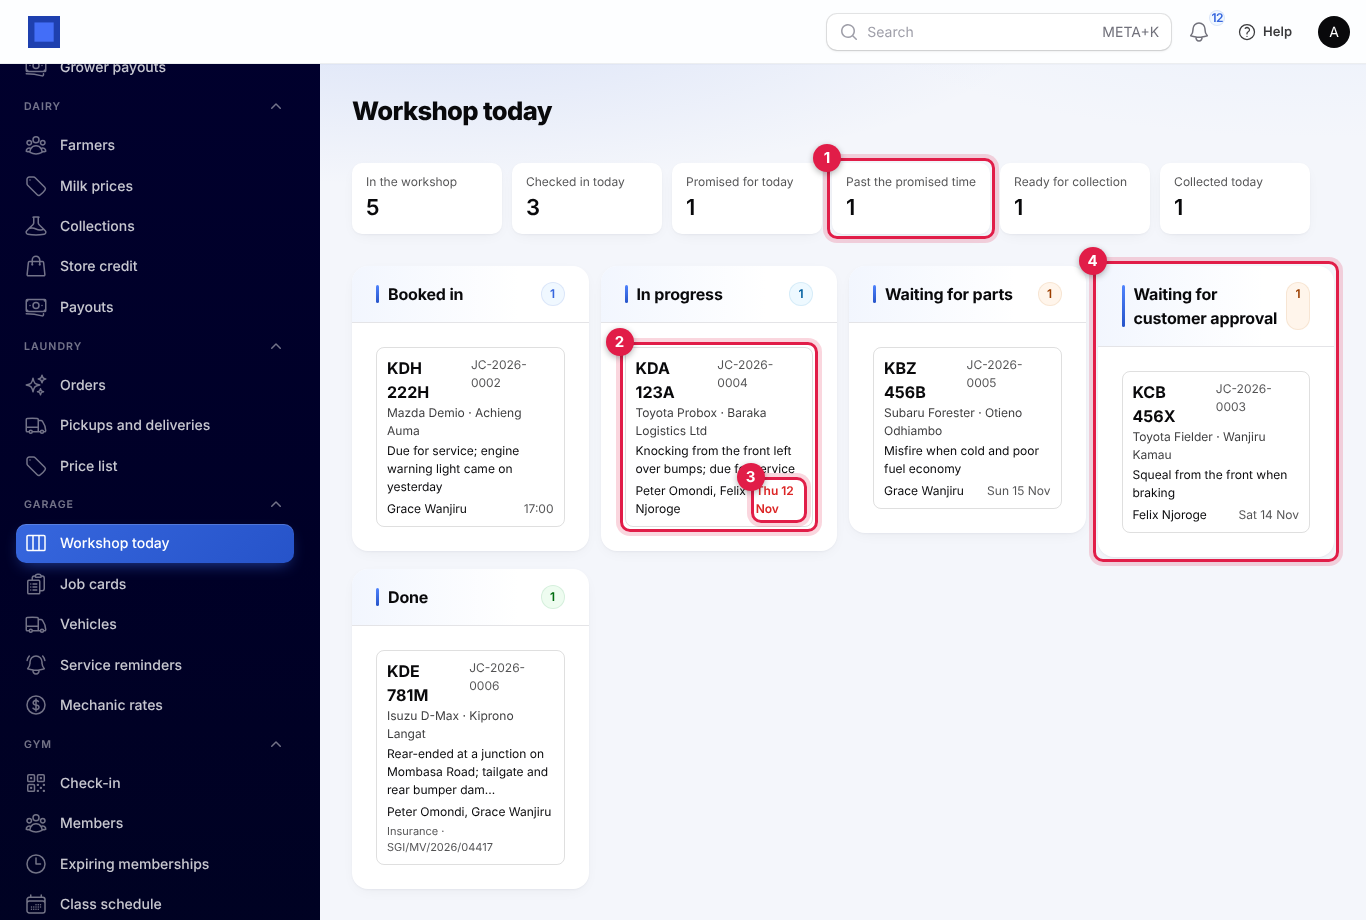
The counters at the top (marker 1 is Past the promised time) show how many vehicles are In the workshop, Checked in today, Promised for today, Past the promised time, Ready for collection and Collected today.
Below is a column for each status from Booked in to Done, with a count. Each card (marker 2) shows the plate, job number, vehicle, customer, complaint, mechanics and the promised time; it turns red when overdue (marker 3). Insurance jobs show the claim number. The cards are in order of promised time. Click a card to open the job. Use Waiting for customer approval (marker 4) to see who to chase.
Estimates
Nothing can be issued or logged on a job until the customer has approved an estimate. Estimates are on the job card, on the Estimates tab below the form.
Write an estimate
- Open the job card and scroll down to Estimates.
- Click New estimate (on a job with approved work it is called Supplementary estimate).
- Add a line for each part, labour item and outside job:
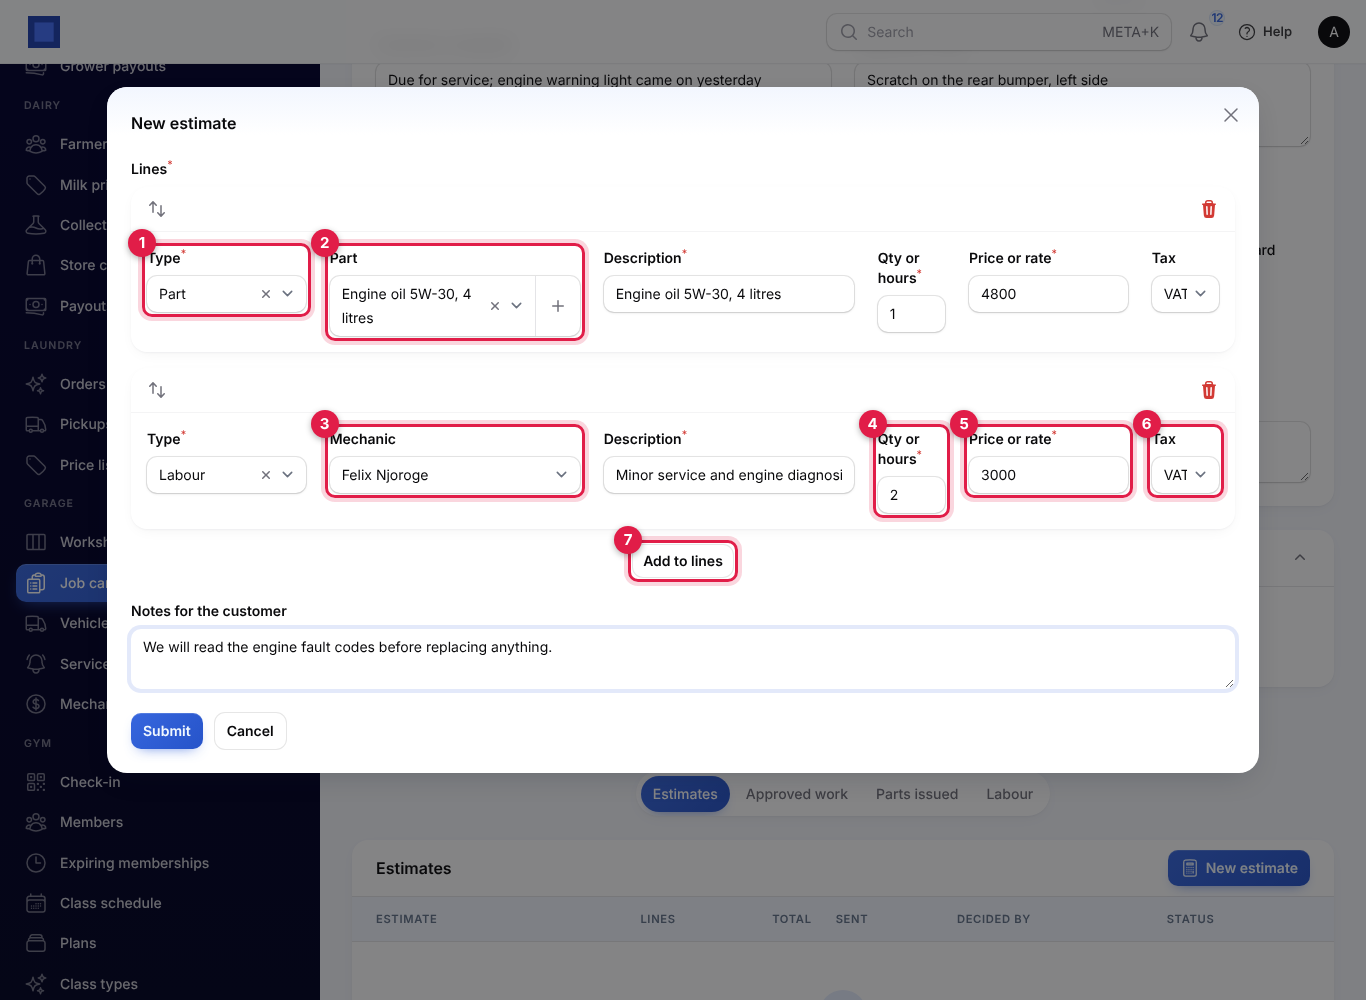
| Field | What to enter |
|---|---|
| Type (marker 1) | Part, Labour or Sublet (outside work), for example skimming discs at a machine shop or spray painting at a paint shop. |
| Part (marker 2, parts only) | Search your products by name or SKU. The description, price and tax are filled in from the product. Leave it empty for a part you will buy in; type the description and price yourself. |
| Mechanic (marker 3, labour only) | Optional. The price becomes that mechanic's own rate; without one, the default labour rate. |
| Description (required) | What the customer sees. |
| Qty or hours (marker 4) | The quantity, or the hours for labour. |
| Price or rate (marker 5) | The price per unit, or the hourly rate. |
| Tax (marker 6) | Your default tax, or the part's own. Clear it for an untaxed line. |
- Click Add to lines (marker 7) for another line. Drag lines to reorder them, or click the bin to remove one.
- Add Notes for the customer if needed, and click Submit.
The estimate gets a number such as GE-2026-0008, with the status Draft. Click Edit on it to change the lines while it is a draft or sent; once it is approved or declined it cannot change.
Send it and record the answer
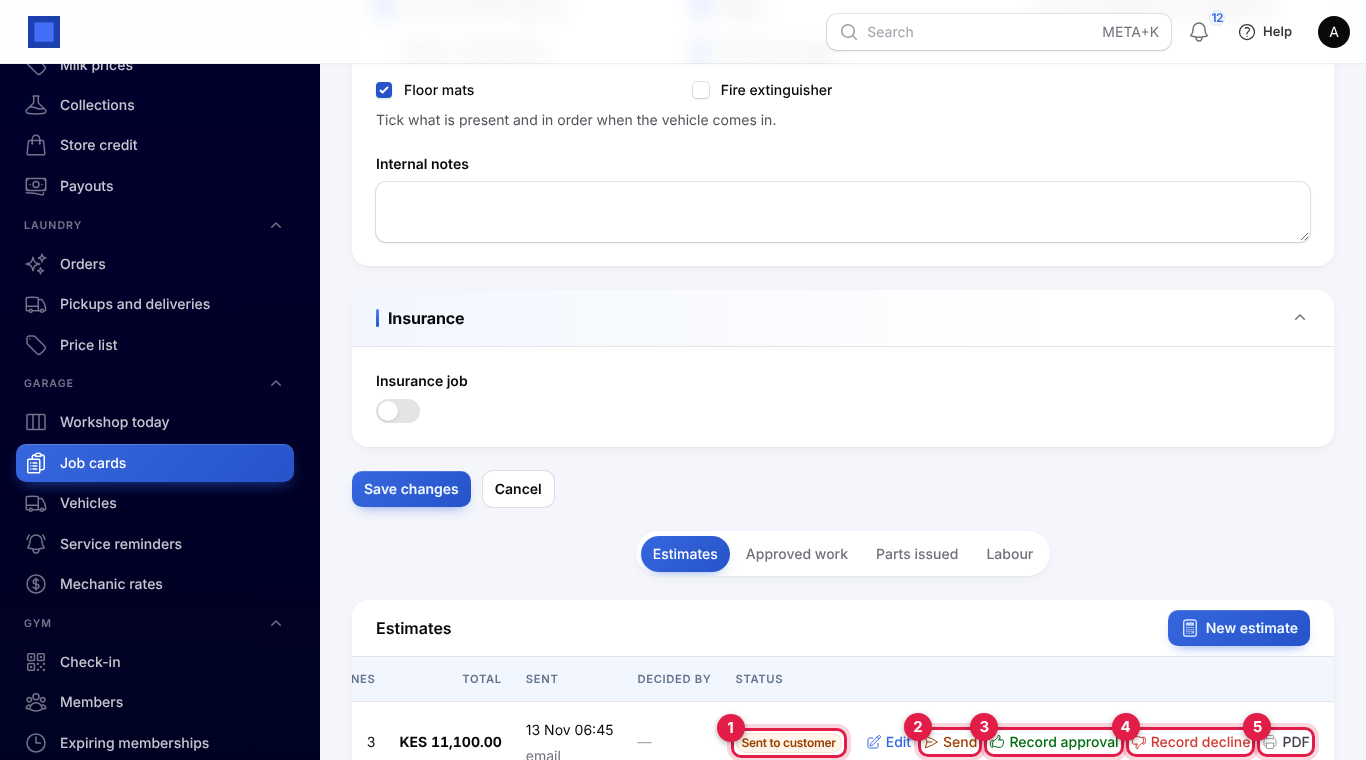
- Click Send (marker 2). Choose Email the PDF (shows the customer's email address, or "The customer has no email address.") and Text a link (shows their phone, or "SMS is not set up in Marketing."), then Submit.
- The email has the estimate PDF attached and a View the estimate button.
- The text reads, for example: Acme Traders Ltd: estimate GE-2026-0002 for KCB 456X is KES 11,100.00. View it here: … Please call us to approve it.
- The link opens the estimate PDF without signing in. It is a signed link that cannot be guessed or changed.
- The estimate becomes Sent to customer (marker 1) with when and how it was sent, and the job becomes Waiting for customer approval. If nothing could go out, you see "Nothing could be sent; marked as sent. Share the PDF with the customer yourself."
- The customer answers by phone, text or in person; they cannot approve online. Record their answer:
- Record approval (marker 3): Approved by (filled with the customer's name; change it to whoever approved, for example the fleet manager or the insurer's assessor) and How it was approved (By phone, In person, By text). The lines become the job's work and the job moves to In progress.
- Record decline (marker 4): Declined by and a Reason. That work will not be done.
- PDF (marker 5) opens the estimate as a PDF to print or share: the vehicle, customer, complaint, the parts, labour and sublet lines, the totals with tax, a note that no work is done until approved, and a line for the customer's name and signature. Once decided, it shows who approved or declined it and when.
You can record an approval without sending, for a customer who approves at the counter.
Supplementary estimates
When more work is found during the repair, put it on a supplementary estimate rather than doing it unasked.
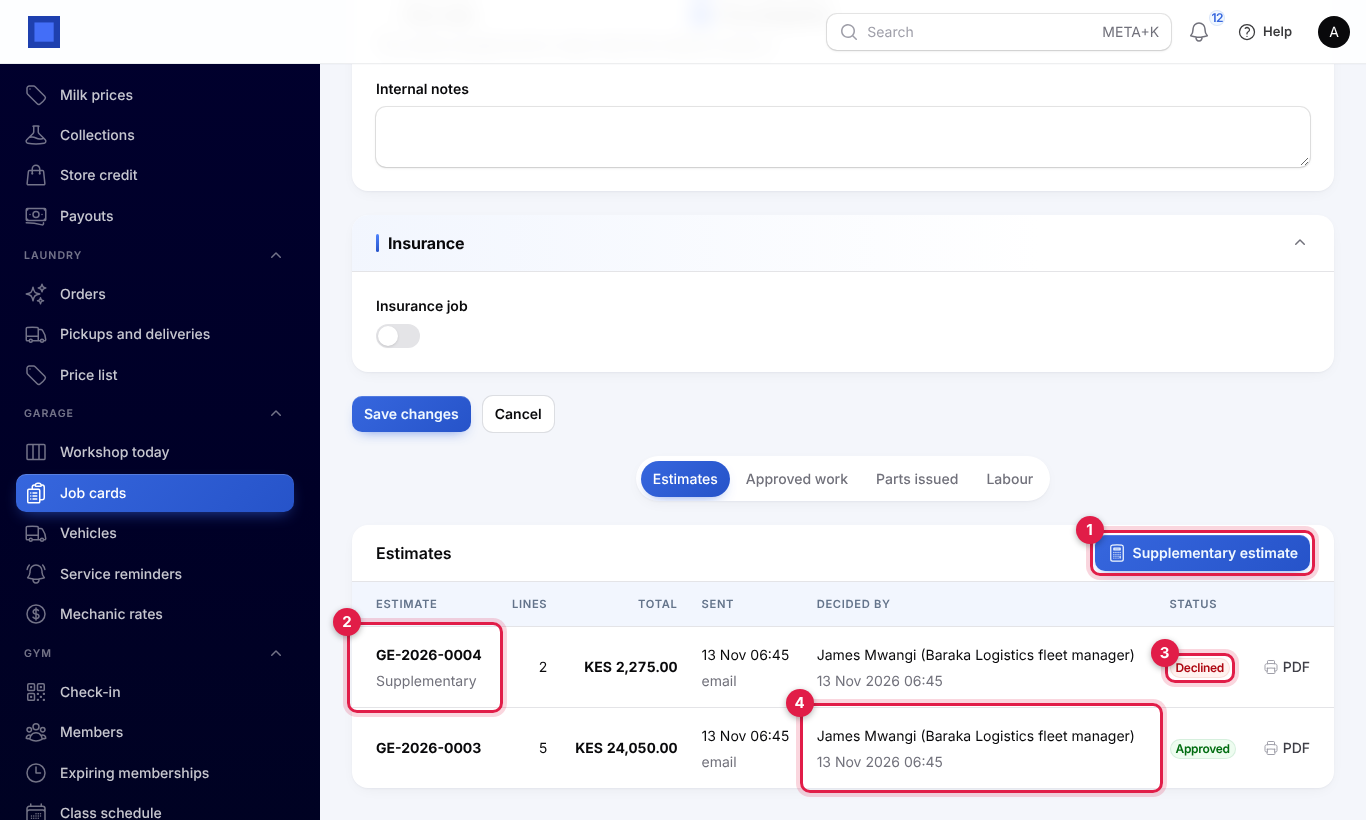
- Click Supplementary estimate (marker 1), add the lines and Submit. It is marked Supplementary (marker 2), and its PDF says the work was found while the vehicle was being repaired.
- Send it and record the answer as above. While it waits, the job shows Waiting for customer approval, but work already approved can carry on.
- If it is declined (marker 3), the job goes back to In progress with the work approved before. Decided by (marker 4) shows who decided and when.
Do the work
Open the job card. The header shows the status, customer, promised time and the running totals of parts, labour and hours (marker 1).
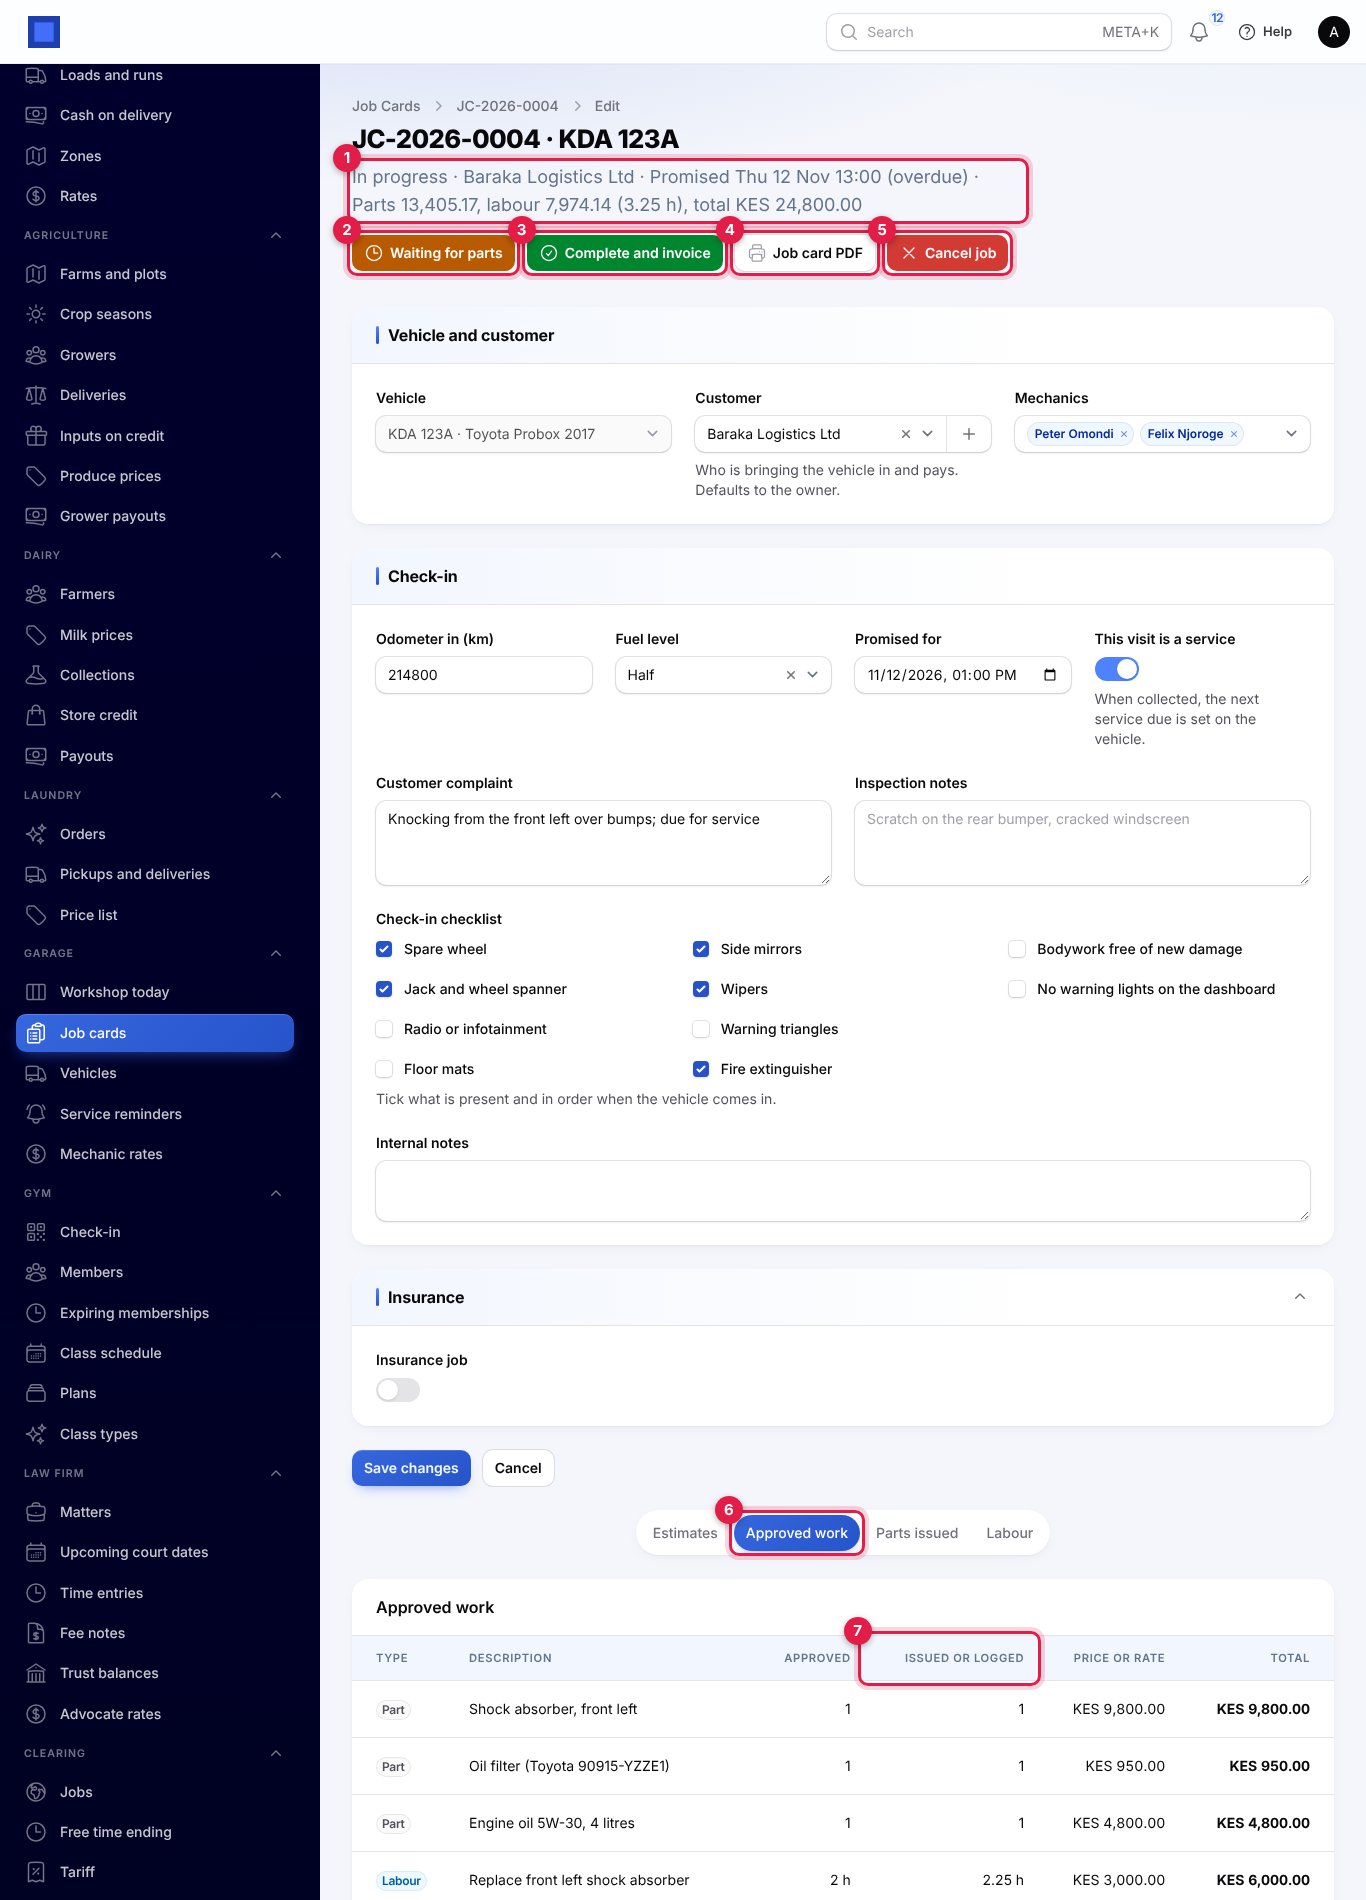
- Waiting for parts (marker 2) parks the job; Resume work brings it back to In progress.
- Complete and invoice (marker 3), see Complete and invoice.
- Job card PDF (marker 4), see PDFs.
- Cancel job (marker 5) is possible only while no parts have been issued. Open estimates are declined with the note Job cancelled.
- The Approved work tab (marker 6) lists every approved line with how much was approved and how much has been Issued or logged (marker 7).
You can still change the customer, odometer, fuel level, promised time, complaint, notes, checklist and mechanics on the form, and click Save changes.
Issue parts
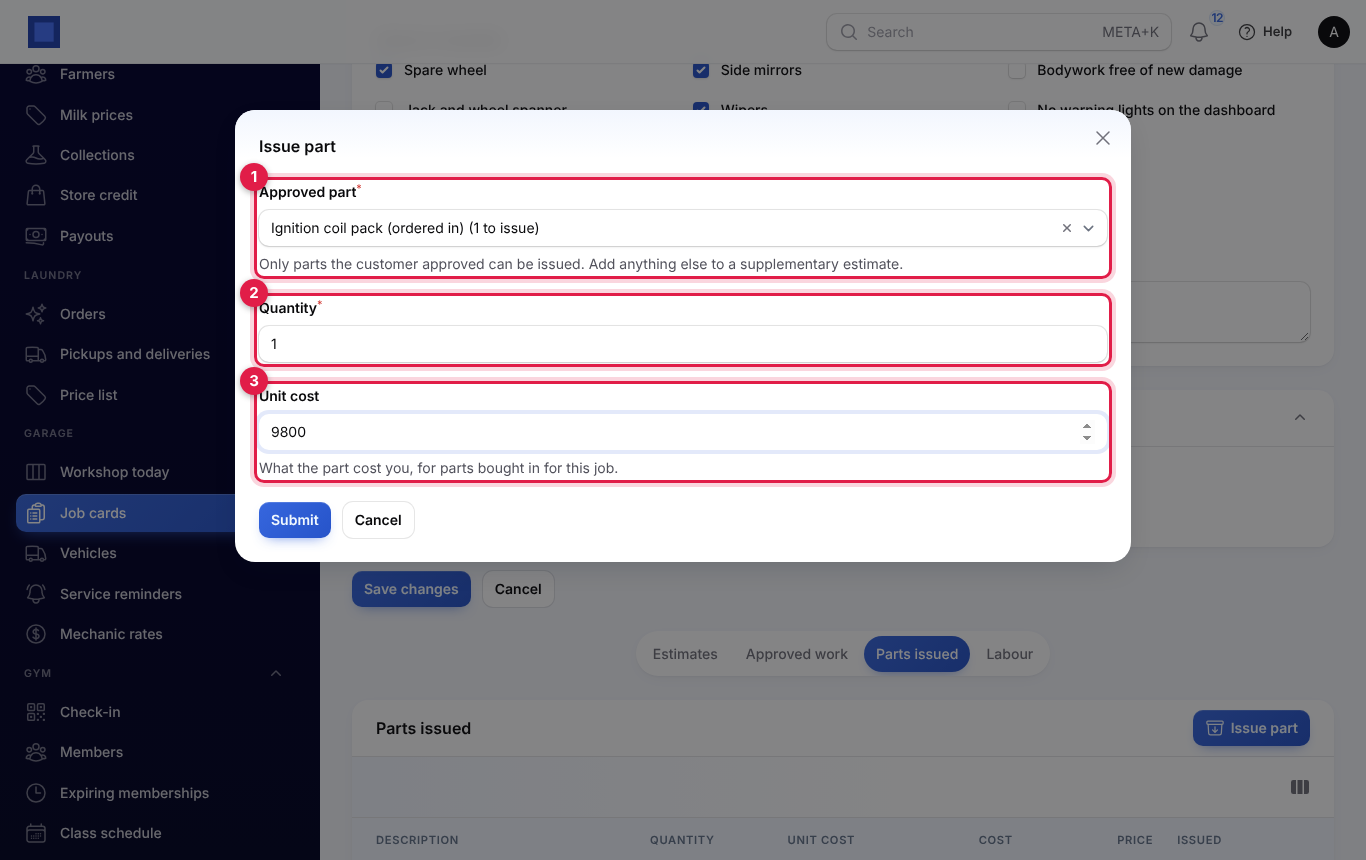
- Open the Parts issued tab and click Issue part.
- Choose the Approved part (marker 1). Only approved part lines with something left to issue are offered, for example Ignition coil pack (ordered in) (1 to issue).
- Enter the Quantity (marker 2).
- For a part that does not come from stock, enter the Unit cost (marker 3), what it cost you. Leave it empty to use the product's cost price.
- Click Submit.
- With the Inventory app on, a product that tracks stock is taken out of your main warehouse at its stock cost (posted to cost of sales when Accounting is on), and the line shows From stock. The Unit cost box is hidden for it. See Inventory.
- The customer is always charged the approved price.
- You cannot issue more than was approved: "Only 0 of Brake pads, front set was approved and not yet issued. Put the extra on a supplementary estimate for the customer to approve."
- The list shows each part's quantity, unit cost, total Cost, Price, and when and by whom it was issued. The cost total is your parts cost for the job.
Log labour
- Open the Labour tab and click Log labour.
- Choose the Mechanic (you, by default), and the Approved labour line if the time is for one.
- Type Work done (optional; the approved line's description is used otherwise), the Hours (for example 1.25 for an hour and a quarter) and the Date.
- Click Submit.
The rate is the approved labour line's rate; without a line, the mechanic's own rate from Mechanic rates; otherwise the default labour rate in settings. The list totals the hours and labour for the job.
Labour rates per mechanic
Open Garage → Mechanic rates to charge some mechanics at their own hourly rate, for example a senior technician.
- Click Set a mechanic's rate.
- Choose the Mechanic and type the Hourly rate. Each mechanic can have one rate.
- Click Create. Use Edit or Delete on a row to change it.
The rate is used when that mechanic is chosen on an estimate's labour line, and for time they log that is not against an approved line.
Complete and invoice
When the work is finished, click Complete and invoice and confirm. The job must have approved work.
- The job becomes Done and the vehicle is ready for collection.
- With the Invoicing app on, an invoice is issued to the job's customer for what was actually done: each labour entry (Labour: Replace front left shock absorber (Felix Njoroge)), each part issued, and the approved sublet work. The reference is the job number and plate. The job card needs a customer: "Pick the customer on the job card before completing it."
- Parts already taken out of stock are not taken out again by the invoice.
- Open invoice appears in the header. See Invoices and payments to send it and record payment.
Without Invoicing, the button is called Mark as done and no invoice is raised.
Insurance jobs
For an insurance repair, turn on Insurance job at check-in (or on the job card before it is done) and fill in:
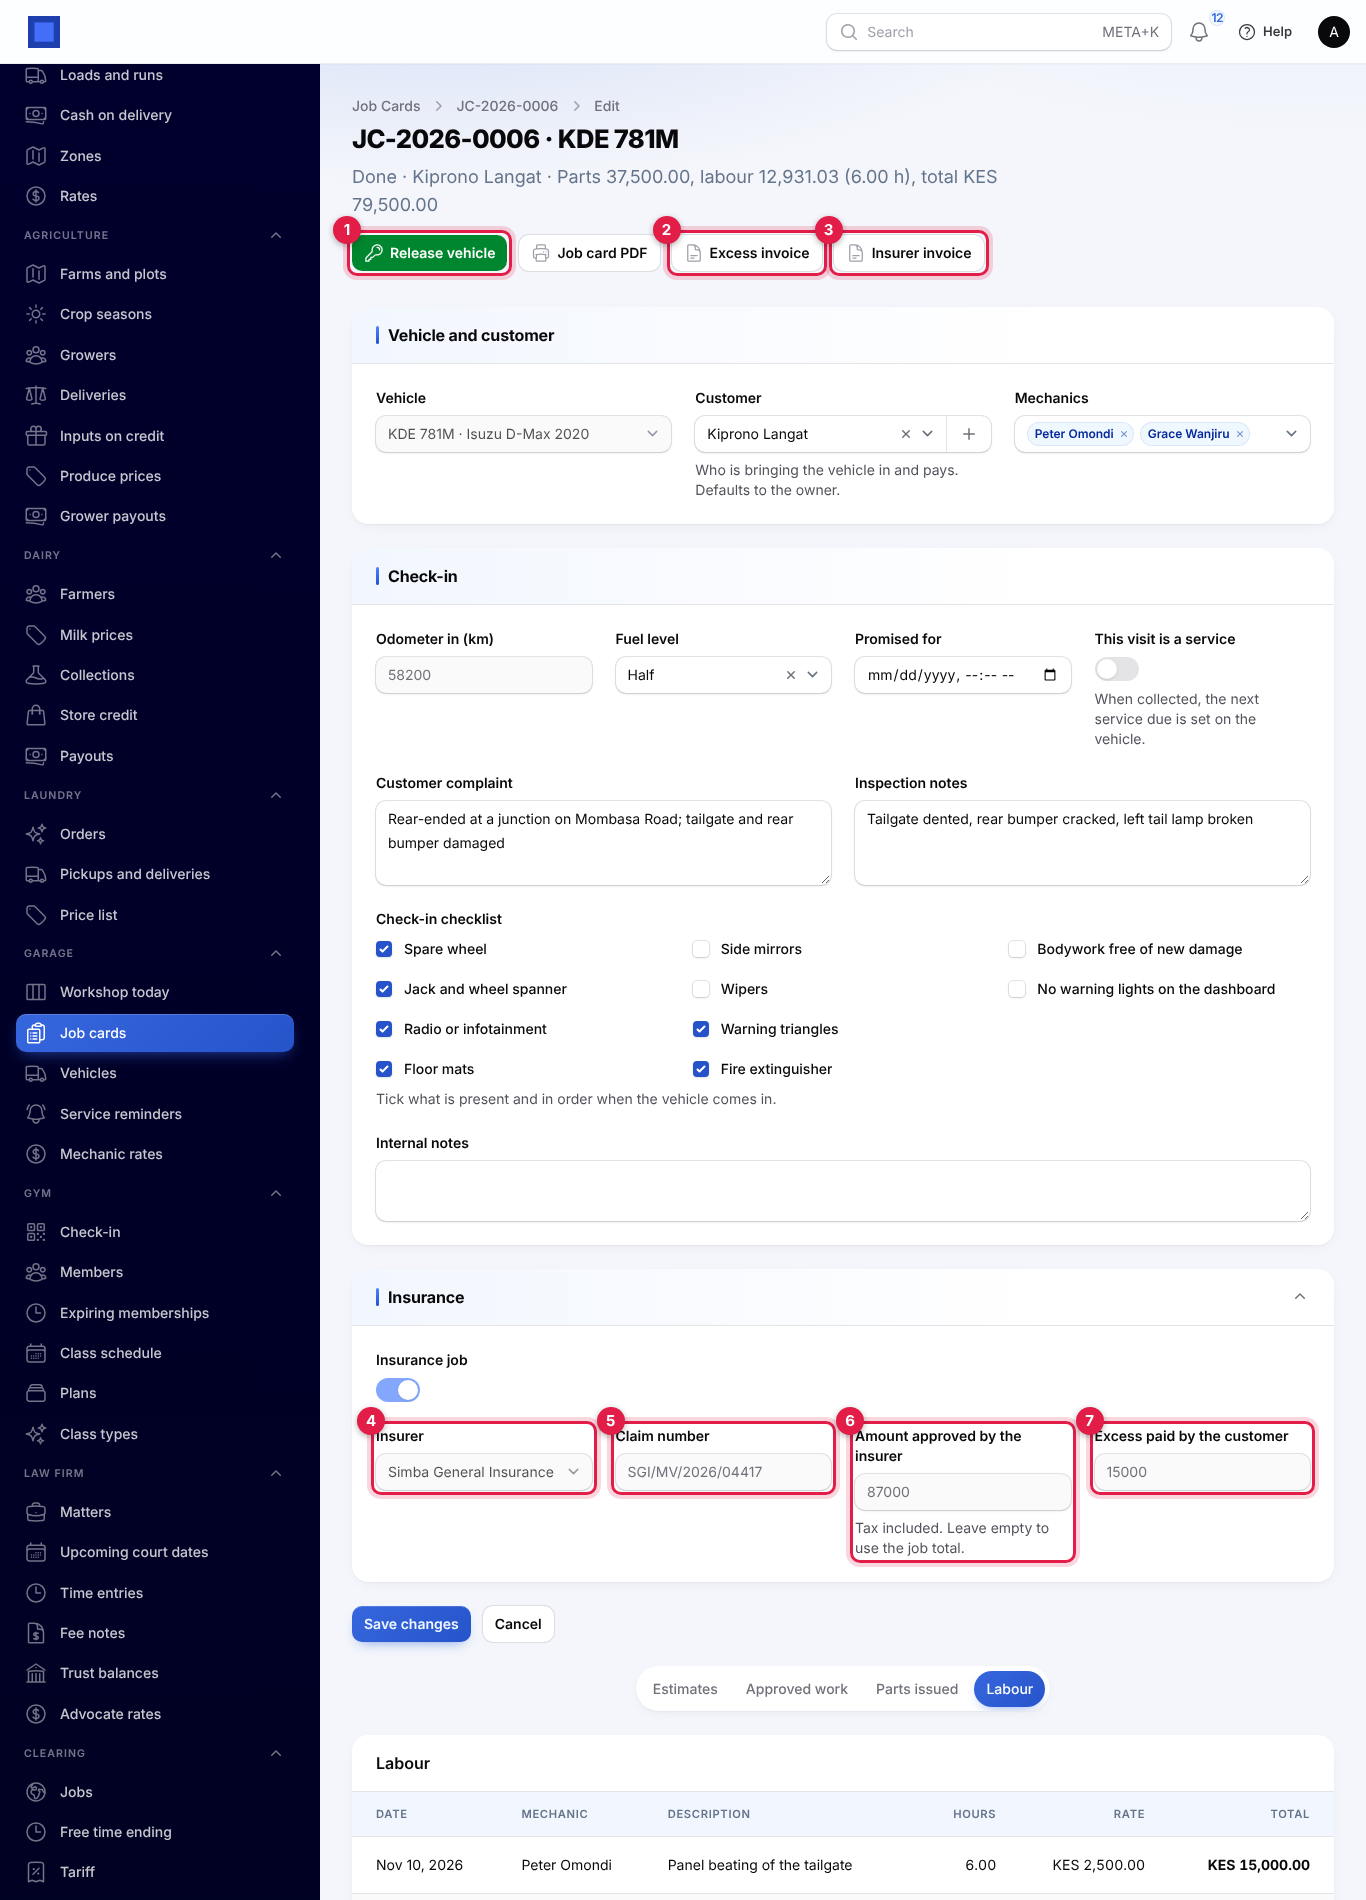
| Field | What to enter |
|---|---|
| Insurer (required, marker 4) | The insurance company, from your contacts. |
| Claim number (required, marker 5) | The insurer's claim reference. |
| Amount approved by the insurer (marker 6) | What the insurer agreed to pay, tax included. Leave it empty to use the job total. |
| Excess paid by the customer (marker 7) | The customer's share under the policy. It cannot be negative or more than the approved amount. |
When you click Complete and invoice, two invoices are issued instead of one:
- To the insurer: one line for the approved amount less the excess, for example Repairs to KDE 781M under claim SGI/MV/2026/04417 (job JC-2026-0006): approved KES 87,000.00 less the excess of KES 15,000.00 paid by the insured, with your default tax included in the price. Open it with Insurer invoice (marker 3).
- To the customer: one line for the excess, Insurance excess on claim …. Open it with Excess invoice (marker 2).
With no excess, only the insurer is invoiced. The insurance details cannot change once the job is done.
Release the vehicle
When the customer collects the vehicle, click Release vehicle (marker 1 in the screenshot above) on the done job, check the Odometer out (km) (filled with the reading at check-in) and click Submit.
- The job becomes Collected and the reading is saved on the vehicle. It cannot be lower than the odometer in.
- For a service (This visit is a service on), the vehicle's Last serviced on becomes today and the next service falls due after the intervals in settings: with the defaults, 6 months from today or 5,000 km after the reading out, whichever is set. Any earlier reminder is cleared, so the owner is reminded again next time.
Service reminders
Open Garage → Service reminders to see who to call.
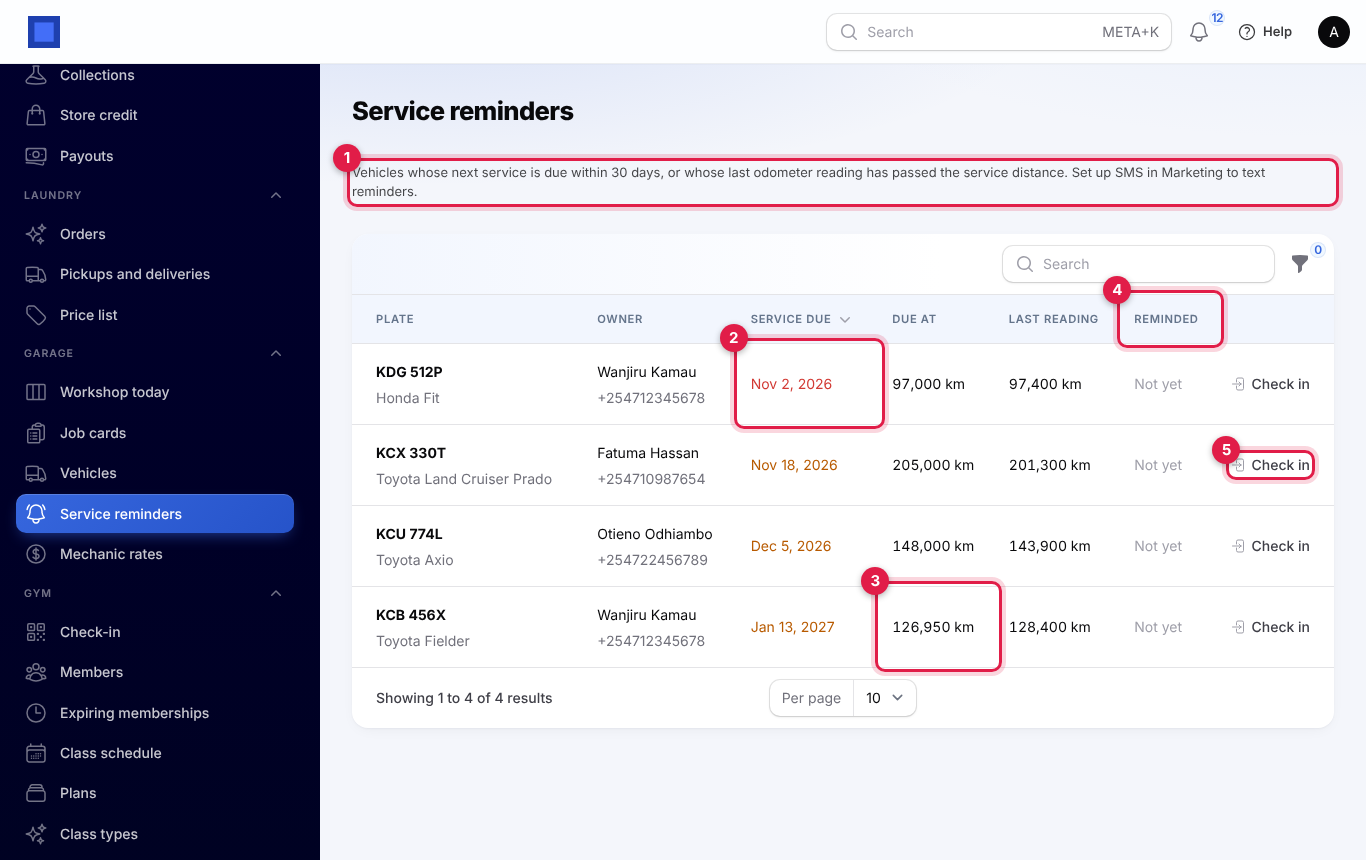
The list (marker 1 explains it) shows active vehicles whose next service is due within 30 days, or whose last odometer reading has passed the service km. The Service due date (marker 2) is red when past and amber when coming up; Due at (marker 3) is the service km; Reminded (marker 4) shows when the owner was last texted, or Not yet. The filter has Overdue and Not reminded yet.
- Check in (marker 5) opens a job card for the vehicle.
- Text reminder texts the owner now. With several rows ticked, Text reminders texts them all. Both appear only when an SMS provider is set up (as in the screenshot, without one the page says "Set up SMS in Marketing to text reminders.").
The daily reminder
Every morning at 08:40 UTC (11:40 in Nairobi), NaliSuite texts the owner of each active vehicle whose next service date is within the reminder days (7 by default) or whose last reading has passed the service km, if they have not been reminded yet:
Hello Wanjiru Kamau, your KDG 512P is due for its service (2 Nov 2026 / 97,000 km). Call Acme Traders Ltd to book it in.
Your company's phone number from Settings → Companies is added after its name when there is one.
The text goes to the owner's mobile (or phone). Each vehicle is reminded once; the next reminder comes after the next service is collected. Nothing is sent when Text owners when their next service is due is off, when SMS is not set up in Marketing, or for a vehicle without an owner.
PDFs
- Job card PDF (on the job card header) prints the job: number, status, check-in and promised times, odometer in and out, fuel level, mechanics, the vehicle with its VIN and engine number, the customer (and insurer and claim), the complaint, inspection notes, the check-in checklist with each item ticked or not, the approved work, the parts and labour used with subtotal, tax and total, and lines for the customer's signature at check-in and at collection. Print it at check-in for the customer to sign.
- Estimate PDF (PDF on an estimate): see Send it and record the answer.
Both use your workspace's document layout and logo.
Good to know
Why can't my mechanic issue a part? Parts and labour can only be recorded once the customer has approved an estimate ("The customer has not approved an estimate yet, so work cannot start."), and only while the job is In progress, Waiting for parts or Waiting for customer approval. Extra parts need a supplementary estimate.
What is invoiced: the estimate or the work done? The work done: parts issued and labour logged at their prices and rates, plus approved sublet work. If a job took less time than estimated, the customer pays less. Insurance jobs are invoiced at the approved amount instead.
Can I invoice a job twice? No. Completing a job invoices it once; to change an invoice, use a credit note in Invoicing.
Can I cancel a job after issuing parts? No: "Parts have been issued to this job, so it cannot be cancelled. Complete it instead."
A customer's vehicle changed hands. Open the vehicle and change the Owner. The service history stays with the vehicle.
Do reminders go by date or km? Both, whichever comes first. The km check uses the last reading you have: it updates at every check-in and collection, and you can correct it on the vehicle.
Do mechanics need their own login? Only to log their own time or appear on the board as assigned. Add them under Settings → Users with a role that has garage.view; give garage.manage to those who issue parts and log labour.