Asset Maintenance
Asset Maintenance keeps your machines, vehicles, generators, cold rooms and buildings running. You keep a register of every piece of equipment, set up preventive plans that raise work orders on time (by date or by running hours and kilometres), and track every repair with its checklist, parts, labour and downtime. Anyone can report a fault by scanning the QR label stuck on a machine. Maintenance managers, technicians, storekeepers and owners use it. It is in the Maintenance group of the sidebar: Work orders, Equipment and Preventive plans.
Asset Maintenance is a marketplace module. The owner buys it under Settings → Marketplace; the Maintenance group appears once it is switched on.
Note: You need the maintenance.view permission to see these pages and print labels, and maintenance.manage to add equipment, plans and work orders, record meter readings, report faults from the list and start, complete or cancel work orders. Owners and admins have both. Set permissions under Settings → Roles.
How maintenance works
- Equipment is anything you look after. Each item has a code (printed on its QR label), a location, a criticality and, if you like, a meter (running hours, kilometres or cycles).
- Preventive plans say what to do and how often: every N days, weeks or months, or every N hours or kilometres on the meter.
- Work orders are the jobs. They come from three places: a plan that has fallen due, a fault report (from the QR page or the Report fault button), or one you create by hand. Each gets a number such as
MW-2026-00008. - When a planned job is completed, the plan moves on. A calendar plan's next date is counted from the day the job was completed; a meter plan's next reading is the reading at completion plus the interval.
- Equipment that has stopped is marked Down while a work order says it is down, and goes back to Running when the last such work order is closed.
- Work orders are raised automatically every morning at 05:45 (the
maintenance:generatejob), and you can raise them on demand.
Register your equipment
- In the menu, open Maintenance → Equipment.
- Click Add equipment (marker 1). The list shows each item's Status (marker 3 shows a machine that is Down after a fault report), Criticality, current Meter reading and number of Open work orders.
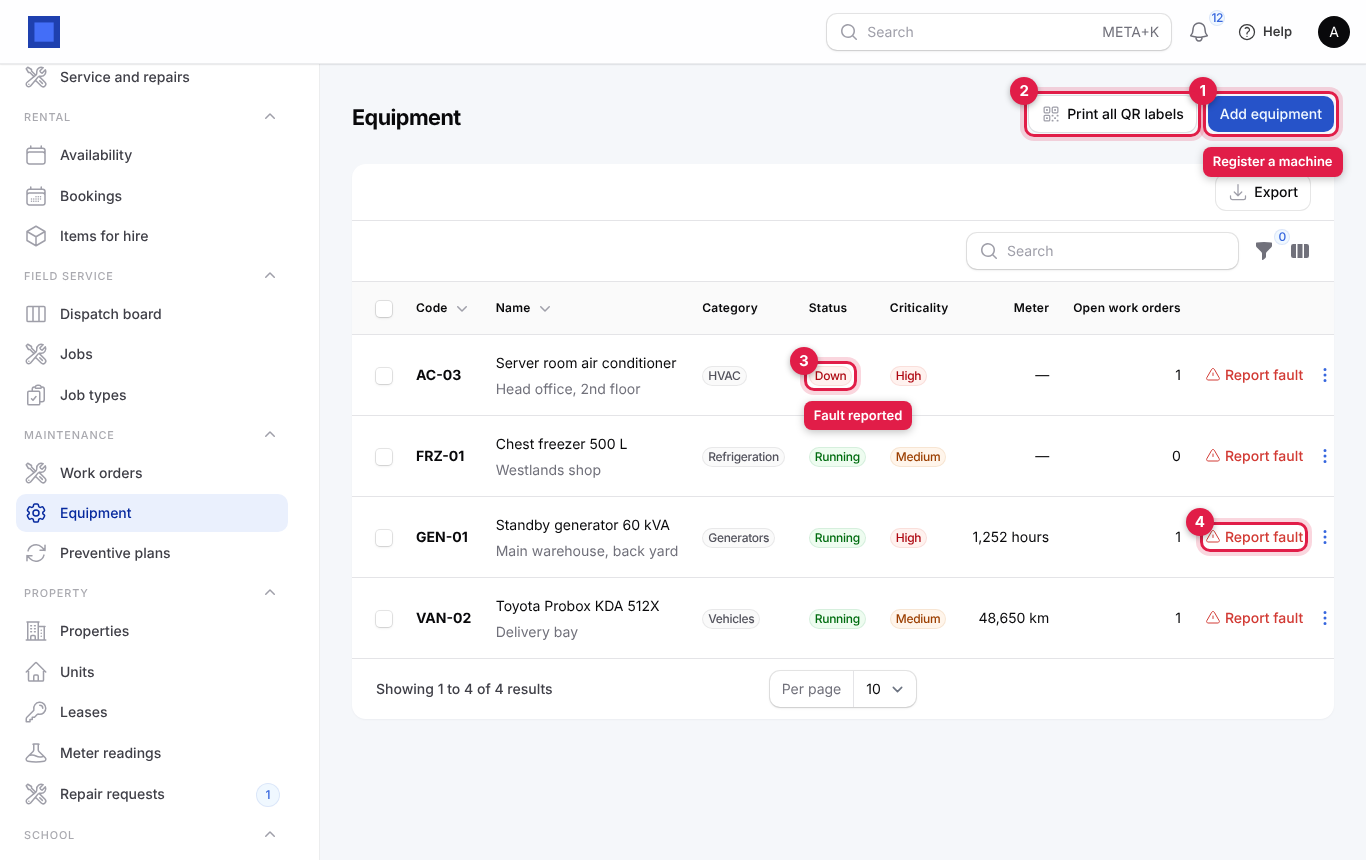
- Fill in the form and click Create. To change an item later, click ⋮ on its row and then Edit.
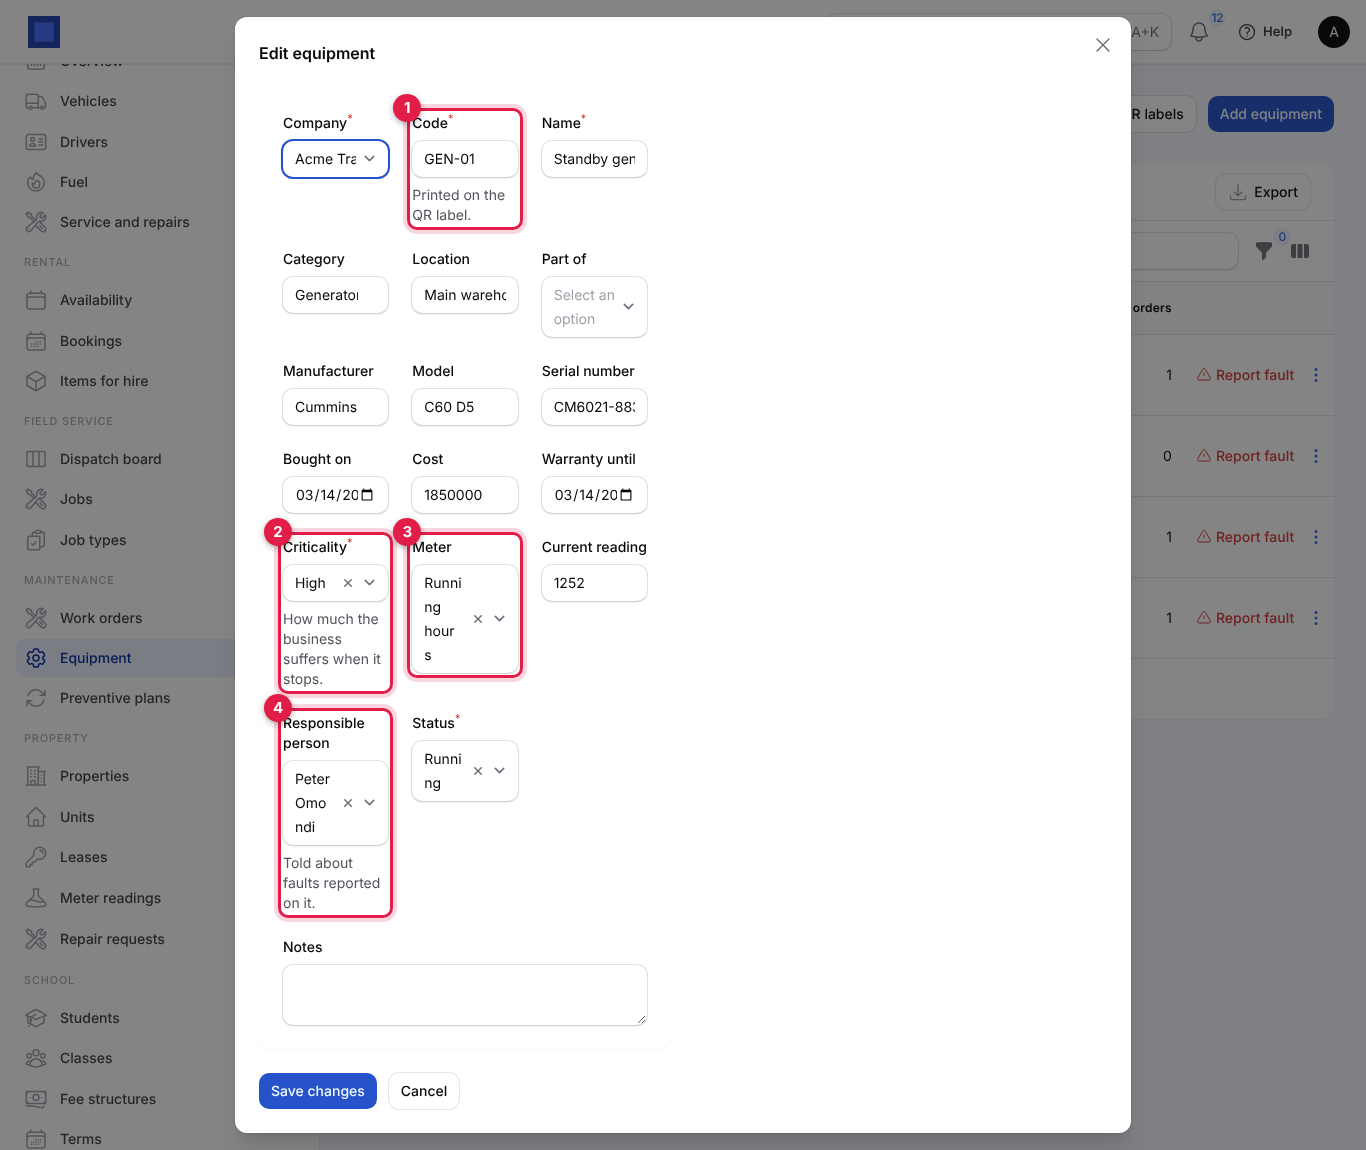
| Field | What to enter |
|---|---|
| Company | Required. The company that owns the equipment. |
| Code | Required, up to 40 characters (marker 1). A short unique code such as GEN-01 or VAN-02. It is printed on the QR label and is part of the fault report address, so keep it short and do not change it once labels are stuck on. |
| Name | Required. For example "Standby generator 60 kVA". |
| Category | Optional. Type a group such as Generators, Vehicles, HVAC or Refrigeration; earlier categories are suggested. Used as a filter. |
| Location | Optional. Where it is, for example "Main warehouse, back yard". Shown under the name and on the fault report page. |
| Part of | Optional. A bigger machine this one belongs to, for example the compressor that is part of a cold room. |
| Manufacturer, Model, Serial number | Optional. For ordering parts and warranty claims. |
| Bought on, Cost | Optional. Purchase date and price. |
| Warranty until | Optional. Shown as a hidden column on the list (use the columns icon to show it). |
| Criticality | Required (marker 2). Low, Medium or High: how much the business suffers when it stops. |
| Meter | Optional (marker 3). Running hours, Kilometres or Cycles. Leave on No meter for equipment serviced by date only. |
| Current reading | The meter reading today, for example 1,240 hours. |
| Responsible person | Optional (marker 4). The user told about faults reported on this equipment (and about new work orders when nobody else is assigned). |
| Status | Running, Down or Retired. Retired equipment is hidden from plans, work orders, labels and fault reports, but keeps its history. |
| Notes | Anything else. |
Use the filter icon to filter by Status or Category, and the search box to find an item by code or name.
More actions on each item
Click ⋮ on a row to see:
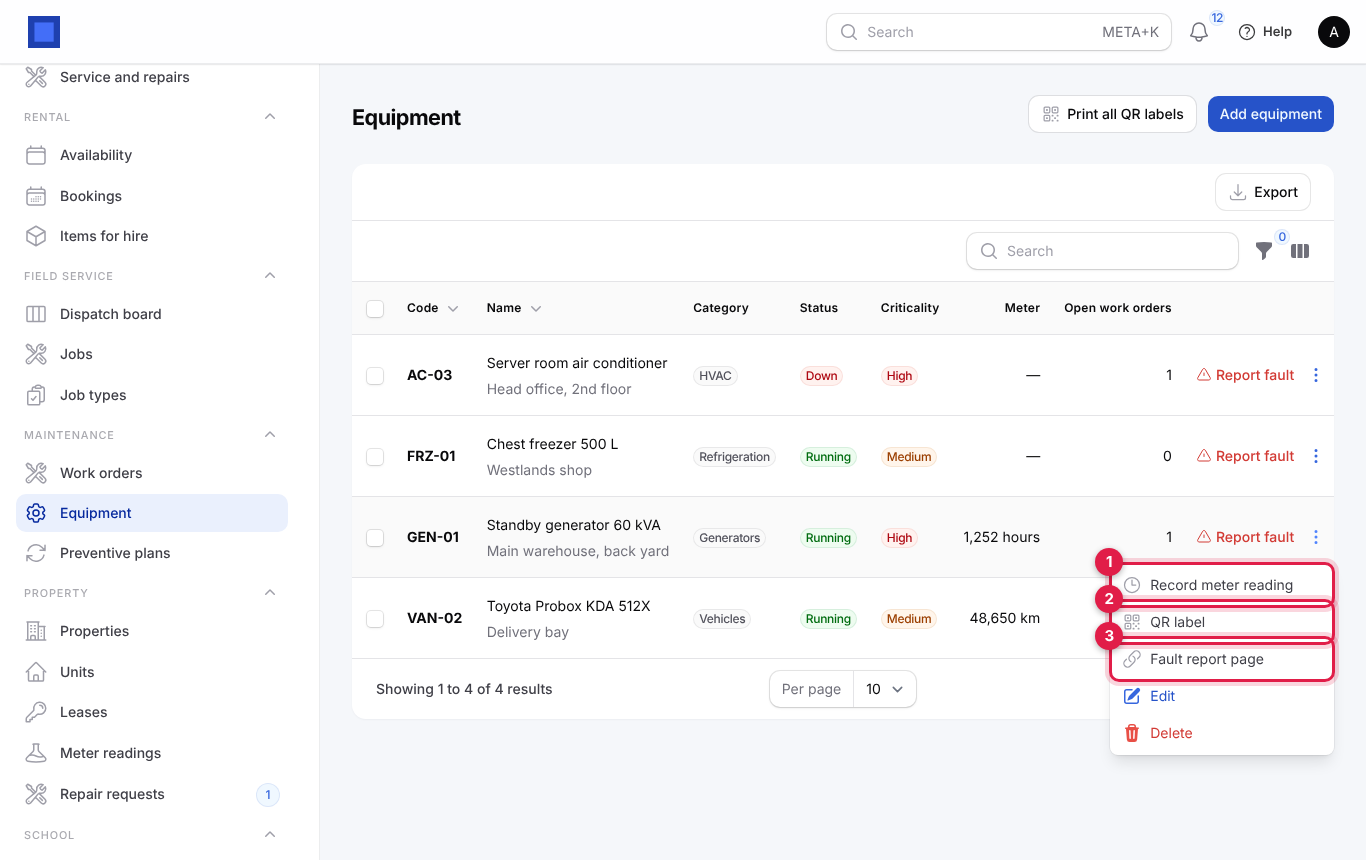
| Action | What it does |
|---|---|
| Record meter reading (marker 1) | Saves today's meter reading and raises any meter-based work that is now due. Shown only for equipment with a meter. |
| QR label (marker 2) | Opens a printable label for this one item in a new tab. |
| Fault report page (marker 3) | Opens the public "Report a problem" page for this item, the same page the QR code opens. |
| Edit / Delete | Change or remove the item. |
Record meter readings
Record readings regularly (for example every Monday from the generator log or the vehicle odometer) so meter-based plans fall due on time.
- On Maintenance → Equipment, click ⋮ → Record meter reading on the item.
- Enter the Reading (marker 1) and an optional Note (marker 2), such as "Weekly generator log". Click Submit.
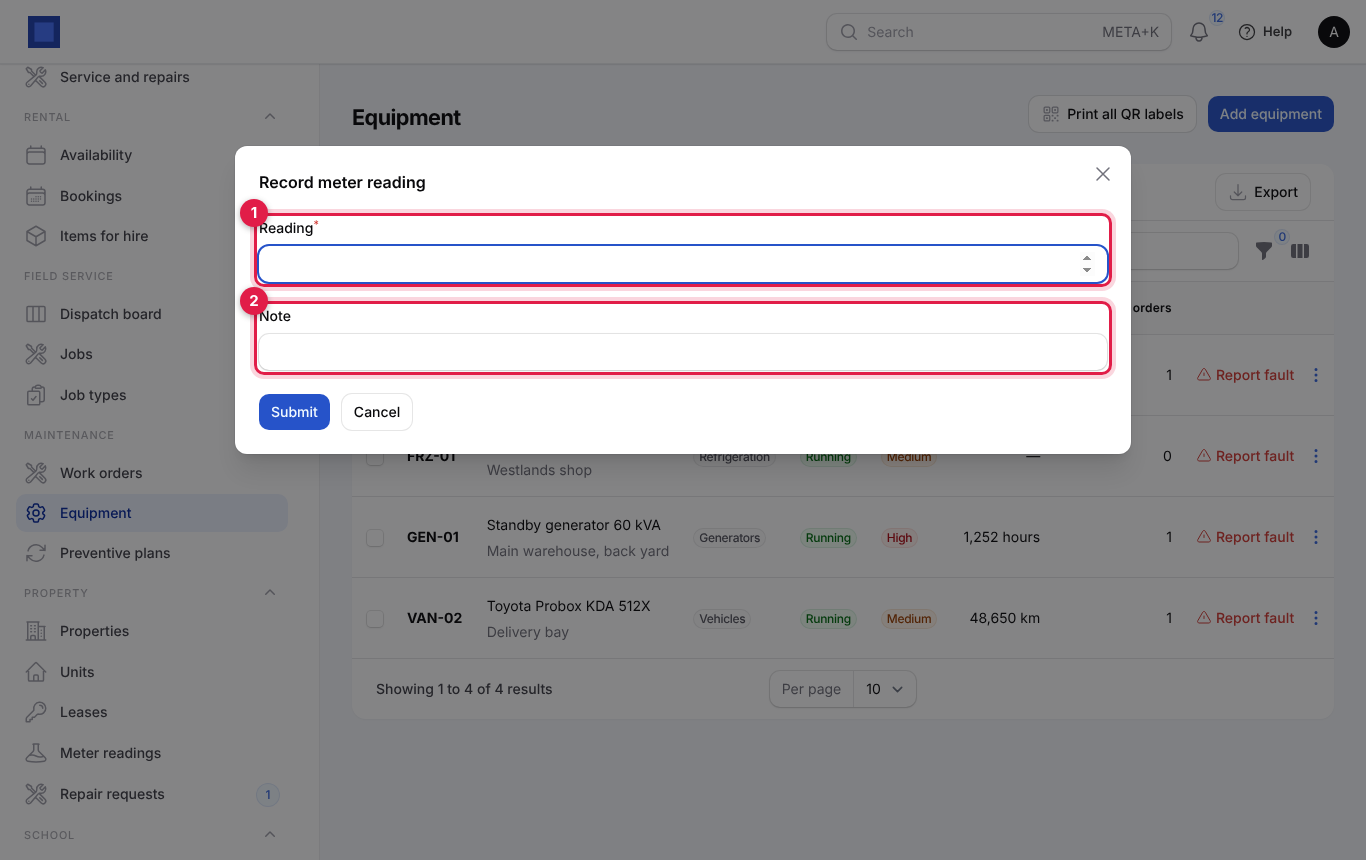
You see Reading saved., or Reading saved. 1 planned job(s) are now due. when the reading reached a plan's due point and a work order was raised. A reading lower than the current one is saved in the history but does not lower the meter.
Print QR labels and let anyone report a fault
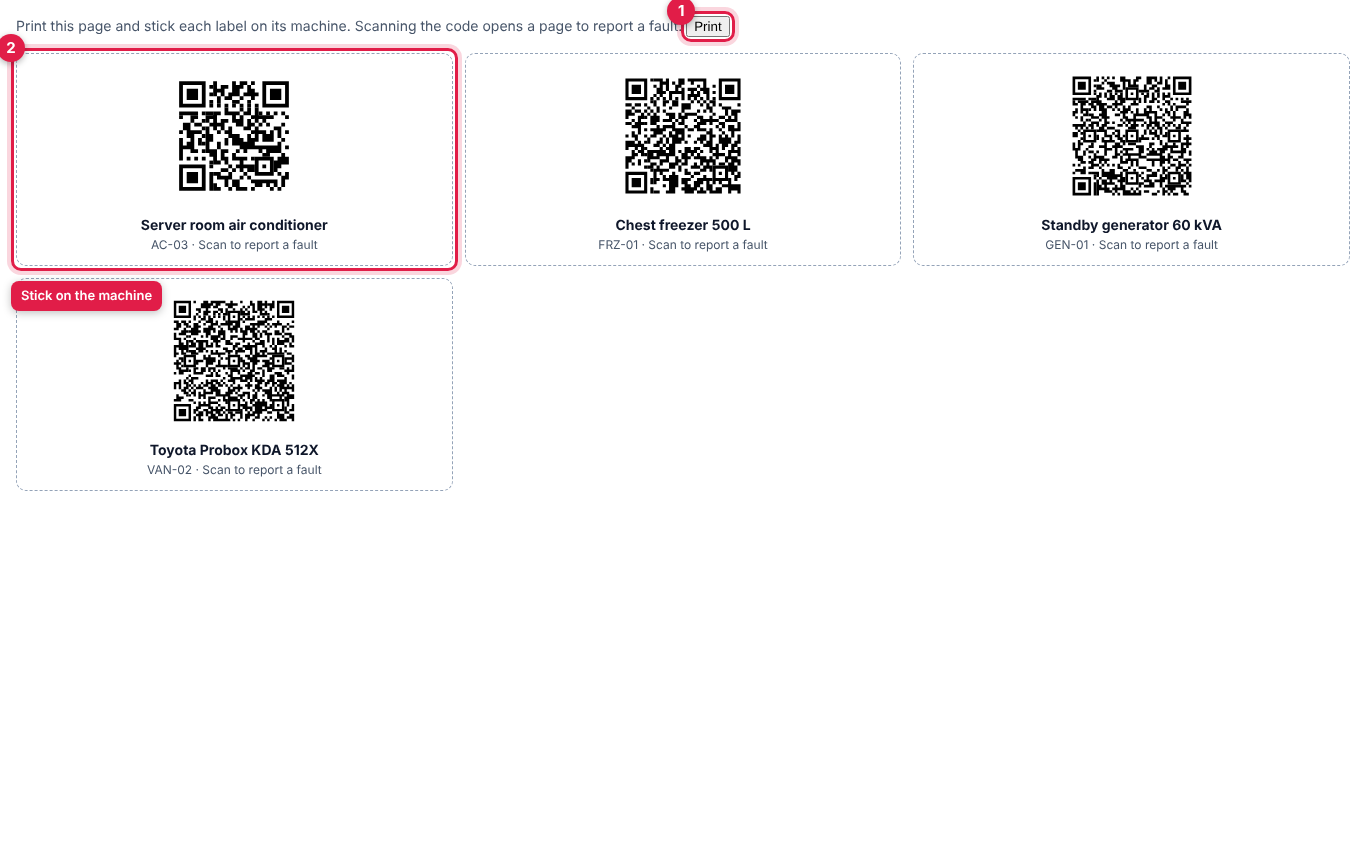
Every item has its own QR code. Stick it on the machine: whoever notices a problem (a guard, a cashier, a driver) scans it with their phone and reports the fault without signing in.
- On Maintenance → Equipment, click Print all QR labels to print every item that is not retired. To print only some, tick them in the list and click Print QR labels above the list. To print one, use ⋮ → QR label.
- On the label sheet, click Print (marker 1). Each label (marker 2) shows the QR code, the name and the code.
When someone scans a label they see Report a problem for that machine. They describe What is wrong? (marker 1), tick It has stopped working if it has (marker 2), give Your name (marker 3) and optionally an email to hear back, then click Send report (marker 4).
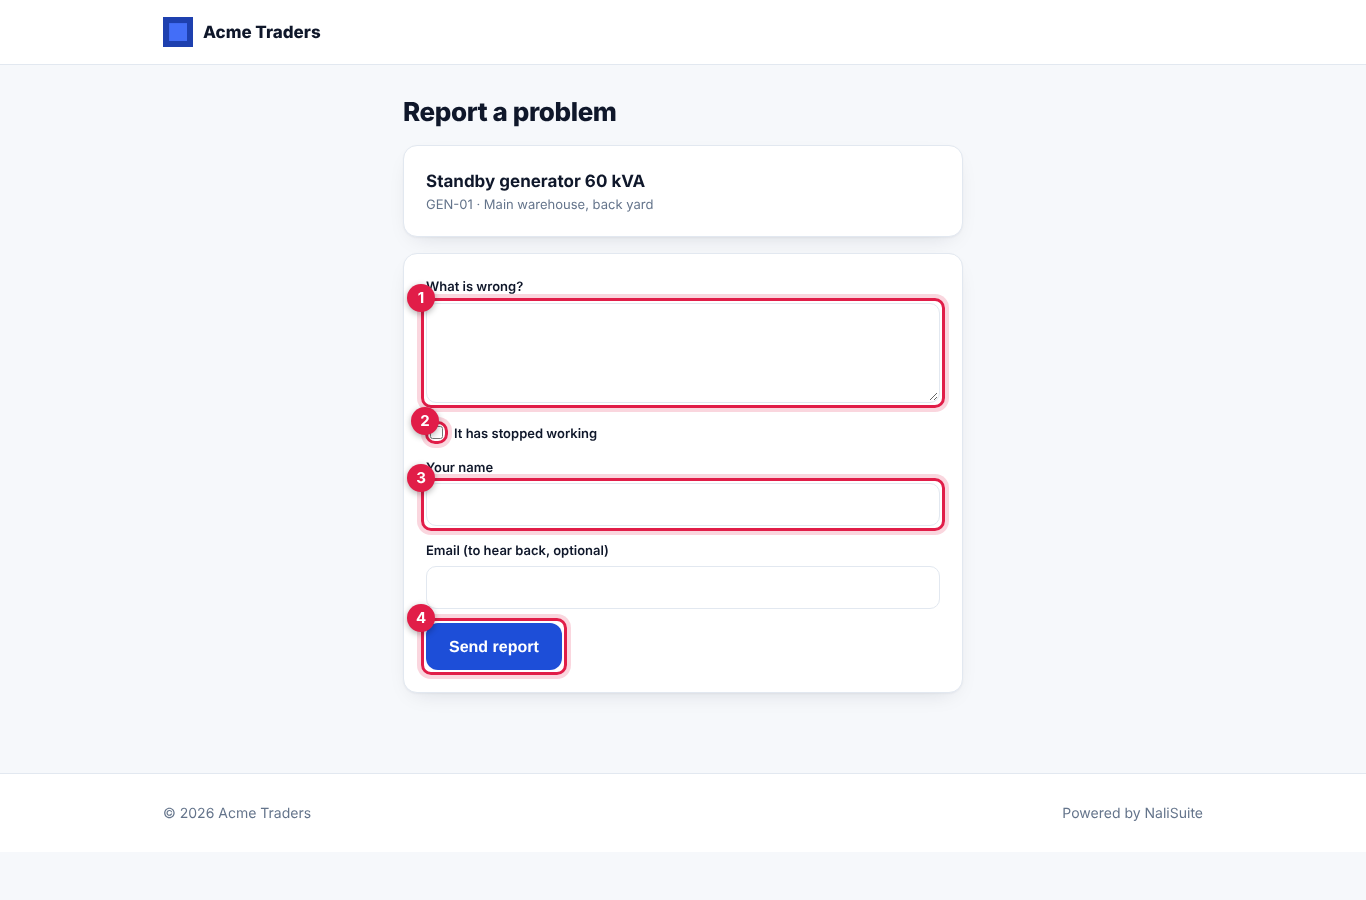
What happens:
- A Repair work order called "Fault reported on …" is opened, due today. It is Urgent when It has stopped working was ticked, otherwise Normal.
- When it has stopped, the equipment is marked Down until the work order is closed.
- The equipment's Responsible person gets a notification with an Open button.
- The person who reported it sees "Thank you. Your report is logged as MW-… and the maintenance team has been told."
You can switch the public page off under Settings → Preferences (see Settings).
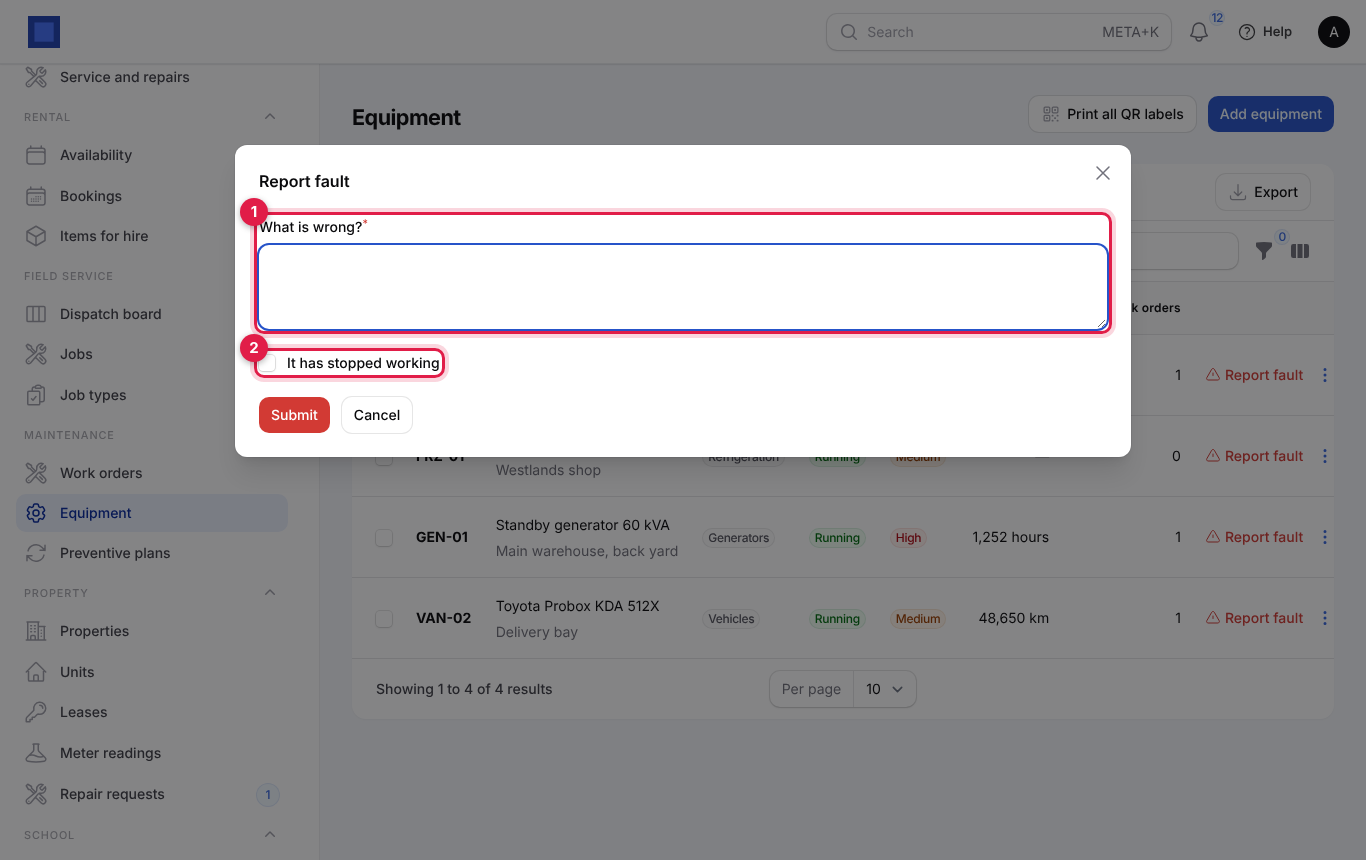
Report a fault from the list
Staff can also report a fault without the label: click Report fault on the item's row, describe What is wrong? (marker 1), tick It has stopped working if needed (marker 2) and click Submit. It works exactly like the public page, with your name as the reporter.
Set up preventive plans
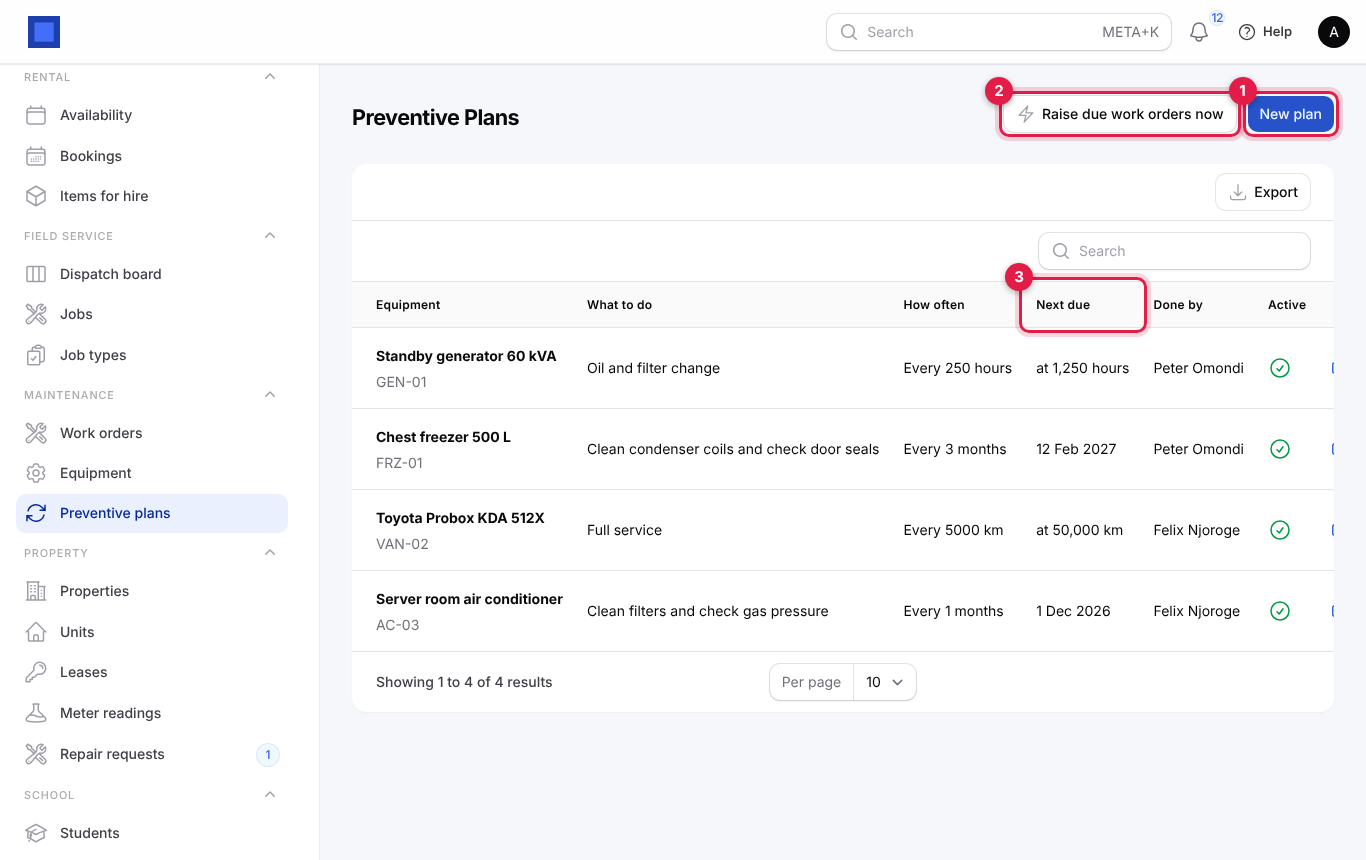
- In the menu, open Maintenance → Preventive plans.
- Click New plan (marker 1). The list shows the equipment, What to do, How often, Next due (marker 3; shown in red when the date has passed) and who usually does it.
- Fill in the form and click Create.
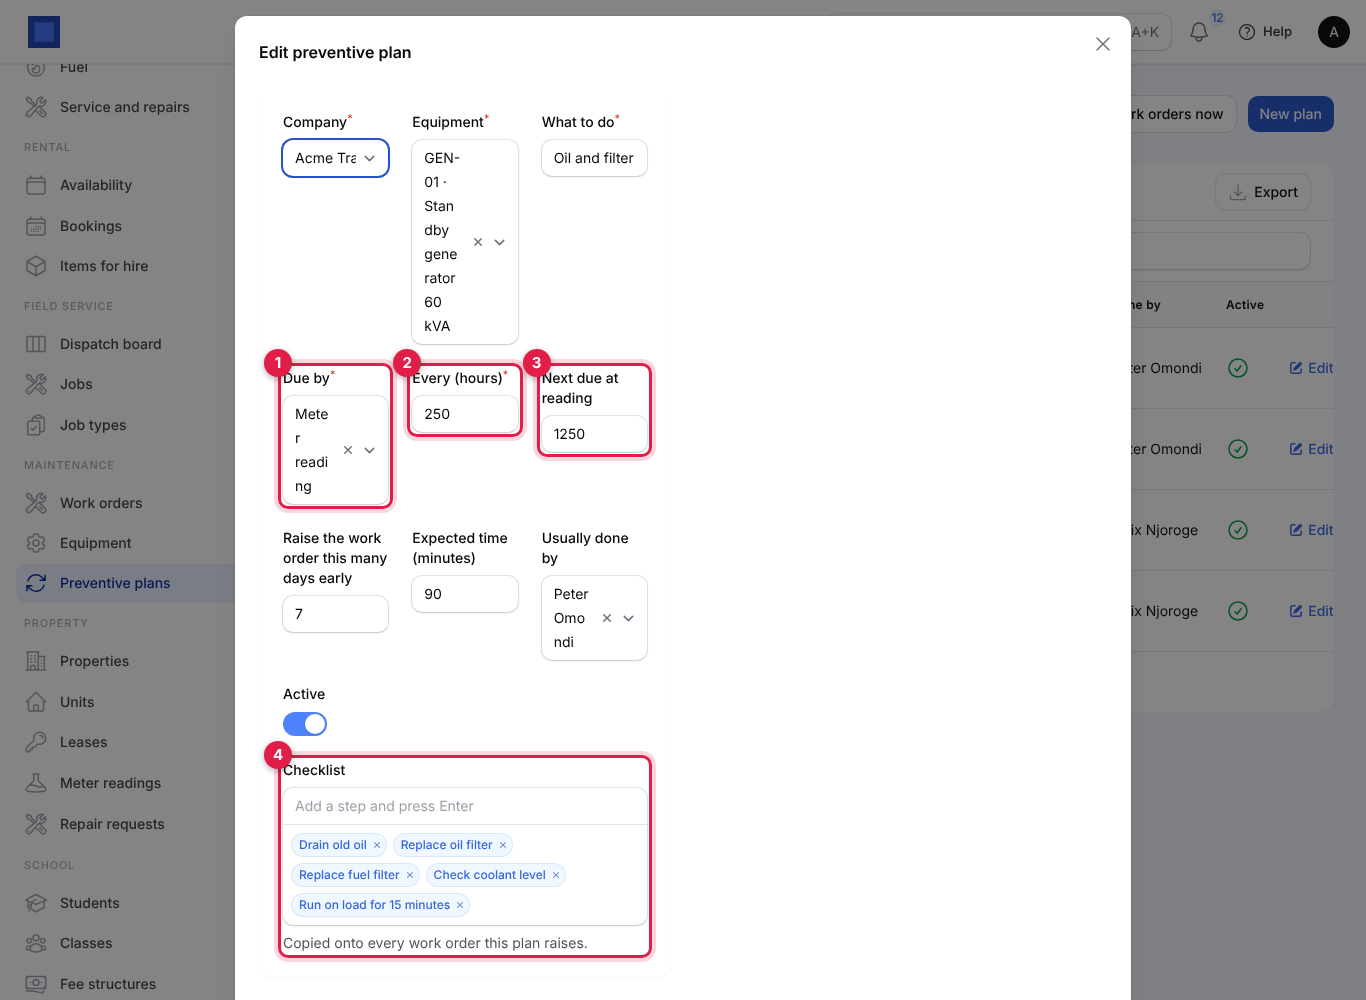
A plan by meter reading, such as an oil change every 250 running hours:
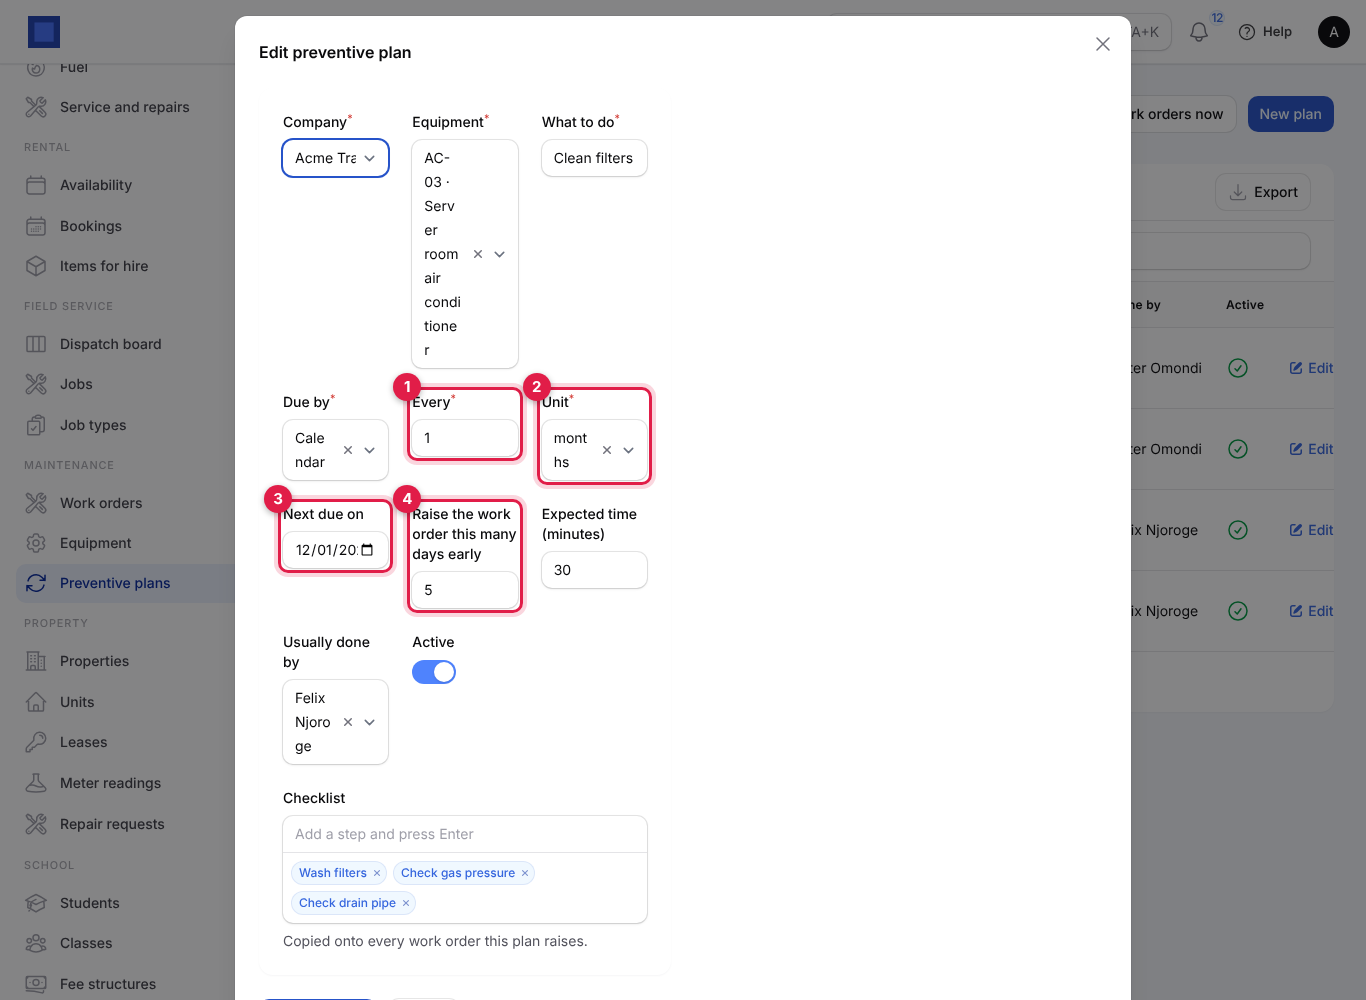
A plan by calendar, such as cleaning air-conditioner filters every month:
| Field | What to enter |
|---|---|
| Company | Required. |
| Equipment | Required. Retired equipment is not listed. |
| What to do | Required. Becomes the work order title, for example "Oil and filter change". |
| Due by | Required (meter screenshot, marker 1). Calendar or Meter reading. Meter reading only makes sense for equipment with a meter. |
| Every and Unit | Calendar plans (calendar screenshot, markers 1 and 2). For example every 3 months, every 2 weeks or every 90 days. |
| Next due on | Calendar plans (marker 3). The date the next service is due. Starts one month from today. |
| Every (hours) / Every (km) | Meter plans (meter screenshot, marker 2). The interval in the equipment's meter unit. |
| Next due at reading | Meter plans (marker 3). The meter reading at which the next service is due, for example 1,250. |
| Raise the work order this many days early | Calendar plans (calendar screenshot, marker 4). Default 7: the work order is raised a week before the due date so you can order parts. |
| Expected time (minutes) | Optional. For planning. |
| Usually done by | Optional. The work orders this plan raises are assigned to this person, who is notified. |
| Active | Turn off to pause a plan without deleting it. |
| Checklist | Optional (meter screenshot, marker 4). Type a step and press Enter; repeat for each step. Copied onto every work order the plan raises, for the technician to tick off. |
When plan work orders are raised
- Every morning NaliSuite checks every active plan. A calendar plan is due when its next date is within the "days early" window; a meter plan is due when the equipment's reading has reached the next due reading.
- On demand, click Raise due work orders now (marker 2 on the plans list). You see how many were raised.
- After a meter reading, as described above.
A plan never has two open work orders at once: while its job is open, nothing new is raised for it. The work order is a Preventive job, due on the plan's next due date, assigned to Usually done by, with the plan's checklist.
Work orders
- In the menu, open Maintenance → Work orders. The menu shows a red badge with the number of open work orders that are overdue.
- The list opens with the Open only filter on. Remove it to see completed and cancelled jobs too. Use the filter icon to filter by Status, Type, Equipment or Assigned to.
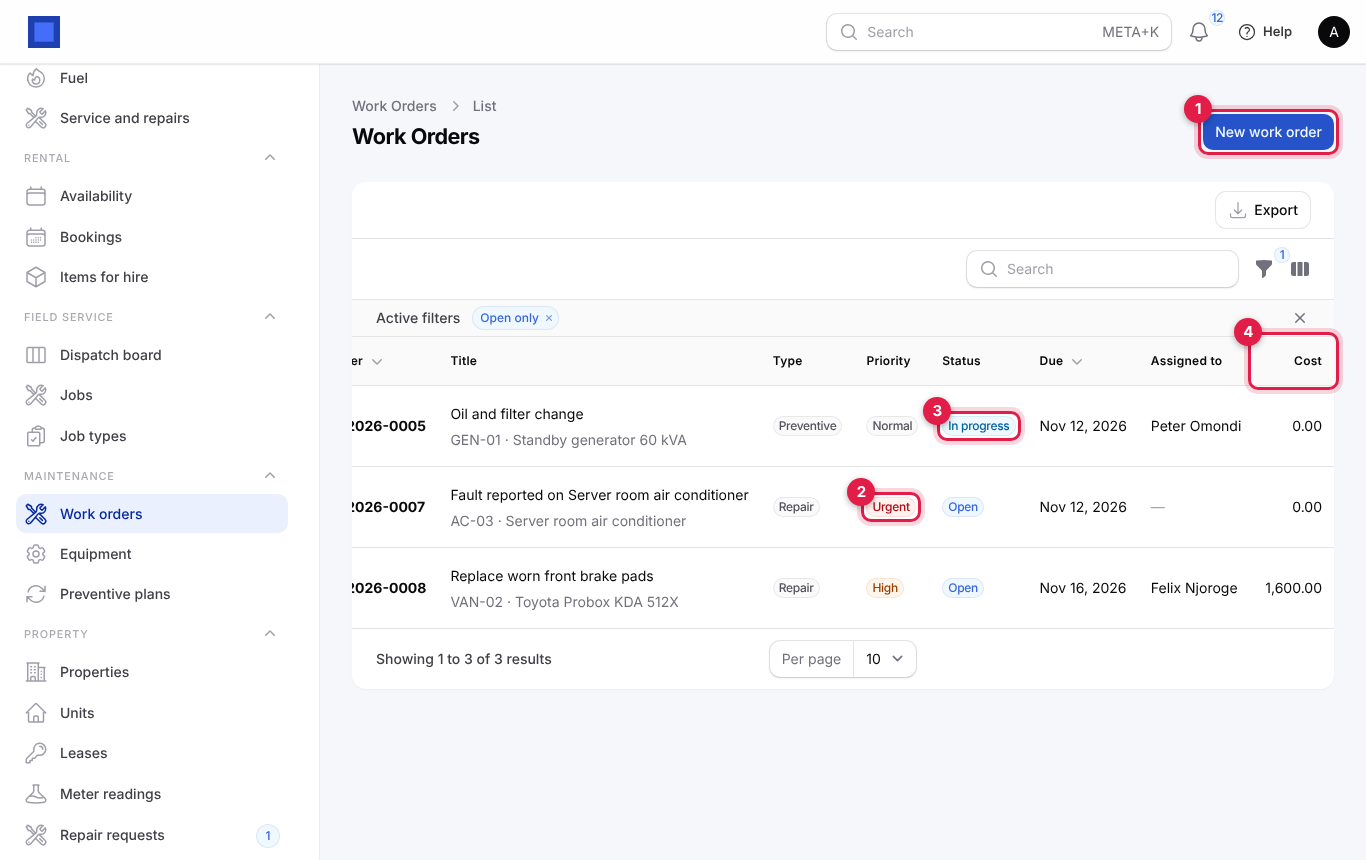
The Priority (marker 2) is Low, Normal, High or Urgent. A Due date in red means the job is overdue. Cost (marker 4) is labour hours × labour cost per hour, plus parts.
Work order statuses
| Status | What it means | How it changes |
|---|---|---|
| Open | Raised, not started. | Start → In progress; Complete → Done; Cancel → Cancelled. |
| In progress | Someone is working on it. | Put on hold → On hold; Complete; Cancel. |
| On hold | Waiting, for example for a part. | Start → In progress; Complete; Cancel. |
| Done | Finished. The form is locked. | Final. |
| Cancelled | Not needed. | Final. |
Create a work order by hand
- On Maintenance → Work orders, click New work order (marker 1).
- Fill in the top section: pick the Equipment (marker 1), the Type (marker 2), the Priority (marker 3), and turn on The equipment is down (marker 4) if it has stopped.
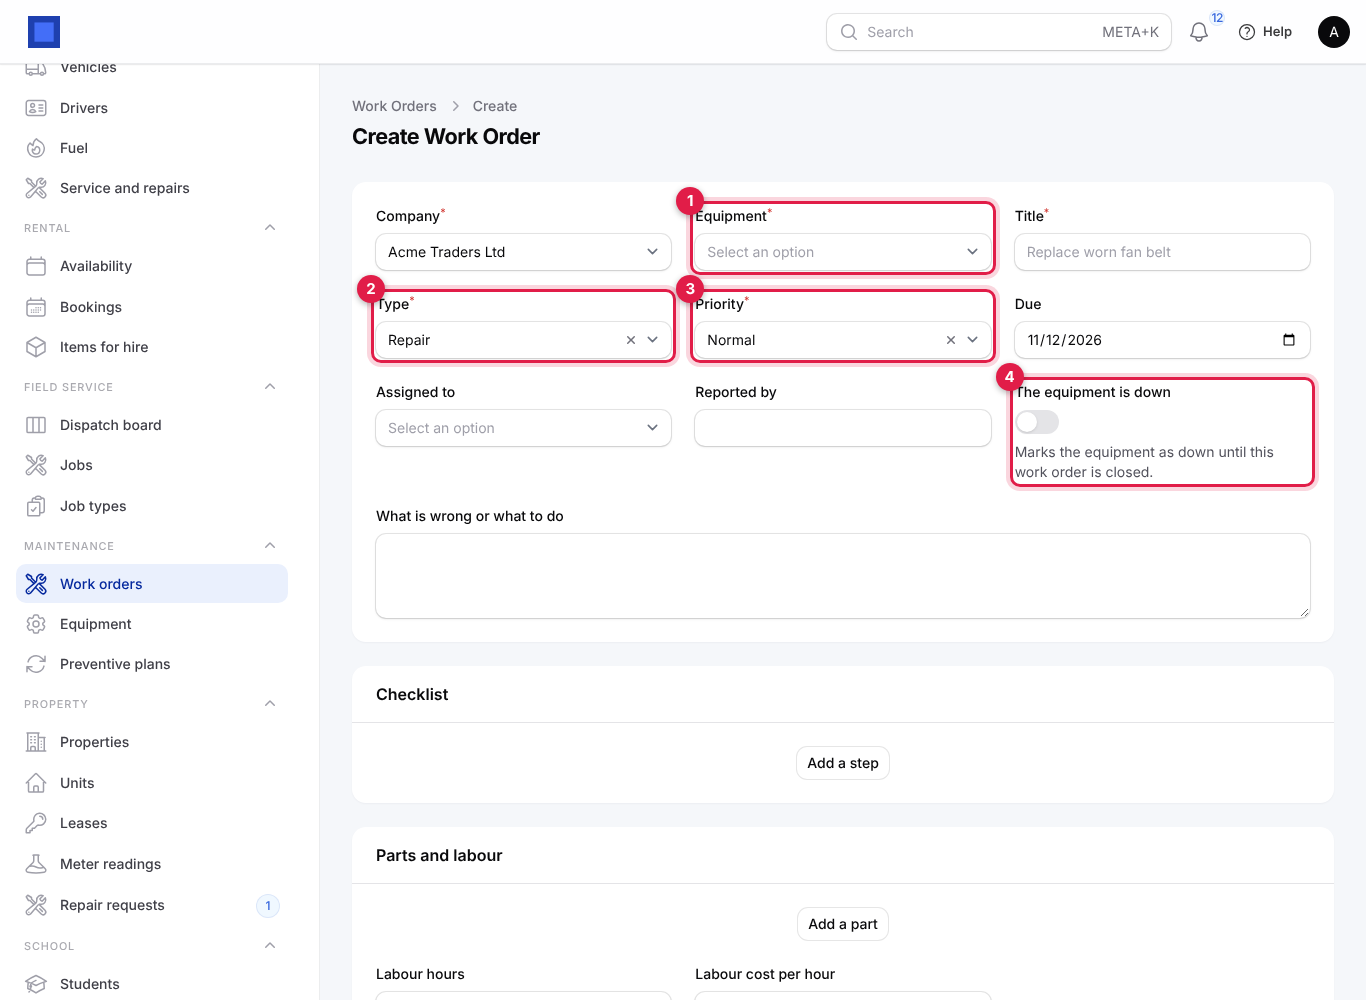
- Add checklist steps and parts if you know them (see the next section) and click Create. The person in Assigned to (or, if nobody, the equipment's responsible person) is notified.
| Field | What to enter |
|---|---|
| Company | Required. Cannot be changed after saving. |
| Equipment | Required. Cannot be changed after saving. |
| Title | Required, for example "Replace worn front brake pads". |
| Type | Preventive, Repair or Inspection. |
| Priority | Low, Normal, High or Urgent. |
| Due | The date it should be done by. Starts on today. |
| Assigned to | The technician. |
| Reported by | Who reported the problem. Filled in automatically for fault reports. |
| The equipment is down | Marks the equipment Down until this work order is closed. |
| What is wrong or what to do | The details. |
Checklist, parts and labour
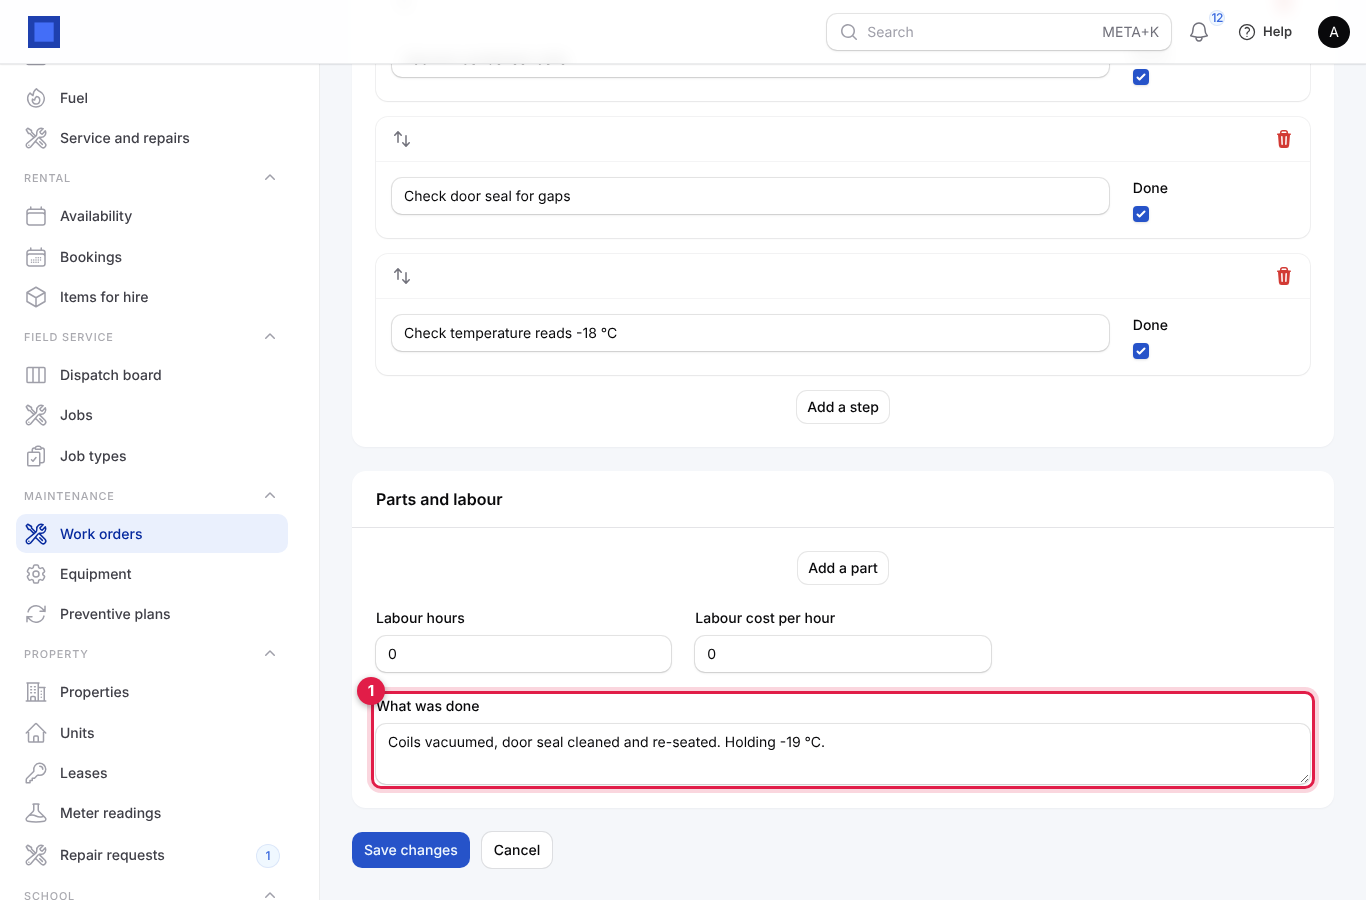
Open a work order and scroll down. The Checklist section lists the steps; click Add a step (marker 1) to add one and tick Done as each is finished. In Parts and labour, click Add a part (marker 2) for each part used, with Description, Quantity and Unit cost, then enter the Labour hours (marker 3) and Labour cost per hour (marker 4). Type What was done and click Save changes.
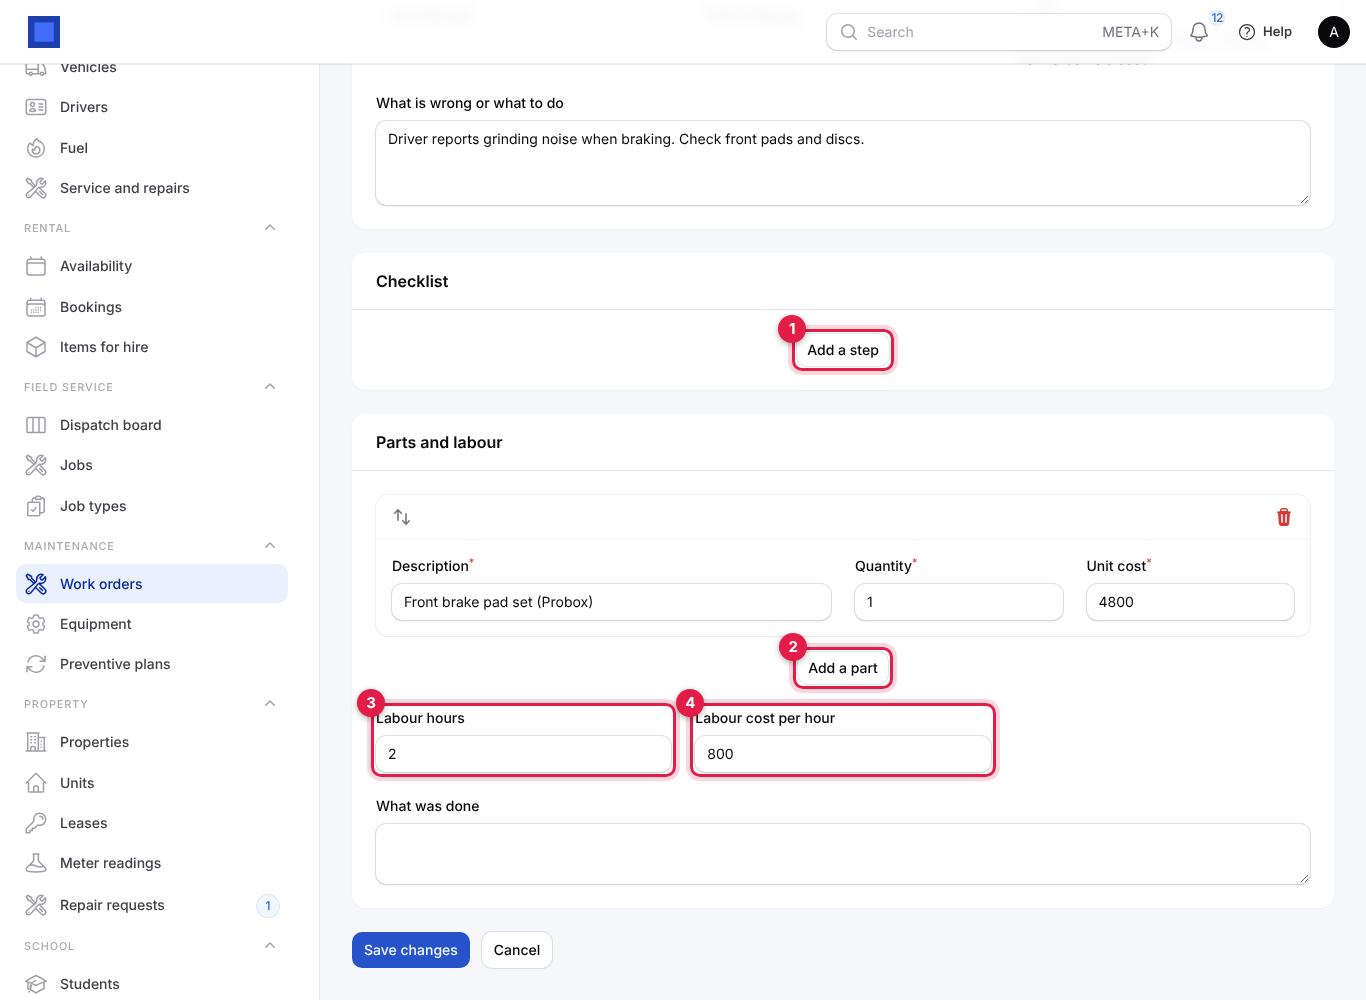
Labour cost per hour starts on the default from settings. The parts are for costing only; they do not take stock out of Inventory.
Tip: After adding parts on a new work order, click Save changes once more so the Cost column on the list includes the parts.
Start, hold, complete or cancel a work order
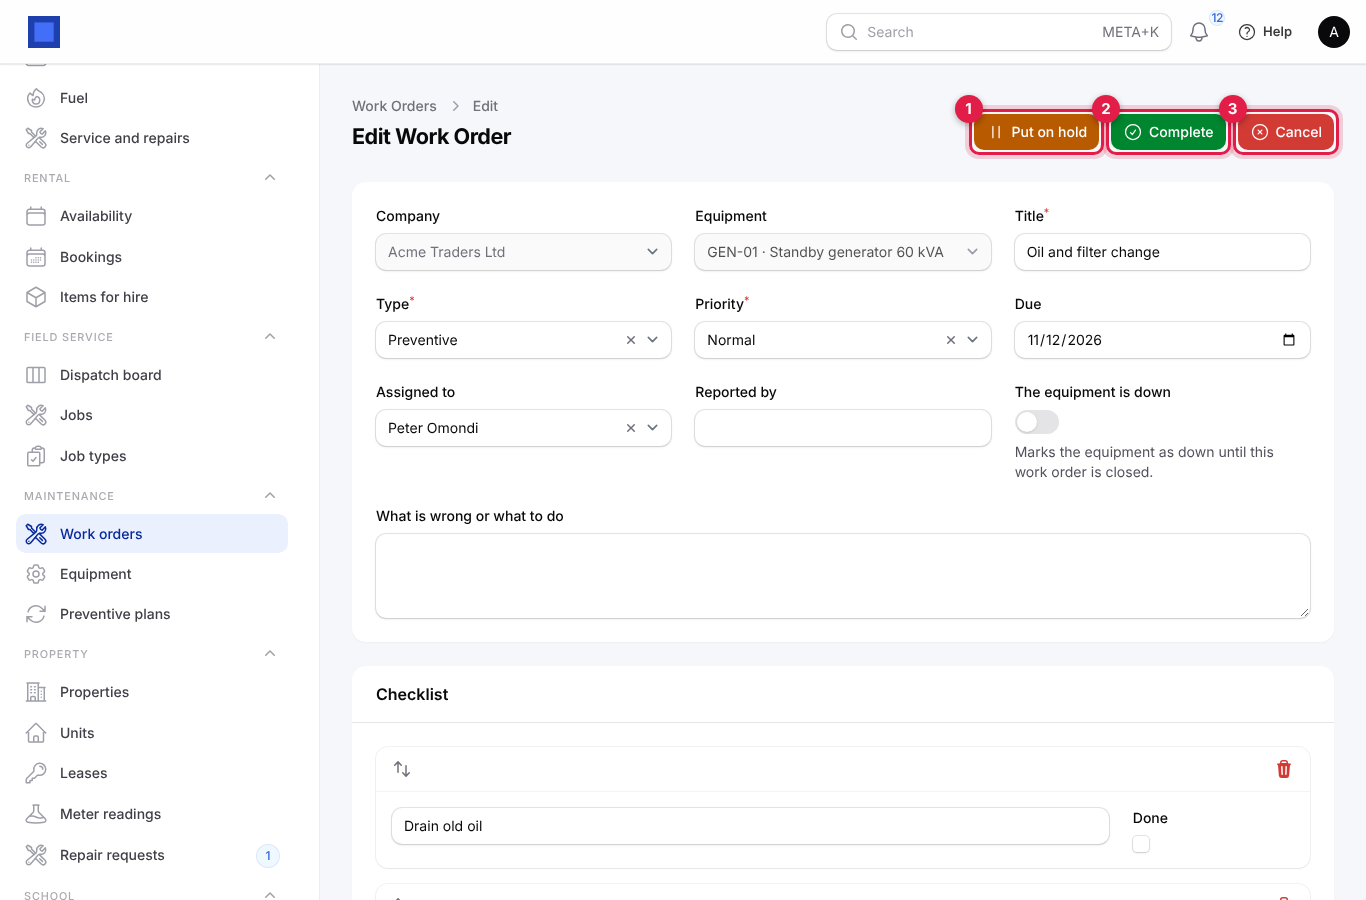
Open the work order. The buttons at the top depend on its status: Start (open or on hold), Put on hold (marker 1, in progress), Complete (marker 2) and Cancel (marker 3).
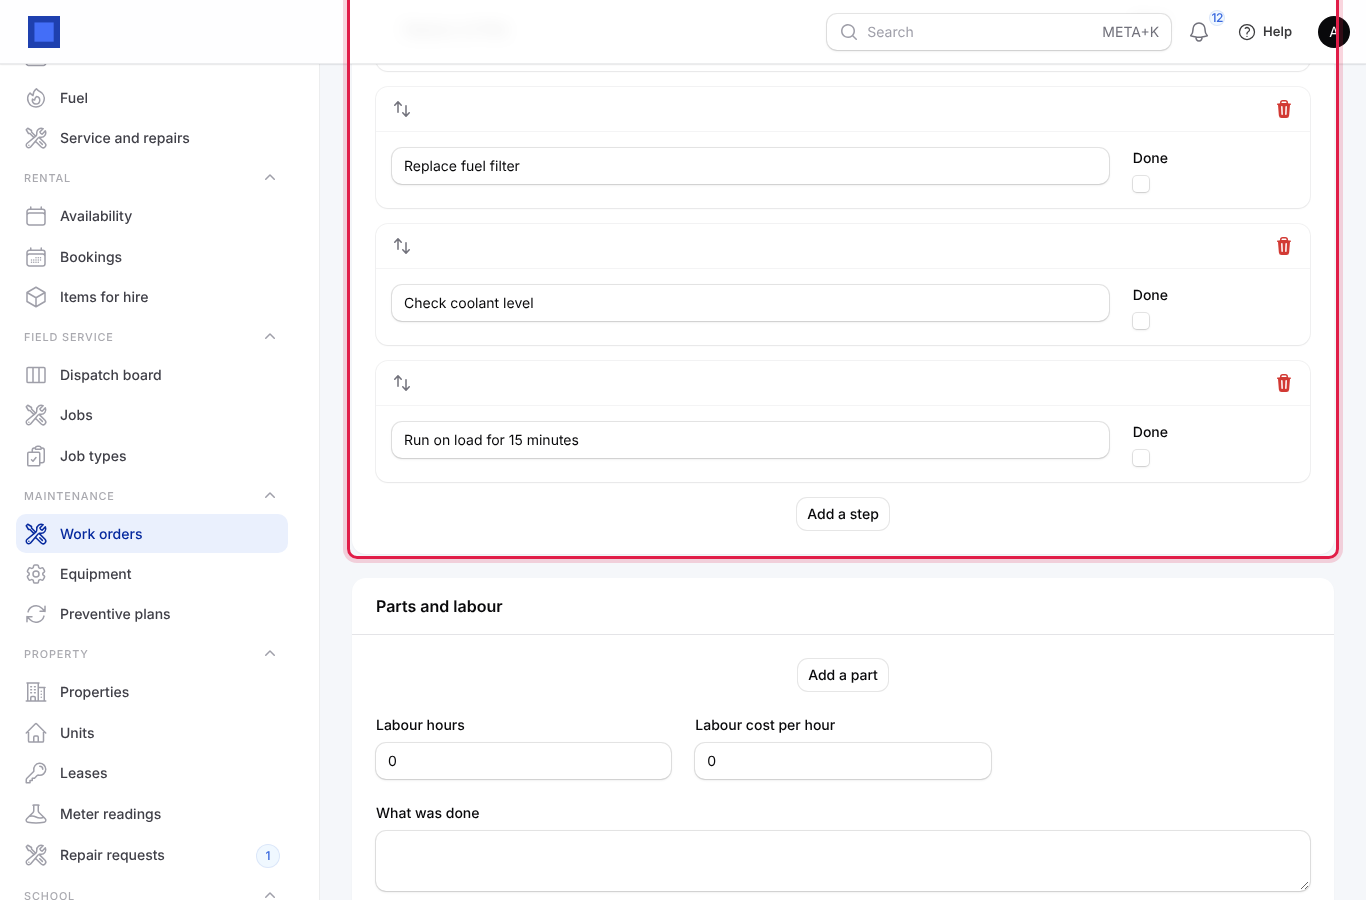
The checklist of a planned job is copied from its plan. Tick Done next to each step as you go.
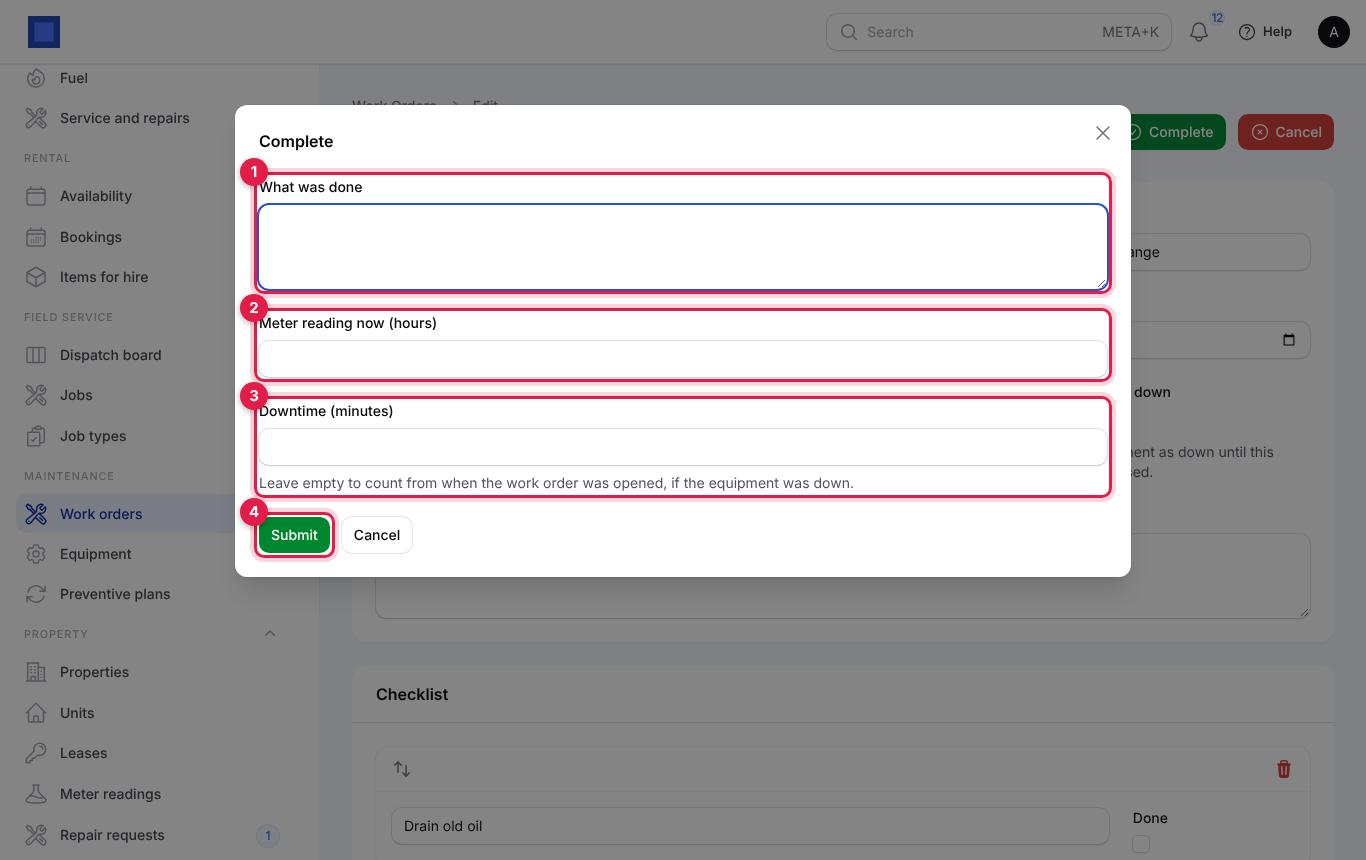
To complete:
- Click Complete.
- Type What was done (marker 1). For equipment with a meter, enter the Meter reading now (marker 2). Enter the Downtime (minutes) if the equipment was down (marker 3); leave it empty to count from when the work order was opened.
- Click Submit (marker 4).
What happens:
- Any unsaved changes on the form are saved, the work order becomes Done and its cost is totalled.
- The meter reading is recorded on the equipment.
- The equipment goes back to Running if no other open work order says it is down.
- For a planned job, the plan's next due date (from today) or next due reading (from the reading now) moves on.
A completed work order is read-only, with What was done showing the resolution.
Cancel asks you to confirm, closes the job without completing it and sets the equipment back to Running if nothing else holds it down. Cancelling a planned job does not move the plan on, so it will be raised again.
Maintenance settings
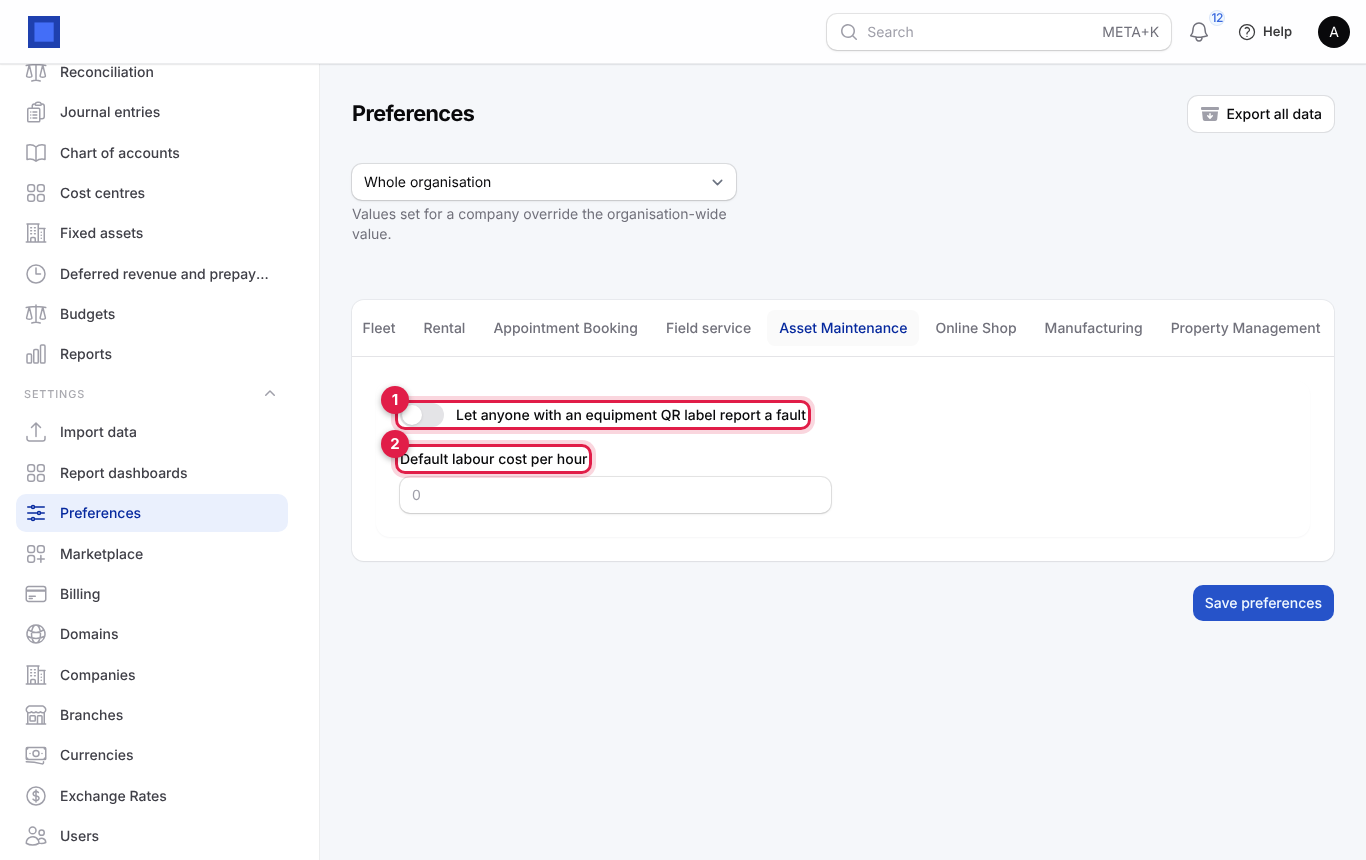
- In the menu, open Settings → Preferences.
- Click the Asset Maintenance tab, change the settings and click Save preferences.
| Setting | What it does |
|---|---|
| Let anyone with an equipment QR label report a fault (marker 1) | On by default. Turn off to close the public fault report page; scanning a label then shows "not found". |
| Default labour cost per hour (marker 2) | The starting Labour cost per hour on new work orders, for example KES 800. |
Common questions
Does a work order take parts out of stock? No. Parts on a work order are for costing the job. Issue the parts from Inventory separately if you track them there.
Why was no work order raised for my plan? Check that the plan is Active, the equipment is not Retired, there is no open work order for the plan already, and (for meter plans) that a reading at or above Next due at reading has been recorded.
Can I change how often a plan runs after it has started? Yes. Edit the plan. The next due date or reading you set is used from now on.
Who is told about a fault reported from a QR label? The equipment's Responsible person. Set one on every critical machine.
Can customers or the public see our equipment list? No. The QR page only shows the one machine's name, code and location and a form to report a problem.
How do I see how much a machine has cost us in repairs? On Maintenance → Work orders, remove Open only, filter by Equipment and read the Cost column. Use Export to total it in a spreadsheet.