Workspace settings
This page is for owners and administrators who set the workspace up and keep it running. It covers Settings → Preferences (formats, sign-in security, appearance, email and the options of each app), your Companies and Branches, Users, Roles and record rules, and a short word on API tokens and webhooks. Everything here is in the Settings group at the bottom of the menu.
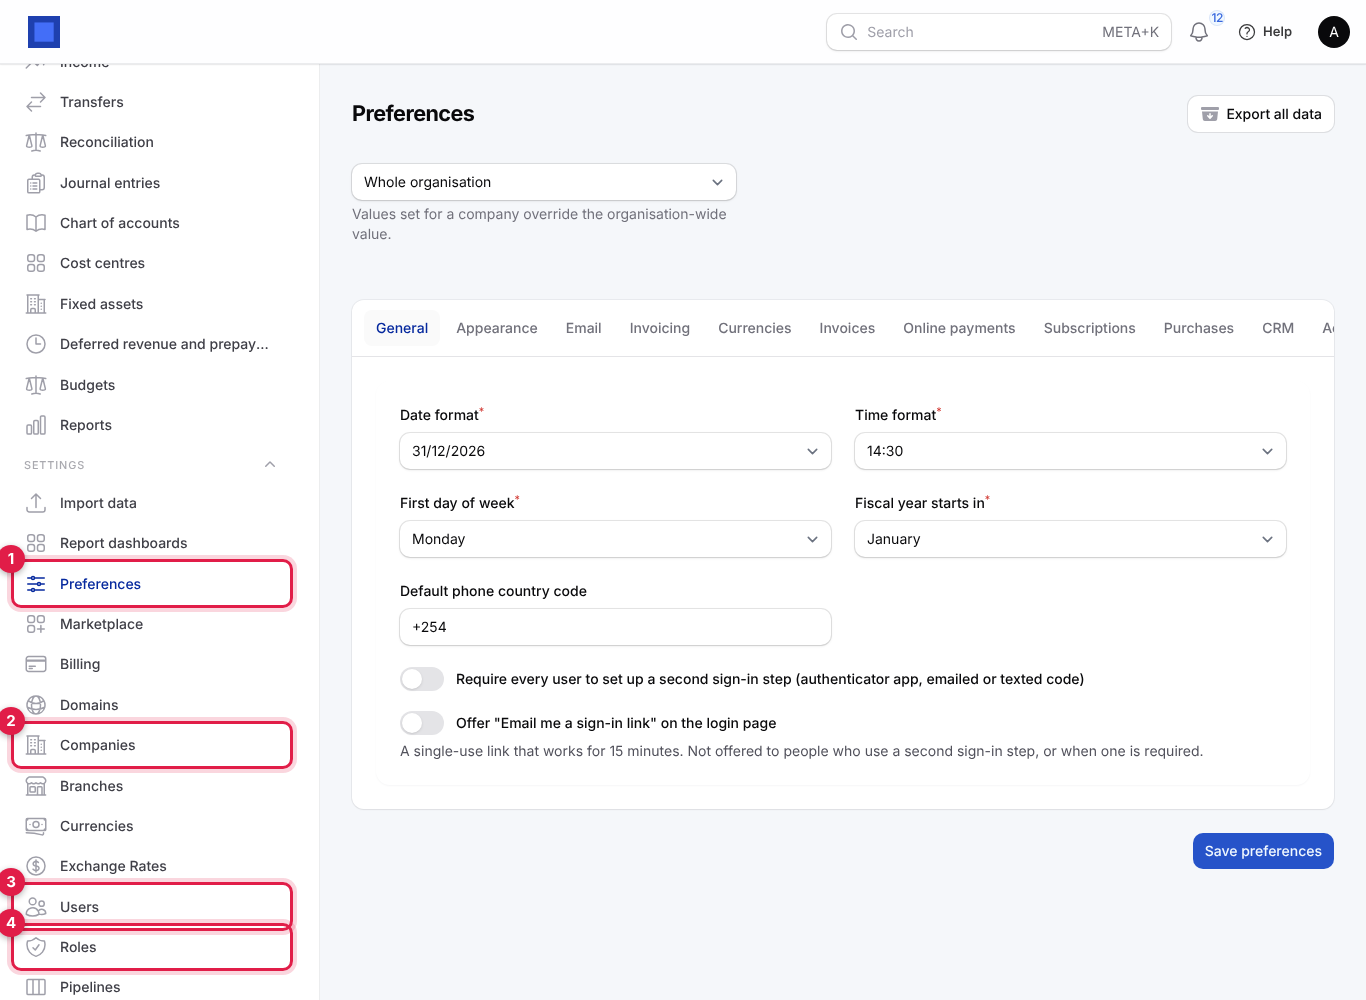
What you see under Settings depends on your role and on the apps your workspace uses. A typical list is: Import data, Report dashboards, Preferences (marker 1), Marketplace, Billing, Domains, Companies (marker 2), Branches, Currencies, Taxes, Exchange Rates, Users (marker 3), Roles (marker 4), then app settings such as Pipelines, Lost Reasons, Sales teams, Lead assignment, Lead templates, Price lists, Promotions, Commissions, and the technical screens API tokens, OAuth clients, Webhooks, Approval rules and Automations.
Who can do what:
| Permission | Allows |
|---|---|
core.settings.view |
Open Preferences and Domains (read only), and see the dashboard checklist. Stored keys, passwords and tokens (payment providers, email server, SMS and other connections) stay hidden; only people with core.settings.manage see and change them. |
core.settings.manage |
Save preferences, send a test email, export all data, hide the checklist, connect domains. |
core.companies.view / core.companies.manage |
See / change Companies and Branches. |
core.users.view / core.users.manage |
See / create, change and delete Users and Roles. |
billing.view / billing.manage |
See / change Billing and the Marketplace. Only the owner role has these by default. |
The built-in owner role has every permission; admin has everything except billing. See Roles and permissions.
Preferences: how the page works
Open Settings → Preferences.
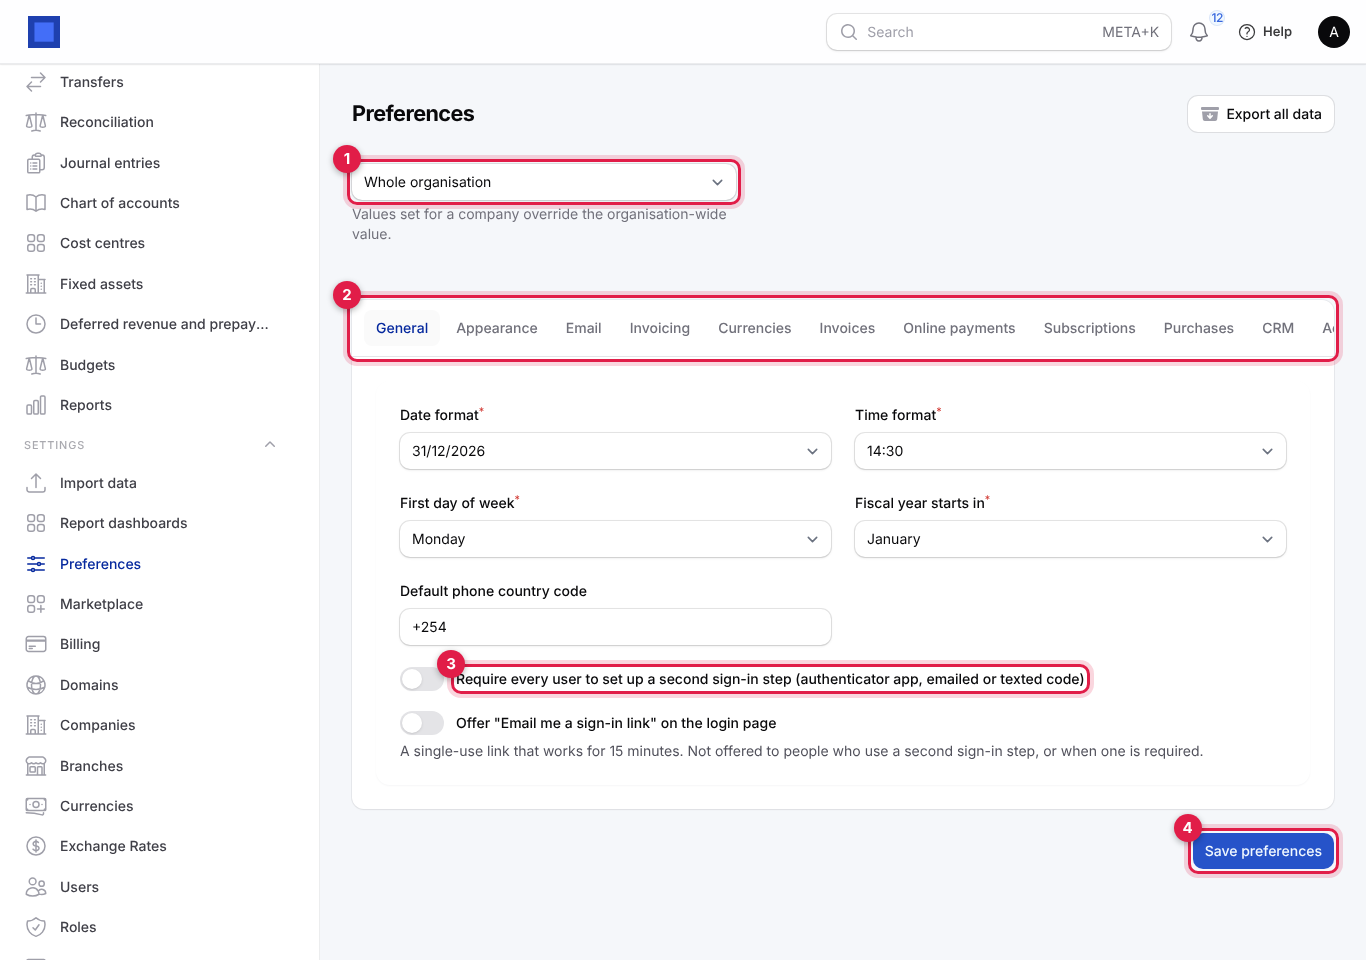
- Choose what you are changing (marker 1). Whole organisation sets the value for everyone. If you pick a company instead, the values you save apply to that company only and override the organisation-wide value ("Values set for a company override the organisation-wide value"). Use this when two companies need, for example, different invoice notes or payment gateways.
- Pick a tab (marker 2). General, Appearance, Email, Invoicing and Currencies are always there. Each app you use adds its own tab: Invoices, Online payments, Subscriptions, Purchases, CRM, Accounting, Inventory, Sales, Customer portal, Point of Sale, HRM, Payroll, Projects, Helpdesk, Marketing, Fleet, Rental, Field service and Manufacturing. The tab bar scrolls sideways when there are many. The tab you are on is kept in the address, so you can bookmark or share it.
- Change the fields. Nothing is saved yet.
- Click Save preferences (marker 4). You see "Preferences saved". Changes apply at once for every user. If you leave the page without saving, your changes are lost.
Users without core.settings.manage can look at the page but see no Save preferences button.
The buttons at the top right are Send test email (only when your own mail server is switched on; see Send email from your own address) and Export all data (see Import, export and your data).
The app tabs (Invoices, Online payments, Payroll and so on) are explained on the guide page for each app. This page explains the tabs every workspace has.
General: formats and sign-in security
| Field | What to enter |
|---|---|
| Date format | Required. How dates are shown and printed: 31/12/2026, 2026-12-31, 12/31/2026 or 31 Dec 2026. Most of East Africa uses 31/12/2026. |
| Time format | Required. 24-hour 14:30 or 12-hour 2:30 PM. |
| First day of week | Required. Monday, Sunday or Saturday. Used by calendars, weekly reports and timesheets. |
| Fiscal year starts in | Required. The first month of your financial year, for example January, or July for many government-linked businesses. Year-to-date reports and the year-end close follow it. |
| Default phone country code | The code added to phone numbers typed without one, for example +254 (Kenya), +255 (Tanzania), +256 (Uganda), +250 (Rwanda). Used for SMS, WhatsApp and click-to-call. |
| Require every user to set up a second sign-in step (authenticator app, emailed or texted code) (marker 3) | On: every user must set up two-factor authentication. People who have not are taken to a set-up page at their next sign-in and cannot continue until they do. Also switches off emailed sign-in links for everyone. |
| Offer "Email me a sign-in link" on the login page | On (default): the sign-in page shows Email me a sign-in link instead. A single-use link that works for 15 minutes. Not offered to people who use a second sign-in step, or when one is required. |
| Allow sign-in with Google | Only shown when your provider has set up Google sign-in for the platform. On: the sign-in page shows Sign in with Google. |
| Allow sign-in with Microsoft | Same for Microsoft 365 accounts. |
| Create a member account for anyone who signs in with SSO using a new email address | Only shown with Google or Microsoft available. On: anyone who signs in with Google or Microsoft and has no user yet gets one, with the member role. Off (safer): they see "No account here uses … Ask an administrator to invite you". |
Warning: Only switch on automatic account creation if everyone who can sign in to your Google Workspace or Microsoft 365 tenant should be in NaliSuite. A personal Gmail address would also get an account.
Require two-factor authentication for everyone
- Open Settings → Preferences, tab General, with Whole organisation selected.
- Switch on Require every user to set up a second sign-in step (authenticator app, emailed or texted code).
- Click Save preferences.
What happens next: at their next sign-in, each person without a second step sees Set up two-factor authentication and chooses an authenticator app, emailed codes or texted codes (texted codes need an SMS provider under the Marketing tab). The sign-in link option disappears from the login page. Tell your team before you switch this on. How each person sets up a method is explained in Getting started.
Sign-in links (magic links)
Leave Offer "Email me a sign-in link" on the login page on if your team forgets passwords often; switch it off if you want everyone to type a password. It has no effect while two-factor authentication is required.
Google and Microsoft sign-in (SSO)
Your provider (the platform staff) registers NaliSuite with Google and Microsoft once. Until they do, these switches are hidden and no SSO buttons appear. When they are available:
- Switch on Allow sign-in with Google and/or Allow sign-in with Microsoft.
- Decide on Create a member account for anyone who signs in with SSO using a new email address.
- Click Save preferences. The buttons appear on the sign-in page at once.
Existing users sign in with SSO by using the same email address as their NaliSuite user. The first time, NaliSuite links their Google or Microsoft account to their user.
For sign-in with Facebook, LinkedIn or X, and for alerts in Slack and Telegram, see Sign in with Facebook, LinkedIn or X, and alerts in Slack and Telegram.
Appearance: name, colour, logo and dark mode
Click the Appearance tab.
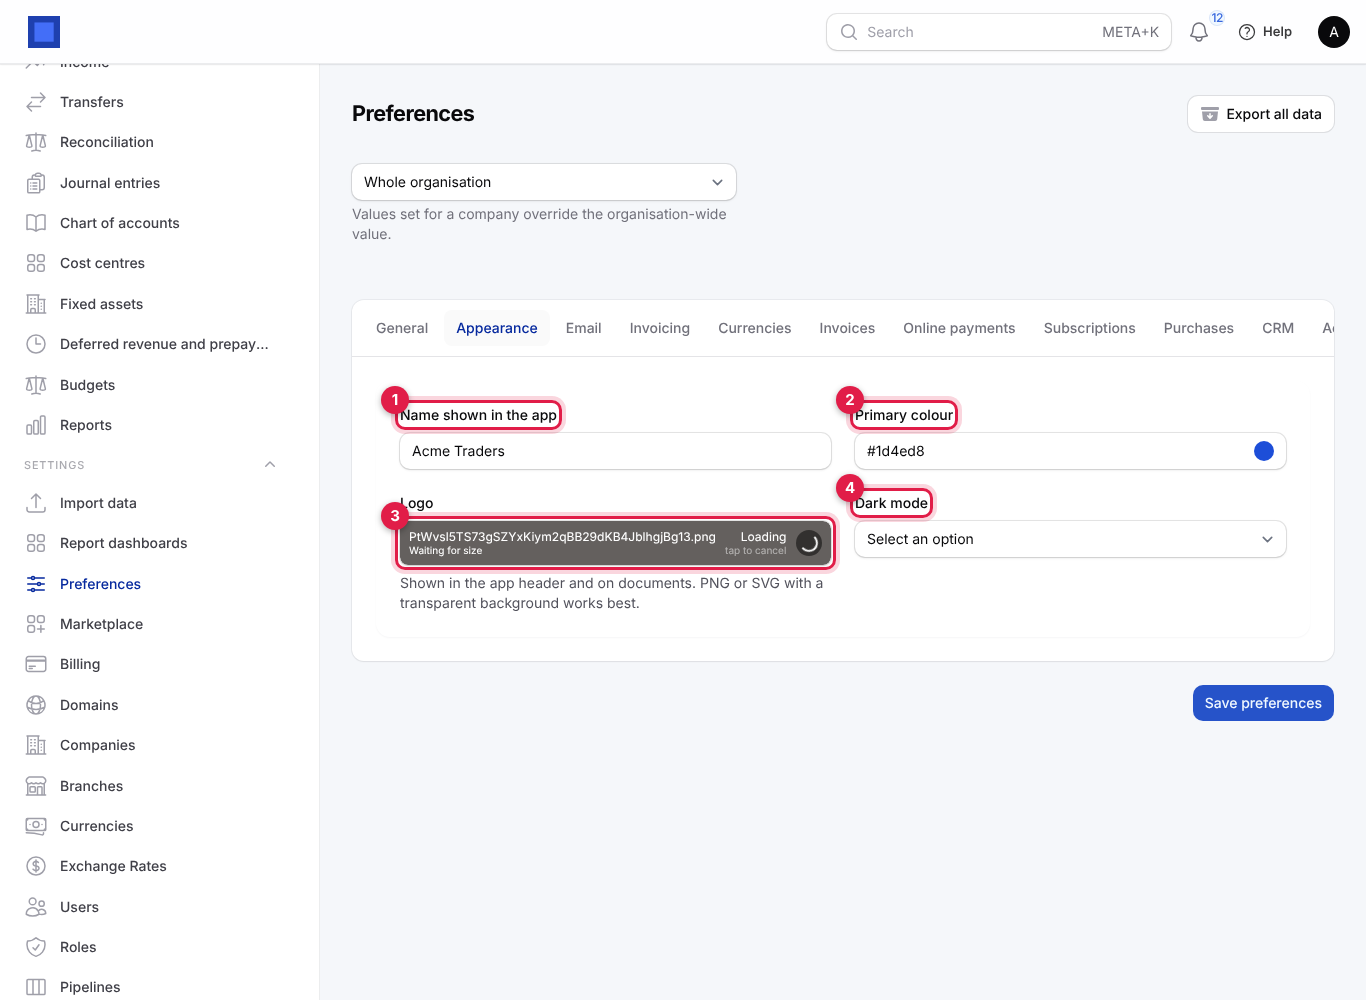
| Field | What to enter |
|---|---|
| Name shown in the app (marker 1) | Up to 60 characters. Replaces the workspace name in the browser tab, the installed app and emails. Leave empty to use the name you signed up with. |
| Primary colour (marker 2) | Click to pick your brand colour, or type a hex code such as #0F766E. Buttons, links and highlights use it. Empty uses the platform colour. Pick a colour dark enough for white text to be readable. |
| Logo (marker 3) | Drag a file in or click Browse. PNG or SVG with a transparent background works best, up to 2 MB. Shown in the app header, on documents and in the customer portal. Also ticks Add your logo on the checklist. |
| Logo for dark mode | Optional. A version of the logo for dark backgrounds, usually white, shown in the app header when dark mode is on. Without it the normal logo is used. |
| Dark mode (marker 4) | Follow each user's device (default; users can still pick light or dark in their user menu), Always light, Always dark, or Not available (dark mode and the theme buttons are removed). |
Click Save preferences. Reload the page to see the new colour and logo everywhere.
Note: Each company also has its own Logo under Settings → Companies. Documents use the company logo when one is set; see Manage your companies.
Email: reply-to, signature and your own mail server
Click the Email tab.
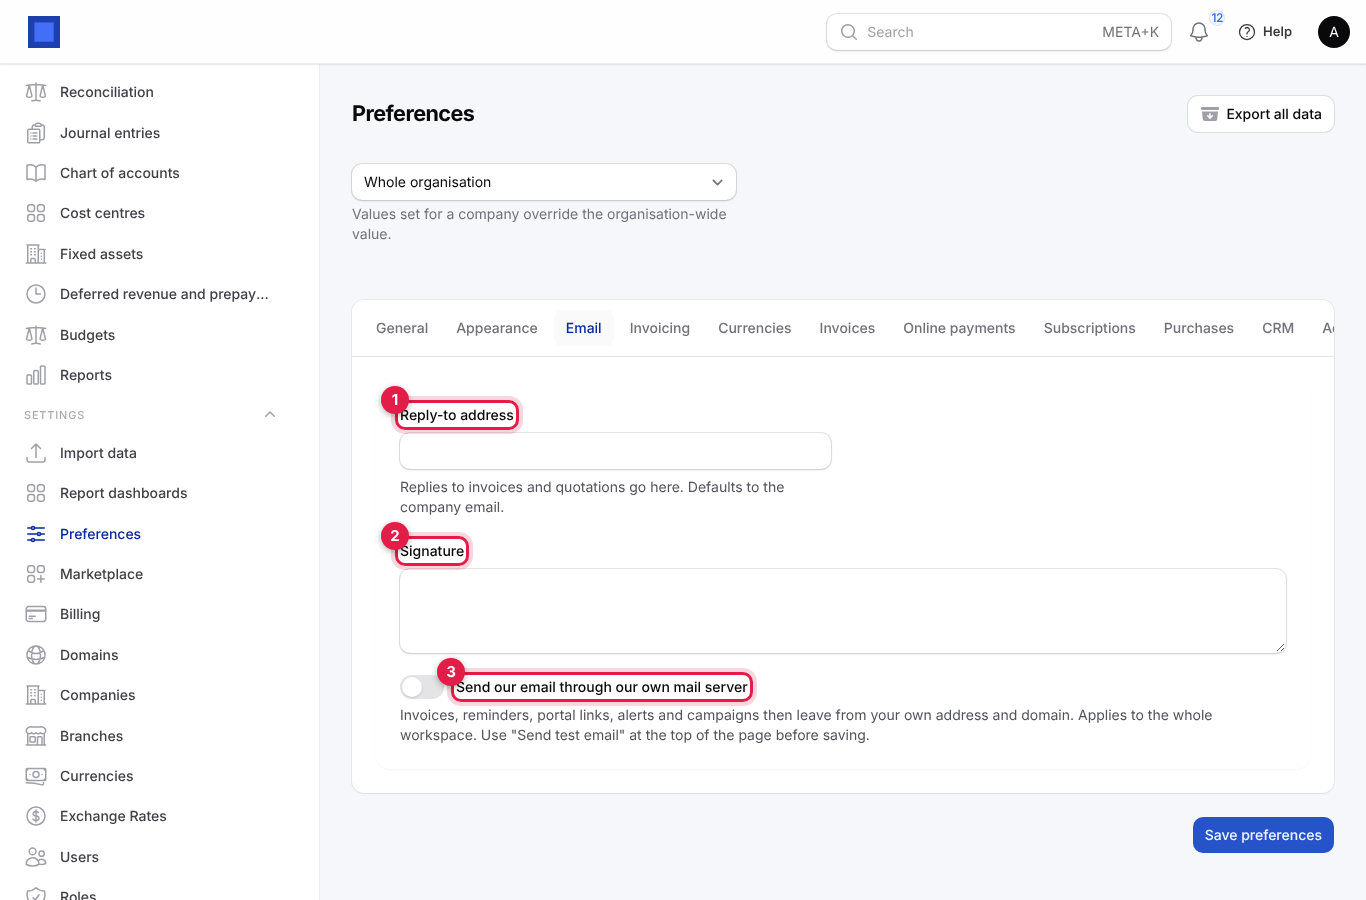
| Field | What to enter |
|---|---|
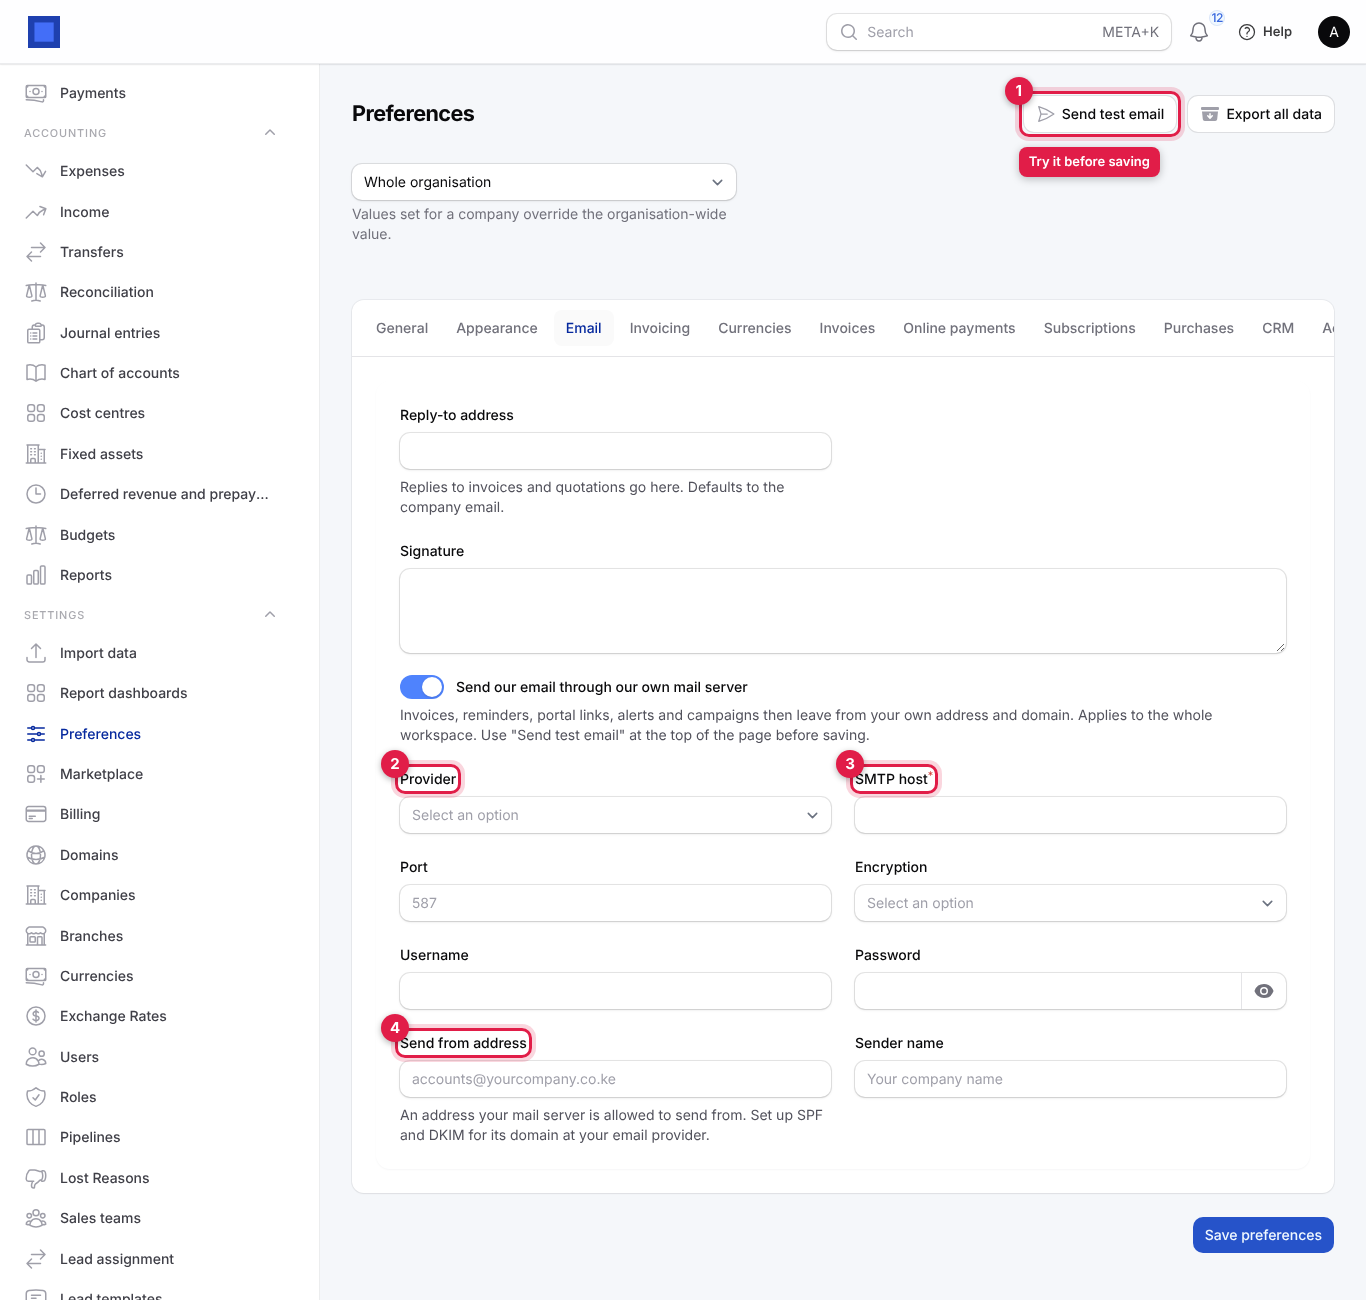
| Reply-to address (marker 1) | Where customer replies to invoices and quotations go, for example accounts@yourcompany.co.ke. Defaults to the company email. |
| Signature (marker 2) | Text added to the bottom of emails sent from the workspace: your name, phone, address, PIN. |
| Send our email through our own mail server (marker 3) | Off (default): everyday emails (invoices, quotations, reminders, statements, portal links, alerts, payslips) leave from the platform's mail service, so they work from day one. On: they leave from your own address and domain instead. Applies to the whole workspace. Marketing email (campaigns and email steps in sequences) is only ever sent through your own mail server, so switch this on before you send any. |
Send email from your own address and mail server
Use this so customers see mail from accounts@yourcompany.co.ke and replies land in your own mailbox.
- On the Email tab, switch on Send our email through our own mail server. More fields appear.
- Choose your Provider (marker 2). The SMTP host, Port and Encryption are filled in for you, and a hint under Username tells you what to type.
- Check the SMTP host (marker 3) and fill in the remaining fields.
- Click Send test email at the top of the page (marker 1) and confirm. A short message goes to your own address through the server you entered, without saving anything. You see "Test email sent to …" or "Sending failed" with the reason.
- When the test arrives, click Save preferences.
| Field | What to enter |
|---|---|
| Provider | My own mail server (cPanel, Plesk, Mailcow), Brevo (Sendinblue), Mailgun, SendGrid, Amazon SES, Postmark, Resend, Zoho Mail, Google Workspace / Gmail, Microsoft 365 / Outlook or Other SMTP provider. |
| SMTP host | Required. For your own server usually mail.yourdomain.com; filled in for the others (for example smtp.gmail.com). |
| Port | Usually 587 (TLS) or 465 (SSL). |
| Encryption | TLS (STARTTLS) for port 587, SSL for port 465, None only for local relays. |
| Username | Depends on the provider (see below). |
| Password | The mailbox password, SMTP key or API key. Click the eye to check what you typed. |
| Send from address (marker 4) | An address your server is allowed to send from, for example accounts@yourcompany.co.ke. |
| Sender name | The name customers see, for example your company name. |
Username and password by provider:
| Provider | Username | Password |
|---|---|---|
| My own mail server | A full mailbox address, for example no-reply@yourdomain.com |
That mailbox's password |
| Brevo | Your Brevo login email | An SMTP key from Brevo → SMTP & API |
| Mailgun | postmaster@your-mailgun-domain |
The SMTP password from the domain settings |
| SendGrid | The word apikey |
An API key with Mail Send permission |
| Amazon SES | SES SMTP credentials (not your AWS keys) | SES SMTP password; change the region in the host if needed |
| Postmark | The server API token | The same token |
| Resend | The word resend |
An API key |
| Zoho Mail | Your Zoho mailbox | An app-specific password |
| Google Workspace / Gmail | Your Google address | An App Password (two-step verification must be on) |
| Microsoft 365 / Outlook | Your Microsoft 365 address | Its password; SMTP AUTH must be enabled for the mailbox |
Which emails use which server
| Own mail server off | Own mail server on | |
|---|---|---|
| Invoices, quotations, statements, purchase orders, reminders, receipts, portal and signing links, alerts, payslips | Platform's mail service | Your mail server |
| Email campaigns and email steps in sequences (Marketing) | Not sent. "Email campaigns and sequences are sent only through your own mail server." | Your mail server |
| SMS, WhatsApp and AI | Always your own accounts, set up under their own tabs | Same |
Marketing email goes only through your own server so that bulk mail is sent under your own domain's reputation and limits, not the platform's. If you switch your server off while a campaign is scheduled, its recipients are marked failed with that reason instead of being sent from the platform.
Tip: Set up SPF and DKIM for your domain at your email provider. Without them, invoices you send may land in spam.
Common mistake: Using your normal Gmail password. Google refuses it; create an App Password in your Google account security settings.
Invoicing defaults
Click the Invoicing tab.
| Field | What to enter |
|---|---|
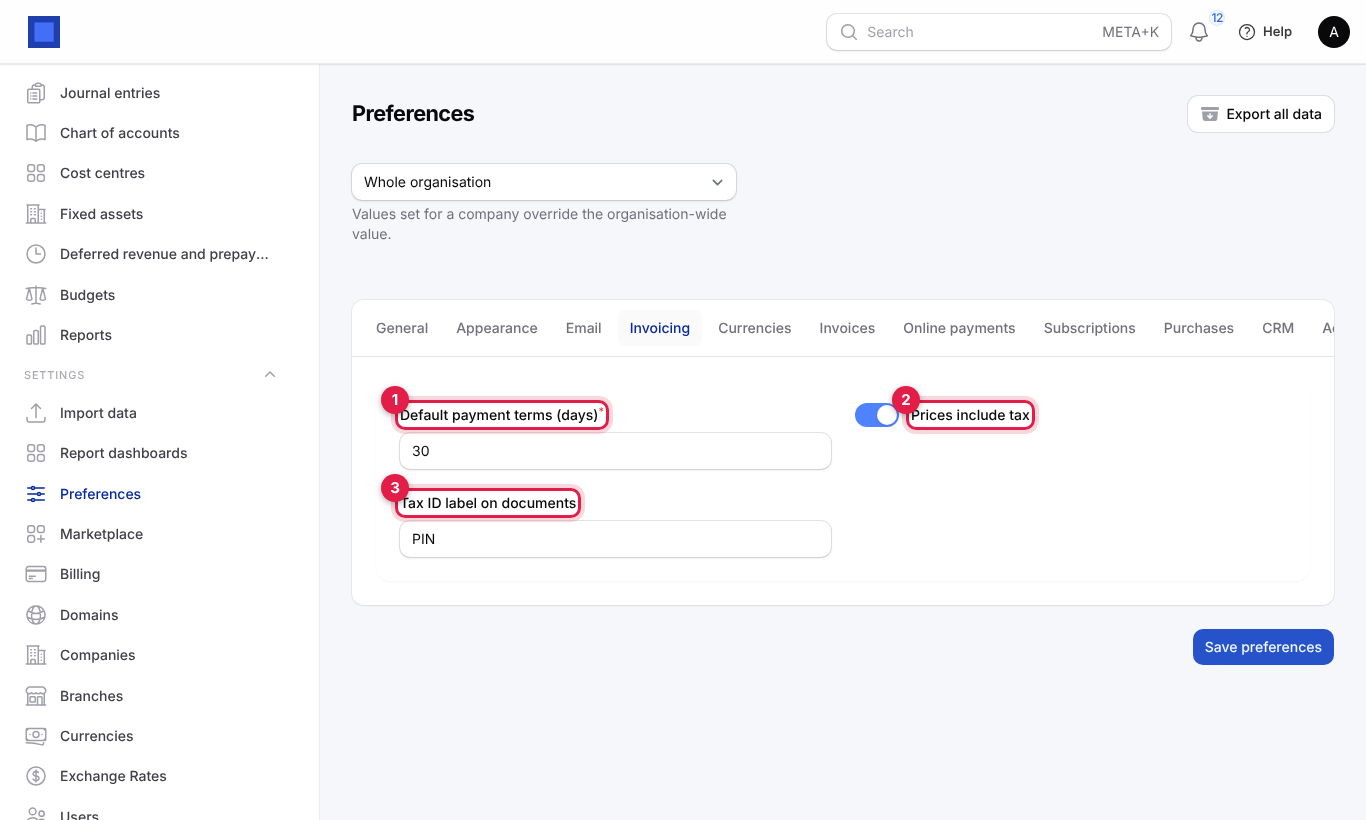
| Default payment terms (days) (marker 1) | Required, 0 to 365. Days between invoice date and due date when the customer has no terms of their own, for example 30. 0 means due on receipt. |
| Prices include tax (marker 2) | On: prices you type already include VAT, and tax is worked out backwards. Off: tax is added on top. Choose what your price list shows. |
| Tax ID label on documents (marker 3) | The label printed before tax numbers, for example PIN (Kenya), TIN (Tanzania, Uganda, Nigeria) or VAT No. |
The Invoices and Online payments tabs (numbering, bank details, e-invoicing such as KRA eTIMS, M-Pesa, Paystack, Flutterwave, Stripe and others) are explained in the invoices and payments page of this guide.
Currencies and exchange rates
Click the Currencies tab.
| Field | What to enter |
|---|---|
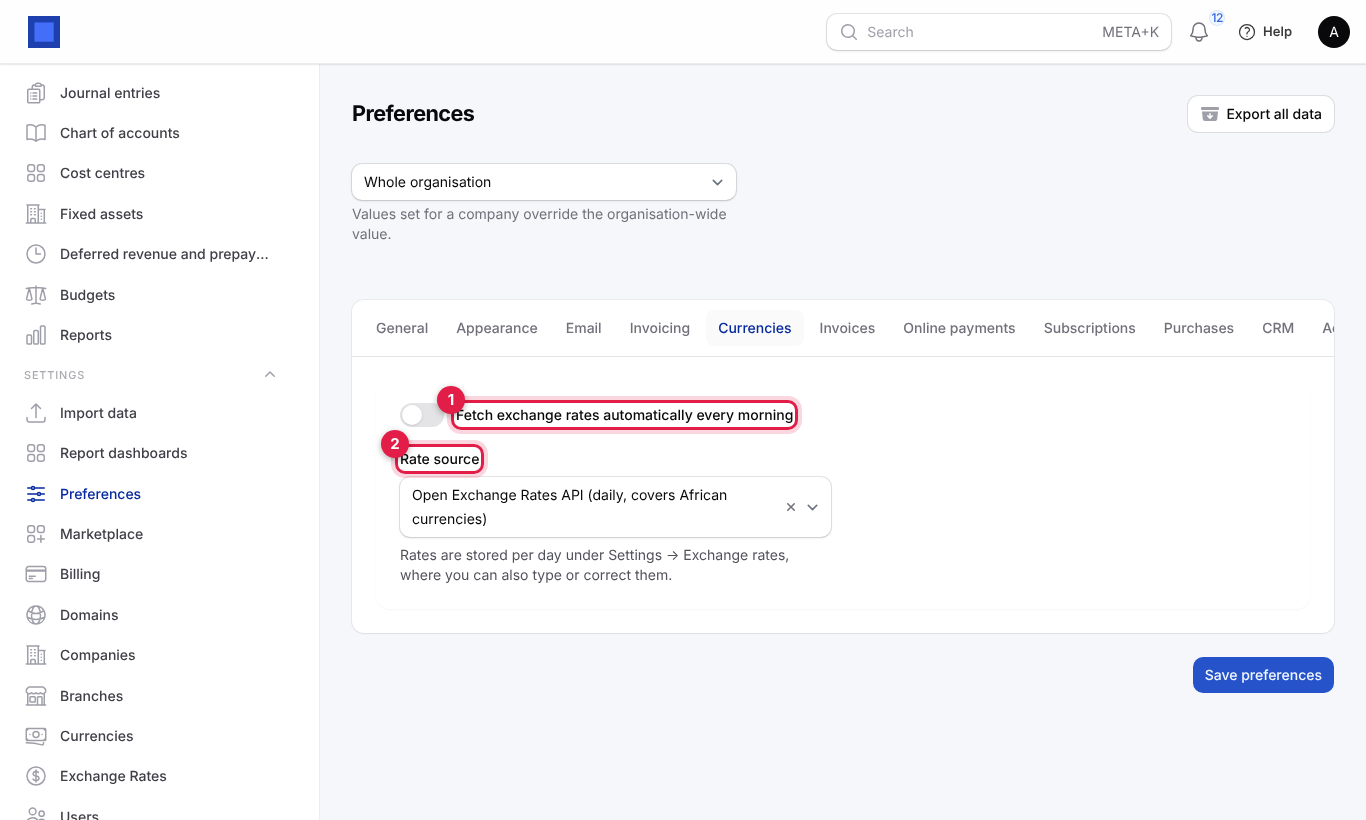
| Fetch exchange rates automatically every morning (marker 1) | On (default): rates for your active currencies are downloaded daily. |
| Rate source (marker 2) | Where the rates come from. Rates are stored per day under Settings → Exchange rates, where you can also type or correct them. |
Which currencies you can use is set under Settings → Currencies. Each company's base currency is set on the company.
Manage your companies
A workspace can hold several companies: legal entities with their own books, documents and numbering. Most businesses have one. How many you may add depends on your plan.
- Open Settings → Companies.
- Click New company (marker 1) to add one, or click a row (marker 2) to change it.
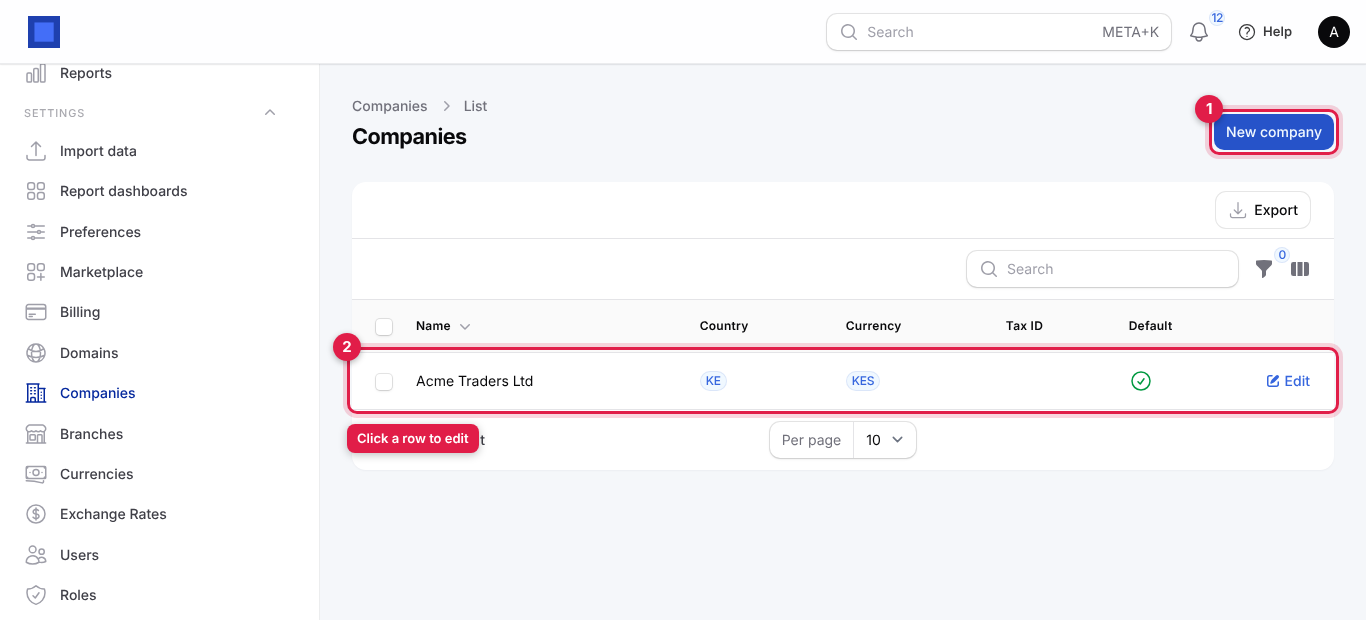
The list shows each company's name, Country, Currency, Tax ID and whether it is the Default. Tick rows to Delete or Restore them in bulk; use the Trashed filter to see deleted companies.
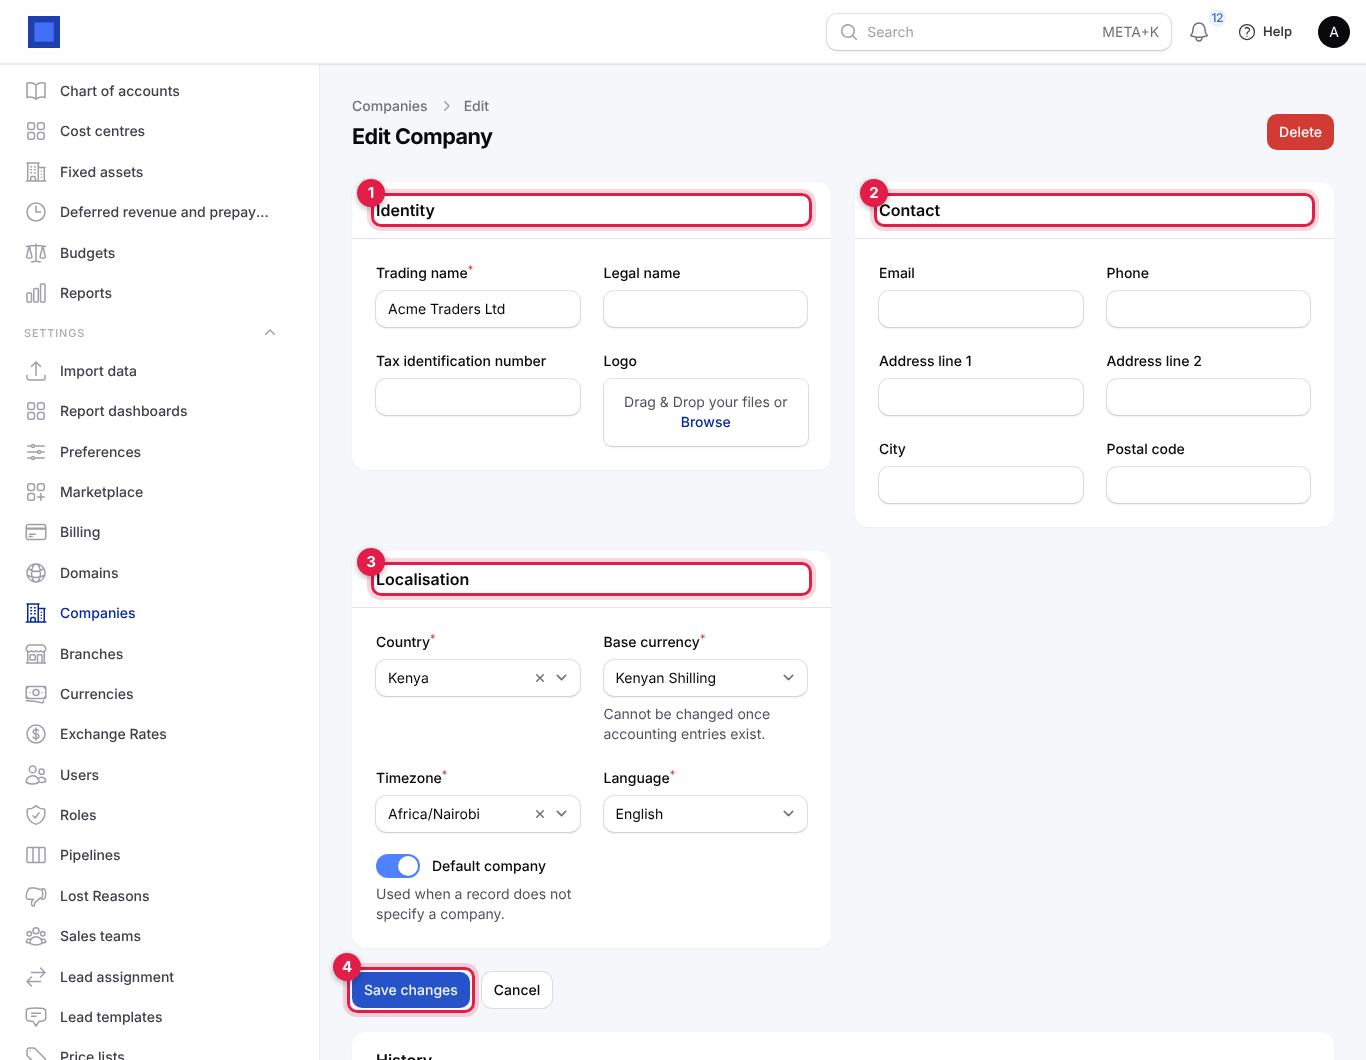
Identity (marker 1)
| Field | What to enter |
|---|---|
| Trading name | Required. The name customers know, shown on documents. |
| Legal name | The registered name, if different, for example "Mama Mboga Traders Limited". |
| Tax identification number | Your KRA PIN, TIN or VAT number. Printed on invoices. Needed for the Fill in your company details checklist step. |
| Logo | PNG or JPG up to 2 MB, printed on this company's documents. |
Contact (marker 2)
| Field | What to enter |
|---|---|
| The company email. Also the default reply-to for invoices. | |
| Phone | The main phone number. |
| Address line 1, Address line 2, City, Postal code | Printed on documents. Address line 1 is needed for the checklist step. |
Localisation (marker 3)
| Field | What to enter |
|---|---|
| Country | Required. Drives tax and statutory defaults (for example payroll rules). |
| Base currency | Required. The currency the books are kept in, for example Kenyan Shilling. It cannot be changed once accounting entries exist, so set it before you start. |
| Timezone | Required, for example Africa/Nairobi. Used for dates and times on documents and schedules. |
| Language | Required. The workspace language for users without their own language, and for this company's documents. |
| Default company | On for the company used when a record does not specify one. Only one company should be the default. |
Click Save changes (marker 4), or Create on a new company (Create & create another saves and opens a blank form). Delete at the top of an edit page moves the company to the bin; Restore brings it back and Force delete removes it for good.
Common mistake: Creating a second company to represent a shop or office. Use a branch instead; a company has its own separate books.
Set up branches
Branches are shops, offices or sites inside a company. Staff, tills, warehouses and invoices can be tagged with a branch, and reports can filter by it.
- Open Settings → Branches.
- Click New branch (marker 1).
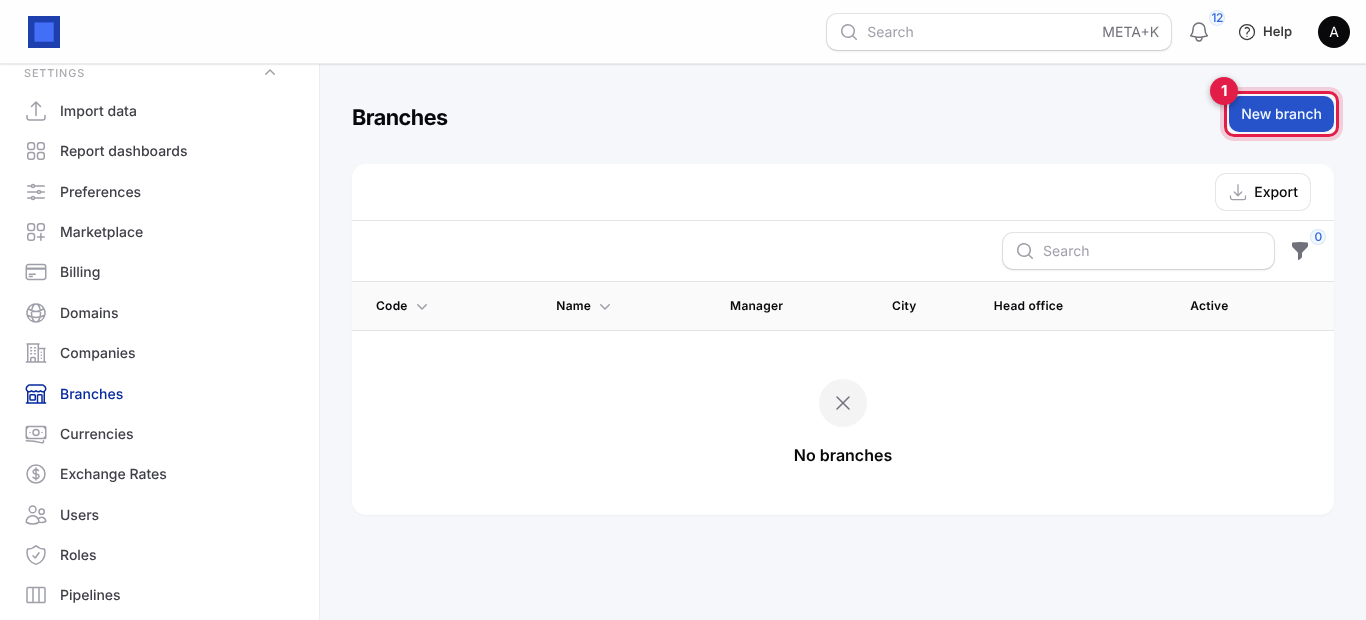
- Fill in the window and click Create (or Create & create another).
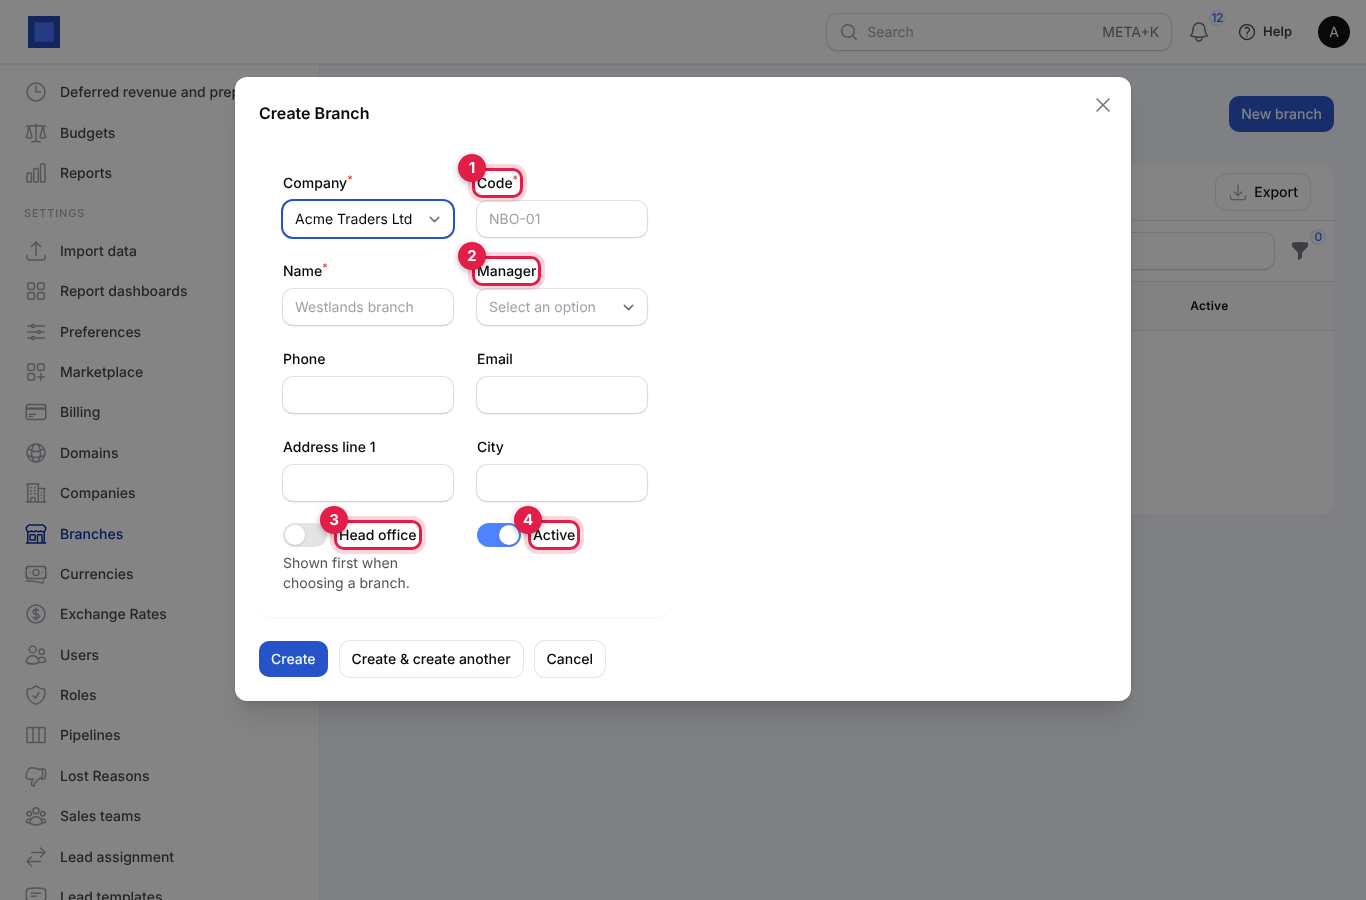
| Field | What to enter |
|---|---|
| Company | Required. The company the branch belongs to. Starts on the default company. |
| Code (marker 1) | Required, up to 20 characters. A short code, for example NBO-01 or MSA-02. Shown in lists and reports. |
| Name | Required, for example "Westlands branch". |
| Manager (marker 2) | The user in charge. |
| Phone, Email | The branch's own contact details. |
| Address line 1, City | Where the branch is. |
| Head office (marker 3) | On for your main branch. It is shown first when people choose a branch. |
| Active (marker 4) | On by default. Switch off for a closed branch; it stays on old records but is no longer offered. |
Each row has Edit and Delete. Use the Company filter when you have several companies.
Add users
Everyone who signs in needs their own user. How many users you can have depends on your plan and any Extra users add-on (see Billing and marketplace); when you reach the limit, New user disappears. Users are counted on each subscription invoice.
- Open Settings → Users.
- Click New user (marker 1). To change someone, click Edit on their row (marker 3).
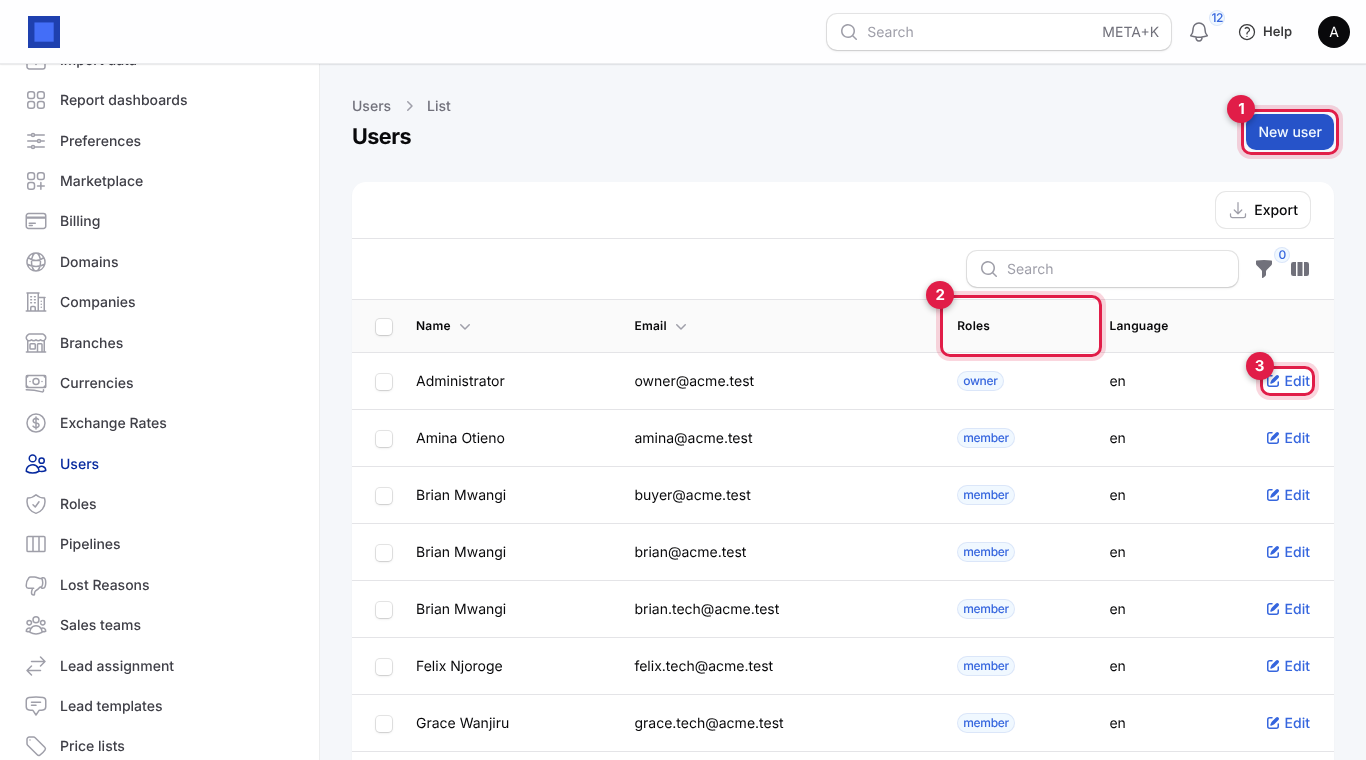
- Fill in the form and click Create (or Create & create another).
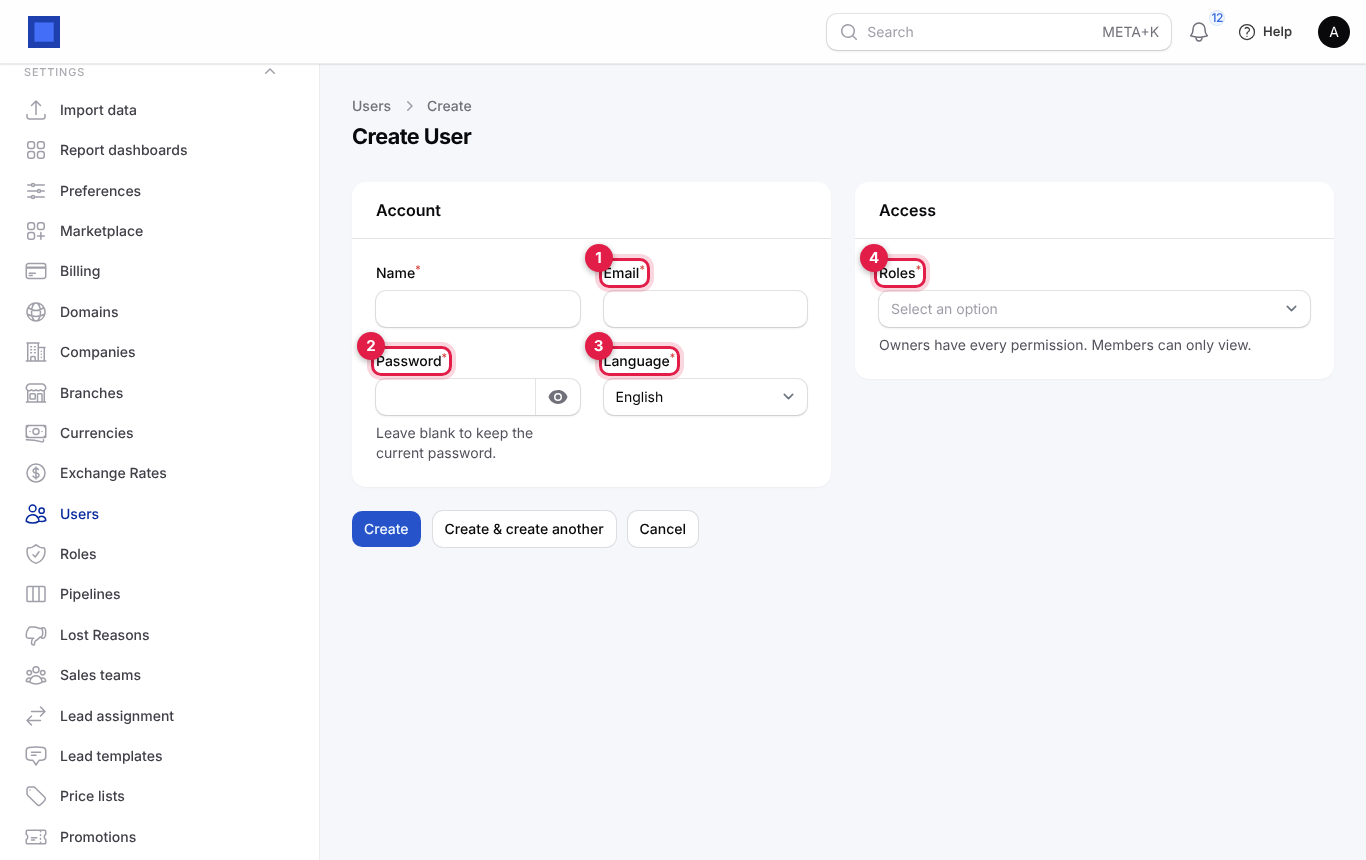
Account
| Field | What to enter |
|---|---|
| Name | Required. The person's full name. Used for @mentions, assignments and on documents. |
| Email (marker 1) | Required, unique. Their sign-in address and where alerts and codes go. |
| Password (marker 2) | Required for a new user; at least the platform minimum (10 characters by default). On an existing user, leave it blank to keep their password, or type a new one to reset it. |
| Language (marker 3) | Required. English, Français, Português, العربية or Kiswahili. The language the whole workspace appears in for this person. |
Access
| Field | What to enter |
|---|---|
| Roles (marker 4) | Required. One or more roles. A person with several roles gets all their permissions together. |
What happens next: the user can sign in straight away (their email is treated as confirmed). NaliSuite does not send an invitation email. Send them the workspace address, their email and the password yourself, by a private channel, and ask them to change the password on their Profile.
The list shows Name, Email, Roles (marker 2) and Language; filter by role with the filter icon. To remove people, tick them and choose Delete selected from Bulk actions, or click Delete on their edit page. Their past notes and the records they created stay.
Tip: When someone leaves, delete their user (or reset their password) on their last day. Deleting also frees a paid seat before the next invoice.
Common mistake: Giving everyone the owner role. Owners can change billing and close the workspace. Give most people member or a custom role.
Roles and permissions
A role is a named set of permissions. Open Settings → Roles.
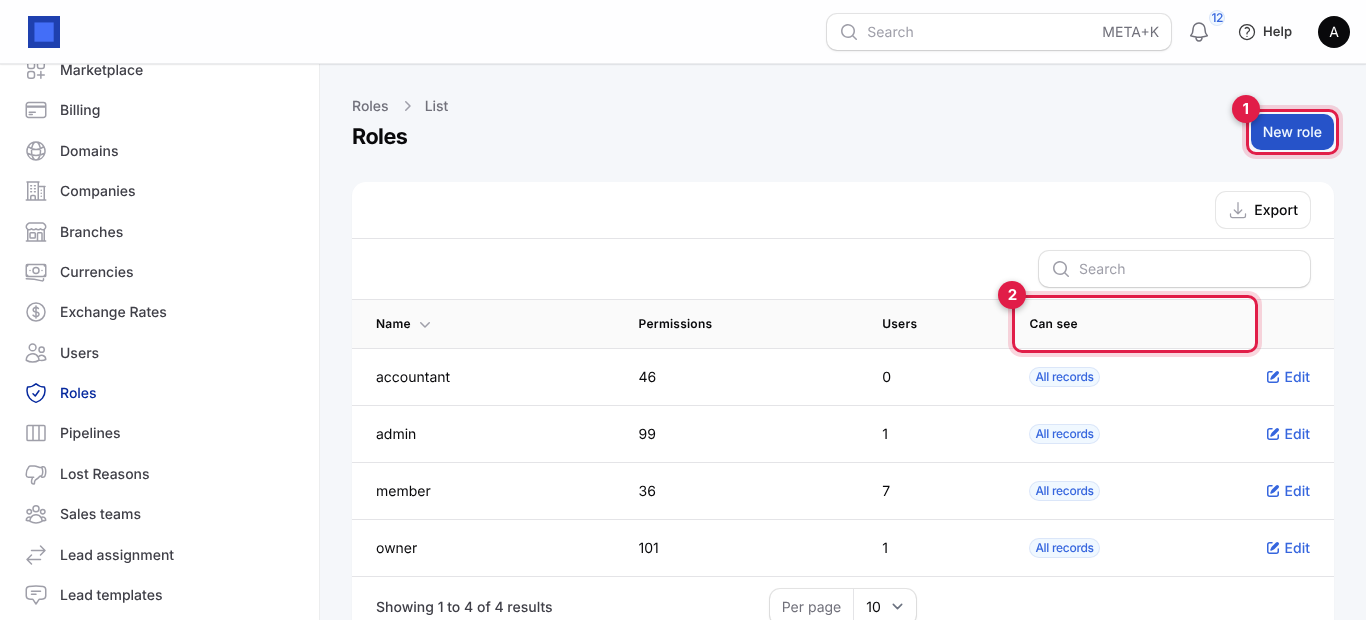
The list shows each role, how many Permissions and Users it has, and Can see (its record rule). The four built-in roles are kept up to date automatically when apps are added:
| Role | Gets |
|---|---|
| owner | Every permission, always. Cannot be edited. The only role with billing (billing.view, billing.manage) and Close workspace. |
| admin | Every permission except billing. |
| member | Every "view" permission: can look at everything in the apps but not change it. |
| accountant | Every "view" permission, plus all of Accounting and Payroll, vendor bills, invoice payments and taxes. For an in-house or external accountant. |
Create or change a role
- Click New role (marker 1), or Edit on a role.
- Fill in the form and click Create / Save changes.
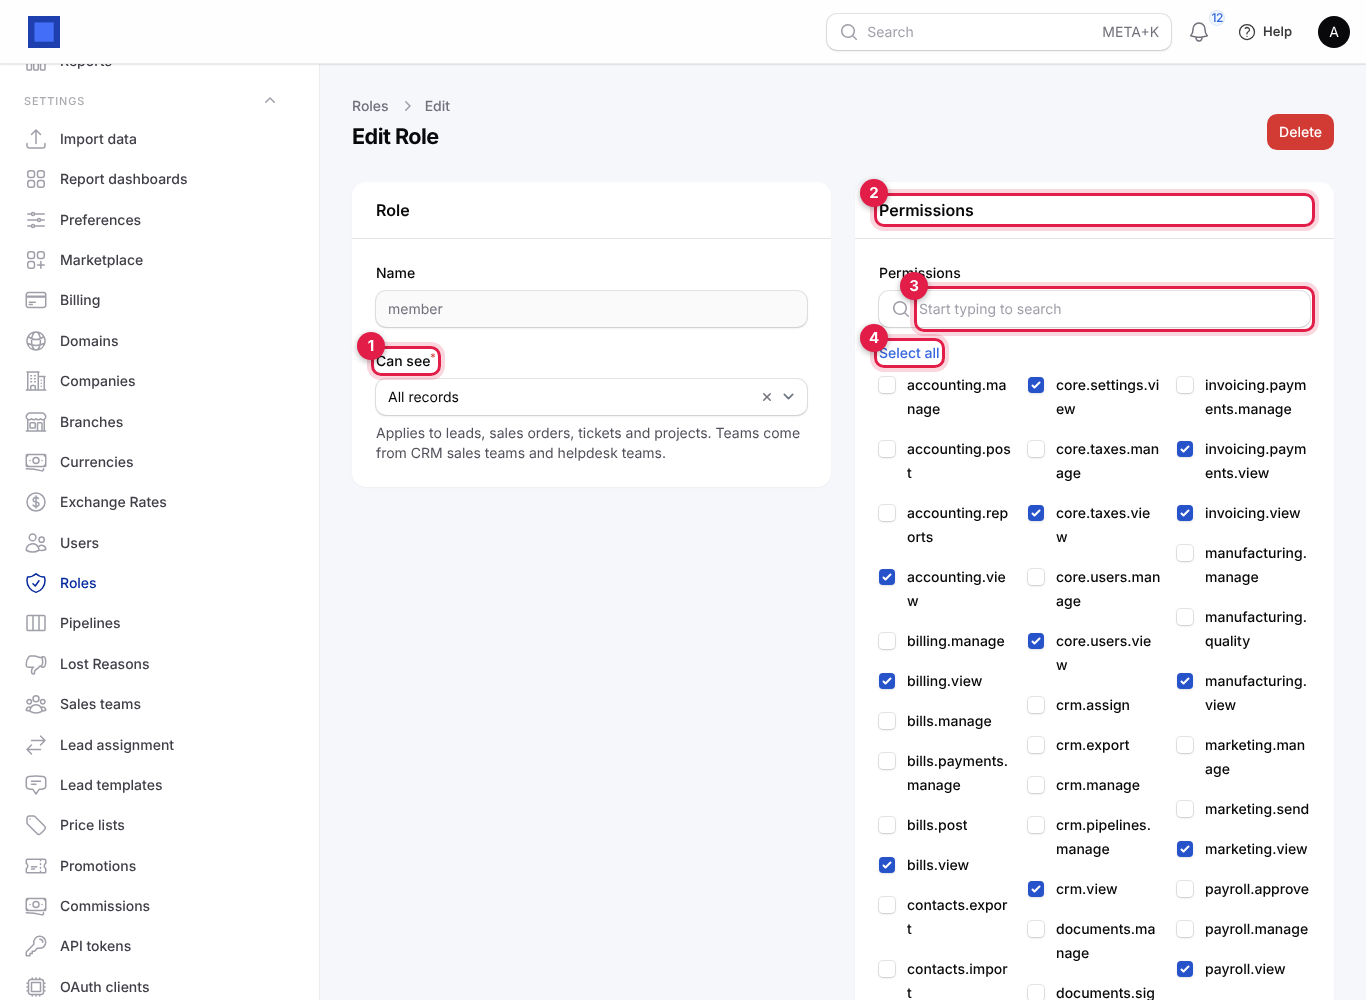
| Field | What to enter |
|---|---|
| Name | Required, unique, up to 64 characters, for example "Cashier" or "Sales rep". The built-in role names cannot be changed. |
| Can see (marker 1) | Required. The record rule; see below. |
| Permissions (marker 2) | Tick what the role may do. Type in Start typing to search (marker 3) to find permissions, for example invoicing. Select all (marker 4) ticks every permission; click again to untick all. The owner role's permissions cannot be changed. |
Permissions are named app.area.action. As a rule:
| Ending | Means |
|---|---|
.view |
See the screens and records of that area. |
.manage |
Create, change and delete them. |
| Others | Special actions, for example contacts.import, contacts.export, crm.assign, bills.post, payroll.approve, marketing.send, core.data.export (the Export button on lists), billing.manage. |
A user who lacks a .view permission does not see that menu item at all.
Record rules: what each person can see
Can see limits which leads, sales orders, tickets and projects people with the role see:
| Option | Meaning |
|---|---|
| All records | Everything. Default. |
| Records owned by their team | Records assigned to them or to anyone in their team. Teams come from CRM sales teams and helpdesk teams. |
| Only records assigned to them | Only what is assigned to the person themselves. |
If a person has several roles, the widest rule wins. Owners always see everything. The rule applies everywhere those records are listed: the lists themselves, global search and the Export button.
Example: give sales reps a "Sales rep" role with Only records assigned to them so each sees only their own leads and orders, and their manager a role with Records owned by their team.
API tokens and webhooks (in brief)
These screens are for connecting other software. They are explained fully in the API and integrations page of this guide.
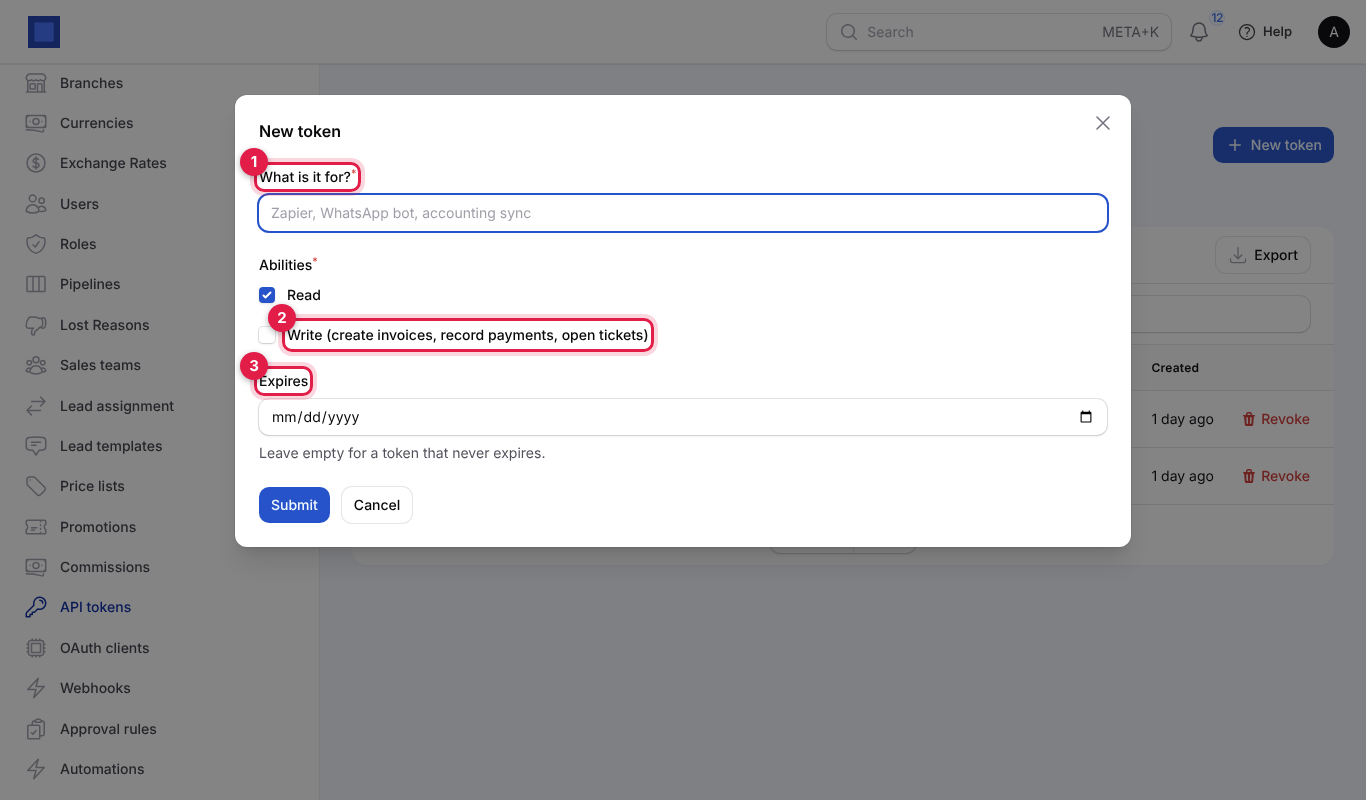
- Settings → API tokens: click New token, describe it in What is it for? (marker 1), choose Read and/or Write (create invoices, record payments, open tickets) (marker 2) and an optional Expires date (marker 3). The token is shown once in a message ("Token created. Copy it now: it will not be shown again."); copy it then. Send it as a Bearer header to the base URL shown on the page; an OpenAPI description link documents the API. Revoke removes a token.
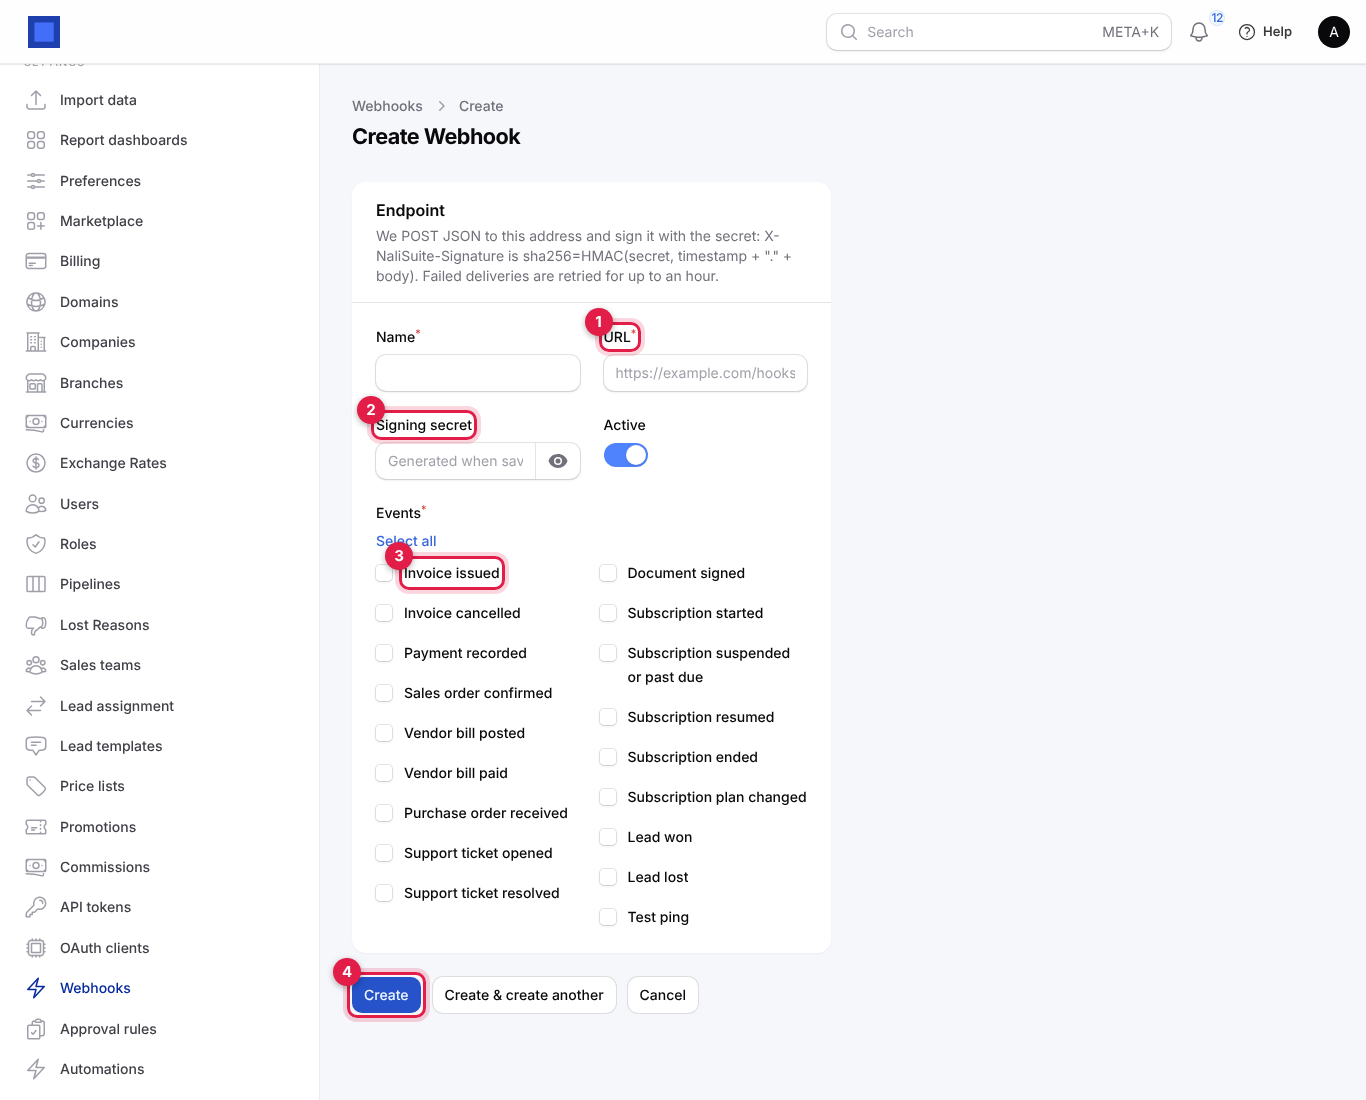
- Settings → Webhooks: send events to another system's address. Give a Name, the URL (marker 1), an optional Signing secret (marker 2; generated when saved if empty), tick the events (marker 3) such as Invoice issued, Payment recorded, Support ticket opened or Lead won, and click Create (marker 4). NaliSuite POSTs JSON to the URL, signed in the
X-NaliSuite-Signatureheader (sha256 HMAC of the timestamp, a dot and the body, with the secret); failed deliveries are retried for up to an hour. The URL must be a public web address: private and internal network addresses are refused, and redirects are not followed. Each webhook keeps a list of deliveries with Redeliver and Payload, and offers Send test ping.
- Settings → OAuth clients lets other applications connect on behalf of a user.
Send an idea, ask for an app or report a problem
Open your name in the top corner and choose Ideas and problems. Click Send an idea or report a problem and pick what it is:
| Choice | Use it for |
|---|---|
| Feature idea | Something the system should do that it does not do yet. |
| Request an app | An app you want in your workspace. Pick it under Which app?, or Something new, not in the list. |
| Report a problem | Something that is not working. Say what you did, what you expected and what happened. Page where it happened is filled in with the page you came from. |
Add up to three Screenshots (pictures of up to 5 MB each); on Windows press Win+Shift+S to take one. Click Send. The page lists everything your workspace has sent, its status (Received, Planned, In progress, Done or Not planned) and our answer, and we email you when we reply.
Common questions
I saved a preference but nothing changed for one company. That company has its own value. Pick the company at the top of Preferences, check the field and save, or clear the company-level value by setting it the same as the organisation.
Why can I not see the Google or Microsoft switches? Your provider has not set up that sign-in for the platform yet. Ask them.
Can I change a company's currency later? Only until accounting entries exist. After that, create a new company if you really need a different base currency.
How do I invite someone? Create their user under Settings → Users with a temporary password and send them the details yourself. There is no invitation email.
Someone left the company. What should I do? Delete their user under Settings → Users (or reset their password). Their records stay. If they used Google or Microsoft sign-in, also remove them there.
A colleague cannot see a menu item.
Their roles lack the .view permission for it, or the app is not part of your plan. Check their roles under Settings → Users and the role under Settings → Roles.
Test email says "Sending failed". Read the reason shown. Usually the username or password is wrong, the port and encryption do not match (587 with TLS, 465 with SSL), or the provider blocks the Send from address.