Logistics and Courier
Logistics and Courier runs a parcel, courier or delivery business from the counter to the customer's door. You set your zones and a rate card, book waybills priced from it, print a label with a QR code, move parcels between branches on line-haul loads, send them out on delivery runs, and let drivers record proof of delivery on their phone. Cash collected on delivery is tracked until you pay it over to the sender, and account customers are billed once a month. Receivers follow their parcel on a public tracking page. It is in the Logistics group of the sidebar: Shipments, Loads and runs, Cash on delivery, Zones and Rates, plus Me → My deliveries for drivers.
Logistics and Courier is a marketplace module. The owner switches it on under Settings → Marketplace (search for Logistics). It needs the Contacts and Invoicing apps, which every workspace has.
Note: Three permissions control this area. logistics.view shows the Logistics pages, logistics.manage books and changes shipments, loads, zones and rates and opens Cash on delivery, and logistics.deliver lets a driver record deliveries. Give drivers only logistics.deliver. Set permissions under Settings → Roles.
How it fits together
- Zones are the areas you serve, usually one per branch (Nairobi, Mombasa, Kisumu…), each with the towns and estates it covers.
- Rates set the price of each service from one zone to another. The same price applies in the other direction unless you add that direction separately.
- A shipment (waybill) is one consignment: sender, receiver, parcel details and who pays. Each gets a waybill number such as
WB-2026-000001and a tracking code such asP8YQQJ2NKM. - A line haul (load) carries shipments from one branch to another. A delivery run carries them from a branch to the receivers' doors. Both are numbered
MF-2026-00001and listed under Loads and runs. - Proof of delivery is the name of the person who received the parcel and, optionally, a photo.
- Cash on delivery (COD) is money the driver collects from the receiver for the sender, for example the price of goods the sender sold online. You pay it over to the sender later.
Set up your zones
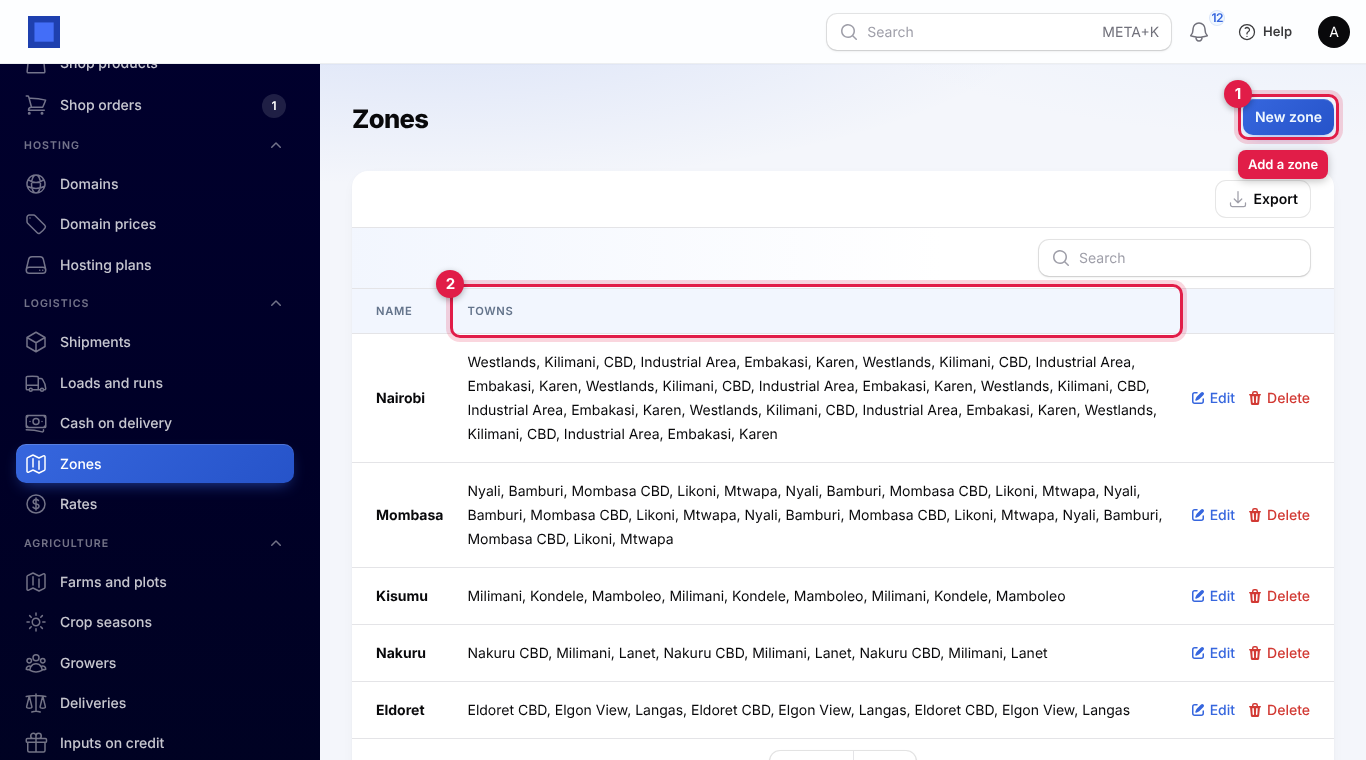
- In the menu, open Logistics → Zones.
- Click New zone (marker 1). The Towns column (marker 2) lists what each zone covers.
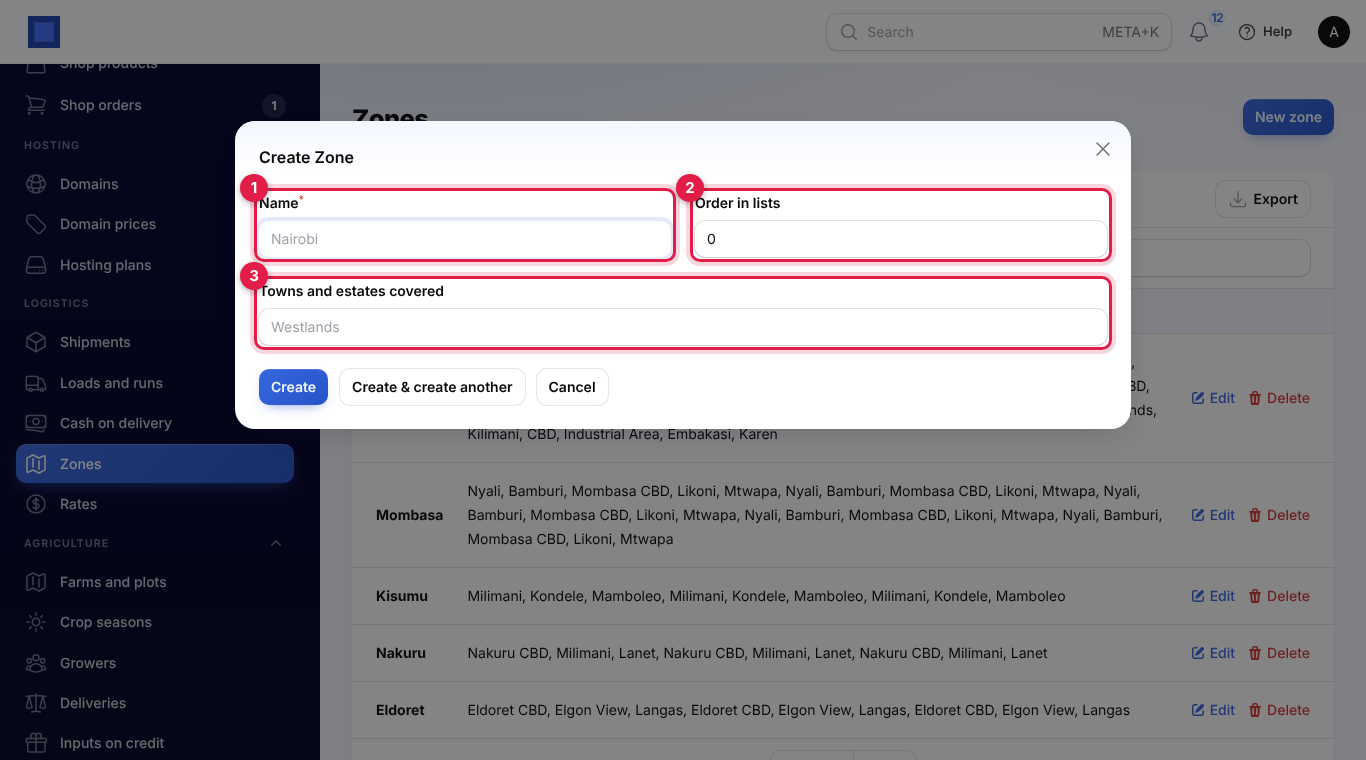
- Type the zone Name (marker 1), for example "Nairobi". Set Order in lists (marker 2) to control where it appears in drop-downs; lower numbers come first.
- Under Towns and estates covered (marker 3), type a town and press Enter for each one: Westlands, Kilimani, Embakasi…
- Click Create.
To change a zone, click Edit on its row. Delete removes a zone; do this only for zones you never used.
Build your rate card
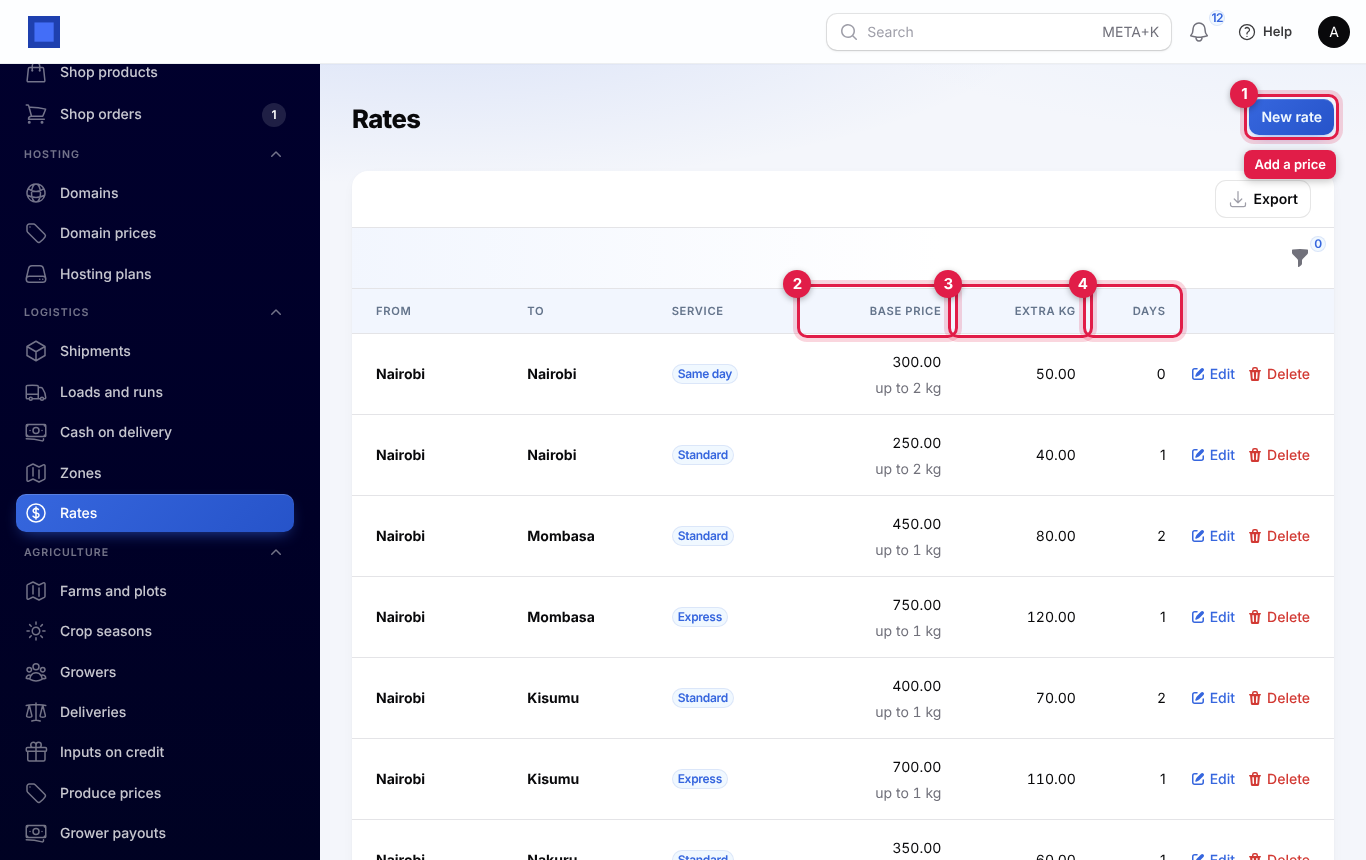
- In the menu, open Logistics → Rates.
- Click New rate (marker 1). Each row shows the Base price and the weight it covers (marker 2), the price for each Extra kg (marker 3) and the Days on the way (marker 4). Use the filter icon to show one Service only.
- Fill in the rate and click Create.
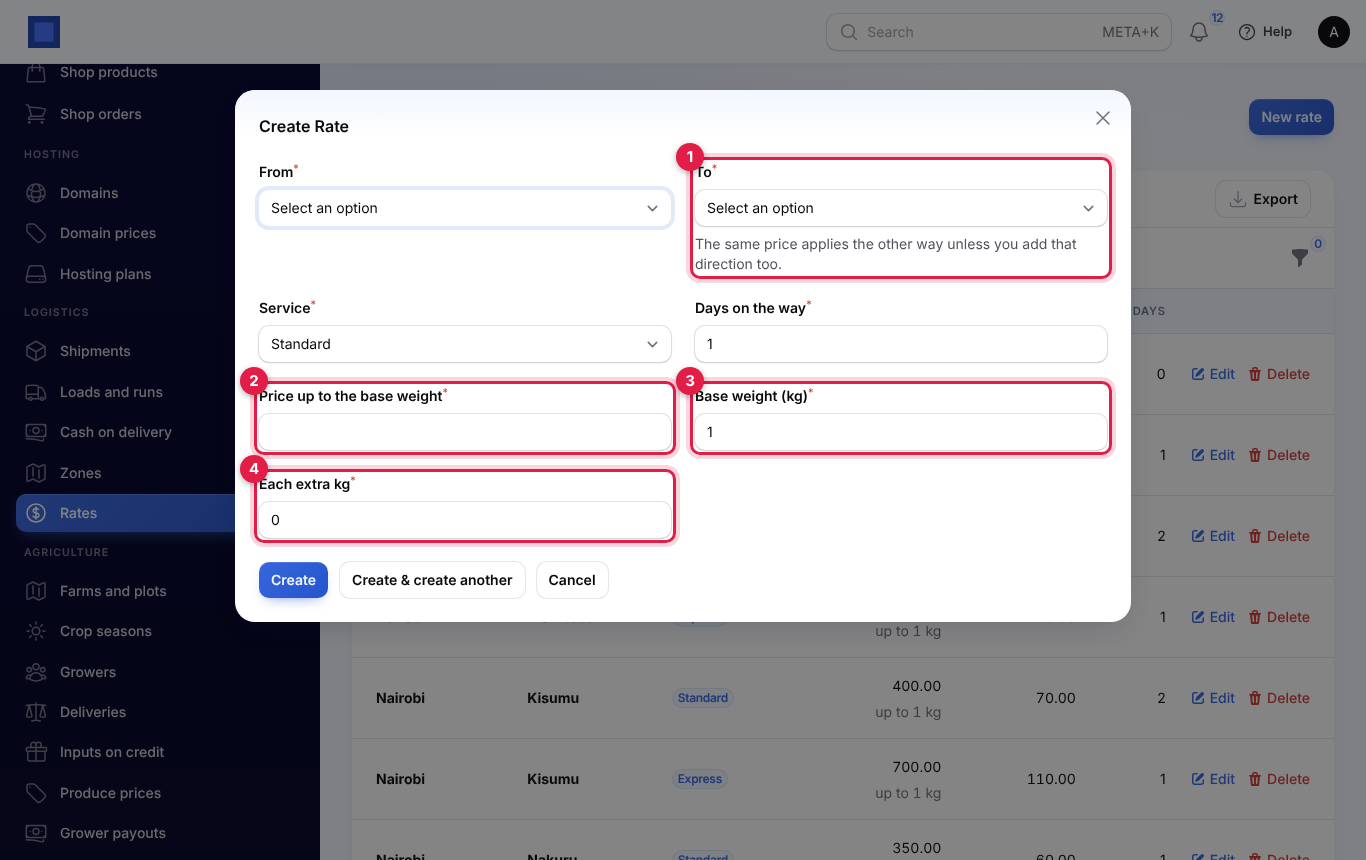
| Field | What to enter |
|---|---|
| From | Required. The zone the parcel leaves from. |
| To | Required (marker 1). The zone it goes to. Pick the same zone as From for deliveries within a town. The price also applies the other way unless you add that direction as its own rate. |
| Service | Required. Standard, Express or Same day. Add one rate per service you offer on that route. |
| Days on the way | Required. Used to work out the Expected by date the receiver sees on the tracking page. Same-day parcels are always expected today. |
| Price up to the base weight | Required (marker 2). The price for a parcel up to the base weight, for example KES 450. |
| Base weight (kg) | Required (marker 3). The weight the base price covers. Starts at 1. |
| Each extra kg | Required (marker 4). Added for each kilogram, or part of one, over the base weight. |
Example: Nairobi to Mombasa Standard is KES 450 up to 1 kg plus KES 80 for each extra kilogram. A 3 kg parcel costs 450 + 2 × 80 = KES 610. A 3.2 kg parcel counts as 3 extra kilograms (parts are rounded up), so it costs KES 690.
Tip: If you book a parcel on a route with no rate, you see "There is no standard rate between these zones yet. Add it under Logistics → Rates." You can still book it by typing the Charge yourself.
Courier settings
- In the menu, open Settings → Preferences.
- Click the Logistics and Courier tab.
- Change the settings and click Save preferences.
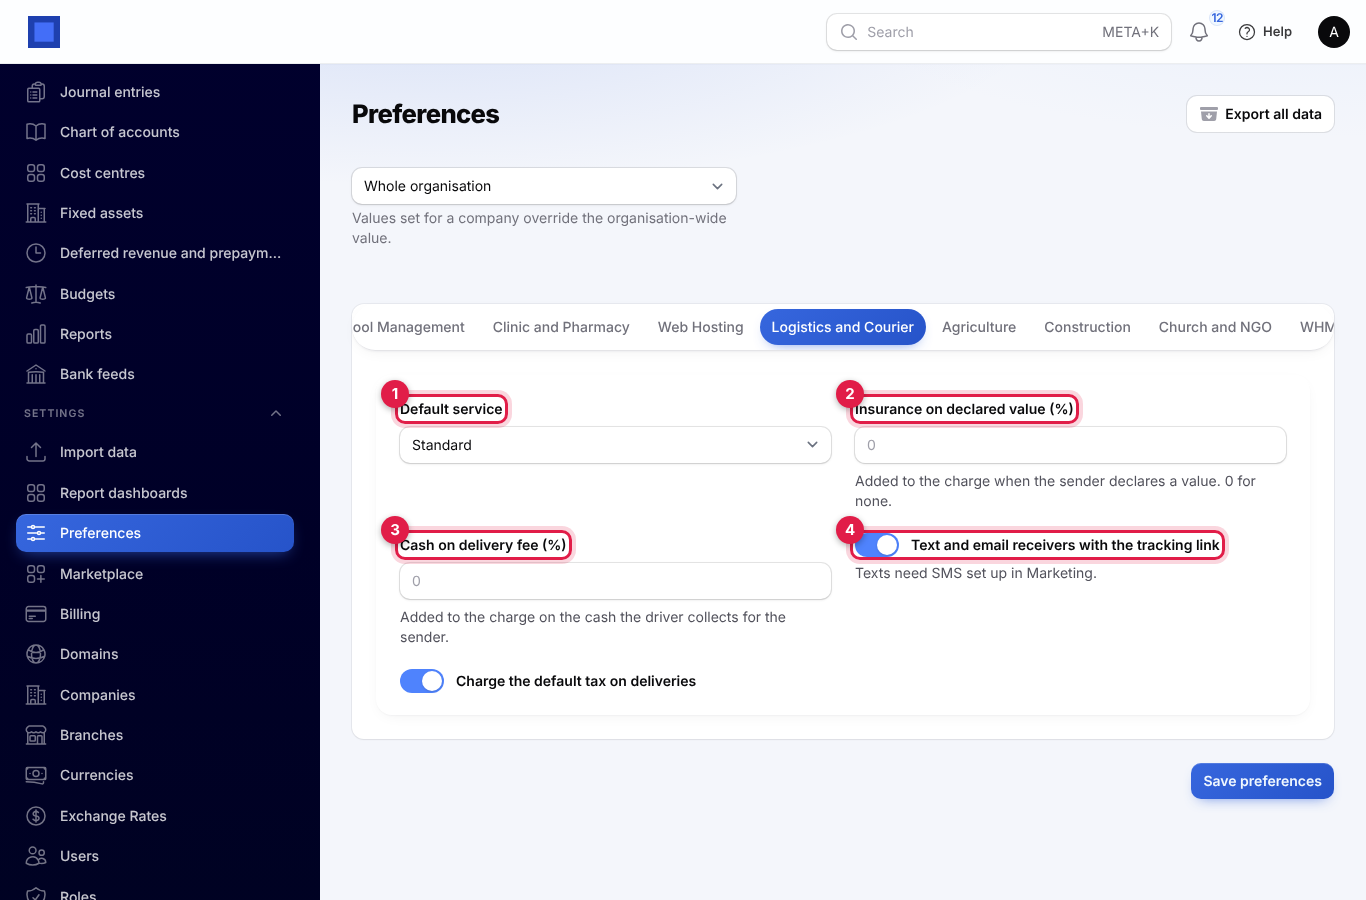
| Setting | Default | What it does |
|---|---|---|
| Default service (marker 1) | Standard | The service a new booking starts on. |
| Insurance on declared value (%) (marker 2) | 0 | Adds this percentage of the Declared value to the charge. 1% on a parcel declared at KES 8,500 adds KES 85. 0 for none. |
| Cash on delivery fee (%) (marker 3) | 0 | Adds this percentage of the cash on delivery amount to the charge, for handling the cash for the sender. |
| Text and email receivers with the tracking link (marker 4) | On | Sends receivers the tracking link at booking, when the parcel goes out for delivery and when it is delivered. Texts need SMS set up in Marketing; emails go when the receiver has an email address. |
| Charge the default tax on deliveries | On | Puts your default tax (for example VAT 16%) on every courier invoice. |
The dropdown at the top of Preferences sets different values for one company; company values override the organisation-wide ones.
Book a shipment
Book each parcel when it comes in at the counter or when a customer calls for a pick-up.
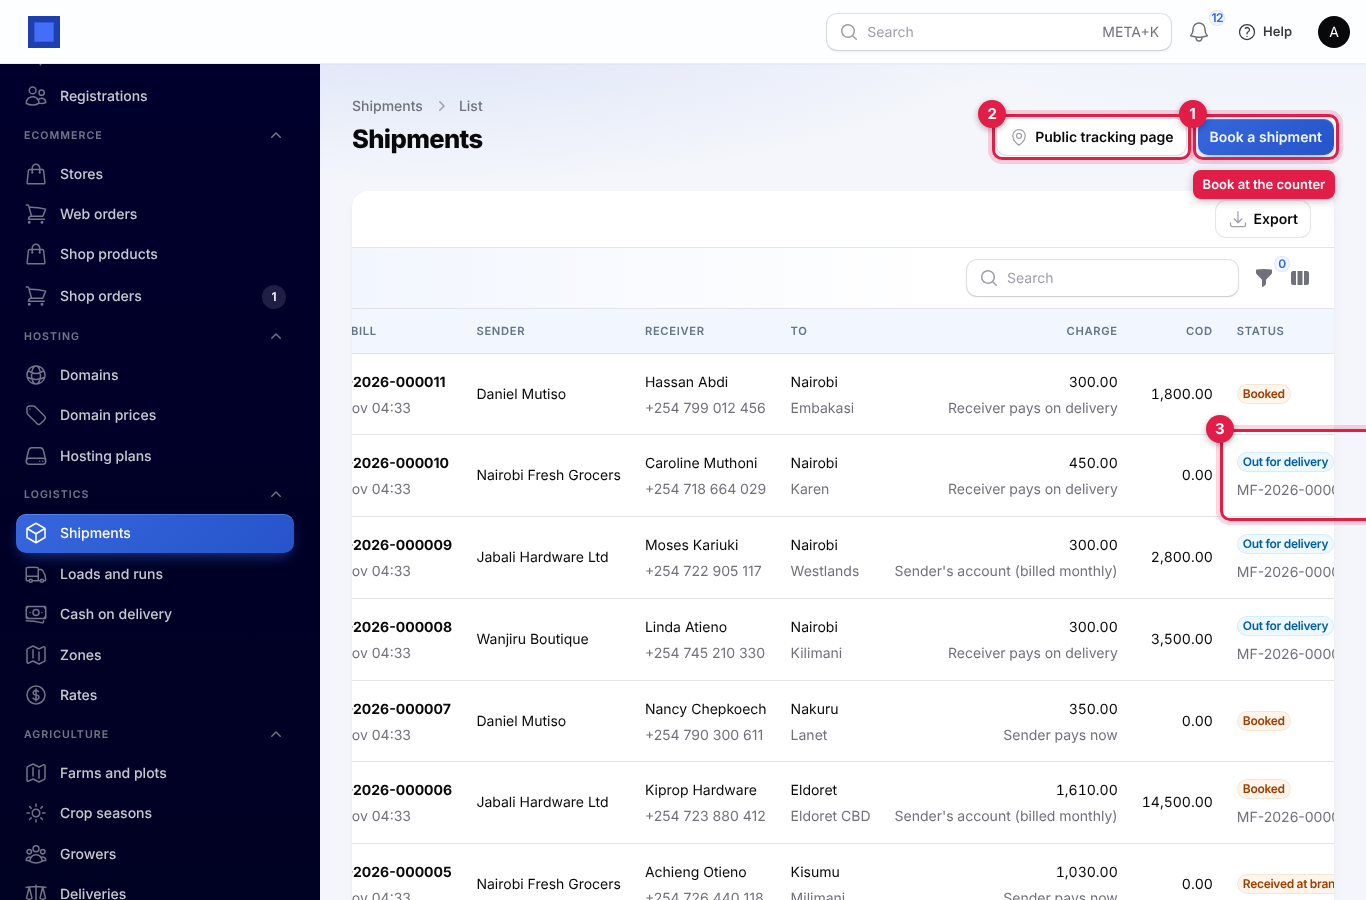
- In the menu, open Logistics → Shipments.
- Click Book a shipment (marker 1). Public tracking page (marker 2) opens the tracking page in a new tab so you can share its address. The Status badge (marker 3) shows where each parcel is, with the load or run it is on underneath.
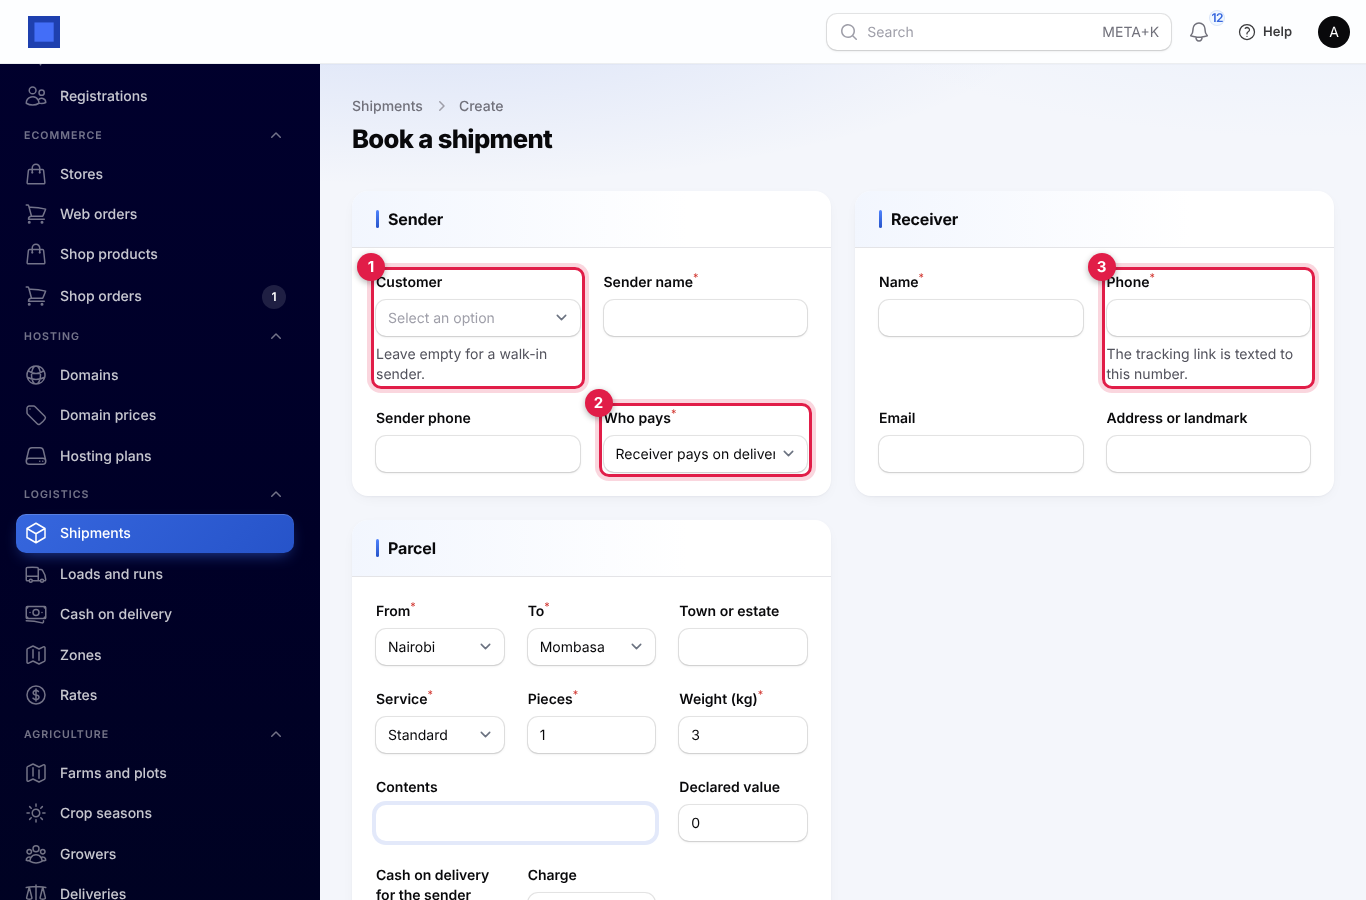
- Fill in the Sender section. Pick the Customer (marker 1) if the sender is one of your contacts; leave it empty for a walk-in and type the Sender name instead. Choose Who pays (marker 2).
- Fill in the Receiver section. Name and Phone (marker 3) are required: the tracking link is texted to this phone. Add an Email and an Address or landmark if you have them.
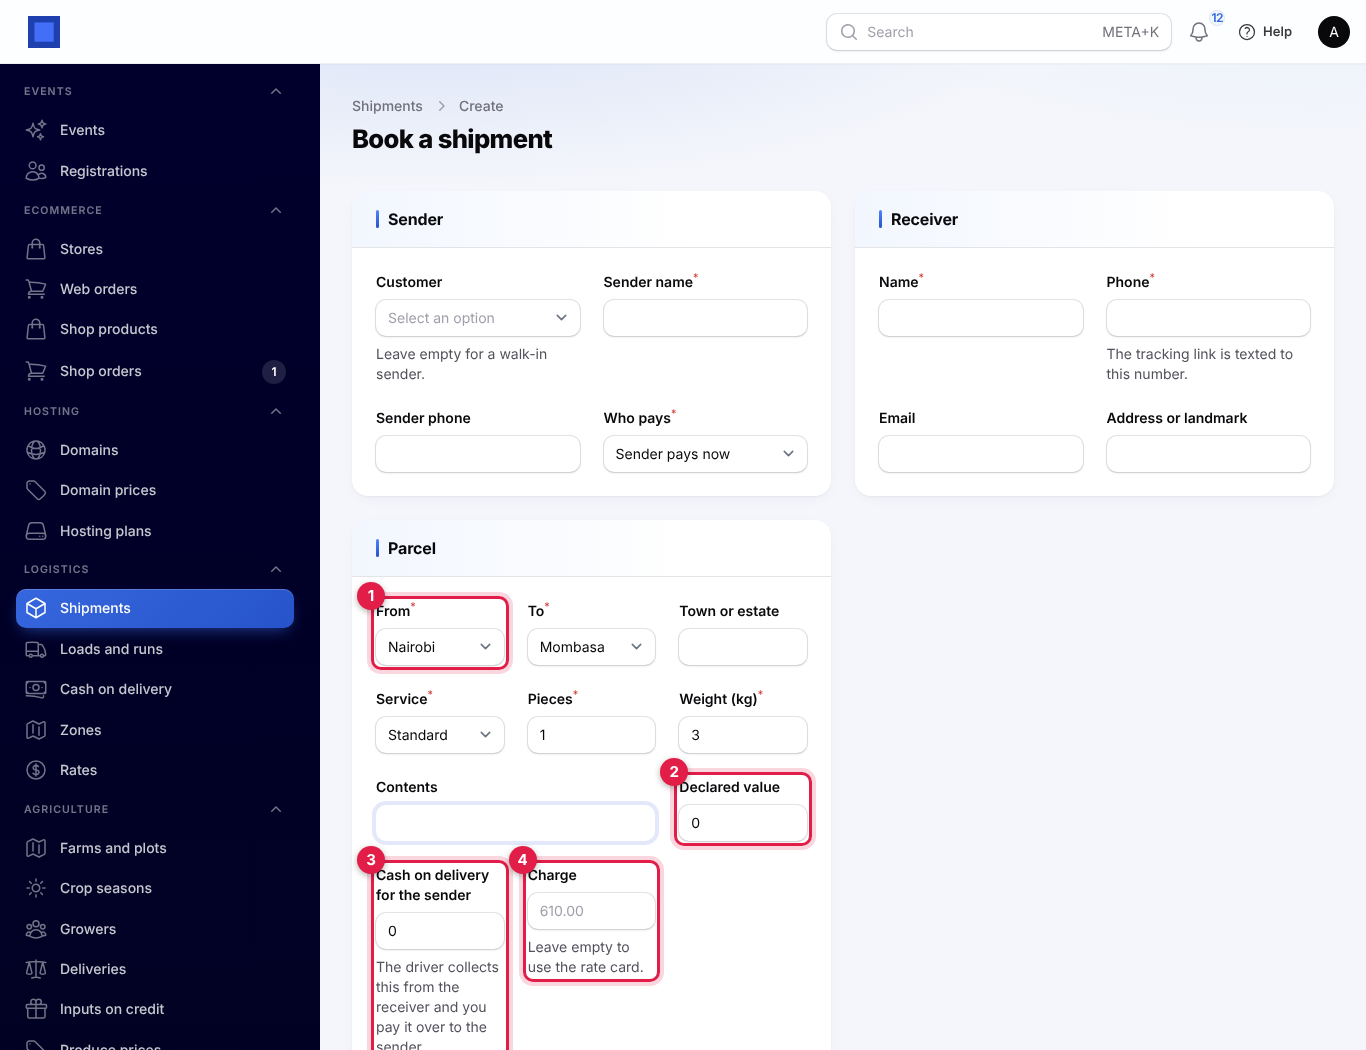
- Fill in the Parcel section: From and To (marker 1), the Town or estate, the Service, Pieces and Weight (kg), and what is inside under Contents.
- Enter the Declared value (marker 2) if the sender wants the parcel insured, and any Cash on delivery for the sender (marker 3).
- Look at Charge (marker 4). The grey figure is the price from the rate card for what you have filled in so far; it updates as you change the zones, service, weight, declared value and cash on delivery. Leave it empty to use that price, or type a different charge.
- Add any Notes and click Create.
Who pays
| Option | What happens |
|---|---|
| Sender pays now | When the sender is a customer contact, an invoice for the charge is issued at once and emailed to them. Take the payment as usual from Finance → Invoices. For a walk-in sender no invoice is made; take the cash at the counter through your till. |
| Receiver pays on delivery | The driver collects the charge at the door (together with any cash on delivery). When the delivery is recorded, the receiver is invoiced and the invoice is marked paid, by cash or mobile money. The receiver is saved as a contact (matched by phone). |
| Sender's account (billed monthly) | For regular senders such as shops and online sellers. You must pick the Customer. Nothing is invoiced at booking; on the 1st of each month one invoice per account customer lists all last month's waybills. |
After you click Create, the shipment is Booked, gets its waybill number and tracking code, and the receiver is texted and emailed: "Your parcel WB-… from … is on its way. Track it: …".
Note: After booking, the sender, who pays, the zones, service, weight, values and charge are locked. You can still correct the receiver's details, the town, the contents and the notes. If the price was wrong, cancel the waybill and book it again.
Work with a shipment
Click ⋮ on a shipment's row to see what you can do with it (on the shipment's own page, use the Actions button). Each action appears only when it applies.
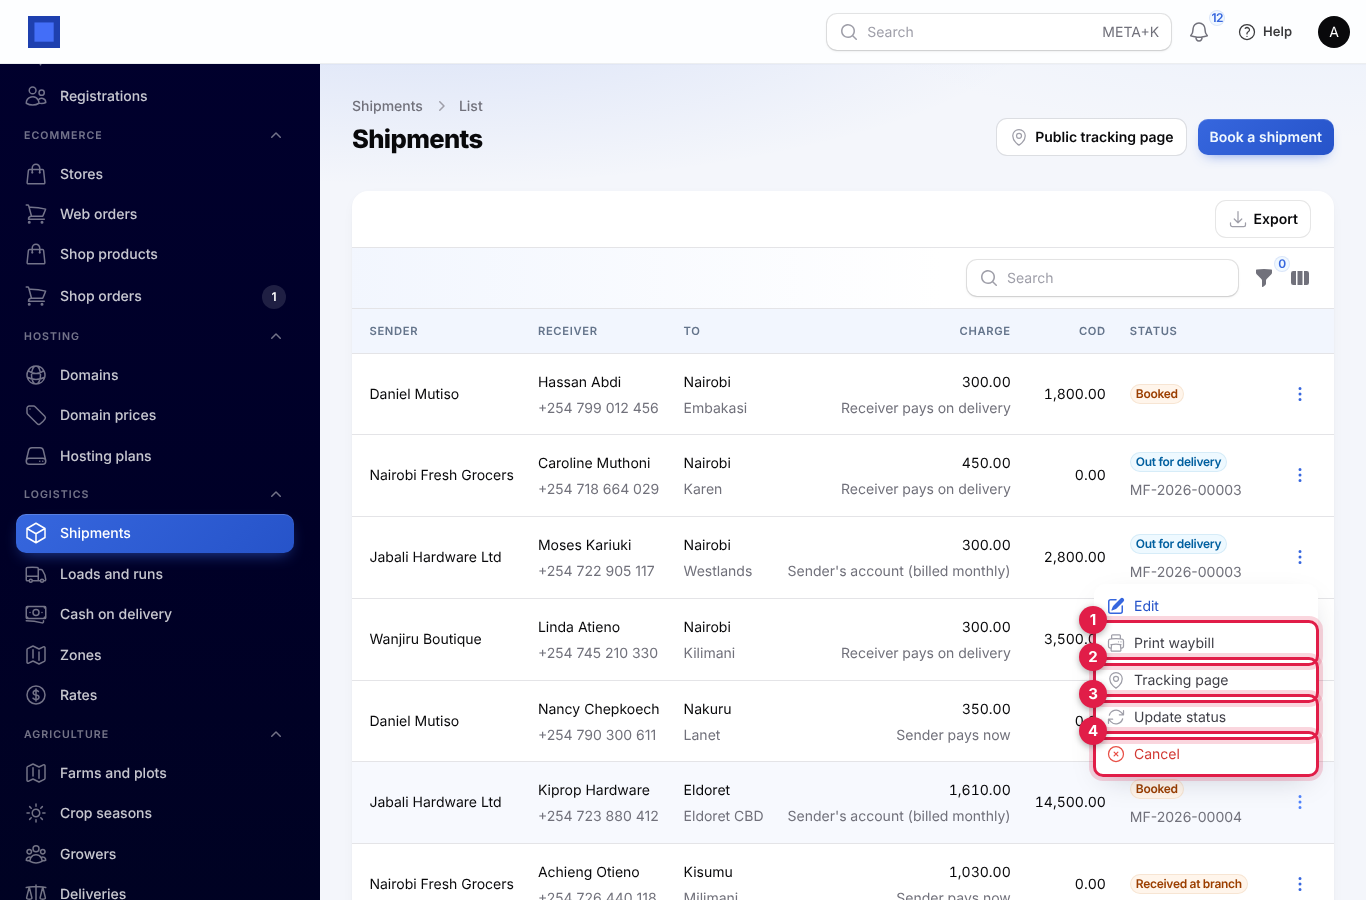
| Action | What it does |
|---|---|
| Edit | Opens the shipment with its Tracking history. |
| Print waybill (marker 1) | Opens the waybill as a PDF to print and stick on the parcel: waybill number, tracking code, from and to, sender and receiver, service, pieces, weight, contents, declared value, charge, any cash on delivery and To collect from the receiver, a Scan to track QR code and a Received in good order by (name and signature) box. |
| Tracking page (marker 2) | Opens this parcel on the public tracking page. Copy the address to send it to the sender or receiver. |
| Update status (marker 3) | Records a step by hand (see below). |
| Delivered | Records the delivery with proof (see Record a delivery). |
| Delivery failed | Records a failed attempt with the reason. |
| Return to sender | For a parcel at the destination branch or after a failed attempt that cannot be delivered. Asks you to confirm; the status becomes Returned to sender and the parcel comes off any load. |
| Cancel (marker 4) | Only while the parcel is Booked or Received at branch. Cancels the waybill and its unpaid invoice. |
Update the status by hand
Loads and runs move parcels on for you. Use Update status for anything else, for example when a walk-in parcel is checked in at the counter or a parcel is taken to the destination by another courier.
- Click ⋮ → Update status.
- Pick the new Status (marker 1), say Where it is (marker 2) and add a Note (marker 3) if useful.
- Click Submit. The step is added to the tracking history and the tracking page.
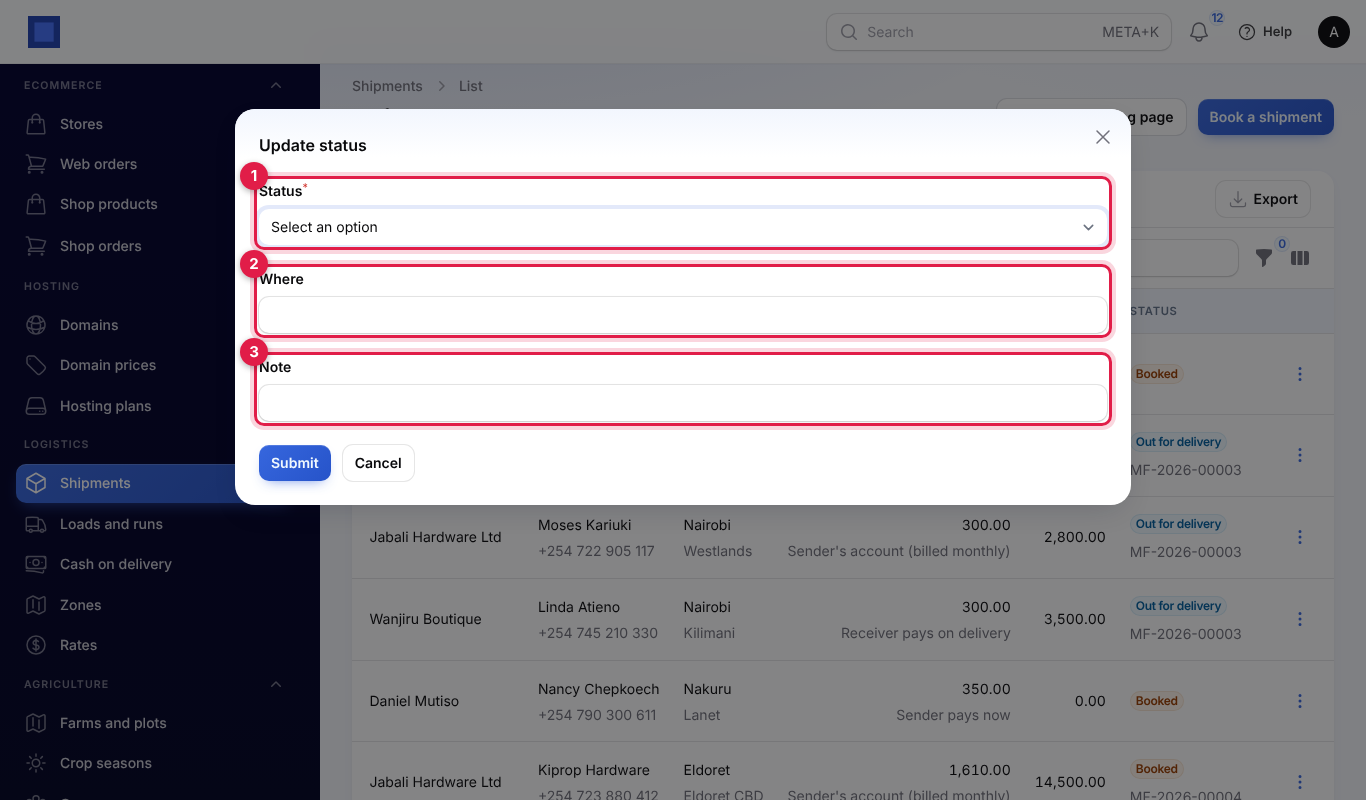
A parcel can only move forward in a sensible order. If you pick a step that does not follow, you see a message such as "WB-2026-000003 cannot go from "Booked" to "At destination branch"." Delivered is never set here: record it with Delivered and its proof.
Shipment statuses
| Status | What it means |
|---|---|
| Booked | Waybill created, parcel not yet checked in. |
| Received at branch | The parcel is at your counter or branch. |
| In transit | On a line haul between branches. |
| At destination branch | Unloaded at the destination branch, waiting for a delivery run. |
| Out for delivery | On a dispatched delivery run. The receiver has been told it is coming. |
| Delivered | Handed over, with proof of delivery. Final. |
| Delivery attempt failed | The driver could not hand it over. It can go out again or be returned. |
| Returned to sender | Sent back. Final. |
| Cancelled | The waybill was cancelled. Final. |
See a shipment's history
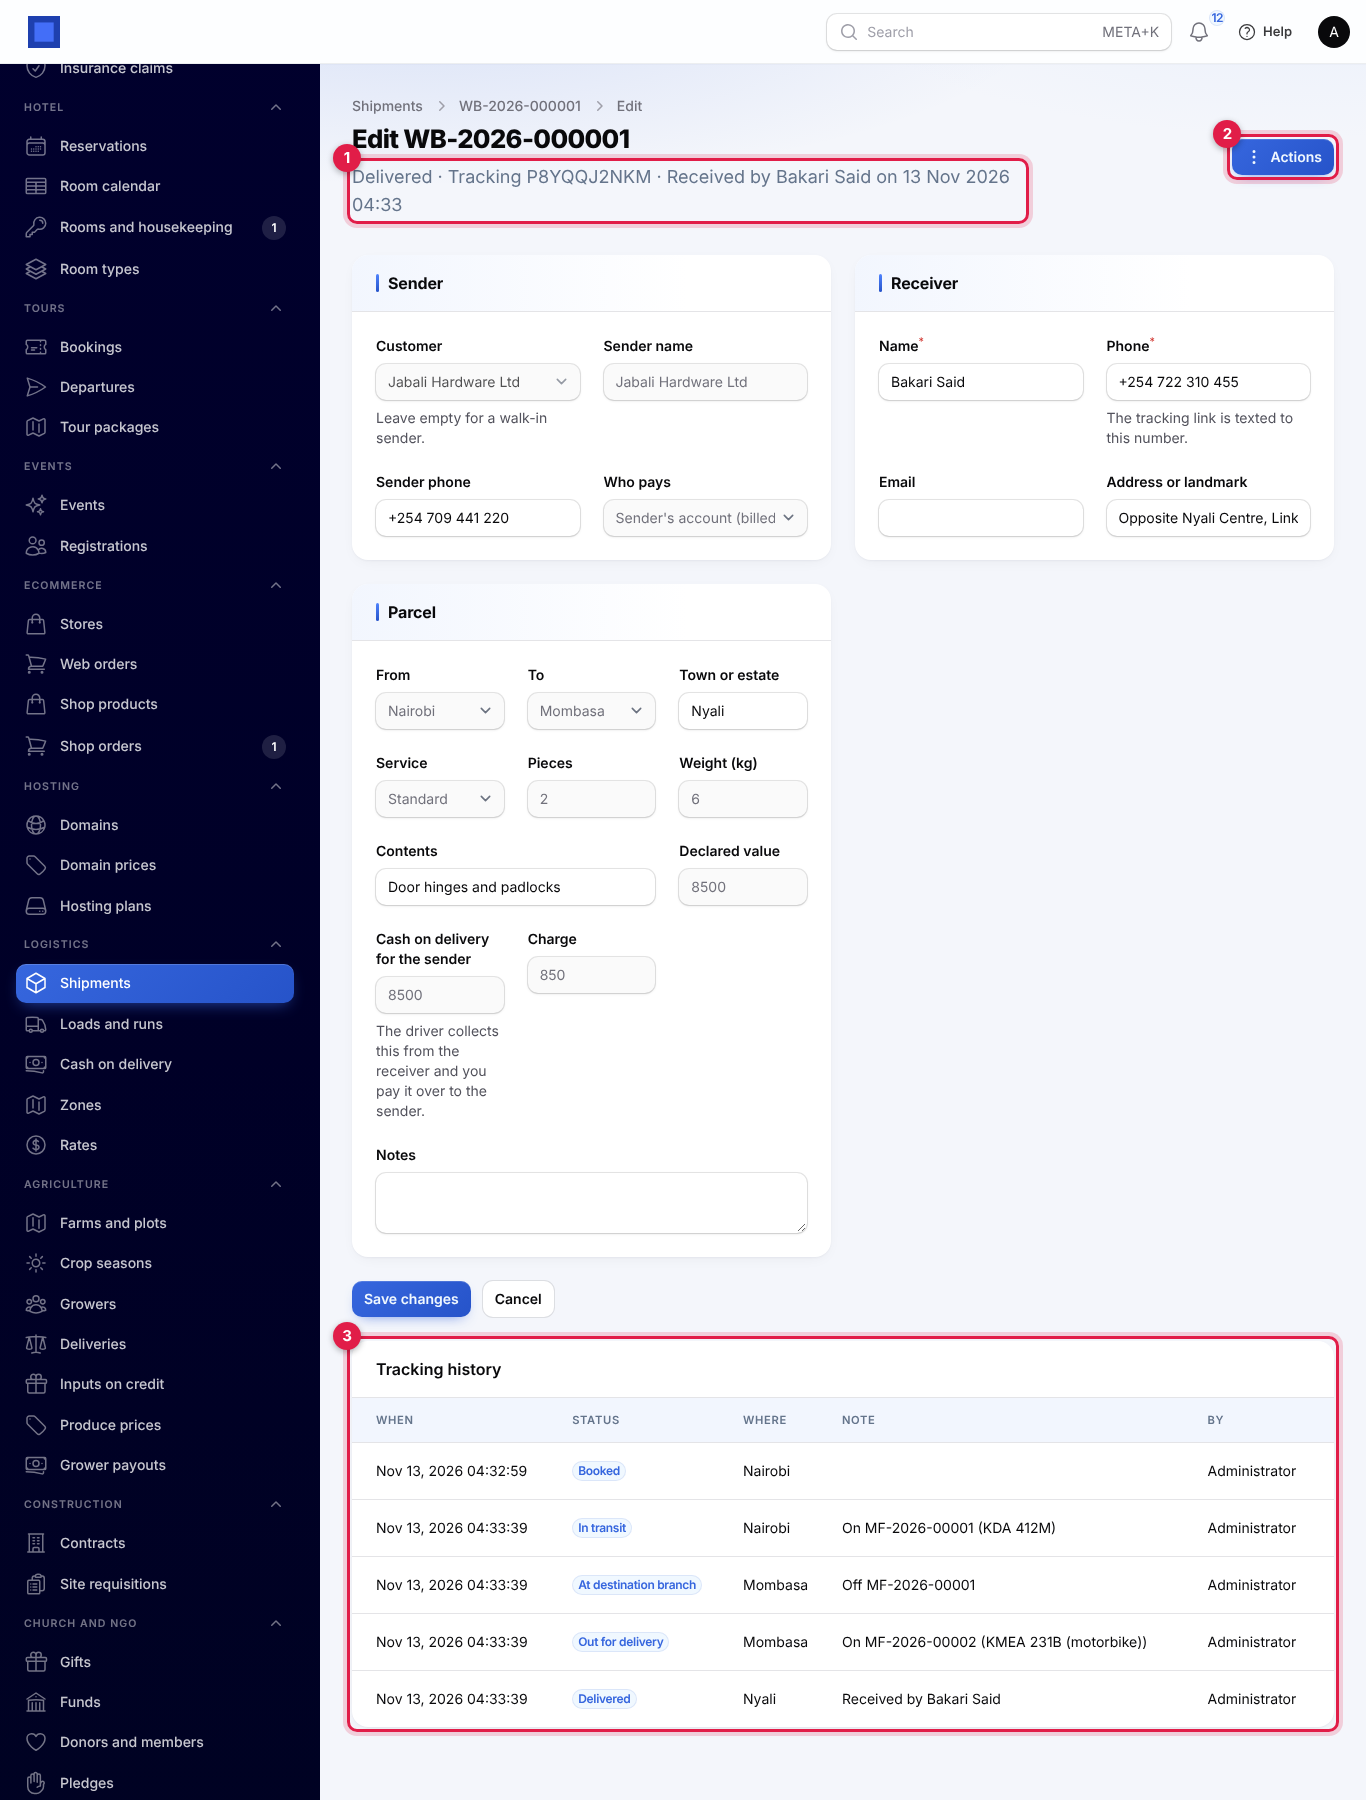
Click Edit on a row to open the shipment. The line under the title (marker 1) shows the status, the tracking code and, once delivered, who received it and when (or the reason for a failed attempt). Actions (marker 2) holds the same actions as the row. Tracking history (marker 3) lists every step with where it happened, any note and who recorded it.
The public tracking page
Your tracking page is at /track on your workspace address, for example https://yourbusiness.nalisuite.com/track. The link in each text and email, and the QR code on the waybill, open the parcel directly.
The receiver types the tracking code (marker 1; the waybill number alone is not accepted, because waybill numbers run in order and could be guessed) and clicks Track. They see the waybill number, the route and number of pieces, the current status (marker 2), "Expected by …" while it is on the way or "Delivered …, received by …" when done, and the journey (marker 3) with When, What happened and Where.
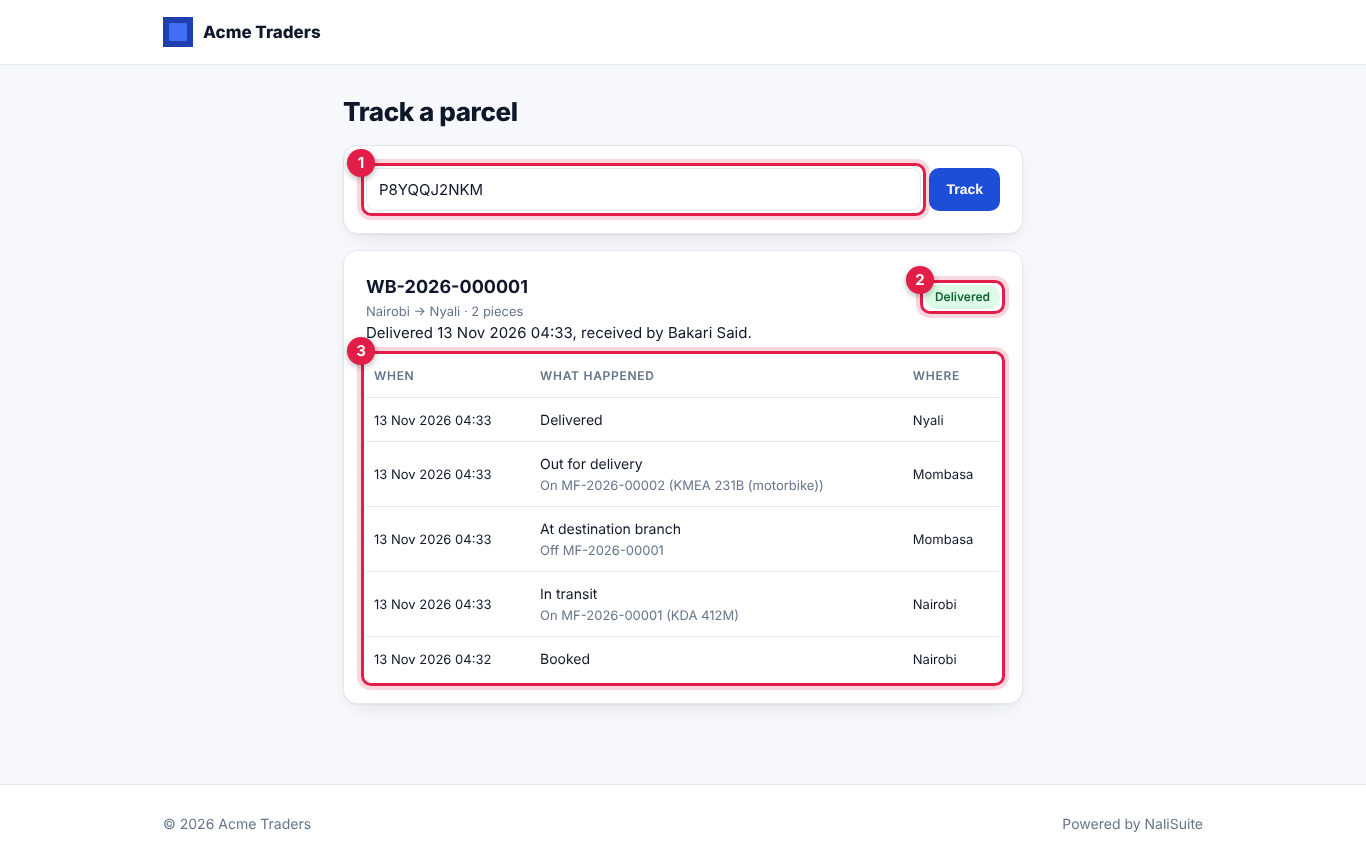
The tracking page never shows the receiver's phone, address or the sender's details. If the code is wrong it says "We could not find that parcel. Check the code on your text or waybill."
Move parcels between branches (line haul)
- In the menu, open Logistics → Loads and runs.
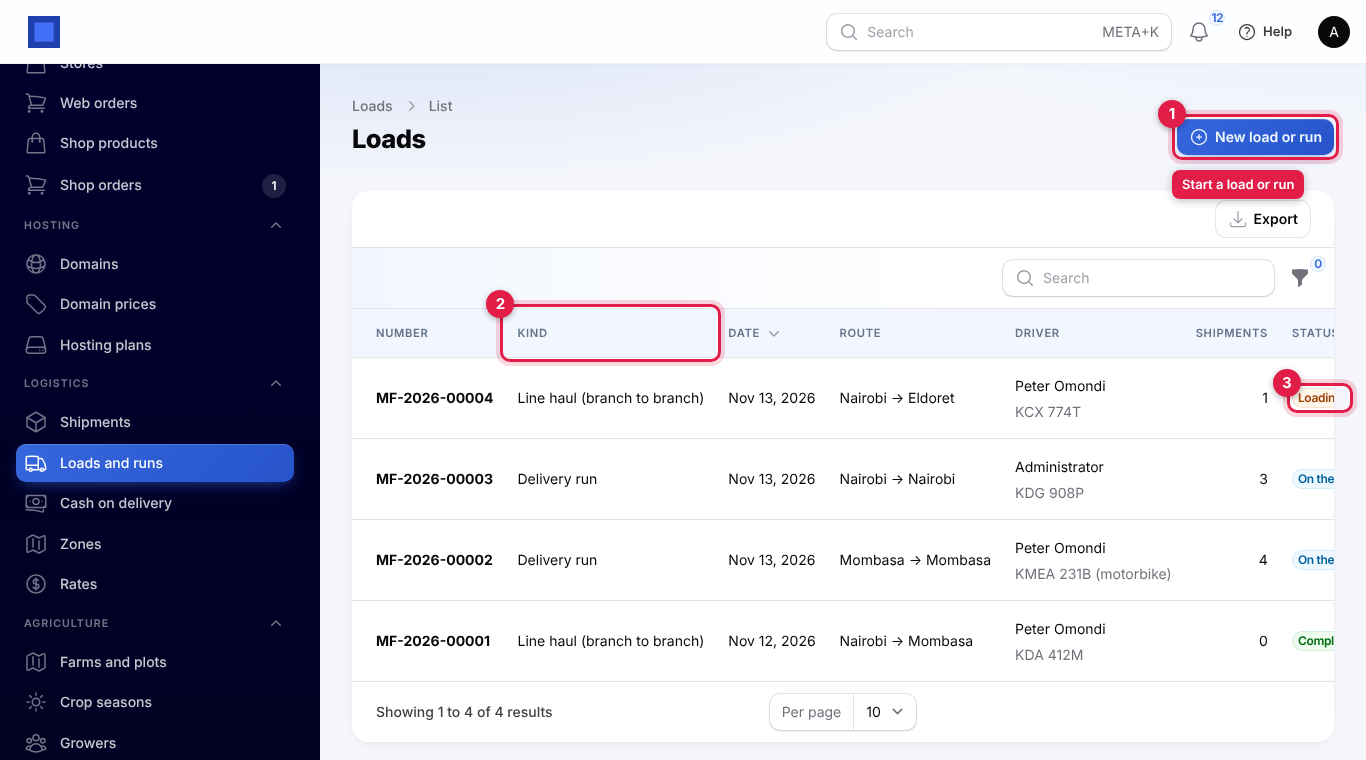
- Click New load or run (marker 1). The Kind column (marker 2) shows line hauls and delivery runs, and the badge (marker 3) shows Loading, On the road or Completed.
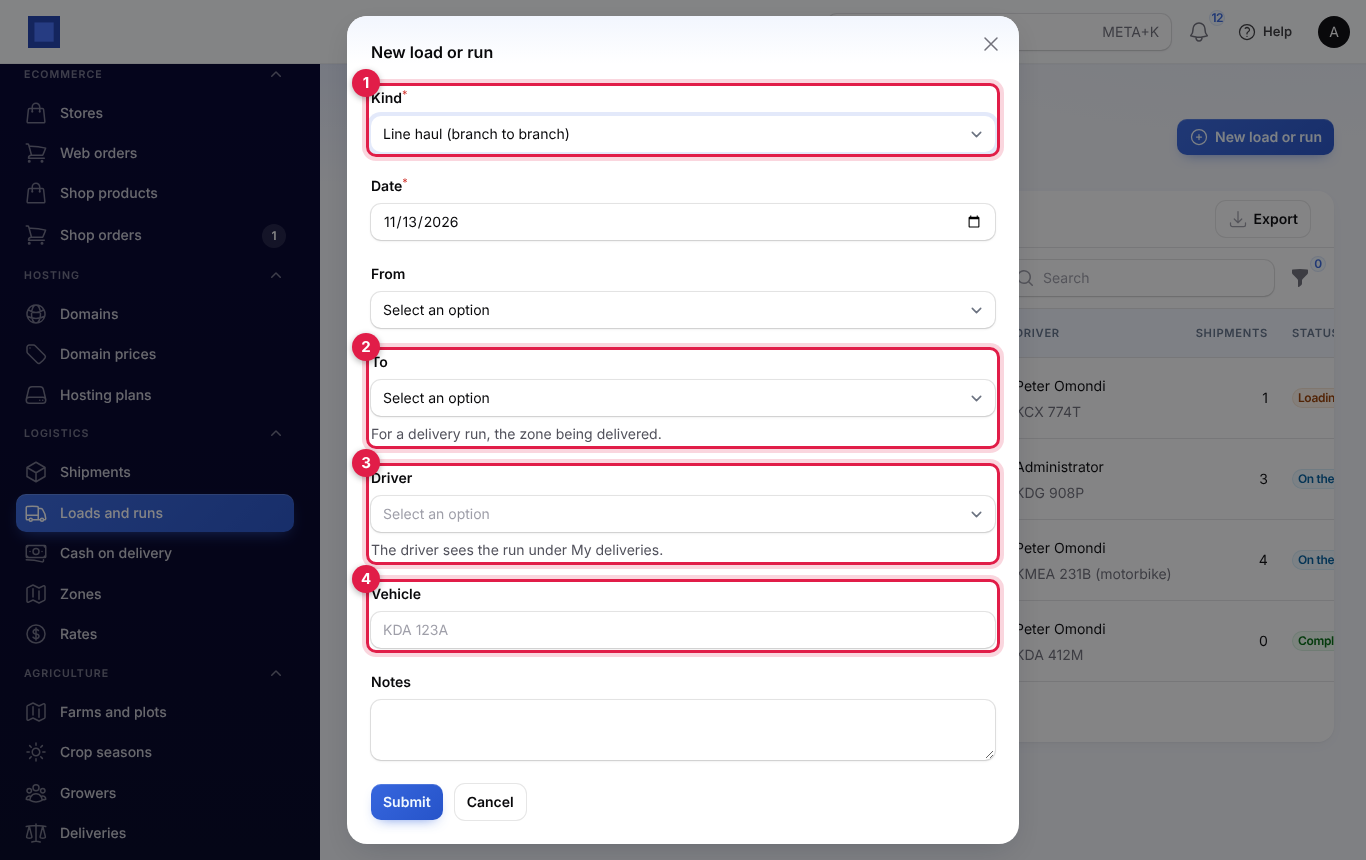
- Set Kind (marker 1) to Line haul (branch to branch), the Date, From and To (marker 2), the Driver (marker 3) and the Vehicle registration (marker 4). Add any Notes and click Submit.
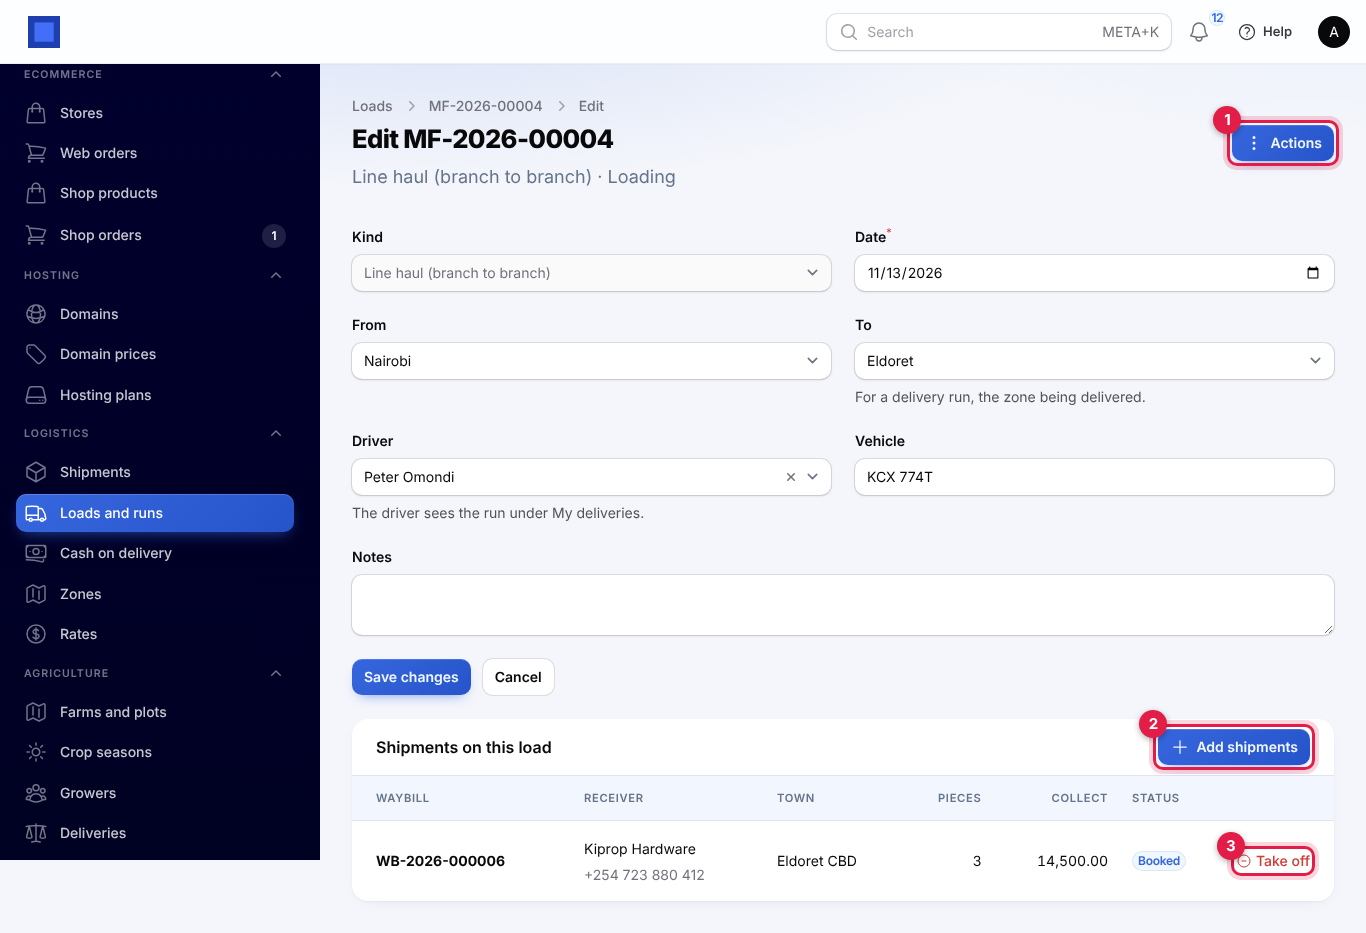
- The load opens. Under Shipments on this load, click Add shipments (marker 2). To take a shipment off before the vehicle leaves, click Take off on its row (marker 3).
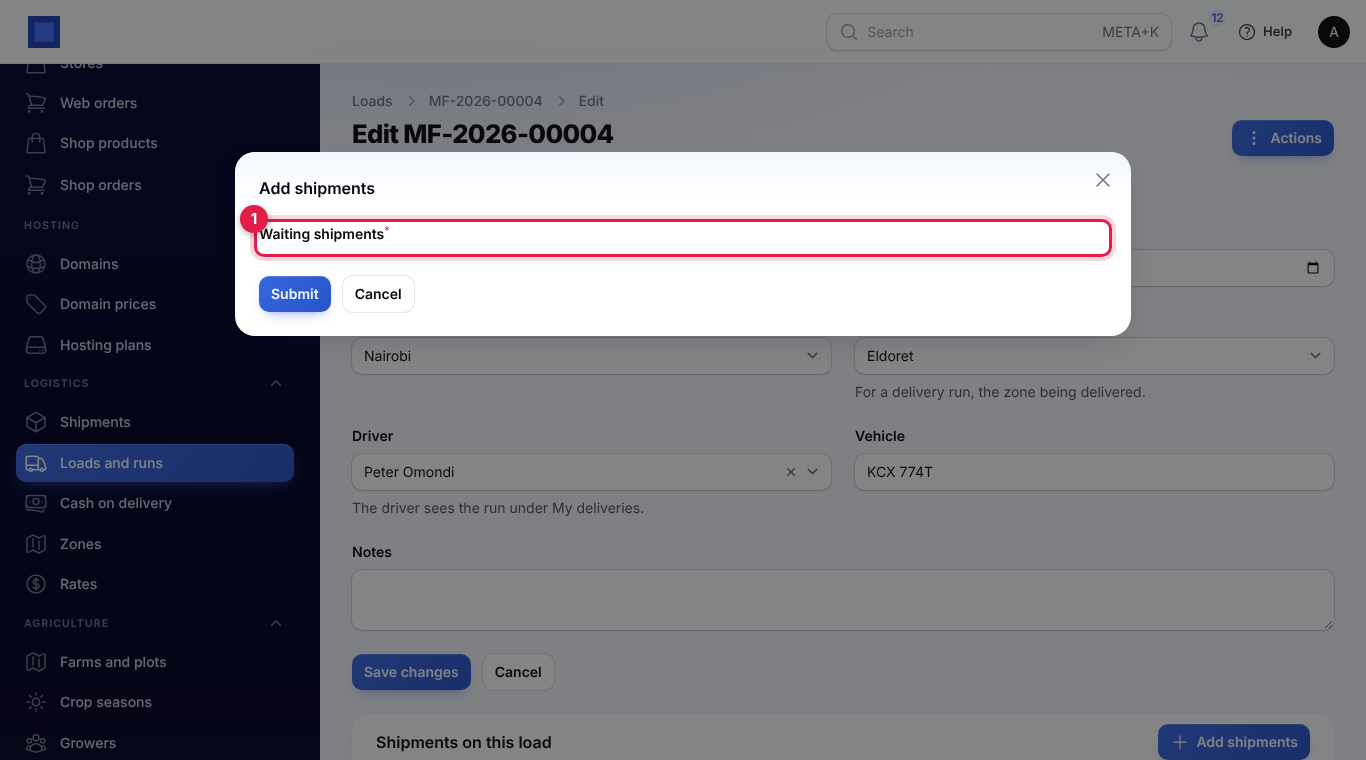
- Tick the Waiting shipments to put on the vehicle (marker 1). Select all ticks them all. Click Submit.
A line haul offers shipments that are Booked, Received at branch or At destination branch, going to the load's To zone, and not already on another load. 6. When the vehicle leaves, click Actions (marker 1 in the load screenshot) and then Dispatch (marker 2 below). Confirm. Every shipment on it becomes In transit.
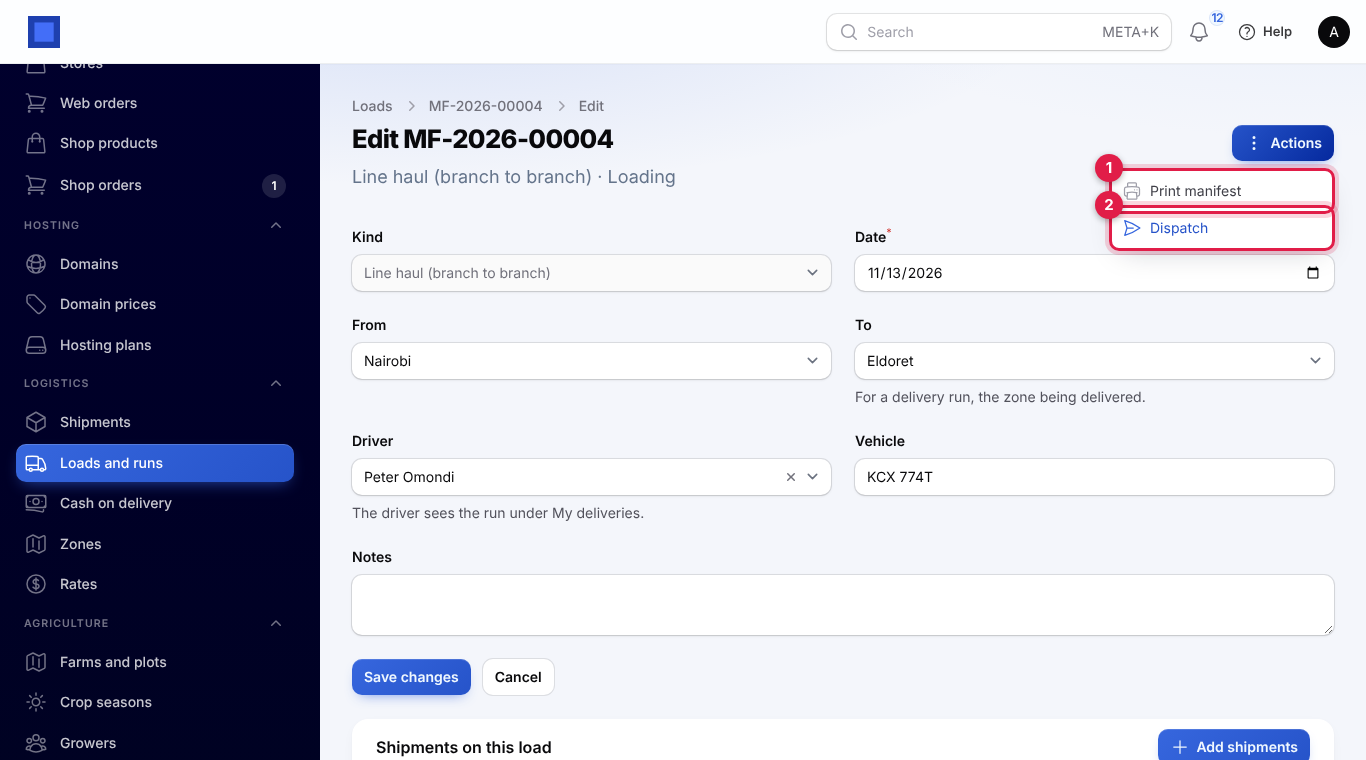
- When it reaches the other branch, open it again and click Actions → Arrived. Confirm. Every shipment becomes At destination branch, ready for a delivery run, and the load is Completed.
Print manifest (marker 1) opens the load sheet as a PDF: the manifest number, route, date, driver and vehicle, each waybill with receiver, destination, pieces and weight, and signature lines.
Send parcels out for delivery (delivery run)
- On Logistics → Loads and runs, click New load or run.
- Set Kind to Delivery run, pick the zone being delivered under To, and pick the Driver. The driver sees the run under Me → My deliveries. Click Submit.
- Click Add shipments. A delivery run offers shipments At destination branch, those back from a failed attempt, and local parcels (booked within one zone) that are Booked or Received at branch.
- Click Actions → Print manifest to give the driver the Delivery run sheet: each drop with the receiver and the Collect amount, and the total Cash to collect.
- When the driver leaves, click Actions → Dispatch and confirm. Every shipment becomes Out for delivery and each receiver is texted and emailed "Your parcel … is out for delivery today", with the amount to have ready when there is one.
The run closes itself (Completed) when no parcel on it is still out for delivery. Parcels that failed come off the run so they can go on the next one.
Record a delivery on the phone
Drivers open Me → My deliveries on their phone. It lists every parcel on their dispatched runs, with the receiver and waybill, the Phone (marker 1, tap it to call the receiver), the address and town, the pieces and the amount to Collect (marker 2): the delivery charge when the receiver pays, plus any cash on delivery.
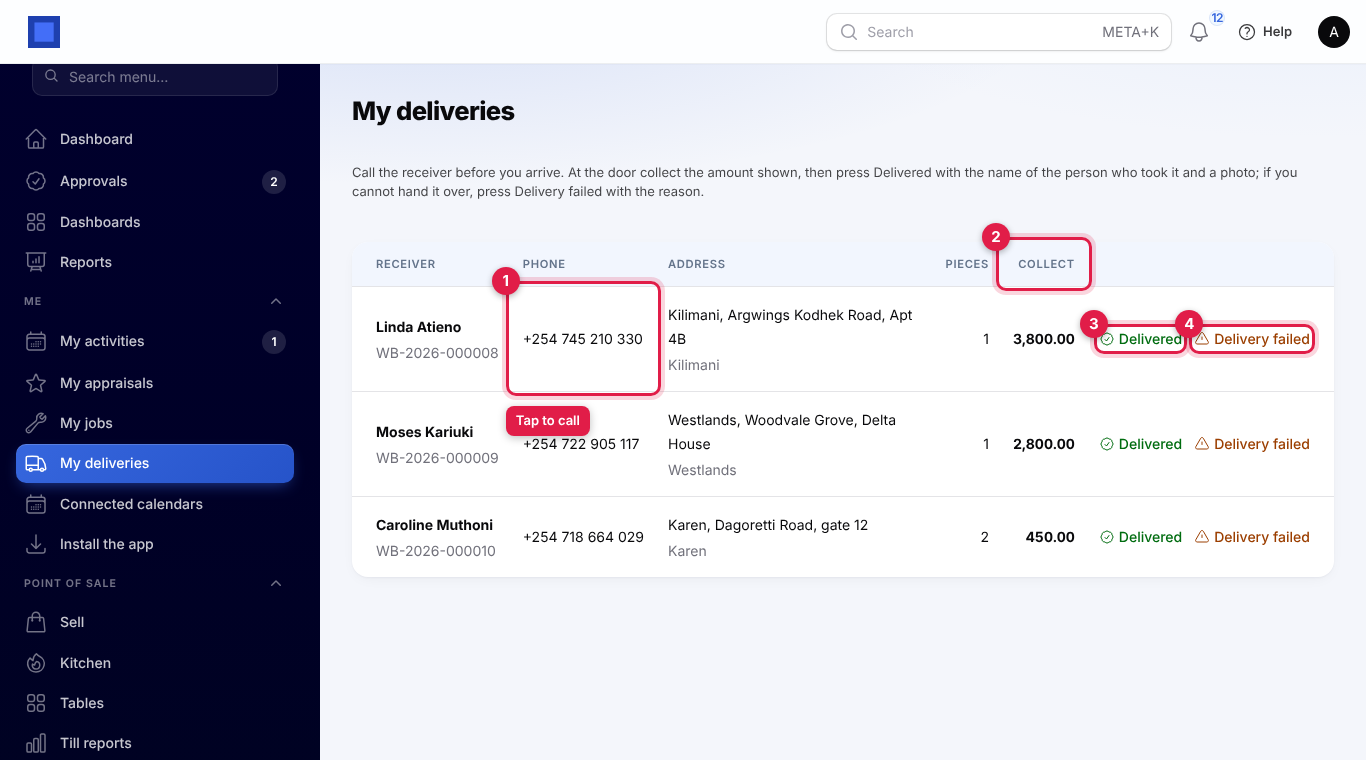
At the door:
- Collect the amount shown.
- Tap Delivered (marker 3 above).
- The window says how much to collect (marker 1), or "Nothing to collect." Check Received by (marker 2): it starts on the receiver's name; change it if someone else took the parcel.
- Add a Photo of the signed waybill or the parcel at the door (marker 3). On a phone this opens the camera.
- If money was collected, pick how it was Paid by (marker 4): Cash or Mobile money.
- Tap Submit.
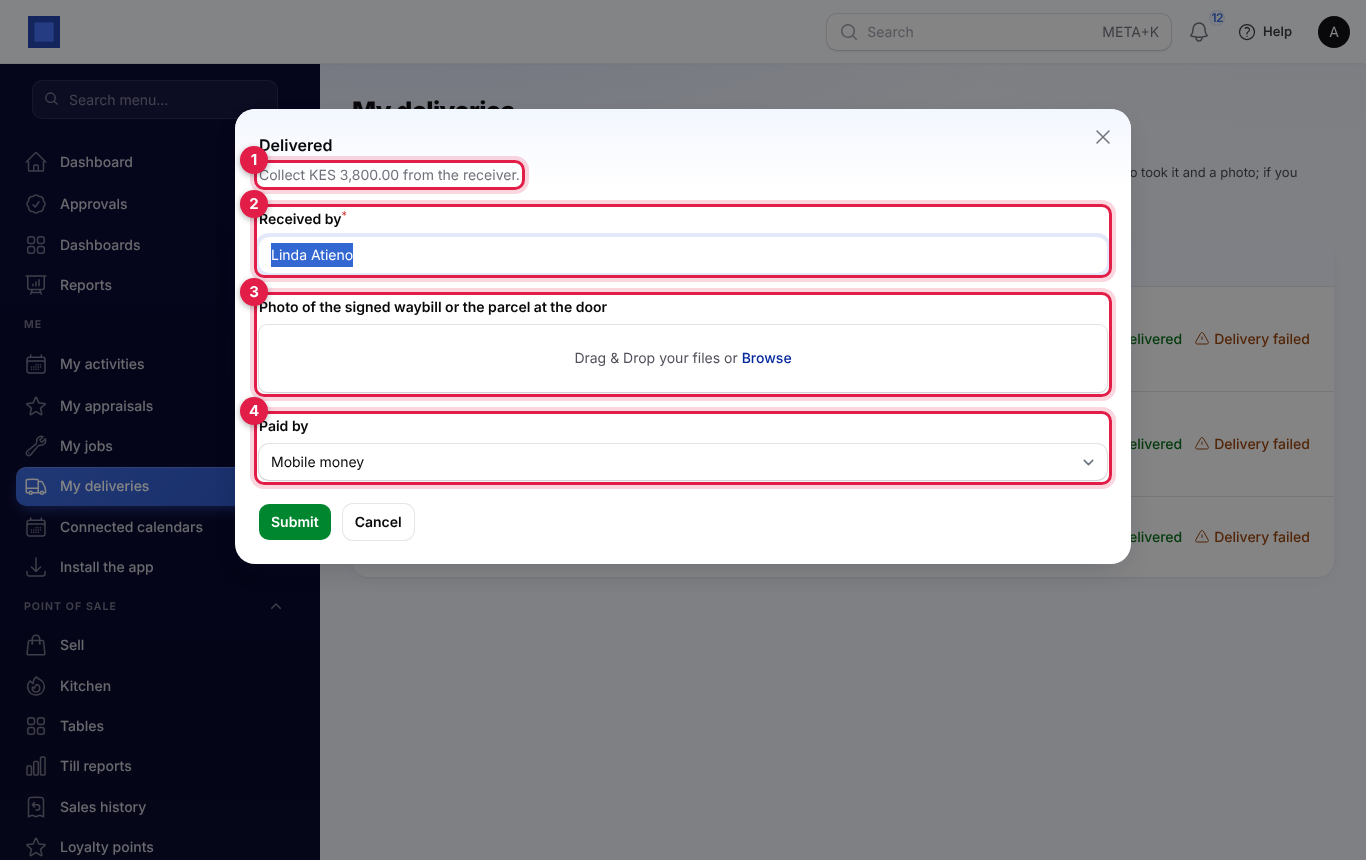
What happens:
- The parcel becomes Delivered with the receiver's name, the time and the photo.
- When the receiver pays the charge, an invoice is issued to them and marked paid with the method chosen.
- Any cash on delivery is recorded as collected and appears under Logistics → Cash on delivery.
- The receiver gets "Your parcel … was delivered to …. Thank you."
If the parcel cannot be handed over, tap Delivery failed (marker 4 in the list screenshot), pick the Reason (Receiver not available, Receiver refused the parcel, Wrong or incomplete address, Could not pay or Phone off or not answered) and tap Submit. Everyone with logistics.manage gets a "Delivery failed" notification with an Open button (switch it off under Notification settings if you do not want it, under Failed deliveries). The parcel can go on another run or be returned with Return to sender.
Tip: Staff can also record a delivery from the shipment's ⋮ menu, for example when a receiver collects the parcel at the branch. Delivered is offered for parcels At destination branch too.
Pay cash on delivery over to senders
- In the menu, open Logistics → Cash on delivery. The cards at the top (marker 1) show how much is owed to each sender and for how many parcels.
- The table lists each delivered parcel whose cash was collected but not yet paid over, grouped by sender, with the Amount (marker 3) and a total per sender.
- Pay the sender by M-Pesa, bank or cash as you normally do.
- Click Paid over on a row (marker 2) and confirm, or tick several rows and use Mark as paid over from the bulk actions. The rows leave the list.
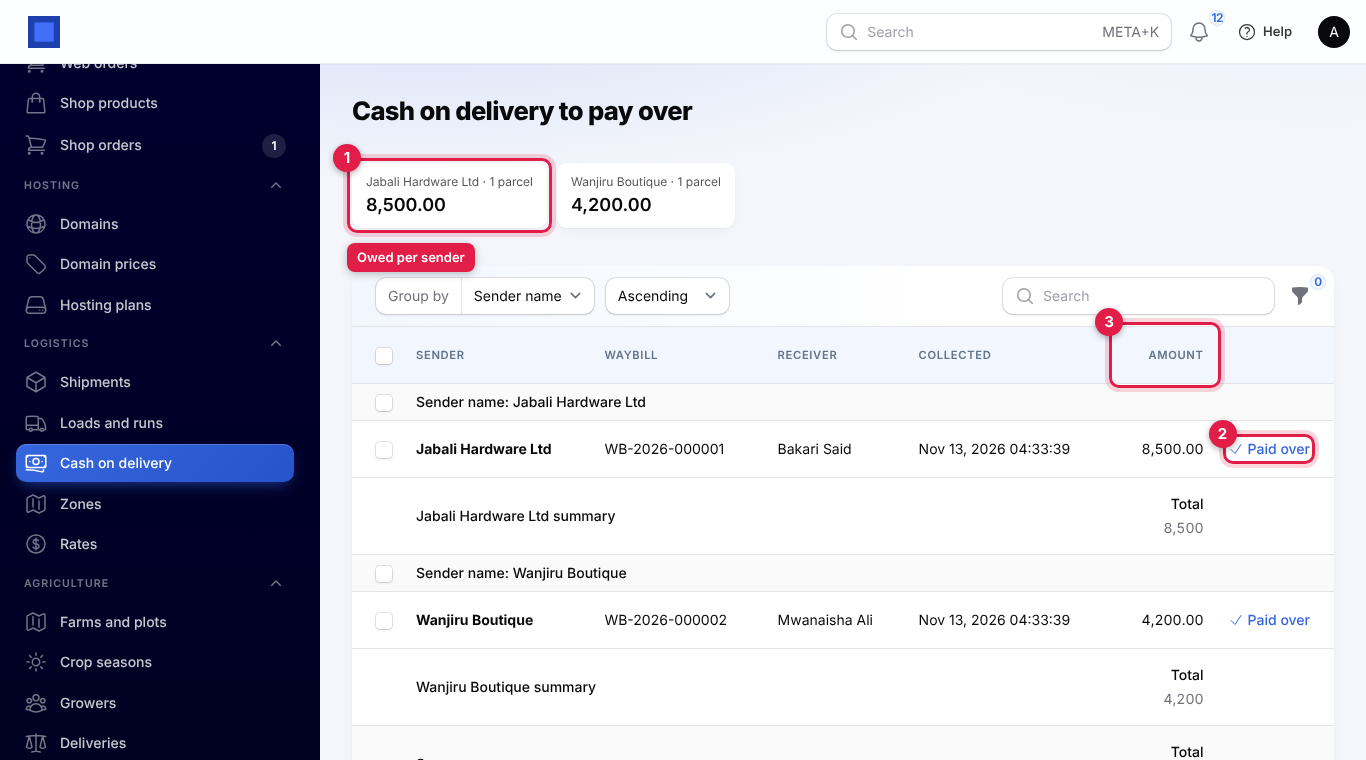
Note: Mark as paid over only records that you have paid; it does not send money or post an accounting entry. Record the payment out in your books as you usually do.
Monthly invoices for account customers
On the 1st of each month, NaliSuite raises one invoice per account customer for all of last month's shipments booked as Sender's account (billed monthly) that were not cancelled. Each waybill is a line, for example "WB-2026-000006, 13 Nov, to Eldoret CBD (Kiprop Hardware), 18 kg", at its charge. The invoice is issued and emailed to the customer. Find these invoices under Finance → Invoices.
What senders see in the customer portal
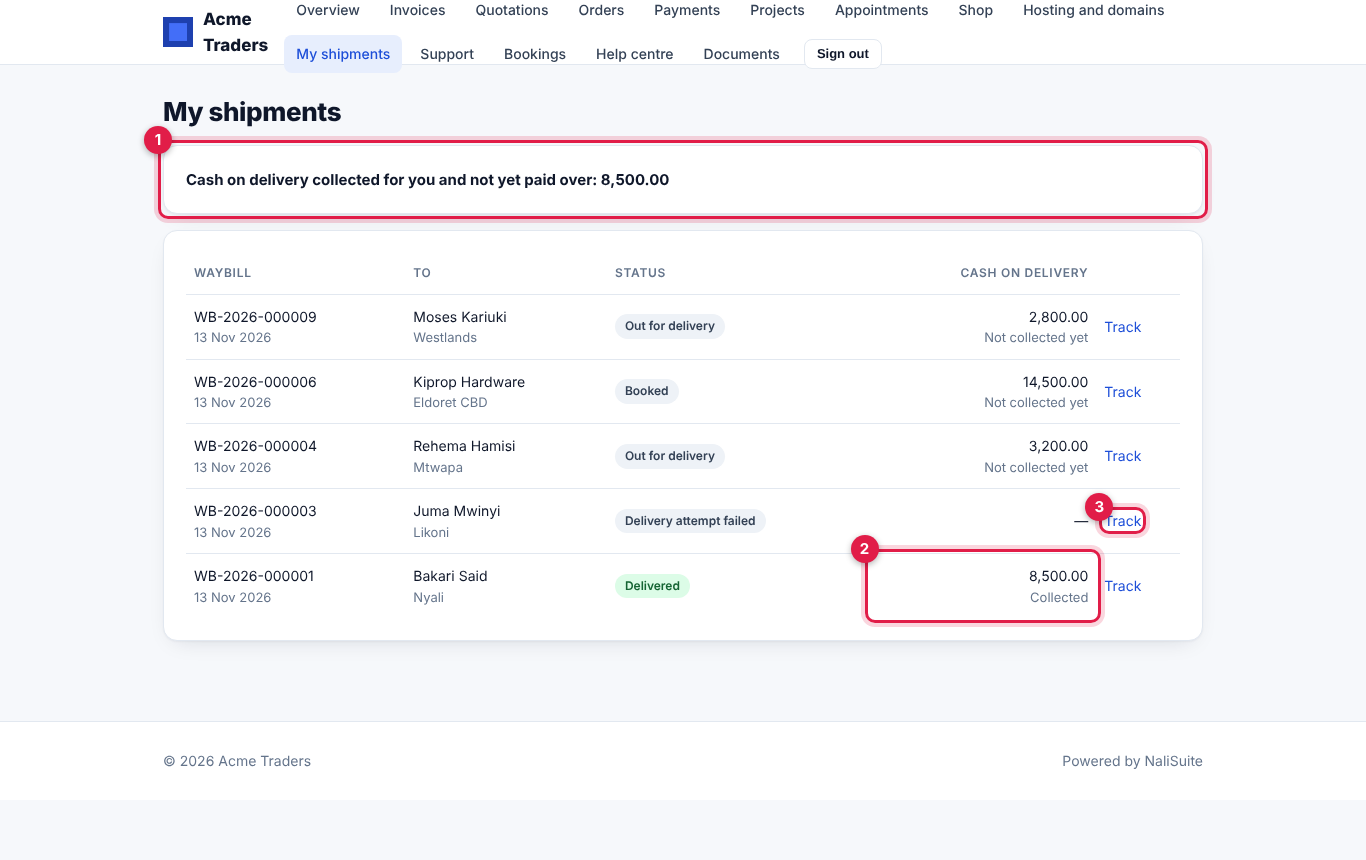
Senders who sign in to your customer portal see My shipments. It appears once they have sent at least one parcel and the Customer portal app is on. The box at the top (marker 1) shows cash on delivery collected for them and not yet paid over. Each waybill shows the receiver and town, the status, the cash on delivery with Not collected yet, Collected or Paid to you (marker 2), and a Track link (marker 3) to the tracking page.
Common questions
Why does Charge show a message instead of a price? There is no rate for that service between the two zones, in either direction. Add one under Logistics → Rates, or type the charge yourself.
Why is a shipment missing from Add shipments? It is already on another load, it is going to a different zone from the load's To, or its status does not fit (a line haul takes parcels waiting at a branch; a delivery run takes parcels at the destination branch, after a failed attempt, or local parcels).
A driver cannot see My deliveries. Why? The run must have them as Driver and be dispatched. Give drivers the logistics.deliver permission so the page is always in their menu.
Can I change the price after booking? No. Cancel the waybill (while it is Booked or Received at branch) and book it again with the right charge. Cancelling also cancels its unpaid invoice.
Does the receiver get texts? Yes, when Text and email receivers with the tracking link is on and an SMS provider is set up in Marketing. Emails go when the receiver has an email address.
What happens to a parcel after a failed attempt? It stays Delivery attempt failed and comes off the run when the run finishes. Add it to the next delivery run, record a delivery at the branch, or use Return to sender.