Radiology and imaging
The Radiology app is for imaging centres and hospital radiology departments. You set up your X-ray, ultrasound, CT, MRI and mammography rooms with their opening days, hours and slot length, and the examinations you offer, each with a report template. Imaging orders come from clinic visits, walk-in patients and referring doctors; you book each study into a free slot, keep the images exported from the scanner on the study, and the radiologist writes the findings and impression starting from the template. Once verified, the report is released as a PDF to the patient portal and emailed to the referring doctor. Studies are charged on the patient's clinic visit, with the insurer's share claimed as for any visit.
It works with the Clinic app: patients, visits, billing and insurance claims come from there (see Clinic and Pharmacy). Everything is in the Radiology group of the left menu: Imaging orders, Room schedule, Imaging rooms and Study types and templates.
Note: Three permissions control Radiology (under Settings → Roles). radiology.view lets people see orders, studies, images and the schedule. radiology.manage is needed to set up rooms and study types, place, book and cancel orders, mark studies done, attach images and email reports. radiology.report is for radiologists: writing, verifying and releasing reports. Owners and admins have all three; the member role has radiology.view.
Switch it on
Radiology is a marketplace app and needs the Clinic app, which is switched on with it.
- Open Settings → Marketplace and type Radiology in the Search add-ons… box (marker 1).
- On the Radiology and imaging card (marker 2), click Start free trial (or Add to subscription) and confirm. The Radiology group appears in the menu.
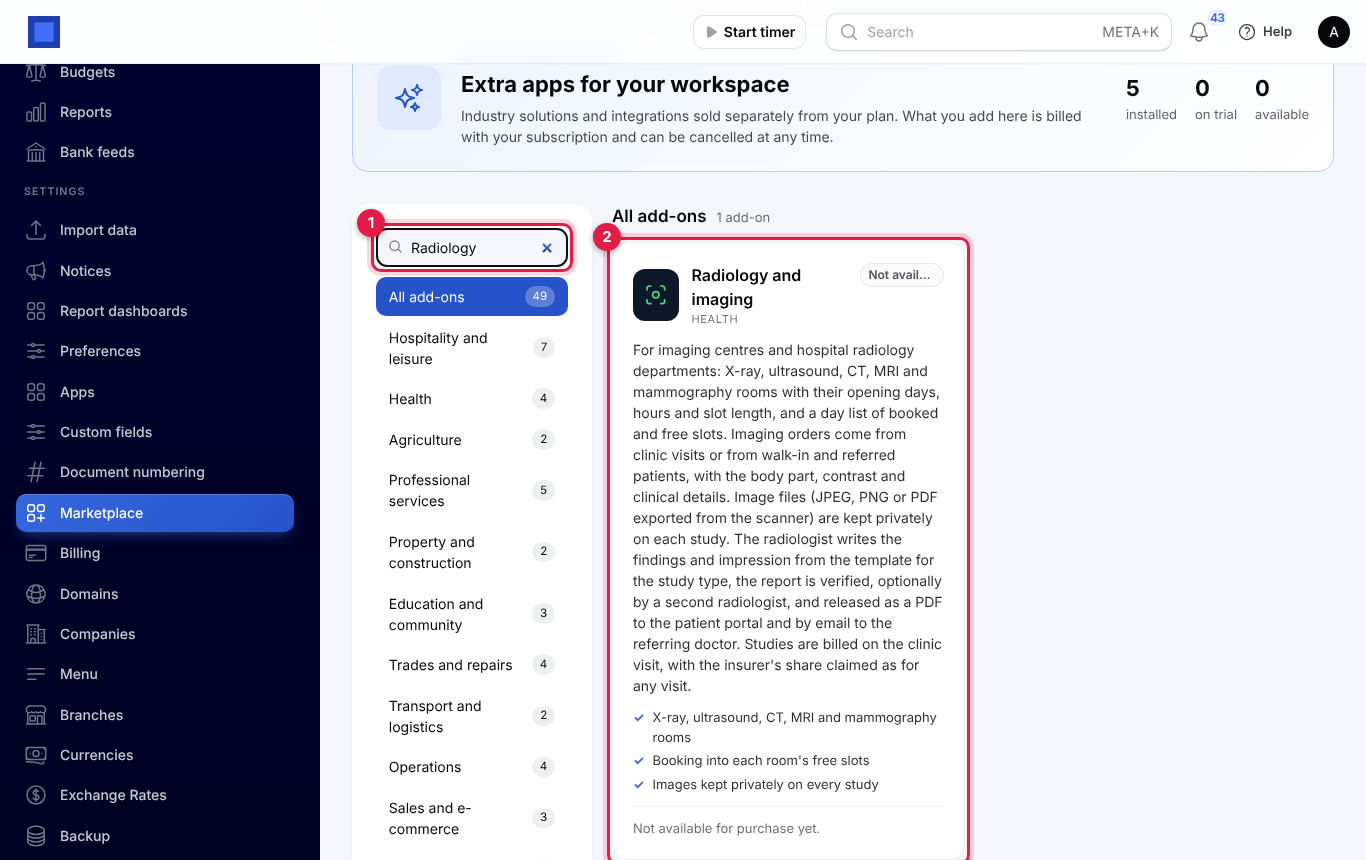
If the card says Not available for purchase yet, ask NaliSuite support to switch it on. See Billing and marketplace.
Settings
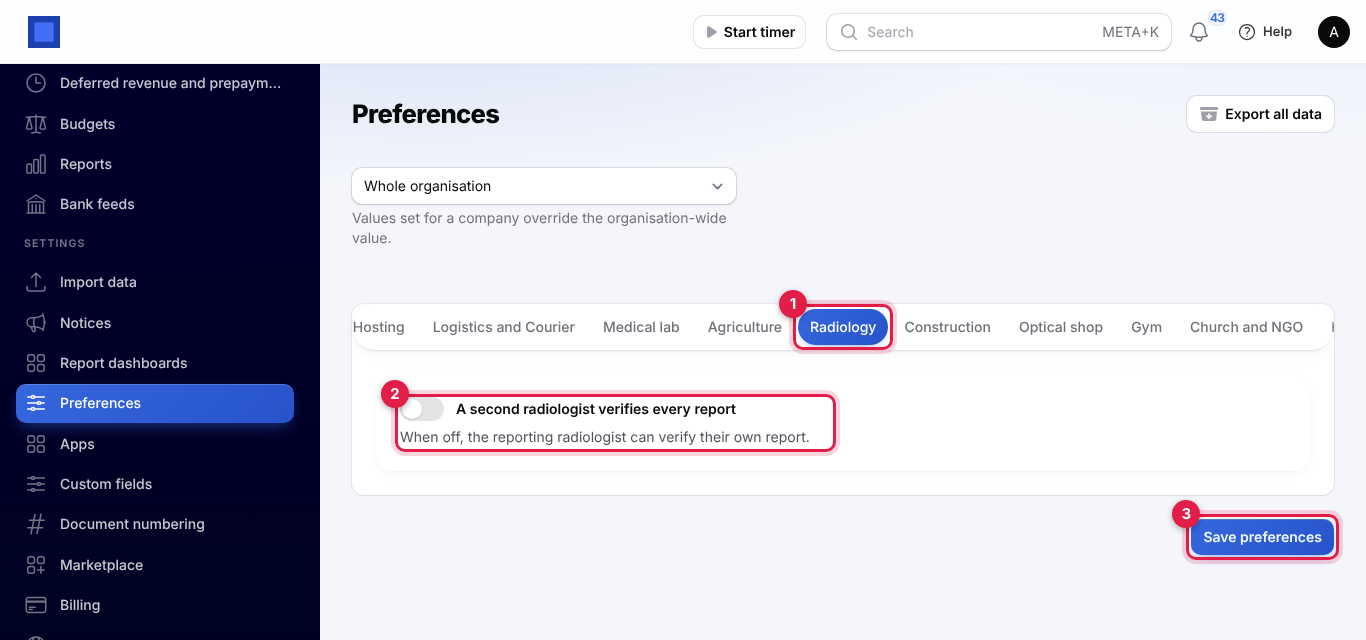
Open Settings → Preferences, click the Radiology tab (marker 1), and click Save preferences (marker 3) after a change.
| Setting | Default | What it does |
|---|---|---|
| A second radiologist verifies every report (marker 2) | Off | When on, a report must be verified by a radiologist other than the one who wrote it. When off, the reporting radiologist can verify their own report. |
Imaging rooms
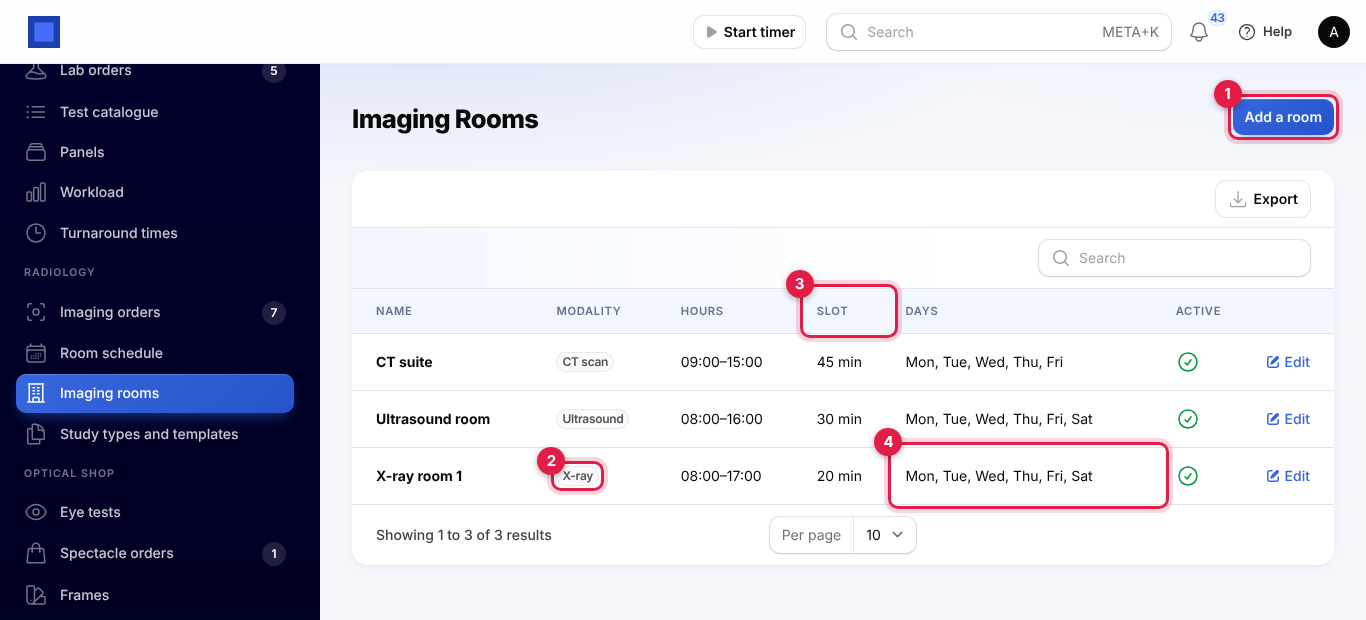
Open Radiology → Imaging rooms and click Add a room (marker 1).
| Field | What it is |
|---|---|
| Name | For example X-ray room 1. |
| Modality (marker 2) | X-ray, Ultrasound, CT scan, MRI or Mammography. A room only takes studies of its modality. |
| Taking bookings | Turn off to close the room for bookings; it leaves the schedule. |
| Opens and Closes | The room's hours, on your company's clock. |
| Slot length (minutes) (marker 3) | How long each booking lasts, from 5 to 240 minutes. Slots start at the opening time; the last one must end by closing. |
| Open on (marker 4) | The days of the week the room works. |
Study types and templates
Each examination you offer is a study type with its price and the report template the radiologist starts from. Open Radiology → Study types and templates and click Add a study type, or Edit on one.
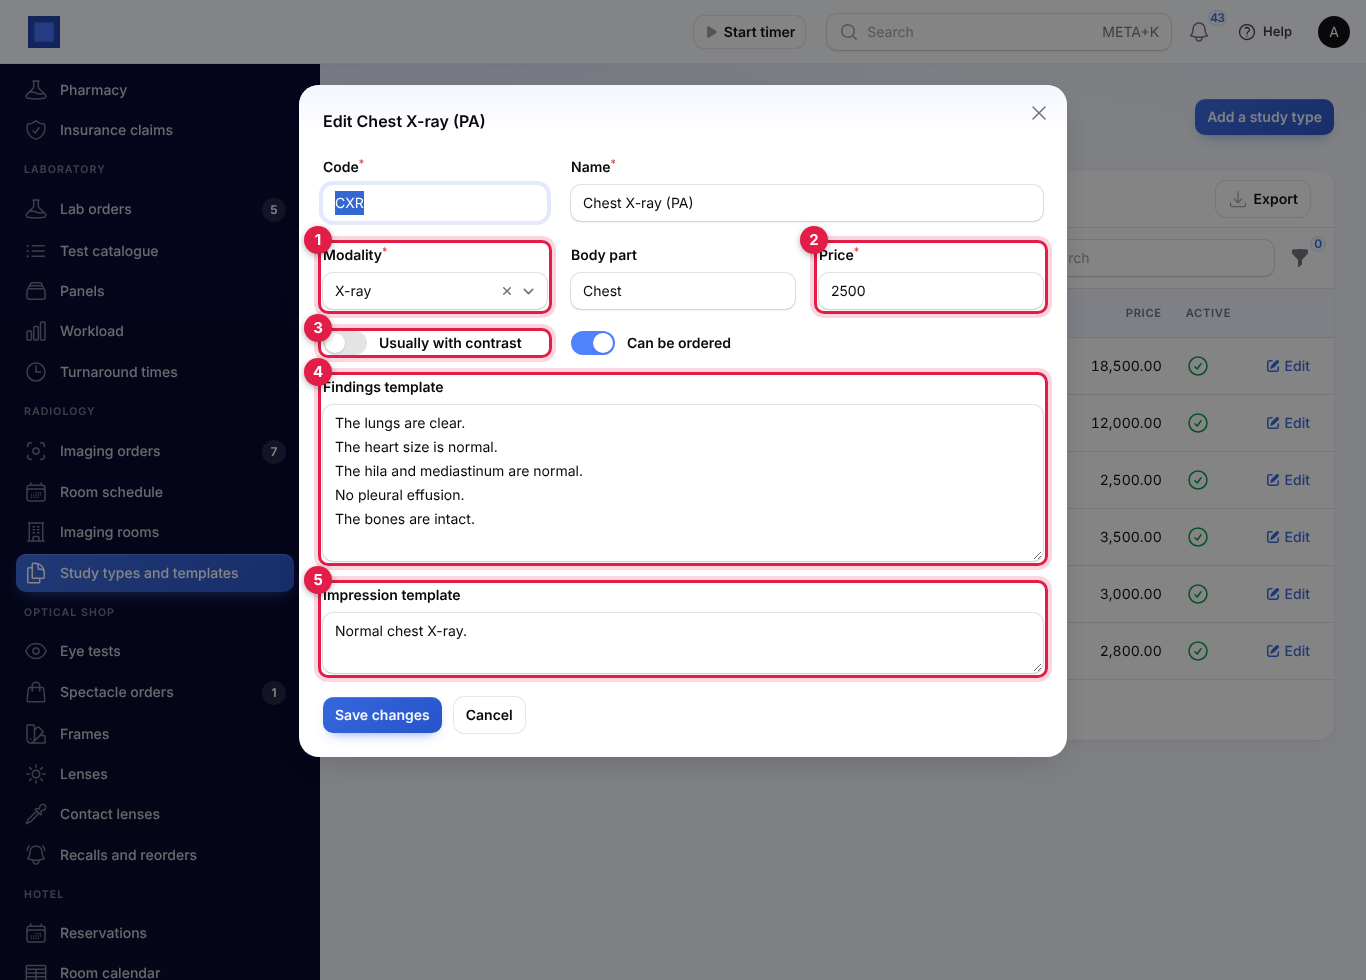
- Give the Code (for example CXR, unique) and Name (Chest X-ray (PA)).
- Choose the Modality (marker 1) and type the usual Body part.
- Type the Price (marker 2), charged on the clinic visit for each study.
- Usually with contrast (marker 3) notes that this examination is normally done with contrast. Turn Can be ordered off to stop offering it.
- Write the Findings template (marker 4): the normal findings, one line per structure, that the radiologist edits.
- Write the Impression template (marker 5), for example Normal chest X-ray.
- Click Save changes. The list filters by modality.
Order a study
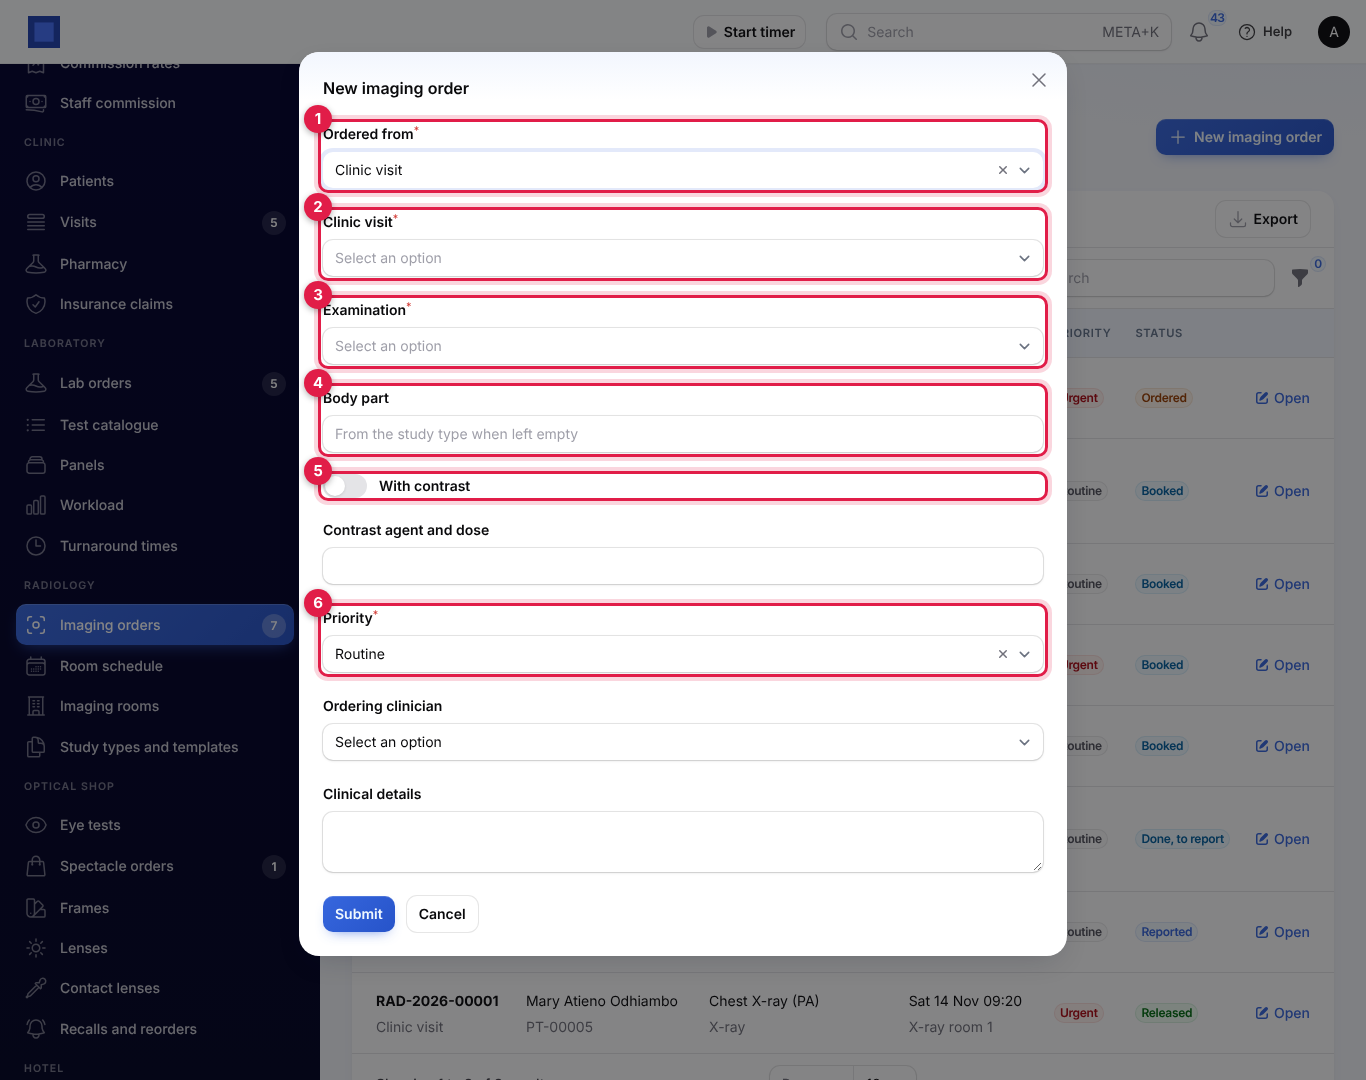
- Open Radiology → Imaging orders and click New imaging order.
- Choose where it is Ordered from (marker 1):
- Clinic visit: choose the Clinic visit (marker 2). Only visits waiting or in consultation are listed.
- Walk-in or Referral: choose the Patient. Search by name, number or phone, or click + to register a new patient. For a referral, type the Referring doctor and Referring doctor's email: the released report is emailed there.
- Choose the Examination (marker 3).
- Type the Body part (marker 4) when it differs from the study type's, for example Right knee.
- Turn on With contrast (marker 5) when contrast is used, and type the Contrast agent and dose.
- Choose the Priority (marker 6): Routine, Urgent or Immediate (STAT), and the Ordering clinician.
- For walk-ins and referrals, leave Claim from the insurer on for an insured patient.
- Add Clinical details and click Submit. The study gets a number such as RAD-2026-00006 and opens.
How studies are billed
Each study is one charge on the clinic visit, such as "Imaging: Chest X-ray (PA) (RAD-2026-00001)", at the study type's price:
- From a Clinic visit, it joins the visit's bill, invoiced when the visit is completed in the Clinic. See Clinic and Pharmacy.
- For a Walk-in or Referral, NaliSuite opens an imaging-only visit and bills it at once. For an insured patient with Claim from the insurer on, the insurer's share goes on a claim (see Insurance claims). If the patient already has a visit waiting or in consultation, the study joins that visit's bill instead.
The imaging orders list
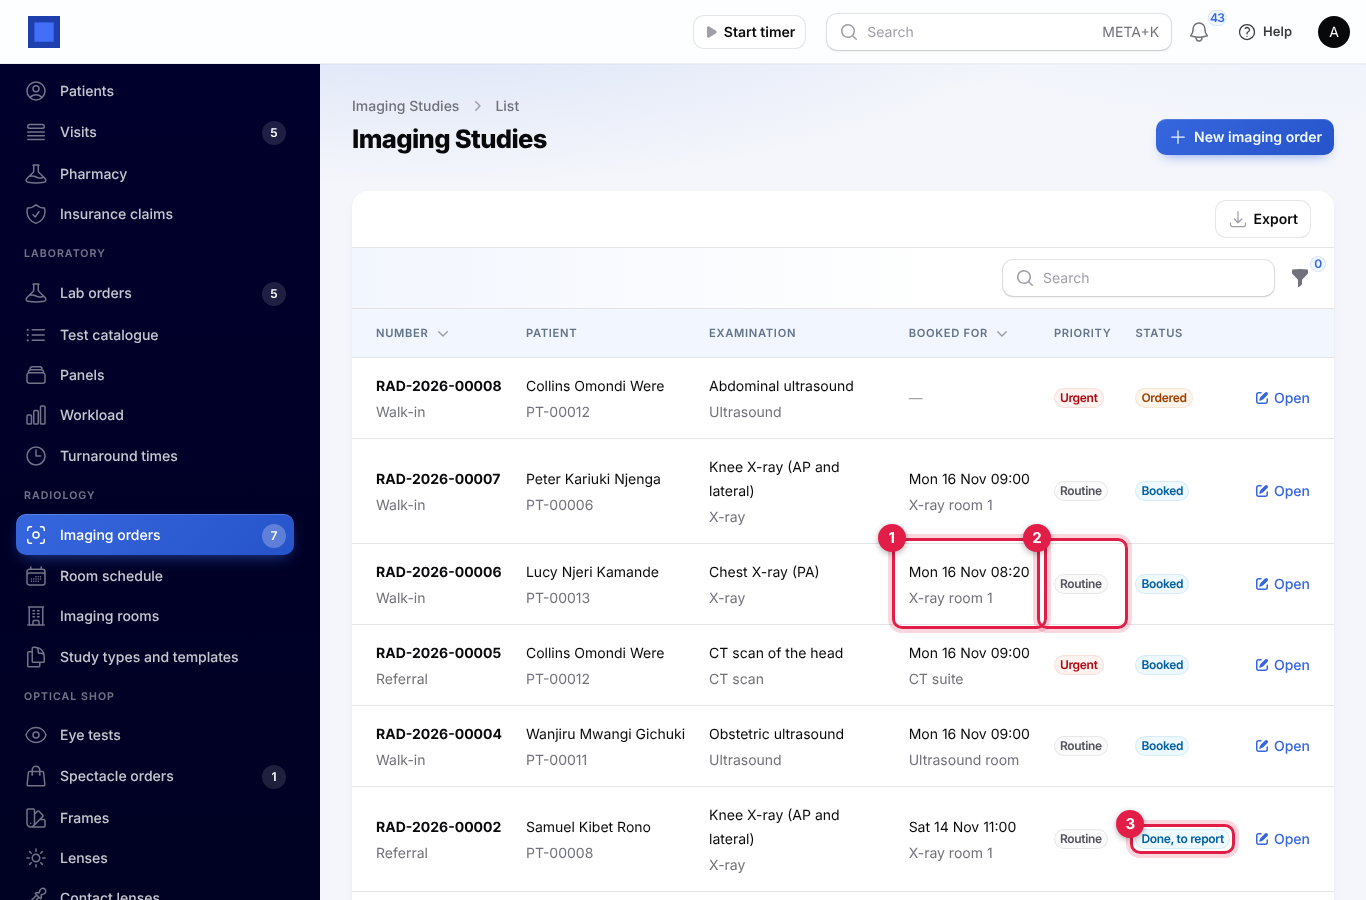
Each row shows the number and where the order came from, the patient, the examination with its modality, the Booked for time and room (marker 1), the priority (marker 2) and the status (marker 3). Filter by Status, Modality or Patient. The number next to Imaging orders in the menu counts studies not released or cancelled yet.
| Status | What happens next |
|---|---|
| Ordered | Book a slot, or do the study straight away. |
| Booked | The patient comes at the booked time. |
| Done, to report | Attach the images; the radiologist writes the report. |
| Reported | The report is verified. |
| Verified | Release the report. |
| Released | The report is in the portal and emailed. |
| Cancelled | Called off before the study was done. |
Book a slot
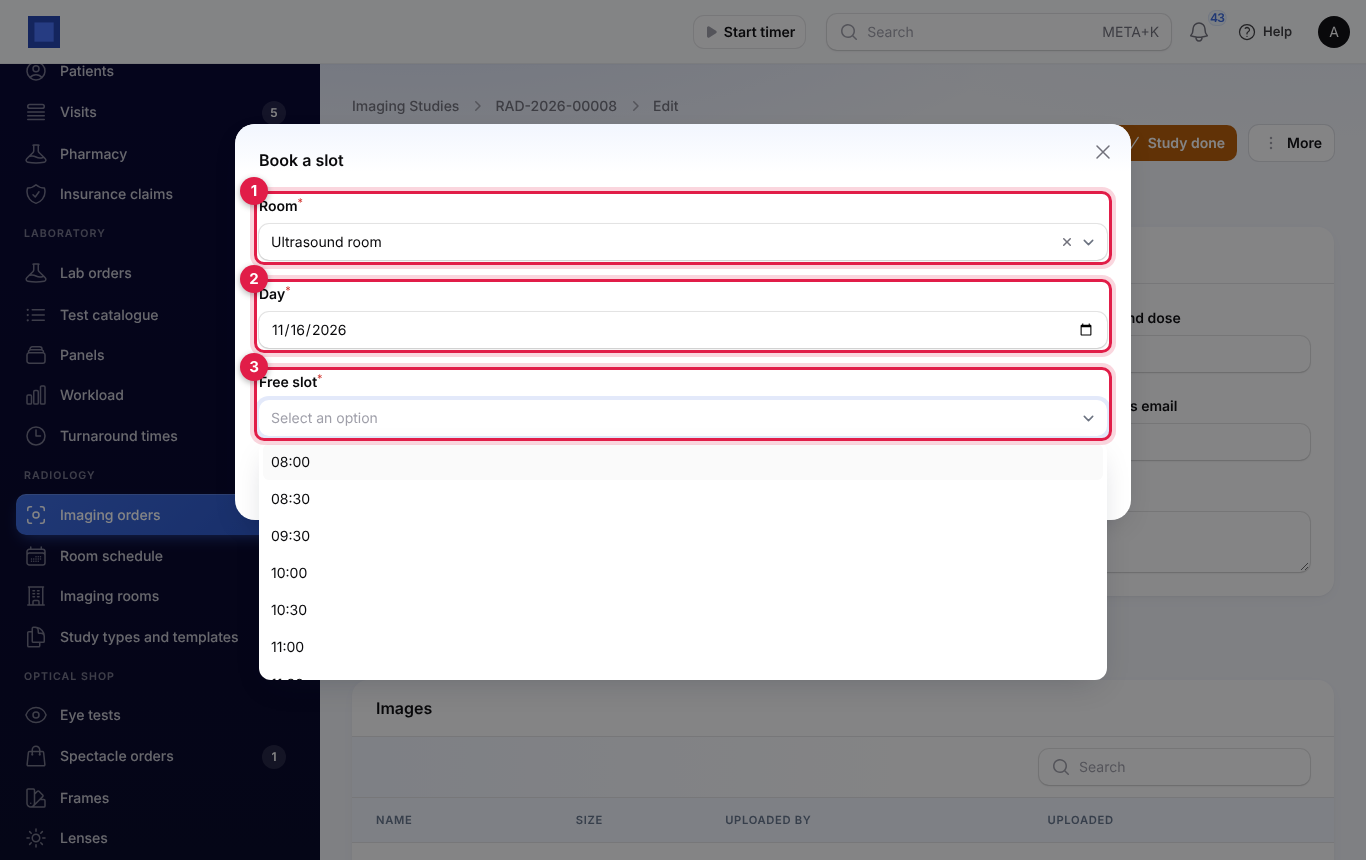
- Open the study and click Book a slot (Move the booking once it is booked).
- Choose the Room (marker 1). Only rooms taking bookings for the study's modality are listed.
- Choose the Day (marker 2), today or later.
- Choose a Free slot (marker 3). Booked and past times are left out.
- Click Submit. The study is Booked for that time and room.
To call a study off, click More → Cancel the study while it is ordered or booked. The charge comes off the visit while it is still open; if it is already billed, credit the invoice in Invoicing instead.
The room schedule
Radiology → Room schedule shows one day for every room taking bookings, today when you open it. Use Previous day, Next day or the date box (marker 1) to move.
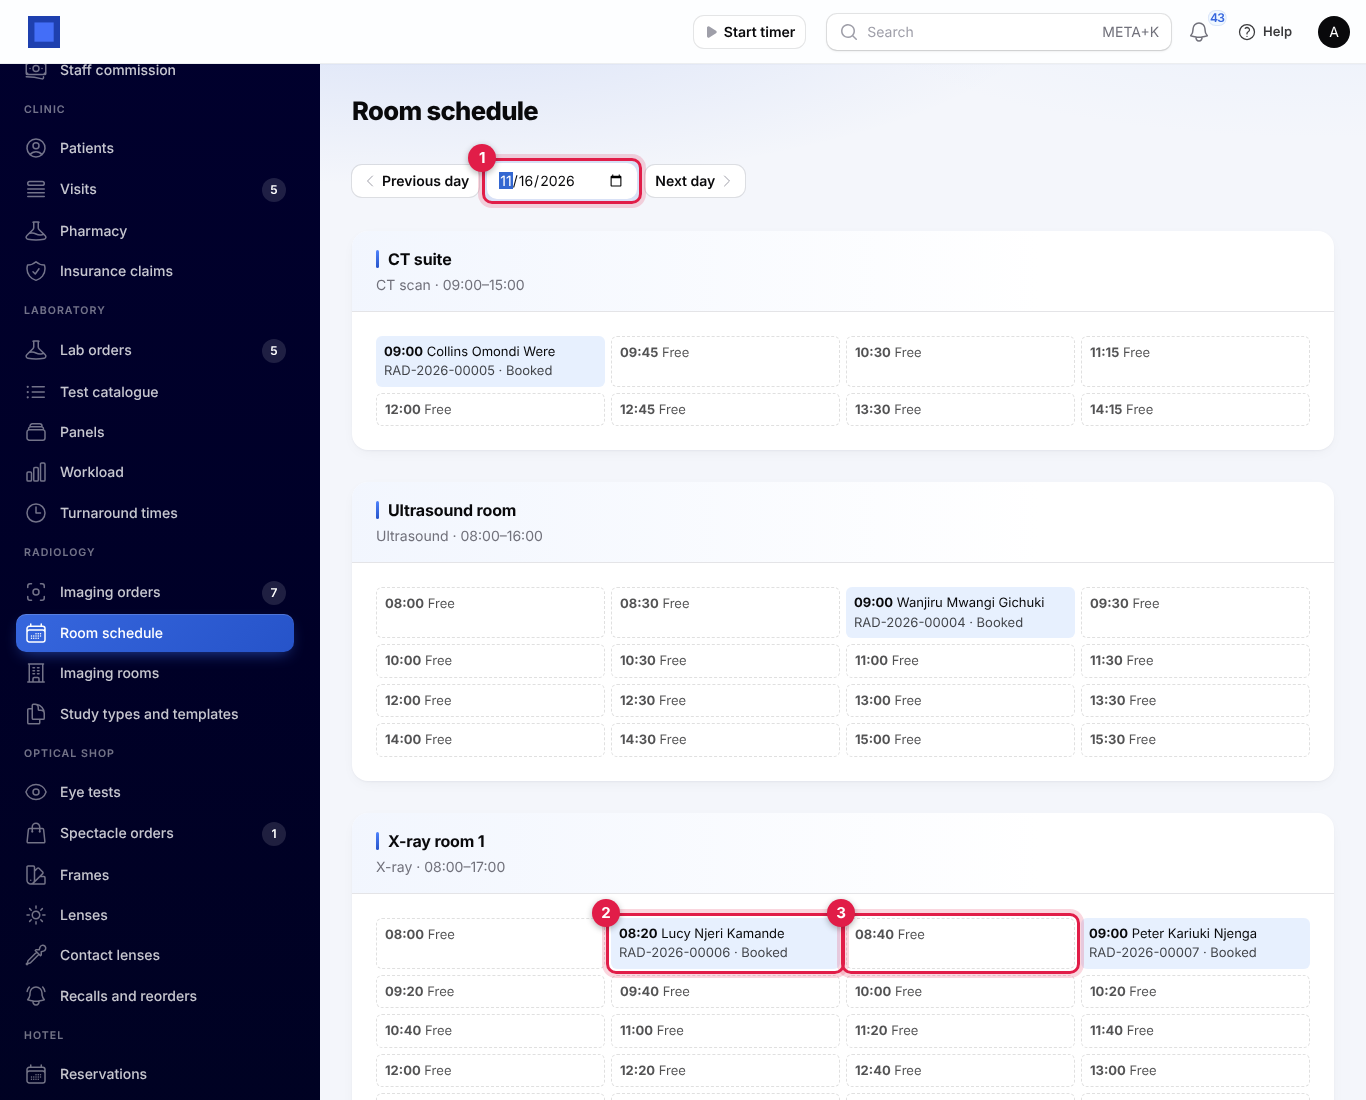
Each room shows its modality and hours, then every slot: a booked slot (marker 2) shows the time, patient, study number and status, and opens the study when you click it; a free slot shows Free (marker 3). A room shows Closed on this day. on days it does not work.
Do the study and keep the images
- When the radiographer has done the study, click Study done and confirm. The status becomes Done, to report, and the Report section is filled with the study type's templates.
- Under Images, click Attach (marker 1). Give the image a Name, for example PA view, and choose the File: a JPEG, PNG or PDF exported from the scanner, up to 20 MB. Click Create.
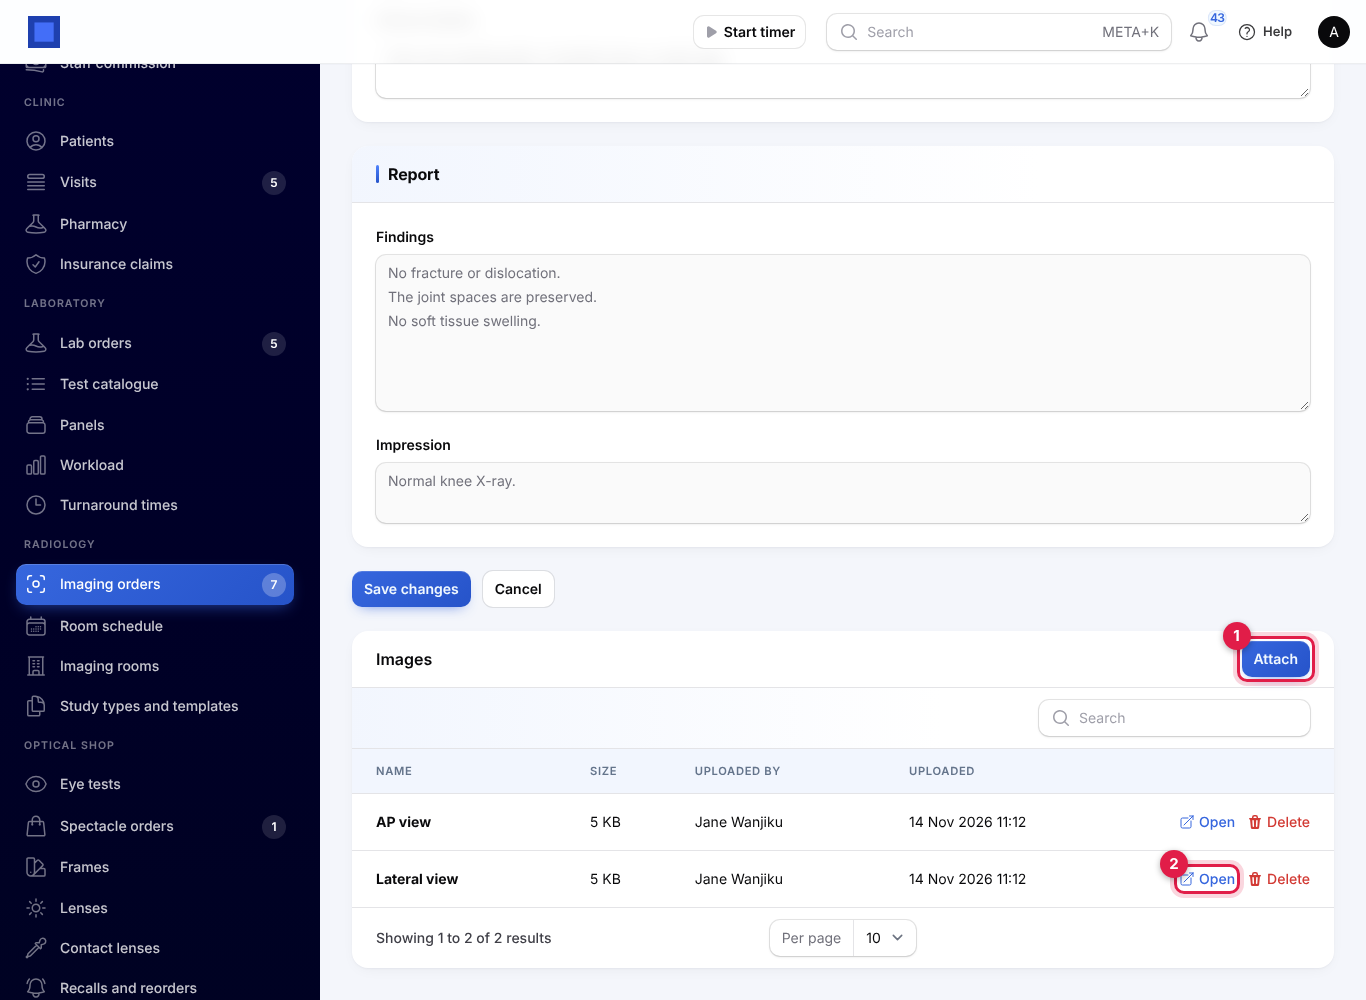
Images are stored privately with the study and shown only to signed-in staff. Click Open (marker 2) to view one in a new tab, or Delete to remove it. You can attach images while the study is done, reported or verified. DICOM files are not viewed in NaliSuite: export a JPEG or PDF from your viewing software.
Write, verify and release the report
Write the report
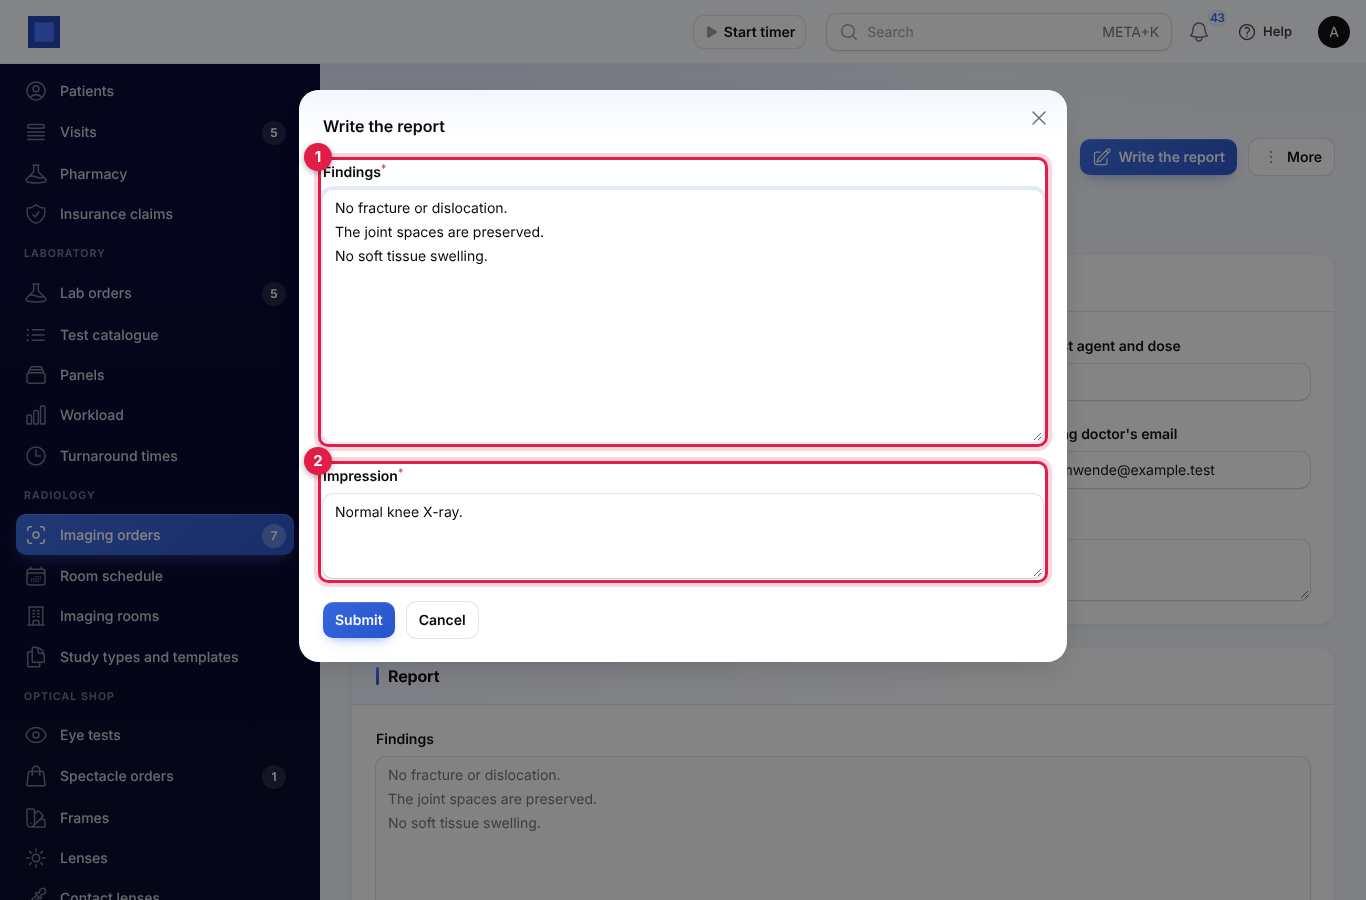
- A radiologist with radiology.report clicks Write the report.
- Edit the Findings (marker 1), which start from the template, and the Impression (marker 2). Both are required.
- Click Submit. The study becomes Reported.
Verify
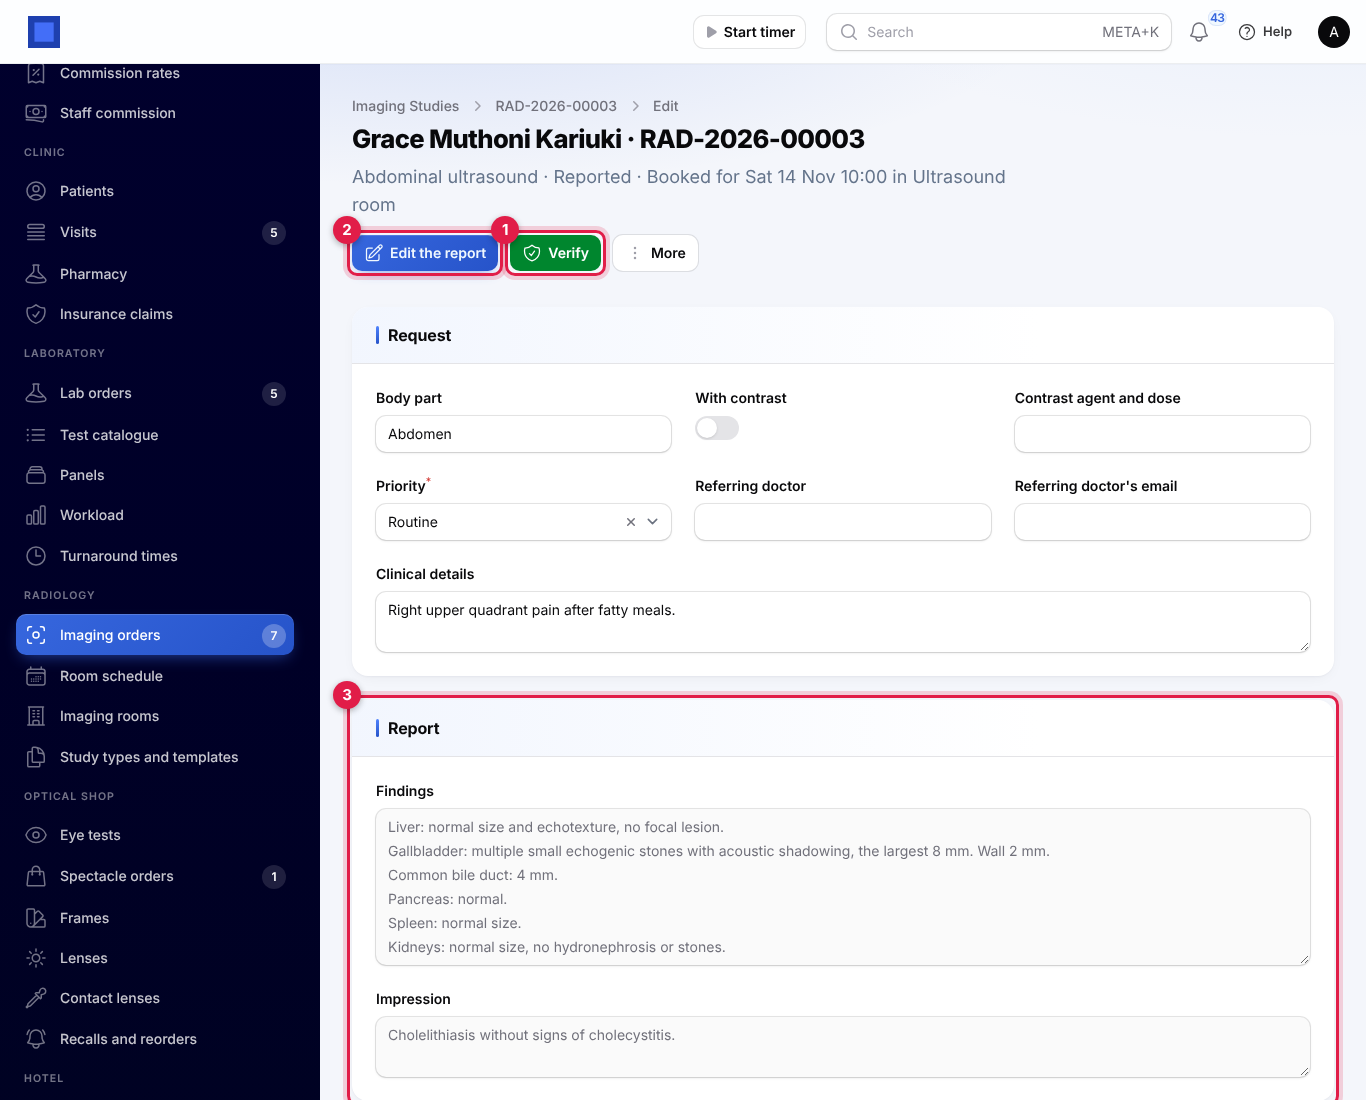
Open the Reported study, read the Report section (marker 3) and click Verify (marker 1). Until it is verified, Edit the report (marker 2) lets the radiologist change it. With A second radiologist verifies every report on, another radiologist must verify; NaliSuite refuses the one who wrote it.
Release
Click Release report on a Verified study and confirm. On release:
- the report shows in the patient portal,
- the imaging charge on the clinic visit carries the impression, such as "Report RAD-2026-00001: Normal chest X-ray.",
- the report is emailed to the referring doctor: the email on the order, or else the ordering clinician's email. You see "Emailed to …", or "No email address for the referring doctor: the report was not emailed."
The PDF report and email
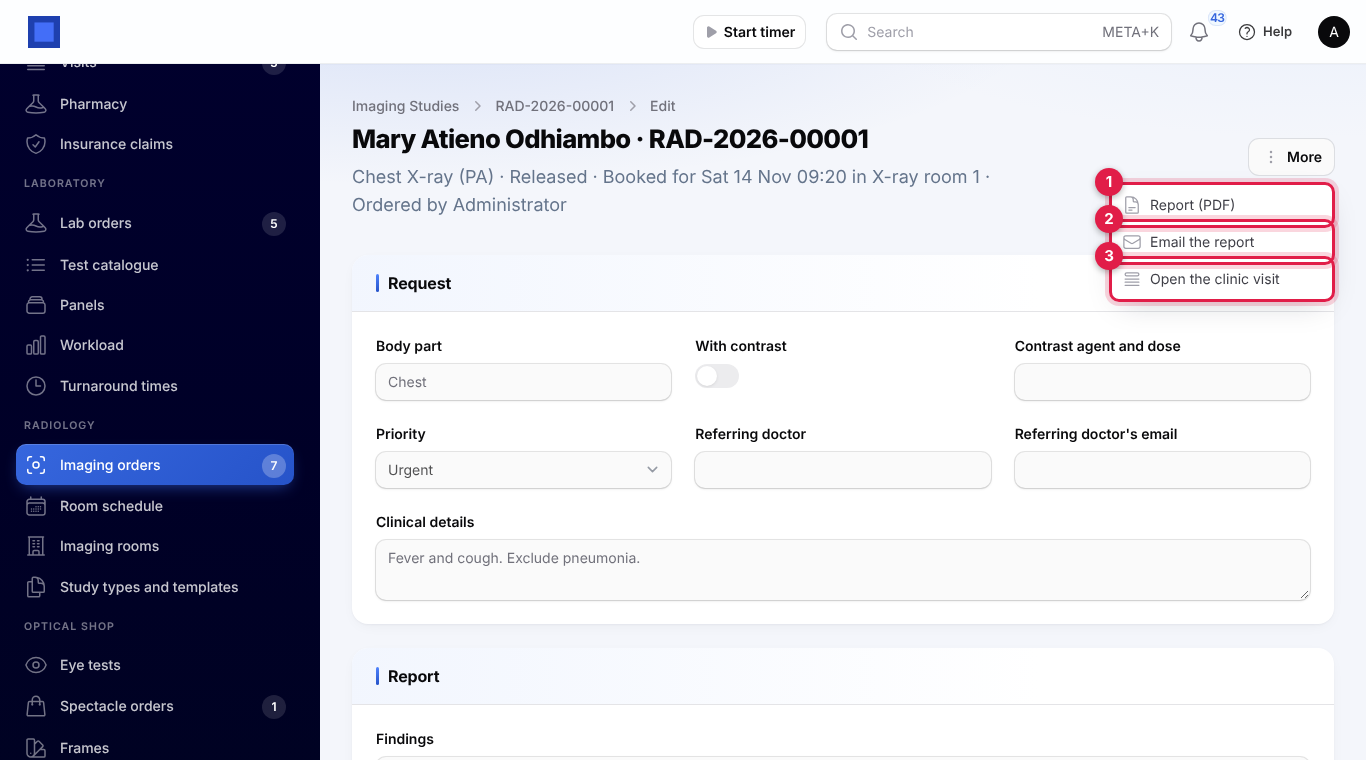
The More menu has:
- Report (PDF) (marker 1): the patient's details, who referred them, the examination, body part, contrast, when it was done and by whom, the clinical details, findings and impression, who reported and verified it and how many images are kept. Before release it is called Draft report (PDF) and is marked "Not released: draft report only."
- Email the report (marker 2): sends the released report to the referring doctor again; turn on Send a copy to the patient too to email the patient as well.
- Open the clinic visit (marker 3) and Open the bill.
The patient portal
Patients with customer portal access see My imaging reports in the portal menu once they have a released report. Invite patients as described in Customer and vendor portal.
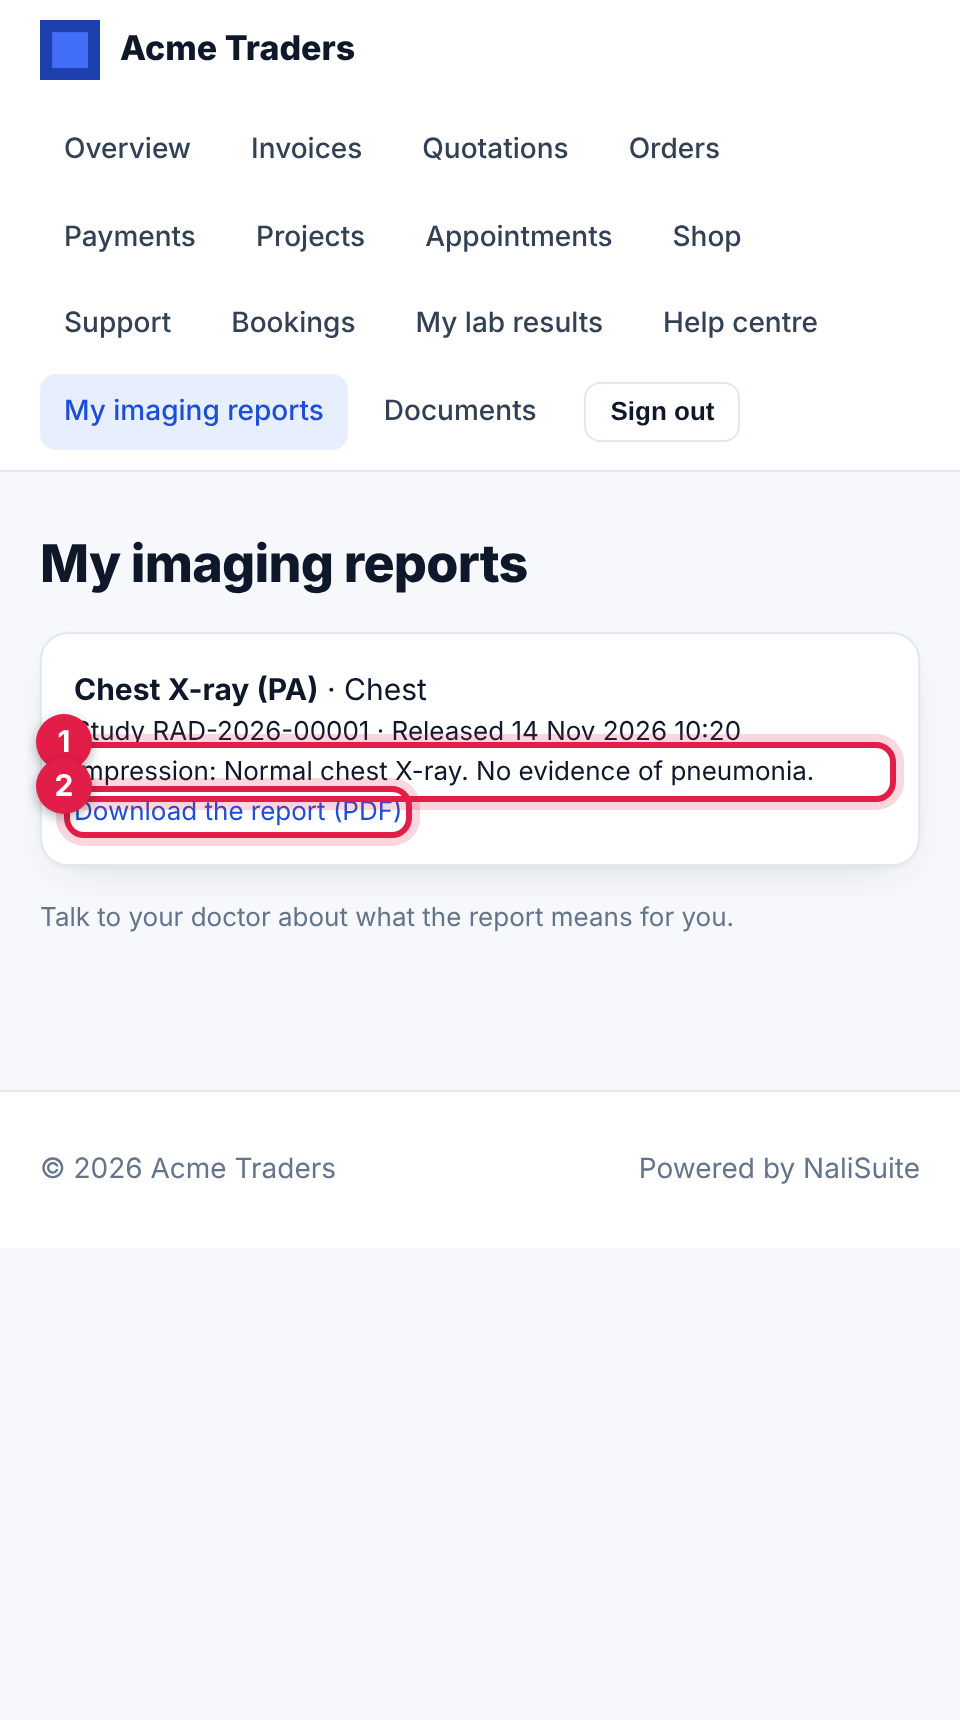
Each report shows the examination and body part, the study number and when it was released, the Impression (marker 1) and Download the report (PDF) (marker 2). The page reminds patients to talk to their doctor about what the report means.
Good to know
Can I do a study without booking it? Yes. Study done works on an ordered study too, for walk-ins seen at once.
Who can change the request? The body part, contrast, priority, referring doctor and clinical details can be corrected on the study until the report is released.
Can a released report be changed? No. Released reports are final; order a new study if the patient needs a fresh examination.
Are the images sent to the patient? No. Patients and doctors get the PDF report, which says how many images are kept with the study. The images stay with your team.