Manufacturing
The Manufacturing app is for businesses that make what they sell: furniture workshops, bakeries, feed millers, soap and cosmetics makers, garment makers, metal fabricators. You describe each product once in a bill of materials (the components and the work steps), then make it with work orders that take the components out of stock and put the finished goods into stock at what they really cost, components plus labour. The planning page tells you what to make and what to buy from your open sales orders and reorder levels, and quality inspections with non-conformance tracking keep bad batches out of stock. Everything is under Manufacturing in the left menu: Planning, Bills of materials, Work orders, Work centres, Inspections, Control points and Non-conformances. It works with Inventory (stock and warehouses) and, when switched on, Accounting.
Switch the Manufacturing app on
Manufacturing is an add-on sold separately from your plan.
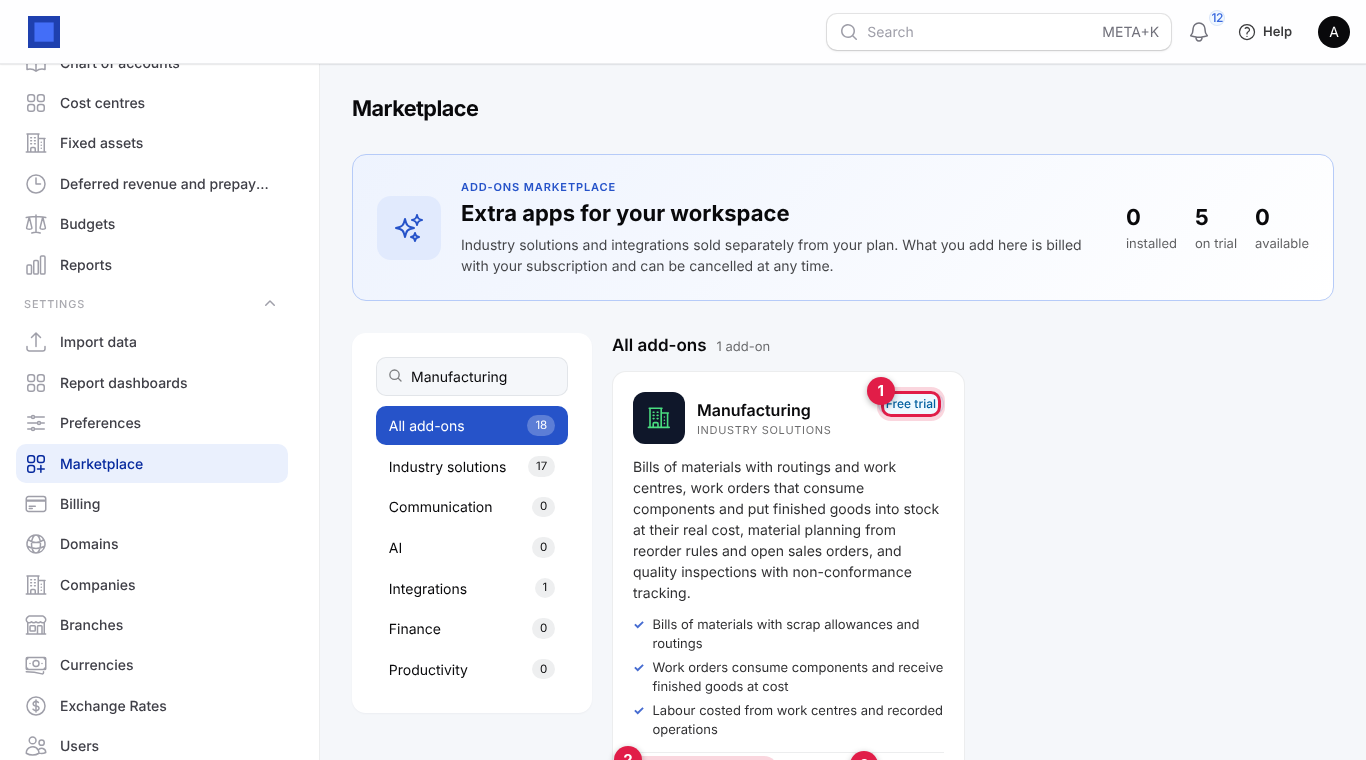
- Open Settings → Marketplace and find Manufacturing under Industry solutions. The card shows what it does and the monthly price (marker 2).
- Click Start free trial (or Add to subscription) and confirm. During the trial the card shows Free trial (marker 1) and when it ends. The Manufacturing menu appears straight away.
- End trial (marker 3) or Cancel switches it off at the end of the paid period; your bills and work orders are kept.
Permissions (under Settings → Roles): manufacturing.view (see everything), manufacturing.manage (bills, work orders, work centres, planning) and manufacturing.quality (pass and fail inspections, close non-conformances).
Set the defaults
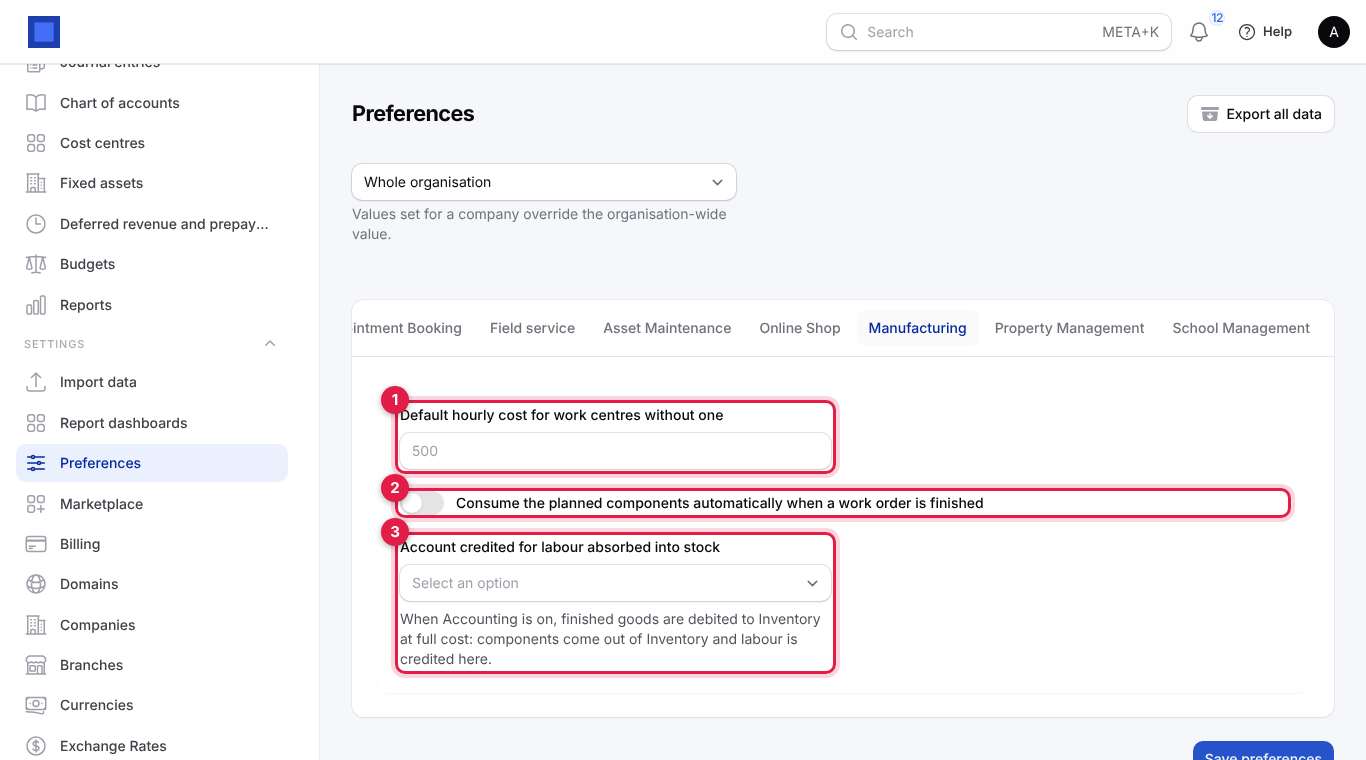
Open Settings → Preferences, click the Manufacturing tab and click Save preferences after changing:
| Setting | What it does |
|---|---|
| Default hourly cost for work centres without one (marker 1) | Labour cost per hour used when a work centre has no cost of its own, for example 500. |
| Consume the planned components automatically when a work order is finished (marker 2) | On (the default, called backflushing): finishing a work order takes any components not yet taken out of stock at the planned quantities. Off: you must click Consume components before Finish. |
| Account credited for labour absorbed into stock (marker 3) | When Accounting is on, finished goods are debited to Inventory at full cost: components come out of Inventory and labour is credited to this account (usually a Direct labour or Production wages absorbed account). |
Set up work centres
A work centre is a place or team where work happens (Cutting and turning, Assembly bench, Finishing booth, Oven 1) with a cost per hour that is absorbed into what is made there.
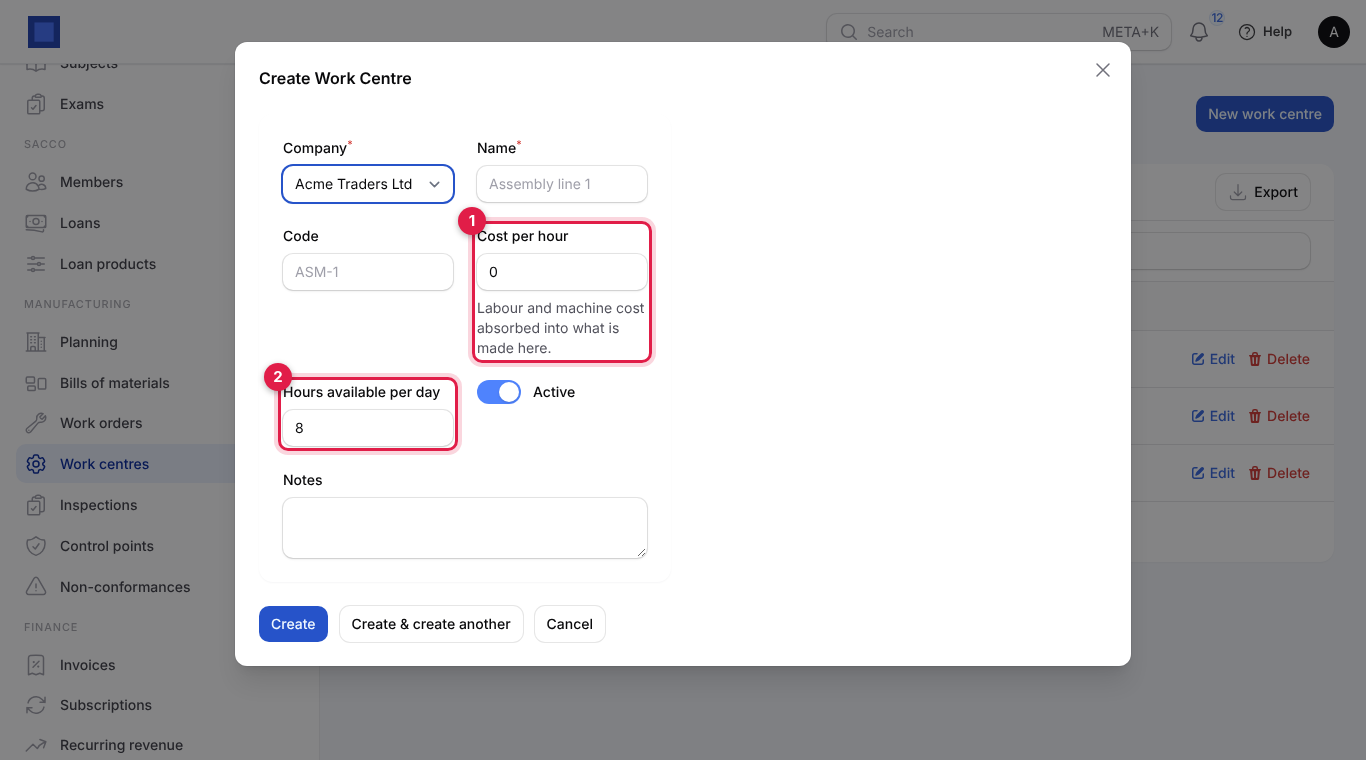
- Open Manufacturing → Work centres and click New work centre.
| Field | What to enter |
|---|---|
| Company (required), Name (required), Code | For example Assembly bench, code ASM-1. |
| Cost per hour (marker 1) | Labour and machine cost per hour: wages of the people at the bench plus power and wear, divided by productive hours. 0 uses the default in Preferences. |
| Hours available per day (marker 2) | Capacity, 8 by default. |
| Active | Switch off to hide it from new operations. |
| Notes | Anything else. |
- Click Create.
Create a bill of materials
- Open Manufacturing → Bills of materials. Each bill shows its code, the product it makes, how many it makes, the number of components (marker 2) and operations, and whether it is the default and active.
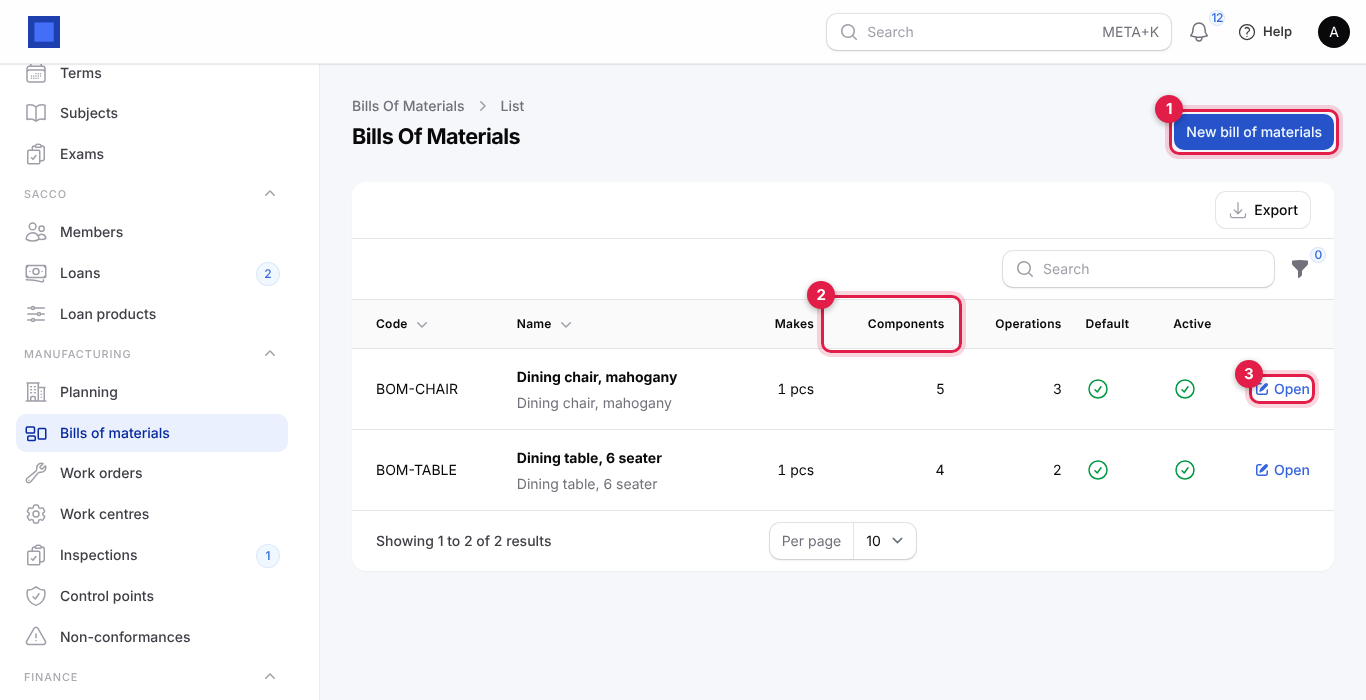
- Click New bill of materials (marker 1).
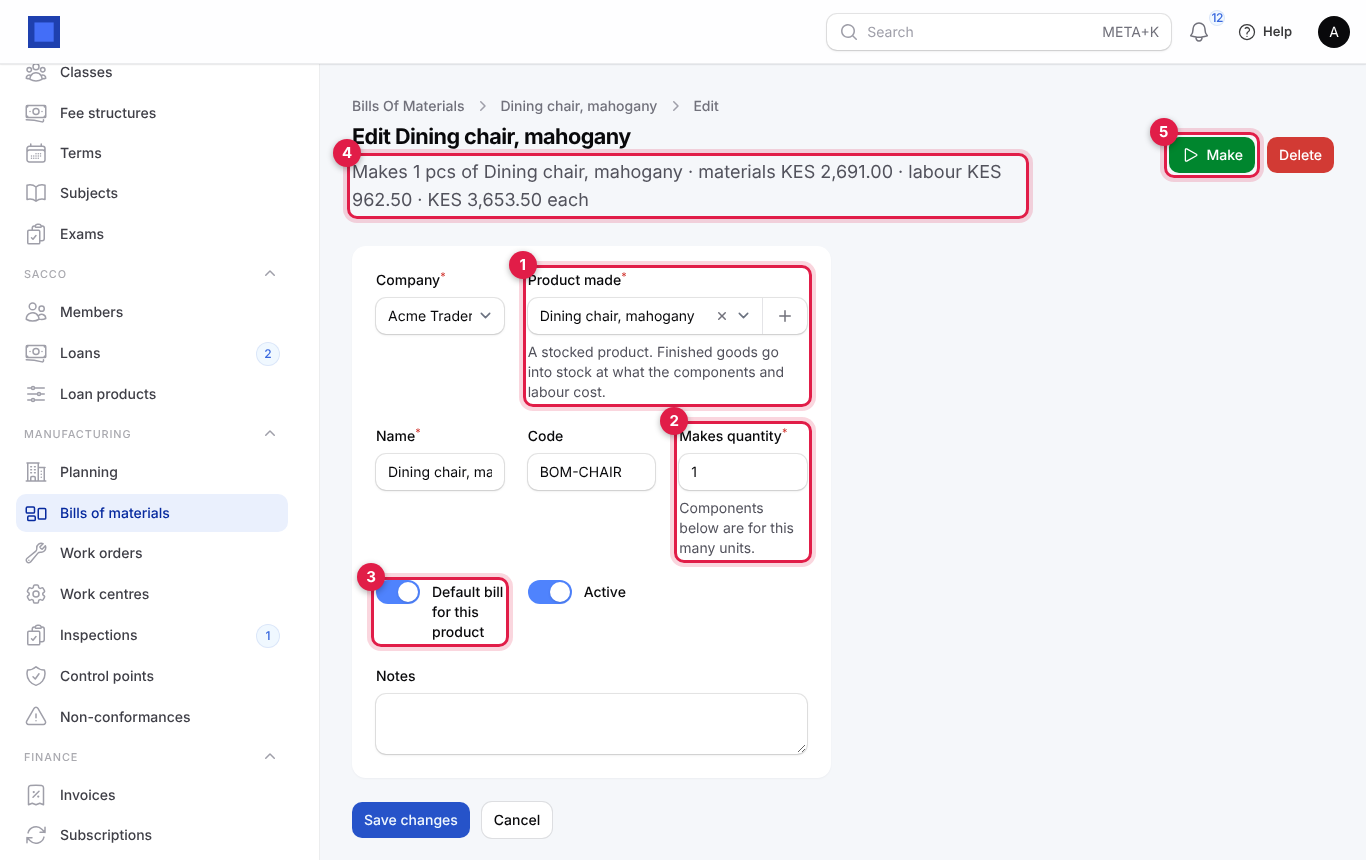
| Field | What to enter |
|---|---|
| Company (required) | Who makes it. |
| Product made (required, marker 1) | A stocked product (create it with + if needed). Finished goods go into stock at what the components and labour cost. |
| Name (required), Code | For example Dining chair, mahogany, code BOM-CHAIR. |
| Makes quantity (required, marker 2) | How many units the components below make: 1 chair, or a batch of 50 loaves. |
| Default bill for this product (marker 3) | On for the bill used by planning and Plan suggestions. A product can have several bills (for example a cheaper wood); only one is the default. |
| Active | Off to stop using a bill without deleting it. |
| Notes | Instructions for the floor. |
- Click Create. The page reloads with the cost summary under the title (marker 4): Makes 1 pcs of Dining chair · materials KES 2,691.00 · labour KES 962.50 · KES 3,653.50 each. Make (marker 5) starts a work order from this bill (see below).
Add components
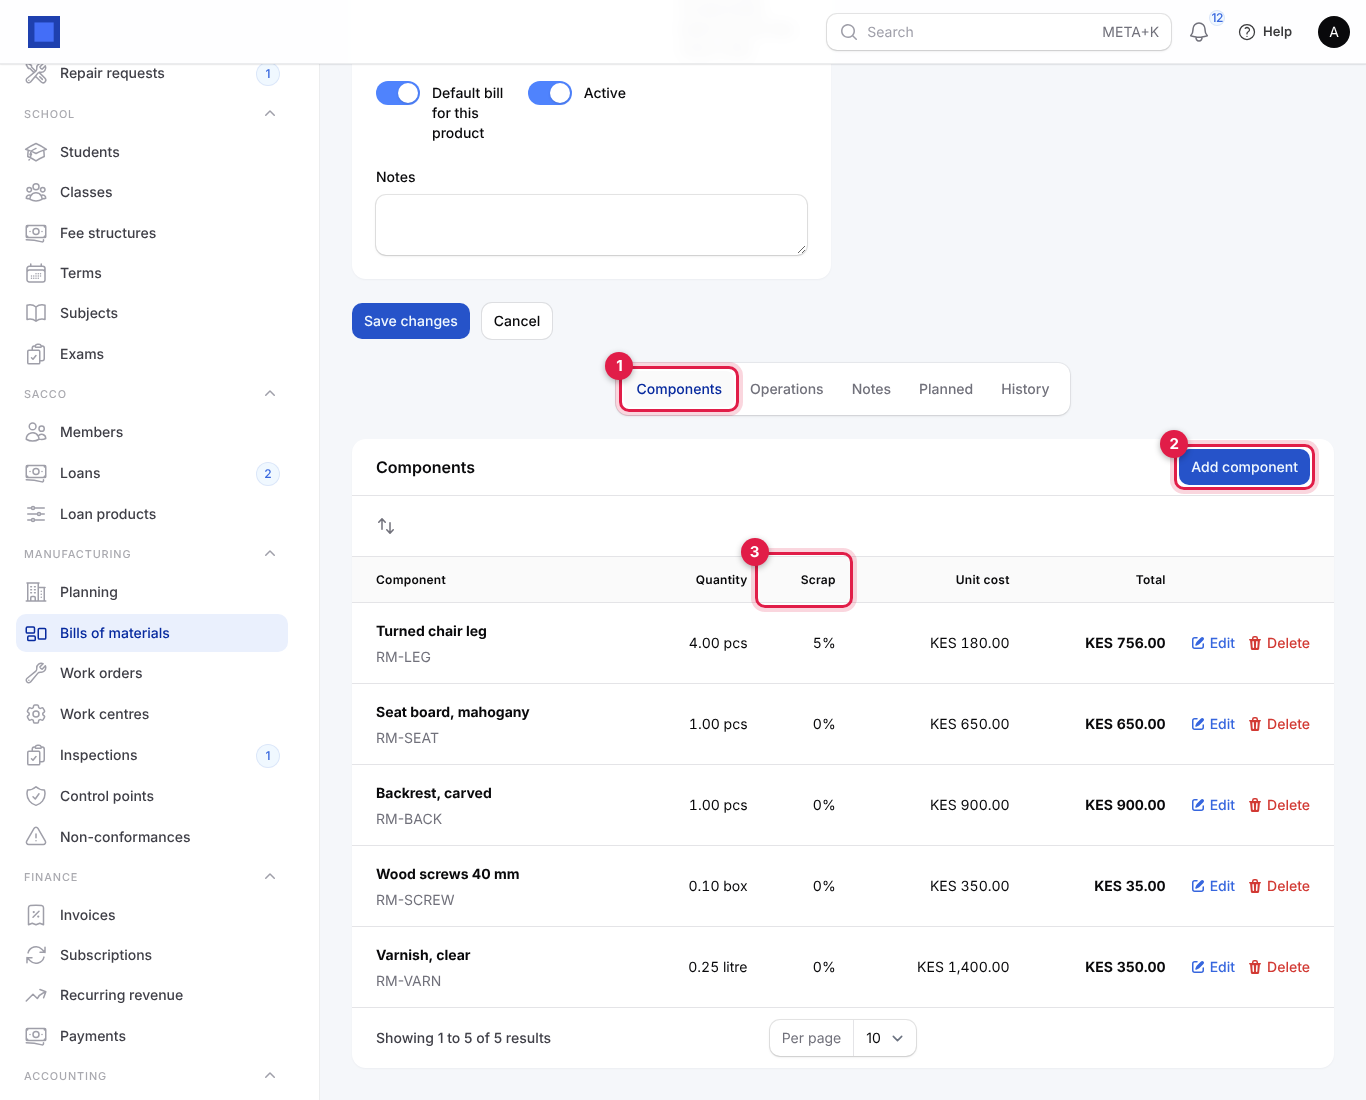
- On the bill, open the Components tab (marker 1) and click Add component (marker 2).
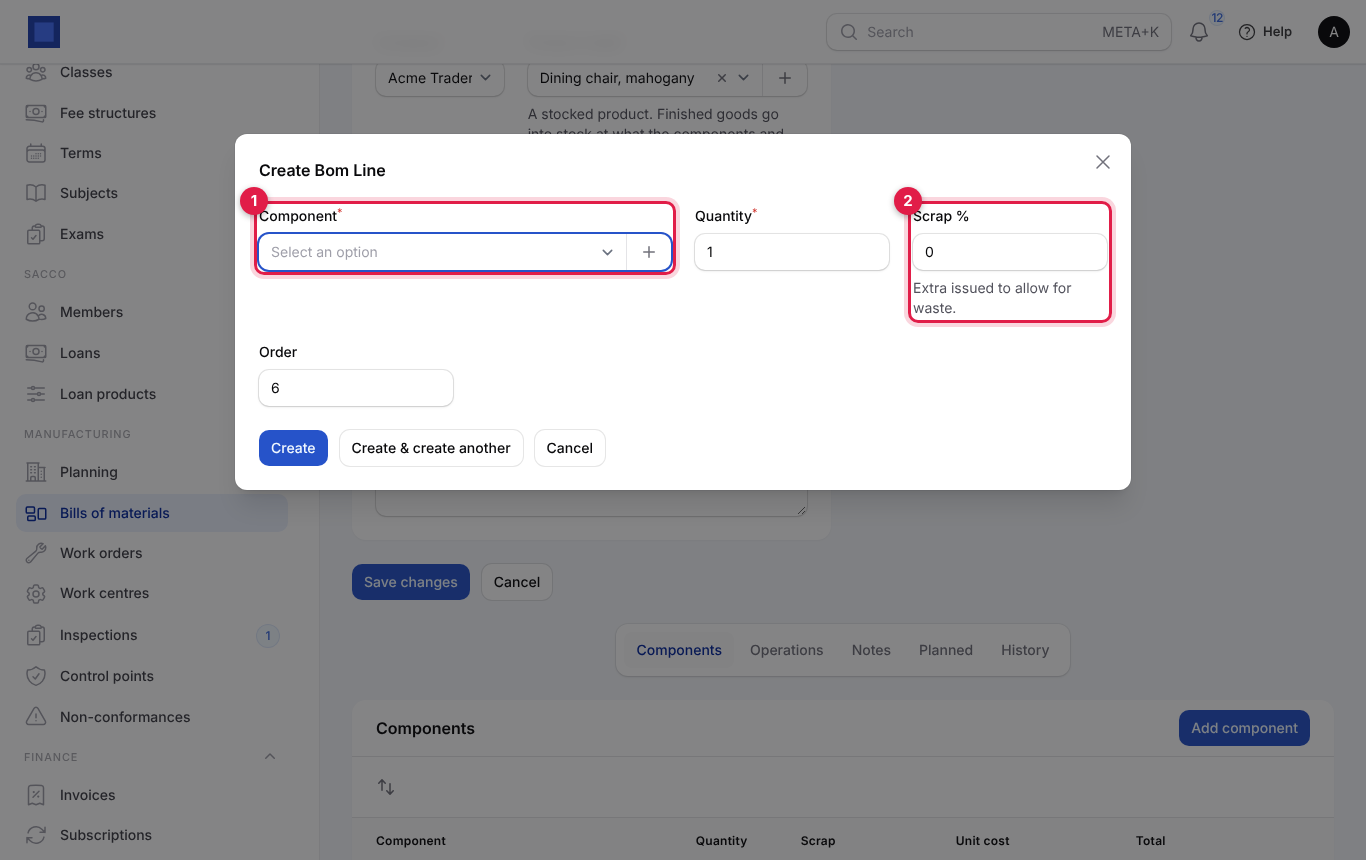
| Field | What to enter |
|---|---|
| Component (required, marker 1) | The raw material or part: timber, screws, varnish, flour. |
| Quantity (required) | How much is needed for the bill's Makes quantity, in the component's unit (0.25 litre, 0.1 box). |
| Scrap % (marker 2) | Extra issued to allow for waste. 5 means 5% more is taken out of stock. |
| Order | The position in the list. |
- Click Create. The table shows each component's quantity, Scrap (marker 3), current unit cost (its average stock cost) and line total.
Add operations
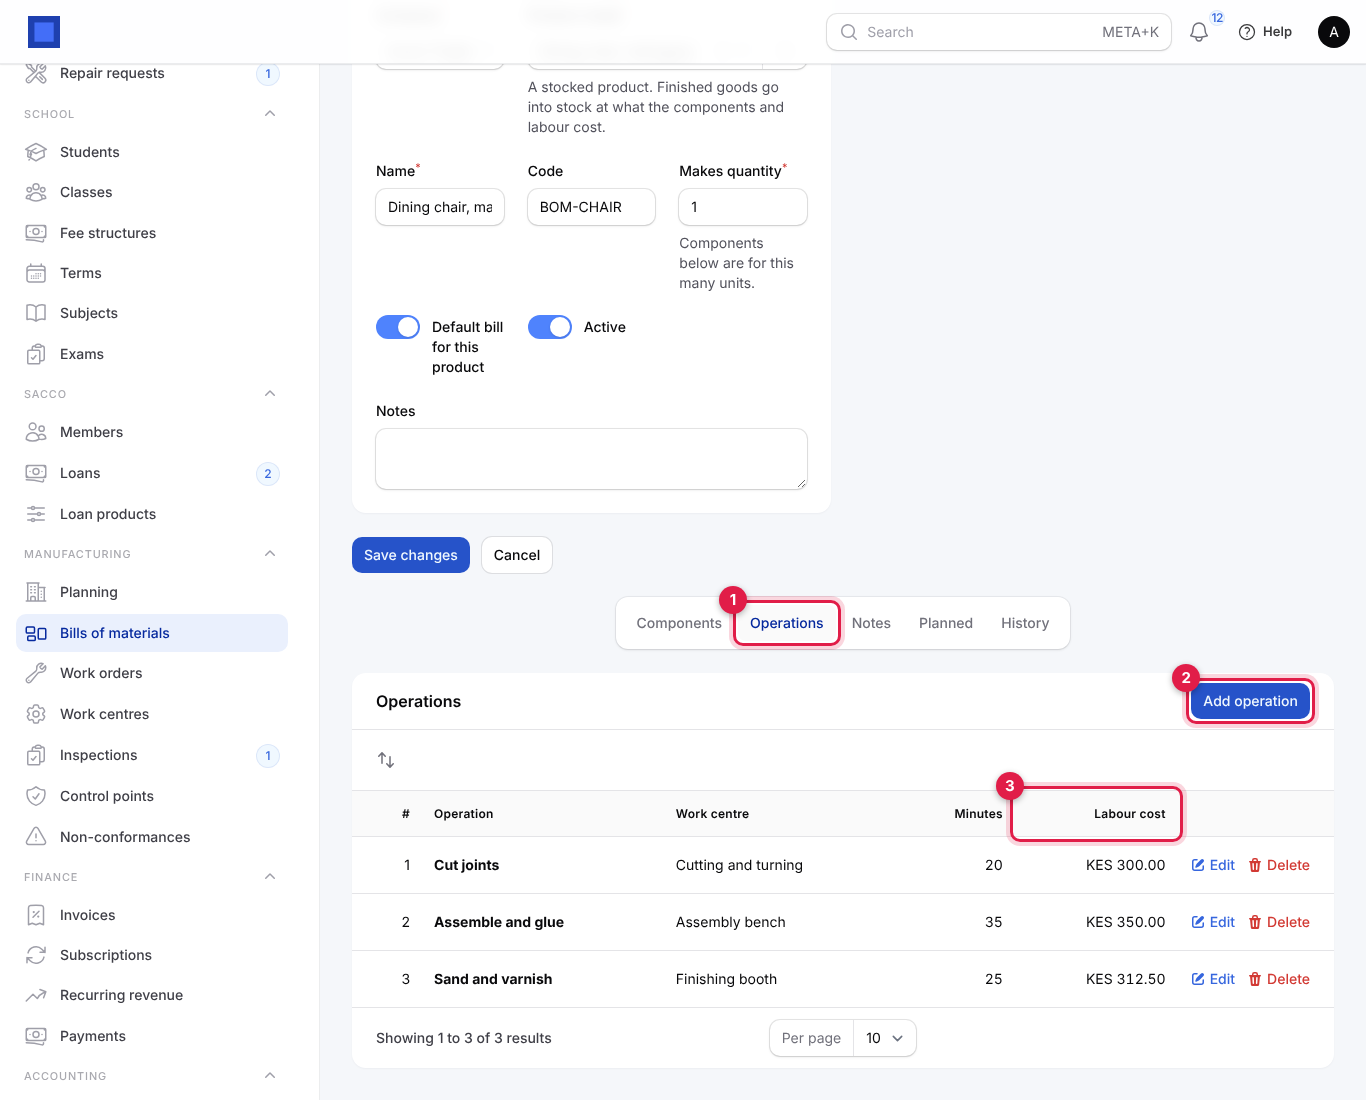
On the Operations tab (marker 1), click Add operation (marker 2) and enter the Operation name (Cut and sew, Assemble and glue), the Work centre, the Minutes it takes for the bill quantity, and its Order. The Labour cost column (marker 3) is minutes ÷ 60 × the work centre's cost per hour.
Plan what to make and what to buy
Open Manufacturing → Planning (titled Manufacturing planning).
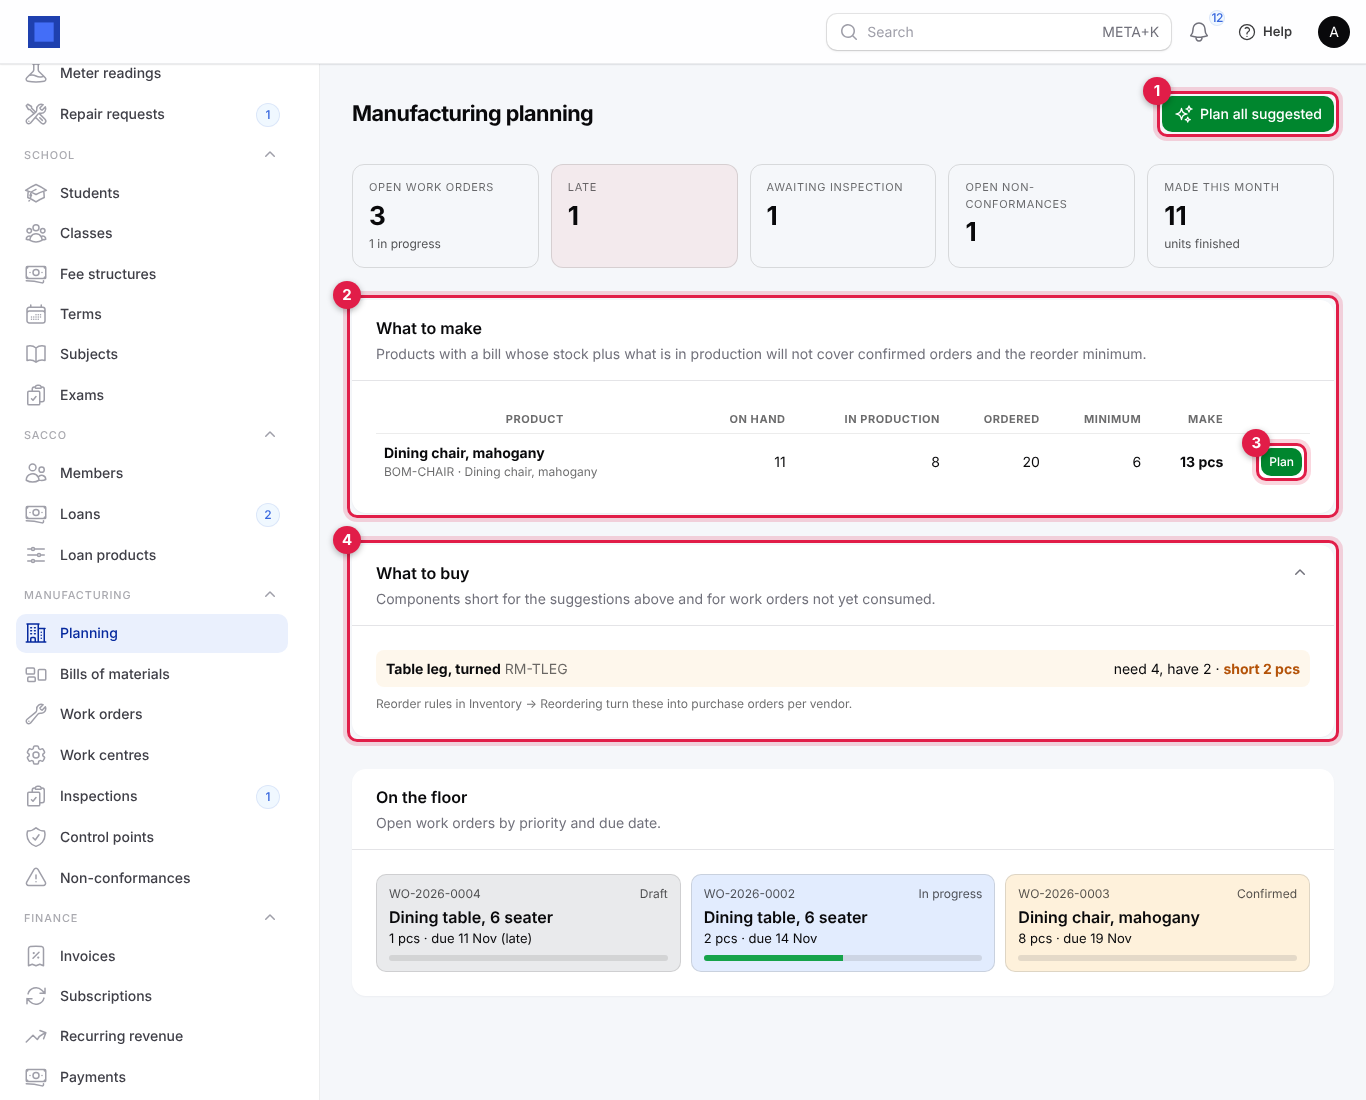
- The tiles show open work orders (and how many are in progress), late orders, orders awaiting inspection, open non-conformances and units made this month.
- What to make (marker 2) lists products with a bill whose stock plus what is already in production will not cover confirmed sales orders and the reorder minimum, with on hand, in production, ordered, minimum and the quantity to Make. Click Plan on a row (marker 3) to draft a work order from the default bill, or Plan all suggested (marker 1) to draft one per suggested product.
- What to buy (marker 4) lists components that are short for the suggestions and for work orders not yet consumed, for example Table leg, turned · need 4, have 2 · short 2 pcs. Reorder rules under Inventory → Replenishment turn these into purchase orders per vendor.
- On the floor shows open work orders by priority and due date as cards with their progress.
Make a product with a work order
Create the work order
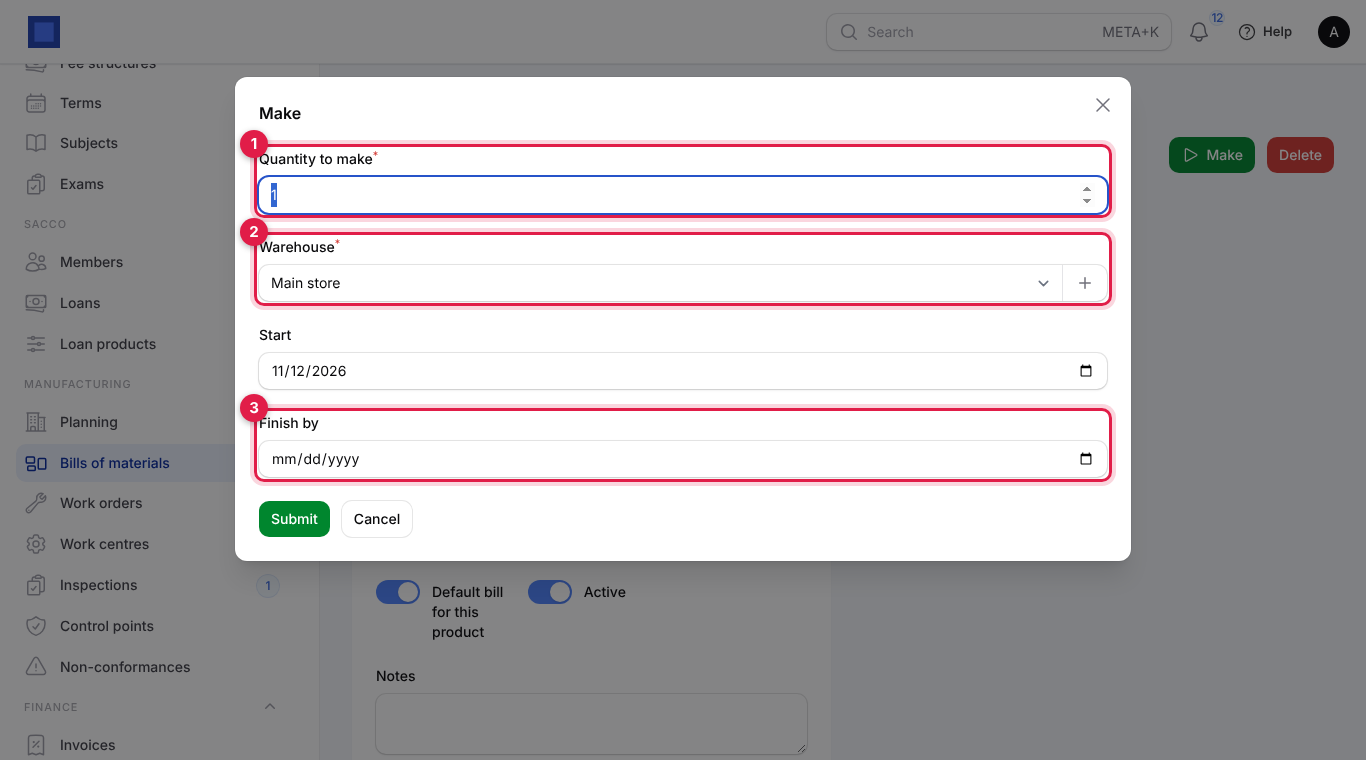
Start it from Plan on the planning page, from Make on a bill, or from the work orders list. Make on a bill asks for the Quantity to make (marker 1), the Warehouse (marker 2), the Start date and Finish by (marker 3); click Submit and the new draft work order opens.
From the list:
- Open Manufacturing → Work orders. Each order shows its number, product and warehouse, quantity (and how many were made), the due date (marker 2; red when late), cost and status (marker 3).
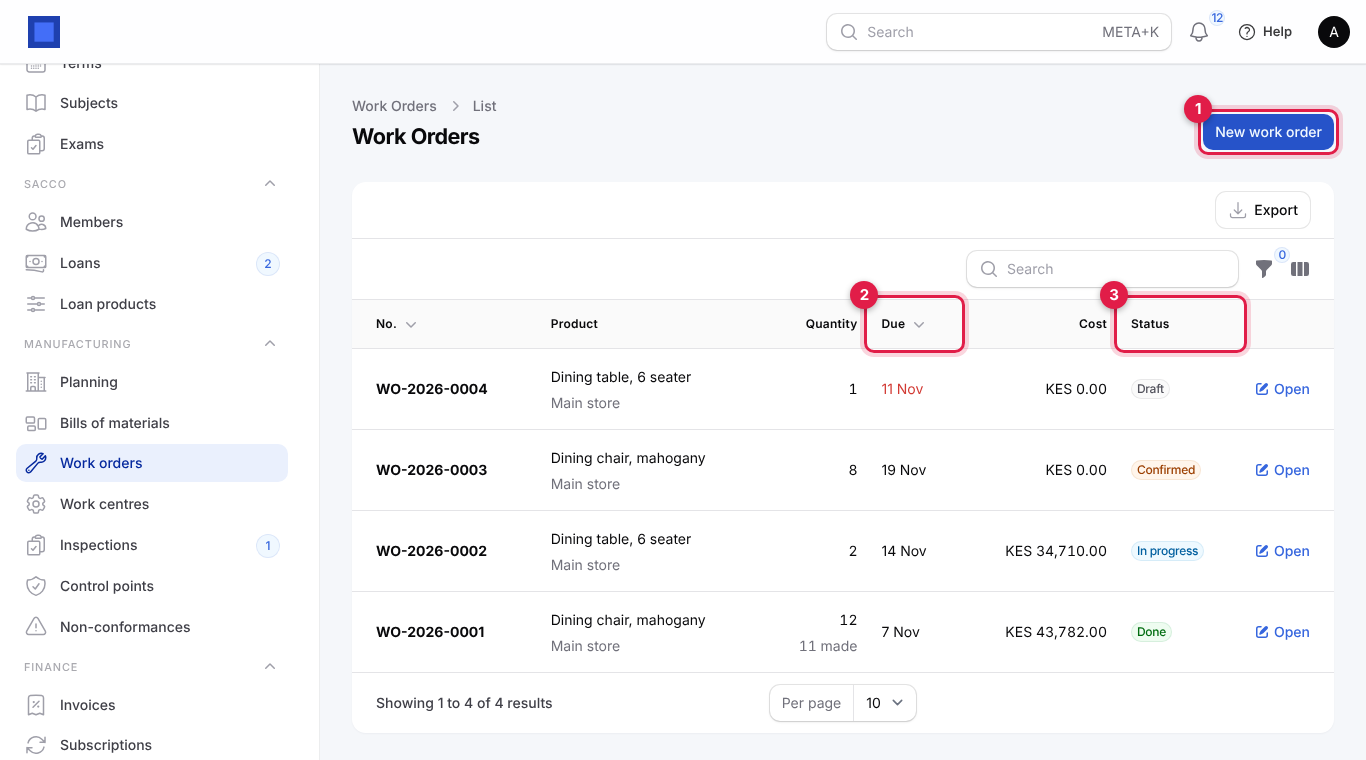
- Click New work order (marker 1).
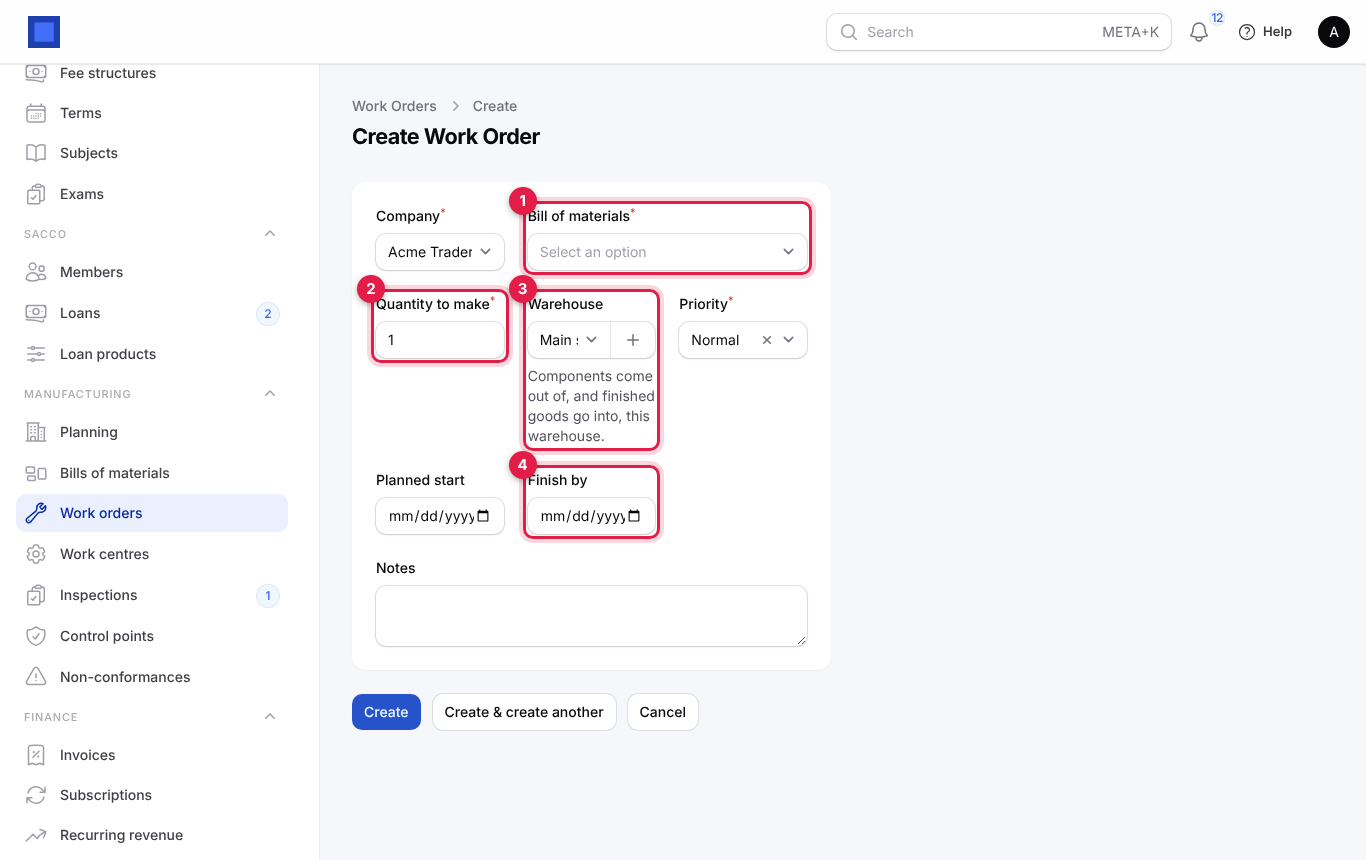
| Field | What to enter |
|---|---|
| Company (required) | Who makes it. |
| Bill of materials (required, marker 1) | Which bill to follow; it sets the product. |
| Quantity to make (required, marker 2) | How many units. Components and minutes are scaled from the bill. |
| Warehouse (marker 3) | Components come out of, and finished goods go into, this warehouse. |
| Priority | Low, Normal, High or Urgent; orders the floor view. |
| Planned start, Finish by (marker 4) | The plan. An order past Finish by and not done is late. |
| Notes | For example For the Savanna Hotel order. |
- Click Create. The order is a Draft with its materials and operations copied from the bill.
Run it on the floor
The buttons on a work order follow its status. A Draft:
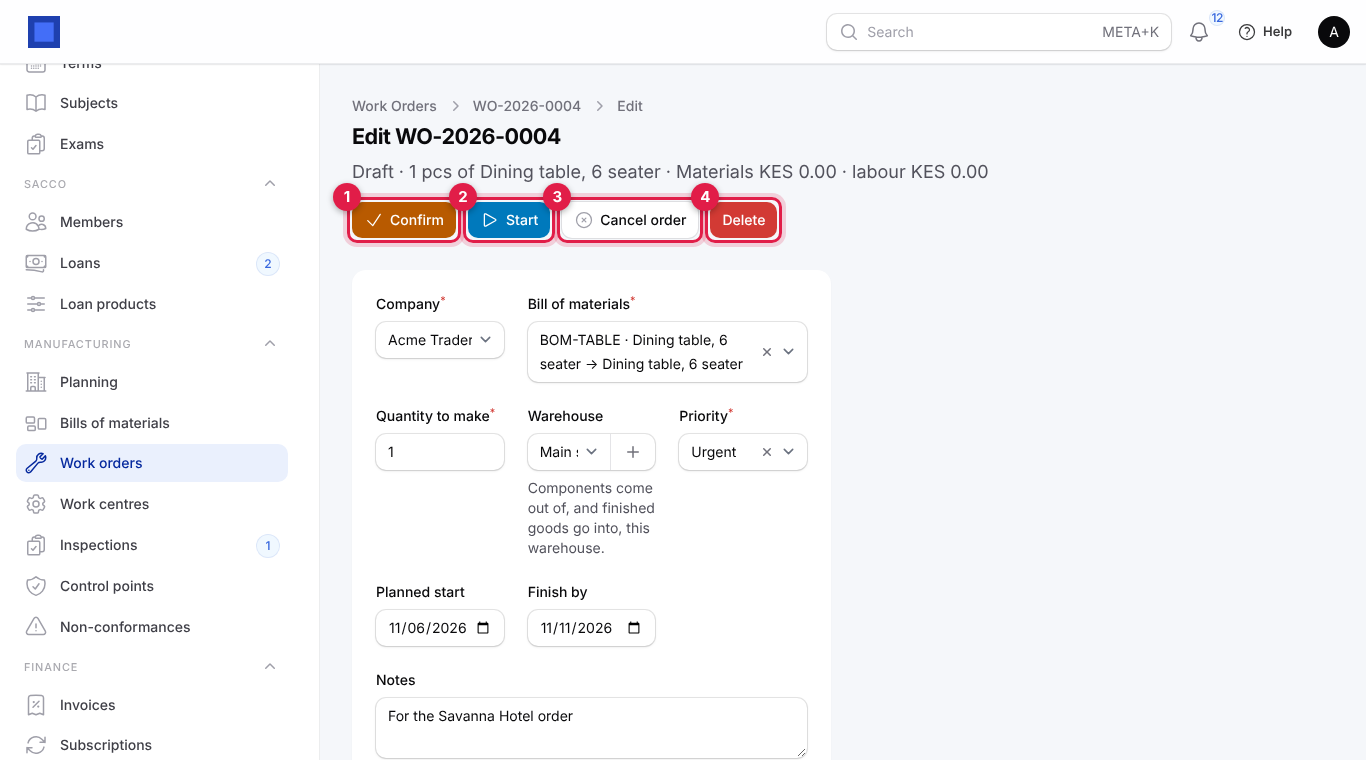
- Confirm (marker 1): commits to making it. The bill and quantity are locked.
- Start (marker 2): production has begun.
- Cancel order (marker 3): stops it. Allowed until components are consumed.
- Delete (marker 4): only for drafts.
A Confirmed order:
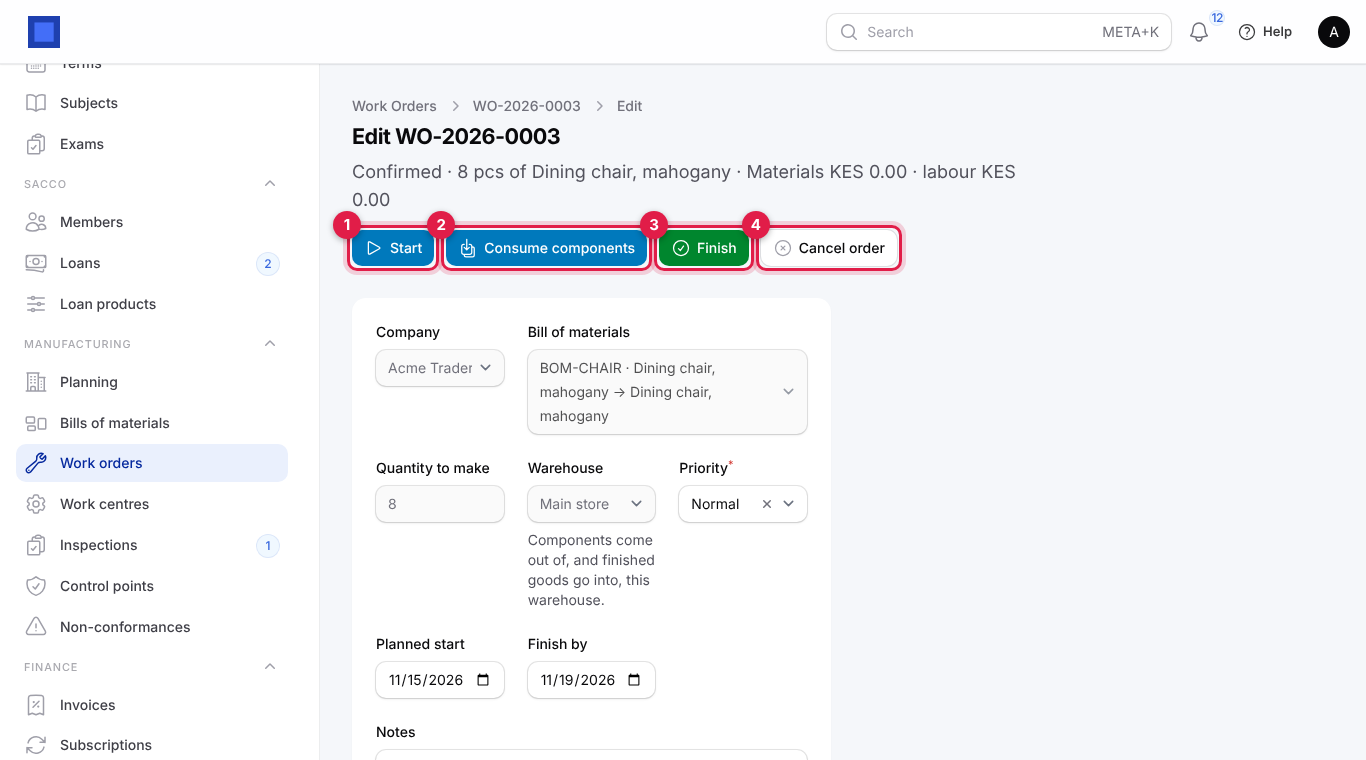
- Start (marker 1) sets it In progress.
- Consume components (marker 2) takes the planned quantity of every component out of the warehouse now, at its stock cost. Adjust the planned quantities on the Materials tab first if they differ (for example a board was split).
- Finish (marker 3) and Cancel order (marker 4) as below.
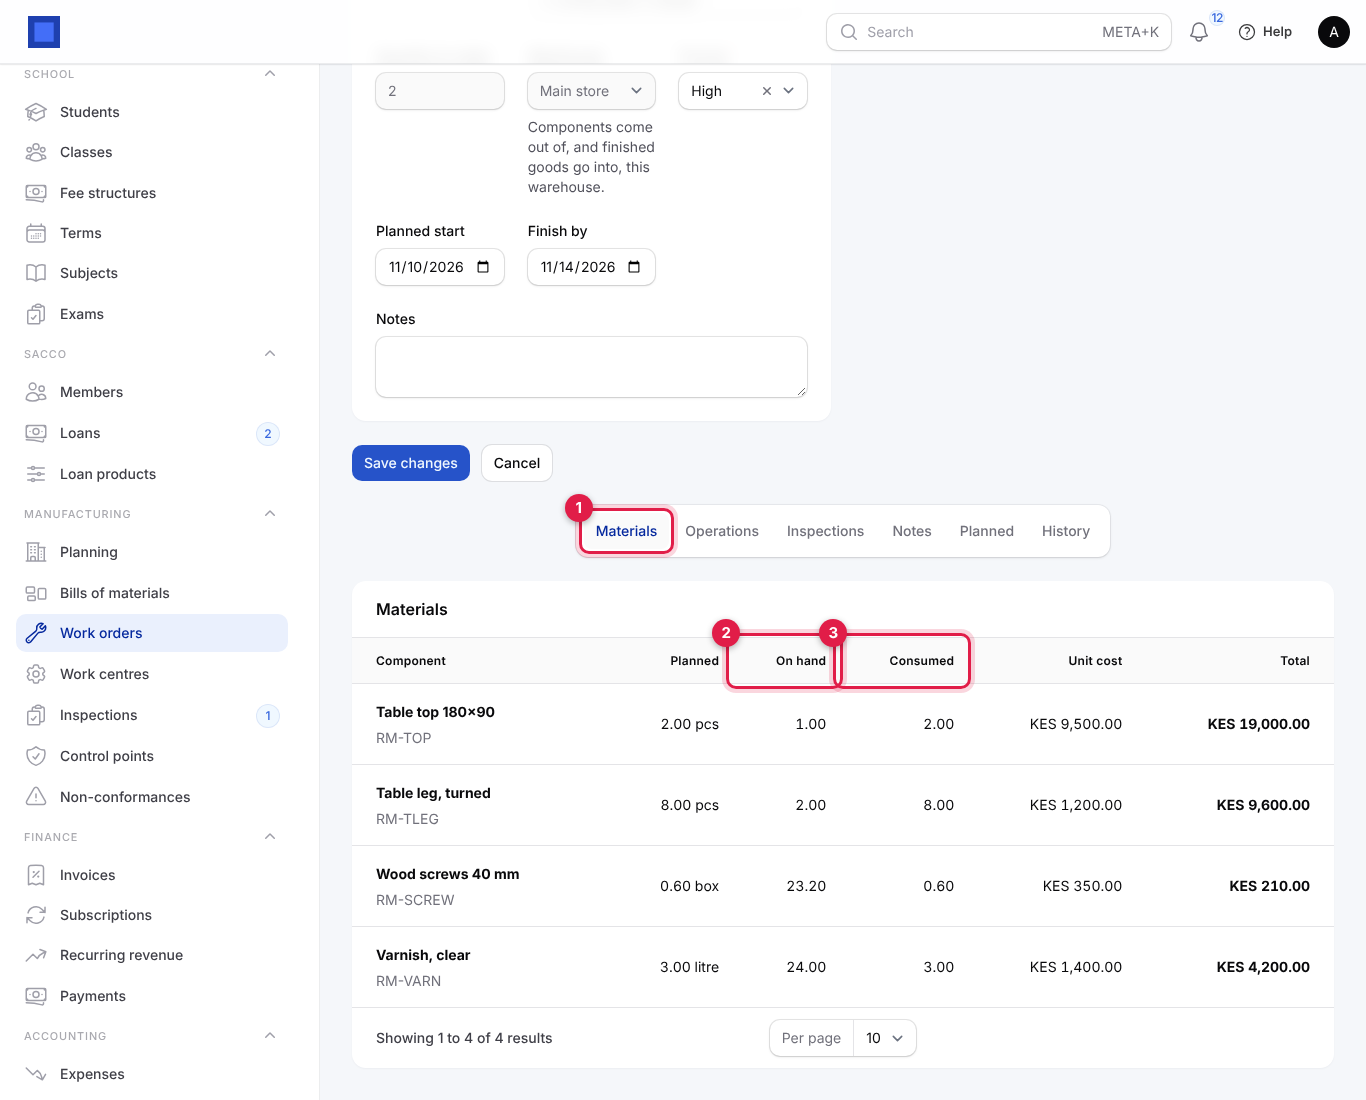
The Materials tab (marker 1) shows each component's planned quantity, what is On hand (marker 2) in the warehouse, what has been Consumed (marker 3), unit cost and total. While the order is open you can add, edit or remove components there.
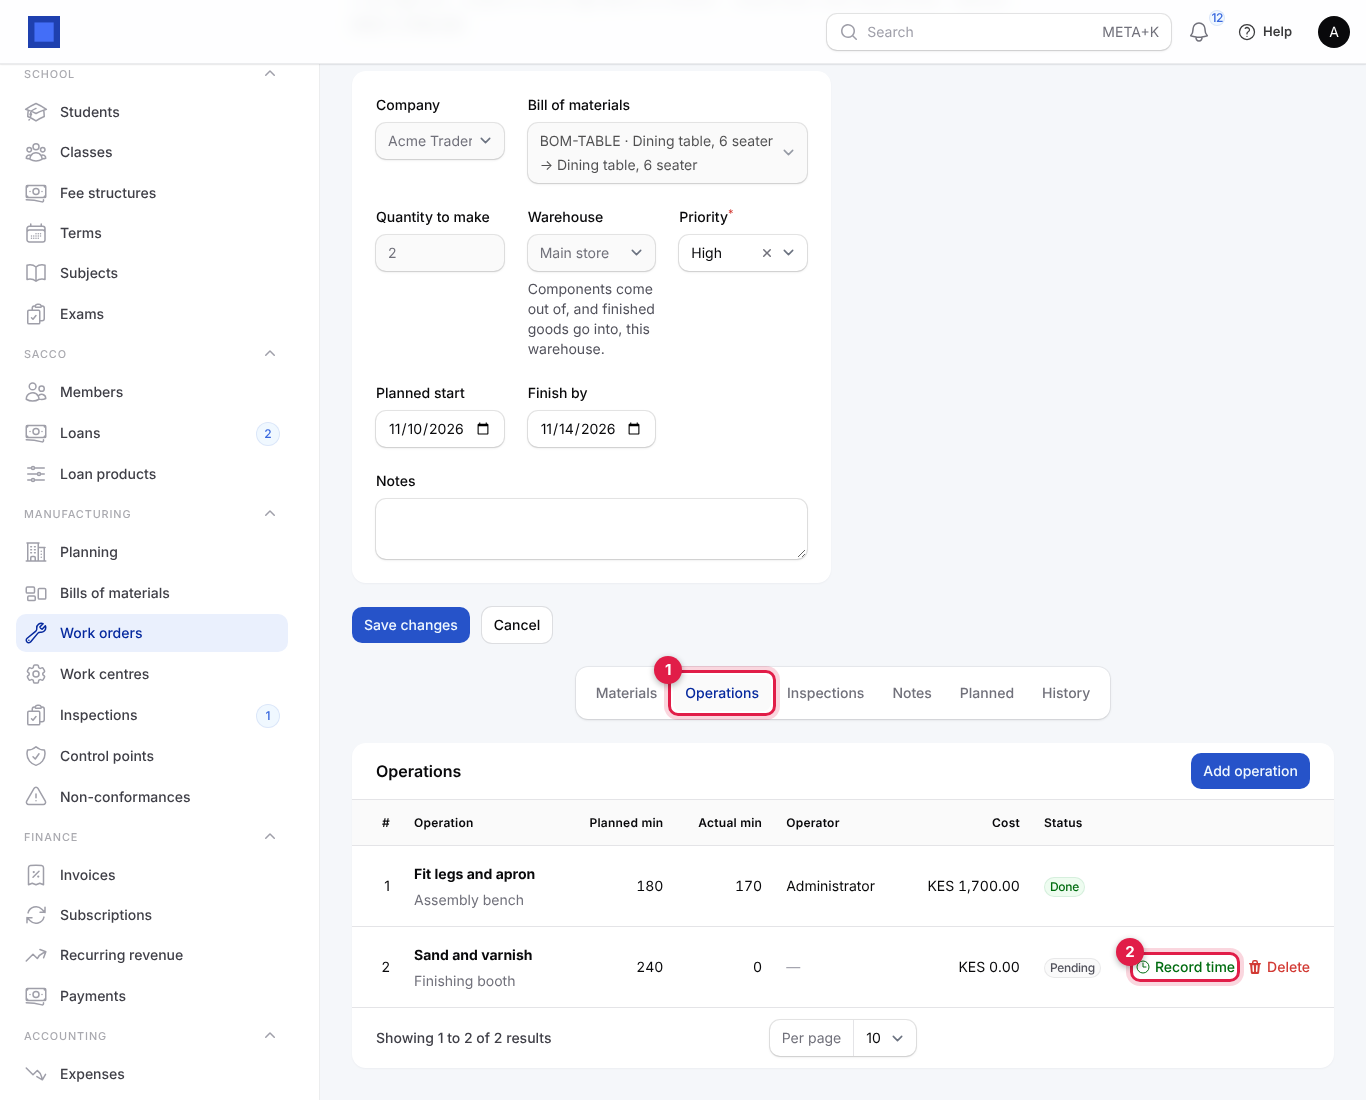
The Operations tab (marker 1) shows planned and actual minutes, the operator and cost for each step. When a step is done, click Record time (marker 2), type the Minutes taken and click Submit; the step is Done and costed at its work centre's rate. Steps never timed are costed at their planned minutes when the order finishes.
Finish
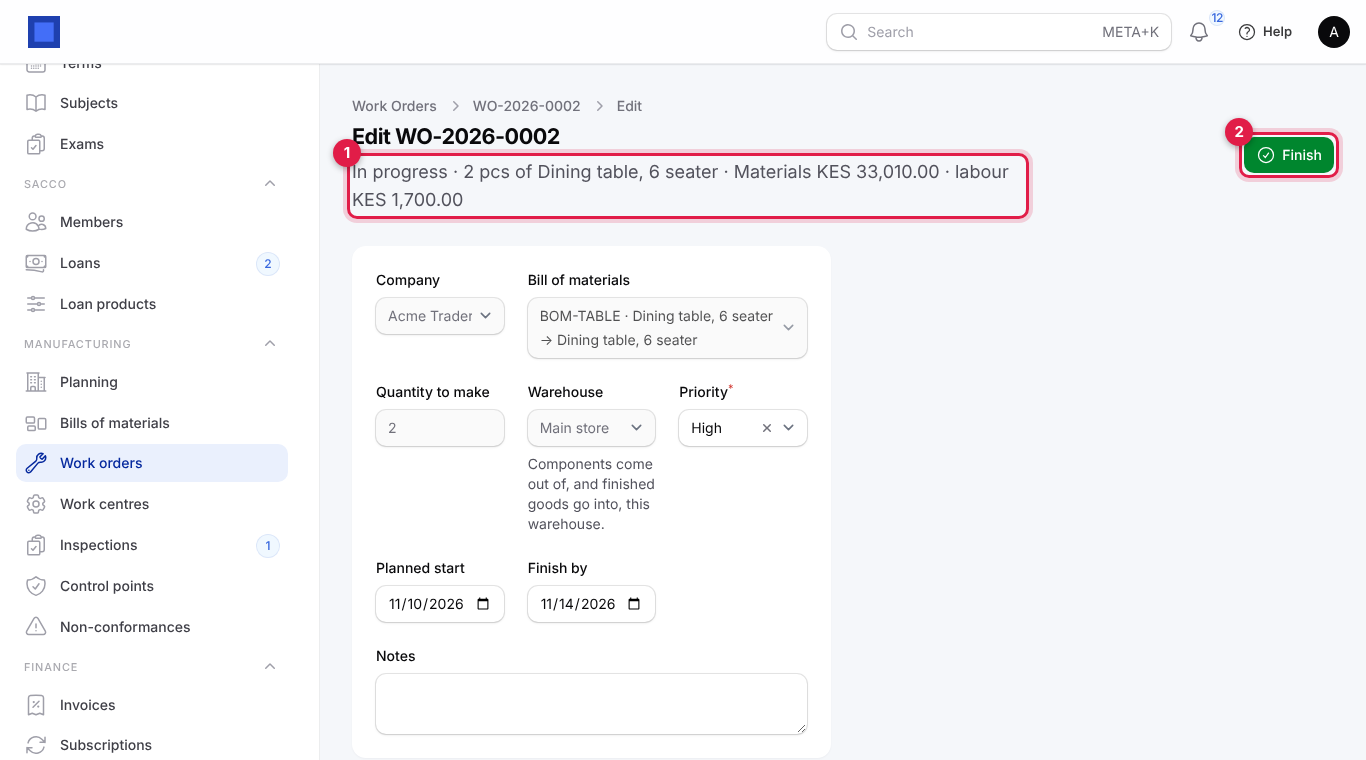
- When production is complete, open the work order. Its summary (marker 1) shows the status, quantity, product and materials and labour so far. Click Finish (marker 2).
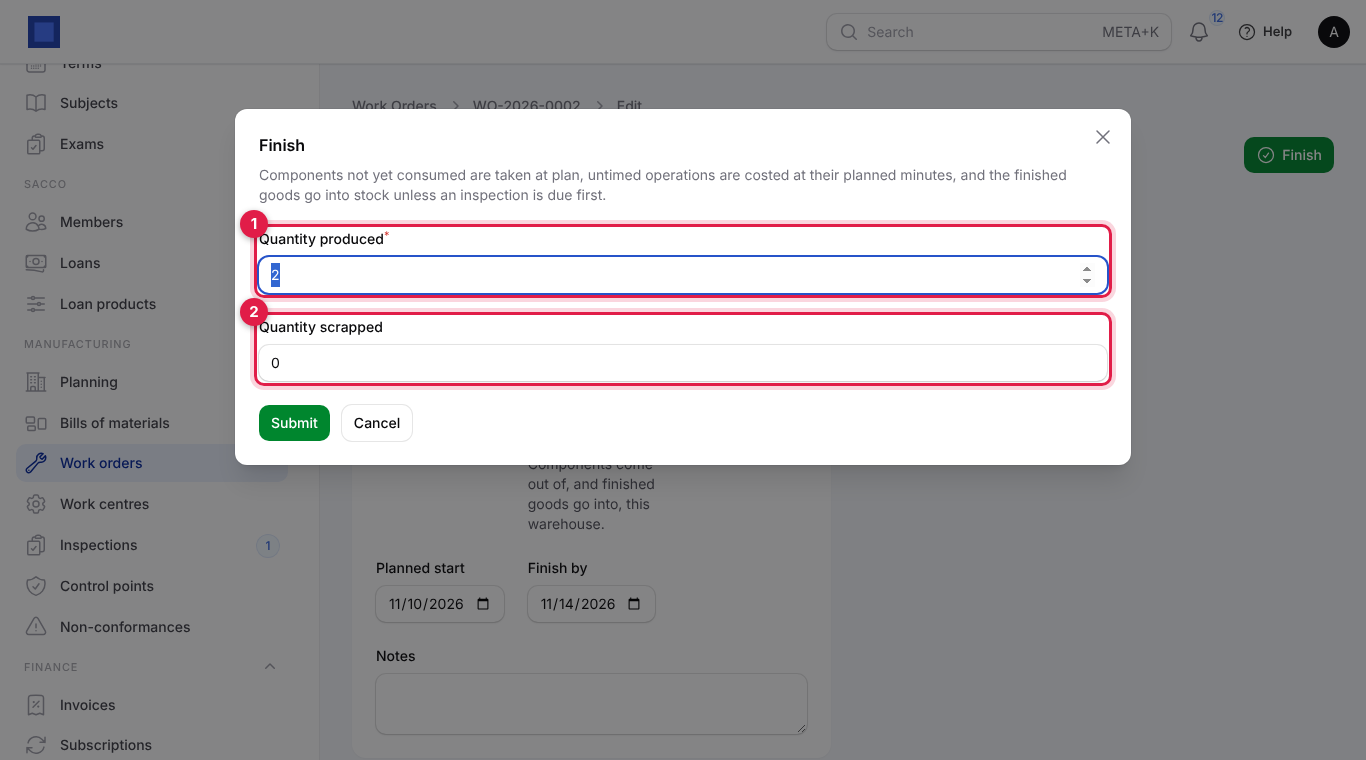
- Enter the Quantity produced (marker 1) and any Quantity scrapped (marker 2), then click Submit. The dialog explains: Components not yet consumed are taken at plan, untimed operations are costed at their planned minutes, and the finished goods go into stock unless an inspection is due first.
What happens:
- Components not yet consumed are taken out of stock (when backflushing is on).
- If a control point applies to the product, an inspection is raised and the order waits as Awaiting quality; the goods go into stock when the inspection passes.
- Otherwise the produced quantity goes into stock at unit cost = (components + labour) ÷ good units, and the order is Done.
- With Accounting on: Inventory is debited for the finished goods at full cost, components are credited out of Inventory, and labour is credited to the account set in Preferences.
Work order statuses: Draft → Confirmed → In progress → (Awaiting quality) → Done; Cancelled when stopped before consumption.
Check quality
Control points
Control points say when an inspection is needed.
- Open Manufacturing → Control points and click New control point.
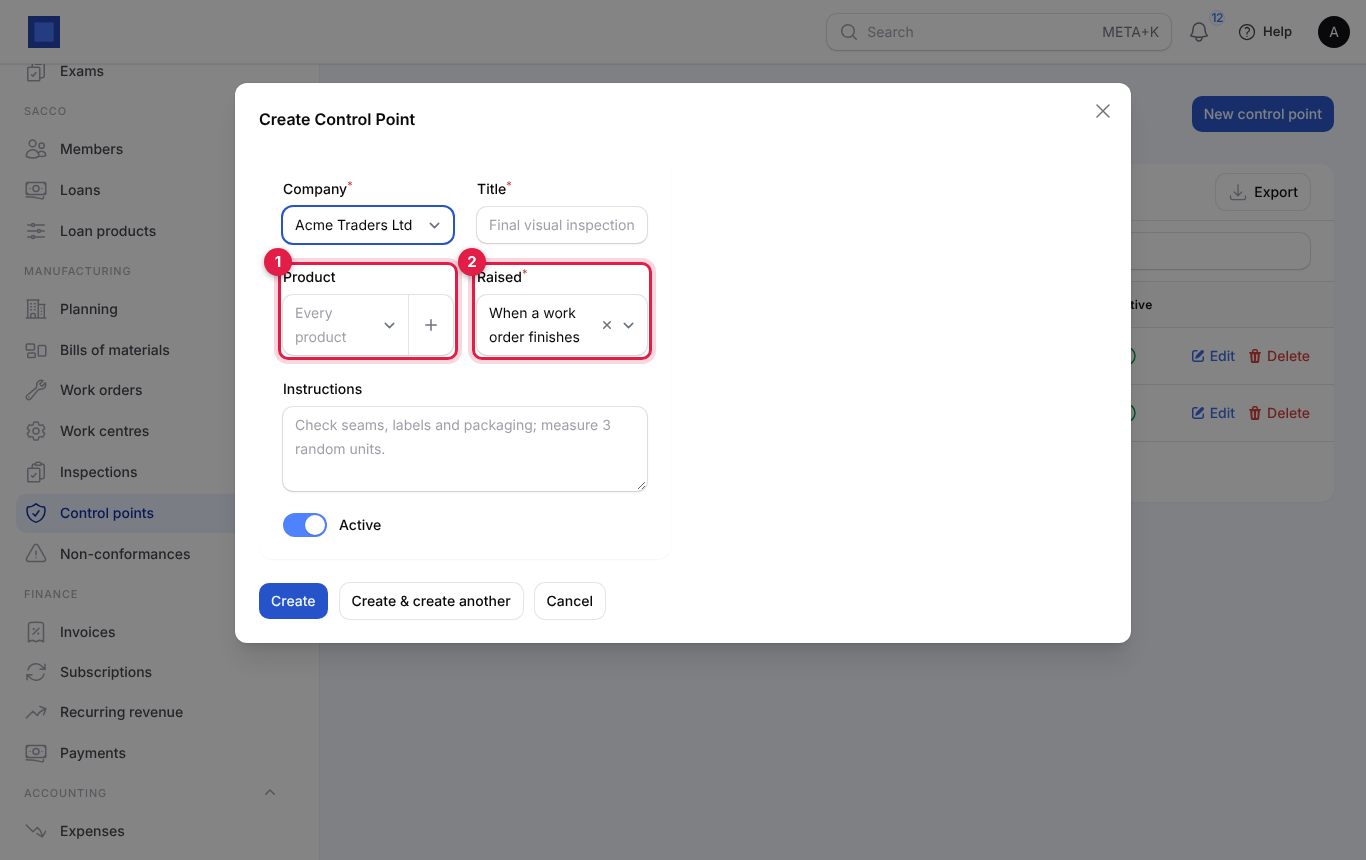
| Field | What to enter |
|---|---|
| Company (required), Title (required) | For example Final visual inspection. |
| Product (marker 1) | One product, or leave empty for every product. |
| Raised (required, marker 2) | When a work order finishes (automatic) or Only when requested. |
| Instructions | What to check, for example Check seams, labels and packaging; measure 3 random units. |
| Active | Off to stop raising it. |
- Click Create.
Inspections
Manufacturing → Inspections lists every inspection with its number, title and instructions, product, work order, quantity checked and failed, inspector and status (Pending, Passed, Failed).
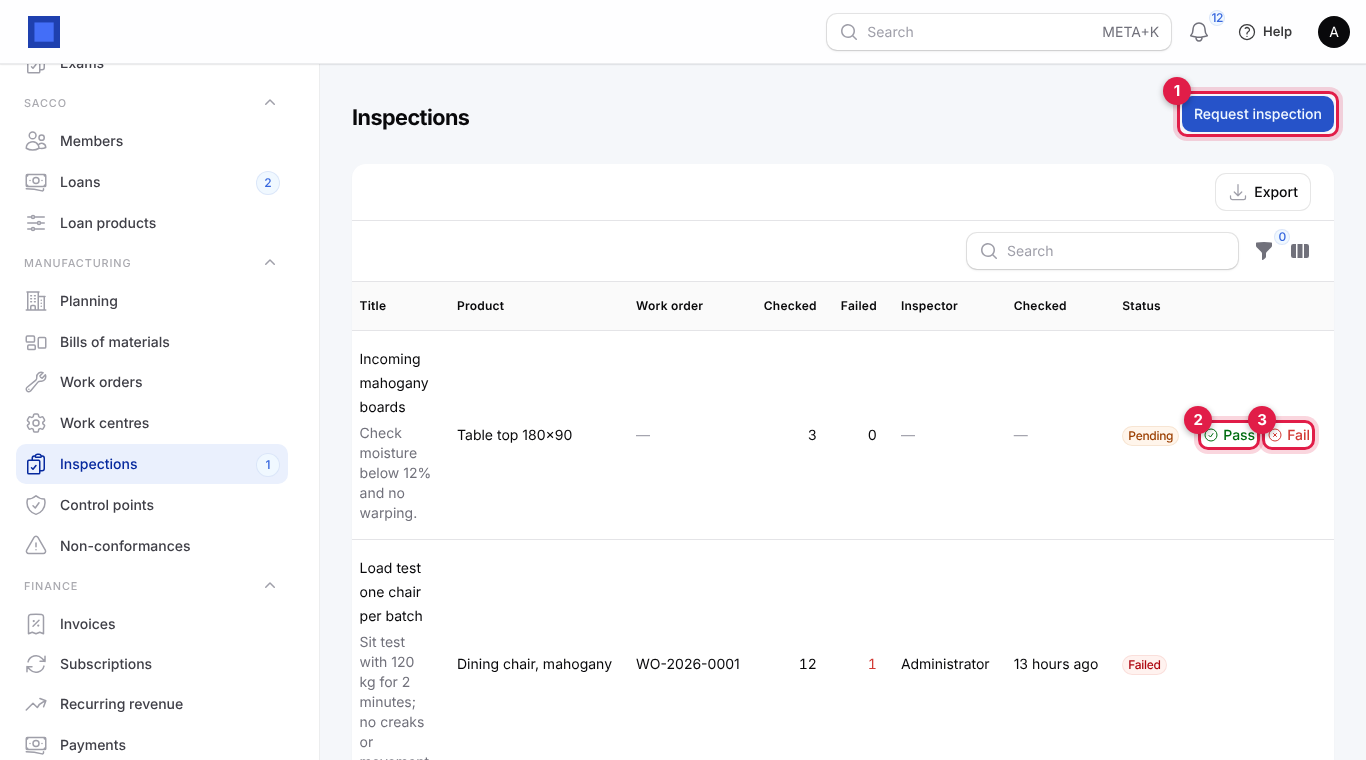
- Request inspection (marker 1): raise one by hand, for example for incoming raw materials: Company, Title, Product, Quantity to check and Instructions.
- Pass (marker 2): add optional Notes and click Submit. If it belongs to a work order awaiting quality and nothing else is pending, the finished goods go into stock and the order is Done.
- Fail (marker 3):
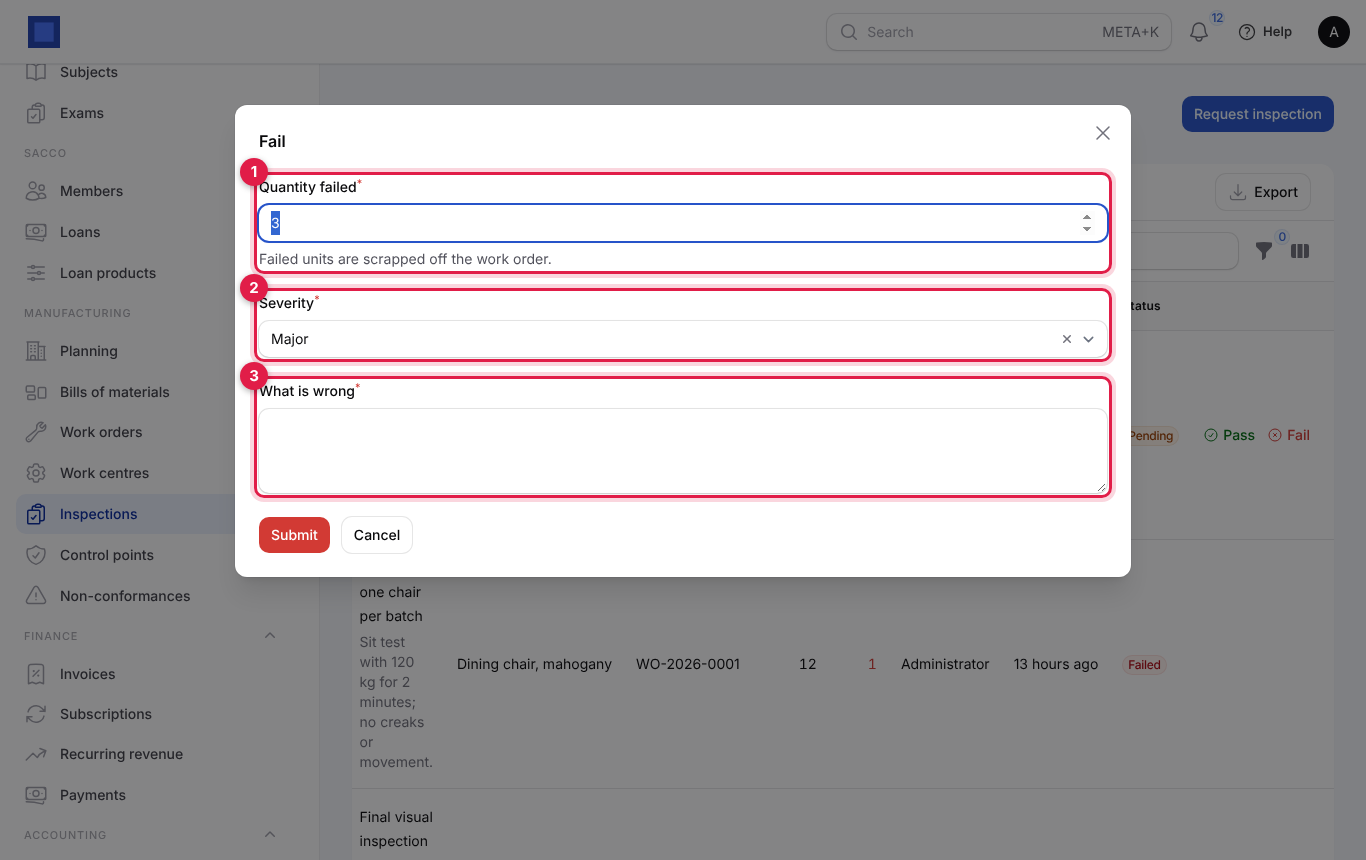
| Field | What to enter |
|---|---|
| Quantity failed (required, marker 1) | How many units failed. Failed units are scrapped off the work order; the rest go into stock. |
| Severity (required, marker 2) | Minor, Major or Critical. |
| What is wrong (required, marker 3) | The defect, for example Chair wobbles under load test. |
Failing opens a non-conformance automatically. You need manufacturing.quality to pass or fail.
Non-conformances
Manufacturing → Non-conformances tracks every quality problem until it is fixed. Each has a number, title, work order, quantity, severity, who it is Assigned to, when it was raised and its Status (marker 2): Open, In progress or Closed.
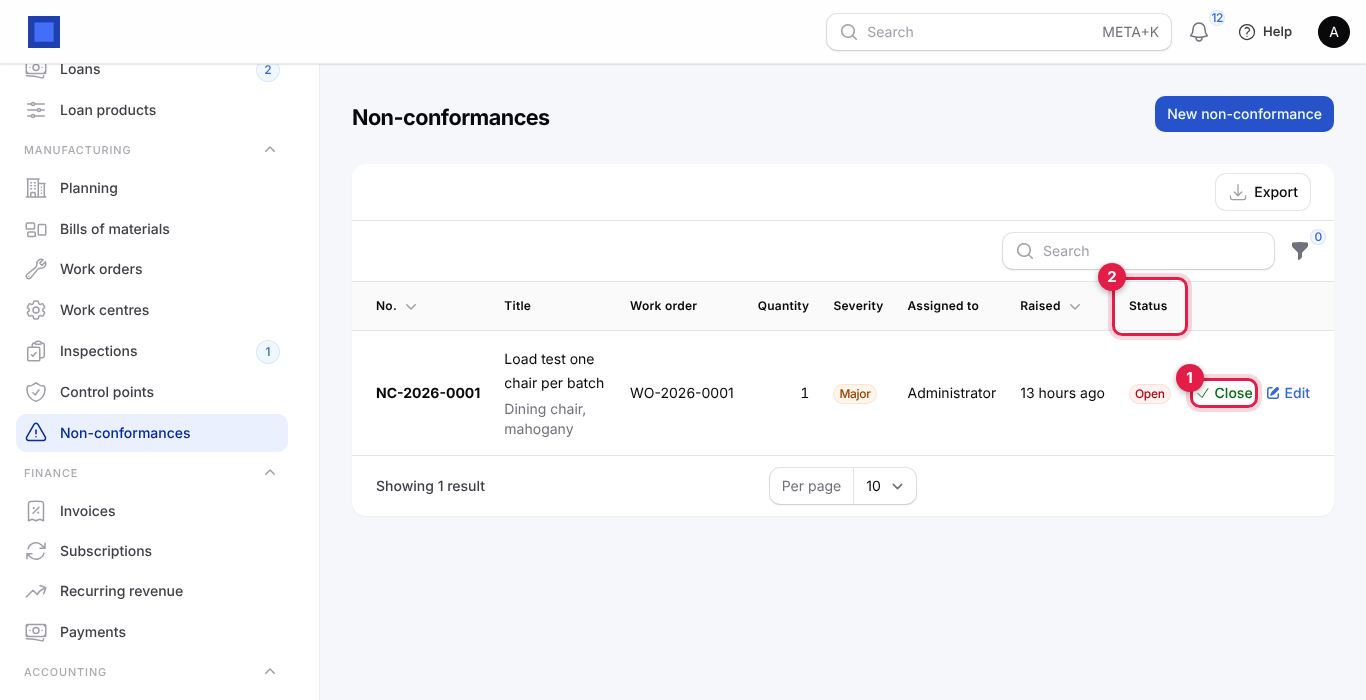
- New non-conformance raises one by hand (from a customer complaint, for example) with Company, Title, Product, Work order, Quantity, Severity, Status, Assigned to, What is wrong, Root cause and Corrective action.
- Edit to assign it and set it In progress.
- Close (marker 1): type the Root cause and Corrective action (both required) and click Submit.
Common questions
Why is the unit cost of a finished product higher than the bill says? The bill uses today's component costs and planned minutes; the work order uses what was really consumed, the actual minutes recorded and the good units after scrap.
Finish says to consume the components first. Backflushing is off in Preferences. Click Consume components, then Finish.
Finish says inspections are pending. A control point raised an inspection. Pass or fail it under Manufacturing → Inspections.
The planning page suggests nothing. Suggestions come from confirmed sales orders and reorder minimums for products that have a default, active bill.
Can I make a product without tracking operations? Yes. A bill can have components only; the cost is then materials only.