Warranty claims
For shops and distributors that sell goods with a warranty: phones, TVs, appliances, solar kits, tools. When a customer brings something back faulty, you find the sale by serial number, receipt or invoice number, and see at once whether it is still under warranty. You then repair it, replace it, refund it or turn the claim down with a reason, and the customer is told at each step. Faulty items can be claimed back from your supplier, and a report shows what is coming back and why.
You will find it under Inventory → Warranty claims. Products carry their warranty in Sales → Products.
Note: You need inventory.view to see claims and the report, and inventory.manage to open and settle claims. The Warranty claim buttons on invoices and till sales only show to people with inventory.manage. Set permissions under Settings → Roles.
Give products a warranty
- Open the product in Sales → Products.
- Fill in Warranty for customers (months) (marker 1), for example 12.
- If your supplier covers the item too, fill in Warranty from the vendor (months) (marker 2), for example 18.
- Click Save changes.
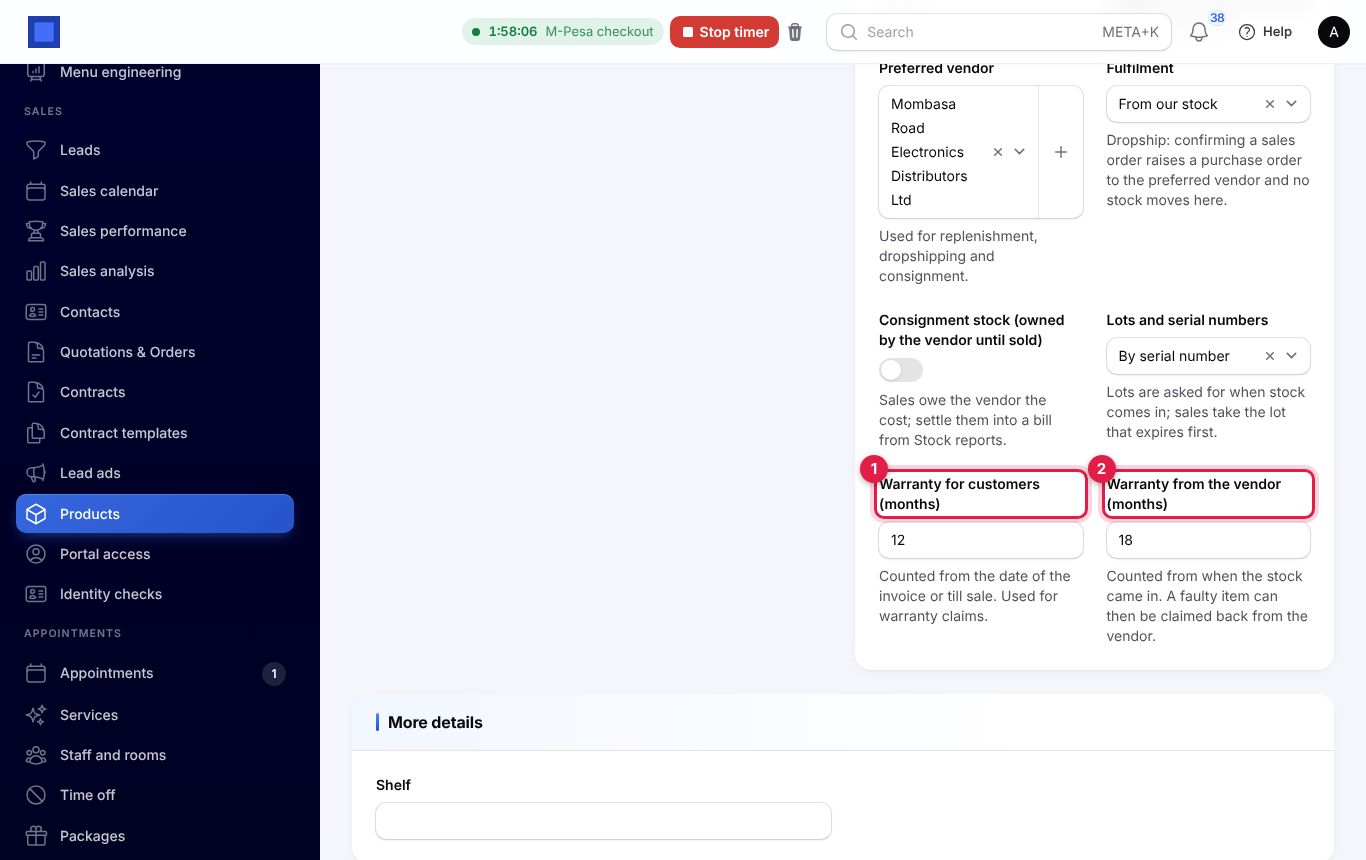
For items with serial numbers, set Lots and serial numbers to By serial number on the same product. Each unit then has its own sale date and warranty; see Track lots, serial numbers and expiry.
How the warranty end is worked out
- The warranty runs from the date of the invoice, or the day of the till sale, for the number of months on the product. The last day covered is the day before the same date that many months later. A TV sold on 12 September 2026 with 12 months is covered until 11 September 2027.
- The customer warranty is checked against the day the claim is reported. A claim reported on the last day is still covered; a day later it is not.
- With no sale linked, the Sold on date you type is used.
- A product with no warranty months is never covered, and the claim shows No warranty.
- The vendor warranty runs from the day the unit came into stock (or the sale date when that is not known), for the vendor months.
Open a claim
Open Inventory → Warranty claims and click New warranty claim (marker 1). The list shows each claim with the customer, the product and serial, the sale, the warranty end date (green when covered, red when not), and the status with the outcome under it.
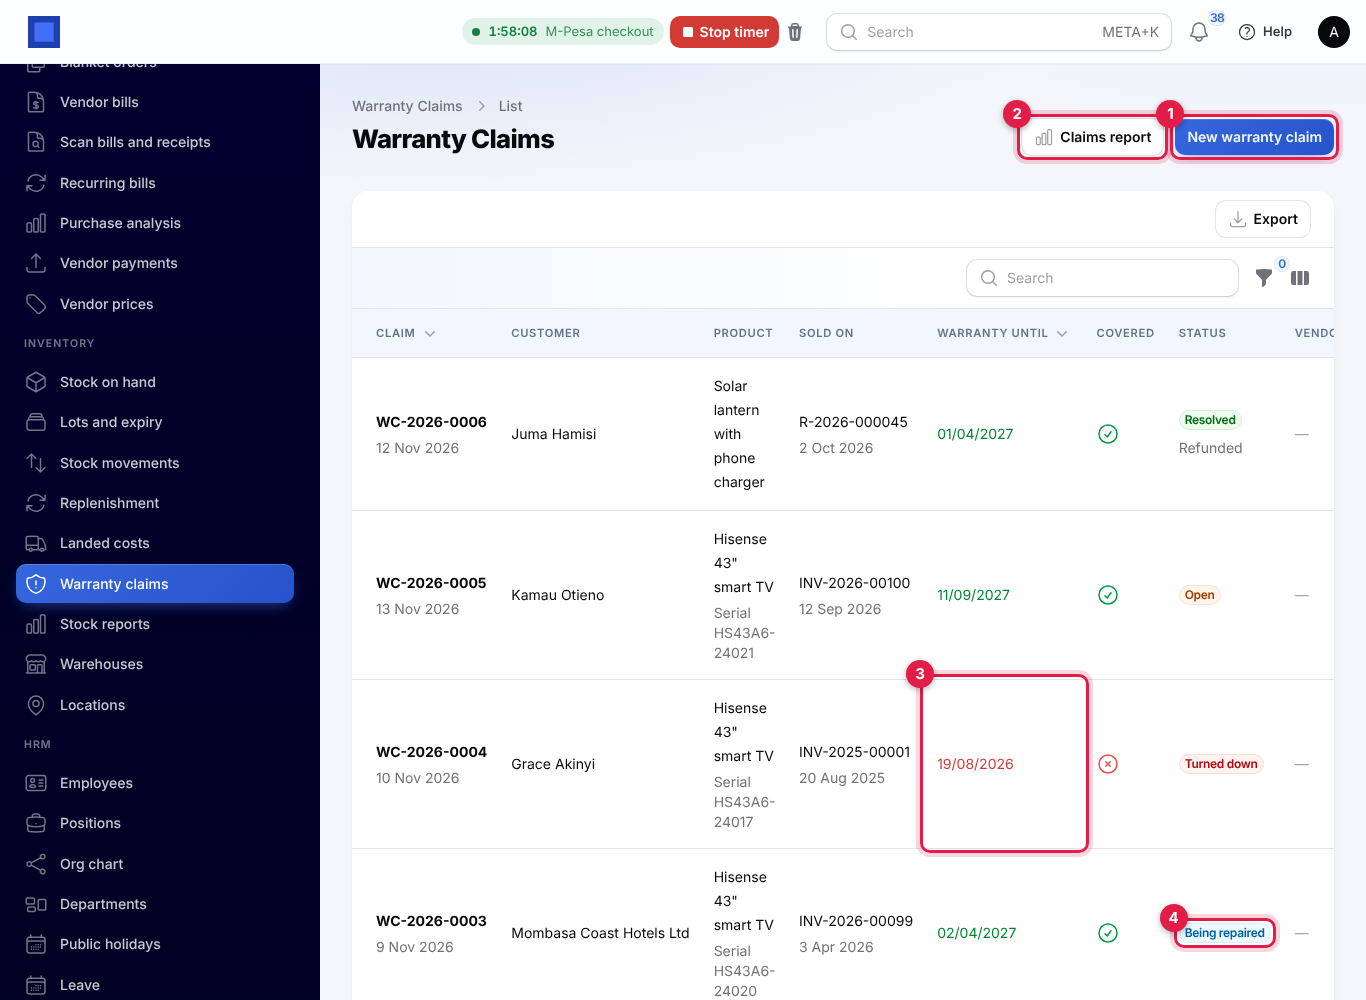
Filter by Status, Outcome or Under warranty. You can also find a claim from the global search by its number, the serial number or the customer's name.
Find the sale
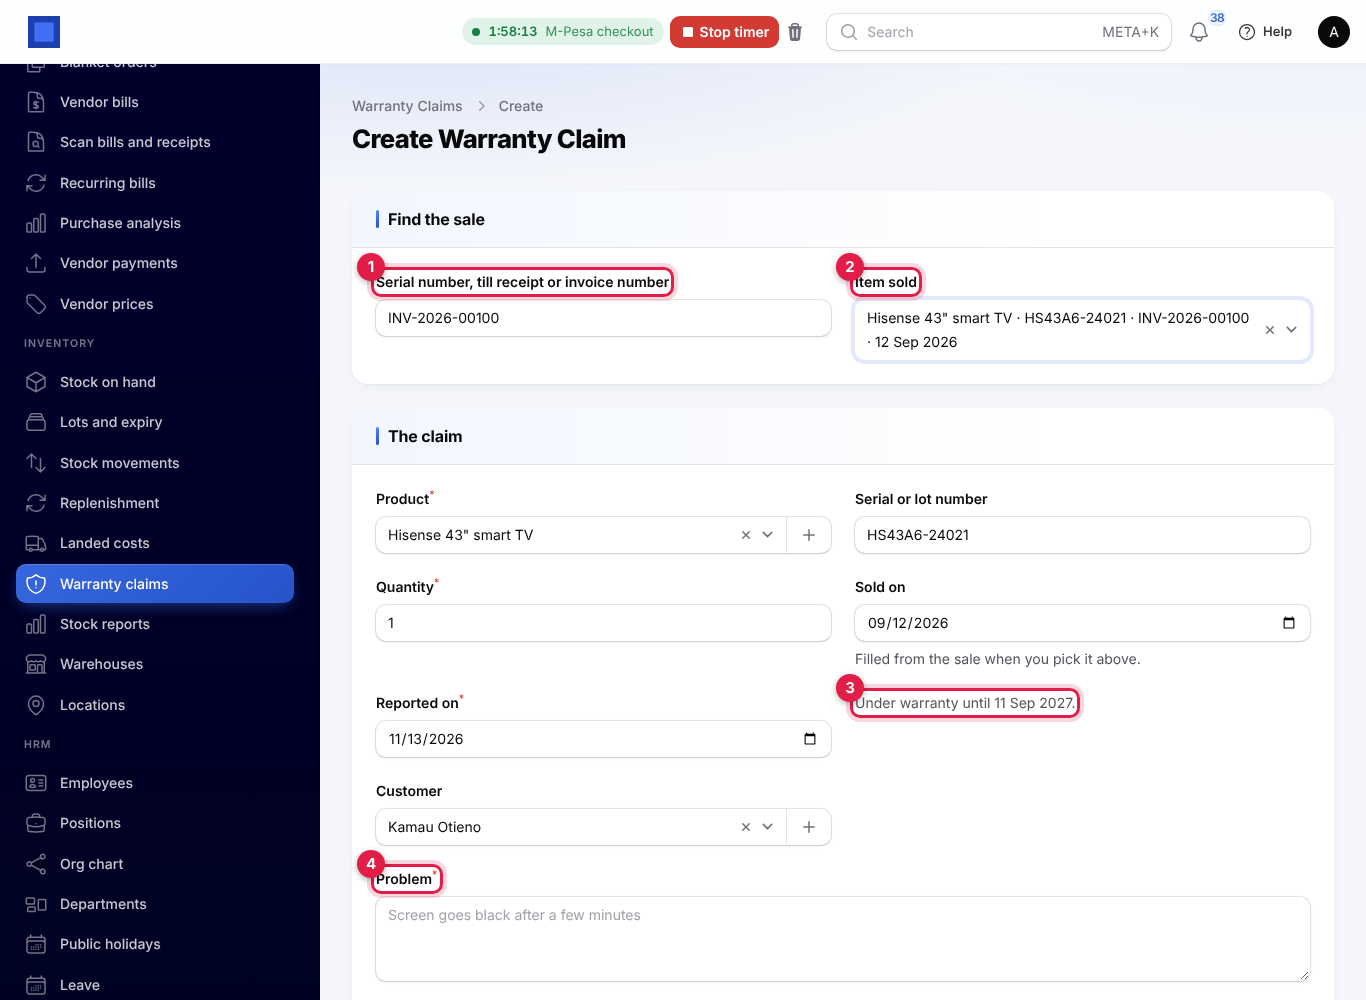
- Under Find the sale, type a Serial number, till receipt or invoice number (marker 1) and press Tab.
- Choose the line in Item sold (marker 2). Each line shows the product, the serial, the receipt or invoice and the sale date.
Picking it fills in the product, serial number, quantity, Sold on date, customer and the link to the sale. The line under the dates says whether it is covered (marker 3): Under warranty until 11 Sep 2027, or Out of warranty: it ended on ….
What the search finds:
- a serial or lot number: the last invoice or till sale it went out on;
- a till receipt number: every product on that sale;
- an invoice number: every product on that issued invoice.
Only goods are listed, not services. Serial-tracked goods are listed one line per serial; other goods are one line with the quantity sold.
If nothing matches, fill in the claim by hand: choose the Product, type the Serial or lot number and the Sold on date.
Describe the problem
- Check the Reported on date (today unless you change it).
- Choose the Customer, or for a walk-in customer type their Customer name, Customer phone and Customer email.
- Describe the Problem (marker 4), for example Screen goes black after a few minutes.
- Add Photos of the fault, up to six.
- Click Create. The claim is numbered WC-2026-0001 and so on, and the customer is told it was received.
From an invoice or a till sale
You can also start a claim from the sale itself:
- on an issued invoice, click Warranty claim at the top (marker 1);
- in Point of Sale → Sales history, click Warranty claim on the sale (marker 1).
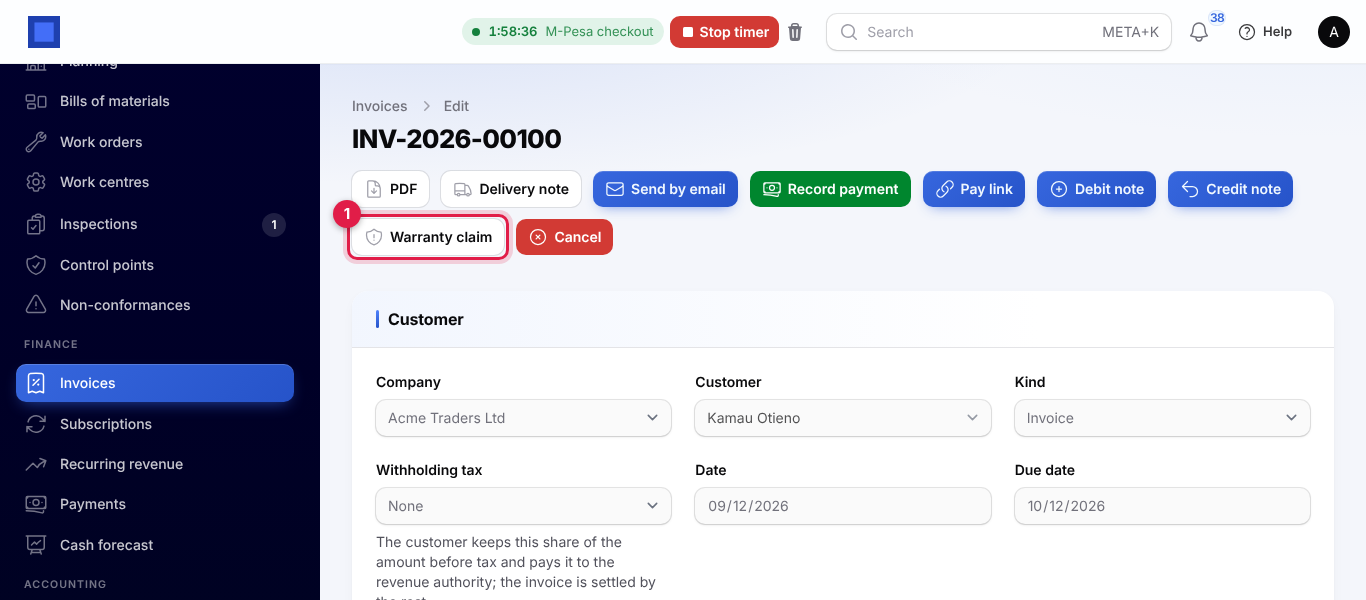
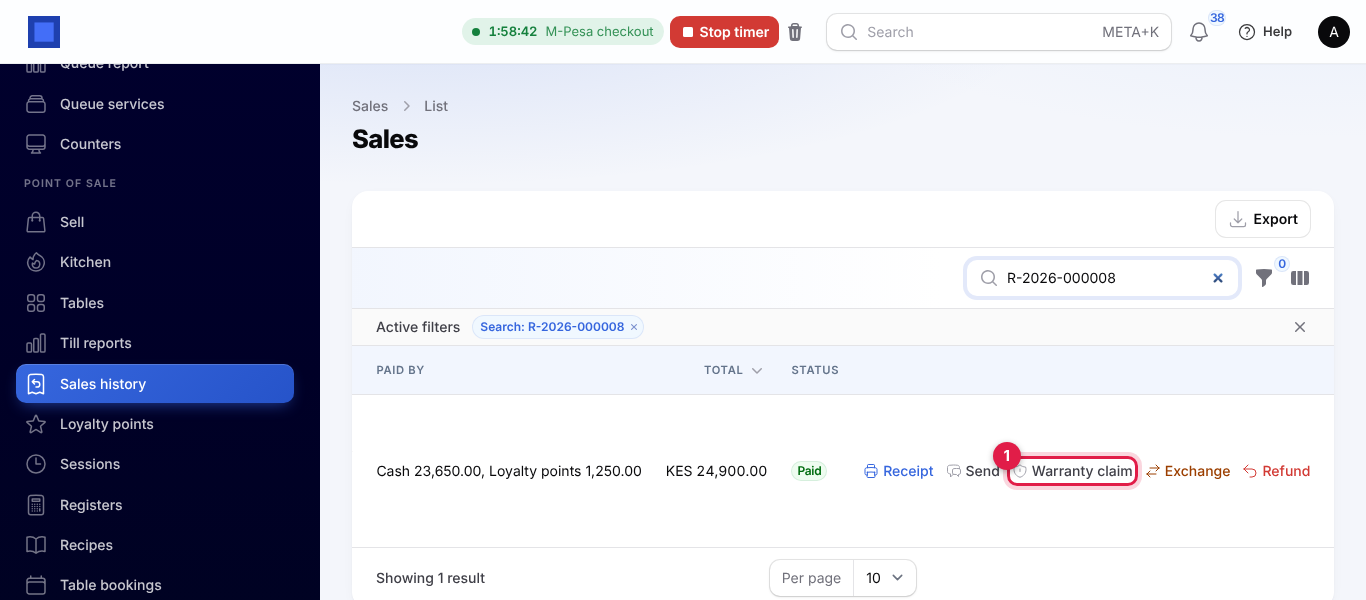
The new claim opens with the invoice or receipt number already looked up. Choose the item and describe the problem.
Settle a claim
Open the claim. The line under the title (marker 1) gives the status, the customer, the serial, the sale and the warranty. The buttons show what can be done next.
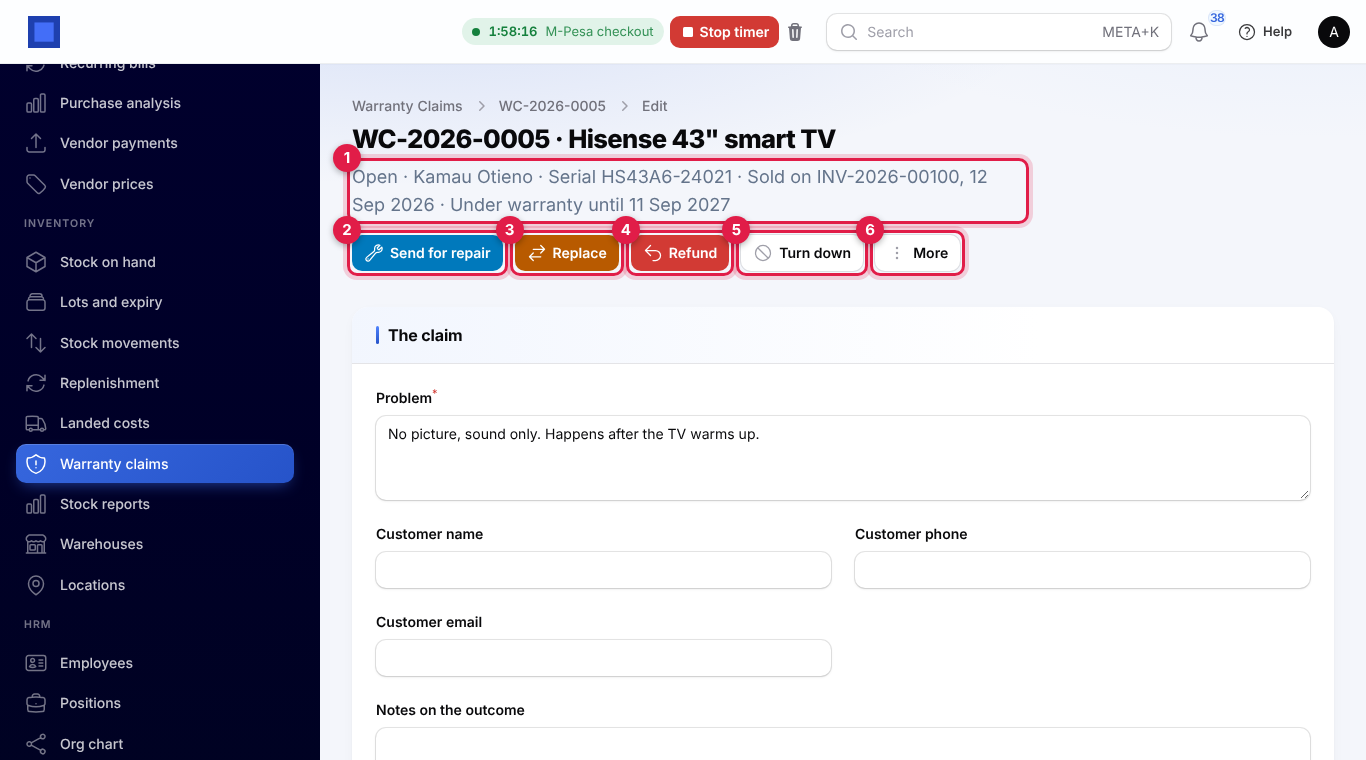
You can still correct the Problem, the customer's contact details, the Notes on the outcome and the Photos and click Save changes.
Repair
- Click Send for repair (marker 2), add notes if you like, and Submit. The claim shows Being repaired.
- When it comes back, click Repaired. The claim is Resolved, outcome Repaired, and the customer is told it is ready to collect.
Replace
Click Replace (marker 3). For serial-tracked goods choose the Replacement serial or lot (marker 1) from those in stock, then Submit.
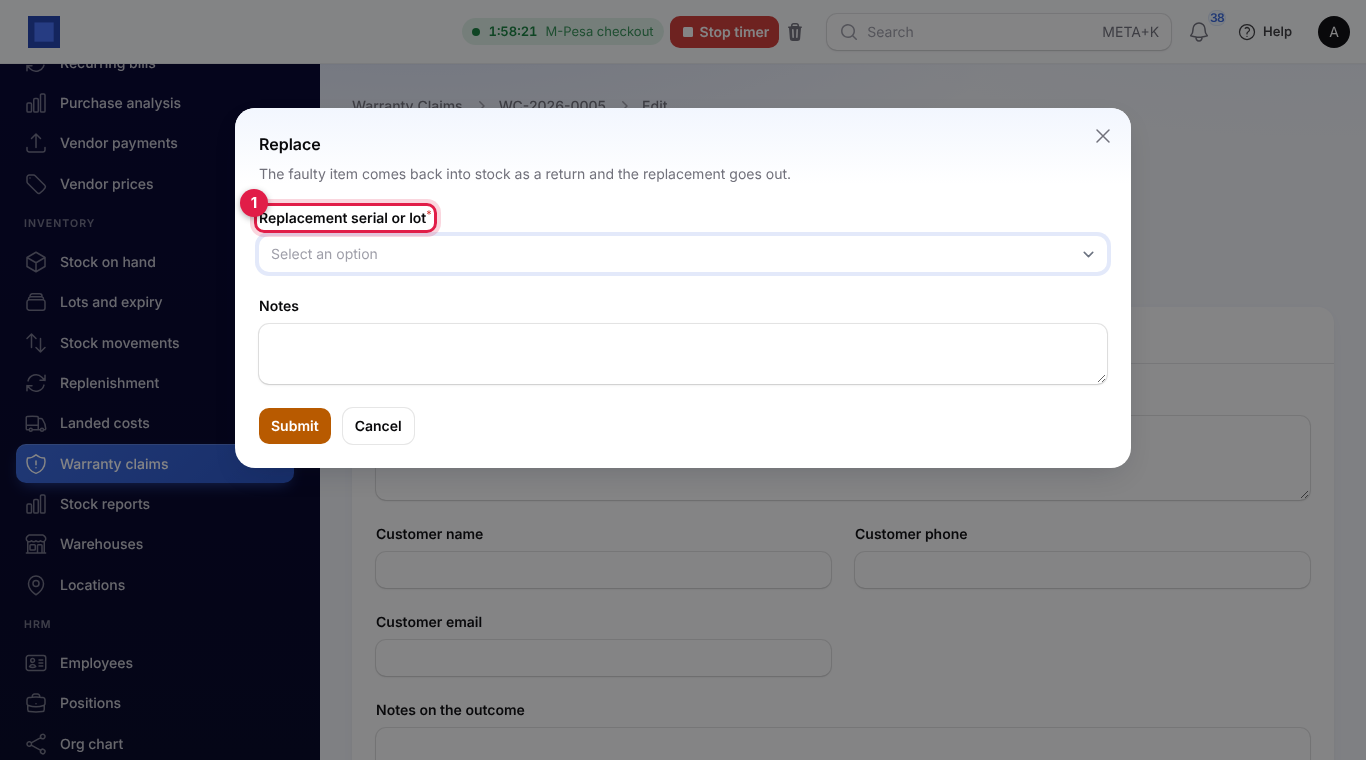
The faulty unit comes back into stock as a customer return and the replacement goes out, both in your main warehouse. The customer is told the new serial number. Replace shows only for products tracked in stock.
Refund
Click Refund (marker 4). The money goes back the way the item was sold:
- Sold on an invoice: a credit note for just this item is issued against the invoice (marker 1). It reduces what the customer owes, and when invoices take goods out of stock, it brings the item back.
- Sold at the till: the item is refunded against the receipt. Choose Money back by, for example cash or mobile money. A session must be open on that till's register.
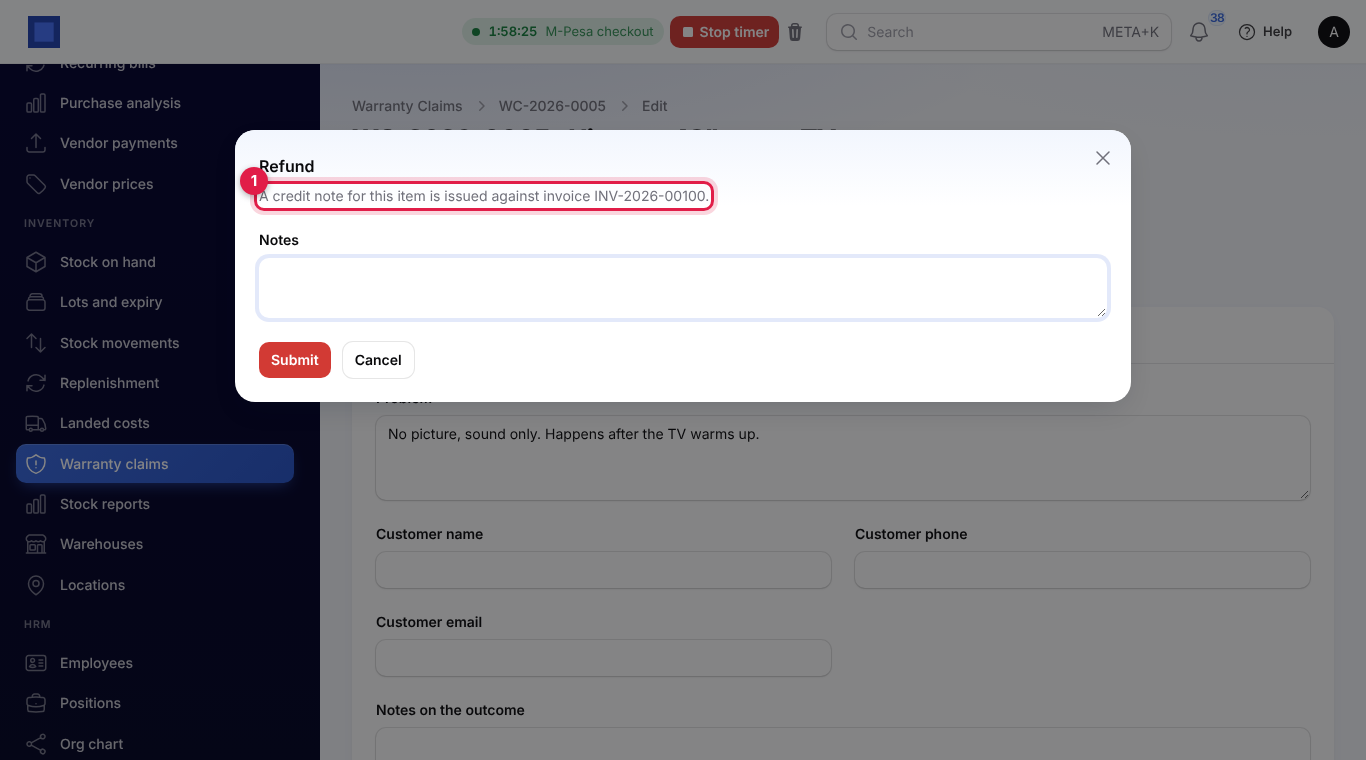
Refund shows only on claims linked to an invoice or a till receipt. Afterwards, More → Open the credit note or Till receipt opens what was made.
Turn down
Click Turn down (marker 5), give the Reason (required), for example Damage from a fall is not covered, and Submit. The claim shows Turned down, and the customer is told the reason.
A claim that is resolved or turned down cannot be settled again.
Claim it back from the vendor
Open More (marker 6) and click Claim from the vendor.
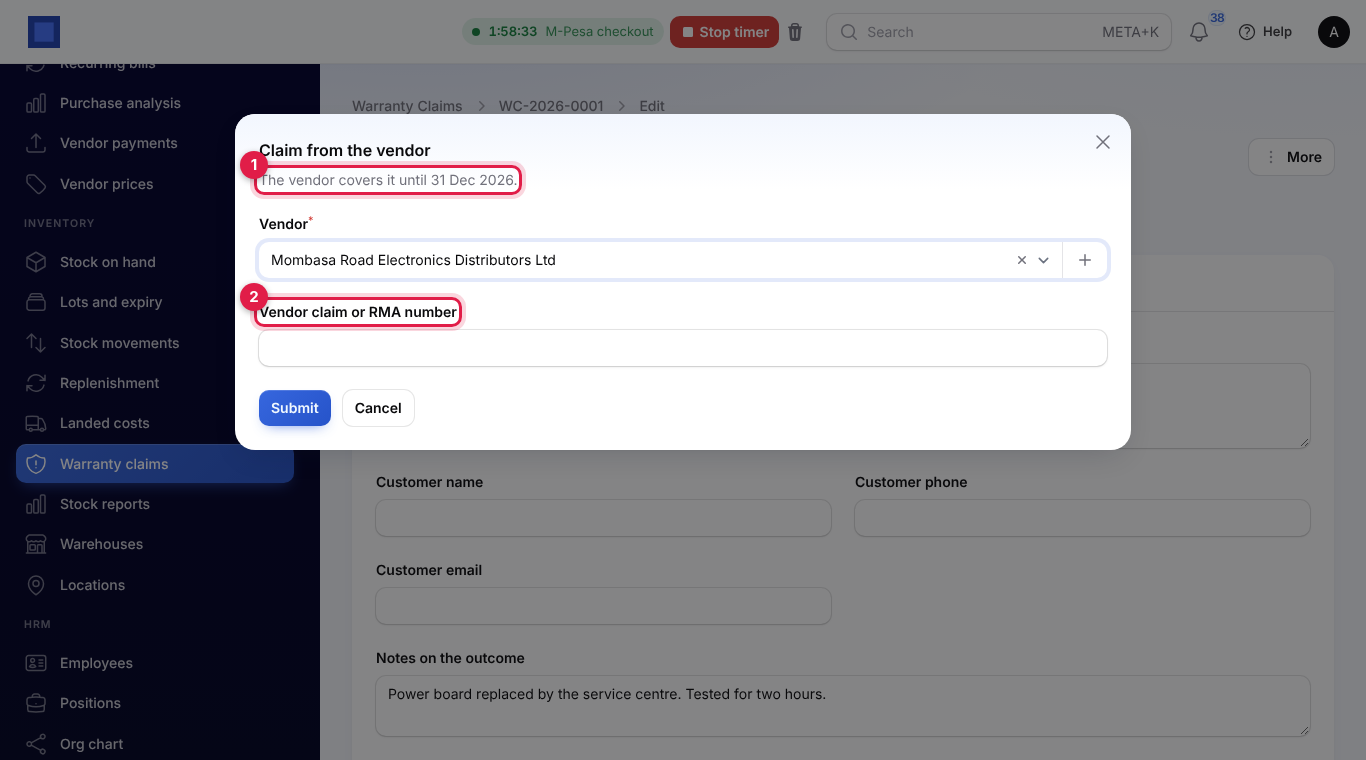
- The window says whether the vendor still covers the item (marker 1), for example The vendor covers it until 31 Dec 2026.
- Check the Vendor. It is filled with the vendor on the purchase order the serial came in on, or else the product's preferred vendor.
- Type the vendor's Vendor claim or RMA number (marker 2).
- When the item was replaced or refunded, it is back in your stock: switch on Send the faulty item back to the vendor to take it out of stock and off what you owe that vendor.
- Click Submit. The Vendor column in the list shows Claimed from the vendor.
When the vendor answers, use More → Vendor accepted or Vendor turned it down, with a note. After a refusal you can claim again.
What the customer is told
The customer gets a short message at each step:
- the claim was received;
- it is being repaired;
- it has been repaired and is ready to collect;
- it has been replaced (with the new serial);
- it has been refunded;
- the claim was turned down, with the reason.
Messages go by email to the customer's contact (or the email on the claim). If the Marketing app is on with an SMS provider set up, a text goes to their mobile number too. Nothing is sent when there is no email or phone.
The claims report
Click Claims report on the claims list. Choose the period with From and To (marker 1); it starts at the beginning of the year.
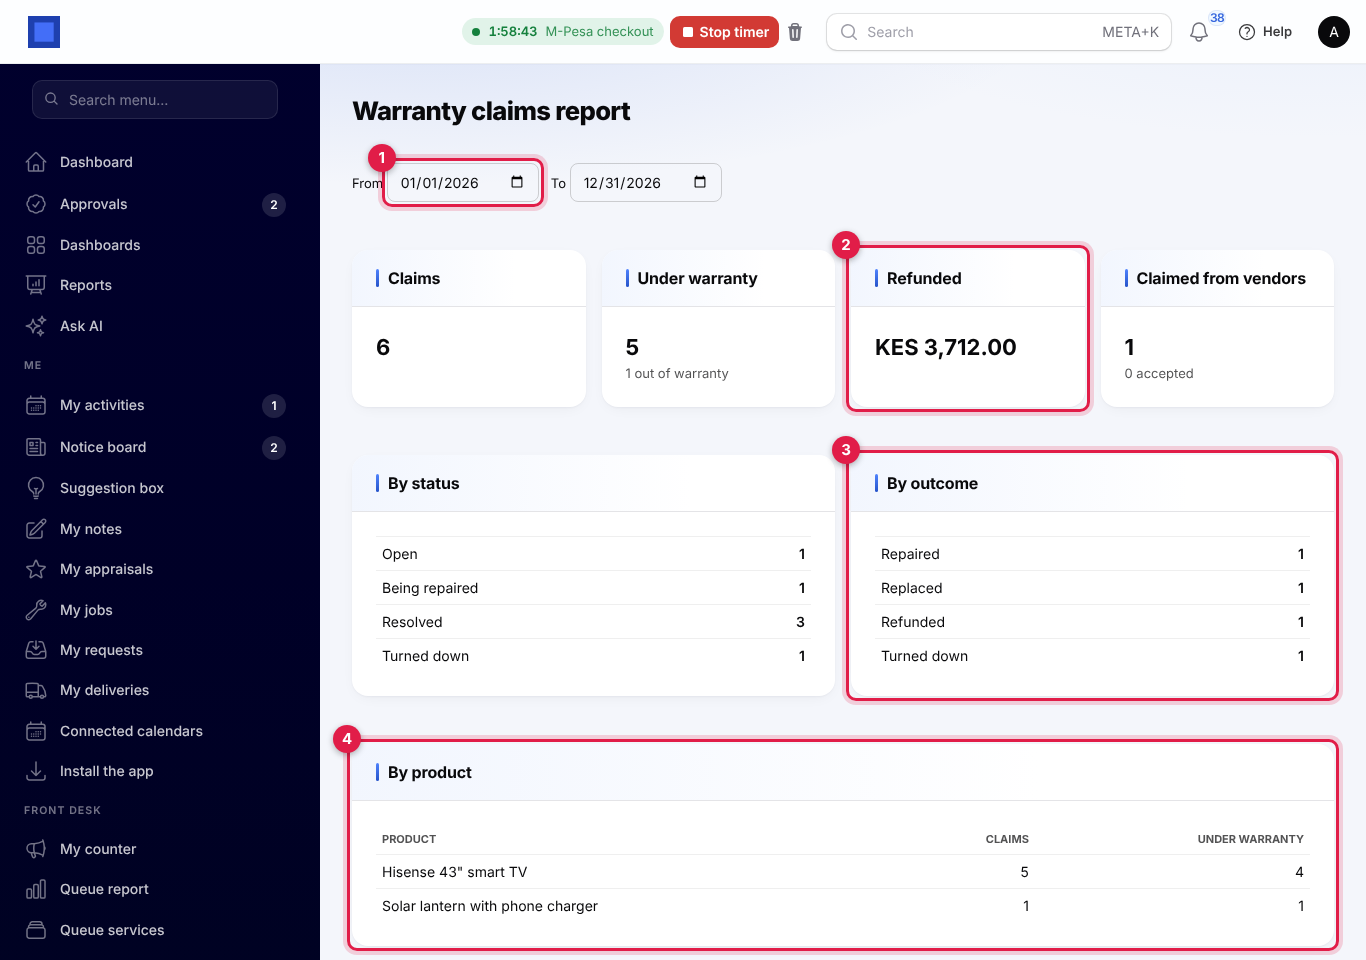
- Claims and Under warranty, with how many were out of warranty.
- Refunded (marker 2): the total of credit notes and till refunds.
- Claimed from vendors, with how many the vendors accepted.
- By status and By outcome (marker 3): open, being repaired, resolved and turned down; repaired, replaced, refunded and turned down.
- By product (marker 4): which products come back most, and how many of those were under warranty.
Claims are counted by the day they were reported.
Good to know
- Serial numbers are known when stock leaves on the sale. When an invoice or till sale takes the goods out of stock, each serial shows separately. If goods leave another way, the search finds the invoice but without serials: type the serial on the claim.
- Out-of-warranty claims can still be opened and settled; the claim just shows that it is not covered.
- One claim per item. For several faulty units of the same product, open one claim per serial, or one claim with the quantity for goods without serials.
- Refunds follow the sale. A claim not linked to an invoice or receipt cannot be refunded here. Open claims from the sale (or find the sale when you create the claim) so they are linked; otherwise refund the customer by hand.
- Photos can be up to 8 MB each.