Purchases and vendor bills
This page follows a purchase from start to finish: ask several vendors for prices, compare them and award the best; send a purchase order; receive the goods (in one delivery or several); enter the vendor's bill and check it against the order and the delivery (three-way matching); pay it. It also covers vendor price lists with lead times, blanket orders for agreed yearly volumes, the purchase settings, and what your vendors see on the vendor portal. Everything is in the sidebar under Purchases: Requests for quotation, Purchase Orders, Blanket orders, Vendor bills, Purchase analysis, Vendor payments and Vendor prices.
Who can do what.
Permission Allows purchases.view See requests for quotation, purchase orders, blanket orders and vendor prices. purchases.manage Create and edit them, send requests, enter quotes, award, receive goods, email orders, invite vendors to the portal, cancel. purchases.confirm Confirm purchase orders and Activate blanket orders. bills.view See vendor bills and vendor payments. bills.manage Create and edit bills, Create bill from an order, cancel bills. bills.post Post bills. bills.payments.manage Record payment on bills. Owners and admins have all of them. The accountant role has the bill and payment permissions and can view purchases. An approval rule can make large orders and bills wait for a manager.
The purchase flow at a glance
| Step | Where | Result |
|---|---|---|
| 1. Ask for prices (optional) | Requests for quotation | Vendors quote by email link or you type their prices; you compare and award. |
| 2. Order | Purchase Orders | A numbered order (PO-2026-00001) sent to the vendor as a PDF. |
| 3. Receive | The order's Mark received | Received quantities recorded; stock goes up if Inventory is on. |
| 4. Bill | The order's Create bill, or Vendor bills → New bill | A bill checked against the order and receipt, then posted as owed. |
| 5. Pay | The bill's Record payment | The bill becomes paid; the payment is posted from your bank, cash or M-Pesa. |
Ask vendors for quotes (requests for quotation)
A request for quotation (RFQ) sends the same list of items to several vendors so you can compare prices and delivery times before ordering.
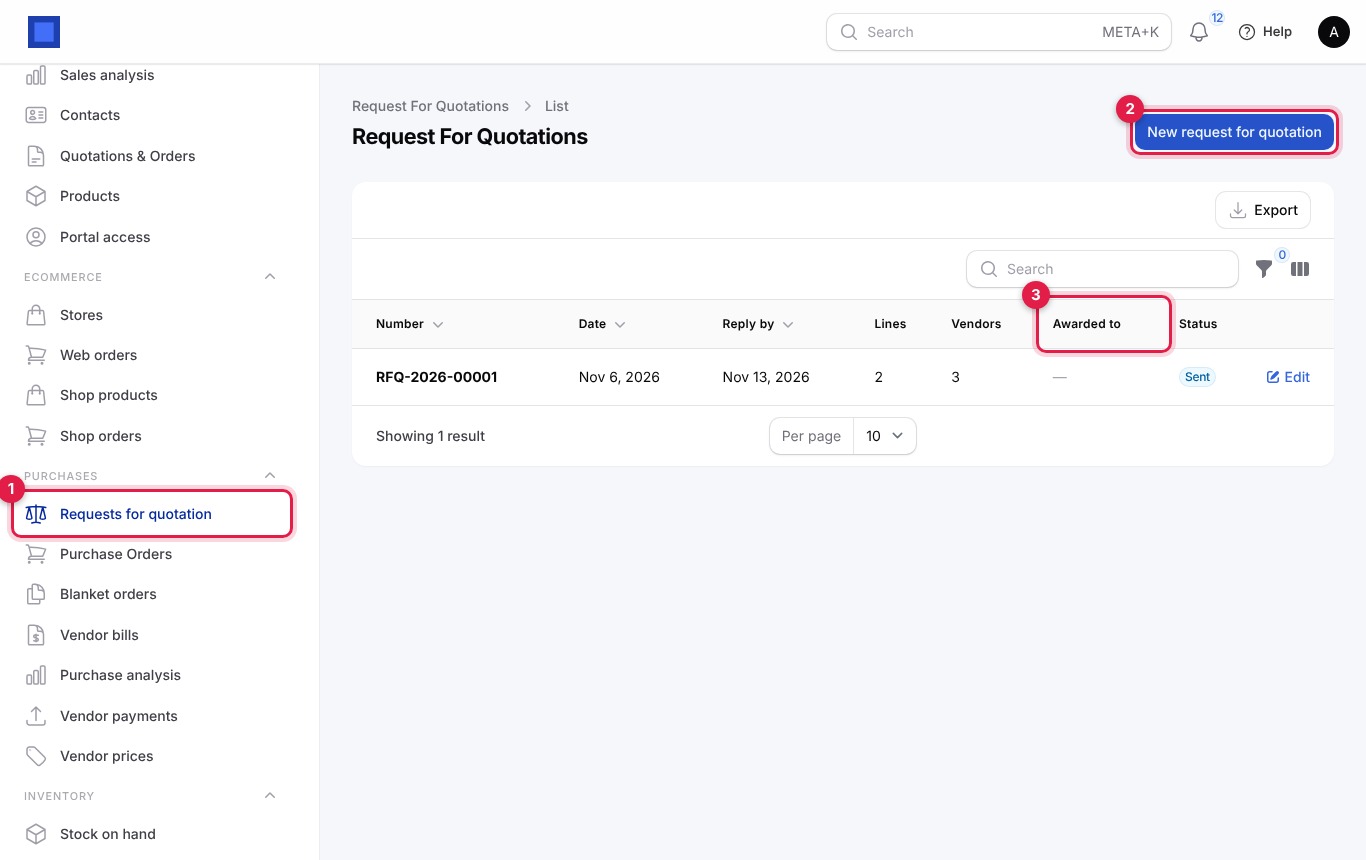
- Open Purchases → Requests for quotation (marker 1) and click New request for quotation (marker 2). The Awarded to column (marker 3) later shows who won each request.
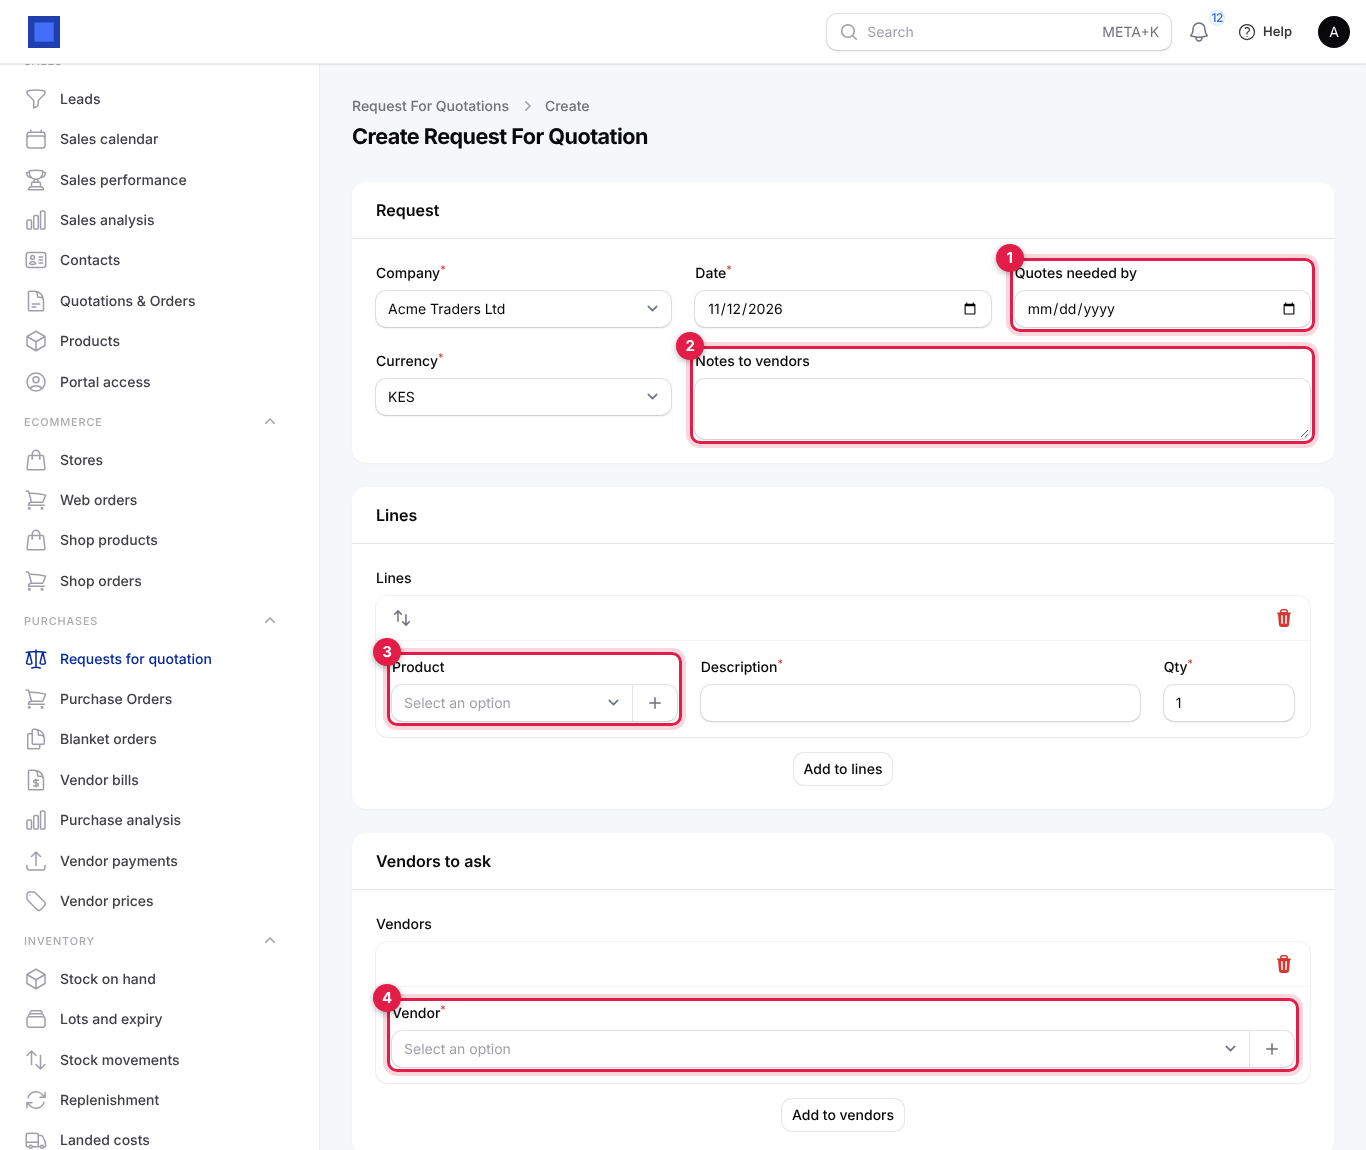
- Fill in the request:
| Field | What to enter |
|---|---|
| Company | Required. Sets the currency. |
| Date | The request date. Required. |
| Quotes needed by (marker 1) | The deadline you give vendors. Optional but recommended. |
| Currency | The currency you want prices in. Required. |
| Notes to vendors (marker 2) | Delivery address, hours, payment terms, specifications. Sent with the request. |
| Line Product (marker 3) | Pick a product that can be purchased (the description fills in), or leave it empty and type a Description for something not in your catalogue. |
| Line Description | What you want. Required. |
| Line Qty | How many. Required. |
| Vendors to ask → Vendor (marker 4) | One row per vendor. Only contacts marked as vendors are listed; each vendor only once. + adds a new vendor. |
- Click Create. The request is saved as a Draft and opens.
- Use the buttons at the top of the request:
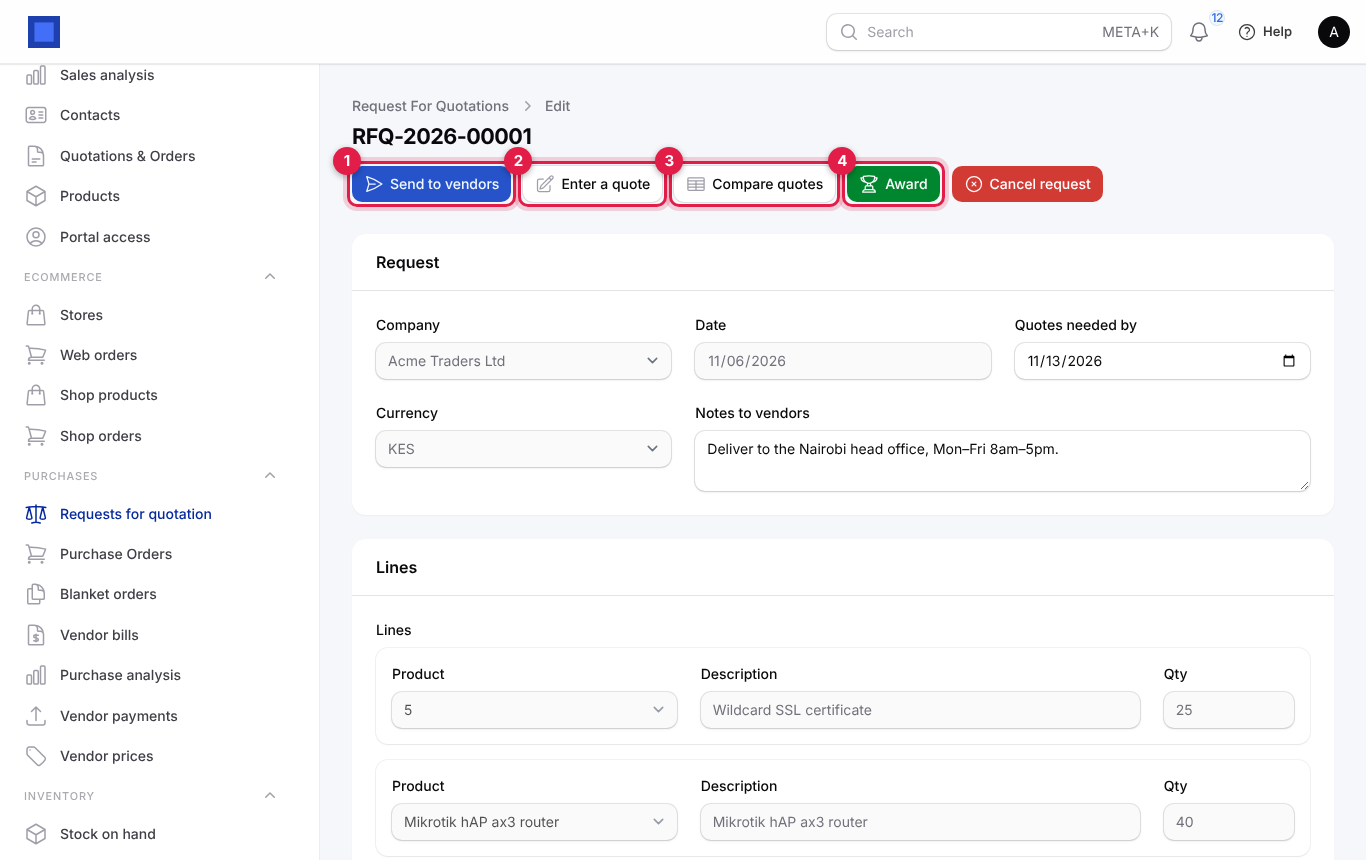
- Send to vendors (marker 1): confirms, gives the request its number (RFQ-2026-00001) and emails every vendor that has an email address. When the vendor portal is on, the email has a Submit your quote button that opens a page where the vendor types their price per line, a lead time and a note, with no sign-in. Status becomes Sent. While the request is open you can click it again to re-send, for example after adding a vendor.
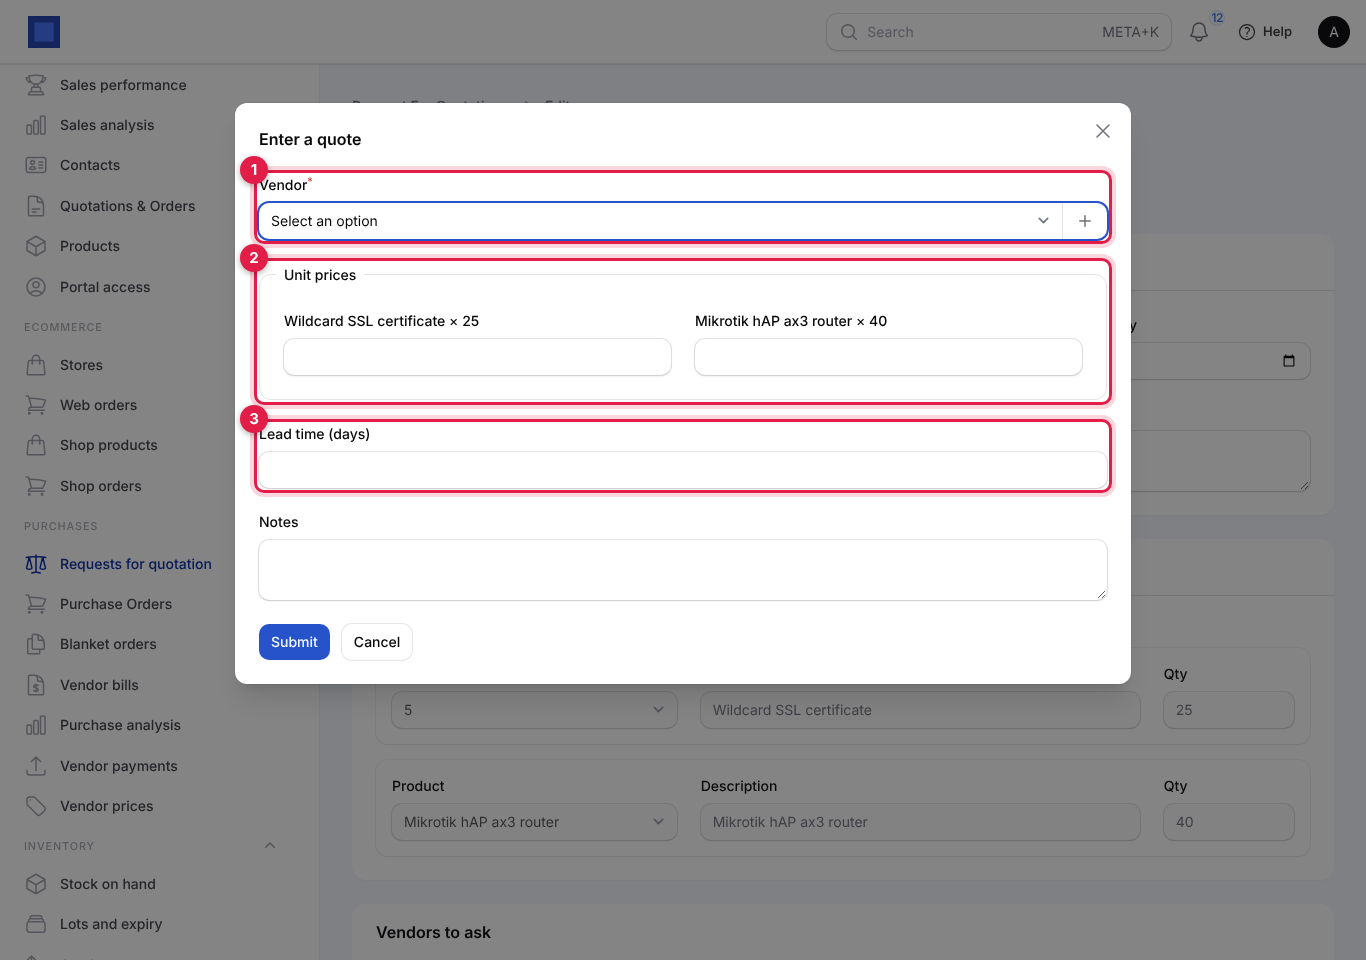
- Enter a quote (marker 2): type in a quote a vendor gave you by phone, WhatsApp or paper. Choose the Vendor (marker 1 below), type a unit price per line under Unit prices (marker 2; leave a line empty if they cannot supply it), the Lead time (days) (marker 3) and any Notes, and click Submit.
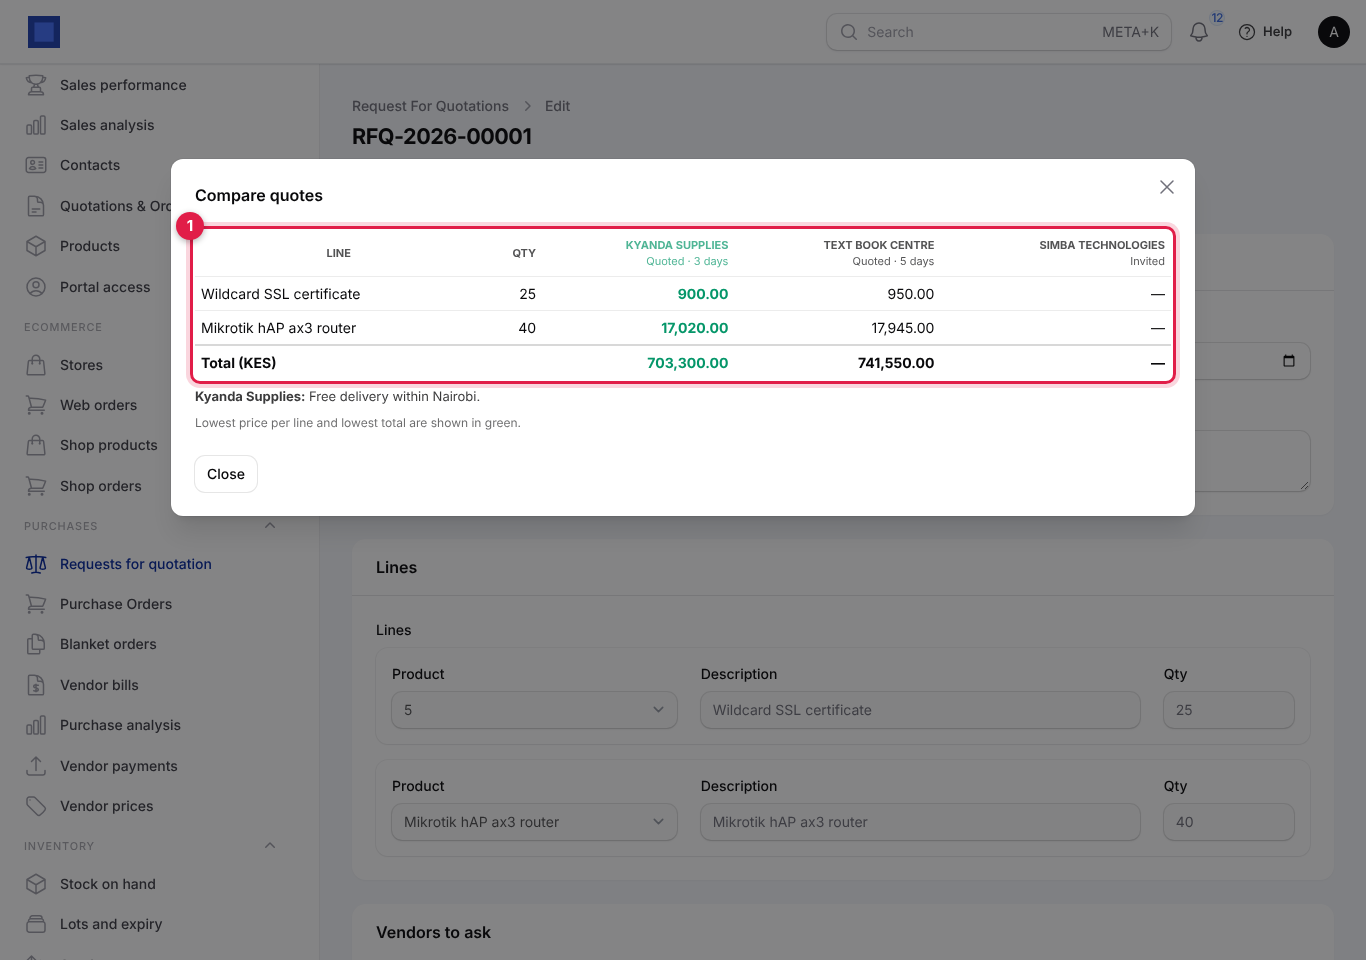
- Compare quotes (marker 3): appears once at least one vendor has quoted. It shows every line against every vendor, with each vendor's status and lead time in the column heading, and the lowest price per line and the lowest total in green (marker 1). Vendors who have not answered show "—".
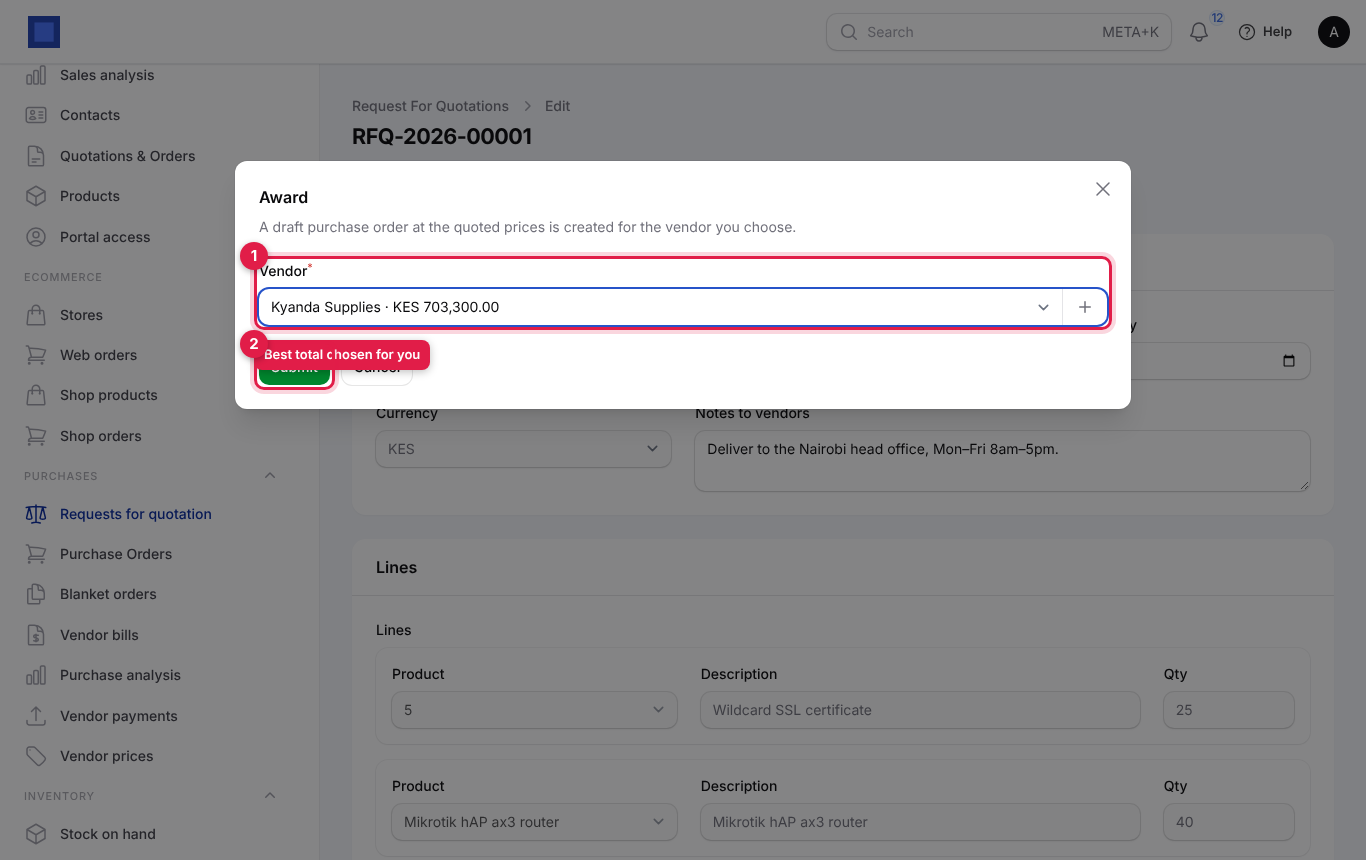
- Award (marker 4): choose the winning Vendor (marker 1; the one with the best total is pre-selected, and each choice shows its total) and click Submit (marker 2). A draft purchase order for that vendor at the quoted prices is created and opens, and the request becomes Awarded.
- Cancel request stops the request (status Cancelled). Delete is only offered while it is a draft.
| Request status | Meaning |
|---|---|
| Draft | Being prepared; lines and vendors can still change. |
| Sent | Vendors have been asked; quotes can be entered; lines and vendors are locked. |
| Awarded | A vendor won and a purchase order was created. |
| Cancelled | Stopped without an order. |
Each vendor on a request is Invited, Quoted, Awarded or Declined.
Create a purchase order
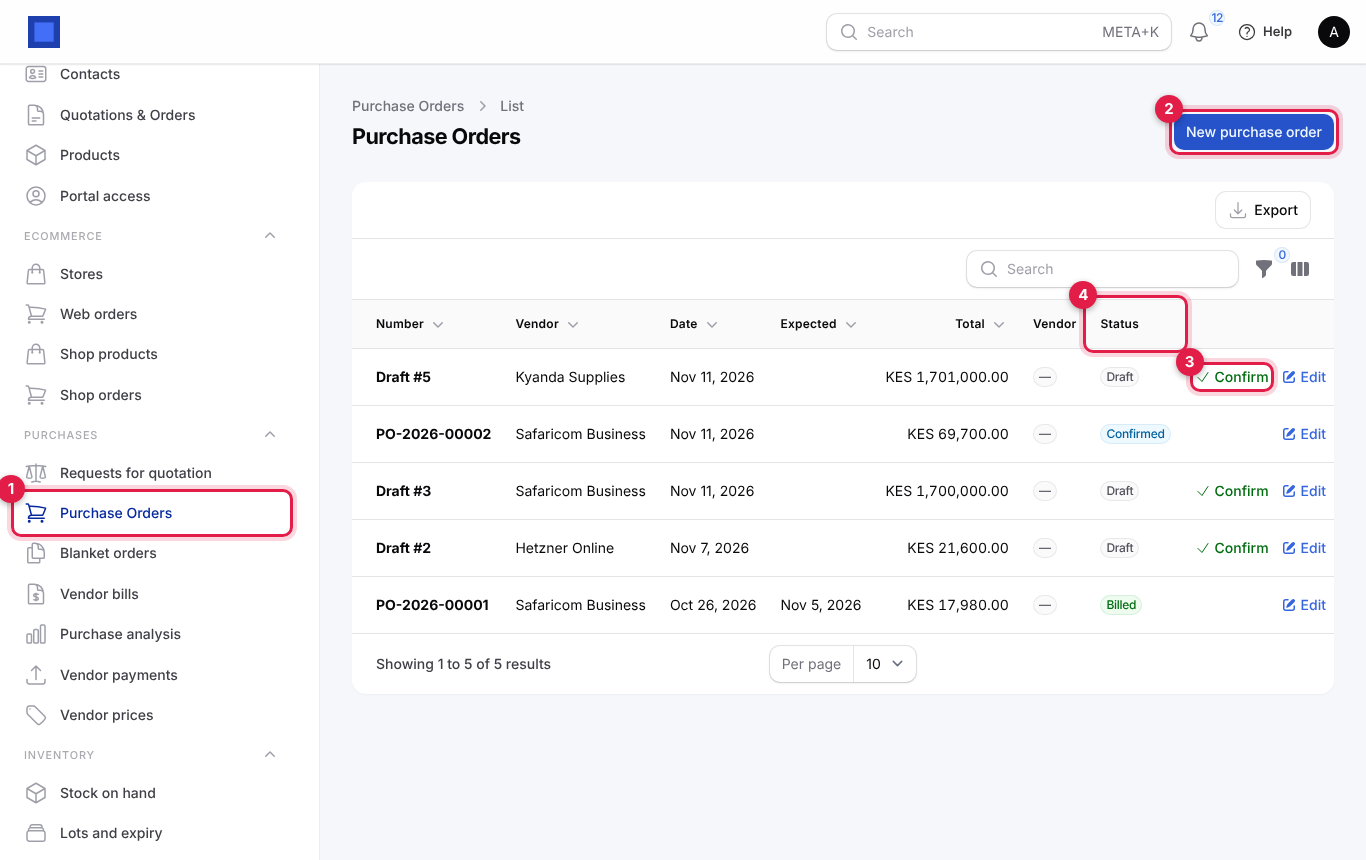
- Open Purchases → Purchase Orders (marker 1) and click New purchase order (marker 2). The Status column (marker 4) shows where each order is. Draft orders have a quick Confirm action on their row (marker 3).
- Fill in the order:
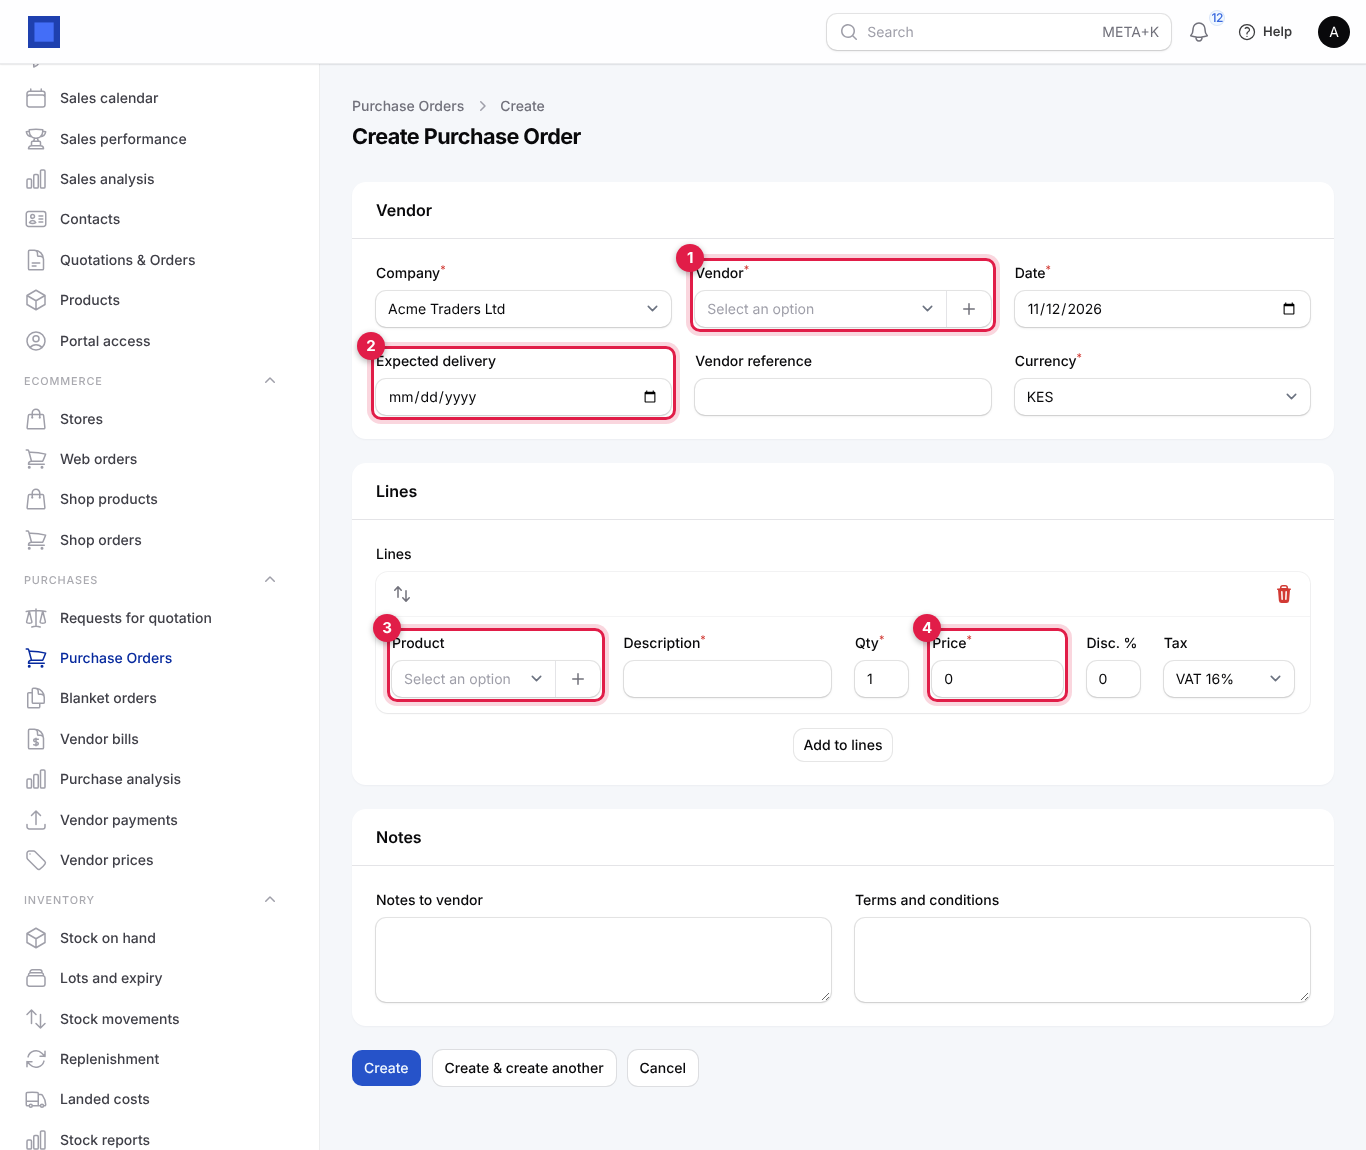
| Field | What to enter |
|---|---|
| Company | Required. Sets the currency. |
| Vendor (marker 1) | Required. Type to search. + adds a new vendor (see below). |
| Date | The order date. Required. |
| Expected delivery (marker 2) | When you expect the goods. Apply vendor prices can fill it from lead times. |
| Vendor reference | The vendor's quote or proforma number. It is copied to the bill as the vendor's invoice number. |
| Currency | Required. A foreign currency uses the day's exchange rate. |
| Line Product (marker 3) | A product that can be purchased. Its name, unit and cost price fill in. Leave empty for a free-text line. |
| Line Description | What you are buying. Required. |
| Line Qty | Required. |
| Line Price (marker 4) | Unit price before tax. Required. |
| Line Disc. % | Discount the vendor gives, 0 to 100. |
| Line Tax | The purchase tax, for example VAT 16%. Defaults to your default tax. |
| Notes to vendor | Printed on the order. |
| Terms and conditions | Printed on the order. Filled from Default terms on purchase orders in the settings. |
To add a vendor on the spot, click + next to Vendor, type the Name (marker 1) and if you have them the Email (marker 2, needed to email the order) and Phone, and click Create (marker 3).
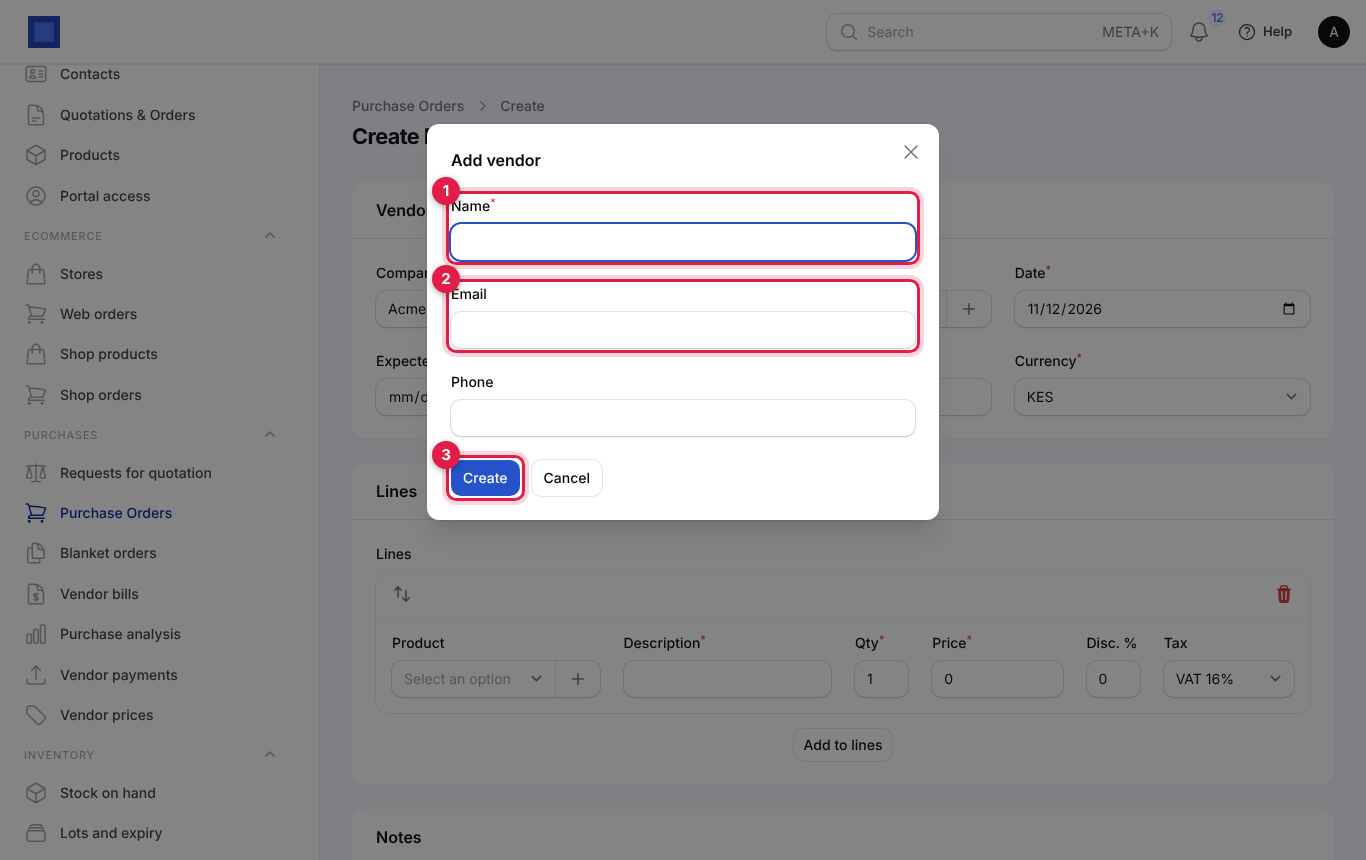
- Click Create. The order is saved as a Draft and opens. The Totals section shows Subtotal, Tax and Total; they update when you save.
Draft order actions
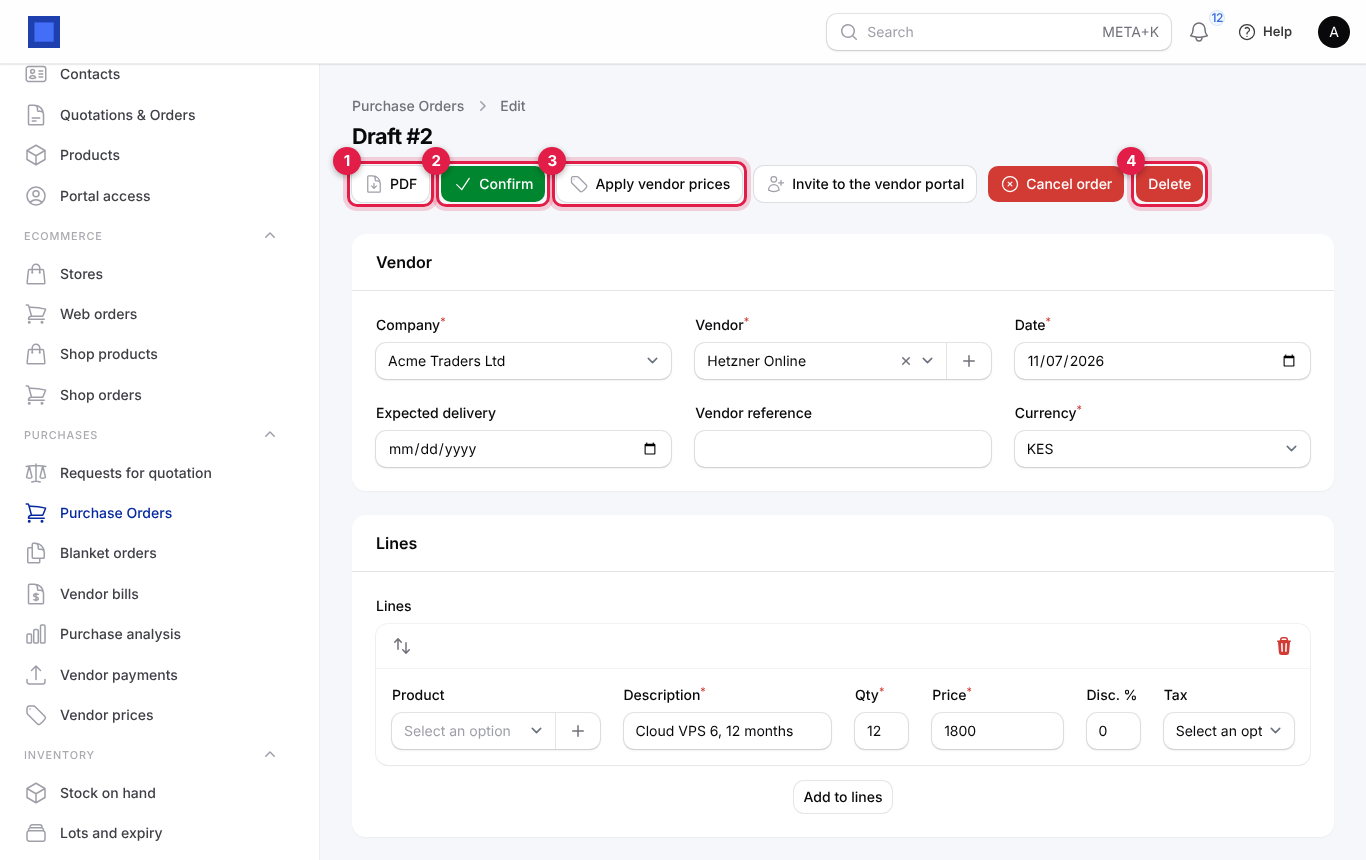
- PDF (marker 1): download the order as a PDF to check it.
- Confirm (marker 2): saves, numbers the order (PO-2026-00002) and makes it Confirmed. Lines and prices are then locked. If an approval rule applies and you are not an approver, the order waits in the Approvals inbox and you see "Sent for approval…"; it is confirmed automatically when approved.
- Apply vendor prices (marker 3): every line with a current vendor price for this vendor and quantity takes that price, and Expected delivery is set from the longest lead time.
- Delete (marker 4): removes a draft for good.
- Invite to the vendor portal and Cancel order are also offered on drafts; see below.
Confirmed order actions
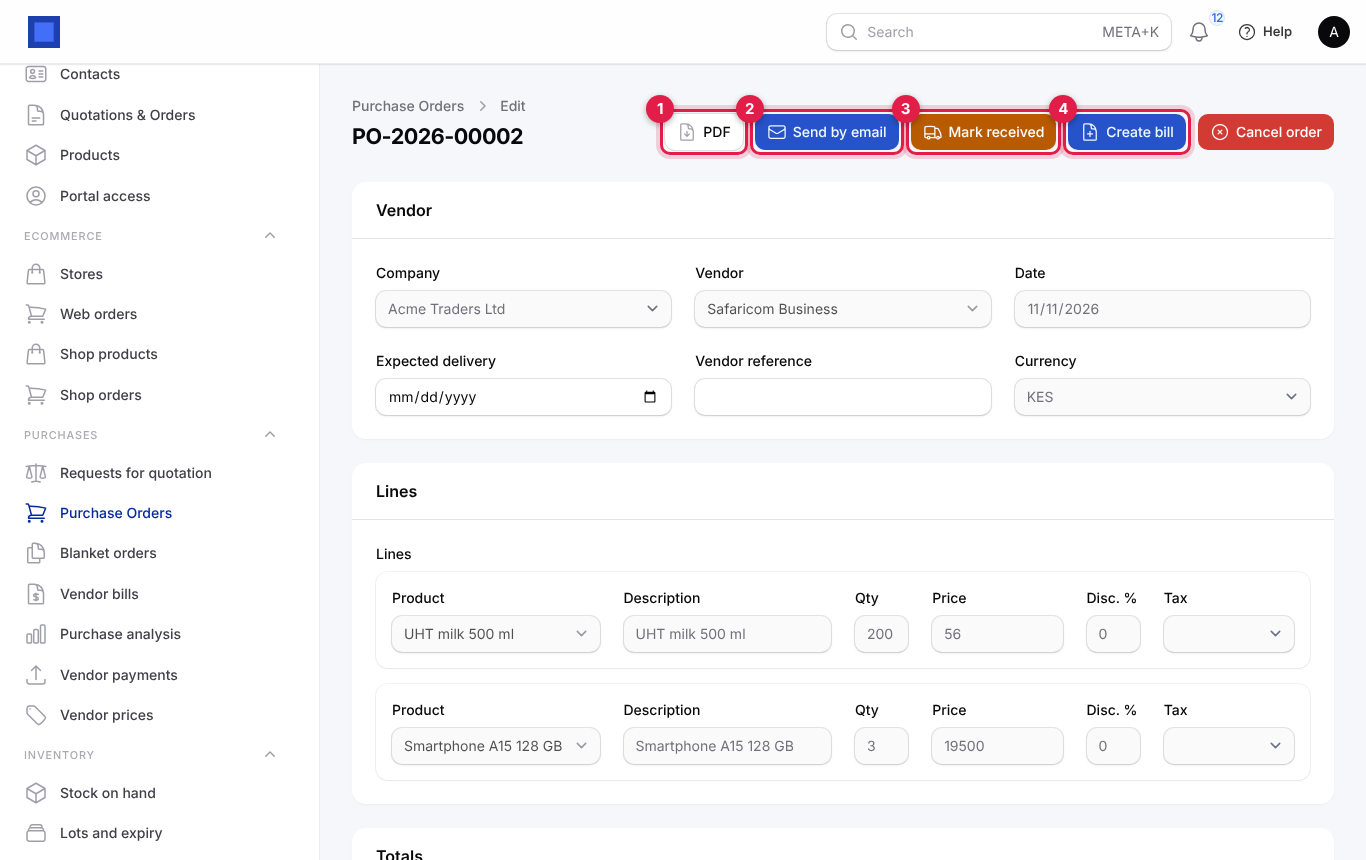
- PDF (marker 1): download the order.
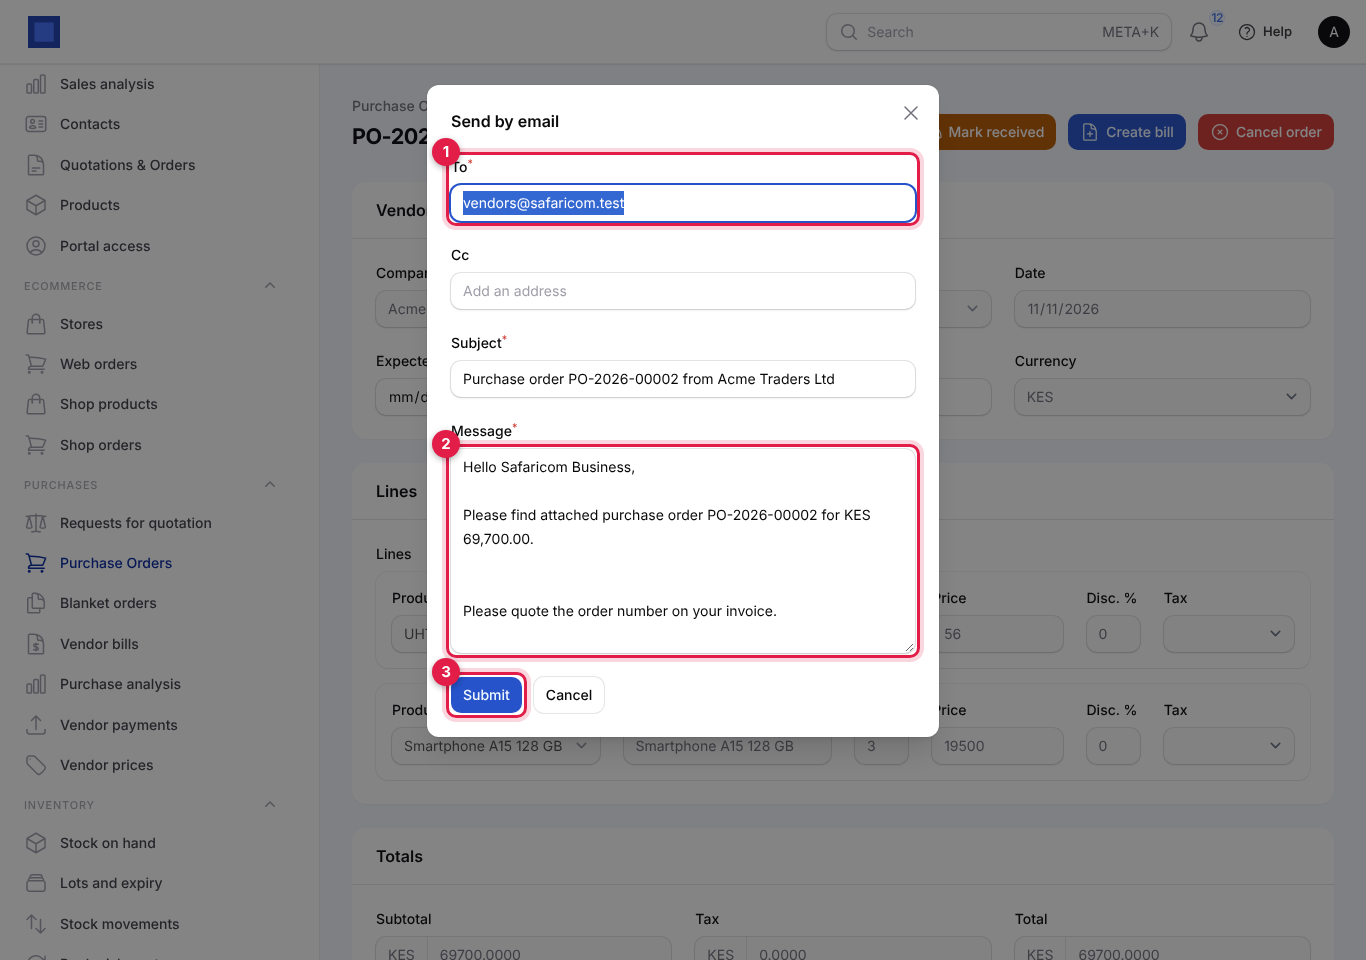
- Send by email (marker 2): emails the order PDF to the vendor. In the window, check To (marker 1 in the next picture; the vendor's email), add Cc addresses, edit the Subject and the Message (marker 2 in the next picture; it already says the order number, total and expected date), then click Submit (marker 3). When the vendor portal is on, the email has a Confirm the order and send your invoice button with the vendor's private link.
- Mark received (marker 3): record a delivery (see Receive goods).
- Create bill (marker 4): creates a draft bill with every line of the order and opens it. The order becomes Billed.
- Vendor portal link: when the vendor portal is on, shows the order's private link to share by WhatsApp, and whether and when the vendor confirmed it (with any promised date and note).
- Invite to the vendor portal: shown when the Portal module is on and the vendor has no portal sign-in yet. Check the Email and click Submit; the vendor gets a sign-in link by email.
- Goods received note: after a delivery of stock items (Inventory on), opens the printable goods received note in a new tab.
- Cancel order: cancels a draft, confirmed or (partly) received order that is not billed yet.
At the bottom of every order, Notes, Planned and History let you leave internal notes, plan follow-up activities (for example "chase delivery") and see who changed what.
| Order status | Meaning | How it moves on |
|---|---|---|
| Draft | Being prepared. | Confirm (or approval). |
| Confirmed | Sent or ready to send; waiting for goods. | Mark received or Create bill. |
| Partially received | Some goods arrived. | Receive more, or Create bill. |
| Received | Everything arrived. | Create bill. |
| Billed | A bill was created from it. | Final. |
| Cancelled | Stopped. | Final. |
The Vendor column in the list shows Sent once the order has been emailed and Confirmed once the vendor confirmed it on the portal.
Receive goods
When a delivery arrives, record exactly what came, so stock is right and the bill can be checked.
- Open the confirmed order and click Mark received (after a first partial delivery the button is called Receive more).
- For each line still to come, the window shows the quantity still due (marker 1, marker 2) with "… of … received so far" under it. Leave the full quantity if everything arrived, change it for a part delivery, or put 0 for a line that did not come.
- For goods tracked by lot or serial number, fill in the Lot number and Expiry date, or the Serial numbers (one per line, as many as the quantity).
- Click Submit (marker 3).
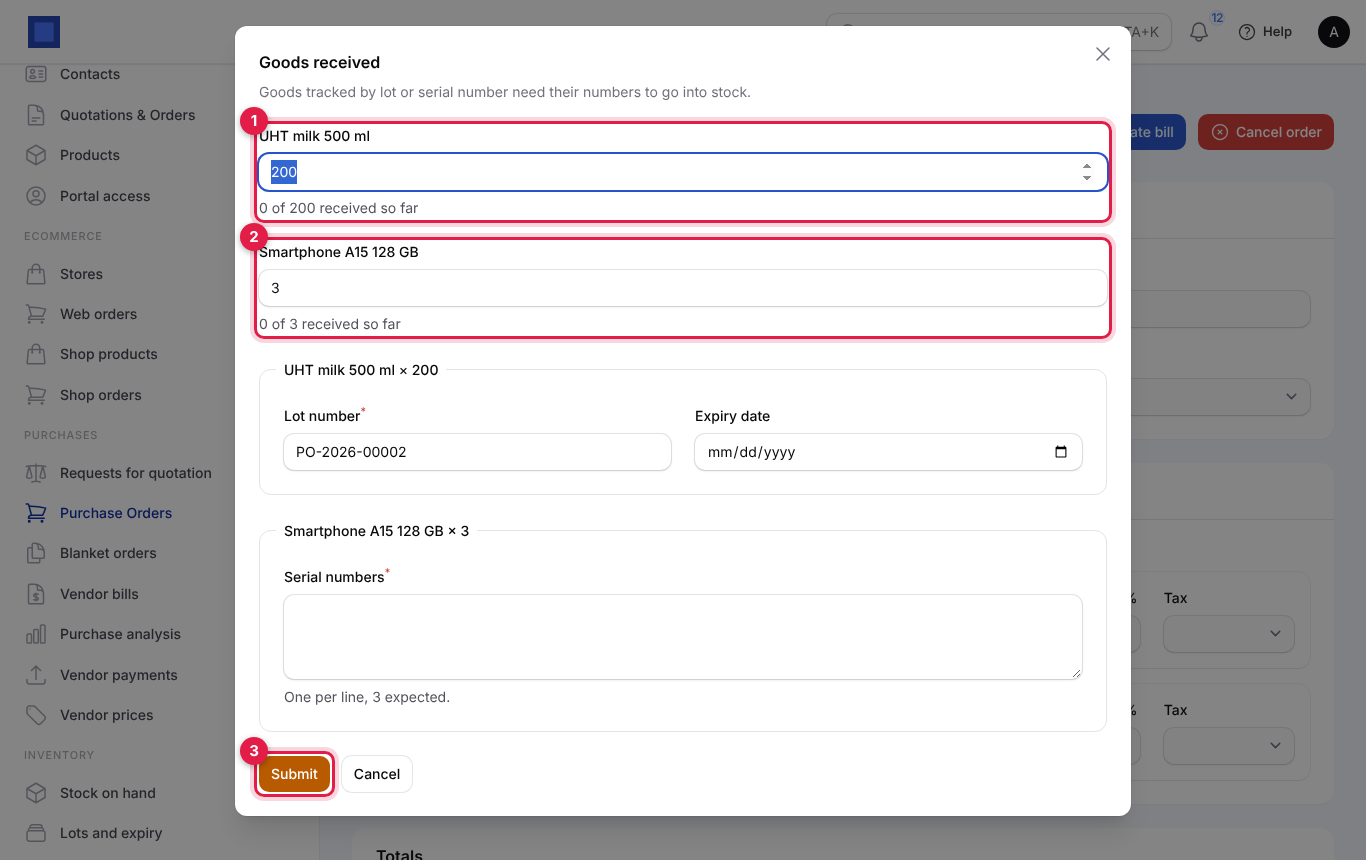
The order becomes Partially received or Received. With the Inventory module on, stock of tracked products goes up in your warehouse, and a goods received note is available from the order. You cannot receive more than was ordered.
Enter a vendor bill
A vendor bill is what you owe a vendor. Create it from the purchase order with Create bill (best: the lines and the link to the order are filled in for you), or by hand for vendors you do not order from.
- Open Purchases → Vendor bills (marker 1) and click New bill (marker 2). The list shows what is still Owed on each bill (marker 3) and the Match result (marker 4): Matched or Exceptions. Overdue due dates and statuses show in red.
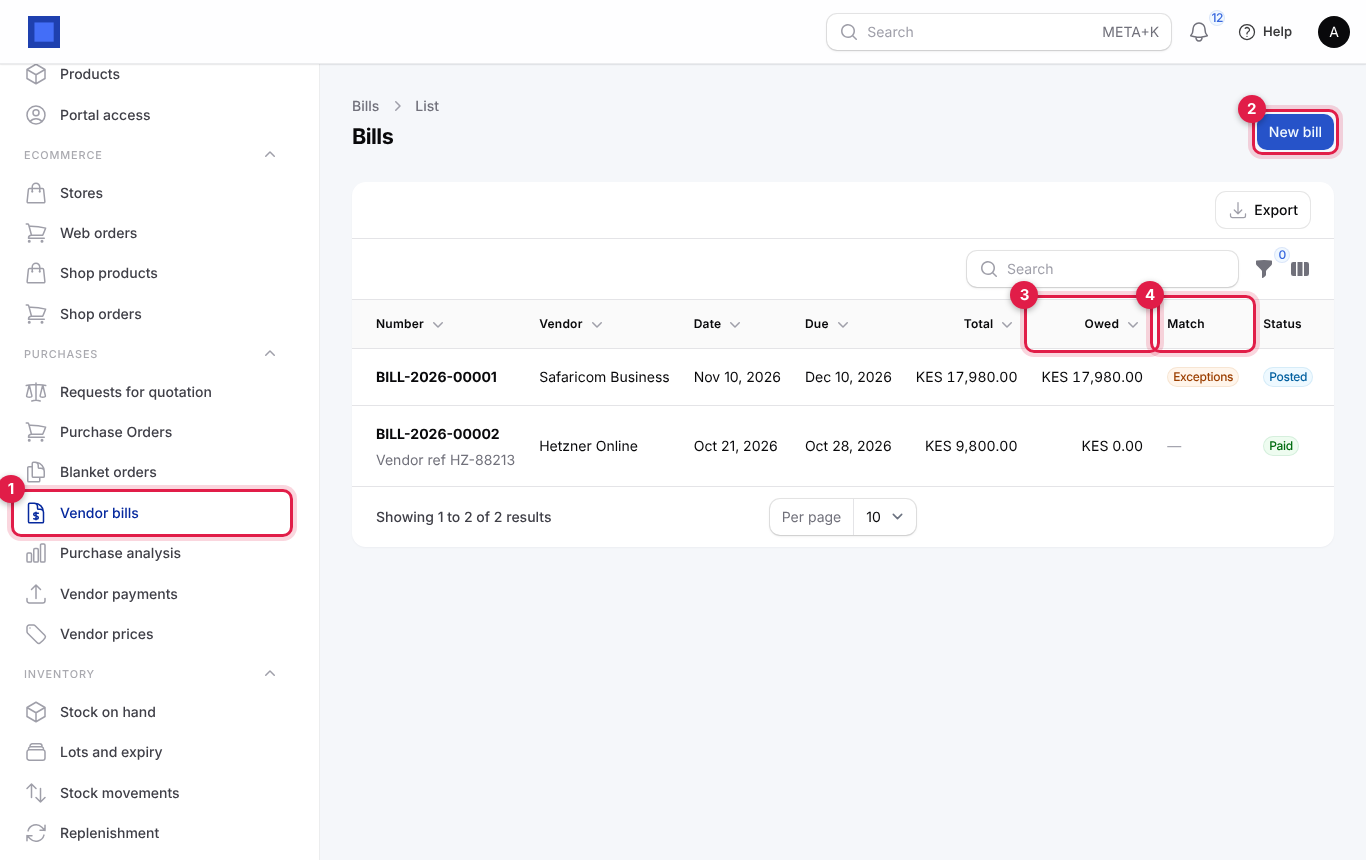
- Fill in the bill:
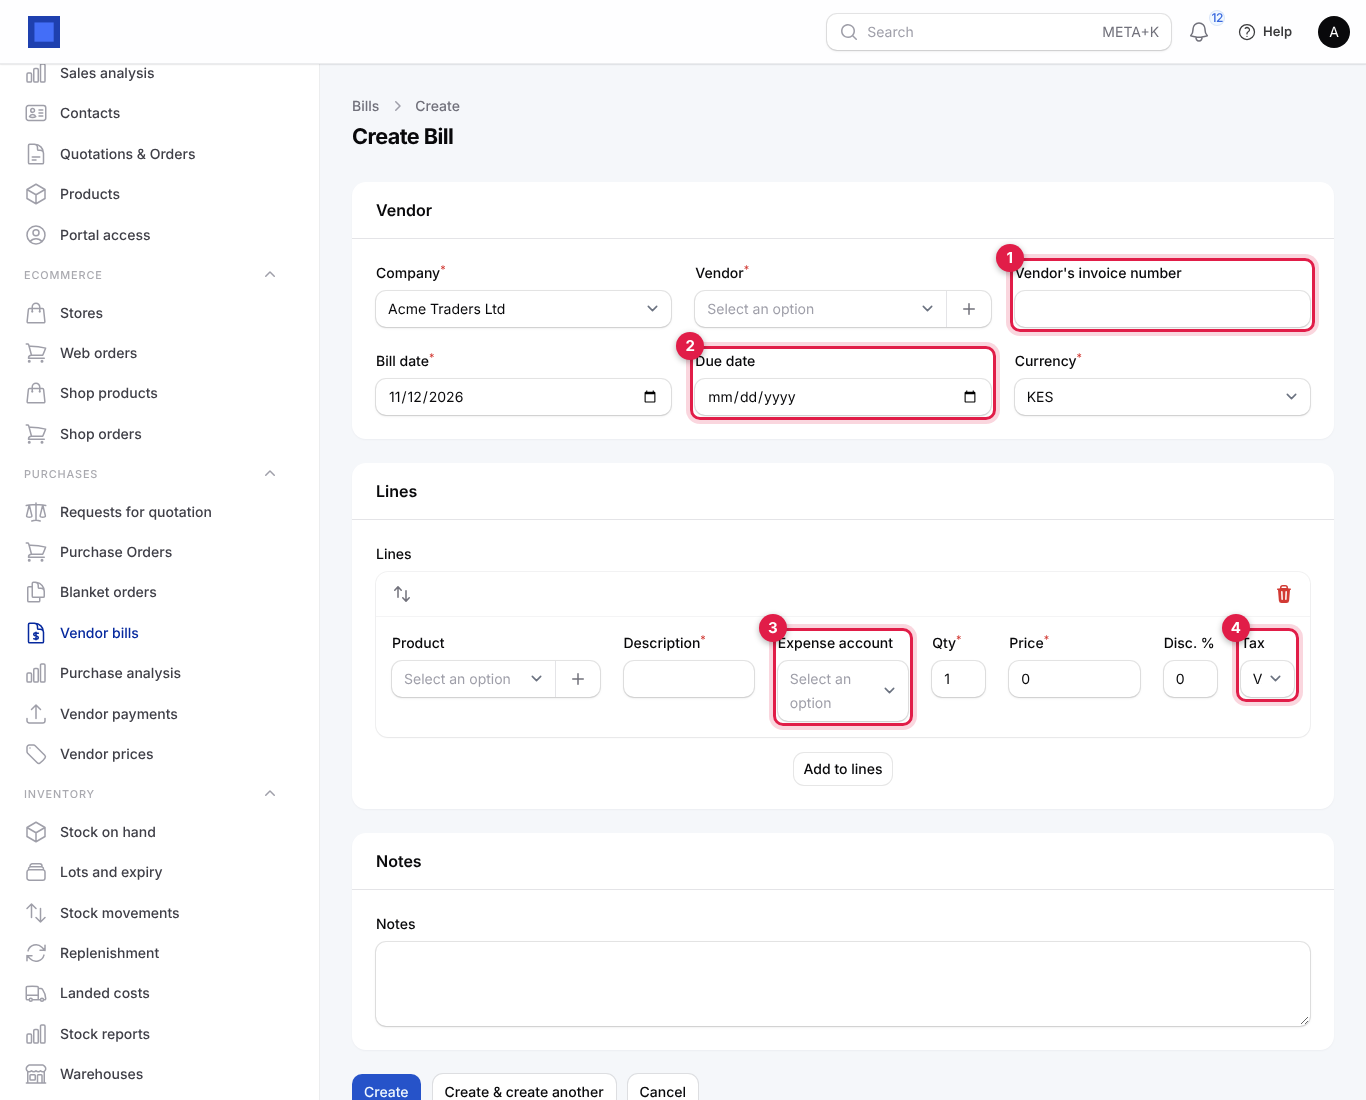
| Field | What to enter |
|---|---|
| Company, Vendor, Currency | As on a purchase order. |
| Vendor's invoice number (marker 1) | The number on the vendor's invoice. Use it to avoid entering the same invoice twice. |
| Bill date | The date on the vendor's invoice. It is the ledger date. Required. |
| Due date (marker 2) | When you must pay. Leave empty and it is set from the vendor's payment terms, or from Default bill due days in the settings (30 days if not set). |
| Line Product, Description, Qty, Price, Disc. % | As on a purchase order. |
| Line Expense account (marker 3) | Shown when Accounting is on. The expense or asset account to charge, for example 6300 · Internet and telephone. Leave empty and the line goes to Inventory for stock items or Cost of sales otherwise. |
| Line Tax (marker 4) | The purchase tax on the line. |
| Notes | Internal notes. |
- Click Create. The bill is a Draft; check the Totals (Subtotal, Tax, Total, Amount due).
- Click Post at the top of the bill (or Post on its row in the list) and confirm. The bill gets a number (BILL-2026-00001) and is recorded as owed. In the ledger: debit each line's expense account (net), debit Tax receivable (input) (tax), credit Accounts payable (total). An automation on Vendor bill posted can now run.
If the bill is linked to a purchase order, posting first runs the three-way match; if an approval rule covers bills of this amount, the bill waits for approval.
Check the bill against the order and delivery (three-way match)
Three-way matching compares, line by line, what you ordered, what was received and what the vendor billed, so you only pay for what you ordered and got, at the agreed price.
- On a bill made from a purchase order, click Three-way match at the top (marker 1 in the next section's picture). When there are problems the button turns amber with the number of exceptions.
- Read the window: the summary line (marker 1) and the table (marker 2) with Ordered, Received, Already billed, This bill, Order price, Bill price and a Status per line. Each exception is explained underneath.
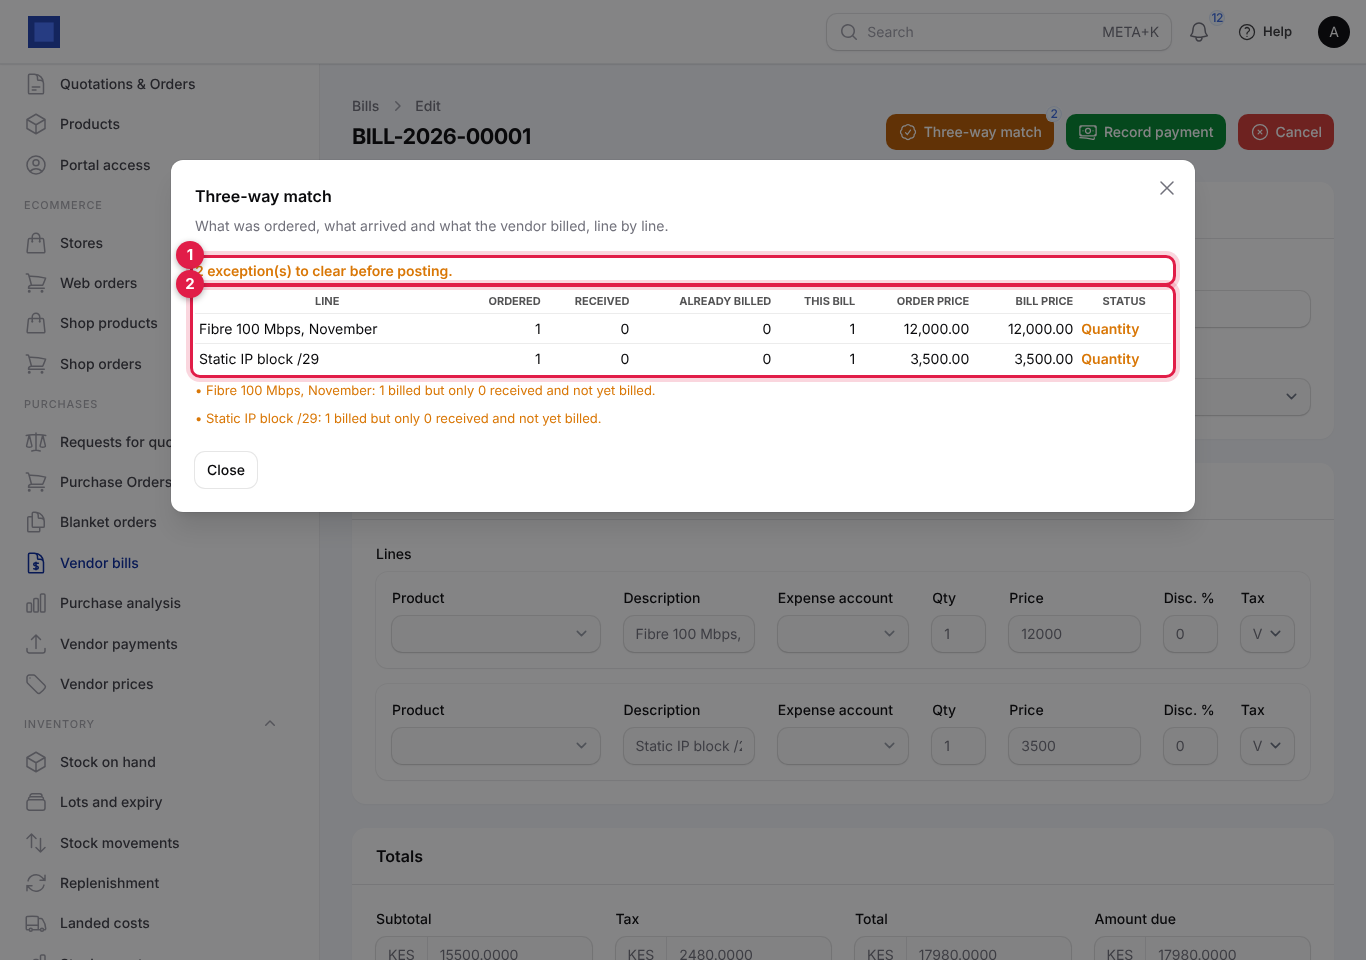
| Line status | Means | What to do |
|---|---|---|
| OK | Matches. | Nothing. |
| Quantity | More billed than received and not yet billed. | Record the delivery with Mark received, or ask the vendor for a corrected invoice and change the quantity. |
| Price | Billed price is above the order price by more than the tolerance (2% unless you change it). | Ask the vendor, or accept by correcting the line. |
| Not ordered | The line is not on the order. | Remove it or check with the buyer. |
If Block bills that do not match the order and receipt is on in the purchase settings, a bill with exceptions cannot be posted; you get "The bill does not match the order and receipt: …". If it is off, the exceptions are shown but posting is allowed.
Bill actions and statuses
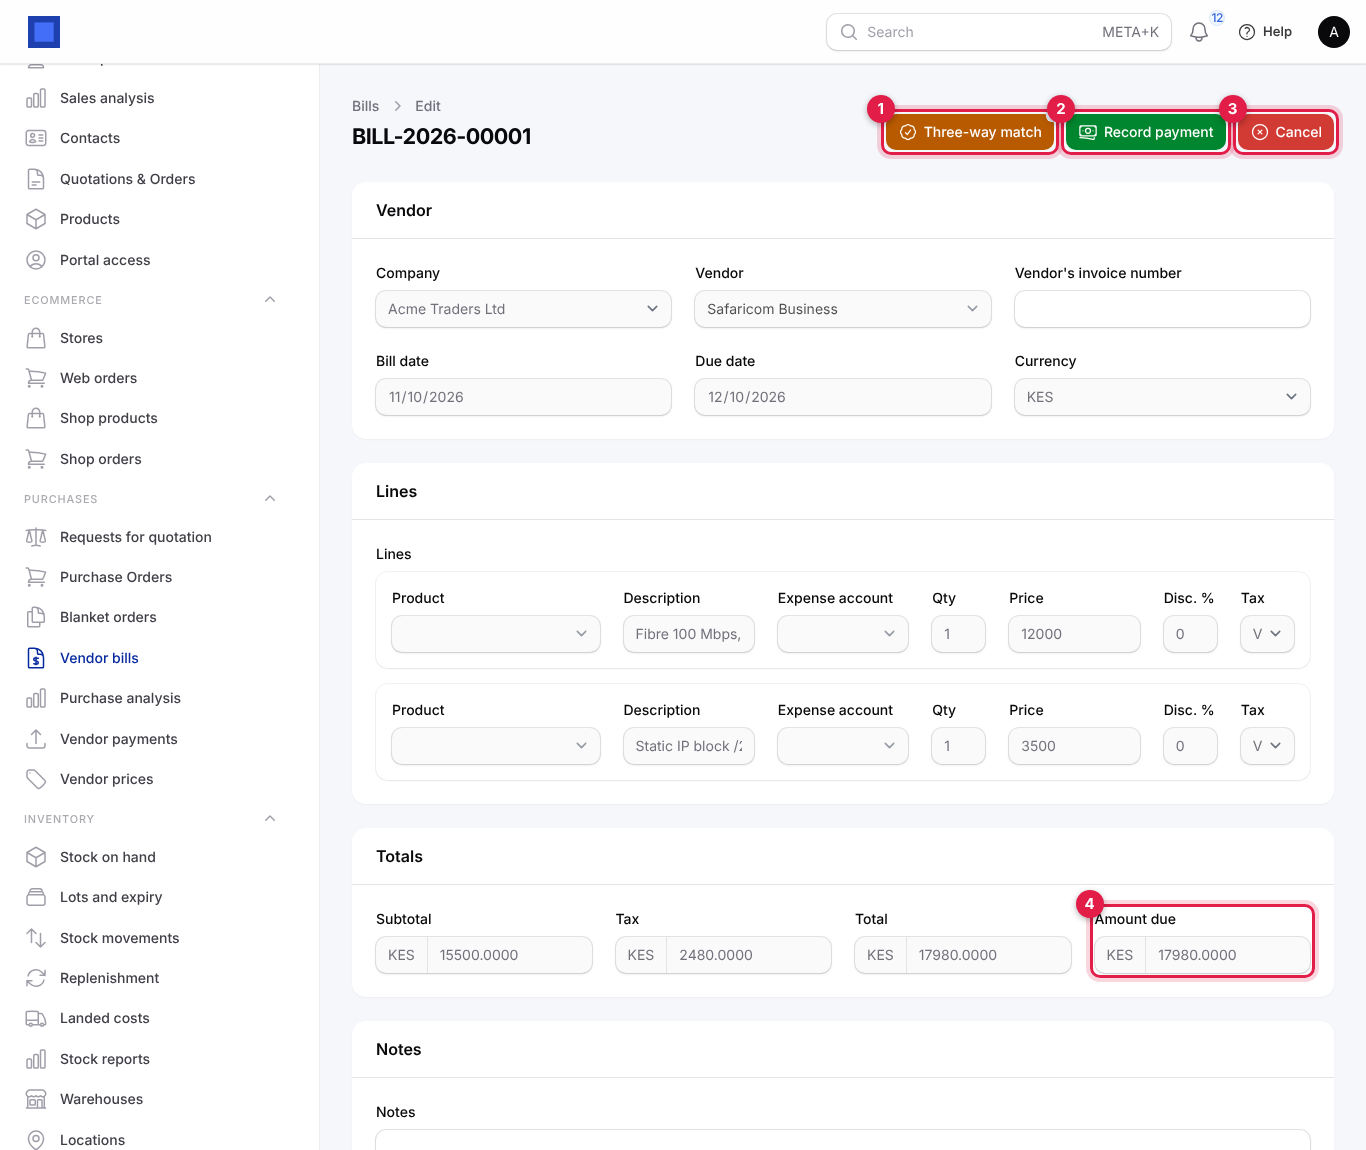
- Three-way match (marker 1): see above. Only on bills linked to an order.
- Record payment (marker 2): see Pay a bill.
- Cancel (marker 3): cancels a draft or posted bill that has no payments; a posted bill's ledger entry is reversed.
- Vendor's invoice: downloads the file the vendor uploaded, for bills that came in through the vendor portal.
- Delete: only for drafts.
- Amount due (marker 4): what is still owed after payments.
| Bill status | Meaning |
|---|---|
| Draft | Not yet owed; can be edited. |
| Posted | Owed to the vendor; locked. Shown red when past the due date. |
| Partially paid | Some paid; Amount due shows the rest. |
| Paid | Settled in full. |
| Cancelled | Withdrawn; reversed in the ledger. |
Pay a bill
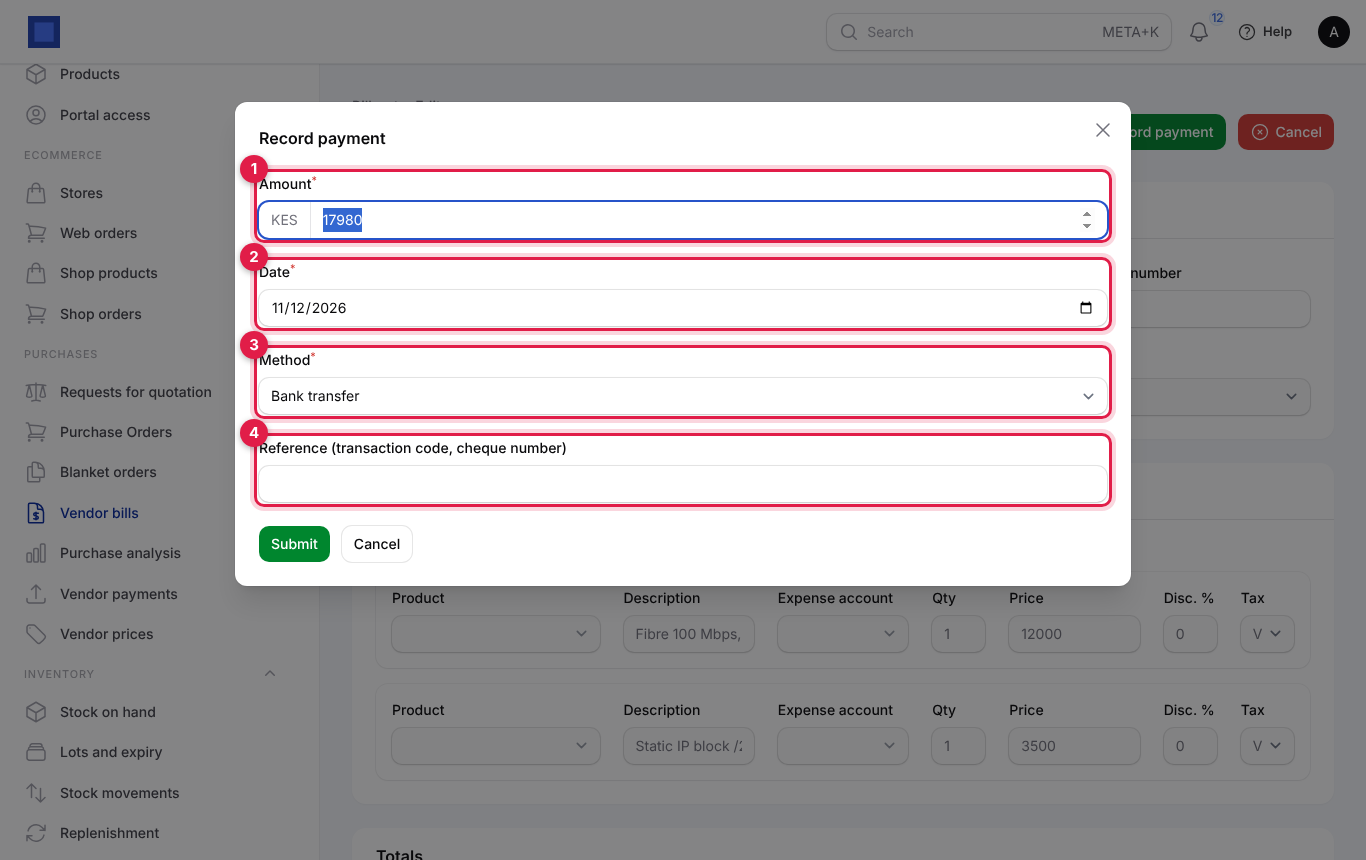
- Open the posted bill and click Record payment.
- Fill in the window and click Submit.
| Field | What to enter |
|---|---|
| Amount (marker 1) | Defaults to the full amount due. Type less for a part payment. Required. |
| Date (marker 2) | The day the money left. Required. |
| Method (marker 3) | Bank transfer, Mobile money, Cash, Cheque, Card or Other. It decides which account the money comes from: cash from your Cash account, mobile money from your Mobile money account, everything else from your Bank account. Required. |
| Reference (marker 4) | The M-Pesa code, bank reference or cheque number. Useful for reconciliation. |
The payment gets a number, the bill becomes Partially paid or Paid, and the ledger gets: debit Accounts payable, credit the bank, cash or mobile money account. If the vendor uses the portal, they see the payment and a remittance advice.
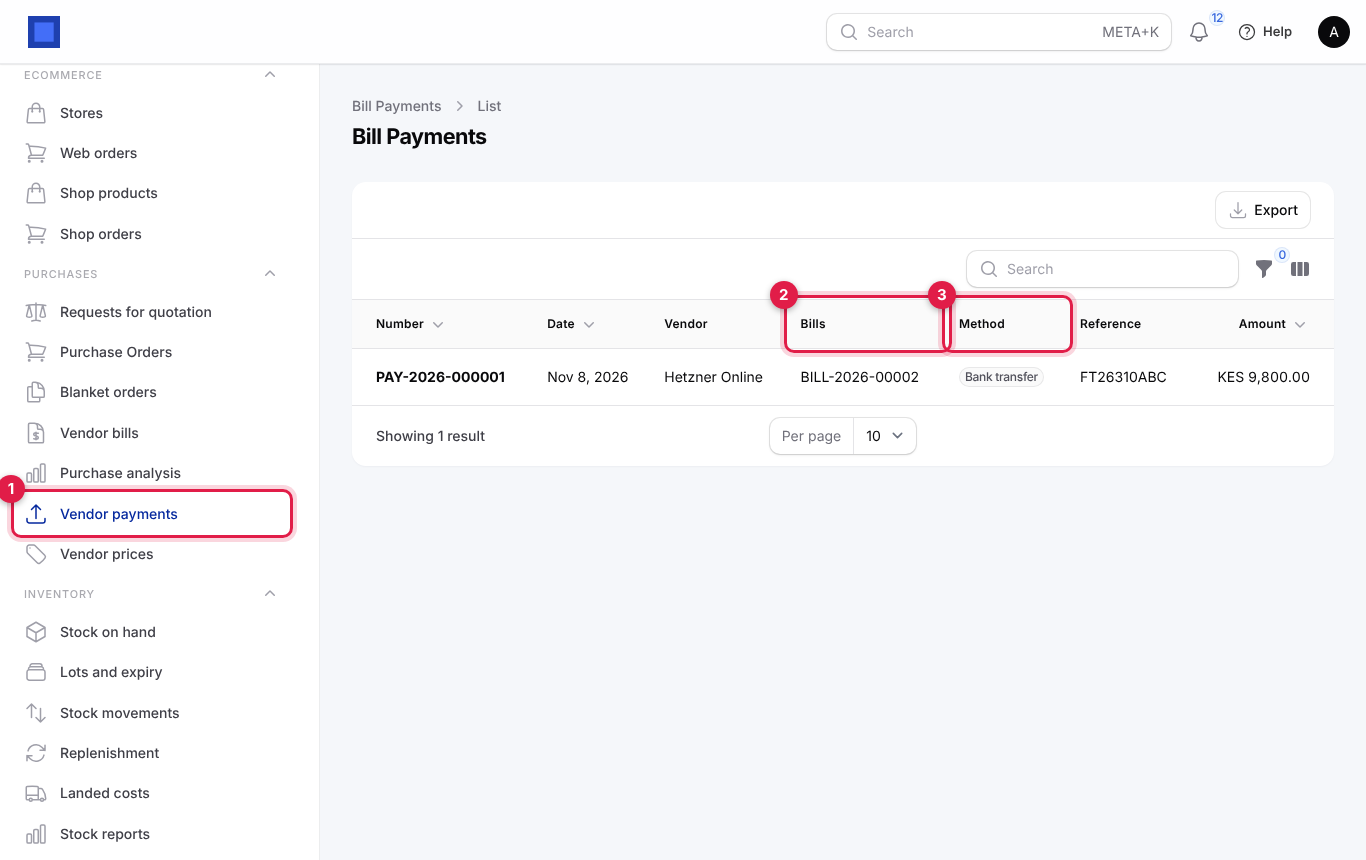
All payments are listed under Purchases → Vendor payments (marker 1), with the Bills each one paid (marker 2), the Method (marker 3), reference and amount. Filter by method; search by number, reference or vendor.
Keep vendor price lists
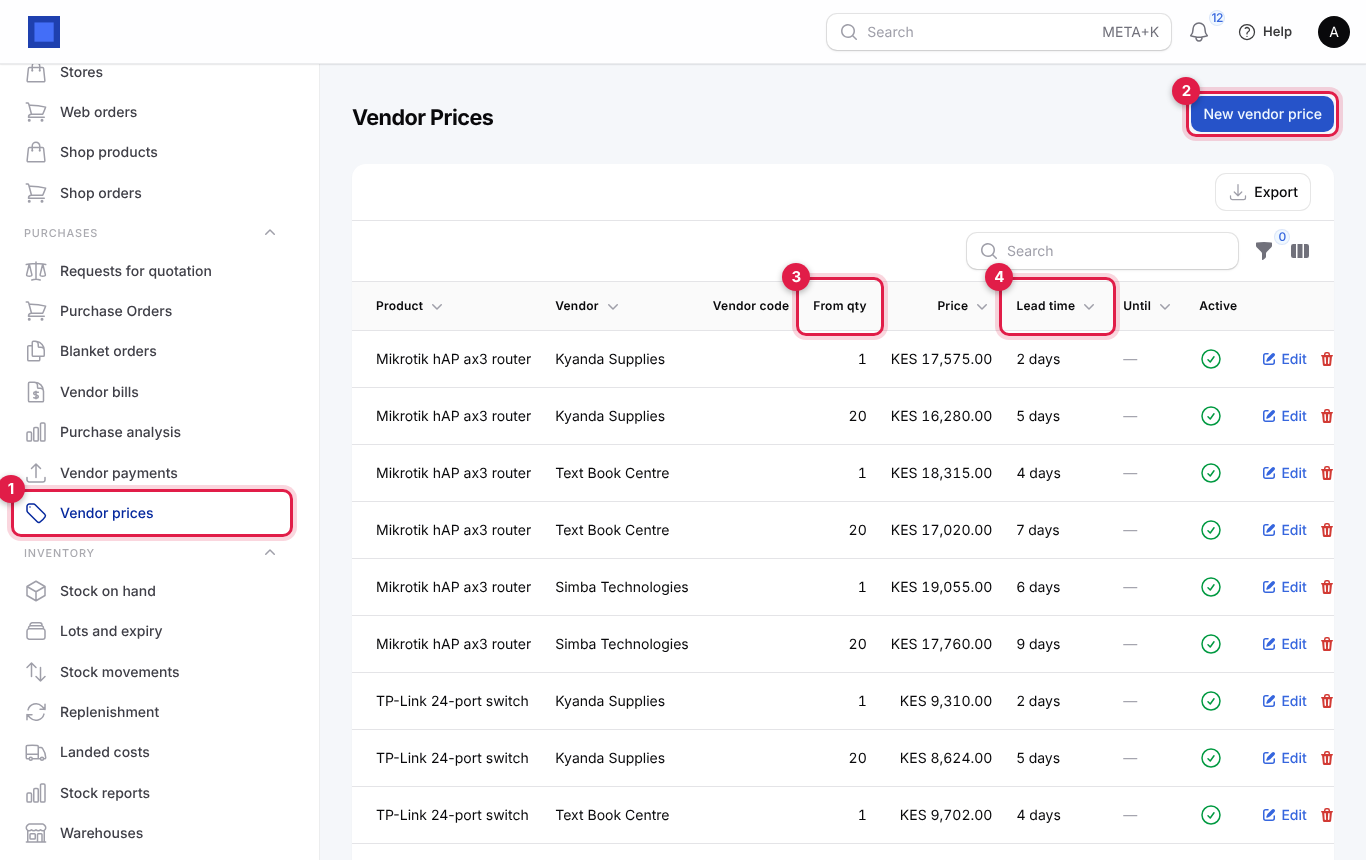
Vendor prices record what each vendor charges for a product, from which quantity, until when, and how long they take to deliver. Apply vendor prices on a draft order uses them.
- Open Purchases → Vendor prices (marker 1) and click New vendor price (marker 2). The list shows the From qty band (marker 3) and the Lead time (marker 4) per vendor and product. Filter by Vendor or Product.
- Fill in the window and click Create:
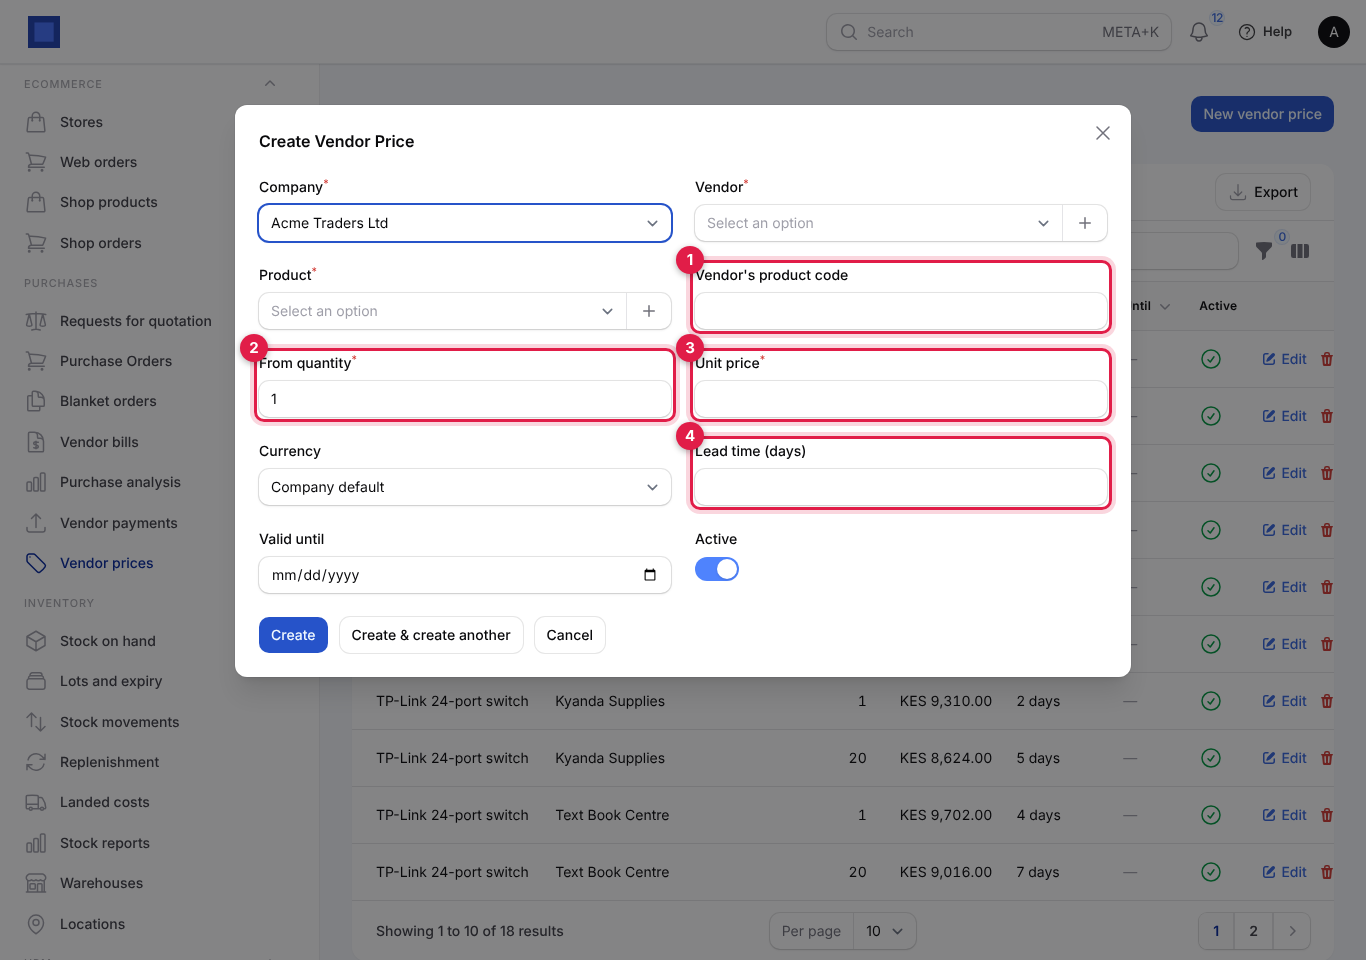
| Field | What to enter |
|---|---|
| Company, Vendor, Product | Required. |
| Vendor's product code (marker 1) | The vendor's own SKU, to quote on orders. |
| From quantity (marker 2) | The price applies from this quantity up. Add several rows for volume breaks, for example 1 at 1,200 and 50 at 1,050. Required. |
| Unit price (marker 3) | Required. |
| Currency | Leave on Company default or choose the vendor's currency. |
| Lead time (days) (marker 4) | Days from order to delivery. |
| Valid until | After this date the price is ignored. |
| Active | Switch off to keep the price on file without using it. |
When applying prices to an order line, NaliSuite uses the active, still-valid price from the highest quantity band the line reaches.
Use blanket orders for agreed volumes
A blanket order is a supply agreement: a vendor agrees to supply a total quantity at fixed prices over a period, and you call off ("release") deliveries as you need them.
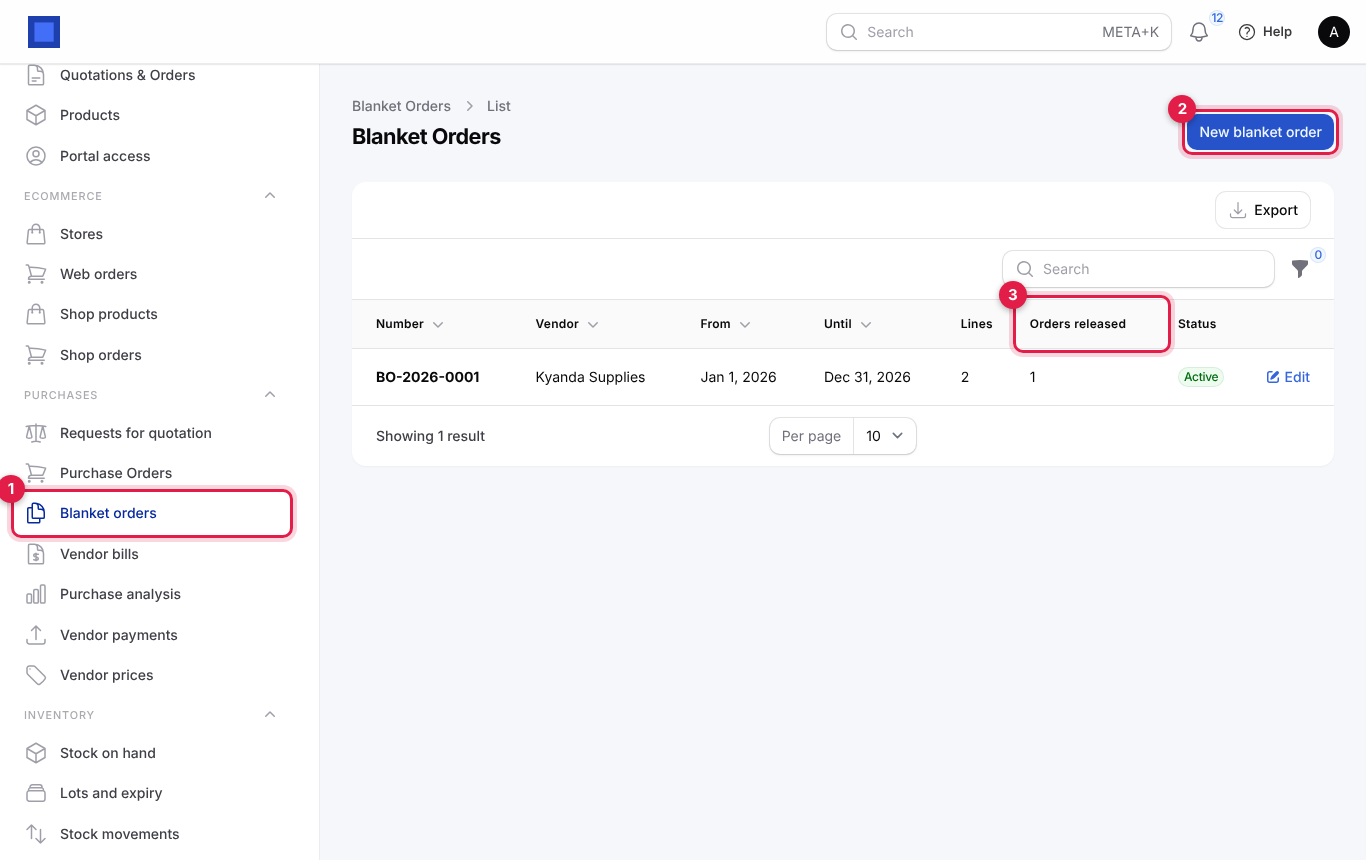
- Open Purchases → Blanket orders (marker 1) and click New blanket order (marker 2). Orders released (marker 3) counts the purchase orders made from each agreement.
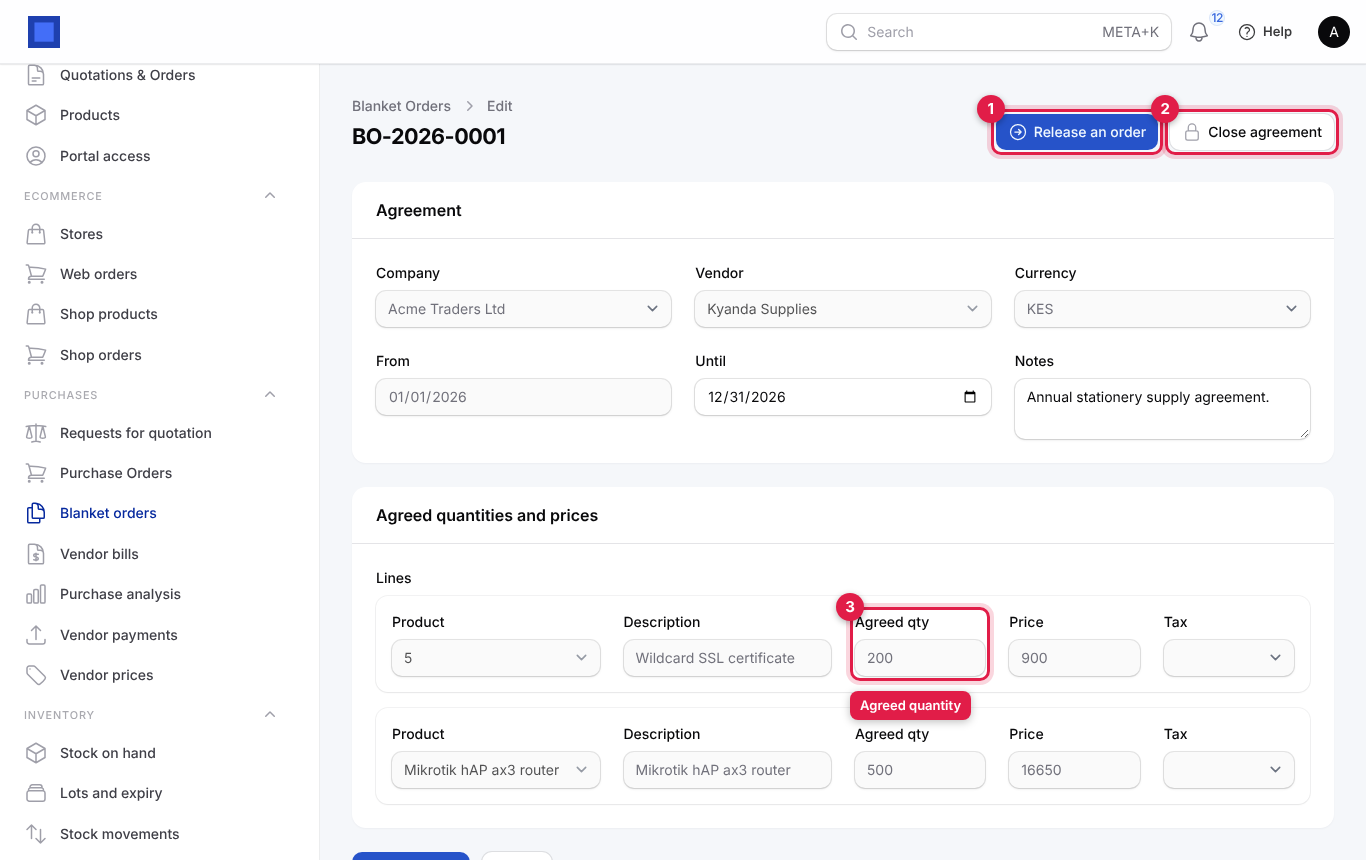
- Fill in the Agreement: Company, Vendor, Currency, From and Until dates and Notes; and under Agreed quantities and prices, one line per item with Product, Description, Agreed qty, Price and Tax. Click Create.
- Click Activate (needs purchases.confirm). The agreement gets a number (BO-2026-0001), becomes Active and is locked.
- Each time you need goods, click Release an order (marker 1).
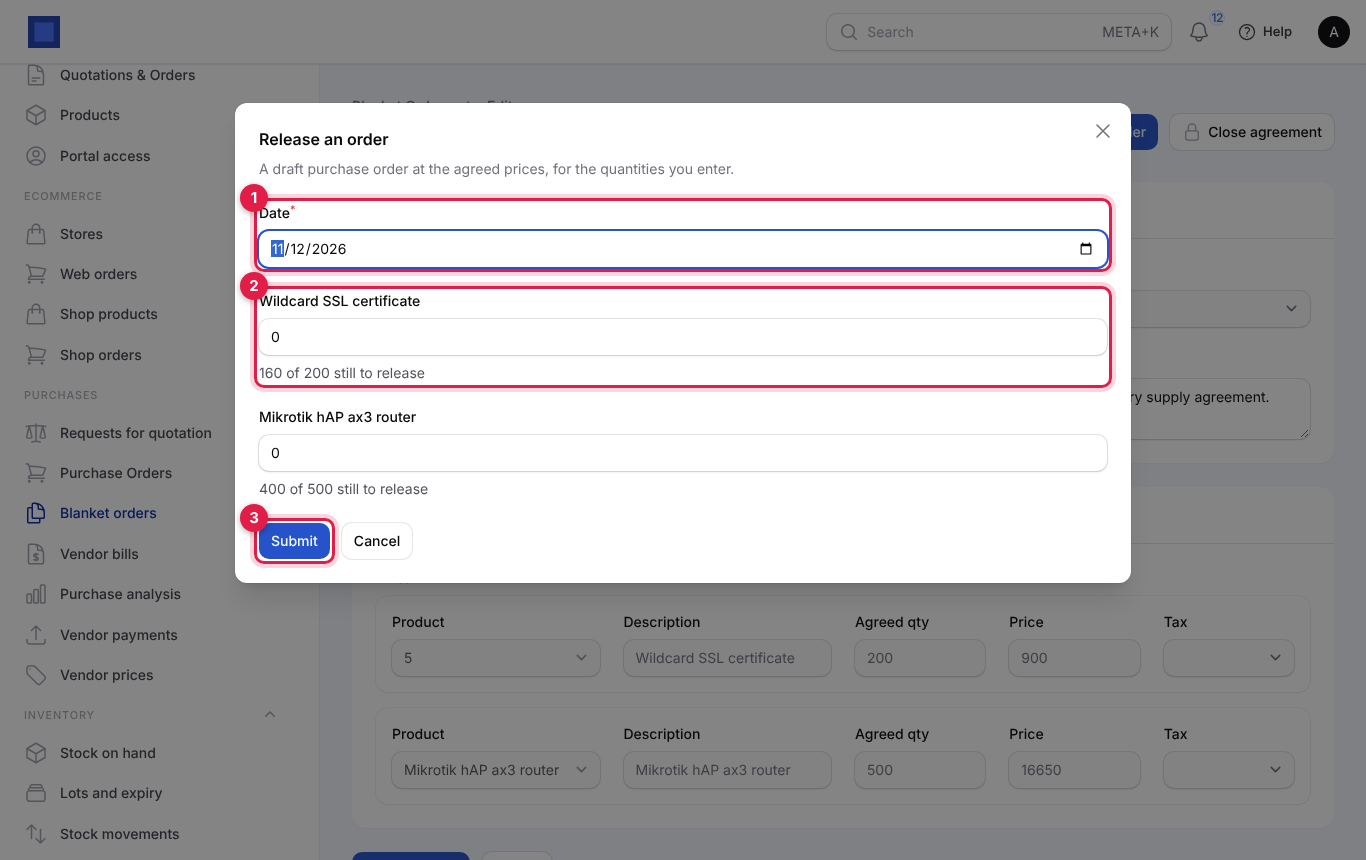
- Set the Date (marker 1) and type how many of each line to release now (marker 2); under each line you see how much is still to release, for example "160 of 200 still to release". Click Submit (marker 3). A draft purchase order at the agreed prices opens; confirm and send it as usual.
- When the agreement ends, click Close agreement (marker 2 in the previous picture). Status becomes Closed and no more orders can be released.
| Blanket order status | Meaning |
|---|---|
| Draft | Being agreed; editable; can be deleted. |
| Active | Orders can be released. |
| Closed | Finished. |
Purchase settings
Open Settings → Preferences and click the Purchases tab. As with all preferences, Whole organisation applies to every company and a single company can override it.
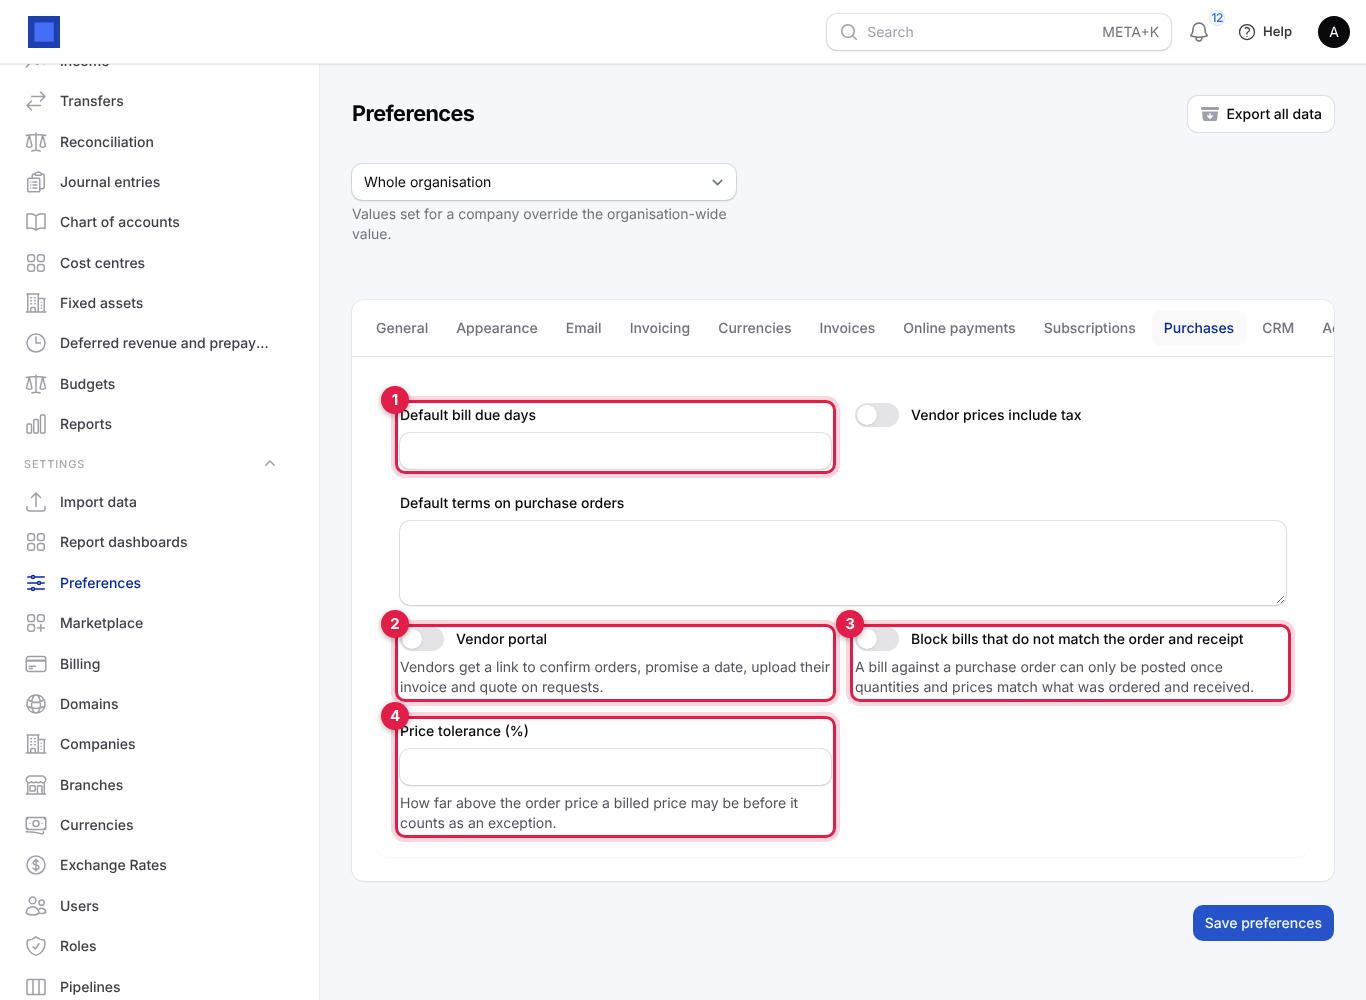
| Setting | Effect |
|---|---|
| Default bill due days (marker 1) | Days after the bill date a bill is due, when the vendor has no payment terms of their own. 30 if empty. |
| Vendor prices include tax | Treat prices typed on orders and bills as tax-inclusive. |
| Default terms on purchase orders | Text put into Terms and conditions on every new order. |
| Vendor portal (marker 2) | On by default. Vendors get links to confirm orders, promise a date, upload their invoice and quote on requests. Switch off to send plain PDFs only. |
| Block bills that do not match the order and receipt (marker 3) | When on, a bill against a purchase order can only be posted once quantities and prices match what was ordered and received. |
| Price tolerance (%) (marker 4) | How far above the order price a billed price may be before it counts as an exception. 2 by default. |
Click Save preferences.
The vendor portal in brief
With the vendor portal on, your vendors can work with you without phone calls:
- From the order email (no sign-in needed): open the order, download the PDF, confirm it with a promised delivery date and a note, and upload their invoice. The invoice arrives in Vendor bills as a draft bill with the order's lines and the file attached (source Vendor portal), ready for you to check and post.
- From the request for quotation email: enter their prices, lead time and notes. The quote appears in Compare quotes.
- With a portal sign-in (after Invite to the vendor portal): a vendor area with their purchase orders, their bills and what is still owed, the payments you made with a remittance advice for each, and your open requests for quotation; they can also send invoices from there.
Common questions
Do I need a purchase order for every bill? No. Enter a bill directly for services and regular suppliers. Use orders when you want approval before spending, stock receipts, or three-way matching.
The vendor delivered less than ordered. What now? Receive what came. The order stays Partially received. Bill only what was received; the match will flag anything more. Receive the rest later with Receive more, or cancel what will not come by agreeing a corrected bill.
Why can't I post this bill? Either the three-way match found exceptions and blocking is on (open Three-way match to see why), the bill date is on or before the lock date, or the bill needs approval (check Approvals).
Why is there no Confirm button on my order? Your role lacks purchases.confirm, or the order is no longer a draft.
How do I pay several bills from one vendor at once? Record a payment on each bill. Each payment can be matched to the bank statement line separately, or matched in reconciliation as they appear.
Where do I see what I owe each vendor? Filter Vendor bills by vendor and look at Owed, or build an Outstanding bills report with the report builder (dataset Vendor bills).
What is Purchase analysis? A summary page under Purchases → Purchase analysis for this month, quarter, year or the last 12 months: total spend on confirmed orders (before tax), on-time delivery rate, open commitments (ordered but not yet billed), bills still owed, spend by month, and the top vendors, products and categories.