Documents and signatures
Documents is your company's file cabinet and e-signature tool in one. Keep contracts, policies, KRA certificates and customer files in folders with tags and versions; share files with customers by secure link or the portal; ask customers or staff to upload a document you need; and send PDFs to be signed electronically, with a signed copy and an audit certificate kept for you. Everything is in the Documents group of the sidebar: Library, Requests and Signatures.
Note: Permissions: documents.view to see and open documents, documents.manage to upload, organise, share, request documents and add versions, and documents.sign.request to send signature requests. Owners and admins see every folder; other users see restricted folders only if they are on the folder's list. Set permissions under Settings → Roles.
The library
- In the menu, open Documents → Library (headed Documents).
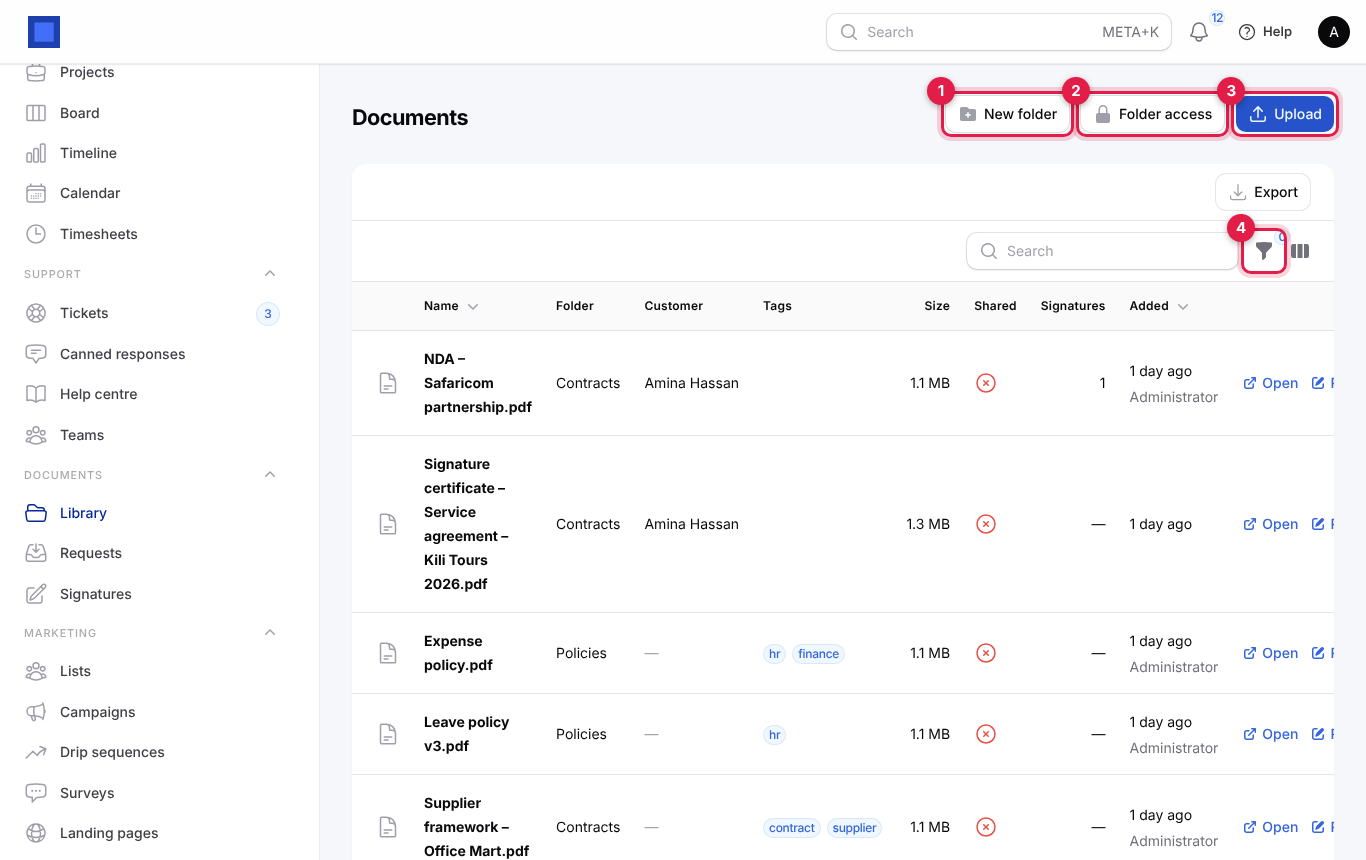
| Column | Meaning |
|---|---|
| Icon | PDF, picture or other file. |
| Name | The file name, with its description under it. |
| Folder | Where it is filed. |
| Customer | The customer it belongs to. |
| Tags | Labels such as contract, hr, finance. |
| Size | File size, with the version under it once there is more than one (for example v2). |
| Shared | Whether the customer can see it in the portal. |
| Signatures | How many signature requests it has. |
| Added | When, and who uploaded it. |
The header buttons are New folder (marker 1), Folder access (marker 2) and Upload (marker 3). Use Search to find a file by name, and the filter button (marker 4) for Folder, Customer and Shared. Documents can also be found from the global search (Ctrl/Cmd+K) by name, description or customer.
Each row has these buttons (scroll the table to the right on small screens):
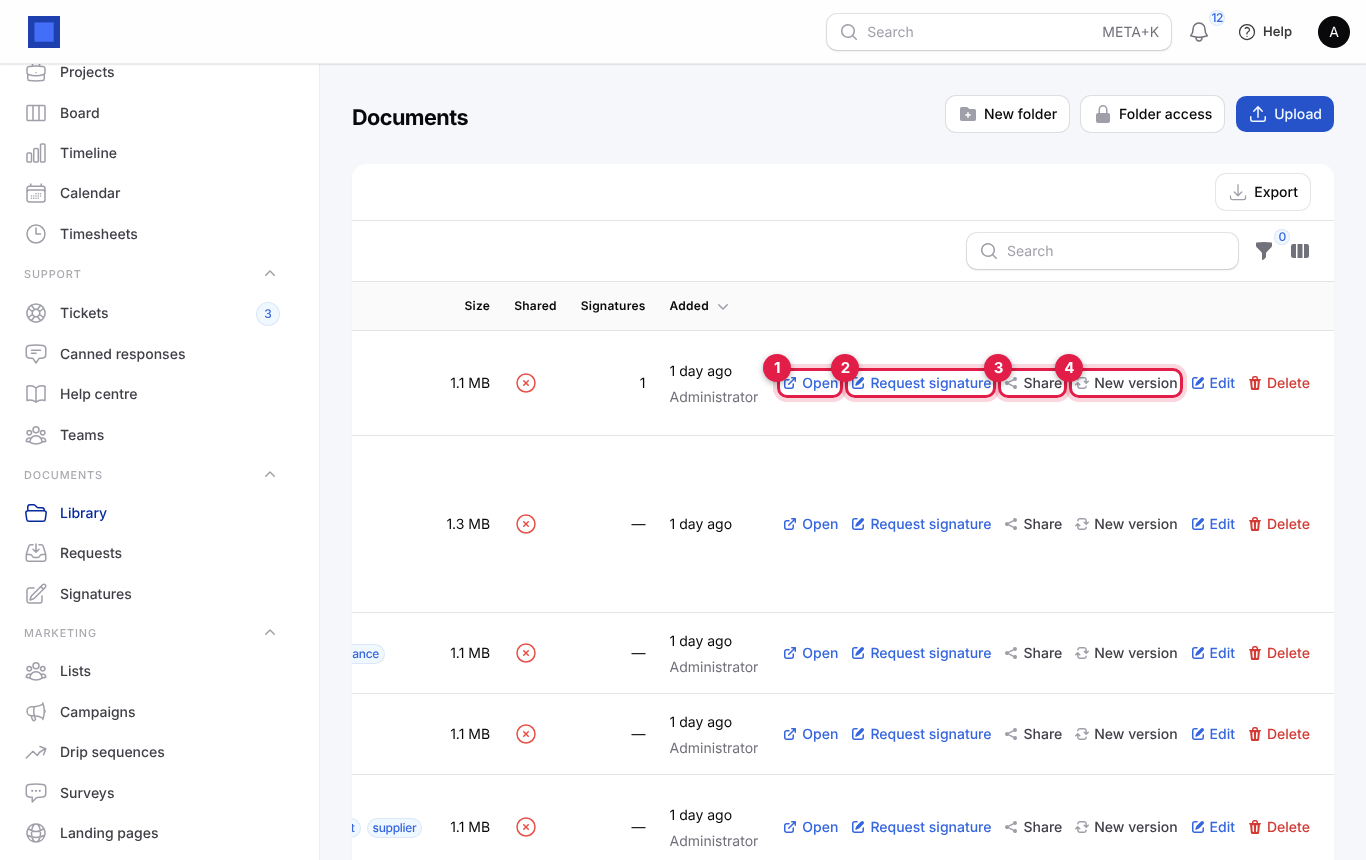
| Button | What it does |
|---|---|
| Open (marker 1) | Opens or downloads the file in a new tab. |
| Request signature (marker 2) | Sends the PDF to be signed. Shown for PDFs to users with documents.sign.request. |
| Share (marker 3) | Shares it with a customer. Shown until it is shared. |
| New version (marker 4) | Replaces the file while keeping the old one. |
| Versions | Lists earlier versions. Shown once there is more than one. |
| Edit | Changes the name, folder, customer, tags, description and portal sharing. |
| Delete | Deletes the document and its file. Asks you to confirm. |
Create folders and control who sees them
- On the library, click New folder.
- Fill in the form and click Submit.
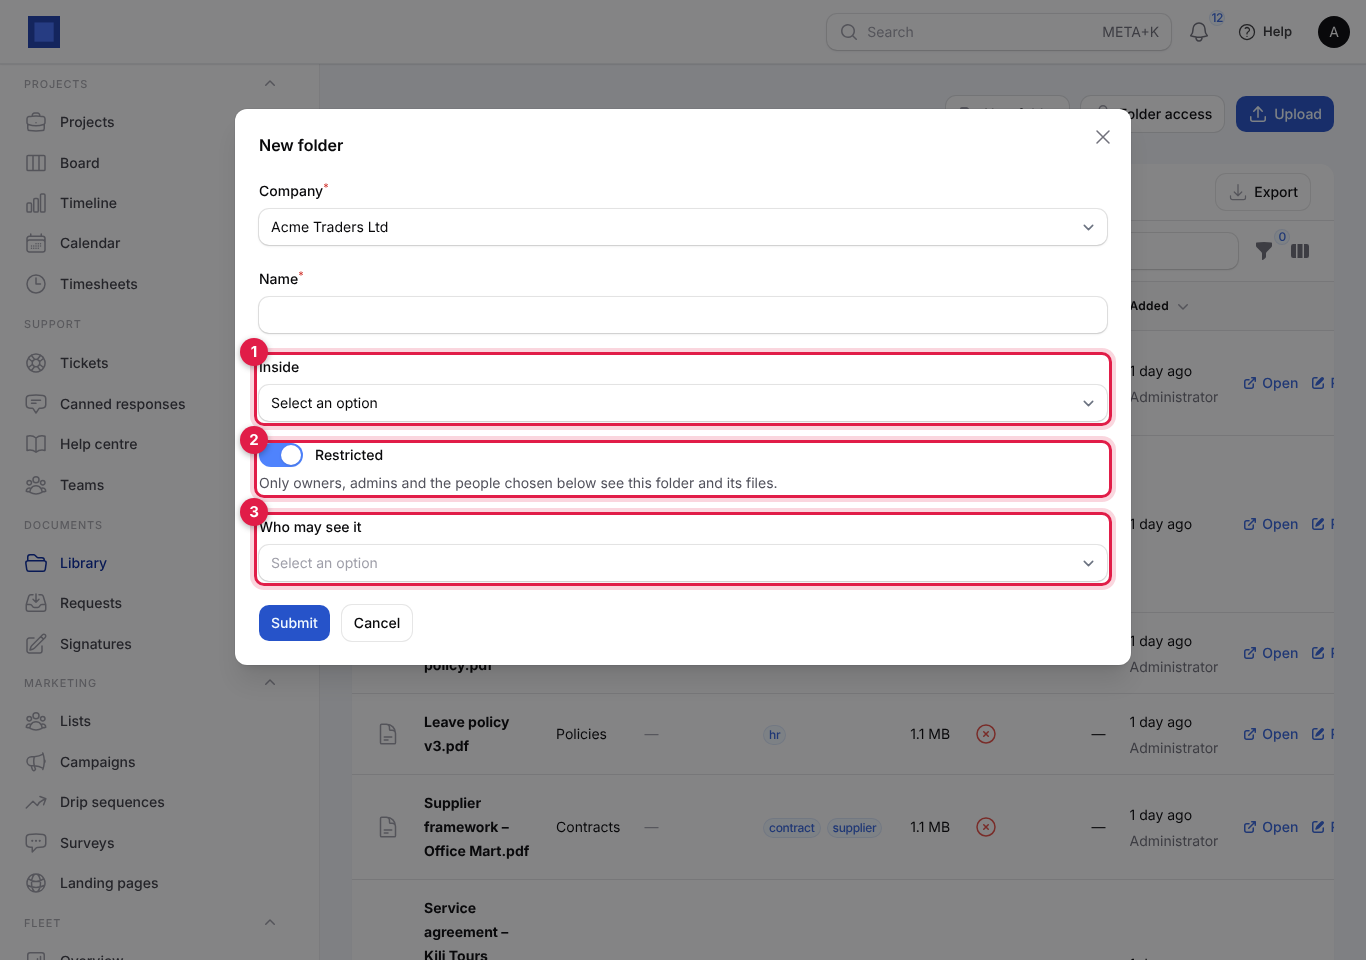
| Field | What to enter |
|---|---|
| Company | Required. |
| Name | Required, for example "Contracts", "HR – staff files", "KRA". |
| Inside | Optional (marker 1). Put the folder inside another, for example "HR / Payslips". Folders are shown with their full path. |
| Restricted | Optional (marker 2). When on, only owners, admins and the people chosen below see this folder and its files. |
| Who may see it | Shown when restricted (marker 3). The users allowed in. |
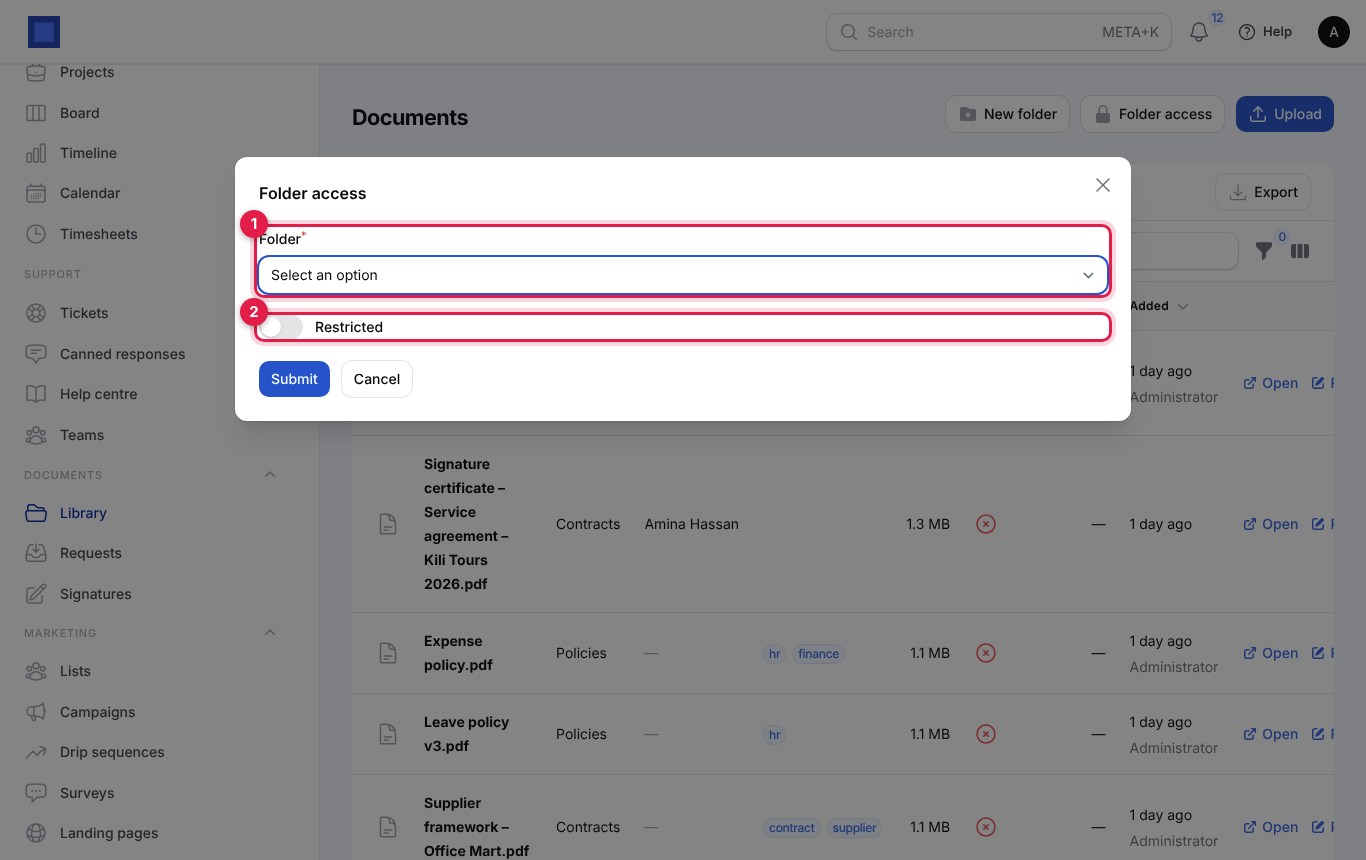
To change access later, click Folder access, choose the Folder (marker 1; restricted folders show a 🔒), turn Restricted on or off (marker 2), choose Who may see it, and click Submit.
Tip: Restrict folders such as HR or payroll. Restriction applies to the files directly in that folder, so restrict each sensitive sub-folder too.
Upload documents
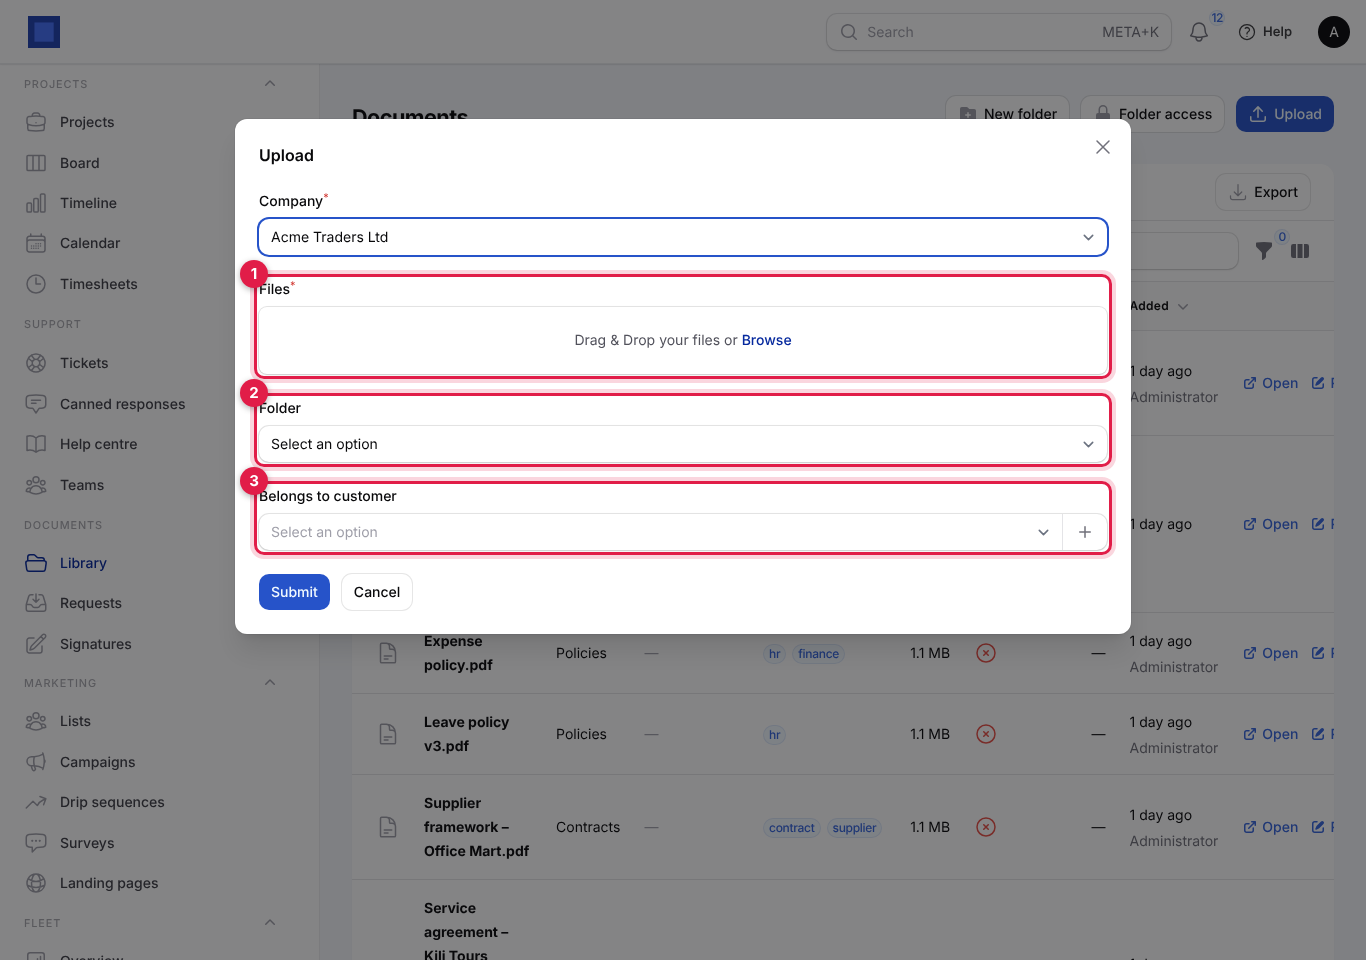
- On the library, click Upload.
- Drag files into Files or click Browse (marker 1). You can add several at once.
- Choose the Folder (marker 2) and, if the files are about one customer, Belongs to customer (marker 3). Click + to add a new customer.
- Click Submit. You see "n file(s) added".
Allowed files: PDF, PNG, JPEG, WebP, text, CSV, Word, Excel, PowerPoint and zip. Other types are refused.
Name, tag and describe a document
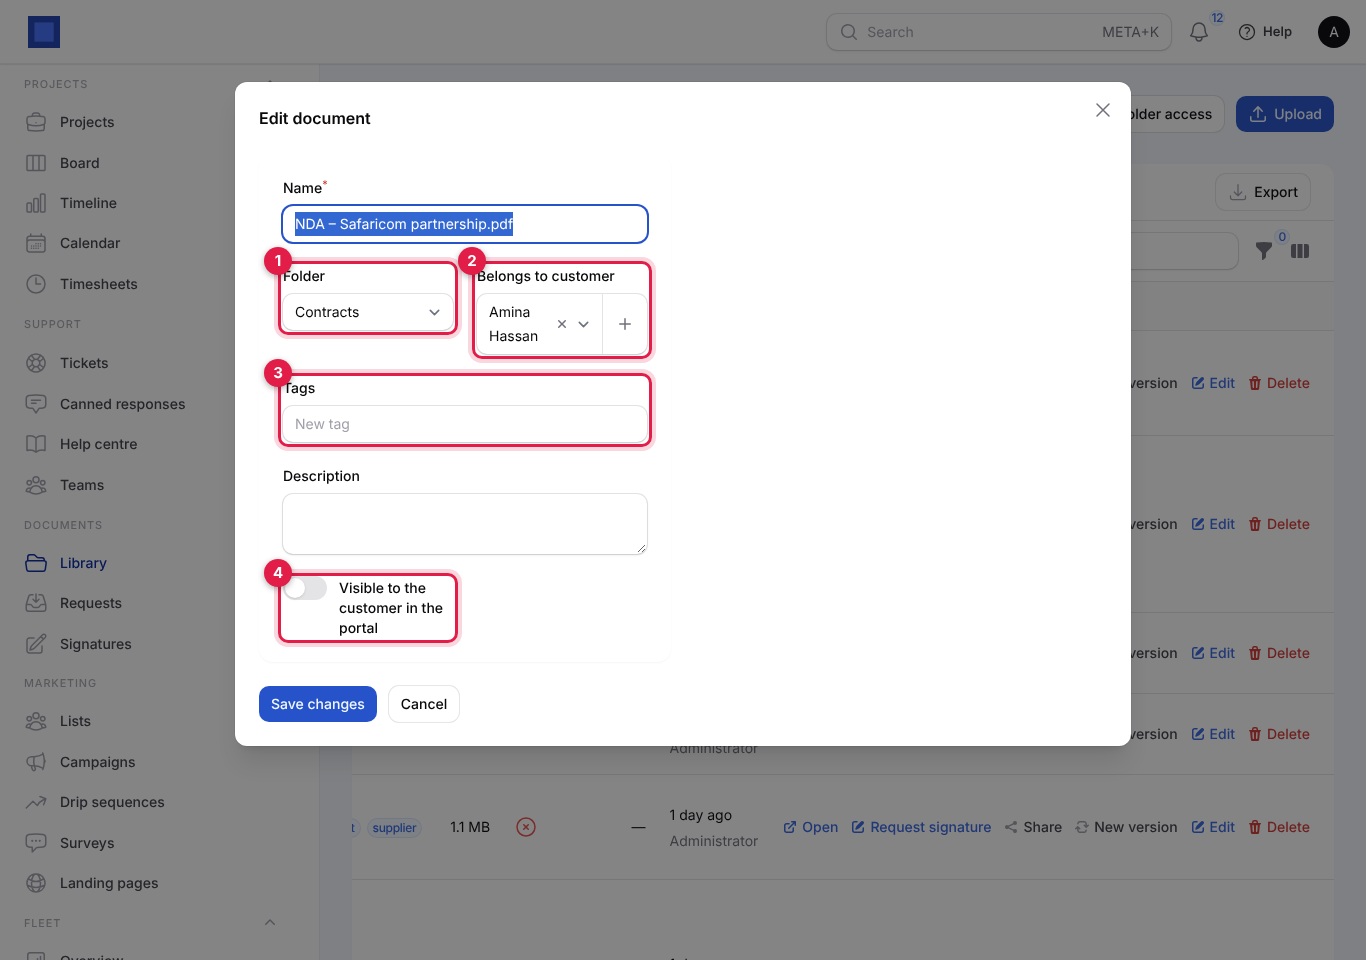
Click Edit on a row, change the details and click Save changes.
| Field | What to enter |
|---|---|
| Name | Required. A clear name, for example "Service agreement – Kili Tours 2026.pdf". |
| Folder | Optional (marker 1). |
| Belongs to customer | Optional (marker 2). Links it to the customer so it can be shared and found by customer. |
| Tags | Optional (marker 3). Type a tag and press Enter, for example contract, 2026, signed. |
| Description | Optional. What it is, the expiry date, who to ask. |
| Visible to the customer in the portal | Optional (marker 4). Shows it on the customer's portal Documents page. |
Keep versions
When a contract or policy is updated, add the new file as a version instead of uploading a second copy.
- Click New version on the document.
- Choose the File (marker 1) and write What changed (marker 2), for example "Clause 7 updated after legal review".
- Click Submit. You see "Now at version 2".
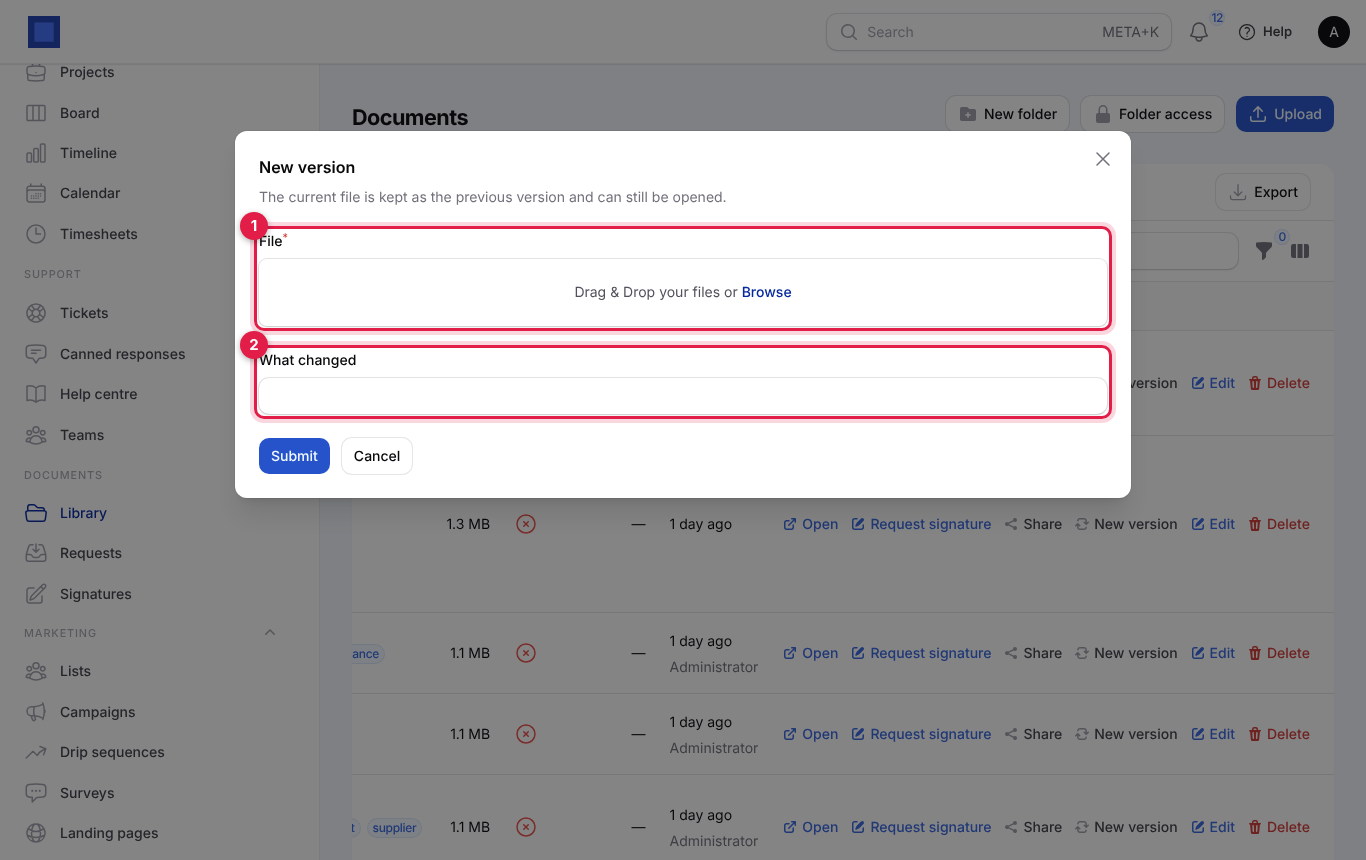
The current file is kept as the previous version and can still be opened: click Versions on the row to see every version with who uploaded it, when and what changed, and open any of them. Signing a PDF also adds a new version (the signed copy).
Share documents with customers
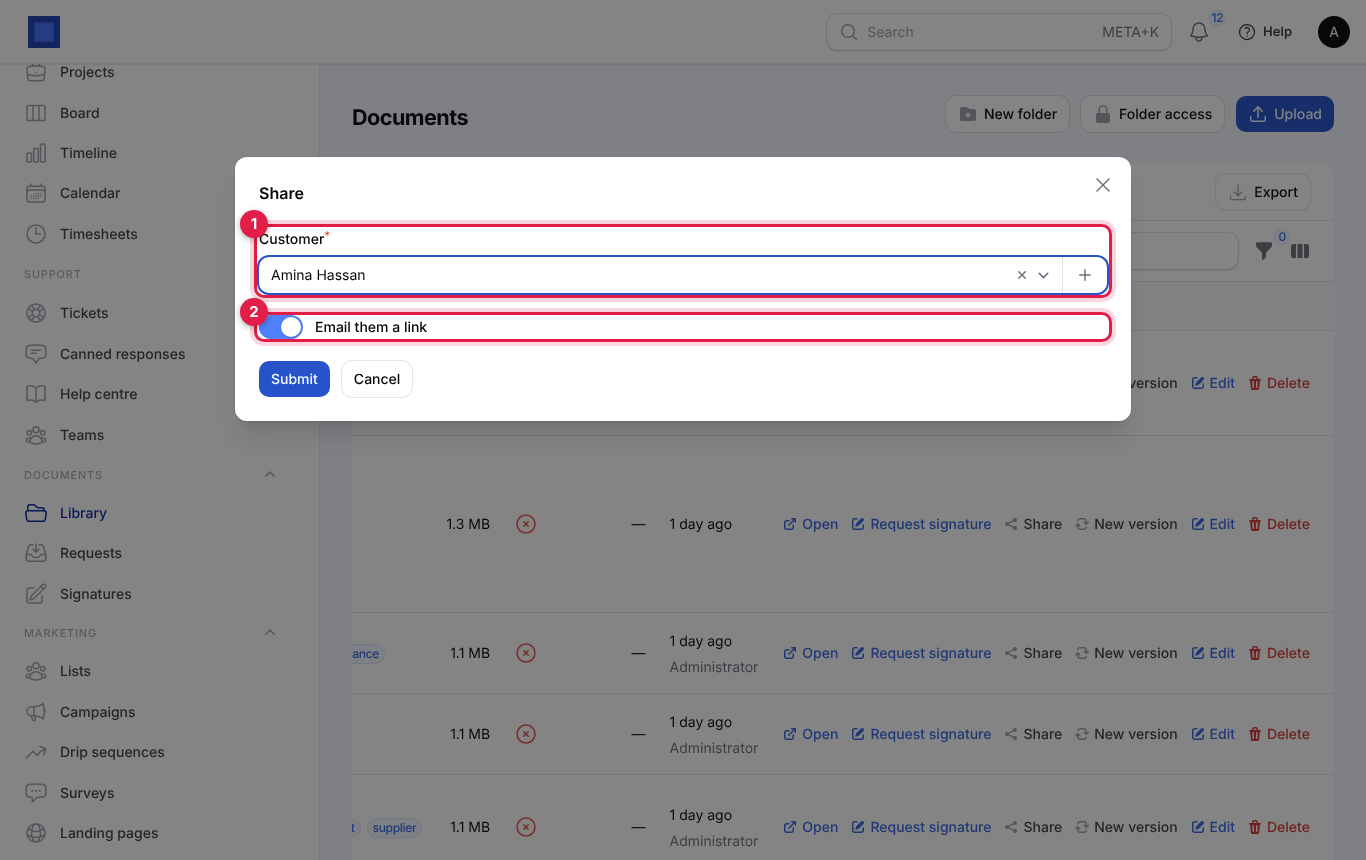
- Click Share on the document.
- Choose the Customer (marker 1). It starts with the document's customer.
- Leave Email them a link on (marker 2) to send them an email with a View document link.
- Click Submit. You see "Shared with the customer".
The customer can open the file from the secure link without signing in, and also sees it on the Documents page of the customer portal under Shared with you. To stop sharing, Edit the document and turn off Visible to the customer in the portal.
Note: The share email needs the customer to have an email address on their contact.
Request a document from someone
Use this to collect a KRA PIN certificate, a certificate of incorporation, a signed form or an ID copy from a customer, supplier or employee.
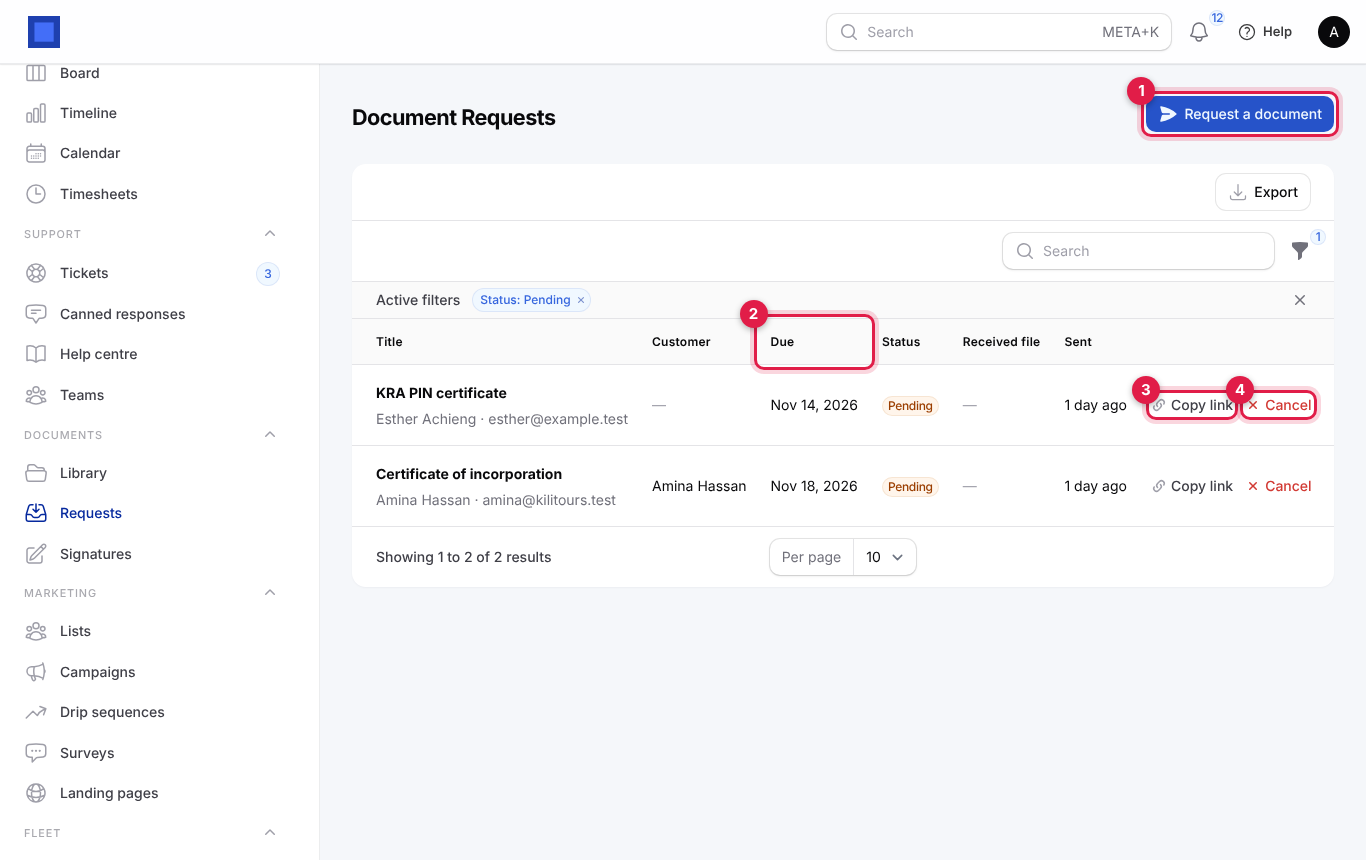
- In the menu, open Documents → Requests and click Request a document (marker 1).
- Fill in the form and click Submit.
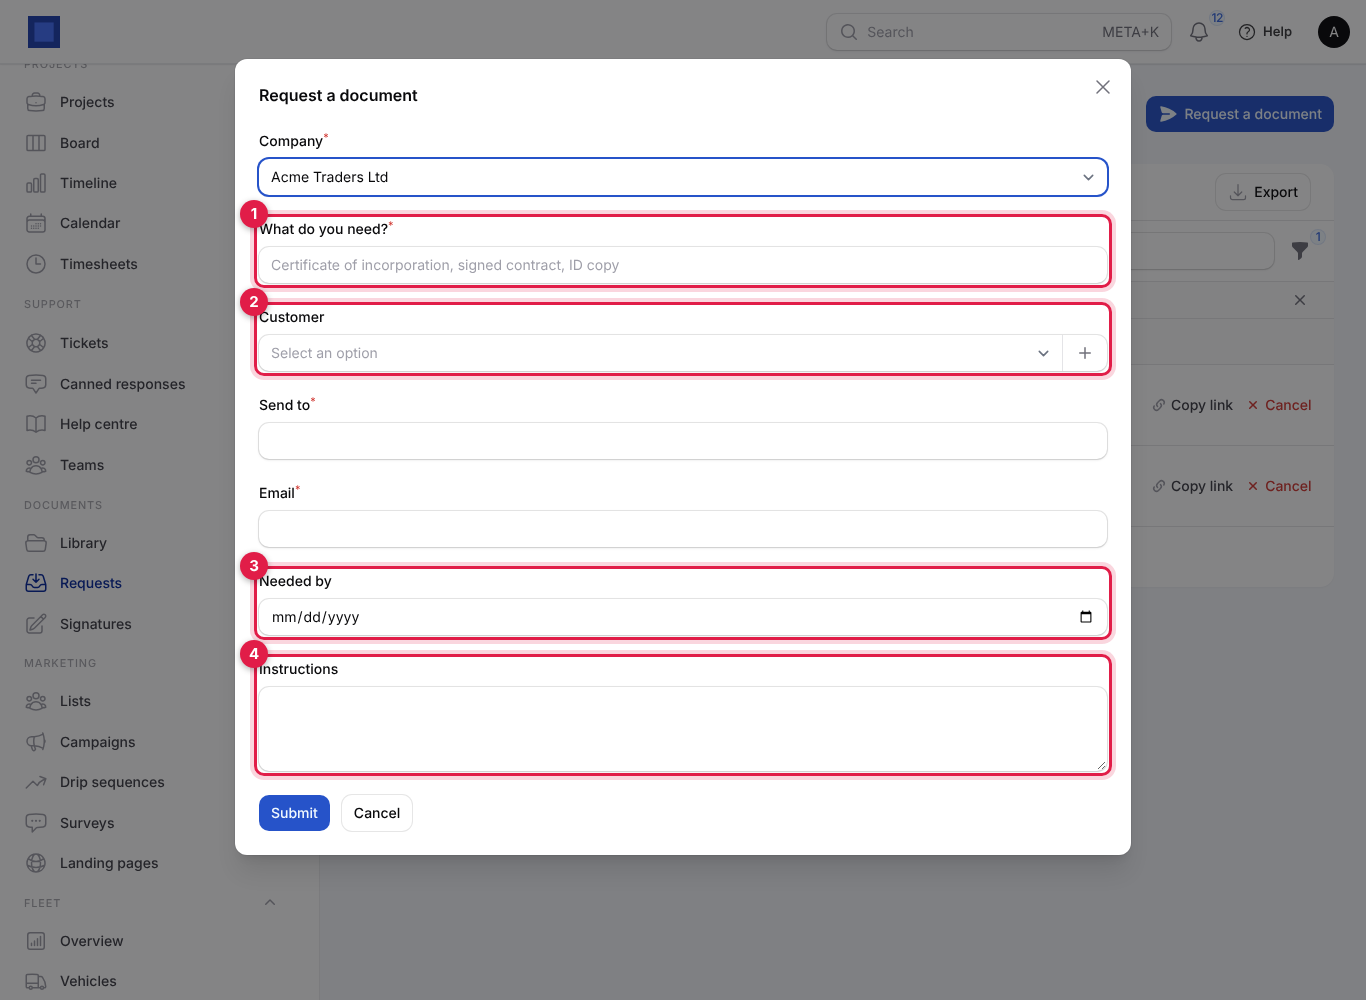
| Field | What to enter |
|---|---|
| Company | Required. |
| What do you need? | Required (marker 1), for example "KRA PIN certificate". This becomes the request's title and the start of the file name. |
| Customer | Optional (marker 2). Choosing one fills Send to and Email. The received file is linked to them. |
| Send to | Required. The person's name. |
| Required. Where the request goes. | |
| Needed by | Optional (marker 3). Shown in the email and in red on the list once past. |
| Instructions | Optional (marker 4), for example "A clear scan of both pages, please." |
The person gets an email "Company needs a document from you: …" with an Upload document button. The upload page looks like this; they choose a file (PDF, image or Office document, up to 25 MB) and click Upload:
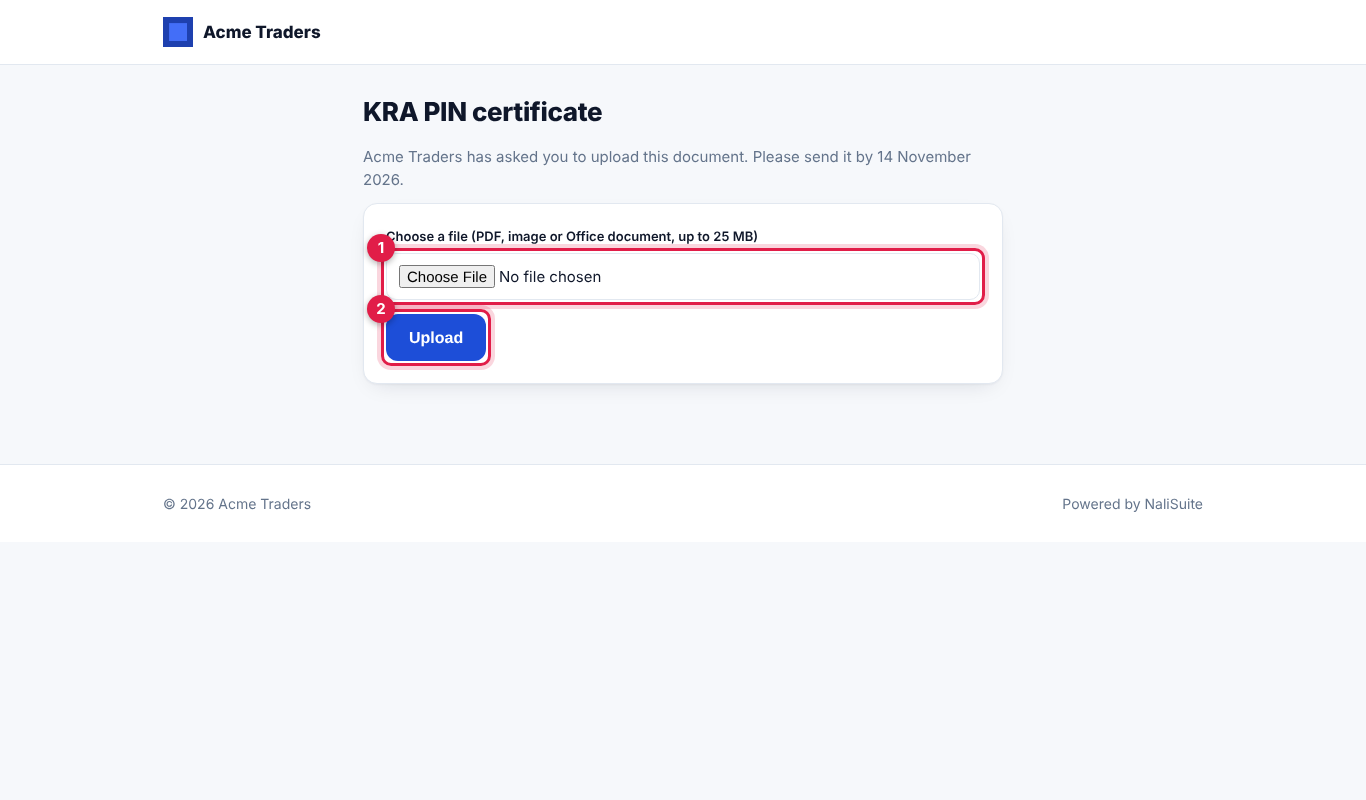
When they upload, the file is added to the library (linked to the customer, with a description saying who uploaded it for which request), and the request becomes Received. On the requests list:
| Status | Meaning |
|---|---|
| Pending | Waiting for the upload. The list shows these by default. |
| Received | Uploaded. Click Open file to see it; Received file shows its name. |
| Cancelled | You cancelled it; the link no longer accepts uploads. |
Copy link (marker 3) opens the upload page so you can copy its address and send it by WhatsApp or SMS. Cancel (marker 4) closes a pending request after you confirm. Customers also see pending requests on the portal's Documents page under Documents we need from you.
Send a document for electronic signature
You can send any PDF in the library for signature.
- In Documents → Library, click Request signature on the PDF.
- Fill in the form and click Submit.
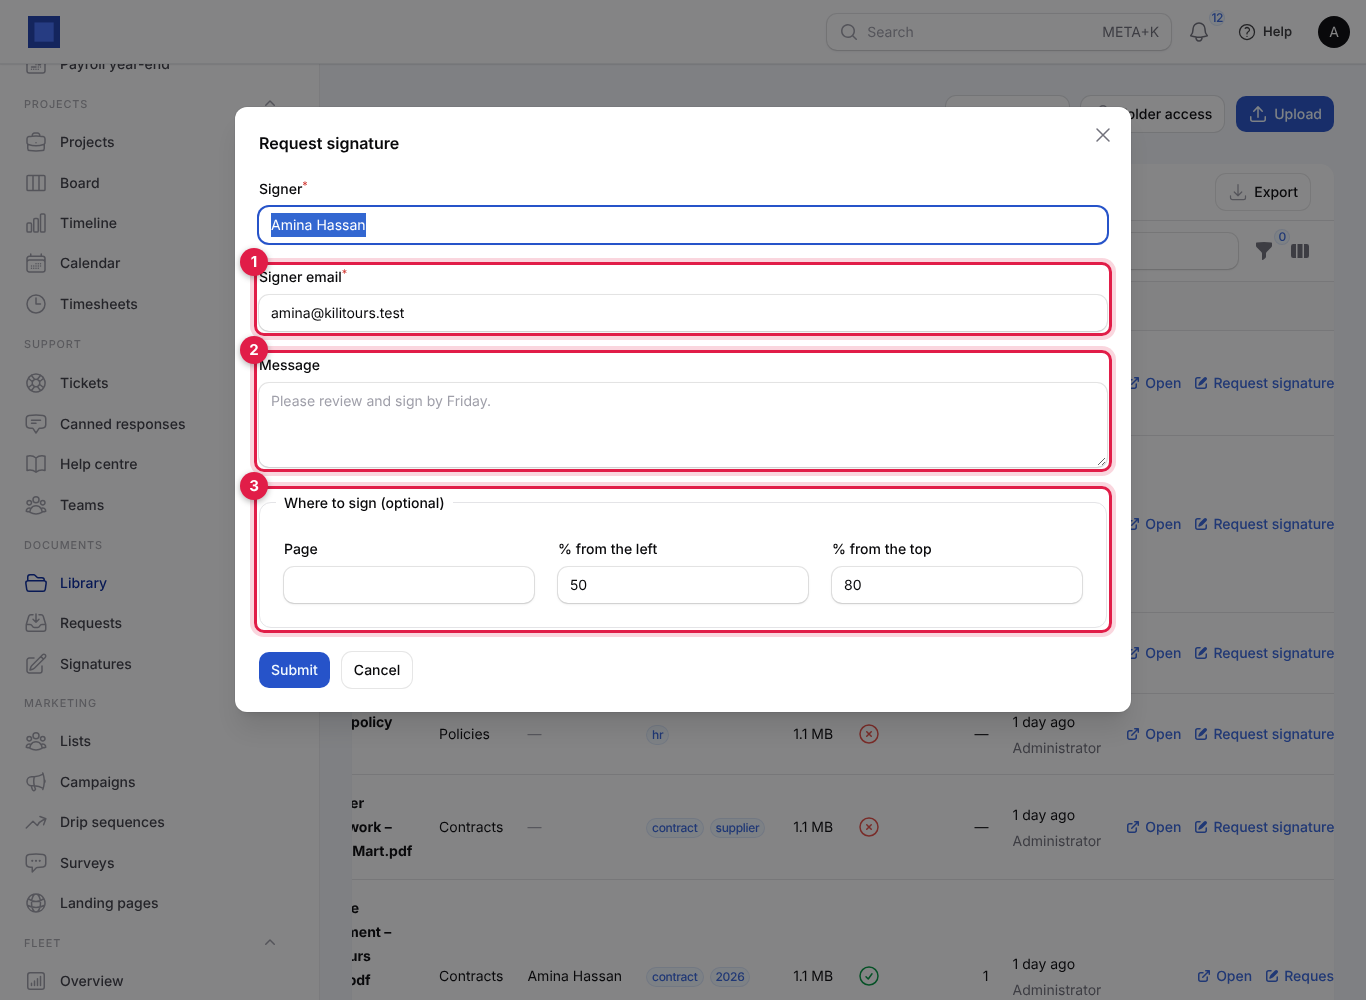
| Field | What to enter |
|---|---|
| Signer | Required. The signer's full name. Starts with the document's customer. |
| Signer email | Required (marker 1). The signing link goes here. |
| Message | Optional (marker 2), for example "Please review and sign by Friday." Shown in the email and on the signing page. |
| Where to sign (optional) | Marker 3. Where the signature is stamped on the PDF. Page: the page number (leave empty to skip placement and stamp the default position). % from the left (default 50) and % from the top (default 80): the position on the page as a percentage, so 50 and 80 is the middle, near the bottom. |
You see "Signature request sent to …". The signer gets an email with a link to the signing page.
Tip: For a contract whose signature line is at the bottom right of page 3, enter Page 3, 70 from the left and 85 from the top.
What the signer sees
The signing page shows the document (with Open the document in a new tab to read it in full) and the message. To sign, the signer:
- Types Your full name (marker 1).
- Optionally draws a signature in the box with a mouse or finger (marker 2). Clear starts again. Their typed name counts as their signature if they do not draw.
- Ticks "I have read this document and agree that my electronic signature is as binding as a handwritten one." (marker 3).
- Clicks Sign document (marker 4).
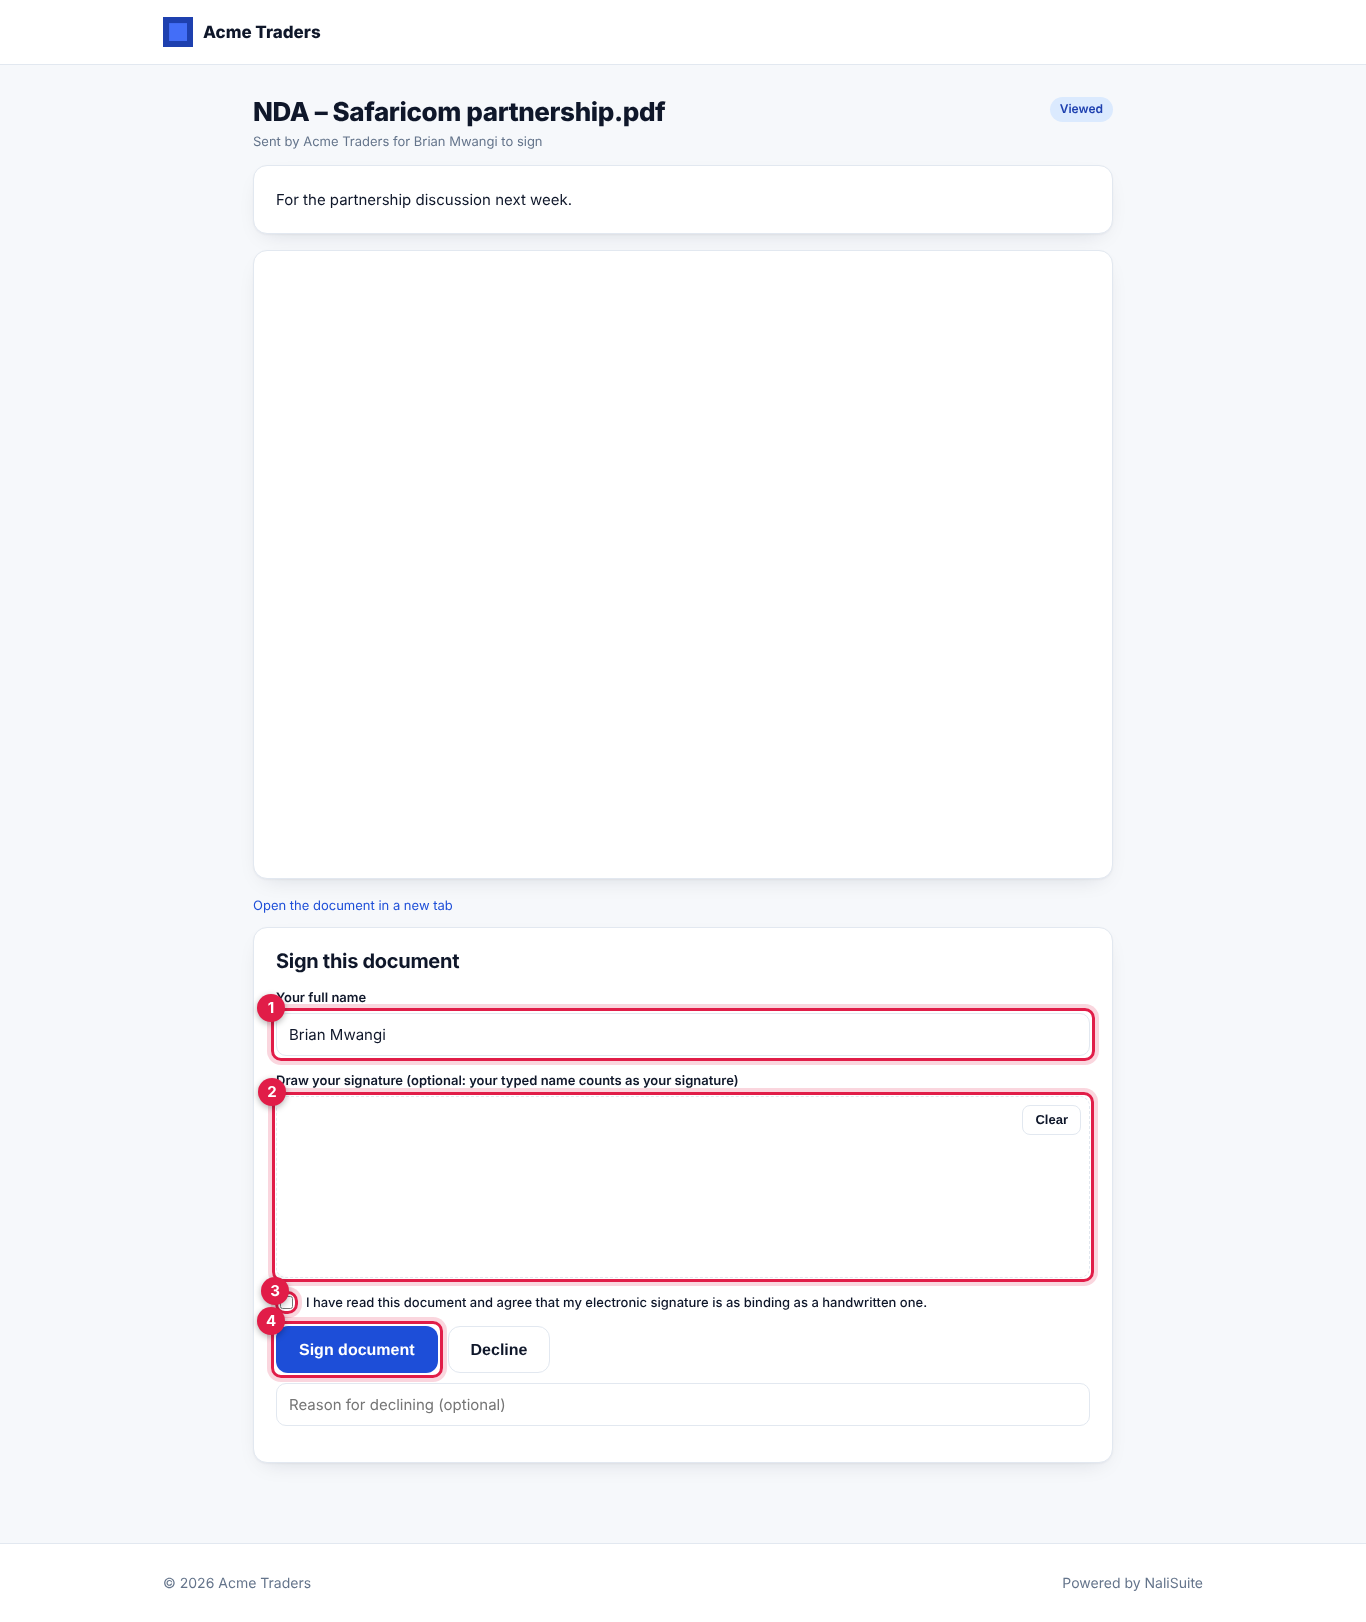
They can instead write a Reason for declining (optional) and click Decline.
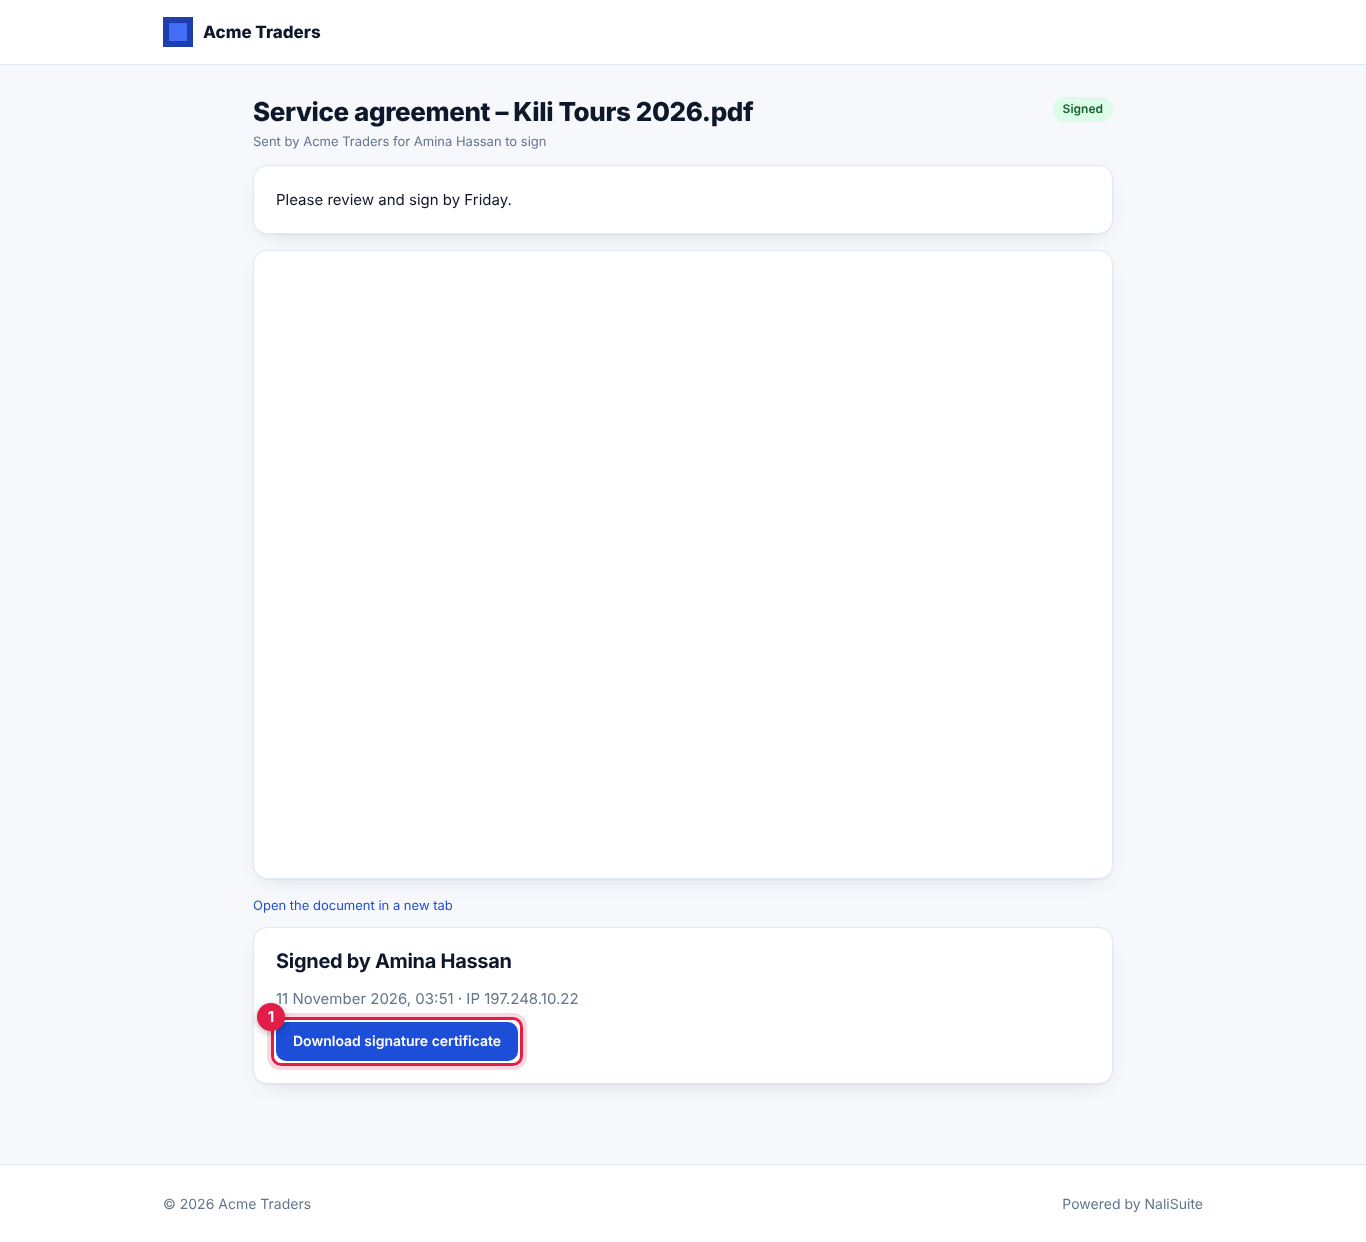
After signing, the page shows Signed by … and Download signature certificate (marker 1):
What happens when a document is signed
- The signature (drawn image, name, date and IP address) is stamped onto the PDF at the chosen place, and the signed PDF becomes the document's new version ("Signed by …").
- A signature certificate PDF is created and added to the library next to the document.
- The signer and your company email address get an email "Signed: …" with a link to the signed document.
- A
document.signedwebhook fires if you have webhooks set up (Settings → Webhooks).
Track signatures and the audit certificate
In the menu, open Documents → Signatures.
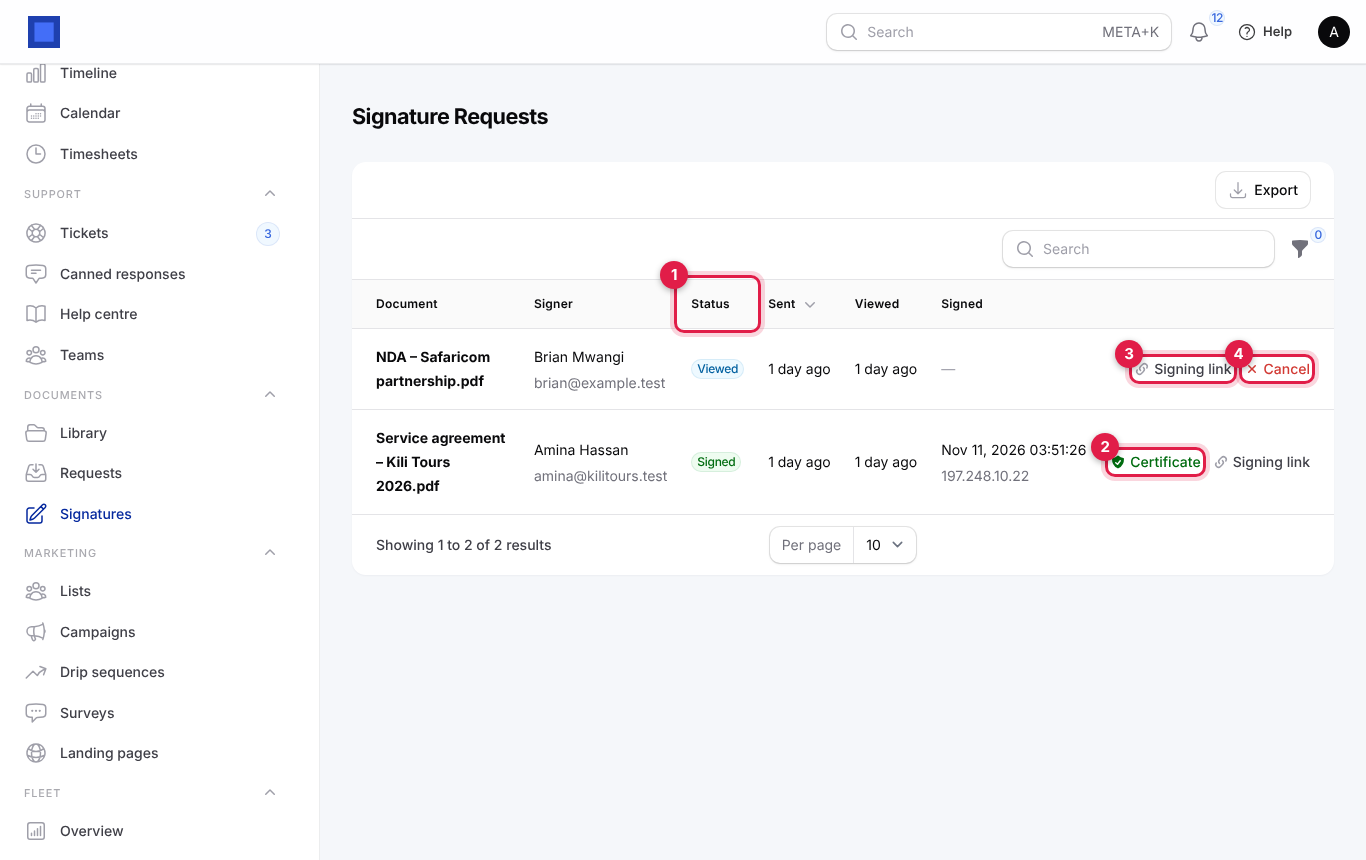
| Status (marker 1) | Meaning | What moves it |
|---|---|---|
| Sent | Emailed, not opened yet. | The signer opens the link. |
| Viewed | The signer has opened it. | Signing or declining. |
| Signed | Signed. Signed shows the date and time and the signer's IP address. | — |
| Declined | The signer declined, with their reason. | Send a new request. |
| Cancelled | You cancelled it; the link stops working. | — |
The buttons on each row:
- Certificate (marker 2): downloads the signature certificate of a signed request.
- Signing link (marker 3): opens the signing page, so you can copy the link and send it by WhatsApp.
- Cancel (marker 4): cancels an open request after you confirm.
Filter by status to see what is still waiting.
The signature certificate records the electronic signature as captured by your company through NaliSuite. It lists the document, its size and its Document fingerprint (SHA-256) (which identifies the exact file presented to the signer), the reference, the signer, the status, where the signature was placed, and a timeline of every event (sent, viewed, signed, stamped) with the time in UTC and the IP address. It states that the signer confirmed they had read the document and intended to sign electronically. Keep it with the signed document.
What customers see in the portal
On the customer portal's Documents page, customers see:
- Waiting for your signature: open signature requests with a Review and sign button.
- Documents we need from you: pending requests with an Upload button and the due date.
- Shared with you: shared documents with View and Download.
Give customers portal access from Sales → Portal access; see Customer and vendor portal.
Common questions
Why is Request signature missing on a file? Only PDFs can be signed, and you need the documents.sign.request permission. Convert Word files to PDF first.
The signer did not get the email. Check the email address, then click Signing link and send the link yourself by WhatsApp or SMS. Also check Settings → Preferences → Send test email.
Can I change a document after sending it for signature? Cancel the request, upload a New version, and send a new request, so the signer signs the right file. The certificate's fingerprint identifies the exact file signed.
Is an electronic signature legally valid in Kenya? Kenya's Business Laws (Amendment) Act 2020 recognises electronic signatures for most contracts. Some documents, such as land transfers, still need other formalities. Ask your advocate when in doubt.
A colleague cannot see a folder. The folder is restricted. Use Folder access to add them to Who may see it.
Where did the customer's upload go? Into the library, linked to the customer, with a description saying it came from the request. The request shows Received with Open file.